USER MANUAL 271575 Arktic
You should read this user manual carefully before using the appliance.
Keep these instructions with the appliance.
For indoor use only.
NcnoB30BaTbToBkoB NOMEeHnX.
Tia xpano aE eOwTeipkoXwpo.
Pouze pro vinitnifouziti.


CE
Thank you for purchasing this Arktic appliance. Read this manual carefully, paying particular attention to the safety regulations outlined below, before installing and using this appliance for the first time.
Safety regulations
- This appliance is intended for buffet and household use.
- Only use the appliance for the intended purpose it was designed for as described in this manual.
- The manufacturer is not liable for any damage caused by incorrect operation and improper use.
- Keep the appliance and electrical plug away from water and other liquids. In the event the appliance falls into water, immediately remove the power plug from the socket. Do not use the appliance until it has been checked by a certified technician. Failure to follow these instructions will cause life threatening risks.
- Never attempt to open the housing of the appliance by yourself.
- Do not insert objects into the housing of the appliance.
- Do not touch the plug with wet or damp hands.
DANGER OF ELECTRIC SHOCK! Do not attempt to repair the appliance by yourself, repairs are only to be conducted by qualified personnel.
- Never use a damaged appliance! When it's damaged, disconnect the appliance from the socket and contact the retailer.
- WARNING! Do not immerse the electrical parts of the appliance in water or other liquids.
- Never hold the appliance under running water.
- Regularly check the power plug and cord for any damage. When damaged it must be replaced by a service agent or similarly qualified person in order to avoid danger or injury.
- Make sure the cord does not come in contact with sharp or hot objects and keep it away from open fire. Never pull the power cord to unplug it from the socket, always pull the plug instead.
- Make sure that the power cord and/or extension cord do not cause a trip hazard.
- Never leave the appliance unattended during use.
- WARNING!As long as the plug is in the socket the appliance is connected to the power source.
- Turn off the appliance before unplugging it from the socket.
- Connect the power plug to an easily accessible electrical socket so that in case of emergency the appliance can be unplugged immediately.
- Never carry the appliance by the cord.
- Do not use any extra devices that are not supplied together with the appliance.
- Only connect the appliance to an electrical outlet with the voltage and frequency mentioned on the appliance label.
-
Never use accessories other than those recommended by the manufacturer. Failure to do so could pose a safety risk to the user and could damage the appliance. Only use original parts and accessories.
-
This appliance should not be operated by persons with reduced physical, sensory or mental capabilities, or persons that have a lack of experience and knowledge.
- This appliance should, under any circumstances, not be used by children.
- Keep the appliance and its power cord out of reach of children.
- WARNING: ALWAYS switch off the appliance and unplug from power socket before cleaning, maintenance or storage.
Special Safety Regulations
- This appliance is intended to be used in household and similar applications such as
1) Staff kitchen areas in shops, offices and other working environments;
2) Farm houses and by clients in hotels, motels and other residential type environment;
3) Bed and breakfast type environments;
4) Catering and similar non-retail applications.
- This appliance should be operated by trained personnel in kitchen of the restaurant, canteens or bar staff, etc.
CAUTION! Hot surface! The surface is hot when in use.
Touch the control panel only.
CAUTION! Risk of fire! The refrigerant used is R290 in this appliance. It is a highly flammable refrigerant. The foam blowing agent used is Cyclopentane in this appliance. They are highly flammable.
IMPORTANT:
The wires in this mains lead are colored in accordance with the following code:
Green and yellow: Earth
Blue: Neutral Brown: Live
As the color of the wires in the mains lead of the appliance may not correspond with the colored markings identifying the terminal in your plug, proceed as follows:
The wire which is colored green-and-yellow must be connected to the terminal in the plug which is marked with the letter E, G or by symbol or colored green or green-and-yellow.
The wire which is colored blue must be connected to the terminal which is marked with the letter N.
The wire which is colored brown must be connected to the terminal which is marked with letter L.
NOTE: Created ice cubes are joined together and still need to be broken apart before use.
Intended use
- This appliance is intended for buffet and household use.
-
The appliance is designed only for making ice cubes. Any other use may lead to damage to the appliance or personal injury.
-
Operating the appliance for any other purpose shall be deemed as misuse of the device. The user shall be solely liable for the improper use of the device.
EN
Grounding installation
This appliance is classified as protection class
I and must be connected to a protective ground. Grounding reduces the risk of electric shock by providing an escape wire for the electric current.
This appliance is fitted with a power cord that has a grounding wire and grounded plug. The plug must be plugged into an outlet that is properly installed and grounded.
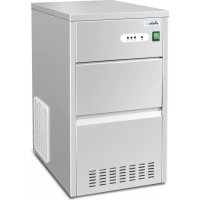
Technical Specifications
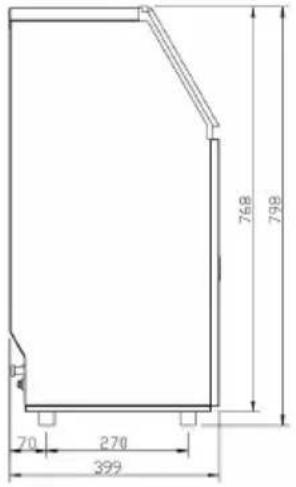
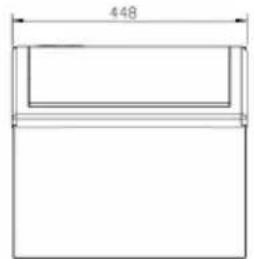
1) Dimensions/ Connections

2) Rating
| Item no. 271575 | |
| Operating voltage and frequency 220-240V~ /50Hz | |
| Rated current 2,2A | |
| Rated input power 280W | |
| Refrigerant used & injection quantity R290 / 95g | |
| Climate class SN-T | |
| Foam blowing agent Cyclopentane | |
| Protection class Class I | |
| Running conditions Room temp | Water supply tempWater supply pressure | 10°C ~ 38°C5°C ~ 35°C0,04 ~ 0,6 MPa |
| Net weight (approx.) 27kg | |
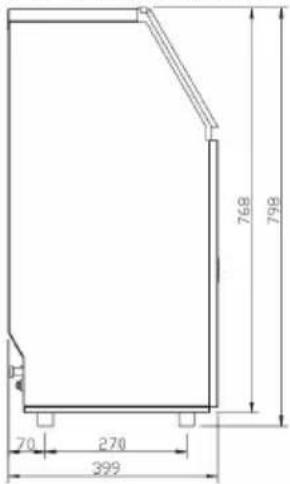
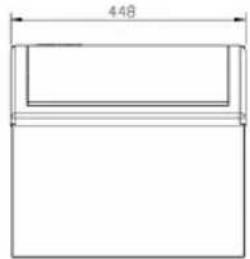
| Dimension 448x400x(H)798mm | |
Remark: Technical specification is subjected to change without prior notification.
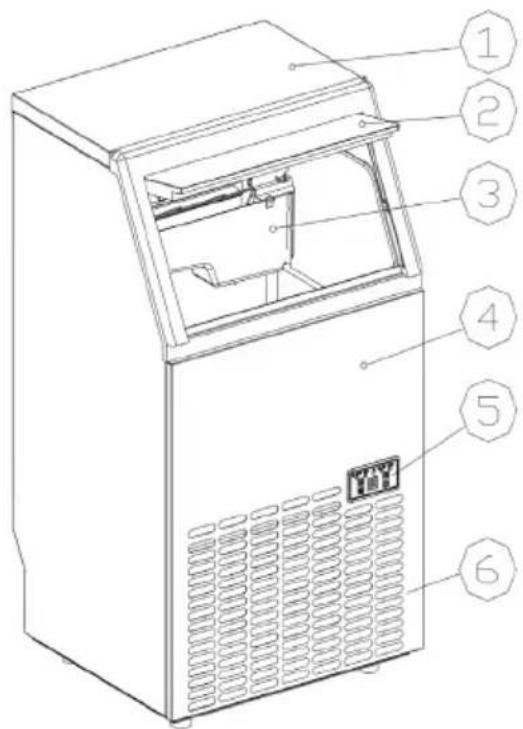
1) Main Unit Construction

- Top cover
- Door
- Ice-making & water tank assembly
- Front panel
- Operation panel
-
Air outlet: Must keep the air circulate smoothly, hot air will blow out when unit running.
-
Water draining port.
- Water inlet port for water supply.
Accessory: White 2 meters long water drain pipe, connector for the water faucet, white 3 meter long water supply pipe (6.35mm).
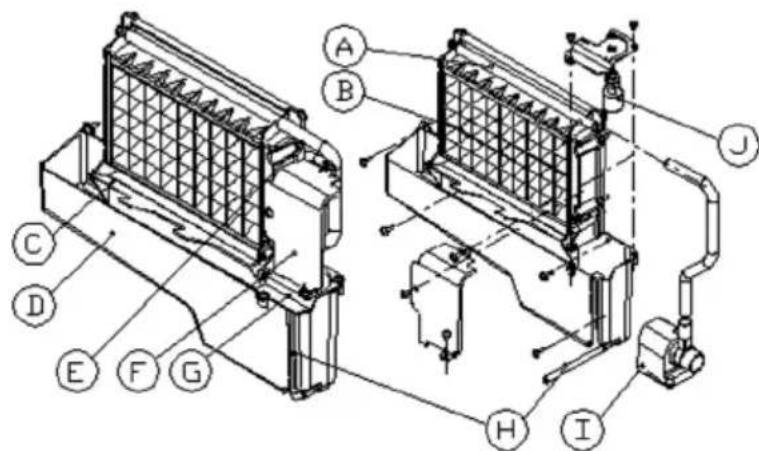
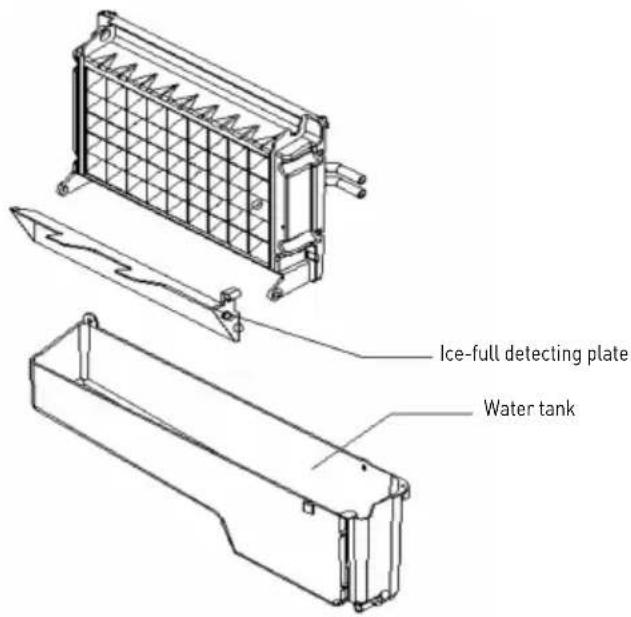
A. Water dividing pipe: with nine little holes, water will flow out from these little holes.
B. Evaporator (ice-making module)
C. Ice full detecting board.
D. Water tank.
E. Water supplying pipe.
F. Cover board on the right side of the evaporator.
G. Water level switch installing plate.
H. Water drain pipe of the water tank.
I. Water pump.
J. Water level detecting switch.
2) Operation panel
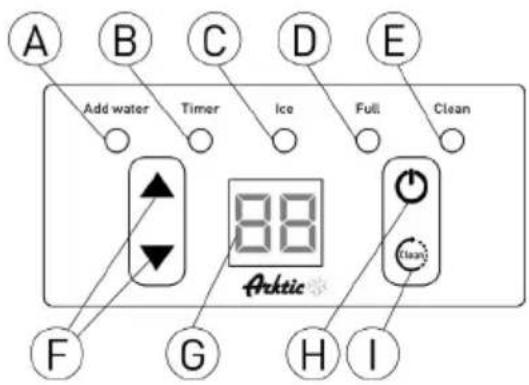
A. "Add water" light: When the light flashes, it means the water is supplied to slow; and when the light is on always, it means absence of water in unit.
B. "Timer" light: When this light is on, it means the TIMER is set. Timer can be set on or off with the clean/timer button.
C. "Ice" light: If the light is on, means the unit is making ice; And if the light flashes, means the unit is during the ice-harvest process.
D. "Full" light: When the unit is full of the ice cube, the light will be on.
E. "Clean" light: When this light is on, water pump cleaning start. When the light flashes, water pump cleaning stop.
F. & button: Use to adjust the ice-making process duration period length, the default setting is zero, 1 minute adding or decreasing per each pressing of or button. Also to adjust the delay time of the timer, the default setting is zero, 1 hour adding or decreasing per each pressing of or button.
G. LED Display: At normal condition, the number in the window is always on, it displays the ambient temperature; And if the number flashes, it will display the time left in minutes of each process, like ice-making cycle, self-cleaning program, etc.
H. "On/Off" button: When the unit is off, press this button to turn on the unit; And during the Self-cleaning program, or normal ice-making state, press this button to turn off the unit at once; And also if the unit is set with the Timer, press this button to cancel the Timer setting. When the unit is making the ice cube, press this button for more than 5 seconds, the unit will switch to ice harvest process by force.
I. "Timer clean") button: Quickly press this button once, to enter the Timer setting program; And press this button for more than 5 seconds when the machine is off, to enter the Cleaning program.
Part list
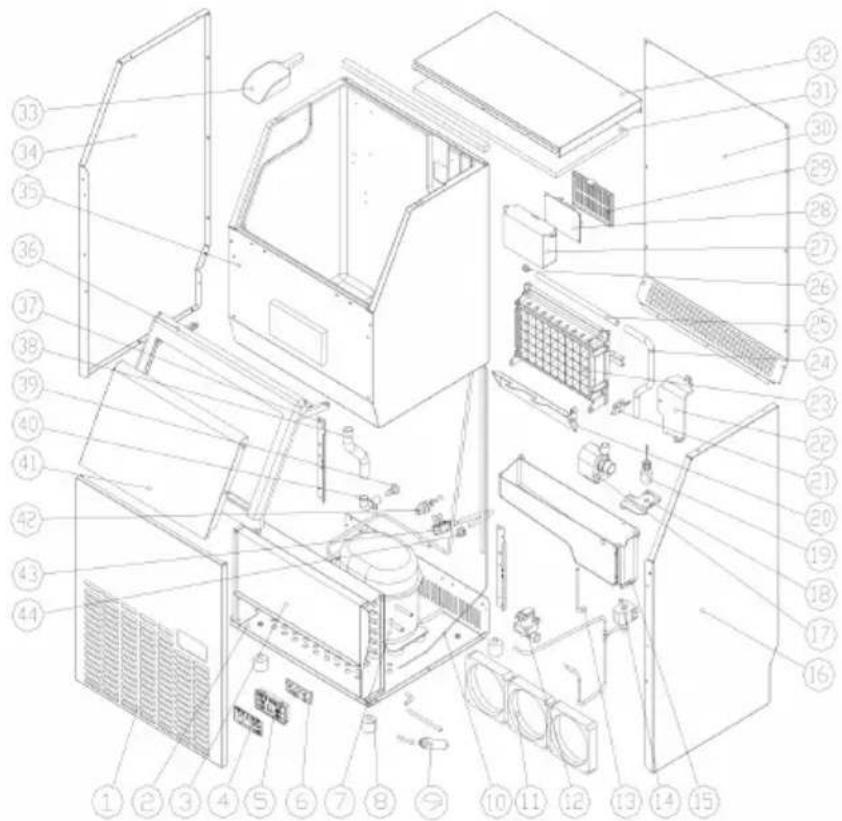
| No. | Parts Name Qty. Notes | | | No. | Parts Name Qty. Notes | | |
| 1 | Front panel | 1 | | 23 | Evaporator and its frame | 1 | |
| 2 | Bottom plate | 1 | | 24 | Water supplying pipe | 1 | |
| 3 | Condenser | 1 | | 25 | Water dividing pipe, with nine holes | 1 | |
| 4 | Operation panel paper | 1 | | 26 | Cap of the water dividing pipe | 1 | |
| 5 | Operation panel PCB box | 1 | | 27 | Electrical PCB box | 1 | |
| 6 | Operation panel PCB | 1 | | 28 | Main control PCB | 1 | |
| 7 | Compressor | 1 | | 29 | Cover of the main control PCB | 1 | |
| 8 | Adjustable foot | 4 | | 30 | Rear plate | 1 | |
| 9 | Dry filter | 1 | | 31 | Insulation sponge of the top cover | 1 | |
| 10 | Capillary | 1 | | 32 | Top cover | 1 | |
| 11 | DC fan | 3 | | 33 | Ice shovel | 1 | |
| 12 | Water inlet valve | 1 | | 34 | Left side plate | 1 | |
| 13 | Water drainage pipe of the water tank | 1 | | 35 | Foaming inner cabinet & Ice storing bin | 1 | |
| 14 | Ice-harvesting Electro-magnetic valve | 1 | | 36 | Door frame | 1 | |
| 15 | Water tank | 1 | | 37 | Back strength plate | 1 | |
| 16 | Right side plate | 1 | | 38 | Water outlet pipe of the inner cabinet | 1 | |
| 17 | Water circulation pump | 1 | | 39 | Water drainage cap | 1 | |
| 18 | Cover of the water tank | 1 | | 40 | Water drainage port | 1 | |
| 19 | Water level detecting switch | 1 | | 41 | Door | 2 | |
| 20 | Ice-full detecting plate | 1 | | 42 | Water inlet port | 1 | |
| 21 | Magnetic control switch | 4 | | 43 | Power cord | 1 | |
| 22 | Cover board on the right side of the evaporator | 1 | | 44 | Clipper of the power cord | 1 | |
| 45 | Wiring | 1 | |
EN
Unpacking your ice maker
- Remove the exterior and interior packaging Check if all the accessories, including instruction manual, ice scoop, white water inlet pipe, 4 ways to 2 ways water quick connector and the water draining pipe, etc., are inside or not. If any parts are missing, please contact our customer service.
- Keep the packaging if you intend to store your appliance in the future.
-
Remove the tapes for fixing the door and inned cabinet, ice scoop, etc.. Roughly clean the inner cabinet & ice scoop with wet clothes.
-
Put the ice maker on a level & flat floor, without direct sunlight and other sources of heat (i.e.: stove, furnace, radiator). Maker sure that there is at least 20cm gap between the air outlet and the obstacles, and at least 5 cm between Left/Right side and the wall.
- Allow 4 hours for the refrigerant fluid to settle before plugging the ice maker in if the unit may be fall upside down during shipping or transportation.
- The appliance must be positioned so that the plug is accessible.
WARNING: Only use drinking water to make ice.
Installation location requirement
a) Keep the proper room temperature and inlet water temperature according to above specification table. Otherwise it will affect the ice making performance.
b) This unit should not be located near any heat source.
c) The unit should be located on a firm & level foundation at normal counter top height.
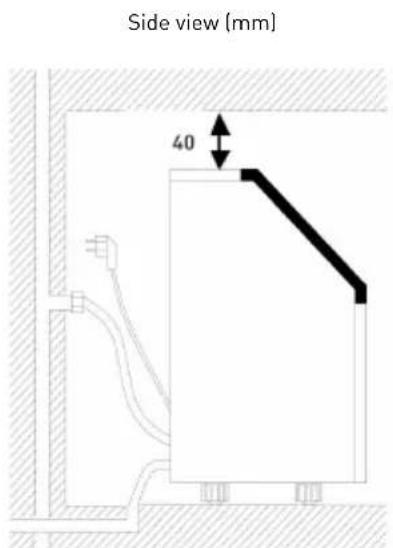
d) There must be at least 200mm clearance around the appliance and 40mm clearance from the top to keep good air ventilation.
e] Do not put anything on the top of the ice maker.

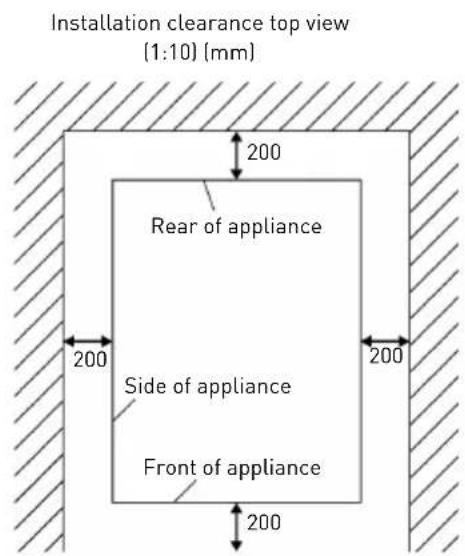
When installing the ice maker under a counter, follow the recommended spacing dimensions shown above. Place electrical and water supplies and drain fixtures in the recommended locations as shown.
Choose a well-ventilated area with temperatures above 10^ and below 32^ . This unit MUST be
installed in an area protected from the elements, such as wind, rain, water spray or drips.
The ice maker requires a continuous water supply with pressure 1-8 Bar as required in above specification table. The temperature of the water feeding into the ice maker should be between 5^ and 25^ for proper operation.
Electrical requirement & connections
WARNING: THIS UNIT MUST BE EARTHED.
- Before you move your ice maker into its final location, it is important to make sure you have the proper electrical connection.
- It is recommended that a separate circuit, serving only your ice maker, be provided. Use receptacles that cannot be turned off by a switch or pull
chain. If the supply cord or plug to be replaced, it should be done by a qualified service engineer.
- This appliance requires a standard 220-240 Volt, 50Hz electrical outlet with good grounding means.
Cleaning your ice maker beforehand using
- Open the door.
- Clean with diluted detergent, warm water and a soft cloth.
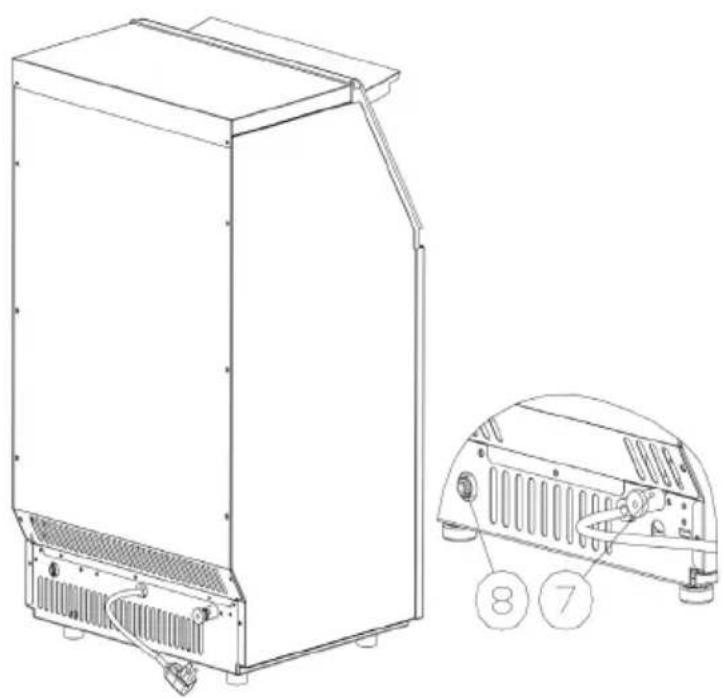
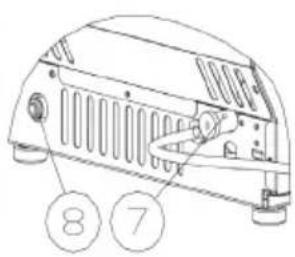
- Repeatedly clean the water contacting inner parts, you can pull the Water drain pipe of the water tank indicating "H" in above illustration to drain the cleaned water in the water tank, next clean the inner ice-storing cabinet. After that drain out all of the cleaning water from the water drain port located at the back of the unit ("7") in
above illustration). Reinstall the water drain pipe and the cap of the water drain port, otherwise, the unit will not work properly. Discard the first ice-cube after cleaning.
- The outside of the ice maker should be cleaned regularly with a mild detergent solution and warm water.
- Dry the interior and exterior with a clean soft cloth.
Water connection for your ice maker
Important: Be sure to use the new hose-sets supplied with the appliance.
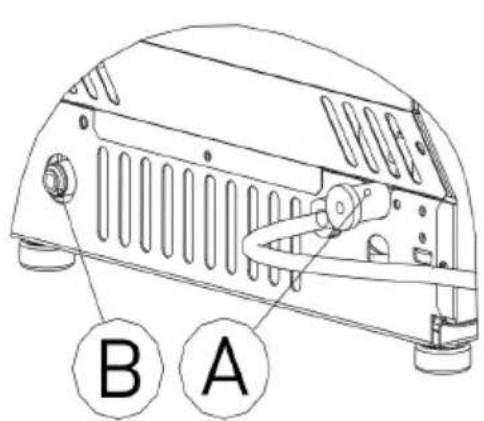
Connect the water supplying hose to the unit
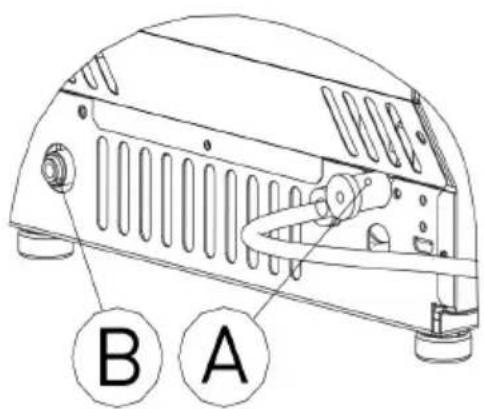
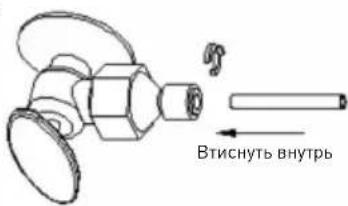
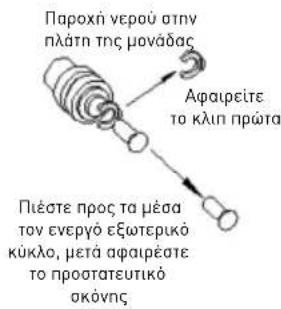
Step 1: First remove the clipper on the water inlet port (indicated in the following illustration "B") located at the back of the unit. Remove the anti-dust plug.
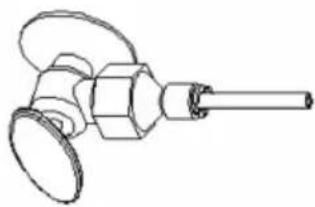
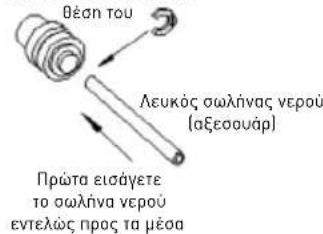
Step 2: Insert the one end of the white water hose into the water inlet port, and push inward completely, and install back the clipper, then water hose connection is completed.
Step 1: Remove the anti-dusty plug
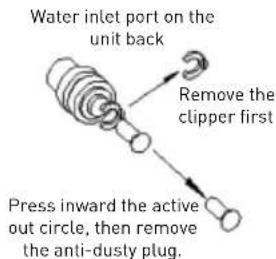

Step 2: Insert the water hose
Connecting the water drain pipe
Pull out the water drainage cap with black color (indicated "A" in above illustration), then connect the white drainage pipe included in accessory, con
nect the other end of this drainage to the main water drainage pipeline.
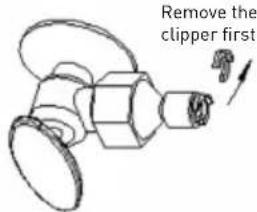
Connect the water hose to the water faucet of the water main supply system
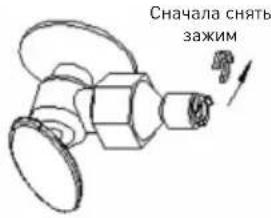
The supplied water quick-connector must be screwed to a faucet; remove the clipper from the water quick-connector, insert the other end of the water hose into this quick-connector port completely, install back the clipper.
Important: The water pressure of main water supply system must be 0.04-05 MPa at.
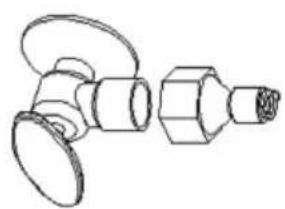
Step 1: Quik-connector and the water faucet
Step 2: Screw the quick-connector on the water faucet by the screw thread, and remove the clipper
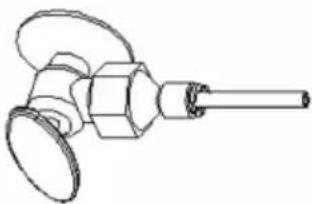
Step 3: Insert the water hose completely
Step 4: Insert back the clipper

Operation the ice-making process
- After all of the water pipe connecting is completed, plug in the main power supply. Then press "O button on the control panel to begin the ice making cycle, and the Ice light will be on at same time. The digit window will display the ambient temperature normally. The compressor, fan motor and water pump will run during ice making process.
- Each ice making cycle will last about 11 to 30 minutes, depending on the ambient temperature and the water temperature.
-
When the ice-making process is over the machine will switch to ice-harvest process. At same time the system will detect the water level, if the water level is lower than required, "Add water" light starts flashing, open the water inlet valve to supply extra water to water tank, when the water supplying process is finished, the "Add water" light is off again.
-
When the "Full indicator is on, the unit stops running. If you remove enough cubes, the unit will start to work again after a 3 minute period.
- During the ice-making process, press the button to adjust the ice-making process duration period length, this will change the thickness of the ice cube. The default setting is zero, 1 minute will add or decrease to the process per pressing of the button. 5 seconds after the last press, the new setting are programmed.
- Bad water quality will cause bad quality of ice cubes and will reduce the transparency of the ice cube.
NOTE: Created ice cubes are joined together and still need to be broken apart.
Automatic self-cleaning program
Start the self-cleaning program: After connecting all of the water pipe, plug on the main power supply plug press the " button for more than 5 seconds, this starts the cleaning program. The "Clean" light will be on during cleaning, the digit window will indicate the left time. The self-cleaning program takes 30 minutes.
Cancel the self-cleaning program: It takes about 30 minutes to complete one self-cleaning program. When the program is over, the system will be in off-state automatically. And also you can press the button on control panel to cancel the self-cleaning program by force.

Timer Setting
How to set the timer: When the machine is off, press the "Timer/Clean" button to set the time when the machine has to turn on. The "Timer" light will go on, the number in digital window will flash to display in how many hours the machine will go on. During the number flashing, press , button to add or remove hours, the default setting is zero. Five seconds after setting, your desired setting will be programmed.
How to cancel the ON-Timer: Press the "Timer/Timer" button, the number in digital window will flash to display the present delay time of your ON-Timer, and press the button again to cancel the setting. Pressing the "O" button will also cancel the timer.
How to cancel the OFF-Timer: This is the same procedure as for canceling the ON-Timer.
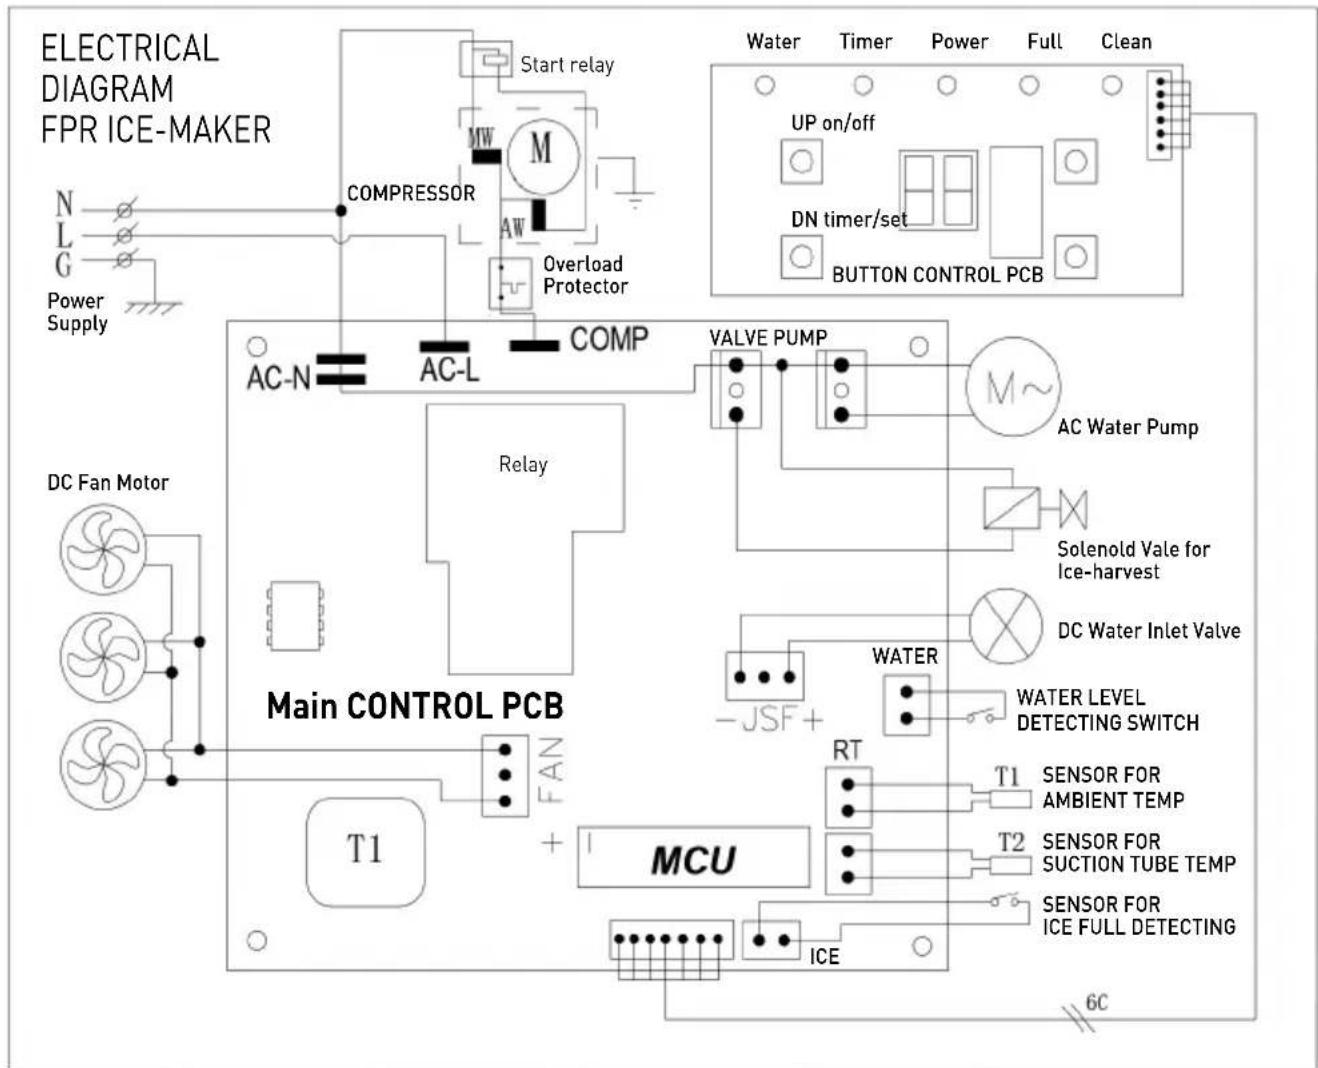
Wiring diagram

Normal Sounds
Your new ice maker may make sounds that are not familiar to you. Most of the new sounds are normal. Hard surfaces like the floor, walls and cabinets can make the sounds seem louder than they actually are. The following describes the kinds of sounds that might be new to you and what may be making them.
- You will hear a swooshing sound when the water valve opens to fill the water tank for each cycle.
- Rattling noises may come from the flow of the refrigerant or the water line.
- The high-efficiency compressor may make a pulsating or high-pitched sound.
Water running from the water tank to the evaporator plate may make a splashing sound.
Water running from the evaporator to the water tank may make a splashing sound.
- As each cycle ends, you may hear a gurgling sound due to the refrigerant flowing in your icemaker.
- You may hear air being forced over the condenser by the condenser fan. During the harvest cycle,
you may hear the sound of ice cubes falling into the ice storage bin.
- When you first start the ice maker, you may hear water running continuously. The ice maker is programmed to run a rinse cycle before it begins to make ice.
Preparing the ice maker for long storage
If the ice maker will not be used for a long time, or is to be moved to another place, it will be necessary to drain out all of the water in the system.
- Turn off the unit, and unplug the power cord.
- Shut off the water supply at the main water supply.
- Disconnect the water supply hose from the water inlet valve.
-
Pull out the Water drain pipe of the water tank (H in illustration) to drain out the water in the water tank. When all the water has been drained, reinstall the water drain.
-
Drain out all the water from the water drain port located at back of the unit (7 in illustration).
- Disconnect the water drain pipe to the main drain pipeline or floor drain, plug on the drain cap again.
- Leave the door open to allow for circulation and prevent mold and mildew.
- Leave water supply hose and power cord disconnected until ready to reuse.
- Dry the interior & wipe the outside of the unit.
- Put a plastic bag on the unit to resist out dust & dirty.
Cleaning & maintenance
WARNING: Do not use any alcohol or fume for cleaning/sanitization of the ice maker. It may cause cracks on the plastic parts. Ask a trained service person to check and clean the condenser at least once a year, in order to let the unit work properly. This appliance must be cleaned by use of a water jet.
CAUTION: If the ice maker has been left unused for a long time, before the next use it must be thoroughly cleaned. Follow carefully any instructions provided for cleaning or use of sanitizing solution. Do not leave any solution inside the ice maker after cleaning.
Periodic cleaning and proper maintenance will ensure efficiency, top performance, hygienic, and long life. The maintenance intervals listed are based on normal conditions. You may want to shorten the intervals if you have pets, or the unit is used outdoors, or there are other special considerations.
What shouldn't be done
Never keep anything in the ice storage bin that is not ice: objects like wine and beer bottles are not only unsanitary, but also it's labels may slip off and obstruct the drain pipe.
Exterior Cleaning
The door and cabinet may be cleaned with a mild detergent and warm water. Do not use solvent-based or abrasive cleaners. Use a soft sponge and rinse with clean water. Wipe dry with a soft clean towel to prevent water spotting.
NOTE: Stainless steel models exposed to chlorine gas and moisture, such as in areas with spas or swimming pools, may have some discoloration of stainless steel. Discoloration from chlorine gas is normal.
Interior Cleaning
For Ice Storage Bin
The ice storage bin should be sanitized occasionally. Clean the bin before the ice maker is used for the first time and reused after stopping for an extended period of time. It is usually convenient to sanitize the bin after the outside, the storage bin must be empty.
- Disconnect power to the unit.
-
Open the door and with a clean cloth, wipe down the interior with a sanitizing solution made of 28g of household bleach or chlorine and 7.5L of hot water.
-
Rinse thoroughly with clear water. The waste water will be drained out through the drain pipe.
- Reconnect power to the unit.
The ice scoop should be washed regularly. Wash it just like any other food container.
WARNING: Do not use solvent-based or abrasive cleaners. These may transmit taste to the ice cubes.
Ice Making Parts Cleaning
During the using, periodically to clean these main system of your ice-maker.
- Repeat above step to clean the water tank and other inner parts of the unit.
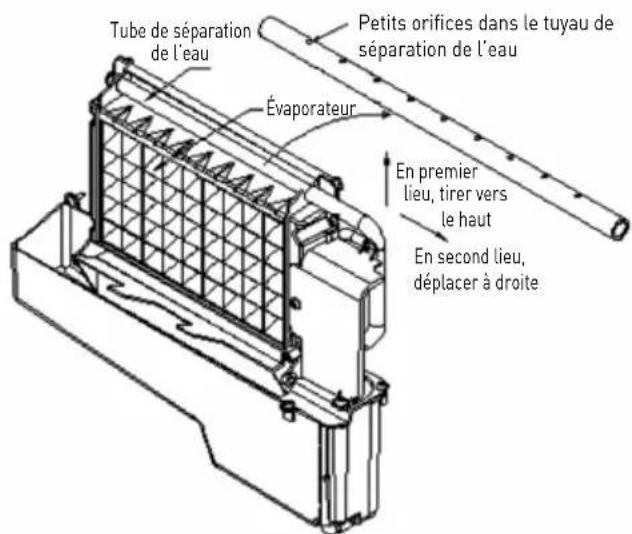
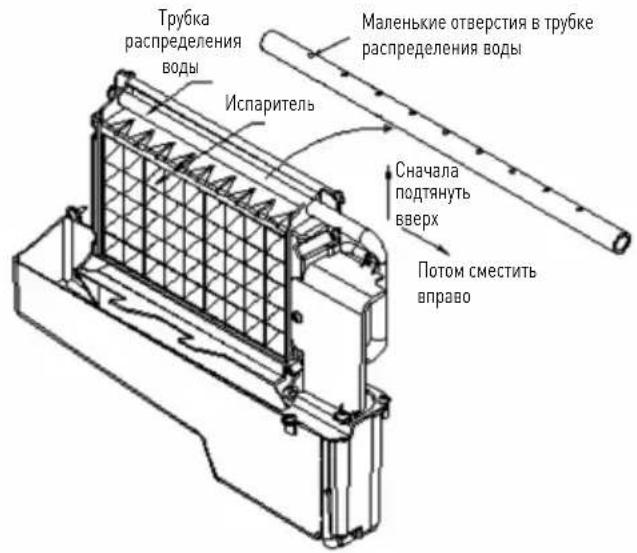
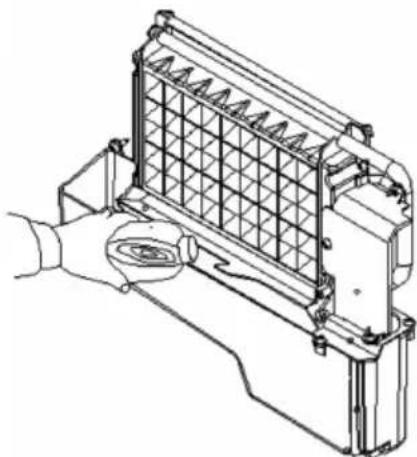
- Clean the water dividing pipe on the evaporator extra, uninstall this part and clean each little hole displayed in the following illustration, make sure each hole is not clogged, then install back to the original location.
- When there are ice cubes on the surface of the evaporator, but they can't fall, don't remove it by force; just press the button for more than 5 seconds, the unit will enter the ice melting process. After some while the big ice-cubes will fall down. Turn off the unit and unplug the power cord to clean the surface of the evaporator.

- For the water tank and ice-full detecting plate.
Also the water tank and the ice-full detecting plate is very important to keep your ice cube hygienic. Put mixture of neutral cleaner & water into a clean water jet, then spray to all the inner surface of tank & the ice detecting plate. Wipe these surfaces as far as possible with a clean cloth. And then, spray the surfaces with clean water, wiping with a dry clean cloth. Then drain out the cleaned water in the water tank by pulling out the Water drain pipe of the water tank indicating (H in illustration). When all of the cleaned water has been drained out, reinstall back the water drain pipe of the water tank.
Suggestion: After cleaning the interior parts discard the first batch of ice.
Descaling the machine
Minerals that are removed from water during the freezing cycle will eventually form a hard scaly deposit in the water system. Cleaning the system regularly helps remove the mineral scale buildup. How often you need to clean the system depends upon how hard your water is. With hard water of 4 to 5 grains/liter, you may need to clean the system as often as every 6 months.
- Turn off the ice maker. Keep the ice maker connect to the water supply and drainpipe. But shut off the water faucet of main water supply.
- Open the door and scoop out all of the ice cubes. Either discard them or save them in an ice chest or cooler.
- Making the cleaning solution. Please mix the Nu-Calgon Nickle Safe Ice Machine Cleaner with water to make the cleaning solution.
WARNING: Wear rubber gloves and safety goggles when handling Ice Machine Cleaner
Use a plastic or stainless container with more than 4 liters capacity, mix 300ml Nu-Calgon Nickle Safe Ice-machine Cleaner with 2.8 liters warm water about 50 - 60^ Then divide them for 2 shares equally in 2 cups. It is better to keep the temperature of each cup of the cleaning solution.
- Check to be sure that the water drain pipe of the water tank has been installed properly in the slot of the tank wall. Then Pour one cup of Nickel-Safe Ice Maker Cleaning Solution into the water tank. Wait about for 5 minutes.

- Turn on the power to the ice maker, then press button on control panel for more than 5 seconds, to enter the self-Cleaning program. During this process, the "Clean" light will always be on during this period, and the digit window will indicate the time left.
- After self-cleaning program, pull out the drain pipe of the water tank, drain the cleaning solution down to the lower ice storage bin. Shake the unit slightly to drain out all of the cleaning solution completely. Then install back the drain pipe to the slot of the water tank.
- Repeat steps 4--6 to clean the ice making assembly system again.
WARNING: The ice machine cleaner contains acids. DO NOT use or mix with any other solvent-based cleaner products. Use rubber gloves to protect hands. Carefully read the material safety instructions on the container of the ice machine cleaner.
- Open the water faucet of the main water supply, let the water flow in the unit. Again press the button on control panel for more than 5 seconds, to enter the self-Cleaning program. Through this process, It will rinse the water dividing pipe, evaporator, water pump, silicone pipe, and water tank, etc..
- After one self-cleaning program complete, then pull out the drain pipe of the water tank, drain the cleaning solution down to the lower ice storage bin, also shake the unit slightly to drain out all of the water completely. Then install back the drain pipe to the water tank slot tightly.
- Repeat the step 8-9 again 2 times.
- Following the above program to clean the ice storage bin.
- Discard the first batch of ice cube.
Cleaning Suggestion
1. DAILY CLEANING
The ice shovel, door and the water dividing pipe should be cleaned by yourself per each day. At the end of every day, rinse the ice shovel and wipe the both sides of the door with a clean cloth.
2. SEMI-MONTHLY CLEANING
The ice shovel, ice bin, water tank, the ice-full detecting plate and the surface of the evaporator are to be cleaned by yourself semi-monthly according to interior cleaning program.
3. SEMI-ANNUAL CLEANING
All the components & surfaces exposed to water or ice cubes, like ice storage bin, water tank, door, evaporator, water pump, silicone tube, water dividing pipe, etc. should be cleaned by Using Nu-Calgon Nickle Safe Ice-machine Cleaner per each 6 months.
Trouble shooting
| Problem Possible Solution | | |
| “Add water” indicator is on. No water supply | Check the main water supply pressure or | check the water supply hose is blocked or not, adding the water pressure or cleaning the hose necessary. |
| Floating ball of the water level detecting switch is blocked, can’t be raised up | Clean the water tank and the water level detecting switch. |
| Water flows out from the water tank Place the unit on the level position, not on the slope. |
| Water flows out from the water drain pipe of the water tank. | Pull out the pipe and install back to the slot of the water tank properly. |
| “Add water” indicator flashes Water supplying | hose breakdown, or water flows in very slowly. | Check the main water supply pressure or check the water supply hose is blocked or not, adding the water pressure or cleaning the hose necessary. |
| Water pump is working, but no water flow out from the water dividing pipe | The little holes on the water dividing pipe is blocked. | Clean these little holes. |
| The transparency of the ice cube is not very good | Water quality is bad Change the water supply, or use the water filter to soften or filter the water. |
| Ice cube shape is irregular Water quality is not good | not good or the water tank is very dirty | Clean the water tank, and change with new water. |
| The little holes on the water dividing pipe is some blocked | Clean the water dividing pipe, make sure all nine holes are unclogged. |
| Ice cube is very thin Ambient temperature is too high | too high Move the unit to low temperature space, or lengthen the time of each ice making cycle. |
| Air circulation around the unit is not good Make sure there is more than 20CM space between the unit back & front and the obstacle |
| Ice cube is too thick Ambient temperature is too low | too low Reduce the time of each ice making cycle. |
| “Full” indicator is on | The ice storage bin is full of the ice cube. | Take out some ice cube |
| Ice making cycle is normal, but there is no ice cube produced | The temperature of Ambient, or water in water tank is too high | Move to the place with temperature lower than 32 centigrade, and change to the low temperature water |
| Refrigerant leakage Need the technical service man to maintain |
| Cooling system tube is clogged | Need the technical service person to maintain |
Error indicator
E1: Ambient temp sensor breakdown E2: The duration time of one ice making cycle is
more than 35 minutes, the unit will be turned off. It is the system protection of no refrigerant in cooling system or the compressor not work.
Warranty
Any defect affecting the functionality of the appliance which becomes apparent within one year after purchase will be repaired by free repair or replacement provided the appliance has been used and maintained in accordance with the instructions and has not been abused or misused in any way. Your statutory rights are not affected. If the appliance is claimed under warranty, state where and
when it was purchased and include proof of purchase (e.g. receipt).
In line with our policy of continuous product development we reserve the right to change the product, packaging and documentation specifications without notice.
Discarding & Environment
When decommissioning the appliance, the product must not be disposed of with other household waste. Instead, it is your responsibility to dispose to your waste equipment by handing it over to a designated collection point. Failure to follow this rule may be penalized in accordance with applicable regulations on waste disposal. The separate collection and recycling of your waste equipment at the time of disposal will help conserve natural re
sources and ensure that it is recycled in a manner that protects human health and the environment.
For more information about where you can drop off your waste for recycling, please contact your local waste collection company. The manufacturers and importers do not take responsibility for recycling, treatment and ecological disposal, either directly or through a public system.
Aarding installation
WAARSCHUWING: DIT APPARAAT MOET GEAARD ZIJN.
Ice Making Parts Cleaning
During the using, periodically to clean these main system of your ice-maker.
- Repeat above step to clean the water tank and other inner parts of the unit.
- Clean the water dividing pipe on the evaporator extra, uninstall this part and clean each little hole displayed in the following illustration, make sure each hole is not clogged, then install back to the original location.
- When there are ice cubes on the surface of the evaporator, but they can't fall, don't remove it by force; just press the "O" button for more than 5 seconds, the unit will enter the ice melting process. After some while the big ice-cubes will fall down. Turn off the unit and unplug the power cord to clean the surface of the evaporator.
YcTaHOBka 3a3eMJIeHnI
3TOT np6op oTHocntc K Klaccy 3auntbI INdoJxH 6bITnOdkNIOUeH K 3aUNTHOMy rpyHTy.3a3emJIeHne CHNkaet pNCK nopaXeHHa 3JeKTPnueckm TOkOM, oBeCneuBa BbIXoI npOBoJa IJIa 3JeKTPnueckoro ToKa. 3TOT np6op Ochauen Hhypom Ni
TaHnC 3a3eMJIHOUIM npoBOOM n 3a3eMJIeHHoI StTeNCeBHO BUNKO. BUNKa DOnXHa 6bITb NOKJIuYeHa K pO3eTKe, KOtOpA npaBUNbHO yCTaHOBJIeHa N 3a3eMJIeHa.
TexnueckcneuKau
1) Ra6apnTbI/NoKJIuOyeHna

RU
2)HOMINHAJIbHbIe3HaueHHa
| № no3nii 271575 | |
| Равоче наразожения и чASTOTа 220-240В~ /50Гц | |
| HominHalbHbI ToK 2,2A | |
| HominHalbHa BbIXoHaN MaOuHocTb 280W | |
| XlaJaTeHTи KOLIYeCTBO BnPbIckNBAHnR 290/95r | |
| KlɪmAtuYeCKn KJIaCC SN-T | |
| ЛeɡКobОсПamEnЯюшь ся пeнобpaZOBaTeMb LcɪkLlpeNTaH | |
| KJIaCC 3aʌntbI KJIaCC I | |
| YcIobNya pa6ToBi Temn. nOmeşehny | 10°C ~ 38°C
Temn. BɔdBi 5°C ~ 35°C
ДавлeNHe BɔdBi 0,04 ~ 0,6 MПа |
| Bec HeTTO (прIMeRHo) 27кг | |
| Виeshne pa3MepbI 448x400x(H)798mm | |
PnmeHne:Texnueckne xapaKTepcntkmoTy6bItb n3MeHebl6e3 npedBapntelbHoro yBeDoMneHn.
067aHΦopMaun
1)KoHcTpkyuIra reHepaTopa
1.BepxHnKpbIka
2.Дверкn
3.БлokьбдoreHepaTopaиpe3ePByapaBoDbl
4. NpeennaHnB
5. Naheb ynpabneHn
6. BbIyck Bo3dyxa: Heo6xOJIMO o6ecneuHTb CBo6oJHoe nocTyIeHHe Bo3dyxa; BO BpeM pa60tbl BbIyBaETc rOpAHyB03dyx.
PNEyPEXEHE: TEHEPATOP IOJXEH
Бытб 3A3EMЛЕH
- Ipeed yctaHOBKoIbdoReHepaTopaB HxKHO EJRA 3TOrO MeTo HxKHO yIOCTOBepNTbcR B TOM, YTO IMeETcra COOTBeTcTByUOuAra ToUka NODKnIOueHINRA K 3NeKTpocetN.
- PekomeHnyeTcBbINOHNHTb OTdEJIbHbI 3JNeKtpnueckn KOHTyp, KOTOpBb 6yDet npedHa3HauehToIbko dIa HyxHO rAM NbDorehepaTopa. HyxHo
N0JIb3OBAtbcraTObKo po3eTKaMn, KOToPbIX HeJIb- 3r OTKJIIOHTb BblKIIIOUaTeIeM, IIN KOTOpBle 3a- IuIueHbI OT aTOrO ueNoOcKo. Ecn HJxHo 6yJeT 3aMeHNTb Ka6eNb eJKeKTPoNITaHn IIN po3eTKy, 3TO dONJKeH BblIOJHrTB KBaIIuΦuNpOBAHHbI 3NeKTPNK.
Ha rehepaTOp HxkdAeTcB NODKnUoyehn K 3neKtpocetn HanpJxHHeM 220-240 B,50 T,a TaKxe IMeIoUe 3a3EmIeHne.
MbItbe IbdoReHepaTopa nepeI nepBbIM npckem
- OTkpbItb DBepkn.
- TenehepaTOp HxKHO BbIMbITb pAcTBOpom YnCTaIe- ro CpeIcTBA B TeIIOB OBe C NOMOuMgKoN TpAKN.
- BnytpenHne noBepxHocTn, KOtOpbIe KOHTaKTHpyoT C BOOn HxKHO BbIMbITb HeCKoNbKO pa3.BbHyTB Ilnar cInBa BObl n3 pe3epByapa BObl, npomapKnpoBaHHbI Ha BblwePnPBeDEHHOM pncyHke IntepoH "H", nocne yero nomblpe3epByap IlaNbIa. Nocne 3tOrO cInb BCIO BDOy, IcNoJIb30BaHHyo IJRA MbITb Ype3 OTBepCTne CInBa BObl, HaxoJaueecr C3aIN rHehepaTopa
[προмακροναHHOe Ha BbIeπpnbEdeHOM pncyHke ΣΦρoN "7"). YcTaHOBnTb o6paTHO shaHr CInBa BOdBi, B npOTNBHom clyuae reHepaTOP He CMOXET npaBnBHo pa60TaTb. IepBbIe ky6nKn IbDa, NOLyueHHbIe Nocne uNCTKN reHepaTopa, CnyCTNTb B KaHaJIIN3aUIO.
- HapyxHbIe NOBepxHocTn NbDoreHepaTopa HxKHOpeyIpaHOBtBcIabIM BODhIMpactBOpOMHCTaIeOcPdCTBaN OOnoNCHytb NocIe 3TOTeIIIOBDOJ.
- BbItepeTb docyxa BHyTpene HapyxHble noBepxHOCTn rehepatopa MrgKoTprnkoi.
PoiKJIoueHne BoDbI K NbDoTeHepaTOpy
BHIMAHNE: Hyxho nCnoB3oBaTb Toblko HOBble
IaHn, NOCTabNaeMbIE BmecTe C rHepaTopom.
IOKIOHTb IaHr, IOBDOJuN BOy K rHepa-
topy
War 1: Chauana chTb 3axm c Mecta noBdoa BOdbI (npomapkpOBAHHoro Ha HnHexcneNy
Houem pncyHke nntepoB“B”, haxoJzerooc c3aDi rHehepatopa. ChrTb npotnBO-nblneByIO 3aIpykU.
War 2: BCTaBnTB oINH KOHeu WlnaHra B MeCTO NOI-KIIOUeHnaHra, npXkaTb n O6paTHo Ha-TeTb 3aXIM.
UJ1:CHrTb npOTBO- nIeByo 3aRnyk
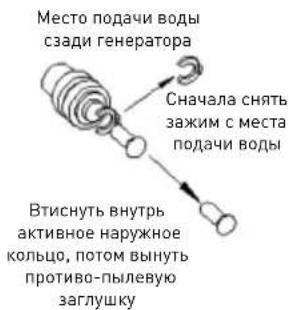
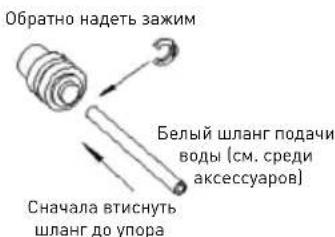
War2:BtncHybwnaHr
RU
PoiKJIouHHe IaHaIra cnYcKa BoDbl
CnTb 3aIyuky cNBA BOnbl yepHoro uBeta (npomapknpoBaHHoro Ha Bblwe cJeDyuOuem pncyHke nItepoi "A"), notom noKluoytbpunaraembl K
noctabke 6enbI uHaHr cInBa, a erO BtOpoKoHeu. NoDBecTu K TpyBe CInBa B KaHaJIIN3aUHO.
IopKIOuHTb WJahr NOpKIOUeHn BObI K KpaHy BODonpoBOda
Ppnilaraemar roIobka 6bICTporo pa3bema HakpyuHbaetcna KpaH - cHaayala CneJeT CHrTb 3aXMM C rOIOBKn 6bICTporo pa3bema, a BTOPOKHeuBTnCHyTb B rOIOBky 6bICTporo pa3bema n CHOBA HaDeTb 3axm.
BHIMAHNE:Давпене ВОдыВВОдпровODEdoJxHo 6bIb He Hnke 0,04-05 MPa.
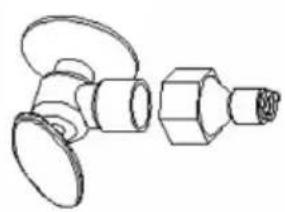
Uar 1: roNoBa 6bCTporo pa3bema KpaH
Uar 2:3akpyntb roonoky 6bictporo pa3bema KOHcO m cpe3b0n Ha kpan, noCne Yero CHRTB 3aXm
War3:BtncyBtJnahrDynopAwar4:06paTHaHaeTb3axmM
PpOu3BOoCTBOIbda
- Nocne noKIOUeHnB CEx ⅢaHROB, HxHo noI KIOHTb K 3JIeKTPocETn Cam reHepatop. Daee HaxKaTb KHOKNy "Ha nAHeN ynpabLeHn IJa Haana npo3BOcCTBa Ibda. 3aXkTeCn JaMNouKa Ice". UΦpOBoN dncnEe6ydt Noka3bIBaTb Tempepatpy B nomueHnN. B TpaKe Tpoceca npo3BOcCTBa Ibda 6ydt pa60TaTB KOMnPecccOp, DBNrAteNb BEHTNJrTOpa N BOJHOH HAcOC.
- KaKdI npOn3BOOCTBeHHbI cNKI 6yJeT npoDJIaTBcR oKOLO 11 - 30 MInHyT B 3aBnCmocTnOT TempeatpyB NOMEeHnN TEmpeatpyBoDi.
-
После завершени поцеса поньовдва льда, reнератор поевкючпся на ржим сбopa льда. Ри заом Инданкатор пожет уровеньовы.Есни on 6удET сишkom Hn3OK,наченMuRGATb lamnoчka "Add water".Torda hyжно ot-KpbITb klnanH noDAuN BODblЯ ee nononHeHINB pe3epByape BODbl.После завершени отoroпосесca, lamnoчka "Add water" notyxnet.
-
Nocne toro, kak 3axkctra HndnkaTOp "Full", reHepatop octaHOBNT pa6Oty. Nocne toro, kak BbI-Hem onpeJeHHoe KOnuYeCTBO Ky6NKOB Ibda, reHepatop Bo306HOBNT pa6Oty cnycTa Okono 3 MNHyT.
- B TpaKe npouecca npoN3BOcTBa Nbda, HaxaTb KhoNky nn N3MeHeHn PpoJOnKuTeNbHOCTn npOceca npoN3BOcTBa Nbda. 3To NOBneHT 3a co60n N3MeHHe ToIuHb Ky6nKa Nbda. PoJa3yMaEBmI npaMeTpom ABnETCa «HoIb», a KaXdoe HaxaTne KhoNkn COOTBeTCTBeHHO yBeJIuHT, NN COKpaNT npoDOnKuTeNbHOCTb npoCecca Ha 1 MInHyTu. Cnyctra 5 cekyHn nocNe nocJeHero HaxaTn KhoNKn HObI npaMeTp 6yDet 3anOMHeH.
6.Плoxoe KaueCTBO BObIДaCT Плoxoe KaueCTBO KByka Ibda n CHn3nt erO np03paHocTb.
BHIMAHNE: npoun3BepeHHbIe Ky6nKu Nbda cKneeHbl dpyr C dpyrom, noTOMy nepei nCnoJIb3ObaHneHxHNOx OTdEInTb dpyr OT dpya.
IporpmaMa aBtOMaTnuecko oUcnCTKu
Haayano nporpammbi ABTomatuecko oucctkn: Nocne noeknoueHnaHra noaun BObl, nooknouHTb rhepatop K 3JeKtpocetn, nocle yero haxatbN ydepkatah 5 nnn 60nbwe cekyHd Khonky "Dnna Hauana nporpammbi uctkn. B TpaKeT npocecca oucctkn 6ydet CBeNTb lamnouka Clean", a uphioboi dincnne 6ydet noka3bIbaTb BpeM, Kaoe octaiocb do OKOHuaHnnpocecca uctkn. Pporpamma abTomatuecko oucctkn npdoJxkaetc 30 MNHyT.
06HyIeHne nporpaMMbI aBTOMaTnueckoOuNCTKN OINH zIKn aBTOMaTnuecko OUcNCTKN npoJOnJa-etcra 30 mHyT. Nocne 3abepseHna nporpaMMbI, rehepatop aBTOMaTnueckn oTKJIouaETcR. MoXHO TaKKe npHuNDiTteBHo npeKpaTtB bInOpJHHeHne nporpaMMbI aBTOMaTnuecko OUcNCTKn NyTeM HaxaTnKa KhoN KaHa NaHeN ynpaBNeHna
YcTaHOBKa TaMepa
Kak yctahOBtB Bpemnnycka JbdoRehepatopa C nOMoubTO TaMepa: KOrda rehepatop BbIKNoyeH NyXHO HaxaTb KhoNky "Timer/Clean" dIyCTAHOBKn Yaca, B KOtOpom DoJxhen 6bITb 3anyueH reHeP aTOp. 3axkTe cIamnoUka "Timer", Ha uΦpoBOM dncnlee 6ydt MURATb YNCNO, yKa3bBAHOoee yepe3 cKobKO qacOB 6ydt BKIOuCeH JbDOreHepaTOp. B TpaKe MIRAHnA UΦPOBOrO DnCnJIeR, MoXHO, HxHMaer KHOKNy △CoABNTb, IIN yMeHBsHTb KOINcCTBO YACOB, pni 3TOM NODpaZymBaEMOn HauJIbHOB BeIIuHHoY ABJeTcR «HOJIb». Cnyctra PnTb CeKYHd NocLe 3TOrO 3aDaHHoe Bpemr 6ydet 3aONMHeHo.
Kak 6hnyntb yctahOBHeHoe BpeMa BKIOueHn: Ia 3TOrO HyxHO HxKaTb KhoNky "TIMER/CLEAN", Ha 5uΦpOBOM dncJIee 6yIe MTIRATb YNCNo, yka- 3bIBaIOoee yCTAHOBHeHoe BpeMa OTcpOuKn BKIOU- ueHn, 3aDaHHoe C NOMOUI TO TaMepa. NobToPHOe Haxatne 3Toi KHONk O6HyNT IMeIOUneCg DaHbIe. Haxatne KhoNkn TAKKe 6hnynt yCTaHOBKn TaMepa.
Kak 6hnyntb 3aHaHoe Bpemr OTKIOUeHnra: Ppoepdypa nIeHTnHa npoepdype 6hnyeHnra 3a- nporpaMMnpoBaHHOrO yaca OTKIOUeHnra.

Cxema BHyTpEnHHx coeHNHeHn
3Bykn
BaH HOBi IbDorehepaTop MoKeT n3daBaTb Heo- 6bUHbIe 3ByK, KOtOpBie, OHaKO, MOrY T 6bITb BnOJIHe eCTeCBHHb. TBePdoe oChOBaHne, HApnpMeR, POn, CTeHbI nnu IkaΦbl MOrY cNooc6CTBOBaT b TOMy, UTo 3ByK, N3daBaEMbIe reHepaTOPOM, MOrY Ka3aTbC8 BoJee rPoMkIMN, Yem OHn Ha CaMOM DeJe. Hxke npuBoDm OnncAHne 3ByKOB, n3daBaE-MbIX NbDoREhepaTOPOM.
Korda oTKpbT BODaHOH KpaH dJa HanoJIHeHnpe3epByapa BOoB B KaJdOM cIKNe, 6yTe TcblWeH xapakTepHbI Wym.
Kneokuyuine 3ByKn MOryT BbI3bBaTbcn nepeteKaHHeM XJaIaReHTa, INN nepeTeKaHHeM BoDbI B BOOnpOBOHbIX Tpy6ax.
- BbICOKonpoN3BODHTeJIbHbI KOMnpecccop, MoKET npOduzupoBaTb NylbcnpyUoUsn 3ByK BbICOKoYacToTbl.
- Boda, Bbitekaioaia n3 pe3epByapa Ha ncnapntelb MokeTn3daBaTb cneuΦnueckn PneckaIOIuN 3ByK.
TakkeBoa, BbiteKaHouaIu3 HcnapTeJI B pe-3epByap Takke MoKe Tn3daBaTb CneuΦnueckn nIpeCKaIOUuN 3ByK.
B MOMENT OKOHUHNA KAKDORO UKJa MOXHO yCJIbIaTb 6yJIbKaHBe, Bbl3bIBaemoe npoTeKaHEm XlaIaIeHTa B reHepaTope.
- Moxho yCblbTaB CBnCT Bo3Dyxa, BblDyBaemorTo BeHTnIaTOpom. B TpaKte uNKla c6opa Ibda, MoxHO ycblbTaB 3ByK Ky6NkOB, nonadaIOuXn Bpe3epByap.
- Nocne nepBoro nyska IbdoRehepatopa Bby ycnblI Wnte 3Byk HnpepbIBHOro noToKa BoDbl. IbdoRehepatop nepeh hauanom npOn3BoDCTBa Ibda npOBeDeT uNKl NoLoCKaHn.
IpoToBka IbdoReHepaTopa K npoJoJXHTeJbHOMy xpaHeHHIO
Ecnn IbdoRehepatop He 6ydt NcnoIb3oBaTbcn npOdoJXnteHbHoe BpeM, nn eCnn OH doJxKeH 6bTb nepemuehen Ha dpyroe MeCTO HxHo CInTb BCIO BDOy n3 reHepaTopa.
- BbIKIIOHT reHepaTOp n BbIHyTb wTeNceJIbHyO BnIKy n3 p03eTKn.
- Перекрьтб подау воры n3 главно Трубоповд.
- OToCoeHnHTb WlnaHr NoaHn BODbl OT KnaHaNoaHn BObl.
- BbHyTb Tpy6ky CInBa BObl n3 pe3epByapa BObl (PpOmaKnpoBaHnbl Ha pncyHKe JntepoR «H»), qTo6bl CInTB BCIO BOdy n3 pe3epByapa. NocJe CInBa BceB Obl, 3aKpeNtB Tpy6ky BObl Ha ee INCXOJHOM MecTe.
-
Cnntb BcIO BOy uepe3 OTBepCTne cINBa BOIbI c3aI rehepaTopa (nr 7 Ha pucynke).
-
OToCoeHnHTb ⅢJIaHr CInBa BOdbI OT KaHaJIN3a- cNoHHoN Tpy6bl, IIN OTBepCTnR CInBa B NOny IN 3aKpyTNTb 3aIgNyUk Ky Ha MeCtO CInBa BOdbI.
- OCTaBnTb DBepKn OTKpbItbIMN DJIa TORO, YTO6bl N03BOJNTb BO3dUxy CBO6oJHO BEHTINIpOBaTb ReHepaTOp BO n36eXaHne o6pa3oBaHnI pIecEHN.
8.Шланг подач Ворьи Кабель Злеступатни Должны 6ытб OTКючевы OT петаши Do мente седуюцero Испльзовеня ЛбдorehepaTopa.
- Ocuyntb BHyTppeHHocTb reHepaTopa N BblTepeTb BHeuHne NOBepxHOCTN DOCyxa.
- JbdoRehepaTOp npKpbItb PHeHkoB O n36eXa-Hne erO 3aqr3HeHnI.
OuNTka N TexHnueckoe obcnyKnBaHne
PPEyPExEHE:JnMaMbITb/Je3HfKeuN NbOReHepaTopa He CneDyeT NcNoIb30BaTb HnKaKoro-Jn6o CnpTa, Hn a3pO30Je - 3TO MoKeT npiBecTu K pactpeckNBaHIO PnaCTNKOBbIX DeTaeJe. He pexe oNHO pa3a B rOd KOHDeHCaTOP HyXHo NOdBeprHyTB BHImaTeNbHOMy OCMOTpy N uCtKe cnilamn KBaInΦuOpOBaHOn cepBucHO cnjx-6bl, Jnra TOro YTo6bl rHeHepaTop pa6oTal DoIro n IcnpabHo. FeneHApTo hUxHo uCSTntb cTpye BoDi.
BHIMAHNE: EcnI nbdoRehepaTop He nCnoB3OBaIcN npoJOnJXntbHoe Bpemn, nepeI erO cNe dyuOuM nCnoB3OBaHnEM HxKHO TuaTeNbHO BblMbIb. HyxHo ToUHO co6IoDaTb INCTpyKuIO no QucTKe, BKluOyAЯ nCnoB3OBaHne De3INHouPyuOux CpeDCTB. NDoRehepaTop HxKHO TuaTeNbHO OuyCTNTb OT IIO6bIX YnCTraUnx CpeDCTB NoCne nCNoB3OBaHnI dIy ChSTKn RehepaTopa.
IepnoDnueckoeMbITbe, npabunbHoeTexnueckoe 6cnyxnbAHne obecneuHT HyxHyIO npOn3BODnteNbHOCTb,6e3OTka3HocTBpa60Tb, uNcToTy npOn3BOndBa n DOnrOBeuHocTB pa60Tb reHepaTopa. HyxHo cobIoDaTb pa3yMhbIe BpeMeHHble npomexyTKm MExdy oupeEHNbIMN uNcTkAm. Ecn y Bac NMeIOTc DOmaUHHe NITOMCuI, reHepaTop uCNoJIb-3yeTcHa OTKpbITOM MeTe, INN IMeIOTc dpyrHe npuHHbl, peKOMeHNdyETc 3TN npomexyTKn COKpATNTb.
HOMHHTe,TOB EMKoCTn IJIbJa He CJIeDyET DeP- XaTb HnueTo,TOHe YBJIeTcIbDOM - 6ytblkn C BnHOM, NtBOM.3To HE ToJIbKO pa3BOJNT aHTncA-HHTapNIO, HO N OTKJIeNBWeecr 3TNKeTKn MOrY TnO-NaCTb B Tpy6y cINBa BOJb N 3acOpNTb ee.
OuInCTka HapyKhbIX NOBepXHocTe KOpnyca
ДверкииВнутpeHHne NOBepxHocTN reHepaTopa cIeHyETMbITb cIa6bIM pactBopOM MOIOSeTo CpeCTBa nTeIIOn BODo. He cIeHyET NcNoJIb3OBAt b CpeICTBa, coIepXaUne pactBopNTeIN, a6pa3NHBie, IInn arpeCCNBHbIe KOMIOHeHTb. JInr MblTCs NcNoJIb3OBAt b MfKyo r6Ky. IocNe MbITbcr MoIOuIIM cpeCTBOM NOBepxHocTN OONLOCKaTb YnCToI BODo, a Notom BblTepeTB Docyxa, yTo6bl npeDTBpATnTb o6pa3OBAHne NoTeKOB.
BHIMAHNE:MoJeN, BbIOpJIHeHbIe N3 HepXaBeHoue CTaI, Ha KOTOpBIE MoKeT Bo3DeIcTBoBaTb Ra3, INI XnIKoCTN, CoepXaUne XLOp INI erO coEINHeHn, yCTaHaBnIBaEmbIe B6JIn3N, HanpImep, BaccenHOB MOrTy MeCTaMn OKpaShnBaTbcr - TaKoe YBLeHne 3TO O6bIuHoe IpOraBLeHne BO3deIcTBnXlopHa HepXaBeIOUyIO CTaJIb.
RU
OuNcTka BHyTpEHnX NOBepxHocTe reHepaTopa EMKoCTb IJIy Ky6NKOB Ibda
EmkoctbIy6nKOBIbdaCneNyETBpeMOrBpeMeHN npOe3HnHnupoBaT.EmkoctbIpeNd nepBbIM NcNoJIb3OBAHHem CneNyET BblMbITb, TaK XeCneNyET NoCTynITB Cnyae DOnrBopeMeHHoro HencNoJIb3OBAHn. NycTyIO emKoctb IyuWe Bcero npOe3HnHnupoBaT, BblHyB ee n3 rehepaTopa.
- Řтклочиь rehepaTOp oT ᵷеКТрocetN.
-
OtkpbIb DBepkn n C NOMOuB BlaXHoT prAnKn npotepeTB BHyTpEHnne NOBepxHocTn De3nHn- unpuyuum pactBopom, coctoam n3 28 roTbeJnte, nn xlopkn n7,5 n ropaye Bobl.
-
Nocne 3Toro onolockaTb uHcToB BDOo. BOy CnITb B KaHaJIIN3aCNIU Oepe3 WJNaHr CInBa.
- 06patno noKIOHTb reHepatop K 3neKtpocetn. Cobok IJy Ibda cJeDyET MbITb peryIpaHo, TaK Jek BcAkn npOuN INBeHTapb, KOtOpBle npNKacaetcK NIIeBbIM npOdyKTam.
PNEyPExKHe: He cJeNyET nCNoB30BaTb pactBopnteHn, abpa3nBhIe, nn arpeccnBhIe cpeCTBa - OH MoTy UxydUnTb BKyc nbda.
OuNTka 3JeMeHTOB, npOn3BoJx JieD
B TpaKe IcNoIb3OBAHnHyxHo nepNoIuYeCKn YnCTITb rAIBhB 6nok NbDoreHepaTopa.
- NOBTOPINb BblweonncAHhBie DeicTBn, npeDncaHHbIe InnMbITbcpe3epByapa BoDbI, a TaKxepnoqHx BHyTpEHnX 3JeMeHTOB reHepaTopa.
2.Дононтельно hyхно npouctntb Tpy6ky no- daHou BOy Ha nCnapTe; demOHtpoBaTb 3TO TJIeMeHT N npochtnb KaXdoe MaJIeHbKoe OTBepCTne, KOTOpoe MOxHO yBnTeb Ha pucHyke, o6paaBHNMaHne Ha To, YTO6bl Tpy6ka CTana npoxOIMoN, Notom O6paTHO yCTaHOBtB ee Ha 7tATHOE MecTo.
- Ecnn Ha nobepxhoctn nCnapnteJn HMeOTcKy6nKn Ibda, KOtOpbIX He ydaetc CHrTb, HeIb3a INX CHNMaTb HacnIbHo; OoCTaTOUHO HaxaTb KHOkKy "ON/OFF" n npndepxatb Ha 60lee 5 cekynd - reHepatop nepenietB pexm noorpeBa Ibda n Ky6nKn camocToarTeNbHO OTpByTCs OT OCHOBAHN. Nocne 3toro HyxHo rehepatop OTKlOuHTb OT 3JIeKTPocETn mOxHo npnstTyNTb KMbitbNoBepxHOCTn nCnapnteJn.

- Pe3epByap BODbl nIaTa, noka3bBaIOUaJ 3a- noJIHeHne IbDM

Pe3epByap BObl n Pnata, NOKa3bIBaIOUa 3aONHeHne Ibdom, IMeOT cyuectBeHHoe 3HaueHne dIra TnIneHNuecko YnCTObI Ky6NKOB Ibda. B YnCTyIO opOsaIOUyIO XnIDKOCTb IO6ABNTb HEmHO rCmecn HeITpaIbHOr MOIOUero CpeDCTBa IBOdy, INOTOM opocntb BCE BVHTpeHHne NOBepXHOCTn pe3epByapa BObl n PnATy, NOKa3bIBaIOUyIO 3aONHeHne EMKoCTn Ibdom. Pocne 3TOrO NOBepXHOCTN BbITEpeTb Docyxua YnCTOn TpIKNo. NcNoJIb3OBAHHyO dIra MblTa BOy cINtB K KaHAn3aUIO, CHMaj Tpy6Ky CnBa (npomapKnpoBaHHyo Ha pncyHke IITepoR H ).Pocne CNBa Bce BODbl, Tpy6Ky CnBa BObl n3 pe3epByapa NOpEcTnB o6paTHoe Ha ee IStaTHoe MeCTO.
POMHnTe O ToM, UTo6bI NocIe BblIOJIHeHnA YnCTKn BHyTppeHHnx NOBepxHocTe NepByIO npTnIO Ky6N-KOB NbDa CInTB B KaHaJIIN3aCNU.
YdaJIeHne KOTJIOBOro KaMHa
MnhepaIb, BbInaBWe n3 BoDbI B TpaKTe znkna 3a-
mopaxkBaHnra, o6pa3yOT TBepdbI cNoi KOtloBOrO
kAMHRA KOHTpe o6paueHnra BoDbI. PeryJrpHoE
MbITbe NOMoAeT ydaNtB HAKoONBwNcR KOTIOBOI KaMeHb. Ka qacto MbITb KOHTyp, 3aBncnt OT
XeCTKOCTn HCNOB3yEmoB ODbI. B Cnyae ouehb
XeCTKOI BODbI (XeCTKOCTb C 4 Do 5 rpaH IINTp BODbI),
OuNCTKy HxKHO IpOBoDnTB KaXdbie 6 MecraueB.
- BbIKIIOHTb IbDOReHepaTOp. He OTKIOUaTb OT BOIOPOBOda nOdaun BOdbI n CnIBa BOdbI. PepeKpbITb rAABHykpanoDAuN BOdbI.
- OTKpbITb DBePKn n C NOMOuBIO COBka y6paTb BCE Ky6nKn Ibda, NOLOXHTb INx B XOJOnIbHNK, MOp03nJIbHNK, INN CInTb B KaHaJIIN3aUIO.
- CénaTb moUpni pactBop, cMeuBaJ moUoee cpeCTBo noi HaBaHnem Nu-Calgon Nickle Safe Ice Machine Cleaner nIy IbDorehepatopoB C BoOn.
PNEyPExKHeHNE:IaNcNoB3OBaHnYnCTa- ⅢeO cpeiCTBa IJIbDoreHepaTopoB HxKHO Ha- dTe b 3aunTHbIe pyKaBnbl 3aunTHbIe OOKn.
B nlaactNKOBOM Bepe nn n3 hepXaBeKn 06bemom CbIe 4 nItpa nepemeaTb 300 mI moIOeOcpeICTBa noI Ha3BaHnEM Nu-Calgon Nickle Safe Ice-machine Cleaner c 2,8 nItpamN tenIoB oDbl TeMnepaTypoi nopAka OKoI O50-60°C. IOTOM noyueHHyo Cmecb HxKHO pa3dEHTb Ha DBe paBhbie qactn B dByx eMKoCTax. Cmecb HAno BblepxNBaTb npTakOn TemnepaType.
- YIOCTOBepNTbC B TOM, 4TO Tpy6ka CJIINBA BOIbI N3 EMKOCtN BOIbI npaBnIbHO 3akpeJIeHa B OTBePCTIN CTEN KI pe3epByapa. IOTOM BInTb OJHy EMKOcTB pactBopa Nickel-Safe Ice Maker Cleaning Solution B pe3epByap BOIbI. IOnOxJaTb 5 MInhy.
- IopKJIIOuHTb 3JIeKTPoNTaHne IbDoreHepaTopa, nocIe yero HaxaTb N ydepXaTb Ha 5 nn 6onb-
yecekynd KhoNky "TIMER/CLEAN"Ha naHenn ynpaBHeHn IyI Nycka nporpaMMbl ABTOMaTnuecko OuNCTKn. B TpaKTe 3ToRo npOecca 3axkTeIamNoUka "CLEAN", a uΦpOBoI nCnIe bYdET NOKa3bIbTaB BpeM, ocTabWeecrdo 3aBepHeHn DaHHoI onepaun.
- Nocne 3aBepseHnO OJHOro noJHOro uKJa npOpTpaMMbI ABTomatueckOn OuHCTKn HxKHO BblHyTb Tpy6ky CInBa BObln3 pe3epByapa BObl, CInTB MoUpniPacTBOp Ha JeD, pacNoJoxKeHNbI B HnXe HaxOJaYUcE emKocTb IJIaNbA, JERKO BCTpXINBa ReHEpatOp, YTO6bl CInTbOCTaTKN BObl. Nocne 3toro ChOBa BCTaBHTb Tpy6ky CInBa B OTBepCTne B pe3epByape BObl.
- NOBTOPbIb4-6, YTO6bl NOBTOpHO BBIMbITb 6nok IbdoRehepatopa.
PNEyPExEHENc: CpeCTBO dIaMbITbIb- Dorehepatopa coepxnt KncnoTb.IHElb3eraero HcNoJIb3OBaTb OTdJIbHO, IIN BMeCTe c dpYrIMMOUuMM CpeCTBaMn, CoepXaUmm pactBopNTeIN.PyKn HyKHO 3aUuATb, HaDeBaer pe3HOBbie pykabu. A nepepa6Toi cneJyET BHMATEJBHO O3HaKOMtbcra c nHCTpyKne, Oco6eHHo CToJ qACTbIO, KOtopaCoepXHT noJoxEHn NO TexHKe 6e30NaChocTN npOdykTa, KOtopa pa3Meuaetcna HaynakOBke CpeCTBa dIa MbITbIbDorehepatopa.
- OTKpbITb KpaH NOdau BODbI IN BnITb BDOy B rehepatop. YTo6bI 3aNyCTnb npoPamMy aBtOMaTHueckO ouNCTKN HxKHO HaxaTb Ha 5 nIN 60JIbWe cekyHKnONKy "TIMER/CLEAN". TorJa 6Byet npouHuaTbc Tpy6ka pacnPpeJeHnRA BOdbI, INcapNTeJIb, BOJHO HAcOC, CnIKKOHOBA Tpy6Ka I pe3epByap BOdbI N.T.I.
- Nocne 3aBepHnO OdHOro NoJHOro zKna nporpammbi ABTomatuecko OuNCTKn HxKHO BblHyTb Tpy6ky CInBa BObl n3 pe3epByapa, cNtBMOUun paCTBop B HxKepacnoLoKeHHy oEMKOCTb IJNA CnErka BCTPaxNBa reHepaTop, YTO6bl CnITb OCTaTKn BObl. Nocne 3Toro o6patHO HyXHo CTapateJIbHO BCTaBHTb Tpy6ky CInBaBObl B OTBepCTne B pe3epByape BObl.
10.ДByKpaTHOBbINOJIHHTbIeIcTBnA,ONuCaHHbIeB n.n.8-9.
- Cornacno Bblueu3noxehHOn nporpaMme noMbItb EMKoCTb IJIaJa.
- NocTe toro, KaN nomoem reHepaTOp nepByIO npapTIO Ky6NKOB Nbda CnBaEM B KaHaJIIN3aCNIIO.
Yka3aHn, KacaIoUncEeMbItb
1. EXEHNHEBHOE
CobokДЯЛбд.ДВеркИТу6КуpacnpedelenHnBODbIHyxHOMbITbExKeIHeBHo.HaKoHeuDnHcOBOKДЯЛБДaHxKHOOnIOChyTbN BbITEpeTbDocyxa,aTaKxeBbITEpeTbOcCyxaUnCTOnTprKnOdBepKcObouxCTopoH.
2.KAKKdbIE DBE HEDENI
CobokIJIaJIbda,emKocTbIJIaJIbdape3epByap BOIbI,IIaTy,yKa3bIBaIOUyIO 3aONHeHne Ibdom, a TakKe NOBepXHOCTbNCnAPNTeJI HyxHO MbITb
KaJbIe IBe HeJeIi CoIaCHO IpOpaMMeMbITbBHyTpEHHocTn ReHepaTopa.
3. KAKDIE6MECAUEB
Bce 3JIeMeHbI N IOBepxHocTn, KOHTaKTnpyUOuNe C BoDoi, Ky6NkAm Nbda; T.e. pe3epByap BoDbI, DBepkn, nCnapntel, BoJHO HAcOC, cnNkoHObYIO Tpy6Ky, Tpy6Ky pacppeJeNTeINrBoDbl, nT.I. HyXHo MbITb KaXdbie 6 MecaueB IcNoIb3yra CpeIcTB0 POn Ha3BaHneM Nu-Calgon Nickle Safe Ice-machine Cleaner.
PeseHne npo6JIem
6pa30m, KOToPbI He BpeDeH IJIa 3OpOBBy N OkpyKaIOUeN cpeDbI.
Texvike npooblaypaefc
Bnua 2: Eoayere to oAnvavepou
Tn ouvexua TOnotheTne kIn Otn
Hendi Food Service Equipment GmbH
Ehring 15
Hendi Food Service Equipment Romania S.R.L.
PKS Hendi South East Europe SA
5 Metsovou Str.
18346 Moschato, Athens, Greece
Tel: +30 210 4839700
Email: info@pks-hendi.com
Hendi Italia S.R.L.
Via Leonardo da Vinci 4
39100 Bolzano (BZ), Italy
Tel: +39 800 727 438
Email: office.italy@hendi.eu
Hendi HK Ltd.
1208, 12/F Exchange Tower
33 Wang Chiu Road, Kowloon Bay, Hong Kong
Tel: +852 2154 2618
Email: info-hk@hendi.eu
FindHendi on internet:
www.hendi.eu
www.facebook.com/HendiToolsforChefs
www.linkedin.com/company/hendi-food-service-equipment-b.v.
www.youtube.com/HendiEquipment
- Changes, printing and typesetting errors reserved.
- Änderungen und Druckfehler vorbehalten.
Wijzigingen en drukfouten voorbehonden.
- Producent zastrzega sarepwo do zmian oraz btedow drukarskich winstrukcji.
-
Variations et fautes d'impression réservés.
-
Errori di cambiamenti, di slampa e di impaginazione riservati.
- Drepturi rezervate cu privire la modificari si greselei de imprimare.
-3meHeHH, neaHTn BepCTKn 0wn6Kn 3aunneHbI.
-Me enipuAn aaiayaw,aaBw eKtunwnoc kai atoixeiOeiaac
Změny, chyby lisku a szby vyhrazeny.