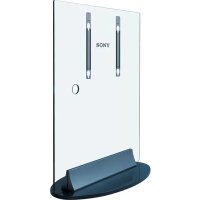
SUPW2 - Flat screen mount SONY - Free user manual and instructions
Find the device manual for free SUPW2 SONY in PDF.

| Product type | Wall mount for flat screen |
| Brand | Sony |
| Model | SUPW2 |
| Compatibility | Specific Sony flat screens: KDE-P37XS1, KE-P37XS1, KDE-P42XS1, KE-P42XS1, KE-P42M1, KDE-P42MRX1, KE-P42MRX1, KDE-P50MRX1, KE-P50MRX1, KDE-P61MRX1, KE-P61MRX1, KDL-L42MRX1, KLV-L42MRX1 (from May 2004) |
| Material | Steel |
| Color | Black |
| Mount weight | Approximately 5 kg |
| Maximum supported load | Up to 4 times the weight of the screen (suitable wall) |
| Tilt | 0°, 5°, 10°, 15°, 20° adjustable |
| Number of fixing points | At least 4 M8 screws (or equivalent) |
| Screws supplied | Screws for hooks (+PSW5·L16) and fixing screws (+B6·L20) |
| Template dimensions | 3 sheets to assemble (see manual) |
| Installation | Recommended by a qualified professional |
| Maintenance | Clean with a soft, dry cloth |
| Safety | Do not install on unstable wall, do not overload, do not modify |
| Repairability | Parts not supplied separately; contact a Sony dealer |
| Warranty | Refer to legal conditions |
Frequently Asked Questions - SUPW2 SONY
User questions about SUPW2 SONY
0 question about this device. Answer the ones you know or ask your own.
Ask a new question about this device
Download the instructions for your Flat screen mount in PDF format for free! Find your manual SUPW2 - SONY and take your electronic device back in hand. On this page are published all the documents necessary for the use of your device. SUPW2 by SONY.
USER MANUAL SUPW2 SONY
For Customers and Sony Dealers in Europe
Wall-Mount Bracket
Instructions GB
Mode d'emploi FR
Instrucciones ES
Instruções PT
Vejledning DK
Instruksjoner NO
Bruksanvising
Käyttoohje FI
Instructies NL
Thank you for purchasing this product.
To Customers
Sufficient expertise is required for installing this product. Be sure to subcontract the installation to Sony dealers or contractors and pay special attention to safety during the installation. Sony is not liable for any damages or injury caused by mishandling or improper installation. Your Statutory Rights (if any) are not affected.
WARNING
If the safety precautions are not observed or the product is used incorrectly, it may result in serious injury or fire.
This instruction manual shows the correct handling of the product and important precautions necessary to prevent accidents. Be sure to read this manual thoroughly and use the product correctly. Keep this manual available for future reference.
For Sony dealers
Sufficient expertise is required for installing this product. Be sure to read this instruction manual thoroughly to do the installation work safely. Sony is not liable for any damages or injury caused by mishandling or improper installation. Your Statutory Rights (if any) are not affected. Please give this manual to the customer after installation.
On Safety
Products by Sony are designed with safety in mind.
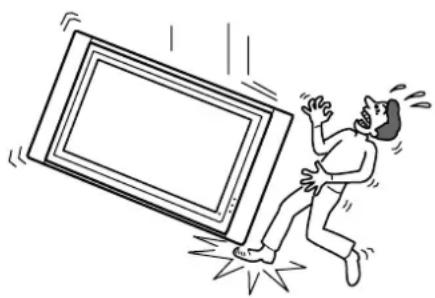
If the products are used incorrectly, however, it may result in a serious injury through fire, electric shock, the product toppling over, or the product dropping. Be sure to observe the precautions for safety to prevent such accidents.
CAUTION
This Wall-Mount Bracket is intended for use only with the following products. Use with other apparatus is capable of resulting in instability causing possible injury.
Specified product (As of May 2004)
| Flat Panel Colour KDE-P37XS1 KE-Television(Display Model) KDE-P42MRX1 KE | P37XS1 KDE-P42XS1 KE-P42XS1 KE-P42M1 P42MRX1 KDE-P50MRX1 KE-P50MRX1 (PDM-4210) (PDM-4210) (PDM-5010) (PDM-5010) KDE-P61MRX1 KE-P61MRX1 (PDM-6110) (PDM-6110) |
| LCD Colour Television KDL-L42MRX1 KLV-L42MRX1(Display Model) (LDM-4210) (LDM-4210) | |
For Customers
WARNING
If the following precautions are not observed, serious injury or death through fire, electric shock, the product toppling over, or the product dropping can result.
Be sure to subcontract the installation to qualified contractors and keep small children away during the installation.
If the Wall-Mount Bracket or the Display Unit is not installed correctly, the following accidents may occur. Be sure qualified contractors carry out installation.
- The Display Unit may fall and cause a serious injury such as a bruise or a fracture.
- If the wall on which the Wall-Mount Bracket is installed is unstable, uneven, or not perpendicular to the floor, the unit may fall and cause injury or property damage. The wall should be capable of supporting a weight of at least four times the Display Unit weight. (See the Display installing dimensions table on page 83 for the weight of each Display Unit.)
- If the installation of the Wall-Mount Bracket on the wall is not sufficiently sturdy, the unit may fall and cause injury or property damage.
Be sure to subcontract moving or dismounting of the Display Unit to qualified contractors.
If persons other than qualified contractors transport or dismount the Display Unit, it may fall and cause injury or property damage. Be sure that two or more persons carry or dismount the Display Unit.
Do not spill liquid of any kind on the Display Unit.
If you allow the Display Unit to get wet, this may result in a fire or an electric shock.
Do not remove screws, etc., after mounting the Display Unit.
If you do so, the Display Unit may fall and cause injury or property damage.
Do not disassemble or make alterations to the parts of the Wall-Mount Bracket.
If you do so, the Wall-Mount Bracket may fall and cause injury or property damage.
Do not mount any equipment other than the specified product.
This Wall-Mount Bracket is designed for use with the specified product only. If you mount equipment other than specified, it may fall or break, and cause injury or property damage.
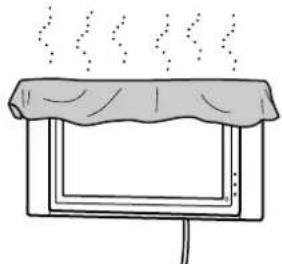
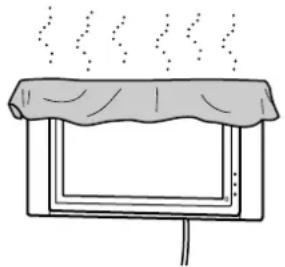
Do not cover the ventilation hole of the Display Unit.
If you cover the ventilation hole (with a cloth, etc.), heat may build up inside and cause fire.
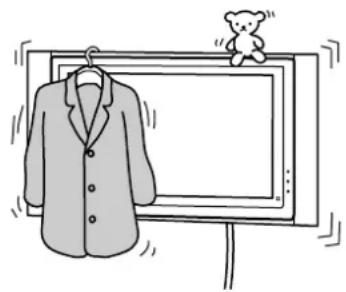
Do not apply any load other than the Display Unit on the Wall-Mount Bracket.
If you do so, the Display Unit may fall and cause injury or property damage.

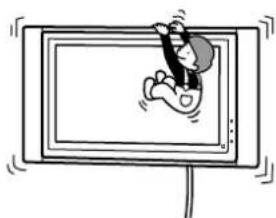
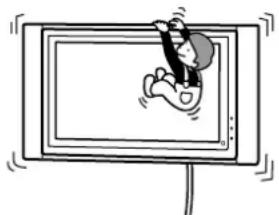
Do not lean on or hang from the Display Unit.
Do not lean on or hang from the Display Unit as it may fall on you and cause serious injury.
Do not expose the Display Unit to rain or moisture.
It may cause a fire or an electric shock.
Never place the Display Unit in hot, humid or excessively dusty places, or in the place where the unit is subjected to mechanical vibrations.
If you do so, it may cause a fire or an electric shock.
Keep flammable objects or open flames (e.g. candles) away from the Display Unit.
To prevent a fire, keep flammable objects or open flames (e.g. candles) away from the Display Unit.
CAUTION
If the following precautions are not observed, injury or property damage may occur.
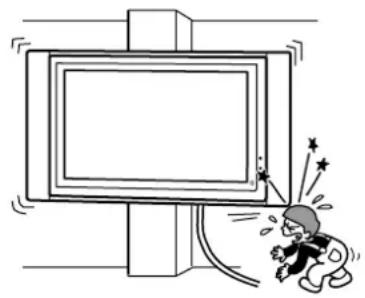
Do not install the Wall-Mount Bracket on wall surfaces where the corners or the sides of the Display Unit protrude away from the wall surface.
Do not install the Wall-Mount Bracket on wall surfaces such as a pillar, where the corners or the sides of the Display Unit protrude away from the wall surface. If a person or object happens to hit the protruded corner or side of the Display Unit, it may cause injury or property damage.

Do not handle the product with excessive force during cleaning or maintenance.
Do not apply excessive force on the topside of the Display Unit. If you do so, the Display Unit may fall and cause injury or property damage.
Do not install the Display Unit over or under an air-conditioner.
If the Display Unit is exposed to water leaks or air current from an air-conditioner for a long time, it may cause a fire, an electric shock or a malfunction of the Display Unit.
Precautions
- If you use the Display Unit installed on the Wall-Mount Bracket for a long time, the wall behind or above the Display Unit may become discoloured or the wallpaper may come unstuck, depending on the material of the wall.
- If the Wall-Mount Bracket is removed after installing it on the wall, the screw holes are left.
- If you have routed 300-ohm feeder cables behind the wall, we recommend that you change them to 75-ohm coaxial cables.
If it is necessary to continue to use 300-ohm feeder cables, be sure there is sufficient space available between the Display Unit and the feeder cables behind the wall before installing. Consult your contractor regarding an appropriate location (free from radio noise, etc.) before installing.
WARNING
To Sony Dealers
The following instructions are for Sony Dealers only. Be sure to read safety precautions described above and pay special attention to safety during the installation, maintenance and checking of this product.
Be sure to install the Wall-Mount Bracket securely to the wall following the instructions in this instruction manual.
If any of the screws are loose or fall out, the Wall-Mount Bracket may fall and cause injury or property damage. Be sure to use the appropriate screws for the material of the wall and install the unit securely, using four or more M8 (or equivalent) screws.
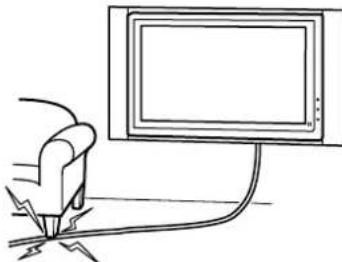
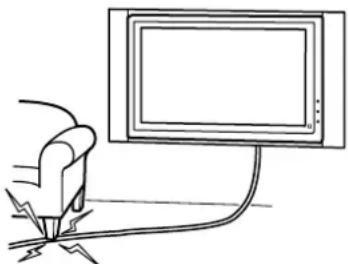
Do not allow the mains lead or the connecting cable to be pinched.
If the mains lead or the connecting cable is pinched between the unit and the wall or is bent or twisted by force, the internal conductors may become exposed and cause a short circuit or an electrical break. This may cause a fire or an electric shock.
Be sure to use the supplied screws and attachment parts properly following the instructions given in this instruction manual. If you use substitute items, the Display Unit may fall, and cause bodily injury to someone or damage to the Display Unit.
Be sure to assemble the bracket properly following the instructed procedure explained in this instruction manual.
If any of the screws are loose or fall out, the Display Unit may fall, and cause bodily injury to someone or damage to the Display Unit.
Be sure to tighten the screws securely in the designated position.
If you fail to do so, the Display Unit may fall, and cause bodily injury to someone or damage to the Display Unit.
Be careful not to subject the Display Unit to shock during installation.
If the Display Unit is exposed to shock, it may fall or break apart. This may cause injury.
Be sure to install the Display Unit on a wall that is both perpendicular and flat.
If you fail to do so, the Display Unit may fall and cause injury.
After proper installation of the Display Unit, secure the cables properly.
If people or objects get tangled in the cables, this may result in injury or damage to the Display Unit.
Be careful not to hurt your hands or fingers during the installation.
Be careful not to hurt your hands or fingers when installing the Wall-Mount Bracket or the Display Unit.
The screws needed to secure the Wall-Mount Bracket to the wall are not supplied.
Use the appropriate screws for the wall material and structure when mounting the Wall-Mount Bracket.
He BbIBopaunBaIe BNHTbI N T.D. NOcNe TORO, KaK 6yDet BblOnHeH MOHTaX DnCnJIeJ.
B npotnbom cnuyae nncnne MoKet ynaTb n CtaTb npuHHO TpaBM INI NOBpeKeHnIMyueCTBa.
He pa3bpaIte n He MeHnTe DeTaJIn HAcTeHHORO MOHTaXHORO KPOHSTeHa.
В поротьном слуае HabTeHHbIM MOHTaXHbIM KPOHSTeMH MOKeT ynaCTb IN polnyHTb NOBpeKDeHnI NII CTaTb npuHNoI TpaBM IIN NOBpeKDeHnI NMyueCTBa.
BbINOJIHnTe MOHTaX TOnIbKO NocTaBJeHHoro Bam O6OpyDoBaHn.
3TOT HAcTeHHbMOHTaXHbKPOHSeH IpeHa3HaueH JIINCnOJIb3OBAHN TOJIbKO C ONpeDeJIeHHbIMN 3dEINrMn. EcIn Ha DaHHOM MOHTaXHOM KPOHSeHHe KpeNTcO bOpUdoBAnHe, He IpeHa3HaueHHOe dJaTakOn yCTaHOBKn, OHO MoXe Tynactb INoIyUnTB NOBpeXJdeHNr Nn pa36ntbcra, a TaKxE MoXe CTaTb npuHNOITpaBM nIIN NobpeKDeHNr IMUeCTBa.
He nepekepbiae BeHTnlaioHHOe OTBepCTne Dncnpe.
Pn nepeKpbltn BENTINLAIOHHO OTBepCTN (TKaHbIO N T.D.) BHyTpN yctpoiCTBa MoKeT NOBbICHTbcr Tempeatypa, YTO MOKeT pInBeCTN K BO3ropaHNI.
Bo n36exaHne neperpy3KN HAcTeHHORO MOHTaXHORO KPOHSTeHa He yCTaHaBnBaIte Ha HEM HnUero, KpOME daHHORO DnCnJIeR.
B npTnBHom cnyae dncnne MoKeT ynaCTb n CtaTb npuHOn TpaBM nnnoBpeKdEHHN mUeCTBa.
He onnpaItecb Ha dncnlei He depxntecb 3a Hero.
He onnpaTecb Ha dncnnei H He depKntecb 3a Hero, TaK KaK OH MOKeT ynaCTb n CTaTb pnuHOn nOlyeHn cepbe3hIx TpaBM.
He noDbepraTe dncnpei BO3deIcTBIO DOxJa IIN BlaIaI.
TO MOKET CTAb PnUHHO B03rOpAHN NIN NopaxeHNN 3JIeKTPuYeCKM TOKOM.
He yctaHaBnBaIte dncJIeB XkapKHX, BlaXHbIX NIIcNtKOM nbIbHbIX MecTax, a TaKKe B MeCTax, rDe dncJIe6ydet NOdBepKeH BO3deiCTBHO MexaHnuecko BV6paun.
B npotnbom cnyae 3TO MOKet CTaTb pnuHnOB 03ropaHn INI nopaKeHHN 3JekTpuecknM TOKOM.
He pa3meaTe IerKOBocnIaMeHIOUneCnpeDMeTbI NJI NCTOCHNKOTKpbITOro ORHa (HaNPmep, CBeu) pAOM c DnCnIeem.
Bo n36eXaHHe Bo3ropaHn He pa3MeuaTe pAdom C dncnneem IerKOBocPnaMeHIOUneC npEIMtBn INCTOuHNK OTKpbIToro ORH (HaNPmep, cBeu).
BHIMAHNE
Pn Heco6JIOeHnn CJeIyUOux Mep IpeIOcTOPOXHOCTN CyueCTByET BepoAHTHOCTb NOLyEHH TpaBM nII NOBpeKDeHn IMyueCTBa.
He yctaHaBJIbBaIte MOHTaXHbI KPOHJTeH Ha TaKHX CTeHHbIX NOBepxHOCTaX, rde KpaI dncJIpe 6ydyT BbICTyNaTb 3a KpaI CTeHHoI NOBepxHOCTn.
He yctaHaBnBaIe MOHTaXHbI KPOHHTeIH Ha TaKHX CTeHHbIX NOBepxHOCTx (Ha npimep, Ha KOJIOHNax), rKe KpaI DnCnJIe 6yDyT BbICTyNaTb 3a KpaI CTeHHoN NOBepxHOcTn. 3aDeB 3a BbICTyaHOUne KpaI DnCnJIe, MoXHo NOnyHTb TpaBMY IIN NOBpeDnTB IMMyECTBO.
YncTk ydnnne Hnn yXo3a Hm Heo6xOIMO ocUeCTBnTb, He npNKlaDbIBaay 4pe3MepHbIX ycInn.
He neperpykaTe BepxHIOU qacTb DnCPIeB. B npOTNBOM cIyuae DnCPIeM MoKet ynaCTb n CTAb npuHoi TpaBM nII NOBpeXdEHH NMyueCTBa.
He yctaHabIbAitcnpIe nCpIe IOD KOHdNtOHePOM Hn HaHm.
EcnB TeueHne npoDOnKnTeIbHOrO npomexyTKa BpeMeHN nCnNei NOBepXeH BO3JeCTBNIO KOHDeHCata NnN
NOTOKa Bo3dyxa N3 KOHNIOHepa, 3TO MOKeT CTaTb npuHHo BO3rOpAHN dncnpe, nopaxehna
3JIeKTPnuCeKN M TokOM nIN HeNCnPabHOCTn DnCnPe.
MepbI ppeOcTOPOXKHOCTN
- Ecnn DnCnIeyn yctAHOBnEn Ha HAcTeHHOM MOHTaXHOM KPOHJTeHne N IcNoJIb3yETcB TeUeHne IINTEbHO npomexKytKa BpeMeHn, BO3MOxHNO, No3aI IN Hero IIN Ha,IHN Hm BblBETyT CTehb IIN OTCTaHT o60N. 3To 3abNCIT OT MaTePnAna CTeh.
- Послкpenlenи И полдуюцero Chrtna HaCTeHHbIX MOHTaXHbIX KPOHSTeHOB Ha CTHe OCTaHyTcOTBepCTnO T BnHTOB.
- Ecnn 3a cTeHoi nOdbedeHbI nTAtouuie Ka6eN 300 Om, peKoMeHdyetcra 3aMeHnTBnx Ha KoakCnAIBhBie Ka6eN 75 Om. Ecnn Heo6xOdmo nCnoIb3oBaTb nTAtouuie Ka6eN 300 Om, To nepeD yCTaHOBKOHeo6xOdmo y6eHnTBCA, YTO MExJy dncPiem E I NtAtouuMn Ka6eMaMn 3a cTeHoi IMeETcdoCTaTOUHO CBO6oHDoro npoctpaHCTBA. NepeD hauanom yCTaHOBKn BbIacNHte y nOdpAduKa, B KaKOM MeCTe Heo6xOdmo yCTaHaBnBaTb DnCnNei (YTo6bl oecneHTb OTCyTCTBne paAnonomex).
ПЕДУПЕХДECHNE
Для дilepoB Sony
Cneyuune Hnctpykunnpedna3haehebI ToIbKO IJRA DNInepOB Sony.ObraTeNbHO npOHTnte INHOpMaUIO no 6e3oNaChocTN u CoBIOdaIte OcObIe MEPBI npEIOCTOPOXHOCTN BO BpEMy yCTaHOBKn, o6cnyKINBaHNr nnnpOBepKN daHHoro N3dennr.
O6a3aTeIbHn HaedexHo npKpeNte MOHTaxHbIKPOHwTeH K CTeHe, cIeDyI HcTpyKzIaM B HAcToaIeM pyKOBoDCTBe No yCTaHOBKe.
Ecn KaKoJ-Ni60 n3 BnHTOB ocna6JeH nn BbInaJ, HAcTeHHbIM OHTaXHbI KPOHHTeH MoXET yNaCTb N CTaTb PnUHNo TpaBM nn NOBpeXeHn IMyueCTBa. Pn BbIOJIHeHm MOHTaXo OBa3aTeJbHO BOCNoJb3yITecb BNHTAMN, KOTOpBIE COOTBeTcBTyIOT MaTePnAly CteHbI, n HaDeXHo YCTaHOBtE yCTpOInCTBO, INCNoJb3yR He MeHee YeTbIpex BnHTOB M8 (nn 3KBnBaJIeHTbIX m).
He donyckaTe 3aueMJeHnKaBeI NHTaHn I COeHNHTbHbIX KaBeIe.
EcnnKa6enb nntaHn Hn CoeHNHTeHbHn Ka6enb 6ydt3axkT MeKdyCTpOYCTBOM N CTeHOH Nn C cnIOH N30rHyT Nn NepeKpyeH,TO N30JIaHn BHYTpEHnX npoBOIOB MOKeT 6bITb HApUSeHa, YTO MOKeT cTaTB npuHnOH KOpOTKOr 3aMbKaHn Hn O6pbIBa. 3TO MOKeT cTaTB npuHnOH BO3ROPaHn Hn NopaKeHn 3NEKTPnueckm TOKOM.
Oba3aTeIbHO nCnOJb3yIte BxOJaIeB KOMnJIeKT BnHTbI n DeTaJI N dJI KpeJIeHnHaIeJkaIzM O6pa30M, CJIeDyI HNCTpyKcIyM B DaHHOM pyKOBoDCTBe IIO YcTaHOBKe. PpN yCTaHOBKe c NcNoJb3OBAHNEM 3aMeaHOuX KOMnOHeHToB DnCnJIe MOnKet UNaCTb I NOJUHTb IOBpeJdeHn IJI N CTaTb PpNUHON TpaBM.
ObaTeIbHO BbINOJIHnYe c6OpKy KpOHSteHa, TOnHO CJeDy HNcTpPyKzIaM, N3JIOXeHHbIM B HaCTOaIeM pyKOBoDCTBe NO yCTaHOBKe.
Ecn KaKoJIb60 n3 BnHTOB OcIa6JIeH IINBbInaJI, INCJIeM MoKeT yNaCTb N NOJyHTb NOBpeXdEHnN CTaTB npuHHoNoJyHeHr TpaBM.
3aTnBaIe BnHtbl HaJekHO,do yKa3aHHoro NOLOXKeHna.
B npotubom clyuae dncnle moKet ynaCTb n noJyHTb NOpeXdeHn Hn CTaTb npUHHo TpaBM.
Cleinte 3a Tem, yTo6bI BO BpeM yCTaHOBKn DnCnJIeH He NOdBepraJcB O3dEiCTBnIO yIapOB.
OT ynapOB dincnneM moKet ynaCTb nn pa36nTbca. Ppi 3tOM cyueCTByeT BepoTHocTb noJyHTb TpaBMy nn NOBpeDnTb dinCnnei.
YcTaHaBnBaIte DncnneH a CTeHe TOnbKO B TOM Cnyae, ecn OHa PnockaI n pacNoJoxeHa NOd npMbIM yrIOM K NOly.
B npotnbom cnyae dncnne MoKet ynaCTb n CTaTb npuHOn TpaBM.
Iocne naJIeJkaUey UcTaHOBKn DnCpIe OBeCpeybTe 6e3OnaHoe pacNoJoxKeHne Ka6eJe.
Kabenn, npedctabnHIOUne npenrTcBnI IIOeN IObekTOB, MOryT CTaTB npuHNOIOnyuHeNcepbe3hIX TpaBM nII NOBpeXdEHHIINCnIe.
CneDHTe 3a TeM, YTO6bI pRyCTaHOBKe He NOBpeDHTb pyKN IJI naJIbCuIb.
CneIte 3a Tem, YTo6bl npn yCTaHOBKe HAcTeHHoro MOHTaXHoro KPOHHTeHa IIN IIN cNIIe He NOBpeNTb pyKIN nn NaJIbUbl.
Bnhtbl, KpePAne MOHTaXHbI KPOHtEi HbI K CTeHe, B KOMnJIeKT He BXoJrT.
IpnMOHTaxe HAcTeHHORO MOHTaXHOrO KpoHsTeHa NcNoJIb3yIe BnHTbl, COOTBeTCTByIOUne MaTePnaJy n CTpyKType cTeHbl.
English Step 1: Check the parts required for the installation
Prepare a Phillips screwdriver and the appropriate screws (four or more M8 (or equivalent) screws, not supplied), depending on the material of the wall, beforehand.
Français
Open the package and check the parts.
Français
Place the paper template on a perpendicular, flat wall and decide on the installation location.
Tape the supplied 3 sheets of the paper template together with commercially available adhesive tape. For details, refer to the instructions printed on the paper template. Allow for suitable clearance between the Display Unit and the ceiling and protruding parts of the wall as shown in the diagram on the right.
Note
If you intend to route the cables in a wall, make a hole in the wall beforehand to make sure that the cables can be drawn into the wall. The positions for the cable holes are printed on the paper template and on page 84 according to the Display Unit model.
Français
Referring to the paper template and the diagram above, determine the positions of the screws and the cable hole (if you intend to route the cables in the wall), and work on the wall.
WARNING
The wall that the Display Unit will be installed on should be capable of supporting a weight of at least four times that of the Display Unit (page 83). Make sure of the strength of the wall the Display Unit will be installed on. Reinforce the wall sufficiently, if necessary.
Note
The position of the cable hole varies depending on the Display Unit model. Determine the position of the cable hole using the paper template or the diagram above and bore a hole in an appropriate position.
Français
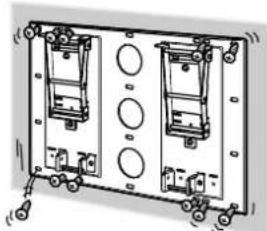
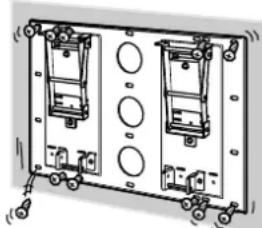
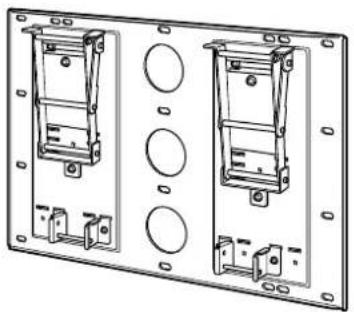
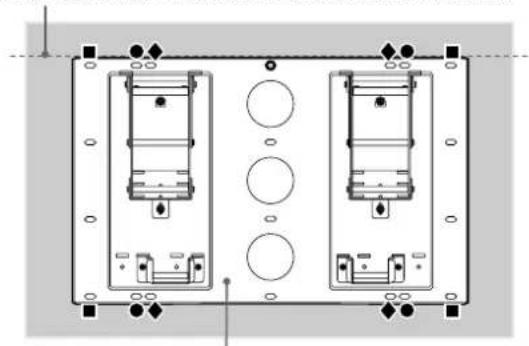
Fix the Plate Unit to the wall using four or more M8 (or equivalent) screws (not supplied).
Select at least four screw holes with the same mark shown in the diagram on the right, and tighten the screws securely so that they will not come loose.
WARNING
- The screws securing the Wall-Mount Bracket to the wall are not supplied.
- Be sure to use the appropriate screws, depending on the material and structure of the wall.
- If the Plate Unit cannot be attached securely enough, use additional screws.
- Be sure to confirm that the Plate Unit is securely fixed to the wall.
Français
Align the unit so that it is exactly level.
Adjust the angle of the arms.
When installing the Display Unit perpendicularly (0 degrees), adjustment of the arms angle (Procedure 1 and below) is not necessary. Make sure that each arm base is screwed in securely.
1 Remove the screws that are at the top and bottom centre of the both arm bases. Then choose the notch corresponding to the desired angle (5, 10, 15 or 20 degrees) and fit the arm base to it.
Firmly secure each arm base using the screws removed in Procedure 1.
Notes
- Be sure to adjust the angles of the right and left arms to the same angle.
- Be careful not to pinch your fingers when adjusting the angle of arms.
- When using an electric screwdriver, set the torque setting to approximately 2N· m .
- Make sure that two Mounting Hook Unit support shaft on the lower part of the Plate Unit are screwed in securely.
Français
- 0 degrees: Leave the white screws tightened as they are.
- Other than 0 degrees: Remove the white screws.
Français
Change the positions of the Mounting Hook Unit support shafts.
1 Remove the screws from the left and right Mounting Hook Unit support shafts and fit the support shafts in the outer notches.
Firmly secure each Mounting Hook Unit support shaft using the screws removed in Procedure 1.
Notes
- If you are installing a Display Unit other than KDE-P37XS1, KE-P37XS1, KDE-P42XS1, KE-P42XS1 or KE-P42M1, do not change the position of the Mounting Hook Unit support shafts.
- When using an electric screwdriver, set the torque setting to approximately 2N· m .
Français
English Prepare for the installation of the Display Unit
Preparation varies depending on the Display Unit to be installed. See the procedure for each model and prepare for the installation.
Note
When using an electric screwdriver, set the torque setting to approximately 2N· m
Français
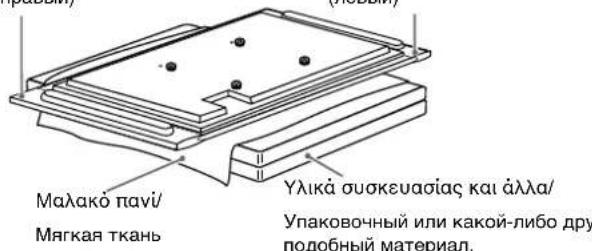
1 Place the Display Unit, with its screen facing down, on a stable, cloth-covered work surface, at least 20cm (8 in) off the floor.
Remove the screws that hold the Display Unit to the Table Top Stand and detach the Table Top Stand from the Display Unit.
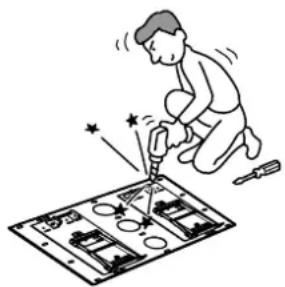
Remove six screws on the rear side of the Display Unit.
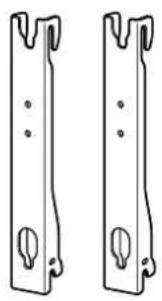
4 Attach the supplied four hooks with the four supplied screws (+PSW5· L16)
Français
No preparations. Go to the next step.
Français
1Place the Display Unit, with its screen facing down, on a stable, cloth-covered work surface.
Notes
- If the weight of the Display Unit is placed on the speakers, deformation or a loose connection of the speakers may result. To avoid this, observe the following.
- Do not hold the speakers when carrying the Display Unit.
-
Place packing material, etc. on the floor and lay the Display Unit face down on it so that the speakers on either side of the Display Unit are clear of the packing material, etc.
-
Be sure to place the Display Unit stably.
- Use soft cloth to protect the screen of the Display Unit from damage or dirt.
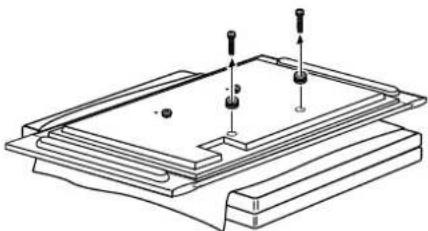
Remove the two screws and the two hooks at the bottom of the Display Unit rear.
3 Attach the two hooks with the two screws (+PSW5· L16) (both supplied with the Wall Mount Bracket).
If you intend to use the Display Unit without the speakers, detach the speakers at this stage. For details on detaching the speakers, refer to the instruction manual of the TV.
Français
Place the Display Unit, with its screen facing down, on a stable, cloth-covered work surface.
Notes
-
If the weight of the Display Unit is placed on the speakers, deformation or a loose connection of the speakers may result. To avoid this, observe the following.
-
Do not hold the speakers when carrying the Display Unit.
- Place packing material, etc. on the floor and lay the Display Unit face down on it so that the speakers on either side of the Display Unit are clear of the packing material, etc.
- Be sure to place the Display Unit stably.
- Use soft cloth to protect the screen of the Display Unit from damage or dirt.
If you intend to use the Display Unit without the speakers, detach the speakers at this stage. For details on detaching the speakers, refer to the instruction manual of the TV.
Français
Step 4: Install the Display Unit
Français
Be sure to complete the installation before connecting the mains lead to the wall socket. If you allow the mains lead to be pinched under or between pieces of equipment, this may result in a short circuit or an electric shock.
Be careful not to stumble over the mains lead or the Display Unit, as you may hurt yourself.
Français
AVERTISSEMENT
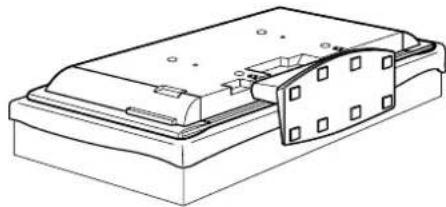
Hitch the Mounting Hook Unit on the hooks on the rear side of the Display Unit. Then slide the Mounting Hook Unit and fix it using the supplied screws (+PSW5·L16).
Français
Rear side of the Display Unit/
Arrière de l'écran/
(The model of the Display Unit in the illustration is PDM-4210.)
Connect the mains lead and the connecting cable(s) supplied with the Display Unit to the Display Unit.
Connect the mains lead and the connecting cable(s) to the connectors on the rear side of the Display Unit. For details on connecting the mains lead and the connecting cable(s), refer to the instruction manual of the Display Unit.
When you route the cable and the lead in the wall, feed them through the hole you bored (page 84).
The position of the hole that should be bored varies depending on the model of the Display Unit.
Notes
- Once you install the Display Unit to the Plate Unit, you cannot connect the lead and the cables.
- Be sure to subcontract the routing of the cable in the wall and electrical work to qualified contractors.
Français
Install the Display Unit on the Plate Unit.
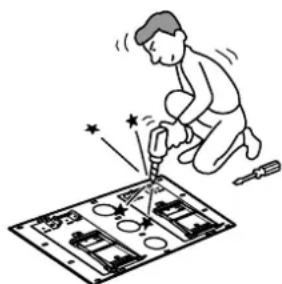
Insert the screws (+B6· L20 supplied) for securing the Mounting Hook Unit into the screw holes on the outer left and right sides of the Mounting Hook Unit support shafts, and then tighten them temporarily.
Hitch the upper hooks of the two Mounting Hook Units on to the support shafts of the arms.
Place the lower hooks of the two Mounting Hook Units so that they touch the front side of the Mounting Hook Unit support shafts.
4Slightly push the Display Unit toward the Plate Unit and upward, to hitch the lower hooks of the two Mounting Hook Units on to the Mounting Hook Unit support shafts.
5 Confirm the eight hooks are firmly hooked on the four shafts on the Plate Unit.
6Firmly tighten the securing screws screwed in temporarily in Procedure 1.
Note
If the temporarily attached screws for securing the Mounting Hook Unit protrude inside the Mounting Hook Unit support shafts, the lower hooks of the Mounting Hook Units cannot be fitted in.
Français
Tighten the screws to halfway so that they do not protrude from the opposite side.
Français
Confirm the completion of the installation
Check the following points.
Eight hooks of the Mounting Hook Units are firmly hooked on the four shafts on the Plate Unit.
- The lead and the cable are not twisted or pinched.
- The two securing screws on the Mounting Hook Unit support shafts are securely tightened.
Français
Incomplete installation may cause the product falling and result in injury or product damage. Also, improper placement of the mains lead, etc., may cause fire or electric shock through a short circuit.
Be sure to confirm the completion of the installation for safety.
Français
AVERTISSEMENT
Unplug the mains lead from the wall socket.
Français
Remove the two securing screws on the right and left Mounting Hook Unit support shafts.
Français
Be sure that two or more persons hold the Display Unit and slide it upward to remove the Display Unit.
WARNING
- Be sure that two or more persons hold the Display Unit when carrying it.
- Be careful not to allow the leads and cables to get hung up when removing the Display Unit.
- Be careful not to hurt your hands or fingers when removing the Display Unit.
Français
Design and specifications are subject to change without notice.
Français
Unité : mm (pouce)
Poids: 9,0kg
Characteristicas techniques
Specificationer
Spesifikasjoner
Portugues
Unidade: mm
Peso: 9,0 kg
3apaHee noIroTOBbTe KpeCTOByIO OTBeptKy I He MeHee YetbIepex BnHTOB (M8 nnn 3KBnBaJIeHTbIX MM (He npNlaIaOTcA)), COOTBeTCTByIOuNX MaTePnaJy CTeH.
2
EALnVik
AvoiTe Tn ouokuaia kai eEyEe Ta eApntmuata.
Pycckn
PacnakyTe ynaKOBky n npoBepbTe HaJIuHne BcEx deTanei.
Bao(1)/
MOHTAXKHAR naheJIb (1)
Páðoc με áykiotpa (2)/
MOnTaXHoe npncnooc6nHe n c KpOuKaMa (2)

AynioTo (4)/ KpOoK (4)

Biδa(+B6·L20)(2)/BnHT(+B6·L20)(2)
BbIePnte He MeHee YetbIpex BnHTOB,OTMeueHHbIX OINHakOBbIM CmMBONOM,KaK NOKa3aHO Ha pncyHKe cnpaba,N HAdExKHO 3aKpeNTE INx (TaK, Yo6bl OHn He ocna6n).
PNEUYNPEXDEHNE
BnHTb, KpeneMOnTaXHbIe KpoHHTeHbIKCTHe,BKOMPJIeKT He BXOJrT.
- O6ra3aTeIbHBO BOCONb3yIteCb BnHTamN, KOTOpBIE COOTBeTCTByHOT MaTePnAly n CTpykType CTeHbl.
EcHHe ydaetc DOCTaTOHO HAdexHo 3aKpeNTb MOHTaxHyOnaHEnb,NCNOb3yTe DOnONHTeBhIe BnHTbl.
- Y6eIntecb, YTO MOHTaxHa HaHeIb HaJeXHO 3aФNKCuPoBaHa HaCTeHc.
Euuypappiote akpiEia Tn bao./
ToHb BbipOBBnTe naHEnb no BEptnKaHn rOpn3oHTan.
Baoj/
MOHTaXHaHa nahEnb
2
EAAyivka
PpoeDpya noIroTOBKn 3aBnCnT OT moJeN yCTaHaBnBaEMoro dncnpe. Cm. npoceDpy dna KaKdoi MoJeN n noIroTOBbTEc b K yCTaHOBKe.
PpMueaHne
Ecnnncnolb3yeTc3neKtpueckn wypynobert,eroBpaauoMmOeH DoJKeH CoCTaBnIbTp np6bn3ntelbHO 2 H.M.
KDE-P37XS1
KE-P37XS1
KDE-P42XS1
KE-P42XS1
KE-P42M1
EAAyiká
ToonotntoTnV oovn e TnV npootivn nEuopaopuuevnpoc taKaTOWeia KALUmuevn E Kaio navi, e uoc Touaxiotov 20 cm enaw ano to daneto.
Apaepote Tc Bides nou ouykpatouv tv oovn otnv enitpaneia baon kai otn ouvexia aapoeote tn v enitpaneia baon ano tnv oovn.
AphiéoTe E Ei βiδc ano to niow eepoc TnC oovns.
4Pnoopntote tig teoeepic biides nou npexovtai otn oukeuaia (+PSW5 L16)ota teoepa aykiotpa nou npexovtau otn oukeuaia.
Pycckn
1PomeCTIe DCINJIe 3KpaHOM BHN3 Ha yCTOuYBIO,POBHyIO,NOKpbIyIO TKAHBIO NOBepXHOCTb Ha BBICOTE He MeHee 20 cm OT nOJa.
BbIeBHnHTe BnHTbI, KOToPbIe Kpenr HAcToNbHyIO NOCTaBky K DInCnJIeHO, n OTcOeINHnTe 3Ty NODCTaBky OT DInCnJIeA.
BbIeHnTe WecTb BHTOB Ha 3aDHei NaHei DucnJe.
4NcnoB3yueTbipe npnilaraembix BnHTa (+PSW5·L16),npikpenTe ueTbipe npnilaraembix KpOyka.
1
IoproToBka He Tpe6yETc. IpeiDnte K cneDuoueMy wary.
GR
RU
PDM-6110
EAAnyiKa
Toonotnte tyn oovn e Tny npootivn eaupa otpaumevn npoc ta kaTow emu staepn eniavia kauuumevn e Kaioio navi.
Inuieooie
Eav tonoetnoe Tnv oovn enaw ot anxieia, evexetai va npokanthei napapopphiom ou oxnatoc n xalaowon tnc ouvdesontw nxiewyow Tou bapouc nC oovns. Ia va anoepuxei auto, abetaTe TIC akolouee npoouaeic.
-Mnv Kpatate Ta nxeia otav eataepetetnvofoyn.
TOnoTeHnToTaUkAouNepiExovTaOtn auKeuaia, OTo dAnEooKaiakoumuote TnV oBovn enavw oe auta, wote Ta nxelia nou unApxouv otic duo Ieupc tnc oBovnc va mV eapntovtae ta UkA tcuokueoiac.
Bεβαωθειτεόπηοθονηεxεισερεωθειμε αφαλεια.
Xpnouonotne eva paaknavi yia va npootatepet nvoovn ano cnpiec npounc.
Apaepote Tc duo biedes ka ta duo aykioppa nou piokoovtal oTo katw epos Tns niow nauupac ts oOvns.
Pnoaaptntote TIC duo biDc (+PSW5 L16) Ota duo aykiotpa (kai ta duo Eaptnmuata napexovtai otn ouokuaia tou otnpiymuatoc toixou).
Eav oKoNEeTe va xpnoiOonoIooTe TnV
08ovn XwpiC Ta nxieia, apaipoeTe ta nxieia 0
auto to stadio. Iia nepioootepec
tnnpopopiec oxetikA ME TNV apaipean Tsw
nxeiw, auBouLeuteite To EyXeipidio
obnyiw Tns Tnaeopaonc.
Pycckn
1POMeCTnTe DnCnIeN3KpaHOM BHN3Ha yCTOnuHBYIO,POBHyIO,NOKpbITyIO TKAHbIO NOBepxHOCTb.
PpmeaHn
- Ecnn NOMeCTnB DnCnNe Ha rPOMKOROBOpHTn, BO3DeIcTBne erO Beca MoKeT pNpBeCTn K DeΦopMaun Nn Hn HeaDexHOMy NOkKnIOHeHIO rpOMKOROBOpTeJe. Bo n36ExKaHne 3TOrO CO6nOdaJTe npBVeDEHHbE Hxke MepbI npedocTopoXHOCTn.
-Пипегноке дслген He cneуet DepxkaTbC RA rPOMKOROBOPHTeIN.
Pa3Mecnte ynaKoBOHyb nn KaKoJ-NIOO dpYro nOIO6bHm MaTePnAn Ha nOly n NOXHTe Hrero DnCnne 3KpaHOM BHN3 TAKIM O6p3aOM, YTO6bl rPoMKOBOOpNTEn n O6em CTOPOHAM dncnner He HaxOdnncb Ha ynaKoBOyHOM nn Dpyrom NcNOB3yeMOM MaTePnAnE. - Y6eIntecb,HTO DnCnIeHaxoDITcB VCTOuHOBMOLOXKeHN.
-Ⅱn npedoxpaheneHn dncnner OTOB0MxKbIX NOBpeXdEHHnn 3arpa3HeHn NCNOJb3yTe MANKYIO TKAHb.
BbIeHHTe DBA BnHTa N CHMNTe DBa KIOUka B HIXKHe Yactn 3aDHe NaHeN INCJIeJ.
3IcnoIb3yI Db BnHTa (+PSW5·L16), npNKpeNITe Dba KpOuKa (INBnHTbl, INKpOuKn BXoIAT B KOMIIeKT HAcTeHHORO MOHTaXHORO KPOHHTeHa).
Ecnn nlaHpyetcNcNoIb3OBAbT dncnnei 6e3 rpoMkoROBOpntene, oTOcoEHNHTe nx Ha 3tOM 3tane. NpOpbHbIe CBeDEHn no OTcoEINHEHIO rpoMkoROBOpntene CM. B pyKOBOdCTBe NO 3KcnnyatauTN TeNEBn3opa.
1
Hxio (0 0
TpomKorOBOpTeIb (npabbl)
Hxio (apioTepo/
PomKorOBOpntJIb (nEBbl)
2
3
LDM-4210
EAAViká
TOno8eIOTe TnV oOvN e TnV npootivn IaEupa OtpauevN npoc Ta KAtw o e ia Otaepn Epiavia KaUmuEvN eKanoio navi.
∑ημειωεις
Eav tonoetnoe Tnv oovn enavw otna xieia, evexetai va npoknthei napapoppwon tou oxmuatoc n xaapomega tnc ouvdeanc twv nxieiw loyow Tou bapouc nC oovnc. Ia va anofouxtheta auto, abetae TIC akoloueNpofuAeaEic
-Mny kpatate ta nxa otav eataepetetnvofoyn.
-TonooTne ta uAikou neipieoxovta ot n oukeuaia, oTo danoe kai akoumuote tv oovn enaw os auta, wotE ta nxiaou unapxouv otc duo nAeupes tns oovns va npv eantovtai me Ta uAikacuokueaiaq.
Bεβαιωθειτεότιηοθόνηxεισερεωθειμε αφαλει.
Xpnoiopoonotote eva paalako navi yia va npootatetepentv oboyn ano znuec npounoc.
Eav oKoneuETe va xpnaiouoioaTe TnV
ooovxupic Ta nxieia, apaipoeTc Ta nxieia 0e
auto to tAioio. Iia nepioootepec
nnpoopioec oxetikae Tnv aopaiean Twv
nxeiow, ouuboueute To Eyyepio
Oonyiw Tns Tnaeopaoc.
Pysckn
IomeCTNE DnCnJIeKpAHOM Bn3 Ha yCTOuHByIO,POBHyIO,POKpbITyIO TKaHbIO NOBepxHOCTb.
PpmeaHna
Ecnn Nmecntb DnCnnne Ha rPOMKOROBOpNTnn, BO3JeCTBME erO BECA MOxET PnIBeCTN K DeOpMaUN Hn HeHaDExKHOMy NoKnIOHeHIO rpOMKOROBOpTeN. Bo n36exaHne 3TOr Co5NoDaIte npBeDeHHbIe HnKe MepbI npedocToPOXHOCTN.
-Пиппесдспнг He cneуet DepekaTbCn 3a rPOMKOrOBOpuTeJI.
-Pa3MeCTHe ynaKoBOuHbI INn KaKoI-Ni6O pyrO nIOo6HbI MaTePnA1 Ha NOny I NOOnXkITe Ha Hero dncnne 9KpaHOM BHN3 TaKIM O6paOM, YTO6bI rPOMKOrOBOpNTeINo OBeM CTopoHAm DnCnpe He HaxOdInncb Ha ynaKoBOuHOM INn DpyROM mONb3yEOM MaTePnAe.
- Y6eNTecb, YTO DnCnne HaxoNTcB yCTOuVBOM nONOXEHN.
-ⅡHnIpeOxpaHeHHIINCINJIeOTBO3MOXHbIX NOBpeKdEHHIIN3aPr3HeHHIINCIOJIb3yITEmRfKyIOTKaHb.
EcnnnnaHpyetca nCNoB3ObaTb DnCnIeN 6e3 rpmKorOBOpnteNe,OTcoeHNHTeHX Ha 3tOM 3tane. NpOp6NbIE CBeDeHn no OTcoeHNHeHIO rpmKorOBOpnteNe CM.B pykoBOdCTBe No 3KcnnyatauHn TeJeBu3opa.sore.
Hxεio(δεiO)/
PomKorOBopntb (npabn)
Hxio (apotepo)/
PpOMKOROBOPuTeB (nebbi)
Maakoknai/
Märka TkaHb
Ylka oukeuaiaqkai aaaa/ Ynakoohbnn KAKo-n60 dpyro nOobHm MaepnA.
Elambda
Printed on 100% recycled paper using VOC (Volatile Organic Compound)-free vegetable oil based ink.