
KG36V6WEP - Fridge SIEMENS - Free user manual and instructions
Find the device manual for free KG36V6WEP SIEMENS in PDF.

User questions about KG36V6WEP SIEMENS
0 question about this device. Answer the ones you know or ask your own.
Ask a new question about this device
Download the instructions for your Fridge in PDF format for free! Find your manual KG36V6WEP - SIEMENS and take your electronic device back in hand. On this page are published all the documents necessary for the use of your device. KG36V6WEP by SIEMENS.
USER MANUAL KG36V6WEP SIEMENS
4.13 CMHa Ha LED oCBeTneHHeTo OTrope 22
4.13.1 CbAJIHe Ha LED ocBETneHneTo 22
4.13.2 MoHTpaHe Ha LED ocBETJeHMeTo OTrope 23
OTHOCHO To3n DokyMeHT
1.1 Baxha nHΦopMaζη
1.1.1 Uen
TeHc cBbETn 3a pEmOH T NOMarat Ha Ntpe6nTEnla da pEmOHtnpa Cam ypeiB n BcOTBeTCTBnC pernameHTa 3a ekONOrOcb6p3No npoeKtnpaHe Ha ypeiNe (OT03.2021 r.).
cBbPax HNFOMaJH KJa Da CMeHrTe OnpEeHEn PReepHn QaTn, BkLIOH-TeHNO pIeynPecHeHH NPKOBE.
Ako IMATE HRAKAKINBbnpoM,MOJIa CbIpKeTe Ce c HAUNO OTdEe 3a OBCNYBAHe Ha KIMENTH. Hne HOCIM OTTOBOPHOCT 3a UETN, CAMO AKO CbBeNTe 3a peMOHT ca cna3eHN npabInHo.
1.2 06aCHeHne Ha cHMBOJInTe
1.2.1 HbHa onachoct
IpeynpeintenHnbeBaCe cBcTOrT OT CmMBoN nCnHnHaDyMa.CnHnHaTaDyMa noka3Ba cepno3HOCTTA ha onaCHOCTTA.
MoHTnpaTeB o6paTeH peI.

PemOH
4.3 CmHa Ha rohata naHt ha BpataTa
Cneunannn HNCTpyMeHTN:
HakpaHHK Torx TX20 6,3 MM (1/4") [00340865]


PNEyPPEKDEHNE
Teekn, o6emncTuypeu!
IobpeHa HpyrHuactn Ha ypeHa NmB Doma Ha KHeHTa, HAp. DbHO
TC
3akpenete KOMnoHEHTa, Taka Ye Da He naHe.
N3nCKBaHe:
YpeDbTe N3KJIIOueHOT 3aXpaHbHaHeTo.
BbtpseHHTE qHTINHn Ha ypeDa ca oTcTaHeHN.
4.3.1 CbajrHe Ha rohpata naHa BpaTaTa
- Nocatabete ypeda nergan Ha 3aHaTc cn ctpana.


PemOH
2.1.HaTnCHETe KanaHceto Ha rohpHa Ta NaHTa OT DBeTe CtpaHN (1).
2.ИЗваде КанаЧЕТа На РорнATA NaHTA (2).
3. 3aBbptete Kanayeto Ha naHTata (3).
4.Cbanete kanaheTo Ha rohpata naHTa (4).
5. Pa3BnTe DbTa BnHTa (5).
6. CbaneTe ropHaTa naHTa (6).

Tophata naHTa e CbaneHa.
4.3.2 MoHTnpaHe Ha ropHaTa naHTa Ha BpaTaTa
MoHTnpaIteB06paTeHpeI.

PemOH
4.4 CmHa Ha cpeHata naHTa Ha Bpata
Cneunannn HNCTpyMeHTN:
HakpaHHK Torx TX20 6,3 MM (1/4") [00340865]

PDEYIPKXDEHNE
Texk, o6emnctuypei!
IobpeHa HpyrHuactn Ha ypeHa NmB Doma Ha KHeHTa, HAp. DbHO
TO.
3akpenete KOMnoHEHTa, Taka Ye Da He naHe.
N3nCKBaHe:
YpeDbTe N3KJIIOUeHOT 3aXpaHbHaHeTo.
BbtpseHHTE qHTINHn Ha ypeDa ca oTcTaHeHN.
Toghata nHaTa HbPaTaTa e cBaNeHa.
4.4.1 CbanyHe Ha cpeHata naHTa Ha BpTaTata
1.CBaIeTe BpaTaHa XnaDnHToO TdJIeHeN (1).
2. Pa3BnIte DBaTa BnHTa (2).
3.CbaneTe cpeHata naHa (3).
CpeHata nHaTa e cBaIeHa.
4.4.2 MoHTnpaHe Ha cpeHnTa nHa HbpaTa
MoHTnpaIteB06paTeHpeI.

PemOH
4.5CMHaHaDonHaTaNaHTaHaBpTaTa
Cneunannn HNCTpyMeHTN:
HakpaHHK Torx TX20 6,3 MM (1/4") [00340865]

A PENEYUNPEXDEHNE
TeKKn, o6emnctuypei!
4.5.2 MoHTnpaHe Ha DoJIHaTa NaHTa Ha BpaTaTa
MoHTnpaIteB06paTeHpeI.

PemOH
4.6 CmHa Ha paΦTa
N3nCKBaHe:
BpaTaTa e oTbopeHa.
4.6.1 N3BaKaDaHe Ha paΦTa
H3dbpnaTepaTa.
PaftbtecbaneH.
4.6.2 MoThupaHe Ha paΦTa
MOHTnpaTeB06paTeH peI.

PemOH
4.7 CmHa Ha Ta6nKaTa 3a 6yTnIKN
M3nCKBaHe:
BpaTaTa eOTBopeHa.
4.7.1 CbAhe Ha Ta6nukata 3a 6ytnkn
H3dbpnaTe Ta5nHkata 3a 6ytnkn.
Ta5nukata3a6ytnknecbaneHa.
4.7.2 MoThiPaHe Ha Ta6JnUkata 3a 6yTnIkn
MoHTnpaIeB06paTeHpeI.

PemOH
4.8 CMraHa Ha cTeJaXa Ha BpaTaTa
M3nCKBaHe:
BpTaTa e TbOpeHa.
4.8.1 N3Baxdahe Ha CTenaxa Ha BpaTata
NobHHTeCTeJaxaHaBpTaTaHarope.


CTenakbTaHaBpaTaTaeCBaneH.
4.8.2 MoNTupaHe Ha cTeJaXa Ha BpaTaTa
MoHTnpaTBe 06paTeH peI.

PemOH
4.9 CmHa Ha peryInpyemn cTeJaX Ha BpataTa
M3nCKBaHe:
Bpatae oTbopeha.
4.9.1 Cbanahe Ha perynpemyra cTeJax Ha BpaTaTa
PpeMeCTe pepynnpemyrno BnCOyHnCteJax HA BpaTata Harope,doKATO ce ocbo6oOn OT dbpkaa.
PerynpyemnT CTJIaX Ha BpaTaTa e CbaIeH.
4.9.2 MoHTnpaHe Ha perynpyemn cTeJax Ha BpTaTa
MOHTnpaTBeB o6paTeH peA.

PemOH
4.10 CMHa Ha KOHTeHepa 3a 3ampa3EHn XpaHHTeHH npOdykTN
N3nCKBaHe:
BpaTaTa e oTbopeHa.
4.10.1 3BaXdaHe Ha KOHTeHepa 3a 3ampa3EH XpaHHTEN npOdykTN
- 13dbpnaTe DOKpaK KOHeHepa 3a 3aMPa3eHN XpaHnTeHN npOdyKTn (1). 2. N3BaTe TE KOHeHepa 3a XpaHnTeHN npOdyKTn (2).
KoHTeHepb3a 3aMPa3EHn XpaHHTeHn npOpykTN e N3BaJeH.
4.10.2 MoHTnpaHe Ha KOHTeHepa 3a 3ampa3eHxpaHnTeHn npOdykTN
MOnTnpaTaeB06paTeHpeJ.
4.13.2 MoHTnpaHe Ha LED ocBETneHnEto OTrope
MOHTnpaTBeB0bpaTeHpeI.
Sorg for at sikre apparater mod at glide.


PAS PAI
Fare for nedfaldende dele pga. Iosnede skruer!
ronskade pga. nedfaldende dele
Sorg for at sikre componenten mod at falde ned.

BEM/ERK!
Fare for nedfaldende dele pga. Iosnedeskruer!
Sorg for at sikre componenten mod at falde ned.
Preindstilling:
Sorg for at sikre apparater mod at glide.

PAS PAI
Fare for nedfaldende dele pga. Iosnede skruer!
ronskade pga. nedfaldende dele
Sorg for at sikre componenten mod at falde ned.
BEMERKI
Fare for nedfaldende deleg pga. Iosnede skruer!
Sorg for at sikre componenten mod at falde ned.
Preindstilling:
Sorg for at sikre apparater mod at glide.


Fare for nedfaldende dele pga. Iosnede skruer!
rsonskade pga, nedlaldende dele
Sorg for at sikre componenten mod at falde ned.


Sorg for at sikre componenten mod at falde ned.
Preindstilling:
Repair hints - Fridge-freezer
1 Concerning this document. 113
1.1 Important information 113
1.1.1 Purpose 113
1.2 Explanation of symbols 113
1.2.1 Danger levels 113
1.2.2 Hazard symbols 113
1.2.3 Structure of the warnings 114
1.2.4 General symbols 114
Safety. 115
2.1 General Safety instructions 115
2.1.1 All domestic appliances 115
Tools and aids. 116
Repair 117
4.6 Replacing shelf. 125
4.6.1 Removing shelf 125
4.6.2 Installing shelf 125
4.7 Replacing bottle tray. 126
4.7.1 Removing bottle tray 126
4.7.2 Installing bottle tray 126
4.8 Replacing door rack 127
Concerning this document
1.1 Important information
1.1.1 Purpose
These repair hints support consumer to repair appliances by himself according to the applicable eco-design regulation (as of 03/2021).
They contain information how to exchange defined spare parts including warnings and risks.
In case of questions, please contact our customer service. We will only be liable for damages if the repair hints have been followed properly.
1.2 Explanation of symbols
1.2.1 Danger levels
The warning levels consist of a symbol and a signal word. The signal word indicates the severity of the danger.
| Warning level Meaning | |
| Danger | Non-observation of the warning message will result in death or serious injuries. |
| Warning | Non-observation of the warning message could result in death or serious injuries. |
| Caution | Non-observation of the warning message could result in minor injuries. |
| Notice | Non-observation of the warning message could result in damage to property. |
Table 1: Danger levels
1.2.2 Hazard symbols
Hazard symbols are symbolic representations which give an indication of the kind of danger.
The following hazard symbols are used in this document:
| Hazard symbol Meaning | |
| ! | General warning message |
| ! | Danger from electrical voltage |
| Risk of explosion | |
| Danger of cuts | |
| Danger of crushing |
Concerning this document
| Hazard symbol Meaning | |
| Danger from hot surfaces | |
| Danger from strong magnetic field | |
| Danger from non-ionizing radiation |
Table 2: Hazard symbols
1.2.3 Structure of the warnings
Warnings in this document have a standardised appearance and a standardised structure.

Danger
Type and source of danger!
Possible consequences of ignoring the danger / warning.
Measures and prohibitions for preventing the danger.
The following example shows a warning that warns against electric shock due to live parts. The measure for avoiding the danger is mentioned.

Danger
Risk of electric shock due to live parts!
Death by electrocution
- Disconnect appliances from electrical supply at least 60 seconds before starting repairs.
1.2.4 General symbols
The following general symbols are used in this document:
| Gen. symbol Meaning | |
| i | Identification of a special tip (text and/or graphic) |
| j | Identification of a simple tip (only text) |
| Identification of a link to a video tutorial |
Table 3: General symbols
| Gen. symbol Meaning | |
| Identification of required tools | |
| Identification of required preconditions | |
| Identification of a condition (if ..., then ...) | |
| Identification of a result | |
| [Start] Identification of a key or button | |
| [00123456] Identification of a material number | |
| Status Identification of displayed text / window(in the appliance's display) | |
Safety
2.1 General Safety instructions
2.1.1 All domestic appliances
Risk of electric shock due to live parts!
Errors by repairs involving electrical components can lead to electrical shock!
- Disconnect the appliance from the mains for at least 60 seconds before starting work.
After the repair have a safety test according VDE 0701 or country-specific regulations performed.
Risk of injury from sharp edges!
Wear protective gloves.
Risk of crushing during repair, maintenance, troubleshooting and service due to heavy and moving components
Wear protective shoes.
- Secure heavy components from falling down.
- Do not stick body parts into moving components.
Risk to the appliance's safety / function!
Only use original spare parts.
Risk of damage to electrostatically sensitive components (ESDs)!
- Do not touch the modules, including connections and conductor paths.

Tools and aids
| Designation Details Images | ||
| Protection cloth [00342013] | 60 cm x 50 cm | ### |
| Slotted screwdriver | Blade 2.4 mm x 0.4 mm x 60 mm, in the kit [00341820] | Φ |
| Special tool [00342180] | ||
| Suction cup [00342224] | ∅50 mm | |
| Torx Bit TX20 [00340865] | 6.3 mm (1/4") | Φ |
| Slotted screwdriver | Blade 10 mm x 1.6 mm x 200 mm | Φ |
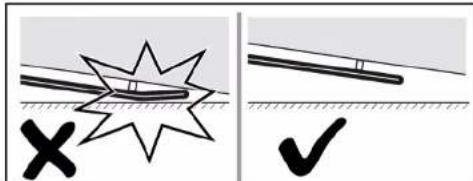
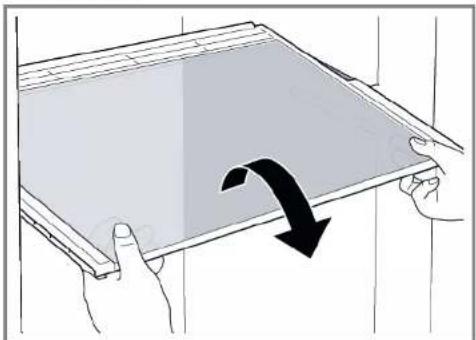
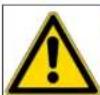
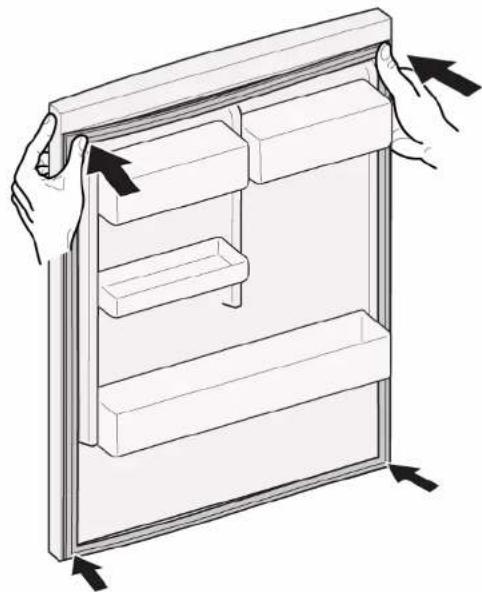
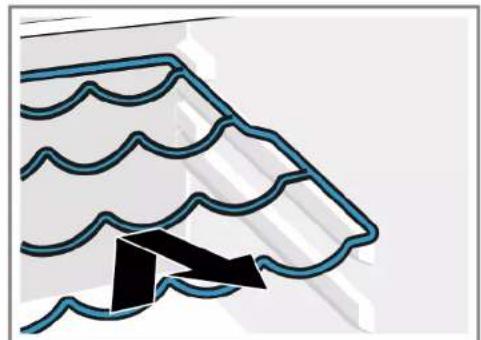
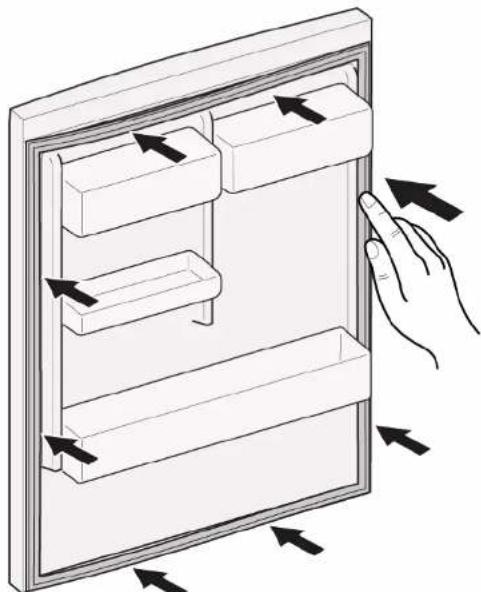
Prerequisite:
Door is open.
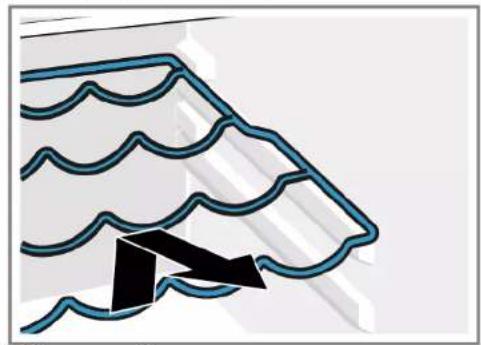
- Release door gasket from the groove on right and left corner.
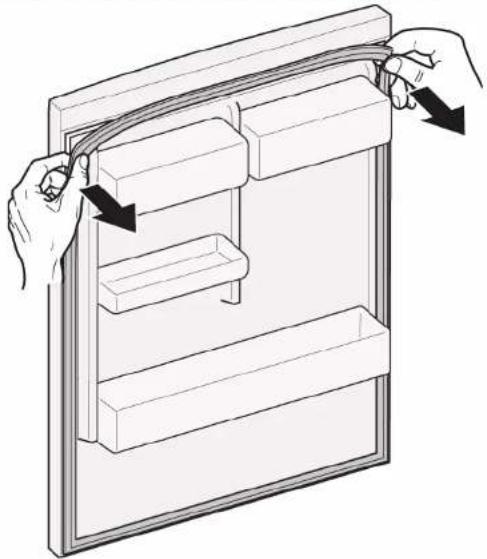
- Pull out door gasket from groove.

Door gasket is removed.
| i | Thickness of new door gasket may deviate slightly from thickness of old door gasket. This will not affect closing behavior and long-term function. |
| i | If your appliance has adjustable hinges or hinge attachments, you can optimize the closing behavior subsequently. |
| i | Small side holes in door gasket are functional (required for ventilation). These are not production faults. |

Repair
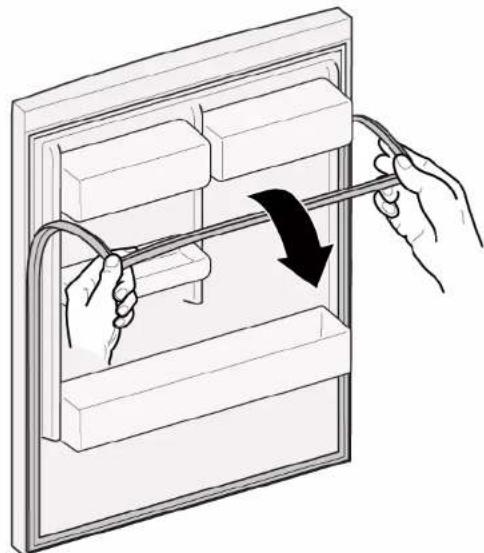
- Check groove for gasket for damage.
- If groove for gasket is it is damaged.
- Contact customer service.
- Slight deformation of door gasket is normal and does not affect its function. It is recommended to straighten door gasket before inserting it into appliance.
Heat door gasket with a hair dryer or hot water and manually reshape it.
- Push corners of gasket at the top and bottom to the groove.

Repair
- Press whole gasket step by step into the groove.


Door gasket is installed.

Repair
4.2 Replacing door handle
Required tools:
Torx Bit TX20 6,3 mm (1/4") [00340865]
Slotted screwdriver Blade 10 mm x 1.6 mm x 200 mm
Prerequisite:
Appliance is disconnected from power supply.
Door is open.
4.2.1 Removing door handle
-
Remove two screw caps (1).
-
Unscrew two screws (2).
- Remove door handle (3).
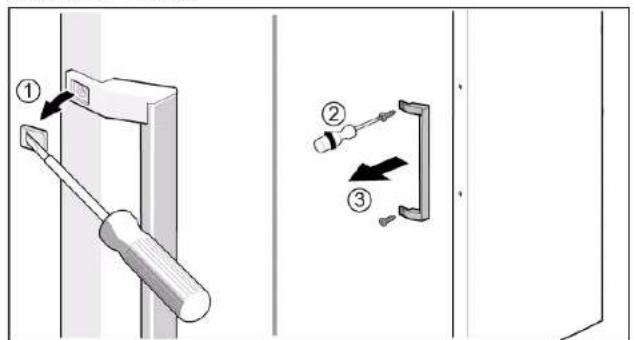

Door handle is removed.

Door handle for the second door can be removed in the same manner.
Install in reverse order.

Repair
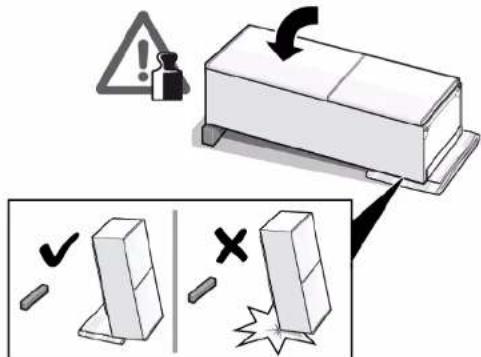
Heavy, bulky appliances!
Back and muscle injuries
Appliance door removal operation should only be carried out by
trained specialists.
To move the appliance, two people are required.
Use only suitable tools and equipment.

Caution
Sharp edges!
Cut injuries
Wear protective gloves.

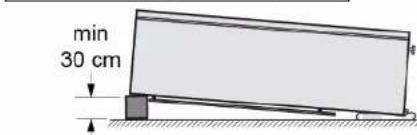
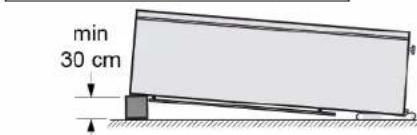
Warning
Slipping of tilted appliances!
Bone fractures / crush injuries
Secure appliances against slipping
Caution
Risk of falling parts due to released screws!
ury because of falling parts.
- Secure component from falling down.
Notice
Risk of falling parts due to released screws!
Damage to other parts of the appliance or at customers home e.g. bot
tom.
- Secure component from falling down.
Prerequisite:
Appliance is disconnected from power supply.
Appliance interior fittings are removed.
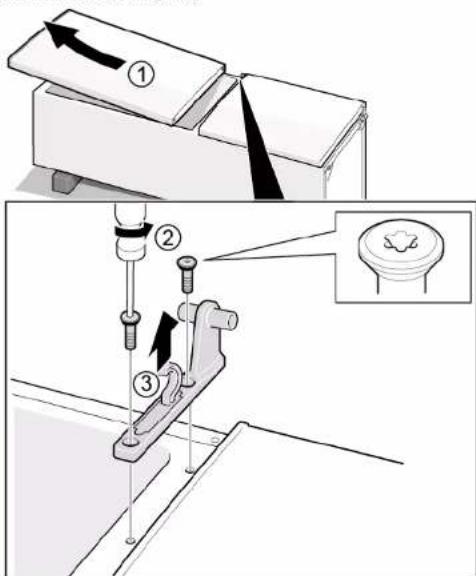
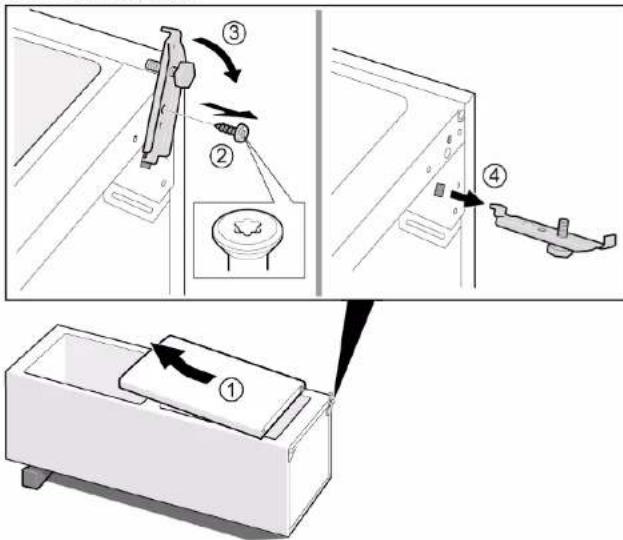
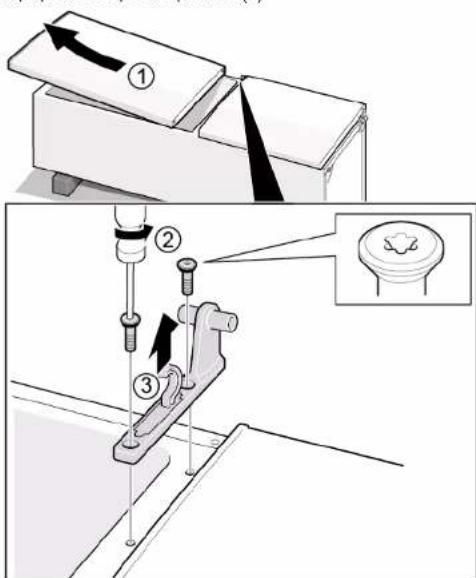
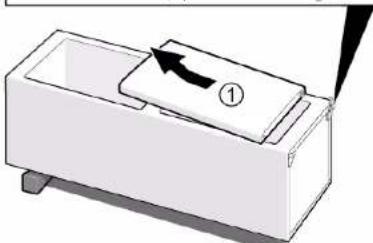
- Place appliance on the back side.


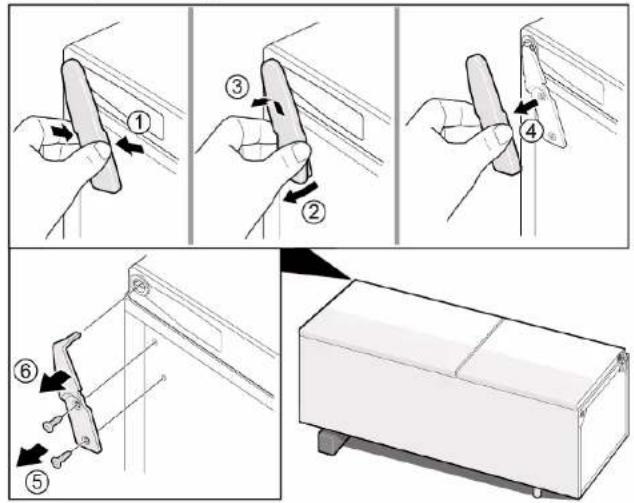
Repair
2.1. Press upper hinge cover on both sides (1).
- Move out upper hinge cover (2).
- Rotate hinge cover (3).
- Remove upper hinge cover (4).
- Unscrew two screws (5).
- Remove upper hinge (6)
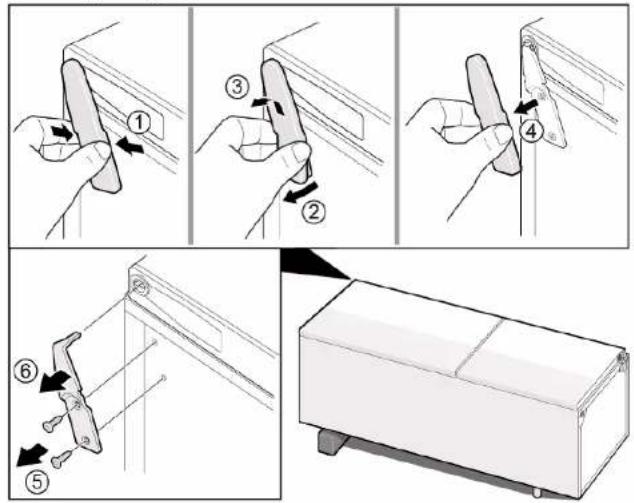

Upper hinge is removed.
Install in reverse order.

Repair
4.4 Replacing door middle hinge
Required tools:
Torx Bit TX20 6,3 mm (1/4") [00340865]


Prerequisite:
Appliance is disconnected from power supply.
Appliance interior fittings are removed.
Door upper hinge is removed.
4.4.1 Removing door middle hinge
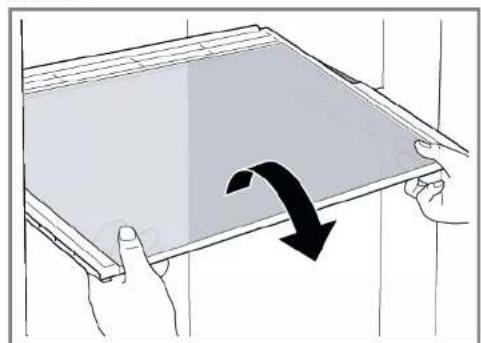
- Remove fridge compartment door (1).
- Unscrew two screws (2).
- Remove middle hinge (3).
Middle hinge is removed.
Install in reverse order.

Repair
4.5 Replacing door lower hinge
Required tools:
Torx Bit TX20 6,3 mm (1/4") [00340865]


Prerequisite:
Appliance is disconnected from power supply.
Appliance interior fittings are removed.
Upper hinge is removed.

Middle hinge is removed.
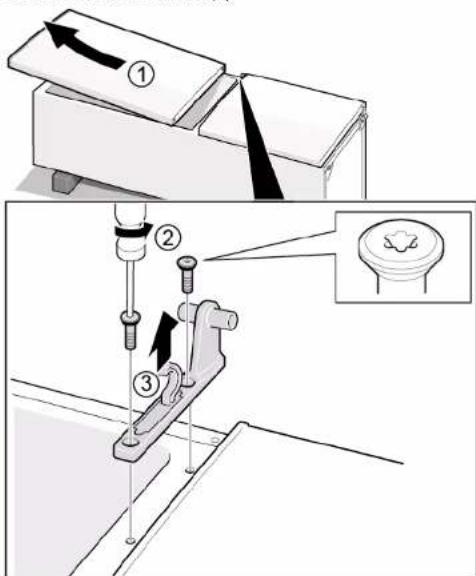
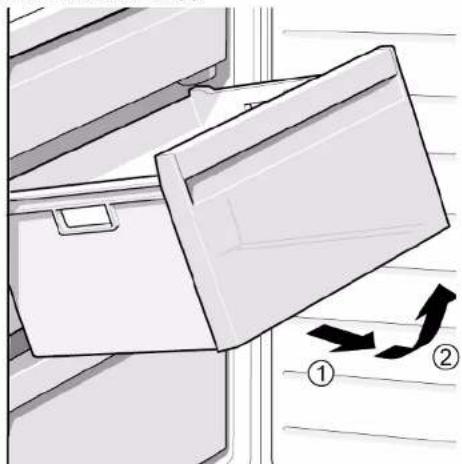
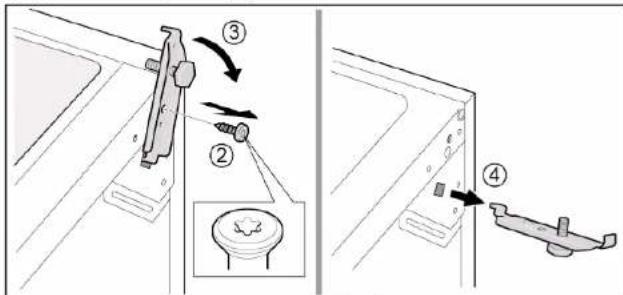
4.5.1 Removing door lower hinge
- Remove freezer compartment door (1).
- Unscrew the screw (2).
- Turn lower hinge out (3).
- Remove lower hinge (4).

Door lower hinge is removed.
4.5.2 Installing door lower hinge
Install in reverse order.

Repair
4.6 Replacing shelf
Prerequisite:
Door is open.
4.6.1 Removing shelf
Pull out shelf.

Shelf is removed.
4.6.2 Installing shelf
Install in reverse order.

Repair
4.7 Replacing bottle tray
Prerequisite:
Door is open.
4.7.1 Removing bottle tray
Pull out bottle tray.
Bottle tray is removed.
4.7.2 Installing bottle tray
Install in reverse order.

Repair
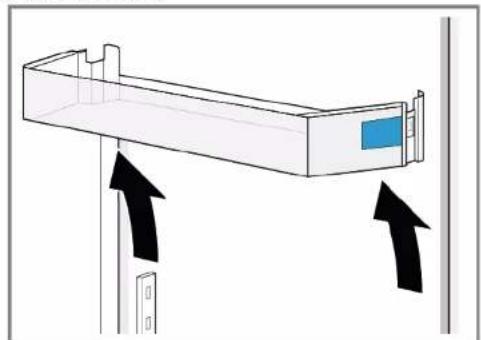
4.8 Replacing door rack
Prerequisite:
Door is open.
- Lift door rack upwards.
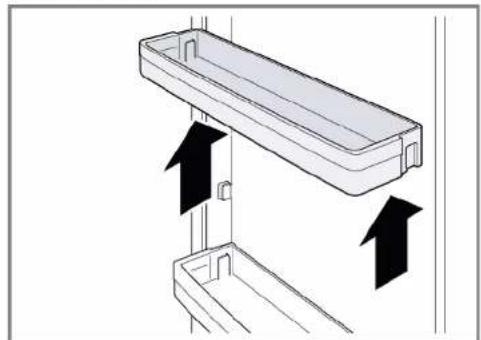
Door rack is removed.
Install in reverse order.

Repair
4.9 Replacing adjustable door rack
Prerequisite:
Door is open.
4.9.1 Removing adjustable door rack
- Move high-adjustable door rack upwards until the door rack is released from the holder.
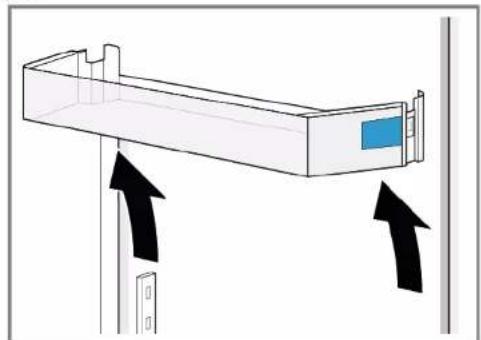

Adjustable door rack is removed.
Install in reverse order.

Repair
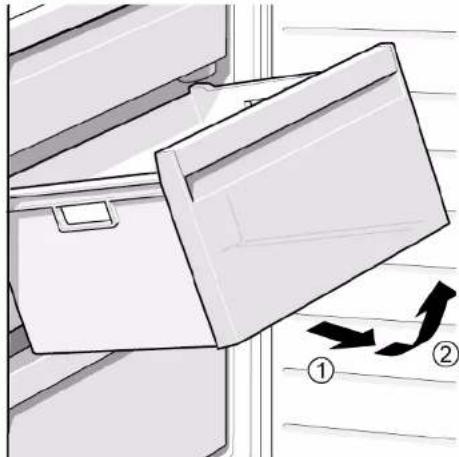
4.10 Replacing frozen food container
Prerequisite:
Door is open.
4.10.1 Removing frozen food container
- Pull out frozen food container all the way (1). 2. Remove food container (2).
Frozen food container is removed.
4.10.2 Installing frozen food container
Install in reverse order.

Repair
4.11 Replacing container
Prerequisite:
Door is open.
4.11.1 Removing container
- Move out lower fridge container (1).
- Move out upper fridge container (2).
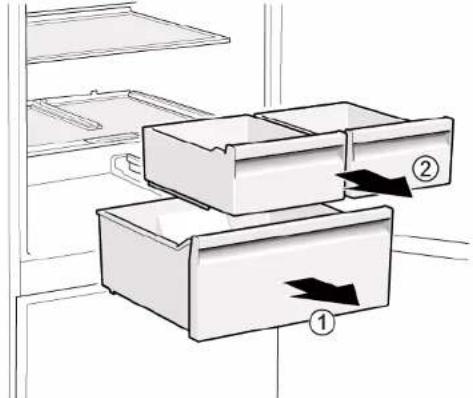
- Containers are removed.
4.11.2 Installing container
Install in reverse order.

Repair
4.12 Replacing extendable container
Prerequisite:
Door is open.
4.12.1 Removing extendable container
1.Pull extendable container out all the way (1).
2. Remove extendable container (2).
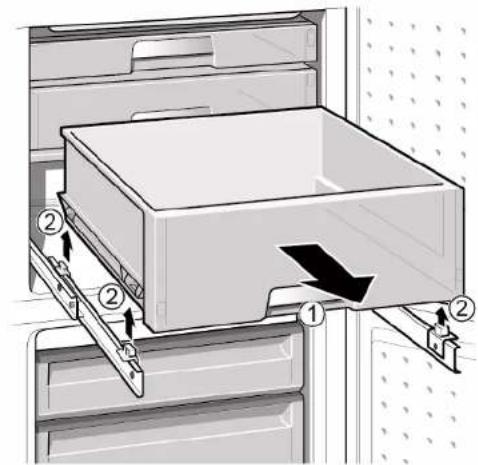

Extendable container is removed.
4.12.2 Installing extendable container
Install in reverse order.

Repair
4.13 Replacing LED top light
Required tools:
Slotted screwdriver Blade 2.4 mm x 0.4 mm x 60 mm, in the kit [00341820]

Your appliance features a maintenance-free LB
These lights may be repaired by customer service or authorised technicians only!


Danger
Risk of electric shock due to live parts!
Danger to life through electric shock in case of improper repair
Electric parts should be repaired by a qualified electricians.
After the repair have a safety test according VDE 0701 or country-specific regulations performed.


Danger
Risk of electric shock due to live parts!
Death by electrocution
- Disconnect appliances from electrical supply at least 60 seconds before starting repairs.


Caution
Sharp edges!
Cut injuries
Wear protective gloves.
Prerequisite:
Appliance is disconnected from power supply.
Door is open.
Upper interior fittings are removed.
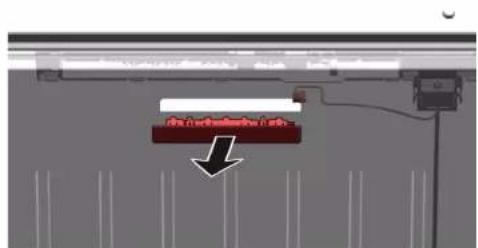
4.13.1 Removing LED light
- Move the LED light to the left side.
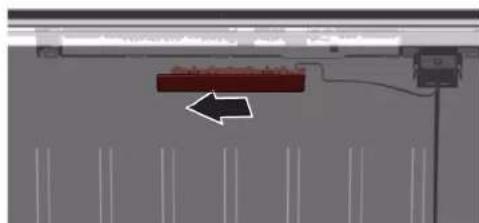
LED light electrical connection is disconnected.
- Release LED light hooks.
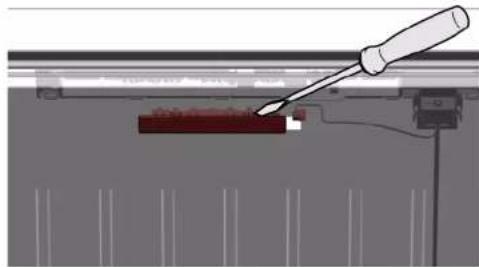

Repair
- Remove LED light moving it forward.

LED light is removed.
4.13.2 Installing top LED light
Install in reverse order.
Remonditeave - Kombikülmik
1 Selle dokumendiga seoses 135
1.1 Tahtis teave 135
1.1.1 Eesmark 135
1.2 Sumbolite selgitus 135
1.2.1 Ohutasemed 135
1.2.2 Ohusumbolid 135
1.2.3 Hoiatuste struktuur 136
1.2.4 Üldised sumbolid 136
Ohutus. 137
2.1 Üldised ohutusjuhised 137
2.1.1 Koki kodumasinad 137
Tabel 1: Ohutasedmed
1.2.2 Ohusumbolid
Ohusumbolid on sumboolsed kujutised, mis viytavad ohu laadile. Selles dokumendis kasutatakse alljargnevaid ohusumboleid.
m = 311
Mun Torx TX20 6.3 mm (1/4") [00340865]
PnakkeKaataaβiAeTlIda10mmx1,6mmx200mm
PouTo6eOg:
Houokekunivataoosuvdeevn anTnynapoxnpofooogla
H nóptα εilvai avoiθn.
4.2.1 Aqaipeoan aBnns tropras
- ApaipoeTe Ta duo Tiuura Tioa (1).
- 3εβδωτε δύο βίδες (2).
3.ApaipoeTnAaBnTns npra3


HaaanTnTPOtaeExaapapeB

HaaBn npTc yia Tn 8eutepn npra mtopei va apaiepeei e tov iio tpoTo.
4.2.2 ToTobetnnon aBns tropas
Eykaataotne 1y nV aVfTeN oipd.

EMIOKEUN
4.3 Avikataoan Eavw Meveoe TOpas
EiikαβonθηrKaμεσa:
Mun Torx TX20 6,3 mm (1/4") [00340865]


IPOEIOIOIH
Bapie,oykwoiOuKeuec
Tpaunpatiogoi eonkaipuwv
Hdiakiaqa apaipeoNt TnTropaTnOuKEunPepTei va
EKTAEITAI MVO aTTO ETTAOIEUVEOVG EIOIKOUC
Hetakivnon tsoukeun ts peTie va ekteiai aTO du aToa.
XpnoiopoieIe movo katalnnnaepyaleia kai eonlioa.

PPOOxH
AixunpeS aKpE5!
Tpaunpoaianto kmt
ΦopATE IppoatauteiKa yavTia.


A PPOEIAOIOIHEN
Oia0nKekaipevovuokewvV
Katayata ootaw/tpaupatiaoio ouvBaiu
AopaaIATE Tc oukeuec aTIO aIaon.


A PPOOxH
Kivduvoi ano mwn npw v faia c hao apw biov!
auatipos eaias mwns tmuw
Aoaiote ta eapntmuata ano Twnon.

PPOZOHI
Kivuvwv ano Twnn eapntmuw vgaia xalapwBidw!
Znuae aaaa aepn ts ouokueu n otyn oikia tou Taeatn, x. datteo
AopaaioTe ta eapntmuataaTO TTOWn.
PountoEa:
Houkeunivatnooovdeevnntpoxnpopodooia
ApaipouviTa eowtepiKa eapntmuata oukeunc.
4.3.1 AqaipeoN ETrawu MeVTeE TOpTAs
- TOnoBcHnTne n ouakeun otyn niow nIeupa.

EMIOKEUN
auatipos eaiia twns npuataw
Aoaiote ta eapntmuata ano Twnon.


PPOZOXHI
Kivuvwv ano Twnn eapntmuw vgaia xalapwBidwV
Znmu e aaaaepn nns ouakeun ng otnv oikia tou taeatn, T.x. datteno
AopaaioTe ta eapntmuataaTO TTOWn.
PountoEaŋ:
H ouokevi eivai aotouovdeepevn atnoTny npoxn Tpofooioiac.
ApaipouviT a eowtepiKa eapntnata ouokeuC.
O EπáwμeVTεoεç éxαραipéθi.
4.4.1 Apaipoeon meaoiou evtote troptac
- ApaipoeTnV npOa xwpou yuyeiou (1).
- 三εβδωτε δuδβδε(2).
- ApaipoeToVmuoAo uveTe(3).
Oeos evtocexaepoet.
4.4.2 ToTtoBETnAnpeaoioueVTEoE TpOtaS
Eykataaotnote nTvntvnttneip

EMIOKEUN
4.5 Avtikataaon katw mevtoe troptas
Eioka Bonntika eo:
Mun Torx TX20 6,3 mm (1/4") [00340865]

IPOEIOIHEN
Bapie,oykwdeis oukeuec
Tpaunpatiogoi eonkaipuwv
Hdiakiaqa apaipeoNt TnTropaTnOuKEunPepTei va
EKTAEITAI MVO aTTO ETTAOIEUVEOVG EIOIKOUC
Hetakivnon tsoukeun ts peTie va ekteiai aTO du aToa.
XpnoiopoieIe movo katalnnnaepyaleia kai eonlioa.

NPOOxH
Aixunpeaeké!
Tpaunpoaianto kmt
ΦopATE IppoatauteiKa yavTia.

NPOEIAONOHZH
Oia0nKekaipevovuokewvV
Katayata ootaw/tpaupatiaooi ouvBaii
AopaaIATE Tc oukeuec aTIO aIaon.

IPOSOXH
Kivduvoi ano mwn npw v faia c hao apw biov!
auatipos eaiia twns npuataw
Aoaiote ta eapntmuata ano Twnon.

PPOZOXH!
Kivuvwv ano Twn eapntmuw EaiaapwBidw!
Znuae aaaa aepn ts ouokueu n otyn oikia tou Taeatn, x. datteo
AopaaioTe ta eapntmuataaTO TTOWn.
PountoEaŋ:
H ouakeun eivai aonouvodepevn an to nT npox npofoooiac.
ApaipouviT a eowtepiKa eapntnata ouokeuC.
O EπáwμeVTεoεç éxéαραpeθei.
OmuaoevevtaeexeqaepBeI
4.5.1 Apaipoeon katoe e tropac
- ApaipoeTe Tny npTa xwpou Karauuugns (1).
2.3εβδωτεηβδα(2). - FupioTe Tov KATW MEVTeT PPOC Ta E5w (3).
- ApaipoeTe Tov KAtw (4).
O KATU MEVIEOECIPOTACEXEIAQAPAEOEI.
4.5.2 ToTtoBETmAn KAtu MeVTeE TIOpta
3.ApaipoeTo 4wG LED,ETAKIVWvTAs TnpoTa EPTPOs
To LED apaipéθηke.
4.13.2 ToToBtToN eTavw foTioou LED
EvkataoThee eTnavTtBtn oepa
Cap torx TX20 6.3 mm (1/4") [00340865]
Surubelinita platá Lamá de 10 mm x 1,6 mm x 200 mm
Cerintă:
Aparatul este deconectat de la sursa de energia electrica.
Usa este beschisä.
Cap torx TX20 6.3 mm (1/4") [00340865]

AVERTISMENT
Aparate grele, masive!
Accidentarea spatelui si leziuni musculare
Cap torx TX20 6.3 mm (1/4") [00340865]


AVERTISMENT
Aparate grele, masive!
Accidentarea spatelui si leziuni musculare
Cap torx TX20 6.3 mm (1/4") [00340865]

AVERTISMENT
Aparate grele, masive!
Accidentarea spatelui si leziuni musculare
- Tryck in hela packningen i sparet bit for bit.

Torbits TX20 6.3 mm (1/4") [00340865]


Forutsattning:
Apparaten ar bortkopplad fran stromforsorjning.
Tillbehör inuti apparaten har tagits bort.
