
EWS3100 - Weather Station HAMA - Free user manual and instructions
Find the device manual for free EWS3100 HAMA in PDF.
| Brand | Hama |
| Model | EWS3100 |
| Category | Weather station |
| Display type | Digital with backlight |
| Base station power supply | 4.5 V, 3 LR6/AA batteries (not included) |
| External sensor power supply | 3.0 V, 2 LR03/AAA batteries (not included) |
| Indoor temperature measurement range | 0 °C to +50 °C / 32 °F to +122 °F |
| Outdoor temperature measurement range | -20 °C to +60 °C / -4 °F to +140 °F |
| Relative humidity range | 20 % to 90 % |
| Temperature accuracy | 0.1 °C / 0.2 °F |
| Radio-controlled clock | Yes (DCF) |
| Alarm function | Yes, dual alarm (A1 weekdays, A2 weekends) |
| Max number of external sensors | 3 |
| Radio range | ≤ 50 m in open space |
| Radio frequency | 433 MHz |
| Weather forecast | 5 icons (sunny, partly cloudy, cloudy, rainy, stormy) |
| Temperature trend display | Yes (rising, steady, falling) |
| Max/min values memory | Yes, resettable |
| Maintenance and cleaning | Slightly damp non-lint cloth, without aggressive detergent |
| Safety | Observe battery polarity, do not open the device, keep away from children |
| General information | Hama EWS3100 weather station, household use, non-commercial |
Frequently Asked Questions - EWS3100 HAMA
User questions about EWS3100 HAMA
0 question about this device. Answer the ones you know or ask your own.
Ask a new question about this device
Download the instructions for your Weather Station in PDF format for free! Find your manual EWS3100 - HAMA and take your electronic device back in hand. On this page are published all the documents necessary for the use of your device. EWS3100 by HAMA.
USER MANUAL EWS3100 HAMA
Operating Instructions
Bedienungsanleitung
Moded'emploi
Instruccionesdeuso
PykoBOIDCTBON03KcnpnyatauH
Istruzioniperl'uso
Instrukcjaobslugi
Návodk p oužiti
Návodnapoužitie
Instrukcjaobslugi
A
1
A
27

B
33
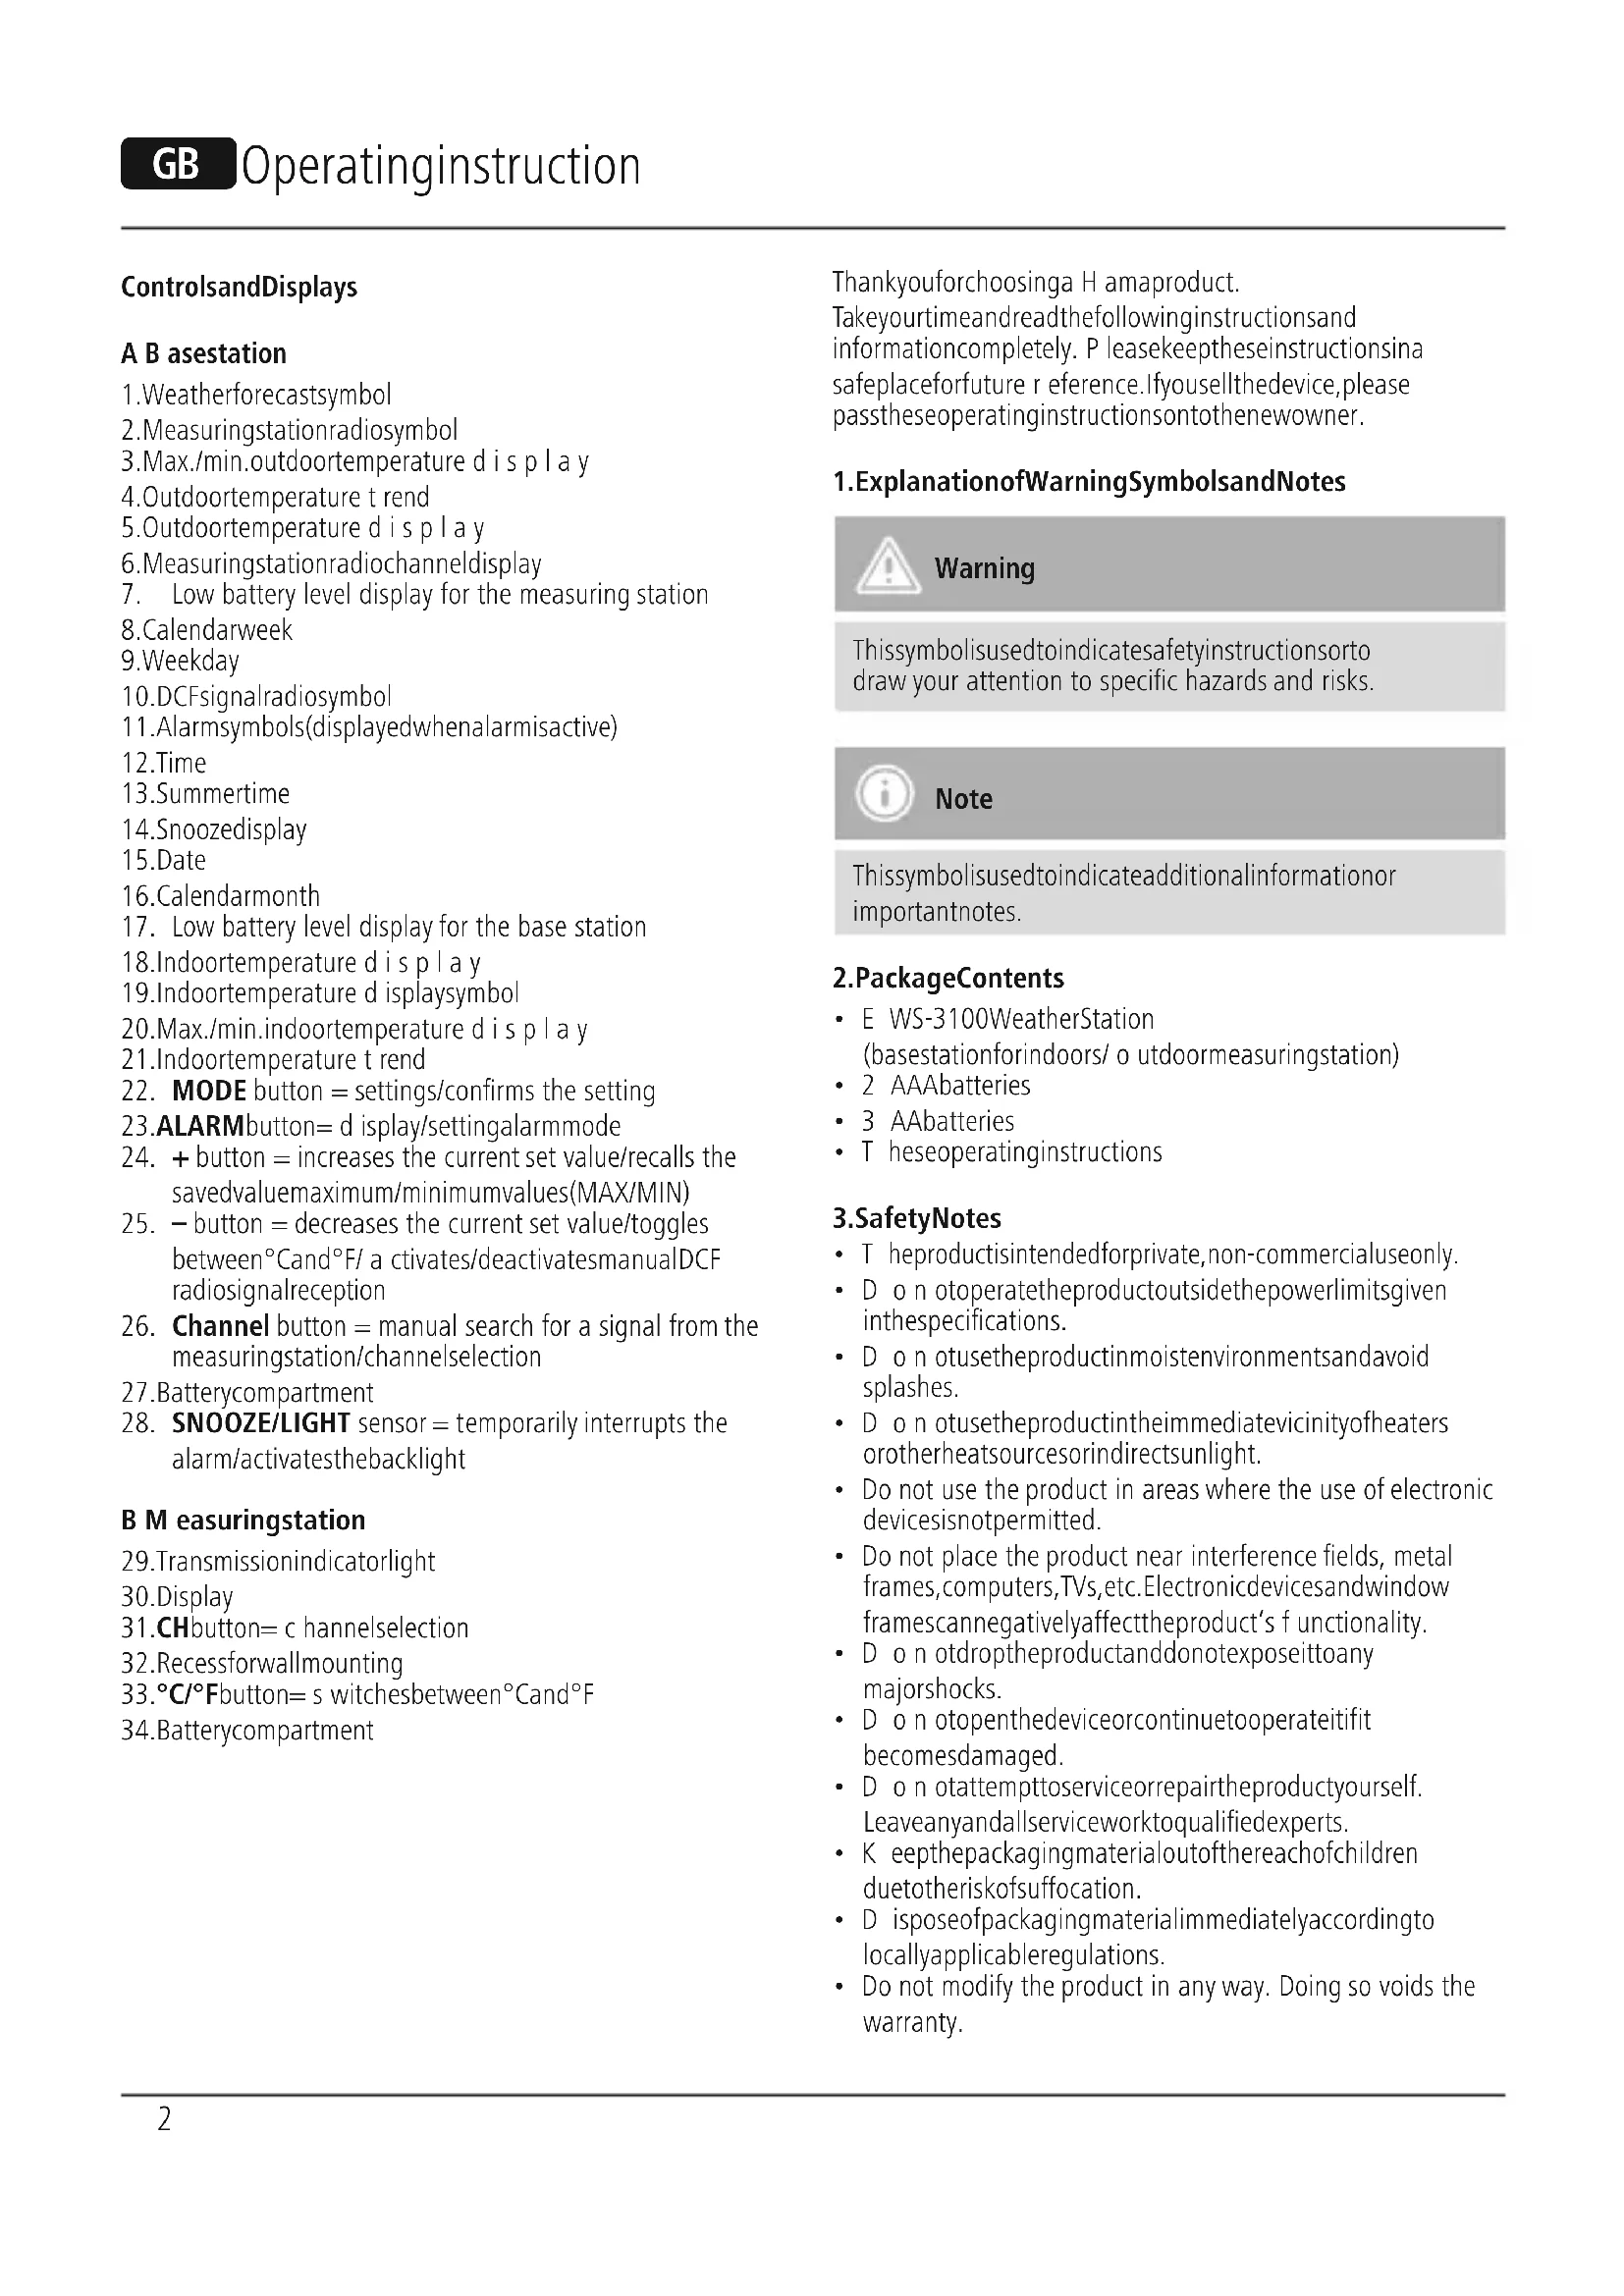
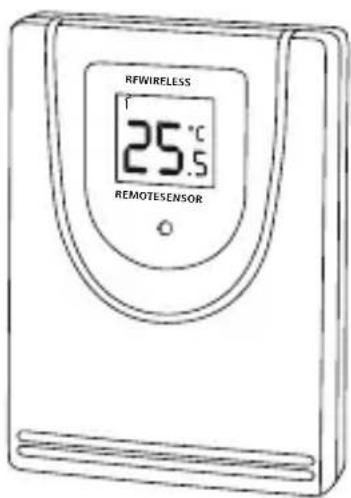
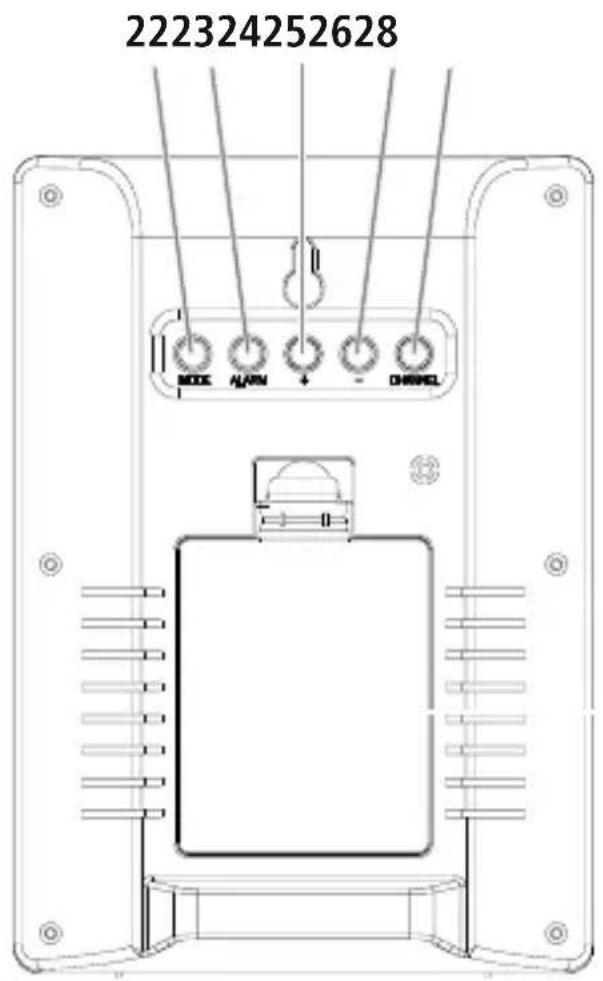
ControlsandDisplays
A B asestation
1.Weatherforecastssymbol
2.Measuringstation radiosymbol
3.Max./min/outdoortemperature display
4.Outdoortemperature t rend
5.Outdoortemperature display
6.Measuringstationradiochanneldisplay
7. Low battery level display for the measuring station
8CALENDARweek
9.Weekday
10.DCFsignalradiosymbol
11.Alarmsymbols(displayedwhenalarmisactive)
12.Time
13.Summertime
14.Snoozedisplay
15.Date
16CALEndarmonth
17. Low battery level display for the base station
18.Indoortemperature display
19.Indoortemperaturedisplaysymbol
20.Max./min.indoortemperature di s p l a y
21.Indoortemperature t rend
22. MODE button = settings/confirms the setting
23.ALARMbutton= d isplay/settingalarmmode
24. + button = increases the current set value/recalls the savedvaluemaximum/minimumvalues(MAX/MIN)
25. - button = decreases the current set value/toggles between°Cand/F/ a cittates/deactivatesmanualDCF radiosignalreception
26. Channel button = manual search for a signal from the measuringstation/channelselection
27.Batterycompartment
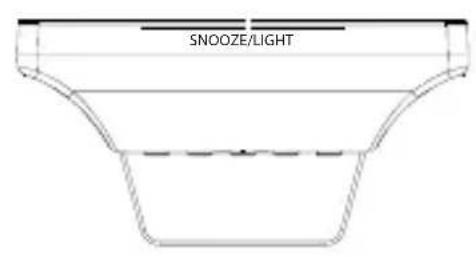
28. SNOOZE/LIGHT sensor = temporarily interrupts the alarm/activatesthebacklight
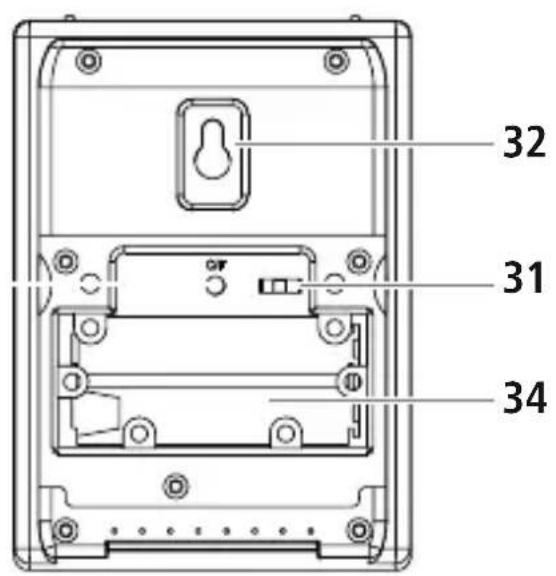
BM easuringstation
- Transmission indicatorlight
30.Display
31.CHbutton=c hannelselection - Recessforwallmounting
- ^ C / ^ button = s witchesbetween°Cand°F
34.Batterycompartment
Thankyouforchoosinga H amaproduct.
Takeyourtimeandreadthefollowinginstructionsand informationcompletely. P leasekeeptheseinstructionsina safeplaceforfuture r eference.Ifyousellthedevic,please passtheseseoperatingsinstructionsontothewowner.
1.ExplanationofWarningSymbolsandNotes

Warning
Thissymbolisusedtoindicatesafetyinstructionso rto draw your attention to specific hazards and risks.

Note
Thissymbolisusedtoindicateadditionalinformationor importantnotes.
2.PackageContents
EWS-3100WeatherStation (basestationforindoors/ o utdoormeasuringstation)
- 2 AAAbatteries
3 AAbatteries
T heseoperatinginstructions
3.SafetyNotes
T heproductisintendedforprivate,non-commercialuseonly.
- D on otoperatetheproductoutsidethepowerlimitsgiven inthespecifications.
- D on otusetheproductinmoistenvinronmentsandavoid splashes.
- D o n otusetheproductintheimmediatevicinityofheaters orotherheatsourcesorindirectsunlight.
- Do not use the product in areas where the use of electronic devices is not permitted.
- Do not place the product near interference fields, metal frames, computers, TVs, etc. Electronic devices and window frames can negatively affect the product's functionality.
- D on otdroptheproductanddonotexposeittoany majorshocks.
- Dón otopenthedeviceorcontinuetooperateititift becomesdamaged.
- D o n otattempttoserviceorrepairtheproductyourselves. Leaveanyandallserviceworktoqualifiedexperts.
- K eepthepackagingmaterialoutofthereachofchildren duetotheriskofsuffocation.
- D isposeofpackagingmaterialimmediatelyaccordingto locallyapplicable管理条例.
- Do not modify the product in any way. Doing so voids the warranty.

Warning-Batteries
- I immediatelyremoveanddisposeofdeadbatteriesfrom theproduct.
- O nlyusebatteries(orrechargeablebatteries)that matchthespecifiedtype.
- D o n otmixoldandnewbatteriesorbatteriesofa differenttypeormake.
- W heninsertingbatteries,notethecorrectpolarity (+and- m arkings)andinsertthebatteriesaccordingly. Failure to do so could result in the batteries leaking oreexploding.
- D o n o toverchargebatteries.
- K eep b atteriesoutofthereachofchildren.
- D o n otshortcircuitthebatteries/rechargeablebatteries andkeepthemawayfromuncoatedmetalobjects.
4. GettingStarted

Note
Always make sure to start the measuring station first and thenthebasestation.
4.1. Measuringstation
- O penthebatterycompartment(34),removethecontact breakerandthenclosethebatterycompartment(34).
- Press the CH button (26) repeatedly to select the channel themeasuringstationistousefortransmission.CH1,CH2 orCH3isshownonthedisplay.
- Press the ^ C / F button (33) to choose between ^ C and ^ F forthetemperature d isplay.
- T henclosethebatterycompartmentcover.
4.2. Basestation
- O penthebaturitycompartment(27)andinsertthree AAbatterieswiththecorrectpolarityintothebattery compa ment(27).Thenclosethebaturitycompartment cover.
4.3. Replacingthebatteries

Note- R replacingthebatteries
- N otethathestationshavetoberesynchronisedeach timeafteryouchangethebatteriesinthemeaning orbasestation.
- T o d o t his,removethebatteriesfromtheotherstation andthenreinsertthem,orchangethemasrequired.
Measuringstation
- W henthe symbol(7)appears,replacehe2 A A A batteriesforthemeasuringstationwith2 n ewones.
- O penthebatterycompartment(34),removeandproperly disposeofthedepletedbatteries,andinserttwonewAAA batterieswiththecorrectpolarity. T henclosethebattery compantmentcover.
Basestation
- W henthe symbol(17)appears, replace the 3AA batteries for the basestation with 3 n ewones.
- O penthebetarycompartment(27),removeandproperly disposeofthedeadbatteriesandinsert3 n ewAA batterieswiththecorrectpolarity. T henclosethebattery compartmentcover(27).
5. Installation

Note-Installation
- We re recommend initially placing the base and measuring stations in the intended locations without installing them and making all the settings described in 6. Operation- to do.
- O nlyinstalllthestationsoncetheappropriatesettings havebeenmadeanda s tablewirelessconnectionis established.

Note
- T hewirelesstransmissionrangebetweenthemeasuring andbasestationsisupto30m i n o penspaces.
- Before installation, ensure that wireless transmission willnotbedisruptedbyinterferenceorobstacleslike buildings,trees,vehicles,high-voltagelines,etc.
- Before the final installation, ensure that there is sufficientreceptionbetweentheintendedinstallation locations.
- When installing the measuring station, ensure that it is protected from direct sunlight and rain.
- The international standard height for measuring air temperature is 1.25m (4 ft) above ground.

Warning
B uyspecialisorsuitableinstallationmaterialfrom specialiseddealerforwall-mounting.
- Ensure that no faulty or damaged parts are installed.
- N everapplyforceduringinstallation. This could damage the product.
- Before installation, ensure that the chosen wall is suitable for the weighttobemounted, and makesure that there are no electrical wires, water, gas or other lines at the installationsiteonthewall.
5.1. Basestation
- Use the base to position the base station on a level surface.
- Alternatively, you can install the base station on a wall usingtheopeningontheback.
5.2. Measuringstation
- Y oucanalsopositionthemeasuringstationona I evel outdoorsurface.
- We re recommendinstallingthemeasuringstationsecurely on anoutdoorwallusingtherecess(32).
6. Operation
6.1.Connectiontothemeasuringstation
Afteryouinsertthebatteries, thebasestationautomatically searchesforac onnnectionto themeasuringstationand performsinitialsetup.

Note
- 1 initialsetuptakesapprox.3 m inutes.
- D uringtheconnectionattempt, themeasuringstation radiosymbol(2)willflash.
-
D o n otpressanybuttonsduringsetup. Otherwise, valuesmaynotbetransmittedcorrectlyandthereisa riskofvalueerrorsandinaccuracy.
T hesetupprocessiscompletedwhentheindoor(18) andoutdoor(4)measurementdataisdisplayed -
If the base station still does not receive a signal from the measuringstation, pressandholdtheChannelbutton (24) for approx.3 secondsostartthemanualsearchfor the signal.
6.2.Basicandmanualsettings AutomaticsettingusingtheDCFsignal
- A fterthefirsttimethebasestationiswitchedonand successfultransmissionisestablishedbetweenthe basestationandthemeasuringstation, theclockwill automaticallysearchfora D CFsignal. Duringthesearch, thewirelesssymbol(10)willflash.
| Display(10)SearchingfortheDCFsignal | |
| Displayflashing | Active |
| Displayedcontinuously | Successful- signalisbeingreceived |
| NodisplayInactive | |
- If the station still does not receive a signal, press and hold the - button (25) for approx. 3 seconds to start the manualsearchfortheDCFsignal.Theradiosymbol(2)will starttoflash.

Note-Timesettings
- The search process takes about 7 minutes. If the search fails, it ends and is repeated at the next clock hour.
Theradiosymbol(2) goes out. -
In the meantime you can, however, set the time and the datemanually.
T hecclockautomaticallycontinuestosearchforthe DCFsignalona d ailybasis(between1:00a.m.and 5:00a.m.)tocorrectanydeviations.Ifthesignalis received successfully, the manually set time and date are o verwritten. -
Press and hold the - button (25) again for approx. 3 secondstostopthemanualsearch.

Note-Summertime
Theclockautomaticallyswitchestosummertime. DST appearsonthedisplayaslongassummertimeis activated.
Manual)settings

Note
Holddownthe+button(24)ortho-button(25)to selectthevaluesfaster.
- Press and hold the - button (25) for approx. 3 seconds to stop these searchfortheDCFsignal.Thewirelesssymbol(2) goesoutandyoucansetthetimemanually.
- Press and hold the MODE button (22) for approx. 3 secondstomakethefollowingsettingsoneaftertheother:
1 2/24hourformat
T imezone
H our(12)
- M inute(12)
Year
C alendarmonth(16)
D ate(15)
- W eekday(9)
To select the individual values, press the ^+ button (24) or the -button(25)andconfirmreachselectionbypressing theMODEbutton(22).
- Press the MODE button (22) immediately to adopt the set valuedisplayedandtokiponwards.
- I fy oudonotmakeanentryfor20seconds,you automaticallyexitsetupmode.

Note-T imezone
- The DCF signal can be received over long distances, but always transmits the current Central European Time in Germany. Make sure you set the time difference in countries with no other time zone.
- If you are in Moscow, for example, the time is 3 hours laterthaninGermany. This meansthatyoushouldset +3forthetimezone.Theclockthenautomaticallysets the timeto3 h oursaftertheDCFsignalreceivedor relativethemeanuallysettime.

Note-Weekday
You can choose from German (GE), English (EN), Danish (DA), Dutch (DU), Italian (IT), Spanish (SP) and French (FR) for the weekday display.
Celsius/Fahrenheit
Pressthe—button(25)toswitchbetween°Cand°Fforthe temperature d isplay.
Alarm

Note-A l a r m
- When activated, alarm mode 1 only triggers an alarm signalonweekdays(MundaytoFriday).
- When activated, alarm mode 2 only triggers an alarm signalonSaturdayandSunday.
TheA1orA2alarmssymbolwillappearintheseconds positionofthetimetexasplayduringsetting.
- Press the ALARM button (23) once or twice to display alarmA1orA2.
- Press and hold the ALARM button (23) for approx. 3 secondstosetthetimeofthealarmdisplayed.Thehours displaybeginstoflash.
- Press the + button (24) or the - button (25) to select the hourforthealarmtimeandconfirmyourselectionby pressingtheALARMbutton(23).Theminutesdisplay beginstoflash.
- R épeattheprocesstosettheminutesforthealarmtime.
- I f n o entryismadefor20seconds,setupmode automaticallyxits.
- T o s electandactivateordeactivatetheappropriatealarm, presstheALARMbutton(23)repeatedlytoselectA1orA2.
- Press the - button (25) to activate the selected alarm (A1 or A2). The active alarm misdisplayed with the alarmsymbol(11).
W henthealarmstriggered, the activityalsymbolo (11)beqinstoflashandanalalarmsounds.
- Press any button (except SNOOZE/LIGHT sensor (28)) to stophealarm. Otherwise, it will stop automatically after 2 m inutes.

Note-S noozefunction
W hilethealarmsignalissounding, pressthe SNOOZE/ LIGHT sensor(28)toactivatethesnoozefunction. Zz (14) will begin to flash on the display. The alarm signal will stopfor5 m inutes, afterwhichitwillsoundagain.
- P ressanybutton(exceptthe SNOOZE/LIGHT sensor [28])tostopthesnoozefunctionandthealarm.
6.3.Weatherforecast
- Based on changes in the atmospheric pressure and the datasaved, the basestationisabetomakeweather forecastsforthenth重新24hours.

Note-Weatherforecast
Theweatherforecastfunctionisnotavailableduringthe firstfewhoursofoperationbecauseitrequiresdatalathatis collectedduringoperation.
- The weather forecast and the current weather are indicated by fivedifferentsymbols(1):
| Symbol(1)Weather | |
| Sunny | |
| Slightlycloudy | |
| Cloudy | |
| Rainy | |
| Stormy |
6.4.Temperaturetrend

Note - Temperature trend
The temperature trend display is not available during the firstfewhoursofoperationbecauseitrequiresdatathatis collectedduringoperation.
- The weather station indicates a trend as to how the values for the outdoor temperature (4) and room temperature (21) are likelytodevelopopoverthenextfewhours.
| DisplayTrend | |
| ↑ | Increasing |
| → | Constant |
| ← | Decreasing |
6.5.Maximumandminimumtemperature
Thebasestationautomaticallystoresthemaximumand minimumoutdoor/indoortemperature values.
- Repeatedly press the + button (24) to switch between the current temperature, maximum temperature (MAX) and minimum temperature (MIN).
- Press and hold the + button (24) for approx. 3 seconds to reset the stored maximum and minimum values.
6.6.Backlight
Pressthe SNOOZE/LIGHTsensor(28)toactivatethebacklight.
7.CareandMaintenance
Onlycleanthisproductwitha s lightlydamp,lint-freecloth anddonotuseaggressivecleaningagents.Makesure t h a t waterdoesnotgetintotheproduct.
8.WarrantyDisclaimer
HamaGmbH& Co K G a ssumesnoliabilityandprovidesn warrantyfordamageresultingfromimproperinstallation/ mounting,improperuseoftheproductormfaiureto observetheoperatingsnionsand/orsafetynotes.
9. Service and Support
Please contact Hama Product Consulting if you have any questions about this product.
Hotline:+499091502-115(German/English)
Furthersupportinformationcanbefoundhere:
www.hama.com
- Technical Data
| BasestationOutdoorsensor | ||
| Powersupply | 4,5V 3 x A A b a t t i e s | 3,0V 2 x A A b a t t i e ries For useinoutdoortemperaturesunder 0°C/32°F, w e r ecommendingAAA lithiumbatteriesfortheoutdoorsensors. |
| Measuringrange Temperature (°C) Humidity | 0°C-+50°C/32°F-+122°F 20%-90% | -20°C-+60°C/-40°F-+140°F 20%-90% |
| Measurement increments Temperature Humidity | 0,1°C/0,2°F 1% | 0,1°C/0,2°F 1% |
| DCFradio-controlledclockYesNo | ||
| ThermometerYes | Y | e |
| Alarm function | Yes / 2 alarms (dual alarm) | No |
| Max.numberofoutdoorsensors3 | ||
| Range≤50m | ||
11.RecyclingInformation
Noteonenvironmentalprotection:

AftertheimplementationoftheEuropean Directive2012/19/EUand2006/66/Euinthe nationallegalsystem, the following applies: Electricandecronicidevicesaswellasbatteries mustnotbedispersedofwithhouseholdwaste.
Consumers are obliged by law to return electrical and electronic devices as well as batteries at the end of their service. They should be aware that they are responsible for the maintenance of the products they sell, which is a responsibility of the manufacturer.
12.DeclarationofConformity

Hereby, Hama GmbH & Co KG declares that the radioequipmenttype[00136257]isincompliance withDirective2014/53/EU. T hefulltextoftheEU
declarationofconformityisavailableatthefollowinginternet address:www.hama.com->00136257->Downloads.
Frequencyband(s)433MHz
Maximumradio-frequency powertransmitted
0,002mW
3.TexHnKa6e3oNaCHOCTN
- I3eJne npedHa3HaeHo TOnbko DnIaOMaHHeRo npImeHnI.
Co6JIIOJaTb TexHnueckne XapaKTepeNCTNKn. - BepeybOTBlaIaNb6pbI3r.
He 3KcIpyaTnpoBaTB HENOCpeCTBeHHoN 6n3OCTn C HArpeBaTeJIbHbIMnPnBopamnn 6 epeyBoITpAmbIX COJHeuHbIXnye
He npimEnHbB 3aIpeTHbIX 30HaX.
He pa3Meuatab pyaOM c MaHHTbIMn PONAMM, MetaJIInueCKmPamKaMn, KOMNbIOTepaMn OKHaMn IN T.I. 3NeKtpoHHbe np6Opbl N OKOHbIe paMbI HeaTMBHO Cka3bIAJTOc H apa6ote n3dEINr.
-HepoHrTa.5epeybotcunbHbIxynapoB.
-ИЗдели He OTKpbIbA Tb.3anpeuaeTc8 KcNnyaTnpoBa Tb HeNCnpaBHOeN3delen.
3anpeucaetcamaoctoTebHOpemOntupoBaTy yctpoiCTBO.PeOH Tpa3peaaTeT npOu3BoUHTbTOJbKO KBaIINpUPOBaHHOMyepcoHaLy. - YnakOBky He nDaBaTb DeTAM: ONaCHOCTb acOHKcN.
- YTNIN3NPOBaTb yNaKOBky B COOTBeTCTBmC MecTHbIMN HOpMaMn.
3anpeaaetcBHOCTb n3MeHeHnB KOHCTpyKUIO. B npOTNBOMClyaerapaHTnHbIeO6aTeNbCTBa aHHyIpyIOTc.

BHHMaHHe -TexHnKa 6e3oNaCHOCTn
- ɪЗрасхоюванные батари Немлеленho удалгь n3 ппборану тллзировать.
Pa3pewaaetc npimMeHb akKymyIaTOpbI TOnbKO yka3aHHOrTo nna.
He npimHeHb pa3nHbIe TINbI INHOBbI n CTapbIe 6aTapeNBmecte.
CobioaTb noIpaHocTb 6aTapei (+n - ) HecobJeHne noIpaHocTm MoXe TcTaB npuHoi B3pbBa6aTapei.
He noDBepratb akkymyIaTopbl ue3mepHoJ 3apJKe. - BaTApEn XpaHnTB B 6e30NaCHOM MecTe N He DaBaTb DeTAM.
He 3akopauBaTb KOHTaKtBi 6aTapei. He xpaHntb pAOMC M eTaNnueckmMnOBeKtAmN.
4.BBOB3KcNpyatauio

PpmeaHne
Pn BBOe B 3KcNpyatauio Bcerda Chaayana Heo6xOIMOBKJIouatb 6JOK BHeUHero DaTUnKa, N ToIbKO 3aTeMOCHOBHO6IOK.
4.1. BnokBneHerOdaTnuKa
- OTkpoIe KpbIuKy OTeKa 6aTapei (34), ydaJIte n3OJIaTOp u 3akpoIe KpbIuKy OTeKa 6aTapei (34).
HeckoIbko pa3 haxMnte KhoNky CH (26),YTO6bl Bbl6paTb KaHJI BHeUHero DaTuKHa. Ha IucnIee OTO6paxaetc COOTBETCTByIOUaI INHINKaUaI:CH1,CH2nn CH3.
BbIbOpEnHnCbuN3MpeHnTEmnpaTpybIOcUeCTBnJrTeCAHONKoN°C/OF(33).
-3aKpOienTeKpbIiKhkyoTcKa6aTaapei.
4.2.OCHOBHOJ6JOK
- OTkpoIe KpbIuKy OTeKa 6aTapei (27) n BCTabBte Tpu 6bTapei AA, coJIIOJa IOnJIrpHocTb. 3aKpOte KpbIuKy OTeKa6aTapei.
4.3.3aMeHa6aTapei

HnctpyKun-3aMeHa6aTapei
-ПослеЗамныбатариochoBHO6LOkaИ6LOKa BHeшeroДаТУнka HeO6XODIMO 3aHOBO BbINOJHITb CnHXPOH3aUIO6LOKOB.
-ДягTORO Heo6xOIMO ydaIITb 6aTapeu B TOM YnCne n3 npyroTO 6Ioka, a 3aTeM CHOBa 3aRpy3ntb INB OTcEK 6 aTapei.
БлokвesheroDAtyna
-ECNIO6paXaaetc3HaHOK (7),3aMeHnte26aTapeA AAA 6Ioka BHeUHero DaTuKHa Ha 2 HOBbIe 6aTapei.
- OTKpOHTe oTcEK 6aTapei (34), ydaJIte n yTuINI3npuYTe cTapbIe 6bTapei. BCTaBbTe IBe HOBbIe 6bTapei AAA, co6JIHOJdA IOJIaRPHoCTb. 3aKpOHTe KpbIshKy oTcEK 6bTapei.
OCHOBH0N6JOK
- ECNIO6paXaE73Ha0K (17),3aMeHnte3 6aTapeA AA OCHOBHOrO 6noka Ha 3 HOBbIe 6aTapei.
- OtkpoTe 0tcek 60aTapei (27), ydaJIte n yTuJIIN3npyIte cTapbIe 6aTapei. BCTaBbTe 3 HObIe 6aTapei AA, co6JIIOJaI IOJIaRPHocTb. 3akpoTe KpbIuKy 0tceKa 6aTapei (27).
5. MoHTaX

PpIMeuaHne-MoHTaxK
- Ipeed Tem KaK MOHTIPOBaTb 6JOKN, peKOMeHdyeTcR cHaJa3aBepWntbHaCTpOiKNM eCTax6yUeY yCTaHOBKn (cm. 6. BBoD B 3KcNpyatauio n pa60Ta).
- MoHTax CNeIyET npOn3B0DnITb NocIe TOrO, KaK npaBnJIbHbIeHaCTpOuKnO6ecNcpeT H aIeXHyU paAnOCBra3bMeJxDy6IoKAMN.

PpmeaHne
-MaxcImaJIbHOIOJOnyCTnMoepacctOHaMeMekJy 6JokamcoCTabJIeT30MeTpOB.
MOnHTpy6IOKn, CNeIyET yYeCTb, YTO pa3NnHbIe npenTCTBnA (CTeHbI, DepeBbA, ABTomObnn, BbICOKOBJIbTHbIE JINHHN N Dp.) CO3aIOT NOMExn paAnOCBra3IMexKdy6IokAMn.
-пелег мontжом убенистсь,чTOВMectaxpacnoложеняблokobобеспунbaeцустониваяразиocbra3b.
BIOK BHeHrO DaTnka DoJXeH pa3MeaTaBCB M eCT,3aUHcEHHomOTBO3JeICTBnApmBX COJIHeHbIXJyEIN O cAnKOB.

BHHMaHHe
-ПolyчntbceuaJIbHoeJINIOxOJaUyOyctaHOBkyB MaRa3nHaXdIЯMOHTaxJaHAnOpTaBneHHOMCTeHe.
- NpeiHaayanom 3Kcnnyataun y6eintecb B OTCYCTBnNepekTHbIXuINIOBpeXdeHHbxIeTaeJe.
- PnMoHTaxe He npImeHbTb Ype3MepHbIX ycunu. B npOTNBOMClyuAeMOXHOHONOBpeUHTbYcPTOICTBO.
- Y6eIntecb, cTo cTeHa nOJxOJNT IJIa MoHTaxa. B cTeHe HAmecTeMOHTaxaHEnOJXHO6bITb3JIeKTPnueCKo npOBoKn, ra3OpPBOda, BOIOpPBOda n Dpyrnx Tpy60npoBOOB.
5.1.OCHOBHOH6JOK
C NOMOuIIOCTaBKn yCTaHOBnTe OCHOBHn 6JOK HaPOBHyIOHOBePxHOCTb.
OCHOBHO6IOK TaXKe MOXHO NOBecuTb Ha CTeHy 3a OTBepCTne.
5.2.BnokBHeHerOdaTUnKa
BIOK BHeIHeRo DaTUnKa MoXHO pa3MeCTNb Ha yInue c NOMObIONoCTaBKN.
BHeuHn6IokpekomeHnyeTcMoHTnpoBaTbHactehc NOMOUsbIOOCOTBeTCTByUoero n a3a(32).
6. 3knnyataun
6.1.CoeiHHeHnec 6 IOKOMBHeuHerOaTUnKa
Iocne3aRpy3kn6batapenochOBHO6nOKnaHnae ABtOMaTnuecknNONCK CnHaNbHEuHrO daTuNKa N BblONJIHeT OpeauuBBOda yCTPOINCTBa B KcnnyatauHIO.

PpmeaHne
-ABTomatnueckaHaCTpOkaPnBBOeB 3KcNpyatauIOIDnTcraok.3MnHyT.
-BoBpEmaONcKapadNocnHaJaAMnraeT3HaOK paAnOCBraNC B HeuHmDaTChkOM(2).
B TeueHne 3TO RBOpeMeHN He HaxIMaTe KHOKN yCTPOINCTBA! B npoTnBHOM Cnyae MOxET BO3HNKHyTb cboToHohHaCTpOoiKn3HaueHmN n epeDaHn CnHana.
- ABTomatnuecka Hactpoika 3aBepseHa, KOrda Ha DnCnJIeHaHHTO6paKaTbCaHHbIeN3MpeHn BHyTpni NOMEeHn (18) n BHe NOMEeHn (4).
- EcncnHanaTOMaTnuecknnpnHaTbHeydaETc, haxmnte n OK. 3 cekyhd yapedxnbAte KhoNky Channel (26),YTO6bIKNoHTbNoNcKpaNocnHanaDCFbpuyHyo.
6.2.OCHOBHbIe npaMetpyuHbIeHaCTpOKN ABToMaTuYeCKnPnpEmpaOnocnHaJaDCF
Pocne nepBoro BKNoueHnO OCHOBHO 6Joka u yctaHOBKn paAnocBra3n C 6JOKOM BHeuHero DaTuNka YacbI npbopa aBTOMaTnueeCKn HauHaOT NOnCK paAnocrHana ToHOro BPemEni(DCF).BoBPema3torOpoucecaHaundncJIee Mrraet3HaUOKpaAnocrHana(10).
INHnkaa(10)PonckcnHanaDCF

Mnraet
AKTNBbI

TopHTHeIpepbIBHO
CNHHaJIINPnIHATyCNEuHo
HeropunTheaKTKBbH
EcIINrHaJIaBtOMaTnuecknnpHnHTbHeydaetc,HaXMMte n OK.3ceKHyd yIepxNBAitKe KHOkky-(25),YTO6bIKNIOHTb nonckpAioocnHaJADCFByuHyo.3HaOkoPainocnHaJa (2)Muraet.

HacpoKa acob.PpmeaHn
- PONCKДЛNTCЯOKONo 3 MInHyT. EcIN CnHaN pInHnTb HeydaNoCb,ОпepaциЗавepшaetcAEBTOMaTnueckn. ПOBTOPHaNNonbTkab6ydeTpnpoN3BeDeHaB CNeDyUOuNnNoHbIuac.3HaQKpaDnOCrHaHaToTOHOro BpeMeHn (2) rachet.
- Pn Heo6xOIOMOCTN acbI KajeHapb MoXHO HactpontbBypyHyIOckpaIIOOCrHaHaDCF C u, EJIOKOPpeKTnpOBKNUAcOBocUeCTBJIaTcR KaKDbIe cyTKI (MeJy 01:00 n 05:00).Pn yCneuHOM npEmepaIOOCrHaHaBBeDEHHbIEBpyHyO3HaueHna BpemeHn I DaTbI 3aMeHryOTcR.
-TO6bInpHnyDnTeBHo3aBepuTbNONCKpaAnOcHnHaJa, HaxMnte nOK. 3 cekyHd yapedxNbaTe KhoNky - (25).

HdkaunetaTeHeroBpeMeHN
IpeeknueehneHaJeTHeeBpeMa npocxOaNT abTomatueckn.Bo BpeMa nHdkauu NteHero BpeMeHn HAnCnneeTo6paKaetcRdST.
HacpoKn(BpyHyo)

Примеане
-убьИсКОпТБИЗМeHеHиЕЗHAчЕнЯВOBpeMЯ Настpoйк, удөрхиBaɪTeKHоIGNк + (24) Илл KhoIGNк -(25).
Haxmnte nok.3cekynd ydepxnbate KhoNky-(25), 4TO6bIOCTaHOBnTBnOcKpaAnocnHaJaDCF.3Haoho paAnocnHaHa (8) He ropnt.Tenepb Yacbl MoXHo HAcTpOHTbBPuyHyIO.
- Haxmnte n okolo 3 cekynd ydepxnbaiTe KhoNky MODE (22),T06bHaactpontbnapaMeTpblB CJeNyUoIeM nopAikke:
-ΦopMaT INДиКацИВpeMeHn (12/24)
- YacobovIoc
-4ac(12)
MunHyTb1(12)
·T0
-Mecau(16)
- yinclo(15)
- KhoNko+ (24) nnn - (25) yctaHOBnte 3HaueHne n HaxMMTeKHOKNkyMODE(22),YTObIIOJNTBepdITb NaCTpOiky.
- YTO6bI npIMeHnTb OTOBpaXaEMoe 3HaueHne n cpa3y nepeHTNK C JeNyUOcEmynapamEtpy,HaXMITEKHOJKNy MODE(22).
- Pexim Hacptpoikn BbIKIOaetcra ABtOMaTneCKn,ecnn Haxatni Ha KhoIKN He npou3BOIDIOcB TeueHne 20 cekyHd.

Hnctpykun-ycaobonorc
PaHnOcHnAToHOro BpeMeHH DCF COOTBeTCTBye TpeDHeEbponeNCKOMyBpeMeHH.Ecnuacbl 3KcNJIyaTnpYIOTCB DpyROM YacOBOM NOCe,TO INX Heo6xOIMMOHaCTpOnTBcoOTBeTCTByUOUMO6pa3OM.
Hapnep,pa3HnauBOBpeMeHmExMyMockBoi n BepnnHom coCTabIeT 3 yaca.B MockBe, taKIM o6pa3OM, Heo6xOJIMO cIeNaTb nonpaBky B +3 yaca. B 3tOM cIyae K Ioka3aTeJIIO BpeMeHn (ycTaHOBJEHOMy aBTOMatNueCKInopAINOcRHaNyDCFInuBpyHyU) yaCbIAbTOMaTNUeCKN6yDyTpnpBabIb3yaca.

Hnctpykun-DehhepeJN
HnHeIeIIMOryTo6paXaTbCHaNcNeIyUxnx
A3bIKax: HeMeuKn (GE), aHrnnckn (EN), DaTCKn (DA),
roJIaHndCKn (DU), nTaJIbHarCKn (IT), nCnHaHcKn (SP),
φpaHcy3ckn (FR).
UeIbCm/ΦapeHreT
KhoNkoi-(25)BbIbePteeHnHcym3MepeHnaTeMnpaTpyb (°CnnF).
BydunbHnK

BydunbHK.ИHcTpkyKUa
- Ecn6yHnJbHnK 1 BkIIOeH,TO OH cpa6aTaBaET OJbKO B 6yHN (NoHeJeBnK-NaTHNuA).
- Ecnn 6ydnbHK 2 BkIouen, To OH cpa6aTb1BaET TOnbKO nO BBIXoINHbIM (cy66ota, BocKpeceHbe).
PnHacTpoKe 6yDnIbHnKOB HaI, HnDnKaUne CeKyHd OTo6paKaetc3HaYOk A1 nnA2.
- Haxmte KhoNky ALARM (23) OINH pa3 nIN dBa pa3a, yTo6bl nepeKJIIOHTcH ha 6yDnIbHnK A1 nIN A2.
- Haxmnte n OKoNo 3 ckyHd ydepXnBaIte KhONky ALARM (23),yTObHaCTpOHTbBpeMrcpa6aTbIBaHn6yDnIbHnka. Hayhet MIRatb 3HaueHne Yacob.
- Khonkou + (24) nJn - (25) yCTaHOBNTe 3HaueHne Yaca, 3aTeMHaXMMteKHONkyALARM(23),yTO6bIPOITBepdntb HaCTpOky. HauHET mRgatb 3HaueHne MmHyT.
-Повторп electудлЯнстойкимунуT.
- Ecn3haeHne He BBOIDTCB TeueHne 20 cekyH, peKIM NaCTpOINaBTOMaTNUeCKNBbIKJIOuHaETc.
-706bIBbIbpaTb/BKJIIOHTb/BbIKJIIOHTbHyXHbI 6yINJbHNK, HaxmMaTe KHOJky ALARM (23).Ha ducnnee nepeeknOuaetc COOTBeTCTByoUa nHnkaCua (A1/A2).
- ¥T06bI BKJIOUHTb 6yDnJIbHnK A1 nnn A2, HaxMnte KhoNky - (25). BkJIIOUeHHbI 6yDnJIbHnK OTO6paXaETc3HaYKom nnn (11).
- Pnp cpa6aBbAHm 6yDnHbHKa Mfraet 3HaOK (11), n NOdaeTc3ByKOBOuCnHaJ.
- YTO6bl OTKJIIOHTb CnHaI, HaxMNTe IIO6yIO, KpOMe SNOOZE/ LIGHT (28). Ecnn CnHaI He 6bl OTKJIIOUeH BpyHyIO, To OH aBtOMaTNUeCKN OTKJIIOHTcA Upe3 2 MmHyTbl.

PnmueyaHneK yHKunnaBTONOBToPa cnHaJa6yDnblbHnka
BOBPMAOaHcHnHa6yIbHnKaHaxMmTeaTNUK SNOOZE/LIGHT (28),YTO6bIKNIOHTbΦyHKUHO aBTOOBTOPacHnHa.HaINCnEeMnRAeTNnKauZz (14).Pioua CnHana npepbBaetca Ha 5 MInHT, nocne yero CnHaJINoaETcRcHOba.
-TO6bIOTKIOHTbOyHKUaBTONOBTOPacnHaJa 6yINbHnKa n Cam CnHaJ, HaxMITE JIO6yIO KHOKNy, KpOME SNOOZE/LIGHT (28).
6.3.IporHoznoroDbl
HaochoBeH3MeHeHHaTMOcΦepHOro d aBHeHHa coXpaHeHHbIXdAHHbIXnPpN6OpnpPOrHO3npyeTnOry H a nepnoD ot 12do 24acob.

IporH03nOrOdbI
B nepbIe yacI noCne BBOda B 3KcPnyatauHIO n3-3a oTcyTCTBnHReO6xOdIMbIXDaHHbIXfYHKU npOrHO3a noroDbI He pa60taet.
Iporno3noroObl OTO6paKaTcC nOMoUbNo pAnu 3NaUKOB (1):
6.4.DnHaMnKaun3MeHHeNHTempeTpybI

ДиHamkaиЗмeнгЯTempepaTpybl
B nepbIe yacI noCJI BBOaB 3KcIIyatauHIO cyHKU nporHO3 aNOrObl He pa60TaET n3-3a OTCyTCTBn HEOxOIMbIX daHHbIX, KOtOpBE COXpAHJOTcT OJIbKO BO BpeMaKcIIyatauH.
-Пибборонобрахаetпрогнзмeнeнсуннг TeMnepaTpyb(4)иTeMnepaTpybВnomeшeHHN(21).
HnDnKaunHaHnKaun3MeHeHH

NOBbIwaeTcR

NOHnKaetc

y6bIBAUOuN
6.5.MakcmaJIbHbIeM M NHMaJIbHbIe3HaueHnA TempepaTypbl
3aΦnKcnpoBaHHbIeMaKcImaJIbHbIeM NnHmAlbHbIe 3NaueHnAhpXHoN K OMHaTHoTEmNepaTypbl ABTomatUneCKn COxpaHJOTcB NaMaTn np6opa.
HaxmMaTe KhoNky + (24), yTo6bI nepeKJIIOuATb INdkaunTeKyUeITempePaTypbI, MInHMaJIbHOI TEMpepaTybl (MIN) mAKcMmaJIbHOI TempepaTybl (MAX).
Haxmte n okono 3 ckynd ydepxnbai Te KhoNky + (24),y06bIydaJIITbcOxpaHeHHbIeMaKcImaJIbHOe MHNIMaJIbHOe3HaueHn.
6.6.NoDcBETKa
YTo6bIbKJIIOuHTbNOIDCBETKy,HaXMnTeJaTnKSNOOZE/ LIGHT(28).
7.yxou Te xhnueeoeo6cnyuBaHne
UHCTky H3dJIINnI pOn3BOoNTb TOnbKO 6e3BOPcOoN CnERKa BnaXHOncaIΦeTko.3anpeuaeTcnpmehrTaBparpeccNBhie UHCTyIune cpeIcTBa.CneIte 3a TeM,HTo6bl ByctpoiCTBO HeNoJaIbOda.
8.0Ka3oTrapaHnHbIXo6aTeIbCTB
KomnaHamaGmbH&CoKGHe HecetOTBeTCTBHeHOCTb 3ayuep6,BO3HNKwINBCneDCTBnEHeNpaBnIbHOrO MOHTaxa,NoKluohEnn uNCNoJb3OBaHn u3denn He NO Ha3HaueHNO,aTaXe BCneDCTBnE HcO6JIoDeHn IHCTpykUINo EKCNyatauIN TeXHKn6e3OnaCHOCTn.
9.0TdIeITexo6cnyKuBaHnA
IobonpocampeMOHa nIIN3aMeHbHeNCnpaBbixn3deJIn
O6paauTeCb K npoDaBu y IIN B cepBucHyo Cnyk6y
KOMnAHnHama.
TopayraHHnoTdeJaTeXo6cLyKuBaHna:
+499091502-115(hemeukn,aHrnnckn)
PiOpno6HeeCMOTpuTe3deCb: www.hama.com
10. TexnuecknxexapakTepcntkN
MaKcMmaBnaHn3nyaemar MOUHOCTb
0,002mW
86652Monheim/Germany
www.hama.com

- ControlsandDisplays
- A B asestation
- BM easuringstation
- 1.ExplanationofWarningSymbolsandNotes
- Warning
- Note
- 2.PackageContents
- 3.SafetyNotes
- Warning-Batteries
- GettingStarted
- Measuringstation
- Basestation
- Replacingthebatteries
- Note- R replacingthebatteries
- Measuringstation
- Basestation
- Installation
- Note-Installation
- Basestation
- Measuringstation
- Operation
- 6.1.Connectiontothemeasuringstation
- 6.2.Basicandmanualsettings AutomaticsettingusingtheDCFsignal
- Note-Timesettings
- Note-Summertime
- Manual)settings
- Note-T imezone
- Note-Weekday
- Celsius/Fahrenheit
- Alarm
- Note-A l a r m
- Note-S noozefunction
- 6.3.Weatherforecast
- Note-Weatherforecast
- 6.4.Temperaturetrend
- Note - Temperature trend
- 6.5.Maximumandminimumtemperature
- 6.6.Backlight
- 7.CareandMaintenance
- 8.WarrantyDisclaimer
- Service and Support
- 11.RecyclingInformation
- Noteonenvironmentalprotection:
- 12.DeclarationofConformity
- 3.TexHnKa6e3oNaCHOCTN
- BHHMaHHe -TexHnKa 6e3oNaCHOCTn
- 4.BBOB3KcNpyatauio
- PpmeaHne
- BnokBneHerOdaTnuKa
- 4.2.OCHOBHOJ6JOK
- 4.3.3aMeHa6aTapei
- HnctpyKun-3aMeHa6aTapei
- БлokвesheroDAtyna
- OCHOBH0N6JOK
- MoHTaX
- PpIMeuaHne-MoHTaxK
- BHHMaHHe
- 5.1.OCHOBHOH6JOK
- 5.2.BnokBHeHerOdaTUnKa
- 3knnyataun
- 6.1.CoeiHHeHnec 6 IOKOMBHeuHerOaTUnKa
- 6.2.OCHOBHbIe npaMetpyuHbIeHaCTpOKN ABToMaTuYeCKnPnpEmpaOnocnHaJaDCF
- HacpoKa acob.PpmeaHn
- HdkaunetaTeHeroBpeMeHN
- HacpoKn(BpyHyo)
- Примеане
- Hnctpykun-ycaobonorc
- Hnctpykun-DehhepeJN
- UeIbCm/ΦapeHreT
- BydunbHnK
- BydunbHK.ИHcTpkyKUa
- PnmueyaHneK yHKunnaBTONOBToPa cnHaJa6yDnblbHnka
- 6.3.IporHoznoroDbl
- IporH03nOrOdbI
- 6.4.DnHaMnKaun3MeHHeNHTempeTpybI
- ДиHamkaиЗмeнгЯTempepaTpybl
- 6.5.MakcmaJIbHbIeM M NHMaJIbHbIe3HaueHnA TempepaTypbl
- 6.6.NoDcBETKa
- 7.yxou Te xhnueeoeo6cnyuBaHne
- 8.0Ka3oTrapaHnHbIXo6aTeIbCTB
- 9.0TdIeITexo6cnyKuBaHnA
- TexnuecknxexapakTepcntkN
Brand : HAMA
Model : EWS3100
Category : Weather Station