
EWS-440 - Weather Station HAMA - Free user manual and instructions
Find the device manual for free EWS-440 HAMA in PDF.


| Product type | Wireless weather station |
| Brand | Hama |
| Model | EWS-440 |
| Dimensions (indoor unit) | 120 x 100 x 30 mm |
| Weight (indoor unit) | 150 g |
| Power supply | Batteries: 2x AAA (indoor unit), 2x AA (outdoor sensor) |
| Display | Backlit LCD |
| Built-in sensors | Temperature, humidity, atmospheric pressure |
| External sensors (included) | Outdoor temperature and humidity |
| Functions | Clock, date, alarm, weather forecast, trends, extreme memory |
| Radio range | Up to 100 m in open field |
| Transmission frequency | 433 MHz |
| Backup power | Batteries (in case of power failure) |
| Maintenance | Clean with a soft, dry cloth. Do not use solvents. |
| Safety | Use good quality batteries. Do not expose to excessive humidity. |
| Recommended batteries | Alkaline batteries |
| Warranty | 2 years |
| Repairability | Repair by an approved center. Spare parts available on request. |
| Box contents | Indoor unit, outdoor sensor, user manual |
Frequently Asked Questions - EWS-440 HAMA
User questions about EWS-440 HAMA
0 question about this device. Answer the ones you know or ask your own.
Ask a new question about this device
Download the instructions for your Weather Station in PDF format for free! Find your manual EWS-440 - HAMA and take your electronic device back in hand. On this page are published all the documents necessary for the use of your device. EWS-440 by HAMA.
USER MANUAL EWS-440 HAMA
D-86651 Monheim/Germany
www.hama.com
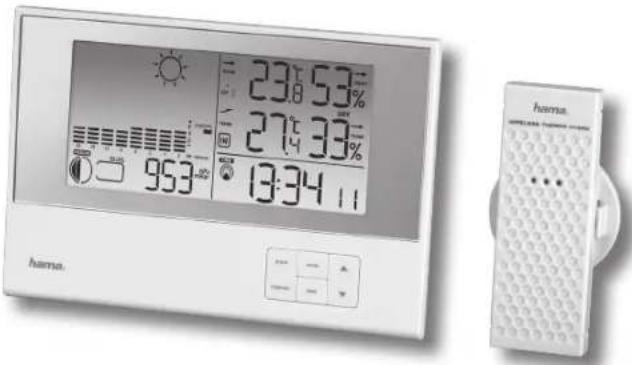
All listed brands are trademarks of the corresponding companies. Errors and omissions excepted, and subject to technical changes. Our general terms of delivery and payment are applied.
00104938
A. WETTER / LUFTDRUCK
B. TEMPERATUR / LUFTFEUCHTE
C. UHR
D. Taste ▼
Operating Instruction
INTRODUCTION
Thank you for selecting our slim Weather Forecaster. This device combines precise time keeping, monitoring and displaying of pressure information and current temperature/humidity data from up to three remote locations (additional sensors are required).
In this package, you will find:
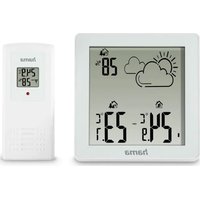
• One main unit (receiver)
• One single-channel remote sensor (transmitter)
- One user manual
Please keep this manual handy as it contains practical
instructions, technical specifications and precautions.
INSTALLATION
The communication between the main unit (receiver) and the remote sensor (transmitter) is wireless, thus simplifying the installation. The remote temperature sensor transmits data to the main unit, with an operating range of up to 30 meters in opened area.
The remote temperature sensor can be placed indoors or outdoors, depending on the area where the temperature is intended to be measured. If you intend to measure outdoor conditions, place the remote sensor outdoors.
NOTE:
- It is critical to power the remote sensor BEFORE setting up the main unit.
- It is critical to power up and test communication between the remote sensor and the main unit BEFORE permanently mounting if outside.
BEFORE YOU BEGIN
- We recommend using alkaline batteries for the remote sensor and the main unit. When the temperature falls below freezing point 0°C (32°F), battery voltage levels will be dropped and this may reduce the transmission range. For optimum performance, we recommend using lithium batteries.
- Avoid using rechargeable batteries. (Rechargeable batteries cannot maintain correct power requirement)
- ALWAYS install batteries in the remote sensor before the main unit.
- Insert batteries before first use, matching the polarity in the battery compartment.
- During initial set up, place the remote sensor close to the main unit.
- After reception is established (remote readings will appear on the main unit's display), position the remote sensor and the main unit within the effective transmission range of up to 30 meters.
NOTE:
- Avoid pressing any buttons on the main unit before the remote readings are displayed.
• Transmission or reception range may be affected by trees, metal structures, and electronic appliances, surrounding building materials and how the main unit and transmitter are positioned.
- Place the remote sensor so that it faces the main unit (receiver), minimizing obstructions such as doors, walls and furniture.
- Though the remote sensors are weather-resistant, they should be placed away from direct sunlight, rain or snow. The optimal location for the remote sensor outdoors is under the eaves on the north side of the building.
REMOTE TEMPERATURE AND HUMIDITY SENSOR (TS21) FEATURES
Remote data transmission to the main unit via 433 MHz frequency

A. BATTERY COMPARTMENT
Hold two AAA-size batteries
B. WALL-MOUNT RECESSED HOLE
Mount the remote sensor on the wall
MOUNTING
The remote sensor can be placed on the fl at surface or mounted on the wall in vertical position.
- Use a screw, rather than a nail, for best mounting of the sensor.
- When mounting the main unit on the wall or vertical surface, fold the table stand back into the unit.
PLACEMENT
- The remote sensor should be placed under eaves or a similar location with free air circulation sheltered from direct sunlight and extreme weather.
- Ideally, place the remote sensor over soil, rather than asphalt which would cause false readings.
- Avoid placing the remote sensor near sources of heat, such as chimneys and heating elements
- Avoid areas that collect heat from the sun and radiate heat, such as metal, brick or concrete structures, paving, and patios - The international standard for the valid air temperature measurements is 4 feet (1.25 meters) above the ground
OPERATION
Immediately after batteries are installed, the remote sensor will start transmitting a temperature and humidity data to the main unit.
MAIN UNIT
FEATURES
TIME
- Precise time and date set via radio controlled time signals (DCF 77) from the central atomic clock in Frankfurt
• 12 or 24 hour time format
• Manual adjustment of time and date
• Calendar date with month and day in 7 languages English, German, French, Italian, Spanish, Dutch and Swedish
• Dual crascendo alarms with snooze
• Programmable ice warning alarm
WEATHER
- Weather forecast for the next 12 to 24 hour in seven large icons: sunny, slightly cloudy, cloudy, rainy, heavy rainy, snowy and heavy snowy.
- User-defined high/low temperature alarm
- Indoor/outdoor temperature and humidity in up to 3 remote locations (additional sensors required)
• Barometric pressure in imperial or metric units
- Altitude adjustment for pressure compensation - 24 hour barometric pressure history chart
• Comfort level indicators (Dry, Humid, etc)
FRONT
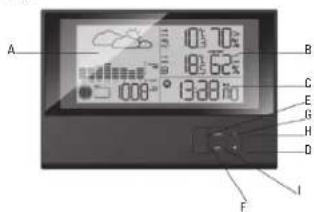
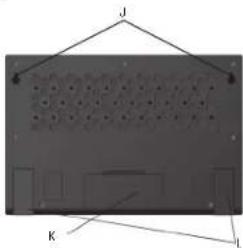
REAR
A. WEATHER/ PRESSURE window
B. TEMPERATURE/ HUMIDITY window
C. CLOCK window
D. DOWN | ▼ | button
- Select the next available mode - Press and hold for 2 seconds to search for wireless signal from remote sensor.
- Decrease parameters.
E. ALARM button
- When time mode has been selected, press once to display the alarm time of weekday alarm (W), single alarm (S) and pre-alarm (Pre-AL).
- Hold for 2 seconds, set weekday, single or pre-alarm's alarm time.
- When temperature mode has been selected, press once to display the highest or lowest temperature alarm's value.
- Hold for 2 seconds, set the highest or lowest temperature alarm's value.
- When alarm is on, press once to stop the alarm temporarily.
F. CHANNEL button
- Press to display the outdoor temperature readings of Channels 1, 2 and 3. (additional remote sensors are required)
- Hold for 2 seconds, enter into the circulation mode and outdoor temperature readings of Channels 1, 2 and 3 will be displayed automatically in every 5 seconds.
G. MODE button
- When pressure mode has been selected, press once to display the local pressure, altitude and sea level.
- Press and hold for 2 seconds to set altitude and sea level. - When time mode has been selected, press once to toggle between time with seconds display or time with weekday display.
- Press and hold for 2 seconds, set language of the day of the week, year digit, month digit, date digit, hour format (12/24 hours), hour digit and minute digit. (Note: calendar format is default in month-date display)
- When temperature mode has been selected, press and hold for 2 seconds to toggle the temperature unit between Celsius or Fahrenheit.
H. UP | ▲ button
- Press to select the next available mode
- Increase the parameters
- In time with seconds display mode, press and hold for 2 seconds to activate/ deactivate radio controlled time signal search manually.
I. MEM/ HISTORY button
- When temperature mode has been selected, press to recall the minimum or maximum temperature and humidity readings of main and remote units.
- Press and hold for 2 seconds, collected memories will be cleared.
- When pressure mode has been selected, press once to check the historical pressure data for the past 24 hours.
J. WALL-MOUNT hole
A recessed opening to mount the unit on a wall
K. BATTERY COMPARTMENT
Accommodate two (2) CR2032 batteries
L. TABLE STAND
PLACEMENT
- Make sure that the main unit is locating within the operating range of all remote sensors.
- Ideally the main unit should be placed within line of sight of remote sensors. Avoid placing the main unit where surfaces emitting and radiating heat (e.g. heating ducts or air conditioners) and areas with interference from wireless devices (e.g. cordless phones, radio headsets, baby monitoring devices and other electronics)
OPERATION
Once the main unit is powered, the display will show all available LCD segments for a moment.
IMPORTANT: All of the display functions will be locked, allowing setting your local altitude and pressure parameters by pressing the UP (▲) or DOWN (▼) and MODE buttons. The locked display will show the pressure icon and abbreviation "infig" flashing in the Weather Pressure Window, default time in Clock Window and channel T's temperature and humidity readings in Temperature/Humidity Window. If pressure and altitude are not configured during this time, the unit will self-calibrate in a few minutes and show the default settings for the pressure and altitude (sea level) and all remote weather sensors readings.
GETTING STARTED
WEATHER FORECAST
This unit is capable of detecting the atmospheric pressure changes. Based on collected weather data, it forecasts the weather for the next 12 to 24 hours.
| Forecast is... When the display shows... | |
| Sunny | |
| Partly Cloudy | |
| Cloudy | |
| Rainy | |
| Heavy Rainy | |
| Snowy | |
| Hoavy Snowy | |
NOTE: The weather forecast accuracy is approximately 70%. The main unit display shows forecasted (predicted) not current conditions. The SUNNY icon indicates clear weather, even when displayed during the night-time.
PRESSURE OPERATION
The pressure window displays: current barometric pressure, sea level pressure, and weather forecast.
The information contains a number of historical statistics: pressure/temperature/humidity history bar-chart for the past 24 hours. Pressure can be measured in inHg, hPa/mBar or mmHg, and altitude is determined in either meters or feet.
IMPORTANT: There are three viewing options available: barometric pressure for SEA LEVEL, LOCAL and ALTITUDE. Local pressure is a measured value (can't be adjusted) while Sea Level & Altitude are variables that you can enter. It is advisable to select and program only one of the variables and to allow the unit to calculate the third value. The unit is designed to measure pressure changes at your specific location, when LOCAL barometric pressure is selected. Information for programming your unit, with either Altitude or Sea Level values, may be obtained from GPS readings, online from the Internet, etc. SEA LEVEL barometric pressure provides you with information about pressure changes at lower elevations in your surrounding area. The SEA LEVEL pressure value can be set to match your local area's weather information. (Sources - local TV or radio station, etc.)
SETTING INITIAL PRESSURE PARAMETERS
IMPORTANT: Allow the unit to set without touching ANY buttons for about 6-8 minutes during the main unit initial set up. This will give the unit time to synchronize with remotes, stabilize pressure readings and settle with default settings.
SELECT PRESSURE UNITS OF MEASURE
Press UP (▲) or DOWN (▼), as needed, until the pressure icon "PRESSURE", to the left of the barometric pressure value, begins to flash.
- Press MODE button, to toggle through selections until "SEA LEVEL" or "LOCAL" barometric pressure is displayed.
- Press and hold MEM/ HISTORY button to enter the pressure unit selection mode. Press the UP | ▲ or DOWN (▼) button to select the preferred units of measure for pressure: inHG (English), hPa/mBar (scientific) or mmHg (metric)
- Press MEM/ HISTORY to confirm your selection. Then press MODE to move to the ALTITUDE unit selection mode. Press the UP ( ▲) or DOWN ( ▼) button to select pressure unit as FEET or METER.
- Press MEM/ HISTORY to confirm and hold MODE to move to the ALTITUDE value selection mode.
- Press UP (▲) or DOWN (▼) to select or adjust the altitude value to your location. (Press and hold either button for accelerated digit advance)
- Press MODE to confirm the programming selection. ( NOTE: The unit will automatically exit programming mode if it does not detect a button press after 2 minutes.)
VIEWING PRESSURE AND ALTITUDE INFORMATION
To view pressure or altitude information, press MODE button. The display will alternate between the sea level pressure, local pressure and local altitude screens.
PROGRAMMING SEA LEVEL PRESSURE
(not required if you did altitude)
- Press and hold MODE, until the barometric pressure digits are flashing.
- Enter the desired sea level pressure value by pressing UP ( ▲ or DOWN ( ▼ buttons. (Press and hold either button for accelerated digit advance.)
- Press MODE, to confirm sea level value selection.
CHANGING PRESSURE AND ALTITUDE UNITS
- Press MODE as needed, until "LOCAL" pressure is displayed.
- Press and hold MEM/HISTORY, until the pressure unit is flashing.
- Change local or sea level pressure units by pressing the UP ( ▲ ) or DOWN ( ▼ ) buttons to select the pressure units. Choose from: inHg, hPa/inBar or mmHg. - Press MEM/HISTORY to confirm your selection
- Press MELM HISTORY to turn in your selectible. - Press MODE button until the local altitude value will be displayed
- Press and hold MEM/HISTORY until the altitude unit is flashing.
- Select the ALTITUDE unit, meters or feet, by pressing UP ( ▲ or DOWN | ▼ buttons.
- Press MEM/ HISTORY to confirm your selection.
VIEWING SEA LEVEL PRESSURE HISTORY
- In pressure mode, press MEM/HISTORY button entering the sea level pressure display.
- When the SEA LEVEL is displayed, press MEM/ HISTORY repeatedly viewing the sea level pressure history for the past 24 hours in 1 hour intervals.
- If no buttons are pressed for 5 seconds, the unit will automatically return to the default Pressure and Weather Forecast Mode.
VIEWING PRESSURE, TEMPERATURE AND HUMIDITY CHARTS
The bar chart in Pressure Window can be configured to display historical data for the sea level pressure and temperature or humidity for channel 1.
After selecting the Pressure Window, press and hold ALARM button to toggle the bar chart between the sea level pressure with the word "PRESSURE" displayed at the right bottom corner of the chart, temperature with a thermometer icon and "CH1" and a humidity with "RH" icon and "CH1".
MOON PHASE ICONS

1
1
Moor

Waning
Crescent

First
Quarter

Waxing
Gibbous

Full Moon

Waning
Gibbous

Last
Quarter

Waning
Crescent
The main unit supports up to 3 remote sensors, corresponding to a separate channel of the temperature and relative humidity display. The temperature can be displayed in Celsius ( 2 C) or Fahrenheit ( 2 F).
The main unit carries the temperature and humidity sensor and uses this data to calculate an indoors comfort level - Wet, Comfort or Dry. A temperature alert function is available for all channels. It can be programmed to sound if the channel temperature exceeds or falls below the pre-set upper and lower limits.
REMOTE SENSORS STATUS
The wave icon above the current channel icon shows the connection status of the corresponding remote sensor:
| Icon Status | |
| Searching for the signals from the remote sensor | |
| Corresponding remote sensor signal received successfully | |
| No signals received far over 1 hour |
SEARCH FOR REMOTE SENSORS
The main unit can be manually activated to search for the signals from remote sensors by pressing and holding DOWN (▼) button.
OPERATION
To select the indoor/outdoor temperature and humidity mode, press UP (▲) or DOWN (▼) until the IN icon flashing with a beep sound alert.
VIEWING REMOTE (CHANNEL) TEMPERATURE AND
HUMIDITY
Static Display:
Press the CHANNEL button to select measurements from different remote sensors, each assigned to a unique channel: 1 2 or 3
Channel Auto-Scan Display:
To enable an automatic scan of all channels, press and hold CHANNEL, until the icon is displayed. The measurements from each remote channel will be alternately displayed with a 5 seconds viewing. NOTE: the channel auto-scan feature can be active only if there are more than one remote sensors operating and are assigned to different channels.
PROGRAMMING TEMPERATURE IN CELSIUS OR
FAHRENHEIT
Press and hold MODE button for 3 seconds to toggle the temperature unit in Celsius (°C) or Fahrenheit (°F).
SETTING TEMPERATURE ALARM
- Press the ALARM button to select the desired alarm. Displayed will be the upper temperature alert with icon (if disabled, displays OFF), or lower temperature alert with icon (if disabled, displays OFF).
- Press and hold the Alarm button until the temperature
digits fl ashing.
- Adjust the temperature digits using the UP | ▲| or DOWN (▼button. Press and hold either button for fast digits advance
- Press the ALARM button to confirm selection and return to the temperature alarm selection screen
ACTIVATING OR DEACTIVATING TEMPERATURE ALARMS Once the above alerts are displayed, press the UP ( ▲) or DOWN ( ▼) button to enable or disable the corresponding alert.
VIEWING MAX/MIN AND MINIMUM READINGS
Press the MEM/HISTORY button recalling:
• Current temperature and humidity
• Minimum temperature and humidity
• Maximum temperature and humidity at the remote location.
RESETTING TEMPERATURE MEMORIES
Press and hold the MEM/HISTORY button for 3 seconds to clear all channel memories.
COMFORT LEVEL INDICATORS
The main unit is capable of detecting and displaying the current indoor comfort levels of surrounding environment.
The comfort level is based on the combination of the current indoor temperature and humidity readings. The following comfort levels may be displayed: COMFORT (comfortable); WET (wet) and DRY (dry)
| Indicator displayed | Temperature Range | Humidity Range | Shows current condition |
| COM 20°C to | 25°C[68°F to 77°F] | 40%RH-70%RH | Ideal relative humidity and temperature |
| WET -5°C to | 0°C[23°F to122°F] | OVER70%RH | Contains excess moisture |
| DRY -5°C to | 0°C[23°F to122°F] | BELLow40%RH | Contains inadequate moisture |
CLOCK WINDOW
RADIO CONTROLLED TIME
The radio controlled signal for time (DCF 77) is transmitted from the central atomic clock in Frankfurt/Main in short intervals. It has a reception range of approx. 1500 km. If the tower icon is not fully lit, or if the time and date are not set automatically, please consider the following:
- During night-time hours, atmospheric disturbances are typically less severe and radio signal reception may improve. A single daily reception is sufficient enough to keep the clock accuracy within 1 second.
• Make sure the unit is positioned at 2 meters distance from any interference source such as a TV, computer monitor, microwave, etc.
- Within concrete wall rooms such as basements or off ca buildings, the received signal may be weakened. Always place the main unit near the window for better reception. Once the radio controlled time signal is received, the date and time will be set automatically, and the [icon will appear.
| Icon Time Signal Reception Strength | |
| [Flashing] Undelled data | |
| No Reception for the▲ | past 24hours |
| Mean signal, but can be decoded | |
| Spring signal | |
The radio controlled clock receiver is programmed so that it will search for the time signal daily at 0:00, 3:00, 6:00, and 12:00 am.
- To enable or disable the radio controlled time receiver, press and hold UP ( ▲ button for 3 seconds. If atomic time reception is activated, a tower icon will start flashing. If reception is disabled, the tower icon will disappear.
- If the time signal has not been received in 8 minutes, you may set the time manually.
MANUAL SETTINGS
To select the time mode, press UP (▲) or DOWN (▼) until the IN icon 📄 flashes with a beep sound alert.
TIME AND CALENDER
- Press and hold the MODE button until the day of week language abbreviation "EN" will flash
- Press the UP | ▲ | or DOWN (▼) selecting the day of the week in English, German, French, Italian, Spanish, Dutch or Swedish.
• Alter the language of weekday is set, press the MODE button to confirm and move to the next parameter (year)
- Continue setting the year, month, day, time format (12 or 24 hours), local hour and minutes, using the same technique
- After programming is complete the display will return to the default hour and minutes with seconds display.
CLOCK ALARMS
There are two time alarms - Weekday alarm (WW) and Single day alarm (S) - and one Ice Warning Alarm (PRE-AL).
- If Weekday (p-w) alarm is activated, it will sound at the set time and the alarm icon will flash Mondays through Fridays
- If Single (10S) day alarm is activated, it will sound at the set time and the alarm icon will flash only for this specific day and will not activate on subsequent days
- If Ice Warning Alarm (PRE-AL) is activated, in will sound at the set time and alarm icon will flash once the remote temperature for Channel One (1) will reach 0°C (32°F) and below
NOTE: Ice Warning Alarm can be set only if one or both - Weekday or Single alarm - are programmed.
SETTING THE WEEKDAY (W) AND SINGLE DAY (S) ALARMS
- Press ALARM button once to enter into the alarms setting mode. The default alarm is a Weekday alarm ( 10W) The abbreviation "OFF" with a letter " 10W" next to it will be displayed, if the alarm has not been set previously
- Press and hold the ALARM button for two seconds. The hour digit will ll ash
- Adjust the hour using the UP ( ▲ or DOWN | ▼ buttons
- Press the ALARM button again. The minute digits will 11 ash
- Adjust the minutes using the UP ( ▲ or DOWN ( ▼ buttons
- Press the ALARM button again to confirm and the weekday alarm time will be set
- Set Single | (a) day alarm if desired in the same manner
SETTING THE ICE WARNING ALARM (PRE-AL)
If Weekday (W) or Single day (S) alarm is MODE, the Ice Warning Alarm (Pre-AL) can be programmed.
- Press the ALARM button once to enter into the Ice Warning Alarm setting mode. The abbreviation OFF with a PRE-AL next to it will be displayed.
- Press and hold the ALARM button for two seconds. The number 30 will flash, meaning that if selected, the alarm will sound 30 minutes earlier than the Weekday or Single alarm.
- Select the desired Ice Warning Alarm interval in 15 minutes increments between 15 and 90 minutes, using the UP ( ▲) or DOWN ( ▼) buttons
- Press the ALARM button to confirm and exit from the alarm setting mode.
ACTIVATING/ DEACTIVATINSALARMS
- Press the ALARM button to enter into the desired alarm mode.
- Press UP (▲) to activate alarm and the corresponding icons -w (ogr PRE-AL will be displayed.
- Press DOWN (▼) to deactivate alarm until "OFF" is displayed.
MAINTANANCE
CHANGING BATTERIES
- If the low battery indicator lights up, replace batteries in the corresponding unit.
- Do not mix old and batteries.
CLEANING
The main unit and remote sensors housings can be cleaned with a damp cloth. Small parts can be cleaned with a cotton tip or pipe-cleaner. Never use abrasive or corrosive cleaning agents or solvents. Do not immerse electronic components in water.
TROUBLESHOOTING
Check here before contacting customer service.
| Issue Symptom | Solution | |
| Main unit | Radio Controlled Time signal is not received | Place unit by the window and keep it there overnight |
| Remote sensor | Cannot locate remote sensor | Check batteries |
| Check location | ||
| Press and holdDOWN(▼)button on the main unit to search for the signal form the remote sensor | ||
| Data does not match data on the main unit | Initiate manual sensor search (Press and holdDOWN(▼)button on the main unit) |
PRECAUTIONS
This product is engineered to give you years of satisfactory service if handled carefully. Here are a few precautions:
- Do not immerse the units in water.
- Do not clean the units with abrasive or corrosive
materials. They may scratch the plastic parts and corrode the electronic circuits. - Do not subject the product to excessive force, shock, dust, temperature, or humidity, which may result in malfunctions, shorter lifespan, damaged batteries, and damaged parts.
- Do not tamper with the units internal components. Doing so will invalidate the warranty and may cause damage. These units contain no user-serviceable parts.
- Use only fresh batteries. Do not mix new and old batteries.
- Read the user's manual thoroughly before operating the units.
SPECIFICATIONS
Main Unit
Indoor Temperature
Proposed operating range: 5°C to +50°C (23.0°F to 122.0°F) Temperature resolution: 0.1°C/0.2°F
User-selectable (°C or °F) temperature display
Humidity (Indoor)
Operating Range: 30% to 80%
Resolution: 1% R.H.
Weather Forecast: in seven large icons: sunny, slightly
cloudy, cloudy, rainy, heavy rainy, snowy and heavy snowy. Maximum number of remote persons?
Maximum Humber in Remote Sensors.
Headings update interval: every 45 seconds Low battery indicator
Clock
Radio Controlled time (DCF77)
12/24 hour time format
Crescendo 2 minutes alarm with 8 minutes snooze
Barometric Pressure
Measuring Range: 14.75 inHg to 32.44 inHg (500 Hpa to
1100Hpa; (374.5 mmHg to 023.0 mmHg)
Restitution: t.ous inHy (d.1 Rja, d.ua himHy)
Altitude Compensation Range: -657 ft to 16404 ft (-200m to 500m)
-5000 m 2
Remote Sensor
Remote Temperature
Proposed operating range
-10°C to + 60°C (14°F to + 140°F)
Temperature resolution: 0.1°C/0.2°F
Humidity (Outdoor)
Operating Range: 30% to 80%
Resolution: 1% R.H.
Transmitting Interval: around 47 seconds
RF Transmission Frequency: 433 MHz
RF range: Maximum 30 meters (Open area)
Temperature transmission cycle: approximately 45 seconds
Wall-mount of Table stand
Power
Main unit: 2 CR2032 size 3V batteries
Remote Sensor: 2 AAA size 1.5V batteries
Dimensions
Main unit: 178|L| × 120|H| × 9.5|W| mm
Remote sensor: 37.5(L) x 110(H) x 23(W) mm

Mode d'emploi
INTRODUCTION
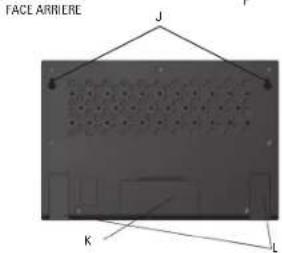
A. COMPARTIMENT A PILES
A. BATTERIJVAK
A. WEER/LUCHTDRUK
WEERGAVE VAN DE BEHAAGLIJKHEIDSFACTOR
A. KOYTI MPATAPIΩN
A POGODA / CISNIENIE ATMOSFERYCZNE
B. TEMPERATURA / WILGOTNOSC POWIETRZA
C. ZEGAR
D. Przycisk ▼
( in W ) I JEDNORAZOWEGO BUDZENIA ( in S )
A. BATERIOVA PRIHRÁDKA
Pro dvé baterie velikosti AAA.
A. PRIEHRADKA NA BATÉRIE
Dimenzované pro dve batérie typu AAA.
B. OTVOR PRE MONTAŽ NA STENU
A. POČASIE / TLAK VZDUCHU
B. TEPLOTA / VLHKOST VZDUCHU
C. HODINY
D. Tlačidlo ▼


- WETTER / LUFTDRUCK
- TEMPERATUR / LUFTFEUCHTE
- UHR
- TASTE ▼
- OPERATING INSTRUCTION
- INTRODUCTION
- IN THIS PACKAGE, YOU WILL FIND
- INSTALLATION
- NOTE
- BEFORE YOU BEGIN
- REMOTE TEMPERATURE AND HUMIDITY SENSOR (TS21) FEATURES
- BATTERY COMPARTMENT
- WALL-MOUNT RECESSED HOLE
- MOUNTING
- PLACEMENT
- OPERATION
- MAIN UNIT
- FEATURES
- TIME
- WEATHER
- WEATHER/ PRESSURE WINDOW
- TEMPERATURE/ HUMIDITY WINDOW
- CLOCK WINDOW
- DOWN | ▼ | BUTTON
- ALARM BUTTON
- CHANNEL BUTTON
- MODE BUTTON
- UP | ▲ BUTTON
- MEM/ HISTORY BUTTON
- WALL-MOUNT HOLE
- TABLE STAND
- GETTING STARTED
- WEATHER FORECAST
- PRESSURE OPERATION
- SETTING INITIAL PRESSURE PARAMETERS
- SELECT PRESSURE UNITS OF MEASURE
- VIEWING PRESSURE AND ALTITUDE INFORMATION
- PROGRAMMING SEA LEVEL PRESSURE
- (NOT REQUIRED IF YOU DID ALTITUDE)
- CHANGING PRESSURE AND ALTITUDE UNITS
- VIEWING SEA LEVEL PRESSURE HISTORY
- VIEWING PRESSURE, TEMPERATURE AND HUMIDITY CHARTS
- MOON PHASE ICONS
- REMOTE SENSORS STATUS
- SEARCH FOR REMOTE SENSORS
- VIEWING REMOTE (CHANNEL) TEMPERATURE AND
- HUMIDITY
- STATIC DISPLAY
- CHANNEL AUTO-SCAN DISPLAY
- PROGRAMMING TEMPERATURE IN CELSIUS OR
- FAHRENHEIT
- SETTING TEMPERATURE ALARM
- VIEWING MAX/MIN AND MINIMUM READINGS
- RESETTING TEMPERATURE MEMORIES
- COMFORT LEVEL INDICATORS
- RADIO CONTROLLED TIME
- MANUAL SETTINGS
- TIME AND CALENDER
- CLOCK ALARMS
- SETTING THE ICE WARNING ALARM (PRE-AL)
- ACTIVATING/ DEACTIVATINSALARMS
- MAINTANANCE
- CHANGING BATTERIES
- CLEANING
- TROUBLESHOOTING
- PRECAUTIONS
- SPECIFICATIONS
- INDOOR TEMPERATURE
- CLOCK
- RADIO CONTROLLED TIME (DCF77)
- BAROMETRIC PRESSURE
- REMOTE SENSOR
- REMOTE TEMPERATURE
- HUMIDITY (OUTDOOR)
- POWER
- DIMENSIONS
- MODE D'EMPLOI
- COMPARTIMENT A PILES
- BATTERIJVAK
- WEER/LUCHTDRUK
- WEERGAVE VAN DE BEHAAGLIJKHEIDSFACTOR
- KOYTI MPATAPIΩN
- A POGODA / CISNIENIE ATMOSFERYCZNE
- TEMPERATURA / WILGOTNOSC POWIETRZA
- ZEGAR
- PRZYCISK ▼
- ( IN W ) I JEDNORAZOWEGO BUDZENIA ( IN S )
- BATERIOVA PRIHRÁDKA
- PRIEHRADKA NA BATÉRIE
- OTVOR PRE MONTAŽ NA STENU
- POČASIE / TLAK VZDUCHU
- TEPLOTA / VLHKOST VZDUCHU
- HODINY
- TLAČIDLO ▼
Brand : HAMA
Model : EWS-440
Category : Weather Station