
KBL 713 - Food Processor Koenic - Free user manual and instructions
Find the device manual for free KBL 713 Koenic in PDF.
| Brand | Koenic |
| Model | KBL 713 |
| Product type | Food processor (blender) |
| Power supply | 220-240 V ~ 50/60 Hz, 700 W |
| Protection class | Class I (with grounding) |
| Number of speeds | 3 (1: low, 2: high, P: pulse) + stop (0) |
| Bowl capacity | Up to MAX mark (graduations in liters, cups, and oz) |
| Included accessories | Measuring cup, lid with sealing ring, bowl, blade with sealing ring, coupling, motor unit |
| Materials | Bowl and lid made of plastic, blade made of stainless steel |
| Care and cleaning | Blade, seals, lid, measuring cup, and bowl are dishwasher safe (max 70°C). Wipe the motor unit with a damp cloth. Do not immerse the motor unit. |
| Safety | Blades are very sharp – handle with care. Do not exceed 3 minutes of continuous operation. Do not blend hot liquids. Unplug before cleaning or changing accessories. Bowl locking is mandatory. |
| Intended use | Blending food, for household use only |
| Repairability | Spare parts available from the manufacturer. Power cord replaceable by a professional. |
| Warranty | Statutory warranty (2 years in France) |
Frequently Asked Questions - KBL 713 Koenic
User questions about KBL 713 Koenic
0 question about this device. Answer the ones you know or ask your own.
Ask a new question about this device
Download the instructions for your Food Processor in PDF format for free! Find your manual KBL 713 - Koenic and take your electronic device back in hand. On this page are published all the documents necessary for the use of your device. KBL 713 by Koenic.
USER MANUAL KBL 713 Koenic
- Before connecting the appliance to a socket outlet, make sure the voltage indicated on the appliance corresponds to your local mains voltage.
- For safety reasons, this class I appliance is provided with a plug with earth connection. Always connect this appliance to a mains socket outlet with a protective earthing vconnection.
- This appliance is not intended for use by persons (including children) with reduced physical, sensory or mental capabilities, or lack of experience and knowledge, unless they have been given supervision or instruction concerning use of the appliance by a person responsible for their safety. Children should be supervised to ensure that they do not play with the appliance.
- If the supply cord is damaged, it must be replaced by the manufacturer or its service agent or similarly qualified persons in order to avoid hazard.
- Caution: Risk of injury. The cutting blades are very sharp. Use care when handling the blades, emptying the bowl, during cleaning and storage.
Always disconnect the blender from the supply when unattended and before assembling, disassembling or cleaning. - Do not allow children to use the blender without supervision.
- Switch off the appliance and disconnect from the supply before changing accessories or approaching parts that move in use.
- If the blades get stuck, unplug the appliance before removing the ingredients that block the blades.
- Only use with the stand provided.
- CAUTION: Ensure that the blender is switched off before removing it from the stand.
-
Do not immerse the motor unit in water or any other liquid, nor rinse it under the tap. Only use a moist cloth for cleaning the motor unit.
-
The appliance is intended for household use only. Do not use the appliance for purposes other than described in this manual in order to avoid hazardous situation.
- Do not use outdoors.
- Do not exceed the quantities and processing times indicated in this manual.
- Do not use attachments other than recommended by the manufacturer or specified in this manual.
- Do not operate this blender longer than indicated in the user manual when blending or chopping heavy loads. After this amount of time, let the appliance cool down sufficiently before next operation. None of the recipes in this user manual constitute heavy loads.
- Never carry or pull the appliance by the supply cord. Do not pull the supply cord over sharp edges. Do not jam or bend it.
- Never put the appliance or supply cord on hot surfaces or near open flames.
- Before switching on, make sure the jug is in place with the lid and measuring cup being properly assembled. This appliance will not work without the jug in place.
- Do not use the appliance without any load in the jug.
Intended use
This appliance is only intended for blendig food. Only use according to these instructions. Improper use is dangerous and will void any warranty claim. Observe the safety instrc tions.
Disposal

The crossed-out wheeled bin logo requires the separate collection of waste electric and electronic equipment
(WEEE). Electric and electronic equipment may contain dangerous and hazardous substances. Do not dispose of this appliance as unsorted municipal waste. Return it to a designated collection point for the recycling of WEEE. By doing so, you will help to conserve resources and protect the environment. Contact your retailer or local authorities for more information.
Technical Data
Rated voltage: 220-240 V
Rated power input: 700 W
Rated frequency: 50/60 Hz
English
Congratulations
Thanks for your purchase of a KOENIC product. Please read this manual carefully and keep it for future reference.
Before first time use
Clean the blender 2-3 times as described in Cleaning and care.
Using the blender
- Place the jug on the motor unit and lock it.
- Cut the ingredients into small dices and put them into the jug. Do not exceed the MAX markings (LITRES; CUPS and OZ).
- Firmly close the lid; fit measuring cup on the lid and turn until it locks into place.
- Turn speed selector to desired position. When using pulse function, hold the switch at P position until finished.
- When mixture has reached desired consistency, turn speed selector to off position 0.
- Unlock the jug; remove the lid and serve.
Cleaning and care
- Turn coupling clockwise to remove it from the jug. Hold in upright position in order for the blade not to fall off.
- Carefully remove blade from the coupling. Remove seal ring from the blade.
- Remove measuring cup and seal ring from the lid.
- Clean the blade, seal rings, lid, measuring cup and jug in hot soapy water.
- Dry all parts and then reassemble.
Note
The blade, lid, measuring cup and jug can be cleaned in the dishwasher, but not hotter than 70^
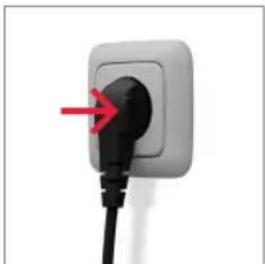
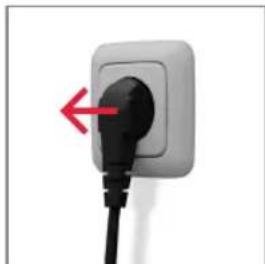
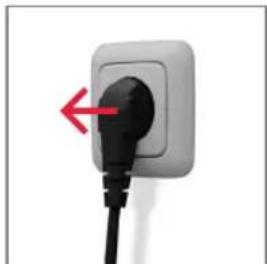
Before use plug the blender.
After use unplug the blender.
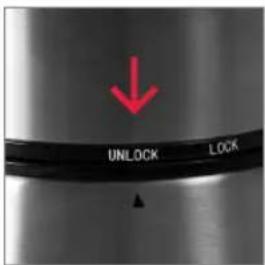
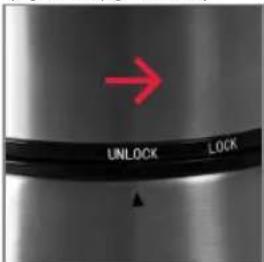
Align UNLOCK with the arrow on the motor unit.

Turn clockwise LOCK to lock the jug.
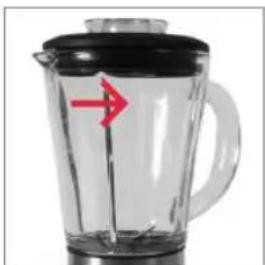
Fill the jug, do not exceed the MAX markings.
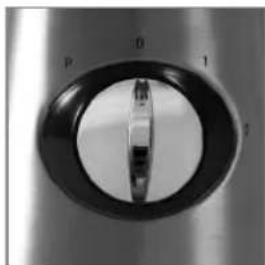
Set desired speed to 1, 2 or P (Pulse).

Operate the blender not longer than 3 minutes at a time.
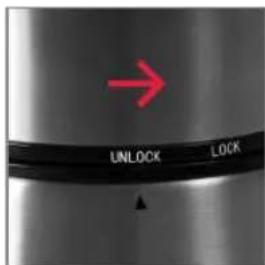
Turn anticlockwise to unlock the jug.

EN
Note
The best proportion of fruit and water is 2:3.
- Ingredients can be added through the opening in the lid; replace the measuring cup afterwards.
Speed settings
1 Low speed - liquid ingredients
2 High speed - solid and liquid ingredients
P Pulse - Instant power bursts
0 Off
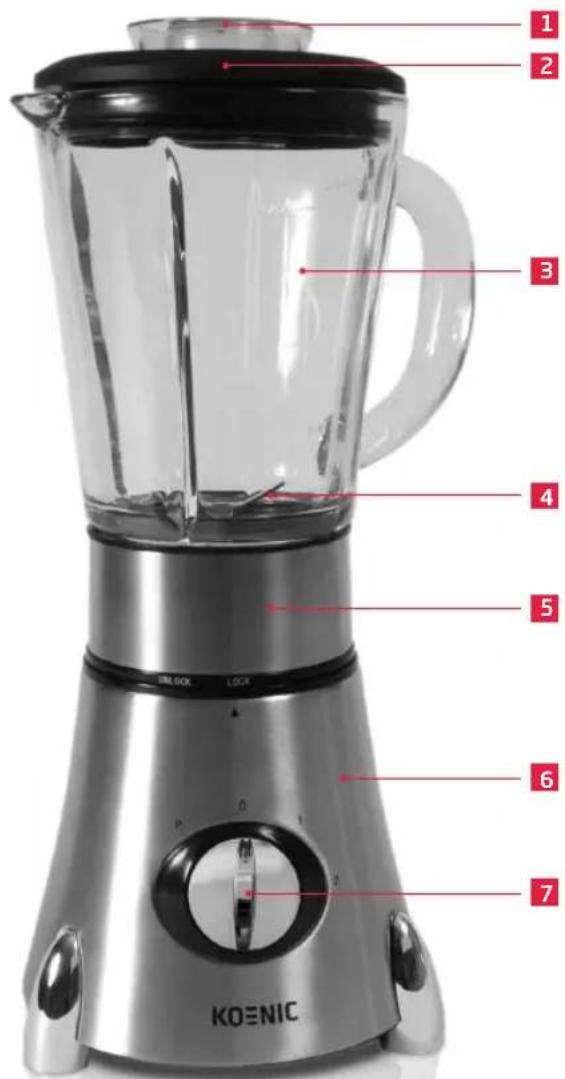
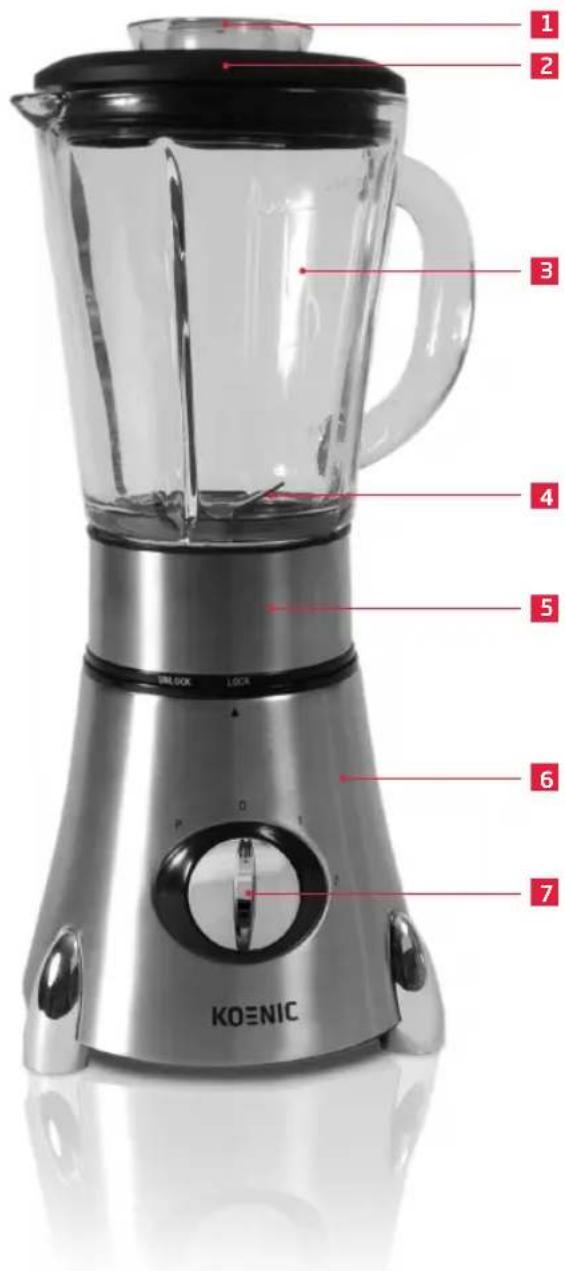
1 Measuring cup
2 Lid with seal ring
3 jug
4 Blade with seal ring
5 Coupling
6 Motor unit
7 Speed selector
Caution

The blade is sharp, handle with great care.
- Unplug the appliance before assembling or removing parts.
- Never run the blender empty, with hot liquids or without the lid and measuring cup in place.
Ipea
NcnoAb3OBaHnEM
NOAKHOUHTe Bnky
6AnHepaB CeTb.
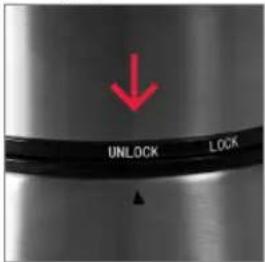
BbipOBHnTe HaAnncb UNLOCK co cTpeKo Ha MOTOPHOM 6AoKe.

HanoHnTe KyBunH, He npebbcnB OTMeKy MAX (MAKC).

He nCnoB3yIte 6aHepdoBwE 3 MNHyT NOpA.
Nocae
NCNOA63OBAHNA
OTKAHOHTe BNAky
6aehepa oT cETn.
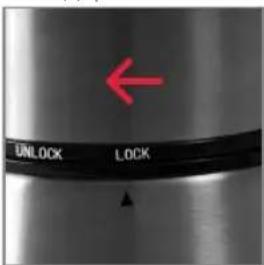
NoBepHnTe no
YacOBoN CTpeAke
(LOCK) AAN BAnKIpOBKn
KYBUnHa.
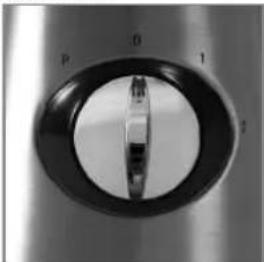
YCTaHOBNTe Tpe6yEmIO CKOpOCTb Ha1,2uP (nybCnpyKUoui).
NoBepHnTe npOTnB yacobOCTpeAKn dApa36oKupoBaHnKaYBwUnHa.

RU
PpMueaHne
- Ayyuee COOTHOWeHne OBOUeN IN BOaBi -2:3.
- INHpeaENbIMoXHO 06abNTb Yepe3 OTBepCTne B KpbIuKe; nocAe 3Toro BCTaBBTe MePbI CTaKaH.
HactpoKn ckopocTn
1 Hn3kajckopoctb-xnkneHrpeaehtbi
2 BbICOKaCKOpocTb-TBepAbleN KUdKne HrpeAneHTbl
P Nylbcnpyouo -6bictpoe nepemueBaHne pactBOpMOn Cmecu
0 Bbika
PpeocTepeXeHne

Hox octpbin,co6aHoaJTe 60abuyo octopoxHOCTb.
- OTKAnouaHte BnAky npnbopa oT ceTu nepead c6bpKo nn CHaTneM qacTe.
- HnB Koem cayae He 3anyckaTe nycToi 6aehep, C ropyIMN XNDKOCTMn nn 6e3 KpbIuKN NAn MepHOrO CTaKaHa Ha MeCTe.
1 MepHbI CTaKaH
2 KpbiWka cynoTHHTeHbHIM KOaUM
3 KyBUNH
4 Hox cyIaOTHTnEaHbHIM KOaBcOM
MyΦτa
6 MoTOpHbI 6AOK
7 NepekAIOUaTeA bckOpocTei
Sakerhetsinstruktioner

Brand : Koenic
Model : KBL 713
Category : Food Processor