
Bravia KD75XG8505 - Television SONY - Free user manual and instructions
Find the device manual for free Bravia KD75XG8505 SONY in PDF.



| Product type | LED 4K HDR Television |
| Brand | Sony |
| Model | Bravia KD75XG8505 |
| Screen size | 75 inches (189 cm) |
| Resolution | 3840 x 2160 (4K Ultra HD) |
| Display technology | LED, Direct backlight |
| HDR functions | HDR10, HLG, Dolby Vision |
| Operating system | Android TV |
| Connectivity | Wi-Fi, Bluetooth, Ethernet |
| HDMI inputs | 4 HDMI inputs |
| USB inputs | 3 USB ports |
| Dimensions (without stand) | Approximately 1673 x 963 x 107 mm (W x H x D) |
| Dimensions (with stand) | Approximately 1673 x 1042 x 401 mm (W x H x D) |
| Weight (without stand) | Approximately 30.8 kg |
| Weight (with stand) | Approximately 32.5 kg |
| Power supply | 220-240 V AC, 50-60 Hz |
| Power consumption (max) | 350 W |
| Standby consumption | Less than 0.5 W |
| Compatible wall mount | SU-WL450 (optional) |
| VESA standard | 300 x 300 mm |
| Speakers | 2 x 10 W stereo |
| Audio functions | Dolby Audio, S-Force Front Surround |
| Maintenance and cleaning | Use a soft, dry cloth. Do not use chemicals. |
| Spare parts and repairability | Parts available from authorized dealers. Repairability index: 7.0/10. |
| Documents provided | Reference guide, Installation guide, Wall mount instructions |
| Warranty | 2 years |
Frequently Asked Questions - Bravia KD75XG8505 SONY
User questions about Bravia KD75XG8505 SONY
0 question about this device. Answer the ones you know or ask your own.
Ask a new question about this device
Download the instructions for your Television in PDF format for free! Find your manual Bravia KD75XG8505 - SONY and take your electronic device back in hand. On this page are published all the documents necessary for the use of your device. Bravia KD75XG8505 by SONY.
USER MANUAL Bravia KD75XG8505 SONY
- In the actual model names, the "□□" indicates numbers and/or characters specific to each model.
To Customers For product protection and safety reasons, Sony strongly recommends that installation of your TV be performed by Sony dealers or licensed contractors. Do not attempt to install it yourself.
To Sony Dealers and Contractors Provide full attention to safety during the installation, periodic maintenance and examination of this product.
Sufficient expertise is required for installing this product, especially to determine the strength of the wall for withstanding the TV's weight. Be sure to entrust the attachment of this product to the wall to Sony dealers or licensed contractors and pay adequate attention to safety during the installation. Sony is not liable for any damage or injury caused by mishandling or improper installation.
For Safety and proper installation, follow the Wall-mount Bracket Operation Instructions, TV Setup Guide and the directions in this manual.
On Safety
Thank you for purchasing this product.
To Customers
Sufficient expertise is required for installing this product. Be sure to subcontract the installation to Sony dealers or licensed contractors and pay special attention to safety during the installation. Sony is not liable for any damages or injury caused by mishandling or improper installation, or installing any other than the specified product. Your Statutory Rights (if any) are not affected.
To Sony dealers
Sufficient expertise is required for installing this product. Be sure to read this instruction manual thoroughly to do the installation work safely. Sony is not liable for any damages or injury caused by mishandling or improper installation. Please give this manual to the customer after installation.
This instruction manual shows the correct handling of the product and important precautions necessary to prevent accidents. Be sure to read this manual thoroughly and use the product correctly. Keep this manual available for future reference.
Products by Sony are designed with safety in mind. If the products are used incorrectly, however, it may result in a serious injury through fire, electric shock, the product toppling over, or the product dropping. Be sure to observe the precautions for safety to prevent such accidents.
CAUTION
Specified products
This Wall-Mount Bracket is designed for use with the specified products. For TVs, refer to their Reference Guide to verify that the Wall-Mount Bracket can be used.
To Customers
WARNING
If the following precautions are not observed, serious injury or death through fire, electric shock, or the product dropping can result.
Be sure to subcontract the installation to licensed contractors and keep small children away during the installation.
If the Wall-Mount Bracket or the TV is not installed correctly, the following accidents may occur. Be sure licensed contractors carry out installation.
The TV may fall and cause a serious injury such as a bruise or a fracture. - If the wall on which the Wall-Mount Bracket is installed is unstable, uneven, or not perpendicular to the floor, the unit may fall and cause injury or property damage. The wall should be capable of supporting a weight of at least four times the TV weight. (Refer to your TV's Reference Guide for its weight.) - If the installation of the Wall-Mount Bracket on the wall is not sufficiently sturdy, the unit may fall and cause injury or property damage.
Be sure to subcontract moving or dismounting of the TV to licensed contractors.
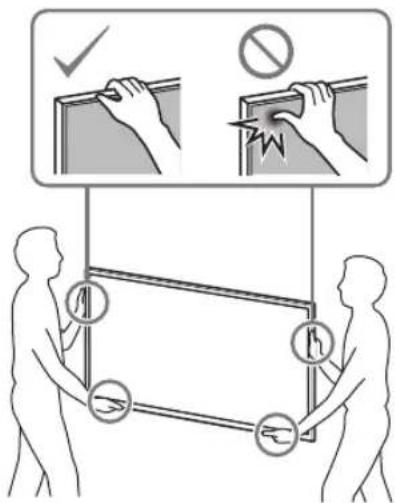
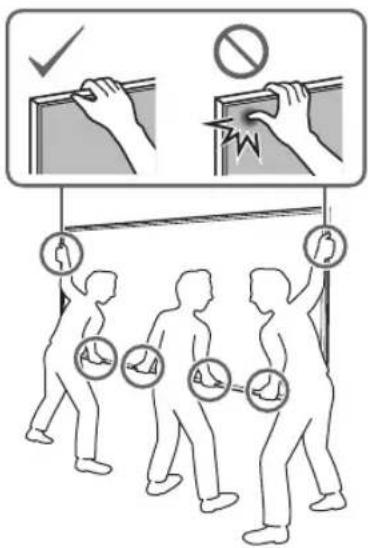
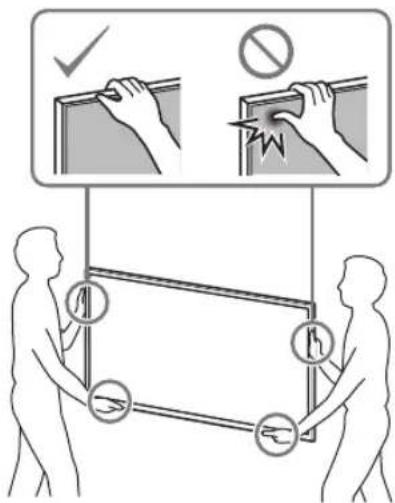
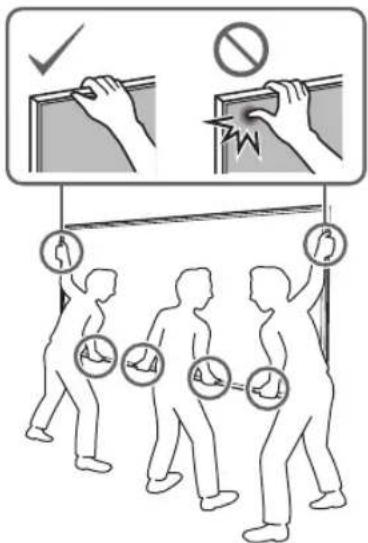
If persons other than licensed contractors transport or dismount the TV, it may fall and cause injury or property damage. Be sure that two or more persons (three or more persons for 75 inches and above TV set) carry or dismount the TV.
Do not remove screws, etc., after mounting the TV.
If you do so, the TV may fall and cause injury or property damage.
Do not make alterations to the parts of the Wall-Mount Bracket.
If you do so, the Wall-Mount Bracket may fall and cause injury or property damage.
Do not mount any equipment other than the specified product.
This Wall-Mount Bracket is designed for use with the specified product only. If you mount equipment other than specified, it may fall or break, and cause injury or property damage.
Do not apply any load other than the TV on the Wall-Mount Bracket. Do not shake the TV left/right, up/down.
If you do so, the TV may fall and cause injury or property damage.
Do not lean on or hang from the TV.
Do not lean on or hang from the TV as it may fall on you and cause serious injury.
CAUTION
If the following precautions are not observed, injury or property damage may occur.
Do not handle the product with excessive force during cleaning or maintenance.
Do not apply excessive force on the topside of the TV. If you do so, the TV may fall and cause injury or property damage.
Precautions
- If you use the TV installed on the Wall-Mount Bracket for a long time, the wall behind or above the TV may become discolored or the wallpaper may come unstuck, depending on the material of the wall. If the Wall-Mount Bracket is removed after installing it on the wall, the screw holes are left.
- Do not use the Wall-Mount Bracket in a place where it is subjected to mechanical vibrations.
Installing the Wall-Mount Bracket
To Sony Dealers
WARNING
The following instructions are for Sony dealers only. Be sure to read safety precautions described above and pay special attention to safety during the installation, maintenance and checking of this product.
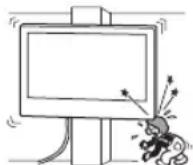
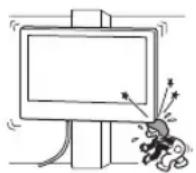
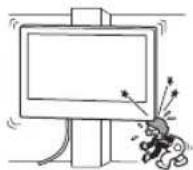
Do not install the Wall-Mount Bracket on wall surfaces where the corners or the sides of the TV protrude away from the wall surface.
Do not install the Wall-Mount Bracket on wall surfaces such as a pillar, where the corners or the sides of the TV protrude away from the wall surface. If a person or object happens to hit the protruded corner or side of the TV, it may cause injury or property damage.
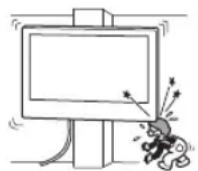
Do not install the TV over or under an air-conditioner.
If the TV is exposed to water leaks or air current from an air conditioner for a long time, it may cause a fire, an electric shock or a malfunction of the TV.
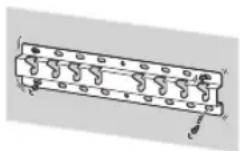
Be sure to install the Wall-Mount Bracket securely to the wall following the instructions in this instruction manual.
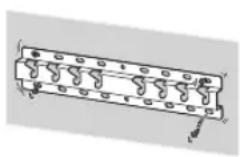
If any of the screws are loose or fall out, the Wall-Mount Bracket may fall and cause injury or property damage. Be sure to use the appropriate screws for the material of the wall and install the unit securely using four or more screws of 8 mm diameter (or equivalent).
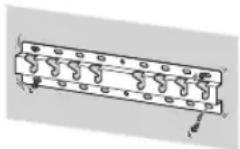
Be sure to use the supplied screws and attachment parts properly following the instructions given in this instruction manual. If you use substitute items, the TV may fall and cause bodily injury to someone or damage to the TV.
Be sure to assemble the bracket properly following the instructed procedure explained in this instruction manual.
If any of the screws are loose or fall out, the TV may fall and cause bodily injury to someone or damage to the TV.
Be sure to tighten the screws securely in the designated position.
If you fail to do so, the TV may fall and cause bodily injury to someone or damage to the TV.
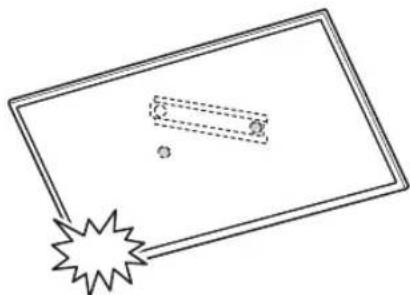
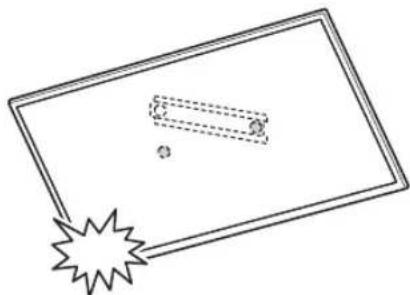
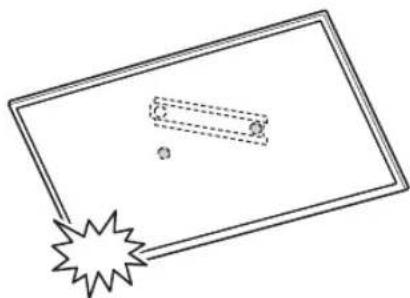
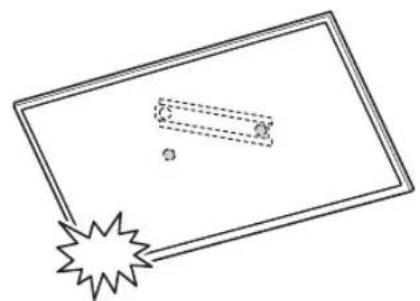
Be careful not to subject the TV to shock during installation.
If the TV is exposed to shock, it may fall or break apart. This may cause injury.
Be sure to install the TV on a wall that is both perpendicular and flat.
If you fail to do so, the TV may fall and cause injury.
After proper installation of the TV, secure the cables properly.
If people or objects get tangled with cables, this may result in injury or damage to the TV.
Do not allow the mains lead or the connecting cable to be pinched.
If the mains lead or the connecting cable is pinched between the unit and the wall or is bent or twisted by force, the internal conductors may become exposed and cause a short circuit or an electrical break. This may cause a fire or an electric shock.
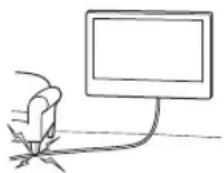
The screws needed to secure the Wall-Mount Bracket to the wall are not supplied.
Use the appropriate screws for the wall material and structure when mounting the Wall-Mount Bracket.
Table of Contents
Preparing for installation. 5
Checking the parts. 5
Deciding on the installation location 6
Installing the Base on the wall 8
Preparing for the installation of the TV. 9
KD-85/75XG85□□, KD-75XG87□□
KD-65/55XG87□□, KD-65/55XG85□□.11
Installing the TV on the wall 13
KD-85/75XG85□□, KD-75XG87□□.13
KD-65/55XG87□□, KD-65/55XG85□□.15
Confirming the completion of the
installation 18
Other information. 18
Specifications. 18
Installing the TV onto the wall
Installation procedure differs, depending on your TV.
Use the Wall-Mount Bracket SU-WL450 to install the TV to the wall.
Note
- Be sure to store the removed screws in a safe place, keeping them away from children.
Preparing for installation
- Have the TV's Reference Guide and Setup Guide at hand before installation.
- Be sure to have a Phillips screwdriver that fits the screws prior to the assembly.
- Confirm the installing position of your TV.
- Prepare four or more screws of 8 mm diameter and one screw of 5 mm or equivalent (not supplied). Select screws suitable for the material of the wall.
Checking the parts
Supplied with SU-WL450
- Verify that all the parts are included.
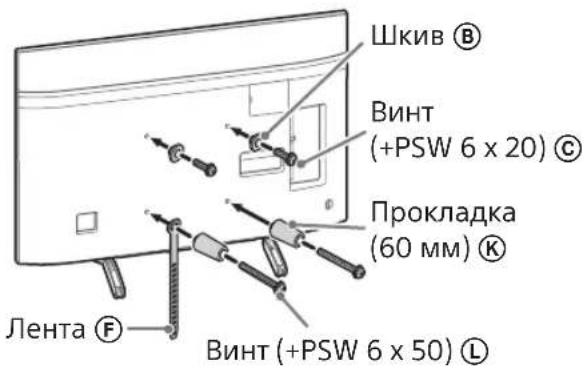
| A Base (20) (1) B Pulley (2) | |
| ◎ PSW 6x20 (4)◎ PSW 4x20 with Bush (2) | |
| ◎ Spacer (20) (2)◎ Belt (1) | |
| ◎ Bush (20) (M4) (2)◎ PSW 4x20 (2) | |
| ① Base Adaptor (2)① | PSW 4x10 (8) |
| ◎ Spacer (60) (2)◎ PSW 6x50 (2) | |
| ◎ Bush (M4) (2)◎ PSW 4x50 (2) | |
Deciding on the installation location
1 Decide on the installation location.
Make sure that the wall has enough space for the TV and is capable of supporting a weight of at least four times that of the TV.
Refer to the following table on installing the TV to the wall. Refer to your TV's Reference Guide for the TV's weight.
Standard mounting Slim mounting Screen centre point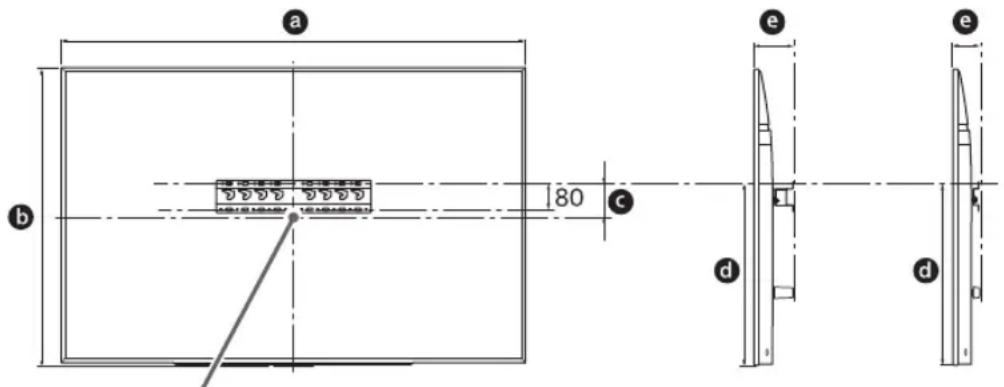
Unit: mm
| Model Name | Display dimensions | Screen centre dimension | Length for mounting | |||
| a | b | c | d | e | ||
| Standard mounting | Slim mounting | |||||
| KD-85XG85□□ | 1,909 | 1,097 | 251 | 803 | 142 | 100 |
| KD-75XG87□□ KD-75XG85□□ | 1,673 | 963 | 107 | 595 | 116 | 75 |
| KD-65XG87□□ KD-65XG85□□ | 1,450 | 836 | 99 | 523 | 115 | 73 |
| KD-55XG87□□ KD-55XG85□□ | 1,231 | 713 | 106 | 468 | 115 | 73 |
Note
- Figures in the table may differ slightly depending on the installation.
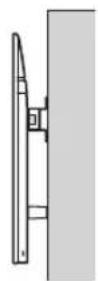
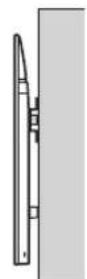
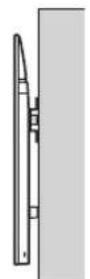
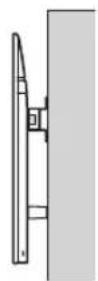
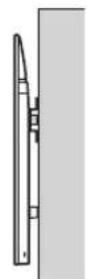
- When your TV is installed on the wall, the upper side of the TV slightly leans forward.
Allow for suitable clearance between the TV and the ceiling and protruding parts of the wall as shown below.
Unit: mm
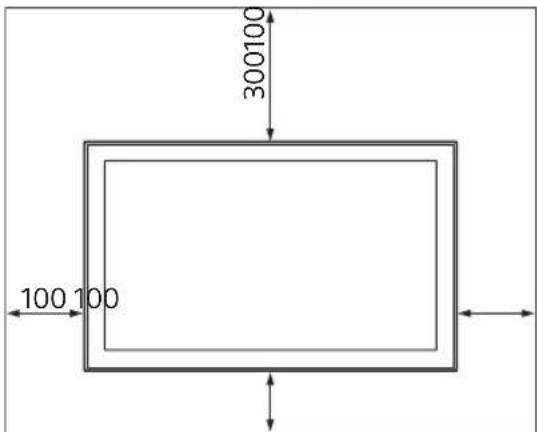
To ensure proper ventilation and prevent the collection of dirt or dust:
- Do not lay the TV set flat, install upside down, backwards, or sideways.
- Do not place the TV set on a shelf, rug, bed or in a closet.
- Do not cover the TV set with a cloth, such as curtains, or items such as newspapers, etc.
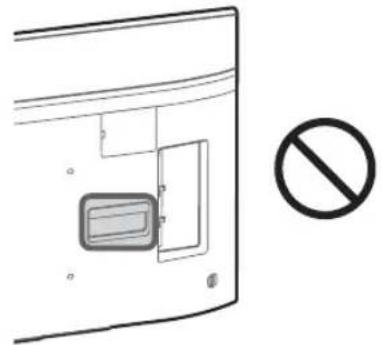
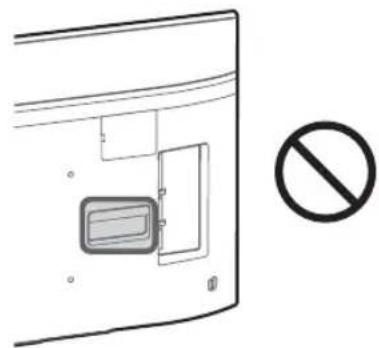
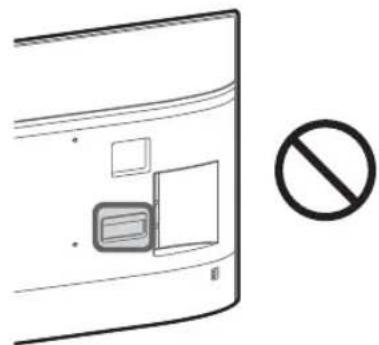
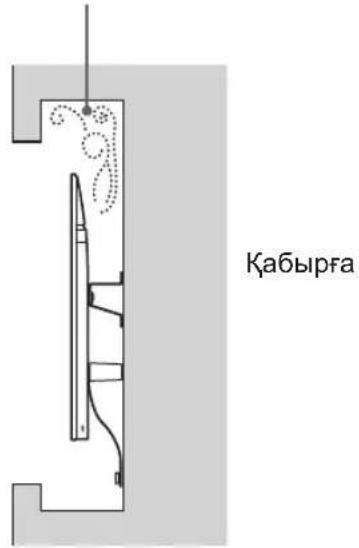
- Do not install the TV set as shown below.
Air circulation is blocked.
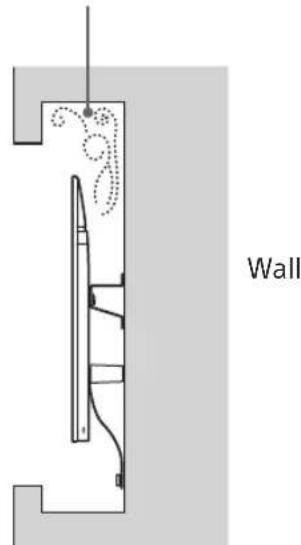
Note
If you intend to route the cables in the wall, make a hole in the wall to insert the cables before beginning the installation.
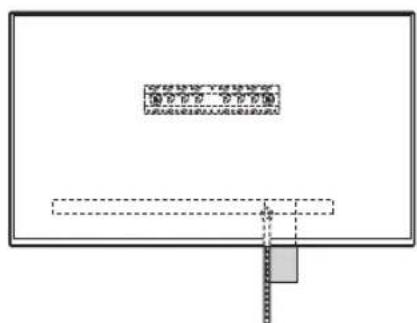
To prevent pinching the cables, prepare a hole in the wall somewhere outside the perimeter of the Base (20) A, Base Adaptor 1 and Spacer (20) E, Spacer (60) K.
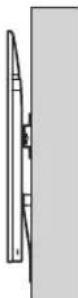
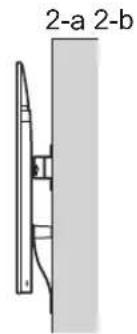
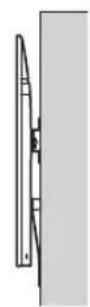
2 Select Wall mounting style. It is selectable as shown below.
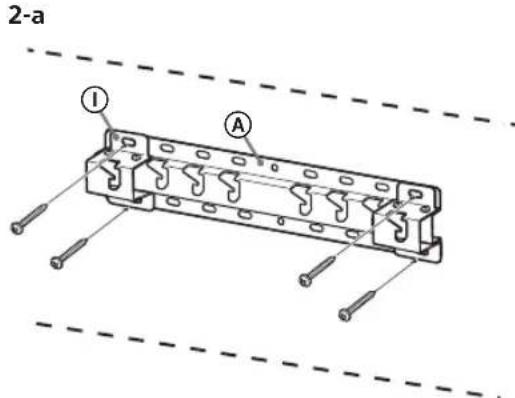
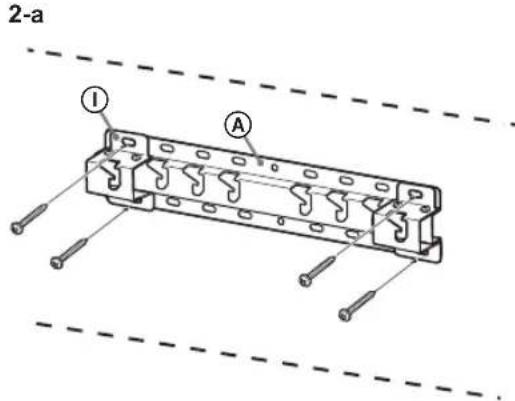
2-a Standard mount
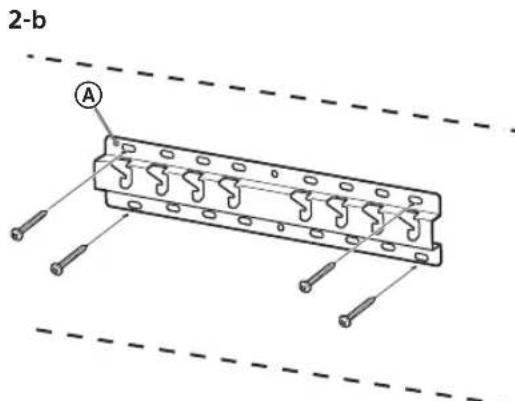
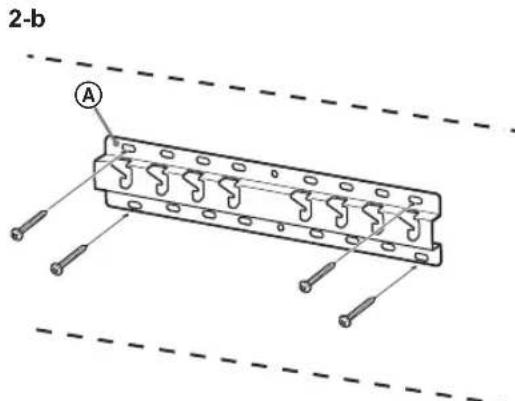
2-b Slim mount
Refer to the table of step 1.
WARNING
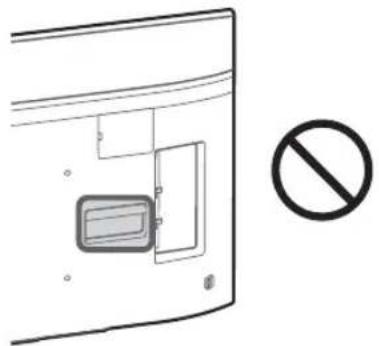
- When 2-b is selected, rear terminal access is limited.
2-a 2-b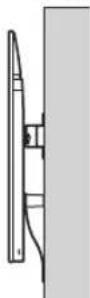
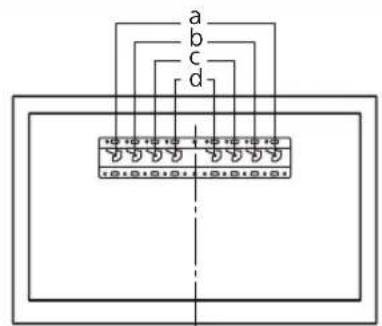
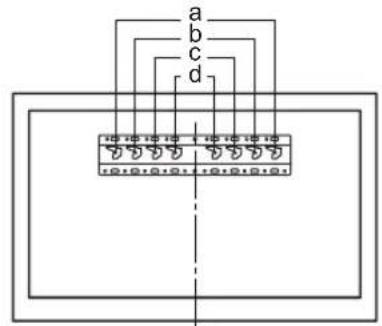
3 Refer to the table below for the Base Adaptor fitting location. If you select 2-b, skip this step.
| Model Name Hook location | |
| KD-85XG85□□ | |
| KD-75XG87□□ | a |
| KD-75XG85□□ | |
| KD-65XG87□□ | |
| KD-65XG85□□ | b |
| KD-55XG87□□ | |
| KD-55XG85□□ | |
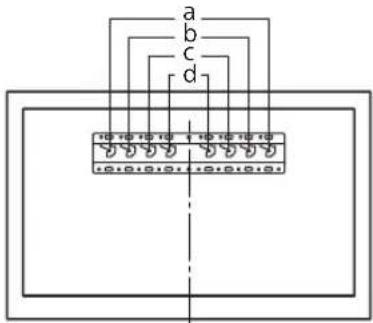
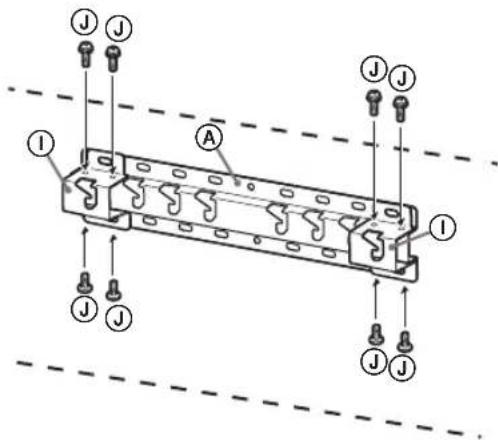
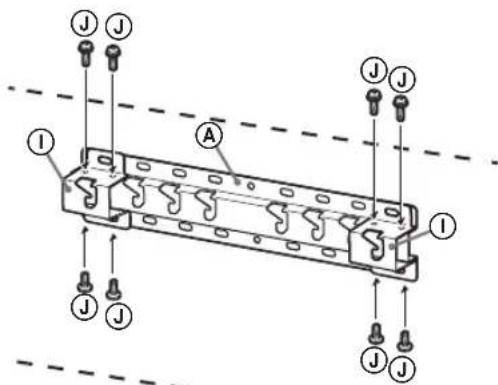
When selecting 2-a, fit the Base Adaptor ① to the Base (20) ④ using Screw (PSW 4x10) ⑧.
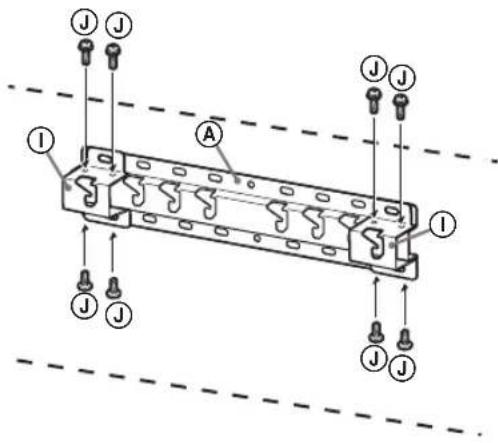
4 Decide the positions of the screws for installing the Base (20) A.
Refer to the specifications on page 18. When selecting 2-a, use the hole positions of Base Adaptor ①.
WARNING
The wall on which the TV will be mounted must be able to support a weight of at least four times that of the TV (refer to your TV's Reference Guide for its weight). Determine the strength of the wall and reinforce it sufficiently if necessary.
Installing the Base on the wall
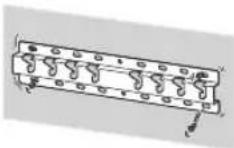
- Use four or more screws of 8 mm diameter or equivalent (not supplied).
- Fit four screws into the holes of the Base Adaptor ① with the Base (20) A (2-a only). Install the Base (20) A horizontally on the wall.
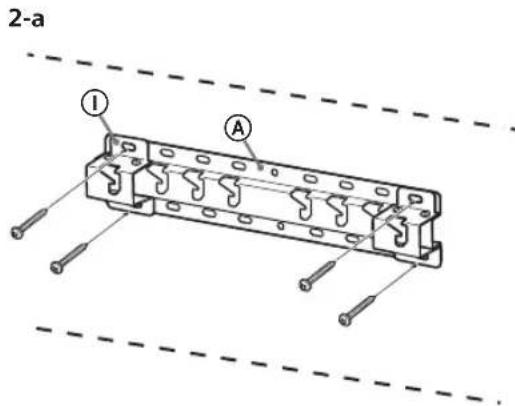
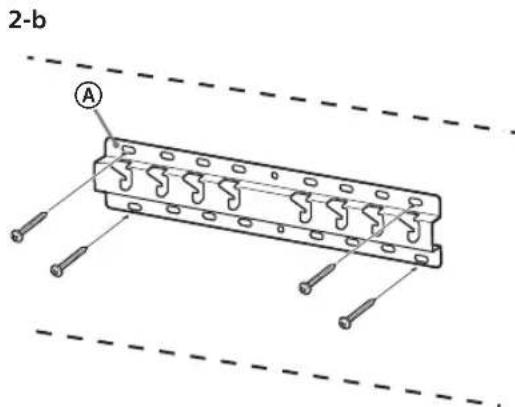
Preparing for the installation of the TV
Refer to the Setup Guide for stand installation.
KD-85/75XG85□□, KD-75XG87□□
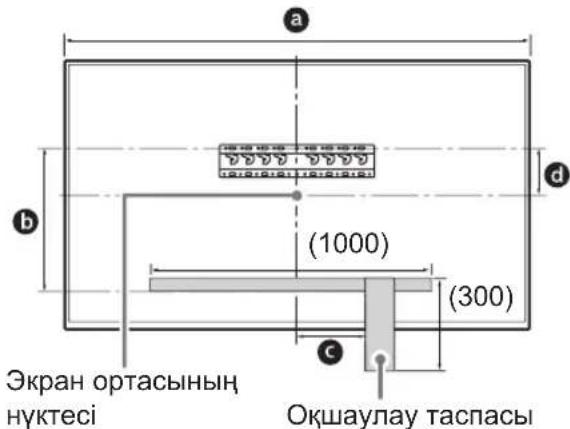
1 Mark the installation location on the wall.
- Use masking tape or similar (not supplied) to mark the location of the TV near the Base or Base Adaptor. Refer to the following table.
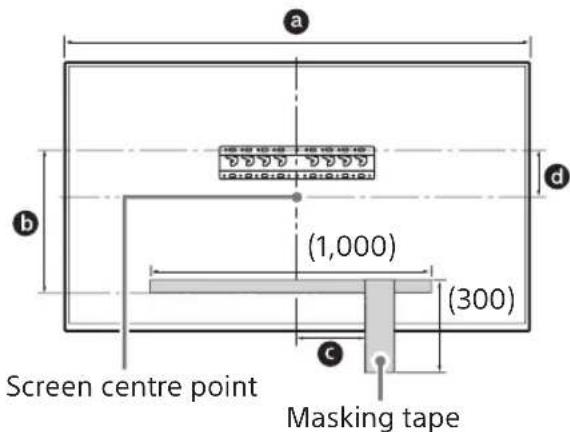
| Model Name | Length for marking | Screen centre dimension | ||
| a | b | c | d | |
| KD-85XG85□□ | 1,909 | 683 | 200 | 251 |
| KD-75XG87□□ KD-75XG85□□ | 1,673 | 468 | 200 | 107 |
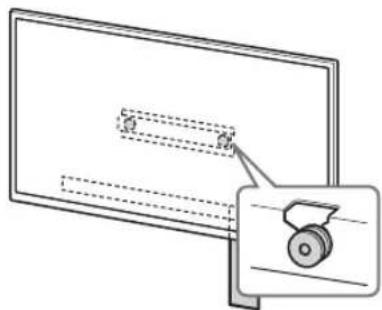
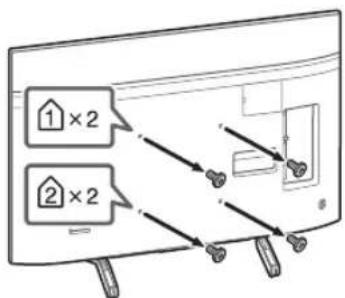
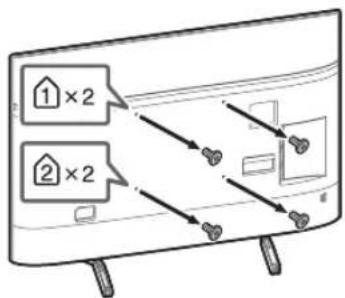
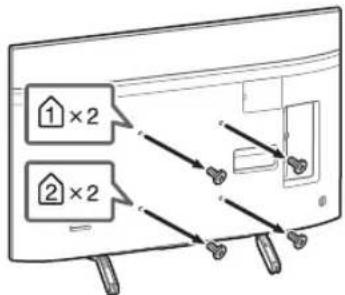
2 Remove the screws from the rear of the TV.
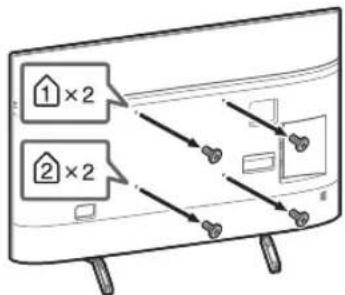
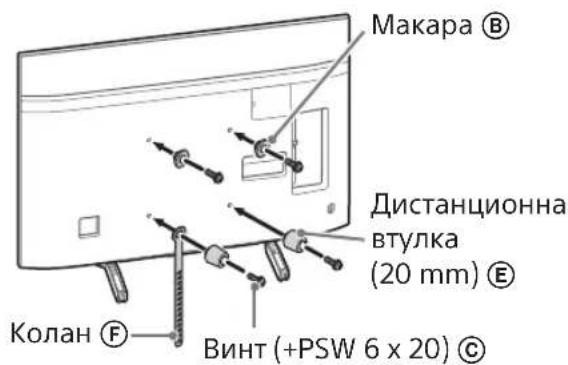
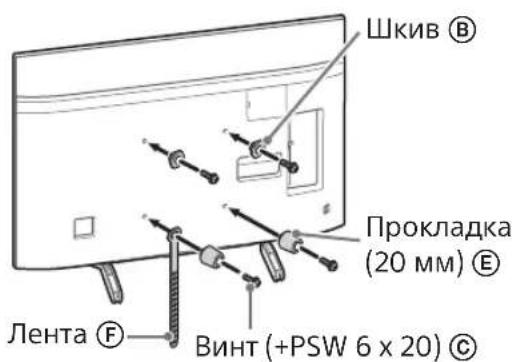
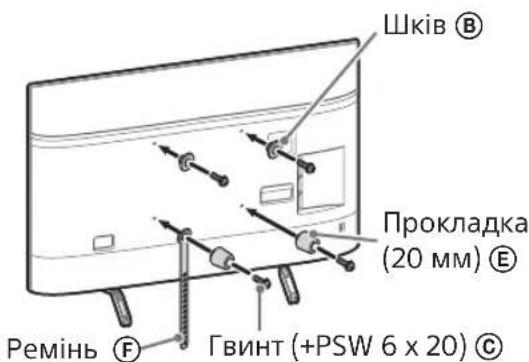
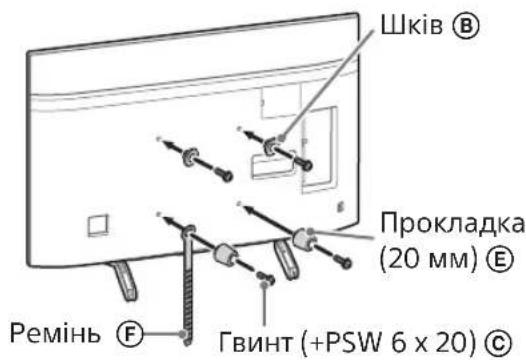
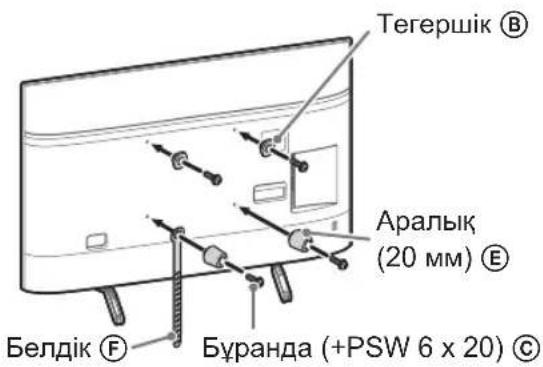
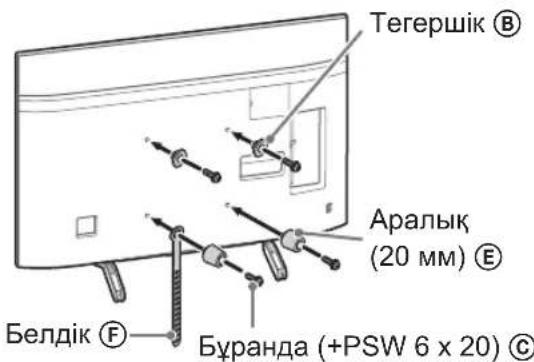
3 Attach the Attachment parts for Wall-Mount Bracket. Check the Attachment parts by referring to "Supplied with SU-WL450" in "Checking the parts" on page 5.
Note
- Firmly secure the Attachment parts using screws.
- When using an electric screwdriver, set the torque setting to approximately 1.5N· m {15 kgf·cm}.
- Be sure to store the used or unused parts in a safe place for future use. Retain this manual for future reference.
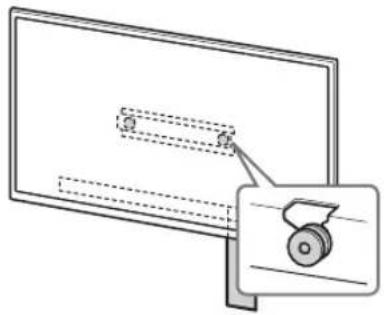
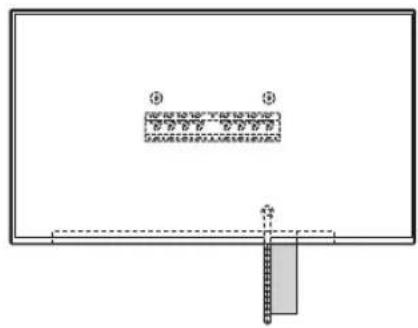
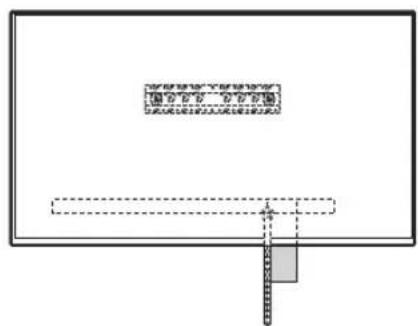
Standard mounting (2-a) Slim mounting (2-b)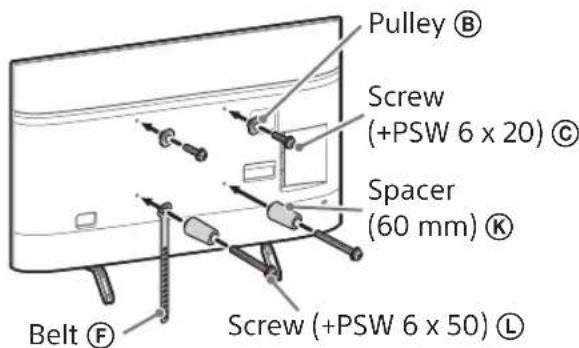
Note
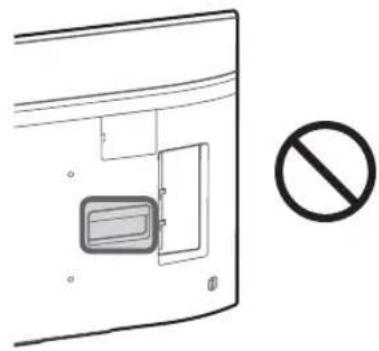
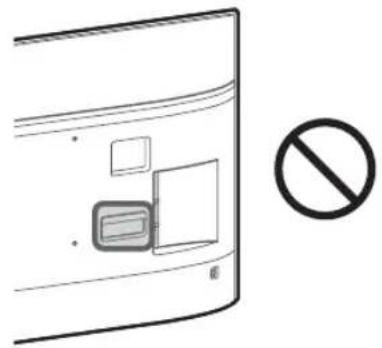
- You cannot use some of the terminals on the rear of the TV when using this mounting style.
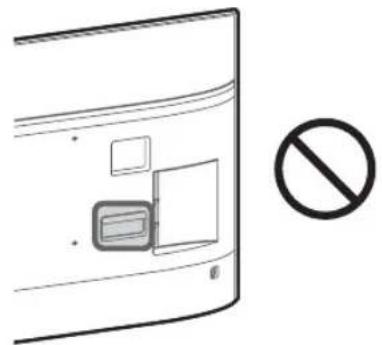
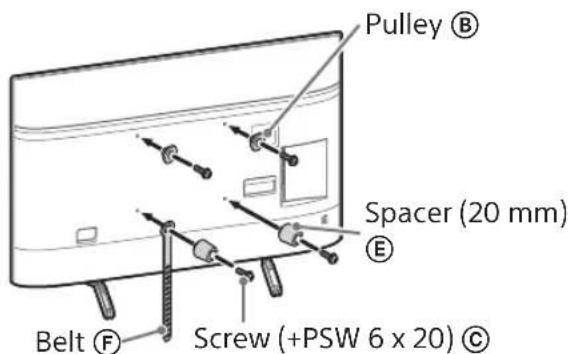
4 Connect the necessary cable(s) to the TV.
Make sure to connect the cables before installing the TV on the wall. You will be unable to connect the cables when the TV is installed. Refer to the Reference Guide supplied with your TV.
Note
- Subcontract the cable routing in the wall to a licensed contractor.
- Bundle the connecting cables to prevent stepping on them before wall mounting.
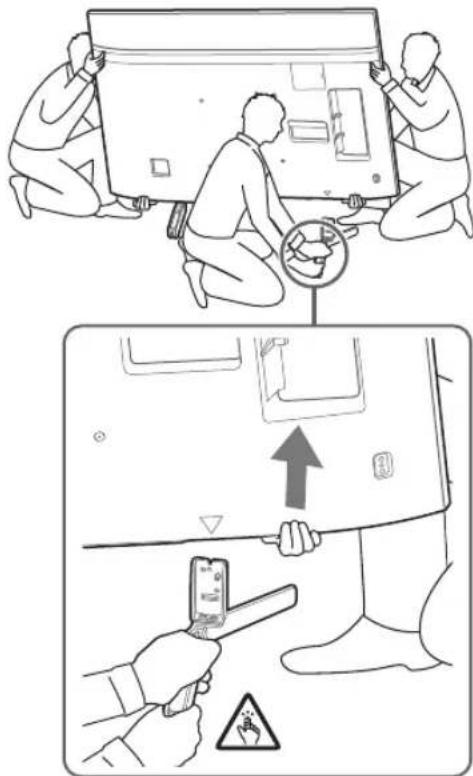
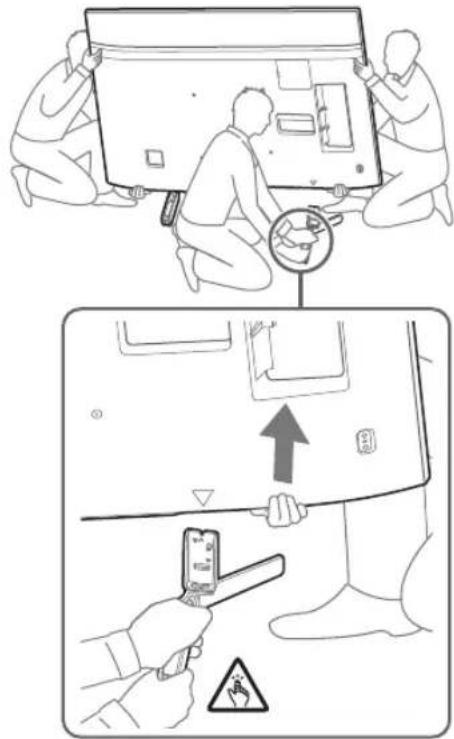
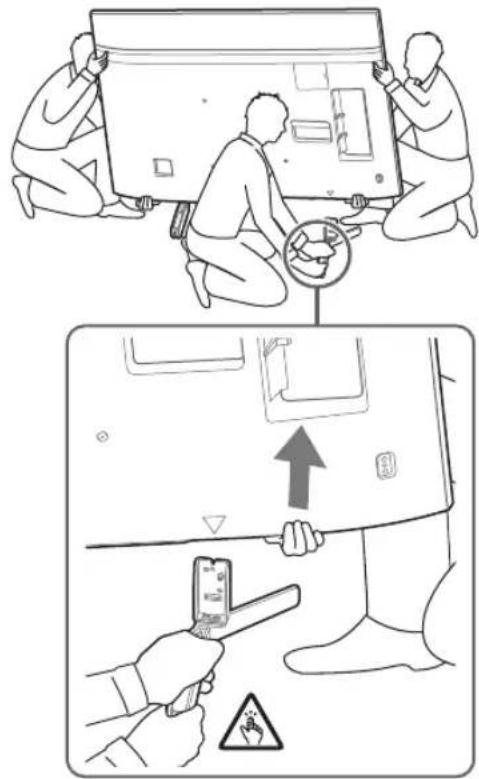
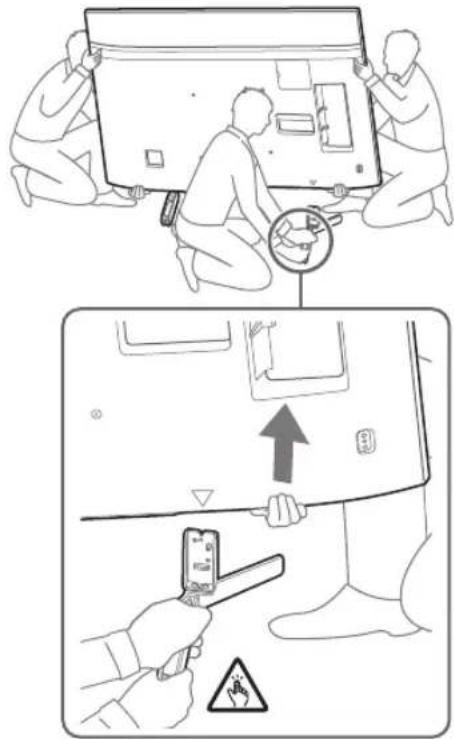
5 Detach the Table-Top Stand from the TV.
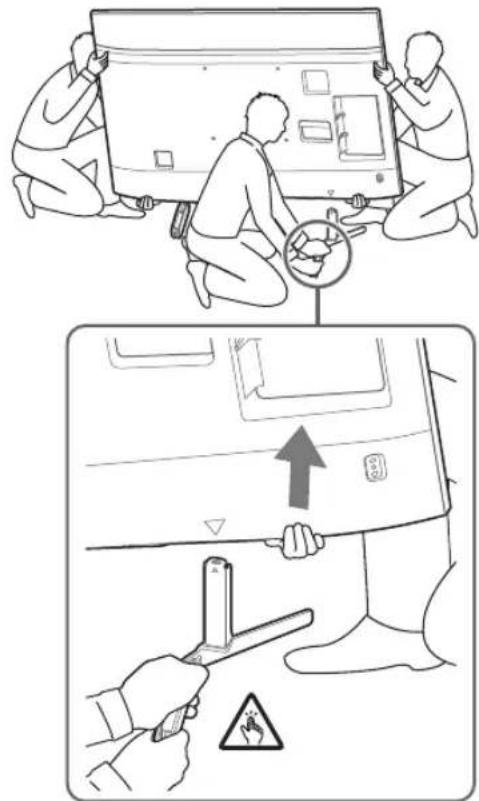
- Remove one side of the Table-Top Stand at a time. Firmly hold the Table-Top Stand securely with both hands while the other people lift up the TV.
KD-85XG85□□
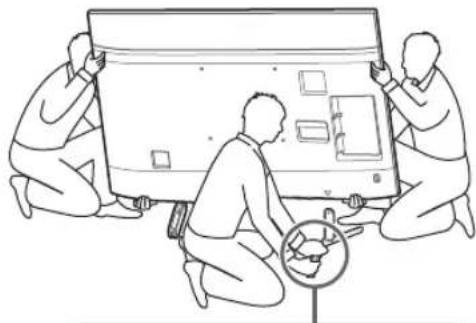
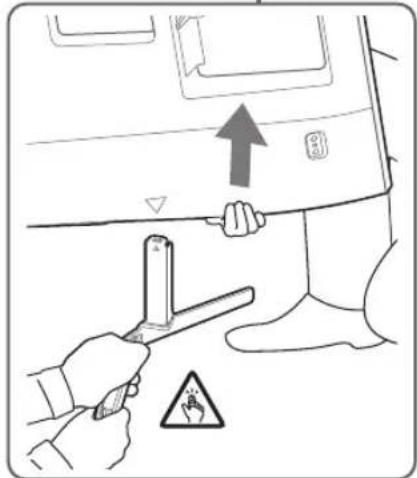
KD-75XG87□□, KD-75XG85□□
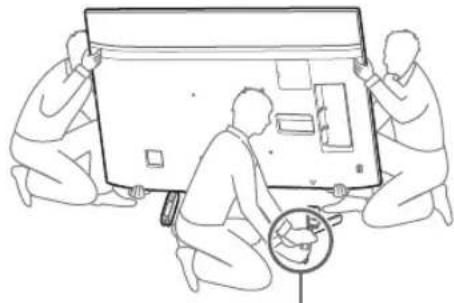
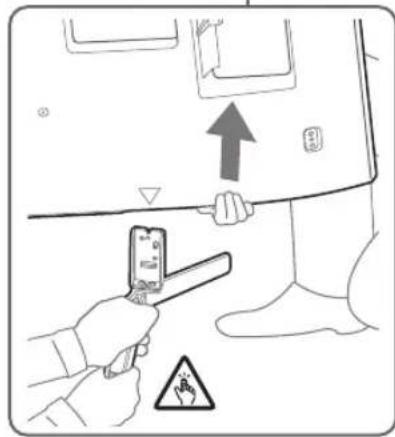
- Repeat the previous step and remove the other side of the Table-Top Stand.
Note
- Three or more people are required to detach the Table-Top Stand.
- Be careful not to use excessive force while detaching the Table-Top Stand from the TV as it may cause the TV set to fall resulting in personal injury or physical damage to the TV. Take care when handling the Table-Top Stand to prevent damage to the TV.
- Be careful when lifting the TV as the Table-Top Stand is detached, the Table-Top Stand may topple over and cause personal injury. Take care when removing the Table-Top Stand from the TV to prevent it from falling over and damaging the surface that the TV is sitting on.
1 Remove the screws from the rear of the TV.
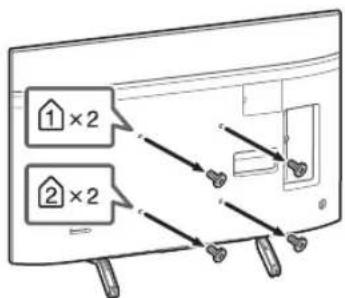
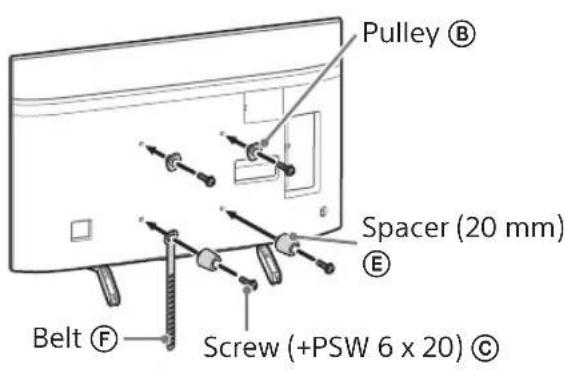
2 Attach the Attachment parts for Wall-Mount Bracket. Check the Attachment parts by referring to "Supplied with SU-WL450" in "Checking the parts" on page 5.
Note
- Firmly secure the Attachment parts using screws.
- When using an electric screwdriver, set the torque setting to approximately 1.5 N·m {15 kgf·cm}.
- Be sure to store the used or unused parts in a safe place for future use. Retain this manual for future reference.
Standard mounting (2-a)
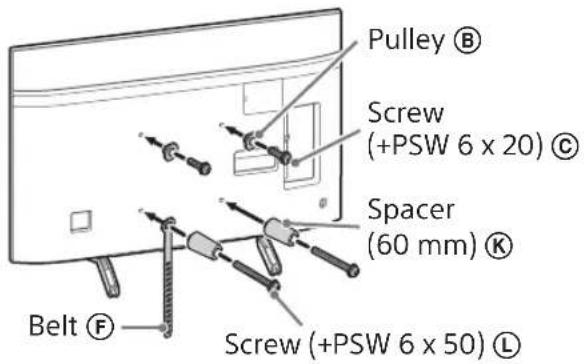
Slim mounting (2-b)
Note
- You cannot use some of the terminals on the rear of the TV when using this mounting style.
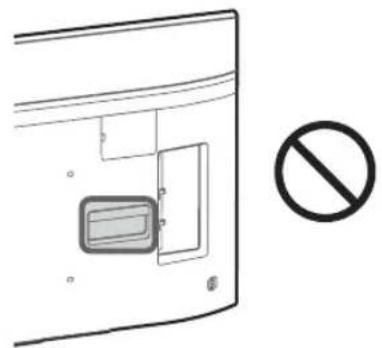
3 Connect the necessary cable(s) to the TV.
Make sure to connect the cables before installing the TV on the wall. You will be unable to connect the cables when the TV is installed.
Refer to the Reference Guide supplied with your TV.
Note
- Subcontract the cable routing in the wall to a licensed contractor.
- Bundle the connecting cables to prevent stepping on them before wall mounting.
4 Detach the Table-Top Stand from the TV.
- Remove one side of the Table-Top Stand at a time. Firmly hold the Table-Top Stand securely with both hands while the other people lift up the TV.
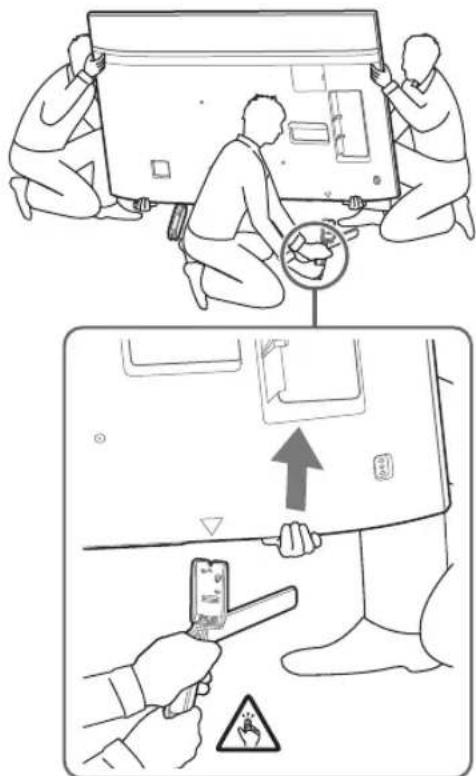
- Repeat the previous step and remove the other side of the Table-Top Stand.
Note
- Three or more people are required to detach the Table-Top Stand.
- Be careful not to use excessive force while detaching the Table-Top Stand from the TV as it may cause the TV set to fall resulting in personal injury or physical damage to the TV. Take care when handling the Table-Top Stand to prevent damage to the TV.
- Be careful when lifting the TV as the Table-Top Stand is detached, the Table-Top Stand may topple over and cause personal injury. Take care when removing the Table-Top Stand from the TV to prevent it from falling over and damaging the surface that the TV is sitting on.
Installing the TV on the wall
KD-85/75XG85□□, KD-75XG87□□
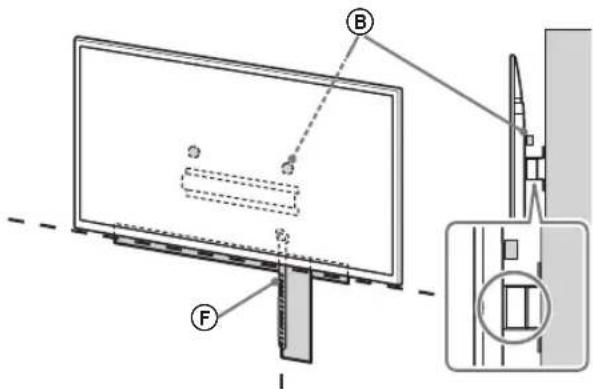
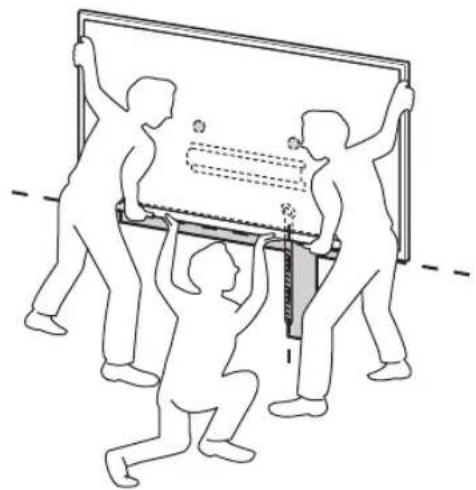
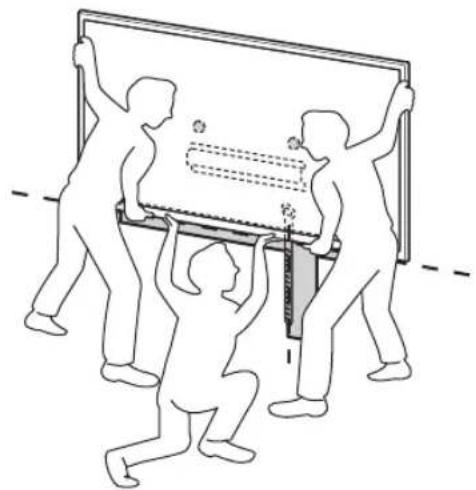
1 Lift the TV.
- For the location of the Pulleys (B) to hang on the Base or Base Adaptor, refer to the table of step 3 in "Deciding on the installation location" on page 7.
- Make sure that the rear of the TV touches the Base or Base Adaptor when holding the TV.
Note
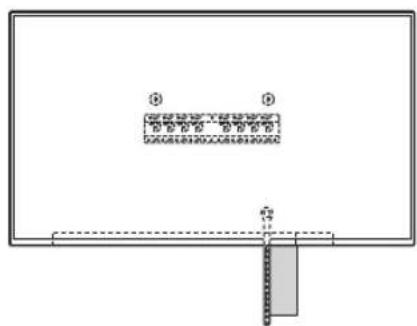
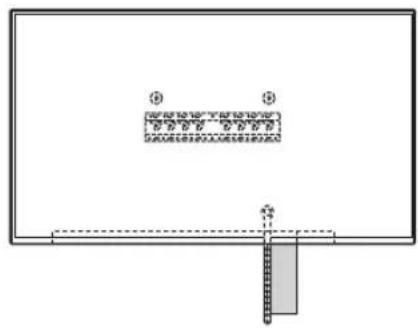
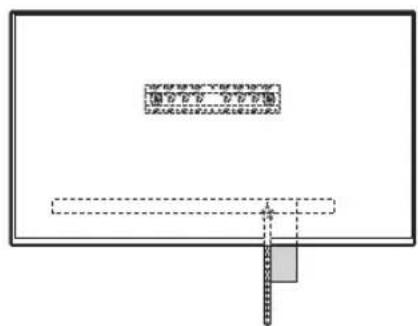
- Hold the TV securely with both hands and make sure the Belt (F) and the bottom of the TV align with the masking tape.
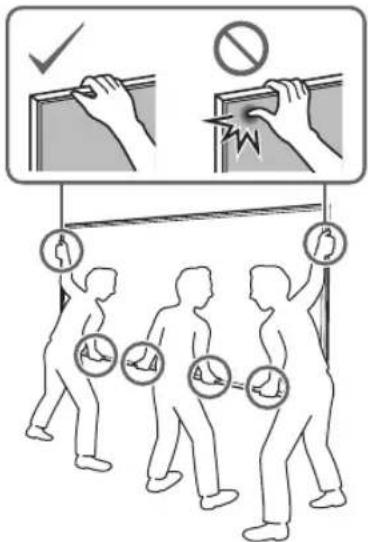
- Carry the TV with three people and the person who is in front of the TV leads the others to adjust the position.
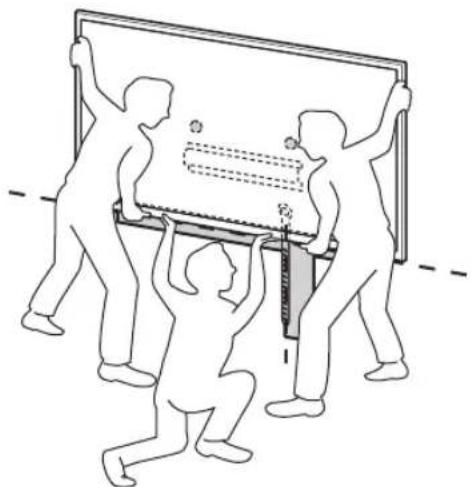
Take great care when installing the TV to the wall, especially for the person who is supporting the TV from below. The television set may fall, causing serious bodily injury or even death.
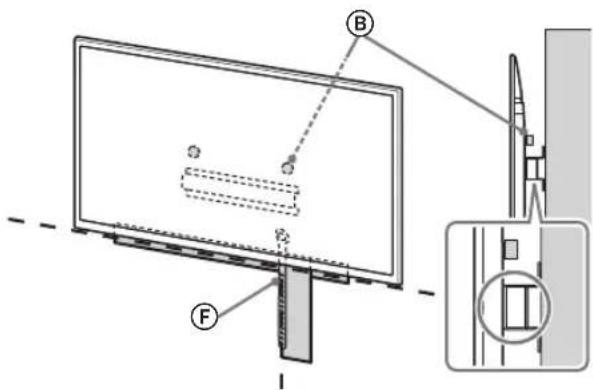
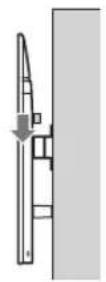
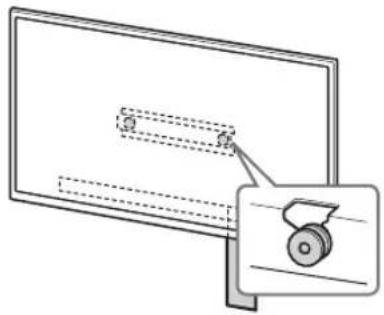
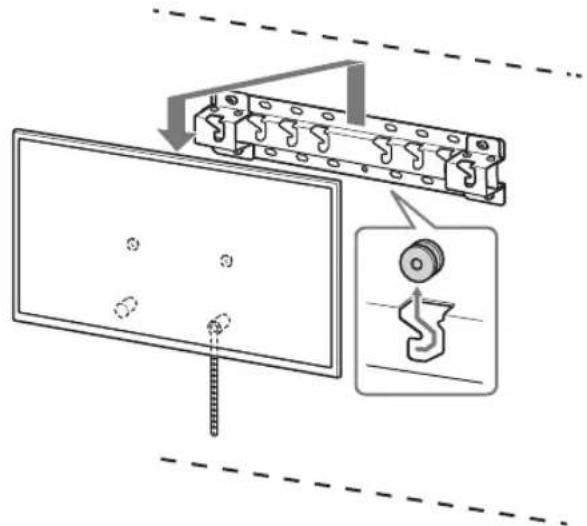
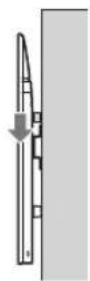
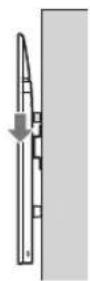
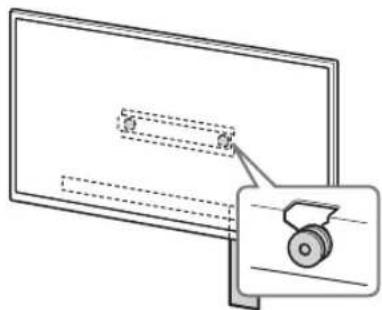
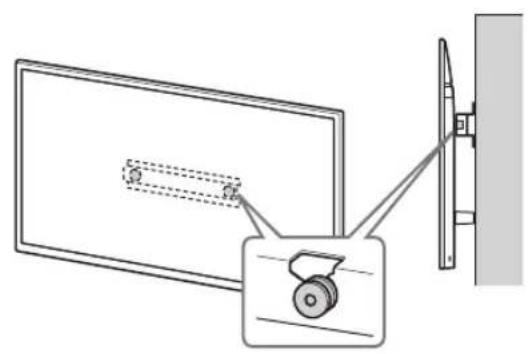
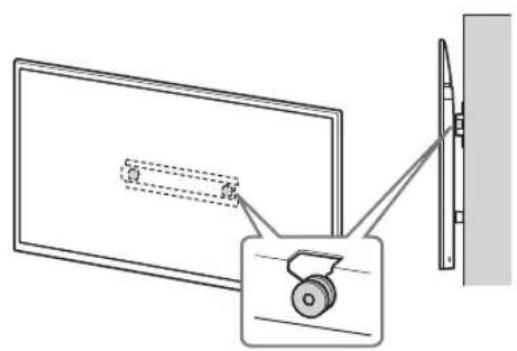
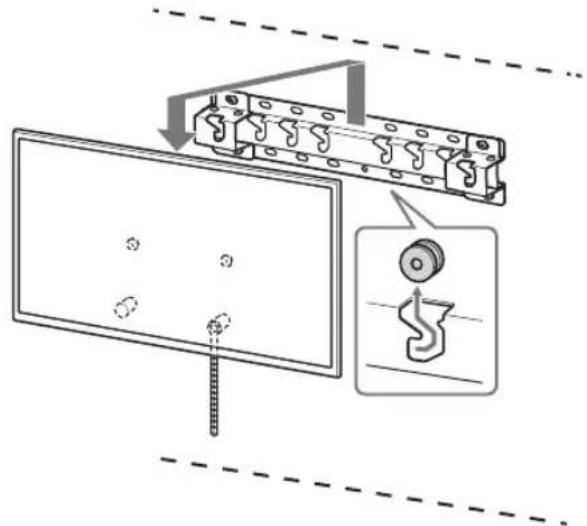
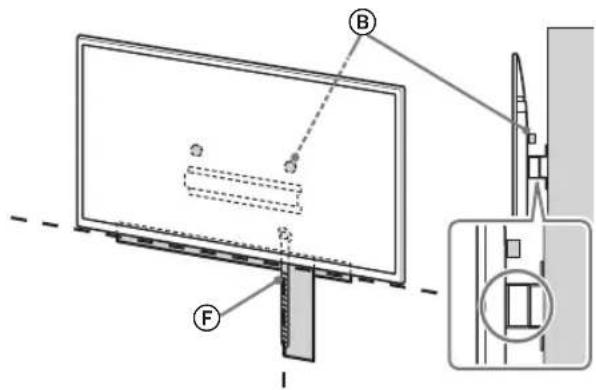
2 Install the TV onto the Base or Base Adaptor.
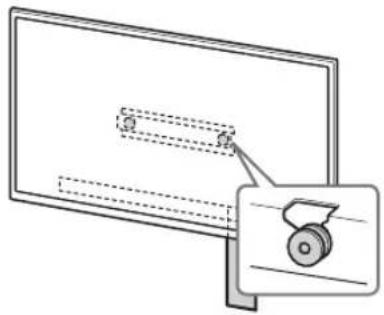
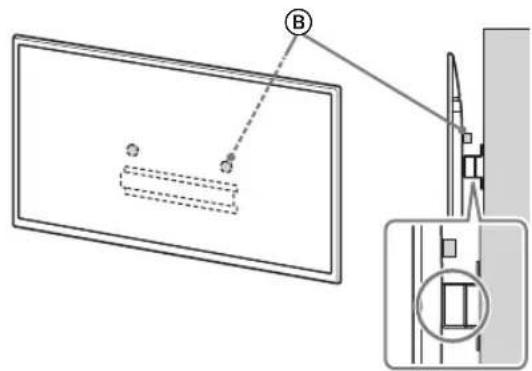
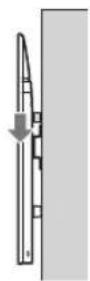
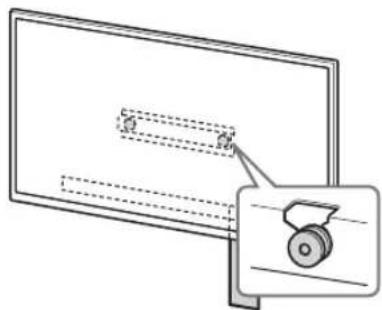
- Gently slide down the TV and hang the Pulleys (B) attached to the rear of the TV to the Base or Base Adaptor, making sure to confirm the shape of the holes. After installing the TV on the wall, confirm the Pulleys (B) are firmly latched into the Base or Base Adaptor.
- Release both hands slowly to ensure that the TV does not fall.
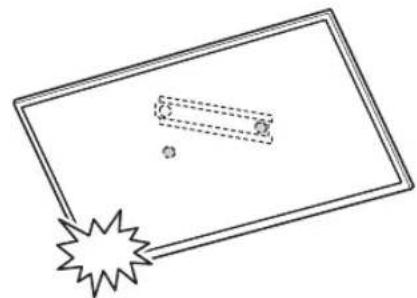
After installing the TV on the wall, remove the masking tape, etc. from the wall.
2-a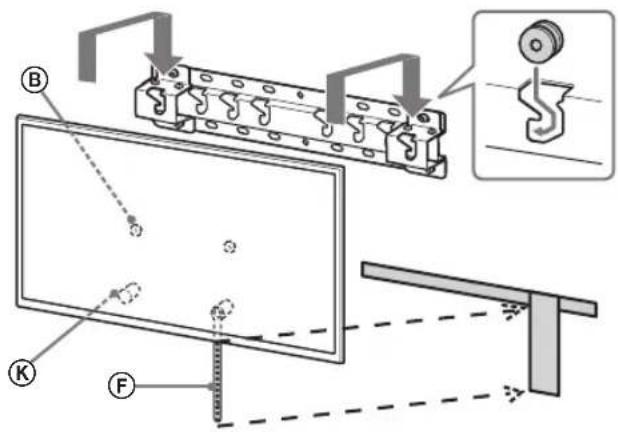



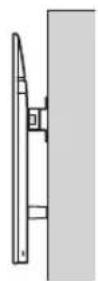
2-b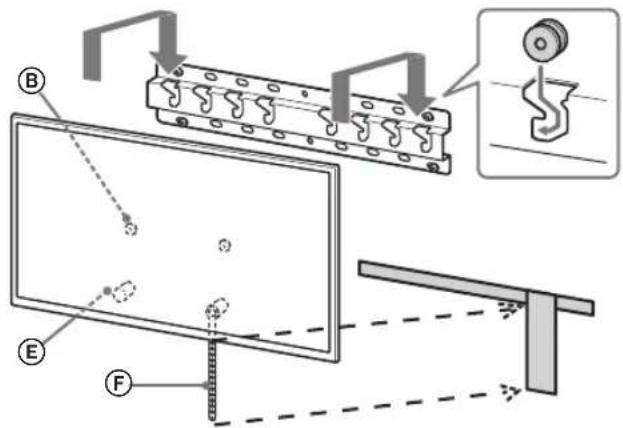
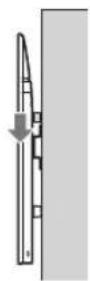

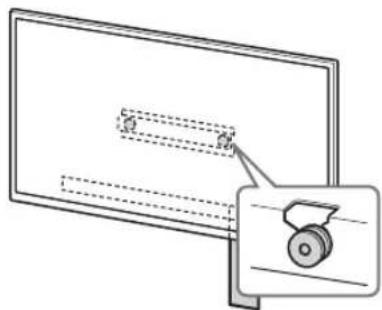

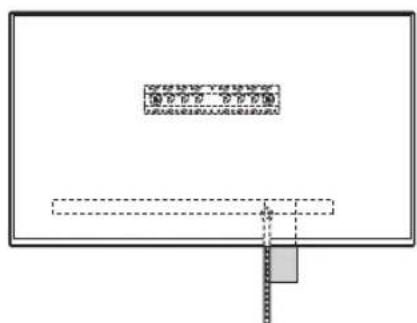

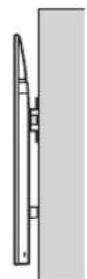
WARNING
- Be sure that two or more persons (three or more persons for 75 inches and above TV set) hold the TV when carrying it.
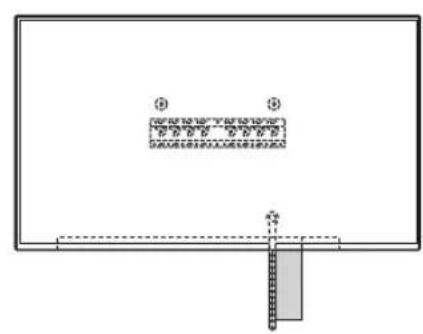
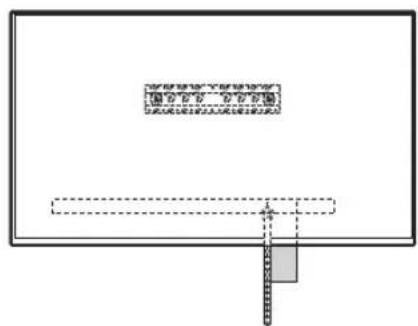
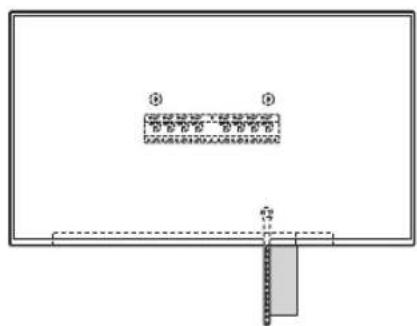
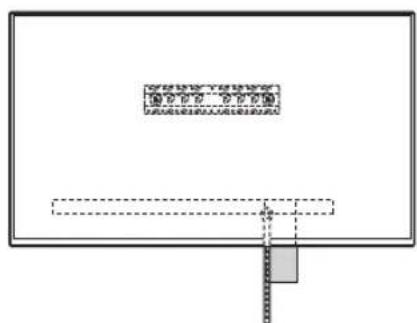
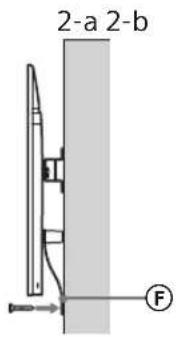
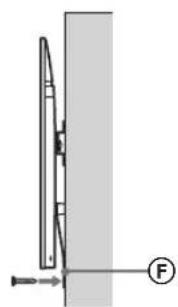
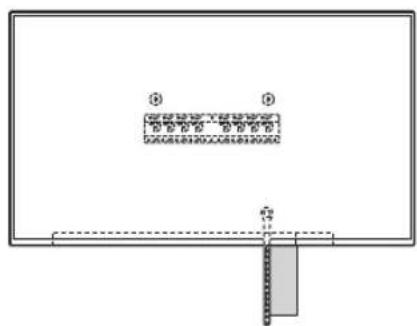
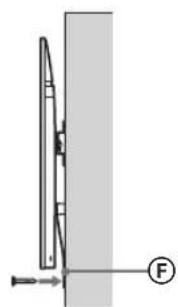
3 Preventing the bottom of the TV from shifting.
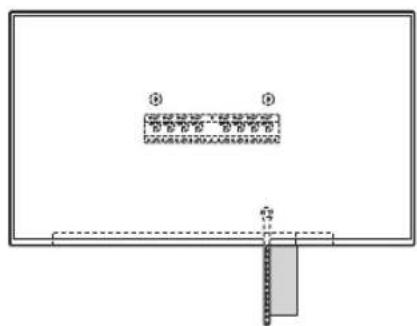
Take up the slack of Belt F and attach it to the wall tightly.
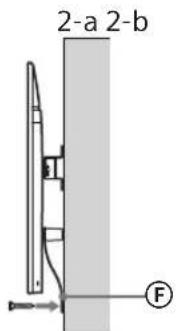
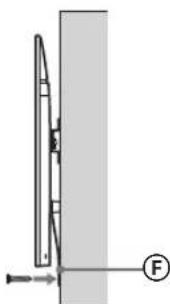
- Use a 5 mm diameter screw or equivalent (not supplied).
Note
Try to pull the bottom of the TV towards yourself slightly, to make sure that it does not move forward. If there is any movement, it is not fixed correctly, and the Belt should be secured firmly again.
KD-65/55XG87□□
KD-65/55XG85□
1 Lift the TV.
- For the location of the Pulleys to the hang on the Base or Base Adaptor, refer to the table of step 3 in "Deciding on the installation location" on page 7.
- Make sure that the rear of the TV touches the Base or Base Adaptor when holding the TV.
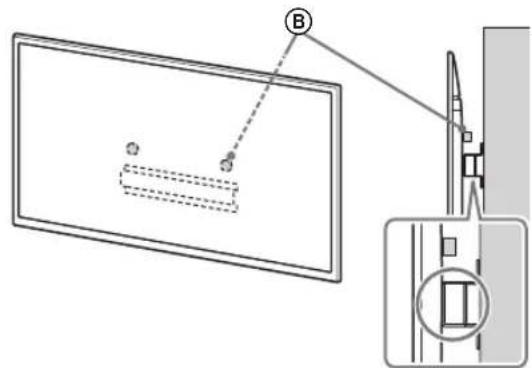
Note
- Hold the TV securely with both hands.
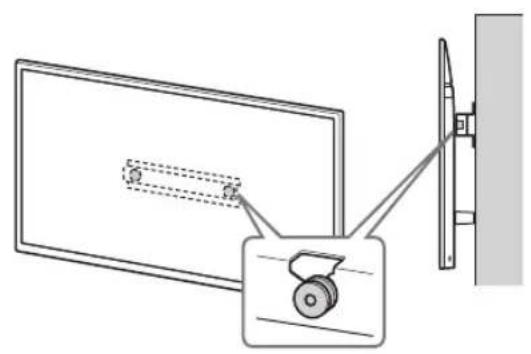
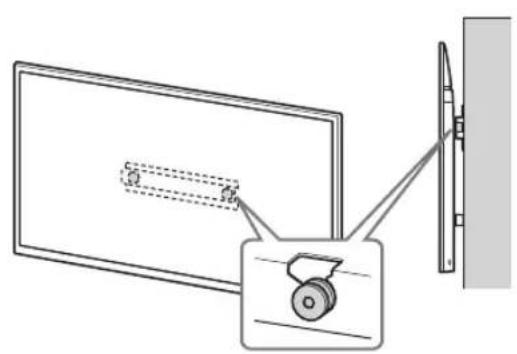
2 Install the TV onto the Base or Base Adaptor.
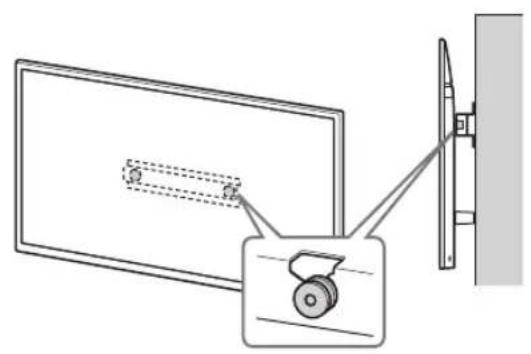
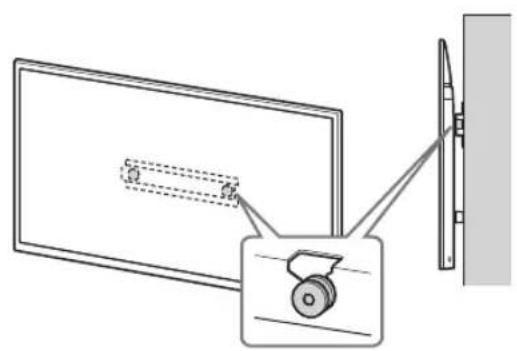
Gently slide down the TV and hang the Pulleys (⑧) attached to the rear of the TV to the Base or Base Adaptor, making sure to confirm the shape of the holes. After installing the TV on the wall, confirm the Pulleys (⑧) are firmly latched into the Base or Base Adaptor. - Release both hands slowly to ensure that the TV does not fall.
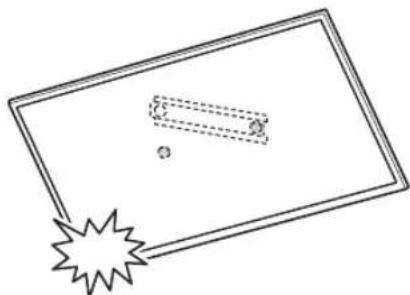
2-a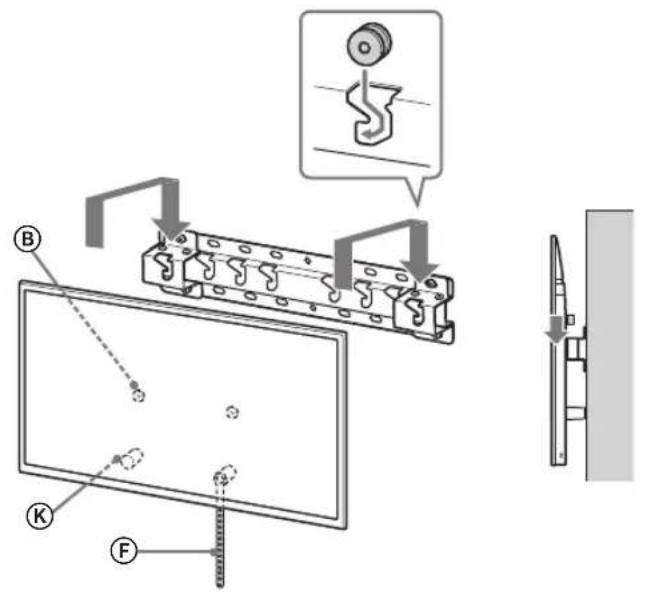
2-b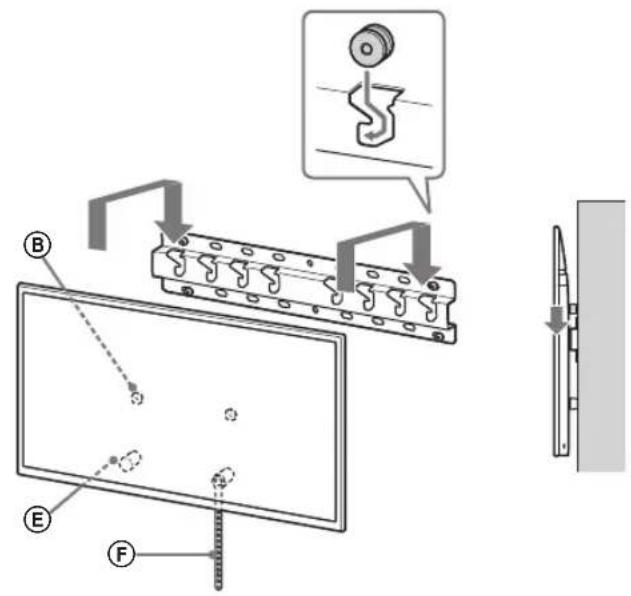
↓
↓
WARNING
- Be sure that two or more persons (three or more persons for 75 inches and above TV set) hold the TV when carrying it.
3 Preventing the bottom of the TV from shifting.
Take up the slack of Belt F and attach it to the wall tightly.
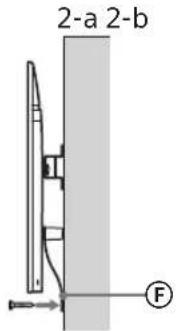
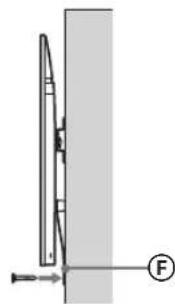
- Use a 5 mm diameter screw or equivalent (not supplied).
Note
Try to pull the bottom of the TV towards yourself slightly, to make sure that it does not move forward. If there is any movement, it is not fixed correctly, and the Belt should be secured firmly again.
Confirming the completion of the installation
Check the following points.
The Pulleys \(\mathbb{B}\) are firmly hung onto the Base or Base Adaptor. - The cord and the cable are not twisted or pinched. - The Belt \((\mathsf{F})\) is tight with no slack.
WARNING
- Improper placement of the mains lead, etc. may cause fire or electric shock through a short circuit. Be sure to confirm the completion of the installation for safety.
Other information
When removing the TV, reverse the previous installation procedure.
WARNING
- Be sure that two or more persons (three or more persons for 75 inches and above TV set) hold the TV when removing it.
Specifications
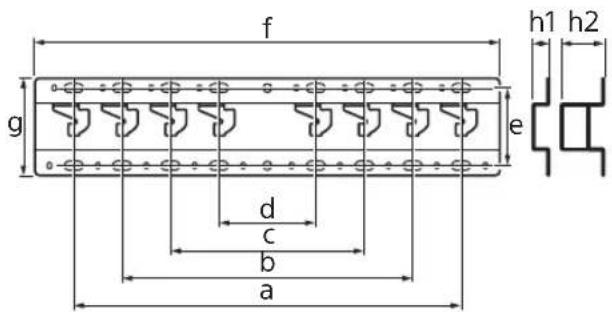
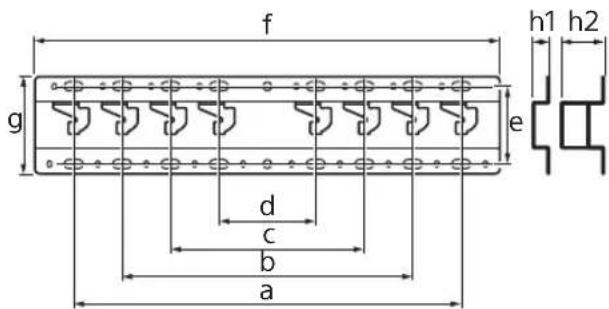
Dimensions: (Approx.) [mm]
a:400
b : 300
c:200
d:100
e:80
f : 480
g: 100
h1: 20 (case 2-b)
h2: 60 (case 2-a)
Weight (base only): (Approx.) [kg]
0.8
Design and specifications are subject to change without notice.
Dimensions: (Approx.) [mm]
a: 400
b: 300
c: 200
d: 100
e: 80
f: 480
g: 100
h1: 20 (case 2-b)
h2:60 (case 2-a)
Dimensions: (Approx.) [mm]
a: 400
b: 300
c: 200
d: 100
e: 80
f: 480
g: 100
h1: 20 (case 2-b)
h2: 60 (case 2-a)
Weight (base only): (Approx.) [kg]
0.8
Clearance for installation. 5
Check of parts 5
Find a location 6
Preparation for installation
1 Find the TV's location.
PpOeToIaOia yia tooTheTnO
- Na éxete ková Šaç tov Ośnyó avaφopac
- kal tov Ośnyó ekatáσtaoç nts
- tnaεópaoc πριν aπο tnv ekatáσtao.
- Pniv a nó tny tonoθεπon φpovtiσe vα éxετ e eva katoαβiδi Phillips πou vα taipiaζει στις βidες.
- Eπαληθεύστε τη θέση τοῦθέτησις της τηλεόρασκ. Etoiaote teoepic n nepioootepc bi8e c diapetpu 8 mm kai iia bi8a diapeptou 5mmniooovauan (ev npexovtai). EnlaTe BiEc nou eiva kaataaAaN8c yi ta uliko kataaKeunc tou toixou.
'EAeyxoc twv eapntmuatwv
TuniktootheonAnEπtn tootheon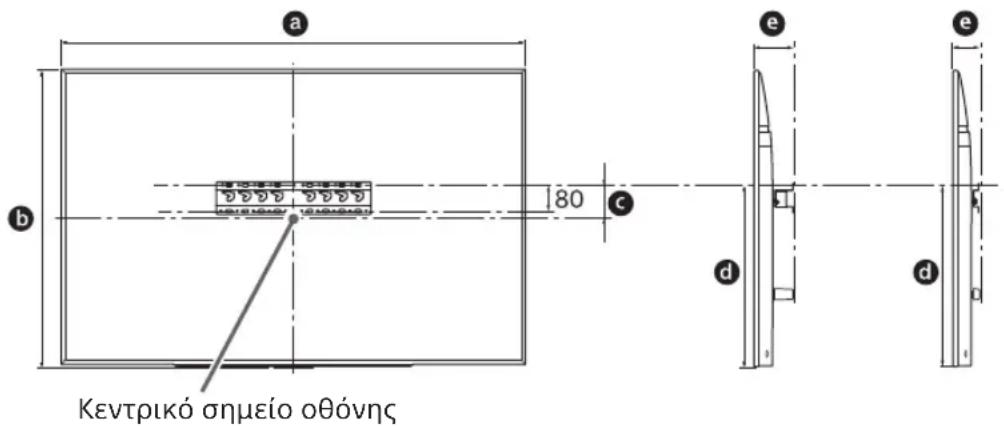
Movαδα: mm
Rozmery: (pribl.) [mm]
a:400
b : 300
c:200
d:100
e:80
f:480
q:100
h1:20 (case 2-b)
h2:60 (case 2-a)
Important information for the customer
For the installation of the product, experience is required. Read this manual carefully to perform the installation safely and completely. Sony is not responsible for damage or injury caused by improper installation. Keep this manual for future reference.
This manual shows the correct way to work with the product and the important safety measures that must be followed to avoid accidents. Read this manual carefully and use the product correctly. Keep the manual for future reference.
Sony products are designed with safety in mind. However, if the product is used incorrectly, it may cause serious injury or damage due to fire, electric shock, falling, or product malfunction. Follow the safety measures to prevent such incidents.
WARNING
Product description
This wall-mounting bracket is designed for use only with the specified televisions. Refer to the TV manuals to verify that this bracket can be used for wall mounting.
To the customers
If these safety measures are not followed, it could lead to serious injury or fire, electric shock, or product damage.
Have the wall mount installed by a licensed installer.
If the wall mount is not installed correctly, the following incidents may occur. Make sure the wall mount is installed by a licensed installer.
The TV may fall and cause serious injury or property damage. If the wall mount is not installed securely, is uneven, or is not properly anchored to the floor, the structure may fall and cause injury or property damage. The wall must be capable of supporting the weight of the TV. (See the TV's reference guide for its weight.) If the wall mount is not securely installed, the structure may fall and cause injury or property damage.
Make sure you have the TV installed or removed by a licensed installer.
If the product is transported or removed by an unlicensed installer, it may fall and cause injury or property damage. Make sure at least two people (or more than two people for TVs with a screen size of 75 inches or larger) carry or remove the TV.
Do not tighten the screws after the TV is installed.
If you do, the TV may fall and cause injury or property damage.
Do not skip any parts of the wall mount.
If you do, the wall mount may fall and cause injury or property damage.
Do not install any equipment other than the specified product.
This wall mount is designed for use only with the specified product. If you install equipment other than the specified one, it may fall and cause injury or property damage.
Do not place the wall mount on any other product than the TV. Do not place the TV on top of or below the wall mount.
If you do, the TV may fall and cause injury or property damage.
Do not place the TV on an unstable cart, stand, or table.
Do not place or lean the TV on the television stand, as it may fall and cause serious injury.
WARNING
If the provided safety measures are not followed, injury or property damage may occur.
Do not treat the product with excessive force during cleaning or repair.
Do not apply excessive force to the top part of the TV. If you do, the TV may fall and cause injury or property damage.
Safety Precautions
- If you use the TV for a long time, mounted on a wall-mounting bracket, the wall behind it may become discolored or crack, depending on the wall material.
- If the wall-mounting bracket is removed from the wall after mounting, screw holes will remain. Do not use the wall-mounting bracket on the same spot, as it may cause mechanical vibrations.
Wall-Mounting Bracket Installation
To Sony dealers
WARNING
These instructions are for Sony dealers only. Read the safety precautions described above and pay special attention to safety during installation, maintenance, and inspection of the product.
Do not install the wall-mounting bracket on wall surfaces where the screws or the TV's stand may protrude from the wall surface.
Do not install the wall-mounting bracket on wall surfaces, such as columns, where the screws or the TV's stand may protrude from the wall surface. If the TV is subjected to impact or falls, it may cause injury or property damage.
He mounted the TV on the wall under the window.
If the TV is placed in a location with continuous vibration or impact, this may cause electric shock or TV malfunction.
Mount the wall mount bracket securely to the wall by following the instructions in this manual.
If any of the screws are loose or fall out, the wall mount bracket may fall and cause property damage. Use appropriate screws for the wall material and mount the bracket securely using four or more screws with a diameter of 8 mm (or equivalent).
Use correctly installed screws and fastening parts by following the instructions in this manual. If you use replacement parts, the TV may fall and cause personal injury or damage.
Make sure you use the bracket correctly by following the procedure described in this manual.
If any of the screws are loose or fall out, the TV may fall and cause personal injury or damage.
Tighten the screws firmly in the indicated position.
If you do not do this, the TV may fall and cause personal injury or damage.
Be careful not to hit the TV during installation.
If the TV is subjected to impact, it may fall and cause injury. This may lead to damage.
Mount the TV on a wall that is perpendicular and flat.
If you do not do this, the TV may fall and cause damage.
After proper installation of the TV, ensure the cables are correctly connected.
If people or objects get caught in the cables, this may cause damage or injury to the TV.
Do not pull on the power cord or the connecting cord.
If the power cord or the connecting cord is pulled between the TV and the wall, or if it is stepped on or pinched by furniture, the internal wires may be damaged and cause a short circuit or electric shock. This could lead to fire or electric shock.
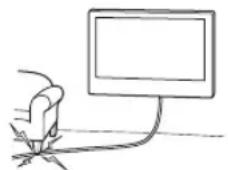
The screws required to secure the wall-mount bracket to the wall are not included in the package.
Use appropriate screws according to the wall material and structure when mounting the wall-mount bracket.
Contents
Preparation for installation. 5
Checking the parts. 5
Determining the installation location 6
Installing the wall-mount base 8
Preparing for TV installation...9
KD-85/75XG85□□,KD-75XG87□□
KD-65/55XG87□□,KD-65/55XG85□□.11
Installing the TV on the wall.13
KD-85/75XG85□□,KD-75XG87□□.13
KD-65/55XG87□□,KD-65/55XG85□□.15
Check the installation
Mounting 18
Other information 18
Specifications.. 18
Mounting the TV on the wall
The mounting procedure is different depending on the TV.
Use the bracket for wall mounting SU-WL450 to mount the TV on the wall.
Note
Do not forget to keep the supplied screws in a safe place, keeping them away from children.
Mounting procedure
The installation of the TV requires the mounting procedure to be performed correctly. - Use a Phillips screwdriver that matches the screws. - Choose the mounting position for the TV. - Prepare four or more screws with a diameter of 8 mm and one screw with a diameter of 5 mm or equivalent (not included in the package). Select screws suitable for the wall material.
Selecting the parts
Supplied with SU-WL450
4 Determine the positions of the screws for mounting on the base (20) A.
See the specifications on page 18.
Remove the 2-a, use the screws for the wall-mount adapter holes on the base ①.
WALL-MOUNTING
The wall on which the TV will be mounted must be able to support at least four times its weight (see the TV's reference guide regarding its weight).
- Determine the correct wall position where the TV will be mounted. If necessary, reinforce the wall sufficiently.
Mounting the base on the wall
- Use four or more screws with a diameter of 8 mm or equivalent (not supplied). Secure the four screws in the holes of the wall-mount adapter on the base ① with the base (20) A (only 2-a).
- Mount the base (20) A horizontally on the wall.
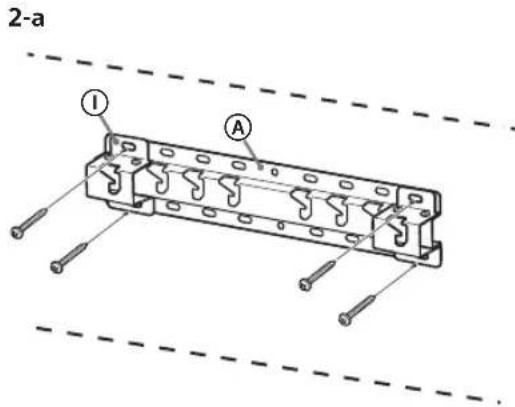
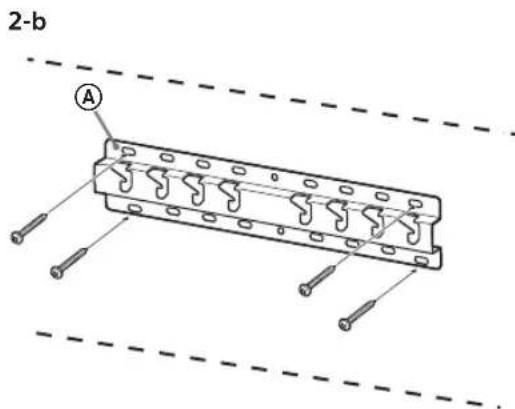
Preparation for TV mounting
When mounting, follow the setup guide.
KD-85/75XG85□□, KD-75XG87□□
1 Mark the location for wall mounting.
- Use only self-tapping screws or similar (not supplied) to mark the TV's location, close to the base or wall-mount adapter. See the following table.
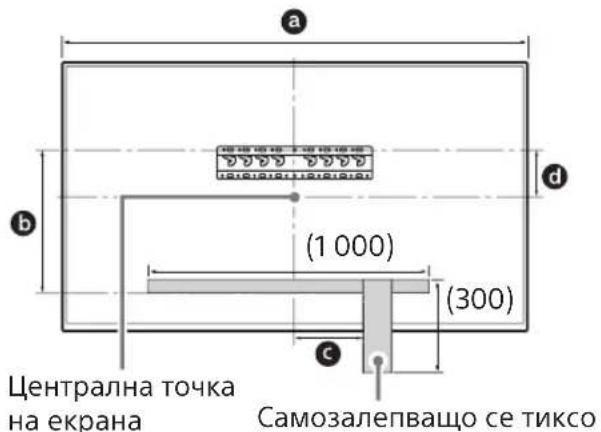
| Мернейнци: mm | ||
| Име на м odeл | Дыжина 3a otбелязвае | Размер на центьра на ekранa |
| a b c d | ||
| KD-85XG85□□ | 1909 683 200 251 | |
| KD-75XG87□□ | 1673 468 200 107 | |
| KD-75XG85□□ | ||
2 Remove the screws from the rear of the TV.
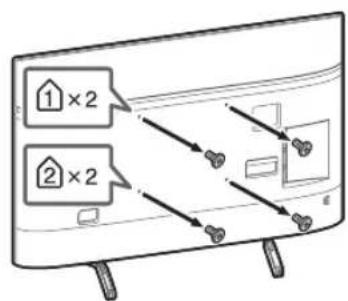
3 Attach the wall-mount brackets to the wall. Check the brackets by comparing with "Supplied with SU-WL450" in "Parts Check" on page 5.
Marking
Tighten the screws with a screwdriver. When using an electric screwdriver, set the torque to approximately 1.5 N·m {15 kgf·cm}. Store the unused parts in a safe place for future use. Keep this manual for future reference.
Standard mounting (2-a)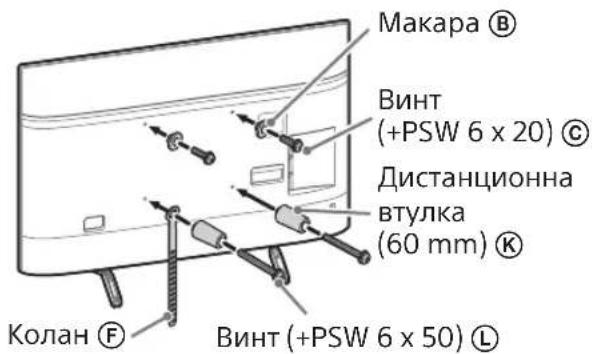
Tight mounting (2-b)
Note
When using this mounting style, you can use the terminals on the back of the TV.
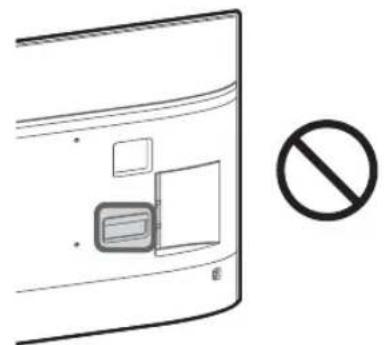
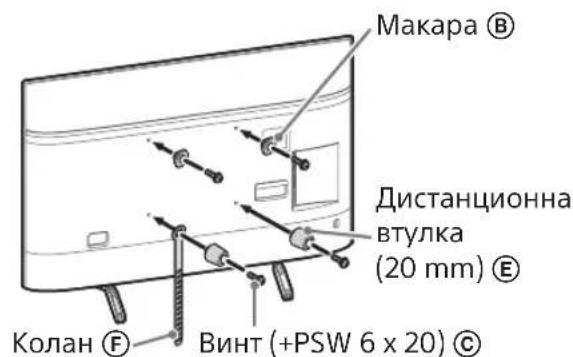
4 Connect the necessary cables to the TV.
Make sure you have connected the cables before mounting the TV on the wall. You can connect them after the TV is mounted. Refer to the manual supplied with your TV.
Note
Route the cables through the wall or use approved cable guides. Be careful not to pinch the cables when mounting to the wall.
5 Attach the table-top stand to the TV.
- Remove one side of the stand. Insert the stand securely into the two holes until it clicks into place.
KD-85XG85□□
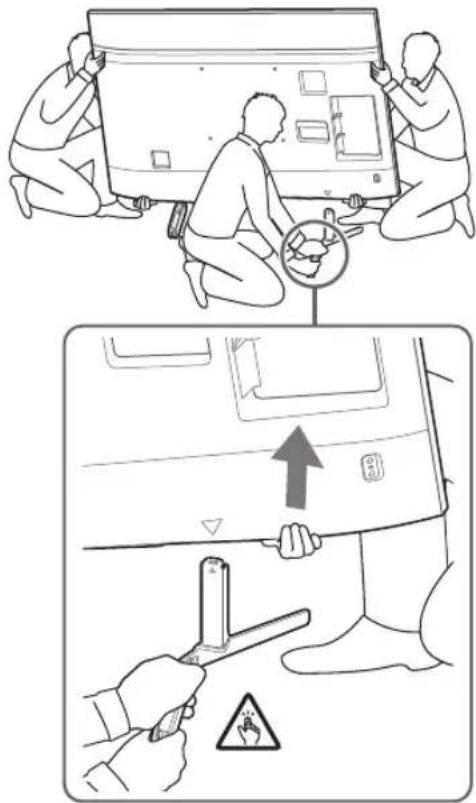
KD-75XG87□□, KD-75XG85□□
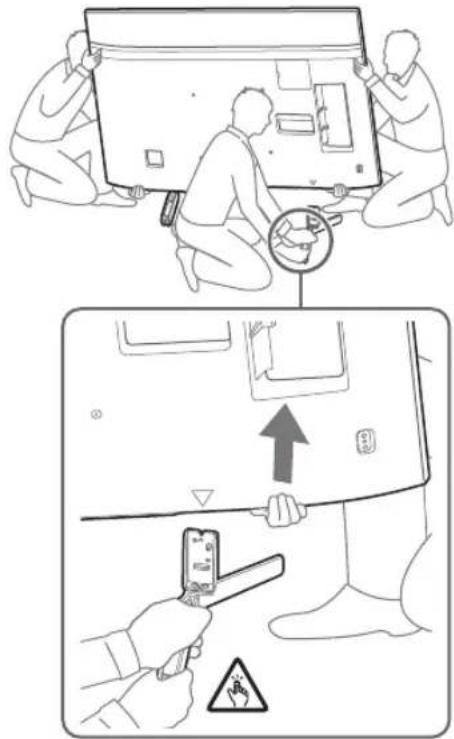
- Repeat the same procedure and remove the other side of the stand.
Note
Before lifting the TV, make sure to remove all cables and connections. Be careful not to apply excessive force when lifting the TV, as the TV may fall and cause personal injury or damage to the TV. - Be careful when working with the TV to avoid damage. Be careful when moving the TV, as the stand is not secured and the stand may come off and cause injury. Be careful when removing the stand from the TV to prevent the surface on which the TV stands from being scratched or damaged.
KD-65/55XG87□□,
KD-65/55XG85□
1 Remove the screws from the rear of the TV.
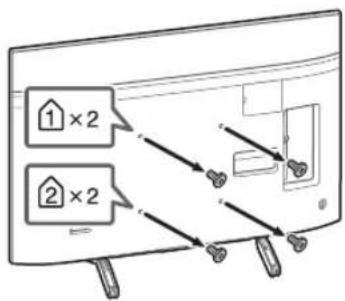
2 Attach the wall mount bracket to the wall. Check the bracket parts by comparing with "Supplied with SU-WL450" in "Parts Check" on page 5.
Note
Secure the wall mount bracket with the screws. When using an electric screwdriver, set the torque to approximately 1.5 N·m {15 kgf·cm}. - Store the unused parts safely for future use. Keep the manual for future reference.
Standard mounting (2-a)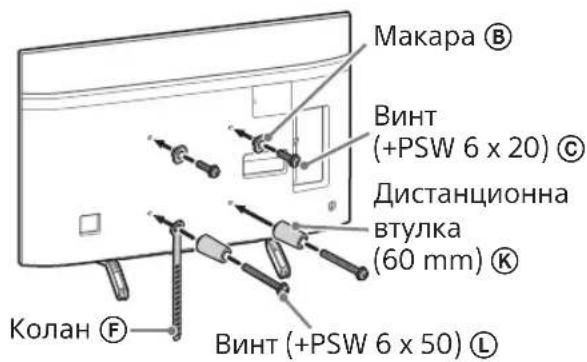
Tight mounting (2-b)
Note
When using this mounting style, you cannot use the terminals on the rear of the TV.
3 Connect the necessary cables to the TV.
Make sure the cables are connected before mounting the TV on the wall. You may not be able to connect them after the TV is mounted. Refer to the manual supplied with your TV.
Note
Route the cables through the wall or use cable ties. - Make sure to connect the cables before mounting to the wall, so you don't step on them.
4 Remove the TV from the tabletop stand.
- Remove the stand cover. Turn the tabletop stand to the right, holding it firmly with both hands, while lifting the TV.
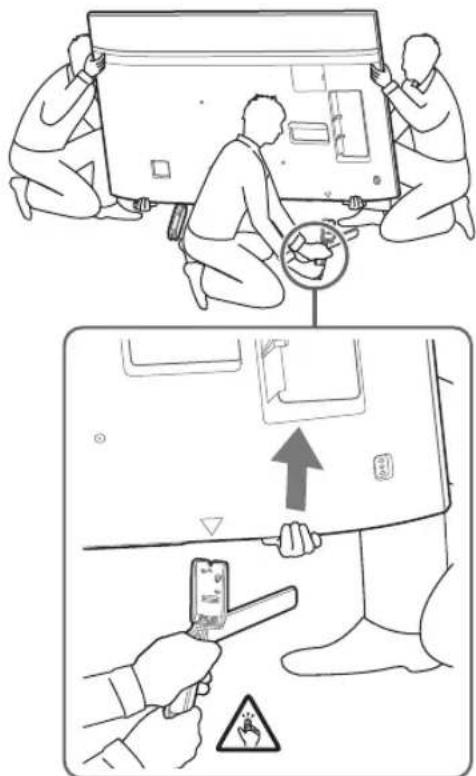
-Repeat the procedure for the other side of the tabletop stand.
Note
Removing the tabletop stand should be performed by two or more people. Be careful not to apply excessive force when removing the tabletop stand from the TV, as the TV may fall and cause personal injury or damage to the TV itself. -Be careful when working with the tabletop stand to avoid damaging the TV. Be careful when lifting the TV, as the tabletop stand is not secured and may slip and cause injury. Be careful when moving the tabletop stand away from the TV to prevent damage to the surface on which the TV stands.
Mounting the TV on a wall
KD-85/75XG85□□,KD-75XG87□□
1 Lift the TV.
For the location of the marks ⑧ for mounting on the base plate, refer to the table in "Mounting location" on page 7. - Ensure that the rear side of the TV is aligned with the base plate when holding the TV.
Note
-Hold the TV with both hands. Ensure that the hooks on the rear side of the TV are parallel with the self-tapping screws. The TV's tilt, which is in front of the TV, can be adjusted to adjust the positioning.
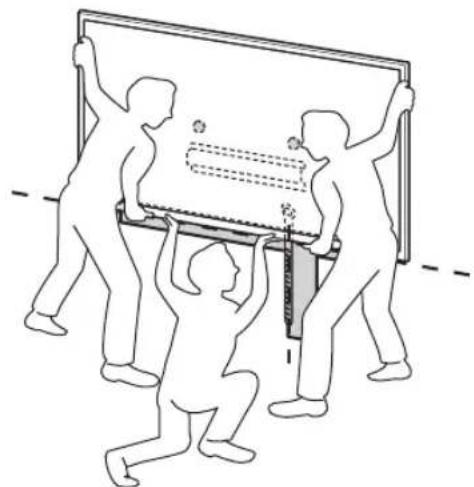
Be careful when mounting the TV to the wall, especially for the person holding it from below, as the TV may fall and cause serious injury or damage.
2 Mount the TV onto the base plate.
Carefully slide the TV onto the base plate and hook the marks ⑧ to the rear side of the TV, onto the base plate, checking the shape of the opening. After mounting the TV, check that the marks ⑧ are securely hooked onto the base plate. Tighten both screws to ensure the TV does not fall.
After mounting the TV to the wall, remove the self-tapping screws from the wall.
2-a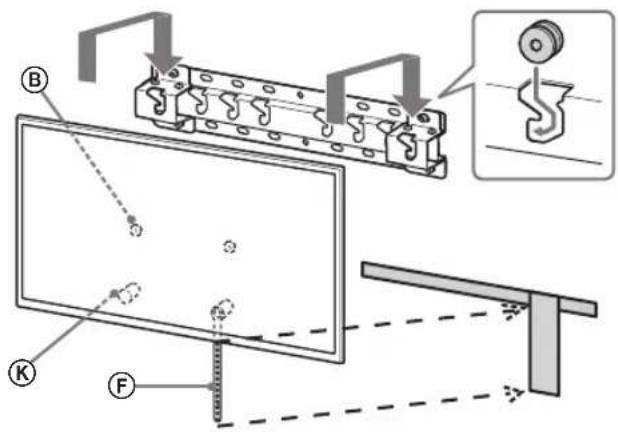



2-b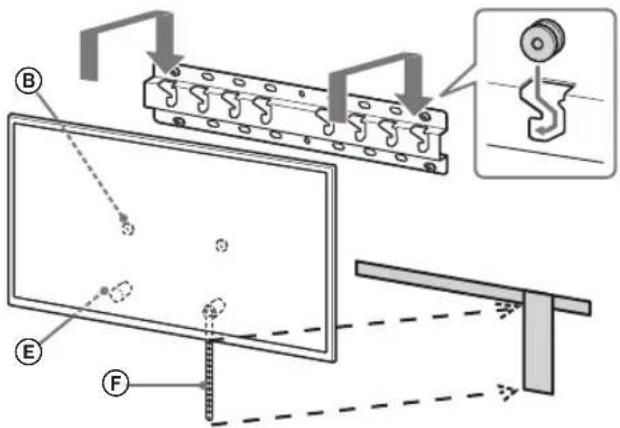



WARNING
- Make sure that the wall is strong enough to hold the TV (for TVs with a size of 75 inches or more) when mounting the TV.
2 Mount the TV to the base of the stand.
Carefully place the TV on the base of the stand and insert the brackets B, securing them to the designated side of the TV, to the base of the stand, while checking the alignment of the holes. After placing the TV, check that the brackets B are properly secured to the base of the stand. - Important: Pull the two screws to ensure that the TV is secure.
2-a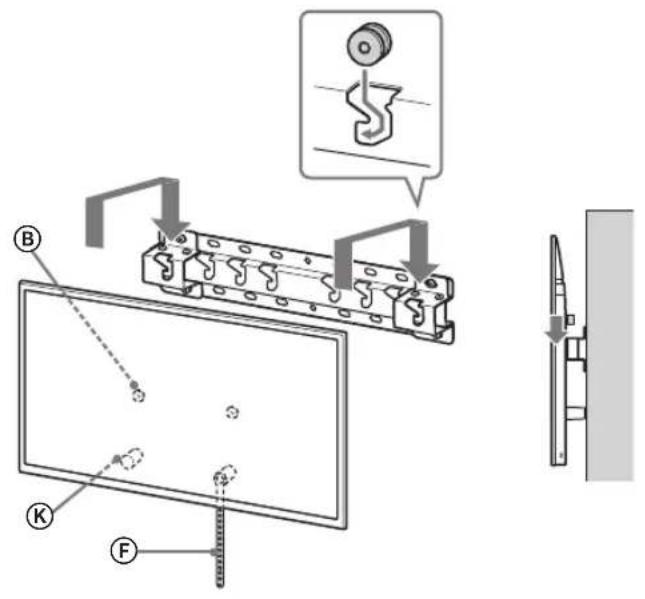
2-b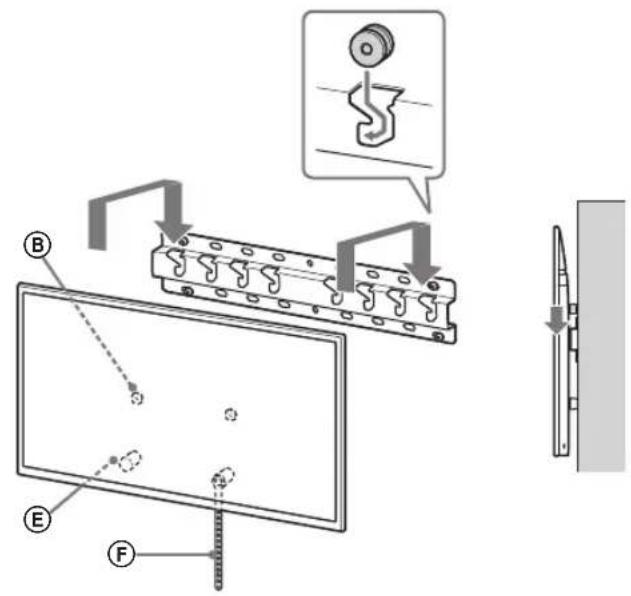
↓
↓
WARNING
- Make sure that the wall is strong enough to hold the TV (for TVs with a size of 75 inches or more) when mounting the TV.
3 Adjustment
Adjusting the height of the TV.
- Pull the loosened part of the collar and secure it to the wall.
- I3noJ3BaIte BnHT c DnaMeTp5 mm NII eKBuBaJIeHTeH (He e BKIOueH B KOMnJIeKTa).
3a6eJexKka
-OnntaTe IeKo Da n3dbpnte KbM c6e cn dOnHaTa HCT Ha TeBn3opa, 3a Da CE yBepuTE, He He CE IpeMeCTBa HAnpei. Ako Ce DnKn, Toi He e 3akpenen npabunHO N KOanH F Tpr6Ba OTHOBO da ce 3akpen 3dpabo.
Поберка на
Pondepknaemble moeI:
KD-85XG85□□*/75XG87□□*/75XG85□□*/65XG87□□*/
65XG85□□*/55XG87□□*/55XG85□□*
* B ΦaKTnuecknx Ha3BaHnIx MoJeIi "□□" o6o3HaayeT uΦpbl I/IIIN CmBOnbl, xapaKTePbIe IJIa KOHKpeTHoN MoJeIi.
K cBeHeHnIO nokyNaTeJIe
Дя obecneuehenia coxpaHnoCTn n3dJIy n n3 COOpaXeHn 6e3OnaCHOCTn KOMpaHn Sony HactoTeJbHO peKOMeHdyET npNBLeKaTb dIy UcTaHOBKn TeJIeBn3Opa TOLbKO dIJIepOB nIIN IInCeH3NpOBaHHbIX NOprdAnKOB Sony. He nbItaTecb BbINOHNbY cTaNOBky camocToTebHo.
K cBeHeHnIO dIJIePoB n IOJaYnIKOB Sony
YdJIyTe NOBbIeHHoe BHMaHHe 6e3oNaChOCTn BO BpeM yCTaHOBKn, IepNoDiueckoro 0cbLyKuBaHnI N OCMOTpa DaHHOro n3JeNIA.
Для паразиьногу установки данноюиздения необхODIMdoctaTOHyBOnbIT,В OOCobeHHocTNпго орpeденин того,В coCTOЯnлл сTeHa BbldepKaTb BeC TeleвиЗopa.Обязатьно рпвькITE ДЯУСТАНБКИ 3TOGOи3delennaHa cTeHy DInIePOBилллцeнзИрOBaHbIX nOДРЯДЧИКOB Sonyи cTporo co6JIOnaIte texHnky 6e3OnaNacHOCTNпги ВыINOLHeHn pa6OT no yStaHOBke.КOMпAnHЯ Sony He HeceT OTBeTCTBeHOCtB 3a ЛIOБbie NOJOMKи Ил TpaBMbl, Bbl3BaHHbIe HENpaBUNbHbIM 6ObpaшeHNem Cи3delenm Ил erO HeNPaBUNbHoi yCTaHOBKOJ.
Дябзогинадлжашу cHCTpyKuIN NO 3KcNlyaTaUKN KPOHHTeHa nIЯ NaCTeHHOY UCTaHOBKn,pyKOBOCTBO NO yCTaHOBKe TeJIeBn3Opa N yka3aHn DaHHORo pyKOBOCTBa.
БezonaCHOCTь
Blaorapum 3a nokykny 3TOro n3dennr.
Для nokynaTeNei
Дя yCTaHOBK DaHHORO n3dEeNnI Tpe6yeTcdoCTaTOHbONbIT. O63aTeBbHO o6paTnTEcb K dInepy Nnn NnueHnPOBaHNOHYo nDpRdUKNy SOy, a TAKKe c0bKnOaTe Heo6xOnMbe MebpI ppeoCTopoxHoCTBO BPeM yCTaHOBKn n3dEeNnI. KomNaHry SONY He HeCET OTBeCTBeHNoCTn npHaHeceHm LIOBO yUepeBa NnI BpeDa, Bb3BAHHOrO HnnpaBnblbIM O6paSeHem nnYcTaHOBKO nIOo yCTaHOBKo He npedHa3NaYeHoro dJ 3TOrO n3dEeNn. 3To He BnReT Ha BaIN 3aKaOHbIe npaba (ecn TaKOBbIe nMeOTc).
Длгдиелеров Sony
Длу yctahOBkn DaHORO n3dEINNA Tpe6yETcdoCTaTOHbOnbIT.Длу 6e3oNaChOH yCTAHOBKn YCTPOIcTBa O6BaTeNbHO BHIMaTeNbHO IpOHTne HAcToHue pyKOBODCTBO.Sony He Hecet OTBeTcBeHHocnB Cnyae NOBPEkDHeN INI NIOJYeHnRA TpaBM B pe3yIbTaTE HenpAIBNbHOrO obpaHnIN INI HeHaJIeXaUeY cTAHOBKn.IO OKOHAnHN yCTAHOBKn NEpeJaTe 3To PYKOBOCTBO NOKyNaTeIIO.
B 3TOM pykoBOdCTBe no yCTaHOBKe npBBeDeHb BaxKbIe Mepbl PpeOCTopOpKHOu INHOpMaUNo 06ecneueHIO HaJIeKaJoo BOpaSeHHc n3dJeM, KOtOpBE HeoXoDMbI DnA npEOTBpaSeHHN HeCAcTHbIX ClyuAEB. OBs3aTeNbHO BHNMaTeNbHO npOHTnTe HaCTOraUee pyKOBOdCTBO NcONb3yInTe n3dJeNn O Ha3NaUEHHIO CoXpaHITe HaCTOraUee pyKOBOdCTBO DnA NCNOB3OBAHIN B6yUeM.
N3dennr Sony pa3pa6oTaHb C yueTOM Tpe6oBauHn no 6e3oNaChOCTn. Ondako HnepaBnHoe nCOnlB3oBaHne n3denn MoKet CtaTb npuHHo NOnyHeHc Cepe3bHX TpaBM BCJIeCTBHe NOPaxHeHn 3JeKTPnueckm TKOM, Bo3RopaHn, OnpoknDlbAHHn nn PAnEHHn n3denn.Bo n36ExAHne BO3HNKHOBeHn TaKHX HeCuaCThIX cNpyaeOBs3aTeNbHO coBIOaIte COOTBeTCTBYUoMe MpeI npEOCTOPOKHOCTn.
DaTaN3rTOBnEHHaKa3aHa Ha N3dEHNu YNAKOBKe HA TtKeTKe CO wTpNX-KoDOM B CNeIyUoEMΦopMaTe:YYHYY/MM, rIe YYHYY -roD, MM-MecAurN3rTOBnEHHa
PonBDoTEnb: CoHn BnKyAn PpOaKTc INHK., 2-10-1 OcaKn IUnHarabaKa Ky ToKno, 141-8610 RaNoHr CpeNaHO B Krtae
Opran3aunynoHMOUeHHa npHnMaTb npTeH3UNOTnPeBHTeNeHa TeppuToPn Ka3axCTaHa AO COHN 3JKeTPOHNC PepctabntBeTBcBO Ka3axCTaHe, 050010,Pecny6nka Ka3axCTaH, r.AmTabl, np.Doctbk,dom 117/7
IMnpTeHapeTtOpTNCTpaH TaMoxeHHoro c0o3a:AO《COnn 3JKeTPOHnKc, Pocsn,123103,MockBa, KapamblweBckn npoe3d,6
BHIMAHNE
Yka3aHHbIe n3dJIIna
DaHHb KpOHTeH nHa HacteHHoro KpenJIeHNn PpeHaN3HaueH dNn OTDeIbHbIX MoJeNe TepEBN3OpB. Cm. CpAbOuHoe pyKOBoDCTBO K TeEbn3Opam dNn npOBepKn BO3MOxHOCTn IcNoJb3ObaHN KpOHTeHnA dNn HaTeHHoY cTaHOBKn.
Для nokуразелей
Failure to follow these safety instructions could result in serious injury or death from electric shock, fire, tipping, or falling of the product.
Be sure to contact a licensed contractor, and do not allow children to be near the installation site of the product.
Improper installation of the wall mount bracket may result in the accidents listed below. For installation, be sure to contact licensed contractors.
The TV may fall and cause serious injury, such as fractures or bruises. If the wall on which the wall mount bracket is installed is not strong enough, uneven, or not vertical, the product may fall and be damaged or cause injury or property damage. The wall must be able to support at least four times the weight of the TV. (To find out the weight of the TV, see the reference manual.) - If the wall mount bracket is installed on an insufficiently strong wall, the product may fall and be damaged or cause injury or property damage.
Safety precautions for children
Do not allow children to climb on the TV. Keep small accessories out of the reach of children so that they cannot accidentally swallow them.
For installation or removal of the TV, be sure to contact licensed contractors.
If transportation or removal of the TV is performed by unlicensed contractors, it may fall and cause injury or property damage. Make sure that the TV is carried or removed by two or more people (three or more people for TVs with a screen size of 75 inches or larger).
After installing the TV, do not remove the screws, etc.
Otherwise, the TV may fall and become a cause of injury or property damage.
Do not disassemble or modify the parts of the wall mount bracket.
Otherwise, the wall mount bracket may fall and become a cause of injury or property damage.
Do not install any other equipment on the bracket other than the specified one.
This wall mount bracket is intended for use only with the specified products. If equipment not intended for this installation is attached to the mounting bracket, it may fall or be damaged, and may also become a cause of injury or property damage.
Do not overload the bracket for wall mounting. Do not place anything on it except the TV. Do not tilt the TV left/right, up/down.
Otherwise, the TV may fall and cause injury or property damage.
Do not lean on the TV or hold onto it.
Do not lean on the TV or hold onto it, as it may fall and cause serious injury.
WARNING
Follow the precautions below. There is a risk of injury or property damage.
When cleaning, do not apply excessive force.
Do not overload the top of the TV. Otherwise, the TV may fall and cause injury or property damage.
Precautions
If the TV mounted on the wall-mount bracket is used for a long time, depending on the wall material, the wall behind or above it may discolor or the wallpaper may peel. After removing the wall-mount bracket, the wall holes will remain. Do not use the wall-mount bracket in places with vibration.
Do not install the wall-mount bracket on walls where the edges of the TV will protrude beyond the edges of the wall.
Do not install the wall-mount bracket on wall surfaces (e.g., columns) where the edges of the TV will protrude beyond the edges of the wall surface. Hitting the protruding edges of the TV may cause injury or property damage.
Do not install the TV under an air conditioner or near it.
If the TV is exposed to the airflow from an air conditioner for a long period, it may cause a fire, electric shock, or malfunction of the TV.
Be sure to securely attach the wall-mount bracket to the wall, following the instructions in this manual.
If the screws are loosened or fall out, the TV may fall and cause injury or damage to property. When performing installation, use screws that match the wall material, securely install the device, using no less than four 8 mm screws (or equivalent).
Be sure to use the screws and parts included in the kit for fastening and strictly follow the instructions provided in this installation guide. If other fastening materials were used during installation, the TV may fall and get damaged or cause injury.
Be sure to perform the stand assembly, exactly following the instructions provided in this installation guide.
If any of the screws are loosened or fall out, the TV may fall and get damaged or cause injury.
Securely tighten the screws in the holes intended for them.
Otherwise, the TV may fall and get damaged or cause injury.
Make sure that during installation the TV is not subjected to impacts.
Impacts can cause the TV to fall and be damaged. This can lead to injury.
Install the TV on a wall only if it is vertical and positioned at a right angle to the floor.
Otherwise, the TV may fall and cause injury.
After securely installing the TV, ensure the cables are arranged safely.
Cables that pose a tripping hazard can cause serious injury or damage to the TV.
Do not allow the power cable and connecting cables to get tangled.
If the power cable or connecting cable is pinched between the device and the wall, or under the floor, or crossed, the insulation of the internal wires may be damaged, which can cause a short circuit or break. This can cause a fire or lead to electric shock.
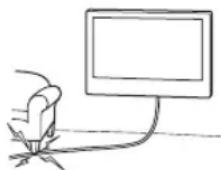
Screws for fastening the stand for wall mounting to the wall are not included in the delivery kit.
For mounting the bracket on a wall, use screws that match the material and structure of the wall.
The brackets should be stored in the cardboard packaging in a dark, dry, clean, and well-ventilated place, away from direct sunlight. Storage temperature: from -20°C to +60°C. Storage humidity: <80%.
Contents
Preparation for installation. 6
Checking the package contents 6
Determining the installation method 7
Mounting the base on the wall 9
Preparation for mounting the TV...10
KD-85/75XG85□□, KD-75XG87□□ 10
KD-65/55XG87□□, KD-65/55XG85□□ 12
Mounting the TV on the wall 14
KD-85/75XG85□□, KD-75XG87□□ 14
KD-65/55XG87□□, KD-65/55XG85□□ 16
Checking the installation 19
Additional information 19
Technical characteristics. 19
Use the bracket for wall mounting SU-WL450 or for mounting the TV on the wall.
Attention
Keep the screws in a safe place out of the reach of children.
4 Determine the position of the screws for the base installation (20) A.
See specifications on page 19. If you choose point 2, use the base adapter hole position ①.
WARNING
The wall on which the TV will be installed must support a weight exceeding the weight of the TV by at least four times (to find out the weight of the TV, see the reference guide.)
- Determine the strength of the wall on which the TV will be installed. If necessary, reinforce the wall.
Installing the base on the wall
- Use four or more screws with a diameter of 8 mm or equivalent (not included in the supply). Insert four screws into the base adapter holes ①, attach it to the base (20) A (only 2-a).
- Install the base (20) A horizontally on the wall.
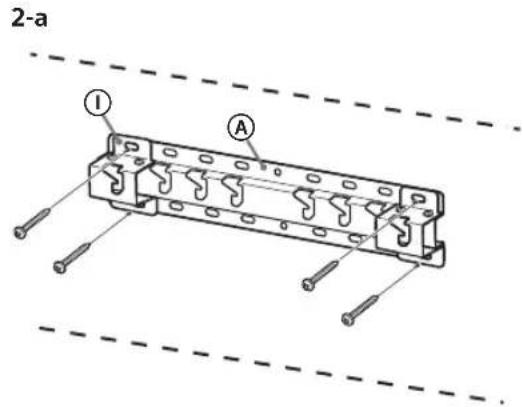
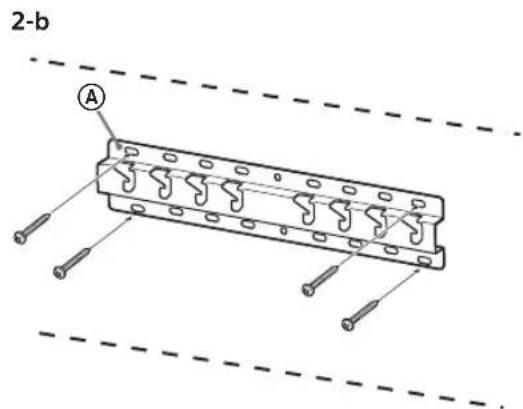
1 Mark the installation location on the wall.
- Use adhesive tape 1. d. (not included in the supply) to mark the position of the TV next to the base or base adapter. See the following table.
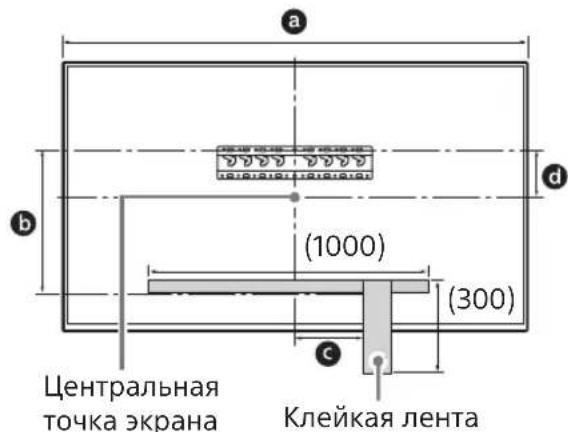
Units of measurement: mm
- Remove the tabletop stand. Hold the tabletop stand firmly with both hands while other people lift the TV.
KD-85XG85□□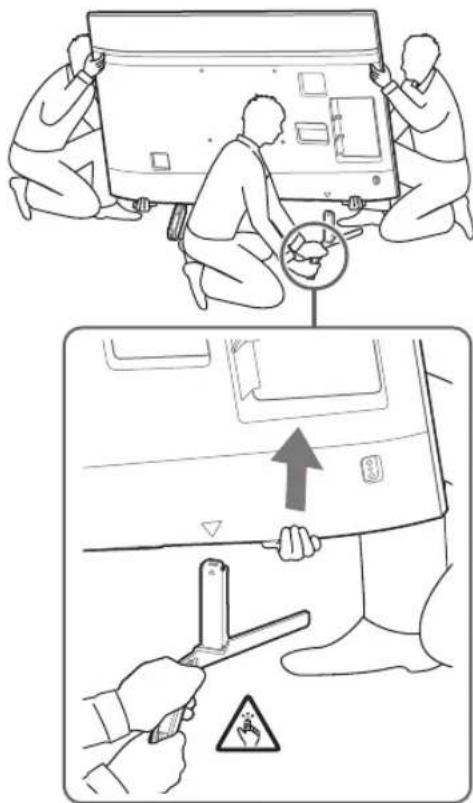
KD-75XG87□□, KD-75XG85□□
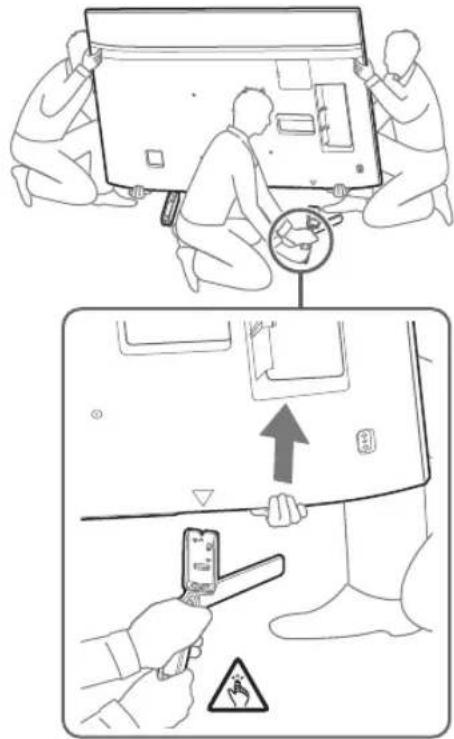
- Repeat the procedure and remove the other side of the tabletop stand.
Note
To detach the tabletop stand, at least two people are required. Be careful not to use excessive force when detaching the tabletop stand from the TV, as this may cause the TV to fall and result in injury or damage to the TV. Be careful when handling the tabletop stand to prevent damage to the TV. Be careful when lifting the TV, as the tabletop stand may detach and fall, which could cause injury. Be careful when detaching the tabletop stand from the TV to avoid tipping over the device and damaging the surface on which the TV is placed.
KD-65/55XG87□□,
KD-65/55XG85□
1 Remove the screws from the rear of the TV.
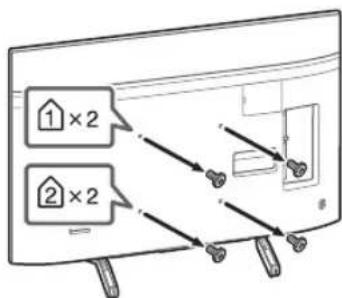
2 Attach the mounting brackets and hooks for wall mounting. Perform the check of the mounting parts according to the section "Wall-Mount Bracket SU-WL450" in the "Checking the Accessories" section on page 6.
Note
Tighten the mounting brackets securely with screws. - When using an electric screwdriver, set the tightening torque to approximately 1.5 N·m {15 kgf·cm}. Keep the used and unused parts in a safe place for future use. Keep this instruction manual for future reference.
Standard mounting (2-a)
Compact installation (2-b)
Note
With this installation, some of the rear panels of the TV may become inaccessible.
Connect the necessary cables to the TV.
Before installing the TV on a wall, be sure to connect the cables. After installing the TV, connecting the cables will become impossible.
See the Reference Manual supplied with the TV.
Note
For laying cables, use the cable guides in the specified order. - Before fixing the device to the wall, connect the cables so that you do not accidentally step on them.
4 Detach the table-top stand from the TV.
- Remove the side of the table-top stand. Hold the table-top stand firmly with both hands while others lift the TV.
- Repeat the indicated action and remove the other side of the table-top stand.
Note
- Detaching the table-top stand requires three or more people. - Be careful and do not use excessive force when detaching the table-top stand from the TV, as this may cause the TV to fall and result in injury to someone or damage to the TV. - Be careful when handling the table-top stand to prevent damage to the TV. - Be careful when lifting the TV, as the table-top stand may detach and fall, which could cause injury. Be careful when detaching the table-top stand from the TV to avoid dropping the device and damaging the surface on which the TV is placed.
Installing the TV on a wall
KD-85/75XG85□□, KD-75XG87□□
1 Lift the TV.
The location of the screws and the mounting base or adapter base See in Table 7, Step 3 in the section "Determining the installation location" on page 8. - Make sure that the rear panel of the TV is in contact with the base or adapter base when holding the TV.
- Hold the TV with both hands and make sure that the bottom part of the TV is level with the floor.
- The TV must be carried by three people: the person in front of the TV should guide the others to place the TV in the proper position.
When mounting the TV on the wall, be careful, especially the person holding the TV from below, as it may fall and cause serious injury or even death.
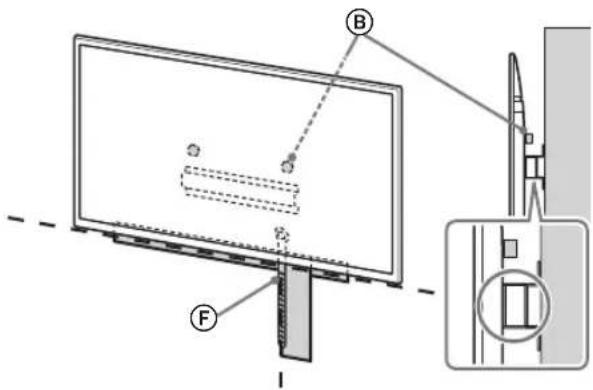
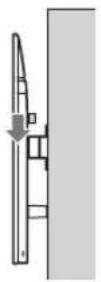
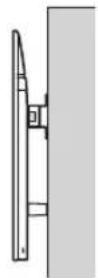
2. Mount the TV on the base or the base adapter.
- Carefully lower the TV and hook the brackets (B) installed on the rear panel of the monitor onto the base or the base adapter, following the shape of the holes.
- After mounting the TV on the wall, make sure that the brackets are securely fixed to the base or the base adapter. Slowly remove both hands and ensure that the TV is securely installed.
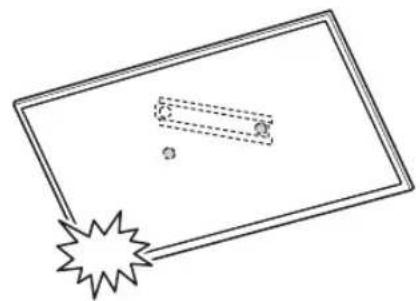
- After mounting the TV on the wall, remove the protective film, etc., from the wall.
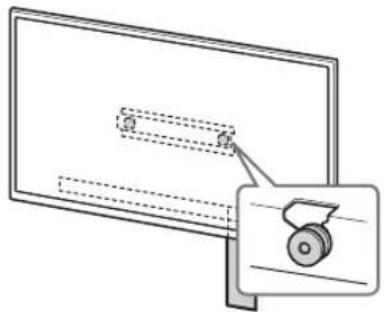
2-a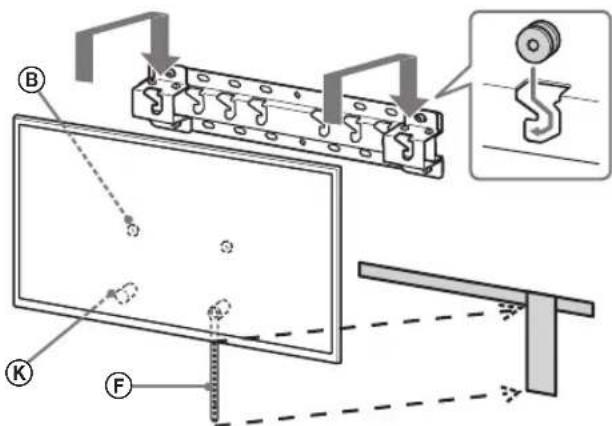
↓
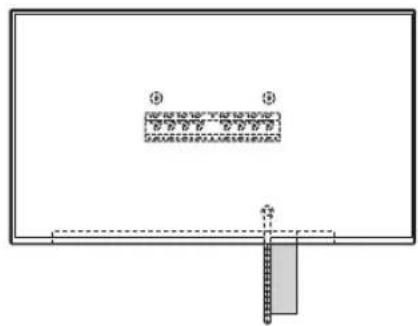
↓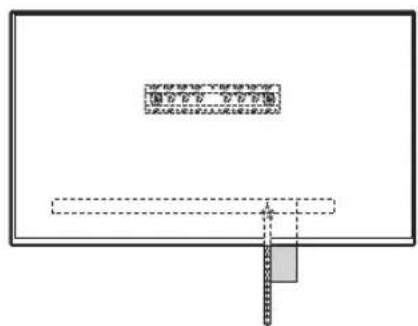
↓
2-b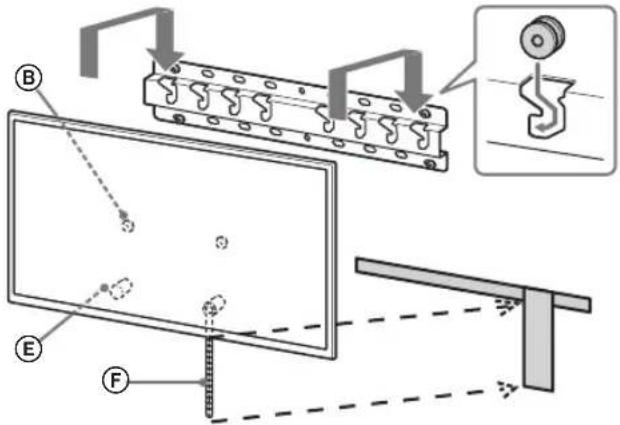
RU
↓
- Ensure that the TV is held by two or more people (three or more people for TVs with a 75-inch screen or larger) when carrying it.
To prevent the TV from tipping over.
- Remove the stand and securely attach it to the wall.
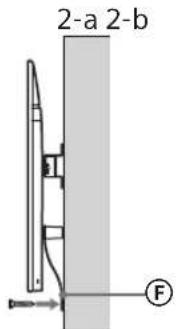
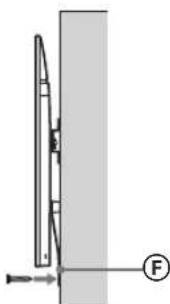
- Use a screw with a diameter of 5 mm or its equivalent (not supplied).
Note
Gently pull the bottom of the TV toward you to make sure it does not tip forward. If there is a slight tilt, the TV is not securely fastened, and the belt should be secured more firmly.
1. Lift the TV.
The location of the screws on the back of the base or base adapter is shown in Table 3 in the "Determining the installation location" section on page 8. - Make sure the back panel of the TV is in contact with the base or base adapter when holding the TV.
Note
- Hold the TV with both hands.
2. Place the TV on the base or base adapter.
- Carefully lower the TV and align the screws (8) installed on the back panel of the monitor with the base or base adapter, following the shape of the holes.
- When installing the TV on a wall, make sure that the anchors are securely fastened to the base of the stand base. Slowly pull both hands and make sure that the TV is securely installed.
2-a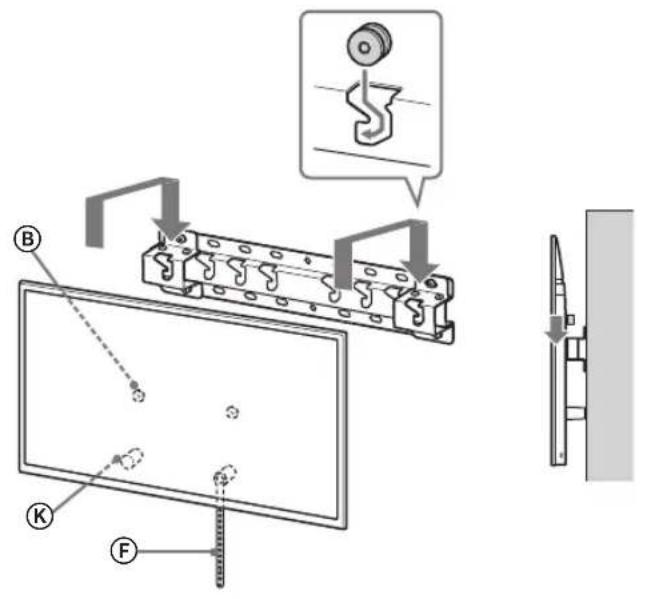
2-b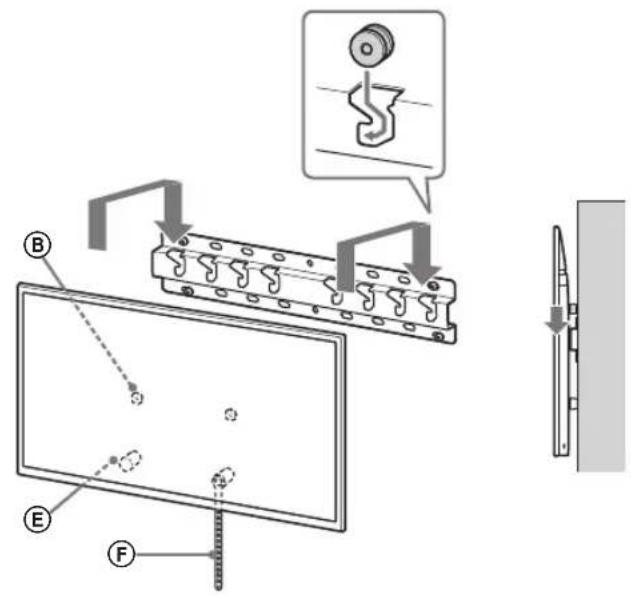
↓
↓
RU
Warning
- Make sure that the TV is held by two or more people (three or more people for TVs with a 75-inch screen or larger) when moving it.
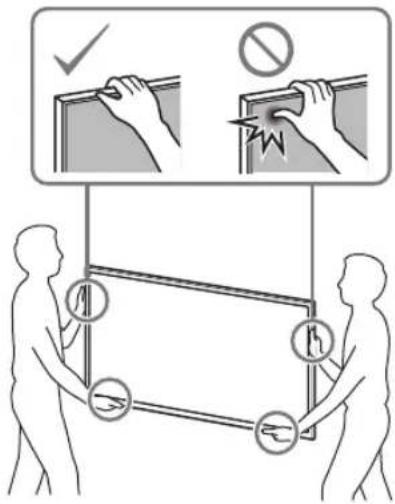
3. Adjust the position of the lower part of the TV.
- Remove the stand base and securely attach it to the wall.
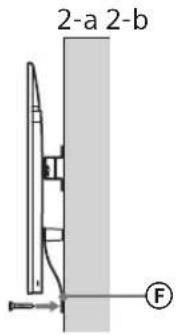
- Use screws with a diameter of 5 mm or equivalent (not supplied).
Note
Slightly tilt the TV towards you to make sure it does not move forward. If there is any slight movement, the TV is not properly secured; the anchors must be secured properly.
- Anchors ⑧ are securely fastened to the base of the stand base.
- The cord and cable are not crossed or tangled.
- This device must be handled without weakening.
PRECAUTIONS
- Incorrect placement of cables, etc. may lead to fire or electric shock due to short circuit. To ensure safety, make sure all installation steps are completed.
Initial Information
When removing the TV, perform the procedure described above in reverse order.
PRECAUTIONS
Make sure that the monitor is held by two or more people (three or more people for TVs with a diagonal of 75 inches or more) when removing it.
Technical Specifications
Dimensions: (approx.) [mm]
The stand is partially incorrect; it may become unstable or unclear. They may have to use the license.
The TV may fall and cause serious injury, such as death or fracture. If the stand is installed on an unstable, uneven, or unlevel surface, the stand may fall and cause injury or damage. The stand must be able to support the weight, as the weight of the TV may be exceeded. (The weight of the TV may be increased.) If the stand is installed on a wall that is not strong enough, the stand may fall and cause injury or damage.
Child safety
Do not allow children to climb on or play with the TV. Keep children away from the TV and do not let them play with it.
Be sure to have the TV moved or dismantled by licensed technicians.
If the TV is moved or dismantled by unlicensed personnel, the TV may fall and cause injury or damage. Moving or dismantling the TV should be done by two or more people (three or more if the TV diagonal is 75 inches or more).
Remove the screws, then, the TV mounting instructions.
If you do this, the TV can cause serious injuries and lead to damage.
Do not remove parts of the bracket for partial mounting.
If you do this, the bracket for partial mounting can cause serious injuries and lead to damage.
Do not install any other devices, except the specified product.
The bracket for partial mounting is intended for use only with the specified product. If you install other devices, except the specified ones, they can fall and cause serious injuries and lead to damage.
Do not use the bracket for partial mounting for hanging objects other than the TV. Do not tilt the TV left/right or up/down.
If you do this, the TV can fall and cause serious injuries and lead to damage.
Do not lean on the TV and do not hang on it.
Do not lean on the TV and do not hang on it, because it can fall on you and cause serious injuries.
WARNINGS
If you do not follow the warnings below, it can lead to serious injuries or damage.
During cleaning or maintenance of the product, do not apply excessive force to it.
Do not apply excessive force to the top of the TV. If you do, the TV can fall and cause serious injuries and lead to damage.
Warnings
The bracket, installed on the wall partially fixed, will be used for a long time, depending on the material of the wall covering. The wall surface behind the TV or above it may become discolored or the wall may peel off.
Partially fixed mounting: If the wall is not strong enough, secure it with anchors. Do not use the bracket for partial mounting in places where there is mechanical vibration.
Installation of the bracket for partial mounting
When mounting the bracket for partial mounting, use screws appropriate for the wall structure and material.
Store the product in its cardboard box, in a dark, dry, clean place with good ventilation, away from acids and alkalis. Storage temperature: from -20°C to +60°C. Storage humidity: <80%.
Contents
Preparation for installation 5
Checking the parts. 5
Determining the installation location. 6
Installing on a concrete wall 8
Preparing the TV for installation......9 KD-85/75XG85□□,KD-75XG87□□ KD-65/55XG87□□,KD-65/55XG85□□ 11
Installing the TV on the wall. 13 KD-85/75XG85□□,KD-75XG87□□ 13 KD-65/55XG87□□,KD-65/55XG85□□ 15
Checking after installation 18 Additional information 18
Technical specifications 18
Installing the TV on the wall
The installation should be carried out by a qualified technician according to the TV model.
To install the TV on the wall, use the bracket for wall mounting SU-WL450.
Support
Keep the packaging materials away from children.
Preparation
Installation
- Before installation, carefully read the user manual and the installation guide for the TV. Before assembling, make sure you have the correct screwdriver for the screws.
- Check the installation location of the TV. Use appropriate screws with a diameter of 8 mm and one screw with a diameter of 5 mm or equivalent (not included in the package). Choose the screws according to the material of the wall.
Parts check
Package contents: SU-WL450
- Check that all parts are included in the package.
| AБаза(20)(1)ВШК | В(2) |
| CГВИNTPSW6x20(4) | DГВИNTPSW4x20i3Втулков(2) |
| EПрокадka(20)(2) | FРемиь(1) |
| GВтулka(20)(M4)(2) | HГВИNTPSW4x20(2) |
| IПерекдддддддддддддддддддддддддддддддддддддддддддддддддддддддддддддддддддддддддддддддддддддддддддддддддддд徳баши(2) | JГВИNTPSW4x10(8) |
| KПрокадka(60)(2) | LГВИNTPSW6x50(2) |
| MВтулka(M4)(2) | NГВИNTPSW4x50(2) |
Determining the installation location
1. Determine the installation location.
Make sure the wall has sufficient dimensions and can support a weight at least four times the weight of the TV.
The required information for installing the TV on the wall can be found in the tables below. The weight of the TV can be found in the TV's user manual.
Mounting hardware
Center point of the screen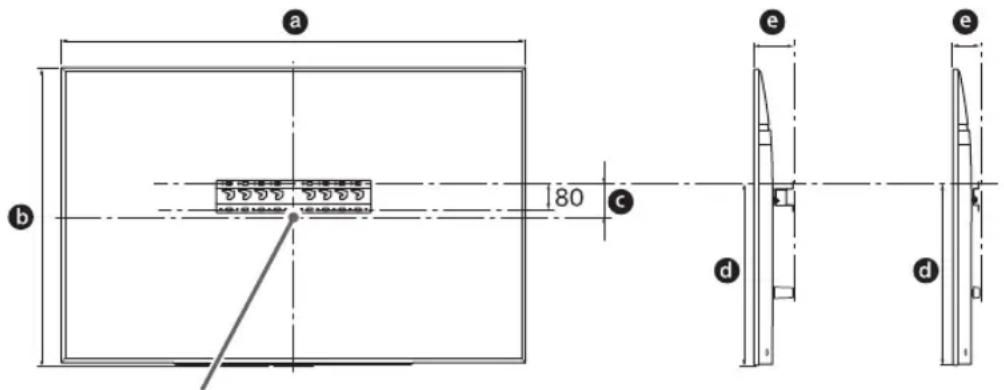
Single mounting: MM
From the installation location of the base, follow the table below. If option 2-b is selected, skip this step.
| Назва модени Розташуванни raков | |
| KD-85XG85□□ | a |
| KD-75XG87□□ | |
| KD-75XG85□□ | |
| KD-65XG87□□ | b |
| KD-65XG85□□ | |
| KD-55XG87□□ | |
| KD-55XG85□□ | |
Attach the mounting plate to the base ① using screws (PSW 4x10) ② to the base (20) A (if option 2-a is selected).
Tighten the screws for installing the base (20) A.
See technical specifications on page 18.
If option 2-a is selected, use the holes on the mounting plate for the base ①.
WARNING
- The wall on which the TV is installed must be able to support at least four times the weight of the TV (the weight of the TV can be found in the manual).
Determine the strength of the wall on which the TV is installed. If necessary, reinforce the wall with a suitable method.
Installation of the wall plate
Use four screws with a diameter of 8 mm or equivalent (not included in the delivery). Screw the four screws into the holes on the mounting plate for the base ① with the base (20) A (only 2-a). Install the base (20) A horizontally on the wall.
When using this type of mounting, the separate plugs on the back of the TV cannot be used.
Connect the TV to the required cable.
Please be careful not to damage the cables when reinstalling the TV. The installation of the TV must be done without pinching the cables.
TV stand.
Note
The cable in the wall must be laid by a licensed electrician. - Route the cables, do not step on them, before mounting them on the wall.
5 Remove the stand from the TV.
Remove one side of the stand at a time. Hold the stand firmly with both hands, while another person lifts the TV.
KD-85XG85□□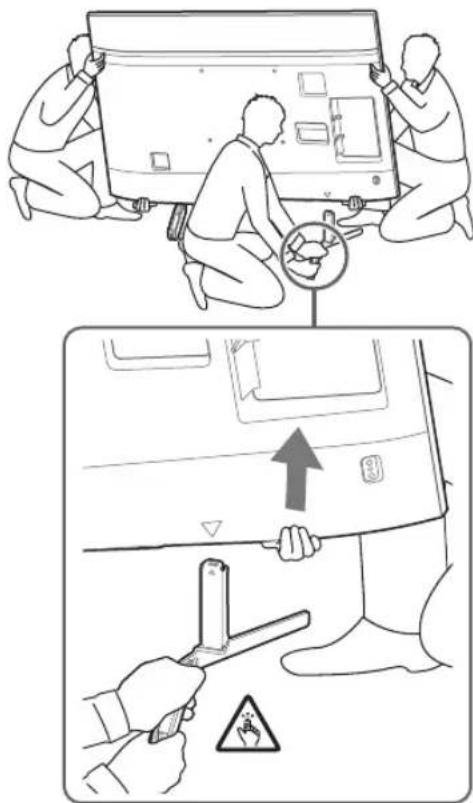
KD-75XG87□□, KD-75XG85□□
- Repeat the previous step and remove the other side of the stand.
Note
- To remove the stand from the TV, at least two people are required. Be careful when using force to detach the stand from the TV, as this may damage the TV and cause injury to people or damage to the TV. - Carefully handle the stand to avoid damaging the TV. - Lift the TV carefully, as the detached stand may tip over and cause injury. - Be extremely careful when removing the stand from the TV. If the stand falls, it may damage the surface on which the TV is placed.
KD-65/55XG87□□
KD-65/55XG85□
1 Remove the screws from the rear of the TV.
2 Attach the mounting brackets to the rear of the TV. Check the presence of the mounting brackets using the list "Supplied with SU-WL450" in the "Checking the parts" section on page 5.
Screw
Screw the wall-mounting elements using screws. - For the wall-mounting bracket, set the tightening torque to approximately 1.5 N·m {15 kgf·cm}. - Be sure to keep the used or unused components in a safe place for future use. Keep this manual for future use.
Standard mounting (2-a)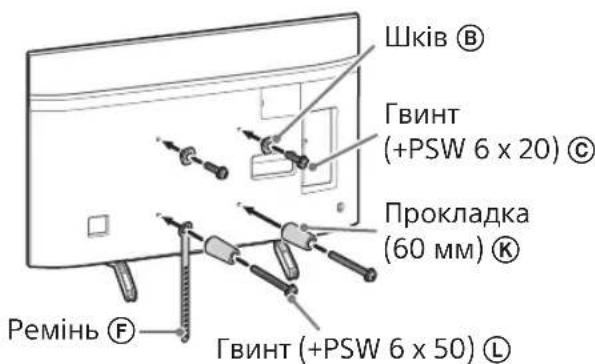
Thin mounting (2-b)
Screw
When using this type of mounting, you cannot use the separately sold stand for the TV.
Connect the TV cables.
Check the cable connections before mounting the TV on the wall. After mounting the TV, it will be impossible to connect the cables. Note: Connect to the TV.
Screw
The cable in the wall must be a licensed electrician. - Route the cables, not stepping on them, before mounting on the wall.
Remove the stand from the TV.
Remove one side of the stand at a time. Hold the stand firmly with both hands, while another person removes the TV.
- Repeat the previous step and remove the other side of the stand.
Screw
- At least three people are needed to remove the stand from the TV. Be careful when applying force to remove the stand from the TV, as it may cause the TV to fall and result in serious injury or damage to the TV. - Handle the stand carefully to avoid damaging the TV. Remove the TV carefully, as the stand may tip over and cause injury.
- ByIbTe BkpaObepeXHmM, KOJI 3HIMaTmMeTe HactInbHy nIDnopy 3 TeNeBi3opa. JaKIO nIINopa BnaJe, BOHa MOKe NOuKOJNTn NOBepXHIO, Ha KaIITpMaCTbCRA TneB13Op.
YctaHOBJIeHHaTeJIeBi3opaHa cTIHi
KD-85/75XG85□□,KD-75XG87□□
1Пидимить телевизр.
- ⅢHaTnca po3aWbHn HaKIB ⑧, 3a Jki TeJIeBi3Op NiDiBiWyEc H a6a3i a6o nepexiHnky dny 6a3n, nB. Ta6JnIu Iy eTany 3 B po3diI i «Bn3HaueHHra Micra BCTaHOBHeHHra» Ha cTOp.7.
- Tpmaou TeIeBi3Op, nepeKoHaNTecra, 3aHn6iK TeIeBi3Opa TopKaETbC8 6a3n a6o nepexiHnka dna 6a3n.
Pnpmitka
HaHIO TpMaTe TeIeB1Op O6oma pykAm. PemHb F y HxKHi YaCTnHi TeEbi3opa Ma6 6yTu BnPIBHn3a MaJIArPHoO CTpiKoO. - Tpumatu Telebi3op nobHHI troe IIOJe. To, xTo po3TaUOByTbcra Cnepey BiHocHO Telebi3opa, Ma DaBAtu Bka3iBk iHMM, 06BupiBHnTn noIOxeHHa Tenebi3opa.
-6yDBe Bkpa ObepeXHmN, KOIN BCTaHOBIOeTe Tenebi3Op Ha cTIi. OocblnBO obepeXHM cnid 6ytu TOMy, xTO niTpmye Tenebi3Op 3HN3y. PaHHa Tenebi3opa MoKe npu3BecTu DO TAAKnx TpaBM Ta HABiTb CMEptI.
2 YcTaHOBITb TeIeBi3Op Ha 6a3y a6o nepexiHNK Ila 6a3n.
- O6epexHo onyctiB TeJIeBI3Op Ta nIDbcIte uKIBu 8, npNKpINLeHi 33aNy TeJIeBI3Opa, Ha 6a3i a6o nepexiHnky dJa 6a3N (BOHN NOBHHI BiINOBiDaTu PO3Mipam OTBOpIB).
- IicJRA BCTaHOBHeHHaTeJIeBi3OpHa CTiHi nepekoHaItecra, 10 WkIBn HADInHO 3aikcoBaHo B 6a3i a6o B nepexIDHnky nn6a3n.
- NobilbHO BiDnyckaIte TeIeBi3Op 6Oma pykam, uo6 nepecBIDHITnC, uo BIn He BnaJe.
- Iicna BCTaHOBneHHa Tenebi3opa Ha CTiHi 3HIMtB MaJpy CtpiKy (uHaIorHm MaTepiA) 3i CTiH.
2-a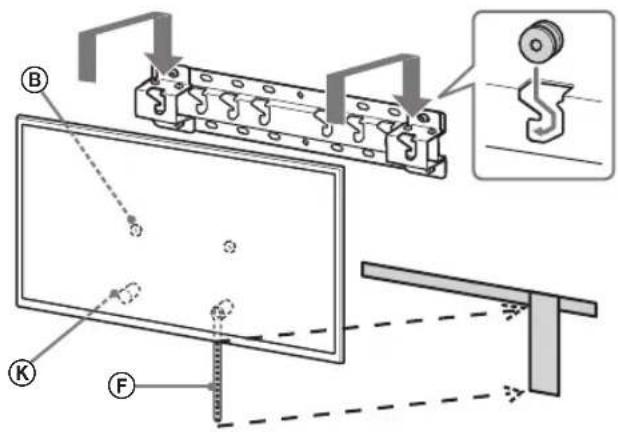






Flush mounting (2-b)
Markus.
Flush mounting (2-b)
Markus.
Mass (base only): (approx.) [kg]
0.8
Do not install the device in a place where it may be exposed to direct sunlight or heat.
The temperature may rise and cause malfunction. If the wall is concrete, the temperature may rise and cause the device to be damaged.
Installation accessories
If the mounting screws are not tightened for a long time, the material of the wall may be damaged and the screws may become loose. If the mounting screws are not tightened properly, the device may fall and cause injury. The mounting screws must be installed in the correct positions.
Mounting screw installation
For Sony devices
Keep the device away from water. When installing the device, ensure that it is securely fastened and protected from strong impacts, and be careful when moving or transporting it.
Fastening brackets
The device's
outlets should not be placed in areas where they can be blocked by the fastening brackets.
The outlets of the fastening brackets should not be placed in areas where they can be blocked by the fastening brackets. If the outlets are blocked, the device may overheat or malfunction.
Do not place the device on unstable surfaces.
If the device is placed on an unstable surface, it may fall and be damaged, or cause injury or damage to the device or other objects.
Fastening bracket installation
Use the screws provided in the instruction manual for installation.
If the screws are too long, they may damage the fastening bracket or cause malfunction. Use screws that are suitable for the material of the mounting surface, and use screws with a diameter of 8 mm (or less) for installation.
The provided screws and fastening brackets should be used in accordance with the instructions in this manual. Do not use other elements, as they may cause damage, injury, or malfunction of the device.
Use the fastening brackets in accordance with the procedures provided in the instruction manual.
Install them.
If the screws are too long or too short, they may cause damage, injury, or malfunction of the device.
The screws should be tightened in the indicated positions.
Before installing the TV, carefully read the safety instructions.
The TV must be installed by qualified personnel.
After reading the safety instructions, install the TV correctly. This is a safety feature.
The TV should be installed perpendicular to the wall and floor.
If the TV is not installed correctly, it may fall and cause injury.
After installing the TV, check the cable connections.
If the TV is not installed correctly, it may fall and cause injury.
The power cord and antenna cable should be kept away from the TV.
If the power cord or antenna cable is pinched between the TV and the wall, it may cause a short circuit or electric shock. This could lead to a fire or electric shock.
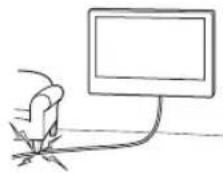
Do not use screws that are longer than the specified length for wall mounting.
When mounting the TV on the wall, be careful not to damage the TV with the mounting screws.
Table of Contents
Installation Instructions 5 Safety Precautions 5 Installation Location 6 Wall Mounting 8 TV Installation 9 KD-85/75XG85□□, KD-75XG87□□ 9 KD-65/55XG87□□, KD-65/55XG85□□ 11 TV Installation 13 KD-85/75XG85□□, KD-75XG87□□ 13 KD-65/55XG87□□, KD-65/55XG85□□ 15 Installation Instructions 18 Safety Precautions 18 Technical Specifications 18
TV Installation
The TV installation procedure is simple. To install the TV, use the SU-WL450 wall mounting bracket.
- The instructions for the brand are given in the table below.
Installation depth
For installation, you need a TORX screwdriver and an installation screwdriver. Before installing the brand, the screw must be Phillips. Tighten the screws. The diameter of the screw is 8 mm for the brand and 5 mm for the smaller screw (not provided). Tighten the screws on the material.
Removing the bracket
Provided with the SU-WL450
- Check that all brackets are present.
| A Heri3 (20) (1) B Terepiik (2) | |
| ◎ PSW 6x20 (4) D TbIFbIH PSW 4x20 (2) | |
| E ApaIbIK (20) (2) E | Belenik (1) |
| ◎ TbIFbIH (20) (M4) (2) | H PSW 4x20 (2) |
| ① Heri3ri aIaIaIep (2) | J PSW 4x10 (8) |
| K ApaIbIK (60) (2) L | PSW 6x50 (2) |
| M TbIFbIH (M4) (2) N | PSW 4x50 (2) |
Identifying the installation location
1 Identify the installation location.
Check that there is a suitable location and that the T-bar can support the weight of the TV.
For installation on the wall, see the installation instructions. For the bracket itself, see the installation instructions for the bracket.
Standard installation: center of the screen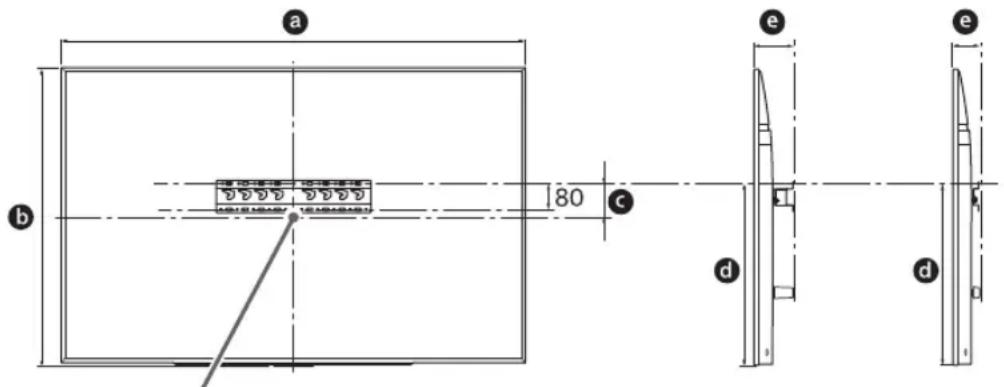
Unit: mm
| Ynliri hemipi | Зкразецемерi | Зкразецьим �шемi | Орнату узbingьгi | ||
| a | b | c | d | ||
| Стандарты орнату | Жа KBИ орнату | ||||
| KD-85XG85□□ | 1909 | 251 | 803 | 142 | 100 |
| KD-75XG87□□ | 1673 | 963 | 107 | 595 | 116 75 |
| KD-75XG85□□ | |||||
| KD-65XG87□□ | 1450 | 836 | 99 | 523 | 115 73 |
| KD-65XG85□□ | |||||
| KD-55XG87□□ | 1231 | 713 | 106 | 468 | 115 73 |
| KD-55XG85□□ | |||||
Instructions
The installation can be adjusted to the left and right. The T-bar can be moved up and down.
Install the device in a place where the temperature between the device and the wall is not too high.
Kypan:MM
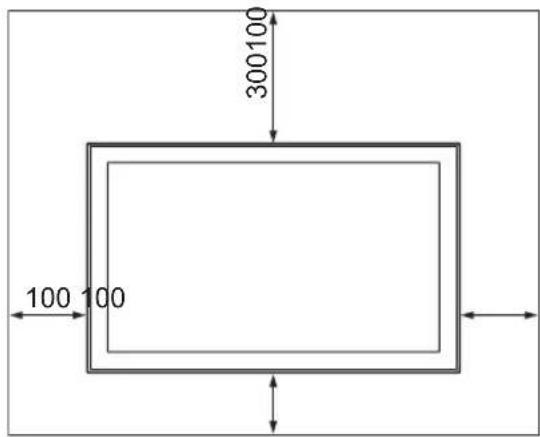
To ensure proper operation and safety, follow these instructions:
- Do not cover the device's openings, do not place it near heat sources, do not block or obstruct them.
- Do not place the device on soft surfaces, beds, sand, or in a cabinet. Do not cover the device with curtains or newspapers, etc. Do not place it near elements that emit heat. Do not place the device in the location indicated in the instructions.
The device has been blocked.
HycKay
If the cables are not long enough to reach the wall, you need to extend the cable length by connecting them.
The cables are connected to the main (20) A, main terminals ① and intermediate (20) E, intermediate (60) K, and the connection is made from the perimeter.
2. Choose the installation location. The device's rear panel should be at a distance from the wall as indicated in the instructions.
2-a Standard installation 2-b Alternative installation
1. Check the device.
WARNING
-2-b In the selected case, the rear terminal may be hot.
3. Refer to the instructions for the location of the main terminals. In the case of 2-b, perform this step and then proceed.
| Yürgi Hämipi İnmek Öpnbı | |
| KD-85XG85☐☐ | |
| KD-75XG87☐☐ | a |
| KD-75XG85☐☐ | |
| KD-65XG87☐☐ | |
| KD-65XG85☐☐ | b |
| KD-55XG87☐☐ | |
| KD-55XG85☐☐ | |
Attach the stand (PSW 4x10) to the TV using the 2 screws (20) as shown in the figure.
Remove the screws (20) from the stand.
Refer to the markings on page 18. When attaching the stand, align the holes on the stand with the holes on the TV.
REMOVAL
To remove the stand, remove the screws that secure the stand to the TV (refer to the markings on the TV for the screw positions).
Remove the screws securing the stand. If necessary, use a screwdriver to loosen them.
Installing the stand
Use screws with a diameter of 8 mm that are not longer than the specified length (provided). Attach the stand to the TV using the 4 screws (20) (only 2). Insert the screws (20) into the holes on the stand and tighten them.
Removing the stand
Refer to the installation instructions.
KD-85/75XG85□□, KD-75XG87□□
1 Mark the position for installing the stand.
Use the alignment marks (provided) to mark the positions of the holes on the TV for the stand or stand legs. Refer to the next step.
Unit: mm
| Ynlri hemipi | Белriney узbihдь范围内 | Зкран ортысbihн саншемi | ||
| a | b | c | d | |
| KD-85XG85□□ | 1909 | 683 | 200 | 251 |
| KD-75XG87□□ | 1673 | 468 | 200 | 107 |
| KD-75XG85□□ | ||||
2 Remove the screws from the back of the TV.
3. Install the wall-mount bracket using the supplied screws. Refer to the "Wall-Mount Bracket Installation" section in the "SU-WL450" manual for the bracket installation instructions.
Note
- Be sure to install the bracket securely. If the TV is not installed properly, it may fall and cause injury or damage. - Install the bracket on a wall that is strong enough to support the TV. If the wall is not strong enough, the TV may fall and cause injury or damage. - For safety, have the installation done by a qualified installer.
Standard installation (2-a)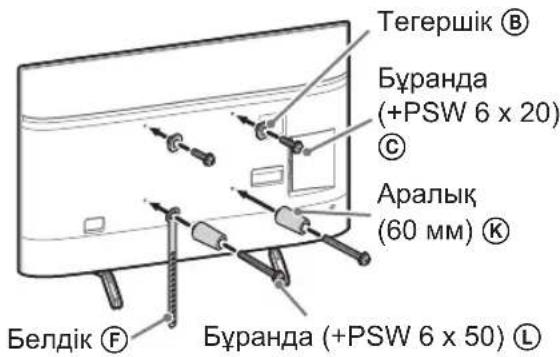
Inclined installation (2-b)
Note
- When using the inclined installation, make sure that the rear terminals of the TV have enough space for cable connections.
4. Attach the cable(s) to the TV.
Before attaching the cables, make sure that the TV is installed on the wall-mount bracket. After the TV is installed, it may be difficult to attach the cables. Refer to the supplied instructions for cable attachment.
Note
When attaching the cables, be careful not to pinch them. When installing the wall-mount bracket, allow some slack in the cables to prevent them from being pulled.
5. Remove the upper protective film.
- Peel off the protective film from the top of the TV. Be careful not to scratch the TV when removing the film.
KD-85XG85□□
KD-75XG87□□, KD-75XG85□□
The instructions for use and safety precautions are given in the manual.
Instruction
- Before using the device, read the manual carefully. The device must be used only for its intended purpose, in accordance with the instructions and safety requirements. To prevent damage, use the device as described. Do not use the device if it is damaged; contact service center for repair. Do not attempt to open the device yourself; contact qualified personnel for maintenance.
1 Remove the protective caps from the device.
2 Install the device into the cabinet and connect the cables. See section 5 "Connecting the cables" in the "SU-WL450 Installation" manual for detailed instructions.
Instruction
Connect the cables to the device. When connecting, ensure the power is off. If the cable is damaged or not, do not use it; replace it with a new one. Follow the instructions carefully.
Standard installation (2-a)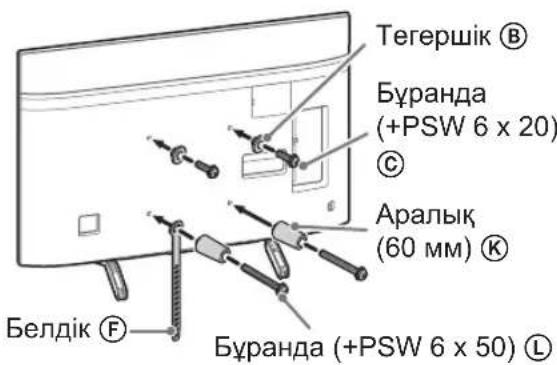
Recessed installation (2-b)
Instruction
When installing, do not touch the contacts on the back of the device.
3 Connect the cables to the device.
After installing the device, connect the cables. Do not connect the cables before installation. See the separate instruction manual for details.
Instruction
Connect the cables to the corresponding terminals on the device. When connecting, do not bend or damage the cables.
4. Remove the TV from the stand.
- To install the TV on the stand, first attach the stand base. Then, carefully lift the TV and place it on the stand base.
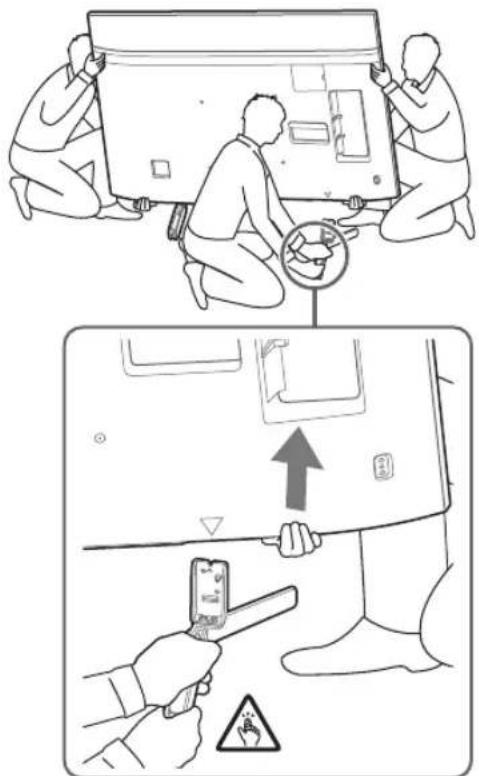
Remove the screws and install the TV on the stand base.
Note
To install the TV on the stand, you need a Phillips screwdriver. When installing the TV on the stand, be careful not to pinch your fingers, and avoid dropping the TV or exposing it to strong impacts. To prevent the TV from falling, do not install it on a stand that is not sturdy. If the TV is not properly installed on the stand, it may fall and cause injury. - When installing the TV on the stand, hold the TV firmly and avoid touching the screen or the stand's sharp edges.
Installing the TV on the wall
KD-85/75XG85□□,KD-75XG87□□
1. Remove the TV.
For the screws to be used for the wall-mount bracket, refer to the "Installing the wall-mount bracket" section (page 7-6). When installing the TV, do not use screws other than those specified.
Note
When installing the TV on the wall, be sure to have two or more people. The TV should be installed by qualified personnel. Be careful not to drop the TV during installation.
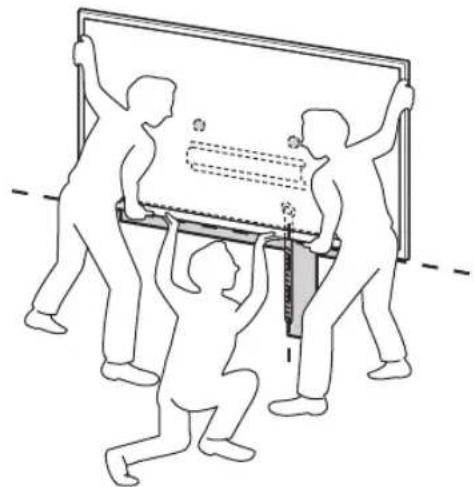
When installing the TV on the wall, be careful not to pinch your fingers (e.g., between the TV and the wall), and avoid dropping the TV or exposing it to strong impacts.
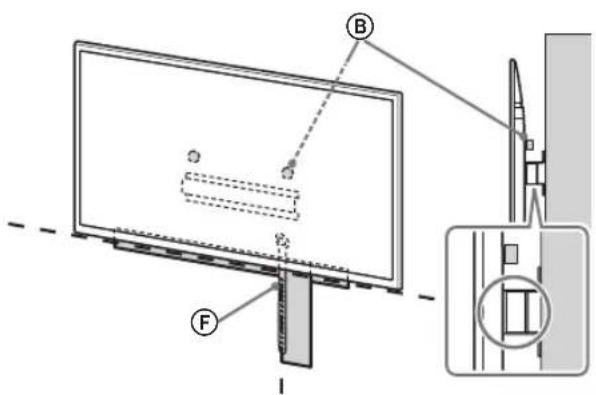
2. Install the TV on the wall or on the stand.
To install the TV on the wall, use the screws provided with the wall-mount bracket. Do not use screws other than those specified. To prevent the TV from falling, ensure that the wall-mount bracket is securely attached to the wall. To avoid damaging the TV, do not apply excessive force.
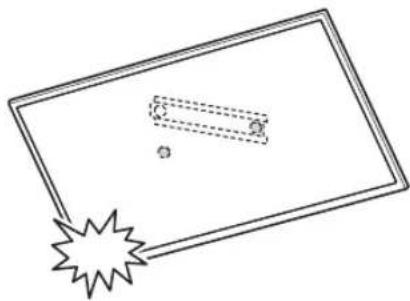
After installing the TV on the wall, remove the stand from the TV.
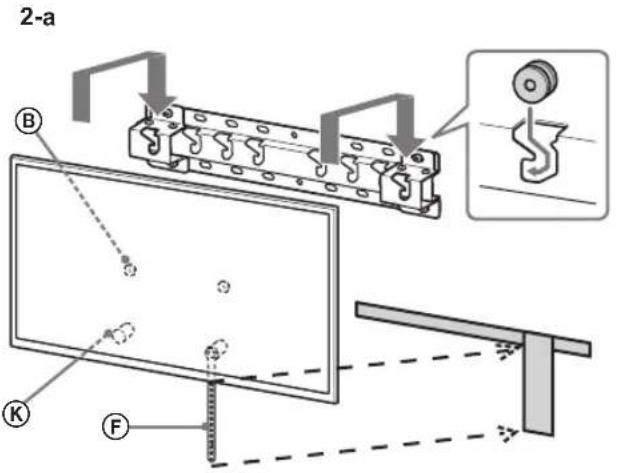
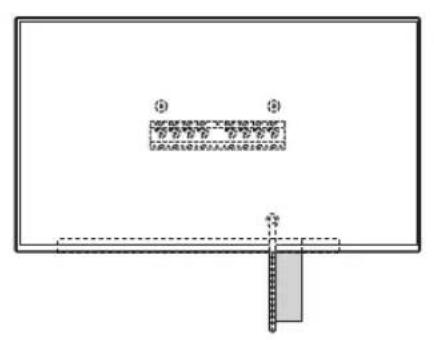
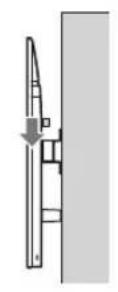
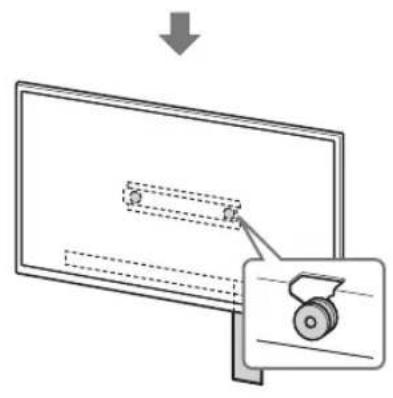
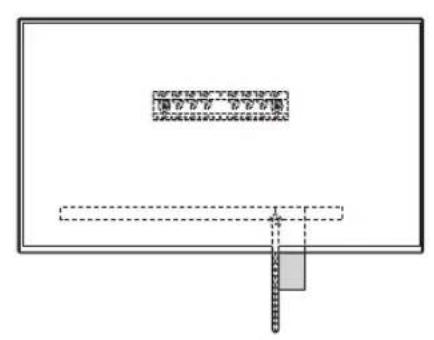
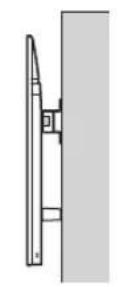
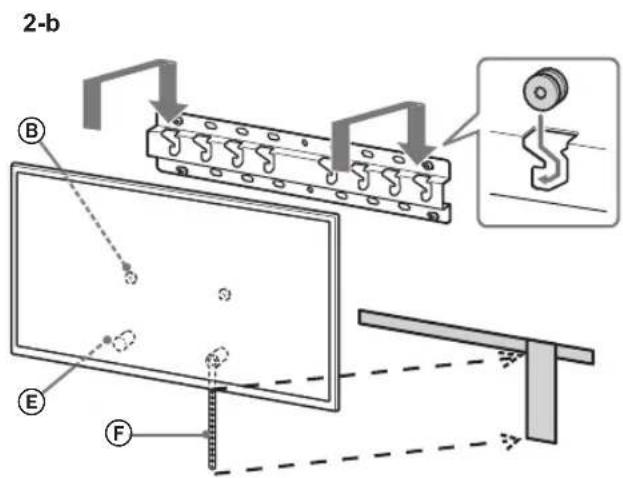
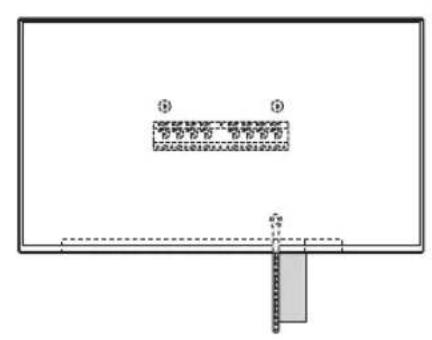
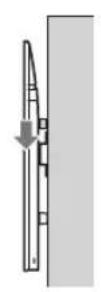
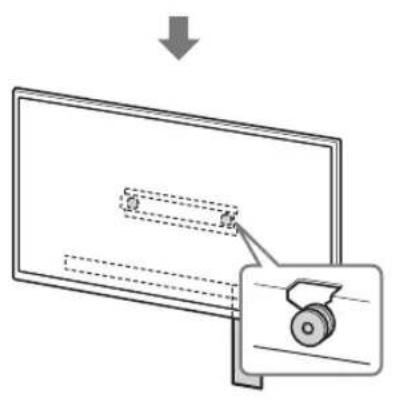
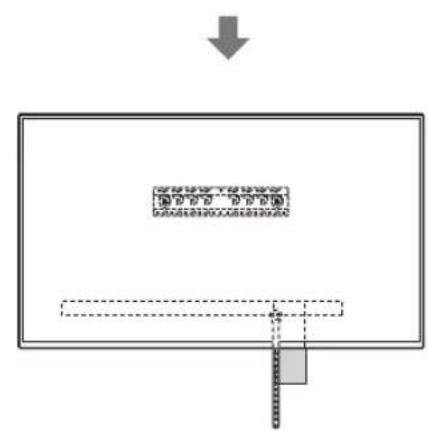
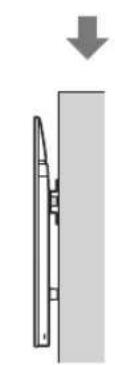
The TV can be installed using the supplied table-top stand or (optional) wall-mount bracket. The instructions for the table-top stand are described below.
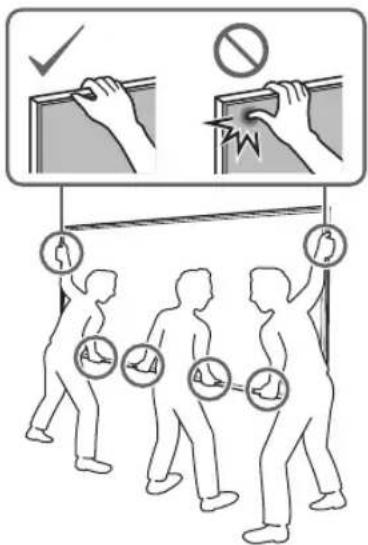
Do not install the TV by yourself.
- Have two people hold the TV and try to attach it to the stand.
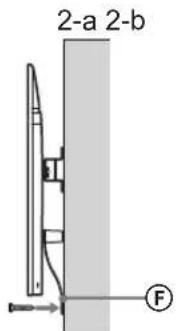
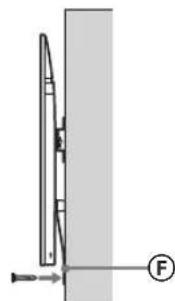
- If the diameter of the screws is 5 mm or more, do not use them (they are not included).
Installation
To install the TV, first attach the stand to the TV. If the stand is not attached correctly, the TV may fall and cause injury. Attach the stand securely.
KD-65/55XG87□□, KD-65/55XG85□□
1 Remove the TV from the box.
Refer to the 3rd step in "Identifying the location of the holes" on page 7-8 for the holes on the base or base adapter. When installing the TV, attach the TV to the base or base adapter securely.
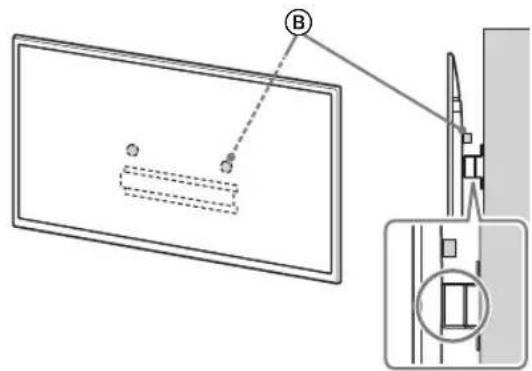
Installation
Install the TV with two people.
2 Place the TV on the base or base adapter.
While holding the TV with both hands, align the holes on the TV with the holes on the base or base adapter, and then secure them with the screws. After attaching the TV to the base, make sure the screws are tightened securely. Do not use excessive force when tightening the screws.
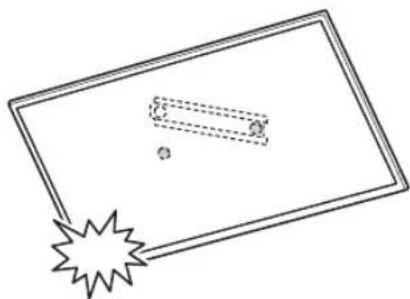
2-a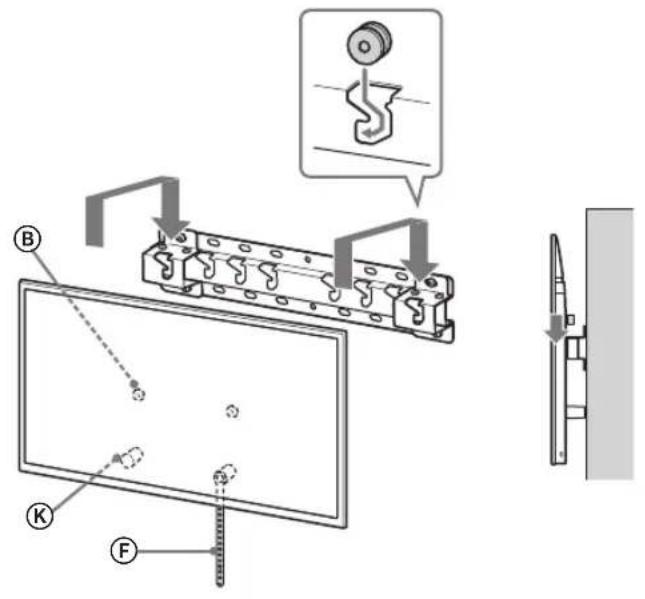
2-b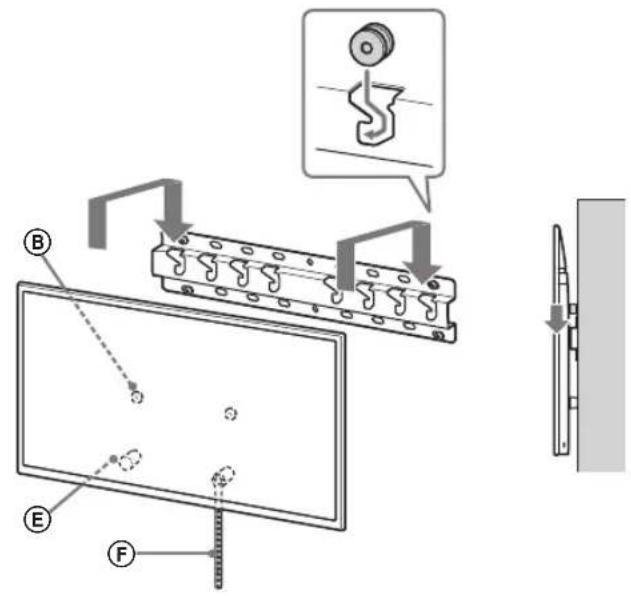
↓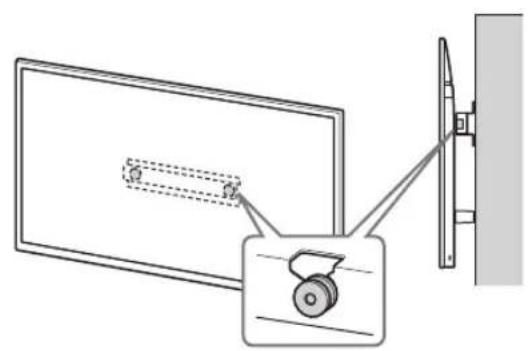
↓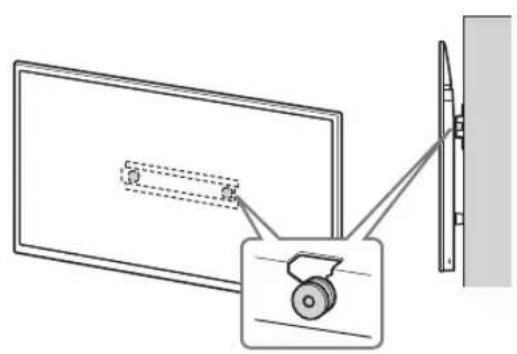
WARNING
Telephone and television equipment must be installed and used in accordance with the requirements of the technical regulations (depending on the type of equipment) established by the Customs Union.
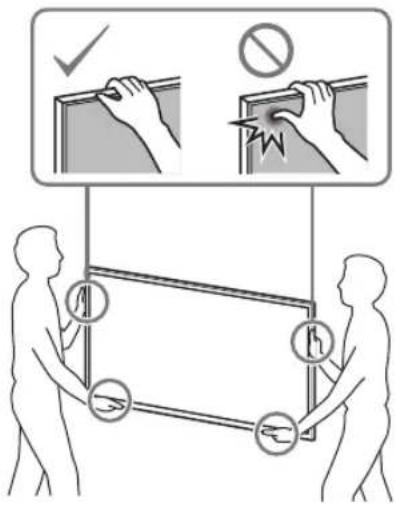
3. Do not attempt to repair the equipment yourself.
- If the equipment is damaged, contact a qualified specialist for repair.
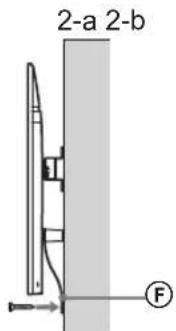
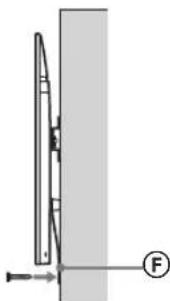
- If the diameter is 5 mm or more, it must be replaced (if damaged).
Instruction
To ensure safe operation of the equipment, carefully read the instructions before using it. If the equipment is damaged or malfunctioning, do not use it and contact a specialist.
Installation and connection instructions
Check the connections.
Make sure the equipment is properly connected to the power supply. - Do not use if the cable is damaged or frayed. - The equipment must be properly grounded.
WARNING
If the equipment is used improperly or in violation of the operating instructions, there is a risk of electric shock or fire. Do not expose the equipment to moisture or extreme temperatures.
This manual describes the procedure for the correct operation.
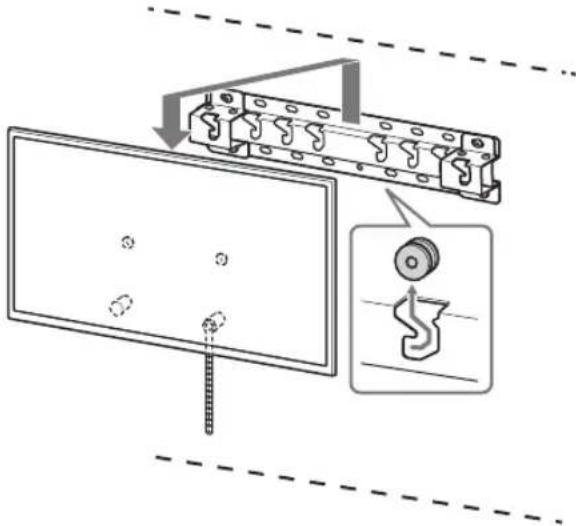
EXCERPT
If the device is not used for a long time (75 days or more), the batteries may leak and damage the device.
Technical specifications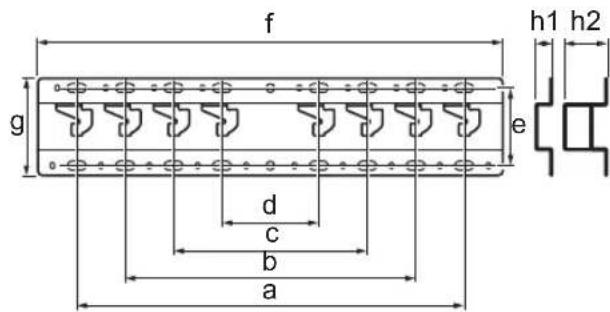
Sony
__SUPPIMER__
yyn pnn by nno nyon bnbynwn,nyon on.ynbn ypninnyo
177
DINNNN NNNN BYNPN INN NNNN NNNN NNNN NNNN NNNN NNNN
ybn npnnv topn
07712 0316 7-5y 1310777777 .
IN pnn nnnn nn nnnn nn nnnnnn nn nnnnnn nn nnnnnn nn nnnnnn nn nnnnnn nn nnnnnn nn nnnnnn nn nnnnnn nn nnnnnn nn nnnnnn nn nnnnnn nn nnnnnn nn nnnnnn nn nnnnnn nn nnnnnn nn nnnnnn nn nnnnnn nn nnnnnn nn nnnnnn nn nannnnn nn nannnnn nn nannnnn nn nannnnn nn nannnnn nn nannnnn nn nannnnn nn nannnnn nn nannnnn nn nannnnn nn nannnnn nn nannnnn nn nannnnn nn nannnnn nn nannnnn nn nannnnn nn nannnnn nn
n
n nn n nn nn nn nn nn nn nn nn nn nn nn nn nn nn nn nn nn nn nn nn nn nn nn nn nn nn nn nn nn nn nn nn nn nn nn nn nn nn nn nn nn nn nn nn nn nn nn nn nn nn nn nn nn nn nn nn nn nn nn nn nn nn nn nn nn nn nn nn nn nn nn nn nn nn nn nn nn nn nn nn nn nn nn nn nn nn nn nn nn nn nn nn nn nn nn nn nn nn nn nn
y nynnnn nn np 1
y 107n nn nnnn nn n.
10000000000000000000000000000000000000000000
NNN 1010777777
__SUPPIMER__
Sony
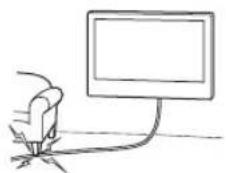
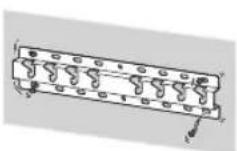
- 6 · 8 9 KD-65/55XG87□11 KD-65/55XG85□
- KD-85/75XG85□□,KD-75XG87□□ KD-65/55XG87□ . KD-65/55XG85□
#
SU-WL450 87 87
(1)(20) (A)(2) 防火手B
18 18. 0792

PSW 4x20 (2)

(4)PSW6x20

(2) (20) nnn

(2)PSW4x20 H

(2) (M4) (20) ⑥

(2) OVAON
E(1) nyn
F
Su-WL450
.


(2) (60)
①⑧) PSW 4x10 J
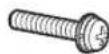

(2) (M4)
M(2)PSW4x50 N
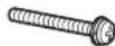
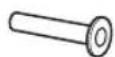
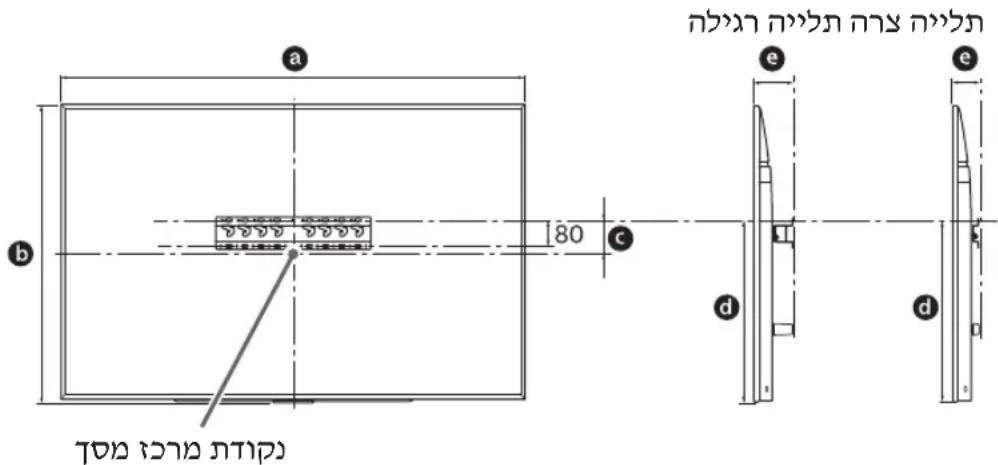
y:n
| e | d | c | b | a | b+10 | |
| n/a | n/a | |||||
| n/a | n/a | |||||
| 1,9091,097KD-803X4860□ | ||||||
| 1,6739631072511675KD-75XG85□□ | ||||||
| 1,450836952311573KD-65XG87□KD-65XG85□□ | ||||||
| 1,23171310646811573KD-55XG87□KD-55XG85□□ |
. .
2-a
npt nvn 2-b
12y
77
nnn nn nyn,2-b nna
nnn
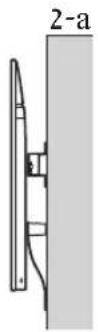
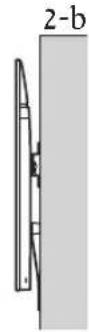
.000000000000000000000000000000000000000000
| a | KD-85XG85□□KD-75XG87□□KD-75XG85□□ |
| b | KD-65XG87□□KD-65XG85□□KD-55XG87□□KD-55XG85□□ |
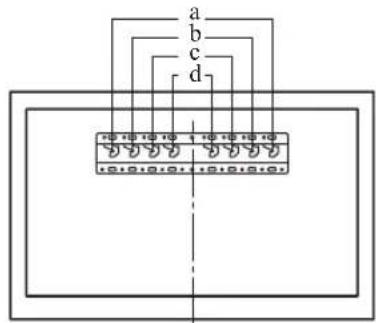
2 1
n:n ∴ n = 72 时. - by in Tn, -NNnNn -, ∴ m : x = 1 或 3x + 4y + 1 = 0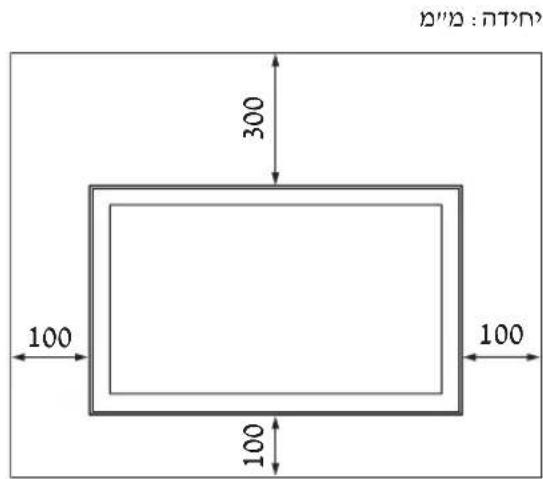
.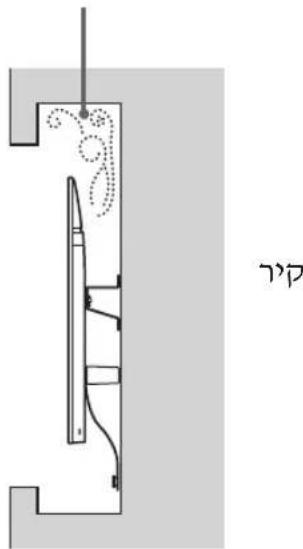
7n7n
nnpnn nn nnnn 0000000000000000
yinnnnn nn, noon no
(20) nnnn ① v nn, (20) v nn
(60) nnnn
7pn 2x-5y 0oan npnn
(p)
.(2-a)④(20)VVA ① V
.
2-a
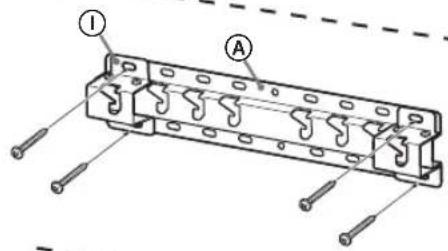
2-b
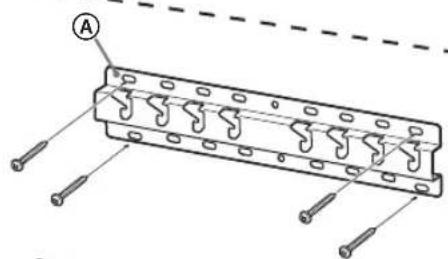
· 87
INO
-
DTNTOVON
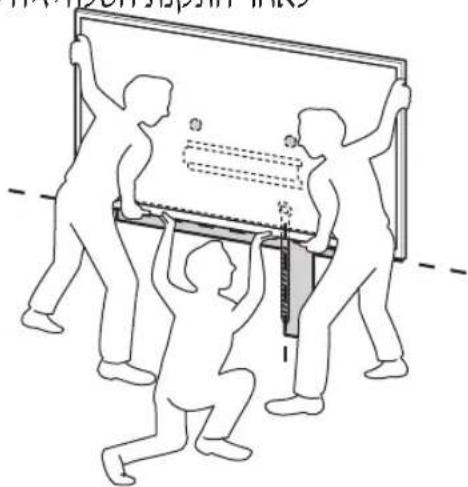
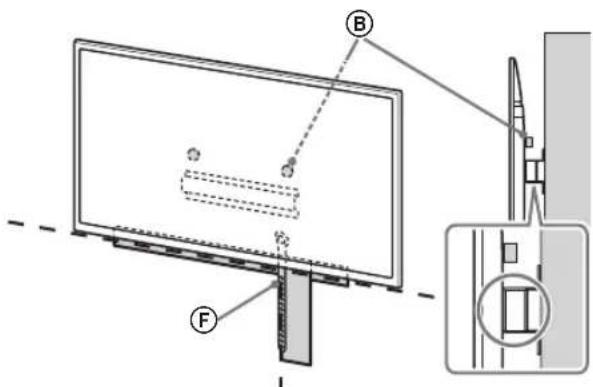
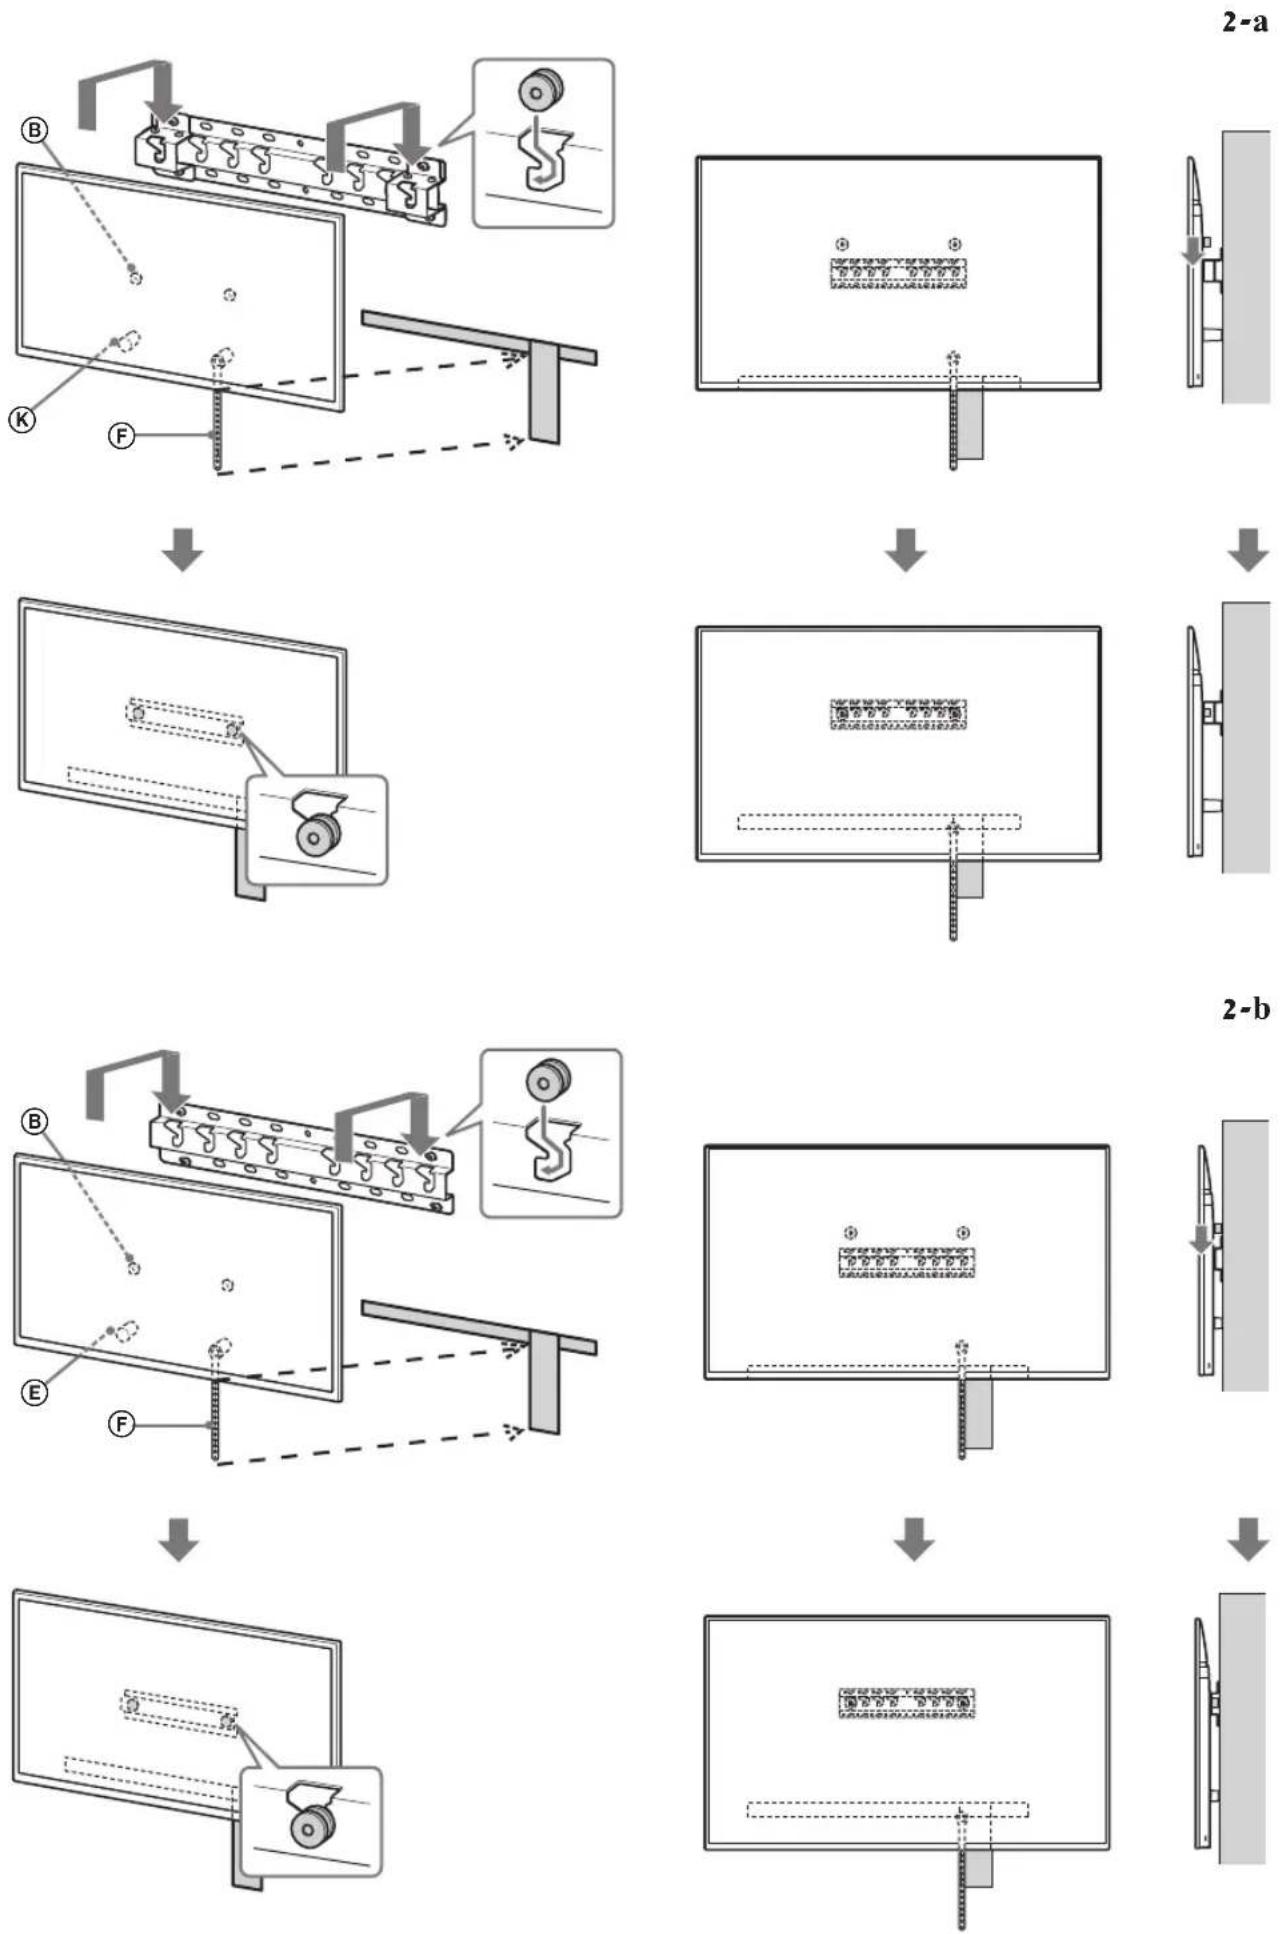
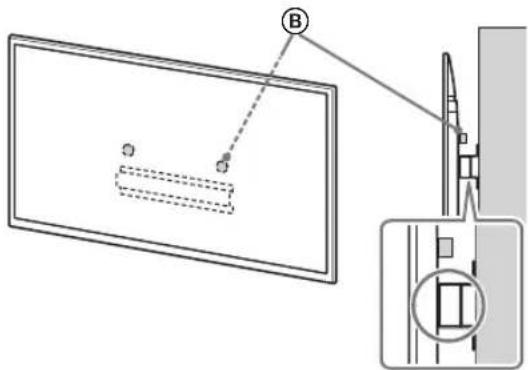
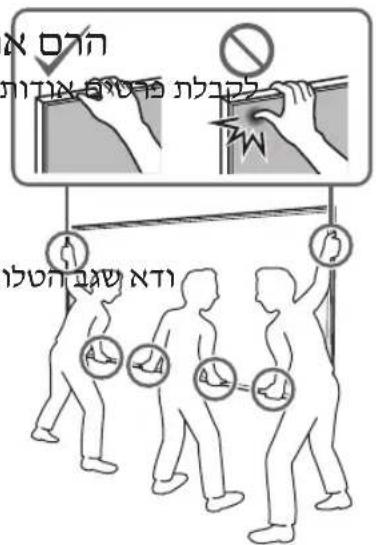
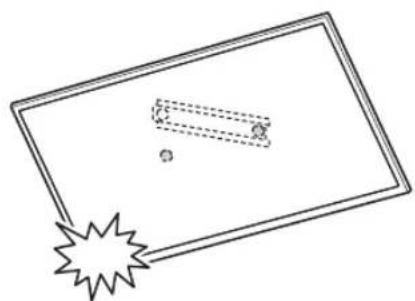
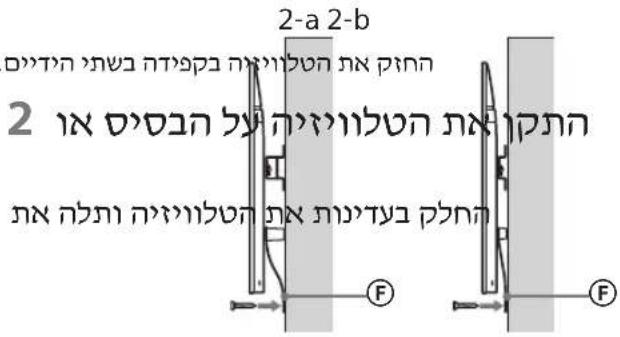
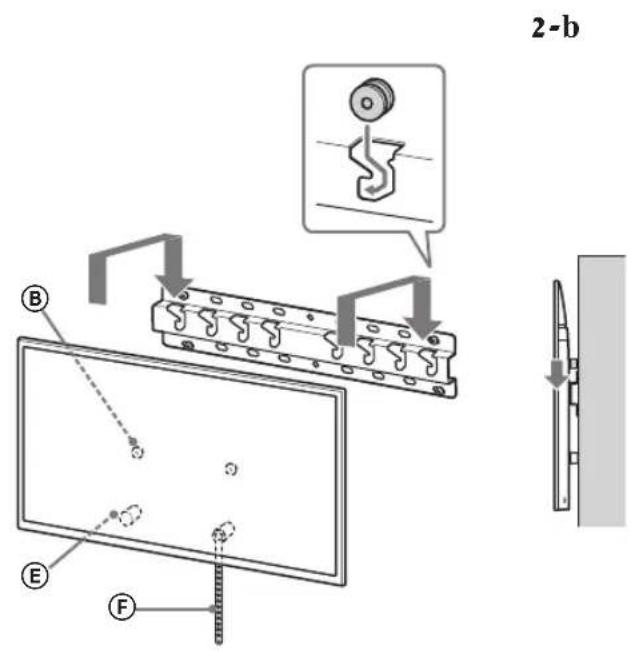
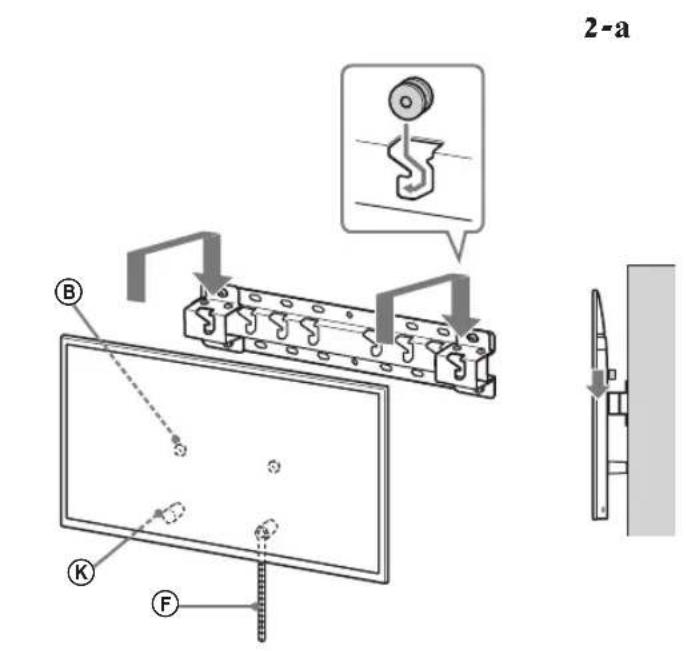
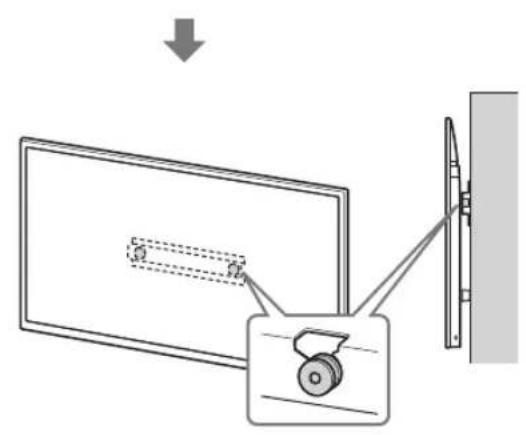
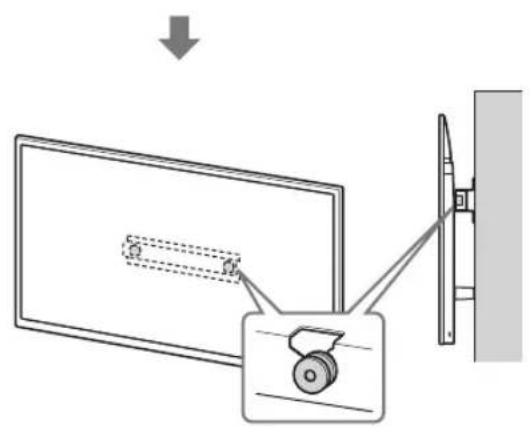
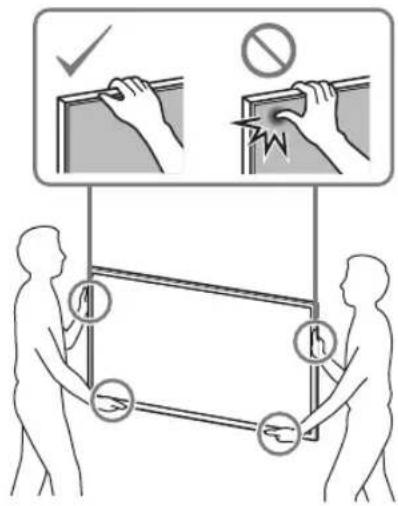
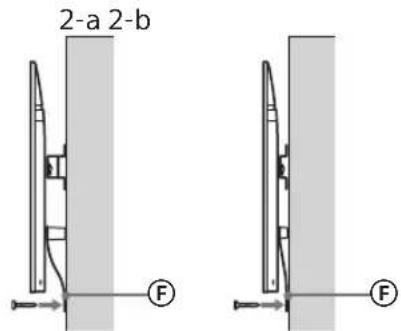
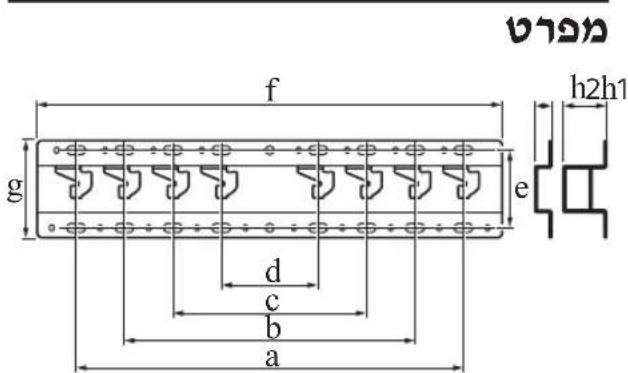
400: a
300: b
200: c
100: d
80: e
480: f
100: g
(2-b nnp) 20: h1
(2-a nnp) 60: h2
[1] (7y): (7y)
0.8
y
nppnn nnsyn nn
.
.07070
Therefore, the area of triangle OBC equals the area of triangle COD plus the area of triangle BOC.
.
.
77
·
77
Therefore, PB is perpendicular to BA.
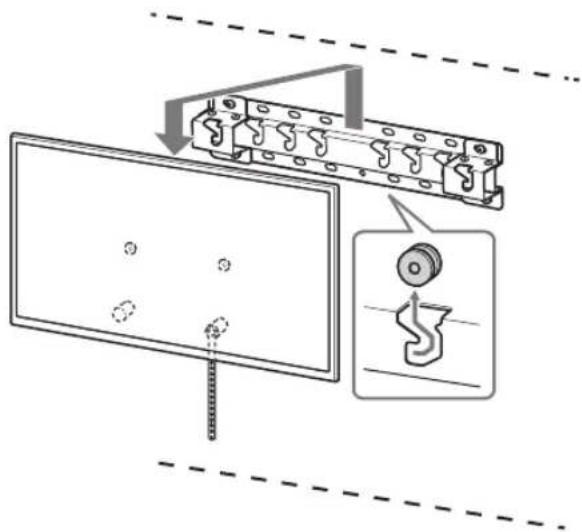
77
- ON SAFETY
- TO CUSTOMERS
- TO SONY DEALERS
- CAUTION
- SPECIFIED PRODUCTS
- WARNING
- BE SURE TO SUBCONTRACT THE INSTALLATION TO LICENSED CONTRACTORS AND KEEP SMALL CHILDREN AWAY DURING THE INSTALLATION
- BE SURE TO SUBCONTRACT MOVING OR DISMOUNTING OF THE TV TO LICENSED CONTRACTORS
- DO NOT REMOVE SCREWS, ETC., AFTER MOUNTING THE TV
- DO NOT MAKE ALTERATIONS TO THE PARTS OF THE WALL-MOUNT BRACKET
- DO NOT MOUNT ANY EQUIPMENT OTHER THAN THE SPECIFIED PRODUCT
- DO NOT LEAN ON OR HANG FROM THE TV
- DO NOT HANDLE THE PRODUCT WITH EXCESSIVE FORCE DURING CLEANING OR MAINTENANCE
- PRECAUTIONS
- INSTALLING THE WALL-MOUNT BRACKET
- DO NOT INSTALL THE TV OVER OR UNDER AN AIR-CONDITIONER
- BE SURE TO INSTALL THE WALL-MOUNT BRACKET SECURELY TO THE WALL FOLLOWING THE INSTRUCTIONS IN THIS INSTRUCTION MANUAL
- BE SURE TO ASSEMBLE THE BRACKET PROPERLY FOLLOWING THE INSTRUCTED PROCEDURE EXPLAINED IN THIS INSTRUCTION MANUAL
- BE SURE TO TIGHTEN THE SCREWS SECURELY IN THE DESIGNATED POSITION
- BE CAREFUL NOT TO SUBJECT THE TV TO SHOCK DURING INSTALLATION
- BE SURE TO INSTALL THE TV ON A WALL THAT IS BOTH PERPENDICULAR AND FLAT
- AFTER PROPER INSTALLATION OF THE TV, SECURE THE CABLES PROPERLY
- DO NOT ALLOW THE MAINS LEAD OR THE CONNECTING CABLE TO BE PINCHED
- THE SCREWS NEEDED TO SECURE THE WALL-MOUNT BRACKET TO THE WALL ARE NOT SUPPLIED
- TABLE OF CONTENTS
- INSTALLING THE TV ONTO THE WALL
- NOTE
- PREPARING FOR INSTALLATION
- CHECKING THE PARTS
- SUPPLIED WITH SU-WL
- DECIDING ON THE INSTALLATION LOCATION
- DECIDE ON THE INSTALLATION LOCATION
- INSTALLING THE BASE ON THE WALL
- PREPARING FOR THE INSTALLATION OF THE TV
- KD-85/75XG85□□, KD-75XG
- MARK THE INSTALLATION LOCATION ON THE WALL
- REMOVE THE SCREWS FROM THE REAR OF THE TV
- CONNECT THE NECESSARY CABLE(S) TO THE TV
- DETACH THE TABLE-TOP STAND FROM THE TV
- KD-85XG
- KD-75XG87□□, KD-75XG
- SLIM MOUNTING (2-B)
- INSTALLING THE TV ON THE WALL
- LIFT THE TV
- INSTALL THE TV ONTO THE BASE OR BASE ADAPTOR
- PREVENTING THE BOTTOM OF THE TV FROM SHIFTING
- CONFIRMING THE COMPLETION OF THE INSTALLATION
- OTHER INFORMATION
- SPECIFICATIONS
- DIMENSIONS: (APPROX.) [MM]
- WEIGHT (BASE ONLY): (APPROX.) [KG]
- PREPARATION FOR INSTALLATION
- FIND THE TV'S LOCATION
- PPOETOIAOIA YIA TOOTHETNO
- EAEYXOC TWV EAPNTMUATWV
- ROZMERY: (PRIBL.) [MM]
- IMPORTANT INFORMATION FOR THE CUSTOMER
- PRODUCT DESCRIPTION
- TO THE CUSTOMERS
- HAVE THE WALL MOUNT INSTALLED BY A LICENSED INSTALLER
- MAKE SURE YOU HAVE THE TV INSTALLED OR REMOVED BY A LICENSED INSTALLER
- DO NOT TIGHTEN THE SCREWS AFTER THE TV IS INSTALLED
- DO NOT SKIP ANY PARTS OF THE WALL MOUNT
- DO NOT INSTALL ANY EQUIPMENT OTHER THAN THE SPECIFIED PRODUCT
- DO NOT PLACE THE WALL MOUNT ON ANY OTHER PRODUCT THAN THE TV. DO NOT PLACE THE TV ON TOP OF OR BELOW THE WALL MOUNT
- DO NOT PLACE THE TV ON AN UNSTABLE CART, STAND, OR TABLE
- DO NOT TREAT THE PRODUCT WITH EXCESSIVE FORCE DURING CLEANING OR REPAIR
- SAFETY PRECAUTIONS
- WALL-MOUNTING BRACKET INSTALLATION
- DO NOT INSTALL THE WALL-MOUNTING BRACKET ON WALL SURFACES WHERE THE SCREWS OR THE TV'S STAND MAY PROTRUDE FROM THE WALL SURFACE
- HE MOUNTED THE TV ON THE WALL UNDER THE WINDOW
- MOUNT THE WALL MOUNT BRACKET SECURELY TO THE WALL BY FOLLOWING THE INSTRUCTIONS IN THIS MANUAL
- MAKE SURE YOU USE THE BRACKET CORRECTLY BY FOLLOWING THE PROCEDURE DESCRIBED IN THIS MANUAL
- TIGHTEN THE SCREWS FIRMLY IN THE INDICATED POSITION
- BE CAREFUL NOT TO HIT THE TV DURING INSTALLATION
- MOUNT THE TV ON A WALL THAT IS PERPENDICULAR AND FLAT
- AFTER PROPER INSTALLATION OF THE TV, ENSURE THE CABLES ARE CORRECTLY CONNECTED
- DO NOT PULL ON THE POWER CORD OR THE CONNECTING CORD
- THE SCREWS REQUIRED TO SECURE THE WALL-MOUNT BRACKET TO THE WALL ARE NOT INCLUDED IN THE PACKAGE
- CONTENTS
- MOUNTING THE TV ON THE WALL
- MOUNTING PROCEDURE
- SELECTING THE PARTS
- DETERMINE THE POSITIONS OF THE SCREWS FOR MOUNTING ON THE BASE (20) A
- WALL-MOUNTING
- MOUNTING THE BASE ON THE WALL
- PREPARATION FOR TV MOUNTING
- MARK THE LOCATION FOR WALL MOUNTING
- MARKING
- TIGHT MOUNTING (2-B)
- CONNECT THE NECESSARY CABLES TO THE TV
- ATTACH THE TABLE-TOP STAND TO THE TV
- KD-65/55XG
- REMOVE THE TV FROM THE TABLETOP STAND
- MOUNTING THE TV ON A WALL
- KD-85/75XG85□□,KD-75XG
- MOUNT THE TV ONTO THE BASE PLATE
- MOUNT THE TV TO THE BASE OF THE STAND
- ADJUSTMENT
- A6EJEXKKA
- ПОБЕРКА НА
- PONDEPKNAEMBLE MOEI
- K CBEHEHNIO NOKYNATEJIE
- K CBEHEHNIO DIJIEPOB N IOJAYNIKOB SONY
- БEZONACHOCTЬ
- ДЛЯ NOKYNATENEI
- ДЛГДИЕЛЕРОВ SONY
- BHIMAHNE
- YKA3AHHBIE N3DJIINA
- ДЛЯ NOKУРАЗЕЛЕЙ
- BE SURE TO CONTACT A LICENSED CONTRACTOR, AND DO NOT ALLOW CHILDREN TO BE NEAR THE INSTALLATION SITE OF THE PRODUCT
- SAFETY PRECAUTIONS FOR CHILDREN
- FOR INSTALLATION OR REMOVAL OF THE TV, BE SURE TO CONTACT LICENSED CONTRACTORS
- AFTER INSTALLING THE TV, DO NOT REMOVE THE SCREWS, ETC
- DO NOT DISASSEMBLE OR MODIFY THE PARTS OF THE WALL MOUNT BRACKET
- DO NOT INSTALL ANY OTHER EQUIPMENT ON THE BRACKET OTHER THAN THE SPECIFIED ONE
- DO NOT OVERLOAD THE BRACKET FOR WALL MOUNTING. DO NOT PLACE ANYTHING ON IT EXCEPT THE TV. DO NOT TILT THE TV LEFT/RIGHT, UP/DOWN
- DO NOT LEAN ON THE TV OR HOLD ONTO IT
- ATTENTION
- STANDARD MOUNTING (2-A)
- COMPACT INSTALLATION (2-B)
- INSTALLING THE TV ON A WALL
- MOUNT THE TV ON THE BASE OR THE BASE ADAPTER
- TO PREVENT THE TV FROM TIPPING OVER
- PLACE THE TV ON THE BASE OR BASE ADAPTER
- ADJUST THE POSITION OF THE LOWER PART OF THE TV
- INITIAL INFORMATION
- TECHNICAL SPECIFICATIONS
- CHILD SAFETY
- BE SURE TO HAVE THE TV MOVED OR DISMANTLED BY LICENSED TECHNICIANS
- REMOVE THE SCREWS, THEN, THE TV MOUNTING INSTRUCTIONS
- DO NOT REMOVE PARTS OF THE BRACKET FOR PARTIAL MOUNTING
- DO NOT INSTALL ANY OTHER DEVICES, EXCEPT THE SPECIFIED PRODUCT
- DO NOT USE THE BRACKET FOR PARTIAL MOUNTING FOR HANGING OBJECTS OTHER THAN THE TV. DO NOT TILT THE TV LEFT/RIGHT OR UP/DOWN
- DO NOT LEAN ON THE TV AND DO NOT HANG ON IT
- WARNINGS
- DURING CLEANING OR MAINTENANCE OF THE PRODUCT, DO NOT APPLY EXCESSIVE FORCE TO IT
- INSTALLATION OF THE BRACKET FOR PARTIAL MOUNTING
- SUPPORT
- PREPARATION
- INSTALLATION
- PARTS CHECK
- PACKAGE CONTENTS: SU-WL
- DETERMINING THE INSTALLATION LOCATION
- DETERMINE THE INSTALLATION LOCATION
- INSTALLATION OF THE WALL PLATE
- CONNECT THE TV TO THE REQUIRED CABLE
- REMOVE THE STAND FROM THE TV
- SCREW
- THIN MOUNTING (2-B)
- CONNECT THE TV CABLES
- YCTAHOBJIEHHATEJIEBI3OPAHA CTIHI
- ПИДИМИТЬ ТЕЛЕВИЗР
- PNPMITKA
- YCTAHOBITB TEIEBI3OP HA 6A3Y A6O NEPEXIHNK ILA 6A3N
- FLUSH MOUNTING (2-B)
- MARKUS
- MASS (BASE ONLY): (APPROX.) [KG]
- DO NOT INSTALL THE DEVICE IN A PLACE WHERE IT MAY BE EXPOSED TO DIRECT SUNLIGHT OR HEAT
- INSTALLATION ACCESSORIES
- MOUNTING SCREW INSTALLATION
- FOR SONY DEVICES
- FASTENING BRACKETS
- THE DEVICE'S
- OUTLETS SHOULD NOT BE PLACED IN AREAS WHERE THEY CAN BE BLOCKED BY THE FASTENING BRACKETS
- DO NOT PLACE THE DEVICE ON UNSTABLE SURFACES
- FASTENING BRACKET INSTALLATION
- USE THE SCREWS PROVIDED IN THE INSTRUCTION MANUAL FOR INSTALLATION
- USE THE FASTENING BRACKETS IN ACCORDANCE WITH THE PROCEDURES PROVIDED IN THE INSTRUCTION MANUAL
- INSTALL THEM
- THE SCREWS SHOULD BE TIGHTENED IN THE INDICATED POSITIONS
- THE TV MUST BE INSTALLED BY QUALIFIED PERSONNEL
- THE TV SHOULD BE INSTALLED PERPENDICULAR TO THE WALL AND FLOOR
- AFTER INSTALLING THE TV, CHECK THE CABLE CONNECTIONS
- THE POWER CORD AND ANTENNA CABLE SHOULD BE KEPT AWAY FROM THE TV
- DO NOT USE SCREWS THAT ARE LONGER THAN THE SPECIFIED LENGTH FOR WALL MOUNTING
- TV INSTALLATION
- INSTALLATION DEPTH
- REMOVING THE BRACKET
- PROVIDED WITH THE SU-WL
- IDENTIFYING THE INSTALLATION LOCATION
- IDENTIFY THE INSTALLATION LOCATION
- INSTRUCTIONS
- HYCKAY
- REMOVAL
- INSTALLING THE STAND
- REMOVING THE STAND
- MARK THE POSITION FOR INSTALLING THE STAND
- REMOVE THE SCREWS FROM THE BACK OF THE TV
- INCLINED INSTALLATION (2-B)
- ATTACH THE CABLE(S) TO THE TV
- REMOVE THE UPPER PROTECTIVE FILM
- INSTRUCTION
- RECESSED INSTALLATION (2-B)
- CONNECT THE CABLES TO THE DEVICE
- REMOVE THE TV FROM THE STAND
- REMOVE THE TV
- INSTALL THE TV ON THE WALL OR ON THE STAND
- DO NOT INSTALL THE TV BY YOURSELF
- KD-65/55XG87□□, KD-65/55XG
- REMOVE THE TV FROM THE BOX
- DO NOT ATTEMPT TO REPAIR THE EQUIPMENT YOURSELF
- INSTALLATION AND CONNECTION INSTRUCTIONS
- EXCERPT
- YBN NPNNV TOPN
- Y
- Y 107N NN NNNN NN N
- NNN
- SUPPIMER
- SONY
- PN 2X-5Y 0OAN NPNN
- NPPNN NNSYN NN
Brand : SONY
Model : Bravia KD75XG8505
Category : Television