
Bravia KD55XG8796 - Television SONY - Free user manual and instructions
Find the device manual for free Bravia KD55XG8796 SONY in PDF.
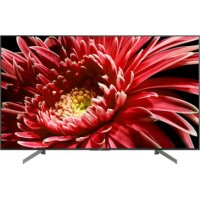



| Product Type | 4K LED TV |
| Brand | Sony |
| Model | Bravia KD55XG8796 |
| Screen Size | 55 inches (139 cm diagonal) |
| Resolution | 4K Ultra HD (3840 x 2160 pixels) |
| Dimensions (W x H x D, without stand) | 1231 x 713 x 70 mm |
| Weight (without stand) | Approximately 16.5 kg |
| Power Supply | 220-240 V AC, 50/60 Hz |
| Power Consumption | Approximately 150 W |
| Operating System | Android TV |
| Main Features | Smart TV, HDR (High Dynamic Range), X1 Processor |
| Compatible Wall Mount | Sony SU-WL450 (wall mount bracket) |
| Wall Mounting | Requires a Sony authorized installer for safety reasons |
| Safety | Safety belt included to secure the bottom of the TV to the wall |
| Maintenance and Cleaning | Clean with a soft, dry cloth; do not use abrasive products |
| Spare Parts and Repairability | Parts available from authorized dealers; repair by qualified personnel |
| General Information | User manual available online in PDF format |
Frequently Asked Questions - Bravia KD55XG8796 SONY
User questions about Bravia KD55XG8796 SONY
0 question about this device. Answer the ones you know or ask your own.
Ask a new question about this device
Download the instructions for your Television in PDF format for free! Find your manual Bravia KD55XG8796 - SONY and take your electronic device back in hand. On this page are published all the documents necessary for the use of your device. Bravia KD55XG8796 by SONY.
USER MANUAL Bravia KD55XG8796 SONY
- In the actual model names, the "□□" indicates numbers and/or characters specific to each model.
To Customers: For product protection and safety reasons, Sony strongly recommends that installation of your TV be performed by Sony dealers or licensed contractors. Do not attempt to install it yourself.
To Sony Dealers and Contractors: Provide full attention to safety during the installation, periodic maintenance, and examination of this product.
Sufficient expertise is required for installing this product, especially to determine the strength of the wall for withstanding the TV's weight. Be sure to entrust the attachment of this product to the wall to Sony dealers or licensed contractors and pay adequate attention to safety during the installation. Sony is not liable for any damage or injury caused by mishandling or improper installation.
For safety and proper installation, follow the Wall-mount Bracket Operation Instructions, TV Setup Guide, and the directions in this manual.
On Safety
Thank you for purchasing this product.
To Customers
Sufficient expertise is required for installing this product. Be sure to subcontract the installation to Sony dealers or licensed contractors and pay special attention to safety during the installation. Sony is not liable for any damages or injury caused by mishandling or improper installation, or installing any other than the specified product. Your Statutory Rights (if any) are not affected.
To Sony dealers
Sufficient expertise is required for installing this product. Be sure to read this instruction manual thoroughly to do the installation work safely. Sony is not liable for any damages or injury caused by mishandling or improper installation. Please give this manual to the customer after installation.
This instruction manual shows the correct handling of the product and important precautions necessary to prevent accidents. Be sure to read this manual thoroughly and use the product correctly. Keep this manual available for future reference.
Products by Sony are designed with safety in mind. If the products are used incorrectly, however, it may result in a serious injury through fire, electric shock, the product toppling over, or the product dropping. Be sure to observe the precautions for safety to prevent such accidents.
CAUTION
Specified products
This Wall-Mount Bracket is designed for use with the products specified TVs. For TVs, refer to their Reference Guide to verify that the Wall-Mount Bracket can be used.
To Customers
WARNING
If the following precautions are not observed, serious injury or death through fire, electric shock, or the product dropping can result.
Be sure to subcontract the installation to licensed contractors and keep small children away during the installation.
If the Wall-Mount Bracket or the TV is not installed correctly, the following accidents may occur. Be sure licensed contractors carry out installation.
The TV may fall and cause a serious injury such as a bruise or a fracture. - If the wall on which the Wall-Mount Bracket is installed is unstable, uneven, or not perpendicular to the floor, the unit may fall and cause injury or property damage. The wall should be capable of supporting a weight of at least four times the TV weight. (Refer to your TV's Reference Guide for its weight.) - If the installation of the Wall-Mount Bracket on the wall is not sufficiently sturdy, the unit may fall and cause injury or property damage.
Be sure to subcontract moving or dismounting of the TV to licensed contractors.
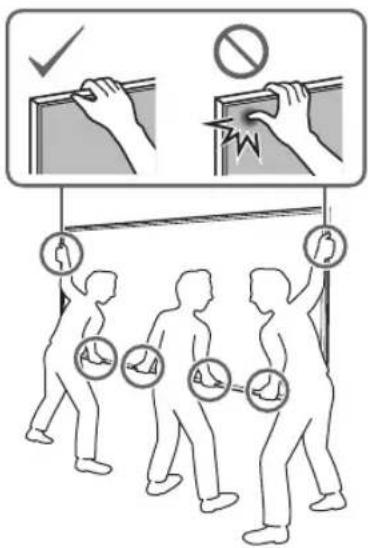
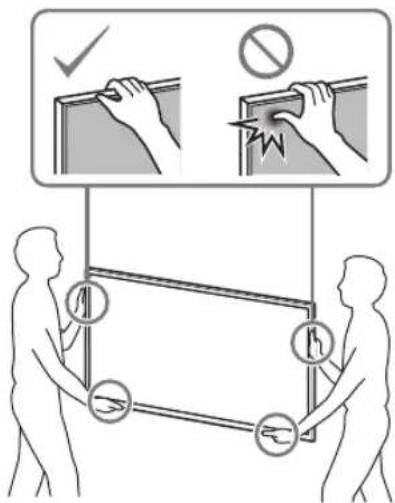
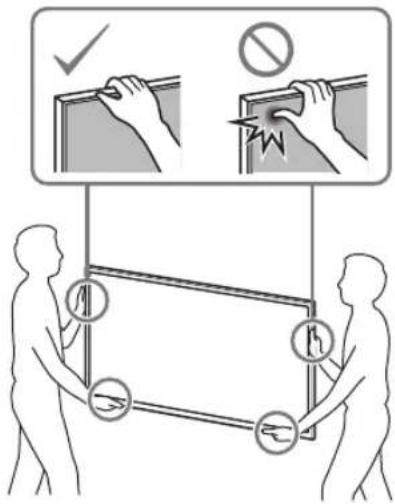
If persons other than licensed contractors transport or dismount the TV, it may fall and cause injury or property damage. Be sure that two or more persons (three or more persons for 75 inches and above TV set) carry or dismount the TV.
Do not remove screws, etc., after mounting the TV.
If you do so, the TV may fall and cause injury or property damage.
Do not make alterations to the parts of the Wall-Mount Bracket.
If you do so, the Wall-Mount Bracket may fall and cause injury or property damage.
Do not mount any equipment other than the specified product.
This Wall-Mount Bracket is designed for use with the specified product only. If you mount equipment other than specified, it may fall or break, and cause injury or property damage.
Do not apply any load other than the TV on the Wall-Mount Bracket. Do not shake the TV left/right, up/down.
If you do so, the TV may fall and cause injury or property damage.
Do not lean on or hang from the TV.
Do not lean on or hang from the TV as it may fall on you and cause serious injury.
CAUTION
If the following precautions are not observed, injury or property damage may occur.
Do not handle the product with excessive force during cleaning or maintenance.
Do not apply excessive force on the topside of the TV. If you do so, the TV may fall and cause injury or property damage.
Precautions
- If you use the TV installed on the Wall-Mount Bracket for a long time, the wall behind or above the TV may become discolored or the wallpaper may come unstuck, depending on the material of the wall.
- If the Wall-Mount Bracket is removed after installing it on the wall, the screw holes are left.
- Do not use the Wall-Mount Bracket in a place where it is subjected to mechanical vibrations.
Installing the Wall-Mount Bracket
To Sony Dealers
WARNING
The following instructions are for Sony dealers only. Be sure to read the safety precautions described above and pay special attention to safety during the installation, maintenance, and checking of this product.
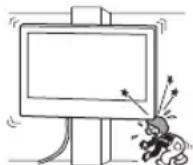
Do not install the Wall-Mount Bracket on wall surfaces where the corners or the sides of the TV protrude away from the wall surface.
Do not install the Wall-Mount Bracket on wall surfaces such as a pillar, where the corners or the sides of the TV protrude away from the wall surface. If a person or object happens to hit the protruded corner or side of the TV, it may cause injury or property damage.
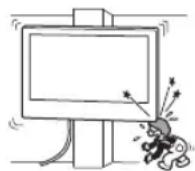
Do not install the TV over or under an air conditioner.
If the TV is exposed to water leaks or air current from an air conditioner for a long time, it may cause a fire, an electric shock, or a malfunction of the TV.
Be sure to install the Wall-Mount Bracket securely to the wall following the instructions in this instruction manual.
If any of the screws are loose or fall out, the Wall-Mount Bracket may fall and cause injury or property damage. Be sure to use the appropriate screws for the material of the wall and install the unit securely using four or more screws of 8 mm diameter (or equivalent).
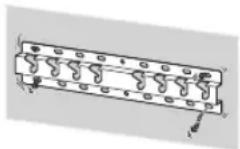
Be sure to use the supplied screws and attachment parts properly following the instructions given in this instruction manual. If you use substitute items, the TV may fall and cause bodily injury to someone or damage to the TV.
Be sure to assemble the bracket properly following the instructed procedure explained in this instruction manual.
If any of the screws are loose or fall out, the TV may fall and cause bodily injury to someone or damage to the TV.
Be sure to tighten the screws securely in the designated position.
If you fail to do so, the TV may fall and cause bodily injury to someone or damage to the TV.
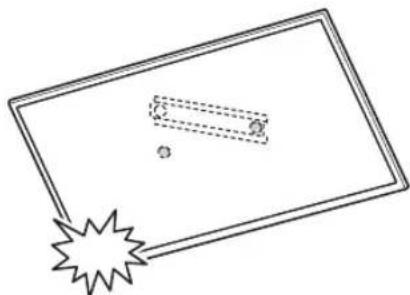
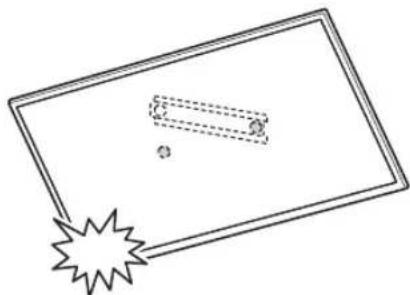
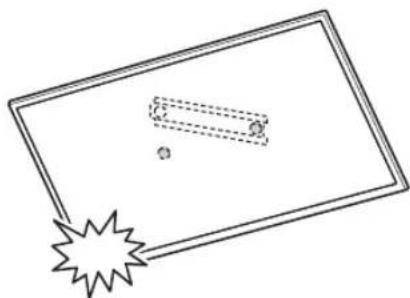
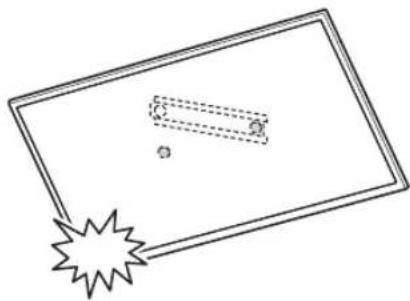
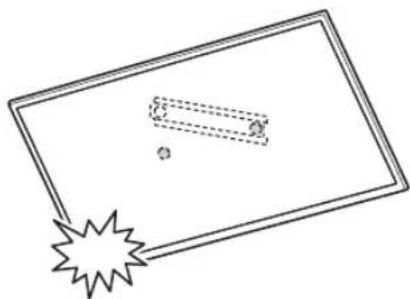
Be careful not to subject the TV to shock during installation.
If the TV is exposed to shock, it may fall or break apart. This may cause injury.
Be sure to install the TV on a wall that is both perpendicular and flat.
If you fail to do so, the TV may fall and cause injury.
After proper installation of the TV, secure the cables properly.
If people or objects get tangled with cables, this may result in injury or damage to the TV.
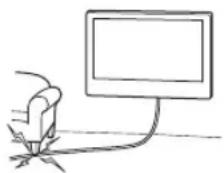
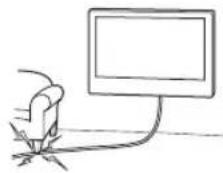
Do not allow the mains lead or the connecting cable to be pinched.
If the mains lead or the connecting cable is pinched between the unit and the wall or is bent or twisted by force, the internal conductors may become exposed and cause a short circuit or an electrical break. This may cause a fire or an electric shock.
The screws needed to secure the Wall-Mount Bracket to the wall are not supplied.
Use the appropriate screws for the wall material and structure when mounting the Wall-Mount Bracket.
Table of Contents
Preparing for installation. 5
Checking the parts. 5
Deciding on the installation location 6
Installing the Base on the wall 8
Preparing for the installation of the TV. 9
KD-85/75XG85□□, KD-75XG87□□
KD-65/55XG87□□, KD-65/55XG85□□.11
Installing the TV on the wall 13
KD-85/75XG85□□, KD-75XG87□□.13
KD-65/55XG87□□, KD-65/55XG85□□.15
Confirming the completion of the
installation 18
Other information. 18
Specifications 18
Installing the TV onto the wall
Installation procedure differs, depending on your TV.
Use the Wall-Mount Bracket SU-WL450 to install the TV to the wall.
Note
- Be sure to store the removed screws in a safe place, keeping them away from children.
Preparing for installation
- Have the TV's Reference Guide and Setup Guide at hand before installation.
- Be sure to have a Phillips screwdriver that fits the screws prior to the assembly.
- Confirm the installing position of your TV.
- Prepare four or more screws of 8 mm diameter and one screw of 5 mm or equivalent (not supplied). Select screws suitable for the material of the wall.
Checking the parts
Supplied with SU-WL450
- Verify that all the parts are included.
| A Base (20) (1) B Pulley (2) | |
| ◎ PSW 6x20 (4)◎ PSW 4x20 with Bush (2) | |
| ◎ Spacer (20) (2)◎ Belt (1) | |
| ◎ Bush (20) (M4) (2)◎ PSW 4x20 (2) | |
| ① Base Adaptor (2)① | PSW 4x10 (8) |
| ◎ Spacer (60) (2)◎ PSW 6x50 (2) | |
| ◎ Bush (M4) (2)◎ PSW 4x50 (2) | |
Deciding on the installation location
1 Decide on the installation location.
Make sure that the wall has enough space for the TV and is capable of supporting a weight of at least four times that of the TV.
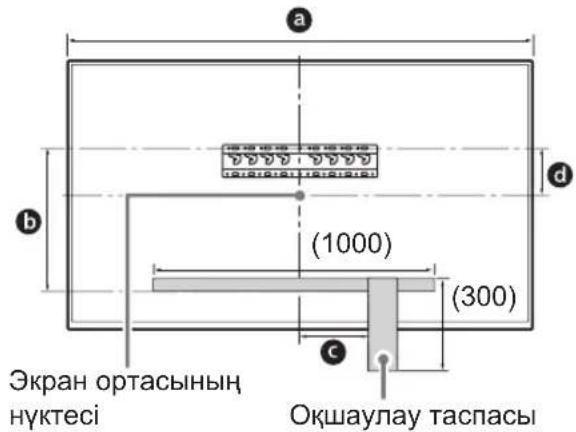
Refer to the following table on installing the TV to the wall. Refer to your TV's Reference Guide for the TV's weight.
Standard mounting Slim mounting Screen centre point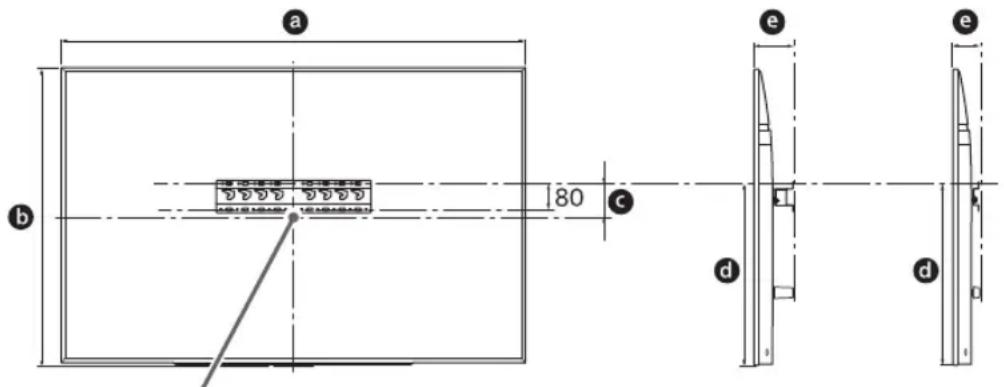
Unit: mm
| Model Name | Display dimensions | Screen centre dimension | Length for mounting | |||
| a | b | c | d | e | ||
| Standard mounting | Slim mounting | |||||
| KD-85XG85□□ | 1,909 | 1,097 | 251 | 803 | 142 | 100 |
| KD-75XG87□□ KD-75XG85□□ | 1,673 | 963 | 107 | 595 | 116 | 75 |
| KD-65XG87□□ KD-65XG85□□ | 1,450 | 836 | 99 | 523 | 115 | 73 |
| KD-55XG87□□ KD-55XG85□□ | 1,231 | 713 | 106 | 468 | 115 | 73 |
Note
- Figures in the table may differ slightly depending on the installation.
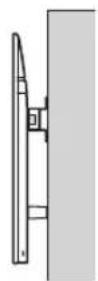
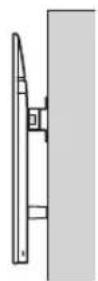
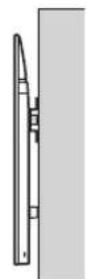
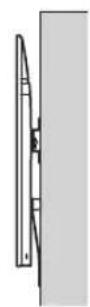
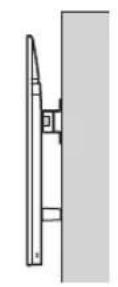
- When your TV is installed on the wall, the upper side of the TV slightly leans forward.
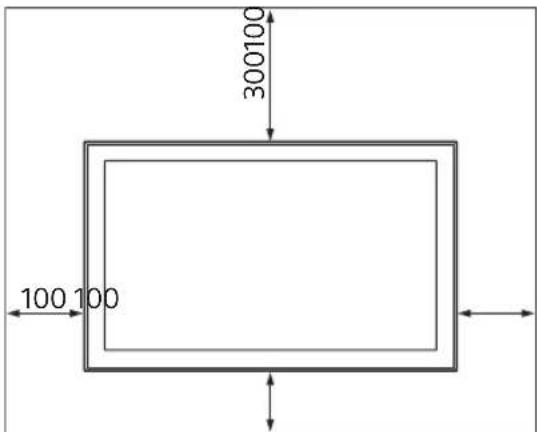
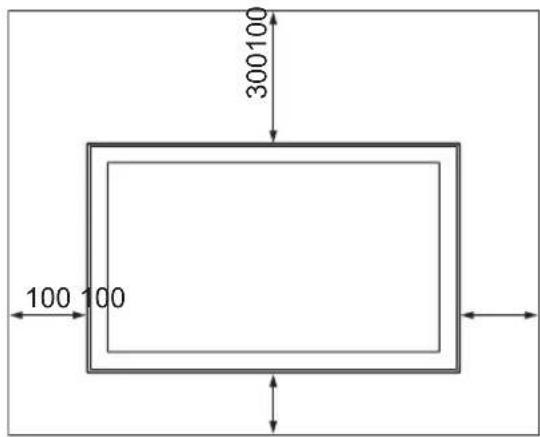
Allow for suitable clearance between the TV and the ceiling and protruding parts of the wall as shown below.
Unit: mm
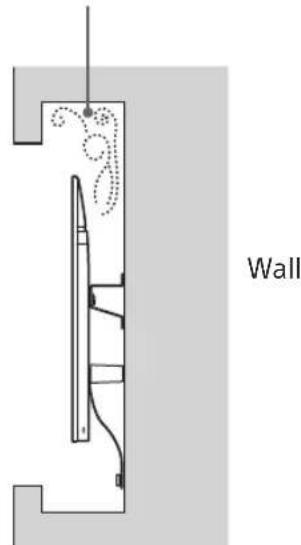
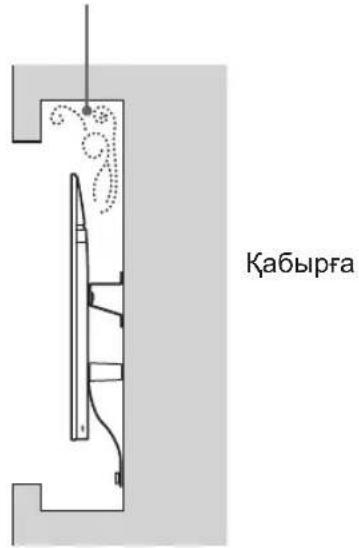
To ensure proper ventilation and prevent the collection of dirt or dust:
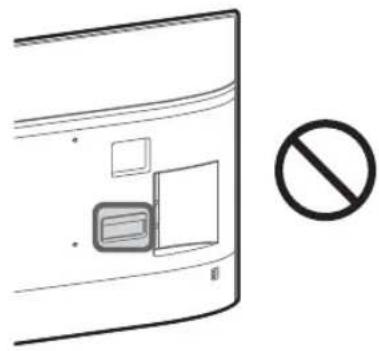
Do not lay the TV set flat, install upside down, backwards, or sideways. - Do not place the TV set on a shelf, rug, bed or in a closet. - Do not cover the TV set with a cloth, such as curtains, or items such as newspapers, etc. - Do not install the TV set as shown below.
Air circulation is blocked.
Note
If you intend to route the cables in the wall, make a hole in the wall to insert the cables before beginning the installation.
To prevent pinching the cables, prepare a hole in the wall somewhere outside the perimeter of the Base (20) A, Base Adaptor 1 and Spacer (20) E, Spacer (60) K.
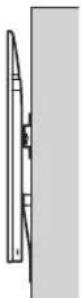
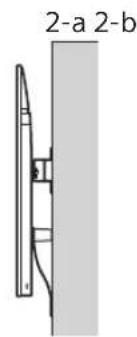
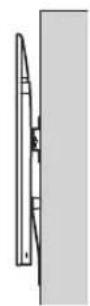
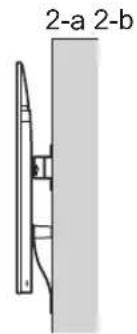
2 Select Wall mounting style. It is selectable as shown below.
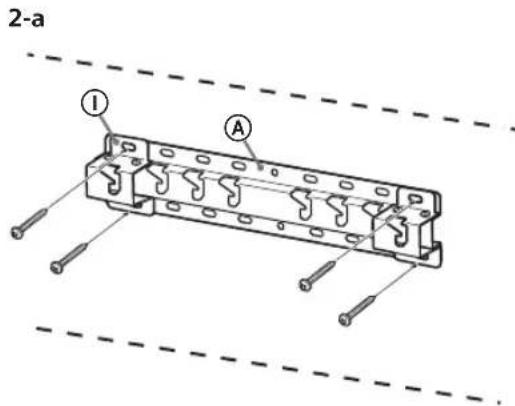
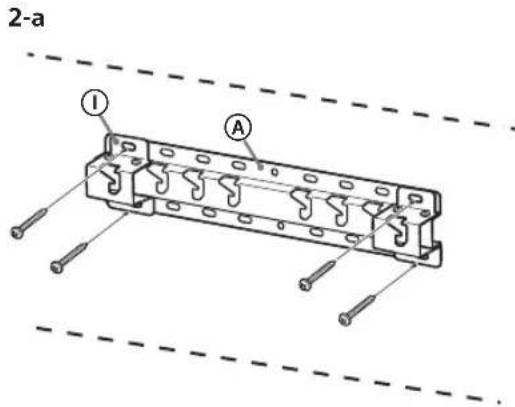
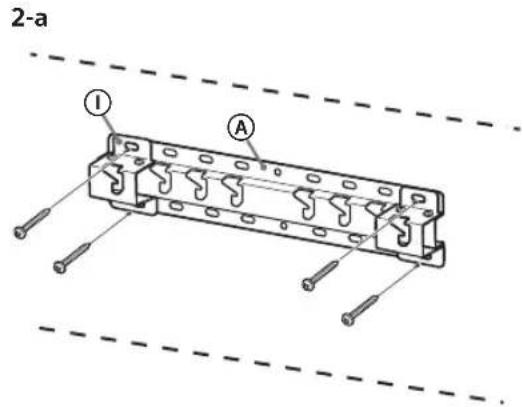
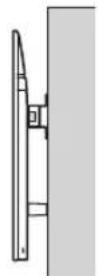
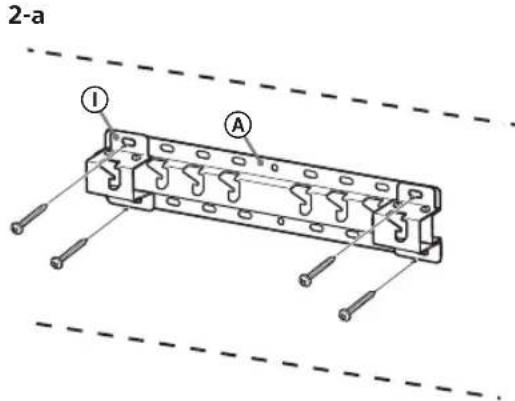
2-a Standard mount
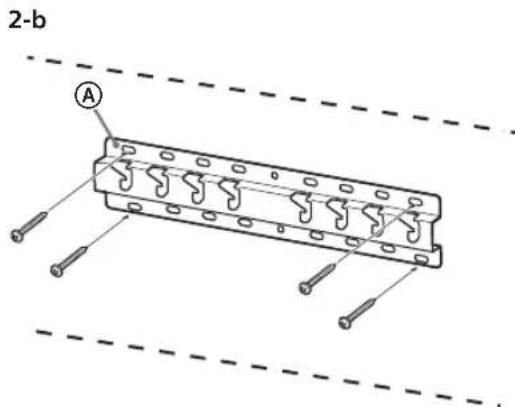
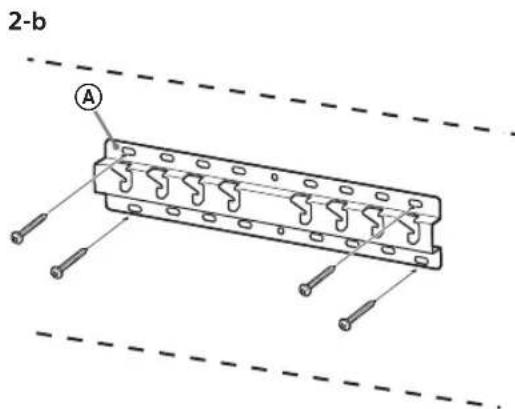
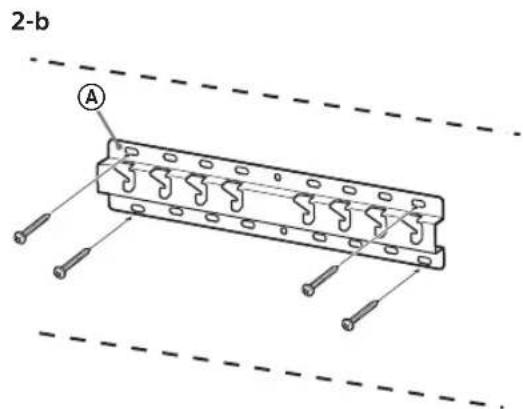
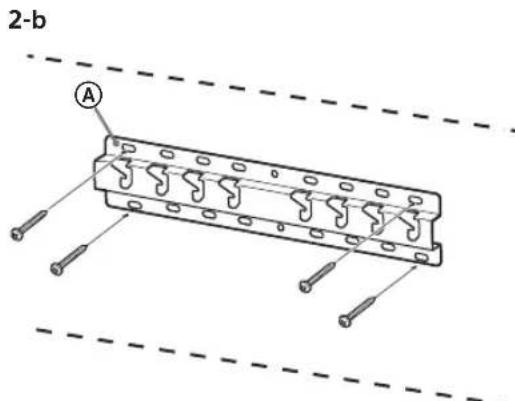
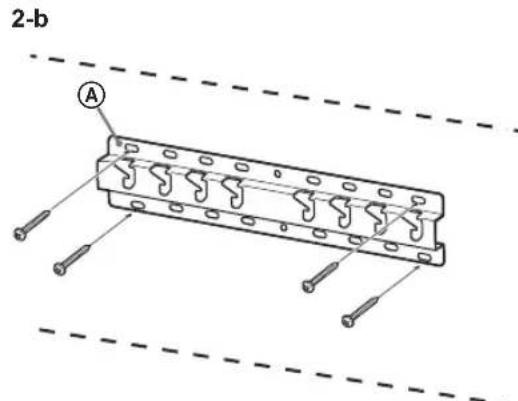
2-b Slim mount
Refer to the table of step 1.
WARNING
- When 2-b is selected, rear terminal access is limited.
2-a 2-b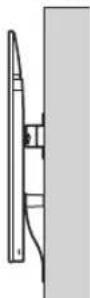
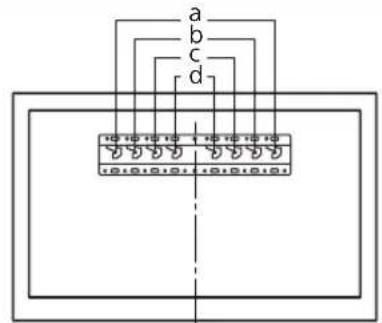
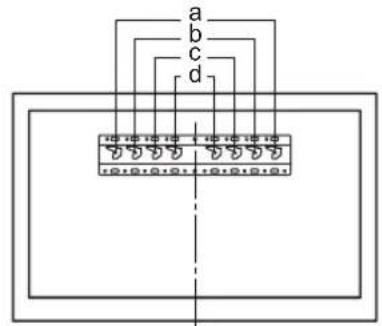
3 Refer to the below table about the Base Adaptor fitting location. In case of selecting 2-b, then skip this step.
| Model Name Hook location | |
| KD-85XG85□□ | |
| KD-75XG87□□ | a |
| KD-75XG85□□ | |
| KD-65XG87□□ | |
| KD-65XG85□□ | b |
| KD-55XG87□□ | |
| KD-55XG85□□ | |
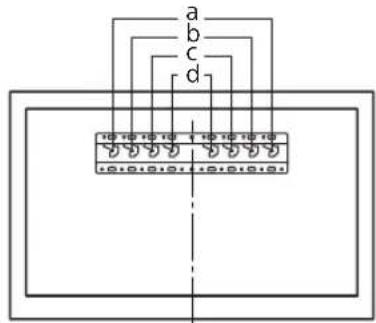
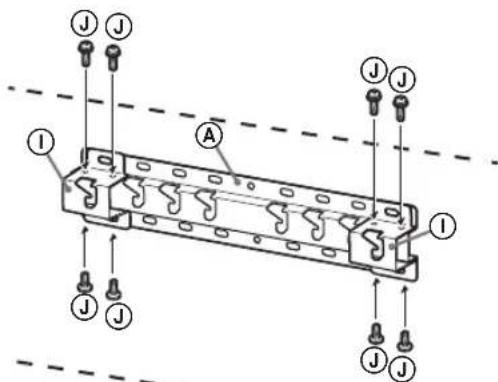
Fit Base Adaptor ① by using Screw (PSW 4x10) ② to Base (20) ④ when selecting 2-a.
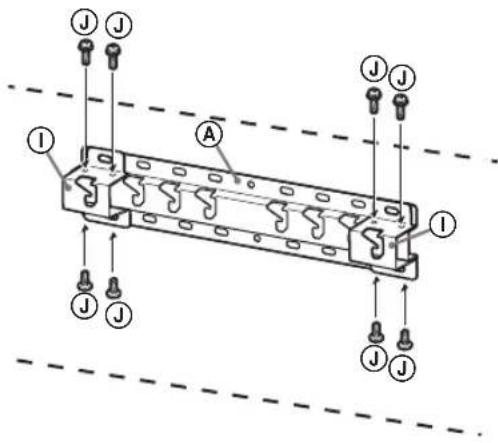
4 Decide the positions of the screws for installing the Base (20) A.
Refer to the specifications on page 18. When selecting 2-a, please use the hole positions of Base Adaptor ①.
WARNING
The wall that the TV will be mounted on should be able to support a weight of at least four times that of the TV (Refer to your TV's Reference Guide for its weight.). - Determine the strength of the wall the TV will be mounted on. Reinforce the wall sufficiently, if necessary.
Installing the Base on the wall
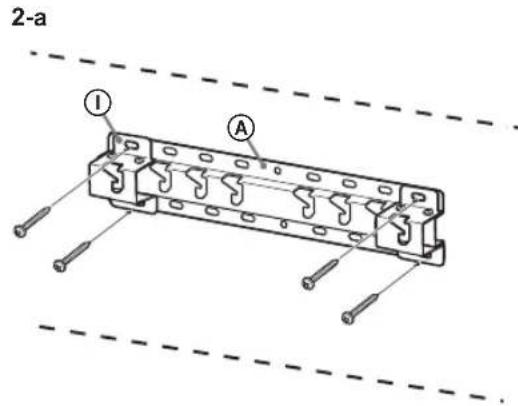
- Use four or more screws of 8mm diameter or equivalent (not supplied).
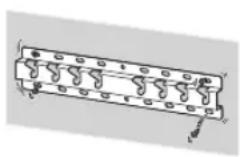
- Fit four screws to the holes of Base Adaptor ① with Base (20) A (2-a only). Install the Base (20) A on the wall horizontally.
Preparing for the installation of the TV
Refer to the Setup Guide for stand installation.
KD-85/75XG85□□, KD-75XG87□□
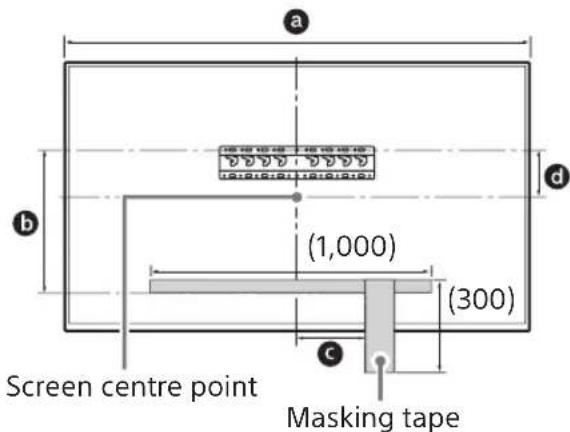
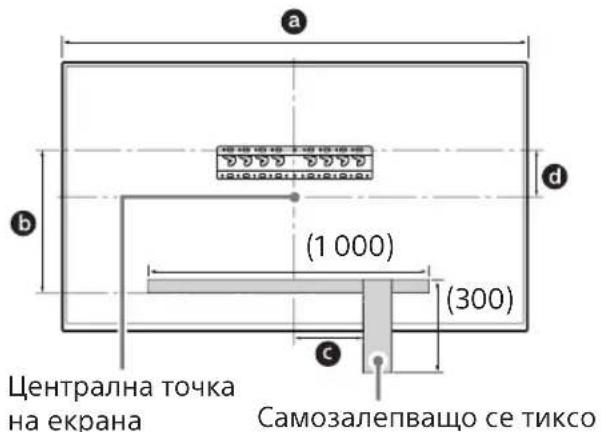
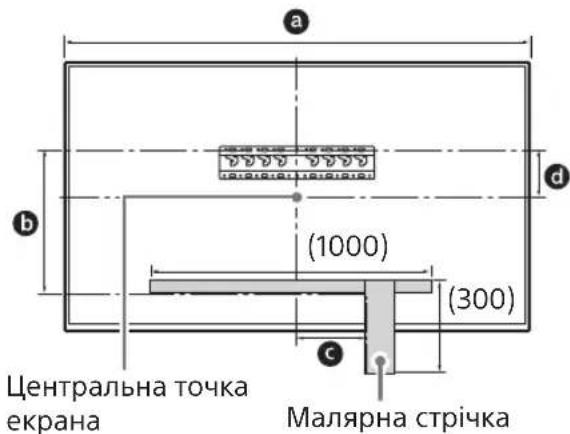
1 Mark the installation location on the wall.
- Use masking tape, etc. (not supplied) to mark the location of the TV near the Base or Base Adaptor. Refer to the following table.
| Model Name | Length for marking | Screen centre dimension | ||
| a | b | c | d | |
| KD-85XG85□□ | 1,909 | 683 | 200 | 251 |
| KD-75XG87□□ KD-75XG85□□ | 1,673 | 468 | 200 | 107 |
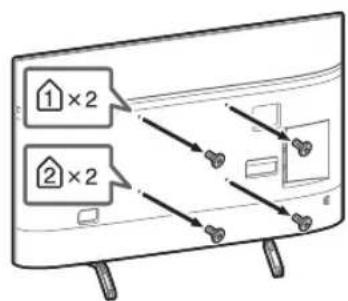
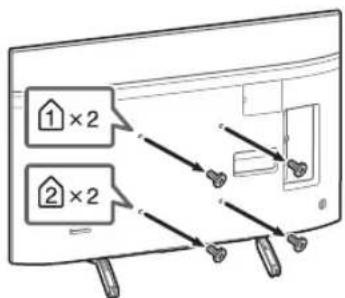
2 Remove the screws from the rear of the TV.
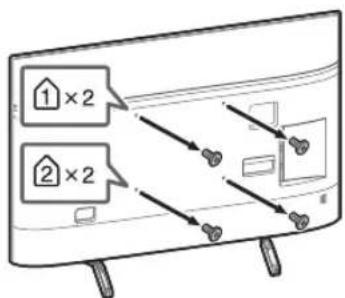
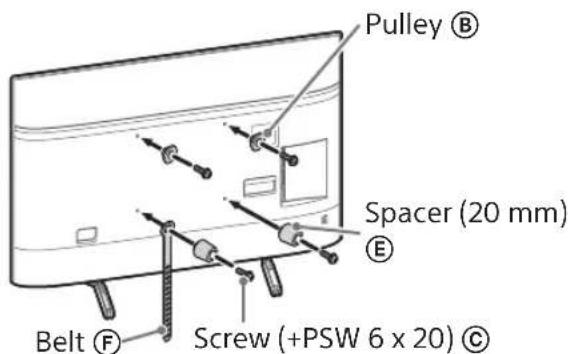
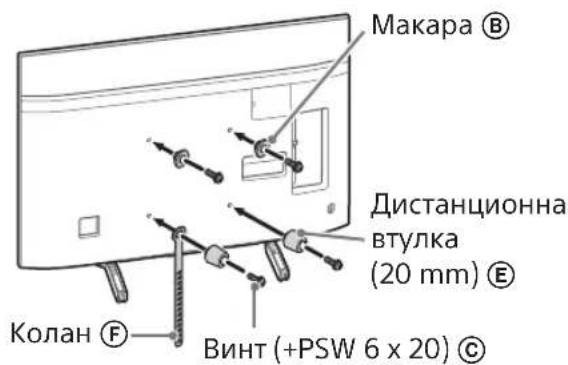
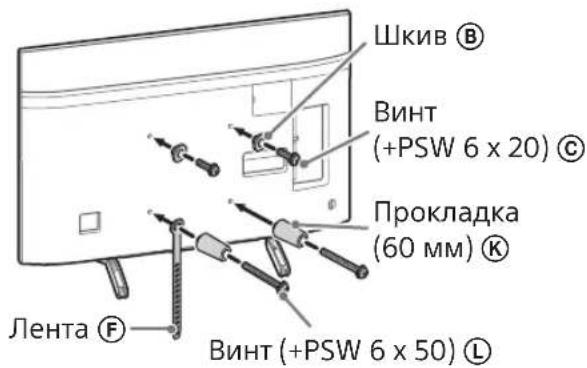
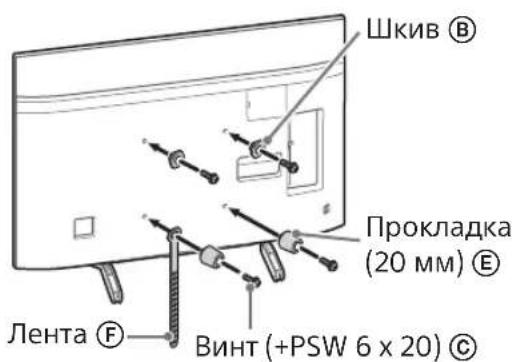
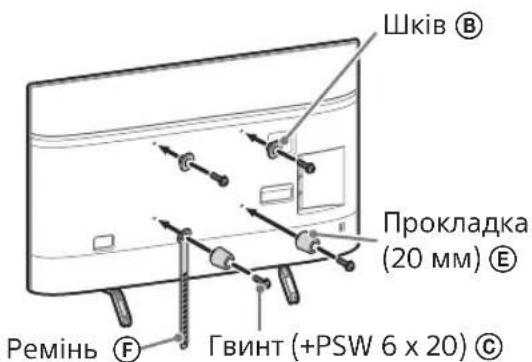
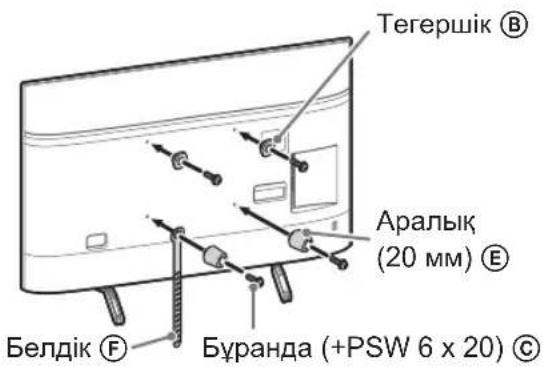
3 Attach the Attachment parts for Wall-Mount Bracket. Check the Attachment parts by referring to "Supplied with SU-WL450" in "Checking the parts" on page 5.
Note
- Firmly secure the Attachment parts using screws.
- When using an electric screwdriver, set the torque setting to approximately 1.5N· m {15 kgf·cm}.
- Be sure to store the used or unused parts in a safe place for future use. Retain this manual for future reference.
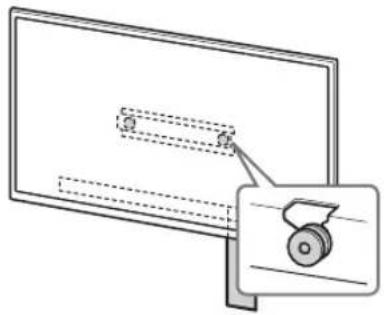
Standard mounting (2-a) Slim mounting (2-b)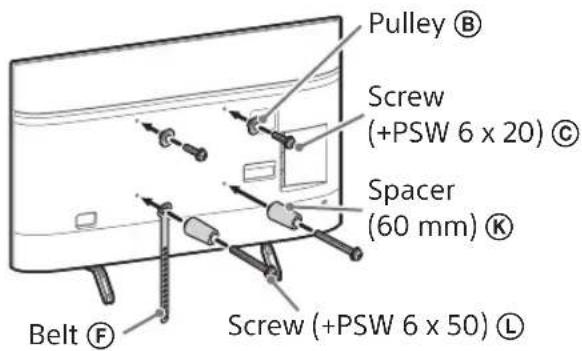
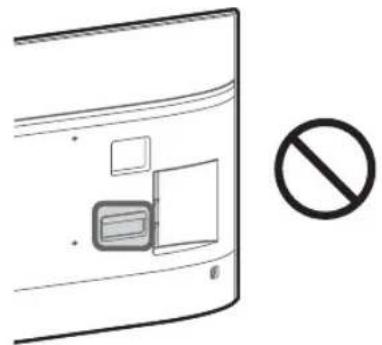
Note
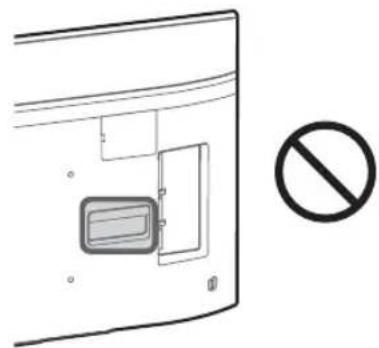
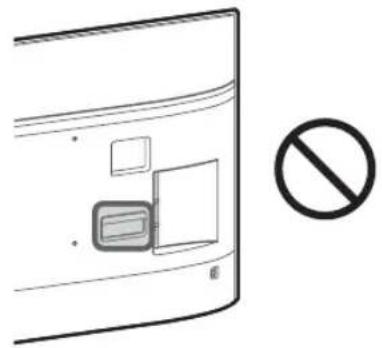
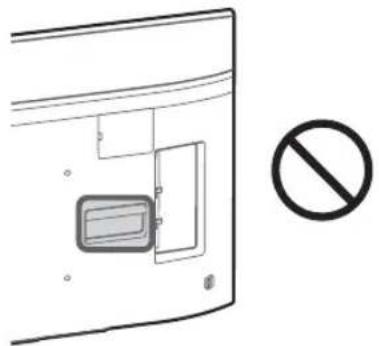
- You cannot use some of the terminals on the rear of the TV when using this mounting style.
4 Connect the necessary cable(s) to the TV.
Make sure to connect the cables before installing the TV on the wall. You will be unable to connect the cables when the TV is installed. Refer to the Reference Guide supplied with your TV.
Note
- Subcontract the cable routing in the wall to a licensed contractor.
- Bundle the connecting cables to prevent stepping on them before wall mounting.
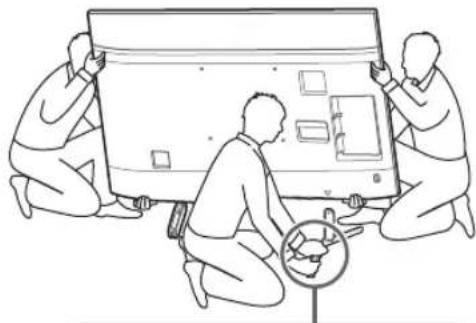
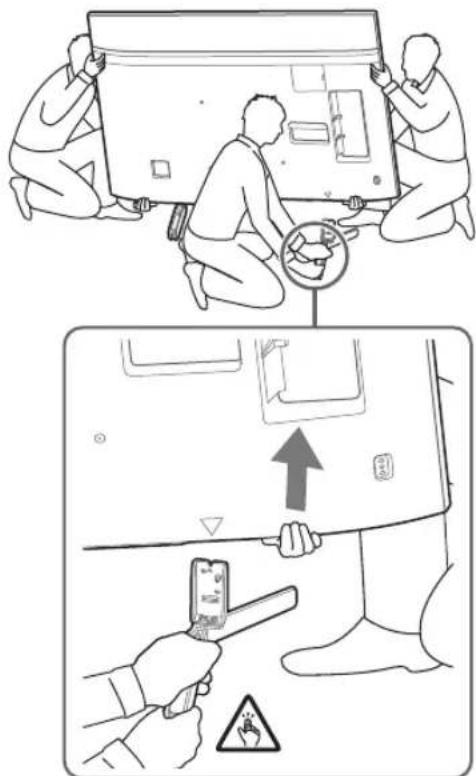
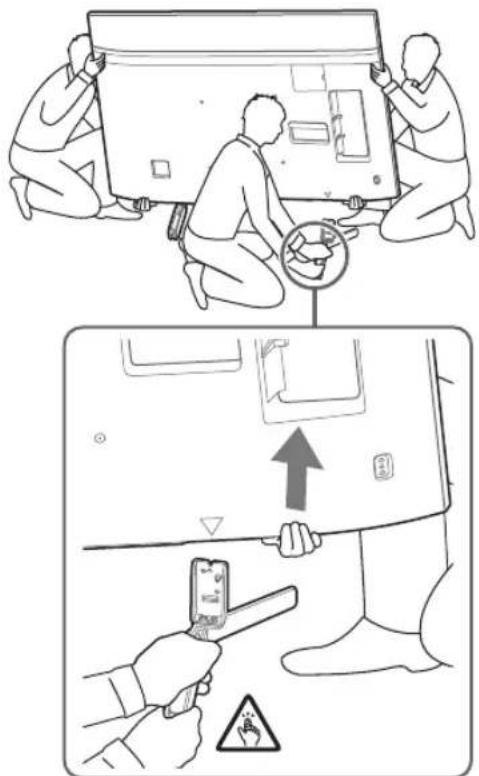
5 Detach the Table-Top Stand from the TV.
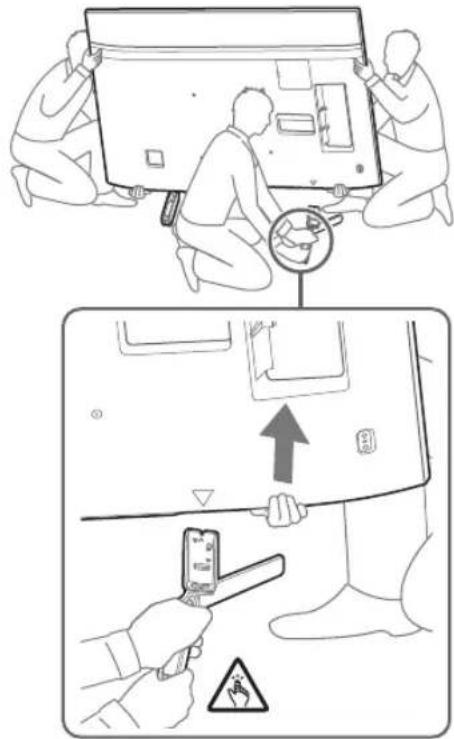
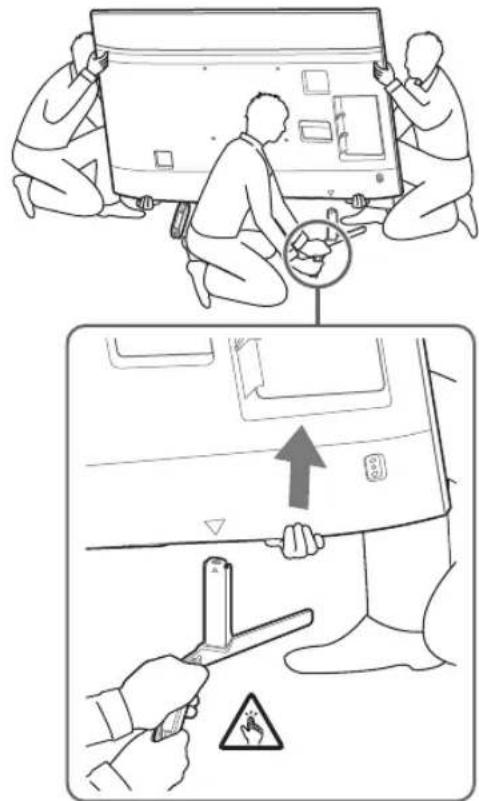
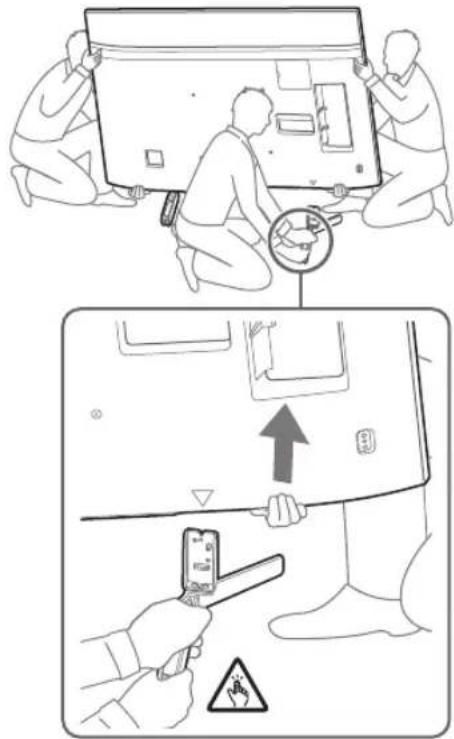
- Remove one side of the Table-Top Stand at a time. Firmly hold the Table-Top Stand securely with both hands while the other people lift up the TV.
KD-85XG85□□
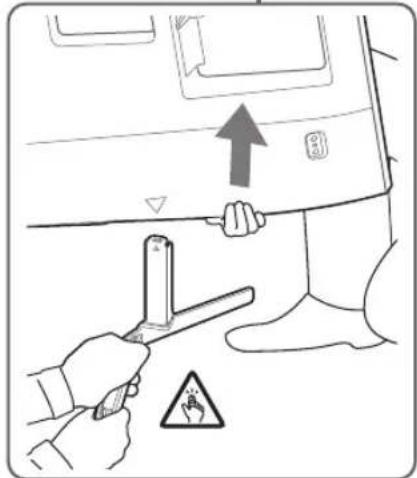
KD-75XG87□□, KD-75XG85□□
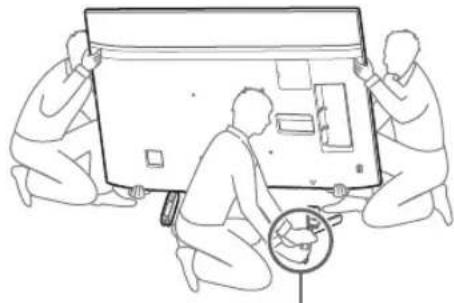
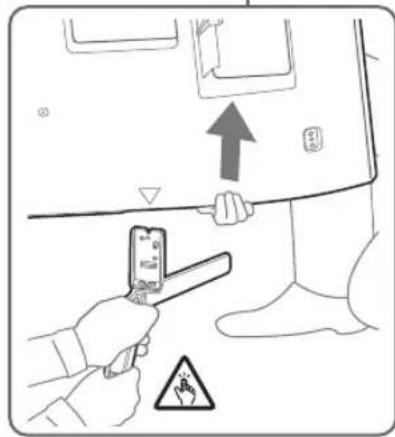
- Repeat the previous step and remove the other side of the Table-Top Stand.
Note
- Three or more people are required to detach the Table-Top Stand.
- Be careful not to use excessive force while detaching the Table-Top Stand from the TV as it may cause the TV set to fall resulting in personal injury or physical damage to the TV. Take care when handling the Table-Top Stand to prevent damage to the TV.
- Be careful when lifting the TV as the Table-Top Stand is detached, the Table-Top Stand may topple over and cause personal injury. Take care when removing the Table-Top Stand from the TV to prevent it from falling over and damaging the surface that the TV is sitting on.
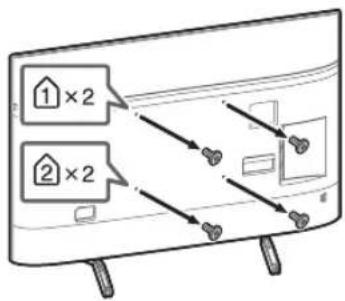
1 Remove the screws from the rear of the TV.
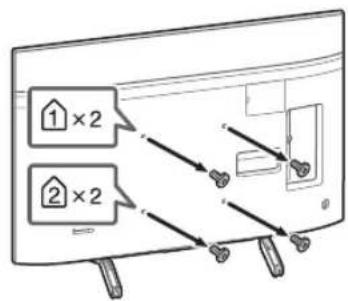
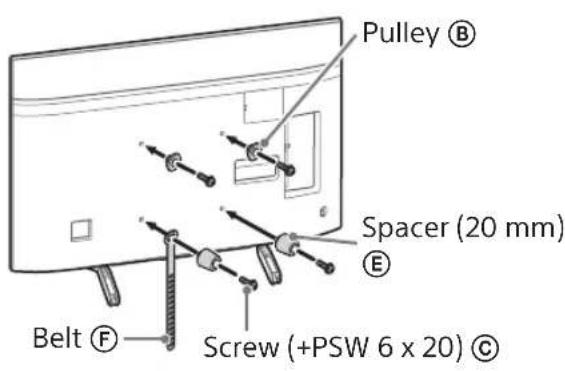
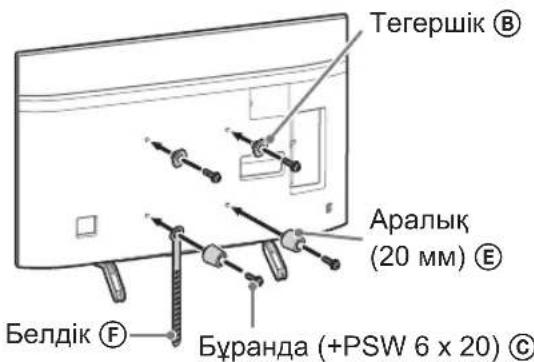
2 Attach the Attachment parts for Wall-Mount Bracket. Check the Attachment parts by referring to "Supplied with SU-WL450" in "Checking the parts" on page 5.
Note
- Firmly secure the Attachment parts using screws.
- When using an electric screwdriver, set the torque setting to approximately 1.5 N·m {15 kgf·cm}.
- Be sure to store the used or unused parts in a safe place for future use. Retain this manual for future reference.
Standard mounting (2-a)
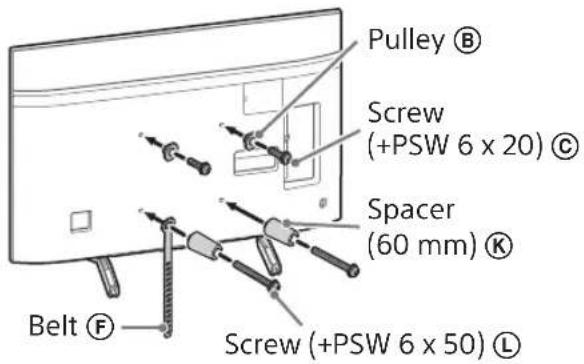
Slim mounting (2-b)
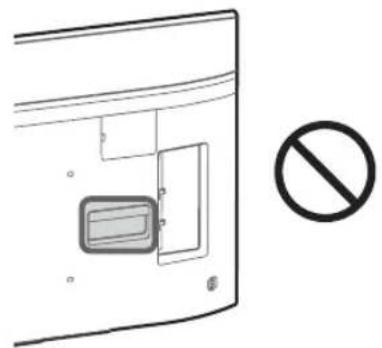
Note
- You cannot use some of the terminals on the rear of the TV when using this mounting style.
3 Connect the necessary cable(s) to the TV.
Make sure to connect the cables before installing the TV on the wall. You will be unable to connect the cables when the TV is installed.
Refer to the Reference Guide supplied with your TV.
Note
- Subcontract the cable routing in the wall to a licensed contractor.
- Bundle the connecting cables to prevent stepping on them before wall mounting.
4 Detach the Table-Top Stand from the TV.
- Remove one side of the Table-Top Stand at a time. Firmly hold the Table-Top Stand securely with both hands while the other people lift up the TV.
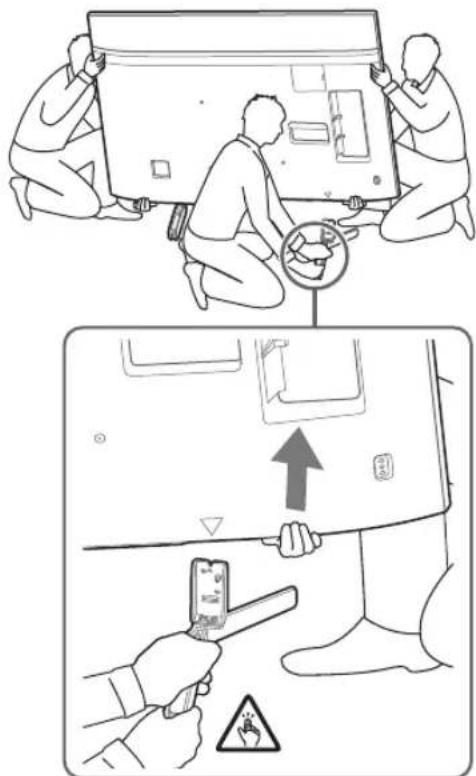
- Repeat the previous step and remove the other side of the Table-Top Stand.
Note
- Three or more people are required to detach the Table-Top Stand.
- Be careful not to use excessive force while detaching the Table-Top Stand from the TV as it may cause the TV set to fall resulting in personal injury or physical damage to the TV. Take care when handling the Table-Top Stand to prevent damage to the TV.
- Be careful when lifting the TV as the Table-Top Stand is detached, the Table-Top Stand may topple over and cause personal injury. Take care when removing the Table-Top Stand from the TV to prevent it from falling over and damaging the surface that the TV is sitting on.
Installing the TV on the wall
KD-85/75XG85□□, KD-75XG87□□
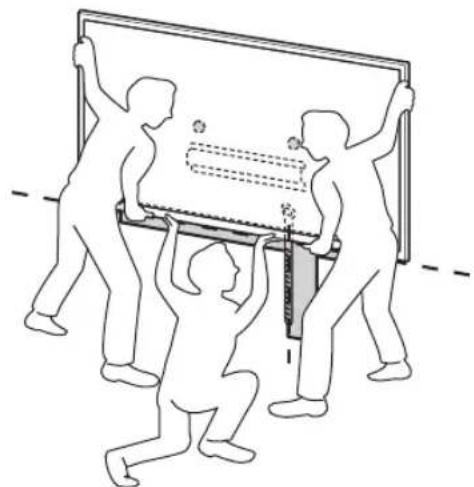
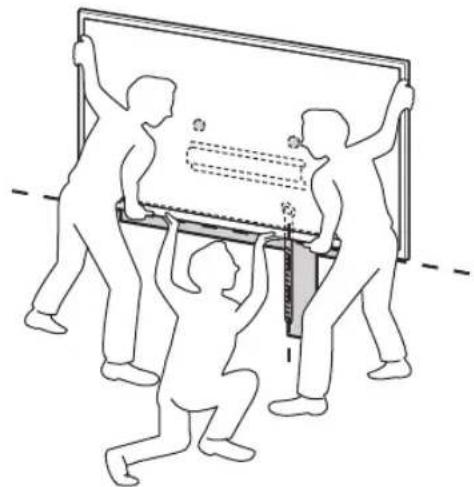
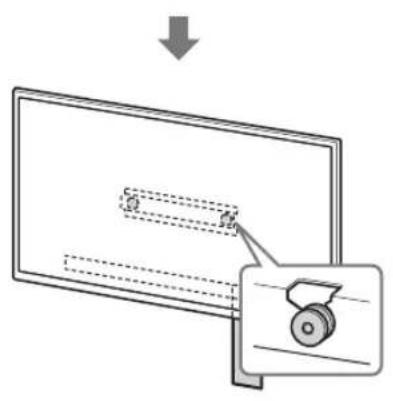
1 Lift the TV.
- For the location of the Pulleys (B) to hang on the Base or Base Adaptor, refer to the table in step 3 of "Deciding on the installation location" on page 7.
- Make sure that the rear of the TV touches the Base or Base Adaptor when holding the TV.
Note
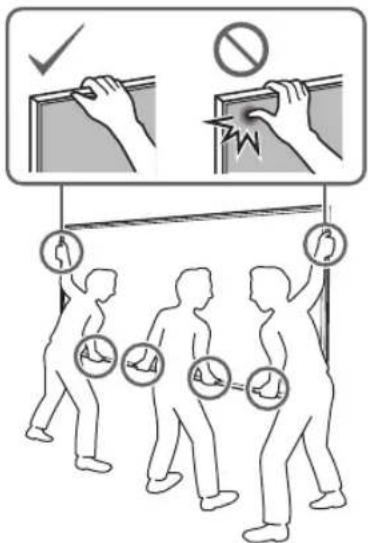
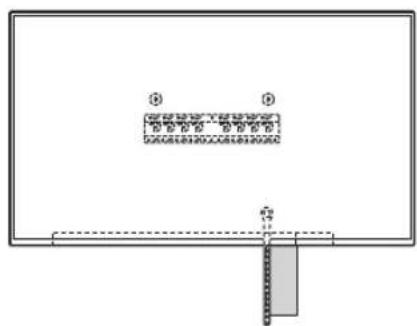
- Hold the TV securely with both hands and make sure the Belt (F) and the bottom of the TV align with the masking tape.
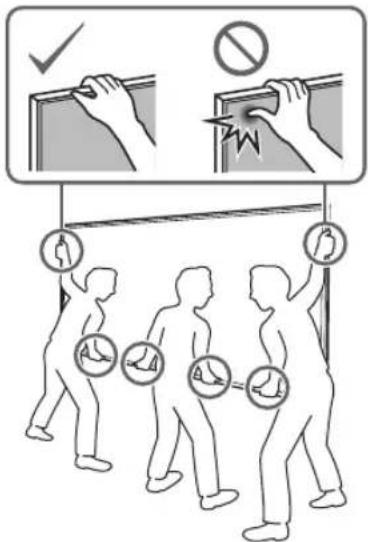
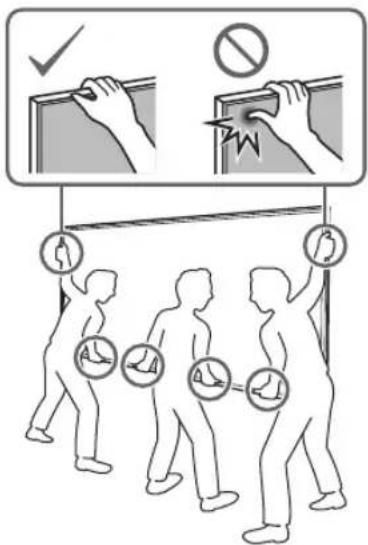
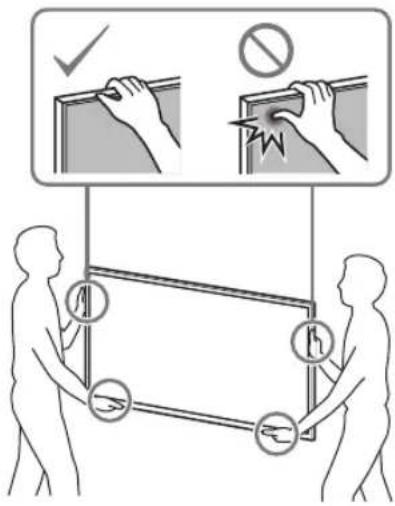
- Carry the TV with three people, and the person who is in front of the TV leads the others to adjust the position.
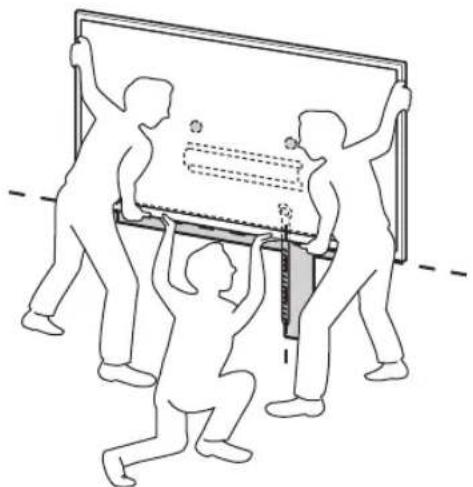
Take great care when installing the TV to the wall, especially for the person who is supporting the TV from below; the television set may fall, causing serious bodily injury or even death.
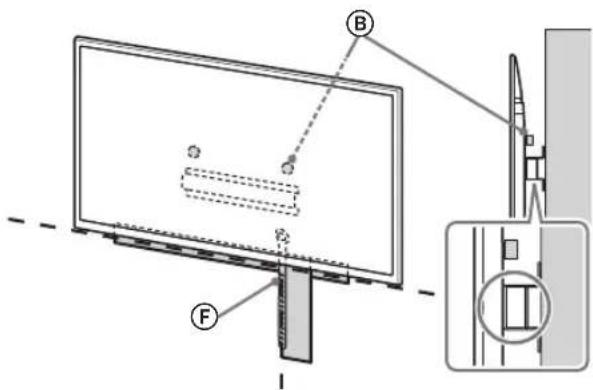
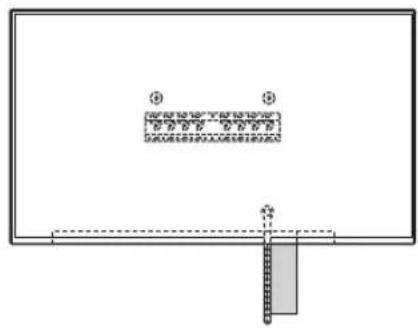
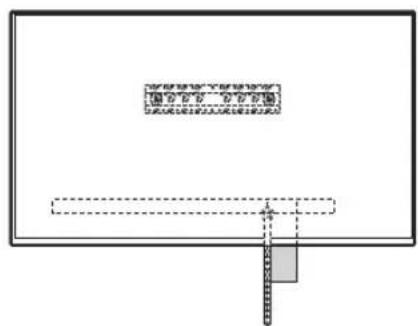
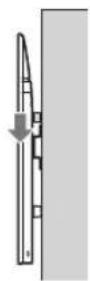
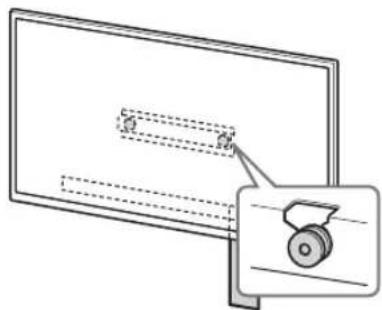
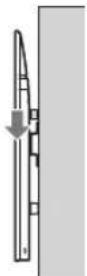
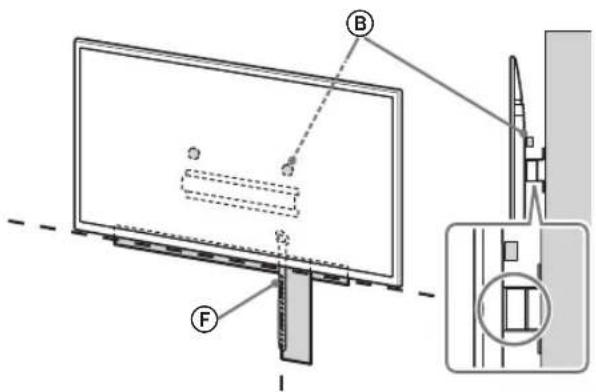
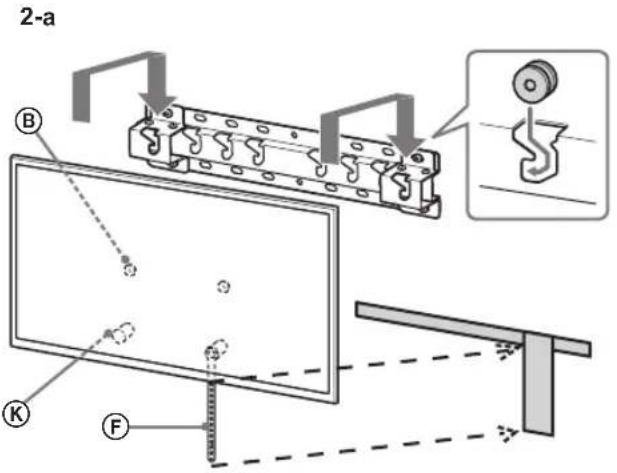
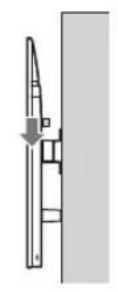
2 Install the TV onto the Base or Base Adaptor.
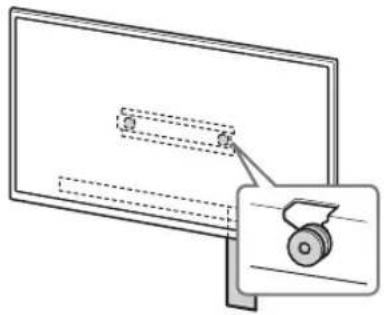
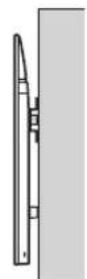
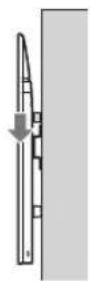
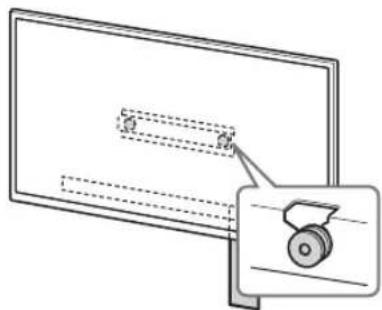
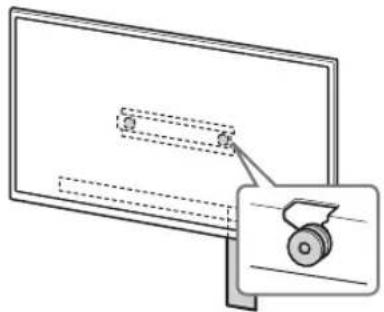
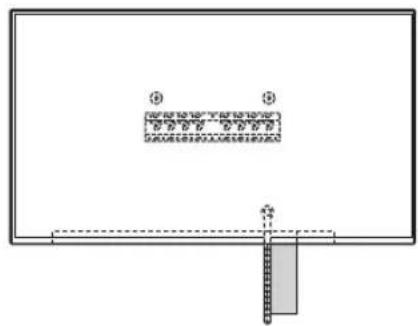
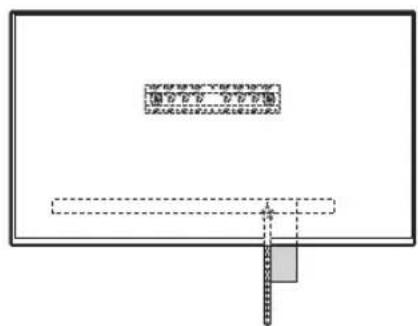
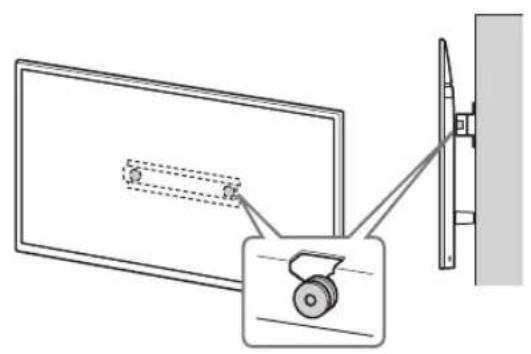
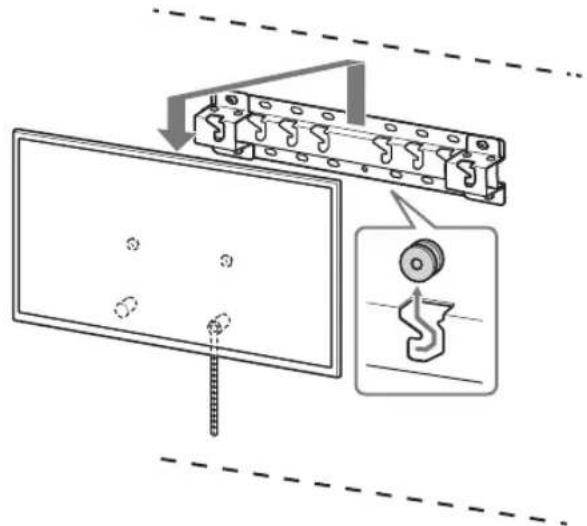
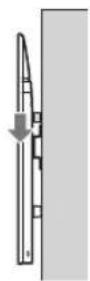
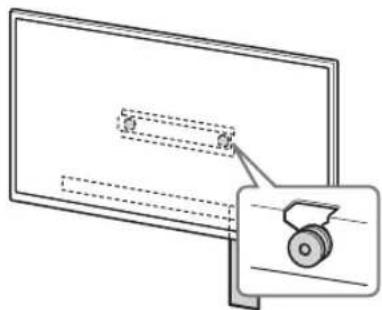
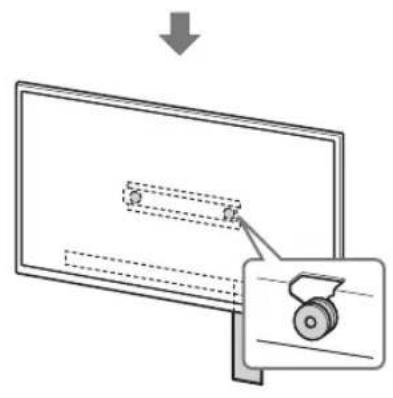
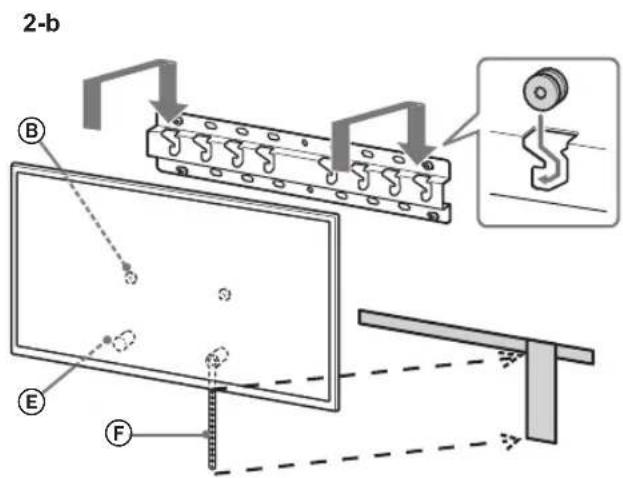
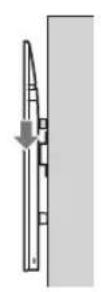
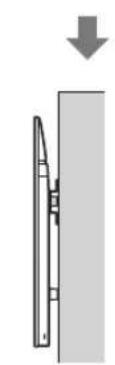
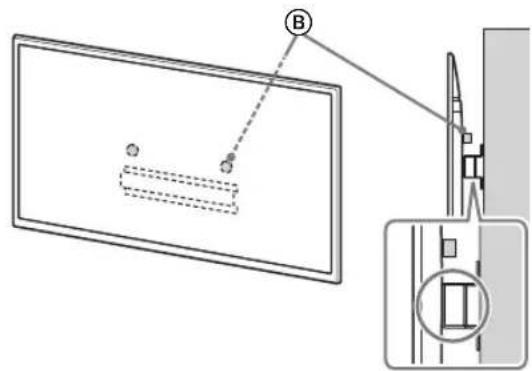
Gently slide down the TV and hang the Pulleys (B) attached to the rear of the TV to the Base or Base Adaptor, making sure to confirm the shape of the holes. After installing the TV on the wall, confirm the Pulleys (B) are firmly latched into the Base or Base Adaptor. Release both hands slowly to ensure that the TV does not fall.
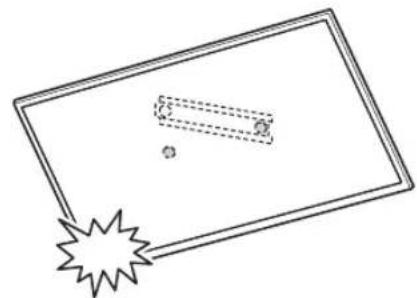
After installing the TV on the wall, remove the masking tape, etc. from the wall.
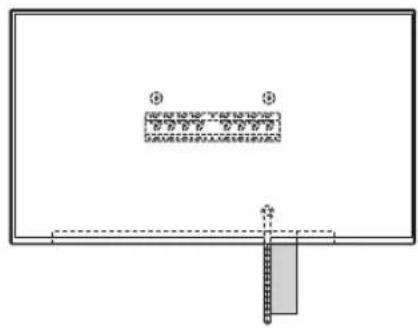
2-a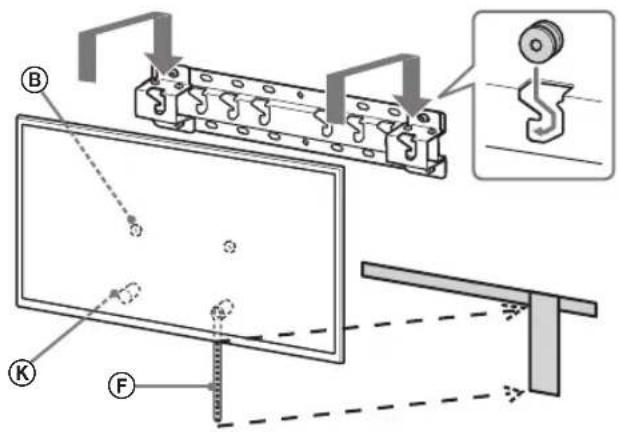



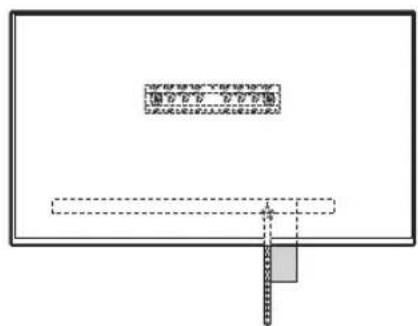
2-b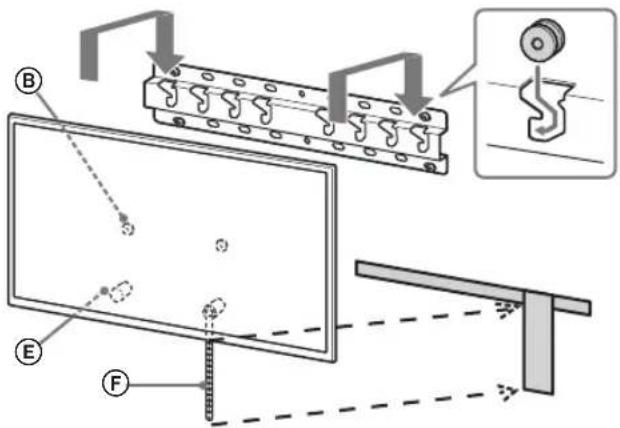



WARNING
- Be sure that two or more persons (three or more persons for 75 inches and above TV set) hold the TV when carrying it.
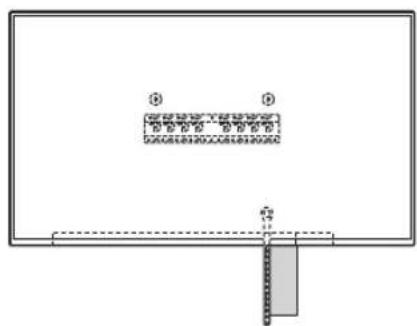
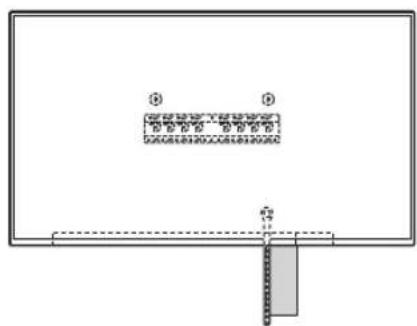
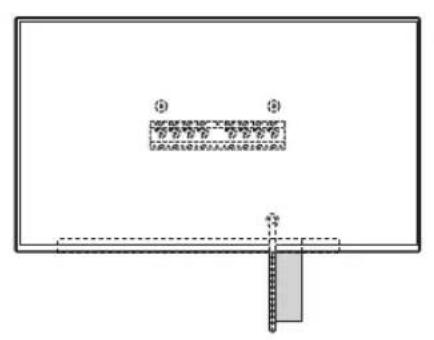
3 Preventing the bottom of the TV from shifting.
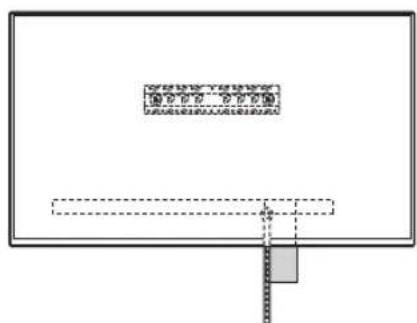
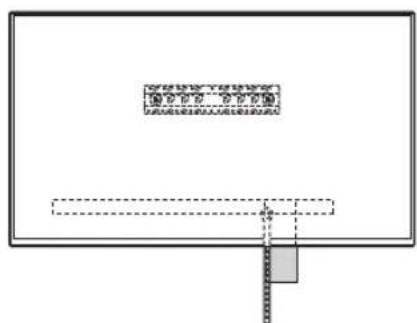
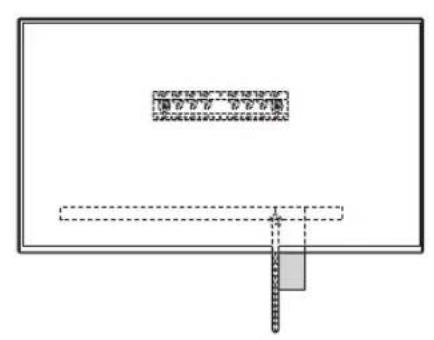
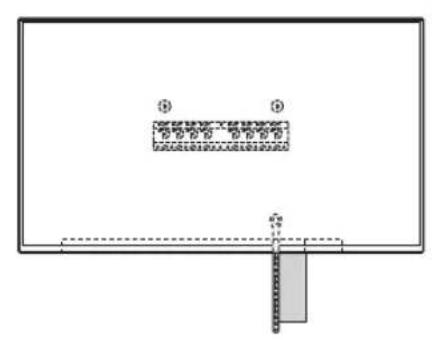
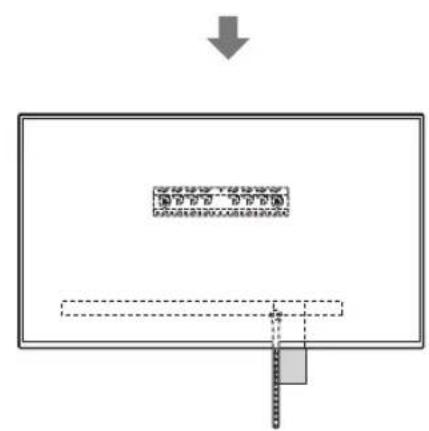
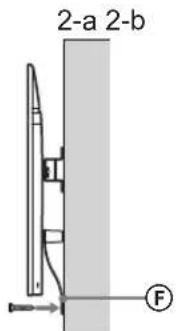
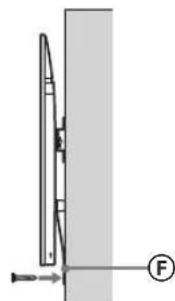
Take up the slack of Belt F and attach it to the wall tightly.
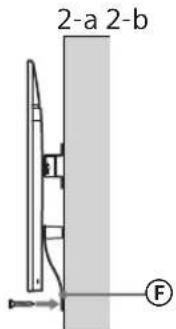
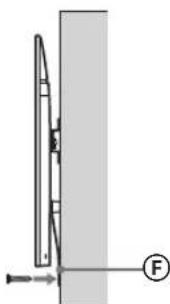
- Use a 5 mm diameter screw or equivalent (not supplied).
Note
Try to pull the bottom of the TV towards yourself slightly, to make sure that it does not move forward. If there is any movement, it is not fixed correctly, and the Belt should be secured firmly again.
KD-65/55XG87□□
KD-65/55XG85□
1 Lift the TV.
- For the location of the Pulleys to hang on the Base or Base Adaptor, refer to the table of step 3 in "Deciding on the installation location" on page 7. Make sure that the rear of the TV touches the Base or Base Adaptor when holding the TV.
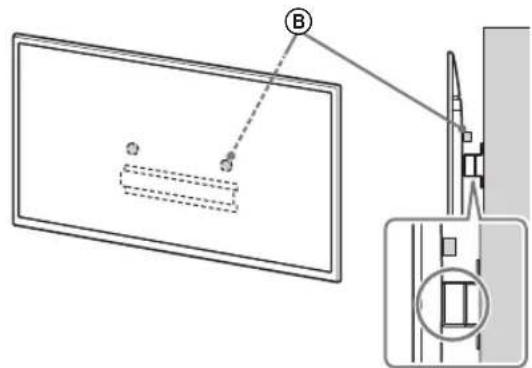
Note
- Hold the TV securely with both hands.
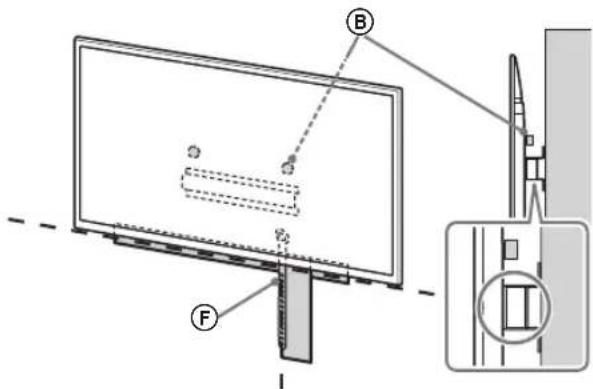
2 Install the TV onto the Base or Base Adaptor.
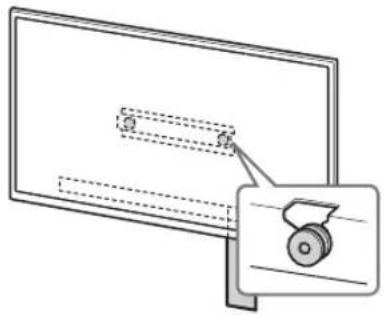
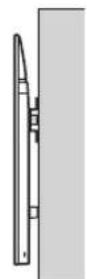
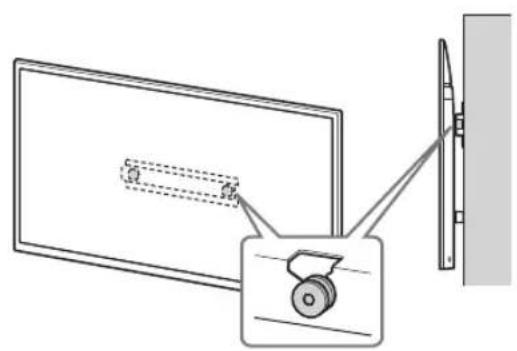
Gently slide down the TV and hang the Pulleys ⑧ attached to the rear of the TV to the Base or Base Adaptor, making sure to confirm the shape of the holes. After installing the TV on the wall, confirm the Pulleys ⑧ are firmly latched into the Base or Base Adaptor. - Release both hands slowly to ensure that the TV does not fall.
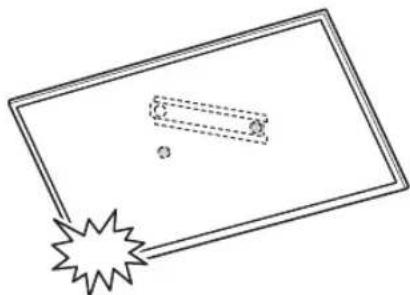
2-a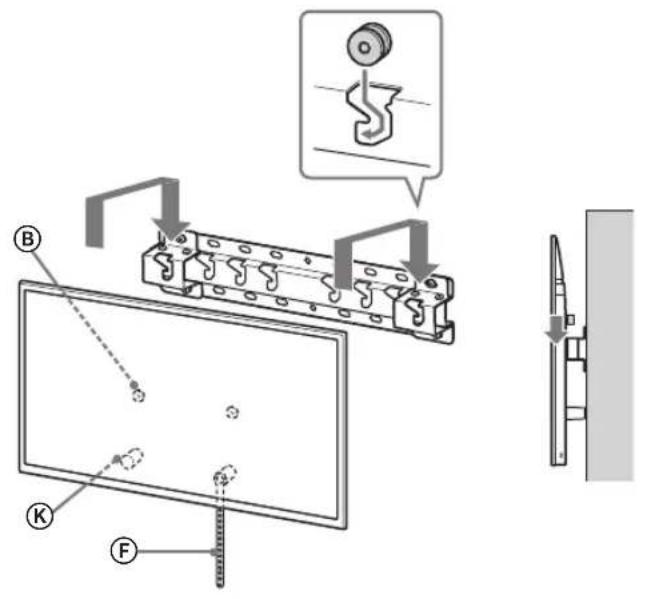
2-b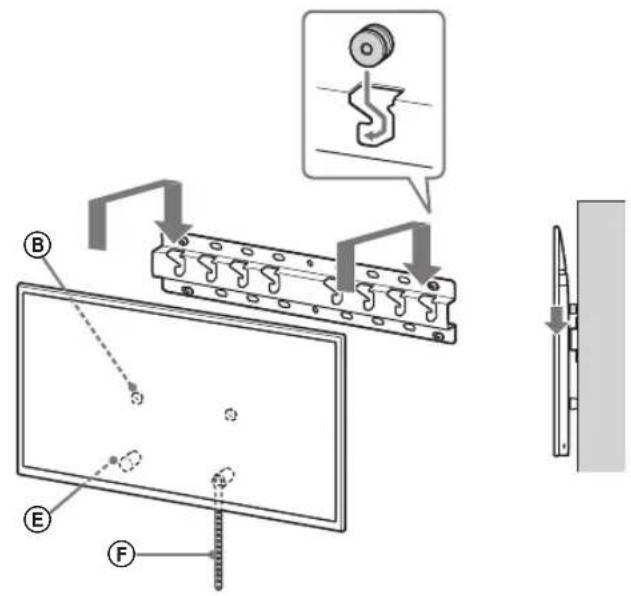
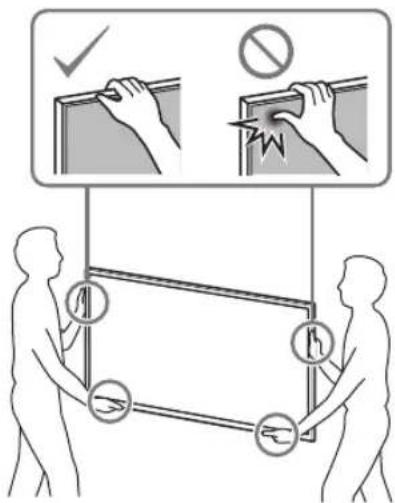
WARNING
- Be sure that two or more persons (three or more persons for 75 inches and above TV set) hold the TV when carrying it.
3 Preventing the bottom of the TV from shifting.
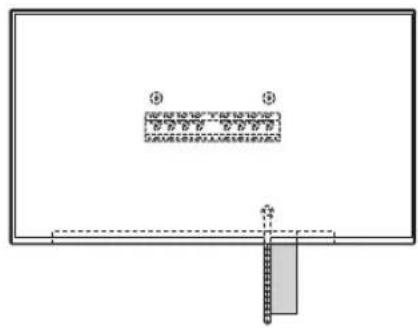
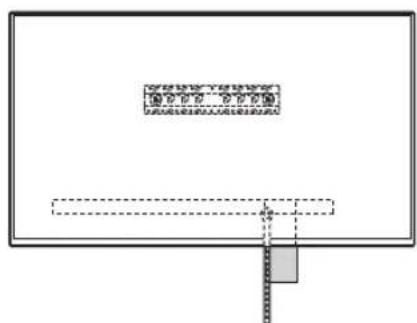
Take up the slack of Belt F and attach it to the wall tightly.
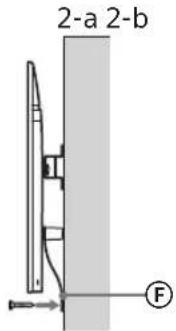
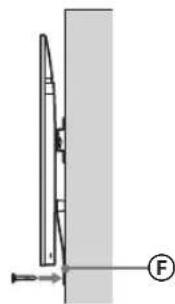
- Use a 5 mm diameter screw or equivalent (not supplied).
Note
Try to pull the bottom of the TV towards yourself slightly, to make sure that it does not move forward. If there is any movement, it is not fixed correctly, and the Belt should be secured firmly again.
Confirming the completion of the installation
Check the following points.
- The Pulleys (B) are firmly hung onto the Base or Base Adaptor.
- The cord and the cable are not twisted or pinched.
- The Belt (F) is tight with no slack.
WARNING
- Improper placement of the mains lead, etc. may cause fire or electric shock through a short circuit. Be sure to confirm the completion of the installation for safety.
Other information
When removing the TV, reverse the previous installation procedure.
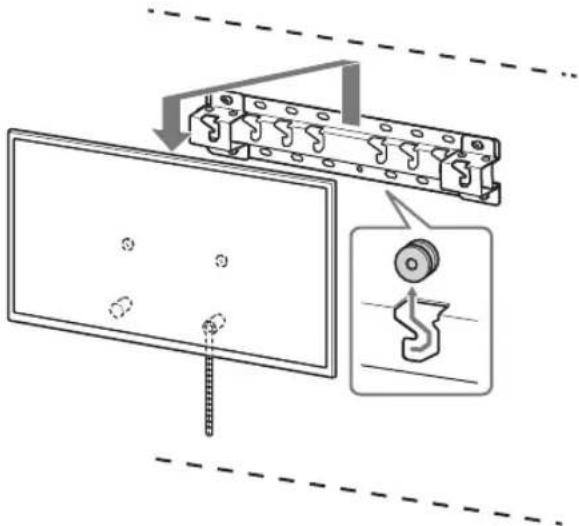
WARNING
- Be sure that two or more persons (three or more persons for 75 inches and above TV set) hold the TV when removing it.
Specifications
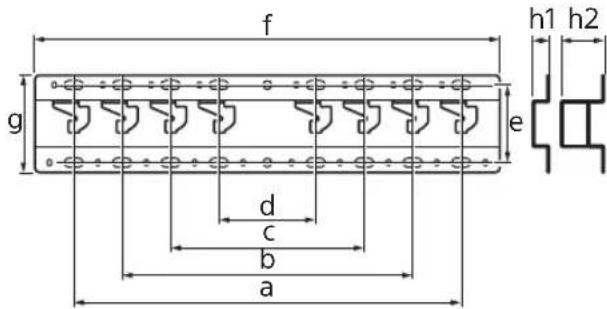
Dimensions: (Approx.) [mm]
a:400
b : 300
c:200
d:100
e:80
f:480
g : 100
h1 : 20 (case 2-b)
h2:60 (case 2-a)
Weight (base only): (Approx.) [kg]
0.8
Design and specifications are subject to change without notice.
Dimensions: (Approx.) [mm]
a:400
b:300
c:200
d:100
e:80
f:480
g:100
h1:20 (case 2-b)
h2:60 (case 2-a)
Dimensions: (Approx.) [mm]
a: 400
b: 300
c: 200
d: 100
e: 80
f: 480
g: 100
h1: 20 (case 2-b)
h2: 60 (case 2-a)
Weight (base only): (approx.) [kg]
0.8
Preparation for installation. 5
Checking the parts 5
Finding a location 6
Preparation for installation
1 Find the TV's location.
PpOeToIaOia yia tooTheTnO
- Do not have the reference guide
- and the installation guide
- before installation.
- Before positioning, make sure you have a Phillips screwdriver that fits the screws.
- Verify the position of the TV. Use two or more screws of 8 mm diameter and one screw of 5 mm diameter (if provided). Choose screws that are suitable for the wall material.
Check the parts
TuniktootheonAnEπtn tootheon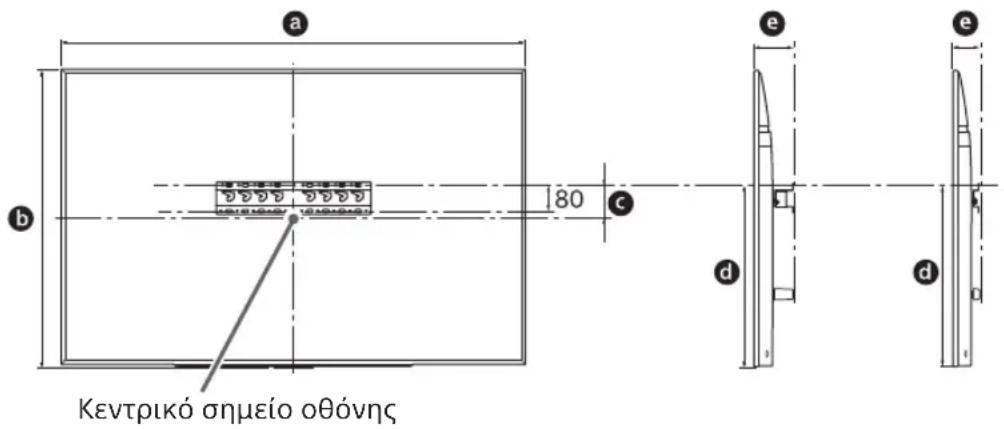
Unit: mm
Dimensions: (approx.) [mm]
a:400
b : 300
c:200
d : 100
e:80
f:480
q: 100
h1:20 (case 2-b)
h2:60 (case 2-a)
Do not insert screws into other places after mounting the TV.
If you do, the TV may fall and cause injury or damage to property.
Do not remove the parts of the console for wall mounting.
If you do, the wall-mount console may fall and cause injury or damage to property.
Do not mount other equipment other than the specified product.
This wall-mount console is designed for use only with the specified product. If you mount other equipment, it may fall or break and cause injury or damage to property.
Do not place the wall-mount console on any other product than the TV. Do not place the TV on a slanted or unstable surface.
If you do, the TV may fall and cause injury or damage to property.
Do not lean on or hang from the TV.
Do not lean on or hang from the TV, as it may fall and cause serious injury.
If the safety measures are not observed, there is a risk of injury and damage to property.
Do not operate the product with a damaged power cord during cleaning or maintenance.
Do not apply excessive force to the front part of the TV. If you do, the TV may fall and cause injury or damage to property.
Safety measures
If you use the TV for a long time, mounted on a wall mount, the wall behind it may become discolored or the wallpaper may peel off, depending on the wall material. If the wall mount is removed from the wall after installation, holes from the screws will remain. Do not use the wall mount in places where it may be subjected to mechanical vibration.
Wall mount installation
For Sony dealers
WARNING
These instructions are intended solely for Sony dealers. Read the safety measures described above and pay special attention to safety during installation, maintenance, and inspection of the product.
Do not install the wall mount on wall surfaces where the TV's screws or sides protrude from the wall surface.
Do not install the wall mount on wall surfaces, such as columns, where the TV's screws or sides protrude from the wall surface. If an object or person impacts or falls on the side of the TV, it may cause injury or damage to property.
Do not install the TV above or below an air conditioner.
If the TV is exposed to prolonged direct airflow from an air conditioner, it may cause fire, electric shock, or malfunction of the TV.
Install the wall mount securely to the wall by following the instructions in this manual.
If any of the screws are loosened or fall out, the wall mount bracket may fall and cause damage or injury. Use suitable screws for the wall material. Always use four or more screws with a diameter of 8 mm (or equivalent).
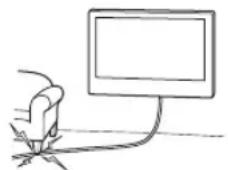
Use the correct screws and mounting parts as you follow the instructions in this manual. If you use replacement parts, the TV may fall and cause injury or damage.
Make sure you install the bracket correctly by following the procedure described in this manual.
If any of the screws are loosened or fall out, the TV may fall and cause injury or damage.
Tighten the screws firmly in the indicated position.
If you do not do this, the TV may fall and cause injury or damage.
Be careful not to hit the TV during installation.
If the TV is subjected to impact, it may fall and break. This can cause injury.
Install the TV on a wall that is perpendicular and flat.
If you do not do this, the TV may fall and cause injury.
After installing the TV correctly, arrange the cables properly.
If people or objects get caught on the cables, this may cause injury or damage to the TV.
Do not pinch the power cord or connecting cables.
If the power cord or connecting cables are pinched between the bracket and the wall, or if they are bent or pulled with force, the internal wires may be damaged and cause a short circuit or electric shock. This may cause a fire or electric shock.
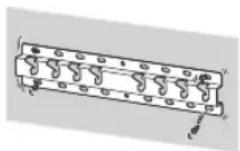
The screws required to secure the wall mount bracket to the wall are not included in the package.
Mounting the TV on the wall, when mounting the bracket for wall installation.
Contents
Preparation for mounting. 5
Checking the parts. 5
Determining the mounting location 6
Mounting the base of the wall 8
Preparation for mounting the TV...9
KD-85/75XG85□□, KD-75XG87□□
KD-65/55XG87□□, KD-65/55XG85□□.11
Mounting the TV on the wall.13
KD-85/75XG85□□, KD-75XG87□□.13
KD-65/55XG87□□, KD-65/55XG85□□.15
Checking the connection of the
mounting 18
Other information 18
Mounting the TV on the wall
The mounting procedure differs depending on the TV.
Use the console for mounting the TV on the wall, model SU-WL450, to mount the TV on the wall.
Note
Do not forget to keep the supplied screws in a safe place, keeping them away from children.
Preparing for mounting
The TV's setup guide must be followed before mounting. - Use a Phillips screwdriver that matches the screws. - Choose the mounting position for the TV. - Prepare four screws with a diameter of 8 mm and one screw with a diameter of 5 mm or equivalent (not included in the package). Select screws suitable for the wall material.
Checking the parts
Supplied with SU-WL450
- Check that all parts are present.
| A Oснова (20) (1) B Мakара (2) | |
| ◎ PSW 6x20 (4)◎ PSW 4x20 c Втулka (2) | |
| E Дистанционна Втулka (20) (2) | F Колан (1) |
| ◎Втулka (20) (M4) (2) | H PSW 4x20 (2) |
| ◎Aдантетер на Оснobата (2) | ◎J PSW 4x10 (8) |
| ◎Дистанционна Втулka (60) (2) | ◎L PSW 6x50 (2) |
| ◎Втулka (M4) (2)◎PSW 4x50 (2) | |
Determining the mounting location
1. Select the mounting location.
Make sure there is enough space on the wall for the TV and that it can support the weight, which is at least four times the weight of the TV. See the table regarding TV mounting on the wall. See the TV's reference guide regarding its weight.
Standard mounting Tight mounting Center of the screen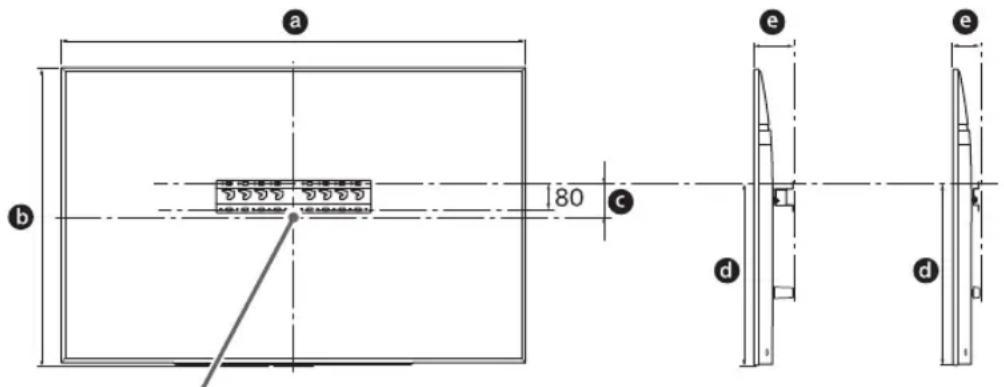
Measurement unit: mm
| Иme на морел | Размeperи на ekранa | Размeper на цentьра на ekранa | Дылжина на моHTах | |||
| a | b | c | d | e | ||
| Стоцартын MOHTах | Teсен MOHTах | |||||
| KD-85XG85□□ | 1909 | 1 097 | 251 | 803 | 142 | 100 |
| KD-75XG87□□ KD-75XG85□□ | 1673 | 963 | 107 | 595 | 116 | |
| KD-65XG87□ KD-65XG85□□ | 1450 | 836 | 99 | 523 | 115 | 73 |
| KD-55XG87□ KD-55XG85□□ | 1231 | 713 | 106 | 468 | 115 | |
Note
- The values in the table may differ depending on how the installation is performed. When your TV is mounted on the wall, its upper part may lean forward.
Leave a suitable distance between the TV, the furniture, and the wall parts, as shown below.
Measurement unit: mm
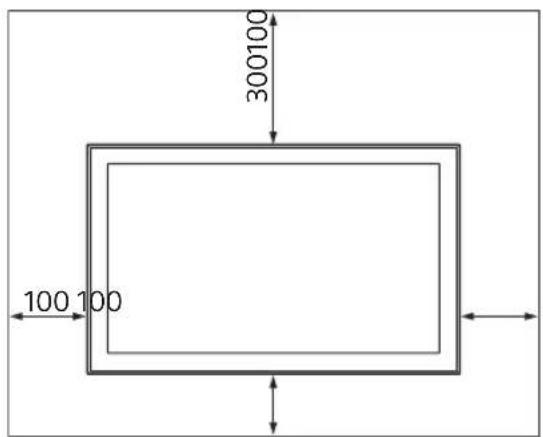
To ensure proper ventilation and prevent dust accumulation:
Do not place the TV on a flat surface, do not mount it upside down with the top edge downward, or on its side. Do not place the TV on rugs, blankets, or other soft surfaces. Do not cover the TV with cloth, such as curtains, or items like newspapers or magazines. Do not mount the TV as shown below.
Air circulation is blocked.
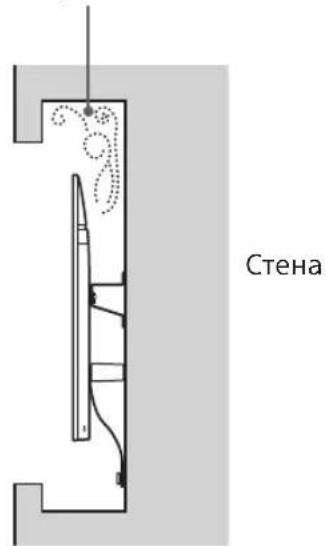
Note
If you intend to route the cables through the wall, make an opening in the wall to pass the cables before installation. To prevent cable damage, make the opening in the wall outside the perimeter of the base (20) A, after the base 1 and the mounting bracket (20) E, the mounting bracket (60) K.
2 Select the wall mounting. The distance from the rear part of the TV to the wall can be selected as shown below.
2-a Standard mounting
2-b Tilt mounting
See the table from item 1.
WARNING
When 2-b is selected, proceed to the corresponding step.
2-a 2-b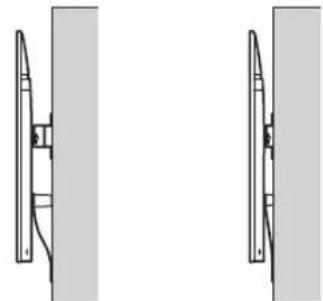
See the table below for the position of the antenna for the base. If you have selected 2-b, follow this step.
| Име на мodyел Мecтоноожени На Кукatinga | |
| KD-85XG85□□ | |
| KD-75XG87□□ | a |
| KD-75XG85□□ | |
| KD-65XG87□□ | |
| KD-65XG85□□ | b |
| KD-55XG87□□ | |
| KD-55XG85□□ | |
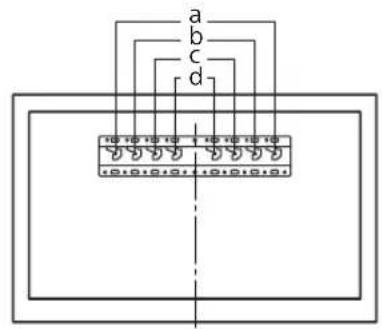
Mount the base antenna ① using the screw (PSW 4x10) to the base (20) A, if you have selected 2-a.
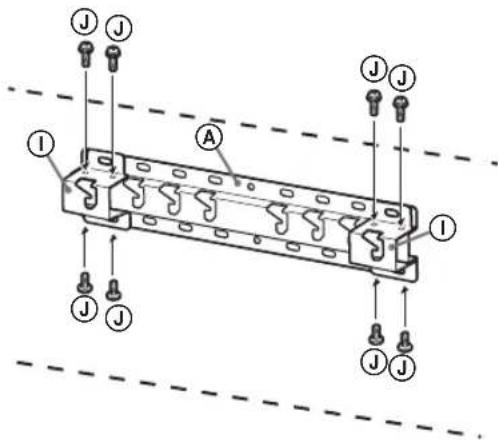
Determine the positions of the screws for mounting the base (20) A.
See the specifications on page 18.
When you select 2-a, use the specified positions of the holes for the antenna on the base ①.
WARNING
The wall on which you are mounting the TV must be able to support at least four times its weight (see the TV's reference manual regarding its weight).
- Determine the correct wall on which the TV will be mounted. If necessary, reinforce the wall sufficiently.
Mounting the base on the wall
- Use four M8 wall screws or equivalent (not supplied). Tighten the four screws into the holes of the antenna on the base ① with the base (20) A (see 2-a).
- Mount the base (20) A horizontally on the wall.
Preparation for mounting the TV
When mounting, follow the setup manual.
KD-85/75XG85□□, KD-75XG87□□
1 Remove the stand from the TV.
- Use only the supplied screws. (They are not provided with the stand), to attach the stand to the TV, near the base of the stand. See the following table.
| Мернейнци: mm | ||
| Име на м odeл | Дыжина 3a otбелязвае | Размер на центьра на ekранa |
| a b c d | ||
| KD-85XG85□□ | 1909 683 200 251 | |
| KD-75XG87□□ | 1673 468 200 107 | |
| KD-75XG85□□ | ||
2 Remove the screws from the back of the TV.
3 Attach the wall mount brackets to the wall. Check the brackets by comparing with "Supplied with SU-WL450" in "Checking the parts" on page 5.
Note
Secure the brackets with the screws. When using an electric screwdriver, set the torque to approximately 1.5 N·m {15 kgf·cm}. Store the unused parts in a safe place for future use. Keep the instruction manual for future reference.
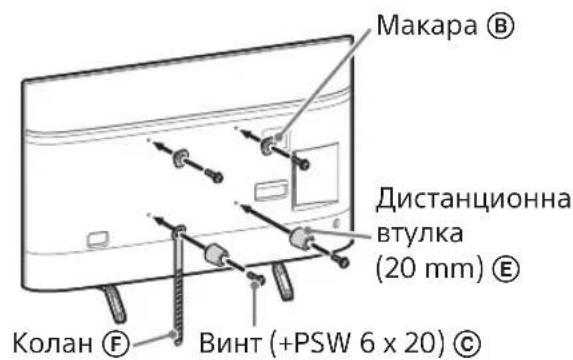
Standard mounting (2-a)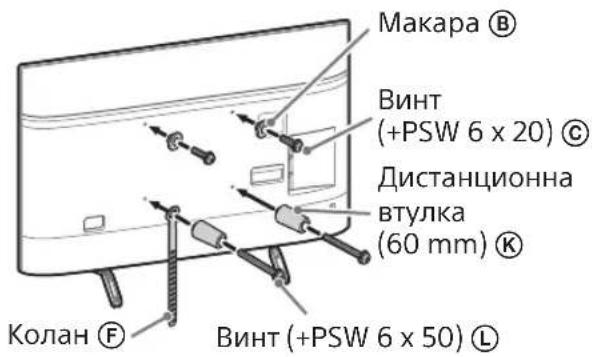
Tight mounting (2-b)
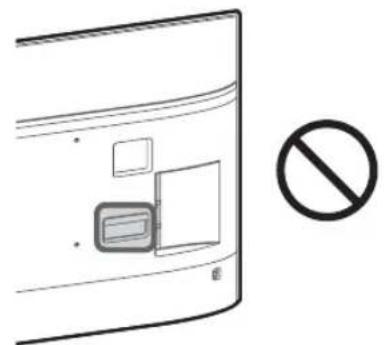
Note
When using this mounting style, you can use the terminals on the back of the TV.
4 Connect the necessary cables to the TV.
Make sure you have connected the cables before mounting the TV on the wall. You can connect them after the TV is mounted. See the instruction manual supplied with your TV.
Note
Running the cables through the wall is not recommended. - Connect the cables before mounting to the wall, so you don't have to reach behind it.
Remove the table top from the TV.
- Remove the stand's side. While holding the stand securely, align the two guides until the hooks catch the TV.
KD-85XG85□□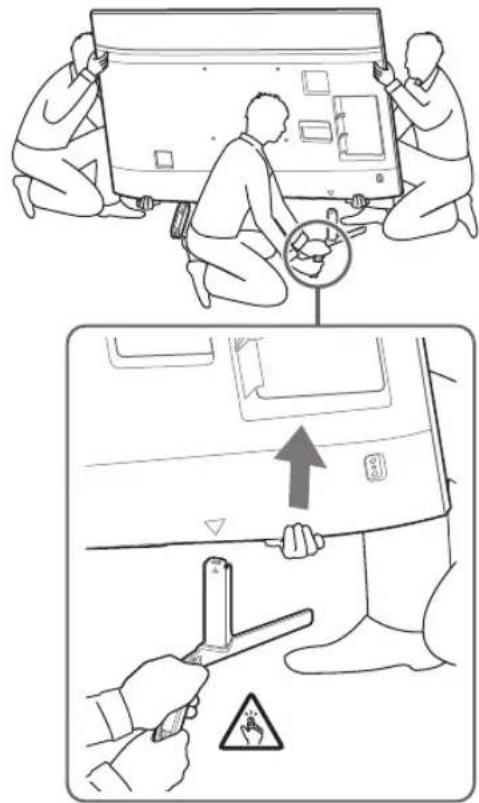
KD-75XG87□□, KD-75XG85□□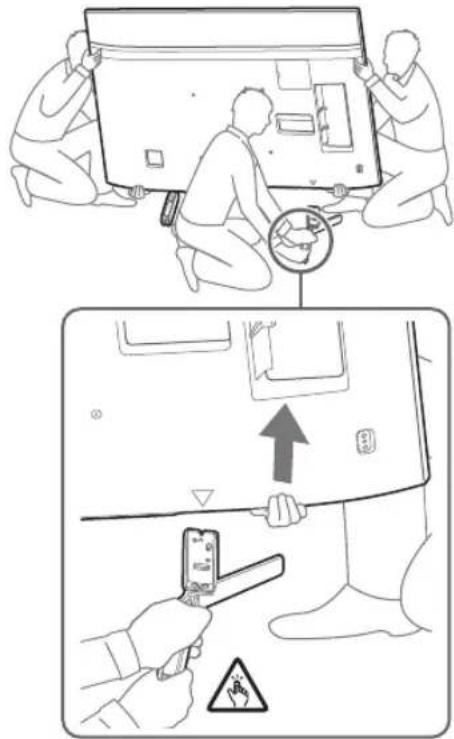
- Repeat the procedure and remove the other side of the stand.
Note
Removing the stand should be performed by two or more people. Be careful not to apply excessive force when removing the stand from the TV, as the TV may fall and cause personal injury or damage to the TV itself. Be careful when working with the stand to avoid damaging the TV. Be careful when lifting the TV, as the stand is not secured and may slip and cause injury. Be careful when moving the stand away from the TV to prevent falling and damage to the surface on which the TV stands.
KD-65/55XG87□□,
KD-65/55XG85□
1 Remove the screws from the rear of the TV.
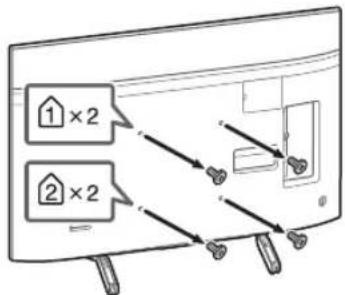
2 Attach the wall mount brackets to the wall. Check the brackets by comparing with "Supplied with SU-WL450" in "Checking the parts" on page 5.
Note
Secure the brackets with the screws. When using an electric screwdriver, set the torque to approximately 1.5 N·m {15 kgf·cm}. - Store the unused parts safely for future use. Keep the manual for reference.
Standard mounting (2-a)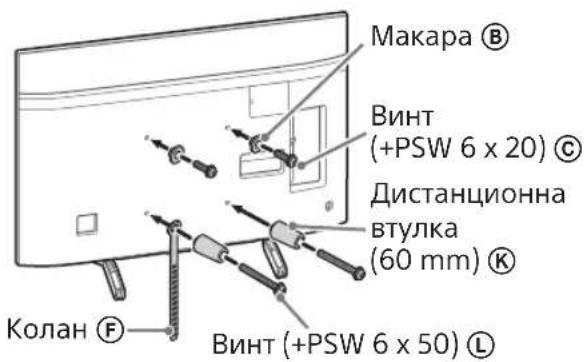
Tight mounting (2-b)
The instructions for installation are provided so that you can use the connectors on the back of the TV.
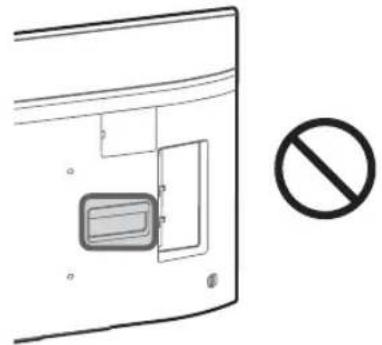
Connect the necessary cables to the TV.
Make sure you have connected the cables before mounting the TV on the wall. You can connect them after the TV is mounted. See the manual supplied with your TV.
Pull the cables through the wall or conceal them. - Connect the cables before mounting to the wall, so you don't step on them.
4 Remove the stand from the TV.
- Remove one side of the stand. Hold the stand firmly with both hands, while lifting the TV.
Repeat the procedure and remove the other side of the stand.
Removing the stand should be done by two or more people. Be careful not to apply excessive force when removing the stand from the TV, as the TV may fall and cause personal injury or damage to the TV. - Be careful when working with the stand to avoid damage to the TV. Be careful when lifting the TV, as the stand is not secured and may slip and cause injury. Be careful when moving the stand away from the TV to prevent it from falling and damaging the surface on which the TV stands.
Mounting the TV on the wall
KD-85/75XG85□□,KD-75XG87□□
1 Lift the TV.
For the position of the marks ⑧ for mounting on the base plate or the base, see the table in "Determining the mounting position" on page 7. - Make sure the rear side of the TV is parallel to the base plate or the base when you hold the TV.
Place the TV on a flat surface, making sure the front of the TV is parallel to the self-adhesive pad. The TV's tilt, which is in front of the TV, should remain in place to adjust the tilt.
When mounting the TV to the wall, be especially careful for the person holding it from behind, so that the TV does not fall and cause injury or damage.
2 Mount the TV to the base stand.
Carefully lift the TV and align the brackets B to the corresponding side of the TV, to the base stand, checking the shape of the holes. After mounting the TV, check that brackets B are securely attached to the base stand. Also pull the two screws to ensure the TV does not fall.
After mounting the TV to the wall, remove the self-adhesive pad from the wall.
2-a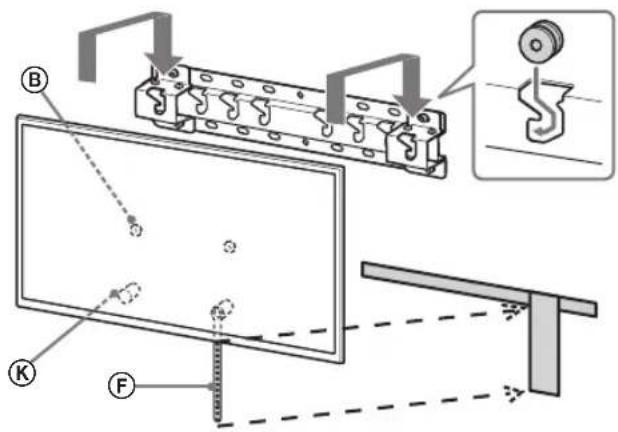


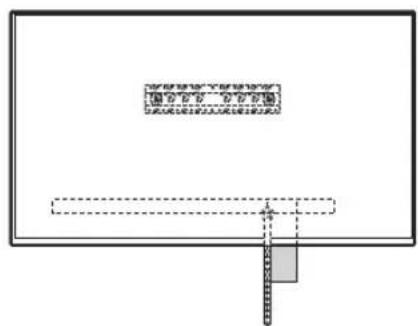

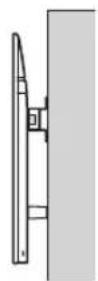
2-b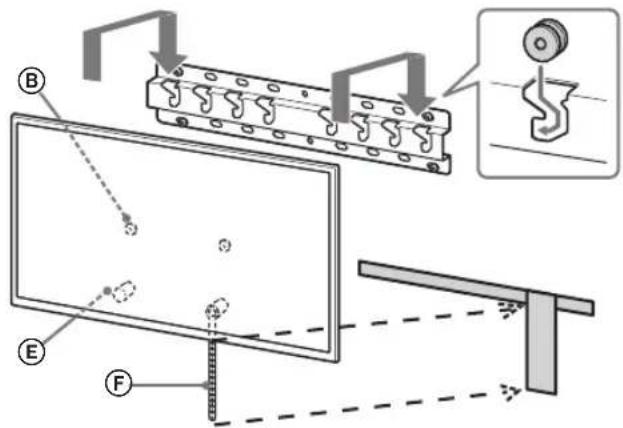
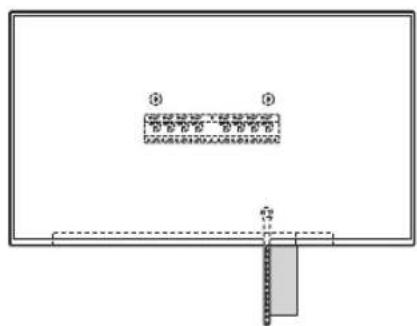



WARNING
- Make sure that the two screws (three or four screws for TV models 75 inches and above) are firmly attached to the TV when carrying it.
2 Mount the TV to the base stand.
Carefully lift the TV and align brackets B to the corresponding side of the TV, to the base stand, checking the shape of the holes. After mounting the TV, check that brackets B are securely attached to the base stand. Also pull the two screws to ensure the TV does not fall.
2-a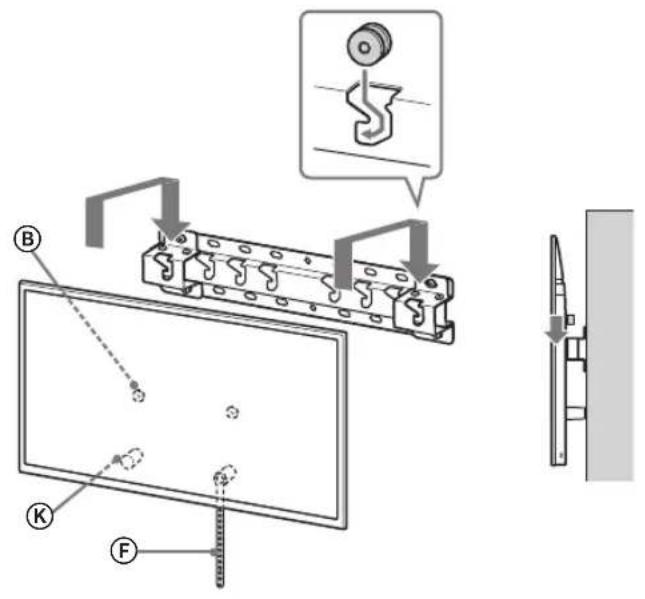
2-b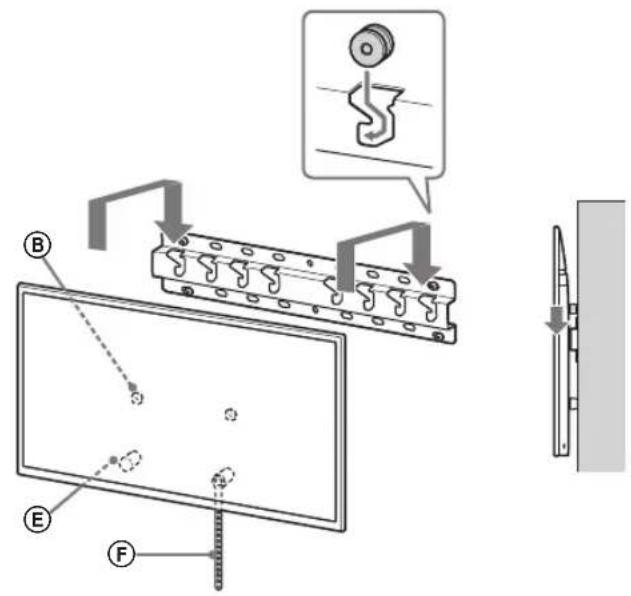
- Repeat the procedure, but do not use the screws for the TV with sizes from 75 inches. Hold the TV when carrying it.
3 Prevention
Preventing the TV from falling. The part of the TV.
- Select the loose part of the bracket and attach it to the wall.
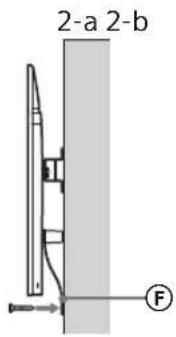
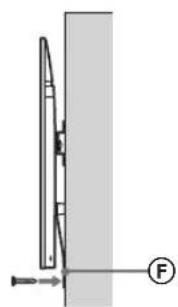
- Use a screw with a diameter of 5 mm or equivalent (not included in the kit).
Care
Tilt the TV towards you to make sure it is not loose. If it moves, it is not properly secured and the bracket must be reattached correctly.
Check
Supported models:
KD-85XG85□□*/75XG87□□*/75XG85□□*/65XG87□□*/
65XG85□□*/55XG87□□*/55XG85□□*
* In actual model names, "□□" denotes digits and/or symbols specific to each model.
To the customer
To ensure the safety of the product, Sony Corporation strongly recommends that only Sony dealers or licensed contractors perform the TV installation. Do not attempt to install it yourself.
For Sony dealers and contractors
Pay special attention to safety during installation, periodic maintenance, and inspection of this product.
For proper installation of this product, sufficient experience is required, especially in determining whether the wall can support the weight of the TV. Be sure to have Sony dealers or licensed contractors install this product on the wall, and strictly follow the safety techniques when performing installation work. Sony Corporation is not responsible for any damages or injuries caused by improper handling or incorrect installation of this product.
For detailed instructions on the wall-mount bracket, refer to the TV installation guide and the instructions in this manual.
Safety
Thank you for purchasing this product.
For customers
Installing this product requires sufficient experience. Be sure to contact a Sony dealer or licensed contractor and take the necessary precautions during installation. Sony Corporation is not responsible for any damages or injuries caused by improper handling or installation, or installation not intended for this product. This does not affect your legal rights (if any).
For Sony dealers
Installing this product requires sufficient experience. For safe installation of the device, be sure to carefully read this manual. Sony is not responsible for any damages or injuries resulting from improper handling or incorrect installation. After installation, hand this manual over to the customer.
This installation guide provides important safety precautions and information to ensure proper handling of the product, which are necessary to prevent accidents. Be sure to carefully read this manual and use the product as intended. Keep this manual for future reference.
Sony products are designed with safety in mind. However, improper use of the product may result in serious injury due to electric shock, fire, tipping over, or falling of the product. To avoid such accidents, be sure to follow the appropriate safety precautions.
The date of manufacture is indicated on the product, packaging, or label with a barcode in the following format: YYYY/MM, where YYYY is the year and MM is the month of manufacture.
Manufacturer: Sony Corporation, 1-7-1 Konan Minato-ku Tokyo, 108-0075 Japan
Organization, authorized to accept claims on the territory of Kazakhstan: LLP "Sony Electronics" Representative Office in Kazakhstan, 050010, Republic of Kazakhstan, Almaty, Dostyk Avenue, building 117/7
Importer in the territory of the Customs Union: LLP "Sony Electronics", Russia, 123103, Moscow, Karamyshevsky proezd, 6
WARNING
The specified models
The data contained in this wall-mount installation manual are intended for specific TV models. See the reference guide for the TVs to check the possibility of using the bracket for wall mounting.
For customers
WARNING
Failure to follow the safety precautions below may result in death or serious injury due to electric shock, fire, tipping over, or falling of the product.
Be sure to contact a licensed contractor, and do not allow children to be near the installation site of the product.
Incorrect installation of the wall-mount bracket for the TV may cause the accidents listed below. For installation, be sure to contact licensed contractors.
The TV may fall and cause serious injury, such as fractures or contusions. - If the wall on which the bracket is installed is not sturdy, uneven, or not vertical, the product may fall and be damaged or cause injury or property damage. The wall must be able to support at least four times the weight of the TV. (To find out the weight of the TV, see the reference guide.) - If the bracket installation is not sufficiently strong, the product may fall and be damaged or cause injury or property damage.
Safety precautions regarding children
Do not allow children to climb on the TV. Keep small parts out of the reach of children so that they cannot accidentally swallow them.
For installation or removal of the TV, be sure to contact licensed contractors.
If transportation or removal of the TV is performed by unlicensed contractors, it may fall and cause injury or property damage. Make sure that the TV is carried or removed by two or more people (three or more people for TVs with a screen diagonal of 75 inches or more).
Do not remove the screws, etc. from the TV.
Otherwise, the TV may fall and cause injury or damage to property.
Do not disassemble or modify the bracket for wall mounting.
Otherwise, the wall mount bracket may fall and cause injury or damage to property.
Do not install any equipment other than the specified one on the bracket.
This wall mount bracket is intended for use only with the specified products. If equipment not intended for such installation is attached to this mounting bracket, it may fall and be damaged, and may also cause injury or damage to property.
To avoid overloading the wall mount bracket, do not place anything on it other than the TV. Do not push the TV left/right or up/down.
Otherwise, the TV may fall and cause injury or damage to property.
Do not lean on the TV or hold onto it.
Do not lean on the TV or hold onto it, as it may fall and cause serious injury.
WARNING
If the following precautions are not observed, there is a risk of injury or damage to property.
When cleaning, it is necessary to do so without applying excessive force.
Do not overload the top of the TV. Otherwise, the TV may fall and cause injury or damage to property.
Precautions
The bracket for wall mounting uses the television's installation time, which depends on the wall material and the wall's condition. After removing the wall-mount bracket, holes will remain in the wall. Do not use the wall-mount bracket in places with mechanical vibrations.
Do not install the wall-mount bracket on walls where the edges of the television will protrude beyond the edges of the wall.
Do not install the wall-mount bracket on such wall surfaces (for example, on columns) where the edges of the television will protrude beyond the edges of the wall surface. Hitting the protruding edges of the television may cause injury or property damage.
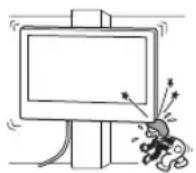
Do not install the television under or over an air conditioner.
If the television is exposed to direct airflow from an air conditioner for a long period of time, it may cause a fire, electric shock, or malfunction of the television.
Be sure to securely attach the wall-mount bracket to the wall, following the instructions provided in this manual.
If any of the screws are loose or missing, the wall-mount bracket may fall and cause injury or property damage. When performing installation, always use screws that match the wall material, securely install the device, using at least four 8 mm screws (or equivalent).
Be sure to use the screws and parts included in the kit for mounting, and strictly follow the instructions provided in this installation manual. If other mounting materials were used during installation, the television may fall and be damaged or cause injury.
Be sure to perform the assembly of the bracket, exactly following the instructions provided in this installation manual.
If any of the screws are loose or missing, the television may fall and be damaged or cause injury.
Securely tighten the screws in the designated mounting holes.
Otherwise, the television may fall and be damaged or cause injury.
Make sure that the television is not subjected to impacts during installation.
Impacts may cause the television to fall and be damaged. This may lead to injury.
Install the television on the wall only if it is flat and positioned at a right angle to the floor.
In any case, the TV may fall and cause injury.
After installation, ensure that the cables are positioned safely.
Cables that present a tripping hazard may cause injury or damage to the TV.
Do not allow the power cord and connecting cables to become tangled.
If the power cord or connecting cables are pinched between the device and the wall, or if they are bent or twisted, the insulation of the internal wires may be damaged, which could lead to a short circuit or break. This can cause a fire or electric shock.
Screws for mounting the bracket for wall installation to the wall are not included in the package.
When mounting the bracket for wall installation, use screws that match the material and structure of the wall.
The TV should be stored in its cardboard packaging in a dark, dry, clean, and well-ventilated place, away from direct sunlight. Storage temperature: from -20°C to +60°C. Storage humidity: <80%.
Contents
Preparation for installation. 6
Checking the package contents 6
Determining the installation method 7
Wall-mounted installation 9
Preparation for TV installation...10
KD-85/75XG85□□,KD-75XG87□□ 10
KD-65/55XG87□□, KD-65/55XG85□□.12
Installing the TV on a wall.14
KD-85/75XG85□□, KD-75XG87□□ 14
KD-65/55XG87□□, KD-65/55XG85□□ 16
Checking the installation 19
Information 19
Technical specifications. 19
4 Determine the location of the screws for the base installation (20) A.
See specifications on p. 19. When selecting item 2-a, use the position of the base holes ①.
WARNING
The wall on which the TV is to be installed must support a weight exceeding the weight of the TV, at least four times (to find out the weight of the TV, see the reference guide.)
- Determine the strength of the wall on which the TV will be installed. If necessary, reinforce the wall.
Installing the base on the wall
- Use four or more screws with a diameter of 8 mm or equivalent (not included in the supply). Insert four screws into the holes of the base ①, and attach it to the base (20) A (only 2-a).
- Install the base (20) A horizontally on the wall.
1 Mark the installation location on the wall.
- Use adhesive tape (not supplied) to mark the location for the TV next to the stand and the stand adapter. See the following table.
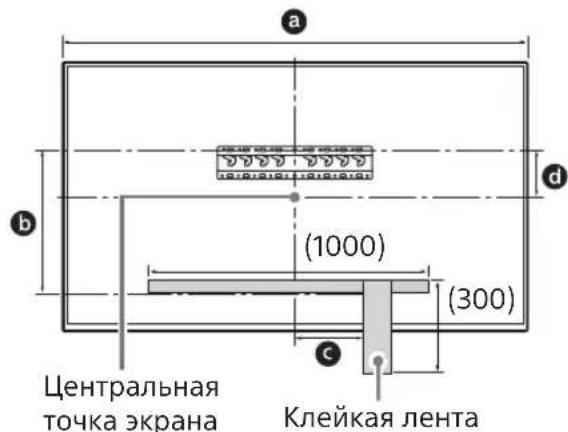
Unit of measure: mm
- Remove one side of the tabletop stand. Hold the tabletop stand firmly with both hands while others lift the TV.
KD-85XG85□□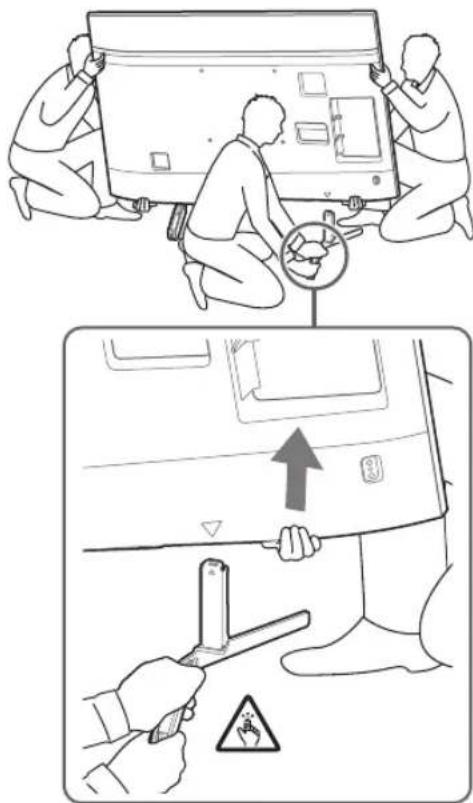
KD-75XG87□□, KD-75XG85□□
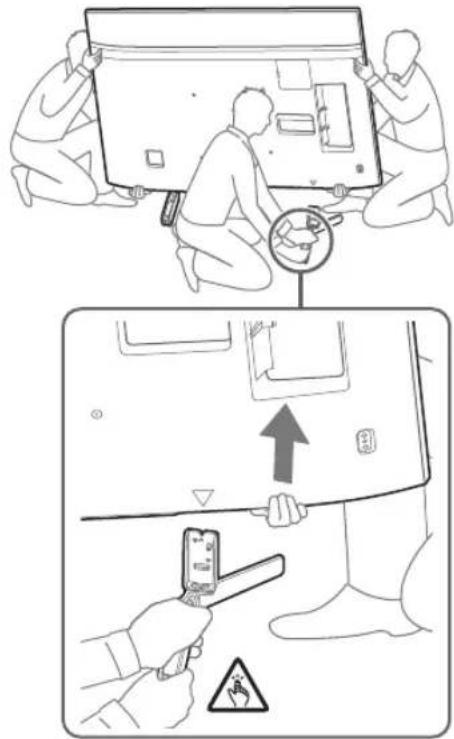
- Repeat the procedure and remove the other side of the tabletop stand.
Caution
- To detach the tabletop stand, at least two people are required. - Be careful not to use excessive force when detaching the tabletop stand from the TV, as this may cause the TV to fall and result in injury or damage to the TV. - Be careful when handling the tabletop stand to prevent damage to the TV. - Be careful when lifting the TV, as the tabletop stand may detach and fall, which could cause injury. - Be careful when detaching the tabletop stand from the TV to avoid tipping over the device and damaging the surface on which the TV is placed.
KD-65/55XG87□□
KD-65/55XG85□
1 Remove the screws from the rear panel of the TV.
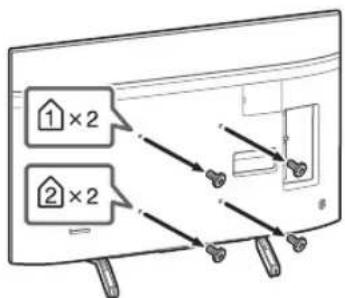
2 Attach the mounting brackets for the tabletop stand. Perform a check of the mounting brackets according to the "Wall-Mount Bracket SU-WL450" section in the "Checking the Accessories" section on page 6.
Caution
- Tighten the mounting brackets securely with screws. - When using an electric screwdriver, set the tightening torque to approximately 1.5 N·m {15 kgf·cm}. Store used and unused parts in a safe place for future use. Keep this instruction manual for future reference.
Wall Mounting (2-a)
Tabletop Stand (2-b)
Note
- When installing the TV, some of its connectors may become inaccessible.
3 Connect the necessary cables to the TV.
Before mounting the TV on the wall, be sure to connect the cables. After mounting the TV, connecting the cables will be impossible.
See the user manual supplied with the TV.
Note
- For routing cables through a wall-mounted installation. - Before mounting the device on the wall, connect the cables so that they do not interfere.
4 Detach the tabletop stand from the TV.
- Pull out one side of the tabletop stand. Firmly hold the tabletop stand with both hands while others lift the TV.
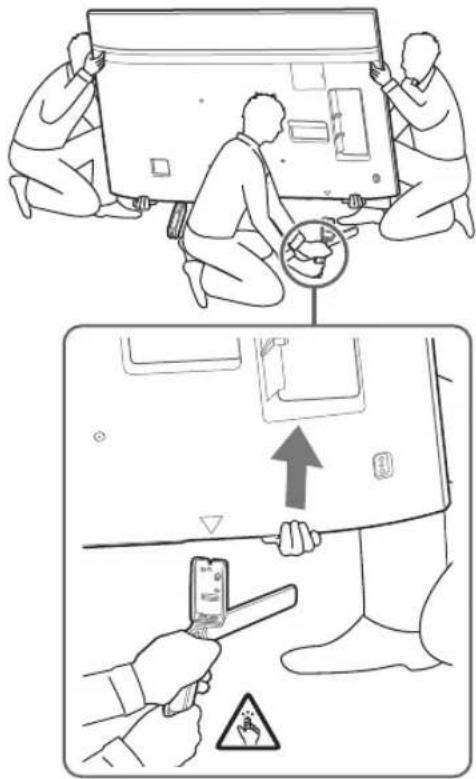
Repeat the same action and pull out the other side of the tabletop stand.
Note
- To detach the tabletop stand, at least three people are required. - Be careful not to use excessive force when detaching the tabletop stand from the TV, as this may cause damage to the TV and injury to persons. - Be careful when handling the tabletop stand to prevent damage to the TV. - Be careful when lifting the TV, as the tabletop stand may detach and fall, which could cause injury. - Be careful when detaching the tabletop stand from the TV to avoid dropping the device and damaging the surface on which the TV is placed.
Wall Mounting the TV
KD-85/75XG85□□, KD-75XG87□□
1 Place the TV on the base or table-top stand.
For the location of the hooks and the base or table-top stand, see step 3 in the section "Determining the installation position" on page 8. - Make sure that the rear panel of the TV is in contact with the base or table-top stand when holding the TV.
Note
- Hold the TV with both hands and make sure that the center and bottom of the TV are level with the floor. - The TV should be carried by three people: the person in front of the TV should guide the others to place the TV in the desired position.
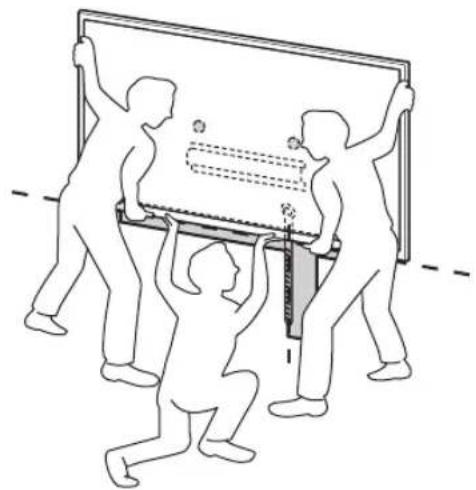
-When installing the TV on a wall, be careful, especially for the person supporting the TV from below, as it may fall and cause serious injury or even death.
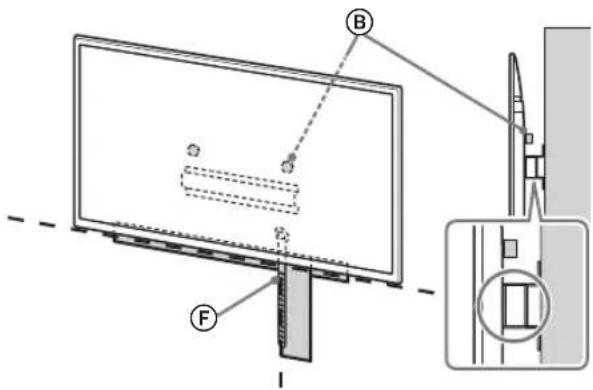
2 Install the TV on the base or table-top stand.
- Carefully lower the TV and hook the hooks (B) installed on the rear panel of the monitor onto the base or table-top stand, following the shape of the holes.
- After installing the TV on the wall, make sure that the hooks are securely fixed in the base or table-top stand. Gently release both hands and make sure that the TV is securely installed.
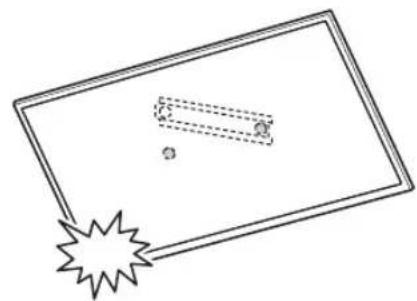
- After installing the TV on the wall, remove the adhesive tape or similar from the wall.
2-a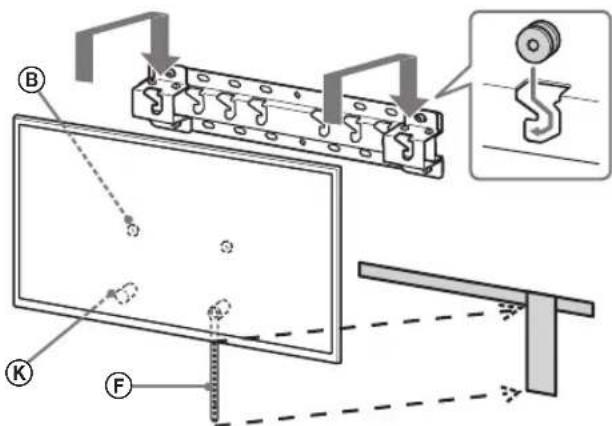
↓
↓

↓
2-b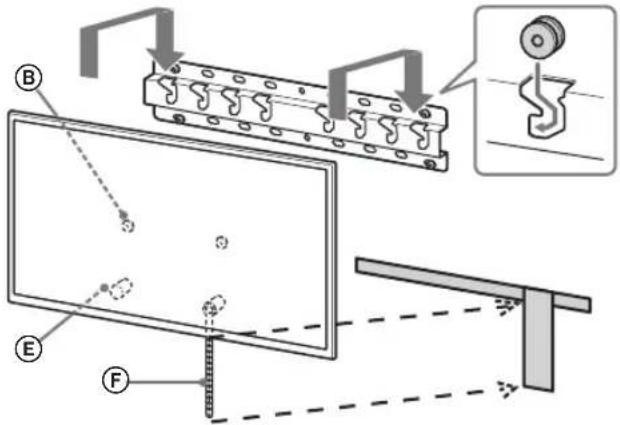
- Ensure that the TV is held by two or more people (for TVs with a 75-inch screen or larger, hold by three or more people).
To prevent the TV from falling over.
- Remove the stand and securely attach it to the wall.
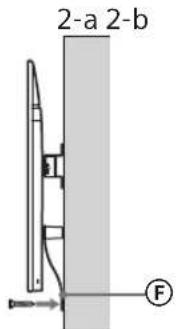
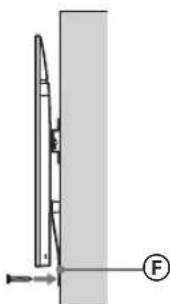
- Use screws with a diameter of 5 mm or their equivalent (not supplied).
Note
Slightly tilt the TV towards you to make sure it does not tip forward. If there is any wobble, the TV is not secured properly, and the strap should be secured more firmly.
1. Lift the TV.
The location of the holes for attaching the base or the base adapter is shown in the table in Step 3 in the section "Determining the mounting location" on page 8. - Make sure that the rear panel of the TV is in contact with the base or the base adapter while holding the TV.
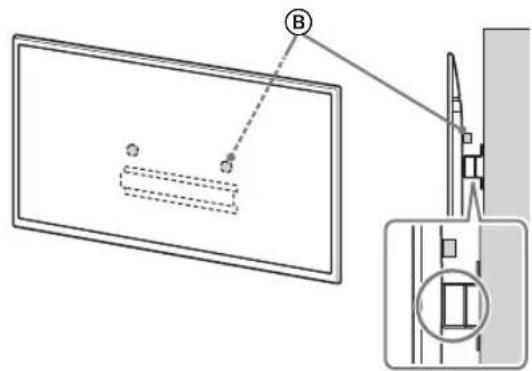
Note
- Hold the TV securely with both hands.
2. Place the TV on the base or the base adapter.
- Place the TV on the wall bracket (8) installed on the back of the monitor, based on the base adapter, following the shape of the holes.
- After installing the TV on the wall, make sure that the brackets are securely fixed in the base or base adapter. Slowly remove both hands and make sure the TV is securely installed.
2-a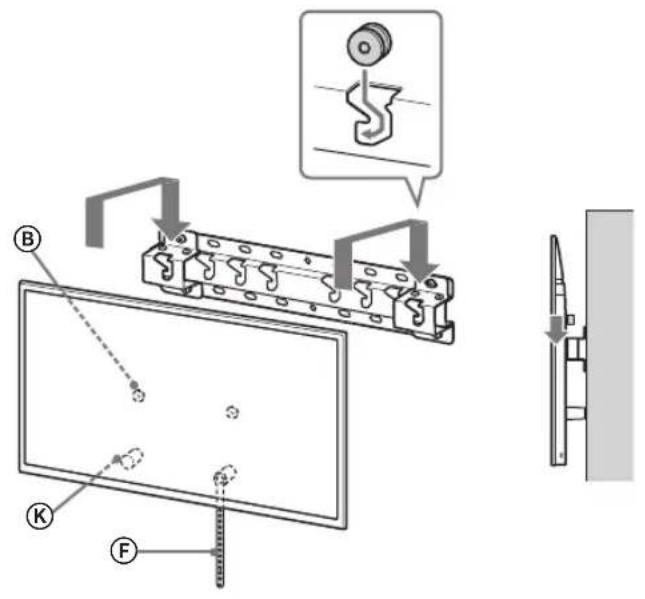
2-b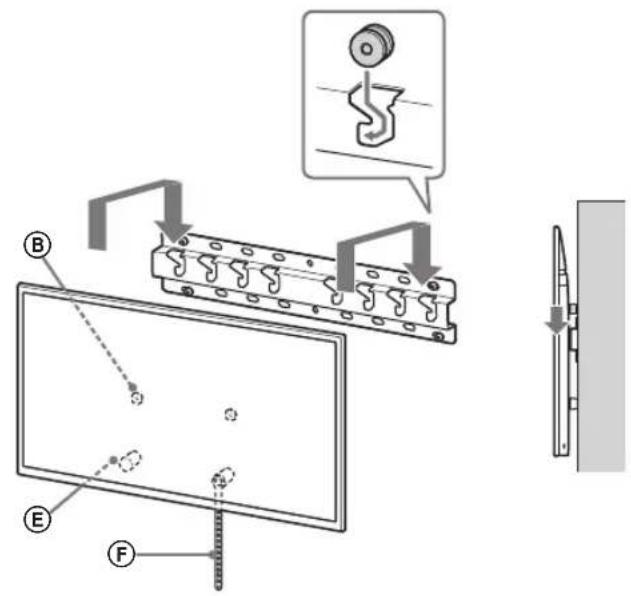
↓
↓
RU
WARNING
- Make sure that the TV is held by two or more people (three or more people for TVs with a screen size of 75 inches or more) when moving it.
3. Prevent the lower part of the TV from shifting.
- Remove the tape F and securely attach it to the wall.
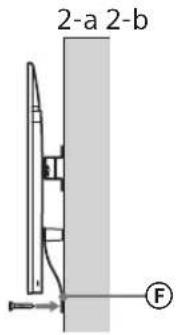
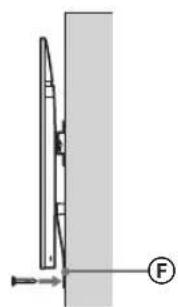
- Use a screw with a diameter of 5 mm or its equivalent (not supplied).
Note
Gently pull the lower part of the TV towards you to make sure it does not move forward. If there is any movement, the TV is not properly secured, and tape F should be attached more securely.
- The brackets ⑧ are securely mounted on the base or base adapter.
- The cable is not twisted or tangled.
- The tape is securely attached without slack.
WARNING
- Incorrect cable routing, etc., can lead to fire or electric shock due to a short circuit. To ensure safety, make sure all installation steps are completed.
Information
To remove the TV, perform the procedure described above in reverse order.
Caution
Make sure that the monitor is held by two or more people (for TVs with a screen size of 75 inches or more, three or more people) when removing it.
Specifications
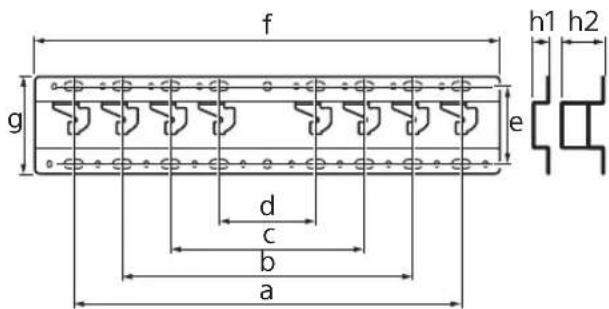
Dimensions: (approx.) [mm]
Do not unscrew the screws used for TV mounting.
If you do, the TV may fall and cause serious injury or damage.
Do not remove the bracket parts for partial mounting.
If you do, the bracket for partial mounting may fall and cause serious injury or damage.
Do not install any other devices other than the specified product.
This bracket is intended for permanent mounting only for use with the specified product. If other parts are installed, besides those specified, they may fall and cause serious injury or even death.
Do not use the bracket for permanent mounting of anything other than a television. Do not tilt the television up/down or left/right.
If you do, the television may fall and cause serious injury or even death.
Do not place the television on the bracket or lean it against it.
Do not place the television on the bracket or lean it against it, as it may fall on you and cause serious injury.
WARNING
If the following safety precautions are not observed, it may result in serious injury or death.
During cleaning or maintenance of the product, do not apply excessive force to it.
Do not apply excessive force to the top of the television. If you do, the television may fall and cause serious injury or death.
Safety Precautions
If the television, mounted with the bracket for permanent mounting, will be used for a long period of time, depending on the material of the wall, the wall surface behind the television may discolor or the wall may peel off.
Permanent mounting bracket installation: If the bracket is not installed correctly, it may fall. - Do not use the bracket for permanent mounting in places where there is mechanical vibration.
Installing the bracket for permanent mounting
Preparation for installation 5
Checking the parts 5
__SUPPIMER__
Preparing for TV installation......9 KD-85/75XG85□□,KD-75XG87□□ KD-65/55XG87□□,KD-65/55XG85□□ 11
Installing the TV on the wall.13 KD-85/75XG85□□,KD-75XG87□□ 13 KD-65/55XG87□□,KD-65/55XG85□□ 15
Checking after installation is complete 18 Additional information 18
Technical specifications 18
Installing the TV on the wall
The installation procedure depends on the TV model.
To install the TV on the wall, use the SU-WL450 wall-mount bracket.
Supplied accessories
Keep the screws out of reach of children.
Preparation
Installation
- Before installation, carefully read the TV manual and setup guide. Before assembling, make sure you have a Phillips screwdriver that fits the screws.
- Check the installation location of the TV. Prepare four screws with a diameter of 8 mm and one screw with a diameter of 5 mm or equivalent (not included in the package). Choose the screws according to the material of the wall.
Item details
Remains 3 SU-WL450
- Check that all parts are included in the delivery set.
| AБаза(20)(1)ВШК | В(2) |
| CГВИNTPSW6x20(4) | DГВИNTPSW4x20i3Втулков(2) |
| EПрокадka(20)(2) | FРемиь(1) |
| GВтулka(20)(M4)(2) | HГВИNTPSW4x20(2) |
| IПерекдддддддддддддддддддддддддддддддддддддддддддддддддддддддддддддддддддддддддддддддддддддддддддддддддддд徳баши(2) | JГВИNTPSW4x10(8) |
| KПрокадka(60)(2) | LГВИNTPSW6x50(2) |
| MВтулka(M4)(2) | NГВИNTPSW4x50(2) |
Installation location
1 Determine the installation location.
Make sure the wall has sufficient dimensions and can support the weight, which is significantly greater than the weight of the TV.
If the TV is to be installed on a wall, the necessary information can be found in the table below. The weight of the TV can be found in the TV's manual.
Standard mounting
Center of the screen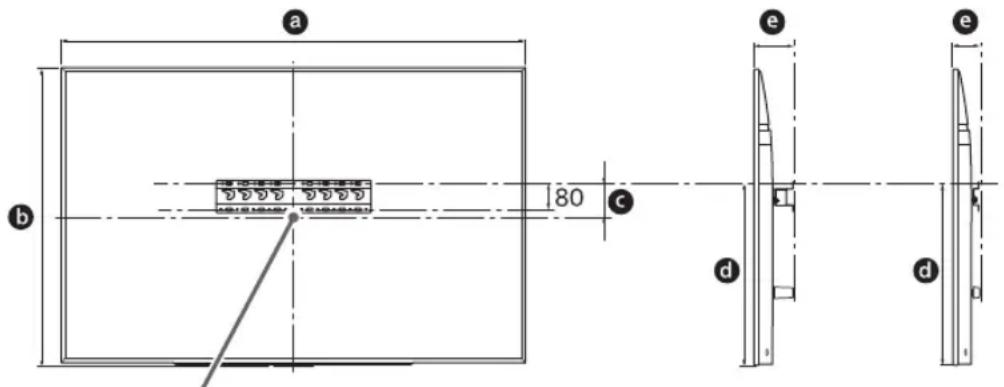
Unit: mm
- If the 2nd hole is selected, access to the rear panel will be restricted.
From the installation position, the base will be guided by the table below. If the 2nd is selected, skip this step.
| Назва модени Розташуванни raков | |
| KD-85XG85□□ | a |
| KD-75XG87□□ | |
| KD-75XG85□□ | |
| KD-65XG87□□ | b |
| KD-65XG85□□ | |
| KD-55XG87□□ | |
| KD-55XG85□□ | |
Determine the wall strength where the TV is installed. If necessary, reinforce the wall with appropriate means.
Installation on a wall
Use straight screws with a diameter of 8 mm or equivalent (not included in the delivery set). Screw the screws into the holes on the rear of the base ① with the base (20) A (only 2nd). Install the base (20) A horizontally on the wall.
Preparing the TV for installation
User manual for installation and setup.
KD-85/75XG85□□,KD-75XG87□□
1. Unpack the TV and place it on a flat surface.
Using a screwdriver or similar tool (not included in the package), remove the stand or the stand adapter from the TV. See the following table.
Unit of measurement: mm
Wall-mount holes (2-b)
Screw
If using this type of mounting, do not use the holes on the back of the TV separately.
4. Connect the TV to the cable.
Check the cable connections before placing the TV on the wall. After installation, it will be impossible to connect the cables.
User manual for the TV.
Screw
The cable in the wall must be laid by a licensed electrician. - Route the cables without stepping on them or bending them during installation.
5. Attach the wall-mount bracket to the TV.
Turn the stand over and attach it to the TV once. Hold the stand with both hands, being careful not to pinch your fingers against the TV.
KD-85XG85□□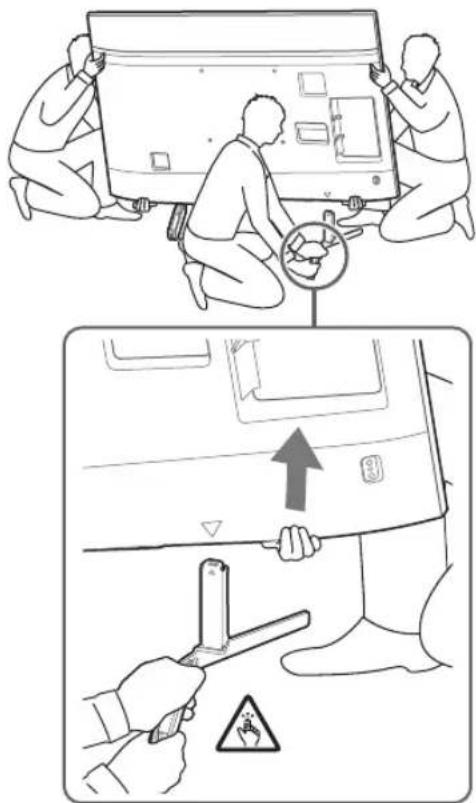
KD-75XG87□□, KD-75XG85□□
- Repeat the previous step to attach the stand to the other side.
Note
- Be especially careful to avoid pinching your fingers when attaching the stand to the TV. Be careful not to use excessive force, as this could damage the TV or cause personal injury.
- Carefully turn the TV over so as not to drop it. Lift the TV carefully, as the attached stand may tip over and cause injury.
- Be extremely careful when removing the stand from the TV. If the stand falls, it may damage the surface on which the TV is placed.
KD-65/55XG87□□
KD-65/55XG85□□
1 Remove the screws from the rear panel of the TV.
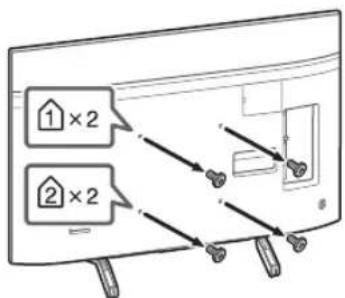
2 Secure the wall-mount bracket's mounting hooks. Check the presence of all mounting hooks using the list "Supplied with SU-WL450" in the "Checking the Parts" section on page 5.
Note
Firmly secure the mounting hooks with the screws. For electric screwdrivers, set the torque to approximately 1.5 N·m {15 kgf·cm}. -Be sure to keep unused components in a safe place for future use. Keep these instructions for future reference.
Standard mounting (2-a)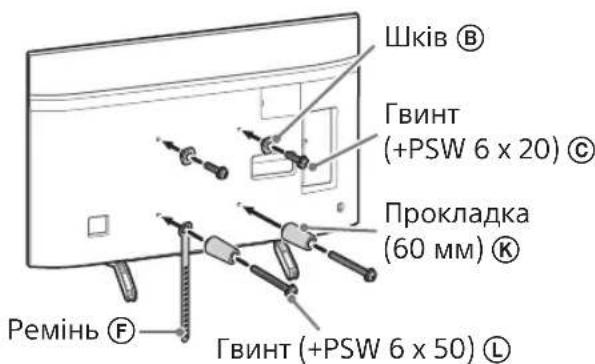
To attach the bracket (2-b)
Note
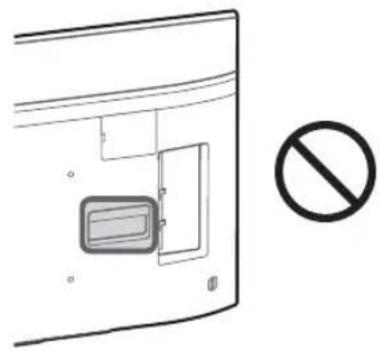
When using this type of bracket, you cannot use separate screws for the rear of the TV.
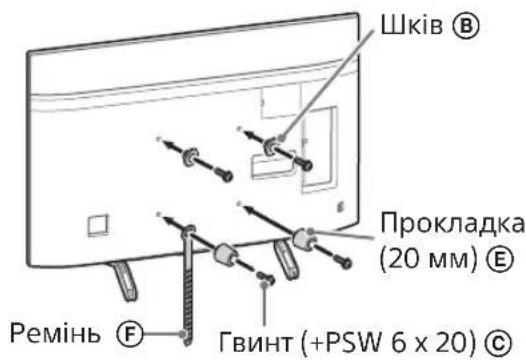
Connect the cables to the TV before mounting.
Check the cable connections before mounting the TV on the wall. After mounting the TV, it will be impossible to connect the cables. Note: Connect to the TV.
Note
The cables must be routed properly. - Route the cables without stepping on them, before mounting on the wall.
4 Remove the stand from the TV.
Remove one side of the stand at a time. Hold the stand firmly with both hands, while another person removes the TV.
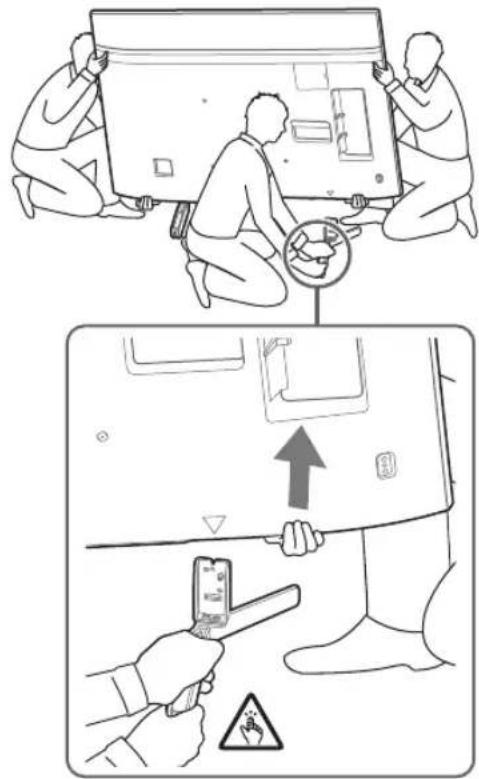
- Repeat the previous step and remove the other side of the stand.
Note
- Three people are required to remove the stand from the TV. Be careful when applying force to remove the stand from the TV, as it may cause the TV to fall and result in injury or damage to the TV. - Carefully handle the stand to avoid damaging the TV. Lift the TV carefully, as the stand may tip over and cause injury.
- Be careful when removing the stand from the TV. If the stand falls, it may damage the surface on which the TV is placed.
Mounting the TV on the wall
KD-85/75XG85□□,KD-75XG87□□
- Place the TV on the base or on the base adapter, see Table 1a and step 3 in the section "Determining the installation location" on page 7. Hold the TV, make sure the TV feet are touching the base or the base adapter.
Warning
Hold the TV with both hands. The feet on the lower part of the TV must be aligned with the magnetic strip. - Hold the TV upright. What is located behind the TV should give instructions to others, to avoid the TV falling.
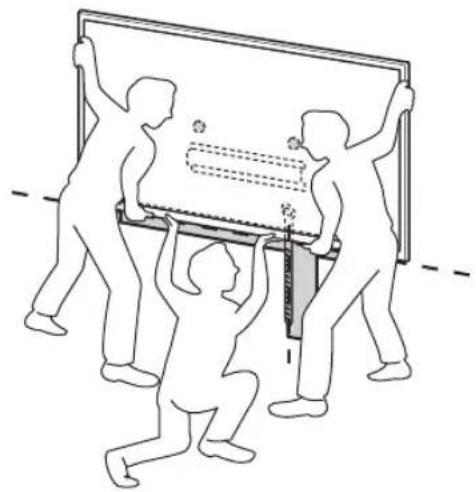
- Be careful when installing the TV on a stand. The stand must be held by the person who holds the TV from below. The TV screen can cause serious injuries and damage.
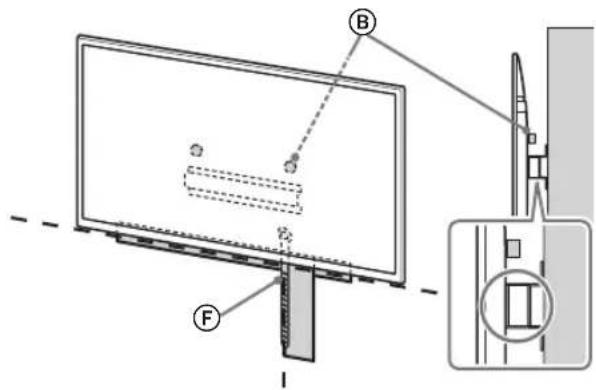
2 Install the TV on the base or the base adapter.
- Carefully lower the TV and the feet ⑧, attached to the back of the TV, onto the base or the base adapter (they must match the holes).
- After installing the TV on the stand, make sure that the feet are securely locked in the base or in the base adapter.
- Gently release the TV with both hands to check that it does not fall.
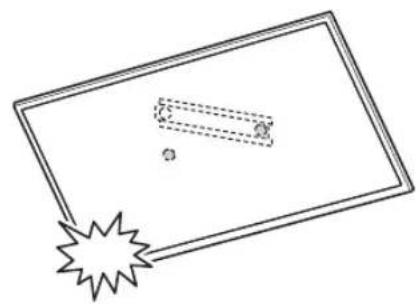
- After installing the TV on the stand, remove the magnetic strip (or similar material) from the stand.
2-a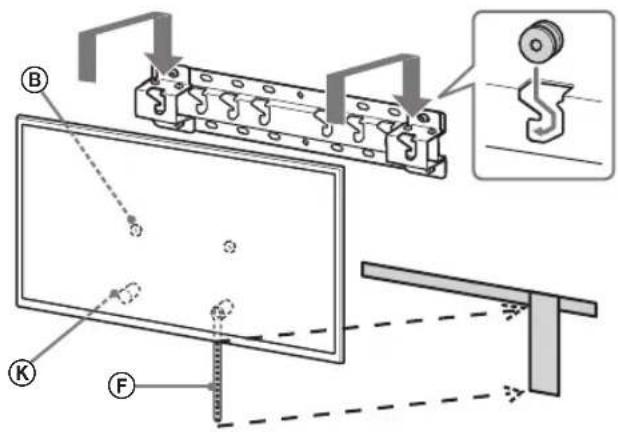



2-b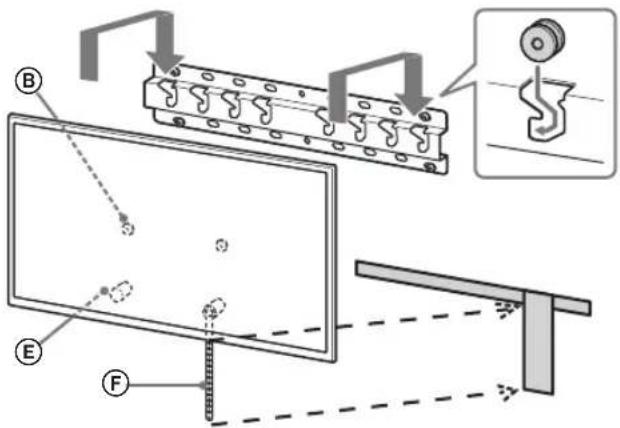



WARNING
Wall mounting (2-b)
Markus.
Installation of the unit (2-b)
Mark.
Mass (base only): (approx.) [kg]
0.8
Do not install the unit in a place where it may be exposed to oil or steam.
The unit should be installed on a wall. If the wall is not strong enough, the unit may fall and cause injury or damage.
Mounting brackets
When installing the mounting brackets, make sure they are securely attached. If the wall material is not strong enough, the unit may fall and cause injury or damage. After installing the brackets, check that they are firmly fixed. If the brackets are not properly installed, they may fall.
Installing the mounting brackets
Do not install the brackets by yourself.
If you install the brackets yourself, they may fall or cause injury. This is dangerous.
The brackets should be installed perpendicular to the wall and floor.
If the wall is not strong enough, the brackets may fall or cause injury.
After the brackets are properly installed, securely fasten the cables.
If there are any other objects or obstacles, they may interfere with the installation.
The rated current of the product must be connected to the power supply.
If the rated current of the product is not connected to the power supply, or if the power cord is damaged or the plug is broken, the two terminals may be short-circuited, causing a short circuit or electric shock. It is possible to cause a fire or electric shock.
Do not use the product if the power cord is damaged.
When connecting the power cord, ensure that the plug is fully inserted into the socket.
Table of Contents
Installation 5
Identifying the installation location 6
Installing the TV on the wall 8
Installing the TV on the wall 9 KD-85/75XG85□□, KD-75XG87□□. 9 KD-65/55XG87□□, KD-65/55XG85□□. 11
Installing the TV on the wall 13 KD-85/75XG85□□, KD-75XG87□□ 13 KD-65/55XG87□□, KD-65/55XG85□□ 15
Troubleshooting 18 Basic operations 18
Specifications 18
Installing the TV on the wall
The procedure for installing the TV on the wall is described below. Use the SU-WL450 wall-mount bracket to install the TV on the wall.
Note
- AnbIHrAn 6paHdIaIapDbI 6anaIapdaH anbc, Kayinc3 opbIHra KoIbHbI3.
Ophatyfa daHbIHdbIK
OpHaTy aIbHda Td aHbIKaMaJIbIK HcayIbIFbIH XHe opHaTy HcKayIbIFbIH aIbHbI3. Kypactbipmac 6ypbH 6paHdaapra cai Keletin Phillips 6ypaybiu 60nyi kepek. TeJeIaIap 6ekitineiH opbIHbI aHbIKTaHbI3. Диамет pi 8 MM 60nataBH Tep Hemece OdaH da KEN 6ypaHaJa XHe 5 MM-Nik Hemece YKcac (6epiImereH) 6ypaHa DaBbIHdAhl3. Ka6bipraHbH MaTePnaJIbHa cai KeJenTin 6ypaHaJaIapDbI TaHaHbI3.
БелшекердTekcepy
SU-WL450 KypbIrfbcBImeH 6epinei
BapIbIK 6eJIWeKTePdIH 6ap eKeHdiIRiH TeKcePiH3.
| A Heri3 (20) (1) B Terepušík (2) | |
| ◎ PSW 6x20 (4)◎ TbIFbIH PSW 4x20 (2) | |
| E Apaŋbɪk (20) (2) E | Bénpáík (1) |
| ◎ TbIFbɪH (20) (M4) (2) | H PSW 4x20 (2) |
| ① Herižrì aðanptep (2) | J PSW 4x10 (8) |
| K Apaŋbɪk (60) (2) L | PSW 6x50 (2) |
| M TbIFbɪN (M4) (2) N | PSW 4x50 (2) |
OphaTbIaTbIH opbIHdbi aHbIKtay
1 OpHaTbIaTbIH opbIHdbI aHbIKTaHbI3.
Ka6bipfada TД ywiH kETkiniKti opbIH 6ap ekeHH kHe TД-DbIH KEMiHde TepT ece aybIpIbIFbIH KeTepe aNaTBHaRaH TeKcepH3.
TeeIuapbI Ka6bIprara opHaTy TypaIbKeNeci KcTeHi KapaHb3. TeeIuapdbIH caMaFbIH TeKcepy ysiH TeeIuapdbIH AHykTaMaNbIK HycKay 6JIIMH KapaHb3.
CTaHdapTTbI opHaTy KaKbIH opHaTy 3KpaH opTacbIHbIH HykTeci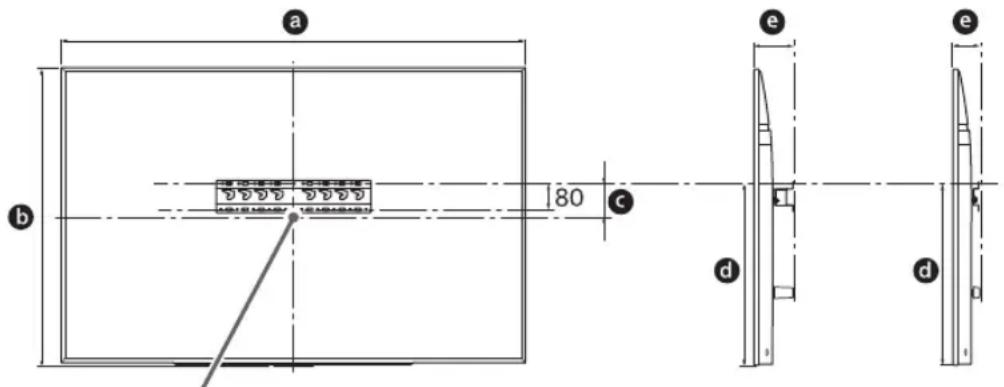
Kypan:MM
| Ynliri hemipi | экразецемерi | экразецьим элшемi | Орнату узbingьгы | ||
| a | b | c | d | ||
| Стондантсы орнату | Жа KBIN орнату | ||||
| KD-85XG85□□ | 1909 | 251 | 803 | 142 | 100 |
| KD-75XG87□□ | 1673 | 963 | 107 | 595 | 116 75 |
| KD-75XG85□□ | |||||
| KD-65XG87□□ | 1450 | 836 | 99 | 523 | 115 73 |
| KD-65XG85□□ | |||||
| KD-55XG87□□ | 1231 | 713 | 106 | 468 | 115 73 |
| KD-55XG85□□ | |||||
HycKay
KecTeDipeKeTep opHatyra 6aIaNahbictb a3dAn e3eweeneHyi MymKin. TД ka6bIPfA OFOPaTBINFaHda TД XOFAPfBI 6eNiri a3d an aIFA eHKeEJI.
Tepeiap MeH Te6e XaHe Ka6bipFaHbIH WbIFbIKbI 6eNikTepi apacbIHda TEmHe KepcetinreHde aWbIK opbIH KaIDbIHbI3.
Connect the Kip MeH WAnHHK HnHaNbyH 6oNdbpMay yuH:
- Do not install the device near heat sources, hot surfaces, or open flames.
- Do not place the device on soft surfaces, sand, or in a cabinet. Do not cover the device with curtains, newspapers, or other elements. Install the device in a well-ventilated area.
The device is blocked.
Instruction
The cables should not be bent sharply; instead, they should be laid with a smooth bend.
To prevent the cables from breaking, connect them to the main (20) A, main filter ① and auxiliary (20) E, auxiliary (60) K terminals as shown in the diagram.
2. Select the installation method. If the device is to be mounted on a wall, choose the appropriate installation kit.
2-a Standard installation 2-b Wall installation
Refer to step 1.
WARNING
-2-b When wall-mounted, the device may become hot.
3. Refer to the section on mounting the main filter. If wall-mounted, perform this step and then continue.
| Yürgi Hämipi İnmek Öpnbı | |
| KD-85XG85☐☐ | |
| KD-75XG87☐☐ | a |
| KD-75XG85☐☐ | |
| KD-65XG87☐☐ | |
| KD-65XG85☐☐ | b |
| KD-55XG87☐☐ | |
| KD-55XG85☐☐ | |
Mount the filter ① to the main (PSW 4x10) ② using the screws provided in step 2-a (20) A.
4. Check the installation location of the brackets (20).
Refer to page 18. On the second attempt, install the brackets (20) in the correct position.
REMOVAL
To remove the TV from the wall mount, first remove the TV (see the removal instructions for the TV).
Check that the TV is securely attached. If necessary, tighten the attachment.
Installation of the wall mount
- Install the brackets (20) with a diameter of 8 mm or larger (provided). Attach the brackets (20) to the base of the TV (only 2). Install the brackets (20) onto the wall mount.
TV installation
See the installation instructions.
KD-85/75XG85□□, KD-75XG87□□
1. Mark the installation location on the wall.
To determine the location of the TV on the base or base brackets, use the included template, i.e., (provided together). See the next page.
Unit: mm
| Yntri hemipi | Белriney Узblдыflы | Зкpen opТасblнIH Елшемi | ||
| a | b | c | d | |
| KD-85XG85□□ | 1909 | 683 | 200 | 251 |
| KD-75XG87□□ | 1673 | 468 | 200 | 107 |
| KD-75XG85□□ | ||||
2. Remove the brackets from the back of the TV.
3. To install the TV on the wall mount, use the included screws. See the "Screw removal" section on page 5-6 for the "SU-WL450" bracket installation.
HycKay
-6ekity 6eIeKTePi 6ypaHdAnap apkblbMbIKtan 6ekit13. 3NeKtp 6bybIbTb naIaIaHaHda, aHany 15 KkCm opHaTbHb3. - NaIaHaHbIraH HeMeCe naIaHaHbIMarHaB6JIeKTeP anDarbl KOnDaHbc yWIn Kayinc3 opBHaKaTaNFaHbIH TeKcepiH3. Byn HcayNtBbI 60NaaKaTaKapay yWIn CaKaTaHbI3.
CTaHdapTTbI opHaTy (2-a)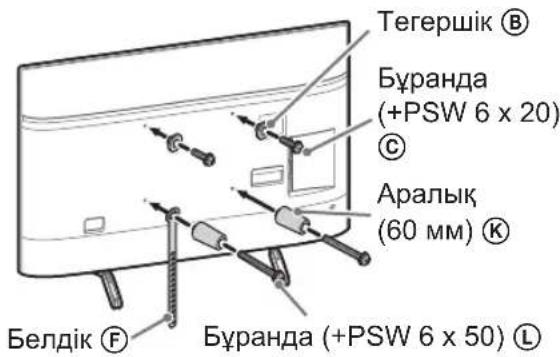
XaKbIH opHaTy (2-b)
HycKay
-5yI opHaty CTNIH naIaIaNHaHaHaTe TENEiIapDbIH apTKbI XaFbIH DaFBI KOHTAKTTap Kei6ipeYIH naIaIaNHa aImaiCb13.
4 KaKeTTi Ka6eNbDi (Ka6eIbepDi) TeJeNIdapra Kajray.
Tepeiapbl Ka6bipfara opHaTnac 6ypbH Ka6ebepin XaJraHraHBIn TEKcepH3. Tepeiapbl OPHaTKaHHaN KeiH Ka6ebepdi XaJray MyMKIN 6oJMaNbbl. TepeiapMeH 6epineTIn AHbIKtAmabIK Hcyckay 6eimH kapaHbI3.
HycKay
Ka6bipfara Ka6en bkypri3ydi nuehen3nncb6ap Meepirepre 6epiH3. Ka6bipfaraMOHTaXday aIbIHda,6acBIn Ketney yuH, XanFactbpyu bKa6enbepdi KocbHb3.
5 TД-дан YcteI TyfblpH aXbIpaTbIHbI3.
- YcTeJin yCTiHri TaKTaBbHbH 6ip Jxak 6aFaHaCbH 6ipDeH aNbIn TAcTaHbI3. BaCa aAamdap TeJeNDapDbI KeTepeRHe We YcTeJin YcTIHri TaKTaBbHbH 6aFaHaCbH KaTbI YCTaHbI3.
KD-85XG85□□
KD-75XG87□□,KD-75XG85□□
AnbHbKaamMbKaTaNbI3XHe yTeiINyCTIHrTaKTabHBnEkiHwJxak 6araHaacbH anbIn TaTaHbI3.
- The device must be connected to a power source with a voltage of 220-240 V. The device must be connected to a grounded socket and must not be used without grounding. To avoid electric shock, the device must be disconnected from the power source before any maintenance. If the device is not working properly, it must be disconnected from the power source and sent to a service center for repair. The device must be disconnected from the power source before cleaning and maintenance.
1. Remove the screws on the back of the device.
2. Carefully remove the cover by lifting it. See the "Removing the Cover" section in the "SU-WL450 Assembly" manual for instructions.
Remove the cover by pulling it towards you. When disconnecting the electrical connections, note the positions. Connect the wires to the correct terminals as indicated. Keep this manual for future reference.
Standard installation (2-a)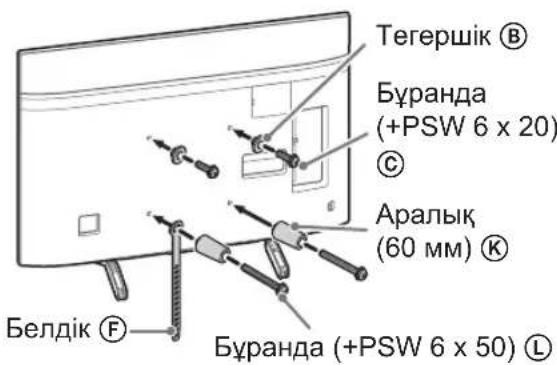
Reversed installation (2-b)
When installing, do not touch the contacts on the back of the device.
3. Connect the cable(s) to the device.
Check that the cables are correctly connected to the device. The cables must not be pulled after installation. Refer to the instructions provided with the device.
If the cable is too short, extend it. When installing, do not bend or damage the cables.
4. Connect the device to the power source.
- We have set up a single balance for the upper and lower parts. We have set up the balance of the upper and lower parts according to the requirements of the people.
We have taken the data and set up the balance of the upper and lower parts.
Instruction
To avoid damage to the upper part and to prevent any person from being injured, you must not use the upper part in cases of emergency. You must not use the upper part to lift people, animals, or objects that are heavy or have a risk of falling. If you need to lift people, you must use the upper part with caution, and it is possible to lift them safely. You must not use the upper part to lift people or to lift objects that are not properly secured, and you must not use it to lift objects that are not properly attached.
Installing the TV
KD-85/75XG85□□,KD-75XG87□□
1 Connect the TV.
For the main or sub terminals, see step 3 of "Identifying the installation location" in the installation manual. When installing the TV, make sure that the TV is not tilted to the main or sub terminals.
Instruction
When installing the TV with the stand, make sure that the TV is placed on a flat surface. The TV must be installed by two or more people, and you must be careful not to drop the TV.
When installing the TV on the wall, make sure that the TV is not tilted (for example, the TV is not tilted forward), and you must use the TV with the stand, and it is possible to install it safely.
2 Install the TV on the main or sub terminals.
When installing the TV on the wall, make sure that the TV is not tilted, and you must install the TV on the main or sub terminals, and you must use the screws provided. Make sure that the screws are securely tightened to the main or sub terminals. To avoid damage to the TV, you must use both hands.
After installing the TV on the wall, make sure that the TV is securely attached.
CAUTION
Install the TV on the wall (optional) or on a table (optional). The wall mount is not supplied.
Do not pull out the TV from the table or wall mount.
- Be careful not to pinch your fingers when installing.
- Use screws with a diameter of 5 mm or larger (not supplied).
Note
Before installing the TV, for the TV to be installed, place the TV on a flat surface with the screen facing down. If it is not possible, install the TV carefully.
KD-65/55XG87□□, KD-65/55XG85□□
1 Remove the TV.
For the screws (not supplied) or the screws (not supplied) for the wall mount, refer to the 3rd step of "Identifying the mounting holes" on page 7-8. When installing the TV, do not tighten the screws too much.
Note
Install the TV with two or more people.
2 Mount the TV on the wall or on the table.
Place the TV on a flat surface with the screen facing down, and attach the screws (not supplied) to the wall or the table. After mounting the TV, make sure that the screws are securely tightened. To avoid damaging the TV, do not apply excessive force.
2-a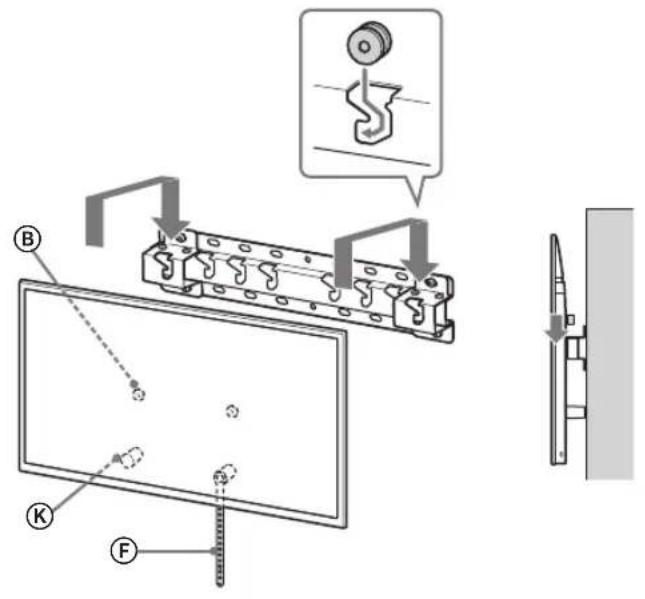
2-b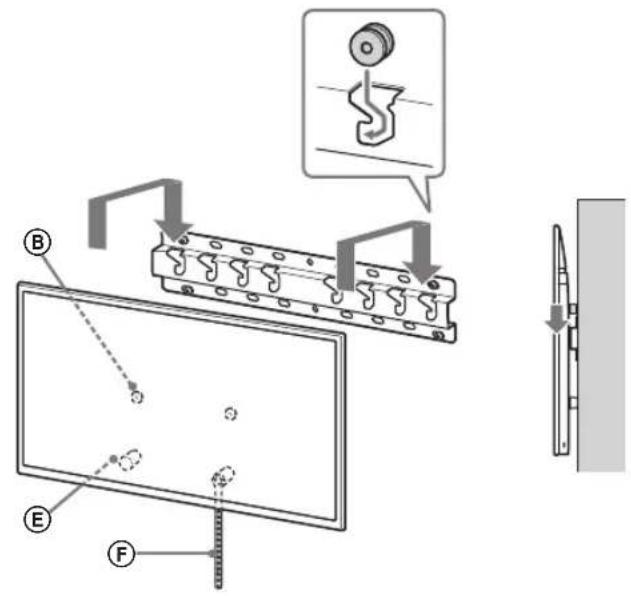
WARNING
Telephone calls to the emergency services (112) and to the national emergency number (101) are free of charge. The text of the law is established.
It is forbidden to make calls that are not related to the emergency services.
- Do not block the device, do not cover it with anything.
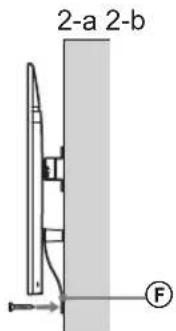
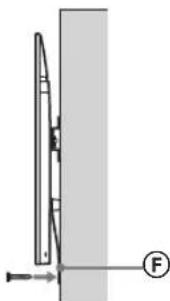
- Diameter 5 mm bolts or screws must be used (provided).
Instructions
Before using the device, read the instructions carefully. If you have any questions, contact the manufacturer or the seller.
Operating instructions
Check the connections.
Make sure that the device is not damaged. - Do not use if the cable is damaged or broken. - Do not block the device (F).
WARNING
Do not use the device if it is damaged or if the cable is damaged. Do not use it if it is not working properly. Do not use it if it has been dropped or damaged. Do not use it if it has been exposed to water.
Other equipment
This manual contains the procedure for using the device.
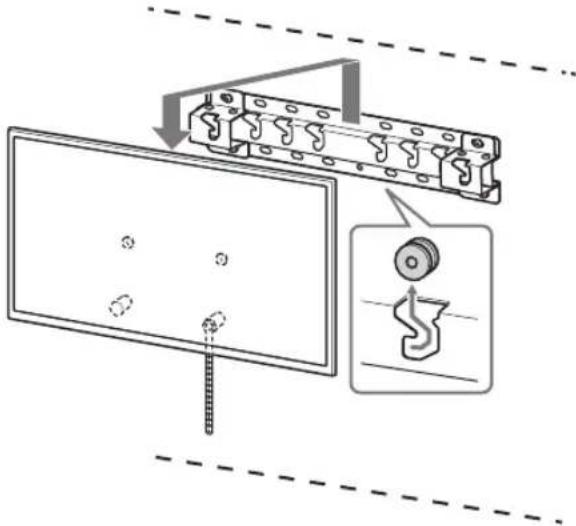
EXPERT
The device is intended for use by persons (including children) with reduced physical, sensory or mental capabilities, or lack of experience and knowledge, unless they have been given supervision or instruction concerning use of the appliance by a person responsible for their safety.
Technical specifications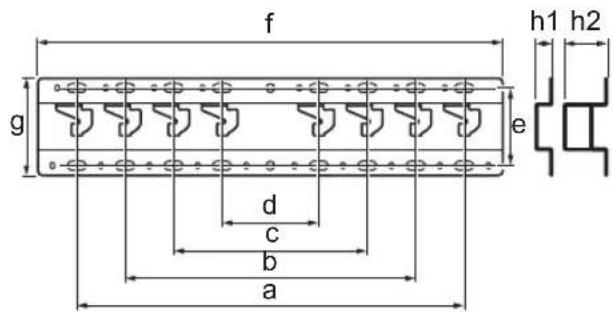
Sony
The Hebrew text appears to be garbled OCR. It may be a fragment of a sentence. Without context, it is unusable. __SUPPRIMER__
177
The Hebrew text appears to be garbled OCR. It may be a fragment of a sentence. Without context, it is unusable. __SUPPRIMER__
The Hebrew text appears to be garbled OCR. It may be a fragment of a sentence. Without context, it is unusable. __SUPPRIMER__
n
The Hebrew text appears to be garbled OCR. It may be a fragment of a sentence. Without context, it is unusable. __SUPPRIMER__
y 107
1000000000000000000000000000000000000000000
NNN 1010777777
The Hebrew text appears to be garbled OCR. It may be a fragment of a sentence. Without context, it is unusable. __SUPPRIMER__
y
yhy npn nny on
7777777777777
ybn by pwn yyn np nnnn nn nn nn nn nn nn nn nn nn nn nn nn nn nn nn nn nn nn nn nn nn nn nn nn nn nn nn nn nn nn nn nn nn nn nn nn nn nn nn nn nn nn nn nn nn nn nn nn nn nn nn nn nn nn nn nn nn nn nn nn nn nn nn nn nn nn nn nn nn nn nn nn nn nn nn nn nn nn nn nn nn
mno 2y
y
mmppb
yipnnn npnnn npn n nn npnnn npnnn npnnn npnnn npnnn npnnn npnnn npnnn npnnn npnnn npnnn npnnn npnnn npnnn npnnn npnnn npnnn npnnn npnnn npnnn npnnn npnnn npnnn npnnn npnnn npnnn npnnn npnnn npnnn npnnn npnnn npnnn npnnn npnnn
Sony
y 1000000000000000000000000000000000000000000000000000000000000000000000
ynnn nn nnnn nn nnnn
nnnnnne nnnnnnnnnnnnnnnnnnnnnnnnnnnnnnnnnnnnnnnnnnnnnnnnnnnnnnnnnnnnnnnnnnnnnnnnnnnnnnnnnnnnnnnnnnnnnnnnnnnnnnnnnnnnnnnnnnnnnnnnnnnnn
in nnnn nn nnnn nn nnnn
NNPnNpN TINN PbynnbOn .y
ybnbynbnon,ynynnON .nybn
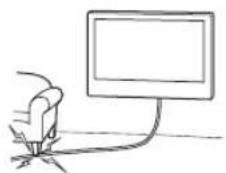
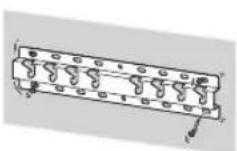
- 6 · 8 9 KD-65/55XG87□11 KD-65/55XG85□
- KD-85/75XG85□□,KD-75XG87□□ KD-65/55XG87□ . KD-65/55XG85□
#
SU-WL450 1
(1)(20) (A)(2) 防火手B
18 18. 0792

PSW 4x20 (2)

(4) PSW 6x20 (5)
(2) (20) nniE1) ny
F
nnuuun nnnn nn nnnn nnnn Su-WL450 npnnnwnn nn
(2)PSW4x20 H

(2) (M4) (20) ⑨

.075v07vnnopnnn

(2) D
①⑧)PSW4x10 ⑥

(2) (60) nnnn
K(2)PSW6x50 L

(2) (M4)
M(2)PSW4x50 N
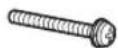
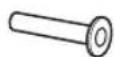
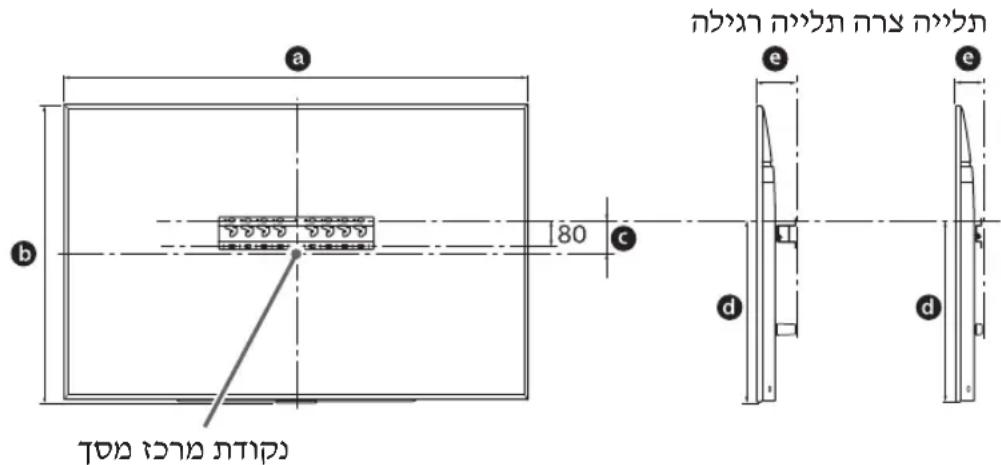
y:n
| e | d | c | b | a | b+1 b+1 | |
| n/a | n/a | |||||
| n/a | n/a | |||||
| 1,9091,097KD-863X4860□ | ||||||
| 1,67396310752511675KD-75XG85□□ | ||||||
| 1,450836952311573KD-65XG87□KD-65XG85□□ | ||||||
| 1,23171310646811573KD-55XG87□KD-55XG85□□ |
2-a
npt nvn 2-b
12y
nnn nn nyn,2-b nna
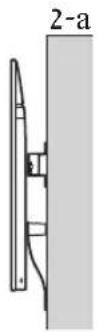
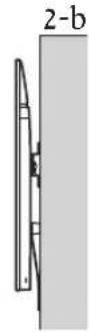
| a | KD-85XG85□□KD-75XG87□□KD-75XG85□□ |
| b | KD-65XG87□□KD-65XG85□□KD-55XG87□□KD-55XG85□□ |
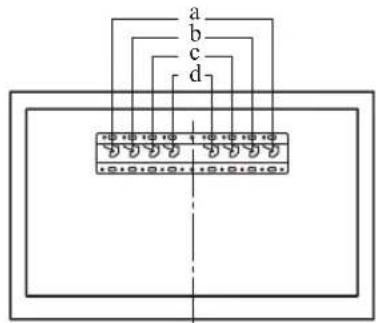
n:n ∴ n = 72 时. - by in Tn, -NNnNn -, ∴ m : x = 1 或 3x + 4y + 1 = 0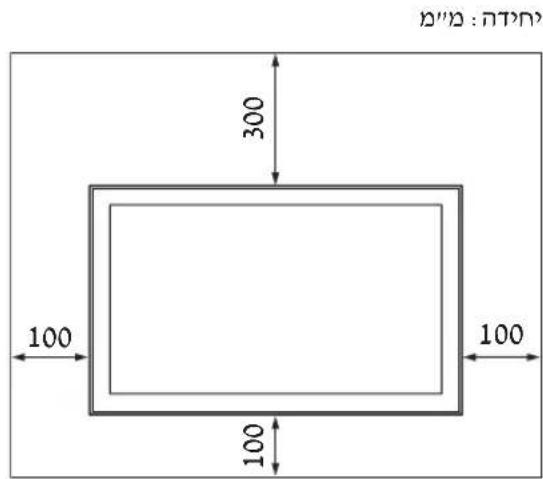
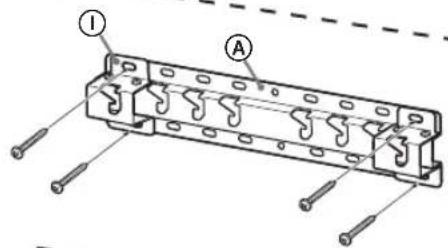
2-b
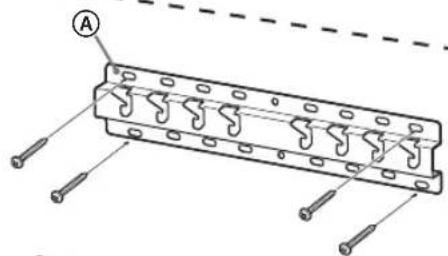
ONnnn,2-a nno ny
· 87
A (20) v'v'v'v (PSW 4x10)
- ANNAN
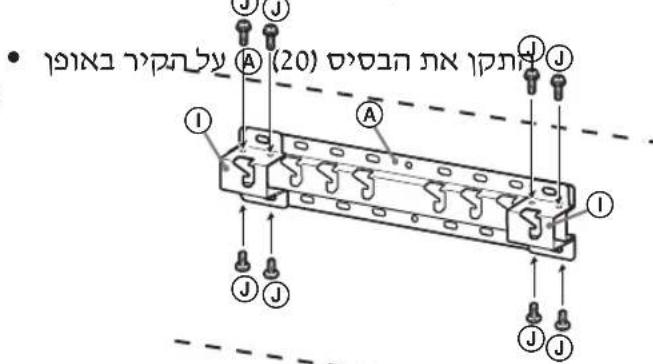
4 npnn
A(20)
.18 0y
yinnipwn2-ainny
.①
77
·
ynnn nn nnnn nn nnnn
mmbn by mnn nnnn
.1npwn npny
KD-85/75XG85□□, KD-75XG87□□
-
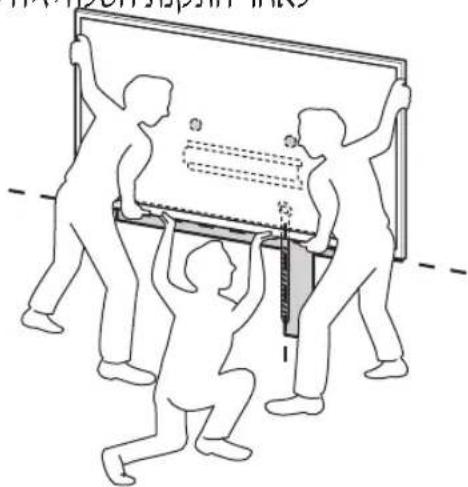
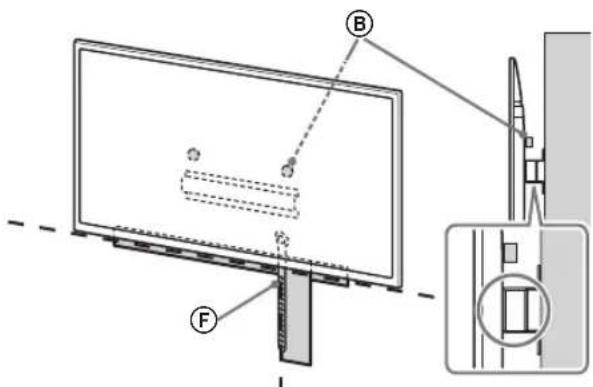
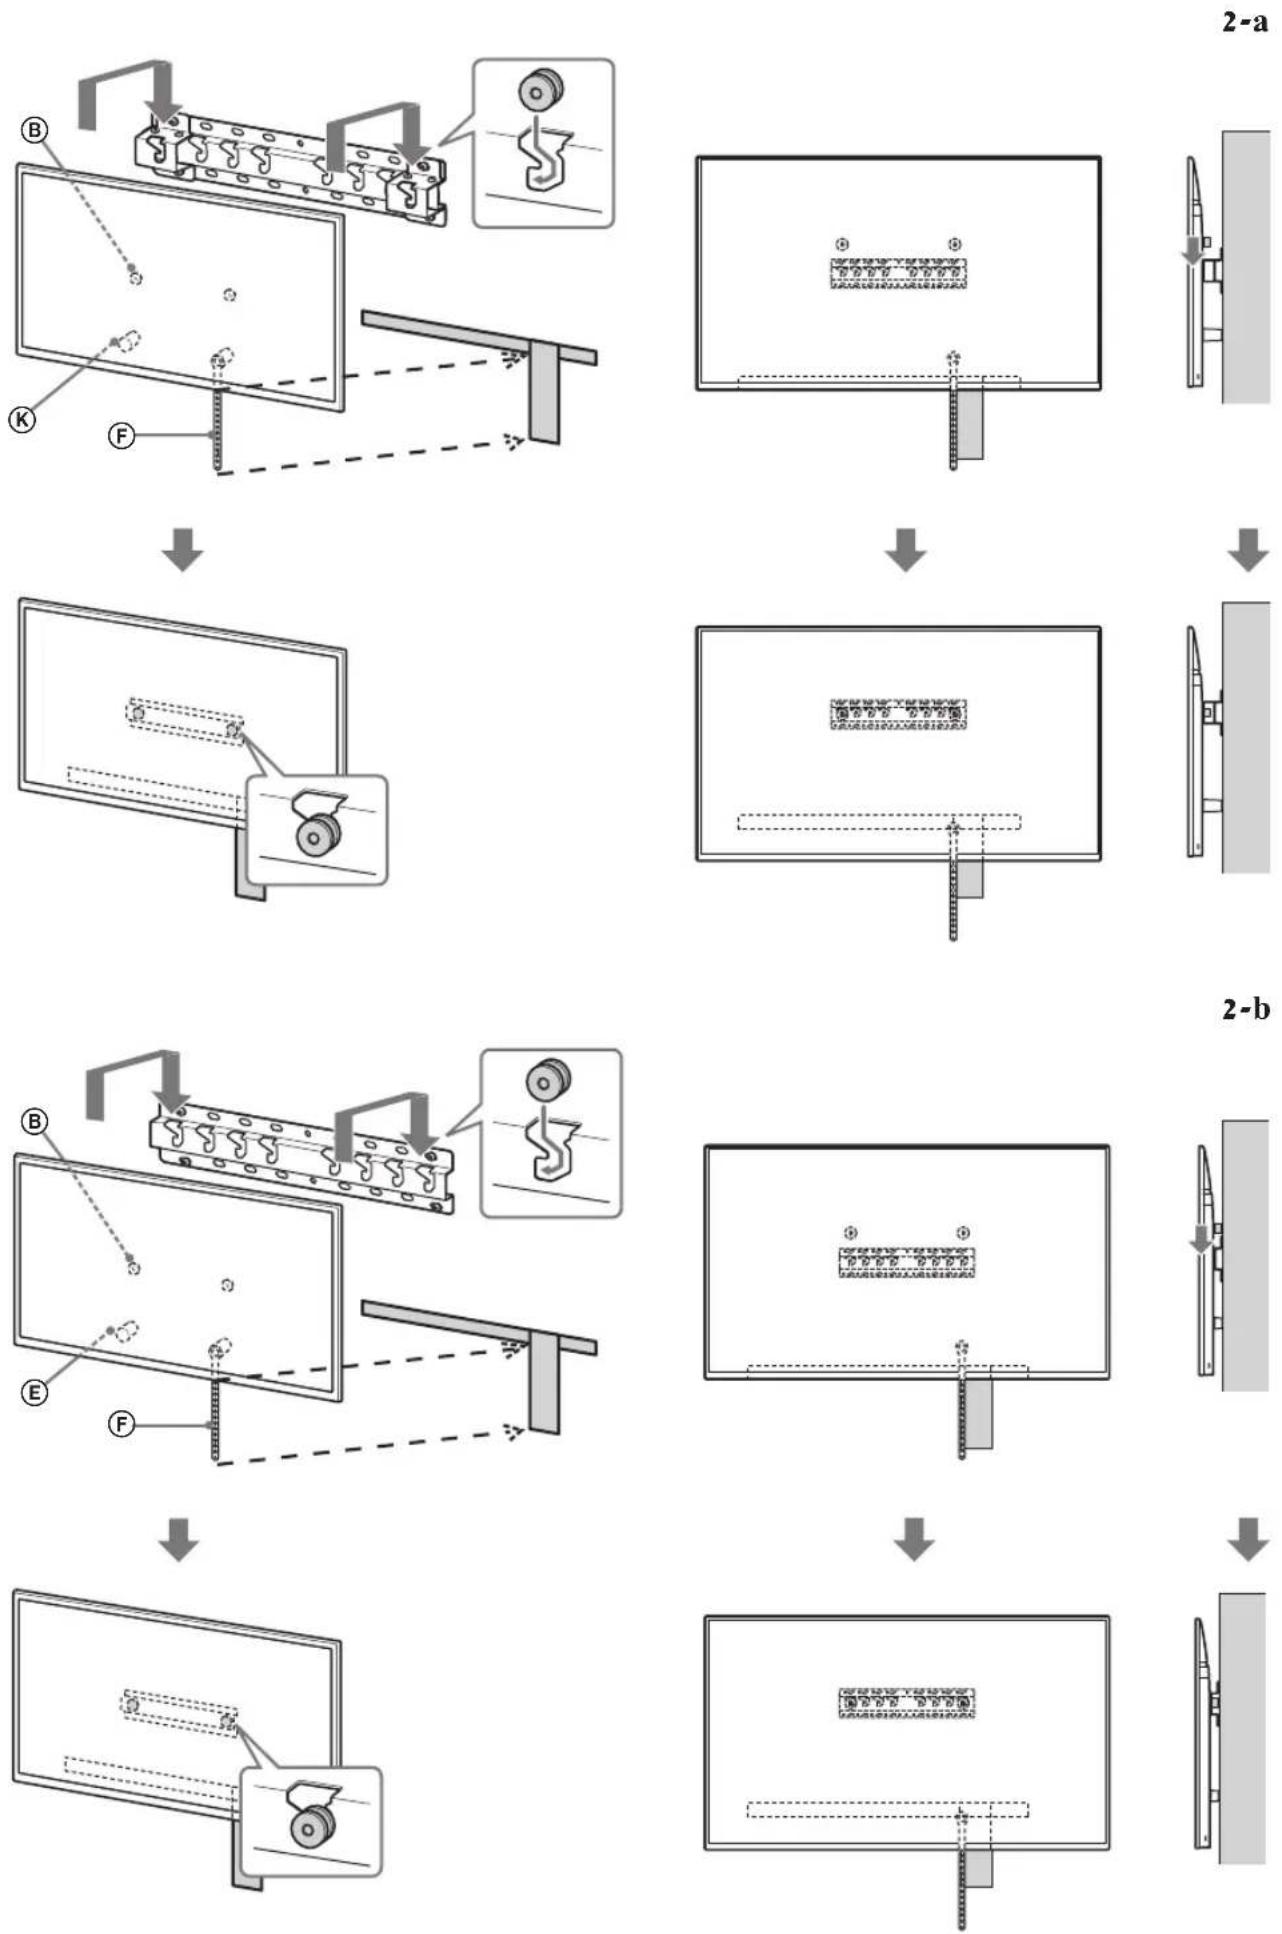
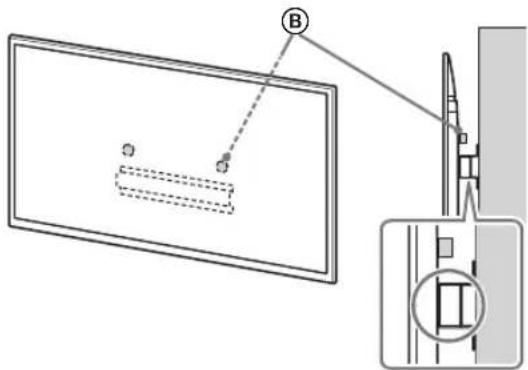
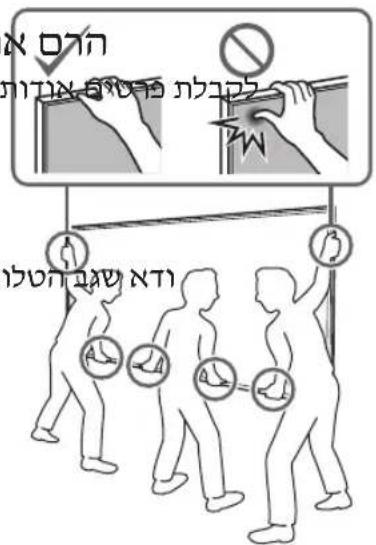
.
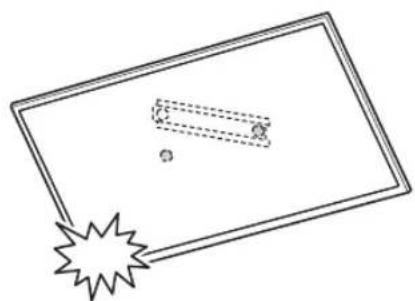
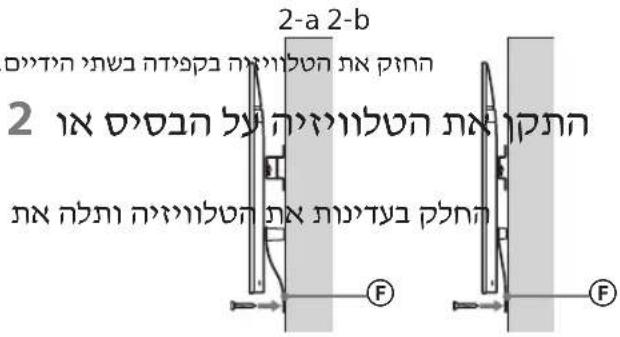
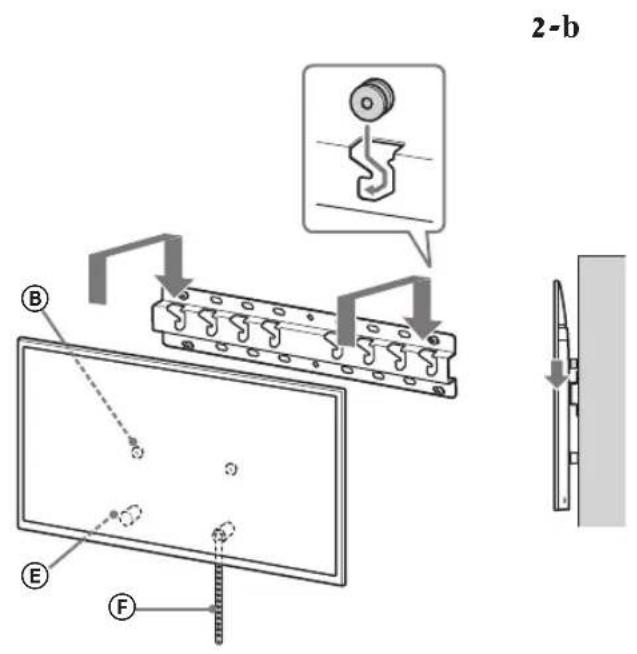
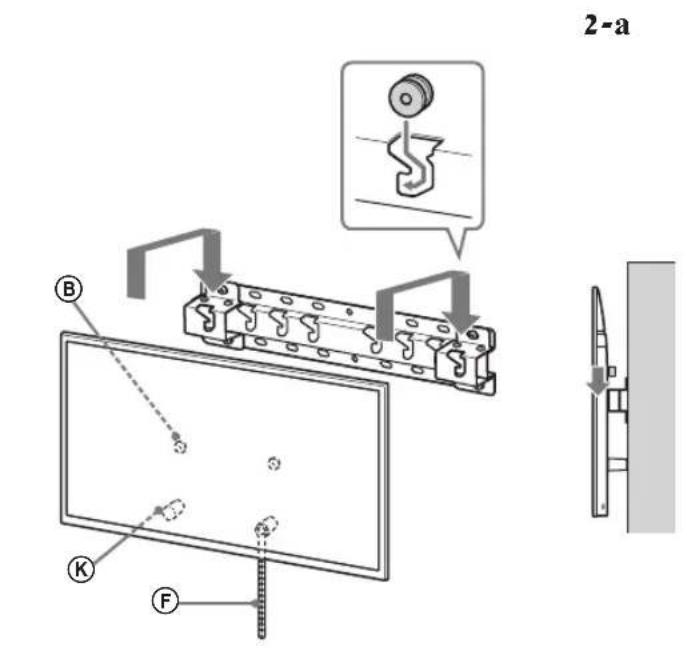
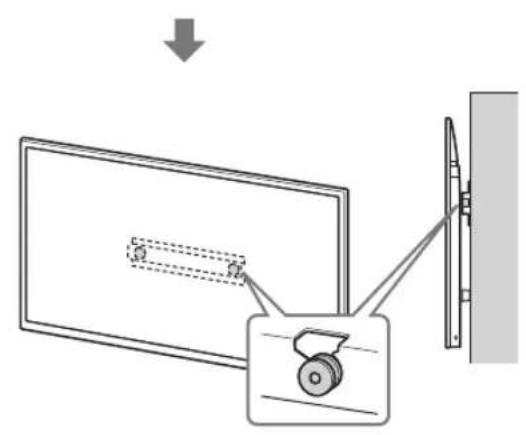
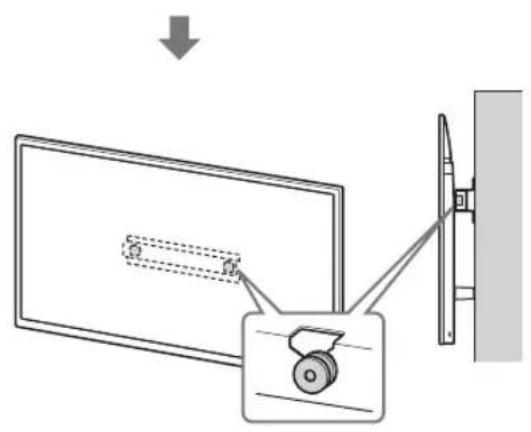
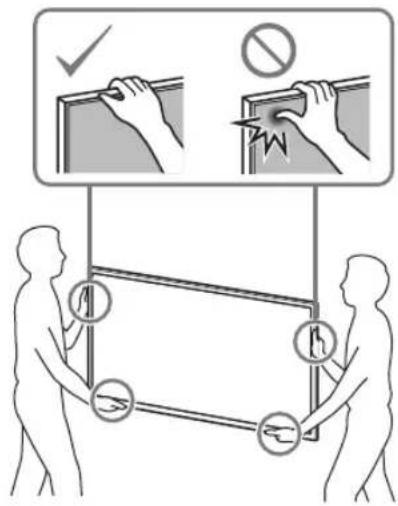
.
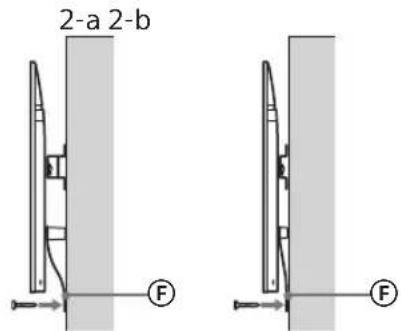
niv 5 vip
(pan)
#
- 72x mnnn
nON. nN NNNNnNnNnNnNnNnNnNn
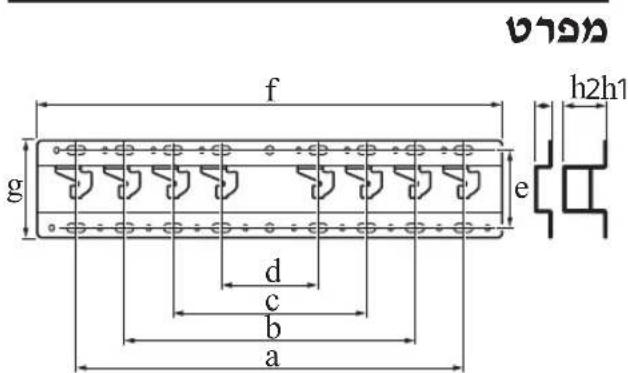
[1] (7y):
400:a
300:b
200:c
100:d
80:e
480:f
100:g
(2-b nnp) 20:h1
(2-a nnp) 60 : h2
[1] (7y): (v)
0.8
y
nppnn nbn nn
mnnnnnnn
.
∴ S ΔAPQ = S ΔAQP + SΔPQR
.01
.
77
·
nn Dn np n nn nn nn
mivan yn npnn
77x 7y
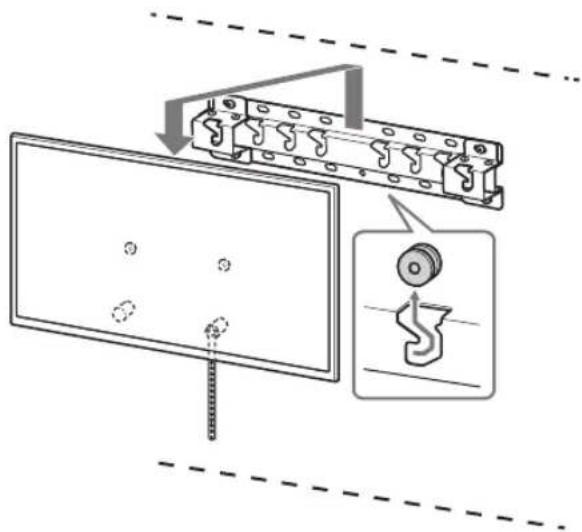
- ON SAFETY
- TO CUSTOMERS
- TO SONY DEALERS
- CAUTION
- SPECIFIED PRODUCTS
- WARNING
- BE SURE TO SUBCONTRACT THE INSTALLATION TO LICENSED CONTRACTORS AND KEEP SMALL CHILDREN AWAY DURING THE INSTALLATION
- BE SURE TO SUBCONTRACT MOVING OR DISMOUNTING OF THE TV TO LICENSED CONTRACTORS
- DO NOT REMOVE SCREWS, ETC., AFTER MOUNTING THE TV
- DO NOT MAKE ALTERATIONS TO THE PARTS OF THE WALL-MOUNT BRACKET
- DO NOT MOUNT ANY EQUIPMENT OTHER THAN THE SPECIFIED PRODUCT
- DO NOT LEAN ON OR HANG FROM THE TV
- DO NOT HANDLE THE PRODUCT WITH EXCESSIVE FORCE DURING CLEANING OR MAINTENANCE
- PRECAUTIONS
- INSTALLING THE WALL-MOUNT BRACKET
- DO NOT INSTALL THE WALL-MOUNT BRACKET ON WALL SURFACES WHERE THE CORNERS OR THE SIDES OF THE TV PROTRUDE AWAY FROM THE WALL SURFACE
- DO NOT INSTALL THE TV OVER OR UNDER AN AIR CONDITIONER
- BE SURE TO INSTALL THE WALL-MOUNT BRACKET SECURELY TO THE WALL FOLLOWING THE INSTRUCTIONS IN THIS INSTRUCTION MANUAL
- BE SURE TO ASSEMBLE THE BRACKET PROPERLY FOLLOWING THE INSTRUCTED PROCEDURE EXPLAINED IN THIS INSTRUCTION MANUAL
- BE SURE TO TIGHTEN THE SCREWS SECURELY IN THE DESIGNATED POSITION
- BE CAREFUL NOT TO SUBJECT THE TV TO SHOCK DURING INSTALLATION
- BE SURE TO INSTALL THE TV ON A WALL THAT IS BOTH PERPENDICULAR AND FLAT
- AFTER PROPER INSTALLATION OF THE TV, SECURE THE CABLES PROPERLY
- DO NOT ALLOW THE MAINS LEAD OR THE CONNECTING CABLE TO BE PINCHED
- THE SCREWS NEEDED TO SECURE THE WALL-MOUNT BRACKET TO THE WALL ARE NOT SUPPLIED
- TABLE OF CONTENTS
- INSTALLING THE TV ONTO THE WALL
- NOTE
- PREPARING FOR INSTALLATION
- CHECKING THE PARTS
- SUPPLIED WITH SU-WL
- DECIDING ON THE INSTALLATION LOCATION
- DECIDE ON THE INSTALLATION LOCATION
- INSTALLING THE BASE ON THE WALL
- PREPARING FOR THE INSTALLATION OF THE TV
- KD-85/75XG85□□, KD-75XG
- MARK THE INSTALLATION LOCATION ON THE WALL
- REMOVE THE SCREWS FROM THE REAR OF THE TV
- CONNECT THE NECESSARY CABLE(S) TO THE TV
- DETACH THE TABLE-TOP STAND FROM THE TV
- KD-85XG
- KD-75XG87□□, KD-75XG
- SLIM MOUNTING (2-B)
- INSTALLING THE TV ON THE WALL
- LIFT THE TV
- INSTALL THE TV ONTO THE BASE OR BASE ADAPTOR
- PREVENTING THE BOTTOM OF THE TV FROM SHIFTING
- CONFIRMING THE COMPLETION OF THE INSTALLATION
- OTHER INFORMATION
- SPECIFICATIONS
- DIMENSIONS: (APPROX.) [MM]
- WEIGHT (BASE ONLY): (APPROX.) [KG]
- PREPARATION FOR INSTALLATION
- FIND THE TV'S LOCATION
- PPOETOIAOIA YIA TOOTHETNO
- CHECK THE PARTS
- DO NOT INSERT SCREWS INTO OTHER PLACES AFTER MOUNTING THE TV
- DO NOT REMOVE THE PARTS OF THE CONSOLE FOR WALL MOUNTING
- DO NOT MOUNT OTHER EQUIPMENT OTHER THAN THE SPECIFIED PRODUCT
- DO NOT PLACE THE WALL-MOUNT CONSOLE ON ANY OTHER PRODUCT THAN THE TV. DO NOT PLACE THE TV ON A SLANTED OR UNSTABLE SURFACE
- DO NOT OPERATE THE PRODUCT WITH A DAMAGED POWER CORD DURING CLEANING OR MAINTENANCE
- SAFETY MEASURES
- WALL MOUNT INSTALLATION
- DO NOT INSTALL THE WALL MOUNT ON WALL SURFACES WHERE THE TV'S SCREWS OR SIDES PROTRUDE FROM THE WALL SURFACE
- DO NOT INSTALL THE TV ABOVE OR BELOW AN AIR CONDITIONER
- INSTALL THE WALL MOUNT SECURELY TO THE WALL BY FOLLOWING THE INSTRUCTIONS IN THIS MANUAL
- MAKE SURE YOU INSTALL THE BRACKET CORRECTLY BY FOLLOWING THE PROCEDURE DESCRIBED IN THIS MANUAL
- TIGHTEN THE SCREWS FIRMLY IN THE INDICATED POSITION
- BE CAREFUL NOT TO HIT THE TV DURING INSTALLATION
- INSTALL THE TV ON A WALL THAT IS PERPENDICULAR AND FLAT
- AFTER INSTALLING THE TV CORRECTLY, ARRANGE THE CABLES PROPERLY
- DO NOT PINCH THE POWER CORD OR CONNECTING CABLES
- THE SCREWS REQUIRED TO SECURE THE WALL MOUNT BRACKET TO THE WALL ARE NOT INCLUDED IN THE PACKAGE
- CONTENTS
- MOUNTING THE TV ON THE WALL
- PREPARING FOR MOUNTING
- DETERMINING THE MOUNTING LOCATION
- SELECT THE MOUNTING LOCATION
- DETERMINE THE POSITIONS OF THE SCREWS FOR MOUNTING THE BASE (20) A
- MOUNTING THE BASE ON THE WALL
- PREPARATION FOR MOUNTING THE TV
- REMOVE THE STAND FROM THE TV
- REMOVE THE SCREWS FROM THE BACK OF THE TV
- TIGHT MOUNTING (2-B)
- CONNECT THE NECESSARY CABLES TO THE TV
- REMOVE THE TABLE TOP FROM THE TV
- KD-65/55XG
- KD-85/75XG85□□,KD-75XG
- MOUNT THE TV TO THE BASE STAND
- PREVENTION
- CARE
- CHECK
- SUPPORTED MODELS
- TO THE CUSTOMER
- FOR SONY DEALERS AND CONTRACTORS
- SAFETY
- FOR CUSTOMERS
- FOR SONY DEALERS
- THE SPECIFIED MODELS
- BE SURE TO CONTACT A LICENSED CONTRACTOR, AND DO NOT ALLOW CHILDREN TO BE NEAR THE INSTALLATION SITE OF THE PRODUCT
- SAFETY PRECAUTIONS REGARDING CHILDREN
- FOR INSTALLATION OR REMOVAL OF THE TV, BE SURE TO CONTACT LICENSED CONTRACTORS
- DO NOT REMOVE THE SCREWS, ETC. FROM THE TV
- DO NOT DISASSEMBLE OR MODIFY THE BRACKET FOR WALL MOUNTING
- DO NOT INSTALL ANY EQUIPMENT OTHER THAN THE SPECIFIED ONE ON THE BRACKET
- TO AVOID OVERLOADING THE WALL MOUNT BRACKET, DO NOT PLACE ANYTHING ON IT OTHER THAN THE TV. DO NOT PUSH THE TV LEFT/RIGHT OR UP/DOWN
- DO NOT LEAN ON THE TV OR HOLD ONTO IT
- WALL MOUNTING (2-A)
- TABLETOP STAND (2-B)
- DETACH THE TABLETOP STAND FROM THE TV
- WALL MOUNTING THE TV
- PLACE THE TV ON THE BASE OR TABLE-TOP STAND
- INSTALL THE TV ON THE BASE OR TABLE-TOP STAND
- TO PREVENT THE TV FROM FALLING OVER
- PLACE THE TV ON THE BASE OR THE BASE ADAPTER
- PREVENT THE LOWER PART OF THE TV FROM SHIFTING
- INFORMATION
- DO NOT UNSCREW THE SCREWS USED FOR TV MOUNTING
- DO NOT REMOVE THE BRACKET PARTS FOR PARTIAL MOUNTING
- DO NOT INSTALL ANY OTHER DEVICES OTHER THAN THE SPECIFIED PRODUCT
- DO NOT USE THE BRACKET FOR PERMANENT MOUNTING OF ANYTHING OTHER THAN A TELEVISION. DO NOT TILT THE TELEVISION UP/DOWN OR LEFT/RIGHT
- DO NOT PLACE THE TELEVISION ON THE BRACKET OR LEAN IT AGAINST IT
- DURING CLEANING OR MAINTENANCE OF THE PRODUCT, DO NOT APPLY EXCESSIVE FORCE TO IT
- SAFETY PRECAUTIONS
- INSTALLING THE BRACKET FOR PERMANENT MOUNTING
- SUPPLIED ACCESSORIES
- PREPARATION
- INSTALLATION
- ITEM DETAILS
- REMAINS 3 SU-WL
- INSTALLATION LOCATION
- DETERMINE THE INSTALLATION LOCATION
- INSTALLATION ON A WALL
- PREPARING THE TV FOR INSTALLATION
- UNPACK THE TV AND PLACE IT ON A FLAT SURFACE
- WALL-MOUNT HOLES (2-B)
- SCREW
- CONNECT THE TV TO THE CABLE
- ATTACH THE WALL-MOUNT BRACKET TO THE TV
- TO ATTACH THE BRACKET (2-B)
- CONNECT THE CABLES TO THE TV BEFORE MOUNTING
- INSTALL THE TV ON THE BASE OR THE BASE ADAPTER
- WALL MOUNTING (2-B)
- MARKUS
- INSTALLATION OF THE UNIT (2-B)
- MARK
- MASS (BASE ONLY): (APPROX.) [KG]
- DO NOT INSTALL THE UNIT IN A PLACE WHERE IT MAY BE EXPOSED TO OIL OR STEAM
- MOUNTING BRACKETS
- INSTALLING THE MOUNTING BRACKETS
- DO NOT INSTALL THE BRACKETS BY YOURSELF
- THE BRACKETS SHOULD BE INSTALLED PERPENDICULAR TO THE WALL AND FLOOR
- AFTER THE BRACKETS ARE PROPERLY INSTALLED, SECURELY FASTEN THE CABLES
- THE RATED CURRENT OF THE PRODUCT MUST BE CONNECTED TO THE POWER SUPPLY
- DO NOT USE THE PRODUCT IF THE POWER CORD IS DAMAGED
- OPHATYFA DAHBIHDBIK
- БЕЛШЕКЕРДTEKCEPY
- SU-WL450 KYPBIRFBCBIMEH 6EPINEI
- OPHATBIATBIH OPBIHDBI AHBIKTAY
- OPHATBIATBIH OPBIHDBI AHBIKTAHBI
- HYCKAY
- INSTRUCTION
- REMOVAL
- INSTALLATION OF THE WALL MOUNT
- TV INSTALLATION
- REMOVE THE BRACKETS FROM THE BACK OF THE TV
- XAKBIH OPHATY (2-B)
- KAKETTI KA6ENBDI (KA6EIBEPDI) TEJENIDAPRA KAJRAY
- TД-ДАН YCTEI TYFBLPH AXBIPATBIHBI
- KD-75XG87□□,KD-75XG
- REVERSED INSTALLATION (2-B)
- CONNECT THE CABLE(S) TO THE DEVICE
- CONNECT THE DEVICE TO THE POWER SOURCE
- INSTALLING THE TV
- CONNECT THE TV
- INSTALL THE TV ON THE MAIN OR SUB TERMINALS
- DO NOT PULL OUT THE TV FROM THE TABLE OR WALL MOUNT
- KD-65/55XG87□□, KD-65/55XG
- REMOVE THE TV
- MOUNT THE TV ON THE WALL OR ON THE TABLE
- IT IS FORBIDDEN TO MAKE CALLS THAT ARE NOT RELATED TO THE EMERGENCY SERVICES
- INSTRUCTIONS
- OPERATING INSTRUCTIONS
- OTHER EQUIPMENT
- EXPERT
- THE HEBREW TEXT APPEARS TO BE GARBLED OCR. IT MAY BE A FRAGMENT OF A SENTENCE. WITHOUT CONTEXT, IT IS UNUSABLE. __SUPPRIMER
- Y
- NNN
- MNO 2Y
- MMPPB
- SONY
- NNPNNPN TINN PBYNNBON .Y
- NPPNN NBN NN
- X 7Y
Brand : SONY
Model : Bravia KD55XG8796
Category : Television