
WX425 - Saw WORX - Free user manual and instructions
Find the device manual for free WX425 WORX in PDF.

User questions about WX425 WORX
0 question about this device. Answer the ones you know or ask your own.
Ask a new question about this device
Download the instructions for your Saw in PDF format for free! Find your manual WX425 - WORX and take your electronic device back in hand. On this page are published all the documents necessary for the use of your device. WX425 by WORX.
USER MANUAL WX425 WORX
- Not all the accessories illustrated or described are included in standard delivery.
TECHNICAL DATA
Type WX425 WX426 ( 4- designation of machinery, representative of Saw )
| Voltage | 220-240V~50/60Hz |
| Power input | 1200W |
| No load speed | 5000/min |
| Max. cutting capacity | |
| 90° | 55mm |
| 45° | 38mm |
| Bevel capacity | 0-45° |
| Blade size | 160mm |
| Bore size | 16mm |
| Protection class | ☐/II |
| Machine weight | 3.5kg |
NOISE INFORMATION
| A weighted sound pressure L | pA 87dB(A) |
| KpA | 3dB(A) |
| A weighted sound power L | wA 98dB(A) |
| KwA | 3dB(A) |
| Wear ear protection when sound pressure is over 80dB(A) | |
VIBRATION INFORMATION
| Vibration total values (triax vector sum) determined according to EN 60745: | |
| Typical weighted vibration | Vibration emission value ah=4.4m/s2 |
| Uncertainty K=1.5m/s2 | |
WARNING: The vibration emission value during actual use of the power tool can differ from the declared value depending on the ways in which the tool is used dependant on the following examples and other variations on how the tool is used:
How the tool is used and the materials being cut or drilled.
The tool being in good condition and well maintained.
The use the correct accessory for the tool and ensuring it is sharp and in good condition.
The tightness of the grip on the handles and if any anti vibration accessories are used.
And the tool is being used as intended by its design and these instructions.
This tool may cause hand-arm vibration syndrome if its use is not adequately managed.

WARNING: To be accurate, an estimation of exposure level in the actual conditions of use should also take account of all parts of the operating cycle such as the times when the tool is switched off and when it is running idle but not actually doing the job. This may significantly increase the exposure level over the total working period.
Helping to minimise your vibration exposure risk.
ALWAYS use sharp chisels, drills and blades.
Maintain this tool in accordance with these instructions and keep well lubricated (where appropriate) If the tool is to be used regularly then invest in anti vibration accessories.
Avoid using tools in temperatures of 10^ or less.
Plan your work schedule to spread any high vibration tool use across a number of days.
ACCESSIONS
Blade
1
Parallel guide 1
Vacuum adapter (32mm&35mm) 2
Hex key 1
We recommend that you purchase your accessories from the same store that sold you the tool.
Use good quality accessories marked with a well-known brand name. Choose the type according
to the work you intend to undertake. Refer to the accessory packaging for further details. Store personnel can assist you and offer advice.
ADDITIONAL SAFETY INSTRUCTIONS FOR YOUR CIRCULAR SAW
- Always wear a dust mask, hearing protection and eye protection.
- Only use saw blades recommended in the specification.
- Always wear gloves when handling saw blades and rough material. Saw blades shall be carried in a holder whenever practicable.
- Fully unwind cable drum extension to avoid potential overheating.
- When an extension cable is required you must ensure it has the correct ampere rating for your power tool and is in a safe electrical condition.
- Ensure your mains supply voltage is the same as indicated on the rating plate.
- Your circular saw is a hand held tool, do not clamp your circular saw.
- Before cutting, check the cutting line is free of nails, screws, etc.
- Do not cut small workpieces with a circular saw. If possible, use a jigsaw.
- Only make cuts with the blade direction downwards, never upwards or at the side.
- Do not use a blade unless the rated blade speed exceeds the saw no load speed.
- Never remove the guard system. Never use the saw if the guard system does not function correctly. Never lock the moving guard open. The guard must move freely.
- Never use saw blades made from high speed steel (HSS).
- Always check walls, floors and ceilings to avoid hidden power cable and pipes.
- After long working periods external metal parts and accessories could be hot.
- Do not cut material containing asbestos.
- Do not use metal or stone saw blades. Only use wood saw blades.
- Do not use circular saw to cut tree limbs or logs.
- Do not use any abrasive wheels.
SAFETY INSTRUCTIONS FOR ALL SAWS
DANGER: Keep hands away from cutting area and the blade. Keep
your second hand on auxiliary handle, or motor housing. If both hands are holding the saw, they cannot be cut by the blade.
- Do not reach underneath the workpiece. The guard cannot protect you from the blade below the workpiece.
- Adjust the cutting depth to the thickness of the workpiece. Less than a full tooth of the blade teeth should be visible below the workpiece.
- Never hold piece being cut in your hands or across your leg. Secure the workpiece to a stable platform. It is important to support the work properly to minimize body exposure, blade binding, or loss of control.
- Hold power tool by insulated gripping surfaces when performing an operation where the cutting tool may contact hidden wiring or its own cord. Contact with a "live" wire will also make exposed metal parts of the power tool "live" and shock the operator.
- When ripping always use a rip fence or straight edge guide. This improves the accuracy of cut and reduces the chance of blade binding.
- Always use blades with correct size and shape (diamond versus round) of arbour holes. Blades that do not match the mounting hardware of the saw will run eccentrically, causing loss of control.
- Never use damaged or incorrect blade washers or bolt. The blade washers and bolt were specially designed for your saw, for optimum performance and safety of operation.
FURTHER SAFETY INSTRUCTIONS FOR ALL SAWS CAUSES AND OPERATOR PREVENTION OF KICKBACK:
- Kickback is a sudden reaction to a pinched, bound or misaligned saw blade, causing an uncontrolled saw to lift up and out of the workpiece toward the operator;
-
When the blade is pinched or bound tightly by the kerf closing down, the blade stalls and the motor reaction drives the unit rapidly back toward the operator;
-
If the blade becomes twisted or misaligned in the cut, the teeth at the back edge of the blade can dig into the top surface of the wood causing the blade to climb out of the kerf and jump back toward the operator.
KICKBACK IS THE RESULT OF SAW MISUSE AND/OR INCORRECT OPERATING PROCEDURES OR CONDITIONS AND CAN BE AVOIDED BY TAKING PROPER PRECAUTIONS AS GIVEN BELOW.
- Maintain a firm grip with both hands on the saw and position your arms to resist kickback forces. Position your body to either side of the blade, but not in line with the blade. Kickback could cause the saw to jump backwards, but kickback forces can be controlled by the operator, if proper precautions are taken.
- When blade is binding, or when interrupting a cut for any reason, release the trigger and hold the saw motionless in the material until the blade comes to a complete stop. Never attempt to remove the saw from the work or pull the saw backward while the blade is in motion or kickback may occur. Investigate and take corrective actions to eliminate the cause of blade binding.
- When restarting a saw in the workpiece, centre the saw blade in the kerf and check that saw teeth are not engaged into the material. If saw blade is binding, it may walk up or kickback from the workpiece as the saw is restarted.
- Support large panels to minimise the risk of blade pinching and kickback. Large panels tend to sag under their own weight. Supports must be placed under the panel on both sides, near the line of cut and near the edge of the panel.
- Do not use dull or damaged blades. Unsharpened or improperly set blades produce narrow kerf causing excessive friction, blade binding and kickback.
- Blade depth and bevel adjusting locking levers must be tight and secure before making cut. If blade
adjustment shifts while cutting, it may cause binding and kickback.
- Use extra caution when making a "plunge cut" into existing walls or other blind areas. The protruding blade may cut objects that can cause kickback.
SAFETY INSTRUCTION FOR CIRCULAR SAW WITH LOWER GUARD
- Check lower guard for proper closing before each use. Do not operate the saw if lower guard does not move freely and close instantly. Never clamp or tie the lower guard into the open position. If saw is accidentally dropped, lower guard may be bent. Raise the lower guard with the retracting handle and make sure it moves freely and does not touch the blade or any other part, in all angles and depths of cut.
- Check the operation of the lower guard spring. If the guard and the spring are not operating properly, they must be serviced before use. Lower guard may operate sluggishly due to damaged parts, gummy deposits, or a build-up of debris.
- Lower guard may be retracted manually only for special cuts such as "plunge cuts" and "compound cuts." Raise lower guard by retracting handle and as soon as blade enters the material, the lower guard must be released. For all other sawing, the lower guard should operate automatically.
- Always observe that the lower guard is covering the blade before placing saw down on bench or floor. An unprotected, coasting blade will cause the saw to walk backwards, cutting whatever is in its path. Be aware of the time it takes for the blade to stop after switch is released.
GENERAL SAFETY WARNINGS FOR YOUR LASER
WARNING: Read all safety warnings and all instructions. Failure to follow
the warnings and instructions may result in serious injury.
Save all warnings and instructions for
future reference.
These lasers do not normally present an optical hazard although staring at the beam may cause flash blindness.
Do not stare directly at the laser beam. A hazard may exist if you deliberately stare into the beam, please observe all safety rules as follows:
- The laser shall be used and maintained in accordance with the manufacturer's instructions.
- Never aim the beam at any person or an object other than the work piece.
- The laser beam shall not be deliberately aimed at another person and shall be prevented from being directed towards the eye of a person for longer than 0.25 seconds area.
- Always ensure the laser beam is aimed at a sturdy work piece without reflective surfaces, e.g. wood or rough-coated surfaces are acceptable. Bright shiny reflective sheet steel or similar is not suitable for laser applications as the reflective surface may direct the laser beam back at the operator.
- Do not change the laser device with a different type. The manufacturer or an authorized agent must carry out repairs.
- CAUTION: Use of controls or adjustments other than those specified herein may result in hazardous radiation exposure.
ADDITIONAL SAFETY WARNING FOR CLASS 2 LASER
The laser device fitted to this tool is CLASS 2 with a maximum radiation of 1mW and 650nm wavelength.
CLASS 2 LASER RADIATION, DO NOT STARE INTO BEAM
SYMBOLS

To reduce the risk of injury, user must read instruction manual

Warning

Double insulation

Wear eye protection

Wear ear protection

Wear dust mask
Waste electrical products should not be disposed of with household waste. Please recycle where facilities exist. Check with your Local Authority or retailer for recycling advice.
Laser radiation
Do not stare into beam
OPERATING INSTRUCTIONS

NOTE: Before using the tool, read the instruction book carefully.
INTENDED USE:
The machine is intended for lengthways and crossways cutting of wood with straight cutting lines as well as bevel angles to 45^ while resting firmly on the work piece.
1. DEPTH OF CUT ADJUSTMENT (See Fig.A)
Lift the depth of cut lock lever and raise the saw body away from the base plate. Set the depth of cut with the scale and push the lever down to lock. Always add 3mm to your depth of cut so that the blade can cut through the material.
2. BASE PLATE ANGLE ADJUSTMENT (See Fig.B1 & B2)
Lift the base plate bevel lock to loosen and rotate the base plate to desired bevel angle with the scale provided. Push the bevel lock down to clamp the base plate position. Check the angle and ensure that the base plate is firmly secured. The angle markings on the base plate are accurate for most general purposes but it is recommended to set the angle with a protractor and make a test cut on other material for accurate work. Do not use the depth of cut scale when making bevel cuts due to possible inaccuracy.
USING THE CIRCULAR SAW
1. SAFETY ON/OFF SWITCH (See Fig. C)
Your switch is locked off to prevent accidental starting. Depress the lock off button then the on/off switch and release the lock off button. Your switch is now on. To switch off, just release the on/off switch. The blade may continue to rotate after switching off. Wait until the machine comes to a complete stop before setting down.
2. PARALLEL GUIDEADJUSTMENT (SeeFig.D1,D2)
It is used for making cuts parallel to a workpiece edge at a chosen distance. Slide the parallel guide arm through the fixture to
achieve the required cutting distance then tighten the lock knob (18) to clamp.
CUTTING GUIDE
For WX426 (See Fig. D1)
For straight cuts, use the 0^ guide mark to align with your parallel guide scale. For a 45^ bevel cut, use the 45^ guide mark to align with your parallel guide scale. Securely clamp the parallel guide.
NOTE: It is best to carry out a trial cut.
For WX425 (See Fig. D2)
The BeveltracTM (20) fixed in front of the base plate is used as cutting guide.
3. HAND GRIP POSITION (See Fig. E)
Always hold your saw firmly with both hands when operating.
4. FITTING / REPLACING A SAW BLADE (See Fig. F, G, H)
Press the spindle lock button and use the hex key to loosen and remove the blade bolt (13). Remove the washer (B) and the outer flange (C). Rotate the lower blade guard clockwise by pushing the guard lever to take out the old blade (12). Fit a replaced blade. Ensure that the blade bore is located on the inner flange (D) and the blade direction arrow points in the same direction as the lower blade guard arrow. Place the outer flange, the washer and the blade bolt onto the blade bore. Press the spindle lock again and use the hex key to tighten the bolt with 1/4 turn more than finger tight. Check if the blade is securely clamped.
WARNING: Blade teeth are very sharp. For best cutting results ensu
you use a saw blade suited to the material and cut quality you need.
5. DUST EXTRACTION OUTLET (See Fig. I)
To remove sawdust, connect a suitable external dust extraction machine (e.g. vacuum cleaner) to the dust extraction outlet with the vacuum adaptor and a flexible hose connection. Ensure the hose connection is secure.
6. HEX KEY STORAGE (See Fig. J)
The hex key provided with the saw can be
placed in the storage area located at back of the base plate.
7. USING THE LASER GUIDE (See Fig. K) (WX426)
WARNING: Never stare directly into the laser beam and never point the beam at anybody. The laser beam energy is extremely harmful to human eyes.
Push the laser on/off switch (3) to 'I' to turn the laser on. The laser device can provide a beam in the same plane as the blade, which projects onto the workpiece to generate a line. The saw blade can be directed to follow the line in order to align the cut. Either straight cutting or bevel cutting, it will make more precise movement during operation.
Push the laser on/off switch (3) to 0^ to turn the laser off.
NOTE: Clean the laser generator periodically.
8. ACCESSIBLE MOTOR BRUSH REPLACEMENT (See Fig. L)
There are two replaceable motor brushes which can be easily accessed on either the front or back of the motor housing.
WARNING: Disconnect the plug from the power source before making any adjustments, changing accessories, or storing power tools. Such preventative safety measures reduce the risk of starting the power tool accidentally.
ATTENTION: When servicing a tool, ALWAYS use only genuine replacement parts
- Locate the plastic motor brush access caps on either the front or back of the motor housing.
- Remove the threaded access cap using a flat head screwdriver and turn in a counterclockwise rotation to loosen. Do not apply excessive force as this may damage the access plug.
- Remove the old motor brush.
- Insert the new motor brush making sure that it is completing inserted into the brush holder.
- Replace the access cap with the flat-head screwdriver turning clockwise to tighten.
WORKING HINTS FOR YOUR CIRCULAR SAW
If your power tool becomes too hot, run it no load for 2-3 minutes to cool the motor. Avoid prolonged usage at very low speeds.
Always use a blade suited to the material and material thickness to be cut. The quality of cut will improve as the number of blade teeth increase. Always ensure the work-piece is firmly held or clamped to prevent movement. Support large panels close to the cut line.
Any movement of the material may affect the quality of the cut. The blade cuts on the upward stroke and may chip the uppermost surface or edges of your work piece. When cutting, ensure your uppermost surface is a non-visible surface when your work is finished. Feeding too fast significantly reduces the performance of the machine and shortens the life of the saw blade. Always face the good side of the work piece down to ensure minimum splintering. Only use sharp saw blades of the correct type.
For pocket cutting (soft materials only) this operation requires much skill with a saw and must only be carried out by a competent person.
WARNING: The blade teeth are exposed during this operation, so operate with extreme caution.
Clearly mark the area to be cut. Set the depth of cut on the saw. Position the saw over the marked area with the front edge of the base plate resting on the work surface and cutting guide aligned with marked line on workpiece. Ensure the blade is not touching but is close to the work surface. The moving lower guard must be rotated open by using the lever.
Switch on the saw and gently swing the blade down into the material but maintain a pivoting force on the front edge of the base. The moving lower guard can now be released for normal action of the guard.
MAINTENANCE
Remove the plug from the socket before carrying out any adjustment, servicing or maintenance.
- Your power tool requires no additional lubrication or maintenance. There are no user serviceable parts in your power tool. Never use water or chemical cleaners to clean your power tool. Wipe clean with a dry cloth.
- Always store your power tool in a dry place.
- Keep the motor ventilation slots clean. Keep all working controls free of dust.
- If the supply cord is damaged, it must be replaced by the manufacturer, its service agent or similarly qualified persons in order to avoid a hazard.
ENVIRONMENTAL PROTECTION
Waste electrical products should not be disposed of with household waste. Please recycle where facilities exist.
Check with your local authorities or retailer for recycling advice.
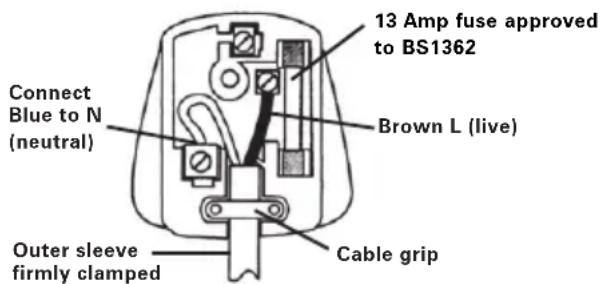
PLUG REPLACEMENT (UK & IRELAND ONLY)
If you need to replace the fitted plug then follow the instructions below.
IMPORTANT
The wires in the mains lead are colored in accordance with the following code:
Blue - Neutral
Brown - Live
As the colors of the wires in the mains lead of this appliance may not correspond with the coloured markings identifying the terminals in your plug, proceed as follows. The wire which is coloured
blue must be connected to the terminal which is marked with N. The wire which is coloured brown must be connected to the terminal which is marked with L.
WARNING: Never connect live or neutral wires to the earth terminal of the plug. Only fit an approved BS1363/A plug and the correct rated fuse.
NOTE: If a moulded plug is fitted and has to be removed take great care in disposing of the plug and severed cable, it must be destroyed to prevent engaging into a socket.
DECLARATION OF CONFORMITY
We,
POSITEC Germany GmbH
Declare that the product,
Description WORX Circular saw
WORX Circular saw with laser
Type WX425 WX426 (4- designation of machinery, representative of Saw)
Function Cutting various materials with a rotating toothed blade
Complies with the following directives,
Machinery Directive 2006/42/EC
Electromagnetic Compatibility Directive
2004/108/EC
RoHS Directive 2011/65/EU
Standards conform to
EN 55014-1
EN 55014-2
EN 61000-3-2
EN 61000-3-3
EN 60745-2-5
EN 60745-1
The person authorized to compile the technical file,
Name Russell Nicholson
Address Positec Power Tools (Europe)
Ltd, PO Box 152, Leeds, LS10 9DS, UK


2013/03/22
Leo Yue
POSITEC Quality Manager
Ltd, PO Box 152, Leeds, LS10 9DS, UK


2013/03/22
Jacky Zhou
INFORMATIONS RELATIVES AU BRUIT
INFORMATIONS RELATIVE AUX VIBRATIONS
DECLARATION CONFORMITE
Directive RoHS 2011/65/EU
Et conforme aux normes:
EN 55014-1
EN 55014-2
EN 61000-3-2
EN 61000-3-3
EN 60745-2-5
EN 60745-1
2013/03/22 Jacky Zhou Responsible qualite POSITEC
| 1. IMPUGNATURA MORBIDA |
| 2. BLOCCO DI AVVIAMENTO |
| 3. INTERRUPTORE D'ACCENSIONE/SPEGNIMENTO LASER (WX426) |
| 4. INTERRUPTORE DI AVVIO/ARRESTO |
| 5. IMPUGNATURA SUPPLEMENTARE |
| 6. TASTO DI BLOCCAGGIO DELL'ALBERINO |
| 7. SCALA ANGOLARE DELLA PIASTA |
| 8. BLOCCO PIASTA TAGLIO A SMUSSO |
| 9. GUIDA PARALLELA |
| 10. PATTINO |
| 11. PROTEZIONE INFERiore |
| 12. LAMA * |
| 13. BULLONE LAMA |
| 14. LEVA PROTEZIONE INFERiore |
| 15. ADATTATORE PER L'ASPIRAZIONE |
| 16. BLOCCO PROFONDITÀ DI TAGLIO |
| 17. SCOMPARTO ALLOGGIAMENTO CHIAVI ESAGONALI |
| 18. VITE BLOCCAGGIO GUIDA PARALLELA (Vedi D) |
| 19. GUIDA LASER (Vedi K) (WX426) |
| 20. BEVELTRAC™ (Vedi D2)(WX425) |
Ltd, PO Box 152, Leeds, LS10 9DS, UK


2013/03/22
Jacky Zhou
Ltd, PO Box 152, Leeds, LS10 9DS, UK


2013/03/22
Jacky Zhou
Gestor de Qualidade POSITEC
| 1. ZACHTE HANDGREEP |
| 2. DEBLOKKERINGSKNOP |
| 3. AAN/UITSCHAKELAAR LASER (WX426) |
| 4. VEILIGHEIDSSCHAKELAAR |
| 5. EXTRA HANDGREEP |
| 6. BLOKKEERKNOP VAN DE AS |
| 7. HOEKSCHAAL VOOR VOETPLAAT |
| 8. BLOKKERING VAN VOETPLAAT |
| 9. PARALLEL GELEIDER |
| 10. VOETPLAAT |
| 11. ONDERSTE BESCHERMKAP |
| 12. ZAAGBLAD * |
| 13. BOUT VAN ZAAGBLAD |
| 14. HENDEL VAN ONDERSTE KAP |
| 15. STOFZUIGERADAPTER |
| 16. INSTELHENDEL VOOR ZAAGDIEPTE |
| 17. OPSLAGRUIMTE INBUSSLEUTEL |
| 18. VERGRENDELKNOP PARALLELGELEIDER (Zie D) |
| 19. LASERAPPPARAAT (Zie K) (WX426) |
| 20. BEVELTRAC™ (Zie D2)(WX425) |
WAARSCHUWING! Lees alle
PO Box 152, Leeds, LS10 9DS, UK


2013/03/22
Jacky Zhou
Type WX425 WX426 ( 4- udpegning af maskiner, representant for Saw)
| Spænding | 220-240V~50/60Hz |
| Indgangseffekt | 1200W |
| Ubelastet motorhastighed | 5000/min |
| Maks. skæredybde | |
| 90° | 55mm |
| 45° | 38mm |
| Vinkelfunktion | 0-45° |
| Bladdiameter | 160mm |
| Klingens boring | 16mm |
| Dobbeltisolering | ☐/II |
| Fodplade | 3.5kg |
STOJINFORMATION
Galerkun WX425 (Se D2)
Tyyppi WX425 WX426 ( 4- sahaa
Ltd, PO Box 152, Leeds, LS10 9DS, UK


2013/03/22
Jacky Zhou
Endast WX426 (Se D1)
Endast WX425 (Se D2)
BeveltracTM (20) som ar fixerad framfor basplattan anvands som sagguide.
3. HANDGREPP (Se E)
Ltd, PO Box 152, Leeds, LS10 9DS, UK


2013/03/22
Jacky Zhou
POSITEC Kvalitetsdirektor
| 1. YUMUŞAK TUTMA YERI |
| 2. KILIT AÇMA KAPAMA DÜGMESI |
| 3. LAZER AÇMA/KAPAMA DÜGMESI (WX426) |
| 4. AÇMA/KAPAMA DÜGMESI |
| 5. AYAR KOLU |
| 6. MIL KILITLEME DÜGMESI |
| 7. ALT PLAKA AKI SKALASI |
| 8. ALT PLAKA PAH KILIDI |
| 9. PARALEL KILAVUZ |
| 10. ALT PLAKA |
| 11. ALT BICAK SIPERLIQE |
| 12. TESTERE BICAGI* |
| 13. BICAK CIVATASI |
| 14. ALT SIPERLIK KALDIRMA KOLU |
| 15. VAKUM ADAPTÖRÜ |
| 16. KESME KILIDI DERINLIGI |
| 17. ALYAN ANAHTARI SAKLAMA BÖLümÜ |
| 18. PARALEL KILAVUZ TESPIT CIVATASI (Bkz. D) |
| 19. LAZER DESTEGİ (Bkz. K) (WX426) |
| 20. BEVELTRACM (Bkz. D2)(WX425) |
Yalinizca WX426 (Bkz. D1)
Yalinizca WX425 (Bkz. D2)
Móvo yia WX426 (Eik D1)
Tia ioeC KOIEc, xpoiooIOInote To onuadi Oanyonc 0^ ia eUohypaumn Tnv Klauka Tpaalnou oynou. Iia kOttn E KIaon 45^ XPOIOIOINTE TO ONUADI ONYONC 45^ ia EuOuypamion Tnv KIAuka Tpaalnnou Oynou.
YNAEIH: Kautepa va dieyave Tpwa iia dokiaaotikn kottn.
Móvo yia WX425 (Eik D2)
H BeveltracTM (20) Tnou exei TOnToeTnEi MInpooTa aTIO To TIAO BaoNc XpnoiOpToIEiTai Wc odnyoc KOTINc.
3. ΘΕΣΗ XΕΙΡΟΛΑΒΗΣ (ΕΙΚ E)
Na Kpatate Tavta To Tpiovi oac ka Ka i e Ta duo xepia kata tn leitoupyia.
4. TONOOETHsH KAI AANAH MIAA ANIADA NPIIONIOY (EIK F,G,H)
Pntote To koupi KkEiOwatoC agova Ka I Xpnoipoiote To KkEiTiou TnapeXeTai Yia va aepaeTe To mTouAovI AeTia (13) Ka Tnv EeWTEPIKn FAVTcA (C). Nepiotpeyte To TPOOTATEUTIKo TcKATW AEITIDAC TTPOCSa Eeia KAI avoiTe To xnpoiotioiwvTacTo moxAo TPOOTATEUTIKOU KATW AEITIDAc 0oo aAAaZete Tn AETIDa Tou PIOVIOU (12). BEBaIWte TWC n DIAuETPOCs TcN AEITIDac Bpiketai OTNV EOWTEPIKn FAVTcA (D) KA iTO BELoc KATEUBOVOns TcS AETIDac DEixVEI OTNV IDIA KATEUBOVON ME TO BELOC TOU TPOOTATEUTIKOU KATW AEITIDAc. ELeyTe TWC eivai KAtheta n ETIAPAVEIA TcN AEITIDAc KAI OI pAVTcEs. Pntote Gava To KkEiOwma Tou AGOVA KAI TOITOTETNEgavT Nv EeWTepiKn FALVTCA (C) TAVW ATo TAETTIIEDa Tou AGOVA, KAI OPITE TO MTOAUovi 1/4 TNC TPOPPhn TEPIOOTepo ATIO OTI MTopeite Me To XePi. ELeyTe ot n AEITIDa Eivai KAla OphiEvn.
IPOEIAOIOIHs: ta dovtia Tns i a c evai nolu koptepa kai
Ppenei va opate yavTia. Ia kautepa
attoteleopata kottns, 8ebaowte TWC
xpoaiotoiite mia aetia pioviou Tou taipiae
STO uIKo KAI TIV TIOIOTnA KOITNC TOU XpeiaZcTe.
Beaiomegaite TTwC n aeTia eivai katalnnyia
TIV OVOPaOTIK TIPN TOU Epyaleiou.
(Europe) Ltd, PO Box 152, Leeds, LS10
9DS, UK


2013/03/22
Jacky Zhou
POSITEC AIEuovtnoIotnTAC
- MяГКА HAKЛадka HA PYKОТKE
- KHONKA ΦHKCALUN BBIKJIQUATEJIA
- BBIKJIIOUATEJIb Ia3EPA (WX426)
- BBIKJIIOUATEJIb NITAHIN
- ДОПОЛНТЕЛБHApyKoRTKA
- KHONKA BLOKINPOBKN UHNDEJI
- UKAJA YrJa HAKNoHa PJIHTbI OCHOBAHnA
- ΦHKCATOP HAKJOHA ПЛNTы OCHOBAHЯ
- NAPALJIENbHbIyNOp
- ПЛNTА OCHOBAHЯ
- NOДВИЖнБИ KOЖУX
- ПИльные ДИСК*
- ПИЖимhoe BOJT ДИСКА
- Pbyar NOdBnKHO KOKyX
15.ADAANTEP NbIJEOTBODA - PbyarФИКСAUПИ ГЛУБИНБI ПОПИЛА
- MECTO XPAHEHNA SECTNIGPAHHORO KJIIOVA
136
- NAPAJIJIeJIbHbI 3AMOK HANPABJIOUcERO BbICTyIa(Cm.Pnc.D)
- ΜΑ3EPHbIŋ yKA3ATEJIb(Cm. Pnc. K) (WX426)
- BEVELTRACT™ (Cm. Pnc. D2)(WX425)
TEXHNUECKNE XAPAKTEPNUCTUKN
Moden Wx425 WX426 ( 4-06o3HaueHne HnCtpymeHTa, KJIacc nII)
BHHMAHNE: Bn6paun, npoun3BoDumma npn pa6oTe mexaHn3IpoBaHHoro IHCTpyMeHTa,
MOKETOTJInuatbcrOT3aBnHbIX3HaueHmB3aBNCIMOCTNOTCNOc06OBNCIOJIb3OBAHn
ycTpOncTb. Hnke nepeuucJIeHbI HeKOToPbI yCNoBMy, OT KOTOpbIX 3aBNCIT INHTeHCNBHOCTb Bn6paun:
Cnocob nCnoB3OBAHnI INCTpyMeHTa I CBOIcTBa O6pa6aTbIbAemOr MaTePnaJa.
CocToHnHe uHcTpymEnTa uypoBeHb Texo6cnyXnBaHn.
Tn nCnoJIb3ayEmbIX npHaIeXHocTe N IX TexHnueckoE COCTOHNHe.
Cnla ydepkaHn pykOaTOK n HaNuHne npOTNBOBn6paCOnHOHBx CpeCTB.
IcnoJIb3yeMbIe pa6OuHne IHCTpyMeHTbl, COOTBeTCTBnE npIMHeHnIHCTpyMeHTOB INx Ha3HaueHnIO.
HnCTpyMeHTaJIbHoI cTani (HSS).
- Bcerda npOBepaIte cTeHbI, noJI bI nNoToJKN Ha npEaMeT cKpbITOn 3JeKtpoPpOBoJKN I Tpy6.
- Iocne npoOJIxNITeIbHbIX nepNoIOB pa60tbl HApUxHbIe MeTaIJIuYeCKHe qAcTn IN npHaJdJIeXHOCTH MoYr HArpeBaTbcra.
- He niiinte maTePnaJI, coDepeJkaun ac6eCT.
- He nCnoB3yIe nIbHbIe dNcKn dIa MetaJIa IIN KAMHЯ. NcNoB3yIe TOnbKO IIbHbIe DnCKn dIa DepeBa.
- He nCloJb3yIte cIpyKJpyHyIO nIy dIy o6pe3Kn BETOK I cyUbeB DepeBBeB.
19.He nCnoJIb3yIe a6pa3nBbIX kpyroB.

BHIMAHHE!
1.ДерхиTe pykn noJaIbwe ot 30HbI pa3pe3a n otДиСka.ДерхиTe BTopyIO pyKy Ha BCnOMOraTeNbHOB pykoTke Jn6o Ha Kopnyce DBnRaTeN. Ecnn ydepxkBaTb nIly obemm pykam, INx HeJIb3Я nopaNHTb DnCKOM.
2. 3oHa noD 3aROTOBKOJ ABJIeTcOnacHoi. 3aUHTbIe KOKyXn He IpeDoTbPaTIT TpaBMY B 3ToN 3OHe.
3. Otperynpyte rny6nHy pacnnIOBKn B COOTBeTCTBnC TOJINHOH 6pa6aTbIBaEMoro n3denny.Bn3y 6pa6aTbIBaEMoro n3denny DnCK DOJIKeH BbICTynat MeHee Yem Ha NOnHbI 3y6.
4.При пиелени Нкога He deprжnte 3arotobky B pykax Ha KoJehx. HadeXho 3akpenIte 3arotobky npn nIIeHnn.ДоJKNbIM O6pa3OM 3akpeTne DeTaJIb ДЯ MInHMn3aCIN pNcKa paHeHry OepaTopa, 3aKJIHNHBaHnI dNcKa IIN NOTepn KOHTpOJIa.
5. YdepxBaIte nHcTpymeHT 3a H3OIIpOBaHHbIe NOBepXHOCTn npn BblIOJIHeHH pa60, KOrda peKyuIIN HHCTpymeHT MoKet 3aTeB cKpbItyIO 3JIeKTPoPBOkY IJI N CO6CTBeHHbIKa6Ib. Ppi KOHTaKTe C pNOBoKDoi HaipJxHeHem MeTaNJIuYeCKne DeTaJI INHCTpymeHTa TAKKe HaxOJaTcN IOd HaipJxHeHem, YTO MOKet pPiBeCTN K IopaxHeHIO OpeaTopa 3JIeKTPuYeCKIM TOKOM.
6. Пи npoДьноу paCnHOBke BCerda
HcnoJb3yIte HnpaBnaIOUyO nlaHky INo napaJIneIbHbI ynop.
3To ynyuwaet ToHocTb pa3pe3a n Chnkae TbepoarHOCTb 3aklnHbAHn nnBHorO dNCKa.
- Bcerda nCnoJb3yIte nJIbHbIe dNcKn C Heo6xOaMbIMBHeuHM dHaMeTpOM NocaoUHbIMN
pa3Mepam. NcKn C HnPaBnBbIMN IOcaOuHbIM pa3Mepam 6yDyT Bbl3bIBaTb 6NeHnI NOTePIO KOHTpOJa. - Hukorda He nCnoJb3yIte NOBpeKdEHHbIe NJIH HenOxDxOJaUne WaI6bl I 6oT KpePJIeHn DaNcKa.
IaIbI 60JI T KpeIIeHn CneIaJIbHO npEHa3HaueHbI Ira BaWe IINbI dIa DOCTIXeHn ONTImaJIbHOI 3ΦΦeKTINBHOCTN I 6e3ONaCHOCTN 3KcPnyatauIN.
ДОПОЛНТЕЛьнtie ИНСТРУКЦИ NOTEXHnKE B3OПАССТN ДЯ BCEXПЛ
ПИЧИНБI OTДАЧИЕ EEE PIPEDOTBPAUSEHNE ONEPATOPOM:
- Oτιαγα ἀνλησετχα Bhe3aHNoi peakünei
Ha 3aKaTHe, 3aKInHbAHHe NnCMeUeHne NINbHOrO DnCKa, PnIBoJrSei K HeynpabJIeMOMy OTCKOKy NINbI N3O6pa6aTbIBaEMOrO n3dJIINB HnPaBJIeHOnepaTopa; - KordaДиСК 3axHMaeTcЯИн 3akJINHBAeTcяВЗkpbIBAUOSeMcЯnpОJIne,ДИСКОCTaHabJINBaETcЯpeakCneiДВURAteJIYNHCTpyMeHT OT6paCbIBAeTcЯHa3aD BHAnpaBHeHIn OepaTopa;
- Ecni DiNCK NCKPnBJIeH INIcMeUeH B pa3pe3e, 3y6b8 3aJHeN KpOMKn DiNCKa MOryt BrPbI3aTbC8 B NOBepXHOCTb DepeBa, npIBOJa K IODBeMy DnCKa I3 IpONIIa N OT6paCbIbAHIO erO Ha3aI B HAnpaBNeHn OnepaTopa.
OTDAU A YBJIETCRAPE3yJbTATOM HENPABNJIbHOROOBPAUeHnA C NNLOH N/NIH ENPABNJIbHbIX PPHEMOB PABOTbl, IINBO YCIOBn PA6OTbl. EE MOxHO N36EXKATb, INPMEHRA MEPbl INPEOCTOPOXHOCTN, ONICAHHbIE HNXE.
- Kpenko ydepxkBaIte nIy dByMa
pykamn npacnojaraTe pykn TaK, 706bl npotnbocToTb cnne OTdaun. PacnojaraTeCb c odHOn CTOpohbl DnCKa, a He B JInHHIO C dNCKOM.
OTdaua MOKeT npNBeCTn K OTbpaCbHaHIO NNbI Ha3aI, HO cNly OTdauu ONepaTop MOKeT KOHTPOJINPOBaTb, eCNI pNHNrTbI COOTBeTCTByUOJIe MepbI PpeoCTOpOXHOC
- Ecni dNCK 3aKlnHnBaet Nl6o ecNI NO IIO60I dpyroI npuHne pe3aHne ppeKpa7aeTcR, OTNyCTIte BbIKIOUateJIb u ydePknBaIte Nlny 6e3 DBHXeHnB MaTePnaIe, Noka dNCK NOLHOCTbIO He OCTaHOBTcR. HNKOrda He nbITaHTecb N3BNeYb NnNy n3nDEJnNn OTTaunTb NnNy Ha3aD, NOKd Ncck Bpa7aeTcR Nl6o cyueCTByET BO3MOXHOCTb OTDaHn.
Pa36epntecb n BheCnTe KoppeKTHBbl
dIy yCTpaHeHn npuHHb 3aKJIHHBaHn
noJToHa.
3.Пиpe3anyske nIbI, HaxoJuscB u3deHn, yctahOBHTe NIIbHbI DNCK NO ueHTpy npOnHa I npOBepbTe, UTO6bl 3y6bI NNbI He HaxoJINCb B CcENJIeHN c MaTePnaIOM.EcNn NIIbHbI DNCK 3aKInHnIO, pRn pe3anyske nIbI OH MOKeT BbIPBaTbcr BBePx nIu CO3daTb OTdauy.
4.Подержьаiteбolyшne naheл nIЯ MHHMn3aun Onachoctn 3aklnHbAHnДИСКa N OTaUn.
Болшпес панели Имеот Teнденцю K провисию по СВОМ COбCTBEHHbIM BECOM. Следует установпь поставки по обе сторны панели, Вблзи линни разраза и Вблзи края панели.
5.He nCnoJb3yIe TynIbe Jn6o NOBpeKdEHHbIe DNCKn. He 3aToueHHbIe Jn6o HnPaBnJIbHO 3aToueHHbIe DNCKn DeJaOT y3Kn IpOnNl, npINBOJ K qPe3MePHOMy TpeHIO, 3akNIINBaHNIO DNCKa N OTDAYe.
6.Фнксруошпpebicarngny6nhbl
dNCKa n perynipobkn HaKJIOHa
doJXHbI 6bITb NtOTHo HnadeJHo
3aTHytbI nepeB BbINOnHeHEm
nponna.Ecn peynipobOuHbIe
npncno6leHnA CMeuaOTcBO BpeM
pacnnIOBKn,3TO MoKeT npNBecTu K
3aKJIHHBaHIO NOTdaue.
7.БydTe Upe3BbUaHNo OCTOpOXHbI, BblOJIHra "Bpe3aHne" BCyueCTByIOuNe CteHbI Jn6o NHbIE cIeNBle 30HbI. BblcTynaiOuN iNCK MoKeT HaToJKNHyTbcr Ha IpeMTebl, YTO npINBeDeT K OTdaYe.
MHCTPyKcH NTOxHnke 6E3OpAChOCTNДЯЦРКУJPaRHOI INJIbIC NOdBnXhblIM KOKyXOM
1.пелдьIM nOJIb3OBaHnem npOBepbTe, npABINbHO JN 3aKpbIT noBnXhBIO KoxyH. He pa6oTaIte C NHLOI, ecII NOBnXhBIO KoxyH He nepemeuaetc CBO6oJHO H He 3aKpbIBaETc 6bICTpo. HnkOrda He 3axmaite N He 3akpenlTe NOBnXhBIO KoxyxBOTKpbITOM NOLOKeHH. PnC slUayAHOM naDeHIN NIIbl I NOBnXhBI KoxyX MOxET NOrHyTbcra. IODHMITE NOBnXhBI KoxyxC NOMOuBo BO3BpaTHOH pyKoRTKn u y6eDInTEcb, YTO OH nepemeuaetc CBO6oJHO N He 3aDeBaET 3a DnCK INI 3a INHbIE DeTaJI N pRn BCex yrJax N rIy6nHax paCnINOBKn.
2. Поберпу пухньи
норвиного кожуха.Еси кожухи
прухина He pa6otarКak cJeуet,
ИХ Heo6xOДHMo NOUHNHTb Nepei
нспльзOBaHHem Nnbl.ПОДВиЖын
Кожух может pa6otatb MeДлeнHo
причино nobpeжденя DeTaJIeN, BЯЗкx
OTLOXeHи ИЛН HAKONJIeHry OTXODOB
pe3aHry.
3.ПОДВИЖнБИ KOKYX MOKHO BOЗВРацаТь 6раTHO BpyHyTOЛьКо npn Oco6bIX npoINnaX, TAKnx KaK "Bpe3aHne".ПОДHMNTe ПОДВИЖнБИ KOKYX BO3ВРaTHOpyKOKTko И KaK TOJIbKO DnCK BOJdETB MaTePnaJI, NOBHXHbI KOKYxCNEdyeT OTNyCTnTb.Пр Всex nHbIX BnDax npoINIOB NOBIXHbI KOKYx DoJIxeh pa60TaTb ABTOMaTnueckn.
4. Bcerda obpaaTe BnMaHne, UTo6bl NOdBxHbI KOxUx NOKpbIBaJ DNCK nepeTd TEM, KaK CTaBtB NJIy Ha Bepctak Hn Ha non. He3aunueHHbI, DBNkUncrpo INHePmN DNCK npuBeDeT
K DVBXKeHIO NINbI Ha3aD, paCnINJBaB
BCE Ha CBOEM NyTN. YUHTbIBaIe BpeM,
HEo6xOAnMOE dJIr OCTaHOBKN NINbI NOcJIe
OTNyCKaHNA BbIKNoCuTeJIa.
HNCHTPYKUNI NO BE30NACHOCTNI PPN PA6OTE C JIA3EPOM
PNEyPExEHNE! BnMaTeBHo 03HaKOmBtEcB
c HNCTpyKqIaMn. HeBbINOJIHeHne BCex HIXKeIPINBeDeHHbIX INCTpyKcuN I peKOMeHaaCNI MOXET pINBeCTN K IopaxeHIO 3JIeKTpUYeCKIM TOKOM, NOxApy I cepbe3HbIM TpaBMam.
CoxpaHnTe 3TN HnctpyKuH.
3TN Ia3epbI O6bIuHO He npedCTaBJIOT
ONaCHOCTn IJr 3peHn. He cmOTPte
HeNOCpeDCTBeHHo Ha IyU Ia3epa.CyuEcTByET
ONaCHOCTb BpemEHNO OcJIeJIeHn,ecII
BbI CMOPTpe npraMo B IyU. PoxKaIyIcTa,
co6IIOaIte cIeDuOuIne npabUna no 6e3
ONaCHOCTn:
- JIa3epdoJXeHNCIOJIb3OBAtbcraN 06cIyXnBaTbcRA COOTBETCTBUN C HHTpyKlYrMNI3ROTOBUTeIa.
- He haçeJIbαIte lyu Ia3epa Ha IIOdei n dpyrIne ppeMTe bKpOme o6pa6aTbIbAemoi NOBepxHOCTn.
- He donyckaTe nonaahanHe lyuHa Ia3epa B rna3a, 6oJee yem Ha 0,25 cek.
- Y6eHITecb, yTO BO Bpemra6oTbI Lyu Na3epa He IonaAaET Ha CBeTOOTpaXaOuXiNe NOBepxHOCTN, NOTOMy yTO IyU MoKcT 6bITb OTPaxhen O6paTHo Ha OnepaTopa.
- He BHOCHTe HnKaKne n3MeHeHnB KOHCTpyKcIIO Ja3epHOro yCTpoiCtBa.Ero peMOHT DOJKeH 6bITb OcyuieCTBNeH TOJIbKO BAIBTOpN3OBAHHOM cepBUCHOM ueHTpe.
- INPENEYNPEXKDEHNE: NcnoJIb3OBAHne HbIX CpeIcTB ynpaBHeHn IIN peRyInpOBKn KpOME yKa3aHHbIX MOKeT npIBeCTN K ONaCHOMY JIyEBOMY BO3dEICTBIO.
HNCHTPYKUNI NO BE3ONACHOCTNI PPN PA6OTE C JIA3EPOM
Ja3epHoe yCTpoiCTBO,yCTaHOBJIeHHOE Ha 3TOT INHCTpyMeHT COOTBeTCTByET KJAccy 2 C MAKcIMaJIbHOm MOUHOCTbIO N3IpyeHnA 1MBT I JINHHO BONHb650HM.
KJIACC JIA3EPA 2, HE CMOTPNTE B JIyU
UCIOBHBIE OBO3HAUHIN

HANPABJIIOUJAI INJIEHN ToIbko IIN WX426 (Cm.Pnc.D1)
Дя ВьINONHeHЯ npMbIX npOInIOB
ИСПОЛБ3yIte MeTKy npOInla 0° ДЯ
ВьIPaBHNBaHЯ shKaJIbI npaJIpeNBJHO
унopa.ДЯ BьINONHeHЯ npOInLOB NOJ yrJOM
45° ИСПОЛБ3yIte MeTKy npOInla 45° ДЯ
ВьIPaBHNBaHЯ shKaJIbI npaJIpeNBJHOунopa.
PIMMEUHNE: LyuWe BCero BbINOHNtB npo6HbI npoNII.
Tolbko dnia WX425 (Cm. Pnc. D2)
BeveltracTM (20), 3akpenenHna neped onopnoI npToN nCNoB3yETcB KaueCTBe HnpaBnIOUe NIIeHn.
3. OBJACTN 3AXBATA PYKOK (CM.Pnc.E)
Bcerda kpenko ydepknaite nny dBym pykamn BO BpeMa pa60Tbl.