WX639.1 - Sander WORX - Free user manual and instructions
Find the device manual for free WX639.1 WORX in PDF.
| Product type | Random orbital sander |
| Brand | WORX |
| Model | WX639.1 |
| Rated voltage | 230-240 V ~ 50 Hz |
| Rated input power | 260 W |
| No-load speed | 6000-12000 rpm |
| Base plate size | 90 x 187 mm |
| Orbital amplitude | 1,6 mm |
| Protection class | II (double insulation) |
| Weight | 2,0 kg |
| Sound pressure level (LpA) | 75,7 dB(A) |
| Sound power level (LwA) | 86,7 dB(A) |
| Vibration emission value (ah) | 3,5 m/s² |
| Included accessories | Paper punch, cyclone box, cyclone adapter, extraction adapters 32 & 35 mm, 3 sandpaper grit 60 |
| Dust extraction | Cyclone box or vacuum cleaner adapter (32/35 mm) |
| Abrasive attachment system | Hook and loop (Velcro) and punch for paper without holes |
| Variable speed | Yes, adjustment wheel (6000-12000 rpm) |
| Maintenance | Clean with a dry cloth; do not use water or chemicals |
| Safety | Wear hearing protection, eye protection, and dust mask recommended; class II, read manual |
| Recycling | Do not dispose of with household waste; take to WEEE collection point |
Frequently Asked Questions - WX639.1 WORX
User questions about WX639.1 WORX
0 question about this device. Answer the ones you know or ask your own.
Ask a new question about this device
Download the instructions for your Sander in PDF format for free! Find your manual WX639.1 - WORX and take your electronic device back in hand. On this page are published all the documents necessary for the use of your device. WX639.1 by WORX.
USER MANUAL WX639.1 WORX
natural_image
Line drawing of a futuristic motorcycle with visible engine and chassis components (no text or symbols)| Finishing sander | EN | P06 |
| Schwingschleifer | D | P13 |
| Ponceuse vibrante | F | P20 |
| Levigatrice orbitale | I | P27 |
| Lijadora orbital | ES | P34 |
| Vlakschuurmachine | NL | P41 |
| Szlifierka wykańczająca | PL | P48 |
| Kézi vibrációs csiszológép | HU | P55 |
| Şlefuitor de finisare | RO | P62 |
| Dokončovací bruska | CZ | P69 |
| Elektrická leštiaca brúska | SK | P75 |
| Original instructions EN | |
| Originalbetriebsanleitung | D |
| Notice originale F | |
| Istruzioni originali I | |
| Manual original ES | |
| Oorspronkelijke gebruiksaanwijzing NL | |
| Tłumaczenie oryginalnych instrukcji | PL |
| Eredeti használati utasítás | HU |
| Traducerea instructiunilor initiale | RO |
| Překlad původních pokynů | CZ |
| Preklad pôvodných pokynov | SK |

natural_image
Completely black image with no visible content, text, or symbols.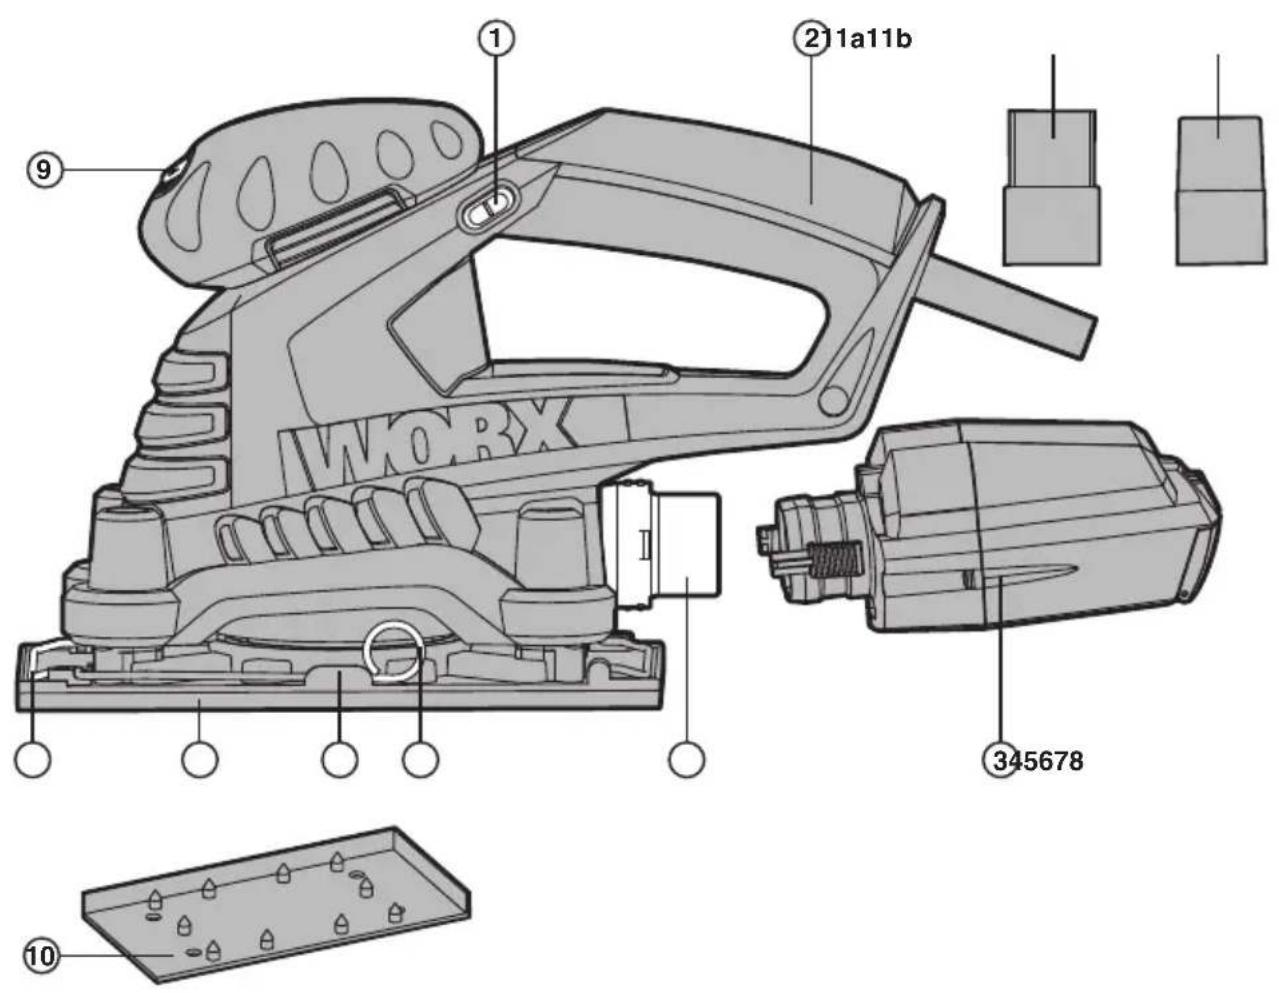
text_image
WORX ① ②11a11b ⑨ ⑩ ⑪ ③45678 ⑩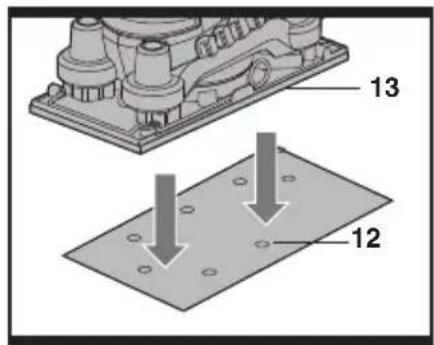
text_image
13 12A
natural_image
Technical line drawing of a mechanical component with a handle and circular features (no text or symbols)B
text_image
1 2C
natural_image
Technical illustration of a mechanical assembly with no visible text or symbolsD
natural_image
Illustration of a hand using a sewing machine to adjust a component (no text or symbols visible)D.1

natural_image
Illustration of a hand holding a mechanical device with internal components (no text or symbols visible)D.2
natural_image
Technical line drawing of a mechanical device with labeled component 'a' (no text or symbols beyond label)E
natural_image
Technical line drawing of a mechanical tool or clamp device (no text or symbols visible)F
text_image
WCBX 11aG1
natural_image
Technical line drawing of a power tool with no visible text or symbolsG2
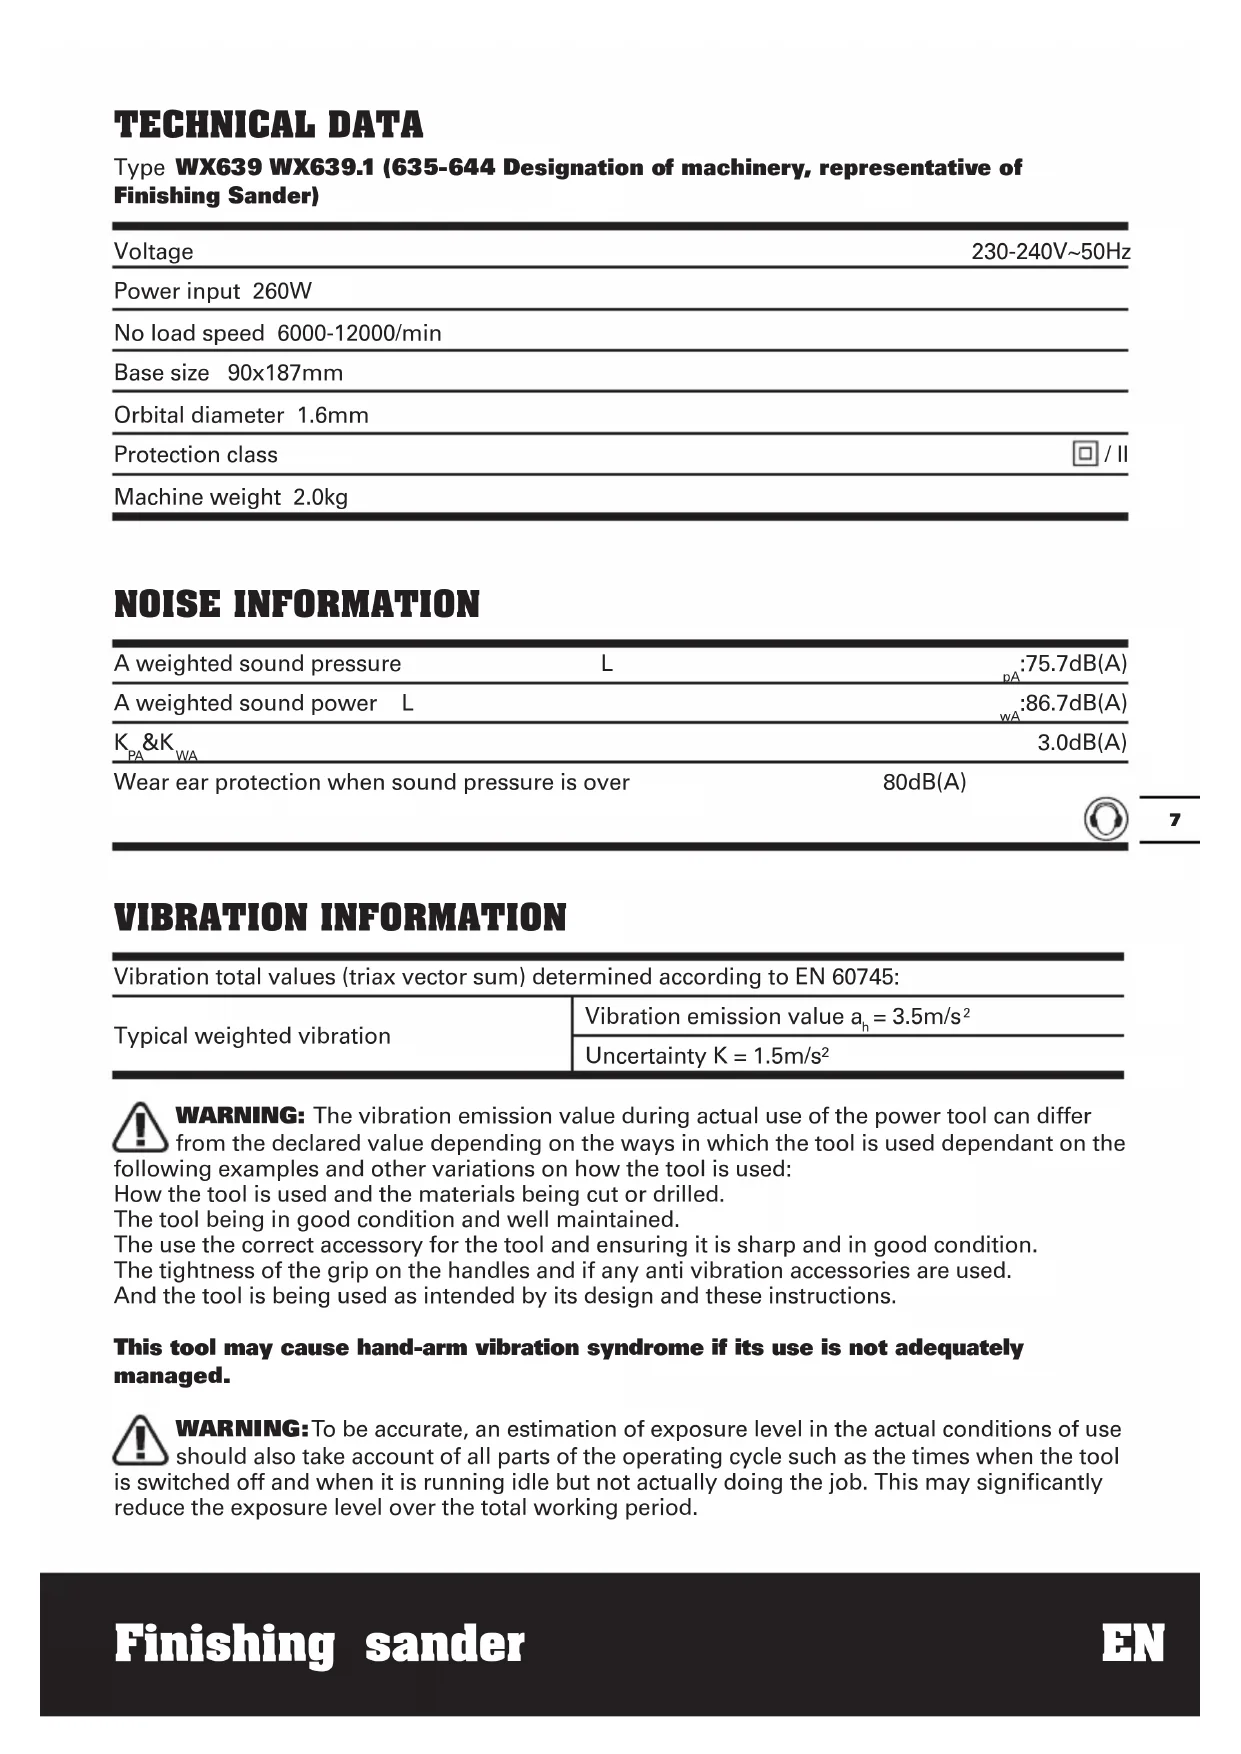
-
SLIDING ON-OFF SWITCH
-
SOFT GRIP HANDLE
-
CYCLONIC DUST BOX
-
CYCLONIC BOX ADAPTER
-
CLAMP LEVER
-
CLAMP LEVER LOCK
-
BASE PLATE
-
SANDING PAPER CLAMP
-
VARIABLE SPEED CONTROL
-
PAPER PUNCH
-
DUST EXTRACTION ADAPTER (a: INNER DIAMETER 35mm b: INNER DIAMETER 32mm) *
-
SANDING PAPER (See Fig. A)
-
HOOK AND LOOP SYSTEM (See Fig. A)
*Not all the accessories illustrated or described are included in standard delivery.
TECHNICAL DATA
Type WX639 WX639.1 (635-644 Designation of machinery, representative of Finishing Sander)
| Voltage | 230-240V~50Hz |
| Power input 260W | |
| No load speed 6000-12000/min | |
| Base size 90x187mm | |
| Orbital diameter 1.6mm | |
| Protection class | ☐ / II |
| Machine weight 2.0kg |
NOISE INFORMATION
| A weighted sound pressure | L | _pA :75.7dB(A) |
| A weighted sound power | L | _wA :86.7dB(A) |
| K_PA \& K_WA | 3.0dB(A) | |
| Wear ear protection when sound pressure is over | 80dB(A) | |
VIBRATION INFORMATION
| Vibration total values (triax vector sum) determined according to EN 60745: | |
| Typical weighted vibration | Vibration emission value a_h = 3.5m/s^2 |
| Uncertainty K = 1.5m/ s^2 | |

WARNING: The vibration emission value during actual use of the power tool can differ
from the declared value depending on the ways in which the tool is used dependant on the
following examples and other variations on how the tool is used:
How the tool is used and the materials being cut or drilled.
The tool being in good condition and well maintained.
The use the correct accessory for the tool and ensuring it is sharp and in good condition.
The tightness of the grip on the handles and if any anti vibration accessories are used.
And the tool is being used as intended by its design and these instructions.
This tool may cause hand-arm vibration syndrome if its use is not adequately managed.

WARNING: To be accurate, an estimation of exposure level in the actual conditions of use should also take account of all parts of the operating cycle such as the times when the tool is switched off and when it is running idle but not actually doing the job. This may significantly reduce the exposure level over the total working period.
Helping to minimise your vibration exposure risk.
ALWAYS use sharp chisels, drills and blades.
Maintain this tool in accordance with these instructions and keep well lubricated (where appropriate).
If the tool is to be used regularly then invest in anti vibration accessories.
Avoid using tools in temperatures of 10^ C or less.
Plan your work schedule to spread any high vibration tool use across a number of days.
ACCESSORIES
Paper hole punch 1
Cyclonic dust box 1
Cyclonic box adapter 1
32mm dust extraction adaptor 1
35mm dust extraction adaptor 1
60 grit clamp sanding paper 3
80 grit clamp sanding paper 3
120 grit clamp sanding paper 3
If using sanding paper without dust holes, you must use the paper punch to make holes.
Use 1/3 sheet sanding paper of the following size:
Sanding paper size:
93x230mm for no hook & loop (Clamp only)
93x182mm for hook & loop
We recommend that you purchase your accessories from the same store that sold you the tool. Use good quality accessories marked with a well-known brand name. Choose the type according to the work you intend to undertake. Refer to the accessory packaging for further details. Store personnel can assist you and offer advice.
SYMBOLS OPERATING INSTRUCTIONS

To reduce the risk of injury, user must read instruction manual

Warning

Double insulation

Wear eye protection

Wear ear protection

Wear dust mask

Waste electrical products should not be disposed of with household waste. Please recycle where facilities exist. Check with your Local Authority or retailer for recycling advice

NOTE: Before using the tool, read the instruction book carefully.
INTENDED USE
The machine is intended for dry sanding of wood, plastic, filler and coated surfaces.
ASSEMBLY
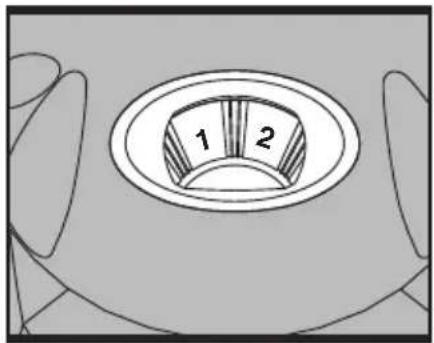
1. FIT THE SANDING PAPER SANDING PAPER WITH HOOK & LOOP SYSTEM (See Fig. A)
The sanding papers are placed directly onto the base plate. The hole pattern in the sanding plate and sanding paper must match.
Before placing on the sanding paper, free the base plate from dust/debris by lightly tapping against it.
2. REMOVE THE SANDING PAPER SANDING PAPER WITH HOOK & LOOP SYSTEM
Simply remove the sanding paper directly.
3. PAPER PUNCH
If using sanding paper without dust holes, use the paper punch to perforate the holes to ensure correct dust extraction. Position the punch (10) over the base plate with the punch sides on the edges of the base plate. Press the punch into the base plate to punch holes into the sanding paper. Then remove the punch and check all the holes have been formed correctly.
OPERATION
1. SWITCHING ON/OFF (See Fig. B)
Depress "I" on the on/off switch to start the machine.
Depress "0" on the on/off switch to stop it.
2. VARIABLE SPEED CONTROL
(See Fig. C)
With the variable speed control (9), the required speed can be selected (also while running).
The required speed is dependent on the material and is to be determined by a practical trial.
After longer periods of working at low speed,
allow the machine to cool down by running it for approx. 3 minutes at maximum speed with no load.
| Sanding work | Grain | Speed setting (opm) | |
| Coarse sanding | Precision sanding | ||
| Sanding down varnishes | 180 400 | 8700~12000 | |
| Stripping paint | 40 120 | 9800~12000 | |
| Touch-ing up paint-work | 120 120 | 7600~10000 | |
| Sanding wood | 60 240 | 7600~12000 | |
| Machining veneer | 180 400 | 8700~11000 | |
| Sanding aluminium | 80 240 | 7600~11000 | |
| Derusting metal | 40 120 | 9800~12000 | |
| Sanding metal and steel | 120 240 | 9800~12000 | |
| Sanding plexi-glass | 180 400 | 6500~8700 | |
3. CYCLONIC DUST BOX (See Fig. D) A) ATTACH THE CYCLONIC DUST BOX
Your sander is equipped with a cyclonic dust box. To attach, slide the box onto the outlet piece and take care that the latching lever engages.
CAUTION: To prevent the possibility of sanding dust or foreign body being thrown into your face or eyes, never attempt to use your sander without the dust box properly installed.
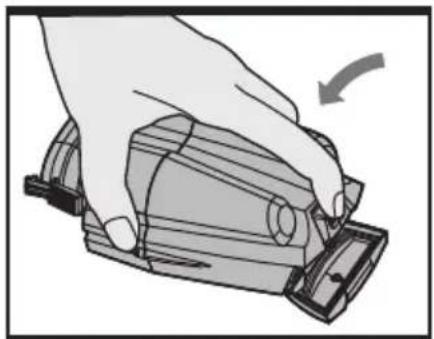
B) EMPTY THE CYCLONIC DUST BOX (See Fig. D1, D2)
For more efficient operation, empty the cyclonic dust box every 5-10mins. This will permit the air to flow through the box better. To empty the box, press the latching lever in and pull off the box. Then press the button at the rear of the box to open it, and shake out dust.
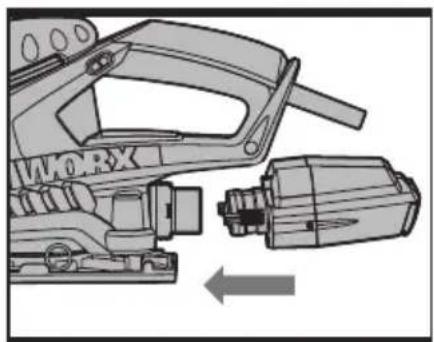
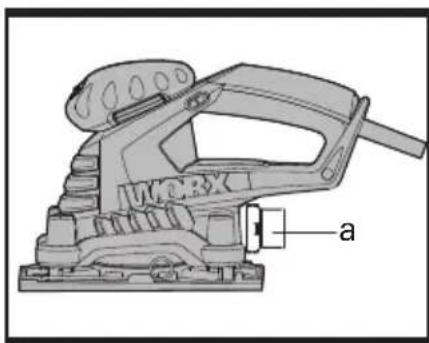
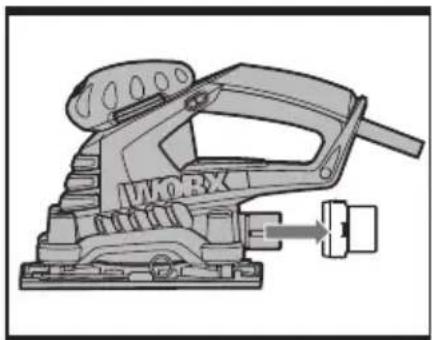
4. USING THE DUST EXTRACTION ADAPTER
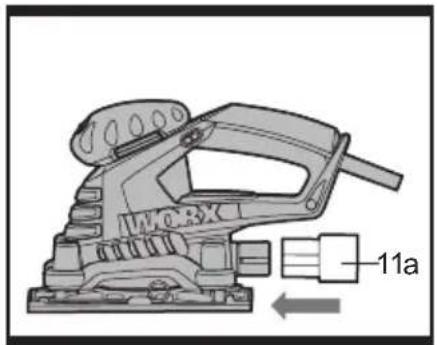
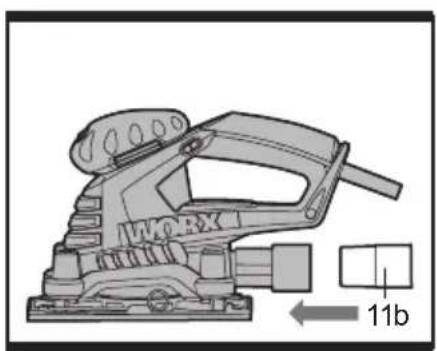
Your sander is equipped with an adapter (4) (See Fig. E), which is designed for connecting the Cyclonic box. To attach the dust adapter (11), you need firstly remove the adapter of the sander (See Fig. F), and then insert the dust adapter of the cleaner (See Fig. G), afterwards, you can connect the vacuum cleaner.
If the vacuum hose is 35mm, insert the 35mm dust adapter (11a) directly into the rear dust outlet of sander (See Fig. G1).
If the vacuum hose is 32 mm, insert the 32 mm adapter (11b) into the back of 35mm adapter (11a) (See Fig. G2).
First please turn on the vacuum cleaner, and then turn on the sander. If you stop sanding, first turn off the sander, then turn off your vacuum cleaner.
5 FLUSH SANDING FACILITY
Your sander can sand flush on three sides of the base plate which allows easy access to corners and edges of mouldings.
6 ORBITAL SANDING
Your sander operates in small circular rotations which allow efficient material removal. Operate your sander in long sweeping movements across your work piece and even across the grain. For a finer finish, always use a fine grain sanding paper and only move the sander in the direction of the grit and never across the grain. Do not allow your sander to remain in the same position
otherwise you will remove material and create an uneven surface.
WORKING HINTS FOR YOUR FINISHING SANDER
If your power tool becomes too hot, especially when used at low speed, set the speed to maximum and run it with no load for 2-3 minutes to cool the motor. Avoid prolonged usage at very low speeds. Always use sand paper that is suitable for the material you want to sand.
Always ensure the work-piece is firmly held or clamped to prevent movement.
Any movement of the material may affect the quality of the sanding finish.
Start your sander before sanding and turn it off only after you stop sanding. For the best results, sand wood in the direction of the grain.
Do not start sanding without having the sandpaper fitted.
Do not allow the sandpaper to wear away it will damage the base-plate. The guarantee does not cover base-plate wear and tear.
Use coarse grit paper to sand rough surfaces, medium grit for smooth surfaces and fine grit for the final surfaces. If necessary, first make a test run on scrap material.
Use only good quality sandpaper.
The sandpaper controls the sanding efficiency, not the amount of force you apply to the tool. Excessive force will reduce the sanding efficiency and cause motor overload.
Replacing the sandpaper regularly will maintain optimum sanding efficiency.
MAINTENANCE
Remove the plug from the socket before carrying out any adjustment, servicing or maintenance.
Your power tool requires no additional lubrication or maintenance. There are no user serviceable parts in your power tool. Never use water or chemical cleaners to clean your power tool. Wipe clean with a dry cloth. Always store your power tool in a dry place. Keep the motor ventilation slots clean. Keep all working controls free of dust. Occasionally you may see sparks through the ventilation slots. This is normal. If the supply cord is damaged, it must be replaced by the manufacturer, its service agent or similarly qualified persons in order to avoid a hazard.
ENVIRONMENTAL PROTECTION

Waste electrical products should not be disposed of with household waste. Please recycle where facilities exist.
Check with your local authorities or retailer for recycling advice.
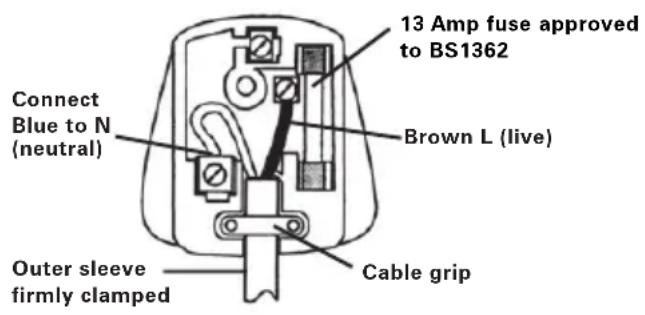
PLUG REPLACEMENT (UK & IRELAND ONLY)
If you need to replace the fitted plug then follow the instructions below.
IMPORTANT
The wires in the mains lead are colored in accordance with the following code:
BLUE = NEUTRAL
BROWN =LIVE
As the colors of the wires in the mains lead of this appliance may not correspond with the colored markings identifying the terminals in your plug, proceed as follows. The wire which is colored blue must be connected to the terminal which is marked with N. The wire which is colored brown must be connected to the terminal which is marked with L.
WARNING! Never connect live or neutral wires to the earth terminal of the plug. Only fit an approved 13ABS1363/A plug and the correct rated fuse.
NOTE: If a moulded plug is fitted and has to be removed take great care in disposing of the plug and severed cable, it must be destroyed to prevent engaging into a socket.
text_image
13 Amp fuse approved to BS1362 Brown L (live) Connect Blue to N (neutral) Cable grip Outer sleeve firmly clampedDECLARATION OF CONFORMITY
We,
POSITEC Germany GmbH
Declare that the product,
Description WORX Finishing sander
Type WX639 WX639.1 (635-644-
Designation of machinery, representative of Finishing Sander)
Function Removing surface material using an abrasive medium
Complies with the following directives,
2006/42/EC
2004/108/EC
2011/65/EU
Standards conform to
EN 55014-1
EN 55014-2
EN 61000-3-2
EN 61000-3-3
EN 60745-1
EN 60745-2-4
The person authorized to compile the technical file,
Name Russell Nicholson
Address Positec Power Tools (Europe)
Ltd, PO Box 152, Leeds, LS10 9DS, UK

text_image
keo.yue
text_image
C€2013/12/04
Leo Yue
POSITEC Quality Manager
Ltd, PO Box 152, Leeds, LS10 9DS, UK

text_image
leo.yue
text_image
C€2013/12/04
Leo Yue
INFORMATIONS RELATIVES AU BRUIT
INFORMATIONS RELATIVE AUX VIBRATIONS
DÉCLARATION DE CONFORMITÉ
Nous,
POSITEC Germany GmbH
3. PERFORATORE CARTA
Ltd, PO Box 152, Leeds, LS10 9DS, UK

text_image
keo.yue2013/12/04
Leo Yue
35mm stofzuigingsadapter 1
Schuurpapier(60#) 3
Schuurpapier(80#) 3
Schuurpapier(120#) 3
6.SCHUREN IN CIRKELS
Type WX639 WX639.1 (635-644-
Typ WX639 WX639.1 (635-644-
Ltd, PO Box 152, Leeds, LS10 9DS, UK
$$ \text {leo.yue} $$

text_image
C€2013/12/04
Leo Yue
PO Box 152, Leeds, LS10 9DS, UK

text_image
leo.yue
text_image
C€2013/12/04
Leo Yue
5. SABLAREA LA NIVEL
Tip WX639 WX639.1 (635-644-
denumirea de maşini, representant al Sander finisare)
INFORMACE TÝKAJÍCÍ SE HLUČNOSTI
Ltd, PO Box 152, Leeds, LS10 9DS, UK
$$ \text {leo.yue} $$

text_image
C€2013/12/04
Leo Yue
POSITEC Manažer kvality
- POSUVNÝ VYPÍNAČ
- MÄKKÁ RUKOVÄT
- CYKLÓNOVÝ ZÁSOBNÍK PRACHU
- NÁSADEC NA CYKLÓNOVÝ ZÁSOBNÍK
- ZAISTOVACIA PÁČKA
- ZÁMOK ZAISTOVACEJ PÁČKY
- ZÁKLADOVÁ DOSKA
- PRÍCHYTKA NA UPEVNENIE BRÚSNEHO PAPIERA
- REGULÁTOR MENITEL'NYCH OTÁČOK
- DIEROVAČKA NA PAPIER
- NÁSADEC NA ODSÁVANIE PRACHU (A: VNÚTORNÝ PRIEMER 35 MM, B:
VNÚTORNÝ PRIEMER 32 MM) * - BRÚSNY PAPIER (Pozri Obr. A)
- SUCHÝ ZIPS (Pozri Obr. A)
TECHNICKÉ ÚDAJE
Typ WX639 WX639.1 (635-644-
Ltd, P. O. Box 152, Leeds, LS 10 9DS, UK
$$ \text {leo.yue} $$

text_image
C€2013/12/04
Leo Yue
you've got the power
Copyright © 2013, Positec. All Rights Reserved.
2SFS104PK11003A4