
EY37C4 - Camera lens PANASONIC - Free user manual and instructions
Find the device manual for free EY37C4 PANASONIC in PDF.
| Product Type | Cordless LED Work Light (Floodlight) |
| Brand | Panasonic |
| Model | EY37C4 |
| Dimensions (W × H × D) | 162 mm × 70 mm × 99 mm (main unit) |
| Weight (main unit) | 380 g |
| Power Source | Panasonic Li-ion battery: 14.4 V / 18 V / 21.6 V (compatible models: EY9L45, EY9L47, EY9L51, EY9L52, EY9L53, EY9L54, EY9L62) |
| Luminous Flux | 750 lumens |
| Illuminance | 1500 lux (front, at 40 cm) |
| Number of LEDs | 10 |
| LED Power | Approx. 8 W |
| USB Ports | 2 USB Type A ports (DC 5 V, total output 2 A) for charging devices |
| Opening and Rotation Angles | Opening: 0° to 90°; Rotation: 0° to 270° |
| Functions | Lighting with 3 levels (high, medium, low); USB auto-off after 6 h; battery level indicator; low battery and overheat alerts |
| Safety | Do not look directly into the LED beam; do not cover during use; do not use in a humid environment |
| Maintenance | Clean with a dry, clean cloth; do not use water or solvent |
| Included Accessories | Battery and charger not included (sold separately) |
| Repairability | Repair by authorized center only; light source not user-replaceable |
Frequently Asked Questions - EY37C4 PANASONIC
User questions about EY37C4 PANASONIC
0 question about this device. Answer the ones you know or ask your own.
Ask a new question about this device
Download the instructions for your Camera lens in PDF format for free! Find your manual EY37C4 - PANASONIC and take your electronic device back in hand. On this page are published all the documents necessary for the use of your device. EY37C4 by PANASONIC.
USER MANUAL EY37C4 PANASONIC
Original instructions: English Translation of the original instructions: Other languages
I. GENERAL SAFETY WARNINGS
WARNING
Read all safety warnings and all instructions. Failure to follow the warnings and instructions may result in electric shock, fire and/or serious injury.
Save all warnings and instructions for future reference.
Read and observe all safety warnings and instructions enclosed with Panasonic charger, battery pack, or this unit which you purchased separately.
a) Do not operate this unit in explosive atmospheres, such as in the presence of flammable liquids, gases or dust.
b) Do not expose this unit to rain or wet conditions.
Water entering this unit will increase the risk of electric shock.
c) Do not overreach. Keep proper footing and balance at all times.
This enables better control of this unit in unexpected situations.
d) Do not use this unit if the switch does not turn it on and off.
Any unit that cannot be controlled with the switch is dangerous and must be repaired.
e) Store idle this unit out of the reach of children and do not allow persons unfamiliar with this unit or these instructions to operate this unit.
f) Recharge only with the charger specified by the manufacturer.
A charger that is suitable for one type of battery pack may create a risk of fire when used with another battery pack.
g) Use this unit only with specifically designated battery packs.
Use of any other battery packs may create a risk of injury and fire.
h) When battery pack is not in use, keep it away from other metal objects, like paper clips, coins, keys, nails, screws, or other small metal objects, that can make a connection from one terminal to another.
Shorting the battery terminals together may cause burns or a fire.
i) Under abusive conditions, liquid may be ejected from the battery; avoid contact. If contact accidentally occurs, fl ush with water. If liquid contacts eyes, additionally seek medical help.
Liquid ejected from the battery may cause irritation or burns.
j) Have your unit serviced by a qualifi ed repair person using only identical replacement parts.
This will ensure that the safety of this unit is maintained.
II. ADDITIONAL SAFETY INSTRUCTIONS
WARNING
LED lights create heat whilst in use.
Heat may be trapped and cause an accident.
- Do not cover this unit with cloth or paper during use.
- Do not use the LED light with this unit closed. The control panel becomes hot and may cause burns.
Do not look into the LED light and do not allow the lights to contact the eyes directly.
If the LED lights contact the eye continuously, it may result in injuries to the eyes.
- The appliance is not a portable luminaire for children usage.
Children shall not play with the appliance. - Do not hang on places where hooks do not hang, or places where hooks do not hang completely.
- When hanging in high places, fix with a string or the like so as not to drop.
-
Do not place this unit on an unstable surface or in an unstable position.
-
Do not place heavy objects on this unit or climb on top of it.
- Use of an attachment not recommended may result in a risk of fire, electric shock, or injury to persons.
| Symbol | Meaning |
| To reduce the risk of injury, user must read and understand instruction manual. | |
| For indoor use only. | |
| Do not look directly into the LED light beam. | |
| Do not touch front or back of LED panel during or immediately after use. |
CAUTION
-
This unit is not waterproof.
-
Do not use it in damp or wet locations.
- Do not wash it in water.
-
Keep it in a safe, dry, and clean area when it is not in use.
-
Do not disassemble this unit. Servicing should be performed by an authorized service centre.
- The light source contained in this luminaire shall only be replaced by the manufacturer or his agent or a similar qualifi ed person.

WARNING for charger and battery pack
- Do not use other than the Panasonic battery packs that are designed for use with this unit.
- Panasonic is not responsible for any damage or accident caused by the use of the recycled battery pack and the counterfeit battery pack.
- Do not dispose of the battery pack in a fire, or expose it to excessive heat.
- Do not drive the likes of nails into the battery pack, subject it to shocks, dismantle it, or attempt to modify it.
- Do not allow metal objects to touch the battery pack terminals.
- Do not carry or store the battery pack in the same container as nails or similar metal objects.
- Do not charge the battery pack in a high-temperature location, such as next to a fire or in direct sunlight. Otherwise, the battery may overheat, catch fire, or explode.
-
Never use other than the dedicated charger to charge the battery pack. Otherwise, the battery may leak, overheat, or explode.
-
After removing the battery pack from this product or the charger, always reattach the pack cover. Otherwise, the battery contacts could be shorted, leading to a risk of fire.
- When the battery pack has deteriorated, replace it with a new one.
Continued use of a damaged battery pack may result in heat generation, ignition or battery rupture.
- If you detect any abnormalities, discontinue use immediately and contact the retailer from which you purchased this product.
- Do not use the Li-ion battery pack with its temperature below 0^ or above 40^ . It may lead to the cause of malfunction of main unit. Leave the battery pack at room temperature for more than one hour for adjusting its temperature.
- Do not store the tool and battery pack in locations where the temperature may reach or exceed 50^ (122°F) (such as a metal tool shed, or a car in the summer), which can lead to deterioration of the storage battery.
III. ASSEMBLY
Attaching or Removing Battery pack
- To attach the battery pack:
[Fig.1]
Align the highlighted marker points and attach battery pack.
Slide the battery pack until it locks into position.
- To remove the battery pack:
[Fig.1]
Push the button and slide the battery pack forward.
CAUTION
Do not use the 28.8 V battery pack.
It cannot be attached properly and may fall out.
IV. OPERATION
Example of use [Fig.2]
- When hooking and using, take out the hook (C) stored in the handle (D). [Fig.3]
IV-1. Illuminate the light
-
Attach the battery pack to the main unit.
-
Adjustment the handle and LED light angle.: [Fig.4]
CAUTION
Do not open and close or rotate this unit for more than its range of motion.
-
Open and close: 0^ to 90^
Rotation: 0^ to 270^ -
Press the ON/OFF switch (F) once to turn on LED light. Each times press the ON/OFF
switch (F), the power turns from high to mid, from mid to low, from low to off.

NOTE:
- To turn off the LED light, hold down the switch for a while.
- Do not use the LED light with the unit closed.
- When using immediately after connecting the battery pack or after not using for a long time, keep the power button down until the light turns on.
CAUTION
- During and immediately after use, the light emitting surface and the back side of the light emitting surface become hot, so be sure to hold the side to operate.
[Fig.5]
- Finish use and store. [Fig.6]
NOTE:
- If the cap (K) is removed, reinstall it. [Fig.7]
IV-2. USB power output
This unit can be used for charging USB devices such as smartphones.
NOTE:
- Power supply to connected devices only. (Rating DC 5 V, total two sockets 2 A)
- Do not connect devices with a rating of 5 V and 2 sockets exceeding 2 A in total to this unit. It may cause damage.
Depending on the USB device or USB cable, charging may not be possible. - Some devices may prohibit other than the specified charging methods.
- The total output current of the 2 sockets is 2 A. Depending on the combination of devices when charging two units simultaneously, the charging time may be longer than usual, or in rare cases the two units may not be charged simultaneously.
-
Charging may not be possible depending on the USB device and/or USB cable.
-
Remove the USB sockets cover (E) and connect a commercially available USB cable. [Fig.8]
- Press the USB power output button (H) and start power supply.
- After use, press the USB power output button (H) to turn off power supply.
NOTE:
The auto-OFF function automatically turns USB
power delivery off after approximately 6 hrs. from the time the button is pressed if it remains turned on.
- Attach the socket cover (E).
IV-3. Battery level indication function
- When you press the USB power output button (H), the battery indication lamp will be displayed in 3 levels.
- Battery indication lamp (G) always lights and displays during USB power supply.
| Indicator | Battery status |
| Charged enough. | |
| Approx. 50% remaining. | |
| Battery level is low. The battery pack will need to be charged soon. | |
| Flashing | Empty. The battery pack needs to be charged. |
V. ALERT FUNCTION
(1) Low battery alert
10 minutes before running out of battery, the LED light blinks three times and switches to "Low mode", and the USB power output indicator (I) and the battery level indicator lamp (3 segments) blink.
- When in "Low mode", the LED light does not dim further. It only blinks.
(2) LED Overheat alert
When the temperature around the LED element becomes high, the LED light switches to "Low mode" gradually to prevent the main unit from malfunctioning, or from shortening the LED element life.
(3) Battery overheat alert
When the battery pack temperature becomes high, the LED light switches to "Low mode" to prevent the battery pack from malfunctioning, and the USB power output indicator (I) and the battery level indicator lamp (3 segments) blink.
Recycling
ATTENTION:
For environmental protection and recycling of materials, be sure that it is disposed of at an officially assigned location, if there is one in your country.
Information for Users on Collection and Disposal of Old Equipment and used Batteries

These symbols on the products, packaging, and/or accompanying documents mean that used electrical and electronic products and batteries should not be mixed with general household waste.
For proper treatment, recovery and recycling of old products and used batteries, please take them to applicable collection points, in accordance with your national legislation and the Directives 2012/19/EU and 2006/66/EC.
By disposing of these products and batteries correctly, you will help to save valuable resources and prevent any potential negative effects on human health and the environment which could otherwise arise from inappropriate waste handling.
For more information about collection and recycling of old products and batteries, please contact your local municipality, your waste disposal service or the point of sale where you purchased the items.
Penalties may be applicable for incorrect disposal of this waste, in accordance with national legislation.
[For business users in the European Union]
If you wish to discard electrical and electronic equipment, please contact your dealer or supplier for further information.
[Information on Disposal in other Countries outside the European Union]
These symbols are only valid in the European Union. If you wish to discard these items, please contact your local authorities or dealer and ask for the correct method of disposal.
VI. SPECIFICATIONS
[Main unit]
| Model No. EY37C4 | |||
| Voltage DC 14.4 V / DC 18 V / DC 21.6 V | |||
| Luminous fl ux 750 lm | |||
| Illuminance 1500 x ( Front, at 40 cm) | |||
| LED Approximate y 8 W (LED 10 lights) | |||
| USB socket | 2 × type A USB (DC 5 V) sockets for total 2 A output | ||
| Weight 380 g (main unit only) | |||
| Dimension (W × H × D) | 162 mm × 70 mm × 99 mm (with handle fl at to body) | ||
| Battery pack | Li-ion battery pack | ||
| EY9L45 EY9L47 EY9L51 EY9L52 | |||
| EY9L53 EY9L54 EY9L62 | |||
[Battery pack]
| Model No. EY9L45 | EY9L47 EY9L51 EY9L52 | |||
| Storage battery Li | Ion Battery | |||
| Voltage | DC 14.4 V DC 18 V | |||
| (3.6 V × 8 cells) | (3.6 V × 4 cells) | (3.6 V × 10 cells) | (3.6 V × 5 cells) | |
| Model No. EY9L5 | 3 EY9L54 EY | 9L62 | |
| Storage battery Li | -ion Battery | ||
| Voltage | DC 18 V DC 21.6 | V | |
| (3.6 V × 5 cells) | (3.6 V × 10 cells) | (3.6 V × 12 cells) | |
[Battery Charger]
| Model No. EY0L82 | ||||
| Electrical rating See the rating plate on the bottom of the charger | ||||
| Weight 0.93 kg | ||||
| Charging time | EY9L45 EY9L47 EY9L51 EY9L52 | |||
| Usable: 50 min. | Usable: 35 min. | Usable: 55 min. | Usable: 35 min. | |
| Full: 60 min. | Full: 40 min. | Full: 70 min. | Full: 40 min. | |
| Model No. EY0L8 | 2 | ||
| Electrical rating | See the rating plate on the bottom of the charger | ||
| Weight 0.93 kg | |||
| Charging time | EY9L53 EY9L54 EY9L62 | ||
| Usable: 45 min. | Usable: 65 min. | Usable: 65 min. | |
| Full: 60 min. | Full: 80 min. | Full: 85 min. | |
NOTE:
This chart may include models that are not available in your area. Please refer to the latest general catalogue.
For the dealer name and address, please see the included warranty card.
VII. MAINTENANCE
Use only a dry, soft cloth for wiping the unit. Do not use a damp cloth, thinner, benzine, or other volatile solvents for cleaning.
In the event that the inside of the unit or battery pack is exposed to water, drain and allow to dry as soon as possible. Carefully remove any dust or iron filings that collect inside the unit. If you experience any problems operating the unit, consult with a repair shop.
VIII. ACCESSORIES
Battery Pack
See the Specification.
Battery Charger
EY0L82
See the Specification.
NOTE:
- Battery pack and charger are not included in this kit.
ONLY FOR U. K.
IX. CAUTION FOR AC MAINS LEAD
FOR YOUR SAFETY, PLEASE READ
THE FOLLOWING TEXT CAREFULLY
This appliance is supplied with a moulded three pin mains plug for your safety and convenience. A 5 amp fuse is fitted in this plug.
Should the fuse need to be replaced please ensure that the replacement fuse has a rating of 5 amp and that it is approved by ASTA or BSI to BS1362.
Check for the ASTA mark or the BSI mark on the body of the fuse.
If the plug contains a removable fuse cover you must ensure that it is refitted when the fuse is replaced.
If you lose the fuse cover the plug must not be used until a replacement cover is obtained.
A replacement fuse cover can be purchased from your local Panasonic Dealer.
CAUTION:
IF THE FITTED MOULDED PLUG IS UNSUITABLE FOR THE SOCKET OUTLET IN YOUR HOME THEN THE FUSE SHOULD BE REMOVED AND THE PLUG CUT OFF AND DISPOSED OF SAFELY. THERE IS A DANGER OF SEVERE ELECTRICAL SHOCK IF THE CUT OFF PLUG IS INSERTED INTO ANY 13 AMP SOCKET.
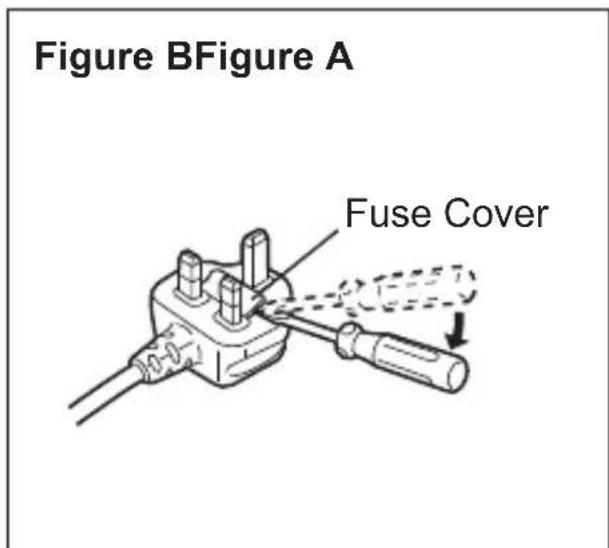
How to replace the fuse
The location of the fuse differs according to the type of AC mains plug (fi gures A and B).
Confirm the AC mains plug fitted and follow the instructions below. Illustrations may differ from actual AC mains plug.
Open the fuse cover with a screwdriver and replace the fuse and close or attach the fuse cover.

VEILIGHEIDSWAARSCHUWINGEN
WAARSCHUWING
Lees alle
Importer for Turkey:
Panasonic Life Solutions Elektrik Sanayi ve Ticaret Anonim Sirketi
Abdurrahmangazi Mah. Ebubekir Cad. No: 44
34887 Sancaktepe Istanbul/Turkiye
Panasonic Testing Centre
Panasonic Marketing Europe GmbH
Winsberging 15,
22525 Hamburg,
Germany
Panasonic Corporation 1006, Kadoma, Osaka 571-8501, Japan http://www.panasonic.com

- GENERAL SAFETY WARNINGS
- WARNING
- ADDITIONAL SAFETY INSTRUCTIONS
- CAUTION
- WARNING for charger and battery pack
- ASSEMBLY
- Attaching or Removing Battery pack
- OPERATION
- Example of use [Fig.2]
- IV-1. Illuminate the light
- NOTE:
- [Fig.5]
- IV-2. USB power output
- IV-3. Battery level indication function
- ALERT FUNCTION
- Low battery alert
- LED Overheat alert
- Battery overheat alert
- Recycling
- ATTENTION:
- Information for Users on Collection and Disposal of Old Equipment and used Batteries
- [For business users in the European Union]
- [Information on Disposal in other Countries outside the European Union]
- SPECIFICATIONS
- [Battery Charger]
- MAINTENANCE
- ACCESSORIES
- Battery Pack
- Battery Charger
- ONLY FOR U. K.
- CAUTION FOR AC MAINS LEAD
- FOR YOUR SAFETY, PLEASE READ
- THE FOLLOWING TEXT CAREFULLY
- CAUTION:
- How to replace the fuse
- VEILIGHEIDSWAARSCHUWINGEN
- WAARSCHUWING
Brand : PANASONIC
Model : EY37C4
Category : Camera lens