
TS35C - Weather Station HAMA - Free user manual and instructions
Find the device manual for free TS35C HAMA in PDF.

| Product type | Outdoor weather station (sensor) |
| Brand | Hama |
| Model | TS35C |
| Power supply | 2 LR6/AA batteries (1.5 V) |
| Temperature measurement range | -40 °C to +70 °C |
| Humidity measurement range | 20% to 90% |
| Radio frequency | 433 MHz |
| Radio range | Up to 50 m (open space) |
| Number of channels | 3 (CH1, CH2, CH3) |
| Measurement cycle | Approximately 60 to 64 seconds |
| Display | LED on the measuring station |
| Installation | Wall-mounted (slot at back) or on stand |
| Package contents | Outdoor sensor TS35C, instruction manual |
| Reset | RESET button (restores factory settings) |
| Safety | Observe battery polarity; do not open the housing; avoid moisture and impact |
| Maintenance | Clean with a damp cloth without harsh detergent |
| Recycling | Do not dispose of with household waste; take to a collection point |
| Compatibility | Hama base stations ref. 00113984, 00113985, 00113986, 00186309 |
Frequently Asked Questions - TS35C HAMA
User questions about TS35C HAMA
0 question about this device. Answer the ones you know or ask your own.
Ask a new question about this device
Download the instructions for your Weather Station in PDF format for free! Find your manual TS35C - HAMA and take your electronic device back in hand. On this page are published all the documents necessary for the use of your device. TS35C by HAMA.
USER MANUAL TS35C HAMA
Operating Instructions
Bedienungsanleitung
Moded'emploi
Instruccionesdeuso
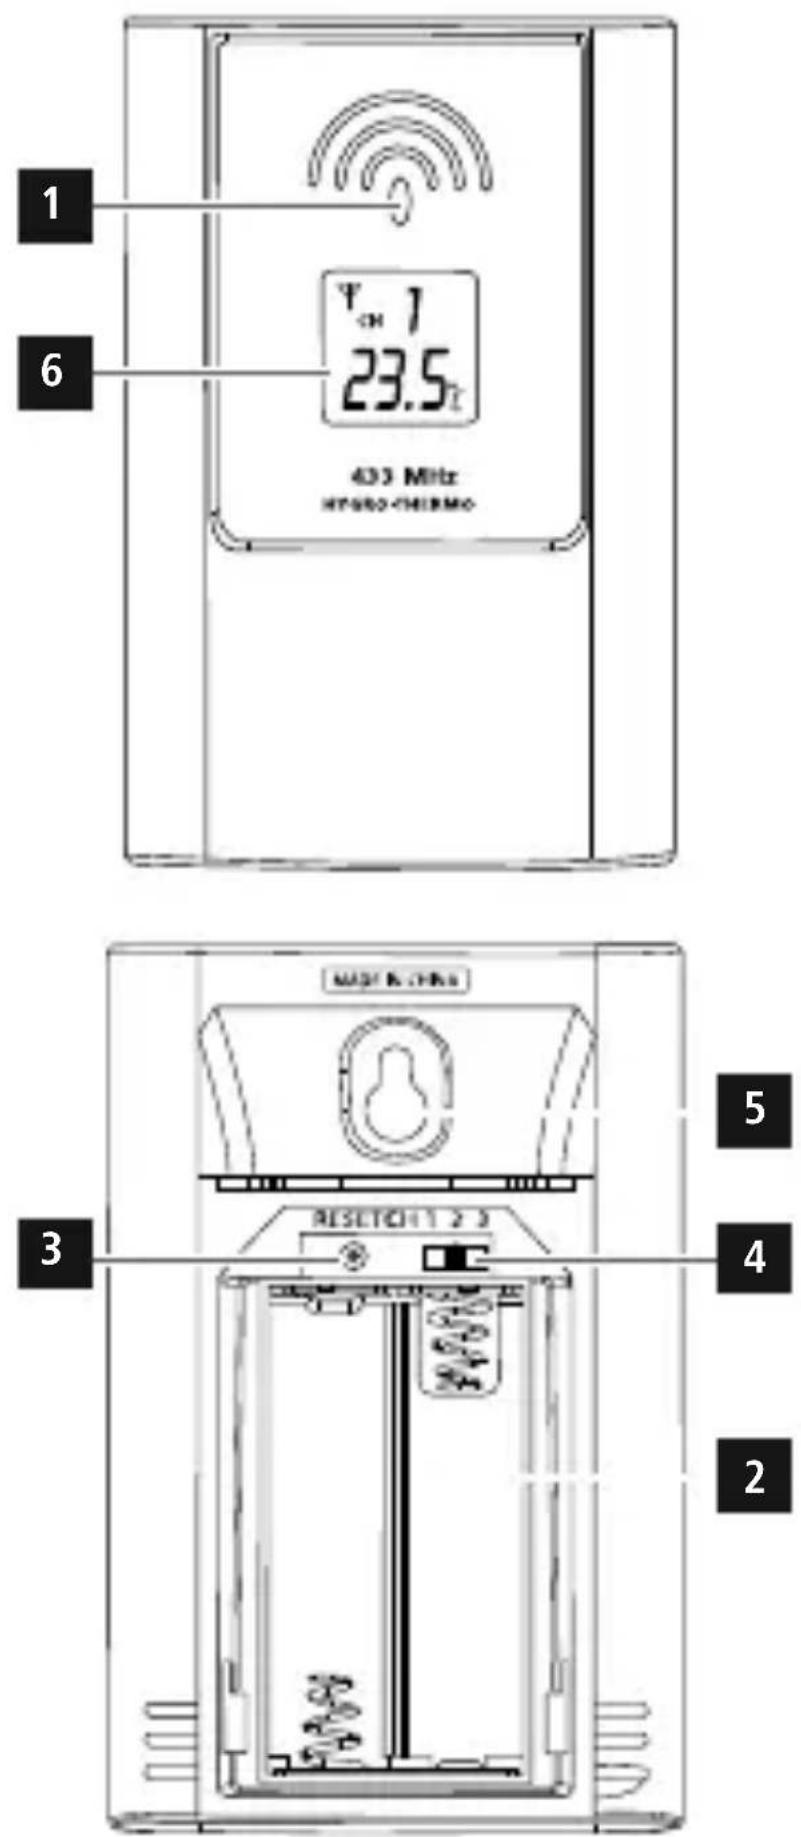
ControlsandDisplays
A M easuringstation
- LEDindicator
- Batterycompartment
- RESETbutton= r estoresfactorysettings
4.CHANNELslideswitch=s electschannel - Recessforwallmounting
- LCD display
Thankyouforchoosinga H amaproduct.
Takeyourtimeandreadthefollowinginstructionsandinformation completely. Please keep these instructions in a safe place for future reference.Ifyousellthedevice,pleasepasstheseoperatinginstructions ontothenewowner.
1. ExplanationofWarningSymbolsandNotes
Warning
This symbol is used to indicate safety instructions to draw your attention to specific hazards and risks.
Note
This symbol is used to indicate additional information or important notes.

2.PackageContents
•TS35COutdoorSensor
• Theseoperatinginstructions
3. SafetyNotes
• The product is intended for private, non-commercial use only.
- Donotoperatetheproductoutsidethepowerlimitsgiveninthe specifications.
- Donotusetheproductinmoistenvironmentsandavoidsplashes.
- Donotusetheproductintheimmediatevicinityofheatersorother heatsourcesorindirectsunlight.
- Do not use the product in areas where the use of electronic devices isnotpermitted.
- Donotputtheproductnearinterferencefields,metalframes, computers,TVs,etc.Electronicdevicesandwindowframescan negativelyaffecttheproduct's functionality.
- Donotdroptheproductanddonotexposeittoanymajorshocks.
- Donotopenthedeviceorcontinuetooperateitifitbecomes damaged.
- Do not attempt to service or repair the product yourself. Leave any and all serviceworktoqualifiedexperts.
- Keep the packaging material out of the reach of children due to the riskofsuffocation.
- Disposeofpackagingmaterialimmediatelyaccordingtolocally applicableregulations.
- Do not modify the product in any way. Doing so voids the warranty.
Warning-Batteries
- Wheninsertingbatteries, notethecorrectpolarity(+and-markings) and insert the batteries accordingly. Failure to do so could result in the batteries leakingorexploding.
- Onlyusebatteries(orrechargeablebatteries)thatmatchthe specifiedtype.
- Before you insert the batteries, clean the battery contacts and the polarcontacts.
Warning-Batteries
- Donotallowchildrentochangebatterieswithoutsupervision.
- Do not mix old and new batteries or batteries of a different type or make.
- Remove the batteries from products that are not being used for anextendedperiod(unlessthesare b eingkeptreadyforan emergency).
- Donotshort-circuitbatteries.
- Donotchargebatteries.
- Donotthrowbatteriesinafire.
- Keepbatteriesoutofthereachofchildren.
- Neveropen, damageorswallowbatteriesorallowthemtoenter theenvironment. Theycancontaintoxic,environmentallyharmful heavymetals.
- Immediatelyremoveanddisposeofdeadbatteriesfromthe product.
- Avoid storing, charging or using the device in extreme temperatures andextremelylowatmosphericpressure (forexample,athigh altitudes).
4. Gettingstarted
- Openthebatterycompartment(2).
- MovetheCHslideswitch(4)totheleftorrighttoselectthechannel onwhichthemeasuringstationtransmits.
- InserttwoAAbatterieswiththecorrectpolarity.
- Once the channel has been assigned to a transmitter, it can only be changed by removing the batteries or by resetting theme measuring station (see section 6.5 Reset).
- Thenclosethebatterycompartmentcover.
Replacingthebatteries
- Openthebatterycompartment(2), remove and properly dispose of the dead batteries and insert twonew AAA batteries with the correct polarity. The closethe battery compartment cover.

Note
Before use, make sure that you insert the batteries in the measuring stationfirstandtheninthebasestation.
5. Installation
Note-Installation

- We recommend initially placing the base and measuring stations in the intended locations without installing them and making all the settings described in 6. Operation.
- Onlyinstallthestationsoncetheappropriatesettingshavebeen madeanda s tablewirelessconnectionisestablished.
Note

- Thewirelesstransmissionrangebetweenthemeasuringandbase stationsisupto50metresinopenspaces.
Before installation, ensure that wireless transmission will not be disrupted by interference or obstacles like buildings, trees, vehicles, high-voltagelines, etc. - Before the final installation, ensure that there is sufficient reception between the intended installation locations.
- When installing the measuring station, ensure that it is protected from direct sunlight and rain.
Note

- The international standard height for measuring air temperature is 1.25m (4 ft) aboveground.
Warning-Batteries
- Buyspecialorsuitableinstallationmaterialfromas p e c i a l i s e d dealerforwall-mounting.
- Ensure that no faulty or damaged parts are installed.
- Neverapplyforceduringinstallation.Thiscoulddamagethe product.
-
Before installation, ensure that the chosen wall is suitable for the weight to be installation, and make sure that there are no electrical wires, water, gas or other lines in the wall at the installationsite.
-
You can position the measuring station on a level outdoor surface using the base.
- Were recommend installing themeasuring station securely on an outdoor wall.
• Install an anchor, screw, nail, etc. in the wall of your choice. - Hangthemeasuringstationusingtheopeningintendedforthis purpose(4).
6.Operation
6.1.Connectiontothemeasuringstation
- To connect the base station and the measuring station, place the two devicesasclosetogeteraspossible.
- Afteryouinsertthebatteries, thebasestationautomaticallysearches fora c onnectiontothemeasuringstationandperformsinitialsetup.
- If the device does not connect automatically, the manual search programonthebasestationmustbestarted.
Note

- Initialsetuptakesapproximately5 minutes.
- During the connection attempt, theradiosymbol and the LED indicator(1) on themeasuring station will flash.
- Donotpressanybuttonsduringsetup. Otherwise, values may not be transmitted correctly and there is a risk of value errors and inaccuracies.
- Thesetupprocessiscompletedwhentheindoorandoutdoor measurementdataisdisplayedonthebasestation.
- Themeasuredvalueisautomaticallyupdatedbythebasedevice aboutevery60–64seconds.
6.2. Selecting the channel/Other measuring stations
Note
- Ensure that the base station and measuring station are set to thesamechannel.Suitablebasestationscanbefoundatwww.hama.com
- Thetransmissionchannelonthesuppliedmeasuringstationcanbe changed/set(CH1,CH2,CH3).
• Themeasuringstationissuitableforthefollowingbasestations: 00113984,00113985,00113986,00186309
6.3.Lowbatterycharge
Oncethebatterysymbolappearsonthedisplayofthebasestation, thecapacityofthebatteriesinthemeasuringstationisverylow.Replace thebatteriesimmediately.
Note— R eplacingthebatteries
- Notethatthestationshavetoberesynchronisedeachtimeafter youchangethebatteriesinthemeasuringorbasestation.
- Todothis, removethebatteries from the other station and then reinsert them, or changethem as required.
6.4Reset
PresstheRESETbutton(3)torestartthestation.Themeasuringstation returnstothefactorysettings.
7. Care and Maintenance
- Only clean this product with a slightly damp, lint-free cloth and do not use aggressive cleaning agents.
• Make sure that water does not get into the product.
8.WarrantyDisclaimer
Hama GmbH & Co KG assumes no liability and provides no warranty for damageresultingfromimproperinstallation/mounting,improperuseof theproductorfromfailure t o o bservetheoperatinginstructionsand/orsafetynotes.
9.TechnicalData
 | Measuringstation |
| Powersupply | 1.5V2 x AAbatteries |
| MeasuringrangeThermometerHygrometerBarometer | -40°C - +70°C/ -40°F - 158°F20%-90% |
| MeasurementincrementsTemperatureHumidity | 0,1°C/ °F1% |
| Measuringcyclethermometer/hygrometerBarometer | ~60-64s- |
| HygrometerYes | |
| ThermometerYes | |
| BarometerNo | |
| Moonphases- | |
| Frequency433MHz | |
| Radio-frequencypowertransmitted | 0,018μW |
| Range≤50m |
10. Recycling Information
Noteonenvironmentalprotection:
natural_image
Symbol of a trash bin crossed with a diagonal line, no text or numbers presentAftertheimplementationoftheEuropeanDirective2012/19/EUand2006/66/EUinthenationallegalsystem,the followingapplies:Electricandelectronicdevicesaswellas batteriesmustnotbedisposedofwithhouseholdwaste. Consumersare o bligedbylawtoreturnelectricaland
electronicdevicesaswellasbatteriesattheendoftheirservicelivesto thepubliccollectingpointsetupforthispurposeorpointofsale.Details to this are defined by the national law of the respective country. This symbolontheproduct,theinstructionmanualorthepackageindicates that a product is subject to these regulations. By recycling, reusing the materialsorotherformsofutilisingolddevices/batteries,youare m a k i n g animportantcontributiontoprotectingourenvironment.
11. DeclarationofConformity

Hereby, Hama GmbH & Co KG declares that the radio equipmenttype[00186346,00176932]isincompliance with Directive2014/53/EU. ThefulltextoftheEUdeclaration
ofconformityisavailableatthefollowinginternetaddress: www.hama.com- >00186346,00176932- > Downloads.
Maximumradio-frequencypowertransmitted0,501mW
natural_image
Symbol of a trash bin crossed with a diagonal line, no text or numbers presentnatural_image
Symbol of a trash bin crossed out by two crossed lines, with a solid black rectangle below (no text or numbers present)natural_image
Symbol of a trash bin crossed out by two crossed lines, with a solid black rectangle below (no text or labels)natural_image
Symbol of a trash bin crossed with a diagonal line, no text or numbers presentnatural_image
Symbol of a trash bin crossed with a diagonal line, no text or numbers presentnatural_image
Symbol of a trash bin crossed out by two crossed lines, with a solid black rectangle below (no text or labels)natural_image
Symbol of a trash bin crossed with a diagonal line, no text or numbers present10. Pokynyk likvidaci
natural_image
Symbol of a trash bin crossed out by two crossed lines, with no text or numbers present.natural_image
Symbol of a trash bin crossed out by two crossed lines, with no text or numbers present.natural_image
Simple line drawing of a trash bin with no text or symbolsnatural_image
Symbol of a trash bin crossed out by two crossed lines, with no text or numbers present.natural_image
Symbol of a trash bin crossed with a diagonal line, no text or numbers presentnatural_image
Symbol of a trash bin crossed with a diagonal line, no text or numbers present86652Monheim/Germany
Service& Support

www.hama.com

+499091502-0
D
GB
All listed brands are trademarks of the corresponding companies. Errors and omissions excepted, and subject to technical changes. Our general terms of delivery and payment are applied.