USER MANUAL D27111 DEWALT
Product and Safety GmbH (TRPS)
Am Grauen Stein 1
D-51105 Köln
Germany
| Cert. No. |
| BM 60015405 0001 |
Product and Safety GmbH (TRPS)
Am Grauen Stein 1
D-51105 Köln
Germany
You have chosen a DeWALT tool. Years of experience, thorough product development and innovation make DeWALT one of the most reliable partners for professional power tool users.
Technical data
| D27111 |
| Voltage | V |
| Power input W 1,500 | |
| Power output W 1,100 | |
| Max. blade speed min | -1 2,950 |
| Blade diameter mm 305 | |
| Blade bore mm 30 | |
| Blade body thickness mm 1.8 | |
| Riving knife thickness mm 2.0 | |
| Riving knife hardness 43 ± 5 | |
| Automatic blade brake time | s < 10.0 |
| Weight | kg 26.5 |
Cutting capacities
| Mitre saw mode |
| Mitre (max. positions) | | left 50° |
| right 60° |
| Bevel (max. positions) | | left 48° |
| right 0° |
| Max. width of cut 90° at max. height 90 mm | | mm 220 |
| Max. width of cut at 45° litre at max. height 90 mm | | mm 155 |
| Max. width of cut at 45° bevel at max. height 50 mm | | mm 220 |
| Saw bench mode |
| Max. depth of cut | | mm 0-51 |
| Fuses: |
| Europe | 230 V tools | 10 Amperes, mains |
| U.K. & Ireland | 230 V tools | 13 Amperes, in plugs |
| U.K. & Ireland | 115 V tools | 16 Amperes, mains |
The following symbols are used throughout this manual:

Denotes risk of personal injury, loss of life or damage to the tool in case of non-observation of the instructions in this manual.

Denotes risk of electric shock.

Sharp edges.

D27111
DeWALT declares that these Power Tools have been designed in compliance with: 98/37/EC, 89/336/EEC, 73/23/EEC, EN 61029-1, EN 61029-2-11, EN 55014, EN 55014-2, EN 61000-3-2 & EN 61000-3-3.
230 For more information, please contact DEWALT at the address below or refer to the back of the manual.
Level of sound pressure according to 86/188/EEC & 98/37/EC, measured according to EN 61029-2-11:
| D27111 |
| L_M (sound pressure) | dB(A)* 98 |
| L_WA (acoustic power) | dB(A) 111 |

Take appropriate measures for the protection of hearing.
Weighted root mean square acceleration value according to EN 61029-2-11:
TUV Rheinland
Product and Safety GmbH (TRPS)
Am Grauen Stein 1
D-51105 Köln
Germany
| Cert. No. |
| BM 60015405 0001 |
Director Engineering and Product Development Horst Großmann

D-65510, Idstein, Germany
Safety instructions
When using stationary power tools, always observe the safety regulations applicable in your country to reduce the risk of fire, electric shock and personal injury.
Read all of this manual carefully before operating the tool.
Save this manual for future reference.
General
1 Keep work area clean
Cluttered areas and benches can cause accidents.
2 Consider work area environment
Do not expose the tool to rain. Do not use the tool in damp or wet conditions. Keep the work area well lit (250 - 300 Lux). Do not use the tool where there is a risk of causing fire or explosion, e.g. in the presence of flammable liquids and gases.
3 Keep children away
Do not allow children, visitors or animals to come near the work area or to touch the tool or the mains cable.
4 Dress properly
Do not wear loose clothing or jewellery, as these can be caught in moving parts. Wear protective hair covering to keep long hair out of the way. When working outdoors, preferably wear suitable gloves and non-slip footwear.
5 Personal protection
Always use safety glasses. Use a face or dust mask whenever the operations may produce dust or flying particles. If these particles might be considerably hot, also wear a heat-resistant apron.
Wear ear protection at all times. Wear a safety helmet at all times.
6 Guard against electric shock
Prevent body contact with earthed or grounded surfaces (e.g. pipes, radiators, cookers and refrigerators). When using the tool under extreme conditions (e.g. high humidity, when metal swarf is being produced, etc.), electric safety can be improved by inserting an isolating transformer or a (FI) earth-leakage circuit-breaker.
7 Do not overreach
Keep proper footing and balance at all times.
8 Stay alert
Watch what you are doing. Use common sense. Do not operate the tool when you are tired.
9 Secure workpiece
Use clamps or a vice to hold the workpiece. It is safer and it frees both hands to operate the tool.
10 Connect dust extraction equipment
If devices are provided for the connection of dust extraction and collection facilities, ensure that these are connected and properly used.
11 Remove adjusting keys and wrenches
Always check that adjusting keys and wrenches are removed from the tool before operating the tool.
12 Extension cables
Before use, inspect the extension cable and replace if damaged. When using the tool outdoors, only use extension cables intended for outdoor use and marked accordingly.
13 Use appropriate tool
The intended use is described in this instruction manual. Do not force small tools or attachments to do the job of a heavy-duty tool. The tool will do the job better and safer at the rate for which it was intended. Do not force the tool.
Warning! The use of any accessory or attachment or performance of any operation with this tool other than those recommended in this instruction manual may present a risk of personal injury.
14 Check for damaged parts
Before use, carefully check the tool and mains cable for damage. Check for misalignment and seizure of moving parts, breakage of parts, damage to guards and switches and any other conditions that may affect its operation.
Ensure that the tool will operate properly and perform its intended function. Do not use the tool if any part is damaged or defective.
Do not use the tool if the switch does not turn it on and off. Have any damaged or defective parts replaced by an authorised De WALT repair agent. Never attempt any repairs yourself.
15 Unplug tool
Switch off and wait for the tool to come to a complete standstill before leaving it unattended. Unplug the tool when not in use, before changing any parts of the tools, accessories or attachments and before servicing.
16 Avoid unintentional starting
Be sure that the tool is switched off before plugging in.
17 Do not abuse cord
Never pull the cord to disconnect from the socket. Keep the cord away from heat, oil and sharp edges.
18 Store idle tools
When not in use, tools must be stored in a dry place and locked up securely, out of reach of children.
19 Maintain tools with care
Keep the tools in good condition and clean for better and safer performance. Follow the instructions for maintenance and changing accessories. Keep all handles and switches dry, clean and free from oil and grease.
20 Repairs
This tool is in accordance with the relevant safety regulations. Have your tool repaired by an authorised DeWALT repair agent. Repairs should only be carried out by qualified persons using original spare parts; otherwise this may result in considerable danger to the user.
Additional safety rules for litre saws
- Make sure all locking knobs and clamp handles are tight before starting any operation.
- Do not operate the machine without the guard in position, or if the guard does not function or is not maintained properly.
- Never use your saw without the kerf plate.
- Never place either hand in the blade area when the saw is connected to the electrical power source.
- Never attempt to stop a machine in motion rapidly by jamming a tool or other means against the blade; serious accidents can be caused unintentionally in this way.
- Before using any accessory consult the instruction manual.
The improper use of an accessory can cause damage.
- Select the correct blade for the material to be cut.
- Observe the maximum speed marked on the saw blade.
- Use a holder or wear gloves when handling a saw blade.
- Ensure that the saw blade is mounted correctly before use.
- Make sure that the blade rotates in the correct direction.
Keep the blade sharp.
- Do not use blades of larger or smaller diameter than recommended.
Do not use any spacers to make the blade fit onto the spindle.
For the proper blade rating refer to the technical data. Use only the blades specified in this manual, complying with EN 847-1.
- Consider applying specially designed noise-reduction blades.
- Do not use HSS blades.
- Do not use cracked or damaged saw blades.
- Do not use any abrasive discs.
- Raise the blade from the kerf in the workpiece prior to releasing the switch.
- Ensure that the arm is securely fixed when performing bevel cuts.
- Do not wedge anything against the fan to hold the motor shaft.
- The blade guard on your saw will automatically raise when the arm is brought down; it will lower over the blade when the arm is raised.
The guard can be raised by hand when installing or removing saw blades or for inspection of the saw. Never raise the blade guard manually unless the saw is switched off.
- Keep the surrounding area of the machine well maintained and free of loose materials, e.g. chips and cut-offs.
- Check periodically that the motor air slots are clean and free of chips.
- Replace the kerf plate when worn.
- Disconnect the machine from the mains before carrying out any maintenance work or when changing the blade.
- Never perform any cleaning or maintenance work when the machine is still running and the head is not in the rest position.
- When possible, always mount the machine to a bench.
- If you use a laser to indicate the cutting line, make sure that the laser is of class 2 according to EN 60825-1:2001. Do not replace a laser diode with a different type. If damaged, have the laser repaired by an authorised repair agent.
- When performing vertical straight cross-cuts, adjust the sliding fence correctly to ensure a clearance of max. 5 mm between the saw blade and the fence.
- When performing metre, bevel or compound metre cuts, adjust the sliding fence to ensure the correct clearance for the application.
- Refrain from removing any cut-offs or other parts of the workpiece from the cutting area while the saw is running and the saw head is not in the rest position.
Additional safety rules for saw benches
- Do not use saw blades with a body thickness greater or a width of tooth smaller than the thickness of the riving knife.
- Make sure that the blade rotates in the correct direction and that the teeth are pointing to the front of the saw bench.
- Be sure all clamp handles are tight before starting any operation.
- Be sure all blade and flanges are clean and the recessed sides of the collar are against the blade. Tighten the arbor nut securely.
- Keep the saw blade sharp and properly set.
- Make sure that the riving knife is adjusted to the correct distance from the blade - maximum 5 mm.
- Never operate the saw without the upper and lower guards in place.
- Keep your hands out of the path of the saw blade.
- Disconnect the saw from the mains supply before changing blades or carrying out maintenance.
- Use a push stick at all times, and ensure that you do not place hands closer than 150mm from the saw blade while cutting.
- Do not attempt to operate on anything but the designated voltage.
- Do not apply lubricants to the blade when it is running.
- Do not reach around behind the saw blade.
Always keep the push stick in its place when not in use.
- Do not stand on top of the unit.
- During transportation make sure that the upper part of the saw blade is covered, e.g. by the guard.
- Do not use the guard for handling or transportation.
- Adjust the sliding fence correctly to avoid contact with the lower guard.
- Ensure that the table is securely fixed.
- Do not use the saw for cutting any material other than wood.
- Slotting, rebating or grooving is not allowed.
Additional safety rules for table top litre saws
- Do not allow untrained people to operate this machine.
- Whenever you use the machine, report any faults in the machine as soon as they are discovered.

This machine is equipped with a specially configured power supply cord (type M attachment). If the power supply cord is damaged or otherwise defective, it must only be replaced by the manufacturer or by an authorized repair agent.
-
For your own safety, always secure the machine to a workbench or a suitable chipboard plate with the minimum dimensions of 1000 × 1000 × 22 ~mm . Use fasteners of 5 ~mm bolts or larger with a suitable length.
-
Ensure that bystanders do not stand behind the machine.
- When the saw blade is jammed in the workpiece, always switch off the machine before removing the workpiece.
- Ensure that the upper portion of the saw blade is completely enclosed in the litre sawing mode. Never remove the upper blade guard when using the machine in litre saw mode.
- Ensure that the arm is securely fixed when sawing in the bench saw mode.
- Make sure that the upper and lower guard are in place in the bench saw mode. Only use the machine when the saw bench table is in horizontal position.
Residual risks
The following risks are inherent to the use of saws:
- injuries caused by touching the rotating parts
In spite of the application of the relevant safety regulations and the implementation of safety devices, certain residual risks cannot be avoided. These are:
- Impairment of hearing.
- Risk of accidents caused by the uncovered parts of the rotating saw blade.
- Risk of injury when changing the blade.
- Risk of squeezing fingers when opening the guards.
- Health hazards caused by breathing dust developed when sawing wood, especially oak, beech and MDF.
-
Risk of injury caused by parts of the workpiece hurled at bystanders.
-
Risk of accidents caused by flying metal particles when cutting into the fence.
-
Fire hazard due to extreme dust concentration when not cleaned regularly.
- Risk of uncontrolled situations when used in ambient temperatures below -10^ or above +45^ .
The following factors are of influence to noise production:
- the material to be cut
- the type of saw blade
- the feed force
The following factors are of influence to dust exposure:
- worn saw blade
- dust extractor with air velocity less than 20m / s
- workpiece not exactly guided
The following pictograms are shown on the tool:

use warning.

the instruction manual before use

using the machine in the litre saw mode, make sure that the upper part of the saw blade is fully covered by the upper saw blade guard. Only use the machine when the bench saw table is in highest position.
using the machine in the bench saw mode, make sure that the upper and lower guards are in place and functioning properly. Only use the machine when the bench saw table is in horizontal position.

making a sliding cut in metre saw mode, observe the instructions as provided under "Performing a sliding cut".

point.
Package contents
The package contains:
1 Table top litre saw
1 Saw blade
1 Parallel rip fence
1 Upper blade guard
1 Push stick
1 Allen key 5 mm
1 Allen key 6 mm
1 Instruction manual
1 Exploded drawing
- Check for damage to the tool, parts or accessories which may have occurred during transport.
- Take the time to thoroughly read and understand this manual prior to operation.
Description (fi g. A1 - A6)
Your D27111 table top litre saw has been developed for professional applications. This high precision machine can be easily and quickly set to crosscut, bevel, litre, or compound litre.
Fig. A1
1 On/off switch
2 Operating handle
3 Head lock up release lever
4 Additional saw bench table locking knob
5 Moveable front lower blade guard
6 Fence right-hand side
7 Fixed table
8 Kerf plate
9 Mitre latch
10 Mitre lever
11 Rotating table/mitre arm
12 Mitre scale
13 Fence left-hand side
14 Bevel scale
15 Bevel clamp handle
16 Saw bench table locking knob
17 Head lock down pin
18 Rail lock knob
Fig.A2
19 Saw bench table
20 Riving knife
21 Upper blade guard
22 Parallel rip fence
23 Push stick location
24 Moveable rear lower blade guard
25 Attachment mounting holes
26 Hand indentation
Optional accessories
Fig.A3
27 Material clamp
Fig.A4
28 Legstand
Electrical safety
The electric motor has been designed for one voltage only.
Always check that the power supply corresponds to the voltage on the rating plate.

115 V units have to be operated via a failsafe isolating transformer with an earth screen between the primary and secondary winding.
Mains plug replacement
(U.K. & Ireland only)
- Should your mains plug need replacing and you are competent to do this, proceed as instructed below. If you are in doubt, contact an authorized DeWALT repair agent or a qualified electrician.
- Disconnect the plug from the supply.
- Cut off the plug and dispose of it safely; a plug with bared copper conductors is dangerous if engaged in a live socket outlet.
- Only fit 13 Amperes BS1363A approved plugs fitted with the correctly rated fuse (1).
- The cable wire colours, or a letter, will be marked at the connection points of most good quality plugs. Attach the wires to their respective points in the plug (see below). Brown is for Live (L) (2), blue is for Neutral (N) (4) and green/yellow is for Earth (E).
- Before replacing the top cover of the mains plug ensure that the cable restraint (3) is holding the outer sheath of the cable firmly and that the leads are correctly fixed at the terminal screws.

er use a light socket.
Never connect the live (L) or neutral (N) wires to the earth pin marked E or 1±
For 115V units with a power rating exceeding 1500 W, we recommend to fit a plug to BS4343 standard.
Using an extension cable
If an extension cable is required, use an approved extension cable suitable for the power input of this machine (see technical data). The minimum conductor size is 2.5mm^2
When using a cable reel, always unwind the cable completely.
Also refer to the table below.
| Conductor size (mm2) | Cable rating (Amperes) |
| 0.75 | 6 | | | | | | |
| 1.00 | 10 | | | | | | |
| 1.50 | 15 | | | | | | |
| 2.50 | 20 | | | | | | |
| 4.00 | 25 | | | | | | |
| Voltage | Cable length (m) |
| 7.5 | 15 | 25 | 30 | 45 | 60 | |
| Amperes | Cable rating (Amperes) |
| 230 | 0 - 2.0 | 6 | 6 | 6 | 6 | 6 | |
| 2.1 - 3.4 | 6 | 6 | 6 | 6 | 6 | |
| 3.5 - 5.0 | 6 | 6 | 6 | 10 | 15 | |
| 5.1 - 7.0 | 10 | 10 | 10 | 15 | 15 | |
| 7.1 - 12.0 | 15 | 15 | 15 | 20 | 20 | |
| 12.1 - 20.0 | 20 | 20 | 20 | 25 | - | |
Installation
Unpacking (flg.B)
-
Remove the saw from the packaging material carefully.
-
Release the rail lock knob (18), and push the saw head back to lock it in the rear position.
- Lock the table (19) into highest position.
- Press down the operating handle (2) and pull out the lock down pin (17), as shown.
- Gently release the downward pressure and allow the head to rise to its full height.
Bench mounting (fi g. C)
- Holes (36) are provided in all four feet to facilitate bench mounting. Two different sized holes are provided to accommodate different sizes of bolts. Use either hole; it is not necessary to use both. Always mount your saw firmly to prevent movement. To enhance the portability, the tool can be mounted to a piece of 12.5mm or thicker plywood which can then be clamped to your work support or moved to other job sites and reclamped.
- When mounting your saw to a piece of plywood, make sure that the mounting screws do not protrude from the bottom of the wood. The plywood must sit flush on the work support. When clamping the saw to any work surface, clamp only on the clamping bosses where the mounting screw holes are located. Clamping at any other point will interfere with the proper operation of the saw.
- To prevent binding and inaccuracy, be sure the mounting surface is not warped or otherwise uneven. If the saw rocks on the surface, place a thin piece of material under one saw foot until the saw is firm on the mounting surface.
The following tools are supplied with the machine:
1 Allen key 5 mm (37)
1 Allen key 6 mm (38)
- Take care to store the tools each time after they have been used in assembly or adjustment.
Assembly

to assembly always unplug the tool.
Mounting the upper blade guard (fi g. E)
The upper blade guard (20) is designed to be quickly and easily attached to the riving knife (19) once the machine has been set up for saw bench mode.
- Loosen the wingnut (39).
- Holding the guard vertically, align the slot in the rear of the guard with the riving knife.
- Lower the guard over the riving knife (19), making sure that the shaft of the bolt enters the recess.
- Turn the guard into horizontal position, which will lock the guard to the riving knife by the locating screw (40).
- Tighten the wingnut
Mounting the saw blade (fg. D & F1 - F4)

teeth of a new blade are very sharp and can be dangerous.
In order to fit a new saw blade it is necessary to adjust the table into highest position and raise the saw head to its highest position.
- Insert the Allen key (37) through the hole (42) in the casing into the spindle end (fi g. F1). Place the Allen key (38) into the blade locking screw (43) (fi g. F2).
-
The blade locking screw has a left-handed thread, therefore holding the Allen key firmly, turn the spanner clockwise to loosen.
-
Depress the head lock up release lever (3) to release the lower guard (5 & 23), then raise the lower guard as far as possible (fi g. F3).
- Remove the blade locking screw (43) and the outside arbor collar (44) (fig. F4).
- Make sure the inner flange and both faces of the blade are clean and free of dust.
- Install the saw blade (45) onto the shoulder (46) provided on the inside arbor collar (47), making sure that the teeth at the bottom edge of the blade are pointing toward the back of the saw (away from the operator).
- Carefully ease the blade into position and release the lower blade guard.
- Replace the outer arbor collar.
- Tighten the blade locking screw (43) by turning counter-clockwise while holding the Allen key steady with your other hand.
- Place the Allen keys in their storage position (fig. D).

After mounting or replacing the blade, always check that the blade is fully covered by the guard.
Adjustment

to adjustment always unplug the tool.
Adjusting the saw blade (fi g. F2)
If the saw blade is wobbling during start up and run down, then adjust as follows.
- Loosen the screw for the arbor collar (44) and rotate the blade (45) a quarter turn.
- Retighten the screw and check to see if the blade has any wobble.
- Repeat these steps until the blade wobble has been eliminated.
Adjustments for litre saw mode
Your litre saw was accurately adjusted at the factory. If readjustment due to shipping and handling or any other reason is required, follow the steps below to adjust your saw. Once made, these adjustments should remain accurate.
Checking and adjusting the blade to the fence (fi g. G1 - G4)
- Release the litre lever (10) and depress the litre latch (9) to release the litre arm (11).
- Swing the metre arm until the latch locates it at the 0^ metre position. Do not tighten the lever.
- Pull down the head until the blade just enters the saw kerf (48).
- Place a square (49) against the left side (13) of the fence and blade (45) (fig. G3).

Not touch the tips of the blade teeth with the square.
If adjustment is required, proceed as follows:
- Loosen the screws (50) and move the scale/mitre arm assembly left or right until the blade is at 90^ to the fence as measured with the square.
- Retighten the screws (50). Pay no attention to the reading of the mitre pointer at this point.
Adjusting the litre pointer (fi g. G1, G2 & H)
- Release the litre lever (10) and depress the litre latch (9) to release the litre arm (11).
- Move the litre arm to set the litre pointer (51) to the zero position, as shown in fig. H.
-
With the litre lever loose, allow the litre latch to snap into place as you rotate the litre arm past zero.
-
Observe the pointer (51) and litre scale (12). If the pointer does not indicate exactly zero, loosen the screw (52), move the pointer to read 0^ and tighten the screw.
Mitre lock/detent rod adjustment (fi g. I)
If the base of the saw can be moved while the metre lever (10) is locked, the metre lock/detent rod (53) must be adjusted.
- Unlock the litre lever (10).
- Fully tighten the metre lock/detent rod (53) using a screwdriver (54). Then loosen the rod a quarter of a turn.
- Check that the table does not move when the lever (10) is locked at a random (not preset) angle.
Checking and adjusting the blade to the table (fi g. J1 - J4)
- Loosen the bevel clamp handle (15).
- Press the saw head to the right to ensure it is fully vertical and tighten the bevel clamp handle.
- Pull down the head until the blade just enters the saw kerf (48).
- Place a set square (49) on the table and up against the blade (45) (fi g. J2).

I touch the tips of the blade teeth with the square.
- If adjustment is required, proceed as follows:
- Loosen the bevel clamp handle (15) and turn the vertical position adjustment stop screw (55) in or out until the blade is at 90^ to the table as measured with the square.
- If the bevel pointer (56) does not indicate zero on the bevel scale (14), loosen the screw (57) that secures the pointer and move the pointer as necessary.
Adjusting the fence (fg. K1 & K2)
The upper part of the left side of the fence can be adjusted to the left to provide clearance, allowing the saw to bevel to a full 45^ left. To adjust the fence (13):
- Loosen the plastic knob (58) and slide the fence to the left.
- Make a dry run with the saw switched off and check for clearance. Adjust the fence to be as close to the blade as practical to provide maximum workpiece support, without interfering with the up and down movement of the arm.
- Tighten the knob securely.

The guide groove (59) can become clogged with sawdust. Use a stick or some low pressure air to clear the guide groove.
The moveable part of the right side of the fence can be adjusted to provide maximum support of the workpiece near the blade, while allowing the saw to bevel to a full 45^ left. The sliding distance is limited by stops in both directions. To adjust the fence (6):
- Loosen the wingnut (60) to release the fence (6).
- Slide the fence to the left.
- Make a dry run with the saw switched off and check for clearance. Adjust the fence to be as close to the blade as practical to provide maximum workpiece support, without interfering with the up and down movement of the arm.
- Tighten the wingnut (60) to secure the fence in place.
Checking and adjusting the bevel angle (fi g. A1, A2 & J5)
- Loosen the left side fence clamping knob (58) and slide the upper part of the left side fence to the left as far as it will go.
-
Loosen the bevel clamp handle (15) and move the saw head to the left. This is the 45^ bevel position.
If adjustment is required, proceed as follows:
-
Turn the stopscrew (61) in or out as necessary until the pointer (56) indicates 45^ .

While performing this adjustment, it is advisable to take the weight of the saw head by holding it. This will make it easier to turn the adjustment screw.
Rail guide adjustment (fi g. L)
- Regularly check the rails for clearance.
- To reduce clearance, gradually rotate the set screw (62) clockwise while sliding the saw head back and forth.
Adjustments for saw bench mode
Changing from litre saw to saw bench mode (fi g. A1 & A2)
- Put the blade into 0^ cross-cut position with the metre lever (10) secured (fi g. A1).
- Lock the rail lock knob (17) with the saw head in the rear position.
- Press the head lock-up release lever (3) to lower the head and depress the lock down pin (16).
- Fit the parallel fence (22) as described below.
Adjusting the riving knife (fi g. M1 & M2)
The correct position is for the top of the riving knife (20) to be no more than 2mm below the highest tooth of the blade and the body of the radius to be a maximum of 5mm from the tips of the saw blade teeth (fi g. M1).
- Loosen the bolts (63) which allows the riving knife to move up and down (fi g. M2).
- Slide the knife either up or down until the correct position is attained.
- Retighten the bolts (63) firmly.
Mounting and adjusting the parallel fence (fi g. N1 - N4)
- Slide the bracket (64) on from the right (fi g. N1). The clamping plate engages behind the front edge of the table.
- Slide the fence (22) up against the blade.
- Push the lever (65) down to secure the fence in place.
- Check that the fence is parallel to the blade.
If adjustment is required, proceed as follows:
- Loosen the adjustment knob (66) fastening the fence bracket to the fence support (fig. N2).
- Adjust the fence so that it is parallel to the blade by checking the distance between the blade and the fence at the front and rear of the blade.
- When the adjustment has been carried out, re-tighten the adjustment knob and check again that the fence is parallel to the blade.
- Check that the pointer (67) indicates zero on the scale (fi g. N3). If the pointer does not indicate exactly zero, loosen the screw (68), move the pointer to read 0 and tighten the screw.
The fence is reversible: the workpiece can be guided along the 52mm or along the 8mm face to allow the use of a push stick when ripping thin workpieces (fig N5).
- To set for 8mm , loosen the adjustment knob (66) and slide the fence (69) out of the clamping support (70).
- Turn the fence and re-engage the clamping support in the slot as shown (fig. N5).
- To use with the full height of 52mm , slide the fence into the clamping support with the wide face in the vertical position (fi g. N4).

- Use the 8 mm profil e for ripping low workpieces to allow access between the blade and the fence for the push stick.
- The rear end of the fence should be level with the front of the riving knife.
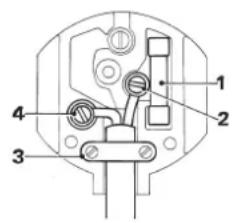
Adjusting the saw bench table (fi g. A1)
The table (19) slides up and down manually and is held at the required height with two locking knobs.
- Loosen the table locking knobs, both main (16) and additional (4), but do not take them off.
- Set the table to the proper height needed.
- Tighten the table locking knobs. First tighten the main knob (16), then secure the table in position with the additional knob (4).
Changing from saw bench to metre saw mode (fi g. A1 & A2)
- Lock the table (19) into highest position.
- Press down the operating handle (2) and pull out the lock down pin (17), as shown.
- Gently release the downward pressure and allow the head to rise to its full height.
Instructions for use

-
Always observe the safety instructions and applicable regulations.
-
Install the appropriate saw blade. Do not use excessively worn blades. The maximum rotation speed of the tool must not exceed that of the saw blade.
- Do not attempt to cut excessively small pieces.
- Allow the blade to cut freely. Do not force.
- Allow the motor to reach full speed before cutting.
- Make sure all locking knobs and clamp handles are tight.
- Ensure the material to be sawn is firmly secured in place.
-
Apply only a gentle pressure to the tool and do not exert side pressure on the saw blade.
-
Avoid overloading.
Always remove the dust from the machine after use to ensure the lower guard operates properly.
The attention of UK users is drawn to the "woodworking machines regulations 1974" and any subsequent amendments.
- When sawing wood and wood products, always connect a dust extraction device designed in accordance with the relevant regulations regarding dust emission.
- Although this saw will cut wood and many non-ferrous materials, these operating instructions refer to the cutting of wood only. The same guide-lines apply to the other materials. Do not cut fern (iron and steel) materials, fi bre cement or masonry with this saw!
- When cutting non-ferrous materials, always use a suitable DWALT saw blade with a rake angle of -5^ . Make sure to secure the material in position using a material clamp.
- Make sure to use the kerf plate. Do not operate the machine if the kerf slot is wider than 10mm .
Switching on and off (fi g. O)
The on/off switch has a built-in no-volt release function: should the power be shut off for some reason, the switch has to be deliberately reactivated.
- To switch the machine on, press the green start button (71).
- To switch the machine off, press the red stop button (72).
Basic saw cuts
Quality of cut
The smoothness of any cut depends on a number of variables, e.g. the material being cut. When smoothest cuts are desired for moulding and other precision work, a sharp (60 tooth carbide) blade and a slower, even cutting rate will produce the desired results.

Ensure that the material does not creep while cutting; clamp it securely in place. Always let the blade come to a full stop before raising the arm. If small fi bres of wood still split out at the rear of the workpiece, stick a piece of masking tape on the wood where the cut will be made. Saw through the tape and carefully remove tape when finished.
The machine is provided with a 38 mm dust extraction port on the upper blade guard.
- Connect a suitable dust extraction device during all sawing operations.
- Whenever possible, connect a dust extraction device designed in accordance with the relevant regulations regarding dust emission.
Sawing in mitre saw mode
It is dangerous to operate without guarding. Guards must be in position when sawing.
General handling
- In the metre saw mode, the sawhead is automatically locked in the upper "park"-position.
- Squeezing the guard release lever will unlock the sawhead. Moving the sawhead down retracts the movable lower guard.
- Never seek to prevent the lower guard returning to its park position when the cut is completed.
- Your saw can cut workpieces up to 220mm width by 90mm height. For the proper cutting capacities, refer to the technical data. The length of the workpiece should never exceed the base width without adequate support. The end of the workpiece should never be less than 160mm away from the blade without additional clamping means.
- In operation, place your hands no closer than 160mm from the blade. When cutting short material (min. 160mm to the left or the right of the blade), the use of the optional material clamp is required.
- The minimum length of offcut material is 10mm
- When cutting workpieces longer than the table width, make sure that the workpiece is stable over its full length. Support the protruding parts of the workpiece as necessary, e.g. using the optional workpiece extension.
- When cutting UPVC sections, a supporting piece made out of timber with a complementary profi le should be placed beneath the material being cut to provide the correct level of support.
Vertical straight cross cut (fig. A1 & P)
- Release the mitre lever (10) and depress the mitre latch (9).
- Engage the litre latch at the 0^ position and tighten the litre lever.
- Place the wood to be cut against the fence (6 & 13).
- Take hold of the operating handle (2) and depress the head lock up release lever (3) to release the head.
- Switch the machine on and allow the saw blade to reach full speed.
- Depress the head to allow the blade to cut through the timber and enter the plastic kerf plate (8).
- After completing the cut, switch the machine off and wait for the saw blade to come to a complete standstill before returning the head to its upper rest position.
The guide rail allows cutting larger workpieces using an out-down-back sliding motion.
- Release the rail lock knob (17).
- Pull the saw head towards you and switch the tool on.
- Lower the saw blade into the workpiece and push the head back to complete the cut.
- Proceed as described above.

Cutting small pieces (fig. K1 & K2)
The upper part of the left side of the fence (13) and the moveable part of the right side of the fence (6) can be adjusted to provide maximum support when cutting small pieces.
- Put the saw blade into vertical position.
- Loosen the plastic knob (58) at least 3 full turns.
- Adjust the left fence as close to the blade as possible.
- Tighten the knob securely.
- Loosen the wingnut (60).
- Adjust the right fence as close to the blade as possible.
- Tighten the wingnut
Verticalmitre cross-cut (fi g.A1&R)
- Release the litre lever (10) and depress the litre latch (9). Move the arm left or right to the required angle.
- The litre latch will automatically locate at 10^ , 15^ , 22.5^ , 31.62^ and 45^ both left and right, and at 50^ left and 60^ right. If any intermediate angle is required hold the head firmly and lock by tightening the litre lever.
- Always ensure that the litre lever is locked tightly before cutting.
- Proceed as for a vertical straight cross-cut.

When mitring the end of a piece of wood with a small off-cut, position the wood to ensure that the off-cut is to the side of the blade with the greater angle to the fence:
left mitre, off-cut to the right right mitre, off-cut to the left.
Bevel cuts (fi g. A1, K1 & S)
Bevel angles can be set from 48^ left to 2^ right and can be cut with the litre arm set between zero and a maximum of 45^ litre position right or left.
- Loosen the left side fence clamping knob (58) and slide the upper part of the left side fence (13) to the left as far as it will go. Loosen the bevel clamp handle (15) and set the bevel as desired.
- Tighten the bevel clamp handle (15) firmly.
- Proceed as for a vertical straight cross-cut.
Compound litre
This cut is a combination of a litre and a bevel cut.
- Set the bevel angle and subsequently set the mitre angle.
Sawing in the bench mode
Always use the riving knife.
- Always ensure that the riving knife and blade guard are correctly aligned.
Always ensure that the litre saw is set and locked in 0^ litre.

t cut metal in this mode.
Ripping (fi g. T)
- Set the bevel angle to 0^ .
- Adjust the saw blade height. The correct blade position is to have the tips of three teeth above the top surface of the wood. Ensure that the saw bench table is securely fixed at the chosen height.
- Set the parallel fence to the required distance.
- Hold the workpiece fl at on the table and against the fence. Keep the workpiece approx. 25mm away from the saw blade.
- Keep both hands away from the path of the saw blade.
-
Switch the machine on and allow the saw blade to reach full speed.
-
Slowly feed the workpiece underneath the upper blade guard, keeping it firmly pressed against the fence. Allow the teeth to cut, and do not force the workpiece through the saw blade. The saw blade speed should be kept constant.
- Remember to use the push stick (73) when close to the blade.
- After completing the cut, switch the machine off, allow the saw blade to stop and remove the workpiece.

- Never push or hold the free or cut-off side of the workpiece.
- Always use a push stick when ripping small workpieces.
Optional accessories (fi g. A3 - A6)
Clamping the workpiece (fi g. A3)
- The action of the blade is suffi cients to hold the material firmly against the fence.
- If the material has a tendency to lift or come forward from the fence, preferably use the optional material clamp (27).
Support for long pieces (fi g. A4)
Always support long pieces.
- For best results, use the extension work support (28) to extend the table width of your saw (available from your dealer as an option). Support long workpieces using any convenient means such as sawhorses or similar devices to keep the ends from dropping.
Consult your dealer for further information on the appropriate accessories.
Transporting (fi g. B)
To transport the saw, lower the head and depress the lock down pin (17).
- Lock the table (19) into lowest position. Lock the rail lock knob with the saw head in the front position, lock the metre arm in the utter right metre angle, slide the fence (13) completely inward and lock the bevel lever (15) with the saw head in the vertical position to make the tool as compact as possible.
- Always use the hand indentations (26) shown in fig. B to transport the saw.

Always transport the machine in saw bench mode with the upper blade guard fi tted. Never carry the machine by the guard.
Maintenance
Your DEWALT power tool has been designed to operate over a long period of time with a minimum of maintenance. Continuous satisfactory operation depends upon proper tool care and regular cleaning.
- If the saw blade does not stop in less than 10 seconds after switching off, have the machine serviced by an authorised DEWALT repair agent.

to maintenance always unplug the tool.

Cleaning
Keep the ventilation slots clear and regularly clean the housing with a soft cloth.
- Regularly clean the table top.

Avoid the use of cleaners or lubricants to maintain the tool. In particular spray and aerosol cleaners may chemically attack the plastic lower guard.
Cleaning and maintaining the kerf plate (fi g. U)
Regularly clean the area below the kerf plate.
If the kerf plate is worn it must be replaced.
- Remove the screws (74) holding the kerf plate (8).
- Remove the kerf plate and clean the area below.
- Re-install the parts of the kerf plate and the screws.
- Tighten the screws hand-tight.
To adjust the kerf plate, proceed as follows:
- Pull down the head until the blade just enters the saw kerf.
- Adjust each part of the kerf plate to fit closely to the teeth of the blade.
- Tighten the screws.

Lubrication
This machine requires no additional lubrication. The bearings of the motor are pre-lubricated and watertight.
- Avoid using oil or grease as this can cause clogging with sawdust and chips and create problems.
- Clean the parts subject to accumulation of sawdust and chips periodically with a dry brush.
Protecting the environment

parate collection. This product must not be disposed of with normal household waste.
Should you find one day that your DeWALT product needs replacement, or if it is of no further use to you, do not dispose of it with household waste. Make this product available for separate collection.

Separate collection of used products and packaging all
materials to be recycled and used again. Re-use of recycled materials helps prevent environmental pollution and reduces the demand for raw materials.
Local regulations may provide for separate collection of electrical products from the household, at municipal waste sites or by the retailer when you purchase a new product.
DeWALT provides a facility for the collection and recycling of DeWALT products once they have reached the end of their working life. To take advantage of this service please return your product to any authorised repair agent who will collect them on our behalf.
You can check the location of your nearest authorised repair agent by contacting your local DeWALT office at the address indicated in this manual. Alternatively, a list of authorised DeWALT repair agents and full details of our after-sales service and contacts are available on the Internet at: www.2helpU.com
GUARANTEE
30 DAY NO RISK SATISFACTION GUARANTEE
If you are not completely satisfi ed with the performance of your DeWALT machine, simply return it within 30 days, complete as purchased, to the point of purchase, for a full refund or exchange. Proof of purchase must be produced.
- ONE YEAR FREE SERVICE CONTRACT
If you need maintenance or service for your DE WALT machine, in the 12 months following purchase, it will be undertaken free of charge at an authorized DEWALT repair agent. Proof of purchase must be produced. Includes labour and spare parts for Power Tools. Excludes accessories.
ONE YEAR WARRANTY
If your DEWALT product becomes defective due to faulty materials or workmanship within 12 months from the date of purchase, we guarantee to replace all defective parts free of charge or, at our discretion, replace the unit free of charge provided that:
The product has not been misused.
- Repairs have not been attempted by unauthorized persons.
Proof of purchase date is produced.
This guarantee is offered as an extra benefit and is additional to consumers statutory rights.
For the location of your nearest authorized DEWALT repair agent, please use the appropriate telephone number on the back of this manual. Alternatively, a list of authorized DEWALT repair agents and full details on our after-sales service are available on the Internet at www.2helpU.com.
Product and Safety GmbH (TRPS)
Am Grauen Stein 1
D-51105 Köln
Germany
| Cert. No. |
| BM 60015405 0001 |
Director Engineering and Product Development Horst Großmann

SCIE A ONGLETS DE TABLE
D27111
Felicitations!
Product and Safety GmbH (TRPS)
Am Grauen Stein 1
D-51105 Köln
Germany
| Cert. No. |
| BM 60015405 0001 |
L'emballage contient:
Product and Safety GmbH (TRPS)
Am Grauen Stein 1
D-51105 Köln
Germany
Product and Safety GmbH (TRPS)
Am Grauen Stein 1
D-51105 Köln
Germany
| Cert. No. |
| BM 60015405 0001 |
Director Engineering and Product Development Horst Großmann

Product and Safety GmbH (TRPS)
Am Grauen Stein 1
D-51105 Köln
Germany
Director Engineering and Product Development Horst Großmann

1 ARS FRI VEDLIKEHOLDSERVICE
Product and Safety GmbH (TRPS)
Am Grauen Stein 1
D-51105 Köln
Germany
| Cert. No. |
| BM 60015405 0001 |
Director Engineering and Product Development Horst Großmann

D E WALT, Richard-Klinger-Straße 11, D-65510, Idstein, Alemanha
11 Retire as chaves de ajuste
Product and Safety GmbH (TRPS)
Am Grauen Stein 1
D-51105 Köln
Germany
| Cert. No. |
| BM 60015405 0001 |
Director Engineering and Product Development Horst Großmann

Director Engineering and Product Development Horst Großmann

DEWALT, Richard-Klinger-Straße 11, D-65510, Idstein, Tyskland
Product and Safety GmbH (TRPS)
Am Grauen Stein 1
D-51105 Köln
Almanya
| Vesika numarasi |
| BM 60015405 0001 |
Muhendislik ve Ürün Gelistirme Müdurü
Horst Großmann

3 Kpatate ta taiia oe arootao
Mny eTIPeTIeTe oAiai, EIOKETTEc n cwa vAnoiAcouv oTo Xwpo epyaiaac n va ayyicouv To epyaaio h to Kaawio Tpopooboaiaac.
4 Opate ta kataaannpaouxa epyaia
Mn φopate φapóia pouxa n koouμa. Yπápxε iπθavotnta va πiaotouv σ ε kivouμeva μépn μnxavw. Eav exετe μakpi μalia φopate πipootateutiko dixtaki. Kata tny εpyaia σ e utaiθpiouc xwpouc, φopéote katipotipunon ta katαληλa yavtiα kai avtioiaθntiKa UToδμata.
5 Atoiikn Tpoostoaia
ΦopéOTE TPOOATEUTIKA yuaia.ΦopéOTE μaoka TPOOWTUOn TPOOATAIac aTOn ΘKoVn, OTIG TEPITNTWoeiC TOn U n EPyaia EvEeXeTai v TPOKALeOEI TIV TAPAYWn OKoVn C aiwopuEvwv σωμaTlWiw. Av UπApxEI N TIIavOTnTa OωμaTlbi auta va eivai Tolu Θερá,va φopate EπIONG TIOBIA avEeKTiN oTn ΘεpOHTnA.Φopate TTAVTA wασTlIDEc. Na φopate TTAVTA Kpavoc αφaλeiaC.
6 PpOToTeUeTe aTo nAeKToPtoTAnia
ATIOPOUYETNVTAPNTOUOWUATOCMEVEIWUEVECETIIPAVEIEC (T.X.OWANVECSWJATAOEPmuVAeWS,NEKTPIKKcKouZIVECS,PUYEIA KAI).KATA TINXPnONTOUPAAYEIOUAEKPAIEOSUVHKECS(TX.0E UWNl uypaiaObnuOpylaetaaALIKsOKovnckT.)MTOpei va auSNei n NAKTPIKn aapalaEAIE MTVTTapeuBoAn Evoc ATTOoUVETIKOU METAOxnpaIOTnEvocdiakOTTITPOoTAOIAcAto ABOcDiepxoe peua(FI).
7 Mn oKubeTnpa TnA
14 ELeyTe eav to epyaaleo aes exi baaes
Piv anT np xpn, EeyEe TPOoekTka to epyaleio kai to kaawio Tpoopooiac yia tuxov zhiies. EeyEe yia tuxov kakn euyuypamion kai emtlokntuv kiovouevuv mepwv, yia mepn toueouv otaoei, yia tuxov cetaes oTOUs TPOpuAaktnpec kai toug diakotttec, kai vikka kae iobouc ouvkecs oTOIOEEvexetai va eTTnpaouv tn aeitoupyia Tou epyaleiou. Beaiowite oTI to epyaleio aletoupyei kavovikakai xnoaiottoieiayia TOKOTyia TOV OTIO ppoopiTeAI Mn xpoaiottoieTE to epyaleio av KATIOEgaptna Tou papouiae I Aattwa.Mn xpoaiottoieTE to epyaleio, ev O biakottnc dev mTopeva To eoei Evtoc n EKTOS AEIToupyiac. Povtate ia Tny avtkataaon tuxov elattwupatikwv egaptmuatw v anto 8ouio000tnevo keVtpoETNIIOKEUWv Tc De WALT. Note mnv etnxipoeote va eTIOKeuaote o lioi to epyaleio.
15 ByaTe to epyaeio aTo nTv npia
To epyaleio kai Tepiivev te va otapatne i Tealeiw Tpoou atoakpuveite ato auto. ByaTe to epyaleio aTo tv npia oav to epyaleio dev xpnoiotoiieitai, TPOU aaaaetoe oioodntote avtaalaktko, Taapekkóevo n Egaptnua Tou epyaleiou, kai Tpiv ato tn ouvtipnou Tou.
16 Anopuyete aevntioutn EKKivnnon Tou epyaieiou
PpOu BaleTe TnV TpiIg, BeaiWteIe Oti O diaKoTTns Tou EpyaEiou Eivai KkEiOTc.
17 Mn xnpoiopoioite Kaawdi yia epyaoies yia tis otoie 6ev Tpoopipoytai
IontuauovdeTeTouakeun aTo Tny TpiGa pabWvTaTO kawio Tc. Ppoataeute To kawio aTo eepoTnta, AaiAuiupeG ywieC.
18 Duayety Ta epyaia caos ae aqaaes hepos
Epyaia Tou xpoiioIOuovTt peTt va pfuaooovTai oE Oteyvous, KIEIOUcs Xwpou, maKpia ato Taiaia.
19 Suvtneite Etnieeaws ta epyaiaea aas
Diatnpite ta epyaleia oac koptepa kai kahtapa wote va elote oe
thean va epyaceote kautepa kai aopaaoletpa. Akouthetaite tic
oonyiec suvtnpnoewc kai tuc utodoeigic via tvn aaayn eaptnmuwv.
Phiovtate olec oi aabcs kai oi diaokottec va evai steyvoi, kahtapo i
kai xupic ladia n ypaa.
20 ETIOKEUc
To epyaieio aac mnpoi touc ioxovtecs kavovec aoepaiaic. Etikaeuazete ta epyaia oac oe gouaiodntmevo staeo uvtnpnoewc tnc DEWALT. Oi tiokeuee cta ppete va yivovtai movo ato EIikoevouc texvikoCs kTn xpOAn aTOKkiaotikayvniaw avtaalaktkuw,diapopetikau Tnapxei To evexoeoaoapou KIOUVOUY TO xpOtn.
PpOoTeoI kavoEa aqaaiai yia ywiak npioia
Bébaiωtheié Οι δατελαρπμa aσφαλiαns kai oλβες twv σφγκτηρων ειαι ερα σφγιμενα πριν Εξεκίνησε ΕΟτοίαδηπόTE λειουργία.
Mny xeiipieote to mnxavnua xwpi v as bioketai ot n theon tou o TPOOULAKTnpac n av O TPOUUAKTKnpac dev aeitoupye n dev ouvtneir aowta.
Mn xnpaiooieTe Tote To dikoiplovo Xwpi Tnv Nkao TpoviaqatoTtoeTneyn.
NotuBacTe Kaveva xepo Tcog eyaotav to Pioiopio evai ouvdejevo any nekpiKn Tnyn Tpoopooia.
NotnTPOoTaOHeToaPAnTeTounXavnaOtavEivaeAeIoupyiaTOnTOeTuVTacEvApAAeio n aALoavTKeIevo TNTV AETiδaYia va TnV μTLOkApTe.MTOpEVA TpOKAnTeI kata λaθoc ObaPoc TpaumatIOs.
Piv xpoaiotoinae oioohtnote eaptnma avatpeTe 0eexipio oonyiw. H akataaannxpnon evoc eapntmuotc mtopei va Ppokalei b
- Eπλεξτη Σωστή λεπίδα για Φιλίκο τιου θα κόψετε.
Mny 5ETepaTe TIV MEYIOIN TAXUTnTTOU AVyPpEtAI OTN AETIIOA TPIOVIOU.
XpnoiopoioIote pia BnKn n φopéOTE yáVTaT av TlavETe pia λεTTIDpioviou.
Bebaiwtheta otio idokoc kottnc exei tottoeetnthei ootata tpiiv tn xpion.
Bebaiwtheta ot n aeTia Tepioppeetai kata n owtn qopa. DiatnpieTe n aeTia koptepn.
Mn xnpoiotioie t e tioe c e yalute np n iipotepn diapetou ato tn ouviotwve. Mn xnpoiotioie te maxia atoataon tpokejevou va taipiaei n e tioa orov agova. Tia owatni diaataioynon ts e tioasoumbouaetheta ta texvika otoxieia. Xpoiotiotaote mvo ae tioides c pdoaiyapc c otiwcs autc s Tou pepiypovtai oe auto to eyxepioio, o ioies oumuoppovvotai e to ptotutno EN 847-1.
- 2keptteTo EvexoEvO VA xpnoipoineTe Aetides Eikns oxiaaons, ia liyotepo bopbo.
Mn xponoiomoiéiE aeTIOEa tO HSS (xAua uynanr taxtnta).
Mn xnpoioutoieAeTIOEe Pwyuies n quiies.
Mx npnaioioiefe Aiaivtkouc diokouc.
AvuwoTe nAeiao aTo tv ToTou UTo KATEpyaia Teaxiou TPiv apnOte Tov biokotttn.
Bepaiwthetai oI bpaxiovac ivai aopaaWc tottoeTneVoc otav npaymuottoie TaeKoTec.
Mn opnywve TITOTe OTOV aveuotnpa vla va ouykpatnoete tov aEova Tou KIVNTpA.
- O TpOpuAkrnpac Aetioac 0a avuwoei autopata otav katei o bpaxiovac. O xamnawei ravw ato tn aeiti daot avuwoei o bpaxiovac. O TpOpuAkrnpac mTopei va avuwoei e to xepi kata nvy EKATAOan n apaipeon tow TPOpuAkrnpow Aetioac n yia etieewpon Tou Tpoviu. Note mnu avuowete vov TpOpuAkrnpa Aetioac me to xepi evd evexi diaikotie n aeitoupyia tou Tpoviu.
- Diatnpie Tnv Tepioxyn yup ato to uNxavnna oE kaN kataaotaon xupic diaoTapra uika, X. Koumuakia kai atokoumuata.
ELeyxETe TAKIka OI Oxiouc Tou aepa Tou KInnpa Eiva Kaapcs Kai Ev exouv Komuataika uikoou.
- Otav Φαρει η πλάκα πτρονίσματος, αντικαταστησε τήν.
- Antouovdeote To unxavnua ato Tny Taopox npeuuato n piv Tpayatotoinaete OtoiaonTote epyaia ouvtnpns n otav aaaceteneTv aeTida.
Noty npayatotoeite oToiahntote epyaiaKaaepiou n ouvtnpnOts otav tounxavna eivai e aeitoupya kai kepaan dev eivai atnv tean avapovns.
- OTOTE eivai epiKTo, va tottoeTeiTai TavTo pynxavma e eva trayko.
Av xnpoiotoeiie Aieep yia tvn evdoen nys ypaunng kottns,
Bbaowte ot to aeip eivai katnyopias 2 ouqwva u to npotto EN 60825-1:2001. Mny avtakiotate ia biodo aiecp e aaln
diapopetikou toutou. Eav n ouakeun aeip utootei zmuia, o npenti va ETIOKEUAOTei aTOEouioDToEv OUepeyio EtIOKEUNs.
- Otav kave TE EYkapoe TOpEe, eEeia, puoiTe Tooupoeo oOyO Owota yia va eTBeaiWote eva diKevo ToTou MM EviAeoa aTo Tn Aetifda KOTnC Kai ToV oNyo.
- Otav kaveTe toun ywvia, lo n ouvthetac ywiakeCs toe, putheta ToV opoEvO oynoyia va eTnebaWote Tn owtn atoataon ia Tny evapouyn.
- Atopuyete va metakivee atokoumuata n aaaa uepn tou epyou an to tv TEPIOXKOTNC Evw To TPOvi Eivai ae Aetoupyia kai n Kepaan Tou TPOviou devivai akivntotoinuyn.
Ipoosotkavovc aqaaiaes yia maykouc biokonpiovou
Mn xpnoiotoiie diokouc kntns ie axos meyaupeo n ttatos dovtio uikpotepo aTO taoxoc tou maiaipou TEaiaoou.
Bebaiwtheta otio biokos tepipetpetaipoc n ootn kateuovon kai ot ta dovtia deixvouv ot npoovin TLeupa Tou nykou biokotpiiovou.
Bebaiwthei 0ti 6c oia aies ouoqiyngs elvai qiyuee Tpiv apxioTE OTIOaONTNEpyaia.
- ⅡIoupeuteite oI OAI oi BIokoi KAI oi PAdVtzEc eivai KaBapai ot i Iaevpc Tou baktuio Tou napouiaQov Kuynakouptouv aTo 0Iko. ZIgTe TO TEPIKOxAIO Tou MIPPO agova Wote v Eivai aqpaAe.
- Diatnpnte KoTePo To DioKo Tou PioVIOu Kai OOTa TToTHeNtEvo.
Bébaiωeite oτι to μαχαρί ποπης εἰναι puθμισενο στη σωτή απόσταη έτο το διακο - μέγιση 5 xιλ.
Notu npnoioutoe to Tpiovi xwpic va evai tottoeetava ta avw kai katw TPOOTATEUTIKA.
KpatnoTe ta xepia oac paekia anto tny tiopeia tou biokou tou triioviou.
- AtouvdeToTpiovAtnVKeVTpiNpOxHnAekptikou peuatoC TIVVa aaaaTe Touc biokou n va Kavete OTOiaDHTOTepyaoia ouvtnpns.
- NaVTOTE xnpoiotoeite pia wotnpia pafo, kai note u n tnaioctet Ta xepia oac oe aototaon mikpotepn ato 150 xla. atto to biako Tpioviu kata tvkottn.
Mny Etnixeipeite va aeitoupynoete To epyaaleio oe taon aaan anto nTv TpokaopoiEvn.
Mn baTeAitavtko oTo biKO oO aeIoupyi.
Mn piakeoteiaw aTo to ioka Tou Tpioviou
- DiatnpieTe to AeBie WOnngs ravta otn Theon tou otav dXpnoioutoitai.
Mny otkeote Tavw OTn Ooukeun.
KataTndiapkeiaTngsEtaopac,betaaiwthetaiOToETtawTuHaTns λaαcTNSσeγaεivai kaluμévo,Tx.μeTovTPOpuakntnpa.
MnV TIAVE TOV TPOQUAKTnpa KAI mNv Tov XpnoIOTIOIEte Wc Aβn μeTAPOPAC.
Pueiote oototov apoevo oyio ia va atotpeyTe Tv Etnaepn e To KATW PPOOTATEUTIKO.
Bεβaiωθείτοπi παγκος ειναι ασραλως totοθετημένος.
Mny xnpoiotoeite To Tpiov Yia Tnv KOTn UAIKWv Tou Ev Eivai aTIO 5uAo.
H n 1n n aakwon dev tntpovra.
PpOo8eToI KAVOVc aopaleia yia einnpanegia paAorponpiovia
Mny eTITpeyTe o atiepa atoqa va xeiipotouv auto to mnxavna.
- Ottoe xpoaioutoieTe to unxavnu, avapepeTe Tc Baaec Tou unxavnu ma oic Teouov stn aviln nac.

AutoToepyaleio elai epoiaaevoe Me eva EIiko Kaawio peuatoC (Eapntmuoc tuou M).Av To kalwio Tapoxn C peuatoC exi Taei Znmuia elvai kattwos Eaattwamikó, TpETei va ekataotaei mvo atoTov kataaekuaotn n ato evav Eouoiobotnevo oneio ouvtnponc.
- TnV aopaleia oac, eaoaipaiote trivta to epyaieio eva tayko
-epyaoiag n iia pala vobotavve Eaataei c 10w 1000 x 1000 x 22 mm. Xpnoimuoiinote opiikntpec mtoulovi taov 5 mm n eyautepa me katalanl ao akpos.
ΦovtεTe Ta UToλoIa Atoua va mny KaOvTa Tio w aTó To epyAeio
- Otav n λεπίδα φρακάρει στο τέμαχοι εργασίας, σβήσε πάντα τόμχανημι πρίν αφαρεότε τέμαχοι εργασίας.
Bebaiwtheite otTtavw mepoc nC aeTIDaG tou Tpovou evai
TnPWS KAUmuEvo OTN KATAOAN KOINs LoNS yWvIac.
Mny apaipote TOTe TOAV TTAV TPOpuAaktnpa aeTIDaG otav
XpOIMOTIOIE TE to EpyaleIo OTN KATAOAN loGotoiNs.
Bepaiwtheta tio bpaxiovac evai otaepa opeewevoc katany kottn otny katataon kottns otov trayko.
Φpovtige 0 tawkai katiopuakntnpac va pikoovta ot n Θean tou n kataaon konnc stov mayko. Xpnaiotnoite mvo To uXavna oTav o Tpanetzi pioviou bpioketa opiovtia eon.
Napaeovotε κίνδυοι
Oi akolouoKivovoi TpoepxovTai oTn xpnoTuv Tpiiovv:
- Tpaunaiouoi aTnV eTnAeH e Ta TnepiotpeoEv aTmuata
Pap Tyn epapoynTwv oxetikovkavoviaow aopaleiac kai twv diataeew aaopaleiac, oipaevo npaepovtec kivduov iev ai duvaro va atoepuxoov. Autol evai:
-Bλαβησινακοή.
- Kivovoi ato atuxnata Tou Tpoepxovtai ato un kaLumeva tunjata Tns TepiTpepoeevnc Aetiaoc Tou pioviou.
-KivduvoTpaauatoukataynaayn
-KivduvoC ovUthiugn dakTuWv otav aoivte Ta TPOoTateutik
- Bλαβεσ Σην uyeia αιο ειπινοι nτι σκόνης τιου παράγεται κατα το κόμιο του Σύλου, εἰδίκα συας, δρύος και MDF.
-MTopei va 0nuioupynei kivduoc tpaauatou ou ia ta uroloitata ota aTo Ta Teuxia epyaoia Tou TETayovtai.
- Kivouoc tpaunapouo anto ta ntrapeva kumataa etaalou otav KoBETe e Tov oynó.
- Kivovoc φωtiac λόγο ακραίwν μαζων σκόνης ὄταν δεν καθαρίζεται TAKTIKA.
- Kivduvoaaveyktwv kataotaeuvotavxpoioeitai e 0eepokpaoies katw ano -10°C n taww ano +45°C.
OI TapaKaTaw TapaoyoTEs EtnpeaQouv Tny Tapaaywyn BOpou.
-To UAIKO TPOG KOITN
- O TUTTO TCS AETIOAC KOTINCS
- n δυναμη τρορδοσας
Oi npakatw npayovtc e nnpaocuv ny npaywnkovn
-Φθαρμενεςλεπίδες
-Egaywyeacokovnc taxtnta aepa liyotepn ano 20m / s
- to tepaxoepyaoiaeovodnyeitrawot
EtkeTeC eTavw oTo epyaIeio
Pavw oTo epyaieo utapxouv oi EeNc oxnpatikeaTneikovieic

1 Kλειδι Allen 5 mm (37)
1 Kλειδι Allen 6 mm (38)
Φovriεte va aioθkeuotae ta epyaia kαθε φopa μετa th xρησn touc σ eouvapmoλoynn n puθμiən.
Euvaopoloynon

ByaTe TAVToE To EpyAeio aTo mTv pIgA piv TPOxWpHnTe OE EpyAoies OuvapuOIoynOns.
TOnotheTnO rou nav npovulaktnpa aeii8aC (iK.E)
O avw TpopuIaktnpac Aetidac (20) exei oxediaotei va ouvatte Ipynoopa kai eukola oTo maXaipi Kottnc (19) otav n mXavn exei puthetai yia aetoupyia Taykou Tpioviou.
XaapwotE Tn TTetaoouδa (39).
KpatuwtaTov TPOpuAakTnpa Ka3eTa, EUOuypaumioTe n Okioun Tiow ato Tov TPOpuAakTnpa ME To paaxai KoTTs.
- Katebaate tov npoulaaktnpa tawo oTo paiaipi kntic (19), Tpoexovtac o aovac ato to pToulovi va pTe otnv eooh.
ΓupioTeTov TPOpuAaktnpa OTNVPoiOvTiαθeON,oi OTOIAaΦaALiZei Tov TPOpuAaktnpa TE To MAxaiPi KOnIc Μεo Tn CβiAs totθeoiAs (40).
- Σφiξτe Tny πεταλούδα.
Toroetmon i a npioiu (EK.D & F1-F4)

Ta 6ovriaiaic kaioupyiac aetifacivai nlu koptepa kai mTOpei va ato8eiXOuv etikivduva.
Tia va toTIOtheTne Tia KAIVOUPYIA AETIIDA KOITNG XPeIaTeA VA PUtheta To TpantEOTNV UwNtNv UwNtEPn Theon KAI VA ONKOWTE T N KEpaN KOITNG OTNV UwNtOePn Theon.
EiayTe to kaiDi Allen (37) otyn otin (42) oTo TepiBnma oTo akpos Tou aOva (EK.F1).TtooetnoTe to kaiAi Allen (38) otyn aoPaiotikni Bida tnc AETIaoc (43) (EK.F2).
H aopaiotikn fba tns aeTiaopoeo ppo oTiepwa, y' auto kai Tpiette va Kpatnoete TO kAeidi Allen oTaepa kai va Tepiotpeyete To kAeidi deioptopa yia va xaapwoi.
Piote Tov moxao anteuepwns aopaaic Kepaic (3) ia va atteaeepwoe ToV kTu Tpopuaktnpa 5 & 23), otu vexia auuwote ToV kTu Tpopuaktnpa ooo yivetaeipooTepeo (Eik.F3).
ApaipoeTnV aopaiotIKiβia λeTIδac (43) KAI TO eXwTepiKoλapo Tou αOva (44) (εικ. F4).
- 21youeUthei oTn eoWtepiKn paavtca kai odu ouieic tou biokou eivai kaOapeckai xwipcakovn.
EykataaTnote Tn Aetia pioviu (45) otv uTOdox (46) TPO pOeTTeai oTo eoTepko kIapoo Tou aOva (47), Eaopalizovac Ota Ta bOVTia OTN KATw akpn Tns AETiAc Deixyovu TPOc To TIAW Mepoc Tou TTIOVIOU (muKpia aTTO tv XeiPiT).
TOTIOETIOTE TPOOKETKaTO BIOKO OTN ΘEON TOU KAI ATTEAEUθEPWOT To KATWTePO TPOOTATEUTKO BIOKOU.
- EtnavatoTOnTeTeiTo To E5WTePko KoApo Tou aOva.
- Σφιετην ασφαλιοπικίβδα της λεπιδας (43) στριβοντάν Αντίθετα με τη φρόα τυν δεικτων του ρολοίου κρατώντας το κλείδι Allen μπλοκαριομενο με το ἀλλοχέρι σας.
TOnToBtIeTaKAEIdAIIenOtnHeoTouc(EIK.D).

Metayntv totoeetonn n tnyavtkatadotaon tnc aetidac, Eeyte Tavta av n aetida kauTTETai ppeaTO TPoOATEUTIKO.
Pouloi

ByaTe TAVToE To EpyAeio aTo Tny TTpiCa TPIV TPOxWpIgTe OE EpyAic pUoiang.
Pouan i a npioiu(iK.F2)
Av o biokoc tou Tpioviou taavveetai, otav apxieva Tnepiotpeptai kai otav otajata, tote Tpeticia va tov puthetaiete wc Efcis.
- EeepiE Tn biOa Tou kOApou Tou dOva (44) KAI TEPiOTpeyTE TO 01KO (45) KaTc EvA TetapTo Tc OTpOphC.
- Σφιξετ πάλι τη βίδα και ελέγεξεταν ἔχει καθόλου τόγο.
- Etnavaalabate Ta Bnmuata auta mexpi va ekundevioeTe to Tcoyo Tou δiakou.
Puigeis yia aetoupyia qaltooppiovou
To IwviakopovacputhetaiKcEttakipic6o Epyoataio. Eav xpeiaetai tavaupheion loywoTc meapopackdiakivnoisou yia otioiovotnte aloo lyo, aokoutheta ta stadia npakatw ia va puthetaieTe to pirovi ca.Auteocu pheaeic, apou vivouv, TpETe va Taapaevouv akbetaic.

