
Cube - Radio HAMA - Free user manual and instructions
Find the device manual for free Cube HAMA in PDF.
| Product Type | Bluetooth Portable Cube Speaker |
| Brand | Hama |
| Model | Cube |
| Dimensions (L x W x H) | 72 x 72 x 72 mm |
| Weight | 290 g |
| Power Supply | Lithium-ion battery 3.7 V, 800 mAh / 2.96 Wh, charging via micro USB (max 5 V, 500 mA) |
| Charging Time | Approx. 3 hours |
| Battery Life (Bluetooth) | Approx. 6 hours |
| Battery Life (microSD playback) | Approx. 8 hours |
| Bluetooth Version | 4.2 + EDR |
| Supported Bluetooth Profiles | A2DP V1.2, AVRCP V1.4, HFP V1.5, aptX |
| Bluetooth Range | Up to 10 meters (without obstacles) |
| Maximum Music Power | 5 W |
| Frequency Response | 100 Hz - 20 kHz |
| Impedance | 4 Ω |
| Distortion (THD) | ≤ 1% |
| Sound System | Mono / True Wireless Stereo (2 speakers) |
| Connectivity | Bluetooth, microSD, micro USB (charging) |
| Main Functions | MP3 playback, hands-free kit, True Wireless Stereo, touch controls (on/off, volume, navigation) |
| Care and Cleaning | Clean with a slightly damp lint-free cloth, avoid harsh detergents |
| Safety | Use a suitable charger, do not open, keep out of reach of children, avoid heat and humidity |
| Battery | Built-in, non-removable |
| Repairability | Do not repair yourself, contact Hama after-sales service |
| Package Contents | Cube speaker, micro USB cable, user manual |
Frequently Asked Questions - Cube HAMA
User questions about Cube HAMA
0 question about this device. Answer the ones you know or ask your own.
Ask a new question about this device
Download the instructions for your Radio in PDF format for free! Find your manual Cube - HAMA and take your electronic device back in hand. On this page are published all the documents necessary for the use of your device. Cube by HAMA.
USER MANUAL Cube HAMA
MobileBluetooth ^® Speaker C
OperatingInstructions
Bedienungsanleitung
Moded'emploi
Instruccionesdeuso
natural_image
Simple line drawing of a rectangular device with buttons and a power button (no text or symbols)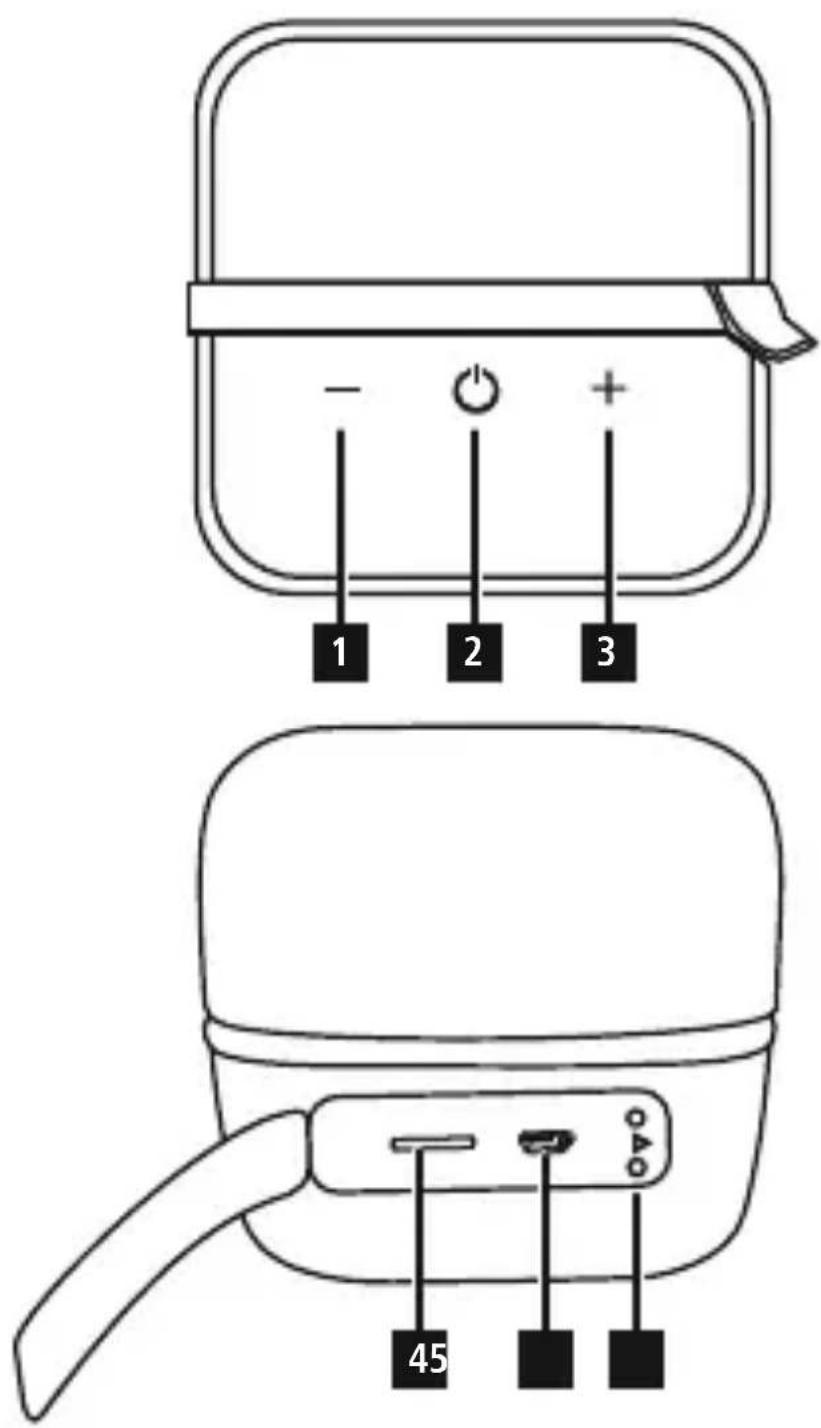
GB Operatinginstruction
Controlsand Displays
- Functionbutton —
- On/off switch ⏻, Bluetooth ^® function button
3.Functionbutton +
4.microSDcardslot - Micro-USB charging connection
6.StatusLED
Thankyouforchoosinga H amaproduct. Takeyourtimeandreadthefollowing instructionsandinformationcompletely. P lease keep these instructions in a safe place for future reference. If you sell the device, please pass these operating instructions on to the newowner.
1. ExplanationofWarningSymbols andNotes

Warning
This symbol is used to indicate safety instructions to draw your attention to specific hazards and risks.

Note
This symbol is used to indicate additional information or important notes.
2.Package Contents
• M o bBluetooth® SpeakerCube
- M micro-USB chargingcable
• T heseoperatinginstructions
3. Safety Notes
- Use the product for its intended purpose only.
- T heproductisintendedfor p rivate,non-commercialuseonly.
- Protect the product from dirt, moisture and overheating, and only use it in a dry environment.
- D o n otusetheproductintheimmediate vicinityofheatersorother h eatsources o r i n direct s unlight.
- Do not use the product in areas where the use of electronic devices is not permitted.
- Since the battery is integrated and cannot be removed, you will need to dispose of the productasa w hole.Dothisincompliance with t helegalrequirements.
-
Do not drop the product and do not expose ittoany majorshocks.
-
D o n otattempttoserviceorrepairthe product yourself. Leave any and all service work to quali ed experts.
- D o n otopenthedeviceorcontinueto operateitifitbecomes d amaged.
- Keep the packaging material out of the reach of children due to the risk of suffocation.
- Be considerate. Loud volumes can have a detrimental effect on your surroundings.
- D isposeofpackagingmaterialimmediately accordingtolocallyapplicableregulations.
- Do not modify the product in any way. Doingsovoidsthe w arranty.
- Keep this product, as all electrical products, out of the reach of children!
- Do not throw the battery or the product into re.
- Do not tamper with or damage/heat/disassemblethe batteries/rechargeable batteries.
4. Gettingstartedandoperation
4.1 Switching on the product
- S lidetheOn/offswitch ⏻(2) to theON positiontoswitchthe s peakeron.
- A voice notification confirms that the device is ready for operation. The LED indicator (6) lights up blue.
4.2 Switching of the product

Note – Automaticshutdown
Note that the speaker will automatically switch o ffter10minuteswithout action(noaudioplayback/no Bluetooth® function).
4.2 Chargingthebattery

Warning – Rechargeable battery
- Only use suitable charging devices with USBconnectionsforcharging.
- A s a rule, donotusecharging devices or USB connection that are defective and do not try to repair them yourself.
- Avoid storing, charging or using the device in extreme temperatures and extremely low atmospheric pressure (for example, at high altitudes).
-
When stored for a long period of time, batteriesshouldbechargedregularly (atleast e verythreemonths).
-
Charge the speaker fully before using it for the first time.
- Connect the included Micro-USB charging cable to the speaker's Micro-USB port (9).
- Connect the unused connector on the Micro-USB charging cable to a suitable USB charger. Please refer to the operating instructions for the USB charger used.
- The status LED (6) lights up constantly in red during the charging process.
- If the battery is fully charged, the status LED (6)willgoout.

Note- Charging
- It takes approx. 3 hours to completely charge the product.
- The speaker's battery can be charged whetherthespeakerisonoroff.
- If the battery capacity is less than 10%, the speaker willemittwoacoustic signals. You will only receive this information if the speaker is on.
- T heactualbatterylifevariesdepending on use of the device, the settings and the ambient conditions (rechargeable batteries have a limitedservicelife).
4.3 Bluetooth ^® pairing

Note
- Check whether your mobile device (MP3 player, mobile phone, etc.) is Bluetooth® capable.
- N otethatthemaximumrangefor Bluetooth® is10metreswithout obstaclessuch a s w alls,people,etc.
- M akesure that you Bluetooth® capable terminal device is on and Bluetooth® isactivated.
-
Make sure that the speaker is located within the Bluetooth® rangeofmax. 10metres.
-
Switch on the speakers as described in 4.1 Switching the product on and off.
- The status LED (6) begins to flash. The speaker searches for a connection.
- O pen t h Bluetooth® settings your terminal device and wait until Hama Cubeappearsinthelistof Bluetooth® devices found.
- Select Hama Cube and wait until the speaker is listed as connected in the Bluetooth® settingsonyourterminaldevice. Anacousticsignalconfirmsthat c onnection was s successful.
• The status LED (6) now remains red.

Note – Bluetooth ^® password
- Some terminal devices require a password in order to connect to another Bluetooth ^® device.
- If your terminal device requests a password for connection to the speaker, enter0000.

Note – Connection to a new device
- If you want to connect a new Bluetooth® terminal d evicetothe speaker, p ressthe Bluetooth® function button (2)untilthestatusLED(6) begins to flash blue and an acoustic signal sounds..
- T hecurrentconnection is disconnected and the searchfornewterminal devices s tarts.
- T hespeakeralwaysstoresthelasteight terminal devices paired.
- T hespeakerwillautomaticallyconnect to the last terminal device paired when itisswitchedonthenexttime.
4.4 Automatic Bluetooth ^® connection (after s successfulpairing)
- M akesure that your Bluetooth® capable terminal device is on and Bluetooth® is activated.
- Make sure that the speaker is located within the Bluetooth® range of max. 10 metres.
- Switch on the speakers as described in 4.1 Switching the product on and off.
- After successful connection, the status LED (6) will light up in blue. An acoustic signal confirms that connection was successful.

Note – Connectionimpaired
- After the speaker and terminal device have been paired, a connection is established a automatically. If the Bluetooth® connection is not established automatically, check the following:
-
Check the Bluetooth® settingsof your terminaldevicetosee w hetherHama Cubeisconnected.Ifnot,repeatthe stepslisted u nd e Bluetooth® pairing.
-
Check whether your terminal device and the speaker are less than 10 metres apart. If not, move them closer together.
- Check whether obstacles are impairing therange.Ifso,movethe devices closertogether.
4.5 Audioplayback(via Bluetooth®)
Start and control audio playback on the connected terminal device accordingly. Alternatively, audioplayback can also be controlled on the speaker (if the connected devices support this function).
- P ressthe function button (2) to start or pause a udio p layback.
- Briefly press the + function button (3) to skip to t henexttrack.
- Briefly press the – function button (1) to go back to the previous track.
- Hold down the + function button (3) to increase the volume.
- Hold down the – function button (1) to reduce the volume.
4.6 MP3audioplayback(viamicroSDcard mediaplayerconnection)
The speaker can also play MP3 audio files from microSDcard s toragemedia.
- Insert a microSD card into the microSD card slot under the cover (4). The speaker automatically switchestomediaplayer mode.
- P ressthe ⏻ function button (2) to start or pauseaudioplayback.
- If you want to remove the microSD card, pause playbackfirst; thentakeout the microSDcard.
4.7 H ands-freefunction
You can use the speaker as a hands-free set for your mobile phone. For this function, the mobile phone must be connected to the speaker v i aBluetooth®.
- Press the Play/Pause/Mode button ⏻(2) oncetoansweranincomingcall.
- Press and hold the Play/Pause/Mode button ⏻(2) for about 3 seconds to reject an incoming call.
- If you would like to end a call, press the Play/Pause/Modebutton(2)once during t hecall.

Note – Callquality
To increase the call quality, make sure that you are near the speaker with your mobile phoneduringthecall.
5.TrueWirelessStereo- c onnectingtwo Hama C ubesforstereosound
- S witchonbothspeakersasdescribedin 4.1 Switching the product on and off.
- E stabilishaBluetooth® connection to o neof the speakers with your terminal device.

Note – Master
- The speaker that is switched on first will bethemaster.
-
If you are only using one speaker, it is automatically the master.
-
Press the + function button (3) twice in quick succession on the speaker connected to your terminal device. A n a cousticsignal sounds, and the automatic search for the second s peaker begins.
• After successful connection, an acoustic signal sounds from both speakers. - Position the speaker that is the master to your left. Position the second speaker to your right.
6.CareandMaintenance
Only clean this product with a slightly damp, lint-free cloth and do not use aggressive cleaningagents.
7.Warranty Disclaimer
HamaGmbH& C o K G a ssumesnoliability and providesnowarrantyfordamageresultingfrom improper installation/mounting, improper use of the product or from failure to observe the operating instructions and/or safety notes.
8. Service and Support
Please contact Hama Product Consulting if you have any questions about this product. Hotline: +49 9091 502-115 (German/English) Further support information can be found here: www.hama.com
9. Service and Support
Mobile Bluetooth® SpeakerCube
| Bluetooth®Technology | JL4.2+ E D R |
| Supportedprofiles | A2DP V 1.2;AVRCPV1.4;HFPV1.5,aptX |
| Frequency100Hz- 2 0 kHz | |
| Range< 1 0 m | |
| Max.music o utput5W | |
| ChargingvoltageMax. 5 V = 500mA | |
| Sound S y s t e m | Mono/TrueWirelessStereo |
| Impedanc4Ω | |
| Distortion (THD)≤1% | |
| Size72x72x72mm | |
| Weight290g | |
| ConnectionsMicroSD,Micro U S B | |
Battery
| Type | Lithium-Ion,3.7V,800mA/2.96 Wh |
| Chargingtime~ 3 h | |
| Playback | Via Bluetooth®: ~ 6 hVia m icroSD:~ 8 h(dependingon volume a ndaudio content) |
10. Declaration of Conformity
CE Hereby, Hama GmbH & Co KG declares that the radio equipment type[00173156,00173157,
00173158] is in compliance with Directive 2014/53/EU. The full text of the EU declaration of conformity is available at the following internet address:www.hama.com->00173156, 00173157, 00173158->Downloads.
| Frequency band(s) | 2402MHz ~ 2480MHz |
| Maximum r adio-frequency power transmitted | 0.3 dBm |
4.5 Lectureaudio(via Bluetooth®)
Avertizare – accumulator
86652Monheim/Germany
www.hama.com
www.hama.com/nep
The Bluetooth® word mark and logos are registered trademarks owned by Bluetooth SIG, Inc. and any use of such marks by Hama GmbH & Co KG is under license. Other trademarks and trade names are those of their respective owners.
All listed brands are trademarks of the corresponding companies.
Errors and omissions excepted, and subject to technical changes.
Our general terms of delivery and payment are applied.


- MobileBluetooth ® Speaker C
- GB Operatinginstruction
- Controlsand Displays
- ExplanationofWarningSymbols andNotes
- Warning
- Note
- 2.Package Contents
- Safety Notes
- Gettingstartedandoperation
- Switching on the product
- Switching of the product
- Note – Automaticshutdown
- Chargingthebattery
- Warning – Rechargeable battery
- Note- Charging
- Bluetooth ® pairing
- Note – Bluetooth ® password
- Note – Connection to a new device
- Automatic Bluetooth ® connection (after s successfulpairing)
- Note – Connectionimpaired
- Audioplayback(via Bluetooth®)
- MP3audioplayback(viamicroSDcard mediaplayerconnection)
- H ands-freefunction
- Note – Callquality
- 5.TrueWirelessStereo- c onnectingtwo Hama C ubesforstereosound
- Note – Master
- 6.CareandMaintenance
- 7.Warranty Disclaimer
- Service and Support
- Service and Support
- Declaration of Conformity
- Lectureaudio(via Bluetooth®)
- Avertizare – accumulator
- 86652Monheim/Germany
- www.hama.com
Brand : HAMA
Model : Cube
Category : Radio