AT9320 - Vacuum Cleaner UFESA - Free user manual and instructions
Find the device manual for free AT9320 UFESA in PDF.
User questions about AT9320 UFESA
0 question about this device. Answer the ones you know or ask your own.
Ask a new question about this device
Download the instructions for your Vacuum Cleaner in PDF format for free! Find your manual AT9320 - UFESA and take your electronic device back in hand. On this page are published all the documents necessary for the use of your device. AT9320 by UFESA.
USER MANUAL AT9320 UFESA
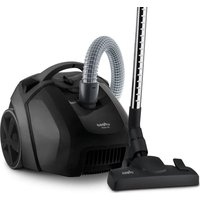
DESCRIPTION OF THE APPLIANCE
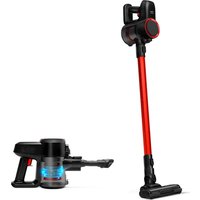
1 Floor brush
2 Brush for wooden floors
3 Telescopic tube.
4. Suction control
5 Hose
6 Suction hole
7 ON/OFF button
8 Power control
9 Cable rewind button
10 Air outlet grilles
11 Air outlet filters
12 Suction cover release catch
13 Carrying handle
14 Container full indicator
15 Crevice nozzle
16 Upholstery nozzle.
17Furniture nozzle
18 Suction bags
Suction container
19 Container
20 Carrying handle
21 Permanent HEPA filter.
22 Nylon filter
23 Container release button
24 Emptying cover
IMPORTANT ADVICE
- Read these instructions carefully. Safeguard them for future reference.
- When passing the vacuum cleaner on to a third party, please also pass on this instruction manual.
- This vacuum cleaner should only be used in with these instructions for use.
- The manufacturer will not accept any responsibility for damage caused by improper use or incorrect operation.
- Before plugging the appliance into the mains, check that the voltage corresponds to that stated on the characteristics plate.
- The appliance should be switched off when plugging it in or unplugging it.
- Do not operate the appliance with the cable still coiled.
- Fully extend the power cord when using the vacuum cleaner continuously for several hours.
- Do not unplug the appliance by tugging on the cable.
- Unplug the vacuum cleaner from the mains supply when not in use and before proceeding to clean it or change the bags or filters.
- This vacuum cleaner must not be used without the dust collector, filter bag or filters correctly fitted.
- This appliance has been designed exclusively for domestic use.
- This appliance has been designed exclusively for domestic use. DO NOT VACUUM UP CEMENT DUST, SAWDUST OR
SIMILAR Cement dust and the like will block the pores on the suction bag and cut off the air intake
- The vacuum cleaner must only be operated with manufacturer's original dust bags.
The vacuum cleaner is not to be used for:
Vacuuming persons or animals
Vacuuming up: - Insects or spiders.
- Hazardous, sharp-edged, hot or burning substances.
- Damp or liquid substances.
- Highly flammable or explosive substances and gases.
- Ash, soot from tiled stoves and central heating systems
The vacuum cleaner should be protected from the weather, moisture and sources of heat.
- Do not use the vacuum if any of its openings are obstructed, given that this will reduce the air flow, causing it to overheat which may damage the appliance.
- Do not handle either the vacuum or the plug with wet hands. Do not immerse the appliance in water.
- Do not pull on either the cable or the suction tube to move the vacuum. Use the carry handle.
- Do not let children handle the appliance.
- This appliance must not be used by persons (including children) with physical, sensory or mental impairments unless they have been instructed in its correct use by a responsible adult.
Children must be supervised to ensure that they do not play with the appliance. - Keep suction away from your face when using the handle, nozzles or pipe.
Risk of injury.
- Do not use the appliance if either the cable or plug are damaged.
- When closing doors, make sure that they do not pinch the cable.
- Switch off the vacuum cleaner when it is not in use.
- At the end of its life, the vacuum cleaner should be disposed of in an appropriate manner.
- Do not switch the appliance on if the cable or plug are damaged or if it can be detected that the appliance is not working correctly.
- Cable repairs and replacements must be carried out exclusively by an Authorised Technical Service Centre.
SETTING UP
Figure 1
a) Push the hose connector into the opening on the vacuum cleaner until it engages.
b) To extract the suction hose, press the release button and pull on the tube.
Figure 2
Connect the handle and the suction pipe together.
Figure 3
Attach the floor brush to the telescopic tube.
Figure 4
Disconnect the telescopic tube and adjust its length by moving the adjusting button in the direction of the arrow.
Figure 5
Holding the power cord by the plug, pull out the required length and plug it into the mains socket.
Figure 6
Press the on/off button in the direction of the arrow to switch your vacuum cleaner on/off.
Figure 7
Set the power with the regulator.
Figure 8
The intensity can be regulated from the hand grip. Opening the flap reduces suction whereas closing it increases suction.
Figure 9
Attach the nozzles to the suction pipe or handle as required:
a) Crevice nozzle. Long nozzle for vacuuming deep grooves and nooks, etc.
b) Upholstery nozzle for vacuuming upholstered furniture, curtains, etc.
c) Upholstery nozzle to prevent surfaces from being gted.
Figure 10
You can use the parking aid on the back of the vacuum cleaner if you wish to stop vacuuming for a short time.
Slide the catch on the floor tool into the groove at the rear of the appliance.
Figure 11
The appliance can also be carried using the two handles when vacuuming steps, for example.
WHEN THE WORK IS DONE
Figure 12
When you have finished using the appliance press the On/Off pedal. Disconnect the plug from the mains and wind in the cord by pressing down on the automatic cord rewind pedal.
Figure 13
To store or transport the vacuum cleaner, use the storage aid on the underside of the vacuum cleaner.
Stand the vacuum cleaner up on its end. Slide the catch on the floor tool into the groove on the underside of the appliance.
You have purchased a floor vacuum cleaner which can vacuum up any type of dry dirt using the dust collector or dust bag.
We recommend that you use:
- the dust collector, in particular for your hobbies, e.g. move wood shavings, etc.
- the dust bag principally for everyday household cleaning.
USING THE DUST COLLECTOR
Figure 14
Set the power setting to maximum for the best results when vacuuming.
We recommend that you reduce the setting only when vacuuming very delicate materials.
Attention! The cover on this appliance cannot be closed if the dust collector or filter bag are not present inside. Do not force it shut and check that the desired dirt collection system is fitted correctly.
Emptying the dust collector
To achieve an optimal result when vacuuming, the dust collector should be emptied each time the vacuum cleaner is used.
Figure 15
Turn the dust compartment locking lever in the direction of the arrow to open the dust compartment cover.
Figure 16
Remove the dust container from the appliance.
Figure 17
To open the container base cover, press the button and empty the contents into a dustbin.
- Close the bottom flap so that it can be heard snapping into position.
no daimaFigure 18
Put the dust bag back into the vacuum cleaner and close the dust bag compartment lid.
!Caution: The inside of the dust container may become scratched with use and Stara to look opaque. This does not, however, affect the performance of the vacuum cleaner in any way, i.e. it will continue to function as normal.
CLEANING THE HEPA FILTER AND THE NYLON FILTER FOR THE DUST CONTAINER
The filters must be cleaned:
- After any operating malfunctions, i.e. after a blockage is cleared.
At least every six months.
Figure 19
Remove the HEPA filter by pulling it straight out.
Turn the nylon filter anti-clockwise to remove it and pull it out of its housing.
Figure 20
- Wash the HEPA and nylon filters. Then leave them to dry for at least 24 hours.
Once clean and dry fit them back into their housings on the container.
Place the container back into its housing on the vacuum cleaner.
VACUUMING WITH THE FILTER BAG
If necessary, the filter bag can also be used instead of the dust collector.
Figure 21
- Open the cover for the appliance (see figure 15).
- Take out the dust container and insert the filter bag.
Close the vacuum cleaner cover
REPLACING THE DUST BAG
Figure 22
If the change filter indicator on the cover goes completely red when the universal nozzle is not touching the floor and the appliance is set to maximum suction, then it will be necessary to change the filter bag even though it is not completely full. Under these circumstances, the type of material being vacuumed requires the bag to be changed.
The nozzle, suction pipe and flexible tube must not be blocked, as this would also lead to dust bag change indicator being triggered.
- Never use the vacuum without a dust bag fitted, nor try to empty a full bag and reuse it.
- To guarantee trouble free operation only use original Ufesa bags, which can be found at Authorised Technical Service centres. The use of other makes of bag may damage the appliance and make the guarantee void.
Figure 23
Open the lid by moving the locking lever in the direction of the arrow.
Figure 24
Seal the dust bag by pulling the locking tab and then remove it.
Figure 25
Place a new dust bag in the holder and close the vacuum cleaner lid.
!Caution: The dust bag compartment lid Hill only close when the dust bag, dust collector are inserted.
Cleaning the motor protection filter
The motor protection filter should be cleaned regularly by knocking out the dirt and rinsing.
Figure 26
- Open the dust bag compartment lid (see Figure 14).
- Pull out the motor protection filter in the direction of the arrow.
Clean the motor protection filter by tapping it. - If it is very dirty, the motor protection filter should be rinsed.
The filter must then be left to dry for at least 24 hours.
- After cleaning, slide the motor protection filter into the vacuum cleaner and close the dust bag compartment lid.
CLEANING THE AIR OUTLET FILTER
Figure 27
Remove the filter cover by pressing the release catches and jiggling it free. Remove the filter.
Important: The vacuum cleaner must never be switched on unless this filter is fitted correctly.
To guarantee trouble-free operation, use only original Ufesa accessories.
CARE
Always switch off the vacuum cleaner and disconnect the power cord from the mains before cleaning the appliance.
The vacuum cleaner and plastic accessories can be cleaned with a commercial plastic cleaner.
!Do not use a scourer, glass-cleaning agent or multipurpose cleaning product.
Never immerse the vacuum cleaner in water.
If necessary, the dust compartment can be cleaned with a second vacuum cleaner or simple wiped with a dry cloth or dusting brush.
ADVICE ON DISPOSAL:
Our goods come in optimised packaging. This basically consists in using non-contaminating materials which should be handed over to the local waste disposal service as secondary raw materials.

This product complies with EU Directive 2002/96/ CE. The crossed wheelie bin symbol shown on the appliance indicates that when it comes to dispose of the product it must not be included in with household refuse. It must be taken to a special refuse collection
point for electric and electronic appliances or returned to the distributor when purchasing a similar appliance. Under current refuse disposal regulations, users who fail to take discarded appliances to special refuse collection points may be penalised. Correct disposal of discarded appliances means that they can be recycled and processed ecologically, helping the environment and allowing materials used in the product to be reused. For more information on available waste disposal schemes contact your local refuse service or the shop where the product was purchased. Manufacturers and importers are responsible for ecological recycling, processing and disposal of products, whether directly or via a public system.
Your local town council can provide you with information about how to dispose of obsolete appliances.
FRANÇAIS
DESCRIPTION DE L'APPAREIL
-Az also fedelet zarla le, es hallatoan kattintsa be.
Ábra 18
IpeHocA yctpoCTBa MoXHO IcNoB3OaTb DBe pyKn, HapnpMep, KOrDa Bbl NcNoB3yTe annapaHa JecTHNue.
NOCJI PABOTbl
PncyHOK 12
Iocne toro, kak Bby 3aKOHnIn nCnOnb3ObaHne annapata, haxmnte Ha KONky BblKnIOyateTn. Bblte Wtencelb n3 po3eTKn u y6epnte shyp npn nomouh Haxatn KhoNk n ABTomatuecko y6opkn shypa.
PncyHok 13
IpaHHeH/ TpaHCnOpTnpOBKn yCTpoiCTBa BO3MOxHO nCNoB3OBAb ONopy Ia Tpy6Kn B BEPTKanbHom NOIOXeHH, paCNOJIOKeHHo B HxKHe qACTn yCTpoiCTBa.
PacnoJXnTe yCTpoIcTBOBePTNkaJIbHOM noJoxHeHnBBeNTe KpOyOK KpeIeHnYHbEpcalbHoI eTKn B KaHaBky, pacnoJoxHeHHyIO B HxKHe Yactn yCTpoIcTBa.
Bb npno6peHn nbIeoc-caH, KOtOpblM MoKHO cO6npaTb BCE BnIb cyXoI rP3N, NcNoJIb3yR KaK nbIeC6OpHNK, TaK nФnIbTpUOuM MeoK.
Mby pekomehyem nCNoIb3OBA Tb
- nbIe6bOpHnK, HApnpMep IyIyIaJIeHnI pyIIN OT pEmoHTbIX pa60T n.T.D.
-Фильстуюш Мшokпржд BCero ДЯ obыньix pa6ot no domy.
YTo6bI NOJyHtB ONTUMaHbHbIe pe3yJIbTaTbI BCacbIBaHnA, noCTaBbe peryIaTOp CNJIb I BCacbIBaHnB B MaKcIMaJIbHOe noJIOxHeH.
Mbl pekomehnyem yEmhwnb cnly BCacbHaHnR TOJbKO, KOrdapeyb ndet 06 ouehb ToHKnx MaTepnanax.
BHHMaHHe! KpbIka yctpoCTBa He 6ydt 3akpbIBaTcB npn OTCyTCTBn Nblnc6OpHnKa nIn Φnltpyoio Meoka. He cTapaIteCb 3akpItb KpbIky, npmEnHB ycInra, a npOBepbTe HAIINHE JkenaemCNCTeMbcoUpaHn rpr3n.
OnyctoweHne nbinec6bopnka
YTO6blIOCTNUbMaKcMmAbHOB3ΦΦeKTnBHOCTNBCaCbBAHN, HxKHO OyCTOwAtb Nblnc6OpHKn PocJe KaJdORo NCNoIb3OBAHNA.
Pucyok 15
OtkpoTe KpbIkky OCHOBHO OToJIeHnI, NOBepHyB Ra3bIOK 3aKpbITnB HAnpaBHeHnCtpeKn.
PncyHok 16
Docahtbe nblnc6opnK yctpoictBa.
Pucyok 17
TTO, Yo6bI OTKpbITb HxHIOO KpbIuKy HaKoNTeHaHXMITE Ha KHONky; 3aTe M BbIbOpcbTe MycOp.
- 3akpoTe KpbIshKy, 3aueKnHyB ee.
Pucyok 18
BHOBB NOMECTNE nbIEc6bOpHNK B yCTpOHTBO N 3aKpoTKe KpbIyK OCHOBHOrO OTdeneHn.
BnMaHHe: BnuNy dInTeIbHoro nCnOJb3OBaHHn PbIeocca, KOHTeHep Nblnn MoKet BHyTpN CnErKa NIOpaapanatbca HEMHO rnoTcKHe. 3To HkAkIM o6pazom He cKa3bIBaETcHa yHKUHOHPOBaHHn PbIeocca, a NMeHHO, yCTpoiCTBO npdoJIxkaet npeKpachO yHKUHOHPOBaTb.
YNCCTKA HENJIOHOBOTO ΦNJIbTPA N ΦNJbTPA HEPA.
Korda HxHNO xuNCTnTb:
-Kakdbipa3,Korda6bilo3ameueHOnnOoepyHKuOHOpOBaHe, aIMeHHo,KaKdbipa3,Korda6bilo ydaJeHO npenrTCTBne.
- KaK MInHmym KaKdIbe WeCTb MeCAeB.
Pucyhok 19
IOTAHHTe HENOCpeDCTBeHHo 3a cHbTp Hepa n N3BNeKHTe erO n3 nbJIecoca.
BbHbTe HeNoHObbl pIbTp, nobepHyB erO npotnb YacBOB CTpeKN.
PncyHok 20
BbIMOnTe 6oaФnIbTpra.3aTeM npocuWnte nX B TeueHne 24 YacOB. IocNe TORO, KaKYNCTbEΦnIbTpbl COBepWeHHo BbICOXHyT, yCTaHOBtne INx O6paTHo Ha HAKONITene.
Tbneocntb C meukom nra c6opaa bnn
B cnyae Heo6xOdMocTn, Bbl MoKTe NcNoIb3OBaTb MeuKn Dnla C6opa nbnn BmecTo HAKONTEJI nbJIN.
Pucyok 21
- OtkpbItb KpbIuKy nbJIncoca (cm.PucyHok 15)
- BbHytb hakonntenb yctaHOBT mewoK dny c6opa nbinn
-3aKpbTb KpbIuKy nbJneocca
3AMEHAΦNJIbTPYIOUCEIOMeUKA
PncyHok 22
B clyuae, ecn hacaKa He kacaetc nona n yctaHOBJeMaKcIMaJIbHbI yPoBeHb 3a6opa Bo3dyxa, a HINDKaTOP 3aMeHbIΦnJIbTp aOCTaETCR KpaCHbIM, Heo6xOdmo 3aMeHNb NJIbeBOMeWOK, daxe ccnIOcneHm He 3anoJInHe DO KOHa.
HacaKa, Tpy6Ka BCacbBaHnI nIaHaHr He DOnXhbl 6bTb 3aKynOpEnbl, TaK KaK 3TO MOrNIO Bbl3BaTb OCBeueHne INHmKaTopa 3aMeHbl fNbTpA.
He BbHyjKaIte PbIeNcOC yHKUHOHPOBaTb 6e3 MeuKa, He CTapaITecb ONyCTOUIb 3aONHeHHHbIM MeoK IN BHOBb NCNoJIb3OBaTb erO.
-Дя obecneueHЯ haexho pa6oTb nbilecoaca nCnoB3yTeToIbKO opunHaJIbHbIe MeuKU Ufesa, kOTOpBie Bbl moKeTe npno6peCTn B OΦnuaJIbHbIX ceHTpax TexHnueckoro 06cnyKBAHn. IcNoIb3OBAHne MeuKOB dNr c6opa nbJIN He MapKn Ufesa, moKet npnbEcTn K nopue annapata n NocnyKtB npnuHoi noTepr npaHTn.
Pucyok 23
OtkpoTe KpbIkwky, NOBepHyB pyuKy 3akpyTnB HAnpaBneHn CTpeKN.
PncyHOK 24
3aKpOte punbtpuyuM MeWOK,notRHyB 3a Ra3bUOK 3aKpbITnA, nH3BJIeKNTeero.
Pucyok 25
BCTaBbTe HOBBI ΦHbTpHyOuIe MHeoK B OCHOBaHne 3aKpOte KpbIuKy yctpoiCTBa.
BHHMaHHe: KpbIka OTDeHnna nbIeC6OpHnka 3aKpbBaTeTcTa TOnbKO, KOrda npCyTCTByET pNlbTpYIOuM MeWOk INN, B daHHOM cnUyae, nbIeC6OpNK.
YnCTka 3aunTHofoJIbTpmaMOTopa
Hyxho peryynapno qnCTnTb 3aunTHbI pNlbTp MOTopa, BbITpaxnBa3r0nnnNoLoua.
PncyHok 26
- OTKpOte KpbIbIKy oChOBHOrO oTdeJeHnR (CM.PncyHOK 15).
-ИЗВЕКИТЕЗДПЛТБИФИЛТРМOTOPABHANPAJIENKOTOPOE NOKA3bIBAeTCTpeJIka.
-ПочимтITEЗИNTHBIФИЛТМOTOPA,BbITPAXINBA3RO. - EcInФильт оонь 3агрзен, nOMоTe erO.
3aTeM cyuHte cHJIbTp MHHmym 24 Yaca.
-ПослесчкнВсtabbteфиьтВустpoiCTBOИЗakpoite OТделенп nbilenc6bopнika.
CHCTKA ΦNJIbTPA BbIXOda BO3dYXA
PncyHOK 27
CHIMNEKpbIHKyΦnIbTpBaBIXOaBO3dyxa,HaXaBHaRa3bIcKN-ΦNKCaTopbl.
I3BnKeNteΦnIbTp.
BnmaHne! HnkOrda HeIb3NcNoIb3oBaTb Nblncoc 6e3 npabInbHO yCTaHOBHeHHoro qIbTpa BixOda BO3dyxa.
Ira oecneueHHn HaeXHn paobToI nbinecoa, Heo6xOIMO nCIOB3OBaT TObKO IOINHHbIe akceccyapbl fmpMb Ufesa.
yXoI
HCTNTe TbIeCOC TOIbKO PnB BbIKIOueHHOM yCTPOINCTBE nOCTaB WTeNCelHyIO BuNKy N3 p03eTKN.
Пьлесси и пл actmaccobbie npedmetbl akceccyapob MOxHo чNTbЛIO6bIM O6bIYHbIM YNCTAUNM CpeCDTBOMДЯ пл actmaccobbxИЗДeЛIM,doCTyHbIMHa pbIHke.
He nCnoJb3yIte abpa3nBhIe YnCTaIe cpeCTBa, Hn CpeCTBa IIN YnCTKn CTekO,IH YnCTAIIe CpeCTBa O6Uero nCnoJb3OBAHn.
Hikorda He norpykaite nbinecoc Bovdy.
OchOBHoe OTdeneHne MOxHO uCTnTb npn Heo6xoDMOCNTc NOMOsbIO dpyrTO nbIeCocA, nIN npocTo TpAnKo / cyXoN 8eTKo DnI PbIIN.
PEKOMEHDAUINIO CDAUE/BbIEPOCY YNAKOBKNI CTAPBX ANIAPATOB

Haun ToBapbI NoCTaBnHOTcB ONTMm3nPOBaHHO ynakobke.B HeN BOCOBHOM NcONb3ObaHbI 3KoONrueckn MaTePnaJIb, KOToPbIe DOnXHbI CdaBaTbCBA MeCTHyO yTINImaUN OTxOIOB B KaYeCTBe BTOPNHOro cbipBa.

JaHHOe N3DeJIne COOTBETCTByet HOpMaM DnpeKtNBbI EC 2002/96/CE.CmBON nepeyepkHyTOro KOHTeHepa dMycopa Ha KOJecNKax, IMEOUINCA HA np6ope, O3Haayet, TTO, KOrDa HAcTyNT BpEMr N3bAutaTbCt ON HeHyXhOTo np6opa, OH He DonKeH NOMeuaTbCt BMeCTe C bbl
OTXoAMn. OH donJxH 6bIb DOCTaBnE H CnEuaJIbHOe MeCTO yTINIm3aUIM OTXoOB 3JeKTPuYeCKNX H3JeKTPoHHbIX npi6OpOB uIN B03BpaAuen pnoabuy npn NOKyNke HOBO rnoDobHO rnp6op.A B COOTBETCBn C DeInCTByIOUmm HOpMaMn yTINIm3aUIM OTXoOB NIOB3OBATEm, He IOCTaBnBUNHeHcyKbIe npi6OpBb I CneuaJIbHbIe MecTAYTINIm3aUIMOTXoOB, MOYr6bITbOWtpaPObAHb.I PpaBILbHaR OTdJIbHaa YTINIm3aUIM BBIpooHeHbIX npi6OpOB O3Haayet, YTO OHMOYr6bITb peUKKnIPoBAhbl, nepepa6OtaHb IMn yHNHTOKeHb 3KOLONUHECKN UcTBIM CNOCoM, He 3aRpa3HnIOUIM OkpyKaIOUHy O Cpey, He OKa3bIBAOUIM HeratNBHOe BO3DeICTBNE Ha 3DPoBBe JIODe n NO3BOJIAUOM INBOTPOH NCNOB3OBATb MaTePnAIbI, n3 KOTopBX 6bl n3rOToBEn npi6Op. DnI NOlyeHn 6Oonee NIOpOBoH mHfOpMaun o6 NMeOuXCS nPoPpAmMax yTINIm3aUIM OTXoOB 6BaIaTECB MecTHyIO Cnyk6y yTINIm3aUIM OTXoOB IM B MarasIH, B KOTOPOM 6bl npio6pTeH npi6Op. Poin3BOJNTeIN n MMNOPTEpbI Hecyt OTBETCTBEHHoc73 a 3KOLOrHECKN uCtTyO yTINIm3aUIM, nepepa6Oky uYNHHTOKeHne BB6poHeHHbx npi6OpOB HAnpMyIO INI NOCpeCTBOM TOCyApCTBeHHOH CNTeMbI.
MecThbIe MyHnUInaNbHbIe Blnactn MoryT npedocBaNTb INHOpMaunO nopAKe CdaHyHToKHeHr HehyXhIX np6opOB.
CESKY
POPIS PRISTROJE
1 Ka na podlahu
2 Kartac pro dfievene podlahy
3 Teleskopická trabice.
4 Ovladani sani
5 Hadice
6 Sacitovor
7 Vypinaci tlačitko
8 Ovladani vykonu
9 Tlačitko pro navinuti kabelu
0 Mfiizky vystupu vzduchu
11 Filtry wystupu vzduchu
12 Uvolnovaci uchy t krytu sani
13 Drzadlo pro pfienasei
14 Indikator pIneho zasobniku
15 Uzký nastavec
16 Nastavec na calouneni.
17 Nastavec na nábytek
18 Pytle do vysavae
Zásobnik vysavae
19 Zasobnik
20 Drzadlo pro pfienaseni
21 Trvaly filtr HEPA
22 Nylonovy filtr
23 Tlacitko pro uvolneni zasobniku
24 Kryt pro vyprzdneni
DULEZITÉPOKNY
Baxho: Hkora He BkIOuBaIe ypea, ako fInTbPbT He e cNoKeH npabnHO.
3a da ocnpynte 6e3npo6nemHa pa60Ta Ha ypea, n3no13BaIte camo opunnaHn Yactn Ha Ufesa.
TPNXA
BnHaHn n3KnUoyBaIte npaxOcMykaKaTa n 3BaXdaIe Te eNceLa OT KOnTaKaTApneDn da NoHCTBaTe ypeDa.
Moxete da nochctBaTe npaxocmykaKaTa n INaCTMACOBITE npHaJnEXHOCHTn C TbPROBCKN NOCHCTBaTe 3a INaCTMaCA.
He n3no3BaTe TeI 3a YnCTeHe, NOHcTBAu areHT 3a
Hnkora He notanrte npaxocmykaKaTa BbB Boda.
Ako e Heo6xOIMO, MoKeTe Da NouchTne OTdeneHnTo 3a npax C Btopa npaxocMykaKu Nn PpOCTo Da ro 3abpwe TcC cyxa KbPna Nn YeTka 3a npax.
PNEyPExEHE3ACKIAINPAHE/ N3XBbPJIaHE

OnakOBKITHe HaHaIITe npOdyk TMc a BMCOKOKAHECTBeHm.
TOBaNo-cbIeCTBOO3HaayBa,YceCeH3NON3BaT6e3BpeHn 3a OKoHata CpeDa MaTePnaJIn, KOnTo e npenOpHuTEnHO da Ce npedaaT Ha NyHKT 3a BTOpUHc CypOBHH.
To3n npOdyKT OTROBapHa DnpeKTHBaTa Ha EC 2002/96/ CE.3aepKHaTnAT CmBON, N3o6pa3RbAa Kcopa 3a 6oknyk Ha KOJenua, O3HaCuBa, Ye To3n npOdyKT ce N3xBbpna 3aeDnO COTnAbuTe OT DomAKHCTBOTO.
Tp6Ba da ce npdae Ha cneuaen nykrt 3a cbipanae Ha n3xBbplneHOn ynoTpe6a eEnKTPnueckn H enEeKTPoHNuypei nn Da ce BbpHe Ha nnctpn6ytopa, Korato KynBate npyeed. Cnope cera DeinCTBaunte pa3npoe6m 3a n3xBbPnHe Ha otnaDbu, noTpe6nTeInTe, KOHT He npedaat n3XBbPnHeHn OT ynoTpe6a ypeHn Ha hAkoN OT cneuaHnTe pyHKTOBe 3a cb6pnahe Ha otnaDbu, MORAT da 6bDat rno6EH. PpaBnHoto n3XBbPnHe Ha n3Je3nn OT ynoTpe6a ypeDn O3Haaba, ye Te MORAT da 6bDat peukKnupaHn n npepa6toHn ekONrHNO.
Toba nomara 3a ona3BaHeTo Ha OKoHaTa Cpea N no3B0nlaBa NOBTOphata ynppe6a Ha MaTePnaNN, n3No3BaHb N ypea. 3a NOBeue HnOcpMaunr OTHOCHO BcIeCTByBaUNTE npOrpAmN 3a INXbPnAHe HA OTNaDbuCe CBpbKte C MeCTHa Tcnyk6a No OTNaDbuN INC MAra3HNA,OTKDeTO CTe 3akynIN pOdyKTa. Ipon3BOInTeJIte IN BHCInTeJNTe OTROBAPRT 3a ekONOrHHTO peuNKnPaHe, npepaOToBAHe IN 3XbBpLnHe Ha pOdyKTInTe, npRko INI NOpeCTBOM ObSeCTBeHATA CNTema.
Hhopmaa 3a Toba, kak da n3xbpInTe ypei, n3n3bl BeyeOT yonotpe6a, moxete da nojynte OT MeCTHRA rpaDCNc CbBET.
ROMAN
DESCRIEREAPARATULUI
.11,3jll jie yolaiy ,yogally jall gao
yolaiy yil jial p
.aaal adjil Jae jay aill Jaaiu aal -
3 8
.11, jaiu, gaii jaiy a
jolalol jzjaiy i, aikall jaiu! Jiauyi:
. 1
jIJIiJl 1e IaIb! jz2 Iia.4g Jy y
10 8
.1bgs 08y jllii yaiu uillj
Slll bll Sllgill gll ggl bll l
20 8
13 2
, jj . jglll slaog Hepa iuulll aglao slauo Juc! -
J 24 15
jz1 jgfo y jno Lguiuug Lgud
jIJIJI JIJIJI IJIJI 1
a 1
- jieell jaiwslj 2. jaiy
. jill JlaaiuJ jll ipaia p
J 1 J 1 J 1 J 1 J 1 J 1 J 1 J 1 J 1 J 1 J 1 J 1 J 1 J 1 J 1 J 1 J 1 J 1 J 1 J 1 J 1 J 1 J 1 J 1 J 1 J 1 J 1 J 1 J 1 J 1 J 1 J 1 J 1 J 1 J
S ACD = S COD + S BDO - S CDO
.
: p502 j4j11
. 1iIg s i jolit iie aillaiy
: yalao
(,j,,)
. 1g 2g g a g iLw, aally sJg -
jglg 2b jgo
. 1g jjjj jj
,
Jusag aagbllg aajarall aall jglall jglal .
Jia dll j, aai! 1uai! lal Jaa
. 1
J.2. 11 y 11 b11 a11 g 2 w i k l d w . 11
y j 10j y j 10j 10j 10j 10j 10j 10j 10j 10j 10j 10j 10j 10j 10j 10j 10j 10j 10j 10j 10j 10j
.1411 1111111111
J (Jabu) Jalai jn jilj
aegallg aal 1 gai, aali gaill gail
jally pao joo Stll Jabla a
g 15 g 15 g 15 g 15
1 1
bI bI y Ibiis p c no sL , yIyI yI . . . 1011 o11 l aB bB jll plaiu J .
1 1
. 1111111111111111111111111111111
1 1 1 1 1 1 1 1 1 1 1 1 1 1 1 1 1 1 1 1 1 1 1 1 1 1 1 1 1
jIgJl IaIgO
a 1
2
3
154
5
yolaoy 6
1 7
Jauio 8g b.82 .8
y11 11 11 j .9
10
1g 11
Jalaoy1 1bc gie duu .12
Jui 13
gao jzai Js .14
Jalil 15
16
17
Jalaiy JwSi .18
Joluaioj
l_2 = 19.
[\left( {c + 1}\right) \div \left( {a + 2}\right) \cdot {20}]
auiuuii aogjso slua.21
jglil 22
j 23
jzal 24
iolo lio 1io xlo
. Jaaall .Jy 12 - 10aai I aai , jai jai ai kll piai . . Jaaay
. y 10aai 100
. y 10aai 100
. y 10aai 100
1 1 1 1 1 1 1 1 1 1 1 1 1 1 1 1 1 1 1 1 1 1 1 1 1 1 1 1 1 1 1 1 1 1 1 1 1 1 1 1 1 1 1 1 1 1
1 1 1 1 1 1 1 1 1 1 1 1 1 1 1 1 1 1 1 1 1 1 1 1 1 1 1
.
jgl jie
Lgll 1
1 0
gaglll Jgaglllaoa! pdc jdc glll jlll jlll
JolaoyI aai jolaooyjgobj Jolag
aalg yll
aalll gll jll golj jll llaai
15

BSH PAE, S.L.
NIF B-01272368