
Sena - Vacuum Cleaner UFESA - Free user manual and instructions
Find the device manual for free Sena UFESA in PDF.

| Product type | Cordless stick vacuum cleaner |
| Brand | Ufesa |
| Model | Sena |
| Power supply | Rechargeable lithium-ion battery (mains charger included, 100-240 V) |
| Main functions | Powerful suction, power adjustment, motorized head for hard floors and carpets, use as handheld vacuum |
| Included accessories | Extension tube, motorized floor head, 2-in-1 flat nozzle, dusting brush, wall mount, charger, battery |
| Maintenance and cleaning | Removable dust container (bottom emptying), sponge filter and high-efficiency filter washable with water, removable brush roll |
| Safety | Automatic shutdown in case of overheating, anti-blocking safety device |
| Spare parts and repairability | Removable battery, washable filters, replaceable brush roll |
| General information | Household use only, max altitude 2000 m, 2-year warranty |
Frequently Asked Questions - Sena UFESA
User questions about Sena UFESA
0 question about this device. Answer the ones you know or ask your own.
Ask a new question about this device
Download the instructions for your Vacuum Cleaner in PDF format for free! Find your manual Sena - UFESA and take your electronic device back in hand. On this page are published all the documents necessary for the use of your device. Sena by UFESA.
USER MANUAL Sena UFESA
natural_image
Two different vacuum cleaner models shown in black and white, standing upright against a plain white background (no text or symbols visible)ESPAÑOL
natural_image
Technical line drawing of a handheld device with internal components and an arrow indicating motion (no text or symbols)natural_image
Technical line drawing of a mechanical assembly with an arrow indicating transformation (no text or symbols present)natural_image
Technical line drawing of a mechanical device with an arrow indicating direction (no text or symbols present)natural_image
Technical line drawing of a mechanical assembly before and after transformation (no text or symbols)natural_image
Technical line drawing of a mechanical device with an arrow indicating direction (no text or symbols present)natural_image
Technical line drawing of a mechanical device with an arrow indicating direction (no text or symbols present)
natural_image
Technical line drawing of a vertical mechanical device with handle and lever (no text or symbols)natural_image
Technical line drawing of a mechanical device with no visible text or symbolsnatural_image
Technical line drawing of a mechanical device with a side view showing internal components (no text or symbols)natural_image
Technical line drawing of a mechanical device with internal components and directional arrows (no text or symbols)natural_image
Technical line drawing of a mechanical component with two views showing assembly or assembly (no text or symbols present)natural_image
Technical line drawing of a mechanical assembly with an inset detail showing a component labeled A (no text or symbols present)natural_image
Technical line drawing of a mechanical assembly with labeled component A (no text or symbols present)natural_image
Technical line drawing of a mechanical device with internal components and directional arrows (no text or symbols)natural_image
Technical line drawing of a mechanical assembly with an arrow indicating transformation (no text or symbols present)natural_image
Technical line drawing of a mechanical device with an arrow indicating direction (no text or symbols present)natural_image
Technical line drawing of a mechanical device with an arrow indicating direction (no text or symbols present)natural_image
Technical line drawing of a vertical mechanical device with handle and lever (no text or symbols)UTILIZAR O ASPIRADOR
natural_image
Technical line drawing of a mechanical device with no visible text or symbolsnatural_image
Technical line drawing of a mechanical device with two views: one showing a cylindrical component and the other a multi-stage device (no text or symbols visible)natural_image
Technical line drawing of a mechanical device with internal components and directional arrows (no text or symbols)natural_image
Technical line drawing of a mechanical component with two views showing assembly or assembly steps (no text or symbols present)natural_image
Technical line drawing of a mechanical assembly with an inset showing a close-up detail (no text or symbols)natural_image
Technical line drawing of a mechanical assembly with labeled component A (no text or symbols present)WE WOULD LIKE TO THANKS YOUR FOR CHOOSING UFESA, WE WISH THE PRODUCT PERFORMS TO YOUR SATISFACTION AND PLEASURE.
WARNING
PLEASE READ THE INSTRUCTIONS FOR USE CAREFULLY PRIOR TO USING THE PRODUCT. STORE THESE IN A SAFE PLACE FOR FUTURE REFERENCE.
DESCRIPTION
- Brush roller
- Floor head
- Floor head release button Crevice nozzle
- Extension tube release button Dusting nozzle
- Dust container release button
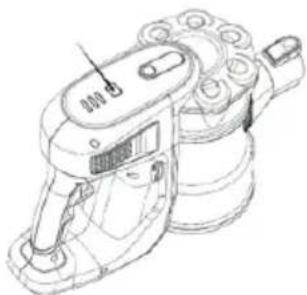
- Power adjustment key
- Indicator lights
- ON/OFF button
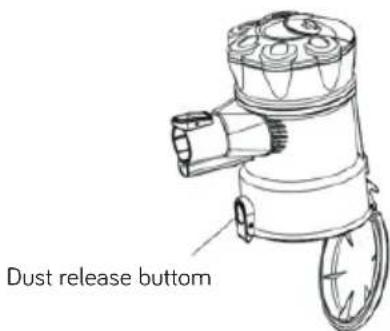
- Dust release button
- Extension tube
- Battery pack release button
- Dust filter
- Wall mount Screws
- Wall mount
15 Battery Pack - Charger
- 2in1 crevice nozzle
- Accessory hook
SAFETY INSTRUCTIONS
This appliance can be used by children aged from 8 years and above and persons with reduced physical, sensory or mental capabilities or lack of experience and knowledge if they have been given supervision or instruction concerning use of the appliance in a safe way and understand the hazards involved. Children shall not play with the appliance. Cleaning and user maintenance shall not be made by children without supervision.
The adaptor cable cannot be replaced.
If the cable is damaged, the adaptor will be discarded.
This device can only be used with the adapter model supplied
with the device and powered with the safety voltage indicated in the rating plate of the device.
Plug must be removed from socket-outlet before cleaning or maintaining the appliance.
This device can only be used with the adapter model supplied with the device and powered at very safety voltage indicated on the appliance specifications plate.
Follow the DEVICE CHARGE instructions in order to charge it. Follow the device BATTERY REMOVAL
instructions for removal of the batteries from the device.
This appliance is intended for use at a maximum altitude of 2000m above sea level.
BATTERY REMOVAL
The appliance must be disconnected from the supply mains when removing the battery.
Make sure the battery broom is fully discharged.
Press the battery removal button and remove the battery from the product.
IMPORTANT WARNINGS
Prior to plugging in the product, check that your mains voltage is the same as the one indicated on the product label.
The mains connection cable must not be tangled or wrapped around the product during use. Do not pull on the connection cord in order to unplug it.
Do not use, connect or disconnect the device to the mains with your hands or feet wet. Proceed according to the conservation and cleaning section of this manual for cleaning.
Unplug the product immediately from the mains in the event of any breakdown or damage and contact an authorised Technical support service.
In order to prevent any risk of danger, do not open the device. Only qualified technical personnel from the brand's Official Technical support service may carry out repairs or procedures on the device.
Any incorrect use or improper handling of the product shall render the warranty null and void. Only an authorised technical support service centre may carry out repairs on this product.
This appliance is designed exclusively for domestic use, in no case should be a commercial or industrial use. In case of misuse or tampering with the product, it will be out of warranty.
Do not use the appliance to vacuum liquids (water, etc), sharp objects (pins, pins, nails, glass, etc), incandescent objects (matches, cigarettes).
Never use the turbobrush to: Polish floors, suck (Liquids, wet or damp dust, hot ash, burning objects, such as cigarettes, matches, sharp and hard items, such us: razors, pins, thumbtacks, pieces of glass, etc), flour, cement, plaster, printer or photocopier toner, etc.
B&B TRENDS SL. disclaims all liability for damages that may occur to people, animals or objects, for the non-observance of these warnings.
ACCESSORIES
Extension Tube: Use for extended reach when using as an upright unit or for those hard to reach places.
Motorized Floor Head: Use this for hard floors and carpets. Easily picking up dirt dust and small debris.
Dusting Brush: Use this for vacuuming fabric furnishings such as sofas armchairs and curtains.
Crevice nozzle: Features a narrow nozzle that makes quick work of vacuuming tight spaces such as corners and hard to reach areas.
ASSEMBLY INSTRUCTIONS
NOTE: Before assembling the appliance fix the included mount to the wall Ensure it is placed high enough for the vacuum to be securely mounted.
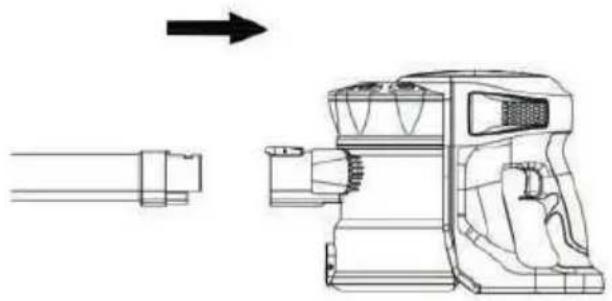
Assembling the main body:
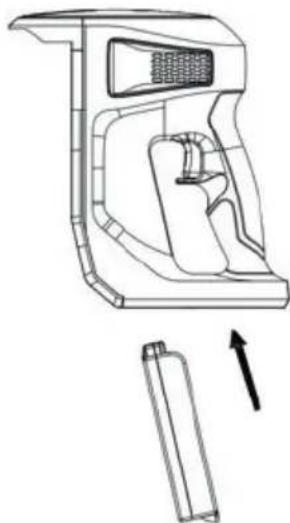
- Install the battery into the housing by sliding it into the appropriate slot. It will "click" into place.
natural_image
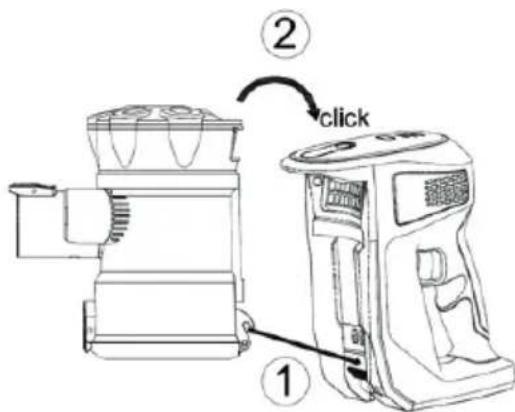
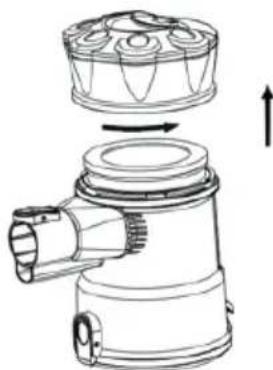
Technical line drawing of a handheld device with internal components and an arrow indicating motion (no text or symbols)- Install the dust container by inserting the clip into the main body, then put the upper side into place. It will "click" to secure.
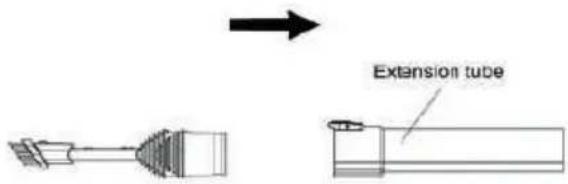
Assemble motorized floor head:
- Insert the connector of the motorized floor head into the base of the extension tube by clicking it into place.

natural_image
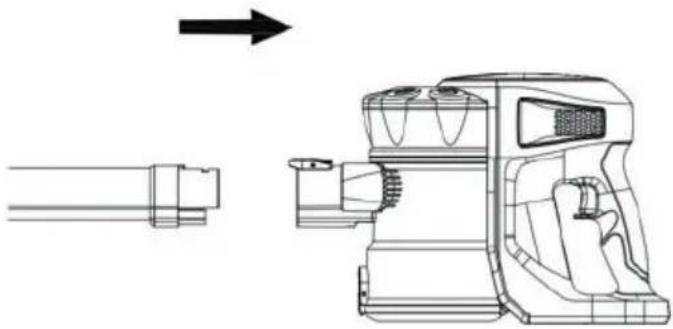
Technical line drawing of a mechanical assembly with an arrow indicating transformation (no text or symbols present)- Attach the floor head and tube to the main body by slotting it into place via the air duct connector.
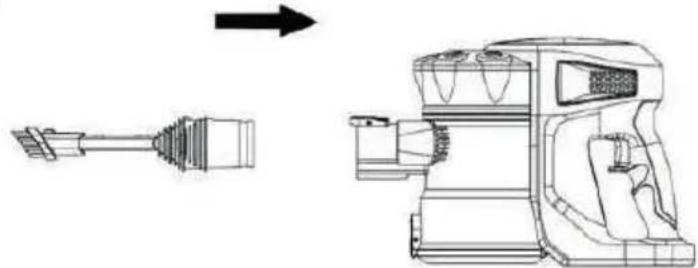
natural_image
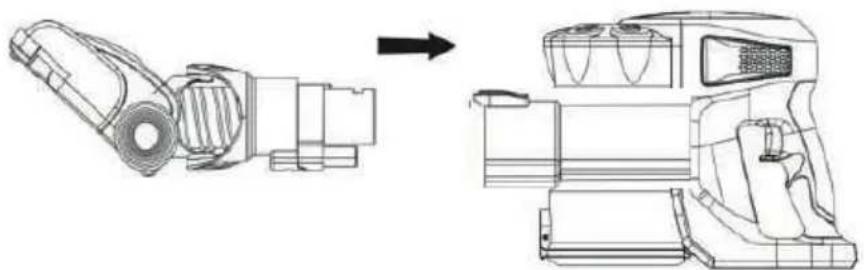
Technical line drawing of a mechanical device with an arrow indicating direction (no text or symbols present)- If using the floor head without the tube, simply attach it to the main body via the air duct connector. It will "click" when secure.
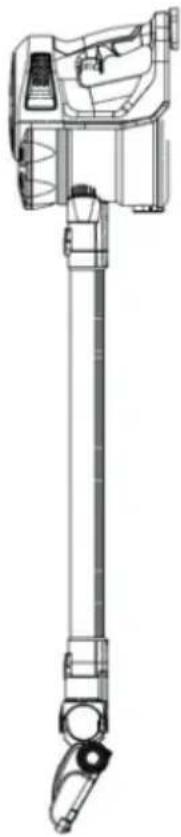
natural_image
Technical line drawing of a mechanical assembly before and after transformation (no text or symbols)Assemble accessories:
- Attach the extension tube to the main body by slotting it into place the via duct connector
natural_image
Technical line drawing of a mechanical device with an arrow indicating direction (no text or symbols present)- Attach the crevice nozzle or dusting brush to the base of the extension tube via the connector. It will "click" into place.
- If using accessories without the tube, simply attach them to the main body via the air duct connector. It will "click" when secure
natural_image
Technical line drawing of a mechanical device with an arrow indicating direction (no text or symbols present)BEFORE FIRST USE
- Put the unit to the wall mount
- Ensure that the air vent, suction pipe are free from blockages and dust. Should they suddenly clogged, switch off the appliance immediately and clear the blockage before attempting to use the vacuum again.
- Remove any sharp or large objects from the path before using this vacuum as these may damage the appliance irreparably.
NOTE: In the event of a maintenance issue with the product such as a jammed brush roller, all three BLUE indicator lights will flash on around 10 seconds then off until the issue is resolved, in this case turn the cleaner off until the issue is rectified.
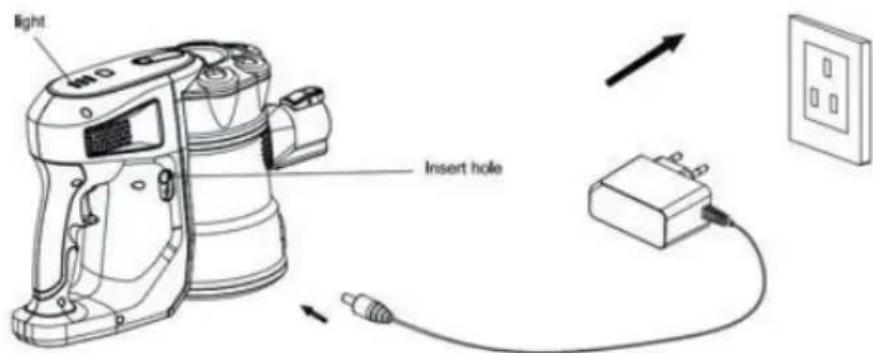
Battery Charging
- Push the release button and take the battery module out.
Plug the cable into the power inlet located on the side of the battery. When charging, the energy indicator light will be illuminated RED. Once fully charged this indicator light will keep bright in Blue. Once fully charged, turn off the charger plug from the power socket.

natural_image
Technical line drawing of a mechanical device with lever and handle (no text or symbols)- You can also charge the battery through the main body. The three indicator lights will indicate one by one to show the battery capacity be charged. When the battery is fully charged, all three lights will keep bright in blue.
CAUTION: The vacuum must be fully charged before using for the first time.
- Remove the vacuum cleaner from the wall mount. If using as a hand held unit, disassemble the tube and attach the desired accessory.
- Use the Power ON/OFF button to turn on the appliance.
- For a stronger suction, press the Power adjustment key to increase the strength. deal for when you are cleaning carpets with a high pile.
- To turn off the vacuum, press the Power ON/OFF button again.
natural_image
Technical line drawing of a mechanical device with no visible text or symbolsMAINTAINING THE VACUUM
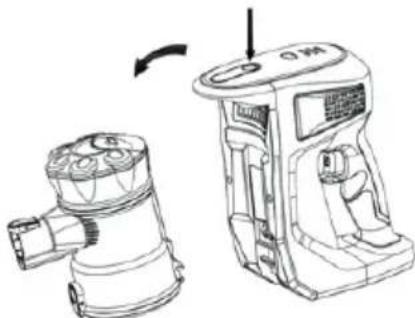
Cleaning the dust container
- Press the dust container release button to take the dust container out..
natural_image
Line drawing of a portable device with a cylindrical component and a side-mounted device (no text or symbols)- Press the dust release button to open the bottom cover and expel trash. Wipe to clean the dust container, do not immerse in water.
Cleaning the filter:
- Remove the dust container from the main body.
- Twist counter-clockwise to remove the filter cover.
natural_image
Technical line drawing of a mechanical device with internal components and directional arrows (no text or symbols)- Lift to remove the sponge filter and high-efficient filter.

natural_image
Technical line drawing of a mechanical component with two views showing assembly or assembly (no text or symbols present)- Rinse the filters thoroughly under the running cold water. Do not use soap or other cleaning solvents.
- COMPLETELY air dry the filters before reassembling. Do not use hair dryer to dry the filter. This may cause the filter to warp.
Cleaning the brush roll:
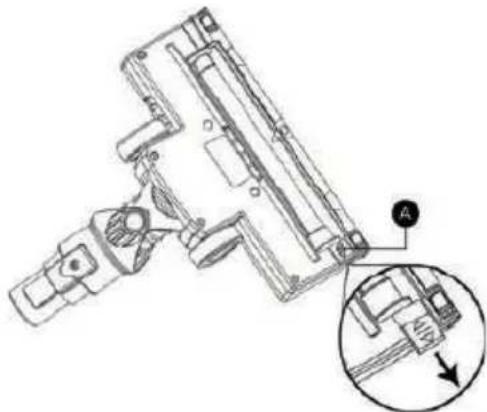
- Remove the brush roller from the brush housing. Slide the brush roller fastener "A" away from the brush as below.
natural_image
Technical line drawing of a mechanical assembly with an inset showing a component detail (no text or symbols)- Carefully clean and remove the hairs and debris from the brush roller. Wipe to clean only, do not use any soap or harsh cleaning solvents.
- If brush roller becomes damp, allow to dry naturally before replacing.
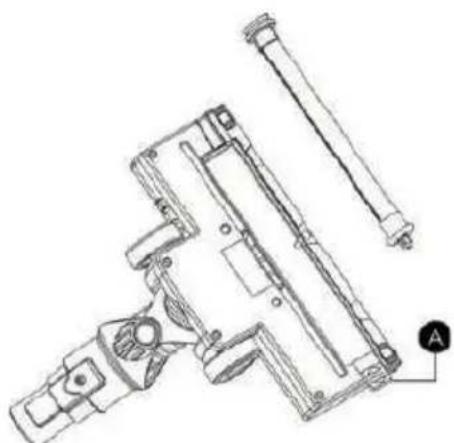
- Slide fastener "A" to original position to secure the brush roller.
natural_image
Technical line drawing of a mechanical assembly with labeled component A (no text or symbols present)TROUBLESHOOTING
The appliance will not power on.
- This may be caused by a flat battery. This can occur if the appliance has been used or stored for an extended period of time. Connect the vacuum to the charger and allow for a full charging cycle to complete.
The vacuum stopped suddenly:
- This will occur if the safety cut-out device has been activated. This device is designed to prevent your appliance from overheating. Ensure the vacuum is turned off, disconnect all accessories and leave to cool down for at least half an hour before attempting to operate again. Try to identify the source of the overheat by checking for blockages in the extension tube motor-driven floor head and accessories. Empty the dust container and clean or replace the filter.
The suction of the vacuum has reduced:
- Turn the vacuum off. Disconnect the floor head, extension tube and any accessories. Check for and remove any blockages from the dustbin filter, air duct, extension tube floor head and accessories.
Motorised floor head is not rotating:
- This tends to occur when there are too many fibres wrapped around the brush roll restricting movement. Consult the maintenance section of this manual for instructions on how to appropriately clean the brush roll.
The charging indicator light does not flash up:
- There may be no power reaching the vacuum from the charger.
Ensure that power is being supplied to the mains socket and that the charger is turned on. Ensure the charging cable is securely connected to the vacuum
- Ensure the mains socket is switched off before checking the charging cable itself. Do not attempt to use if the cable is split, frayed or otherwise damaged. Instead, seek a replacement charger.
The application time of the vacuum is less than it used to be:
- Ensure the battery has completed a full charging cycle. An insufficient charging cycle will result in reduced application time.
- There may be reduced energy discharge in the battery. This is normal and gradually occurs in all batteries over time.
PRODCUT DISPOSAL
This product complies with European Directive 2012/19/EU on electrical and electronic devices, known as WEEE (Waste Electrical and Electronic Equipment), provides the legal framework applicable in the European Union for the disposal and reuse of waste electronic and electrical devices. Do not dispose of this product in the bin, instead going to the electrical and electronic waste collection centre closest to your home.
The product may contain batteries. Remove them before disposing of the product and dispose in special containers approved for this purpose.
FRANÇAIS
NOUS VOUS REMERCIONS D'AVOIR CHOISI UFESA, NOUS SOUHAITONS QUE CE PRODUIT VOUS APPORTE SATISFACTION ET PLAISIR.
AVERTISSEMENT
VEUILLEZ LIRE ATTENTIVEMENT LES INSTRUCTIONS D'UTILISATION AVANT D'UTILISER LE PRODUIT. VEUILLEZ CONSERVER CES INSTRUCTIONS DANS UN ENDROIT SÛR POUR POUVOIR VOUS Y RÉFÉRER ULTÉRIEUREMENT.
DESCRIPTION
natural_image
Technical line drawing of a handheld device with internal components and directional arrows (no text or symbols)natural_image
Technical line drawing of a mechanical assembly with an arrow indicating transformation (no text or symbols present)natural_image
Technical line drawing of a mechanical device with an arrow indicating direction (no text or symbols present)natural_image
Technical line drawing of a mechanical device before and after assembly (no text or symbols)natural_image
Technical line drawing of a mechanical device with an arrow indicating direction (no text or symbols present)natural_image
Technical line drawing of a mechanical device with an arrow indicating direction (no text or symbols present)AVANT LA TOUTE PREMIÈRE UTILISATION
natural_image
Technical line drawing of a vertical mechanical device with handle and lever (no text or symbols)UTILISATION DE L'ASPIRATEUR
natural_image
Technical line drawing of a mechanical device with no visible text or symbolsENTRETIEN DE L'ASPIRATEUR
natural_image
Technical line drawing of a portable air purifier device with a side view showing internal components (no text or symbols)natural_image
Technical line drawing of a mechanical device with internal components and an upward arrow indicating motion (no text or symbols)natural_image
Technical line drawing of a mechanical component with two views showing assembly or assembly steps (no text or symbols present)natural_image
Technical line drawing of a mechanical assembly with an inset showing a close-up detail (no text or symbols)natural_image
Technical line drawing of a mechanical device with labeled component A (no text or symbols present)RÉSOLUTION DES PROBLÈMES
natural_image
Technical line drawing of a mechanical device with internal components and an arrow indicating direction (no text or symbols)natural_image
Technical line drawing of a mechanical assembly with an arrow indicating transformation (no text or symbols present)natural_image
Technical line drawing of a mechanical device with an arrow indicating direction (no text or symbols present)natural_image
Technical line drawing of a mechanical device with an arrow indicating direction (no text or symbols present)PRIMA DEL PRIMO UTILIZZO
natural_image
Technical line drawing of a vertical mechanical device with handle and lever (no text or symbols)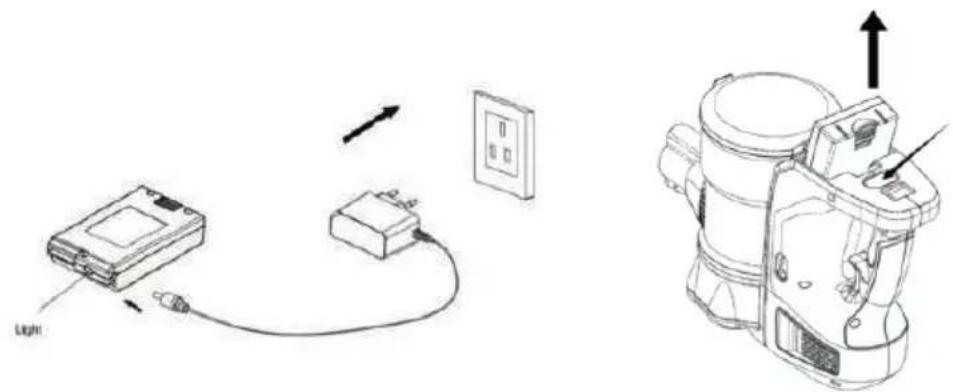
natural_image
Technical line drawing of a mechanical device with no visible text or symbolsnatural_image
Technical line drawing of a mechanical device with a side view showing internal components (no text or symbols)natural_image
Technical line drawing of a mechanical device with internal components and directional arrows (no text or symbols)natural_image
Technical line drawing of a mechanical component with two views showing assembly or assembly steps (no text or symbols present)natural_image
Technical line drawing of a mechanical assembly with an inset showing a close-up detail (no text or symbols)natural_image
Technical line drawing of a mechanical assembly with labeled component A (no text or symbols present)natural_image
Technical line drawing of a handheld device with internal components and an arrow indicating direction (no text or symbols)natural_image
Technical line drawing of a mechanical assembly with an arrow indicating transformation (no text or symbols present)natural_image
Technical line drawing of a mechanical device with an arrow indicating direction (no text or symbols present)natural_image
Technical line drawing of a mechanical assembly before and after transformation (no text or symbols)Zubehör montieren:
natural_image
Technical line drawing of a mechanical device with an arrow indicating direction (no text or symbols present)natural_image
Technical line drawing of a mechanical device with an arrow indicating direction (no text or symbols present)VOR DEM ERSTEN GEBRAUCH
natural_image
Technical line drawing of a vertical mechanical device with handle and lever (no text or symbols)natural_image
Technical line drawing of a mechanical device with no visible text or symbolsnatural_image
Technical line drawing of a mechanical device with a side view showing internal components (no text or symbols)natural_image
Technical line drawing of a mechanical component with no visible text or symbolsnatural_image
Technical line drawing of a mechanical component with two views showing assembly or assembly steps (no text or symbols present)natural_image
Technical line drawing of a mechanical assembly with an inset close-up showing a component detail (no text or symbols)natural_image
Technical line drawing of a mechanical assembly with labeled component A (no text or symbols present)FEHLERBEHEBUNG
natural_image
Technical line drawing of a handheld device with internal components and an arrow indicating motion (no text or symbols)natural_image
Technical line drawing of a mechanical assembly with an arrow indicating transformation (no text or symbols present)natural_image
Technical line drawing of a mechanical device with an arrow indicating direction (no text or symbols present)natural_image
Technical line drawing of a mechanical assembly before and after transformation (no text or symbols)natural_image
Technical line drawing of a mechanical device with an arrow indicating direction (no text or symbols present)natural_image
Technical line drawing of a mechanical device with an arrow indicating direction (no text or symbols present)ПРЕДИ ПЪРВОНАЧАЛНА УПОТРЕБА
natural_image
Technical line drawing of a vacuum cleaner (no text or symbols)natural_image
Technical line drawing of a mechanical device with no visible text or symbolsnatural_image
Technical line drawing of a portable device with a cylindrical component and a side-mounted device (no text or symbols visible)natural_image
Line drawing of a mechanical device with no visible text or symbolsnatural_image
Technical line drawing of a mechanical device with internal components and directional arrows (no text or symbols)natural_image
Technical line drawing of a mechanical component with two views showing assembly or assembly steps (no text or symbols present)natural_image
Technical line drawing of a mechanical assembly with an inset showing a close-up detail (no text or symbols)natural_image
Technical line drawing of a mechanical assembly with labeled component A (no text or symbols present)ОТСТРАНЯВАНЕ НА НЕИЗПРАВНОСТИ
• demands cannot be done. • demands cannot be done. • demands cannot be done. • demands cannot be done. • demands cannot be done. • demands cannot be done. • demands cannot be done. • demands cannot be done. • demands cannot be done. • demands cannot be done. • demands cannot be done. • demands cannot be done. • demands cannot be done. • demands cannot be done. • demands cannot be done. • needs to ensure that the demand is not possible for a request. • needs to ensure that the demand is not possible for a request. • needs to ensure that the demand is not possible for a request. • needs to ensure that the demand is not possible for a request. • needs to ensure that the demand is not possible for a request. • needs to ensure that the demand is not possible for a request. • needs to ensure that the demand is not possible for a request. • needs to ensure that the demand is not possible for a request. • demands to ensure that the demand is not possible for a request. • demands to ensure that the demand is not possible for a request. • demands to ensure that the demand is not possible for a request. • demands to ensure that the demand is not possible for a request. • demands to ensure that the demand is not possible for a request. • demands to ensure that the demand is not possible for a request. • demands to ensure that the demand is not possible for a request. • demands to believe that the demand is not possible for a request. • demands to believe that the demand is not possible for a request. • demands to believe that the demand is not possible for a request. • demands to believe that the demand is not possible for a request. • demands to believe that the demand is not possible for a request. • demands to believe that the demand is not possible for a request. • demands to believe that the demand is not possible for a request. • demands to believe that it's not possible for a request. • demands to believe that it's not possible for a request. • demands to believe that it's not possible for a request. • demands to believe that it's not possible for a request. • demands to believe that it's not possible for a request. • demands to believe that it's not possible for a request. • demands to believe that it's not possible for a request. • demands to believe that it's not possible for a request. • demands you can't know what you can't know what you can't know what you can't know what you can't know what you can't know what you can't know what you can't know what you can't know what you can't know what you can't know what you can't know what you can't know what you can't know what you can't know what you can't know what you can't know what you can't know what you can't know what you can't know what you can't know which you can't know what you can't know what you can't know what you can't know what you can't know what you can't know what you can't know what you can't know what you can't know what you can't know what you can't know what you can't know what you can't know what you can't know what you can't know what you can't know what you can't know what you can't know what you can't know what you can't know how we can't know what we can't know what we can't know what we can't know what we can't know what we can't know what we can't know what we can't know what we can't know what we can't know what we can't know what we can't know what we can't know what we can't know what we can't know what we can't know what we can't know what we can't know what we can't know what we can't know what we can't know when we can't know what we can't know what we can't know what we can't know what we can't know what we can't know what we can't know what we can't know what we can't know what we can't know what we can't know what we can't know what we can't know what we can't know what we can't know what we can't know what we can't know what we can't know what we can't know what we can't know that we can't know what we can't know what we can't know what we can't know what we can't know what we can't know what we can't know what we can't know what we can't know what we can't know what we can't know what we can't know what we can't know what we can't know what we can't know what we can't know what we can't know what we can't know what we can't know what we can't know which we can't know what we can't know what we can't know what we can't know what we can't know what we can't know what we can't know what we can't know what we can't know what we can't know what we can't know what we can't know what we can't know what we can't know what we can't know what we can't know what we can't know what we can't know what we can't know what we can't know who has no knowledge of our people, and there are no knowledge of our people, and there are no knowledge of our people, and there are no knowledge of our people, and there are no knowledge of our people, and there are no knowledge of our people, and there are no knowledge of our people, and there are no knowledge of our people, and there are no knowledge of our people, and there are no knowledge of our people, and there are no knowledge of our people, and there are no knowledge of our people, and there are one knowledge of our people, and there are one knowledge of our people, and there are one knowledge of our people, and there are one knowledge of our people, and there are one knowledge of our people, and there are one knowledge of our people, and there are one knowledge of our people, and there are one knowledge of our people, and there are one knowledge of our people, and there are one knowledge of our people, and there are one knowledge of our people, and there are one information about us in this way.
natural_image
Technical line drawings of a mechanical component showing two views: top view with internal structure and side view with internal mesh (no text or symbols)natural_image
Technical line drawing of a mechanical assembly with an inset showing a close-up detail (no text or symbols)natural_image
Technical line drawing of a mechanical assembly with labeled component A (no text or symbols present)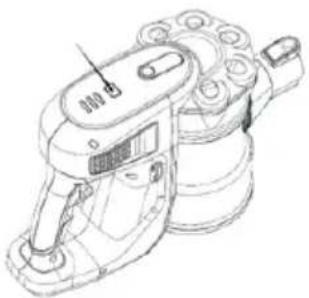
natural_image
Technical line drawing of a mechanical device with no visible text or symbolsnatural_image
Technical line drawing of a mechanical device with a cylindrical component and a side-mounted device (no text or symbols present)natural_image
Technical line drawing of a mechanical device with internal components and directional arrows (no text or symbols)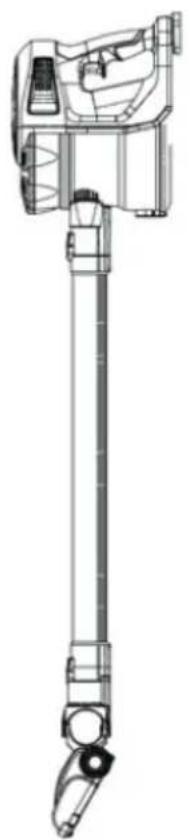
natural_image
Technical line drawing of a mechanical device with lever and handle (no text or symbols)قبل الاستخدام الأول
natural_image
Technical line drawing of a mechanical assembly before and after transformation (no text or symbols): تجmic الملحقات
natural_image
Technical line drawing of a mechanical device with an arrow indicating direction (no text or symbols present)natural_image
Technical line drawing of a mechanical device with an arrow indicating direction (no text or symbols present)natural_image
Technical line drawing of a handheld device with internal components and an arrow indicating motion (no text or symbols)natural_image
Technical line drawing of a mechanical assembly with an arrow indicating process direction (no text or symbols)natural_image
Technical line drawing of a mechanical device with an arrow indicating direction (no text or symbols present)B&B TRENDS, SL. guarantees compliance of this product for the use for which it is intended for a period of two years. In the case of breakdown during the term of this warranty, users are entitled to repair or else the replacement of the product at no charge if the former is unavailable, unless one of these options proves impossible to fulfill or is disproportionate. In this case, you can then opt for a reduction in price or cancellation of the sale, which must be dealt with directly with the sales vendor. This also covers replacement of spare parts provided that the product has been used according to the recommendations specified in this manual for both cases, and has not been tampered with by any third party that is not authorised by B & B TRENDS, SL. The warranty will not cover any parts subject to wear and tear. This warranty does not affect your rights as a consumer in accordance with the provisions in Directive 1999/44/EC for member states of the European Union.
USE OF WARRANTY
Customers must contact a B&B TRENDS, SL., authorised Technical Service for repair of the product. Since any tampering of the same by anyone not authorised by B&B TRENDS, SL., or the careless or improper use of the same shall render this warranty null and void. The warranty must be fully com-
pleted and delivered along with the receipt or delivery docket for the effective exercise of rights under this warranty.
This warranty should be retained by the user as well as the invoice, receipt or the delivery docket to facilitate the exercise of these rights. For technical service and after-sales care outside the Spanish territory, please submit your query to the point of sale where you purchased the item
BON DE GARANTIE
Check out your nearest service station at https://sat.ufesa.com/
ufesa
B&B TRENDS, S.L. · C.I.F. B-86880473