RCCD350 - Hi-Fi System PANASONIC - Free user manual and instructions
Find the device manual for free RCCD350 PANASONIC in PDF.
| Product type | Compact Hi-Fi system with FM/AM radio and CD player |
| Brand | Panasonic |
| Model | RCCD350 |
| Power supply | AC 230 V, 50 Hz, 11 W (standby 2.3 W) |
| Memory backup battery | 9 V (type 6F22/6LR61, 006P, not supplied) |
| Radio frequency ranges | FM: 87.5 to 108.0 MHz (50 kHz steps); AM: 522 to 1629 kHz (9 kHz steps) |
| Main functions | CD playback, FM/AM radio, 3 alarms, sound equalizer (Bass/Clear/Soft/Voice), sound virtualizer, sleep timer, 24-hour clock, display with dimmer |
| Speakers | 4.5 cm speakers, 6 Ω x 2 |
| Compatible disc formats | Audio CD, CD-R, CD-RW (CD-DA format) |
| Maintenance and cleaning | Wipe with a soft, dry cloth. Do not use alcohol, thinner, or benzene. |
| Safety | Laser safety device; do not open or repair yourself; avoid exposure to moisture and open flames; do not block ventilation openings. |
| Included accessories | Loop antenna, user manual |
| Destination country | Temperate climates |
Frequently Asked Questions - RCCD350 PANASONIC
User questions about RCCD350 PANASONIC
0 question about this device. Answer the ones you know or ask your own.
Ask a new question about this device
Download the instructions for your Hi-Fi System in PDF format for free! Find your manual RCCD350 - PANASONIC and take your electronic device back in hand. On this page are published all the documents necessary for the use of your device. RCCD350 by PANASONIC.
USER MANUAL RCCD350 PANASONIC
Operating Instructions
Bedienungsanleitung
HctpyKuaI NO 3KcnpyaatauN
Návod k obssluze
Instrukcja obstugi
Thank you for purchasing this product. Before connecting, operating or adjusting this product, please read these instructions completely. Please keep this manual for future reference.
Sehr geehrter Kunde
Supplied accessories 2
Precautions 2
Connections and power 3
Setting the clock 3
CDs. 4
Radio. 4
Using the alarms. 5
Other features 5
Cautions. 6
Troubleshooting guide 6
Specifications 6
Maintenance 6
Supplied accessories
1 loop antenna
Please check and identity the supplied accessories.
Precautions
- Avoid using or placing this unit near sources of heat.
- Avoid cuts, scratches, or poor connections in the AC power cord, as they may result in possible fire or electric shock hazard. Also, excessive bending, pulling or splicing of the cord should be avoided.
- Do not unplug the AC power cord by pulling on the cord. To do so may cause premature failure or a shock hazard.
- Do not operate this unit on AC power in a bathroom, as a potential shock hazard may result.
CLASS 1
LASER PRODUCT
LUOKAN 1 LASERLAITE
KCLASS 1 LASER APPARAT
(Back of product)
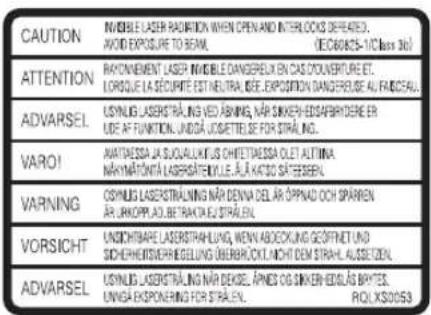
(Inside of product)
(Tuotteen sisallä)
(Produktels innside)
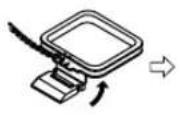
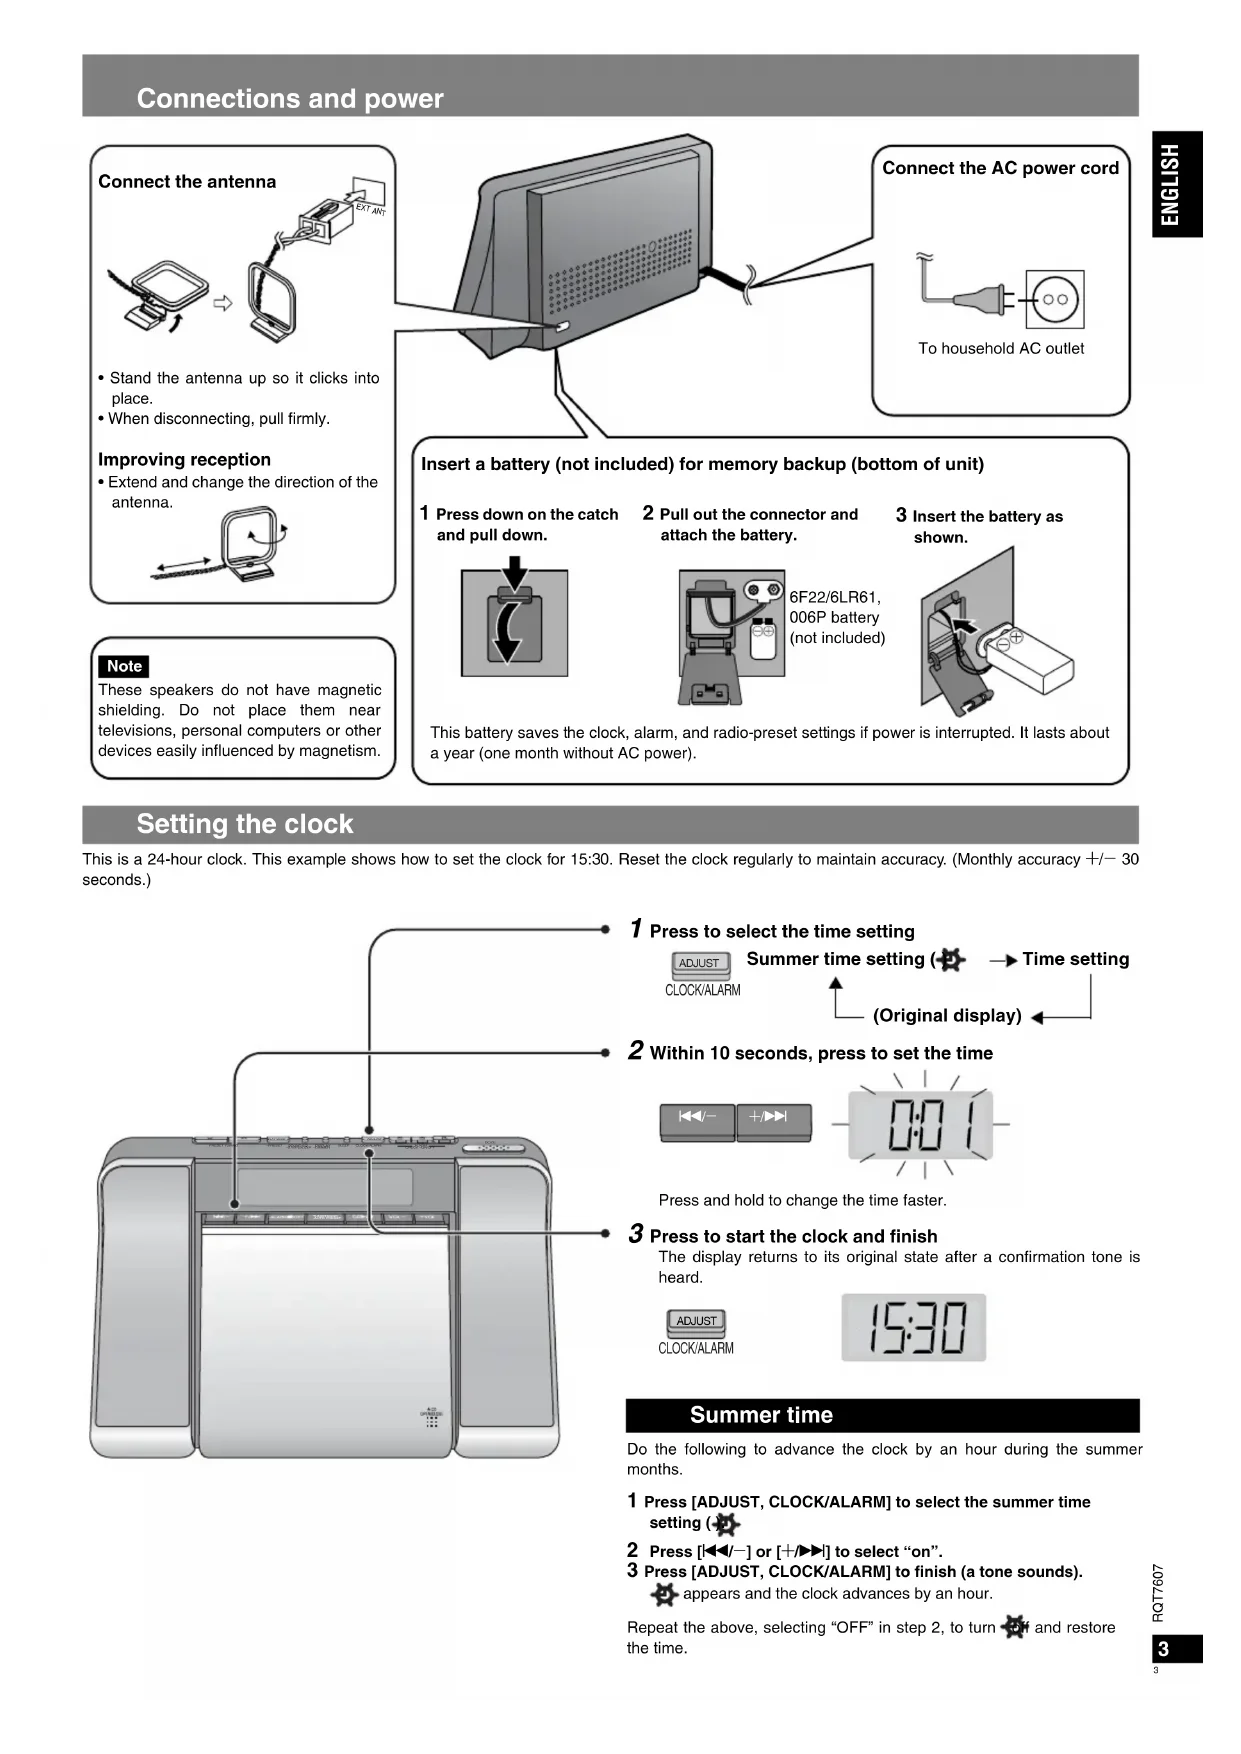
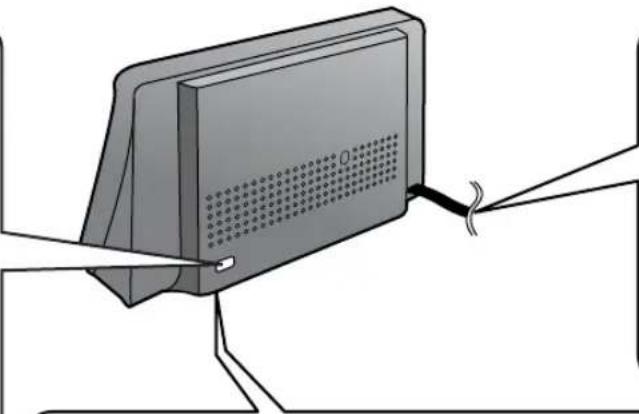
Connect the antenna
- Stand the antenna up so it clicks into place.
- When disconnecting, pull firmly.
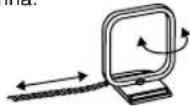
Improving reception
- Extend and change the direction of the antenna.
Note
These speakers do not have magnetic shielding. Do not place them near televisions, personal computers or other devices easily influenced by magnetism.

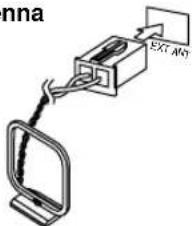
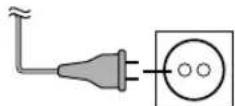
Connect the AC power cord
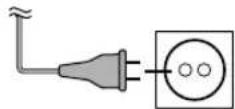
To household AC outlet
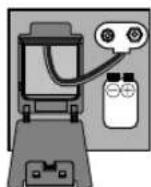
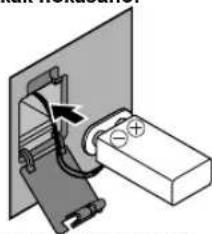
Insert a battery (not included) for memory backup (bottom of unit)
1 Press down on the catch and pull down.
2 Pull out the connector and attach the battery.
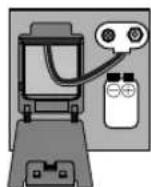
6F22/6LR61, 006P battery (not included)
3 Insert the battery as shown.
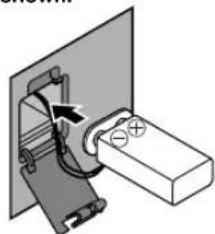
This battery saves the clock, alarm, and radio-preset settings if power is interrupted. It lasts about a year (one month without AC power).
Setting the clock
This is a 24-hour clock. This example shows how to set the clock for 15:30. Reset the clock regularly to maintain accuracy. (Monthly accuracy +/− 30 seconds.)
1 Press to select the time setting


2 Within 10 seconds, press to set the time

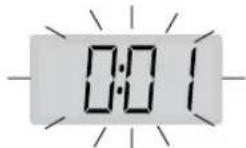
Press and hold to change the time faster.
3 Press to start the clock and finish
The display returns to its original state after a confirmation tone is heard.

Summer time
Do the following to advance the clock by an hour during the summer months.
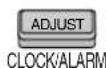
1 Press [ADJUST, CLOCK/ALARM] to select the summer time setting (
2 Press [1 1 / - ] or [+ / + ]] to select "on".
3 Press [ADJUST, CLOCK/ALARM] to finish (a tone sounds).
appears and the clock advances by an hour.
Repeat the above, selecting "OFF" in step 2, to turn off and restore the time.
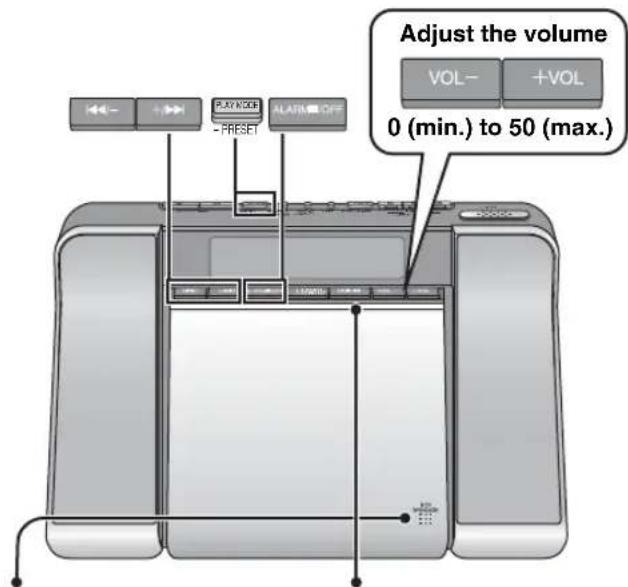
2 Press to play
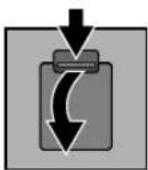
1 Press to open, insert a CD, and close securely

The unit turns off automatically after finishing play of the last track.
To prevent damage to the CD, stop the disc before opening the CD lid.
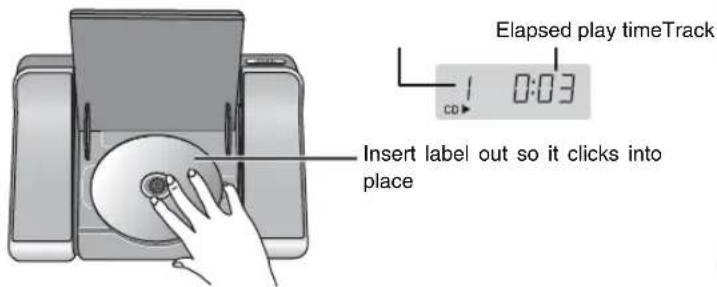
Insert label out so it clicks into place
Elapsed play timeTrack
| Pause | Press CD→1 Press again to restart play |
| Stop and off | Press ALARM OFF Note When the CD is stopped the unit also turns off automatically. You cannot use skip, search, or the play mode. The unit is in the standby condition when the AC power supply cord is connected. The primary circuit is always “live” as long as the power cord is connected to an electrical outlet. |
| Skip/Search | Press to skip, press and hold to search Backward Forward |
| Repeat/Random | Press to select the mode 1-Repeat one track 2:Repeat all tracks RND:Play all tracks randomly No display:Play modes off |
Manual tuning

1 Select the band 2 Tune to a station

In step 2, press and hold to start automatic tuning. Tuning stops when a station is found.
| Off number | Press ALARM OFF | ||
| FM mode Switch to MONO if there is a lot of noise in FM | Press PLAY WOOD -PRESET | MONO | Sound will not be stereo but noise should reduce. Press again to cancel. |
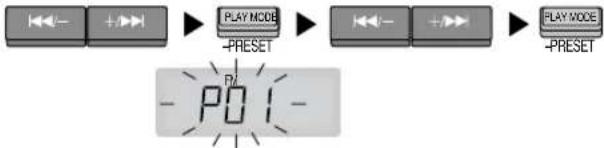
Preset tuning
Preset up to 20 FM and 12 AM stations. Use Auto Preset to preset all the stations the unit can receive, or Manual Preset to preset only those stations you want.
Auto Preset
Do the following once each for FM and AM.
Press and hold

The frequency returns to the lowest in the band, then it scrolls and "AUTO" flashes. The first station to be preset plays when finished.
Manual Preset
Tune to Press Select the station and hold the channel Press
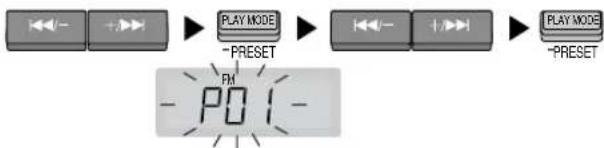
Selecting channels
Select the band Press

Using the alarms
Set the unit to come on and play a CD or the radio with ALARM 1, or to sound a buzzer with ALARM 2 and ALARM 3. Preparation: Set the time. For ALARM 1, play the CD track or radio station and set the unit to the volume you want to wake up to.
1 Press to select one of the alarm types you want to set (ALARM 1, 2, or 3)

2 Within 10 seconds, press to set the alarm time

Press and hold to change the time faster.
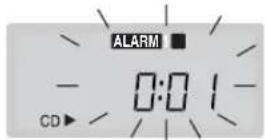
3 Press to confirm
The display returns to its original state after a confirmation tone is heard.

4 Press and hold to turn the alarm on (the [DOZE] button lights) When more than 2 alarm settings are turned on, only the alarm time that will occur first is displayed.

The alarm sounds at the set time and stops automatically after an hour. ALARM 1 plays the CD track or radio station at the volume set (a buzzer) sounds if you take out the CD). ALARM 2 and 3 sound buzzers (you cannot change the volume of the buzzer). You can still play a CD or the radio after setting an alarm.
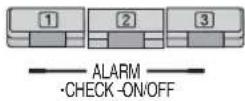
| Checking the settings | Press ALARM ·CHECK-OFF ●ALARM ·CHECK-OFF |
| To turn the alarm off | Press and hold ALARM ·CHECK-OFF The settings stay the same. Press and hold again to turn on again (while playing the CD or radio for ALARM 1). |
| Doze | Press DOZE The alarm sounds again 6 minutes later. |
| To shut off the alarm | Press ALARM OFF ALARM CD 7:30 Settings stay the same and the alarm sounds again the next day. |
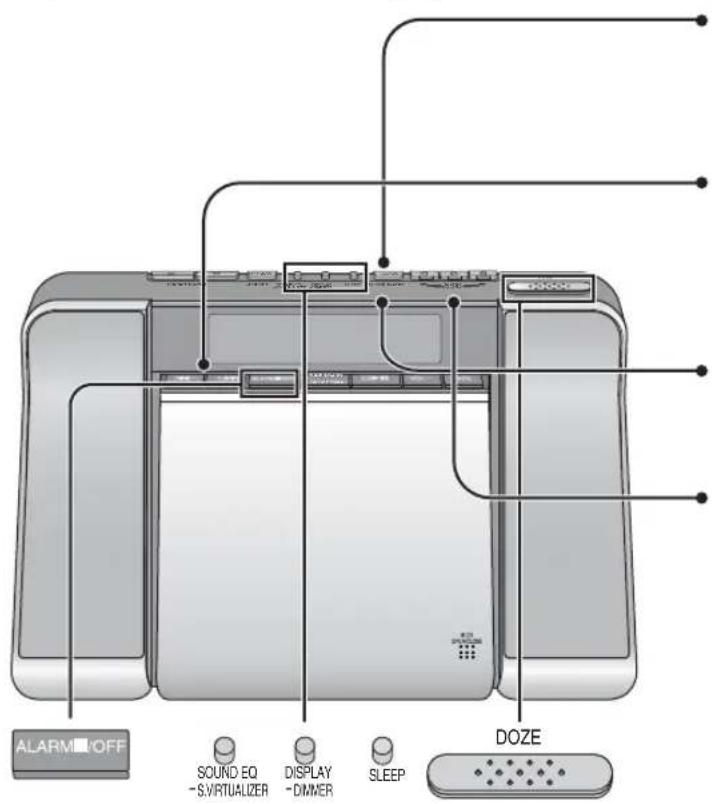
Other features
Sound quality
Sound Equalizer
Press

SOUND EQ
S.VIRTUALIZER


Bass: Emphasizes the bass
Clear: Clarifies the treble
Soft: For background music
Vocal: Adds gloss to vocals
Off
Eq appears while Sound EQ is on.
Sound Virtualizer
This stabilizes the midrange, such as vocals, and gives sound natural width and depth. Use it when listening to stereo sources. (Actual effect depends on the source.)
Press and hold

SOUND EQ
S.VIRTUALIZER

Press and hold again to cancel.
Sleep timer
Set the unit to switch off after a certain number of minutes.
Press


Each time you press the button:
30 60 90 120

To check the remaining time, press once.
Display
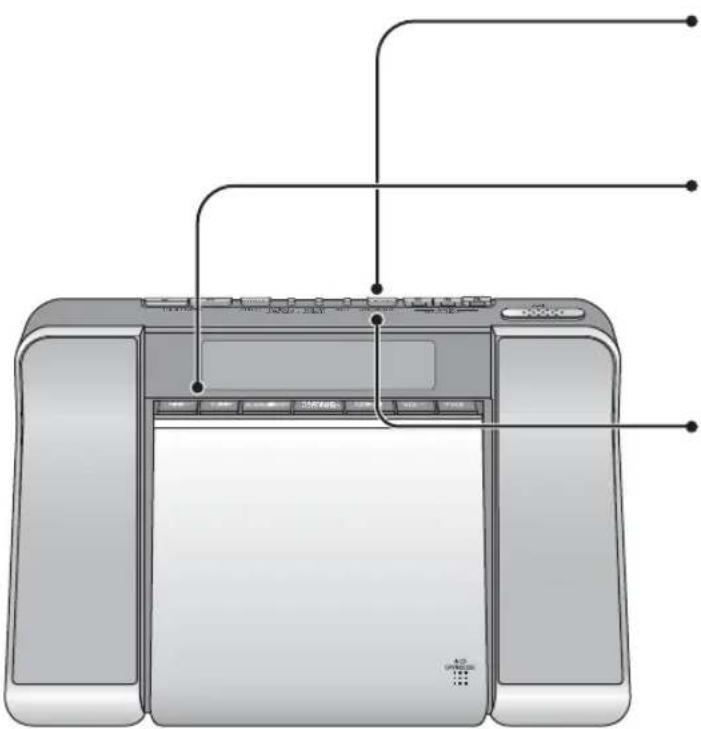
The CD and radio displays disappear after a few seconds. To show them again:
Press

DISPLAY
DIMMER
Dimmer
Press and hold

DISPLAY
-DIMMER
The display switches between bright and dim each time you do this.
Cautions
Batteries
- If the unit is not used for a long period of time, remove the batteries to prevent potential damage due to possible battery leakage.
- Do not heat, disassemble, or allow contact with flame or water.
- Do not peel off the covering and do not use if the covering has been peeled off.
Battery mishandling can cause electrolyte leakage which can damage items the fluid contacts and may cause a fire.
If electrolyte leaks from the batteries, consult your dealer.
Wash thoroughly with water if electrolyte comes in contact with any part of your body.
CDs
- Do not use irregularly shaped CDs.
- Do not use non-specification discs.
- Do not use CDs printed with label printers available on the market.
- Do not use CDs with labels and stickers that are coming off or with adhesive exuding from under labels and stickers.
Note on CD-R/RW
This unit can play CD-R and CD-RW recorded with CD-DA. Use an audio recording disc and finalize* it when you finish recording. The unit may not be able to play some discs due to the condition of the recording.
- A process that enables CD-R/CD-RW players to play audio CD-R and CD-RW.
Troubleshooting guide
Before requesting service, make the below checks. If you are in doubt about some of the check points, or if the remedies indicated in the chart do not solve the problem, consult your dealer for instructions.
| The clock shows “----”. | - Set the clock. |
| There is a lot of noise. | - Keep away from mobile phones, televisions, and other tuners. - Extend and change the direction of the antenna. |
| The alarm doesn't sound at the set time. | - Ensure the alarm's indicator is on (“ALARM 1”, “ALARM 2”, or “ALARM 3”). |
| The memory has been cleared. | - Reset the items into the memory. - Insert a battery to preserve the memory contents. |
| “no dISC” appears. • You haven't inserted a CD. | |
| Play doesn't start or display is incorrect. | - Clean the CD. - Clean the lens with a blower (SZZP1038C recommended). If the lens gets marked with fingerprints, gently wipe them off with a cotton swab. - Wait an hour for condensation to dry, then try again. - Make sure the label is facing out. - Replace the CD if it is scratched, warped, or irregularly shaped. |
| The CD or radio display disappears. | - These displays disappear after a few seconds. To show them again, press [DISPLAY, -DIMMER]. |
Specifications
Frequency range
FM: 87.5 to 108.0 MHz (50 kHz step)
AM: 522 to 1629kHz (9 kHz step)
Sampling frequency 44.1 kHz
Decoding 16 bit linear
Beam source Semiconductor laser (wavelength 780 nm)
(NORSK)
Bolgelengde 780 nm
Number of channels 2 channel, stereo
Wow and flutter Less than possible measurement data
D/A converter 1 bit DAC
Speakers 4.5 cm, 6 Ω × 2
Power requirement AC 230 V, 50 Hz
Power consumption: 11 W
Memory back-up 9 V (One 6F22/6LR61, 006P battery)
Dimensions (W x H x D) 266 x 149 x 137 mm
Mass 1.43 kg without battery
Power consumption in standby mode: 2.3 W
Note
Specifications are subject to change without notice.
Mass and dimensions are approximate.
Maintenance
To clean this unit, wipe with a soft, dry cloth.
- Never use alcohol, paint thinner or benzine to clean this unit.
- Before using chemically treated cloth, read the instructions that came with the cloth carefully.
CAUTION!
THIS PRODUCT UTILIZES A LASER.
USE OF CONTROLS OR ADJUSTMENTS OR PERFORMANCE OF
PROCEDURES OTHER THAN THOSE SPECIFIED HEREIN MAY
RESULT IN HAZARDOUS RADIATION EXPOSURE.
DO NOT OPEN COVERS AND DO NOT REPAIR YOURSELF.
REFER SERVICING TO QUALIFIED PERSONNEL.
WARNING:
TO REDUCE THE RISK OF FIRE, ELECTRIC SHOCK OR PRODUCT DAMAGE, DO NOT EXPOSE THIS APPARATUS TO RAIN, MOISTURE, DRIPPING OR SPLASHING AND THAT NO OBJECTS FILLED WITH LIQUIDS, SUCH AS VASES, SHALL BE PLACED ON THE APPARATUS.
CAUTION!
DO NOT INSTALL OR PLACE THIS UNIT IN A BOOKCASE, BUILT-IN CABINET OR IN ANOTHER CONFINED SPACE. ENSURE THE UNIT IS WELL VENTILATED. TO PREVENT RISK OF ELECTRIC SHOCK OR FIRE HAZARD DUE TO OVERHEATING, ENSURE THAT CURTAINS AND ANY OTHER MATERIALS DO NOT OBSTRUCT THE VENTILATION VENTS.
- DO NOT OBSTRUCT THE UNIT'S VENTILATION OPENINGS WITH NEWSPAPERS, TABLECLOths, CURTAINS, AND SIMILAR ITEMS.
DO NOT PLACE SOURCES OF NAKED FLAMES, SUCH AS LIGHTED CANDLES, ON THE UNIT.
- DISPOSE OF BATTERIES IN AN ENVIRONMENTALLY FRIENDLY MANNER.
The socket outlet shall be installed near the equipment and easily accessible or the mains plug or an appliance coupler shall remain readily operable.
This product may receive radio interference caused by mobile telephones during use. If such interference is apparent, please increase separation between the product and the mobile telephone.
THIS UNIT IS INTENDED FOR USE IN MODERATE CLIMATES.
SUOMI
VAROITUS!
LAITTEEN KAYTTAMINEN MUULLA KUIN TASSA
KAYTTOOHJESSA MAINITULLA TAVALLA SAATTAA ALTISTAA
KAYTTAJAN TURVALLISUUSLUOKAN 1 YLITTAVALLE
NAKYMATTOMALLE LASERSATEILLLE.
VAROITUS:
TULIPALO-, SÄHKOISKUVAARAN TAI TUOTETTA KOHTAAVAN MUUN VAHINGON VAHENTAMISEKSI EI LAITETTA SAA ALTISTAA SATEELLE, KOSTEUDELLE, VESIPISAROLLE TAI ROISKELLE, EIKA NESTETTA SISALTAVI ESINEITÄ, KUTEN ESIMERKIKSI MALJAKOITA, SAA ASETTAA LAITTEEN PÄALLE
VAROITUS!
- ALA ASENNA TAI LAITA TATTA LAITETTA KABINETTITYYPPISEEN KIRJAKAAPPIN TAI MUHUN SULJETTUUN TILAAN, JOTTA TUULETUS ONNISTUI SI. VARMISTA, ETTA VERHO TAI MIKAAN MUU MATERIALAI EI HUONONNA TUULETUSTA, JOTTA VALTETTAISIN YLIKUUMENEMISESTA JOHTUVA SAHKOISKU-TAI TULIPALOVAARA.
- ALA PEITÄ LAITTEEN TUULETUSAUKKOJA SANOMALEHDELLÄ, POYTÄLIINALLA, VERHOLLAA TAI MUULLA VASTAAVALLA ESINEELLÄ.
- ALA ASETA PALAVAA KYNTTILAA TAI MUuta AVOTULEN LAHDETTA LAITTEEN PÄÄLLE.
HAVITÄ PARISTOT LUONTOA VAHINGOITTAMATTOMALLA TAVALLA.
CLASS 1 LASER PRODUCT
UKW:87,5-108,0 MHz (50-kHz-Raster)
MW: 522-1.629 kHz (9-kHz-Raster)
Abtastfrequenz 44,1 kHz
Decodierung 16 Bit linear
CLASS 1 LASER PRODUCT
Faites I'accord maniere continue
Selectionnez
le canal Appuyez
Dimensions (L x H x P)
266× 149× 137mm
Poids
1,43 kg sans pile
Decodering 16 bit lineair
D/A omzetting 1 bit DAC
Luidsprekers 4,5 cm,6Ωx2
Stroomvereiste AC 230 V, 50 Hz

m = 311

Hold inde i trin 2 for at pabegynde automatisk stationsindstilling. Stationsindstillingen stopper, nar en station gar igennem.
3Tn rpoMkoROBOpHTNI He IMeHOT
MaHHTHOrO 3KpaHINPOBAHNA. He
NOMEaIte IN OKOIO TENEBn3OpOB,
NEPCoHaJIbHbIX KOMNbIOTePOB IN DpyInx
ycTPOIcTB,NERKO NOdBepraEBmIX
BO3dECTBNO MaHHTbIX NONEi
IopdoeMHnTe cTeBOH uHyp nepemehoro Toka
K 6bIToBOB cTeBOB po3eTke
Bctabble 6atapeky (he npnaraetc) npe3epBHO namrtn (BnH3y annapata)
1 Haxmte Ha 3aueKny n OTKpoTe.

2 BbItaunTe coeHNHTenb n npKpEnnte 6aTapeKy.
Баразецka6F22/6LR61,006P(небпларетс)
3 BCTaBBte 6aTapeKky KAK NOKa3H0
3Ta 6atapeika coxpanaet yctahOBKn Yacob, 6dynbHnKa N npedBapntbHbIe yctahOBKn padnoepmHnka, ecnnnpocxOoNT cboi nHTAHNA. OHa cnyknt npu6n3ntbHO oINH rOd (OINH Mecaq 6e3 3neKtponTAnHn nepemEHoro ToKA).
YctaHOBka yacOB
3To 24-ycoBbIe yacbl.3ToT npMep noka3bBaET, KaYcTaHOBHTb Yacbl Ha 15:30.PerynphO nepeyctaHabnBaIte Yacbl dNJa DoCTmKeHn ToHoctn. (ToHocht +/- 30 cekyHd B meca.)
1 Haxmnte, 4To6bI Bbl6paTb yCTaHOBky BpeMeHN

CLOCK/ALAR
- Ecnn annapat He 6ydet nCnONb3oBaTbC B TeueHne DnNTenBHoro BpemHn, ydaNtte 6aTapeKn, YTO6bl N36ExKaTB NOTeHuaNbHoro NOBpeXDeHn H3-3a Bo3MOxHOH yTEuKN 3NEkTPOJNTa H3 6aTapeEeK.
He harpeBaIte, He pa36npaIte n He donyckaIte KOHTaKTA c OHNEM UIN BODOM.
He ydane Te oboonoyu nncnob3yute,ecnn obonoouka sbila ydaeneha.
HenpaBnIbHoe 6paueHne c 6aTapeiKaMIM MoKet npNBecT N Kytte Ke3NEKTPoNtA, KOToPbI MoKet IOBpeDInTB IpEeMeTb I np KONTAKTe IN npNBecT N BO3rOpaHIO.
Ecnn 36aTaapeek BbITeKaet 3NEKtpoNT, npOKOHcyNbTnpyITeCb C BaWIM dInlepoM.
TuaTeNbHO npomoe BoDo, ecn 3neKtpoIIT nonaHa KaKyIO-H6yDb.
Yactb BaWero Tena.
Dnckn CD
He nnoJIb3yIte dncKc CD He npaBnJIbHoi foPmbl.
He nCnoB3yIe DNCKn, He COOTBeTCTByIOUne TexHnueckm Tpe6oBaHnM.
He nIcNoIb3yIte DnCKN CD c3TKeTKaMn, HaneHaTaHHbIMn C nOMOuHIO npInTEPOB, IMeUxixCBy npoJaKe.
He nCnoB3yIte DnCKn CD c 3TKeTkAMn HaKNeKaMn, KOToPbIe OKJEnNtCb, INI ecIN KJIe BbCTyNaET N3-NOd 3TKeTOK HAcJneEe.
PnmeaHne OTHoCteJIbHO CD-R/RW
3TOT annapat MoKET BOCnpon3BODntb DnCKn CD-R n CD-RW, 3aNnCaHhIbe B fOpMaTe CD-DA. NcNoB3ayTe mck dIyIe 3aIiCn ayDIO daHHbIX n3aBepuNTe*ero, KOrDa Bbl 3aKaHnBaEte 3aNtCb. Bo3MoKHO, YTO HeKoTOpBe DnCKn H3-3a YcNOBn 3aIiCn He CMOrY 6bITb BOCnpOn3BedeHb Ha anapate.
Pnpoccc, KOTOpBnno3BoJnEe npOnpBbBaTeIaM CD-R/CD-RW BOCpOIN3BOoNTb ayDIO DNCKN CD-R n CD-RW.
PykoBODCTBO no noncky u yctpaHnIO HncnpaBHOtei
Ipepeo6paueHnem 3a TexOcnyKnBaHnEM BblonHnTe pRd npBBeHbIX Hnke npOBepOK. Ecn y Bac noBnncb comHeHHN oTHOCHTbHO HEKOTOpbIX n3 3NX npOBepOK, nIN npBBeEHbIE B TaBnue peKomeHdaun He peWauT npOsbemy, npOKOHcylbTppyntecb C Baum dInepom OTHOCHTbHO daJIbHeuXn DeIcTBn.
4-biCNMBON-MeCAu 3ROTOBNEHNA
(A-ANBapb,B-FeBpaJb,...,L-deKa6pb)
PacnonoJxehne
MapKnpOBKn:
3aHnHHNn60KOBnnaHb yctpoCTBa
ДЯ Рocси
"YcTaHOBHeHbI npOn3BOUnteMe B nopRKe n. 2 CT.5 FeepaIbHoro 3aKoHa PΦ "O 3aunTe npab notpe6nteJe cpoK cnjXkb6bln3dennpaBeH 7 rOam C daTbI npOn3BODCTBa npyCIOBHN, YTO n3dEInne HcNOJb3yETCR B cTporOM COOTBETCTBnC HAcToAueH INcTpyKUne N O 3KcNlNyatauMn IN pPmEHMBIMn TEXHnueCKMN CTahdaptAm."
PAnOpnemHnK-mpOnrpbIbATEJIb CD c yacAMN CdeNaHO B KnTae
MaCywnTa 3NeKtpnK INHdaTpnAaN Ko., JTTd.
1006 KaDoma,Ocaka,YnHn
Obsah
Bass (Graves): Intensifica os graves