
SC-AK310G - Hi-Fi System PANASONIC - Free user manual and instructions
Find the device manual for free SC-AK310G PANASONIC in PDF.


| Product Type | Hi-Fi System |
| Model Number | SC-AK310G (SC-AK310 variant) |
| Dimensions (W x H x D) | 250 x 330 x 370 mm |
| Weight | 7.0 kg |
| Power Supply | AC 230-240 V, 50 Hz |
| Power Consumption | 170 W (standby: approx. 0.5 W) |
| Amplifier Output (RMS) | 55 W per channel (low) + 55 W per channel (high); bi-amp total 110 W per channel |
| Supported Discs | CD-DA, CD-R, CD-RW (finalized) |
| Tuner Bands | FM (87.5–108 MHz), AM (522–1629 kHz) |
| Cassette Deck | 2 decks, 4-track, 2-channel, normal position tapes |
| Speaker System | 3-way, 3 speakers (woofer 16 cm, tweeter 6 cm, super tweeter 2.5 cm) |
| Speaker Impedance | HIGH 6 Ω, LOW 6 Ω |
| Sound Enhancement | Super Sound EQ, Preset EQ (HEAVY, SOFT, CLEAR, DISCO, LIVE, HALL) |
| Timer Functions | Play timer, Record timer, Sleep timer |
| Remote Control | Included (with batteries) |
| Headphone Jack | 3.5 mm stereo |
| Inputs | AUX (250 mV sensitivity) |
| Antenna Connections | FM 75 Ω unbalanced, AM loop antenna; outdoor antenna optional |
| Maintenance | Clean with soft dry cloth; use cleaning tape for heads |
| Safety Features | Auto-off function, laser safety, ventilation requirements |
| Supplied Accessories | AC mains lead, remote control (N2QAGB000028), batteries (2x R6), FM indoor antenna (RSA0007), AM loop antenna (N1DADYY00002), antenna plug adaptor (SJP9009, UK only) |
Frequently Asked Questions - SC-AK310G PANASONIC
User questions about SC-AK310G PANASONIC
0 question about this device. Answer the ones you know or ask your own.
Ask a new question about this device
Download the instructions for your Hi-Fi System in PDF format for free! Find your manual SC-AK310G - PANASONIC and take your electronic device back in hand. On this page are published all the documents necessary for the use of your device. SC-AK310G by PANASONIC.
USER MANUAL SC-AK310G PANASONIC
Operating Instructions
Model No. SC-AK310 SC-AK210 SC-AK110
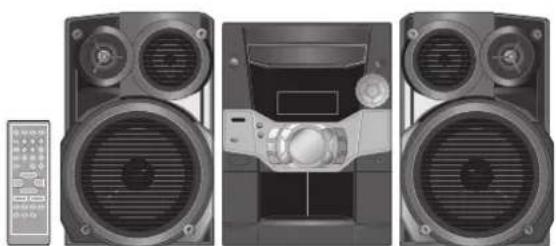
natural_image
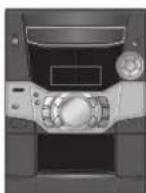
Three-panel image showing front, top, and side views of a multi-unit electronic device with speaker and control panel (no visible text or symbols)The illustrations show SC-AK310.


Panasonic
SC-AK310 is for Australia, New Zealand, Russia and Ukraine only. SC-AK210 is for United Kingdom and Continental Europe only. SC-AK110 is for Australia and New Zealand only.
Note:
"EB" on the packaging indicates the United Kingdom.
Before connecting, operating or adjusting this product, please read these instructions completely. Please keep this manual for future reference.
RQT6713-2B
Dear customer
Thank you for purchasing this product.
For optimum performance and safety, please read these instructions carefully.
These operating instructions are applicable to the following systems.
Unless otherwise indicated, illustrations in these operating instructions are of SC-AK310.
| System SC-AK310 SC-AK210 SC-AK110 | |
| Main unit SA-AK310 SA-AK210 SA-AK110 | |
| Speakers SB-AK310 SB-AK210 SB-AK110 |

(Back of product)
For Russia, Ukraine, Australia and New Zealand
| CAUTION | NIVIBLE LASER RADATION WHEN OPEN.AVOID EXPOSURE TO BEAM. (EDIMICS-1) |
| ATTENTION | RADATION LASER LORQUE OUVERT.ÉMTER TOUTE EXPOSITION AU FABOCEAU. |
| ADVARSEL | USYNLIG LASERSTÄRLING VED ÅBNING, NÄR SIKKERHEDSATBRYDERHE UDE LEF A PUNKTION. UNOGÅ LOSSETTELE FOR STRÄLING. |
| VARO! | AWARTESSA JAK SUOALUKUITS ÖHETTARESSA OLET ALTINA NÄKYMÄTÖNTA LASERSTÄFEYLI.E., ÄLA KATSO SÄFTESEEN. |
| VARNING | OSYNLIG LASERSTÄRLING NÄR DENNA DEL ÅR OPINAD OCH SPARNER ÅR URKOPPLAD. BETRAKTA EU STRÄLEN. |
| ADVARSEL | USYNLIG LASERSTÄRLING NÄR DEKSEL. ÄPNES OG SIKKERHEDSLÄS BRYTES. UNOGÅ EKSPONENING FOR STRÄLEN. |
| VORSICHT | UNDIZTBARE LASERSTÄRLING, WENN ABDECKUNG GEÖFPNET.NICHT DEM STRAH. AUSSETZEN. |
Inside of product
Tuotteen sisällä
Produktets innside
For Continental Europe and United Kingdom
| DANGER | IMNSIBLE LASER RADIATION WIEN OPEN,AVOID RED EXPOSURE TO ELAM |
| ADVARSEL | USYNLIGLASFSTÄVLING VED ENHING NÄR SIKARNIEDSATBRYDEREFRIJCE AF RUNK TIO. UNOJA UISFETTSIFON STÄNLK. |
| VARO | AVATTAESSA JA BUDALAKTUS OHTETTAESSA OLET ALTITINANAYMÄNTÄ LASERSTRATYLLLE. ÄÅ KATSO SATZED ON |
| VARNIVO | OSYNLIGLASFSTÄVLNING NÄRTDENA DEL AFÖTPRAJO OCHSPARVE AH LIROPPLAD. BE TRATAEL STÄLEN |
| ADVARSEL | USYNLIGLASFSTÄVLING NÄR DESGEL AFRES OGSKER IODSLÄS ERYTES. JENVA EKNPORETEIRO FOR STÄLEN |
| VORSIKT | UNICHE-TARELA LASERSTRALUNG, WEHN ABCRD XUC GROFRUET,NICHT DOMSTRAL AUSSELTZEN |
Inside of product
Tuotteen sisällä
Produktets innside
This product may receive radio interference caused by mobile telephones during use. If such interference is apparent, please increase separation between the product and the mobile telephone.
THIS UNIT IS INTENDED FOR USE IN MODERATE CLIMATES.
TÄMÄ LAITE ON TARKOITETTU KÄYTETTÄVÄKSI LEUDOSSA ILMASTOSSA.
DETTE APPARATET ER BEREGNET TIL BRUK UNDER MODERATE KLIMAFORHOLD.
Table of contents
Caution for AC Mains Lead.... 3
Safety precautions.... 4
Supplied accessories 4
Placement of speakers 5
The remote control 5
Set-up 6
Front panel controls 7
CDs 8
The radio: manual tuning 10
The radio: preset tuning.... 10
Cassettes.... 11
Sound quality/sound field 11
Recording 11
Optional antenna connections 12
External unit connections 12
Using an external unit 12
Using headphones (not included) 12
Turning the demo function off.... 13
Convenient functions ...... 13
Auto-off function.... 13
Setting the time.... 13
Using the timers 14
Troubleshooting guide 15
Maintenance 15
Specifications ...... Back cover
CAUTION!
THIS PRODUCT UTILIZES A LASER.
USE OF CONTROLS OR ADJUSTMENTS OR PERFORMANCE OF PROCEDURES OTHER THAN THOSE SPECIFIED HEREIN MAY RESULT IN HAZARDOUS RADIATION EXPOSURE.
DO NOT OPEN COVERS AND DO NOT REPAIR YOURSELF. REFER SERVICING TO QUALIFIED PERSONNEL.
CAUTION!
- DO NOT INSTALL, OR PLACE THIS UNIT, IN A BOOKCASE, BUILT-IN CABINET OR IN ANOTHER CONFINED SPACE. ENSURE THE UNIT IS WELL VENTILATED. TO PREVENT RISK OF ELECTRIC SHOCK OR FIRE HAZARD DUE TO OVERHEATING, ENSURE THAT CURTAINS AND ANY OTHER MATERIALS DO NOT OBSTRUCT THE VENTILATION VENTS.
- DO NOT OBSTRUCT THE UNIT'S VENTILATION OPENINGS WITH NEWSPAPERS, TABLECLOTHS, CURTAINS, AND SIMILAR ITEMS.
- DO NOT PLACE SOURCES OF NAKED FLAMES, SUCH AS LIGHTED CANDLES, ON THE UNIT.
- DISPOSE OF BATTERIES IN AN ENVIRONMENTALLY FRIENDLY MANNER.
WARNING:
TO REDUCE THE RISK OF FIRE, ELECTRIC SHOCK OR PRODUCT DAMAGE, DO NOT EXPOSE THIS APPARATUS TO RAIN, MOISTURE, DRIPPING OR SPLASHING AND THAT NO OBJECTS FILLED WITH LIQUIDS, SUCH AS VASES, SHALL BE PLACED ON THE APPARATUS.
SUOMI
VAROITUS!
LAITTEEN KÄYTTÄMINEN MUULLA KUIN TÄSSÄ KÄYT- TÖOHJEESSA MAINITULLA TAVALLA SAATTAA ALTISTAA KÄYTTÄJÄN TURVALLISUUSLUOKAN 1 YLITTÄ- VÄLLE NÄKYMÄTTÖMÄLLE LASERSÄTEILYLLE.
VAROITUS!
- ÄLÄ ASENNA TAI LAITA TÄTÄ LAITETTA KABINETTITYYPPISEEN KIRJAKAAPPIIN TAI MUUHUN SULJETTUUN TILAAN, JOTTA TUULETUS ONNISTUISI. VARMISTA, ETTÄ VERHO TAI MIKÄÄN MUU MATERIAALI EI HUONONNA TUULETUSTA, JOTTA VÄLTETTÄISIIN YLIKUUMENE-MISESTA JOHTUVA SÄHKÖISKU- TAI TULIPALOVAARA.
-ÄLÄ PEITÄ LAITTEEN TUULETUSAUKKOJA SANOMALEHDELLÄ, PÖYTÄLIINALLA, VERHOLLA TAI MUULLA VASTAAVALLA ESINEELLÄ. - ÄLÄ ASETA PALAVAA KYNTTILÄÄ TAI MUUTA AVOTULEN LÄHDETTÄ LAITTEEN PÄÄLLE.
- HÄVITÄ PARISTOT LUONTOA VAHINGOITTAMATTOMALLA TAVALLA.
VAROITUS:
TULIPALO-, SÄHKÖISKUVAARAN TAI TUOTETTA KOHTAAVAN MUUN VAHINGON VÄHENTÄMISEKSI EI LAITETTA SAA ALTISTAA SATEELLE, KOSTEUDELLE, VESIPISAROILLE TAI ROISKEELLE, EIKÄ NESTETTÄ SISÄLTÄVIÄ ESINEITÄ, KUTEN ESIMERKIKSI MALJAKOITA, SAA ASETTAA LAITTEEN PÄÄLLE.
NORSK
ADVARSEL!
DETTE PRODUKTET ANVENDER EN LASER. BETJENING AV KONTROLLER, JUSTERINGER ELLER ANDRE INNGREP ENN DE SOM ER BESKREVENT I DENNE BRUKSANVISNING, KAN F∅RE TIL FARLIG BESTRÅLING. DEKSLER MÅ IKKE ÅPNES, OG FORS∅K ALDRI Å REPARERE APPARATET PÅ EGENHÅND. ALT SERVICE OG REPARASJONSARBEID MÅ UTF∅RES AV KVALIFISERT PERSONELL.
ADVARSEL!
- APPARATET MÅ IKKE PLASSERES I EN BOKHYLLE, ET INNEBYGGET KABINETT ELLER ET ANNET LUKKET STED HVOR VENTILASJONSFORHOLDENE ER UTILSTREKKELIGE. S∅RG FOR AT GARDINER ELLER LIGNENDE IKKE FORVERRER VENTILASJONSFORHOLDENE, SÅ RISIKO FOR ELEKTRISK SJOKK ELLER BRANN FORÅRSAKET AV OVERHETING UNNGÅS.
- APPARATETS VENTILASJONSÅPNINGER MÅ IKKE DEKKES TIL MED AVISER, BORDDUKER, GARDINER OG LIGNENDE.
- PLASSER IKKE ÅPEN ILD, SLIK SOM LEVENDE LYS, OPPÅ APPARATET.
- BRUKTE BATTERIER MÅ KASSERES UTEN FARE FOR MILJ∅ET.
ADVARSEL:
FOR Å REDUSERE FAREN FOR BRANN, ELEKTRISK ST∅T ELLER SKADER PÅ PRODUKTET, MÅ DETTE APPARATET IKKE UTSETTES FOR REGN, FUKTIGHET, VANNDRÅPER ELLER VANNSPRUT. DET MÅ HELLER IKKE PLASSERES GJENSTANDER FYLT MED VANN, SLIK SOM BLOMSTERVASER, OPPÅ APPARATET.
Caution for AC Mains Lead
(For United Kingdom)
("EB" area code model only)
For your safety, please read the following text carefully.
This appliance is supplied with a moulded three pin mains plug for your safety and convenience.
A 5-ampere fuse is fitted in this plug.
Should the fuse need to be replaced please ensure that the replacement fuse has a rating of 5-ampere and that it is approved by ASTA or BSI to BS1362.
Check for the ASTA mark for the BSI mark on the body of the fuse.
If the plug contains a removable fuse cover you must ensure that it is refitted when the fuse is replaced.
If you lose the fuse cover the plug must not be used until a replacement cover is obtained.
A replacement fuse cover can be purchased from your local dealer.
CAUTION!
IF THE FITTED MOULDED PLUG IS UNSUITABLE FOR THE SOCKET OUTLET IN YOUR HOME THEN THE FUSE SHOULD BE REMOVED AND THE PLUG CUT OFF AND DISPOSED OF SAFELY.
THERE IS A DANGER OF SEVERE ELECTRICAL SHOCK IF THE CUT OFF PLUG IS INSERTED INTO ANY 13-AMPERE SOCKET.
If a new plug is to be fitted please observe the wiring code as stated below.
If in any doubt please consult a qualified electrician.
IMPORTANT
The wires in this mains lead are coloured in accordance with the following code:
Blue: Neutral, Brown: Live.
As these colours may not correspond with the coloured markings identifying the terminals in your plug, proceed as follows:
The wire which is coloured Blue must be connected to the terminal which is marked with the letter N or coloured Black or Blue.
The wire which is coloured Brown must be connected to the terminal which is marked with the letter L or coloured Brown or Red.
WARNING: DO NOT CONNECT EITHER WIRE TO THE EARTH TERMINAL WHICH IS MARKED WITH THE LETTER E, BY THE EARTH SYMBOL 12 OR COLOURED GREEN OR GREEN/YELLOW.
THIS PLUG IS NOT WATERPROOF-KEEP DRY.
Before use
Remove the connector cover.
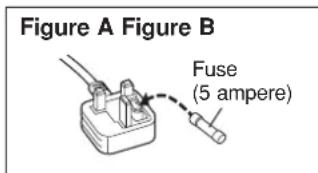
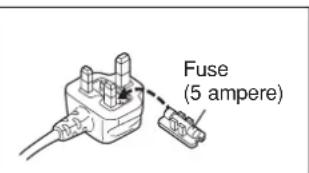
How to replace the fuse
The location of the fuse differ according to the type of AC mains plug (figures A and B). Confirm the AC mains plug fitted and follow the instructions below.
Illustrations may differ from actual AC mains plug.
- Open the fuse cover with a screwdriver.

- Replace the fuse and close or attach the fuse cover.
Safety precautions
Placement
Set the unit up on an even surface away from direct sunlight, high temperatures, high humidity, and excessive vibration. These conditions can damage the cabinet and other components, thereby shortening the unit's service life.
Place it at least 15 cm away from wall surfaces to avoid distortion and unwanted acoustical effects.
Do not place heavy items on the unit.
Voltage
Do not use high voltage power sources. This can overload the unit and cause a fire.
Do not use a DC power source. Check the source carefully when setting the unit up on a ship or other place where DC is used.
AC mains lead protection
Ensure the AC mains lead is connected correctly and not damaged. Poor connection and lead damage can cause fire or electric shock. Do not pull, bend, or place heavy items on the lead.
Grasp the plug firmly when unplugging the lead. Pulling the AC mains lead can cause electric shock.
Do not handle the plug with wet hands. This can cause electric shock.
Foreign matter
Do not let metal objects fall inside the unit. This can cause electric shock or malfunction.
Do not let liquids get into the unit. This can cause electric shock or malfunction. If this occurs, immediately disconnect the unit from the power supply and contact your dealer.
Do not spray insecticides onto or into the unit. They contain flammable gases which can ignite if sprayed into the unit.
Service
Do not attempt to repair this unit by yourself. If sound is interrupted, indicators fail to light, smoke appears, or any other problem that is not covered in these instructions occurs, disconnect the AC mains lead and contact your dealer or an authorized service center. Electric shock or damage to the unit can occur if the unit is repaired, disassembled or reconstructed by unqualified persons.
Extend operating life by disconnecting the unit from the power source if it is not to be used for a long time.
Supplied accessories
Please check and identify the supplied accessories.

☐ AC mains lead .... 1 pc.
For United Kingdom For Continental Europe (RJA0044-3C) (RJA0043-1C)


For Russia and Ukraine For Australia and (RJA0019-2K) New Zealand

(RJA0035-X)

☐ Remote control transmitter .... 1 pc.
SC-AK310
SC-AK210
For Russia and Ukraine (N2QAGB000028)
• Black: (N2QAGB000025)
• Silver: (N2QAGB000029)

For Australia and New Zealand (N2QAGB000029)

SC-AK110
(N2QAGB000029)

☐ Batteries for remote control.... 2 pcs. R6, AA, UM-3

☐ FM indoor antenna.... 1 pc.
For Europe For Australia and (RSA0007) New Zealand
(RSA0006-J)


□ AM loop antenna (N1DADYY00002) .... 1 pc.

Antenna plug adaptor (for United Kingdom only) (SJP9009).... 1 pc.

Use numbers indicated in parentheses when asking for replacement parts.
For United Kingdom and Republic of Ireland

Panasonic
www.panasonic.co.uk (for UK customers only)
- Order accessory and consumable items for your product with ease and confidence by telephoning our Customer Care Centre Mon–Friday 9:00 am–5:30 pm. (Excluding public holidays.)
- Or go on line through our Internet Accessory ordering application.
- Most major credit and debit cards accepted.
- All enquiries transactions and distribution facilities are provided directly by Panasonic UK Ltd.
- It couldn't be simpler!
Customer Care Centre
For UK customers: 08705 357357
For Republic of Ireland customers: 01 289 8333
Technical Support
For UK customers: 0870 1 505610
This Technical Support Hot Line number is for Panasonic PC software related products only.
For Republic of Ireland, please use the Customer Care Centre number listed above for all enquiries.
For all other product related enquiries, please use the Customer Care Centre numbers listed above.
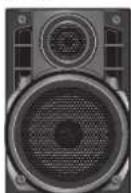
Placement of speakers
SC-AK310
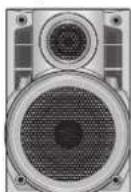
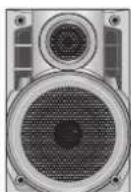
Place the speakers so that the super tweeter is on the outside.

SC-AK210
Speakers are designed identically so that no left or right channel orientation is necessary.

SC-AK110
Speakers are designed identically so that no left or right channel orientation is necessary.

Notes
- Keep your speakers at least 10 mm away from the system for proper ventilation.
- These speakers do not have magnetic shielding. Do not place them near televisions, personal computers or other devices easily influenced by magnetism.
- You cannot take the front net off the speakers.

Caution
- Use the speakers only with the recommended system. Failure to do so may lead to damage to the amplifier and/or the speakers, and may result in the risk of fire. Consult a qualified service person if damage has occurred or if you experience a sudden change in performance.
- Do not attach these speakers to walls or ceilings.
The remote control
Batteries

- Insert so the poles (+ and -) match those in the remote control.
- Do not use rechargeable type batteries.
Do not:
- mix old and new batteries.
- use different types at the same time.
- heat or expose to flame.
• take apart or short-circuit. - attempt to recharge alkaline or manganese batteries.
- use batteries if the covering has been peeled off.
- keep together with metallic objects such as necklaces.
Mishandling of batteries can cause electrolyte leakage which can damage items the fluid contacts and may cause a fire.
If electrolyte leaks from the batteries, consult your dealer.
Wash thoroughly with water if electrolyte comes in contact with any part of your body.
Remove if the remote control is not going to be used for a long period of time. Store in a cool, dark place.
Replace if the unit does not respond to the remote control even when held close to the front panel.
Use

Aim at the sensor, avoiding obstacles, at a maximum range of 7 meters directly in front of the unit.
- Keep the transmission window and the unit's sensor free from dust.
- Operation can be affected by strong light sources, such as direct sunlight, and the glass doors on cabinets.
Do not:
- put heavy objects on the remote control.
• take the remote control apart. - spill liquids onto the remote control.
Set-up
Connect the AC mains lead only after all other connections have been made.
Preparation
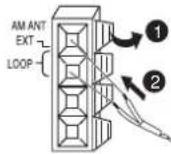
Twist and pull off the vinyl tip of the antenna wires and speaker cords.

2 AM loop antenna
Stand the antenna up on its base.
For Australia and New Zealand
For Europe

AM loop antenna

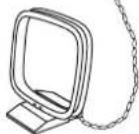
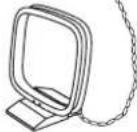
(R)
1 FM indoor antenna
Tape the antenna where reception is best.
For Australia and New Zealand
For Europe
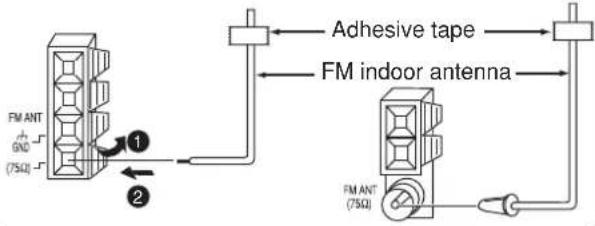
(L)

4 AC mains lead

FOR UNITED KINGDOM ONLY READ THE CAUTION FOR THE AC MAINS LEAD ON PAGE 3 BEFORE CONNECTION.
Insertion of connector
Even when the connector is perfectly inserted, depending on the type of inlet used, the front part of the connector may jut out as shown in the drawing. However there is no problem using the unit.
Note
The included AC mains lead is for use with this unit only. Do not use it with other equipment.
For your reference
Information you enter into the unit's memory, except for time, remains intact for up to a week after the AC mains lead is disconnected.
3 Speaker cords
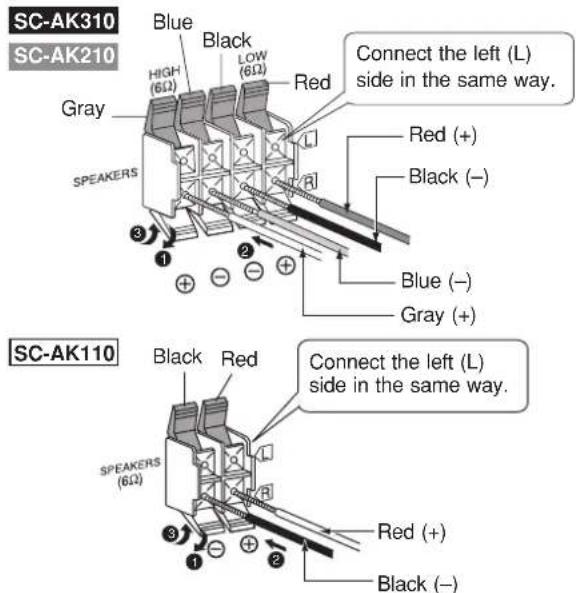
Use only the supplied speakers.
The combination of the main unit and speakers provide the best sound. Using other speakers can damage the unit and sound quality will be negatively affected.
Front panel controls
Main unit
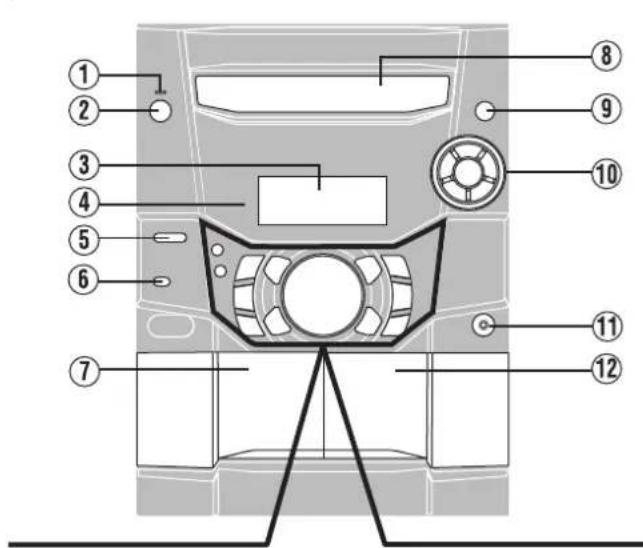

① AC supply indicator (AC IN)
This indicator lights when the unit is connected to the AC mains supply.
② Standby/on switch ⏻/1)
Press to switch the unit from on to standby mode or vice versa. In standby mode, the unit is still consuming a small amount of power.
③ Display
④ Remote control signal sensor .... 5
⑤ Super sound EQ button (SUPER SOUND EQ) ..... 11
⑥ Preset EQ select button (PRESET EQ) 11
⑦ Deck 1 cassette holder....11
⑧ Disc tray
⑨ CD tray open/close button (▲, OPEN/CLOSE) ...... 8
⑩ Disc direct play buttons (1 \~ 5) 8
⑪ Headphones jack (PHONES) 12
⑫ Deck 2 cassette holder....11
Center console
⑬ Tuner/band select button (TUNER/BAND) 10
⑭ CD skip/search, tape fast-forward/rewind, tune/preset channel select, time adjust buttons (I◄◄/REW/∨, ►►I/FF/∧) ...... 8, 9, 10, 11, 13
⑮ Record button (● REC)....11
⑯ Deck select button (DECK 1/2) ...... 11
⑰ Display, demonstration button (-DISP/-DEMO) ..... 13
⑱ Deck 1 open button (▲, DECK 1) ...... 11
⑲ AUX button (AUX) 12
⑳ Volume control (VOLUME DOWN, UP) 13
②1 CD play/pause button (▶/II, CD) 8
②2 Stop/program clear button (■, STOP)....8, 11, 12
②3 Deck 2 open button (▲, DECK 2) ...... 11
②4 Tape play button (▶, TAPE) 11, 12
Remote control
This illustration is of SC-AK310.

Buttons such as ② function in exactly the same way as the buttons on the main unit.
②5 Sleep timer/auto off button (SLEEP, -AUTO OFF) 13, 14
②6 Disc button (DISC) 9
⑳ Program button (PROGRAM) 9
⑳ Muting button (MUTING) 13
⑲ SC-AK310 SC-AK110 CD display button (CD DISP) 8
SC-AK210
CD display/RDS display button (CD/RDS DISP) 8, 10
③0 Dimmer button (DIMMER) 13
③1 Play timer/record timer button ( play/REC)...... 14
③2 Clock/timer button (CLOCK/TIMER) 13, 14
③3 Numbered buttons (10, 1–9, 0) 9, 10
③4 Play mode select button (PLAY MODE) ..... 9, 10, 12
CD selection
Choose CDs with this mark:

Do not:
• use irregularly shaped CDs.
- attach extra labels and stickers.
- use CDs with labels and stickers that are coming off or with adhesive exuding from under labels and stickers.
- attach scratch proof covers or any other kind of accessory.
• write anything on the CD.
- clean CDs with liquids. (Wipe with a soft, dry cloth.)
- use CDs printed with label printers available on the market.


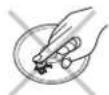

To prevent damage
Always observe the following points:
- Load only 1 CD on the tray.
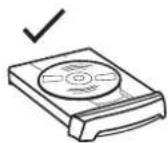
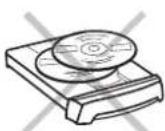
- Load CDs as shown in the figure. An adaptor is not needed with 8 cm CDs (singles).

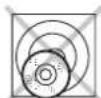
8 cm CD

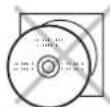
12 cm CD
- Set the system on a flat, level surface.
• Always unload all CDs before moving the unit.
Do not:
- set the unit on top of magazines, inclined surfaces, etc.
- move the unit while a tray is opening/closing, or when loaded.
- put anything except a CD in the tray.
- use cleaning CDs or CDs which are badly warped or cracked.
- disconnect the AC mains lead from the household mains socket during disc changing operation.
This unit can play CD-DA (digital audio) format audio CD-R and CD-RW that have been finalized (a process that enables CD-R/CD-RW players to play audio CD-R and CD-RW) upon completion of recording.
It may not be able to play some CD-R or CD-RW due to the condition of the recording.
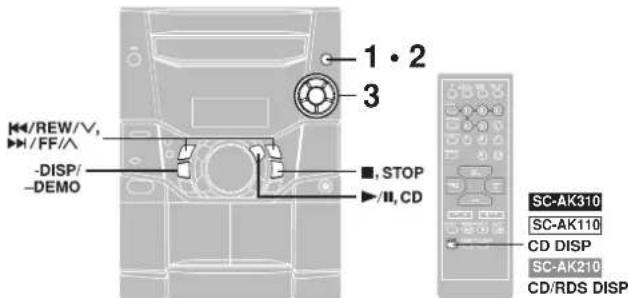
1 Press [▲, OPEN/CLOSE] to open the tray. The unit comes on.
2 Set a CD in the tray. (Label must face upward.) To continue loading CDs in the other trays Press [1]–[5] to select the required tray and press [▲, OPEN/CLOSE] to open the tray. Press [▲, OPEN/CLOSE] to close the tray.
3 Press [1]–[5] to play your desired disc. (Alternatively, you can press [▶/II, CD] if the current disc is your desired CD.) The track number and its elapsed playing time are shown.
Display during play
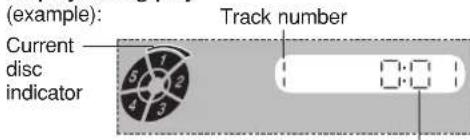
Elapsed playing time (of current track)
Use the CD Play Mode function's ALL-DISC mode to play CDs in succession. (→ page 9)
To stop the disc play Press [■, STOP].
The total number of tracks and total playing time are shown.
"▶(SC-AK110: " ") indication
It indicates current disc has 16 or more tracks.
One touch play
During standby mode and when a CD is loaded, press [▶/II, CD] or [1]–[5].
The unit comes on and play starts.
| To pause | Press [▶/II, CD] during play. Press again to resume play. |
| To search forward/ backward | Hold down [I◀◀/REW/V] (backward) or [▶▶I/FF/∧] (forward) during play or pause. |
| To skip forward/ backward | Press [I◀◀/REW/V] (backward) or [▶▶I/FF/∧] (forward) during play or pause. |
Notes
- During 1-RANDOM or A-RANDOM play (→ page 9), you cannot skip to tracks already played.
- During program play (→ page 9), 1-RANDOM or A-RANDOM play, you can search only within the track.
• Always stop the changer before loading or changing CDs. You cannot change CDs while a disc is playing.
CD display
You can display the remaining play time of the current track.
SC-AK310
Remote control only
Press [CD DISP] during play or pause.
SC-AK210
Remote control only
Press [CD/RDS DISP] during play or pause.
SC-AK110
Press [-DISP/-DEMO] during play or pause.
Remote control: Press [CD DISP].
Every time you press the button:
Elapsed play time ↔ Remaining play time
Note
When track number 25 or greater is playing, remaining play time display shows “- -:- -”.

Starting play from a specific track
Remote control only
1 Press [DISC] and (within 10 seconds) [1]–[5] to select the disc.
2 Select the track with the numbered buttons.
To select track 10 or over, press [≥10] then the two digits.
Play starts from the selected track.
Note
You cannot use this function with 1-RANDOM or A-RANDOM mode.
Program play
You can program up to 24 tracks.
Remote control only
Preparation: Press [▶/■, CD] and then [■, CLEAR].
1 Press [PROGRAM]. "PGM" appears.
2 Press [DISC] and (within 10 seconds) [1]–[5] to select the disc.
3 Select the tracks with the numbered buttons.
To select track 10 or over, press [≥10] then the two digits.
Repeat steps 2 and 3 to program other tracks.
4 Press [▶/II, CD] to start play.
To exit program mode
Press [PROGRAM] in the stop mode. (You can replay your program by pressing [PROGRAM] then [▶/II, CD].)
To cancel
Press [■, CLEAR] in the stop mode. "CLEAR" is displayed.
To check program contents
Press [I◄◄, REW/V] or [►►I, ∧/FF] while "P" is displayed.
Every time you press the button, the track number and program order are displayed.
To add to the program
Do steps 2 and 3 while "P" is displayed.
Note
You can use repeat mode with program play.
Repeat play
Remote control only
Hold down [PLAY MODE] during play.
"C" is displayed.
To cancel repeat play
Hold down [PLAY MODE] to clear "O"

To listen to specific CDs and tracks (CD Play Mode function)
Remote control only
Preparation: Press [▶/II, CD] and then [■, CLEAR].
1 Press [PLAY MODE] to select the desired mode.
Every time you press the button:
![PANASONIC SC-AK310G - Press [PLAY MODE] to select the desired mode. - 1](/content/2026/05/1076430/images/e692ea4f26faf3b6842aa0757f096736c3e79b67c261d8527e62d878c81ee001.jpg)
ALL-DISC: Plays all loaded discs in succession from the selected disc to the final disc ✗
1-SONG: Plays one selected track on the selected disc.
1-RANDOM: Plays one selected disc in random order.
A-RANDOM: Plays all loaded discs in random order.
1-DISC: Plays one selected disc.
(The original display is restored in about 2 seconds.)
Proceed to step 4 when you selected A-RANDOM in step 1.
2 Press [DISC] and (within 10 seconds) [1]–[5] to select the disc.
The CD starts.
3 Only when you selected "1-SONG" in step 1
Select the track with the numbered buttons.
To select a track 10 or over, press [≥10] then the two digits.
Play starts from the selected track.
4 Only when you selected "A-RANDOM" in step 1
Press [▶/II, CD] to start play.
To stop play
Press [■, CLEAR].
When playback ends
The current play mode will be retained.
※ Final disc
For example, if play starts from disc 4, disc 3 will be the "final disc".
Order of progression: Disc 4→5→1→2→3
Note
You can use repeat mode with CD Play Mode function.
The radio: manual tuning

1 Press [TUNER/BAND] to select band.
The unit comes on.
Every time you press the button:
FM ↔ AM
2 Press [PLAY MODE] on the remote control to select "MANUAL".
Every time you press the button:
MANUAL ↔ PRESET
3 Hold down [I◄◄/REW/∨] or [►►I/FF/∧] for a moment to search for a station.
The frequency stops when it finds a clear station.
To stop during the process, press [◀◀/REW/V] or [▶◀/FF/∧].
Under excessive interference, a station may not be found.
Press [I◄◄/REW/V] or [►►I/FF/∧] repeatedly to tune step-by-step.
"TUNED" is displayed when a radio station is tuned.
"ST" is displayed when a stereo FM broadcast is being received.
RDS broadcasting SC-AK210 only
Remote control only
This unit can display the text data transmitted by the radio data system (RDS) available in some areas.
If the station you are listening to is transmitting RDS signals, "RDS" will light up on the display.
Displaying the name of a broadcasting station or a program type
Press [CD/RDS DISP].
Every time you press the button:
Frequency display Station Name (PS) Program type (PTY)
| Program type displays | |||
| NEWS AFFAIRS INFO SPORT EDUCATE DRAMA CULTURE SCIENCE | VARIED POP M ROCK M M.O.R M* LIGHT M CLASSICS OTHER M WEATHER | FINANCE CHILDREN SOCIAL A RELIGION PHONE IN TRAVEL LEISURE JAZZ | COUNTRY NATIONAL OLDIES FOLK M DOCUMENT TEST ALARM |
* "M.O.R M"="Middle of the road music"
Notes
- RDS displays may not be available if reception is poor.
- Sound is momentarily interrupted if you load/unload tapes while listening to an AM broadcast.
If noise is excessive in FM
Remote control only
Hold down [PLAY MODE] to display "MONO".
Monaural sound is selected and noise reduces when reception is weak.
Hold down [PLAY MODE] again to cancel the mode.
"MONO" is also cancelled if the frequency is changed.
The radio: preset tuning
Remote control only
There are two methods of pre-setting stations.
Automatic presetting : All the stations the tuner can receive are preset.
Manual presetting : You can select the stations to preset and the order they are preset in.
Up to 15 stations each can be set in the FM and AM bands.

Preparation:
Press [TUNER BAND] to select "FM" or "AM".
Automatic presetting
Do the following once each for FM and AM.
Preparation: Tune to the frequency where pre-setting is to begin.
Hold down [PROGRAM] until the frequency changes.
The tuner presets all the stations it can receive into the channels in ascending order. When finished, the last station memorized is tuned in.
SC-AK310 SC-AK210

SC-AK110

Manual presetting
Pre-set the stations one at a time.
① Press [PROGRAM] then press [I◄◄, REW/V] or [►►I, ∧/FF] to tune to the desired station.
② Press [PROGRAM] then press [I◄◄, REW/V] or [►►I, ∧/FF] to select a channel.
③Press [PROGRAM].
The station occupying a channel is erased if another station is preset in that channel.
Selecting channels
Press the numbered buttons to select the channel.
To enter channel 10 or over, press [≥10], then the two digits.
SC-AK310 SC-AK210

SC-AK110

OR
① Press [PLAY MODE] to select "PRESET".
② Press [I◄◄, REW/V] or [►►I, ∧/FF] to select the channel.
Cassettes
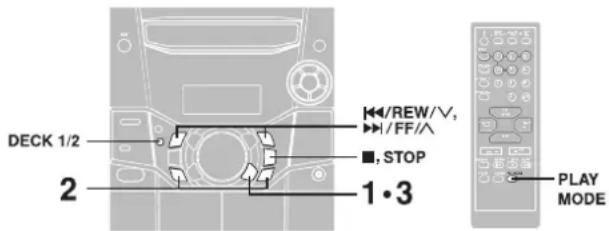
You can use either deck 1 or deck 2 for tape playback.
Use normal position tapes.
High position and metal position tapes can be played, but the unit will not be able to do full justice to the characteristics of these tapes.
1 Press [▶, TAPE].
The unit comes on.
If a cassette was loaded, play starts automatically (One touch play).
2 Press [▲, DECK 1] or [▲, DECK 2] and insert the cassette.
Insert with the side to be played facing towards you and the exposed tape facing down. Close the holder by hand.

Front side
3 Press [▶, TAPE] to start playback.
To play on the other side of the tape, turn the tape over and press [▶, TAPE].
To stop tape playback
Press [■, STOP].
To fast-forward or rewind
Press [◀◀/REW/V] (rewind) or [▶◀/FF/∧] (fast-forward).
To select between loaded decks
Press [DECK 1/2] (remote control: [PLAY MODE]).
Notes
- Tape playback is momentarily interrupted if you open the other deck.
- Tapes exceeding 100 minutes are thin and can break or get caught in the mechanism.
- Tape slack can get caught up in the mechanism and should be taken up before the tape is played.
- Endless tapes can get caught up in the deck's moving parts if used incorrectly.
Sound quality/sound field
Using the built-in sound quality/sound field settings
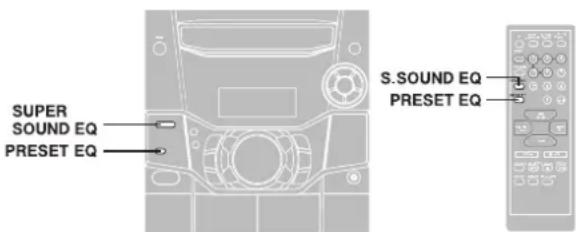
Press [PRESET EQ] to select a setting.
Every time you press the button:

flowchart
graph LR
    A["HEAVY SOFT CLEAR"] --> B["DISCO LIVE HALL"]
    B --> C["EQ-OFF (cancelled)"]
HEAVY (sound quality) : Adds punch to rock
SOFT (sound quality) : For background music
CLEAR (sound quality): Clarifies higher sounds
DISCO (sound field) : Produces sound with the same kind of lengthy reverberations heard at a disco
LIVE (sound field) : Makes vocals more alive
HALL (sound field) : Adds an expansiveness to the sound to produce the atmosphere of a great concert hall.
Note
You cannot use PRESET EQ and SUPER SOUND EQ together.
Sound quality/sound field
Enhancing the sound quality
You can enhance the bass and treble effect of the sound.
Press [SUPER SOUND EQ].
Remote control: Press [S.SOUND EQ].
The button light comes on.
Press the button again to cancel.
The button light goes out.
Recording

Selection of tapes for recording
Use normal position tapes.
High position and metal position tapes can be used, but this unit will not be able to record or erase them correctly.
Preparation:
Wind up the leader tape so recording can begin immediately.
1 Press [▲, DECK 2] and insert the cassette to be recorded.
Insert with the side to be recorded facing towards you and the exposed tape facing down.
2 Select the source to be recorded.
Radio recording:
Tune in the station. ( page 10)
CD recording:
① Insert the CD(s) you want to record. Press [▶/■, CD] and then [■, STOP].
② Prepare the desired CD recording mode.
- To record programmed tracks (→ "Program play" on page 9: steps 1–3).
• To record specific CDs/tracks 1-DISC/ALL-DISC recording
Do steps 1 to 2 on page 9: "To listen to specific CDs and tracks (CD Play Mode function)". Ensure CD is stopped.
1-SONG recording
- Do steps 1 to 2 on page 9: "To listen to specific CDs and tracks (CD Play Mode function)". Ensure CD is stopped.
- Press [I◄◄/REW/V] or [►►I/FF/∧] to select the track.
Tape-to-tape recording:
① Press [▶, TAPE] and then [■, STOP].
② Press [▲, DECK 1] and insert the cassette you want to record.
3 Press [● REC] to start recording.
Your attention is drawn to the fact that recording pre-recorded tapes or discs or other published or broadcast material may infringe copyright laws.
To stop recording
Press [■, STOP].
If the tape finishes before the CD
The CD continues playing. Press [■, STOP] to stop it.
To record on the other side of the tape
Turn the tape over and press [● REC].
Recording
Reducing noise when recording AM
Remote control only
Hold down [PLAY MODE] while recording.
Every time you hold down the button: BP1 ↔ BP2
Choose the setting with the least noise.
Notes
• Changes to volume and sound/field quality do not affect recording.
- You cannot open deck 1 while recording.
- You cannot fast-forward or rewind one deck while recording with the other.
- When recording an AM broadcast, sound is momentarily interrupted when you start and stop the recording.
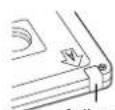
Erasure prevention
Use a screwdriver or similar object to break out the tab.

Tab for side B Tab for side A
To re-record on a protected cassette
Cover the hole with adhesive tape.
To erase a tape
-
Press [▶, TAPE] and then [■, STOP].
-
Insert the recorded tape into deck 2. Ensure there is no tape in deck 1.
-
Press [● REC].
Adhesive tape
Optional antenna connections
Use outdoor antenna if radio reception is poor.
FM outdoor antenna
For Europe

- Disconnect the FM indoor antenna.
- The antenna should be installed by a competent technician.
Optional antenna connections
AM outdoor antenna
For Europe
AM outdoor antenna (not included)
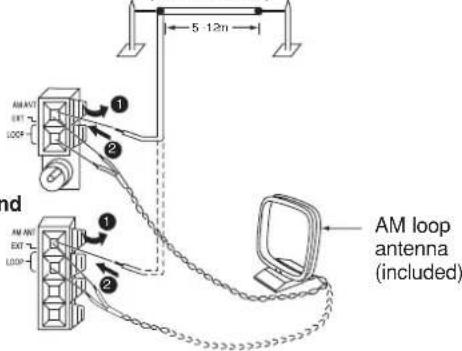
For Australia and New Zealand
Run a piece of vinyl wire horizontally across a window or other convenient location. Leave the loop antenna connected.
Note
Disconnect the outdoor antenna when the unit is not in use. Do not use the outdoor antenna during a lightning storm.
External unit connections

- An analogue player with a built-in phono equalizer can be connected.
- For details, refer to the instruction manual of the units which are to be connected.
- When units other than those described above are to be connected, please consult your audio dealer.
Using an external unit

(See above for external unit connection)
- Press [AUX]. The unit comes on.
- For listening : Proceed to step 3 For recording : Press [● REC] (recording starts).
- Start playback from the external source. (For details, refer to the external unit's instruction manual.)
Using headphones (not included)
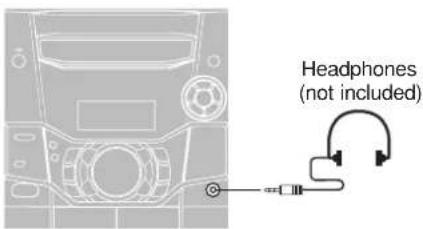
Reduce the volume level and connect the headphones.
Plug type: 3.5mm stereo
Note
Avoid listening for prolonged periods of time to prevent hearing damage.
Turning the demo function off
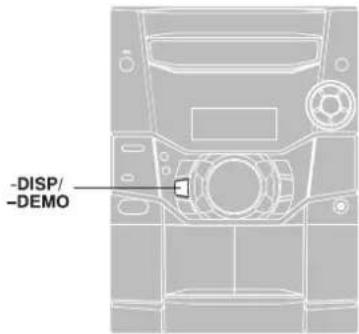
A demonstration of the display is shown if you have not set the clock.
You can reduce the power consumed in standby mode by turning it off.
During standby mode
Hold down [-DISP/-DEMO] until "NO DEMO" is displayed.
Every time you hold down the button:
NO DEMO (off) ↔ DEMO ON (on)
To show a demonstration of the display
Hold down [-DISP/-DEMO] until "DEMO ON" is displayed.
Note
DEMO function cannot be turned on when Dimmer is on.
Convenient functions

To dim the display panel
Remote control only
Press [DIMMER].
The display is dimmed and the indicator is turned off.
(The AC supply indicator remains on.)
Press [DIMMER] again to restore the display.
Switching displays ( SC-AK310 and SC-AK210 only)
Press [-DISP/-DEMO] to select the desired spectrum analyzer.
Every time you press the button:
Normal AuroraPeak hold
![PANASONIC SC-AK310G - Press [DIMMER]. - 1](/content/2026/05/1076430/images/e48325d2d21af128d4fc539601b3d2a8697498425e1f1f87f5a11032454b58e5.jpg)
To mute the volume
Remote control only
Press [MUTING].
Press the button again to cancel.
"MUTING" goes out.
To cancel from the unit, turn [VOLUME] to minimum (--dB), then raise it to the required level.
Muting is also cancelled when the unit is turned off.
Auto-off function
Remote control only

When CD or tape is selected as the source
To save power, the unit turns off if it is left unused for ten minutes.
This function does not work if the source is tuner or AUX.
Hold down [-AUTO OFF].
"AUTO OFF" is shown on the display.
The setting is maintained even if the unit is turned off.
If you select tuner or AUX as the source, "AUTO OFF" goes out. It comes on again when you select CD or tape.
To cancel
Hold down [-AUTO OFF] again.
Setting the time
Remote control only
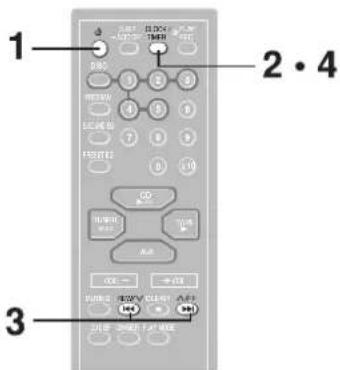
This is a 24-hour clock.
1 Switch on the unit.
2 Press [CLOCK/TIMER] to select "CLOCK".
Every time you press the button:
CLOCK RE@PLAY → ⊙

3 (within 7 seconds or so)
Press [◀◀, REW/V] or [▶▶I, ∧/FF] to set the time.
4 Press [CLOCK/TIMER] to finish setting the time.
The display will return to whatever was displayed before you set the time.
To display the time
Press [CLOCK/TIMER] once when the unit is on or at standby mode.
The time is shown for about 5 seconds.
Note
Reset the clock regularly to maintain accuracy.
Using the timers

Using the play/record timer
Remote control only
You can set the timer to come on at a certain time to wake you up (play timer) or to record a radio station or from the aux source (record timer).
The play and record timers cannot be used together.
Preparations:
- Turn the unit on and set the clock (→ page 13).
- For the play timer, prepare the desired music source (tape/CD/radio/aux), and set the volume.
- For the record timer, check the cassette's erasure prevention tabs (→ page 12) and insert the tape in deck 2 (→ page 11). Tune to the radio station (→ page 10) or select the aux source (→ page 12).
1 Press [CLOCK/TIMER] to select the timer function.

2 ON time setting
① (Within 8 seconds or so)
Press [I◄◄, REW/V] or [►►I, ∧/FF] to set the start time.
②Press [CLOCK/TIMER].
3 OFF time setting
① Press [I◄◄, REW/V] or [►►I, ∧/FF] to set the finish time.
②Press [CLOCK/TIMER].
The start and finish times are now set.
4 Press [∅PLAY/REC] to display the timer indicator.
Every time you press the button:
![PANASONIC SC-AK310G - Press [∅PLAY/REC] to display the timer indicator. - 1](/content/2026/05/1076430/images/6f4182a7a670926ea82ed7b0c906c20c07ce0fbbb7b89e4de00b565fddbb79d8.jpg)
PLAY: to turn the play timer on
②REC: to turn the record timer on
(The indicator doesn't appear if the start and finish times or the clock hasn't been set.)
5 Press [ ⏻] to turn the unit off.
The unit must be off for the timers to operate.
- Play timer: Play will start in the set condition at the set time with volume increasing gradually to the set level.
- Record timer: The unit comes on 30 seconds before the set time with the volume muted.
To cancel the timer
Press [∅PLAY/REC] to clear the timer indicator from the display. (The timer comes on at the set time everyday if the timer is on.)
To change the settings (when the unit is on)
To change the play/record times
Do steps 1, 2, 3 and 5.
To change the source or volume
- Press [∅PLAY/REC] to clear the timer indicator from the display.
- Make changes to the source or volume.
- Do steps 4 to 5.
To change the timer
Press [∅PLAY/REC] to select the desired timer.
Every time the button is pressed:

To check the settings
Press [CLOCK/TIMER] while the unit is on to select "∅PLAY" or "∅REC".
The settings are shown in the following order:
Play timer: start time→finish time→source→volume
Record timer: start time→finish time→source
To check the settings while the unit is off, press [CLOCK/TIMER] twice.
If you use the unit after the timers are set
After using, check that the correct tape/CD are loaded before turning the unit off.
Notes
- If you turn the unit off and on again while a timer is functioning, the finish time setting will not be activated.
- If you selected AUX as the source, when the timer comes on, the unit turns on and engages "AUX" as the source. If you want to playback or record from a connected unit, set that unit's timer to the same time. (See the connected unit's instruction manual.)
Using the sleep timer
Remote control only
This timer turns the unit off after a set time.
While enjoying the desired source:
Press [SLEEP] to select the time (minutes).
Every time you press the button:
![PANASONIC SC-AK310G - Press [SLEEP] to select the time (minutes). - 1](/content/2026/05/1076430/images/bce834d508b85647f7162d2f74fb013bdc6b4fa877f04ff798856f45ee8c9a22.jpg)
To cancel the sleep timer
Press [SLEEP] to select "SLEEP OFF".
To confirm the remaining time
Press [SLEEP] once.
The remaining time is shown for about 5 seconds.
To change the setting
Press [SLEEP] to select the new setting.
You can use the sleep timer in combination with the play/record timer. Make sure the unit is off before the play/record timer's start time.
Note
The sleep timer will be turned off when you start recording from a CD.
Troubleshooting guide
Before requesting service, make the checks below. If you can't fix the system as described below, or if something not listed here occurs, refer to the enclosed directory to locate an Authorized Service Center convenient to you or contact your dealer.
Reference pages are shown as black circled numbers 6.
Common Problems
| No sound.Sound stops. | Turn the volume up.Switch off the unit, determine and correct the cause, then switch the unit on. Causes include shorting of the positive and negative speaker wires, straining of the speakers through excessive volume or power, and using the unit in a hot environment. |
| Sound is unfixed, reversed or comes from one speaker only. | Check the speaker connections.6 |
| Humming heard during play. | An AC mains lead or fluorescent light is near the cables. Keep other appliances and cords away from this unit's cables. |
| “ERROR” is displayed. | Incorrect operation performed. Read the instructions and try again. |
| “- -: - ” appears on the display at standby mode. | You plugged the AC mains lead in for the first time or there was a power failure recently.Set the time.13 |
| “F61” is displayed. | Check and correct the speaker cords connection.6If this does not fix the problem, there is a power supply problem. Consult the dealer. |
Listening to the radio
| Noise is heard.The stereo indicator flickers or doesn’t light.Sound is distorted. | Use an outdoor antenna.12 |
| A beat sound is heard. | Turn the TV off or separate it from the unit. |
| A low hum is heard during AM broadcasts. | Separate the antenna from other cables and cords. |
When there is a television set nearby
| The picture on the TV disappears or stripes appear on the screen. | The location and orientation of the antenna are incorrect. If you are using an indoor antenna, change to an outdoor antenna.The TV antenna wire is too close to the unit. Separate the antenna wire of the TV set from the unit. |
Using the cassette deck
| Poor quality sound. | Clean the heads. See below |
| Recording is not possible. | If the erasure prevention tabs have been removed, cover the holes with adhesive tape. 12 |
Playing discs
| The display is wrong or play won't start. | The disc may be upside down. 8Wipe the disc.Replace the disc if it is scratched, warped, or non-standard.Condensation may have formed inside the unit due to a sudden change in temperature. Wait about an hour for it to clear and try again. |
| CD-RW cannot be read.“TAKE OUT/DISC” appears on the display. | The disc was incompletely formatted. Use the recording equipment to fully format the disc before recording.There is a problem with the disc mechanism. (A power failure may have occurred.)The tray will open automatically. Remove the disc from the tray, and after ensuring there is no disc in the tray, close it. The unit will make the disc changing noises for a few moments and then it should operate normally. |
Remote control
| Remote control doesn't work. | Check that the batteries are inserted correctly. 5Replace the batteries if they are worn. |
Maintenance
If the surfaces are dirty
To clean this unit, wipe with a soft, dry cloth.
- Never use alcohol, paint thinner or benzine to clean this unit.
- Before using a chemically treated cloth, read the instructions that came with the cloth carefully.
For a cleaner, crisper sound
Clean the heads regularly to assure good quality playback and recording.
Use a cleaning tape (not included).
AMPLIFIER SECTION SC-AK310
RMS Power output
10% Total harmonic distortion
1kHz, both channels driven
(Low channel) 55 W per channel (6 Ω)
10 kHz, both channels driven
(High channel) 55 W per channel (6 Ω)
Total Bi-Amp power
110W per channel
Input sensitivity
AUX 250 mV
Input impedance
AUX 13.3kΩ
AMPLIFIER SECTION SC-AK210
RMS Power output
10% Total harmonic distortion
1 kHz, both channels driven
(Low channel) 55 W per channel (6 Ω)
10 kHz, both channels driven
(High channel) 55 W per channel (6 Ω)
Total Bi-Amp power 110W per channel
Input sensitivity
AUX 250 mV
Input Impedance
AUX 13.3kΩ
AMPLIFIER SECTION SC-AK110
Power output
10% Total harmonic distortion
1 kHz, both channels driven
80 W per channel (6 Ω)
Total power 80W per channel
Input sensitivity
AUX 250 mV
Input Impedance
AUX 13.3 kΩ
FM TUNER SECTION
Frequency range
87.50 - 108.00 MHz (50 kHz steps)
(For Europe)
Sensitivity 1.8 μV (IHF)
S/N 26 dB 1.5μV
(For Australia and New Zealand)
Sensitivity 2.5 μV (IHF)
S/N 26 dB 2.2μV
Antenna terminal(s) 75Ω (unbalanced)
AM TUNER SECTION
Frequency range
522 - 1629 kHz (9 kHz steps)
Sensitivity
S/N 20 dB (at 999 kHz) 560 μV/m
CASSETTE DECK SECTION
Track system 4 track, 2 channel
He
Record/playback Solid permalloy head
Erasure Double gap ferrite head
Motor
DC servo motor
Recording system
AC bias 100 kHz
Erasing system
AC erase 100 kHz
Tape speed
4.8 cm/s
Overall frequency response
(+3 dB, -6 dB at DECK OUT)
NORMAL (TYPE I) 35Hz - 14kHz
S/N
50 dB (A weighted)
Wow and flutter
0.18% (WRMS)
Fast forward and rewind time
Approx. 120 seconds with
C-60 cassette tape
CD SECTION
Sampling frequency 44.1 kHz
Decoding
16 bit linear
Pickup
Beam source/wavelength
Semiconductor laser/780 nm
(For Norge)
Bølgelengde 780 nm
Laserstyrke
Number of channels Stereo
Frequency response
20 Hz–20 kHz (+1, -2 dB)
Wow and flutter
Below measurable limit
Digital filter
8 fs
D/A converter
MASH (1 bit DAC)
SPEAKER SECTION SB-AK310
Type 3 way, 3 speaker system
Speaker(s)
Woofer 16 cm cone type
Tweeter 6 cm cone type
Super tweeter 2.5 cm Piezo type
Impedance
HIGH 6 Ω
LOW 6 Ω
Input power
HIGH 110W (Music)
LOW 110W (Music)
Output sound pressure level
86.5dB/W (1.0 m)
Cross over frequency
3.5 kHz, 10 kHz
Frequency range 35
z-25kHz (-16 dB)
47 Hz–24kHz (−10 dB)
Dimensions (WxHxD) 227 x 344 x 243 mm
Mass 3.3
kg
SPEAKER SECTION SB-AK210
Type 2 way, 2 speaker system
Speaker(s)
Woofer 16 cm cone type
Tweeter 6 cm cone type
Impedance
HIGH 6 Ω
LOW 6 Ω
Input power
HIGH 110 W (Music)
LOW 110 W (Music)
Output sound pressure level
86.8dB/W (1.0 m)
Cross over frequency 3.5
5 kHz
Frequency range 45
Hz-25kHz (-16 dB)
60 Hz–24kHz (−10 dB)
Dimensions (WxHxD) 2
20 × 330 × 227 mm
Mass 3.1
kg
SPEAKER SECTION SB-AK110
Type 2 way, 2 speaker system
Speaker(s)
Woofer 16 cm cone type
Tweeter 6 cm cone type
Impedance 6 Ω
Input power 160 W (Music)
Output sound pressure level
86.8 dB/W (1.0 m)
Cross over frequency
4 kHz
Frequency range
Hz-30 kHz (-16 dB)
60 Hz–26 kHz (−10 dB)
Dimensions (WxHxD)
20 × 330 × 227 mm
Mass
3.0 kg
GENERAL
Power supply
AC 230-240 V, 50 Hz
Power consumption
SC-AK310 SC-AK210 170 W
SC-AK110 174 W
Dimensions (WxHxD)
250 x 330 x 370 mm
Mass
SC-AK310 SC-AK210 7.0 kg
SC-AK110 7.2 kg
Power consumption in standby mode:
Approx. 0.5 W
Notes
- Specifications are subject to change without notice.
Mass and dimensions are approximate.
- Total harmonic distortion is measured by the digital spectrum analyzer.
3. Except SB-AK110
The labels "HIGH" and "LOW" on the rear of the speakers refer to High frequency and Low frequency.
- Panasonic
- Note:
- Dear customer
- Table of contents
- CAUTION!
- WARNING:
- SUOMI
- VAROITUS!
- VAROITUS:
- NORSK
- ADVARSEL!
- ADVARSEL:
- Caution for AC Mains Lead
- (For United Kingdom)
- ("EB" area code model only)
- IMPORTANT
- WARNING: DO NOT CONNECT EITHER WIRE TO THE EARTH TERMINAL WHICH IS MARKED WITH THE LETTER E, BY THE EARTH SYMBOL 12 OR COLOURED GREEN OR GREEN/YELLOW.
- THIS PLUG IS NOT WATERPROOF-KEEP DRY.
- Before use
- How to replace the fuse
- Safety precautions
- Placement
- Voltage
- AC mains lead protection
- Foreign matter
- Service
- Supplied accessories
- SC-AK310
- For United Kingdom and Republic of Ireland
- Placement of speakers
- SC-AK210
- SC-AK110
- Notes
- Caution
- The remote control
- Do not:
- Set-up
- Preparation
- Insertion of connector
- Note
- For your reference
- Use only the supplied speakers.
- Front panel controls
- Center console
- Remote control
- CD selection
- To prevent damage
- To stop the disc play Press [■, STOP].
- "▶(SC-AK110: " ") indication
- One touch play
- CD display
- Remote control only
- Starting play from a specific track
- Program play
- To exit program mode
- To cancel
- To check program contents
- To add to the program
- Repeat play
- To cancel repeat play
- To listen to specific CDs and tracks (CD Play Mode function)
- Press [PLAY MODE] to select the desired mode.
- Select the track with the numbered buttons.
- To stop play
- When playback ends
- ※ Final disc
- The radio: manual tuning
- Press [TUNER/BAND] to select band.
- Press [PLAY MODE] on the remote control to select "MANUAL".
- Hold down [I◄◄/REW/∨] or [►►I/FF/∧] for a moment to search for a station.
- RDS broadcasting SC-AK210 only
- Displaying the name of a broadcasting station or a program type
- If noise is excessive in FM
- The radio: preset tuning
- Preparation:
- Automatic presetting
- Hold down [PROGRAM] until the frequency changes.
- SC-AK310 SC-AK210
- Manual presetting
- Selecting channels
- Press the numbered buttons to select the channel.
- Cassettes
- Sound quality/sound field
- Using the built-in sound quality/sound field settings
- Enhancing the sound quality
- Recording
- Reducing noise when recording AM
- Erasure prevention
- To re-record on a protected cassette
- To erase a tape
- Optional antenna connections
- FM outdoor antenna
- External unit connections
- Turning the demo function off
- During standby mode
- To show a demonstration of the display
- Convenient functions
- To dim the display panel
- Press [DIMMER].
- To mute the volume
- Press [MUTING].
- Auto-off function
- Hold down [-AUTO OFF].
- Setting the time
- Using the timers
- Using the play/record timer
- Preparations:
- Press [CLOCK/TIMER] to select the timer function.
- ON time setting
- OFF time setting
- Press [∅PLAY/REC] to display the timer indicator.
- Press [ ⏻] to turn the unit off.
- To cancel the timer
- To change the settings (when the unit is on)
- To change the play/record times
- To change the source or volume
- To change the timer
- To check the settings
- If you use the unit after the timers are set
- Using the sleep timer
- While enjoying the desired source:
- Press [SLEEP] to select the time (minutes).
- To cancel the sleep timer
- To confirm the remaining time
- To change the setting
- Troubleshooting guide
- Maintenance
- If the surfaces are dirty
- For a cleaner, crisper sound
- AMPLIFIER SECTION SC-AK310
- RMS Power output
- AMPLIFIER SECTION SC-AK210
- AMPLIFIER SECTION SC-AK110
- Power output
- FM TUNER SECTION
- Frequency range
- AM TUNER SECTION
- CASSETTE DECK SECTION
- CD SECTION
- SPEAKER SECTION SB-AK310
- SPEAKER SECTION SB-AK210
- SPEAKER SECTION SB-AK110
- GENERAL
- Except SB-AK110
Brand : PANASONIC
Model : SC-AK310G
Category : Hi-Fi System