PEAKS 18 Li Basic - Saw Pattfield - Free user manual and instructions
Find the device manual for free PEAKS 18 Li Basic Pattfield in PDF.
| Product type | Cordless chainsaw |
| Brand | Pattfield |
| Model | PEAKS 18 Li Basic |
| Rated voltage | 18 V |
| Idle speed (chain) | 2400 rpm |
| Guide bar length | 250 mm |
| Maximum cutting length | 230 mm |
| Rated cutting speed | 4.3 m/s |
| Oil tank capacity | 200 ml |
| Net weight (with battery) | Approx. 3.6 kg |
| Sound pressure level (LpA) | 85.7 dB(A) |
| Sound power level (LwA) | 95.4 dB(A) |
| Sound uncertainty | K = 2.47 dB(A) |
| Vibration emissions (ahw) | 4.88 m/s² |
| Vibration uncertainty | K = 1.5 m/s² |
| Battery type | Lithium-ion (not included) |
| Chain brake | Integrated, manual activation |
| Lubrication | Automatic, visible reservoir |
| Intended use | Sawing and felling trees in private domain |
| Authorized materials | Wood only (no plastic, masonry, etc.) |
| Warranty | 3 years (private use) |
| Compliance standards | EN 60745, Machinery Directive 2006/42/EC |
Frequently Asked Questions - PEAKS 18 Li Basic Pattfield
User questions about PEAKS 18 Li Basic Pattfield
0 question about this device. Answer the ones you know or ask your own.
Ask a new question about this device
Download the instructions for your Saw in PDF format for free! Find your manual PEAKS 18 Li Basic - Pattfield and take your electronic device back in hand. On this page are published all the documents necessary for the use of your device. PEAKS 18 Li Basic by Pattfield.
USER MANUAL PEAKS 18 Li Basic Pattfield
Manufacturer:
HORNECK BASement AG
Bucharest/Hobartu 11
7800 Barmont/Germany
Pattfield


PE-AKS 18 Li Basic
01 Aotisipssion:beachin
E
Letop de uwwpgrnt
Obsererat uhtksbnd
D Vir nucleare: strky
80 Also: In project file
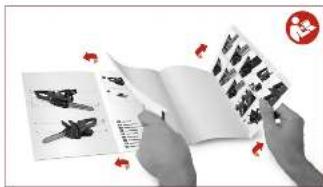
60 Obserer the foolded pags!
Original Instructions
8 CAUSE DEI CONTRACCOLPI E MODI PER EVITARLI
Nominal voltage 18 V
Snelheid zonder belasting (_) 2400/min
Lenge zaagblad 250 mm
Max. snijdlenge 230 mm
neurcitost K = 3 dB(A)
95,4 dB(A) /
neurcitost K = 2,47 dB(A)
Neurcitost K = 1,5m / s^2
9 DAL'SIE BEZPECNOSTNÉ POKNY
Neurcitost K = 3 dB(A)
95,4 dB(A) /
Neurcitost K = 2,47 dB(A)
Neurcitost K = 1,5m / s^2
Current continuu (c.c.)

experienta unui specialist.
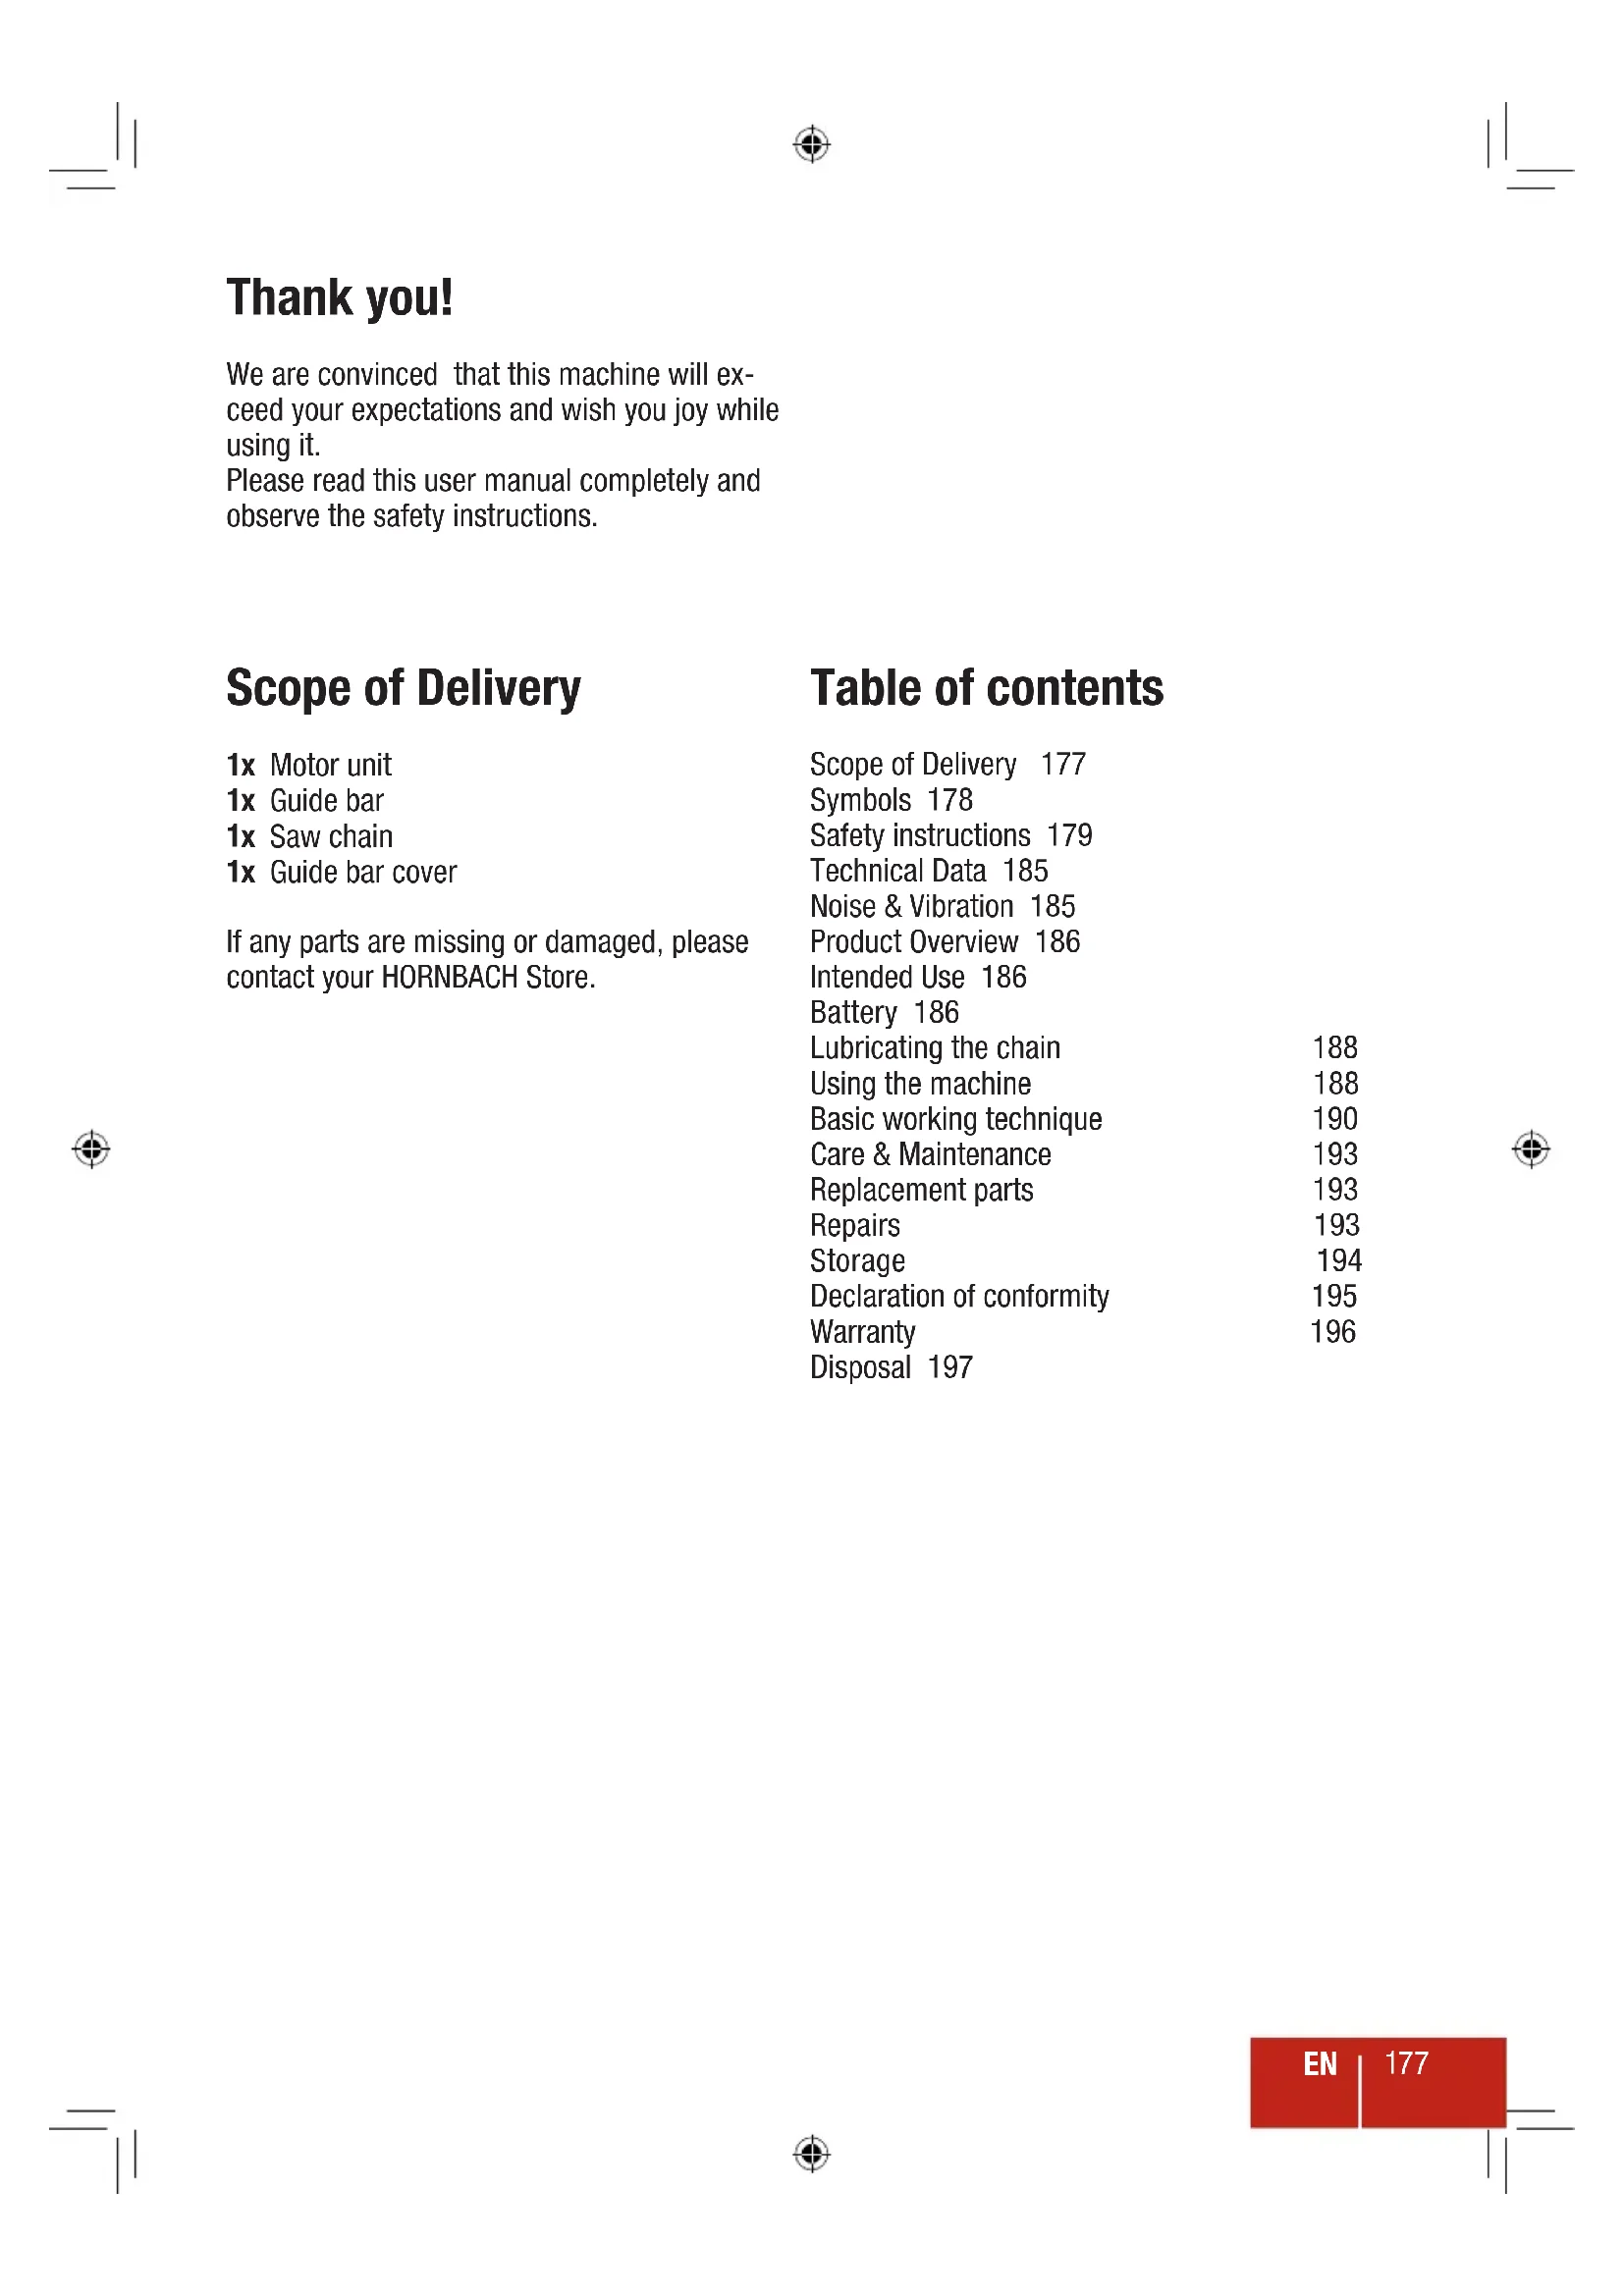
We are convinced that this machine will exceed your expectations and wish you joy while using it. Please read this user manual completely and observe the safety instructions.
Scope of Delivery
1x Motor unit
1x Guide bar
1x Saw chain
1x Guide bar cover
If any parts are missing or damaged, please contact your HORNBACH Store.
Table of contents
Scope of Delivery 177
Symbols 178
Safety instructions 179
Technical Data 185
Noise & Vibration 185
Product Overview 186
Intended Use 186
Battery 186
Lubricating the chain 188
Using the machine 188
Basic working technique 190
Care & Maintenance 193
Replacement parts 193
Repairs 193
Storage 194
Declaration of conformity 195
Warranty 196
Disposal 197
SYMBOLS

Please read this user manual carefully and keep it for further reference.
The guaranteed sound power level is 98 dB.

Wear safety goggles to protect your eyes.
v_0 Chain speed (no load).

Wear hearing protection to protect your hearing.

Direct current (DC).

Deactivate the chain brake.

Wear steel-toed safety boots with cut retardant inserts.

Activate the chain brake.

Wear snug-fitting clothing with cut retardant inserts.

k/Unlock the chain sprocket cover. crease/Reduce the chain tension.

Wear head protection with face shield.

Warning! Danger of accident or injury to persons and serious damage to property.

Prescribed running direction of saw chain.

Protect the device from rain and do not leave it outdoors in the rain!

Safety instructions
GENERAL POWER TOOL SAFETY WARNINGS

WARNING Read all safety warnings and all instructions. Failure to follow
the warnings and instructions may result in electric shock, fire and/or serious injury.
Save all warnings and instructions for future reference.
The term „power tool“ in the warnings refers to your mains-operated (corded) power tool or battery-operated (cordless) power tool.
1 WORK AREA SAFETY
a) Keep work area clean and well lit. Cluttered or dark areas invite accidents.
b) Do not operate power tools in explosive atmospheres, such as in the presence of flammable liquids, gases or dust. Power tools create sparks which may ignite the dust or fumes.
c) Keep children and bystanders away while operating a power tool. Distractions can cause you to lose control.
2 ELECTRICAL SAFETY
a) Power tool plugs must match the outlet. Never modify the plug in any way. Do not use any adapter plugs with earthed (grounded) power tools. Unmodified plugs and matching outlets will reduce risk of electric shock.
b) Avoid body contact with earthed or grounded surfaces, such as pipes, radiators, ranges and refrigerators. There is an increased risk of electric shock if your body is earthed or grounded.
c) Do not expose power tools to rain or wet conditions. Water entering a power tool will increase the risk of electric shock.
d) Do not abuse the cord. Never use the cord for carrying, pulling or unplugging the power tool. Keep cord away from heat, oil, sharp edges or moving parts. Damaged or entangled cords increase the risk of electric shock.
e) When operating a power tool outdoors, use an extension cord suitable for outdoor use. Use of a cord suitable for outdoor use reduces the risk of electric shock.
f) If operating a power tool in a damp location is unavoidable, use a residual current device (RCD) protected supply. Use of an RCD reduces the risk of electric shock.
3 PERSONAL SAFETY
a) Stay alert, watch what you are doing and use common sense when operating a power tool. Do not use a power tool while you are tired or under the influence of drugs, alcohol or medication. A moment of inattention while operating power tools may result in serious personal injury.
b) Use personal protective equipment. Always wear eye protection. Protective equipment such as dust mask, non-skid safety shoes, hard hat, or hearing protection used for appropriate conditions will reduce personal injuries.
c) Prevent unintentional starting. Ensure the switch is in the off-position before connecting to power source and/or battery pack, picking up or carrying the tool. Carrying power tools with your finger on the switch or energising power tools that have the switch on invites accidents.
d) Remove any adjusting key or wrench before turning the power tool on. A wrench or a key left attached to a rotating part of the power tool may result in personal injury.
e) Do not overreach. Keep proper tooting and balance at all times. This enables better control of the power tool in unexpected situations.
f) Dress properly. Do not wear loose clothing or jewellery. Keep your hair, clothing and gloves away from moving parts. Loose clothes, jewellery or long hair can be caught in moving parts.
g) If devices are provided for the connec
tion of dust extraction and collection facilities, ensure these are connected and properly used. Use of dust collection can reduce dust-related hazards.
h) Do not let familiarity gained from frequent use of tools allow you to become complacent and ignore tool safety principles. A careless action can cause severe injury within a fraction of a second.
4 POWER TOOL USE AND CARE
a) Do not force the power tool. Use the correct power tool for your application. The correct power tool will do the job better and safer at the rate for which it was designed.
b) Do not use the power tool if the switch does not turn it on and off. Any power tool that cannot be controlled with the switch is dangerous and must be repaired.
c) Disconnect the plug from the power source and/or the battery pack from the power tool before making any adjustments, changing accessories, or storing power tools. Such preventive safety measures reduce the risk of starting the power tool accidentally.
d) Keep power tools that are not in use outside the reach of children. Do not allow persons handle power tools that are not familiar with power tools or the relevant instructions. Power tools are dangerous in the hands of untrained users.
e) Maintain power tools. Check for misalignment or binding of moving parts, breakage of parts and any other condition that may affect the power tool's operation. If damaged, have the power tool repaired before use. Many accidents are caused by poorly maintained power tools.
f) Keep cutting tools sharp and clean. Properly maintained cutting tools with sharp cutting edges are less likely to bind and are easier to control.
g) Use the power tool, accessories and tool bits etc. in accordance with these instructions, taking into account the working conditions and the work to be
performed. Use of the power tool for operations different from those intended could result in a hazardous situation.
h) Keep handles and grasping surfaces dry, clean and free from oil and grease. Slippery handles and grasping surfaces do not allow for safe handling and control of the tool in unexpected situations.
5 BATTERY TOOL USE AND CARE
a) Recharge only with the charger specified by the manufacturer. A charger that is suitable for one type of battery pack may create a risk of fire when used with another battery pack.
b) Use power tools only with specifically designated battery packs. Use of any other battery packs may create a risk of injury and fire.
c) When battery pack is not in use, keep it away from other metal objects, like paper clips, coins, keys, nails, screws or other small metal objects, that can make a connection from one terminal to another. Shorting the battery terminals together may cause burns or a fire.
d) Under abusive conditions, liquid may be ejected from the battery; avoid contact. If contact accidentally occurs, flush with water. If liquid contacts eyes, additionally seek medical help. Liquid ejected from the battery may cause irritations or burns.
e) Do not use a battery pack or tool that is damaged or modified. Damaged or modified batteries may exhibit unpredictable behaviour resulting in fire, explosion or risk of injury.
f) Do not expose a battery pack or tool to fire or excessive temperature. Exposure to fire or temperature above 130^ may cause explosion.
g) Follow all charging instructions and do not charge the battery pack or tool outside the temperature range specified in the instructions. Charging improperly or at temperatures outside the specified range may damage the battery and increase the risk of fire.
6 SERVICE
a) Have your power tool serviced by a qualified repair person using only identical replacement parts. This will ensure that the safety of the power tool is maintained.
b) Never service damaged battery packs. Service of battery packs should only be performed by the manufacturer or authorized service providers.
7 SAFETY INSTRUCTIONS FOR CHAIN SAWS
a) Keep all parts of the body away from the saw chain when the chain saw is operating. Before you start the chain saw, make sure the saw chain is not contacting anything. A moment of inattention while operating chain saws may cause entanglement of your clothing or body with the saw chain.
b) Always hold the chain saw with your right hand on the rear handle and your left hand on the front handle. Holding the chain saw in reverse working position increases the risk of injuries and must be avoided.
c) Hold the electric power tool by the insulated handle surfaces, as the saw chain may contact hidden wiring. If the saw chain comes into contact with a live line, metallic parts of the unit may become energised and cause an electric shock.
d) Wear safety glasses and hearing protection. Further protective equipment for head, hands, legs and feet is recommended. Adequate protective clothing will reduce personal injury by flying debris or accidental contact with the saw chain.
e) Do not work with the chain saw in a tree. When operating the chain saw in a tree, there is a risk of injury.
f) Always keep proper footing and operate the chain saw only when standing on fixed, secure and level surface. Slippery or unstable surfaces such as ladders may cause a loss of balance or control of the chain saw.
g) When cutting a limb that is under ten
sion be alert for spring back. When the tension in the wood fibres is released the spring loaded limb may strike the operator and/or throw the chain saw out of control.
h) Use extreme caution when cutting brush and saplings. The slender material may catch the saw chain and be whipped toward you or pull you off balance.
i) When cutting a limb that is under tension be alert for spring back. Carry the chain saw by the front handle with the chain saw switched off and away from your body. When transporting or storing the chain saw always fit the guide bar cover. Proper handling of the chain saw will reduce the likelihood of accidental contact with the moving saw chain.
j) Follow instructions for lubricating, chain tensioning and changing accessories. Improperly tensioned or lubricated chain may either break or increase the chance for kickback.
k) Keep the handles dry, clean and free of oil and grease. Greasy and oily handles are slippery and will cause loss of control.
1) Saw wood only. Do not use the chain saw for work for which it is not designed. Example: Do not use the chain saw for sawing plastic, masonry or non-wood building materials. If the chain saw is not used as intended, this may result in hazardous situations.
8 CAUSES OF AND AVOIDING A KICKBACK
Kickback may occur when the nose or tip of the guide bar touches an object, or when the wood closes in and pinches the saw chain in the cut. Tip contact in some cases may cause a sudden reverse reaction, kicking the guide bar up and back towards the operator. Pinching the saw chain along the top of the guide bar may push the guide bar rapidly back towards the operator.
Either of these reactions may cause you to lose control of the saw which could result in serious personal injury. Do not rely entirely on the safety precautions integrated into the saw. As a chain saw user,
you must take several steps to keep your cutting jobs free from accident or injury. Kickback is the result of tool misuse and/or incorrect operating procedures or conditions. It can be avoided by taking proper precautions as given below:
a) Maintain a firm grip, with thumbs and fingers encircling the chain saw handles, with both hands on the saw and position your body and arm to allow you to resist kickback forces. Kickback forces can be controlled by the operator, if proper precautions are taken. Do not let go of the chain saw.
b) Do not overreach and do not cut above shoulder height. This helps prevent unintended tip contact and enables better control of the chain saw in unexpected situations.
c) Only use replacement bars and chains specified by the manufacturer. Incorrect replacement bars and chains may cause chain breakage and/or kickback.
d) Follow the manufacturer's sharpening and maintenance instructions for the saw chain. Decreasing the depth gauge height can lead to increased kickback.
9 ADDITIONAL SAFETY INSTRUCTIONS
a) Before using the power tool, familiarise yourself thoroughly with the sawing technique of chain saws. Information can be found in the specialist literature. We recommend attending suitable training courses.
b) This tool is not intended for use by persons (including children) with reduced physical, sensory or mental capabilities or persons with a lack of experience and/or expertise in handling tools. Children should be supervised to ensure that they do not play with the unit.
c) Switch the unit off and remove the battery under the following conditions:
- if the unit is left unattended;
- before checking, cleaning or performing other work on the unit;
- if the unit starts vibrating excessively.
d) While sawing, ensure that there are no persons (particularly children) or animals in the working area. Ensure that children do not play with the unit.
e) Check the terrain on which the unit will be used and remove any stones and pieces of wire which could be picked up by the chain saw to avoid endangering people or wearing out the unit.
f) Ensure that the saw chain does not touch the ground or other objects.
g) When interrupting work, never leave the unit unattended and keep it in a safe place.
h) Always switch the chain saw off before transporting it to other workplaces.
i) Ensure that all guards and handles are fitted before using the unit. Never attempt to switch on an incompletely assembled unit or a unit which has unauthorised modifications.
j) Operate the unit only in the technical condition stipulated and delivered by the manufacturer. Unauthorised changes to the unit exclude liability of the manufacturer for any resulting damage and/or injury.
k) Spare parts must conform with the requirements specified by the manufacturer. Therefore use original spare parts only or spare parts authorised by the manufacturer. When replacing parts, please follow the supplied installation instructions and remove the battery beforehand.
1) Have repairs carried out exclusively by a qualified technician or a service centre. We recommend new users practise cutting round wood on a sawing block or frame.
10 ADDITIONAL SAFETY INSTRUCTIONS ON RISKS DUE TO VIBRATION
a) The declared vibration data represents the main applications of the tool, but different uses of the tool or poor maintenance can result in different vibration data. This may significantly increase the vibration level over the total working period.
b) Additional safety measure shall be taken to protect the user from effects of vibration. Maintain the tool and its accessories, keep hands warm and organize work patterns and periods.
FOR USE OF BATTERIES
a) Do not open, dismantle, shred or short-circuit batteries. Danger of explosion.
b) Batteries (battery pack or batteries installed) shall not be exposed to excessive heat such as sunshine, fire or the like. Protect from mechanical shock. Keep dry and clean. Keep away from children.
c) Dispose of properly. Pay attention to environmental aspects of battery disposal. Do not dispose of in household waste.
d) Remove batteries when not using the tool for a longer period of time.
e) In case of battery leakage, remove the batteries and clean the battery compartment thoroughly. Avoid contact with eyes and skin.
f) In case of damage and improper use of the battery, Vapours may be emitted. Provide for fresh air and seek medical help in case of complaints. The vapours can irritate the respiratory system.
For safety instructions for the battery charger please refer to the manual of the charger.
For safety instructions for Li-ion batteries please refer to the manual of the battery.
Technical Data
Type Chain saw
Nominal voltage 18 V
No-load speed (_0) 2400/min
Guide bar length 250mm
Max. cutting length 230mm
Cutting speed at rated rpm 4.3 m/s
Oil tank capacity 200 ml
Net weight (with battery) approx. 3.6kg
Sound pressure level (L_pA) 85.7 dB(A) /
Uncertainty K = 3 dB(A)
Measured sound power level (L_WA) 95.4 dB(A)/
Uncertainty K = 2.47 dB( A)
Max. vibration emission (a_hw) 4.88 m/s²
Uncertainty K = 1.5m / s^2
Please observe the article number on the type plate of the machine. The trade names of the individual machine may vary.
Noise & Vibration
The values given in these instructions have been measured in accordance with a standardized measurement procedure specified in EN 60745 and can be used to compare tools. The declared vibration total value may also be used in a preliminary assessment of exposure.
Try to keep vibration stress to a minimum. Measures to reduce vibrations including wearing gloves when using the tool and limiting the working time. In this process, all segments of the operating cycle must be taken into account (for instance times during which the electric tool has been switched off as well as periods during which it is on, but not running under load).

Warning! The vibration emission during actual use can differ from the
declared total value depending on the use of the machine.
Product overview
1 Handle
2 Rear handle
3 Oil tank and level indicator
4 Chain cover
5 Chain tensioning wheel
6 Chain cover wheel
7 Hand guard / Chain brake
8 Saw chain
9 Guide bar
10 Oil tank lid
11 Spiked bumper
12 Unlock button
13 On/Off switch
14 Battery slot
15 Ventilation openings
Intended use
This garden tool is
- intended for sawing wood and felling trees in the private sector exclusively,
- not suitable for sawing plastic, masonry or building materials which are not made of wood,
- to use according to the descriptions and safety instructions indicated in this operat ing manual.
Any other use is not as intended. Improper use is not covered by the warranty and the manufacturer will reject any liability. The user is liable for all injuries to third parties and damage to their property.
Battery (not included)
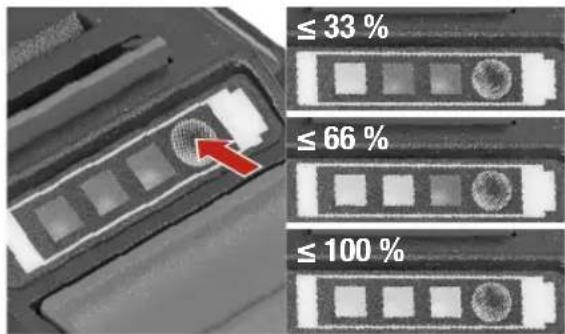
STATE OF CHARGE
Press the button to check the state of charge on LED indicator. To charge consult the user manual of the charger.
1
Attaching guide bar and chain
Unscrew the chain cover wheel 6 and remove the chain cover 4.
2
Install the guide bar 9 to the shaft of the motor unit as shown.

sembly.
Warning! Make sure the battery is removed from the tool prior to as

Warning! The saw chain is very sharp! Wear protective gloves. Dan
ger of personal injury!
3
Install the saw chain 8 to the motor sprocket and onto the guide bar 9.
4
Ensure that the saw chain8 slides freely in the guide bar9. Unscrew the
chain cover wheel 6 and remove the chain cover 4.

Caution! When attaching the saw
chain, observe its rotation direction!
Straighten the saw chain 8 with the chain tensioning wheel 5.
6
Slide the guide bar cover over the saw chain 8 and guide bar 9 and if the chain saw is not in use.
Fill in chain oil
1
Unscrew the oil tank lid 10.
Carefully fill the oil tank 3 and screw the oil tank lid 10 back on.
2
Insert batteries
Insert a charged battery (not included) into the battery slot 14 until it clicks into place.
To remove the battery, press its release button and pull it out.
Chain brake
1
Pull the hand guard 7 towards the handle 1 to deactivate the chain brake.
2
Switching on/off
Deactivate the chain brake, press and hold the release button 12. Press the on/off switch 13 to switch the machine on.

Warning! Make sure that the chain brake works properly.
Release the on/off switch 13 to switch off.
Lubricating the chain

ing.
Caution! Make sure the battery is removed from the tool prior to refill

only. Inadequate lubrication will reduce the service life of the power tool.
- Check the chain oil level at the oil level indicator 3 and top up with chain oil if required.
- Fill the unit only with an environmentally compatible quality chain and bar lubricant (according to RAL-UZ48).
- Do not use waste oil. Renewed contact with waste oil can cause skin cancer. Waste oil is environmentally harmful. Waste oil does not have the necessary lubricating properties and is unsuitable for chain lubrication.
- Any oil other than the one recommended may damage the guide bar, the chain and the lubricating system.
- Ensure that dirt does not get into the oil tank.
- Avoid spilling oil. Always wipe up any spilled oil.
Checking the chain lubrication
- Start the unit (see "Switching on/off").
- Hold running saw chain for some time approx. 15cm above a suitable surface. If there is adequate chain lubrication, the oil which is ejected by the saw chain will form a light trail.
Using the machine

Warning! Before using the power tool, familiarise yourself thoroughly
with the sawing technique of chain saws (see section "Basic working technique"). Danger of personal injury! Never allow children to operate the chain saw. Allow no person to use this chain saw who has not read this user manual or received adequate instructions for the safe and proper use of this chain saw!

Warning! Hold the chain saw firm with both hands! Ensure that the saw
chain does not touch any objects or the ground and that there are no people or animals in the vicinity before starting! Danger of personal injury!
Before each use
- Check that all parts of the power tool are present, firmly attached and undamaged.
- Check that the chain tension is correct.
- Check that the chain brake works properly.
- Check the chain lubrication.
- Check that there are no leaks.
- Ensure that you wear the adequate personal protective equipment.
Correct posture

Warning!
- Never work on unstable ground!
- Never work above shoulder height!
- Never work while standing on a ladder!
- Do not bend too far forwards when working!
- Use the power tool only when the weather conditions and terrain are favourable!


Caution! Always switch the motor off before you put the power tool
down!
- Stand with both legs firmly on the ground.
- Beware of obstructions in the working area.
- When working, always hold the power tool with both hands!
- Hold the power tool:
- with the left hand on the hand grip.
- with the right hand on the handle.
- in a balanced position with your feet firmly on the ground.
Using the device correctly
- Look over the working area and remove any obstructions.
Before starting work, check the safety of the power tool (see "Before each use").
Pick up the power tool in both hands as specified. - Switch the chain saw on before starting the cut.
- Apply a uniform pressure to the unit, however not excessive force.
If possible, place the unit's tree claw on the branch which is to be sawn.
After use
- Stop the engine.
- Wait until all rotating parts have come to a standstill.
- Remove the battery.
- Place sheath on cutting mechanism.
- Activate chain brake.
- Leave power tool to cool down.

Warning! The saw chain continues
to operate briefly after the On/Off
switch is released.
Basic working technique

training and experience of a specialist.

Warning! The information given here does not replace the extensive g and experience of a specialist.
prudent handling of the power tool may result in extremely serious to fatal injuries!

Danger! Stand on uphill side when cutting! Log may roll.
Pull stroke sawing
With this technique the underside of the guide bar saws from top to bottom.
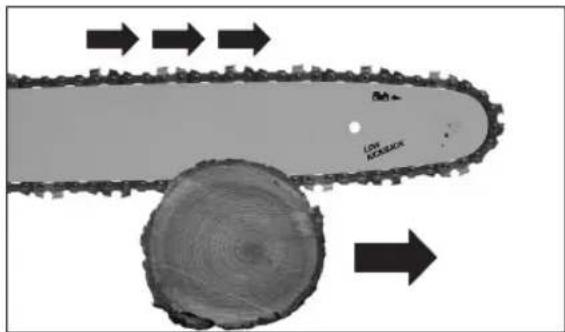
The saw chain pushes the power tool forwards away from the user. The front edge of the power tool forms a support which absorbs the forces which occur when sawing on the tree trunk. In pull stroke sawing the user has much more control over the power tool and can better avoid kickbacks. Therefore this sawing technique should be used preferably.

Warning! If the guide bar jams, the power tool may be thrown back to
wards the user with great force. If the user does not use his physical strength to compensate for the force of the saw chain pushing backwards, there is a risk that only the tip of the guide bar will make contact with the wood and cause a kickback. Risk of death or extremely severe injuries!
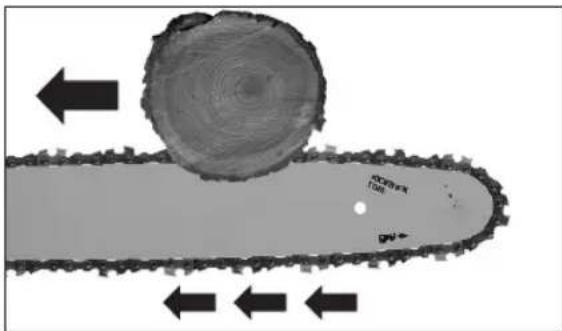
Push stroke sawing
With this technique the upper side of the guide bar saws from bottom to top. The saw chain pushes the power tool backwards towards the user.
Felling a tree

Danger! Felling and limbing work may be performed by trained pernly! There is a risk of life threatening
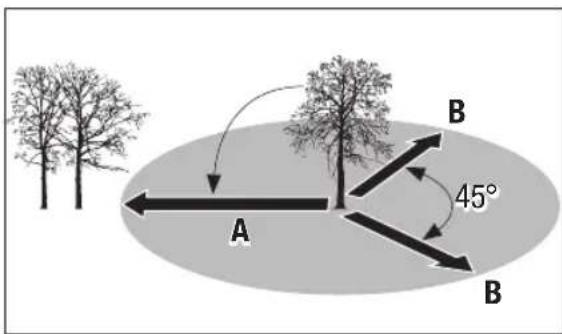
Before starting felling work, ensure that:
- there are no unauthorised persons and no animals within the fall area (A) of the tree;
-
there is an obstacle-free escape route for all those involved. People withdraw (B) at an 45^ angle opposite the direction of fall;
the area around the trunk is free of obstacles (risk of tripping!);
the next workplace is at least two and a half tree lengths away. Before felling the tree, check the direction in which the tree will fall and ensure that there are neither objects nor persons or animals within a distance of 212 tree lengths. -
Ensure no supply lines are affected or material damage is caused when felling trees. If a tree comes into contact with a supply line, the supplier of the line must be notified immediately.
Take into account the natural angle of the tree, the position of larger branches and the direction of the wind prior to felling to be able to assess the direction the tree will fall in. - Remove dirt, stones, loose bark, nails, clamps and wires from the tree.
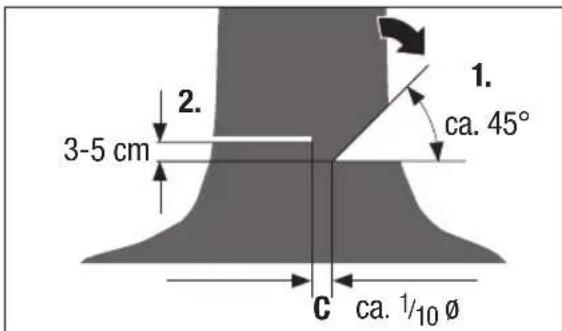
A tree is felled in two stages:
- Notch the trunk by approx. one third of its diameter on the side of the direction of fall.
- On the opposite side make the felling cut slightly higher than the notch (3-5 cm).
Danger! Never saw the tree trunk all the way through. The area (C) is used as a "hinge" and provides a defined direction of fall. When felling, stand only at the side of the tree to be felled! There is a risk of life threatening injuries!
The tree must begin to fall upon coming close to the felling cut at the strut. If it becomes apparent that the tree might not fall in the desired direction or it is leaning back, thus jamming the saw chain, stop cutting and position wooden or plastic wedges at the corresponding positions to expose the cut or make the tree fall in the desired direction.
Once the tree starts falling, remove the chain saw from the cut, put it down and leave the hazardous area via the planned escape route. Look out for falling branches and do not trip.
Trunks lying flat on the ground
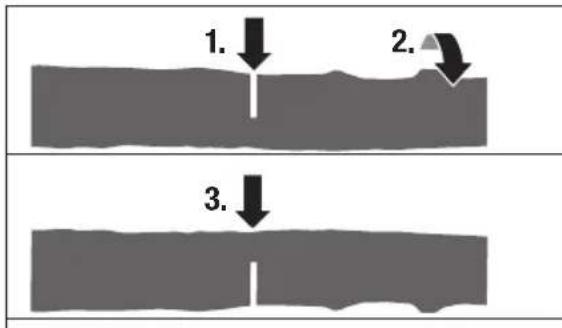
Cut halfway into the trunk, then turn around and saw through from the opposite side.
Warning! When sawing through the trunk, ensure that the guide bar does not touch the ground!
Supported trunks
In area A first cut approx. one third of the trunk diameter from top to bottom, then complete the cut from bottom to top.
In area B first cut approx. one third of the trunk diameter from bottom to top, then cut through from the top.
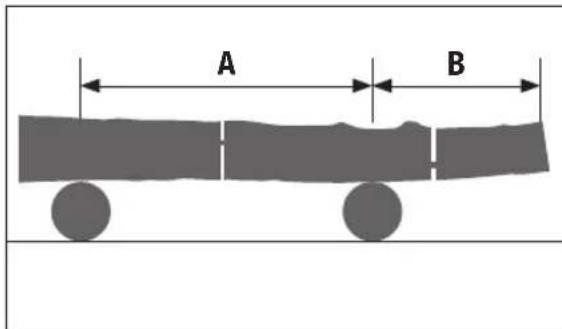
We recommend supporting trunks, which are to be sawn through, on sawhorses. If this is not possible, the trunk should be raised and supported with the aid of the supporting branches or via support blocks.
Warning! Do not saw trunks which are under tension! Splintering wood or a jammed guide bar may result in extremely serious injuries!
from one tree to the next.
Removing branches
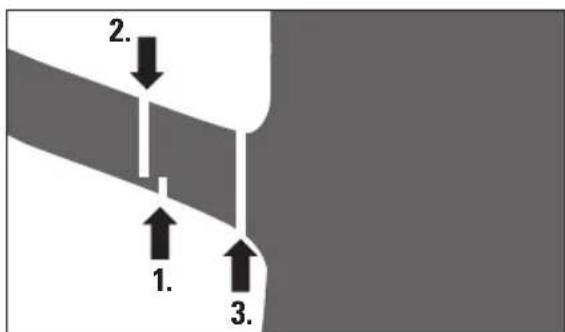
Always work on the side opposite the branch in question.
- Start at the bottom of the trunk and work upwards.
10-15 cm from the base of the branch saw upwards into the branch 1/3 of the branch diameter (1.).
- A little further up the branch saw through the branch from top to bottom (2.).
Make a cut close to the trunk (3.). Make the cut from top to bottom.
- When limbing trunks lying flat on the ground, first always saw off the branches pointing upwards. Do not cut through supporting branches until the trunk has been sawn into lengths.
Warning! Branches which are supported or under tension may wedge the saw chain in the wood!
When sawing on inclines always stand above the trunk. Reduce the pressure without loosening your firm grip on the chain saw handles towards the end of the cut to maintain full control at the moment the saw fully cuts through the trunk. Make sure the saw chain does not come into contact with the ground. After having completed the cut wait for the saw chain to come to a stop before removing it. Always switch off the chain saw drive when moving
Care & Maintenance
Regular and proper cleaning will not only ensure safe use, it also prolongs the life time of the machine.

Warning! Before performing any work on the tool, remove the battery.

Warning! Risk of injury by the saw chain! Wear protective gloves.
- Always:
clean the machine after use.
- Regularly:
-tension the saw chain.
clean oil guide groove in the guide bar.
regrind the saw chain.
check saw chain oil level and top up if required.
Cleaning
- Clean the unit with a damp cloth and a soft brush.
- Remove the chain sprocket cover, and then use a soft brush to remove debris from the guide bar, saw chain, sprocket and chain sprocket cover.
- Keep the ventilation slits clean and free of dust.

Caution! Do not use water or liquid detergents.
Tensioning the saw chain
The saw chain must not sag, but it should be possible to pull it 2-4 millimetres off the guide bar in the middle of the guide bar.
- Turn sprocket protection towards the left to loosen it.
- Turn the chain tensioning wheel clockwise to tension the chain.
- Turn the saw chain by hand to check that it runs perfectly. It must slide freely in the guide bar.
- Tighten the sprocket protection to secure the guide rail and chain tensioning wheel 5.
Note: Check and re-adjust the tension of a new chain after working for a few minutes. Switch the motor off, remove the battery and actuate the chain brake.
Cleaning oil guide groove in the guide bar
- Remove guide bar.
- Remove dirt from the oil guide groove using a suitable tool. Use a plastic spatula, not a steel tool!
- Re-attach guide bar.
Regrinding saw chain
Special tools are required to sharpen the saw chain and guarantee that the blades of the chain are sharpened at the correct angle and to the correct depth. We recommend having the saw chain reground by specialist.
Replacement Parts
Please quote the following data when ordering replacement parts:
- Type of machine
- Article number of the machine
- Identification number of the machine
- Replacement part number of the part required.
Repairs
Check the unit for damage. Repairs may be carried out by an authorised customer service centre only.
Storage
- Store the unit in a dry and frost-free place (10-25 °C).
- Store the battery and the unit separately.
- Charge the battery before storing the unit in winter.
- For a prolonged period of non-use always drain the chain lubricating oil out the power tool.
- Place sheath on cutting mechanism.
- Keep the unit, in particular its plastic components, away from brake fluids, petrol, petroleum products, penetrating oil, etc. They contain chemical substances which may damage, attack or destroy the plastic components of the unit.
- Fertilisers and other garden chemicals contain substances which may have a highly corrosive effect on the metal parts of the unit. Therefore do not store your unit near these substances.
Declaration of Conformity
We declare, that the products described in Technical Data:

Battery-powered chain saw PE-AKS 18 Li Basic
manufactured for:
is in conformity with the following directives:
Machinery Directive 2006/42/EC: Outdoor Directive 2000/14/EC and 2005/88/EC EMC Directive 2014/30/EU
and in accordance to the following applicable harmonized standards:
EN 60745-1:2009+A11
EN 60745-2-13:2009+A1
EN 55014-1:2006+A2
EN 55014-2:1997+A2
The conformity with the Machinery Directive is verified by the conformity assessment procedure according to the Directive 2006/42/EC.
The conformity with the Noise Emission of Outdoor Equipment Directive is verified by the conformity assessment procedure according to annex VI, and the Directive 2005/88/EC.
Measured sound power level: 95.4 dB (A)
Guaranteed sound power level: 98.0 dB (A)
Notified Body:
TÜV SÜD Product Service GmbH
Ridlerstraße 65
D-80339 Munich
Germany
Notified Body No.: 0123
Certificate number: M6A 16 10 27730 106
A. udun
Andreas Back
Head of Quality Management, environment & CSR
Person authorised to compile the technical file
This Pattfield item has been produced according to state-of-the-art production methods and is subject to ongoing strict quality control. Hornbach Baumarkt AG, Hornbachstrasse 11, 76879 Bornheim, Germany, guarantees the quality of the machines according to the following terms and conditions.
1. Warranty Period
The warranty period is 3 years. The warranty period starts on the date of purchase. Please retain the original receipt or invoice in order to be able to furnish evidence of the date of purchase.
2. Warranty Scope
The warranty applies exclusively to production or material defects. The warranty applies only in the case of private use of the item.
The warranty does not apply to defects resulting from
misuse or improper use,
- use of force or external influences,
- damage due to failure to observe the installation instructions or instructions for use,
- connecting to an incorrect grid voltage or current type,
- unprofessional installation,
- overloading the device,
- use of non-approved attachments or accessories,
- failure to observe the maintenance and safety instructions,
- entry of foreign matter into the device,
- wear and tear due to normal use or
- commercial use.
Furthermore, the warranty does not cover damage to parts subject to wear and tear, which is caused by normal wear and tear. The warranty does not comprise any collateral or consequential damage or possible installation and dismantling costs in the event of a warranty incident.
3. Warranty Services
During the warranty period, the warrantor will inspect the defective item in order to determine whether a warranty incident is on hand. If a warranty incident is on hand, the warrantor will repair or replace the item at his own expense. If the item is no longer available at the time of the warranty incident, the warrantor may replace the item with a similar product. The replaced item or part shall become property of the warrantor.
Warranty services (repair or replacement) do not extend the warranty period. Warranty services do not result in any new warranty.
4. Warranty Claims
For warranty claims, please contact the nearest HORNBACH DIY store.
You can find it at www.hornbach.com.
Warranty claims will only be accepted if the original receipt or invoice is produced.
5. Statutory Rights
The warranty does not restrict your statutory rights regarding warranty and product liability.
Waste disposal
The crossed-out wheeled bin logo requires the separate collection of waste electric and electronic equipment (WEEE). Such equipment may
contain dangerous and hazardous substances. These machines must be returned to a designated collection point for the recycling of WEEE and must not be disposed as unsorted municipal waste. In this way, you contribute to protection of resources and the environment. Contact your local authorities for more information.
Children must not play with plastic bags and packaging material, due to possible injury or danger of suffocation. Store such material safely or dispose of environmentally friendly.
Remove used batteries from the device and correctly dispose of them. Battery selling stores and municipal collection points offer special containers for battery disposal.