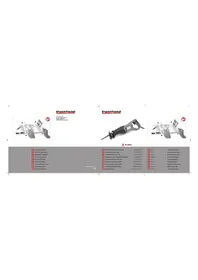
PE1200 TS - Saw Pattfield - Free user manual and instructions
Find the device manual for free PE1200 TS Pattfield in PDF.
| Product type | Jigsaw (reciprocating saw) |
| Brand | Pattfield |
| Model | PE1200 TS |
| Rated voltage | 230 V / 50 Hz |
| Rated power | 1200 W |
| No-load speed | 5500 /min |
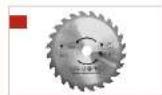
| Saw blade | 160 x 20 x 2.5 mm, 24/48 teeth |
| Max cutting depth (wood at 90°) | 55 mm |
| Max cutting depth (wood at 45°) | 42 mm |
| Bevel angle | 0-45° |
| Protection class | II (double insulation) |
| Weight | 4.8 kg |
| Sound pressure level | 88.9 dB(A) |
| Sound power level | 99.9 dB(A) |
| Vibration emissions | < 2.5 m/s² |
| Compatible materials | Wood, plywood, plastic, light non-ferrous materials |
| Delivery contents | Jigsaw, pre-installed blade, hex key |
| Extraction connection | Diameter 35 mm |
| Warranty | 3 years |
| Maintenance | Cleaning with soft cloth, lubrication of moving parts |
| Main functions | Depth adjustment, bevel cutting, blade guard, riving knife, safety lock |
| Optional accessory | Guide rail (ref. 5661036) |
| Reparability | Identical spare parts, repair by qualified professional |
Frequently Asked Questions - PE1200 TS Pattfield
User questions about PE1200 TS Pattfield
0 question about this device. Answer the ones you know or ask your own.
Ask a new question about this device
Download the instructions for your Saw in PDF format for free! Find your manual PE1200 TS - Pattfield and take your electronic device back in hand. On this page are published all the documents necessary for the use of your device. PE1200 TS by Pattfield.
USER MANUAL PE1200 TS Pattfield
text_image
Scanned document with printed images and Chinese text, hands holding a book titled 'Open Book' with red seal stampsPattfield
PROG TOOLS
Manufactured for
Hombach Bounserkt AG
Hornbachstrahl: 1
10879 Binhemont, Germany
Pattfield
EPO

natural_image
Exterior view of a metal cutting tool with visible blades and mounting holes (no text or symbols)PE-1200 TS
text_image
Scanned document with printed images and a red warning symbol, showing hands reading and viewing contentDE Ausleppenzen beschränft
EEL Observer les rapies à disifier !
[Unreadable]
1. 2017年公司业绩预告情况
NL Let op de uitwampagms!
57 Observera utiletsbladen!
02. Viz moklasnici slumby
1. 2017年1月1日
ok: Yunnan school, 1956 to apply.
AN Alunție la pugăra plătă!
60 Observe the following page!
120150142318
CE
DE Überschung der Original Betriebsschung
Tautstige 1200 €
EB. Produktion de la police adquisée
1. The company is a major player, and the company is a major player, with
4. Available with the English sign at 100%
Verzins van de opportelijke gebruikssenwijing 104222, 1200 M
5V Overwriting av originalbrakesansing 124830g 1200W
C7 Pichladi wajinsloku niewarku i pouditi Forzeda pla 1200W
Eckländ mierstrechny tazenda en pouvities
2017年1月1日,中国证券报、上海证券报及上海证券交易所网站(www.sse.com.cn)
10. Translucile a thinejatranial originale:
61 Original Instructions
Pung: new 1200 W
[1] Siete | Aktioperaktion beschäft!
EIL Box 11 Observer les nages à dédiéant !
1.2.3.4.5.6.7.8.9.10.11.12.13.14.15.16.17.18.19.20.21.22.23.24.25.26.27.28.29.30.31.32.33.34.35.36.37.38.39.40.41.42.43.44.45.46.47.48.49.50.51.52.53.54.55.56.57.58.59.60.61.62.63.64.65.66.67.68.69.70.71.72.73.74.75.76.77.78.79.80.81.82.83.84.85.86.87.88.89.90.91.92.93.94.95.96.97.98.99.100
1. 2013年
NL F021251 Let up the name of the person is
SI 9141 Observera uhlssbladen
C2 Strano 5: Viz názliedeci elreskyl
1. Grup K.
2015. 2016. 3. 2017. 4. 2018. 5. 2019. 6. 2020. 7. 2021. 8. 2022. 9. 2023. 10. 2024. 11. 2025. 12. 2026. 13. 2027. 14. 2028. 15. 2029. 16. 2030. 17. 2031. 18. 2032. 19. 2033. 2034. 21. 2035. 22. 2036. 23. 2037. 24. 2038. 25. 2039. 26. 2040.
No. 104-57-1
A##e is pa##es pr##n
68 Page 81 Observe the Inflow page!
text_image
Labeled diagram of a mechanical device with numbered components for identification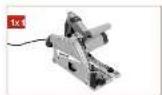

text_image
13 14 15 16 17 18 19 15 Dextefinder
DE Listenlang
FR Elendue de livraison
Malaria: compreso nella familiare
NL Leveningsomfang
5V Leveransomding
07 Bazzah dodzisky
SK Pozsah dorasky
VolumeList
60 Stage of delivery
Vielen Dank!
text_image
Pattfield® ERGO TOOLS1200 W Tauchsäge PE-1200 TS
hergestellt für:
Hornbach Baumarkt AG
Hornbachstraße 11
text_image
Pattfield® ERGO TOOLStext_image
Pattfield® ERGO TOOLS1200 W Vlakzaag PE-1200 TS
geproduceerd voor:
Hornbach Baumarkt AG
Hornbachstraße 11
STYRSKENA (TILLBEHÖR)
1 Plaštyraskentatygetn päipalysriskenelordachbutik.
Artikel nr: 5661036
text_image
Pattfield® ERGO TOOLStext_image
Pattfield® ERGO TOOLSPonorná pila 1200 W PE-1200 TS
vyrobeno pro:
Hornbach Baumarkt AG
Hornbachstraße 11
text_image
Pattfield® ERGO TOOLS1200 W zapichovacia píla PE-1200 TS
vyrobená pre:
Hornbach Baumarkt AG
Hornbachstraße 11
text_image
Pattfield® ERGO TOOLSFerăstrău cu plonjare PE-1200 TS de 1200 W
fabricat pentru:
Hornbach Baumarkt AG
Hornbachstraße 11
76879 Bornheim / Germania
We are convinced that this tool will exceed your expectations and wish you joy while using it.
Please read this user manual completely and observe the safety instructions.
Scope of delivery
1x Plunge saw
1x Saw blade / pre-installed
1x Hex key
If any parts are missing or damaged, please contact your Hornbach Store.
Table of content
Scope of delivery 81
Symbols 81
Safety instructions 82
Product overview 86
Using the tool 86
Intended use 86
Adjustments 87
Technical Data 88
Noise & Vibration 88
Dust collection system 88
Care & Maintenance 89
Declaration of Conformity 89
Warranty 90
Disposal 90
Symbols

Please read this user manual carefully and keep it for further reference.

Warning of accident and injury to persons and serious damage to property.

Wear safety glasses for protection of your eyes.

Wear hearing protection for protection of your ears.

Wear dust mask for protection of your respiratory tract.

Do not use the tool outdoors or in damp environments.

Protection Class II
Safety Instructions
GENERAL POWER TOOL SAFETY WARNINGS

WARNING Read all safety warnings and all instructions. Failure to follow the warnings and instructions may result in electric shock, fire and/or serious injury.
Save all warnings and instructions for future reference.
The term „power tool“ in the warnings refers to your mains-operated (corded) power tool or battery-operated (cordless) power tool.
1 WORK AREA SAFETY
a) Keep work area clean and well lit. Cluttered or dark areas invite accidents.
b) Do not operate power tools in explosive atmospheres, such as in the presence of flammable liquids, gases or dust. Power tools create sparks which may ignite the dust or fumes.
c) Keep children and bystanders away while operating a power tool. Distractions can cause you to lose control.
2 ELECTRICAL SAFETY
a) Power tool plugs must match the outlet. Never modify the plug in any way. Do not use any adapter plugs with earthed (grounded) power tools. Unmodified plugs and matching outlets will reduce risk of electric shock.
b) Avoid body contact with earthed or grounded surfaces, such as pipes, radiators, ranges and refrigerators. There is an increased risk of electric shock if your body is earthed or grounded.
c) Do not expose power tools to rain or wet conditions. Water entering a power tool will increase the risk of electric shock.
d) Do not abuse the cord. Never use the cord for carrying, pulling or unplugging the power tool. Keep cord away from heat, oil, sharp edges or moving parts. Damaged or entangled cords increase the risk of electric shock.
e) When operating a power tool outdoors, use an extension cord suitable for outdoor use. Use of a cord suitable for outdoor use reduces the risk of electric shock.
f) If operating a power tool in a damp location is unavoidable, use a residual current device (RCD) protected supply. Use of an RCD reduces the risk of electric shock.
3 PERSONAL SAFETY
a) Stay alert, watch what you are doing and use common sense when operating a power tool. Do not use a power tool while you are tired or under the influence of drugs, alcohol or medication. A moment of inattention while operating power tools may result in serious personal injury.
b) Use personal protective equipment. Always wear eye protection. Protective equipment such as dust mask, non-skid safety shoes, hard hat, or hearing protection used for appropriate conditions will reduce personal injuries.
c) Prevent unintentional starting. Ensure the switch is in the off-position before connecting to power source and/or battery pack, picking up or carrying the tool. Carrying power tools with your finger on the switch or energising power tools that have the switch on invites accidents.
d) Remove any adjusting key or wrench before turning the power tool on. A wrench or a key left attached to a rotating part of the power tool may result in personal injury.
e) Do not overreach. Keep proper footing and balance at all times. This enables better control of the power tool in unexpected situations.
f) Dress properly. Do not wear loose clothing or jewellery. Keep your hair, clothing and gloves away from moving parts. Loose clothes, jewellery or long hair can be caught in moving parts.
g) If devices are provided for the connection of dust extraction and collection facilities, ensure these are connected and properly used. Use of dust collection can reduce dust-related hazards.
4 POWER TOOL USE AND CARE
a) Do not force the power tool. Use the correct power tool for your application. The correct power tool will do the job better and safer at the rate for which it was designed.
b) Do not use the power tool if the switch does not turn it on and off. Any power tool that cannot be controlled with the switch is dangerous and must be repaired.
c) Disconnect the plug from the power source and/or the battery pack from the power tool before making any adjustments, changing accessories, or storing power tools. Such preventive safety measures reduce the risk of starting the power tool accidentally.
d) Store idle power tools out of the reach of children and do not allow persons unfamiliar with the power tool or these instructions to operate the power tool. Power tools are dangerous in the hands of untrained users.
e) Maintain power tools. Check for misalignment or binding of moving parts, breakage of parts and any other condition that may affect the power tool's operation. If damaged, have the power tool repaired before use. Many accidents are caused by poorly maintained power tools.
f) Keep cutting tools sharp and clean. Properly maintained cutting tools with sharp cutting edges are less likely to bind and are easier to control.
g) Use the power tool, accessories and tool bits etc. in accordance with these instructions, taking into account the working conditions and the work to be performed. Use of the power tool for operations different from those intended could result in a hazardous situation.
5 SERVICE
a) Have your power tool serviced by a qualified repair person using only identical replacement parts. This will ensure that the safety of the power tool is maintained.
MACHINE SPECIFIC SAFETY WARNINGS FOR PLUNGE SAWS
a) DANGER: Keep hands away from cutting area and the blade. Keep your second hand on auxiliary handle, or motor housing. If both hands are holding the saw, they cannot be cut by the blade.
b) Do not reach underneath the workpiece. The guard cannot protect you from the blade below the workpiece.
c) Adjust the cutting depth to the thickness of the workpiece. Less than a full tooth of the blade teeth should be visible below the workpiece.
d) Never hold piece being cut in your hands or across your leg. Secure the workpiece to a stable platform. It is important to support the work properly to minimize body exposure, blade binding, or loss of control.
e) Hold the power tool by insulated gripping surfaces only, when performing an operation where the cutting tool may contact hidden wiring or its own cord. Contact with a „live“ wire will also make exposed metal parts of the power tool „live“ and could give the operator an electric shock.
f) When ripping, always use a rip fence or straight edge guide. This improves the accuracy of cut and reduces the chance of blade binding.
g) Always use blades with correct size and shape (diamond versus round) of arbour holes. Blades that do not match the mounting hardware of the saw will run eccentrically, causing loss of control.
h) Never use damaged or incorrect blade washers or bolt. The blade washers and bolt were specially designed for your saw, for optimum performance and safety of operation.
KICKBACK CAUSES AND RELATED WARNINGS
- Kickback is a sudden reaction to a pinched, bound or misaligned saw blade, causing an uncontrolled saw to lift up and out of the workpiece toward the operator;
- when the blade is pinched or bound tightly
by the kerf closing down, the blade stalls and the motor reaction drives the unit rapidly back toward the operator;
- if the blade becomes twisted or misaligned in the cut, the teeth at the back edge of the blade can dig into the top surface of the wood causing the blade to climb out of the kerf and jump back toward the operator.
Kickback is the result of saw misuse and/or incorrect operating procedures or conditions and can be avoided by taking proper precautions as given below.
a) Maintain a firm grip with both hands on the saw and position your arms to resist kickback forces. Position your body to either side of the blade, but not in line with the blade. Kickback could cause the saw to jump backwards, but kickback forces can be controlled by the operator, if proper precautions are taken.
b) When blade is binding, or when interrupting a cut for any reason, release the trigger and hold the saw motionless in the material until the blade comes to a complete stop. Never attempt to remove the saw from the work or pull the saw backward while the blade is in motion or kickback may occur. Investigate and take corrective actions to eliminate the cause of blade binding.
c) When restarting a saw in the workpiece, centre the saw blade in the kerf and check that saw teeth are not engaged into the material. If saw blade is binding, it may walk up or kickback from the workpiece as the saw is restarted.
d) Support large panels to minimise the risk of blade pinching and kickback. Large panels tend to sag under their own weight. Supports must be placed under the panel on both sides, near the line of cut and near the edge of the panel.
e) Do not use dull or damaged blades. Unsharpened or improperly set blades produce narrow kerf causing excessive friction, blade binding and kickback.
f) Blade depth and bevel adjusting locking
levers must be tight and secure before making cut. If blade adjustment shifts while cutting, it may cause binding and kickback.
g) Use extra caution when sawing into existing walls or other blind areas. The protruding blade may cut objects that can cause kickback.
GUARD FUNCTION
a) Check guard for proper closing before each use. Do not operate the saw if guard does not move freely and close instantly. Never clamp or tie the guard so that the blade is exposed. If saw is accidentally dropped, guard may be bent. Check to make sure that guard moves freely and does not touch the blade or any other part, in all angles and depths of cut.
b) Check the operation of the guard spring. If the guard and the spring are not operating properly, they must be serviced before use. Guard may operate sluggishly due to damaged parts, gummy deposits, or a build-up of debris.
c) Assure that the base plate of the saw will not shift while performing the “plunge cut” when the blade bevel setting is not at 90°. Blade shifting sideways will cause binding and likely kick back.
d) Always observe that the guard is covering the blade before placing saw down on bench or floor. An unprotected, coasting blade will cause the saw to walk backwards, cutting whatever is in its path. Be aware of the time it takes for the blade to stop after switch is released.
RIVING KNIFE FUNCTION
a) Use the appropriate saw blade for the riving knife. For the riving knife to function, the body of the blade must be thinner than the riving knife and the cutting width of the blade must be wider than the thickness of the riving knife.
b) Adjust the riving knife as described in this instruction manual. Incorrect spacing, positioning and alignment can make the riving knife ineffective in preventing
kickback.
c) For the riving knife to work, it must be engaged in the workpiece. The riving knife is ineffective in preventing kickback during short cuts.
d) Do not operate the saw if riving knife is bent. Even a light interference can slow the closing rate of a guard.
ADDITIONAL SAFETY WARNINGS
a) Do not reach into the saw dust ejector with your hands. They could be injured by rotating parts.
b) Do not work overhead with the saw. In this manner you do not have sufficient control over the power tool.
c) Use suitable detectors to determine if utility lines are hidden in the work area or call the local utility company for assistance. Contact with electric lines can lead to fire and electric shock. Damaging a gas line can lead to explosion. Penetrating a water line causes property damage or may cause an electric shock.
d) Do not operate the power tool stationary. It is not designed for operation a saw table.
e) Do not use high speed steel (HSS) saw blades. Such saw blades can easily break.
f) Do not saw ferrous metals. Red hot chips can ignite the dust extraction.
g) When work with the machine, always hold it firmly with both hands and provide for a secure stance. The power tool is guided more secure with both hands.
h) Secure the workpiece. A workpiece clamped with clamping devices or in a vice is held more secure than by hand.
i) Always wait until the machine has come to a complete stop before placing it down. The tool insert can jam and lead to loss of control over the power tool.
ADDITIONAL SAFETY INSTRUCTIONS ON RISKS DUE TO VIBRATION
a) The declared vibration data represents the main applications of the tool, but different uses of the tool or poor maintenance can result in different vibration
data. This may significantly increase the vibration level over the total working period.
b) Additional safety measure shall be taken to protect the user from effects of vibration. Maintain the tool and its accessories, keep hands warm and organize work patterns and periods.
Product overview
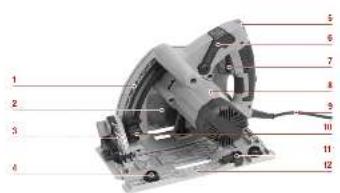
1 Cutting depth scale
2 Saw blade / pre-installed
3 Bevel angle scale
4 Play adjustment screws
5 Lock-off button
6 Fast fix lever
7 On/off switch
8 Motor housing
9 Power cord
10 Cutting depth clamping knob
11 Anti-Rebound knob
12 Base plate
13 Handgrip
14 Dust extraction port
15 Bevel angle clamping knob
16 Auxiliary handgrip
17 Hex key
18 Blade guard
Intended Use
The tool is intended for sawing longitudinal, cross and mitre cuts in firmly supported solid wood, plywood, plastic and lightweight non-ferrous construction materials. The tool is not intended for commercial use.
Any other use (e.g. abrasive wheels) or modification to the tool is considered as improper use and could cause considerable dangers. The pre-installed saw blade is intended for use with wood only!
Using the tool
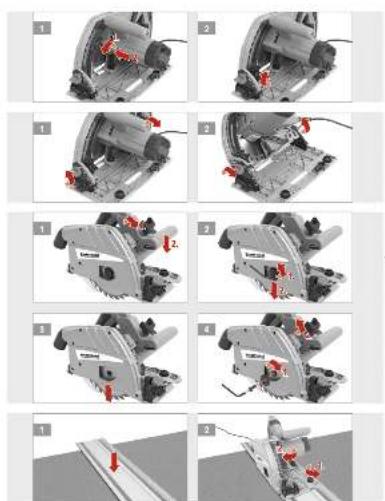
- Check the correct function of the blade guard 18.
- To switch on the tool, first push the lock-off button 5, then press and hold the on/off switch 7.
- Start working, when the tool is at maximum speed. While holding it firmly with both hands. Push the lock-off button 5 forward and slowly push down the auxiliary handgrip 16 so that the saw blade enters the safely fixed workpiece.
- Raise the saw blade out of the workpiece and release the on / off switch 7 to turn off the tool.

Caution! Do not overheat the blade tips of the saw blade.

Caution! If cutting plastic, avoid melting the material.

Caution! Wear hearing protection and if cutting wood, make sure to dust mask.
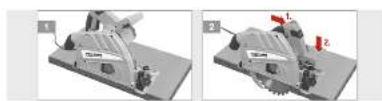
BLADE GUARD FUNCTION
1 Place the tool on the edge of the workpiece as shown.

Caution! Make sure the tool is switched off and unplugged.
2 Push the lock-off button 5 and push down the auxiliary handgrip 16 to see if the blade guard works properly.

Do not use if blade guard is not working properly or damaged.
CUTTING DEPTH
1 Open the depth clamping knob 10 and push in to set the desired cutting depth.
Lower indicator = without guide rail Upper indicator = with guide rail
2 Tighten the depth clamping knob 10 securely.
BEVEL CUTS
1 Open the angle clamping knobs 15.
Lower indicator = 0° bevel angle Upper indicator = 45° bevel angle
2 Set the desired angle and tighten the angle clamping knobs 15 securely.
SAW BLADE REPLACEMENT
1 Open fast fix lever 6, push the lock off button 5 and lower the saw blade until it clicks in place.

Caution! Make sure the tool is switched off and unplugged. Set cutting depth and wear protective
2 Loosen the saw blade clamp washer with the hex key 17 and remove the saw blade 2.
Place a new saw blade in the tool.3
4 Tighten the saw blade clamp washer with the hex key 17 and close the fast fix lever 6.

Caution! Observe that the rotation direction of the saw blade corresponds with the tool.

Caution! The tool can rebound when fast fix lever is closed.
GUIDE RAIL (ACCESSORY)
1 Put the guide on the equalization of the guide tour
Place the guide rail on the workpiece as desired.
2
the play adjustment screws 4 accordingly. Close the anti-rebound knob 11 afterwards.
Run the tool along the guide rail while sawing.
Technical Data
Nominal voltage 230 V / \~50 Hz
Rated power 1200 W
€ No-load speed ( n_0 ) 5500/min
Blade 160 mm x 20 mm x 2.5 mm - 24/48 T
EN 847-1
Max. cutting depth (Wood) 90^ = 55 mm / 45^ = 42 mm
Bevel degree 0 - 45°
Protection Class / II

Weight 4.8 kg
Sound pressure level (L _pA ) 88.9 dB(A) / Uncertainty K = 3 dB(A)
Sound power level ( L_WA ) 99.9 dB(A) / Uncertainty K = 3 dB(A)
Max. vibration emission ( a_hw ) < 2.5 m/s
⚠️ Only use saw blades that correspond with the specifications given above.
The values given are valid for nominal voltages U of 230 V. For lower voltage and models for specific countries, these values may vary.
Please observe the article number on the type plate of the tool. The trade names of the individual tool may vary.
Noise & Vibration
The values given in these instructions have been measured in accordance with a standardized measurement procedure specified in EN 60745 and can be used to compare tools. It may be used for a preliminary assessment of exposure.

Warning! The vibration emission during actual use can differ from the
declared total value depending on the use of the tool.
Dust collection system
Use of dust collection can reduce dust-related hazards.
To prevent personal injuries, make sure to connect a suitable vacuum cleaner to the dust extraction port 14. The port is capable of a connector of 35 mm.
Care & Maintenance

Caution! Make sure the tool is switched off and unplugged.
- Always keep the tool clean, dry and free of oil or grease.
- Wear safety glasses to protect your eyes whilst cleaning.
- Wear safety gloves to protect your hands whilst handling the saw blade.
- For safe and proper working, always keep the machine and ventilation slots clean.
- Regularly check to see if any dust or foreign matter has entered the grills near the motor and around the on/off switch. Use a soft brush to remove any accumulated dust.
- If the body of the tool needs cleaning, wipe it with a soft damp cloth. A mild detergent can be used but nothing like alcohol, petrol or other cleaning agent.
- Never use caustic agents to clean plastic parts.
- Lubricate all moving parts at regular intervals.
- Periodically check all fixings. These could become loose with time due to vibration.

Caution! If the supply cord is damaged, it must be replaced by the manufacturer or its service agent or similarly qualified person in order to avoid hazard.
Declaration of conformity

We declare, that the product described in Technical Data:

text_image
Pattfield® ERGO TOOLS1200 W Plunge Saw PE-1200 TS
manufactured for:
Hornbach Baumarkt AG
Hornbachstraße 11
76879 Bornheim / Germany
is in conformity with the following directives:
Machinery Directive 2006/42/EC
EMC Directive 2004/108/EC
and in accordance to the following applicable harmonized standards:
EN 60745-1:2009+A11
EN 60745-2-5:2010
EN 55014-1:2006+A1+A2
EN 55014-2:1997+A1+A2
EN 61000-3-2:2006+A1+A2
EN 61000-3-3:2013
A. Indiana Jack
Andreas Back
Head of Quality Management, environment & CSR
Person authorised to compile the technical file
In case of malfunctions, which are pointing out material or manufacturing faults, please contact your Hornbach store:
- These conditions are ruling additional warranty performances and are free of charge. The warranty rules given by law will remain untouched.
- The warranty performance is limited on material or manufacturing faults and the elimination of those or alternatively exchange of the product. As our products are not constructed for professional use, we see the warranty contract as not valid, if the product is used under those circumstances. Excluded are warranty claims for transportation damages, damages coming from non-observance of the installation or user manual (like connection to wrong voltage or wrong electricity), unprofessional installation, abuse or incorrect use (like overstressing the product or usage of not approved tools or accessories), non-observance of the maintenance and safety rules, infiltration of foreign objects (like sand, stones or dust), wrong force or man inducted events (like damages by falling down) plus normal accepted attrition (like battery packs, blades and so on). The warranty claim expires if intrusions were already done.
- The warranty period is three years and is starting with the date of purchase of the product. Warranty claims must be raised within two weeks after realising the defect. Warranty claims coming later are excluded. The warranty period is neither extended after repair or exchange nor a new warranty period is started for the product or possible spare parts.
- To enforce warranty claims contact your Hornbach store and show your bill as an original or another dated buying proof. Therefore keep your receipt accurately. Explain the reason of your claims as good as
possible. Is the defect part of our warranty performance, you will get a repaired or new product at once.
Disposal
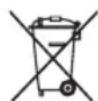
The crossed-out wheeled bin logo requires the separate collection of waste electric and electronic equipment (WEEE). Such equipment may contain dangerous and hazardous substances. These tools must be returned to a designated collection point for the recycling of WEEE and must not be disposed as unsorted municipal waste. By doing so, you will help to conserve resources and protect the environment. Contact your local authorities for more information.
Children must not play with plastic bags and packaging material, due to possible injury or danger of suffocation. Store such material safely or dispose of environmentally friendly.
Used batteries must be disposed of properly. Battery selling stores and municipal collection points offer special containers for battery disposal.