PEERT 4025 - Grass trimmer Pattfield - Free user manual and instructions
Find the device manual for free PEERT 4025 Pattfield in PDF.

| Product type | Electric corded grass trimmer |
| Brand | Pattfield |
| Model | PEERT 4025 |
| Power supply | 230-240 V AC, 50 Hz |
| Power consumption | 400 W |
| Cutting width | 250 mm |
| Cutting line diameter | 1.2 mm |
| No-load speed | 12,000 rpm |
| Machine weight | 1.6 kg |
| Sound pressure level (LpA) | 82.9 dB(A) (k=1.0 dB(A)) |
| Acoustic power level (LwA) | 96 dB(A) |
| Vibration | 2.90 m/s² (k=1.5 m/s²) |
| Cable length | Not specified, recommended outdoor extension cord |
| Cutting type | Rotating nylon line |
| Line feed | Manual and by contact (advance button) |
| Safety | Double insulation (class II) |
| Protective guard | Yes, supplied |
| Auxiliary handle | Yes, adjustable |
| Edge guide | Yes, integrated |
| Adjustable tube length | Yes |
| Maintenance | Clean with a dry cloth - no water or chemicals. Store in a dry place. |
| Warranty | 3 years (against material/manufacturing defects) |
| Devices and accessories | Replacement spool, cutting line (max 1.2 mm) |
| Intended use | Lawn and soft vegetation, private use only |
| Minimum user age | According to local regulations; keep out of reach of children |
Frequently Asked Questions - PEERT 4025 Pattfield
User questions about PEERT 4025 Pattfield
0 question about this device. Answer the ones you know or ask your own.
Ask a new question about this device
Download the instructions for your Grass trimmer in PDF format for free! Find your manual PEERT 4025 - Pattfield and take your electronic device back in hand. On this page are published all the documents necessary for the use of your device. PEERT 4025 by Pattfield.
USER MANUAL PEERT 4025 Pattfield
GB Original instruction

text_image
C 400W ICĂ PENTRU IARBĂ 400W IMMER 400WPattfield® ERGO TOOLS
Pattfield® ERGO TOOLS
Thank you for buying a tool of our brand Pattfield®. We are convinced that this tool will exceed your expectations of top quality and reliability. Please take your time to read these operating instructions before putting the tool into operation. Please note the basic operating and safety regulations.
Pattfield® ERGO TOOLS
Pattfield® ERGO TOOLS
text_image
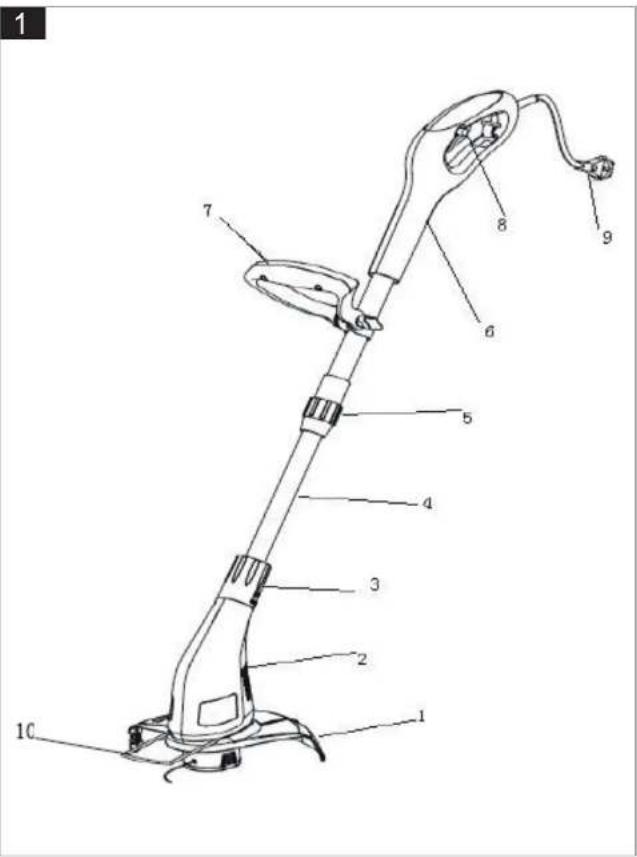
1 7 8 9 6 5 4 3 2 10 1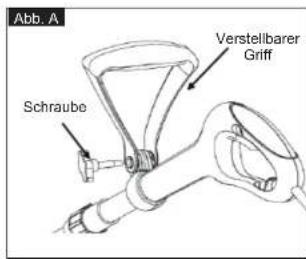
text_image
Abb. A Schraube Verstellbarer Griff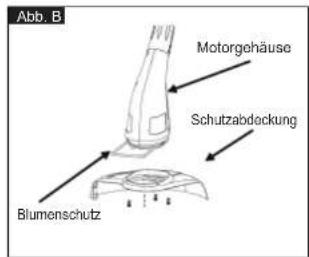
natural_image
Simple line drawing of a stylized object resembling a hand or connector (no text or symbols)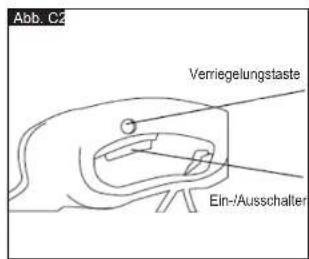
natural_image
Hand holding a cylindrical object with horizontal lines above, no visible text or symbols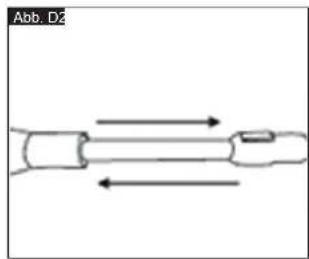
natural_image
Pure diagram of two parallel pipes with directional arrows indicating flow or movement (no text or symbols)Pattfield® ERGO TOOLS
Pattfield® ERGO TOOLS
text_image
Abb. E1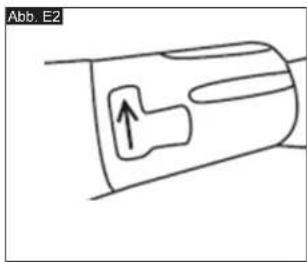
text_image
Abb. E2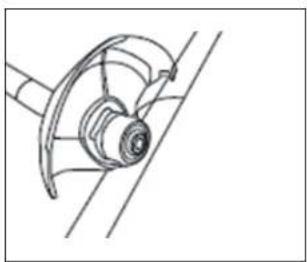
natural_image
Technical line drawing of a mechanical component with curved and straight lines (no text or symbols)
natural_image
Pure technical line drawing of a mechanical component with intersecting lines (no text or symbols)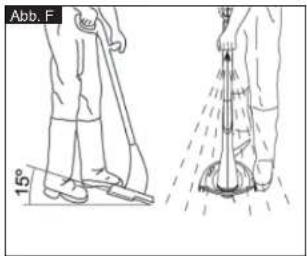
text_image
Abb. F 15°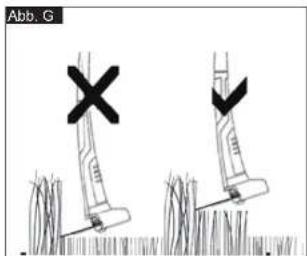
text_image
Abb. G
text_image
Abb. H Fadenschneider Fadenzufuhr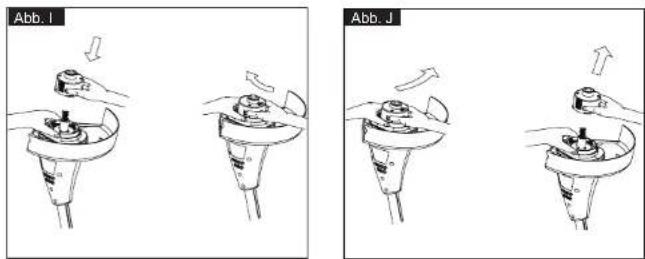
text_image
Abb. I Abb. J
natural_image
Technical line drawings of mechanical components, one labeled Abb. K and Abb. L1 (no text or symbols on the diagrams themselves)Pattfield®
ERGO TOOLS
text_image
Abb. L2 ✓ × ×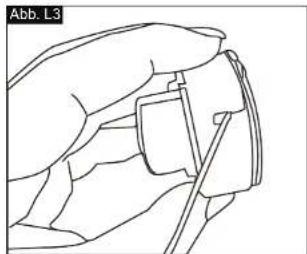
natural_image
Line drawing of a hand holding a small object with a tool, no text or symbols present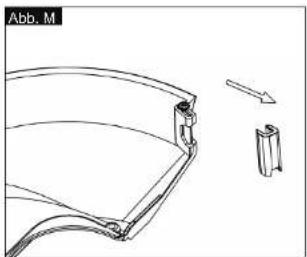
natural_image
Technical line drawing of a curved mechanical component with a separate inset showing a separate part (no text or symbols)Pattfield®
ERGO TOOLS
D Inhalt
Pattfield® ERGO TOOLS
NL Inhoudsopgave
Pattfield® ERGO TOOLS
SK Obsah
Pattfield® ERGO TOOLS
D I-Teileliste
Pattfield® ERGO TOOLS
Pattfield® ERGO TOOLS
SK I- Zoznam častí
- Safety guard
- Motor house
- Edging switch
- Extension tube
- Knob
- Handle
- Auxiliary handle
- Locking switch
- Cable
- Flower guard
Pattfield® ERGO TOOLS
Pattfield® ERGO TOOLS
F II- Technical data
Pattfield® ERGO TOOLS
Pattfield® ERGO TOOLS
Geluidsvermogen (LWA)....96dB (A)
Trillingen. 2.90m/s² k=1.5 m/s²
WAARSCHUWINGII
Pattfield® ERGO TOOLS
s II- Tekniska data
Modellnummer PE-ERT 4025
Märkspänning 230-240V AC 50Hz
Ineffekt 400W
Pattfield® ERGO TOOLS
Pattfield® ERGO TOOLS
Pattfield® ERGO TOOLS
Pattfield® ERGO TOOLS
The vibration emission value during actual use of the power tool can differ from the declared value depending on the ways in which the tool is used dependant on the following examples and other variations on how the tool is used:
How the tool is used and the materials being cut.
The tool being in good condition and well maintained
The use the correct accessory for the tool and ensuring it is sharp and in good condition. The tightness of the grip on the handles and if any anti vibration accessories are used. And the tool is being used as intended by its design and these instructions.
The tool may cause hand-arm vibration syndrome if its use is not adequately managed.
WARNING!
To be accurate, an estimation of exposure level in the actual conditions of use should also take account of all parts of the operating cycle such as the times when the tool is switched off and when it is running idle but not actually doing the job. This may significantly reduce the exposure level over the total working period.
Helping to minimize your vibration exposure risk.
Maintain this tool in accordance with these instructions and keep well lubricated( where appreciate ).
If the tool is to be used regularly then invest in anti vibration accessories.
Avoid using tools in temperatures of 10°C or less.
Plan your work schedule to spread any high vibration tool use across a number of days.
Pattfield®
ERGO TOOLS
Pattfield®
ERGO TOOLS
Pattfield® ERGO TOOLS
Pattfield® ERGO TOOLS
IV- Montageanweisung
Pattfield® ERGO TOOLS
Pattfield® ERGO TOOLS
Pattfield® ERGO TOOLS
Pattfield® ERGO TOOLS
Pattfield® ERGO TOOLS
Pattfield® ERGO TOOLS
IV- Instructions de montage
Pattfield® ERGO TOOLS
Pattfield® ERGO TOOLS
Pattfield® ERGO TOOLS
Pattfield® ERGO TOOLS
2006/42/CE "Directive machines (MD)"
2014/30/EU "Directive CEM (EMC)"
2000/14/EC "Directive de Nuisance Sonore Extérieure"
Pattfield® ERGO TOOLS
Pattfield® ERGO TOOLS
Pattfield® ERGO TOOLS
Pattfield® ERGO TOOLS
Pattfield® ERGO TOOLS
Pattfield® ERGO TOOLS
Pattfield® ERGO TOOLS
Pattfield® ERGO TOOLS
Pattfield® ERGO TOOLS
Pattfield® ERGO TOOLS
Pattfield® ERGO TOOLS
Pattfield® ERGO TOOLS
Pattfield® ERGO TOOLS
Pattfield® ERGO TOOLS
IV- Monteringsanvisningar
Pattfield® ERGO TOOLS
Pattfield® ERGO TOOLS
Pattfield® ERGO TOOLS
Pattfield® ERGO TOOLS
IX- EU-konformitetsdeklaration
Överensstämmelsedeklaration
Pattfield® ERGO TOOLS
Pattfield® ERGO TOOLS
IV- Montážní pokyny
Pattfield® ERGO TOOLS
Pattfield® ERGO TOOLS
Pattfield® ERGO TOOLS
Pattfield® ERGO TOOLS
IV- Pokyny k montáži
Pattfield® ERGO TOOLS
Pattfield® ERGO TOOLS
5 Odnatie krytu roznej hiavy
(Vid'obr. I nižšie)
Pattfield® ERGO TOOLS
Pattfield® ERGO TOOLS
Pattfield® ERGO TOOLS
Pattfield® ERGO TOOLS
IV- Instructiuni de asamblar
Pattfield® ERGO TOOLS
Pattfield® ERGO TOOLS
Pattfield® ERGO TOOLS
Pattfield® ERGO TOOLS
IX- Declaratia de conformitate CE
Declaratia de conformitate
III- SAFETY INSTRUCTIONS
WARNING!
Read all instructions. Failure to follow all instructions listed below may result in electric shock, fire and/or serious injury. The term "power tool" in all warnings listed below refers to your mains operated power tool.
- Read the instruction carefully. Be familiar with the controls and the proper use of the appliance. Read and understand the operator's manual and observe the warnings and instruction labels affixed to the appliance.
- Users. Never allow children or people unfamiliar with these instructions to use the appliance. Local regulations may restrict the age of operator. Never operate the tool under the influence of alcohol, medication or drugs.
- Use appropriate tool. This device is only intended for cutting grass and soft vegetation outdoors and only designated for use on private property. Do not force small tools or attachments to do the job of a heavy duty tool.
- Keep work areas clean. Cluttered areas can cause accidents.
-
Consider work area environment. Do not expose your tool to high humidity or rain. Do not use your tool in damp and wet conditions. Keep the work area well lit. Do not use your tool where there is a risk of causing fire or explosion, e.g. in the presence of flammable liquids and gases.
-
Keep all bystanders, children, and pets away. The operator or user is responsible for accidents or hazards occurring to other people or the property.
- Dress appropriately. Do not wear loose clothing or jewelry, as these can be caught in moving parts. Preferably wear non-slip footwear when working outdoors. Wear protective hair covering to keep long hair out of the way.
- Head protection. Always use safety glasses and gloves. Use a face or dust mask whenever the operations may produce dust or flying particles. Wear ear protection whenever the sound level seems uncomfortable.
- Do not overreach, Keep proper footing and balance at all times.
- Stay alert, watch what you are doing. Use common sense when operating the appliance. Do not operate the tool when you are tired.
- Grip the tool securely. Operator should one hand on the main handle, the other on the front handle. Keep finger off trigger until ready to use.
- Remove adjusting keys and wrenches. Always check that adjusting keys and wrenches are removed from the tool before operating the tool.
-
Risk of cut. Do not touch or try to stop the cutting lines when they are moving.
-
Check for damaged parts. Before further use, carefully check the tool for damage. Check for alignment of moving parts, binding of moving parts, breakage of parts, mounting and any other condition that may affect its operation. Do not use the tool if any parts are damaged or defective. Have any damaged or defective parts repaired or replaced by an authorized service agent. Never attempt any repairs yourself.
- Avoid unintentional starting. Do not carry the tool without disconnect the plug and be sure the tool is switched off.
- Use an extension cord suitable for outdoor use when operating a power tool outdoors. Use a cord suitable for outdoor use reduces the risk of electric shocks.
- If operating a power tool in a damp location is unavoidable, use a residual current device(RCD) protected supply. Use of an RCD reduces the risk of electric shock
- Store idle tools. When not in use, tools should be stored in a dry, locked-up place out of reach of children.
-
Maintain tools with care. Keep tools clean and in good condition for better and safer performance. Follow the instructions for maintenance and changing accessories. Keep handles and switches dry, clean and free from oil and grease.
-
Have your tool repaired by an authorized service agent. This tool is manufactured in accordance with the relevant safety regulations. To avoid danger, electrical appliances must only be repaired by qualified technicians.
Warning!
Do not use any attachments or accessories not recommended by the manufacturer of this tool. The use of attachments or accessories not recommended can result in serious personal injury.
ADDITIONAL SAFETY WARNINGS FOR YOUR LINE TRIMMR
a) Wear protective glasses or goggles;
b) Never allow children or people unfamiliar with the instructions to use the machine.
c) Stop using the machine while people, especially children, or pets are nearby;
d) Only use the machine in daylight or good artificial light;
e) Before using the machine and after any impact, check for signs of wear or damage and repair as necessary;
f) Never operate the machine with damaged guards or without the guards in place.
g) Keep hands and feet away from the cutting means at all times and especially.
h) Take care against injury form any device fitted for trimming the filament line length. After extending new cutter line always return the machine to its normal operating position before switching on:
Pattfield®
ERGO TOOLS
i) Never fit metal cutting elements;
i) Never use replacement parts or accessories not provided or recommended by the manufacturer.
k) Always ensure that ventilation openings are kept clear of debris;
ELECTRICAL SAFETY

WARNING! Read these safety
instructions thoroughly before connecting this product to the mains supply.

Before switching on, make sure that the voltage of your electricity supply is the same as that indicated on the rating plate. This product is designed to operate on 230-240VAC 50Hz. Connecting it to any other power source may cause damage.
DESCRIPTION OF SYMBOLS
Symbols are used in this manual to attract your attention to possible risks. The safety symbols and the explications which accompany them must be perfectly understood. The warning themselves do not prevent the risks and can not be a substitute for proper methods of avoiding accidents.

WARNING!
Before any use, refer to the corresponding paragraph in the present manual.

Conforms to relevant safety standards.

WARNING!
This symbol, before a safety comment, indicates a precaution, a warning or a danger. Ignoring this warning can lead to an accident for yourself or for others. To limit the risk of injury, fire, or electrocution always apply the recommendations indicated.

WARNING!
Wear ear protection.

WARNING!
Wear eye protection.

WARNING!
Wear dust mark.

WARNING!
Wear approved safety footwear with anti-slip.

WARNING!!
Wear approved safety gloves.

WARNING!
Do not expose and operate the tool in rain.
Pattfield®
ERGO TOOLS

WARNING!
Keep all other people, including children ,pet and bystanders outside the 10 meters hazard zone, stop the trimmer immediately if you are approached.

WARNING!
Remove the plug from the mains supply immediately if the cable is damaged or cut.

Double insulation

Recycle unwanted materials instead of disposing of them as waste. All tools, hoses and packaging should be sorted, taken to the local recycling centre and disposed of in an environmentally safe way.

Do not run the machine over objects. They can be throw and cause severe injury. Keep bystanders, especially children and pets, at a distance of greater than 10m
Pattfield® ERGO TOOLS
Pattfield® ERGO TOOLS
IV- Assembly instructions
- Place unit on a flat surface.
- Push the auxiliary handle over the handle mounting location. Reinstall bolt in handle.
- Adjust forward or backward to a comfortable position; tighten bolt securely. (see below Fig.A)
2 Installation the safety guard and flower guard
GBsee below Fig.B)
- Insert the flower guard into the slot on the motor housing
- Insert the safety guard into the slot on the motor housing
- Screw tight the Guard.

WARNING:
The guard must be properly installed. The guard provides partial protection from the risk of thrown objects to the operator and others.
NOTE: If guard is not properly installed, damage to unit (including motor failure) will result.

WARNING!
Do not use the product without fitting the guard.
3 Mains supply cable strain relief (see below fig c1)
-
To prevent excessive strain on the cable connections, the trimmer is fitted with a cable restraint.
-
Before switching on, push a loop of cable through the space in the handle and secure it over the cable restraint.
V- Operating instructions
1 Tube length adjusting
(See below Fig D1, D2)
Loose the knob in the direction indicated by the unlock sign – adjust the tube length to your desire- secure the knob.
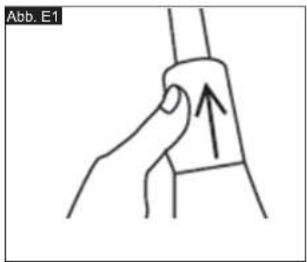
2 Operating the edging swit
(See below Fig E1, E2)
Pull the Edging switch away from the motor house as indicated by "E1", then rotate 180 degrees as indicated by "E2" to the edge cutting mode.
3 Operating the on/off switch
(See below Fig C2)
First press the locking button in then press the on/off switch, your switch is now on. To switch off, simply release the on/off switch.

WARNING!
The cutting head continues to rotate after the trimmer has been switched off, wait until it has stopped then lay down the tool.

WARNING!
Always wear eye protection. Never lean over the trimmer head. Rocks or debris can ricochet or be thrown into eyes and face and cause blindness or other serious injury.
When operating unit, check for the following: Wear eye protection and heavy clothing. Hold front handle with one hand and auxiliary handles with the other hand. Keep unit below waist levels. Work only from your right to your left to ensure debris is thrown away from you.
Without bending over, keep line near and parallel to the ground(perpendicular when edging).Do not switch the machine on with the cutting head on or near material to be cut.
Ensure the cutting line is at full speed before contacting material to be cut.

WARNING!
Make sure that line is fed out before operation. Make sure motor is up to full speed before trimming.
- Let the trimmer run for a few seconds without touching the working area, and allow the trimmer to cut the line.
- Use the trimmer at an angle of approximately 15 degree to the working area.
- Swing the trimmer head from side to side.(See below Fig.F)
- If the grass is very long cut in stages rather than trying to cut in one ago. Do not overload your trimmer, take small cuts this will keep machine operating at high speed and will greatly improve cutting efficiency.(see below Fig.G)
4 To manually feed the line
(See below Fig.H)
If required, line can be fed out manually. To operate, press and release manual line feed button, while gently pulling out the lines until the lines reach the line cutter. When the required amount of line is fed out, gently pull on the second line (there is no need to press the manual line feed button again). If the line extends past the line cutter, too much line has been fed out.
If too much line is fed out, remove the spool cap and turn spool counter-clockwise until the line is at the desired length.
5 To remove the cutting head
(See below Fig.1)
Press the release latch on the spool head cover and remove cover, pulling it straight off the cutting head assembly. Pull the cutting head cover away from the spool holder.
6 When refitting the spool cap
(See Fig.J)
Keep all areas of the cutting head cover and spool holder clean. Replace the spool head cover, pressing firmly down towards the spool holder to ensure the cover is fully located. Check that the cap is correctly fitted by trying to remove it without depressing the two latches.
7 To replace cut line
For your convenience it is recommended you buy spool and line complete.
Pattfield® ERGO TOOLS
8 To fit spool and line complete
Remove old spool
Place new spool into cutting head with cut
out areas of the spool in line with eyelets.
Release line from cleat and feed line
through eyelet.
Refit the spool head cover.
9 To fit nylon line only

WARNING!
Take approximately 4m of line.
Insert line into the spool holes and wind line
in the direction of the arrows on the top of
GBpool .( See Fig K)
Your Trimmer is designed to use only line with a maximum diameter of 1.2mm.
IMPROTANT: Leave approximately 100mm of line unwound and place into cleat.
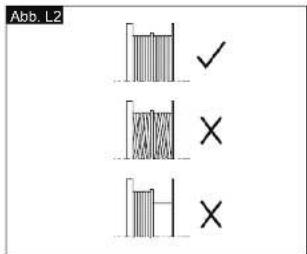
Care should be taken to ensure that the line is neatly coiled on the spool. Failure to do so will impair the efficiency of the automatic line feed. (See Fig L1,L2,L3)
Then fit spool as described in "To fit spool and line complete".
VI- Maintenance
- Never use water or chemical cleaners to clean your power tool. Wipe clean with a dry cloth.
- Always check the cutting head and guard before each use.
- Always store your power tool in a dry place.
-
Keep the motor ventilation slots clean.
-
Have the unit professionally repaired should any damage parts.
VII-Troubleshooting
Although your new grass trimmer is really easy to operate. If you do experience problems, check the following:

WARNING!
Before proceeding, unplug the tool.
Tool runs slowly
- Check that the spool housing can rotate freely. Carefully clean it if necessary.
- Check that the cutting line does not protrude more than 9 cm from the spool housing. If it does, cut it off so that it just reaches the line trimming blade.
If the trimmer is not cutting properly
Check the condition of the cutting head, if the cutting line is too short or cutting head damaged.
Note: Do not use damaged cutting head.
If a fault is suspected return the trimmer to an authorized dealer for repair.
VIII- Warranty
Dear customer, our products are going under strictly qualitycontrols. In case of misfunction, which are pointing out material or manufacturing faults, please contact your Hornbach store.
To enforce warranty claims obtains :
- These conditions are ruling additional warranty performances and are free of charge.
Pattfield® ERGO TOOLS
The warranty rules given by law will remain untouched.
2. The warranty performance is limited on material or manufacturing faults and the elimination of those or alternatively exchange of the product. As our products are not constructed for professional use, we see the warranty contract as not valid, if the product is used under those circumstances.
Excluded are ; warranty claims for transportation damages, damages coming from non-observance of the manual ( like connection to wrong voltage or wrong electricity ), unprofessional installation, incorrect use( like overstressing the product or usage of not approved tools or accessories ), non-observance of the maintenance and safety rules ), infiltration of foreign objects ( like sand, stones or dust ), wrong force or man inducted events ( like damages caused by falling down ), plus normal accepted attrition ( like battery packs, blades and so on ). The warranty claim expires if intrusions were already done.
3. The warranty period is three years and is starting with the date of purchase of the product. warranty claims must be raised within two weeks after realising the defect. Warranty claims coming later are excluded. The warranty period is neither extended after repair or exchange nor a new warranty period is started for the product or possible spare parts.
4. To enforce warranty claims contact your Hornbach store and show your bill as an
original or another dated buying proof. Therefore keep your receipt accurately. Explain the reason of your claim as good as possible. Is the defect part of our warrety performance, you will get a repaired or new product at once.
IX- Declaration of Conformity
Declaration of Conformity
We hereby declare that Hornbach Baumarkt AG
Hornbachstrasse 11
In its design and construction, as brought into circulation by us design meets the essential requirements of the following European Union Directives:
GB
2006/42/EC "Machinery Directive (MD)"
2014/30/EU "Electromagnetic Compatibility Directive (EMC)"
2000/14/EC "Outdoor Noise Directive"
Power sound level ( L_wA ) L_wA=96 dB(A)
Power sound measure value ( L_wA ) L_wA=93.7 dB(A) K=1 dB(A)
The following harmonized standards and normative documents were applied:
EN 60335-1:2012+A11:2014
EN 50636-2-91: 2014
EN 61000-3-3:2013
EN 61000-3-2: 2014
EN 55014-1:2006/+A1:2009/+A2:2011
EN 55014-2: 1997/+A1: 2001/+A2: 2008
Head of Quality Management, environment & CSR
Person authorised to compile the technical file
Hornbach Baumarkt AG
Hornbachstrasse 11