
TK3601DE - Radio KENWOOD - Free user manual and instructions
Find the device manual for free TK3601DE KENWOOD in PDF.
| Product type | dPMR446 digital portable radio (analog compatible) |
| Brand | Kenwood |
| Model | TK3601DE |
| Power supply | Rechargeable lithium-ion battery KNB-81L, KSC-50CR charger |
| Charging time | Approximately 4.5 hours |
| Battery life (battery save ON/OFF) | 19 h (ON) / 14 h (OFF) (5% transmit, 5% receive, 90% standby) |
| Maximum range | Up to 9 km in open area, 2.7 km in residential area |
| Frequency bands | 446 MHz (dPMR446/PMR446) |
| Number of channels | 16 preset channels (zone 1 analog, zones 2 and 3 digital) |
| Main functions | Call, zone selection, scan, VOX, scrambler, monitor, key lock, battery save |
| Display | LCD screen with battery charge, signal strength, channel, digital/analog mode indicators, etc. |
| Connectors | SP/MIC jack for optional speaker/microphone or headset |
| Included accessories | KSC-50CR charger, AC adapter, KNB-81L battery, belt clip, screws (2), battery cover, user guide |
| Maintenance and cleaning | Clean with a dry, soft cloth. Do not use solvents. Disconnect charger before cleaning. |
| Safety | Do not charge if wet. Do not expose to heat. Use only Kenwood accessories. Observe restricted areas (explosives, aircraft, hospitals). |
| Repairability / spare parts | Battery, charger, antenna (not mentioned but standard), belt clip. Have any repairs carried out by a qualified technician. |
| Protection rating | Not specified (use of accessories may reduce water resistance) |
Frequently Asked Questions - TK3601DE KENWOOD
User questions about TK3601DE KENWOOD
0 question about this device. Answer the ones you know or ask your own.
Ask a new question about this device
Download the instructions for your Radio in PDF format for free! Find your manual TK3601DE - KENWOOD and take your electronic device back in hand. On this page are published all the documents necessary for the use of your device. TK3601DE by KENWOOD.
USER MANUAL TK3601DE KENWOOD
The AMBE+2TM voice coding Technology embodied in this product is protected by intellectual property rights including patent rights, copyrights and trade secrets of Digital Voice Systems, Inc. This voice coding Technology is licensed solely for use within this Communications Equipment. The user of this Technology is explicitly prohibited from attempting to extract, remove, decompile, reverse engineer, or disassemble the Object Code, or in any other way convert the Object Code into a human-readable form. U.S. Patent Nos. #8,315,860, #8,595,002, #6,912,495, #8,200,497, #7,970,606, and #8,359,197.
THANK YOU
We are grateful you have chosen KENWOOD for your dPMR446 applications.
This User guide covers only the basic operations of your dPMR446 (Digital Private Mobile Radio). Ask your dealer for information on any customized features they may have added to your radio. For using details user manual, refer to the following URL.
http://manual.kenwood.com/en_contentsearch/keyword

CONTENTS
PRECAUTIONS 4
UNPACKING AND CHECKING EQUIPMENT 7
PREPARATION 8
ORIENTATION 12
BASIC OPERATION 14
CHANNEL LIST 15
OPERATING CONDITIONS
Open locations (no obstructions) : Up to 9.0 km Residential areas (near buildings) : Up to 2.7 km
Note:
The above range is based on fi eld testing and may vary with your operating conditions and individual transceiver.
NOTICES TO THE USER
Refer service to quali ed technicians only.
Safety: It is important that the operator is aware of, and understands, hazards common to the operation of any transceiver.
This equipment complies with the essential requirements of directive 2014/53/EU.
Information on disposal of old Electrical and electronic equipment and batteries (applicable for countries that have adopted separate waste collection systems)

Products and batteries with the symbol (crossed-out wheeled bin) cannot be disposed as household waste.
Old electrical and electronic equipment and batteries should be recycled at a facility capable of handling these items and their waste byproducts.

Contact your local authority for details in locating a recycle facility nearest to you.
Proper recycling and waste disposal will help conserve resources whilst preventing detrimental effects on our health and the environment.
Notice: The sign "Pb" below the symbol for batteries indicates that this battery contains lead.
Firmware Copyrights
The title to and ownership of copyrights for fi rmware embedded in KENWOOD product memories are reserved for JVC KENWOOD Corporation.
PRECAUTIONS
Observe the following precautions to prevent fire, personal injury, and transceiver damage.
- Do not charge the transceiver and battery pack when they are wet.
- Ensure that there are no metallic items located between the transceiver and the battery pack.
- Do not use options not specified by KENWOOD.
- If the chassis or other transceiver part is damaged, do not touch the damaged parts.
- If a headset or earphone is connected to the transceiver, reduce the transceiver volume.
- Do not place the optional speaker/ microphone, clip mic. with earphone, or headset around your neck while near machinery that may catch the cable.
- Do not place the transceiver on unstable surfaces.
- Ensure that the end of the antenna does not touch your eyes.
- When the transceiver is used for transmission for many hours, the radiator and chassis will become hot. Do not touch these locations when replacing the battery pack.
- Always switch the transceiver power off before installing optional accessories.
- The charger is the device that disconnects the unit from the AC mains line. The AC plug should be readily accessible.
- To dispose of batteries, be sure to comply with the laws and regulations in your country or region.

WARNING
Turn the transceiver power off before entering the following locations:
Near explosives or blasting sites.
- In aircraft. (Any use of the transceiver must follow the instructions and regulations provided by the airline crew.)
- Where restrictions or warnings are posted regarding the use of radio devices, including but not limited to medical facilities.
Near persons wearing pacemakers.
- In explosive atmospheres (infl ammable gas, dust particles, metallic powders, grain powders, etc.).
- While pumping fuel or while parked at gasoline service stations.

CAUTION
- Do not disassemble or modify the transceiver for any reason.
- Do not place the transceiver on or near airbag equipment while the vehicle is running. When the airbag inflates, the transceiver may be ejected and strike the driver or passengers.
- If an abnormal odor or smoke is detected coming from the transceiver, switch the transceiver power off immediately, remove the battery pack from the transceiver, and contact your KENWOOD dealer.
- Use of the transceiver while you are driving may be against traffic laws. Please check and observe the vehicle regulations in your area.
- Do not expose the transceiver to extremely hot or cold conditions.
- Do not carry the battery pack (or battery case) with metal objects, as they may short the battery terminals.
- Danger of explosion if the battery is incorrectly replaced; replace only with the same type.
- When attaching a commercial strap to the transceiver, ensure that the strap is durable. In addition, do not swing the transceiver around by the strap; you may inadvertently strike and injure another person with the transceiver.
- If a commercially available neck strap is used, take care not to let the strap get caught on nearby machine.
- When operating the transceiver in areas where the air is dry, it is easy to build up an electric charge (static electricity). When using an earphone accessory in such conditions, it is possible for the transceiver to send an electric shock through the earphone and to your ear. We recommend you use only a speaker/microphone in these conditions, to avoid electric shocks.
- Do not expose the transceiver to long periods of direct sunlight, nor place it near heating appliances.
INFORMATION CONCERNING THE BATTERY PACK
The battery pack includes fl ammable objects such as organic solvent. Mishandling may cause the battery to rupture producing fl ames or extreme heat, deteriorate, or cause other forms of damage to the battery. Please observe the following prohibitive matters.

DANGER
- Do not disassemble or reconstruct battery.
- Do not short-circuit the battery.
- Do not incinerate or apply heat to the battery.
- Do not leave the battery near fi res, stoves, or other heat generators (areas reaching over 80^ / 176^ ).
- Do not immerse the battery in water or get it wet by other means.
- Do not charge the battery near fi res or under direct sunlight.
- Use only the specified charger and observe charging requirements.
- Do not pierce the battery with any object, strike it with an instrument, or step on it.
- Do not jar or throw the battery.
- Do not use the battery pack if it is damaged in any way.
- Do not solder directly onto the battery.
- Do not reverse the battery polarity (and terminals).
- Do not reverse-charge or reverse-connect the battery.
- Do not touch a ruptured and leaking battery. If the electrolyte liquid from the battery gets into your eyes, wash your eyes out with fresh water as soon as possible, without rubbing your eyes. Go to the hospital immediately. If left untreated, it may cause eye-problems.

WARNING
- Do not charge the battery for longer than the specified time.
- Do not place the battery pack into a microwave or high pressure container.
- Keep ruptured and leaking battery packs away from fire.
- Do not use an abnormal battery.
- Do not change or charge the battery in hazardous locations.
UNPACKING AND CHECKING EQUIPMENT
Carefully unpack the transceiver. If any of the items listed below are missing or damaged, fi le a claim with the carrier immediately.
SUPPLIED ACCESSORIES
- Battery charger (KSC-50CR) 1
- AC adapter 1
- Li-ion Battery pack (KNB-81L) 1
Belt clip 1 - Screw (M3 x 8 mm) 2
- Battery cover 1
- User guide 1
Note:
Refer to "PREPARATION" for accessory installation instructions.
PREPARATION
INSTALLING THE BATTERY PACK

CAUTION
- Do not short the battery terminals or dispose of the battery by fire.
- Never attempt to remove the casing from the battery pack.
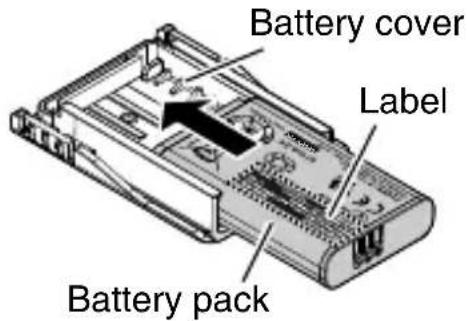
1 Insert the battery pack into the battery cover.
- Pay attention to the position of notch of the battery pack.
- Insert the battery pack with the model name label facing up.
- Be careful not to drop the battery pack.
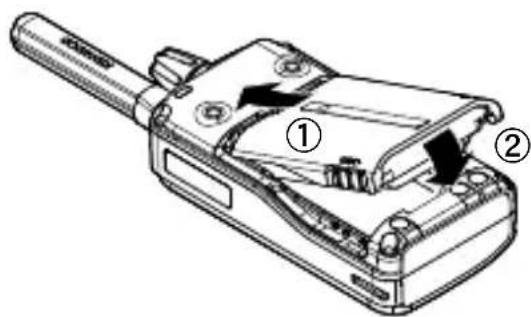
2 Align the battery cover with the groove on the back of the transceiver.
3 Slide the lock lever (both side) to lock it.
- There will be feedback in the form of a click.
REMOVING THE BATTERY PACK
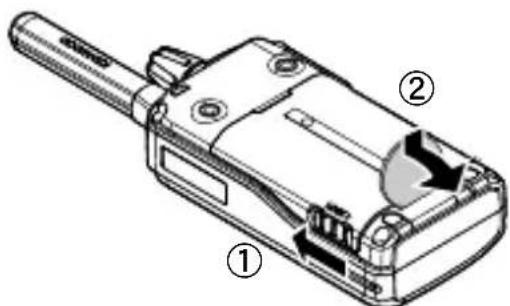
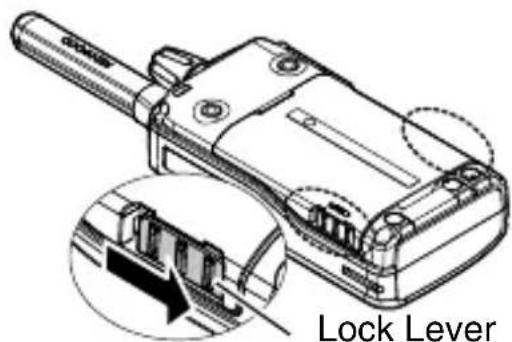
1 Slide the lock lever (both side) to unlock.
2 Release the lock on the battery cover, then remove the battery cover with a coin or the like.
- Be careful not to drop the battery pack.
CHARGING THE BATTERY PACK
The battery pack is not charged at the factory; charge it before use.
Average battery pack life:
| Battery Saver ON Battery | Saver OFF |
| 19 hours 14 hours |
- Average times are calculated using 5% transmit time, 5% receive time, and 90% standby time.
1 Plug the AC adapter cable into the jack located on the bottom of the charger.
2 Plug the AC adapter into an AC outlet.
3 Slide a transceiver equipped with a battery pack into the charging slot of the charger.
- Make sure the metal contacts of the battery pack mate securely with the charger metal terminals.
The indicator lights red and charging begins.
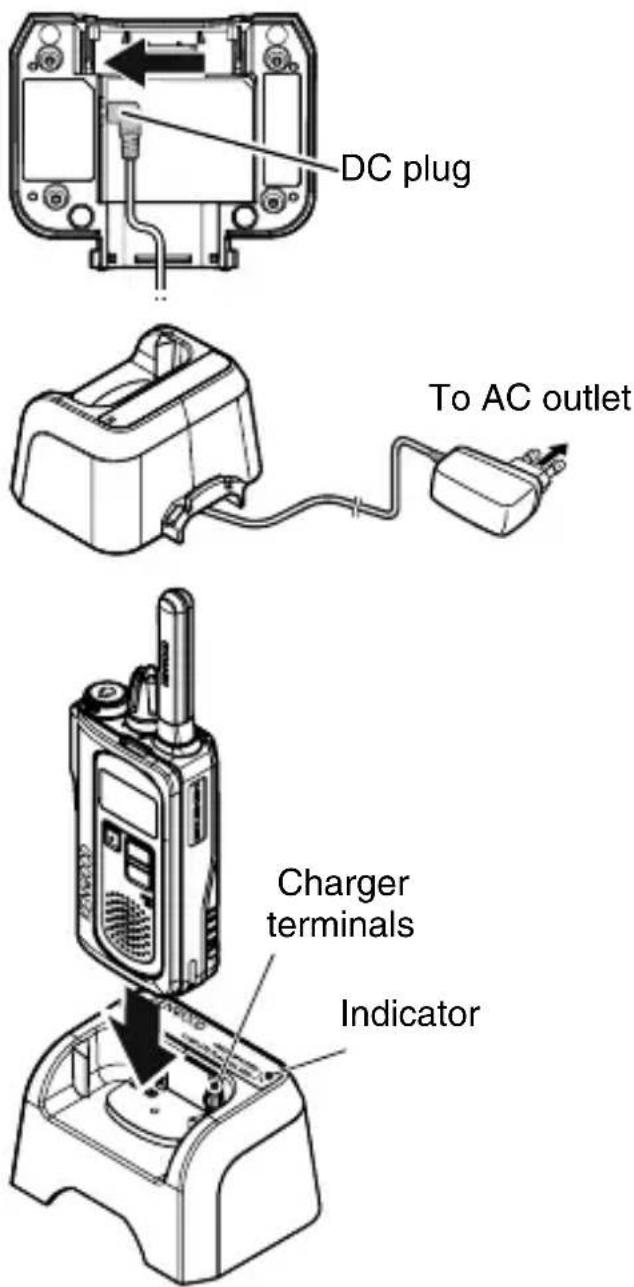
4 When charging is completed, the indicator fl ashing green. Remove the battery pack or the transceiver from the charging slot of the charger.
- It takes approximately 4.5 hours to charge the battery pack.
- When the charger will not be used for a long time, unplug the AC adapter from the AC outlet.

CAUTION
- Always switch OFF a transceiver equipped with a battery pack before inserting the transceiver into the charger.
- Always remove the AC adapter from a wall outlet before attempting to inspect or clean the charger. Removing the battery packs or changing the controls does not remove the AC voltage from the charger.
- Position the AC adapter cable so it will not be stepped on, tripped over, nor subjected to damage.
- Always remove the AC adapter from an AC wall outlet by pulling on the adapter rather than the cable.
- Do not use the charger if it has a damaged AC adapter or adapter cable, or if the charger has been damaged in any way. Contact your KENWOOD dealer to replace or repair the damaged part.
Note:
The ambient temperature should be between 5^ and 40^ while charging is in progress. Charging outside this range may not fully charge the battery.
The battery pack life is over when its operating time decreases even though it is fully and correctly charged. Replace the battery pack.
While operating the transceiver using a Li-ion battery pack in areas of an ambient temperature of -10^ and lower, operating time may be shortened.
| Indicator color Meaning | |
| Light red | A transceiver is in the charging slot and charging has started. |
| Flashing red | The battery pack is either defective or the battery pack contacts are not properly mated with those of the charger. |
| Flashing green | Charging is completed; remove the battery pack from the charger. |
| Alternates fl ashing green and orange | The temperature of the battery pack has not satisfi ed the charging start temperature. Remove the battery pack from the charger and wait until it reaches a normal temperature before charging it again. |
INSTALLING THE BELT CLIP
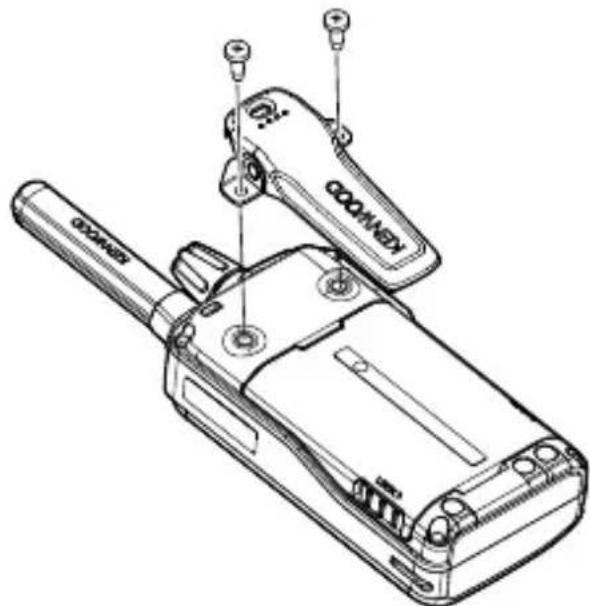
If necessary, attach the belt clip using the two supplied M3 x 8 mm screws.
Note:
If the belt clip is not installed, its mounting location may get hot during continuous transmission or when left sitting in a hot environment.
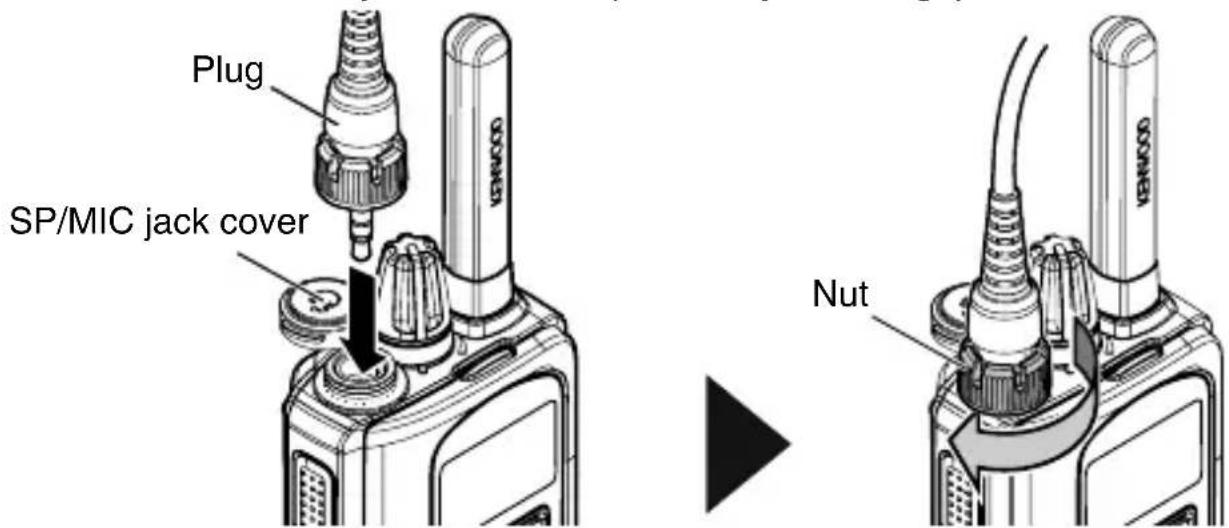
INSTALLING THE OPTIONAL SPEAKER/ MICROPHONE (OR HEADSET)
1 Turn the transceiver power OFF.
- For transceivers that are able to adjust the volume level, adjust the volume to the minimum setting before turning the transceiver power OFF.
2 Insert the plug into the SP/MIC jack on the transceiver, then fix it with a nut.
Fix the plug with a nut firmly to maintain waterproof protection for the transceiver.
- The transceiver is not fully water protection when using a speaker/ microphone or headset
- When not using an optional speaker/ microphone, clip mic. with earphone, or headset, to keep the transceiver dust and water protection, you must cover the SP/MIC jack with the cap securely with no gap.
ORIENTATION
BUTTONS AND CONTROL
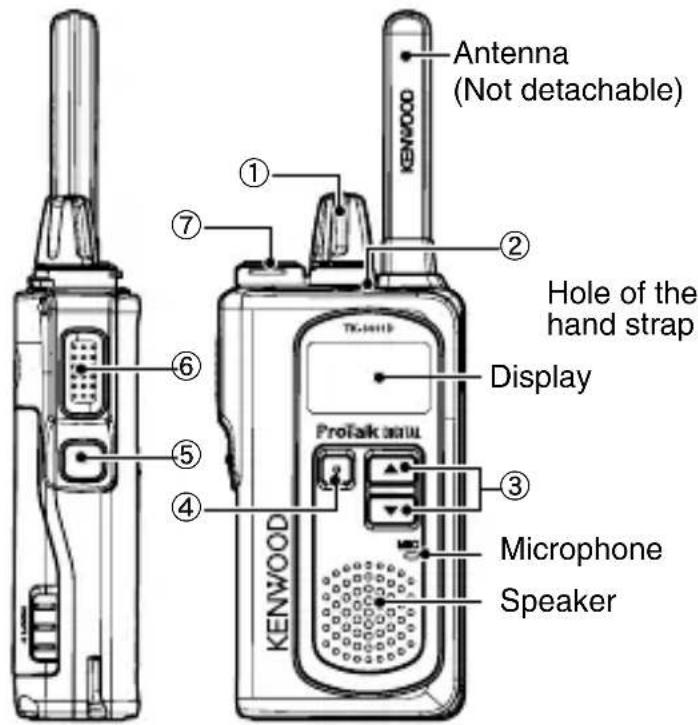

① Power switch/ Volume control
Turn clockwise to switch ON the transceiver. To switch OFF the transceiver, turn counterclockwise until a click sounds. Rotate to adjust the volume level.
② LED indicator
Indicates the transceiver status.
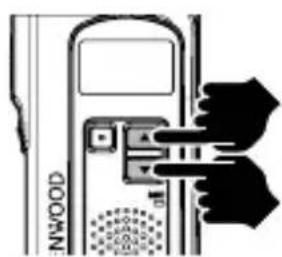
(3) (Up)/Down) buttons
Press to change the operating channel, to select a menu in setting mode, and to perform other functions.
(4) Menu button
Press to activate Channel Menu, to select the various functions.
Press and hold to activate its programmable function. The default is Button Lock.
⑤ Side button
Press and hold to activate its programmable function. The default is Zone.
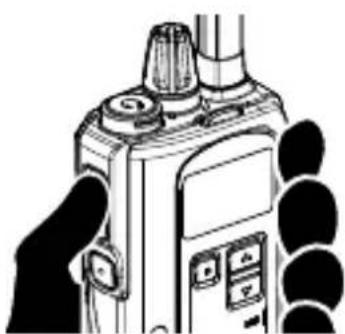
⑥ PTT (Push to Talk) switch
Press and hold, then speak into the microphone to transmit.
⑦ SP/MIC jack
Insert the speaker/ microphone or headset plug into this jack.
DISPLAY
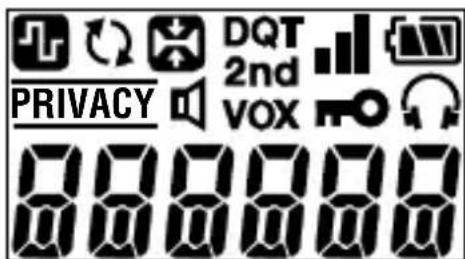
| Indicator | Description |
| When receiving: Appears the signal strength. When transmitting: Appears the Transmit Power. Receiving: Strong : Sufficient : Weak Transmitting: High Power | |
| Appears the battery power. High Sufficient : Low (Flashing) : Very Low | |
| Appears when channel type is set to digital. | |
| Appears when the Scan is in progress. Blinks when the Scan is paused. | |
| Appears when the Compander is activated. | |
| PRIVACY | Appears when the Scrambler (Analog) is activated. |
| VOX | Appears when the VOX function is in progress. |
| Appears when the Button Lock function is activated. | |
| Appears when the Earphone mode is activated. | |
| 2nd | Appears when the Second Scan function is activated. Blinks when the Second Scan paused and staying on Second Channel. |
| Appears when the Monitor Open or Squelch Off is activated. |
BASIC OPERATION
Switch the transceiver power ON by turning the Power switch/ Volume control clockwise.
- A confirmation tone sounds, the LCD lights up momentarily, then the current channel number is displayed.
To switch the transceiver power OFF, turn the Power switch/ Volume control fully counterclockwise, until a click sounds.
ADJUST THE VOLUME
Set your desired volume level by rotating the Power switch/ Volume control.
- Clockwise increases the volume and counterclockwise decreases the volume.
Note:
To adjust the volume using background noise as a reference in analog mode, use the Squelch off Function.


SELECTING A ZONE AND CHANNEL/ ID
1 Select the desired zone using the button programmed as [Zone]. Each zone contains a group of channels.
2 Select the desired channel/ ID using the button.
- A confirmation tone sounds each time you press the [Zone], or button.
MAKE A CALL
1 To make a call, press and hold the PTT switch, then speak around the microphone area using your normal speaking voice.
- Hold the microphone approximately 1.5 inches (3 to 4cm ) from your lips.
2 Release the PTT switch to receive.
CHANNEL LIST
This transceiver allows you to reprogram each of the channels with different frequencies and ID (Digital)/ QT/DQT (Analog) settings. The table below lists the default channel settings.
| Channel Number | Analog Digital | ||||||
| Zone 1 Zone 2 Zone 3 | |||||||
| Frequency (MHz) | QT/DQT | Frequency (MHz) | ID | Frequency (MHz) | ID | ||
| 1 | 446.006250 | 94.8 | Hz 446.103125 | 1 | 446.003125 | 1 | |
| 2 | 446.093750 | 88.5 | Hz 446.109375 | 2 | 446.009375 | 2 | |
| 3 | 446.031250 | 103.5 Hz | 446.115625 | 3 | 446.015625 | 3 | |
| 4 | 446.068750 | 79.7 Hz | 446.121875 | 4 | 446.021875 | 4 | |
| 5 | 446.043750 | 118.8 Hz | 446.128125 | 5 | 446.028125 | 5 | |
| 6 | 446.018750 | 123.0 Hz | 446.134375 | 6 | 446.034375 | 6 | |
| 7 | 446.081250 | 127.3 Hz | 446.140625 | 7 | 446.040625 | 7 | |
| 8 | 446.056250 | 85.4 Hz | 446.146875 | 8 | 446.046875 | 8 | |
| 9 | 446.006250 | 107.2 Hz | 446.153125 | 9 | 446.053125 | 9 | |
| 10 | 446.093750 | 110.9 Hz | 446.159375 | 10 | 446.059375 | 10 | |
| 11 | 446.031250 | 114.8 Hz | 446.165625 | 11 | 446.065625 | 11 | |
| 12 | 446.068750 | 82.5 Hz | 446.171875 | 12 | 446.071875 | 12 | |
| 13 | 446.043750 | D1 32N | 446.178125 13 | 445.078125 | 13 | ||
| 14 | 446.018750 | D1 55N | 446.184375 14 | 446.084375 | 14 | ||
| 15 | 446.056250 | D1 34N | 446.190625 15 | 446.090625 | 15 | ||
| 16 | 446.081250 | D2 43N | 446.196875 16 | 446.096875 | 16 | ||
ProTalk DIGITAL
ÉMETTEUR-RéCEPTEUR NUMÉRIQUE UHF
TK-3601D
GUIDE DE L'UTILISATEUR
MISE SOUS/ HORS TENSION
TRANSCEPTOR DIGITAL UHF
TK-3601D
GUIA DEL USUARIO
Average battery pack life:
Turn the transceiver power off before entering the following locations:
(6) PTT-Taste (Push-to-Talk)
⑥ PTT (Push-to-Talk)-schakelaar
8,315,860, #8,595,002, #6,912,495, #8,200,497, #7,970,606
kai #8,359,197.
ΣAΣ EYXAPIΣTOYME
I P A F M A T O N O I H ζ T E M I A K A H Σ H
1 Tia va npaymuatoonoeTc ma klon, nataoTc npataetapeva tov diaokotn PTT, otn ouvexia mIoTe yupw ano tnV npioxN ikpOswovu E kavovikn ouiia.
KpatnoTe To uikpofwvo o anaotaaon npinou 3 4 cm ano ta xieiN oac.
2 AΦnoTe Tov δiaKoTTn PTT yia va λaβετε κληση.

AIETA KANALION
Auroc o nupnoedektnc oac epiptepenla v npoypaumatioeE k vov kahe eva ano ta kavaliae diafoepetikec ouxvotnte c kal afoepetikec pouthetaic ID (Psiiakn)/ QT/DQT (Avaloyik).Tov npakatw π ivaka npapatiEvtaI oi npoeiIeVmuevc puOIOEIC kavaaiwv.
| AριθμόςΚαναλίου | Αναλογική Ψηφίακή | |||||
| Zώνη 1 Zώνη 2 Zώνη 3 | ||||||
| Συχύτητa (MHz) | QT/DQT | Συχύτητa (MHz) | ID | Συχύτητa (MHz) | ID | |
| 1 | 446,006250 | 94.8 | Hz 446,103125 | 1 | 446,003125 | |
| 2 | 446,093750 | 88.5 | Hz 446,109375 | 2 | 446,009375 | |
| 3 | 446,031250 | 103.5 Hz | 446,115625 | 3 | 446,015625 | 3 |
| 4 | 446,068750 | 79.7 Hz | 446,121875 | 4 | 446,021875 | 4 |
| 5 | 446,043750 | 118.8 Hz | 446,128125 | 5 | 446,028125 | 5 |
| 6 | 446,018750 | 123.0 Hz | 446,134375 | 6 | 446,034375 | 6 |
| 7 | 446,081250 | 127.3 Hz | 446,140625 | 7 | 446,040625 | 7 |
| 8 | 446,056250 | 85.4 Hz | 446,146875 | 8 | 446,046875 | 8 |
| 9 | 446,006250 | 107.2 Hz | 446,153125 | 9 | 446,053125 | 9 |
| 10 | 446,093750 | 110.9 Hz | 446,159375 | 10 | 446,059375 | 10 |
| 11 | 446,031250 | 114.8 Hz | 446,165625 | 11 | 446,065625 | 11 |
| 12 | 446,068750 | 82.5 Hz | 446,171875 | 12 | 446,071875 | 12 |
| 13 | 446,043750 | D132N | 446,178125 13 | 445,078125 | 13 | |
| 14 | 446,018750 | D155N | 446,184375 14 | 446,084375 | 14 | |
| 15 | 446,056250 | D134N | 446,190625 15 | 446,090625 | 15 | |
| 16 | 446,081250 | D243N | 446,196875 16 | 446,096875 | 16 | |
ProTalk DIGITAL
TRANSCEPTOR DE DIGITAL UHF

