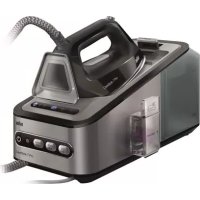
USER MANUAL CareStyle 7 Pro IS 7156 BK BRAUN
Register your product
www.braunhousehold.com/register
CareStyle 7143/7144
CareStyle 7155/7156
Steam generator iron
Deutsch 6
English 12
Francais 18
Espanol 24
Portugues 30
Italiano 36
Nederlands 42
Dansk 48
Norsk 54
Svenska 60
Finnish 66
Polish 72
Czech 78
Slovak 84
Hungarian 90
Croatian 96
Slovenian 102
Turkish 108
Romanian (RO/MD) 114
Greek 120
Kazakh 126
Russian 133
Ukrainian 140
150
De'Longhi Braun Household GmbH
Carl-Ulrich-Straße 4
63263 Neu-Isenburg/Germany
5712811931/10.17-CareStyle 7143-7144-7155-7156-INT
DE/UK/FR/ES/PT/IT/NL/DK/NO/SE/FI/PL/CZ/SK/HU/HR/
SI/TR/RO/MD/GR/KZ/RU/UA/Arab

B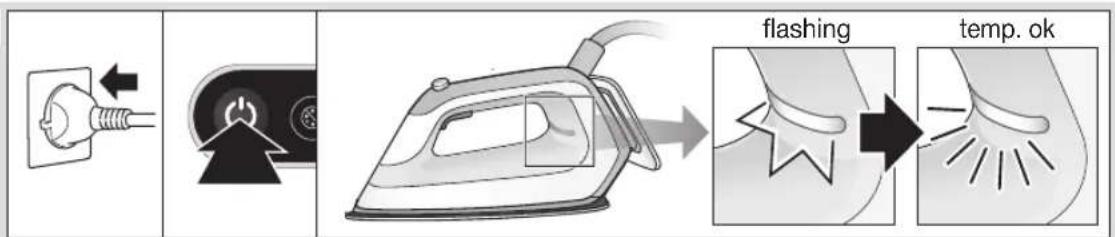

C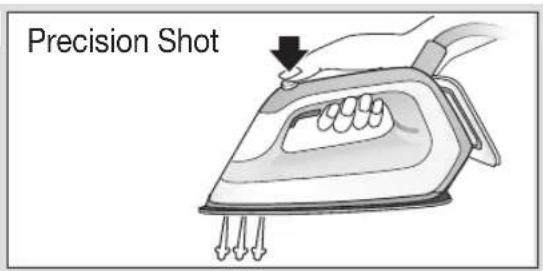
D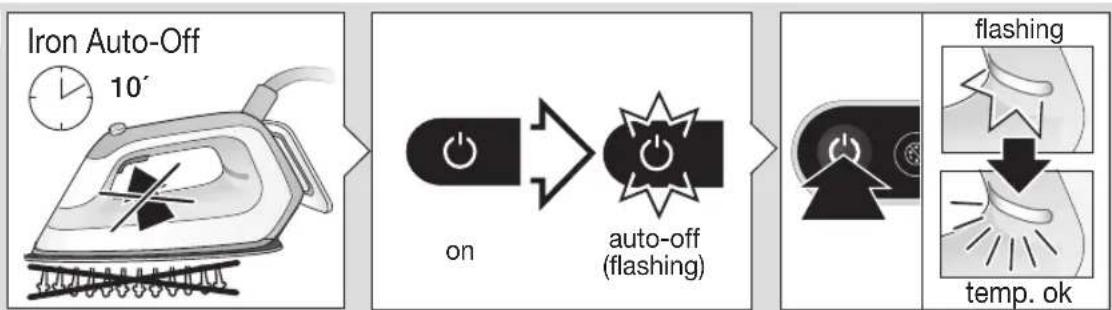
E F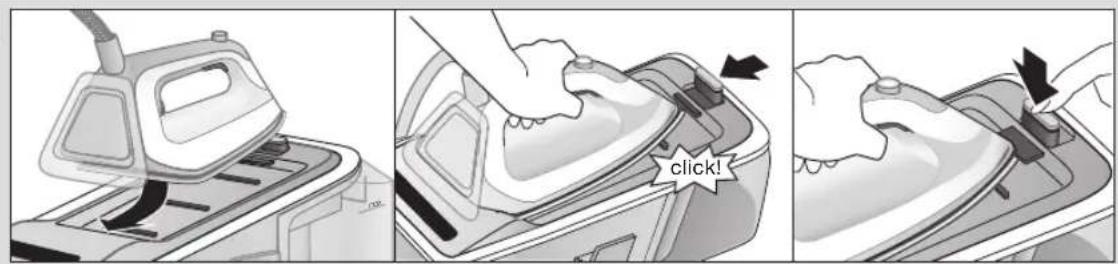
1. Descaling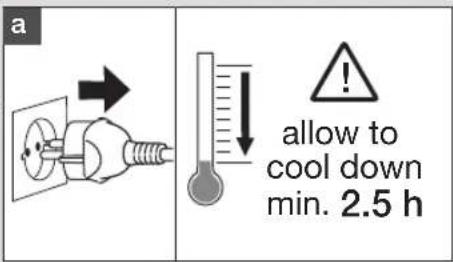

2. Reset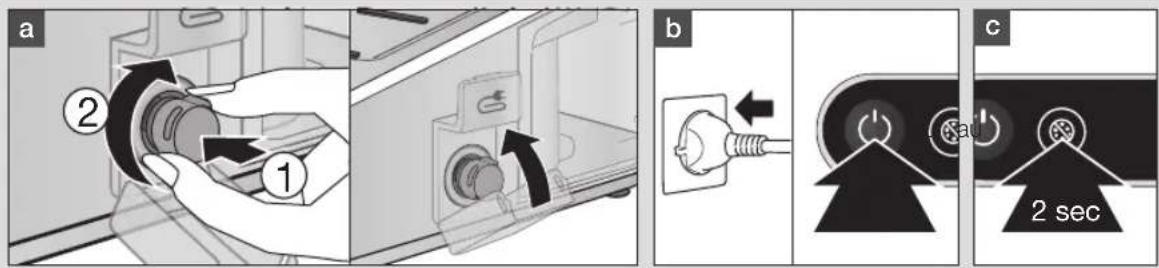
G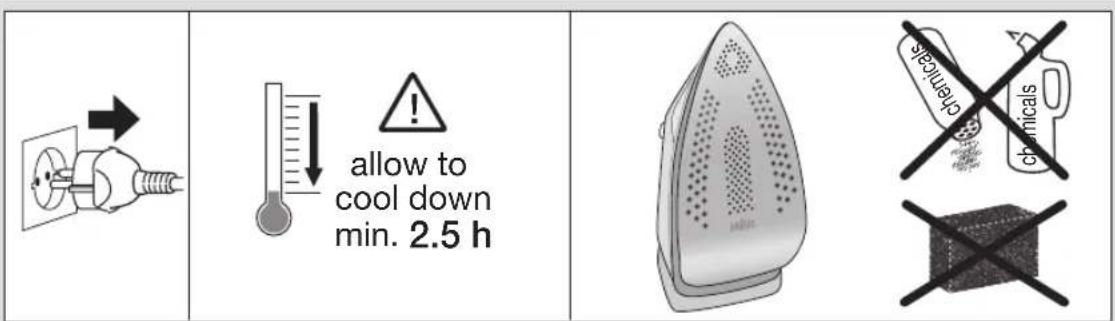
Deutsch
Our products are engineered to meet the highest standards of quality, functionality and design. We hope you thoroughly enjoy the new Braun appliance.
Before use
Please read instructions carefully and completely before using the appliance.
Caution

Caution: Hot surfaces! Electric bus stations combine high temperatures and hot steam that could do burns.
- This appliance can be used by children aged from 8 years and above and persons with reduced physical, sensory or mental capabilities or lack of experience and knowledge if they have been given supervision or instruction concerning use of the appliance in a safe way and understand the hazards involved. Children shall not play with the appliance.
- Cleaning and user maintenance shall not be made by children without supervision.
- During operation and cool-down the appliance and its mains cord shall be kept out of reach of children under 8 years.
- If the supply cord is damaged, it must be replaced by the manufacturer, its service agent or similarly qualified persons in order to avoid a hazard.
- Always unplug the station/iron before filling with water.
- The appliance must be used and rested on a stable surface.
- During ironing pauses, place the iron upright on its heel rest or on the iron rest. Ensure that the heel rest is placed on a stable surface.
- The iron must not be left unattended while it is connected to the supply mains.
- Do not open the boiler during ironing.
- During use, the pressurised apertures must not be opened for filling, descending, rinsing or inspection.
- The appliance must not be used if it has dropped, if there are visible signs of damage or if it is leaking. Regularly check the cords for damages.
- Never immerse the unit in water or other liquids.
- This appliance is designed for household use only and for processing normal household quantities.
- Please clean all parts before first use or as required, following the instructions in the Care and Cleaning section.
- The cords should never come in contact with hot objects, the soleplate, water and sharp edges.
- Before plugging into a socket, check whether your voltage corresponds with the voltage printed on the bottom of the appliance and that you are using an earthed socket.
- When using an extension cord watch out that it is in good condition, has a plug with an earth connection and corresponds with the power rating of the appliance (16A).
- The soleplate and the iron rest can reach very high temperatures that could lead to burns. Do not touch them.
- Choking hazard. The appliance might contain small parts. Some of those small parts might be required to get disassembled during cleaning and maintenance operations. Handle with care and keep small parts out of reach of children.
- Important: Keep all packaging (plastic bags, polystyrene foam) away from children.
Description
Steam Generator Iron
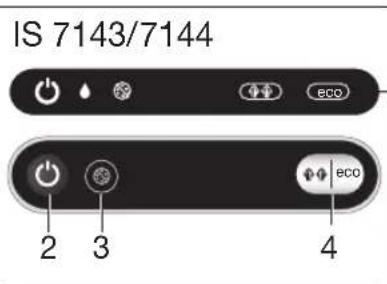
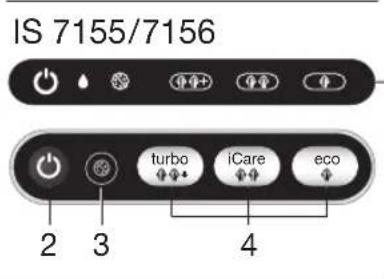
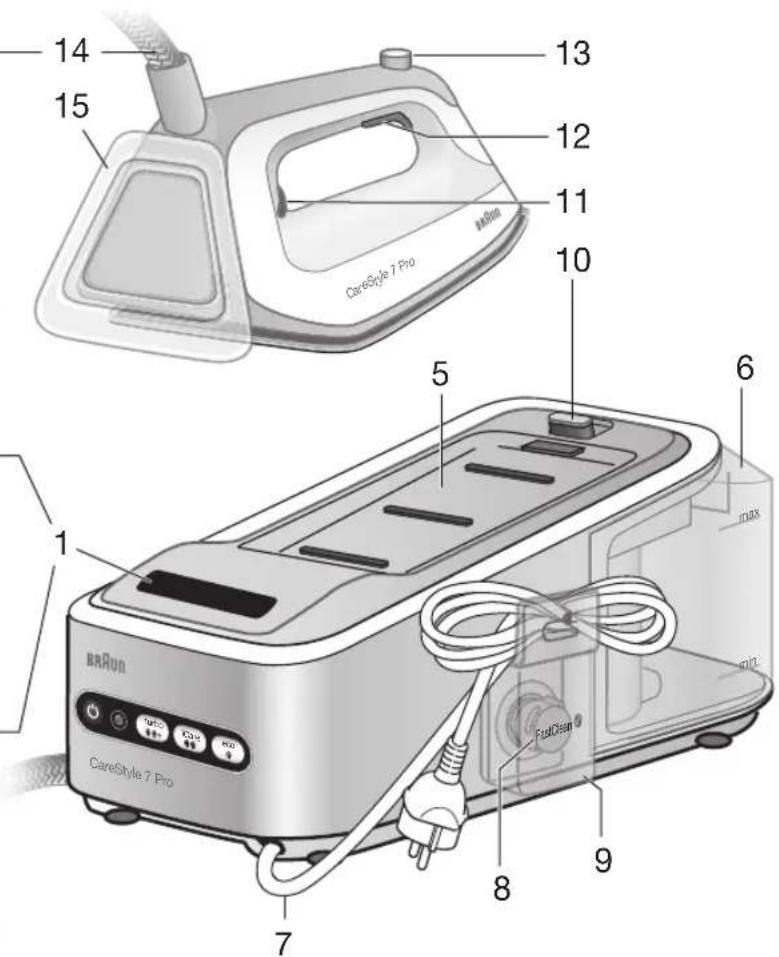
1 Display 2 On/Off button 3 Calc clean system button 4 Settings (eco, iCare, turbo) 5 Iron rest 6 Water tank 7 Power cord 8 Closure 9 Transparent cover
10 Lock system
Iron
11 Temperature control LED 12 Steam button 13 Precision shot button 14 Double cord 15 Heel rest
Intended use
The appliance must be used only for ironing garments which are suitable for ironing according to the care label. In addition the appliance can be used for refreshing. Never iron or dampen garments while wearing them.
Before first use
Take the unit out of the carton. Remove all pieces of the packing. Remove any possibly extant labels on the unit (do not remove the rating plate).
When steam is ready for the first time we recommend to iron for a few minutes over a rag to avoid manufacturing residues can dirty your garments.
(A) Filling the water tank
Make sure that the appliance is switched off and the system is unplugged. - Remove the water tank (6). - Fill the water tank with tap water, taking care not to exceed the "max" level but at least up to the mark "min" otherwise the appliance will not be ready to start steam ironing. If you have extremely hard water, we recommend that you use a mixture of 50% tap water and 50% distilled water.
- Never use distilled water exclusively. Do not add any additives (e.g. starch). Do not use condensation water from a tumble dryer.
- Insert the water tank.
- Place the appliance on a stable, level surface.
Note: If you use filtering devices or in-house permanent descaler, make absolutely sure the water obtained is neutral ph.
Water reserve function
- When the water level is becoming low, the icon starts flashing. At this stage it is possible to continue steam ironing for about 10-15 minutes.
- When the icon turns permanently on, it becomes necessary to refill the tank. At the same time, the temperature control LED (11) is flashing and the icon related to the selected setting (4) turns off.
- To continue steam ironing, refill the water tank (A).
(B) Start into operation
Before start ironing follow the garment care label instructions carefully. Fabrics with this symbol are not ironable.
- Place the iron on the iron rest (5) or on its heel rest (15), unwind completely the cord, plug in the appliance and press the On/Off button (2).
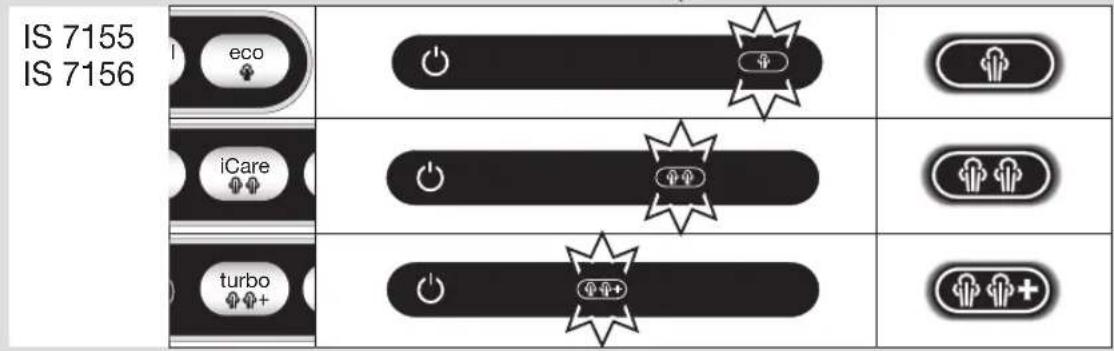
- Select the setting (4) most suitable for the garments to be ironed.
- The requested setting can be chosen by pressing the corresponding button (eco, iCare or turbo). To switch from one setting to another press the dedicated button.
- The iron will start to heat up and the temperature control LED (11) on the iron will flash. Once the temperature is reached, the temperature control LED is permanently on.
- The related icon for the setting in the display (1) will start to flash. When steam is ready the icon turns permanently on.
Steam ironing
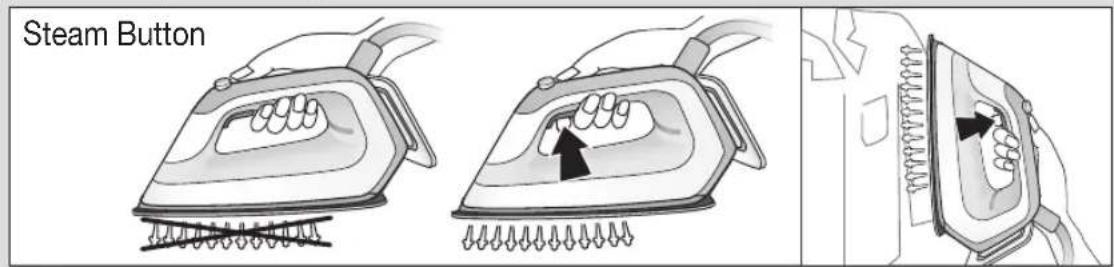
Press the steam button (12) or the precision shot button (13).
Double trigger
Press the steam button (12) or the precision shot button (13) twice in quick succession within 1 second. There will be a continuous steam emission for a few seconds.
Press the steam button or the precision shot button once again during steam emission to stop the function.
Dry ironing
Iron without pressing the steam button (12) or the precision shot button (13). Please note that after
10 minutes of dry ironing, the iron switches to the auto-off mode.
Vertical steam
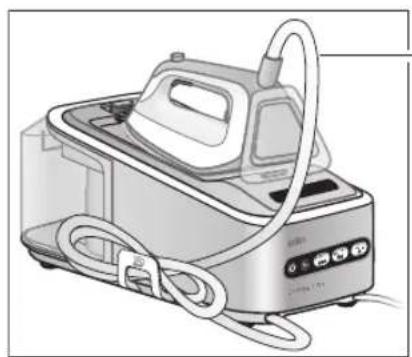
The iron can also be used for steaming hanging clothes (B). Hold the iron in a vertical position, tilted slightly forwards. Press repeatedly the steam button (12) or the precision shot button (13) while moving the iron from top to the bottom.
Steam is very hot: never iron or dampen garment while wearing them.
3D soleplate
The unique round shape of the 3D soleplate ensures best gliding results on difficult parts (e.g. buttons, pockets etc.)
Settings
CareStyle 7143, 7144
The iCare setting is automatically chosen when the appliance is switched on for the first time. From 2nd switch on, it will be set to the last setting chosen.
The iCare setting is suggested for garments like wool, polyester and cotton/linen.
The eco setting (eco) is suggested for most delicate garments like synthetics, silk and blended fabrics for which you need less steam. This setting allows less power consumption.
CareStyle 7155, 7156
eco 800
It is suggested for most delicate garments like synthetics, silk and blended fabrics. This setting allows less power consumption.
iCare
It is suggested for garments like wool, polyester and cotton.
Turbo
It is suggested for garments that need more powerful steam, like thick cotton/linen and jeans. This setting can also be used to refresh and hygienize garments that were in the closet before dressing.
Note: Do not use the hygienize function on people and pets.
When the appliance is switched on, it will always be set to the iCare setting, independently on the last setting chosen.
14
For best results
Before start ironing follow the garment care label instructions carefully.
Always iron black and dark garments inside out to avoid getting a sheen on the fabrics from the iron. - When ironing a shirt, start with the more difficult parts like collar, cuff links and sleeves. Then iron the bigger parts like front and back, so you can prevent wrinkling the bigger parts when you are ironing the other parts. - When you iron a collar, start on its underside and work from the outside (the pointy end) inwards. Turn over and repeat. Fold down the collar and press the edge for a more crisp finish. - When ironing garments with imprints, applications or even more sensitive fabric parts (i.e. embroidery), turn them inside out and, if necessary, lay a cotton cloth between the iron and the fabric. This way you avoid damage and get the volume of fabric designs that are not to be ironed flat. - When ironing woolen garments, we recommend pressing sequentially the precision shot button (13) without placing the iron on the garment. This will avoid shiny effects on the fabric. - In order to prevent new creases while ironing with steam make sure that the garment shows no residual moisture before going on ironing other parts of it.
(C) Precision shot
- Press the precision shot button (13) completely down.
- Steam will come out of the tip area of the soleplate only.
- To stop this function release the button.
- If you do not press it down completely, some steam may also come out from the rear steam holes in the soleplate.
(D) Iron auto-off
This function is activated if after 10 minutes there has been no steam emission.
- When the iron is in the auto-off mode, the icon is flashing and the temperature control LED (11) is off. The iron will turn off to reduce power consumption.
- To turn the iron on again, the On/Off button (2) has to be pressed. Before start ironing again wait until the temperature control LED and the related icon for the setting in the display (1) are permanently on.
After ironing / storage
- Press the On/Off button (2) to turn off the appliance.
- Unplug and let the appliance cool down before storing.
- Empty the water tank.
- Lock the iron.
(E) Lock system
The appliance is equipped with a lock system for convenient transportation and easy storage. It is possible to lift and carry the appliance on the handle of the locked iron.
Note: Before transportation make sure the iron is properly locked and the water tank is empty.
- Place the soleplate into the recess on the iron mat.
- To lock the iron push the slider (10) (easy lock) toward the iron until you hear a "click".
- To unlock the iron, push down the button on the slider (easy lock). The iron will be released.
(F) Descaling
Never open or touch the closure (8) when the appliance is hot and/or plugged in.
To maintain optimum performance, the system needs to be decalcified after every 15 litres of water consumption (about 8 complete refills).
Do not use any chemicals, additives or descaler to rinse the boiler.
The icon 3s flashing.
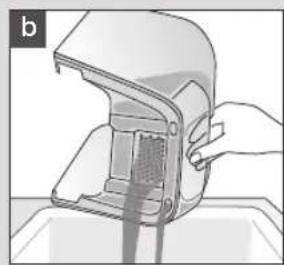
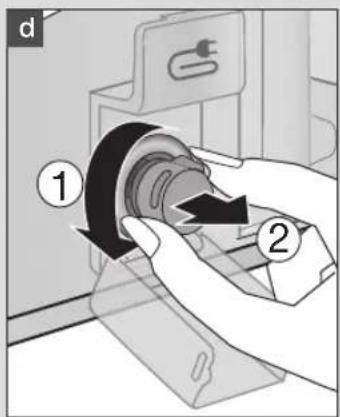
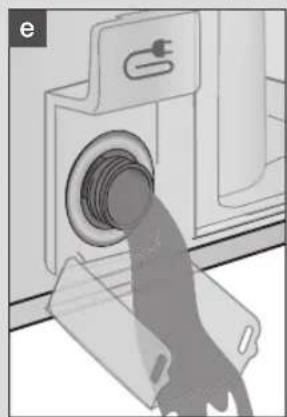
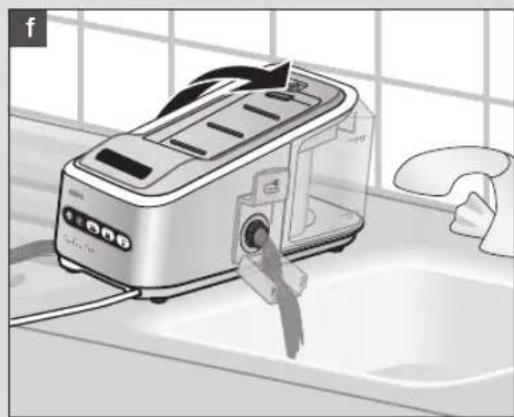
a. Switch off (2) and unplug the appliance. Unlock the iron and remove it from the iron rest. Wait until the appliance has cooled down (minimum 2.5 hours). b. Empty the water tank. c. Place the appliance on the edge of the sink and open the transparent cover (9). d. Turn the closure (8) anticlockwise to open it. e. Let the water flow into the sink. f. Turn the appliance slightly in an inclined position to empty the boiler completely. g. When no more water comes out of the appliance, screw the closure to close the boiler and close the transparent cover. h. After having finished the descaling procedure, plug in and switch on. i. Press the calc clean system button (3) for 2 seconds to reset.
If the appliance is switched off without descaling, the icon will start to flash again when it is next switched on.
Note: Because of the different water composition when using an installed in-house permanent descaler, it is recommended to descale the system after every 4 complete refills or at least once per month. Please note that in this case the icon for descaling will not automatically start flashing.
(G) Care and Cleaning
- Before cleaning, always make sure that the appliance is switched off, unplugged and has cooled down completely.
- To clean the soleplate, it is suggested to use a damp cloth.
- To clean the soft material on the handle and the high glossy surface, use a damp cloth only.
- Never use chemicals, vinegar or scouring pads (e.g., sponges with coarse nylon fabrics, etc.).
Please do not dispose of the product in the household waste at the end of its useful life. Disposal can take place at a Braun Service Centre or at appropriate collection points provided in your country.

For UK Only
Guarantee Information
All Braun Household products carry a minimum guarantee period of two years. The rights and benefits under this guarantee are additional to your statutory rights which are not affected.
In the unlikely event of a breakdown you have access to professional help from our team simply by calling: 02392 392333
For service in the Republic of Ireland please call: 012475471
Braun Household undertakes within the specified period to repair or replace any part of the appliance, free of charge (with the exception of any glass or porcelain-ware incorporated in the product) found to be defective provided that;
- We are promptly informed of the defect. The product is used and maintained in accordance with the User Instructions. The appliance has not been altered in any way or subjected to misuse or repair by a person
other than an authorised service agent for Braun Household.
- No rights are given under this guarantee to a person acquiring the appliance second hand or for commercial or communal use.
- Any repaired or replaced appliance will be guaranteed on these terms for the unexpired portion of the guarantee. The need for repair has not been caused by insufficient aftercare or cleaning: or damage caused by the chemical or electrochemical effects of water.
Under no circumstances shall the application of this guarantee give rise to the complete replacement of the appliance or entitle the consumer to damages.
Braun Household, New Lane, Havant, Hampshire PO9 2NH
www.braunhousehold.co.uk Thank You for choosing Braun. We are confident that you will get excellent service from this product.
TO IMPROVE YOUR EXPERIENCE Register now at www.braunhousehold.co.uk By registering we may send you from time to time details on exclusive offers, promotions, recipes and inside tips.
Troubleshooting guide
| PROBLEM CAUSE REMEDY | | |
| The appliance does not switch on. | The appliance is not plugged into a mains socket. | Make sure the appliance is correctly connected and press the On/Off button. |
| Steam comes out under the base unit. | The "max" pressure safety system has opened. | Turn the appliance off immediately and contact an authorised Braun Customer Service. |
| There are some water drops from the holes in the bottom of the soleplate. | Water has condensed inside the tubes because steam is being used for the first time, or has not been used for some time. | Press the steam button several times away from the ironing board. This will eliminate cold water from the steam circuit. |
| Brown coloured fluid leaks from the soleplate. | Chemical water softeners or additives have been poured into the water tank. | Never pour products into the water tank. Clean the soleplate with a damp cloth and rinse the boiler. |
| The first time the appliance is turned on, you notice smoke or smell. | Some parts have been treated with sealer/lubricant which evaporates the first time the iron heats up. | This is normal and will stop when you have used the iron a few times. If the smoke/smell is still present after turning off the appliance, contact an authorised Braun Customer Service. |
| The appliance emits an intermittent noise associated with vibrations. | Water is being pumped into the boiler. | This is normal and no action is needed. |
| The appliance emits a continuous noise associated with vibrations. | System error. | Unplug the appliance from the mains and contact an authorised Braun Customer Service. |
| The closure is diffi cult to unscrew. | Lime scale has made the closure difficult to open. | Turn the cap forcefully. To avoid the problem, rinse system frequently. |
| The boiler is still under pressure. | Never open the closure if the boiler is still under pressure or hot. Wait at least 2.5 hours before opening the closure. |
| After refl lling the water tank, the light ◆does not reset. | The water fl oat does not work appropriately. | Empty the water tank, rinse out and refl l. |
| The water tank is not positioned correctly. | Position the water tank correctly. |
| All LEDs are fl ashing. System error. | | Unplug the appliance, plug it in again and press On/Off button. If this problem is still present, turn the appliance off immediately, unplug and contact an authorised Braun Customer Service. |
| Steam icon is permanently on, but there is no steam emission from the soleplate. | Water tank fl oat is locked or the water tank is not correctly inserted. | Turn off and unplug the appliance. Remove and empty the water tank, rinse out and refl l. Insert the water tank. Switch on the appliance and wait until the device is ready to use. Press the steam button and wait until steam comes out. Keep the steam button pressed for 10 seconds of steam emission then release the steam button. |
| Steam or water comes out from the closure. | The closure is not tightened properly. | Switch off the appliance, unplug and let it cool down (for at least 2,5 hours). Unscrew the closure and screw it back on the appliance properly. Note: Some water can escape when you unscrew the closure |
| The double cord gets hot during use. | This is normal. It is caused due to the steam passing through the cord during ironing. | Place the double cord on the opposite side so that you cannot touch the cord during ironing. |
Français
MockBa KaIacbl, CyueBckar Keweci,
27/3-yn (27-yn, 3-KypbblbIM)
TeN. +7 (495) 781-26-76
Cakpany Mep3imi: WekTeNmeren
Abyjy kafdajnapb: Kopwafah opTaHb Kopfay TaanTapbHa caikec
TacbImaIay kafdaimapbl: TacbImaIay ke3iHde KJlAdbI anyFa Hemece IamaHaN TbIC WaiKaJItyFa 60MaJdbI.
Caty KaFdaIapbI: Caty KaFdaIapbIH eHdpywi KepceTnerE, bipak olap xeprilikti, MemlekeTTi XaHe xaIbIkapalik, epexeJep MeH cTaHdapTTapFa caBolYFa Tnic
Ehdpuyi3aybI:
De'Longhi Braun Household GmbH,
Carl-Ulrich-Strasse 4,
63263 Neu Isenburg, Germany
AkayIbIKTapDbI XOIO HUCKayIbIFbl
| AKAYIbIK,CEBEBIJXOHIDey | | |
| KурьIFы KOSbIMaДы. | КурьIFы KyaT Ke3iHe JxalFaH6aFAn. | КурьIFын DурьIC KOSbIMn TpyFaHbIN TeKcePIn, Kocy/эшуpy TуIMeciHбacbHbI3. |
| Бу БекeTIin,actbIHan 6by shbIaIbI. | "Max" KByCSbIM Kayinci3di IxuYeci aShbIbIN KetKeH. | КурьIFын Depey eWipin, Braun TytBHybIaIapFA KBy3Met Kepcety opTaJIbIFbIHa xaIapIaIbIbI3. |
| YrIK Ta6aHbIHdaFb TceiKTepeDeh cy TaMbIaIbI. | Бу bIpIHIpi pet KOndahbIbIN OByIFaHbIbIKTaH, TytIKTepeDIn iShInDe cy XunHbIbN KaIfAH HeMece KByIFbIbIbIpa3 yakbIT KOnDaHbIMaFaH. | Бу ТуIMeciH YrIKTeY TakuTacbIH anbIbIpaK TpybIbN biPeHse pet BacbIbIb3. BybIbIbYxuBepeKhen CypTIn aLbHbI3 xdyI xOyIbI. |
| TabaHbIHaH KObIP TycI cyIbIK aFaIbI. | Cy KByTBH bIDbcIbHa cy XyMCaPTaBtH XmIMKaTTap Hemece KOsBbIbIaIap KBybIFaH. | Су КУТВИ BIDbcIgONdAeHIMdePdi KIOfA BoJIMaIbIy. YrIKTIn TabaHbIH dMbKbIbI yuBepeKhen CypTIn aLbHbI3 xOyIbIb3. |
| KурьIFы BiHpi pet KOsBbIaHdA, TyTIn Hemece nIC shbIKKaHbH baiKaIbCbI3. | YrIKTIn Ke3bip 6eJIeKTepe TByIFbIaIbI MATEpHaIaIaPmeH/ MaIIaPmeH eNDJIeRcH, COHbIKTaH TyIK bIpHbIaIbI pet KOsBbIaHa con 3aTTap ShbIaIbI. | Бул KALbITb JxafDai Jxhe YrIKTi biPheWe pet KOndahFAN coH, eZdiirHeN ToKtaIbI. Erep KBybIFbIbIeIipIaIeH cHd AaTyTIN/nc KETNepe, Braun TytBHybIaIapRA KBy3MetI Kepcety opTaIbIFbHa xaIaIaIbIbI3. |
| KурьIFы Ter6beIcTepeMeh baiNaHbICTbI yzIckTI shbIaIbI. | Бу reHepaToPbHa cy TaftbIynda. | Бул KALbITb JxafDai Jxhe eH eH opeKet JxacamaHbI3. |
| KурьIFы Ter6beIcTepeRe baiNaHbICTbI yzIckCIs shbIaIbIaIbI. | XyIe KAteliri. | KурьIFbIbIb KyaT Ke3iH eH axbIpaTbI, Braun TytBHybIaIaPra KBy3Met Kepcety opTaIbIFbHa xaIaIaIbIbI3. |
| KурьIFы Ter6beIcTepeMeh baiNaHbICTbI yzIckCIs shbIaIbIaIbI. | Бу reHepaToPbHa cy TaftbIynda. | Бул KALbITb JxafDai Jxhe eH opeKet JxacamaHbI3. |
| TbIFbIa Da 6ypan any KInbH. | ФК Ka6aTb TByIFbIaIbI aUyRa Ke3epri KeNTipUde. | КaknaKuaHbI KUwTeB 6ypan aUbHbI3. МсeSe I kayTaNahBac yuH, by reHepaToPbH xMyI uAio KaKeT. |
| KaiHaTkbIaTаJI de KByCbIM bap. | KaiHaTkbIaTаJI de KByCbIM bOLca Hemece bIcTbIb, Braun TytBHybIaIaPra KBy3Met Kepcety opTaIbIFbHa xaIaIaIbIbI3. |
| CytontbIFraHHaH KeiH, Shambl KaIa Ta petTeIeMeiDi. | CyrKakbIMaBcI dyPbIC JxMbIC ICTeMeiDi. | Cyr KByTBH bIDbcITb IocatbIn, xaybl, KaIa TaTontbIPbIbIb3. |
| CyrKByTBH bIDbcI dyPbIC cAlbHbSaHaH. | Cyr KByTBH bIDbcITb IydpCTan cAlbHbIb3. |
| Жарык, дioды 社amдарын
барыfcы кынлыктан тур. | Жуие кateлiri. | Жуиени Куат Кеzihe axыртын,
kaйда жалганьда, Кocу/Зшу
Тумесin Басынл.Егет масе
эл徳 чешимесе, Курлыны
черipin, Braun Тулыншларfa
Кызmeti Керсету оралынha
хабарласынл.3. |
| Бу садriшешоци Тураксыт彬 Турde
Косылл彬 Тур, бірak Тâбанын
Бу šылпайды. | Су садылбекитин Калfax
Немес Дурьс салынбоган. | Курлыны Бшірін, Куат Кеziон
axыртынл.3.Су садын
Босатын, iшіншайын, kaітадан су
Талырынл.3.Су куятун bідісты
орнын салынl3.
Курлыны Ксөын, колдануfa зэр
Баллafаншka kUTIH.Бу Түмecin
Басын, by shыikkаншka kUTIH.3.
Бу šылkkанda, by Түмecin 10
секунд устп Турынл.3, одан кeін
Босатынл.3. |
| Тыfcынан сыrtka by Hemece cy
шашьрайды. | Тыfcын дурьс Катайын
Буралmaоган. | Аспацны Кшіріn, розткадан
шашын Сулрынл.3 da, Сулрынл.3
(Кем Degerende 2,5 carat).
Тыfcынды Бүрэн alынл.3 da, acпарka
kaітадан дурьстан bүрэн calынл.3.
Есертпe: Тыfcынды Бүрэн alfahan
kezeideшамалысу afуы мүмін |
| Косарыссын пайдану
keziнды bicsil KeTeDi. | Бул калыntы ќа'da. Мүнын
себeбi - утікту Барысында by
сыm arылы eTeDi. | Косарныссынfa утікту keziinde тиin
ketney ушін оhalі Kapama-Kapсы
жakka Кочинl3. |
Pycckn
IMPORTANT: Never look at or
touch the iron while it is heating up. The "3D" soleplate
thanks to the specially shaped soleplate of the "3D" iron, the best results are achieved when ironing complex parts (for example, elements with buttons, pockets, etc.).
Settings
CareStyle 7143, 7144
The iCare setting is selected automatically when the appliance is turned on for the first time. When turned on again, the setting you selected last time will be active. The iCare setting is recommended for fabrics such as wool, polyester, and cotton.
The eco setting is recommended for the most delicate fabrics, such as synthetics, silk, or blended fabrics that do not require strong steam. It reduces energy consumption.
CareStyle 7155, 7156
eco ECO
This setting is recommended for the most delicate fabrics, such as synthetics, silk, or blended fabrics. It reduces energy consumption.
iCare
This setting is recommended for fabrics such as wool, polyester, and cotton.
turbo
This setting is recommended for fabrics that require stronger steam, for example, thick cotton, linen, or denim materials.
This setting is also suitable for refreshing and deodorizing clothes that have been in the wardrobe and that you want to wear.
Use the ironing function for people and animals.
When the appliance is plugged in, the «iCare» setting is always active, regardless of which setting you selected previously.
Results guide
Before ironing, carefully read the care label on the garment.
Always iron the garment on the reverse side to avoid shiny marks on the fabric. - Start ironing shirts with the more
complex parts, such as the collar, cuffs, and sleeves. Then iron the larger parts, such as the front and back, to avoid creases on the larger parts while ironing other parts.
- When ironing the collar, start from its reverse side, moving from the tip (pointed end) to the collar stand. Turn the garment over and repeat the same. Fold the collar and press its edges to achieve a «crisp» collar effect.
- For garments with buttons, snaps, or delicate trims (e.g., with embroidery), turn them inside out and, if necessary, place a cotton cloth between the iron and the garment. This way you will avoid damaging the garment and iron only those parts that cannot be ironed directly. When ironing woolen items, it is recommended to periodically press the precision steam button (13), without placing the iron directly on the garment. This will help avoid shine on it.
- To avoid new creases during steam ironing, make sure there is no standing water on the garment before proceeding to iron the next part.
(C) Precision steam
Press the precision steam button (13) until it stops. - Steam will be released intermittently from the front part of the soleplate. - To stop the function, release the button. - If the button is not fully pressed, some steam may also escape from the holes in the rear part of the soleplate.
(D) Auto shut-off mode
This function activates if no steam is supplied for 10 minutes.
When the iron is in auto shut-off mode, the indicator light (11) flashes and the iron does not heat up. The iron turns off to reduce energy consumption. - To turn it back on, press the «ON/OFF» button (2). Before starting to iron again, wait until the indicator light and the corresponding symbol on the dial (1) stop
Attention: Danger.
Operation after ironing / Storing the iron
Press the "On/Off" button (2) to switch off the appliance. - Disconnect the appliance from the mains and let it cool down before storing it. - Empty the water from the water tank. Wipe the iron.
(E) Locking system
The appliance is equipped with a locking system for easy storage. The locked iron can be lifted and carried by the handle.
Note: Before moving the iron, make sure it is properly locked and the water tank is empty.
- Place the soleplate of the iron in the groove on the platform of the iron.
- To lock the iron, slide the movable part (10) (locking mechanism) towards the iron until it clicks.
- To unlock the iron, press the button on the movable part (locking mechanism). The iron will be unlocked.
(F) Descaling
Never open the cap (8) and do not touch it if the appliance is hot or plugged in.
To ensure maximum efficiency of the system, it should be cleaned of limescale deposits every 15 uses of water (approximately 8 fills). Do not use any chemical agents, additives, or descaling products when rinsing the boiler.
The indicator light flashes.
a. Switch off the appliance (2) and disconnect it from the mains. Unlock the iron and remove it from the platform. Wait until it has completely cooled down (at least 2.5 hours). b. Empty the water from the water tank. c. Place the appliance on the edge of the sink and open the transparent cover (9). d. Turn the cap (8) counterclockwise to open it. e. Let the water drain into the sink. f. Slightly tilt the appliance to completely empty it of water. g. When water stops flowing out of the appliance,
turn the cap to close the boiler, and close the transparent cover.
h. IIO OKOHuaHn npoueDpybI ydaJIeHnaHKIIu NODKIIOChTE pnp6Op K CETn IN BKIIOChTe erO. i. Haxmnte Ha KhoNky «Cnctema ydaJeHnHaKnIn» (3) n depxnte ee HaxaToB TeueHne 2CeKYndIra c6poca.
EcynyTIO6bINBbIKNIOueH6e3ydaIeHnHaKInn, 3NaOH NaHETMnraTb npn NOBTOpHOM eRO BKJIOUeHN.
PnmeHn: NCKOJbky COCTAB BOdb MoKET 6bIb pa3HbIM, ppi NCIOJIb3OBAHmN BCTPOEHHO 6bITOBORo npnbopa dnyaJeHnHaKnPi peKOMeHdyeTcraYdaJIaTB HaKnIb N3 CNTEmbl nocLe KaXbIX 4-x HanoJIHeHn yTOra BoDOn nn He pexe Ondoro pa3a B Mecau. B 3tOM clyueae 3HaOK ydaJIeHnHaKnIi He HaHET MInTaB ABTomATnueckn.
(G) yxoid noochnctka
- Pered, oucnctkoB CseIyET yIOCTOBepnTbC B TOM, YTO np6Op BbIKJIOueH, OTKIOUoyEH OT CETN INONHOCTbIO OCTbl. -Дя OУСТКИ NOДОЛВБI peKOMeHДуeTCR NcNoJIb3OBAt b BlaJxHyIO TKaHb. -ДяоуNTКМЯгKOrMaTePnanaHa pyuKe n rJaDKoN 6JIeCTaUeI NOBepxHOCTNuCNoJb3yIn TE NCKJIQUHTeJIbHO BIAJXHyIO TkaHb.
- Hn B koem cnyae He nCnoJb3yIe XmMueckne cpeicTBa, yKcyc, r6kN nnCKpe6Kn (Ha npimep, r6kn C rpyoH eHIOHOBOI TkaHbIO).
He Bb6paBcIbAaTe np6Op BmecTe C 6bITOBbIMN OTXoDAMN IO OKOHaHn Cpoka erO kCnlyatauN. CdaTb np6Op Ha yTNl3aUIO MOxHO B CepBnCHOM ueHTpe Braun nnn B COOTBeTCTByIOux NyHKtax c6opa, npedyCMOTpeHHbIX BAWei CTpaHe.

DaTa H3rOToBHeHn
YTo6bI y3HaTb DaTy BbInycka, NocMOTpnte Ha PAnTn3NaHbI KOJ npOdykTa (BO3Ne Ta6nKn C 06o3HaueHem cepu). IepBa rUΦpa o6o3Haayet NocJeHIOU cNΦpy roa n3rOToBJIeHn. DBe CLeNyIoUne cNΦpbI - 3TO KaJeHapHaer HeJeL. A NocJeHNHe DBe YKa3bIBaOT n3DaHne (aBTOMaTnueCKn NOcHTbIBaETcRc 1992 roJa). PpImep: 30421 - n3dennE bblO BbInyueHo B 2013 roy (B 4 HeJeIIO).
EAC
Cpok xpaHenn: He orpaHnueh
YcnoBn yTnH3aun:YTUN3npoBaTb B COOTBETCTBN C 3KOJIOTNueCKMN Tpe6OBAHNA
YcIOBn TpaHCnpTnpOBKn: Bo Bpemr TpaHCnpTnpOBKn, He 6pocatb n He noDbepraTb N3JIuHHe BV6paun.
YcnoBnaPeaHn3aunn:
IpaBnla peaJn3aun TObapa He yCTaHOBJIeHbI n3rTOBNTeJIem,
De'Longhi Braun Household GmbH, Carl-Ulrich-Strasse 4, 63263 Neu Isenburg, Germany
Troubleshooting Guide
Preparation for First Use
Remove the box. Take out all parts of the packaging. Remove the stickers from the appliance (do not tear off the rating label).
On first use, it is recommended to let the appliance operate for a few minutes through the water tank to eliminate any manufacturing residue.
(A) Filling the Water Tank
- Make sure the appliance is unplugged and the system is disconnected from the power supply. Remove the water tank (6).
- Fill the water tank with tap water, making sure it does not exceed the “Max” level, but reaches at least the “Min” level. Otherwise, the appliance will not be ready for steam operation. If you have hard water, we recommend using a mixture of 50% tap water and 50% distilled water. Never use only distilled water. Do not add any additives (e.g., starch). Do not use condensed water from a tumble dryer. Reinstall the water tank.
- Place the appliance on a stable, level surface.
Note: If you use a filter or have a water softening device, make sure the water obtained is neutral.
Water Level Function
When the water level is low, the indicator light starts to blink. At this stage, you can continue steaming for 10-15 minutes. Then refill the water tank. When the temperature control indicator (11) lights up, the indicator light goes out according to the selected setting (4). - To continue steam operation, refill the water tank (A).
(B) Starting Operation
Before operation, carefully read the instructions for use. Fabrics with the symbol [do not iron] are not suitable for ironing.
Place the iron on the stand for the iron (5) or on the heel (15), fully unwinding the cord during ironing, plug it into the mains and press the “I/O” button (2). The selected temperature (4) will be indicated by the indicator light. To change the temperature setting, press the corresponding button (ECO, CARE, or TURBO). To confirm the selected temperature, press the corresponding button. The iron will start heating up, and the temperature control indicator (11) will blink. When the iron has heated up, the temperature control indicator will light up steadily. The selected temperature on the display (1) will blink. When the iron is ready, the display will light up steadily.
Steam ironing
Press the steam button (12) or the steam shot button (13).
Continuous steam
Press and hold the steam button (12) or the steam shot button (13) for more than 1 second. Steam will be emitted continuously for several seconds.
Press the steam button or the steam shot button again to turn off the function.
Dry ironing
Iron without pressing the steam button (12) or the steam shot button (13). Note that after 10 minutes of dry ironing, the iron will switch to automatic standby mode.
Vertical steaming
The iron can also be used for vertical steaming, for example, to remove wrinkles from hanging clothes (B). Hold the iron in a vertical position, slightly tilted forward. Move the iron from top to bottom, while periodically pressing the steam button (12) or the steam shot button (13).
Steam from the iron is very hot: never iron or steam clothes while they are being worn.
3D soleplate
The unique 3D soleplate with a rounded shape ensures the best ironing results on difficult areas (seams, buttons, pockets, etc.).
Settings
CareStyle 7143, 7144
The "iCare" setting turns on automatically when you turn on the appliance. When you turn it on again, the "iCare" setting will be active, just as you selected it the previous time.
The "iCare" setting is recommended for fabrics such as wool, polyester, and terry cloth.
The setting is not recommended for delicate fabrics such as synthetics, silk, or blended fabrics. This setting allows you to use less energy.
CareStyle 7155, 7156
eco ECO
Recommended for delicate fabrics, such as synthetics, silk, or blended fabrics. This setting allows you to use less energy.
iCare
Recommended for wool, polyester, and terry cloth.
turbo
Recommended for fabrics that require more steam, for example, thick terry cloth and linen.
This setting is also suitable for refreshing and dewrinkling clothes that are in the wardrobe and that you want to wear.
Note: Do not use the dewrinkling function for people and animals.
When you turn on the appliance, the "iCare" setting will be active, regardless of whether you selected it the previous time.
For best results
Before first use, carefully read the instructions in the manual.
Iron on the wrong side of the fabric to prevent the soleplate from leaving marks on the fabric. When ironing delicate parts, such as collars and sleeves, start with the lowest heat setting. Then iron larger parts, such as the front and back, to avoid creases on larger parts while ironing them. When ironing a collar, start from its wrong side, moving from the edge (the pointed end) to the center. Turn over
the collar and repeat the same steps. Fold the collar and iron its edge to achieve a "crisp" collar effect.
- When ironing items with prints, appliqués, or thicker parts (for example, with embroidery), turn them inside out and, if necessary, place a cotton cloth between the iron and the garment. This way, you will avoid damaging the print and will be able to iron parts that cannot be ironed directly.
- When ironing stubborn wrinkles, it is recommended to periodically press the steam shot button (13), without moving the iron directly during this. This will help prevent water spots on the fabric. To avoid water spots, make sure there is no residual water on the soleplate before ironing the next parts.
(C) Steam shot
- Press the steam shot button (13) all the way down.
- Steam will only come out of the soleplate. To deactivate the function, release the button.
- If you do not press the button all the way down, some steam may also escape from the steam vents in the soleplate.
(D) Auto shut-off mode
This function activates when the iron is left idle for more than 10 minutes.
When the iron is in auto shut-off mode, the indicator light on the temperature control (11) will blink. The iron will turn off to save energy. To turn the iron back on, press the "ON/OFF" button (2). Before ironing again, wait until the indicator light on the temperature control and the corresponding symbol on the display (1) light up steadily.
After ironing / storing the iron
Press the ON/OFF button (2) to turn off the iron.
Unplug the appliance from the electrical outlet and let it cool down before storing. Empty the water from the water tank. Lock the iron.
(E) Lock system
Press the lock button and turn the handle to lock or unlock. The locked sprayer can be lifted and carried by the handle.
Note: Before moving the sprayer, make sure it is locked and the water tank is empty.
- Place the sprayer in the stand under the sprayer.
- To lock the sprayer, turn the movable part (10) (light click) in the direction of the sprayer until you hear a click.
- To unlock the sprayer, press the button on the movable part (light click). The sprayer unlocks.
(F) Removing the scale
Never open the cap (8) and do not touch it while the device is connected to the power supply or plugged into the mains.
To maintain optimal performance, it is necessary to perform regular descaling of the boiler after every 15 fills of water (about 8 refills).
Do not use chemical or abrasive agents for descaling the boiler.
The scale indicator lights up.
a. Turn off (2) the device and unplug it from the mains. Unlock the sprayer and check the stand. Wait until the device has completely cooled down (minimum 2.5 hours). b. Empty the water tank. c. Place the device on the cap and remove the cap (9). d. Turn the cap (8) counterclockwise and pull to remove it. e. Let the water drain out. f. Tilt the device slightly to completely empty it of water. g. When water stops dripping from the device, replace the cap to close the boiler, and replace the cap (9). h. After completing the descaling procedure, plug the device into the mains and turn it on.
i. Press the "Descaling" button (3) and hold it for 2 seconds to start descaling.
If the sprayer was turned on without descaling, the indicator will light up again when it is turned on again.
Note: Since the composition of water may vary, it is recommended to descale the boiler after every 3-4 full tanks of water or at least once a month. In any case, the descaling indicator should not light up automatically.
(G) Care and cleaning
- Before cleaning, unplug the appliance and turn off the circuit breaker, then let it cool completely. It is recommended to use a soft cloth.
- To clean the soft material, use a
- cloth slightly dampened with water only.
- Use only a soft cloth.
In any case, do not use chemical agents, acids, or metal sponges (for example, sponges with an abrasive surface).
Please do not dispose of the appliance together with household waste at the end of its service life. The appliance can be taken to a Braun Service Center or to appropriate collection points provided in your country.

The device complies with the requirements of the technical regulation on restriction of hazardous substances in electrical and electronic equipment.

Hotline: 0 800 503-507 (toll-free from landline phones).
Troubleshooting and warranty
| ПОНБЛЕМА | ПРИЧИНА | СПОСÍВ UCSYHEH住房 |
| Пробadge He BIMKAeTbCry. | Пробadge He πίдкlioчесу, Σо р tripлад, πίдкlioчесу правильно, i haTuschɪt b KhoŋkU «Увimк.» | Пеpeконайся, Σо р tripлад, πίдкlioчесу правильно, i haTuschɪt b KhoŋkU «Увimк.» |
| Прара вихочь 3-πίд 6a3oborOto 6lOKу. | ВідкрILAcssсссма зассту вid мakсимального ТИСКУ. | ВиMuKHiTb р tripлад i зbernhiTбся в abTopu3OBaHni cepBicHni ceHTp Braun. |
| 3 OTbOPiB в Нixнii частNiPiДОшВи ВИтikaюТ краплі BODи. | ВODa сkondencybalaccesperedinH trpy6, tak як Функцяпари ВИКористовуETься впершабо He BIVKORINCTOBYBaLacn<|rotate_down|>гом Deякого уacy. | HATUSCHIb KhoŋkU podaqui napni kijka paazib y habрamky BiD npacvbaJbHOi Doшк. Lc Даctb 3MORY BIVNcTITN XOJIOnDHy BOdy 3 KOHTypu ZICPKUlaZi II napri. |
| 3 piДошВи ВИтikae piДинacoRунecheBOrO KoIbOpy. | Y pezeerByap дя вODи додавалixiMiChi nom'Яksbyaichi abo doabavkn. | Hikoli Ne 3aJIbBaIte zu npodukTiB pezeerByap dя вODи. OuchcTiB piДошВу BoJorOTo TkaHInHOi i npOMnIte BiDcik dя уТВоренny napri. |
| Пд час першого уВIMКненnya prinp平方у 3'ЯВИСя дIM a60Зanax. | Дяяki часни ррilаду buIiy obrobleni uşilbHouBaYem/Зma3koJU, як BiNap罗BOYUTbcrypiДчс першOTO harpIBaHnЯ пackn. | LcE HopMaJIbHm I npinPInHtbcryпсяdekiьkoX pasizВИКористань пackn.Якцио пicяпь WMIMKHeHNY ррiladу дIM/Зanax BCE ue 36epiraetbcy, 3bernhiTseydo abTropn3OBaHOrO cepBicHoro ceHTpy Braun. |
| Прилад видае пereрьч actnшу, поязану 3 bivpaizieю. | ВODa 3akayetybcsry 6oilnep. | UeHopmalno, nHOrO pOBnTn He notpiho. |
| Прилад renepeyec6e3pepebnyshm,pov'ra3anu 3 koliBaHHaMn. | Система nomilka. | Bidi'eHaIte prnilad BiD Mepejxta 3b'JxItbc i3 ABTopi3OBAHm cepBicHm cHTpOM Braun. |
| 3aRnyuKa BaxkoBidkrivaactbca. | Скam'Янiiнн Нakin He dae3aRnyucci BiDCHNITcB. | Bidkpytib KpniKu CnIoIO. UTo6yHnKHyTu cIeI npoblemu, qacto npommbaiTe cnCTemY. |
| Боilnep BCE ue 3naXoDnTbcr na Tlckom. | HikoiN He BiDnHae Te 3aRnyuKu, ykuO BoiIep BCE ue 3naXoDnTbcraNiD TnCKom a6o 3aLnaaTcBcraPraYum. POnekaiTe He MeHsE 2,5 roDIn, nepu HIX BiDkrBuAtn 3aRnyuKu. |
| Пися nobtopHoro 3aNoBHeHnpe3epByapar dlya BODINCBiTNOBIM iNDkAToP iNDkAToRa He ckiDaEhcb. | ПОлавok Дявои He npaioe HaleKHM ChINOM. | 3IiIte BoDy 3 pe3epByapa, npOMIIte Ioro I 3HOv ByzAnOBHitb. |
| Рe3epByap Dria BoDi BCTAHOBJIeH NHePabINbHo. | BCTahOBiB pe3epByap dlya BoDn HALEKHM ChINOM. |
| Bci CBiTLOdIOHn IaAMPi6IIMaIbTb. | СИstemHa nomilka. | BIMKnHb Prnilad BiD Mepejxi, nIdkIIOUHb Ioro 3HObY i HATNCHITb KONKU «YBMK./BIMK.».ЯкIo npoblemy He yCyHTo, HeaHIO BIMKnHb Prnilad, BITaRTHITbДpI3 pOZeTKn I 3BePHITbcr B abTopi3OBAHm cEpBICHm ceHTp BRAun. |
| 3Nauchok napu noctiHocBcITnTbC, ale HeMae BVKnDiBnapu 3 NiD0Bn. | ПОлавok pe3epByap dlya BoDn 3aBLOKoBaHOn a6o pe3epByap dlya BoDn BCTAHOBJIeH NHeBipHO. | BIMKnHb i BiDkIIOUHb Prnilad BiD Mepejxi. BITaRTHIb pe3epByap dlya BoDn, BVKnHb Tbe 3HbOro BoDy, IOMIIte Ta 3HObY hANOBHITb BOIOU. BCTAHOBITb pe3epByap dlya BoDn. YBIMKnHb Prnilad i NoceKaiaTe, NOKn Prnilad He 6bYe roTOBm do BVKnOpNCtANH.NaTNCHITb KONKU npOdaI npaI i 3aKeaIte, NOKn He 3'YBNTBCaIpa. YTpIMyIte KONKU npOdaI npaI hATNCHTOIO npOTaROM 10 cekynD BVnysckanHn npaI, noTIm BIDnycTb KONKU npOdaI npaI. |
| Ipara abo Boda BVxOdoHb i33aRnyuKn. | 3aRnyuKa He 3akpita Jk csiI. | BIMKnHb Prnilad, BiD'eDnaiTe Ioro BiD Mepejxi i DaIte NOMy OXoLoHUTn (IpOTaROM He MeHsE 2,5 roDIn). BIDUnHb 3aRnyuKhTy a 3aChHITb IIЯK csiI.ПримiTka: Pri n BiDkrPTTI zaRnyuKn Moxe BVtIKTN HeVeJIKA KJIbKICTb BODn. |
| IpondbiHn und rarpiaactbcyPiD chac BVNKOpNCtAHNJa. | Ie HopmalboH. PrnilnoHouCbOMy e npapa,Яka npoxODoTb chepe 3dpit niD quc npacSyBaHn. | Po3TaUyIte IodBiHn DprIT Na npotnlJeXHOMy BoCi BiD Bac, zuoB Bi He TopkaniB cyoI nd qac npacSyBaHn. |
| .(العربية)العربية)العربية)العربية)العربية)العربية)العربية)العربية)العربية)العربية)العربية)العربية)العربية)العربية)العربية)العربية)العربية)العربية)العربية)العربية)العربية)العربية)العربية)العربية)العربية)العربية)
.(العربية)العربية)العربية)العربية)العربية)العربية)العربية)العربية)العربية)العربية)العربية)العربية)العربية)العربية) |
| .(العربية)العربية)العربية)العربية)العربية)العربية)العربية)العربية)العربية) |
| الله | الله |
| بناصرعَة الحرفية بلوتُ لحيى نَزَلِه.الله ميراني بلوتُ لحيى نَزَلِه.الله ميراني بلوتُ لحيى نَزَلِه.الله ميراني بلوتُ لحيى نَزَلِه.الله ميراني بلوتُ لحيى نَزَلِه.الله ميراني بyroتُ لحيى نَزَلِه.الله ميراني بyroتُ lsl.
الله ميراني بyroتُ lsl.
الله ميراني بyroتُ lsl.
الله ميراني بyroتُ lsl.
الله ميراني بyroتُ lsl.
الله ميراني بyroتُ lsl.
الله ميراني بyroتُ lsl.
الله ميراني بyroتُ lsl.
الله ميراني بyroتُ lsl.
الله مermenاني بيوتُ لحيى نَزَلِه.الله مermenاني bуتُ لحيى نَزَلِه.الله مermenاني bуتُ lsl.
الله مermenاني bуتُ lsl.
الله مermenاني bуتُ lsl.
الله مermenاني bуتُ lsl.
الله مermenاني bуتُ lsl.
الله مermenاني bуتُ lsl.
الله مermenاني bуتُ lsl.
الله مermenاني bуتُ lsl.
الله مermenاني bуتُ lsl.
الله مcrmاني bуتُ lsl.
الله مcrmاني bуتُ lsl.
الله مcrmاني bуتُ lsl.
الله مcrmاني bуتُ lsl.
الله مcrmاني bуتُ lsl.
الله مcrmاني bуتُ lsl.
الله مcrmاني bуتُ lsl.
الله مcrmاني bуتُ lsl.
الله مcrmاني bуITED.
الله مcrmاني bуyped.
الله مcrmاني bуyped.
الله مcrmاني bуyped.
الله مcrmاني bуyped.
الله مcrmاني bуyped.
الله مcrmاني bуyped.
الله مcrmاني bуyped.
الله مcrmاني bуyped.
الله مcrmاني bуyped.
الله مcrmاني bуyped.
الله مcrmاني bуyped.
الله مcrmاني bуyped
الله مcrmاني bуyped.
الله مcrmاني bуyped.
الله مcrmاني bуyped.
الله مcrmاني bуyped.
الله مcrmاني bуyped.
الله مcrmاني bуyped.
الله مcrmاني bуyped.
الله مcrmاني bуyped.
الله مcrmاني bуyped.
الله مcrmاني bуyped.
الله مcrmاني bуyped.
łرطاني.
łرطاني.
łرطاني.
łرطاني.
łرطاني.
łرطاني.
łرطاني.
łرطاني.
łرطاني.
łرطاني.
łرطاني.
łرطاني.
łرطاني.
łرطاني.
łرطاني.
łرطاني.
łرطاني.
łرطاني.
łرطاني.
łرطاني.
łرط;/.
łرط;/.
łرط;/.
łرط;/.
łرط;/.
łرط;/.
łرط;/.
łرط;/.
łرط;/.
łرط;/.
łرط;/.
łرط;/.
łرط;/.
łرط;/.
łرط;/.
łرط;/.
łرط;/.
łرط;/.
łرط;/.
łرط;/.
łرط\/.
łرط\/.
łرط\/.
łرط\/.
łرط\/.
łرط\/.
łرط\/.
łرط\/.
łرط\/.
łr\/.
łr\/.
łr\/.
łr\/.
łr\/.
łr\/.
łr\/.
łr\/.
łr\/.
łr\/.
łr\/.
łr\/.
łr\/.
łr\/.
łr\/.
łr\/.
łr\/.
łr\/.
łr\/.
łr\/.
łr\/.
łr\/.
łr\/.
łr\/.
łr\/.
ł\/.
ł\/.
ł\/.
ł\/.
ł\/.
ł\/.
ł\/.
ł\/.
ł\/.
ł\/.
ł\/.
ł\/.
ł\/.
ł\/.
ł\/.
ł\/.
ł\/.
ł\/.
ł\/.
ł\/.
ł\/.
ł\/.
ł\/.
ł\/.
ł\/.
ł\/.
ł\/.
ł\/.
ł\/.
ł\/.
ł\/.
ł\/.
ł\/.
ł⁄.
ł⁄.
ł⁄.
ł⁄.
ł⁄.
ł⁄.
ł⁄.
ł⁄.
ł⁄.
ł⁄.
ł⁄.
ł⁄.
ł⁄.
ł⁄.
ł⁄.
ł⁄.
ł⁄.
ł⁄.
ł⁄.
ł⁄.
ł⁄.
ł⁄.
ł⁄.
ł⁄.
ł⁄.
ł⁄.
ł⁄.
ł⁄.
ł⁄.
ł⁄.
ł⁄.
ł⁄.
ł⁄.
ł⁄?
ł⁄.
ł⁄.
ł⁄.
ł⁄.
ł⁄.
ł⁄.
ł⁄.
ł⁄.
ł⁄.
ł⁄.
ł⁄.
ł⁄.
ł⁄.
ł⁄.
ł⁄.
ł⁄.
ł⁄.
ł⁄.
ł⁄.
ł⁄.
ł⁄.
ł⁄.
ł⁄.
ł⁄.
ł⁄.
ł⁄.
ł⁄.
ł⁄.
ł⁄.
ł⁄.
ł⁄.
ł⁄.
ł⁄.
.
ł⁄.
ł⁄.
ł⁄.
ł⁄.
ł⁄.
ł⁄.
ł⁄.
ł⁄.
ł⁄.
ł⁄.
ł⁄.
ł⁄.
ł⁄.
ł⁄.
ł⁄.
ł⁄.
ł⁄.
ł⁄.
ł⁄.
ł⁄.
ł⁄.
ł⁄.
ł⁄.
ł⁄.
ł⁄.
ł⁄.
ł⁄.
ł⁄.
ł⁄.
ł⁄.
ł⁄.
ł⁄.
ł⁄
.
ł⁄.
ł⁄.
ł⁄.
ł⁄.
ł⁄.
ł⁄.
ł⁄.
ł⁄.
ł⁄.
ł⁄.
ł⁄.
ł⁄.
ł⁄.
ł⁄.
ł⁄.
ł⁄.
ł⁄.
ł⁄.
ł⁄.
ł⁄.
ł⁄.
ł⁄.
ł⁄.
ł⁄.
ł⁄.
ł⁄.
ł⁄.
ł⁄.
ł⁄.
ł⁄.
ł⁄.
ł⁄.
ł⁄、
ł⁄.
ł⁄.
ł⁄.
ł⁄.
ł⁄.
ł⁄.
ł⁄.
ł⁄.
ł⁄.
ł⁄.
ł⁄.
ł⁄.
ł⁄.
ł⁄.
ł⁄.
ł⁄.
ł⁄.
ł⁄.
ł⁄.
ł⁄.
ł⁄.
ł⁄.
ł⁄.
ł⁄.
ł⁄.
ł⁄.
ł⁄.
ł⁄.
ł⁄.
ł⁄.
ł⁄.
ł⁄.
ł⁄.
L
L
L
L
L
L
L
L
L
L
L
L
L
L
L
L
L
L
L
L
L
L
L
L
L
L
L
L
L
L
L
L
L
L
L
L
L
L
L
L
L
L
L
L
L
L
L
L
L
L
L | |
| الله ميراني bуتُ لحيى نَزَلِه.الله ميراني bуتُ lsl.
الله ميراني bуتُ lsl.
الله ميراني bуتُ lsl.
الله ميراني bуتُ lsl.
الله ميراني bуتُ lsl.
الله ميراني bуتُ lsl.
الله ميراني bуتُ lsl.
الله ميراني bуتُ lsl.
الله ميراني bуتُ lsl.
الله مERMANI L
الله مERMANI L
L
L
L
L
L
L
L
L
L
L
L
L
L
L
L
L
L
L
L
L
L
L
L
L
L
L
L
L
L
L
L
L
L
L
L
L
L
L
L
L
L
L
L
L
L
L
L
L
L
l
l
l
l
l
l
l
l
l
l
l
l
l
l
l
l
l
l
l
l
l
l
l
l
l
l
l
l
l
l
l
l
l
l
l
l
l
l
l
l
l
l
l
l
l
l
l
l
l
l
L
L
L
L
L
L
L
L
L
L
L
L
L
L
L
L
L
L
L
L
L
L
L
L
L
L
L
L
L
L
L
L
L
L
L
L
L
L
L
L
L
L
L
L
L
L
L
L
L
1
1
1
1
1
1
1
1
1
1
1
1
1
1
1
1
1
1
1
1
1
1
1
1
1
1
1
1
1
1
1
1
1
1
1
1
1
1
1
1
1
1
1
1
1
1
1
1
1
1
l
l
l
l
l
l
l
l
l
l
l
l
l
l
l
l
l
l
l
l
l
l
l
l
l
l
l
l
l
l
l
l
l
l
l
l
l
l
l
l
l
l
l
l
l
l
l
l
l
1
1
1
1
1
1
1
1
1
1
1
1
1
1
1
1
1
1
1
1
1
1
1
1
1
1
1
1
1
1
1
1
1
1
1
1
1
1
1
1
1
1
1
1
1
1
1
1
1
L
L
L
L
L
L
L
L
L
L
L
L
L
L
L
L
L
L
L
L
L
L
L
L
L
L
L
L
L
L
L
L
L
L
L
L
L
L
L
L
L
L
L
L
L
L
L
L
L
I
I
I
I
I
I
I
I
I
I
I
I
I
I
I
I
I
I
I
I
I
I
I
I
I
I
I
I
I
I
I
I
I
I
I
I
I
I
I
I
I
I
I
I
I
I
I
I
I
I
l
l
l
l
l
l
l
l
l
l
l
l
l
l
l
l
l
l
l
l
l
l
l
l
l
l
l
l
l
l
l
l
l
l
l
l
l
l
l
l
l
l
l
l
l
l
l
l
l
I
I
I
I
I
I
I
I
I
I
I
I
I
I
I
I
I
I
I
I
I
I
I
I
I
I
I
I
I
I
I
I
I
I
I
I
I
I
I
I
I
I
I
I
I
I
I
I
I
1
1
1
1
1
1
1
1
1
1
1
1
1
1
1
1
1
1
1
1
1
1
1
1
1
1
1
1
1
1
1
1
1
1
1
1
1
1
1
1
1
1
1
1
1
1
1
1
1
I
I
I
I
I
I
I
I
I
I
I
I
I
I
I
I
I
I
I
I
I
I
I
I
I
I
I
I
I
I
I
I
I
I
I
I
I
I
I
I
I
I
I
I
I
I
I
I
I
II
II
II
II
II
II
II
II
II
II
II
II
II
II
II
II
II
II
II
II
II
II
II
II
II
II
II
II
II
II
II
II
II
II
II
II
II
II
II
II
II
II
II
II
II
II
II
II
II
II
I
I
I
I
I
I
I
I
I
I
I
I
I
I
I
I
I
I
I
I
I
I
I
I
I
I
I
I
I
I
I
I
I
I
I
I
I
I
I
I
I
I
I
I
I
I
I
I
I
ⅰ
ⅰ
ⅰ
ⅰ
ⅰ
ⅰ
ⅰ
ⅰ
ⅰ
ⅰ
ⅰ
ⅰ
ⅰ
ⅰ
ⅰ
ⅰ
ⅰ
ⅰ
ⅰ
ⅰ
ⅰ
ⅰ
ⅰ
ⅰ
ⅰ
ⅰ
ⅰ
ⅰ
ⅰ
ⅰ
ⅰ
ⅰ
ⅰ
ⅰ | |
10 10
. 1

∴ SΔOBC = 1/2 · OB · BC = 1/2 × CD × 5
∴ SΔOBC = 1/2 · OB · BC = 1/2 × CD × 5
CareStyle 7143, 7144
CareStyle 7155, 7156
.
iCare
jglg gall Jao ylo geeraCi olayy pluoy
jbo1g
中 1
SjI Joo 1
jglg jlljjll
cilllll llll llll llll llll
JUULI JUJUJUJU
aalglgolol ylc aalil alab g pao 10
iCare slyy lye gdo abo paa jaoa
Laiu oJolol oolol jolal aiaa aaii
zliujiasiJieLguaoxu
aaiy yllly aiee 1000
__SUPPIMER__
Therefore S = 1/2 L
(eco, iCare, turbo) 4
δ = S_ΔAOB = 1/2 × OB × 5
Jai 10
01g5
11
12
13
14
15
sga aJl plu
aaii iiaaa aiee
jglalil
Lg1Lg1Lg1Lg1
J51 pluucwU L
gJ jn Jn Jn Jn Jn Jn Jn Jn Jn Jn
gaijy jai y oogai ydo ggo u Suiiai taia
.(
15 15
0g 0g

8
a) 151 g 105151 g 151 dUg 151 200 200 200 200 200 200
aaiy aaiy aaiy aaiy aaiy aaiy aaiy aaiy aaiy
jbs 40sds jyds d3
aJ 1