
KMP 8650 S - Food Processor GRUNDIG - Free user manual and instructions
Find the device manual for free KMP 8650 S GRUNDIG in PDF.

| Product Type | Stand Mixer |
| Brand | Grundig |
| Model | KMP 8650 S |
| Power | 1000 W |
| Power Supply | 220-240 V ~ 50-60 Hz |
| Bowl Capacity | 4.5 litres (approx.) |
| Bowl Material | Metal |
| Display | LED with timer |
| Speeds | Variable with rotary knob |
| Pause function | Yes |
| Timer | Up to 9 min 59 sec |
| Included accessories | Whisk, dough hook, beater, splash guard, spatula |
| Removable bowl | Yes |
| Tiltable head | Yes, with unlocking button |
| Cable storage compartment | Yes, automatic rewinder |
| Bowl and whisk dishwasher safe | Yes |
| Safety | Automatic shut-off in case of overheating, anti-splash soft start |
| Use | Household only |
| Dimensions (approx.) | 35 x 25 x 35 cm |
| Weight (approx.) | 5.5 kg |
Frequently Asked Questions - KMP 8650 S GRUNDIG
User questions about KMP 8650 S GRUNDIG
0 question about this device. Answer the ones you know or ask your own.
Ask a new question about this device
Download the instructions for your Food Processor in PDF format for free! Find your manual KMP 8650 S - GRUNDIG and take your electronic device back in hand. On this page are published all the documents necessary for the use of your device. KMP 8650 S by GRUNDIG.
USER MANUAL KMP 8650 S GRUNDIG
This section contains safety instructions that will help protect from risk of personal injury or material damage.
Failure to follow these instructions voids any granted warranty.
- Retain the operating instructions for later consultation. If the appliance is transferred to a third party, these operating instructions must likewise be handed over.
This appliance complies with the international safety standards.
This appliance may be used by people whose physical, perceptive or mental skills are impaired or who are inexperienced or not knowledgeable about the appliance as long as they are supervised or informed and made understood the safe use of the appliance and the encountered dangers.
Children must not use the appliance.
This appliance is only intended for private use in the household and is not suitable for professional use in the restaurant sector. It may not be used for commercial use.
Children must not play with the appliance.
- Keep the appliance out of the reach of children.
- Cleaning and user maintenance cannot be performed by children.
Clean the appliance in accordance with the instructions given in the "Cleaning" section.
- Do not use it if the power cable, accessories or the appliance itself is/are damaged. Contact an authorised service.
- Only use the original accessories, or accessories recommended by the manufacturer.
- Do not attempt to dismantle the appliance.
- Use the appliance in accordance with the amount and usage instructions given in "Maximum amount and processing times" section of the user manual.
Always use the protective cover against the risk on injury when blending, kneading and whisking for safety reasons.
- Do not operate or place this appliance or its parts on or near hot surfaces.
- Do not use the appliance for hot food.
- Your mains power supply should comply with the information supplied on the rating plate of the appliance.
Use the appliance with a grounded outlet.
- Do not use the appliance with an extension cable.
- Do not touch the plug of the appliance with damp or wet hands.
Always pull the mains plug from the socket; after the use of the appliance, before the cleaning of the appliance, before leaving the room or if a fault occurs. Do not pull the mains plug from the socket using the cable.
- Unplug the appliance before cleaning, disassembly, accessory replacement and wait for it to stop completely.
- After cleaning, dry the appliance and all accessories before connecting it to mains supply and before attaching the accessories.
- Do not use the appliance for purposes for which it is not intended.
- Do not immerse the appliance, the power cable, or the power plug in water or any other liquid.
If you keep the packaging materials, store them out of the reach of children.
Dear Customer,
Congratulations on purchasing the GRUNDIG Kitchen Machine KMP 8650 S.
Please read the following user guide carefully to ensure that you have many years of enjoyment from your quality Grundig product at home.
Responsible trading!

Both internally and for suppliers, GRUNDIG insists on contractually guaranteed social working conditions with fair wages, efficient use of raw materials with continuous reduction in waste of several
tonnes of plastic each year - and at least 5 years' availability for all accessories.
For a future worth living.
Grundig.
Operating elements
Please see the illustrations on page 3.
A Bowl base
B Bowl handle
C Bowl
D Accessory mounting point
Additional accessory inlet
F Button to lift upper body
G LED display
Time setting buttons
Speed adjustment knob
Pause/Start button
K Cable hiding bay
Feeding chute
M Splash guard
N Spatula
Dough Hook
Beater
Whisker
Initial use
1 Take out all packaging and label materials and dispose of them in accordance with the applicable local regulations.
2 Clean the appliance before initial use (Refer to "Cleaning and care" section).
Intended use
This appliance has been designed for domestic use only. It should not be used commercial purposes.
Do not use the appliance for anything other than its intended use.
Accessories
Whisker
Used to prepare light foods such as cream, whipped cream and eggs.
Dough hook
Used to knead doughs that contain thick ingredients, such as bread dough, and to blend additional ingredients (raisins, fruit chips, chocolate chips etc.) with the dough.
Beater P
Used to blend ingredients that have the consistency of cake batter.
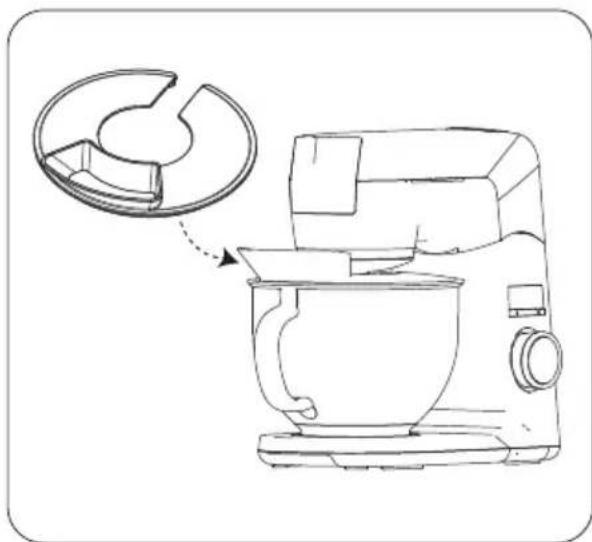
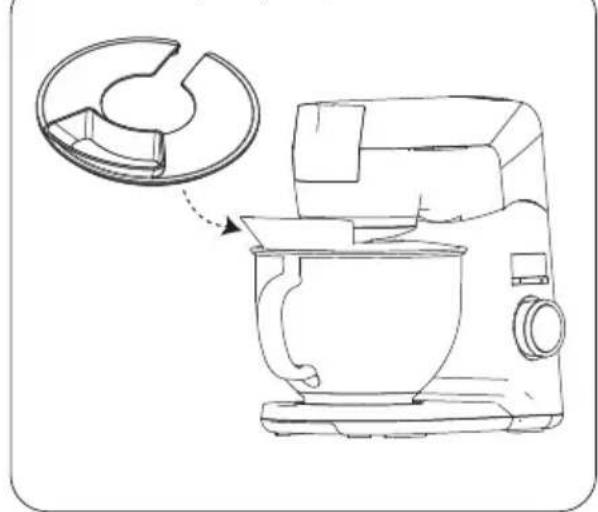
Splash guard M
For safety reasons, you must definitely use this accessory when blending.
Installation and operating
Place the appliance vertically on a stable, level and dry surface.
Warning:
In all installation procedures, make sure that the appliance is unplugged and the speed adjustment knob 1 is in "0" position.
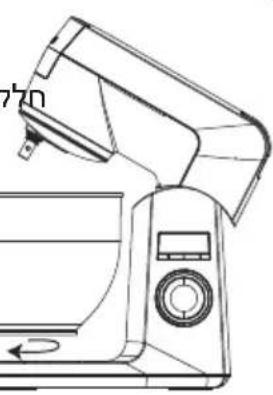
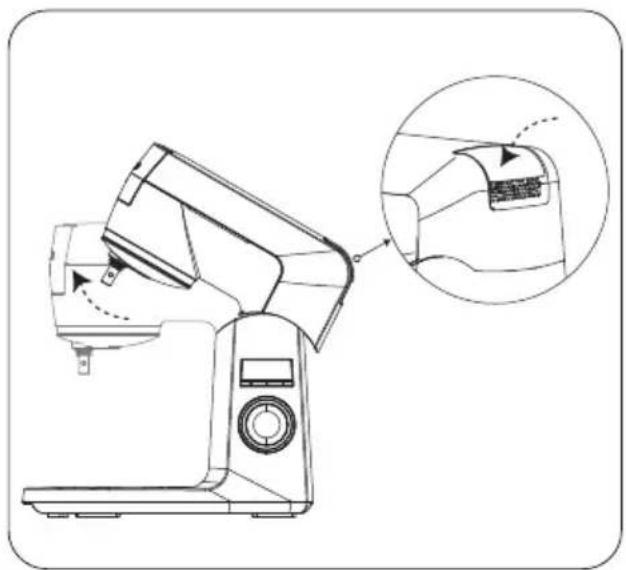
Lifting the upper body
Press and hold the button to lift the upper bodyF and lift the body up.
The body will be locked aloft when you hear a click.
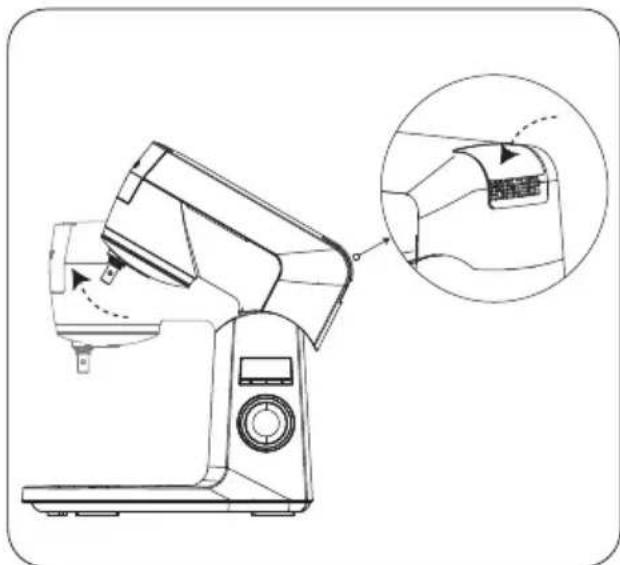
Warning:
Do not continue until you hear the click. The upper body may fall down and cause injuries.
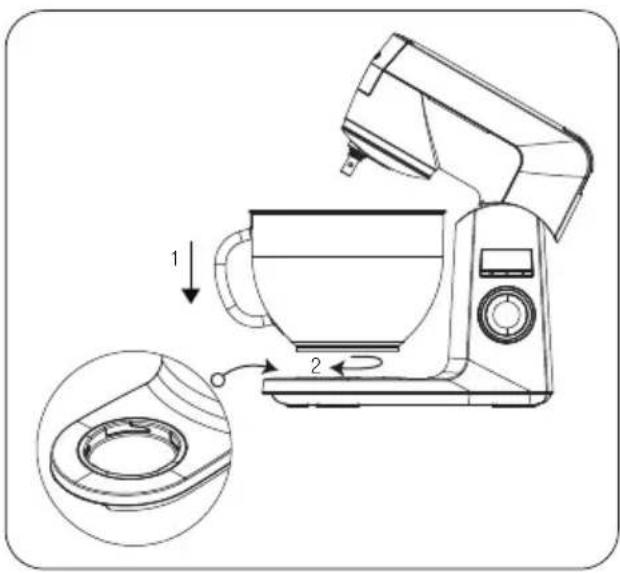
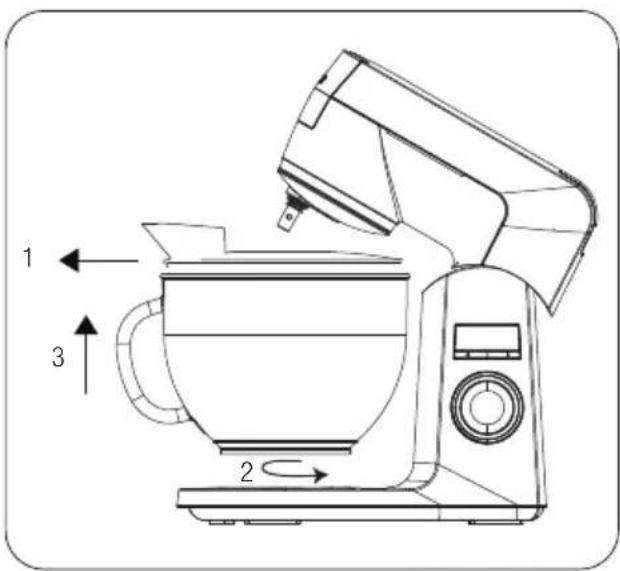
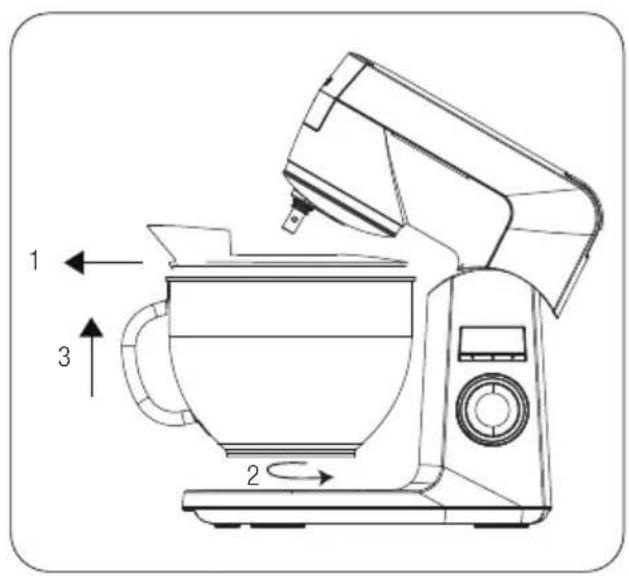
Attaching the bowl
Note:
Make sure that the upper body is in the higher position when attaching the bowl
1 Hold the handle B of the bowl C to fix it into its base A.
2 When the tabs of the bowl are fully seated, turn it towards and fix it in its base A.
3 Put the ingredients to be processed in the bowl C.
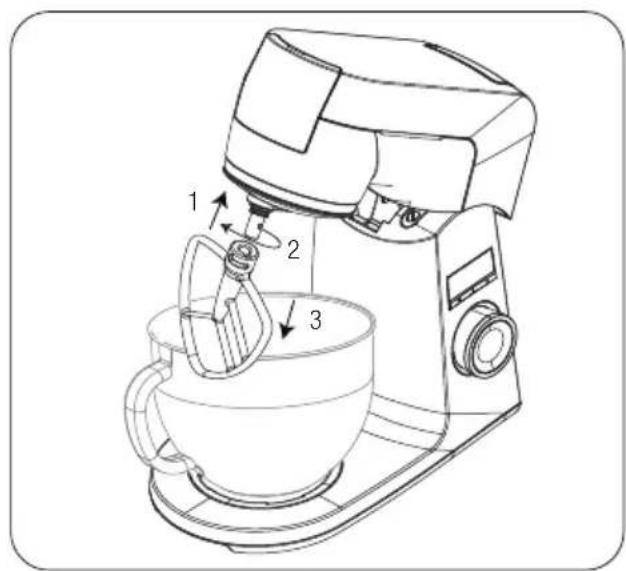
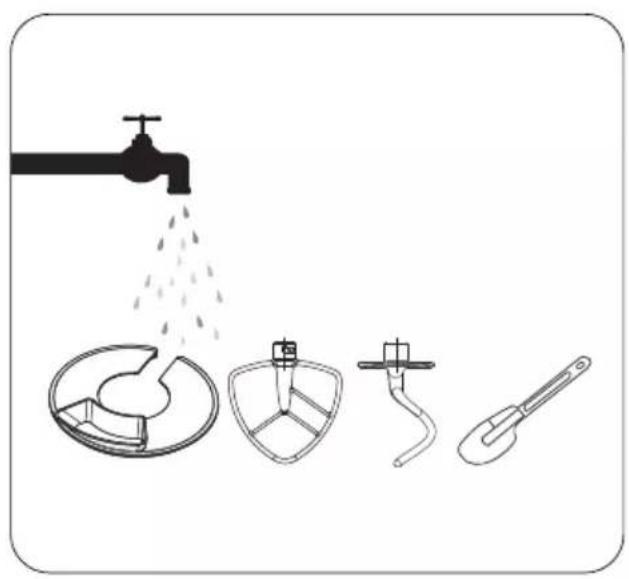
Attaching the accessories
1 Place the accessory so that its notch comes right on the tab located at the accessory mounting point D.
2 Rotate the accessory anti-clockwise to fix it to the mounting point D.
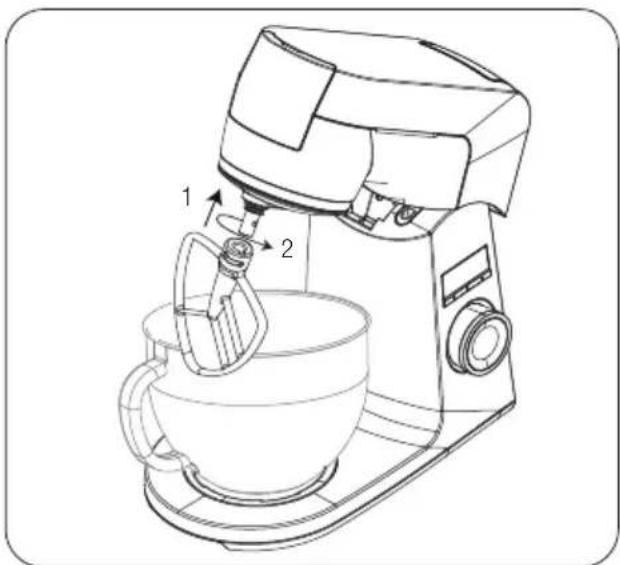
Warning:
Make sure that the accessory is fully seated in place.
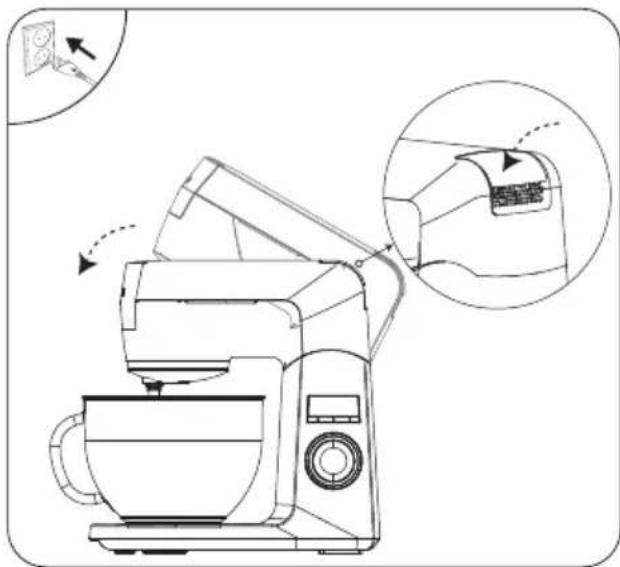
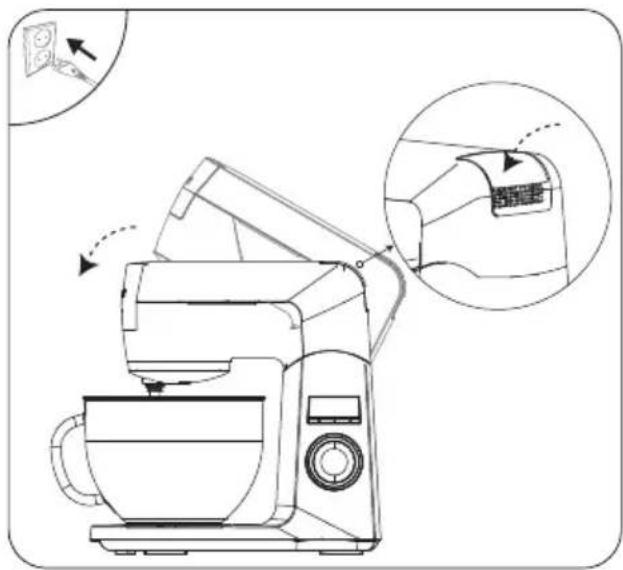
Closing the upper body
Press the button to lift the upper body F and press downwards slightly to bring the body into horizontal position again.
- The upper body will be fixed in place when you hear the click.
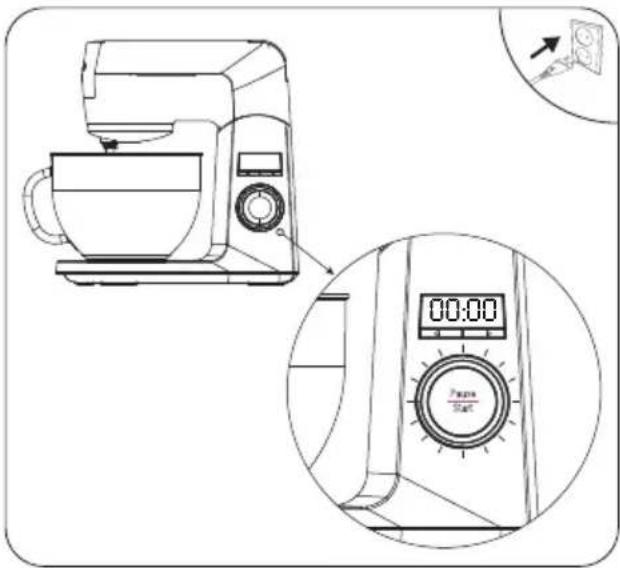
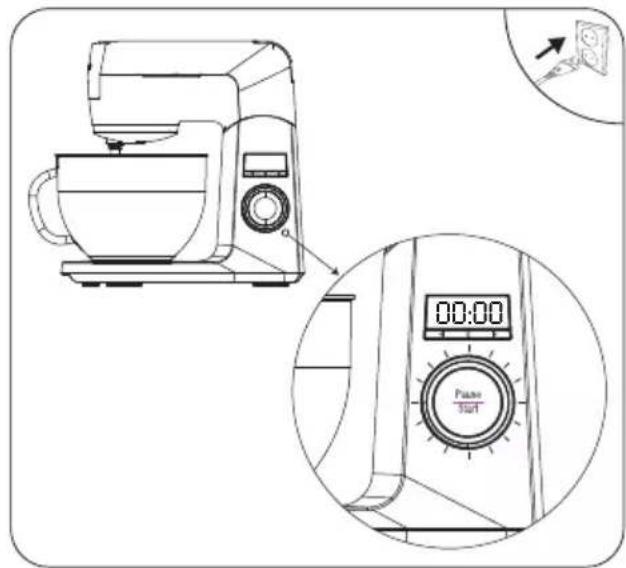
2 Plug in the appliance.
Operation
Note:
Before operating the appliance, place the splash guard M on the bowl C. You can add ingredients through the feeding chute L without lifting the upper body.
1 Plug in the appliance.
-Speed adjustment knob lights will flash.
-00:00 will be displayed on the LED display.
Note:
The appliance will switch to the auto power saving mode if it is not operated for more than 3 minutes. The LED displayG will turn off. You can start stirring or press one of the time setting buttons H to start the appliance again.
Warning:
- Your appliance is equipped with slow start technology to prevent the ingredients to be blended from splashing around.
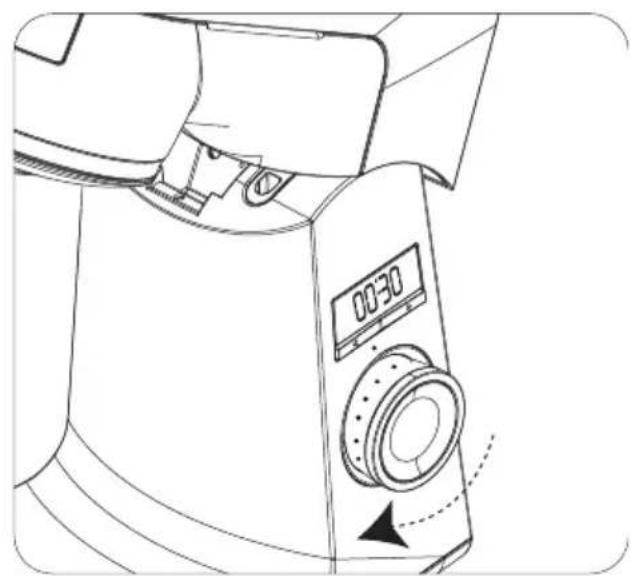
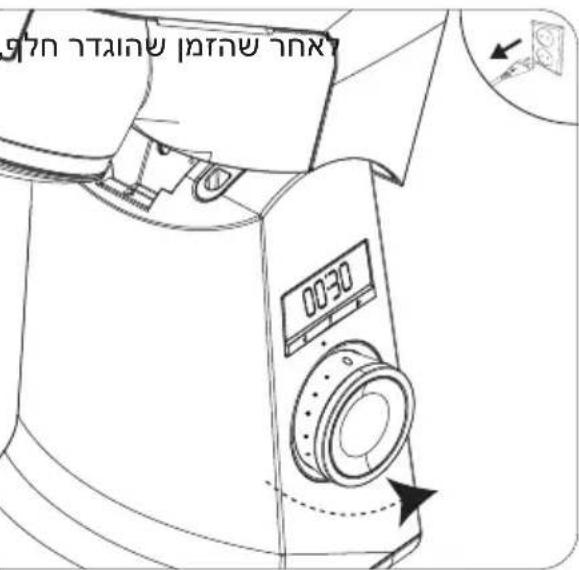
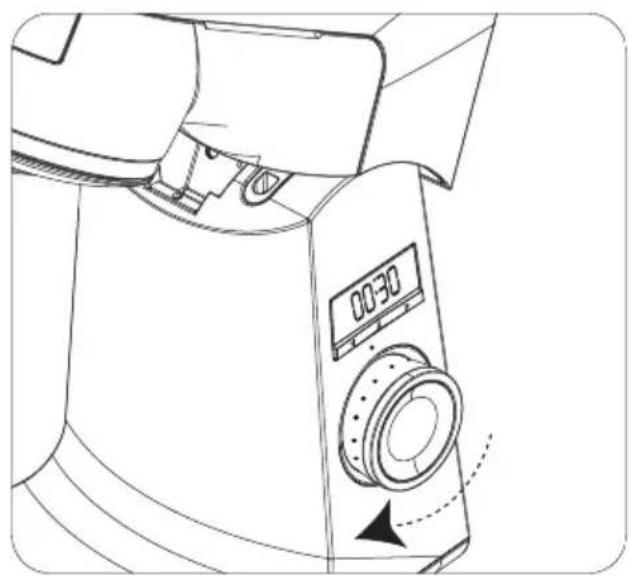
2 To start processing, operate the appliance with the speed adjustment knob 1 starting with "1" position and gradually increase the speed.
The speed adjustment knob light will remain on.
Warning:
Move the speed adjustment knob to "0" position when there is a power outage while the appliance is operating or when it is unplugged. When the power is restored and the appliance is plugged in, start from the 1st step again. The appliance, which has stopped during operation will not start again until you move it to "0" position. Turn the speed regulator to the left in order to select the desired speed level.
Note:
The processing time will be displayed in seconds on the LED display G during operation.
3 When the process is done, turn the speed adjustment knob to "0" position again.
OPERATION
4 When the accessory has completely stopped, unplug the appliance and lift the upper body.
Pause mode
You can press Pause/Start button at any moment during operation to pause/start the operation of the appliance.
The device will stop operating when you press Pause/Start button J. Time counting on the LED display G will also stop.
The time counting will resume when you activate the speed adjustment knob again.
Notes:
When you move the speed adjustment knob to "0" position, the LED display G of the time counter will automatically show 00:00.
Maximum counting time of the counter is 09:59 (minute-second). It will automatically be reset when it exceeds this value. You need to move the speed adjustment button to "0" position and operate it to activate the counter again. Turn the speed regulator to the left in order to select the desired speed level.
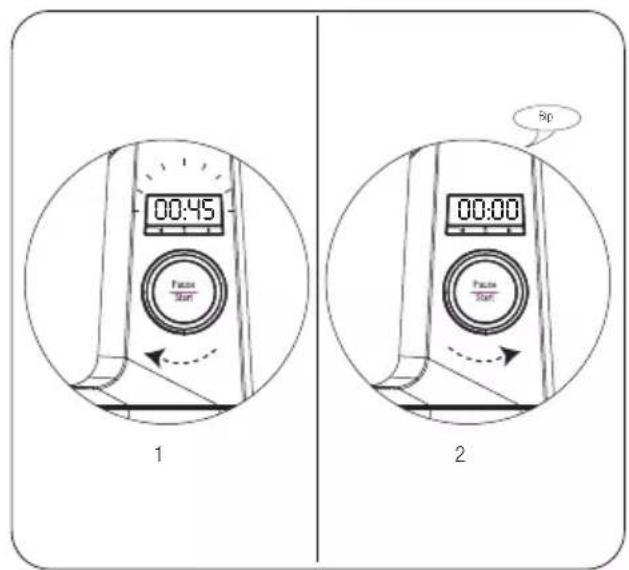
Counter
- You can use the counter function especially for your recipes that require a specific whisking/blending/kneading duration.
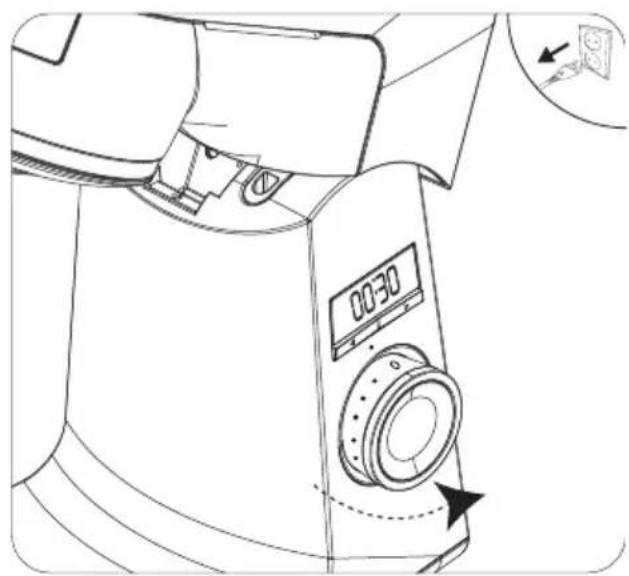
1 Use the time setting buttons at the lower section of the LED display to set the desired processing time and operate the appliance.
- When the set time elapses, the LED display light will go off and an audible warning will be heard. The device will turn off automatically.
2 To start processing again, you must set the speed adjustment knob to "0" position to reset the counter. Turn the speed regulator to the left in order to select the desired speed level.
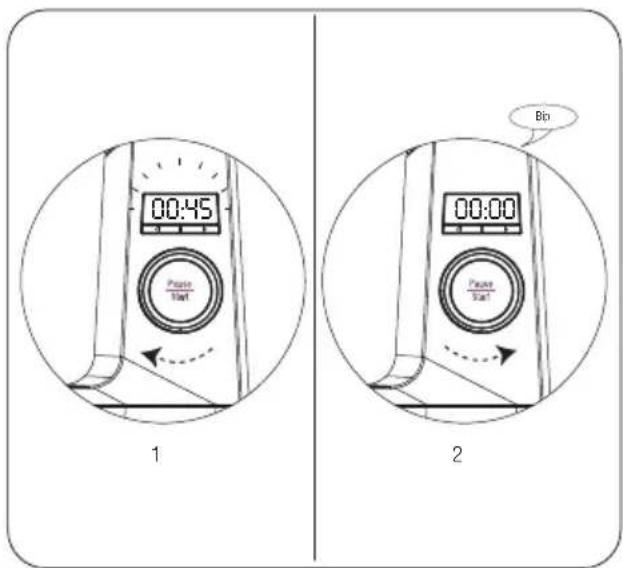
Notes:
Press and hold the time setting buttons to fast forward minutes and seconds.
The maximum time you can set is 09:59 (minute-second).
You can move the speed adjustment knob to "0" position to set the counter to 00:00.
Removing the bowl
1 Remove the splash guard from the mixing bowl.
2 Lift the upper body by pushing button F.
3 Remove the mixing bowl by holding its handle and rotating it to
Removing the accessory
To remove the accessory, slightly press upwards and rotate it clockwise.
Hiding the cable
1 Switch off and unplug the appliance.
2 Thanks to the pull-and-release technology, the cable will be automatically pulled to the hiding bay inside the appliance when you pull and release the cable.
Cleaning
Warning:
- Never use gasoline, solvents or abrasive cleaning agents, metal objects or hard brushes to clean the appliance.
1 Switch off and unplug the appliance.
2 Wait for the appliance to cool down completely.
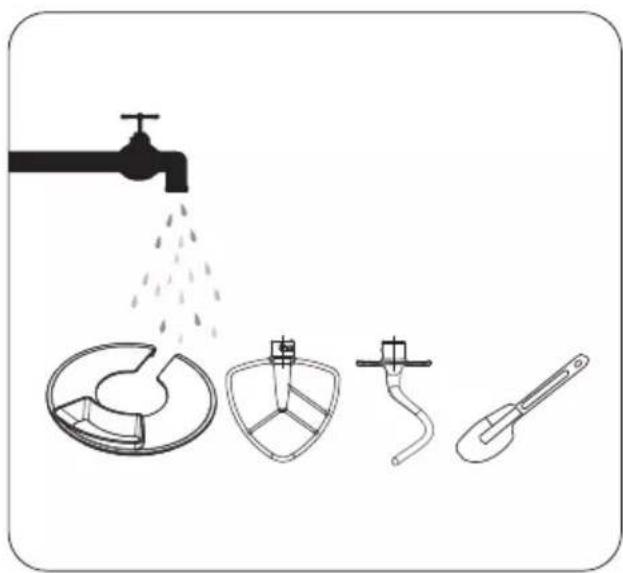
3 Wash and dry the accessories before storing the appliance.
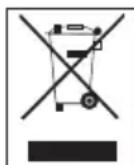
Clean the accessories, splash guard M and mixing bowl with a little amount of washing liquid and a sponge.
You can wash the bowl and the whisker in your dishwasher.
Warning:
Do not wash other accessories in dishwasher.
Use a damp cloth and a small amount of washing liquid to clean the outer surface of the appliance.
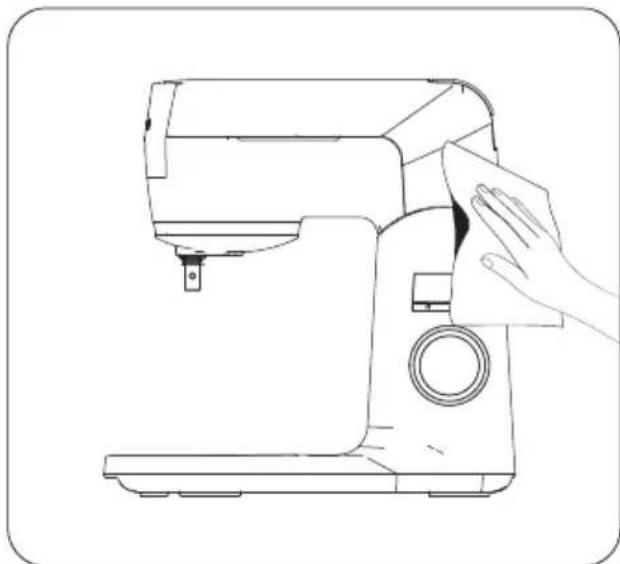
Warning:
Do not immerse the body or the power cord in water or other liquids and do not wash them under water.
Notes:
Dry all parts with a soft towel before starting to use the appliance after cleaning it.
It is recommended to clean the appliance right after using it.
Storage
If you do not intend to use the appliance for a long time, please store it carefully.
Make sure that the appliance is unplugged and totally dry.
Do not wind the power cord around the appliance.
Store it in a dry and cool place.
- Keep the appliance out of the reach of children.
Handling and transportation
During handling and transportation, carry the appliance in its original packaging. The packaging of the appliance protects it against physical damages.
- Do not place heavy loads on the appliance or on the packaging. The appliance may get damaged.
- Dropping the appliance may render it non-operational or cause permanent damage.
Compliance with the WEEE Directive and Disposing of the Waste Product:
This product complies with EU WEEE Directive (2012/19/EU). This product bears a classification symbol for waste electrical and electronic equipment (WEEE).
This product has been manufactured with high quality parts and materials which can be reused and are suitable for recycling. Do not dispose of the waste product with normal domestic
and other wastes at the end of its service life. Take it to the collection center for the recycling of electrical and electronic equipment. Please consult your local authorities to learn about these collection centers.
Compliance with RoHS Directive
The product you have purchased complies with EU RoHS Directive (2011/65/EU). It does not contain harmful and prohibited materials specified in the Directive.
Package information

Packaging materials of the product are manufactured from recyclable materials in accordance with our National Environment Regulations. Do not dis
pose of the packaging materials together with the domestic or other wastes. Take them to the packaging material collection points designated by the local authorities.
Technical data

Power supply: 220 - 240V 50 - 60Hz
Power: 1000 W
Technical and design modifications reserved!
Chere cliente, cher client,
Commerce responsible!

For a future worth living.
Grundig.
Betjeningselementer
Mnn noon nx, nny nny nny
nTn nn nnn nn nnn nn nnn 7n
:nnn
.07070707070707
nnnn nn nnnn nn nnnn nn nnnn nn nnnn nn nnnn nn nnnn nn nnnn nn nnnn nn nnnn nn nnnn nn nnnn nn nnnn nn nnnn nn nnnn nn nnnn nn nnnn nn nnnn nn nnnn nn nnnn nn nnnn nn nnnn nn nnnn nn nnnn nn nnnn nn nnnn nn
:nnyn
nnnnn nn nn nn nn nn nn nn nn nn nn nn nn nn nn nn nn nn nn nn nn nn nn nn nn nn nn nn nn nn nn nn nn nn nn nn nn nn nn nn nn nn nn nn nn nn nn nn nn nn nn nn nn nn nn nn nn nn nn nn nn nn nn nn nn nn nn nn nn nn nn nn nn nn nn nn nn nn nn nn nn nn nn nn nn nn nn nn nn nn nn nn nn nn nn nn nn nn nn nn nn
wnn7 nnnn nn nnn
IONX
INI YUNN NNNN NNNN INN NNN
1077777777777777
.7wnn 0wnnn nn 9974
.771 011n INXONX
T'Unn nn nnnn nn nn nn .D'nn
y nnnn nn nnnnnnnnnnnnnnnnnnnnnnnnnnnnnnnnnnnnnnnnnnnnnnnnnnnnnnnnnnnnnnnnnnnnnnnnnnnnnnnnnnnnnnnnnnnnnnnnnnnnnnnnnnn
Tnnn
INXIOIynynynn
.
mynon
C
F 2
C 3
n
non non
1.7nnnINX 7nI7wnnNn
2 7wn"bn,nnn-1nnn nnnn nn
nynn nn nonnn nnn
nnnnnnnnn
Hntnnn nn nnnn 1nnnnn
TJNNTNNTNCTGLEDNN
yannnnn
4
.
JUNIOIN
2
097 100
nnu nn no nnn nn nn
n
:nnyn
nix pnn nnn nn nn nn nn nn nn nn nn nn nn nn nn nn nn nn nn nn nn nn nn nn nn nn nn nn nn nn nn nn nn nn nn nn nn nn nn nn nn nn nn nn nn nn nn nn nn nn nn nn nn nn nn nn nn nn nn nn nn nn nn nn nn nn nn nn nn nn nn nn nn nn nn nn nn
nni nnnn nn nnnn 0
-97T) 09:59 XIN YIAN HON WEN JIN
.()
xnnn nn nnnn nn nn nn
.00:00-7nnn nn "0"
nwn
yynn/ynnn nn yynn nn
.
/nuwn nn yynnnn 709n nynn GLED-nnna nni n.
Nn
"0" 1 nnnn nn n7 nnnn nnnn nnnn nn nnnn nn nnnn nn nnnn nnnn nnnn nnnn nnnn nnnn nnnn nnnn nnnn nnnn nnnn nnnn nnnn nnnn nnnn nnnn nnnn nnnn nnnn nnnn nnnn nnnn nnnn nnnn nnnn nnnn nnnn nnnn nnnn nnnn nnnn nnnn nnnn nnnn
.00:00nnn
09:59 xin ninn yin 17xu nn nn nn nn nn nn nn nn nn nn nn nn nn nn nn nn nn nn nn nn nn nn nn nn nn nn nn nn nn nn nn nn nn nn nn nn nn nn nn nn nn nn nn nn nn nn nn nn nn nn nn nn nn nn nn nn nn nn nn nn nn nn nn nn nn nn nn nn nn nn nn nn nn nn nn nn nn nn nn nn nn nn nn nn nn nn nn nn nn nn nn nn nn nn nn nn nn nn nn nn
nnnnn nn nnnn nn nnnn nn nnnn nn nnnn nn nnnn nn nnnn nn nnnn nn nnnn nn nnnn nn nnnn nn nnnn nn nnnn nn nnnn nn nnnn nn nnnn nn nnnn nn nnnn nn nnnn nn nnnn nn nnnn nn nnnn nn nnnn nn nnnn nn nnnn nn nnnn nn
Tn nn no nnn nn
1
non
Tnnnn nn nn nnnn
1950ntwnnnn nn
.7/7y/n9x7n
"1" 1
nnnnn nn nnnn
2 7n7nn7yn,1y7nn7
1.7n
1 nnn nn nn nn nn nn nn nn nn nn nn nn nn nn nn nn nn nn nn nn nn nn nn nn nn nn nn nn nn nn nn nn nn nn nn nn nn nn nn nn nn nn nn nn nn nn nn nn nn nn nn nn nn nn nn nn nn nn nn nn nn nn nn nn nn nn nn nn nn nn nn nn nn nn nn nn nn nn nn nn nn nn nn nn nn nn nn nn nn nn nn nn nn nn nn nn nn nn nn nn nn
LED-n ton y 00:00 -
:
"0" 1 nnn nn n nn n nn nn nn nn nn nn nn nn nn nn nn nn nn nn nn nn nn nn nn nn nn nn nn nn nn nn nn nn nn nn nn nn nn nn nn nn nn nn nn nn nn nn nn nn nn nn nn nn nn nn nn nn nn nn nn nn nn nn nn nn nn nn nn nn nn nn nn nn nn nn nn nn nn nn nn nn nn nn nn nn nn nn nn nn nn nn nn nn nn nn nn nn nn nn nn nn nn nn nn nn
:nnn
LED-n ton y nnn nn nnnn
111 7 7 7 7 7 7 7 7 7 7 7 7 7 7 7 7 7 7 7 7 7 7
myn
7nuuunuiuix 100n nn nnnn nnnn nnnn nnnn nnnn nnnn nnnn nnnn nnnn nnnn nnnn nnnn nnnn nnnn nnnn nnnn nnnn nnnn nnnn nnnn nnnn nnnn nnnn nnnn nnnn nnnn nnnn nnnn nnnn nnnn nnnn nnnn nnnn nnnn nn
:
n nn nnnnnnnnnnnnnnnnnnnnnnnnnnnnnnnnnnnnnnnnnnnnnnnnnnnnnnnnnnnnnnnnnnnnnnnnnnnnnnnnnnnnnnnnnnnnnnnnnnnnnnnnnnnnnnnnn
n nn nnnn no
C
3.
1 qnn nn nnnn nn n
n nn nn nn nn nn nn nn nn nn nn nn nn nn nn nn nn nn nn nn nn nn nn nn nn nn nn nn nn nn nn nn nn nn nn nn nn nn nn nn nn nn nn nn nn nn nn nn nn nn nn nn nn nn nn nn nn nn nn nn nn nn nn nn nn nn nn nn nn nn nn nn nn nn nn nn nn nn nn nn nn nn nn nn nn nn nn nn nn nn nn nn nn nn nn nn nn nn nn nn nn
79IN 2x7
- mnnn nn nnn
yynun
2.7n77
y
1 D71
nni nn nnnn nn
D
y77TJ,1ywn 117n nn 2
Dnnnnn nnn
:nnn
Mnn noon nn,wnn nyn 197
TNT Tn nn. Cnnn y
n nn nn nn nn

:nnn
1117 1117 0000
qan yiyynipn nn
yin nix nn 1 qnnn nn yyn
.
IUNN
1 DNN
JINIINIINIINIINNINNNN
-ynwnynyynn
2 |y)|
.("719'01"7'3"9'yO2
TINW
X.
nnon nunj 1wnnu
n nn nn nn nn nn nn nn n
yinnnnnnn
D
Q qyn
n7 n7 n7 n7 nn7 nn7
0
nno nnn nn nn nn nn
,)0000
n7 won nnwn 1X .On Itn
ynn nn nn w
wnnnnynnnn n7 ,1177,wnn
NIN IN TNN D'X
ynn nn xynn7 nyn
noun T y nnynywn 7
ywnn nnyn .xin
7nwnnnn 1X .7x
wn yynn nyn 1N .niun IN nIN D
nyn nn nynn 1X .wnnn
197 7wn nn n, n7n
1n7yuynnn
197 17u DnXn 7 nX
1971 nn7 nIX nnnu


- Responsible trading!
- Operating elements
- Initial use
- Intended use
- Accessories
- Installation and operating
- Warning:
- Lifting the upper body
- Attaching the bowl
- Note:
- Attaching the accessories
- Closing the upper body
- Operation
- Pause mode
- Notes:
- Counter
- Removing the bowl
- Removing the accessory
- Hiding the cable
- Cleaning
- Storage
- Handling and transportation
- Compliance with the WEEE Directive and Disposing of the Waste Product:
- Compliance with RoHS Directive
- Package information
- Technical data
- Commerce responsible!
- Betjeningselementer
Brand : GRUNDIG
Model : KMP 8650 S
Category : Food Processor