
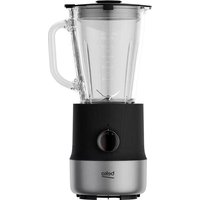
KMP 8650 MBC - Food Processor GRUNDIG - Free user manual and instructions
Find the device manual for free KMP 8650 MBC GRUNDIG in PDF.
| Product Type | Food Processor |
| Brand | Grundig |
| Model | KMP 8650 MBC |
| Power Supply | 220-240 V~, 50-60 Hz |
| Power | 1000 W |
| Main Functions | Mixing, kneading, whisking |
| Included Accessories | Beater, dough hook, mixer, protective cover, spatula |
| Display | LED with timer (up to 9 min 59 sec) |
| Pause Function | Yes, via Start/Pause button |
| Safety Technology | Soft start, mandatory protective cover |
| Cleaning | By hand; do not immerse motor block, avoid dishwasher for accessories |
| Maintenance | Wipe with a soft cloth |
| Storage | In a cool, dry place, cable coiled |
| Availability of Spare Parts | At least 5 years |
| Intended Use | Household use only |
Frequently Asked Questions - KMP 8650 MBC GRUNDIG
User questions about KMP 8650 MBC GRUNDIG
0 question about this device. Answer the ones you know or ask your own.
Ask a new question about this device
Download the instructions for your Food Processor in PDF format for free! Find your manual KMP 8650 MBC - GRUNDIG and take your electronic device back in hand. On this page are published all the documents necessary for the use of your device. KMP 8650 MBC by GRUNDIG.
USER MANUAL KMP 8650 MBC GRUNDIG
KITCHEN MACHINE KMP 8650 MBC

DEUTSCH 07-13
ENGLISH 14-20
FRANÇAIS 21-26
TÜRKÇE 27-35
ESPAÑOL 36-41
ROMÂNA 42-47
HRVATSKI 48-53
NEDERLANDS 54-59
DANSK 60-65
SUOMI 66-71
NORSK 72-77
SVENSKA 78-83
ITALIANO 84-89
POLSKI 90-95
natural_image
Line drawing of a modern kitchen mixer with control panel and side-mounted unit (no text or symbols)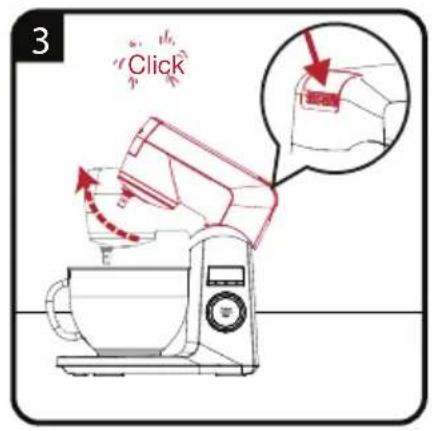
natural_image
Illustration of a kitchen scene with a faucet, bowls, and cleaning items (no text or symbols)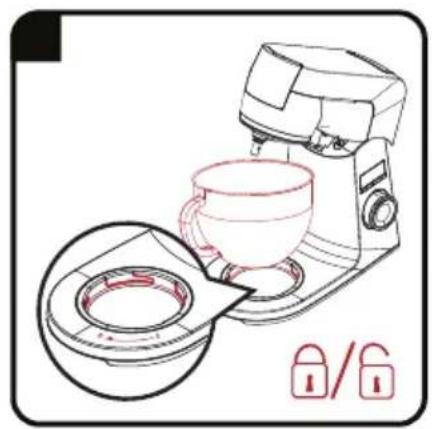
natural_image
Line drawing of a kitchen mixer with a bowl and lid, no text or symbols present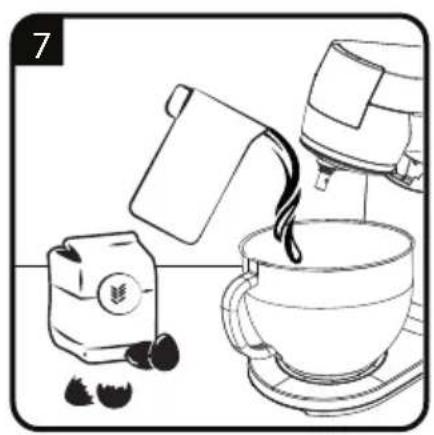
natural_image
Illustration of a coffee machine pouring dark liquid into a cup, with a small container and leafy greens nearby (no text or symbols)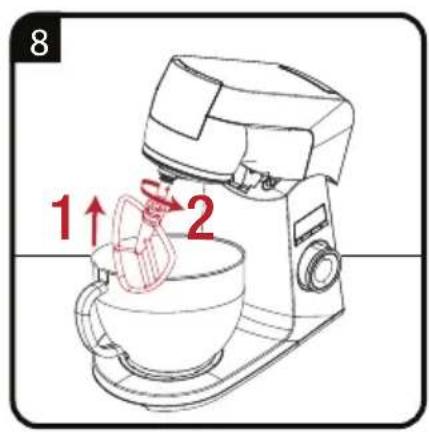
natural_image
Line drawing of a kitchen mixer with a red arrow indicating rotation (no text or symbols)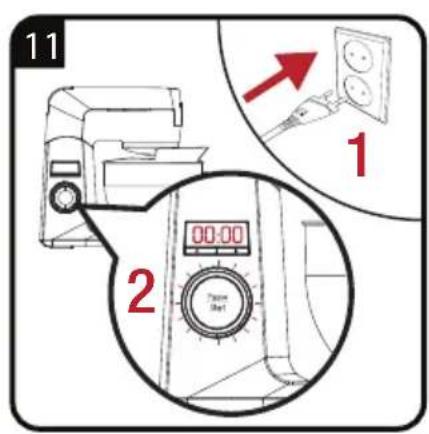
natural_image
Line drawing of a kitchen mixer with a bowl and fan, showing motion arrows (no text or symbols)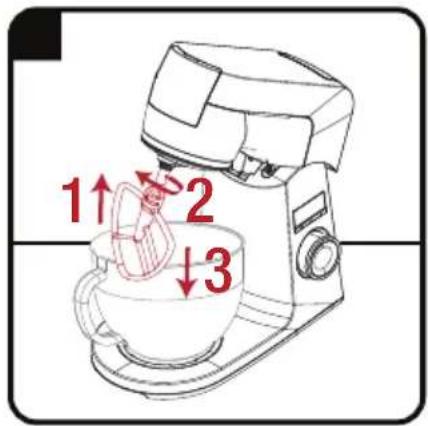
natural_image
Line drawing of a kitchen mixer with a bowl and lid, no text or symbols present
natural_image
Illustration of kitchen utensils and fixtures including a faucet, water drop, and cleaning items (no text or symbols)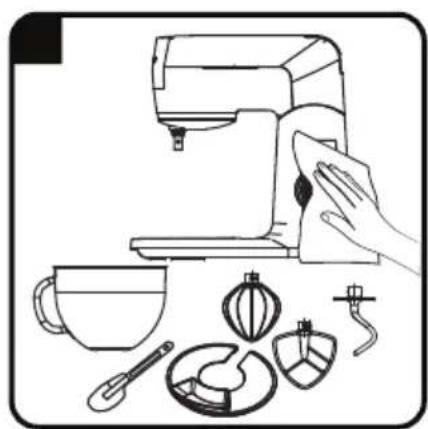
natural_image
Line drawing of a kitchen mixer with cleaning tools and kitchen utensils (no text or symbols) |  | |
| DE | BETRIEB REINIGUNG UND PFLEGE | |
| EN | OPERATION CLEANING | AND CARE |
| FR | FONCTIONNEMENT NETTOYAGE ET ENTRETIEN | |
| TR | KULLANIM TEMIZLEME VE BAKIM | |
| ES | FUNCIONAMIENTO LIM PIEZA Y CUIDADOS | |
| RO | UTILIZARE CURĂ AREA ȘI ÎNGRIJIREA | |
| HR | RAD ČIŠĆENJE I ODRŽAVANJE | |
| NL | WERKING REINIGING EN ONDERHOUD | |
| DA | BETJENING RENGØRING OG VEDLIGEHOLDELSE | |
| FI | KÄYTTÖ PUHDISTUS JA HUOLTO | |
| NO | DRIFT RENGJØRING OG VEDLIKEHOLD | |
| SV | ANVÄNDNING RENGÖRING OG SCH SKÖTSEL | |
| IT | BETJENING RENGØRING OG VEDLIGEHOLDELSE | |
| PL | ANVÄNDNING RENGÖRING OG SCH SKÖTSEL | |
| HE | הכלההכלההכלההכלההכלההכלההכלההכלההכלההכלההכלההכלההכלההכלההכלההכלההכלההכלההכלההכלההכלההכלההכלההכלההכלההכלההכלההכלההכלההכלההכלההכלההכלההכלה | |
This section contains safety instructions that will help protect from risk of personal injury or material damage.
Failure to follow these instructions voids any granted warranty.
■ Retain the operating instructions for later consultation. If the appliance is transferred to a third party, these operating instructions must likewise be handed over.
■ This appliance complies with the international safety standards.
■ This appliance may be used by people whose physical, perceptive or mental skills are impaired or who are inexperienced or not knowledgeable about the appliance as long as they are supervised or informed and made understood the safe use of the appliance and the encountered dangers.
■ Children must not use the appliance.
■ This appliance is only intended for private use in the household and is not suitable for professional use in the restaurant sector. It may not be used for commercial use.
■ Children must not play with the appliance.
- Keep the appliance out of the reach of children.
■ Cleaning and user maintenance cannot be performed by children.
- Clean the appliance in accordance with the instructions given in the "Cleaning" section.
- Do not use it if the power cable, accessories or the appliance itself is/are damaged. Contact an authorised service.
■ Only use the original accessories, or accessories recommended by the manufacturer.
- Do not attempt to dismantle the appliance.
■ Use the appliance in accordance with the amount and usage instructions given in "Maximum amount and processing times" section of the user manual.
■ Always use the protective cover against the risk on injury when blending, kneading and whisking for safety reasons.
- Do not operate or place this appliance or its parts on or near hot surfaces.
- Do not use the appliance for hot food.
- Your mains power supply should comply with the information supplied on the rating plate of the appliance.
■ Use the appliance with a grounded outlet.
- Do not use the appliance with an extension cable.
- Do not touch the plug of the appliance with damp or wet hands.
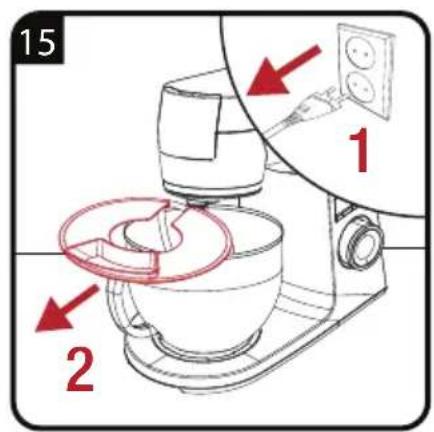
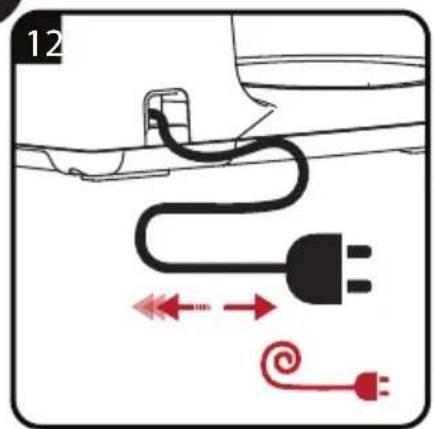
■ Always pull the mains plug from the socket; after the use of the appliance, before the cleaning of the appliance, before leaving the room or if a fault occurs. Do not pull the mains plug from the socket using the cable.
■ Unplug the appliance before cleaning, disassembly, accessory replacement and wait for it to stop completely.
■ After cleaning, dry the appliance and all accessories before connecting it to mains supply and before attaching the accessories.
- Do not use the appliance for purposes for which it is not intended.
- Do not immerse the appliance, the power cable, or the power plug in water or any other liquid.
■ If you keep the packaging materials, store them out of the reach of children.
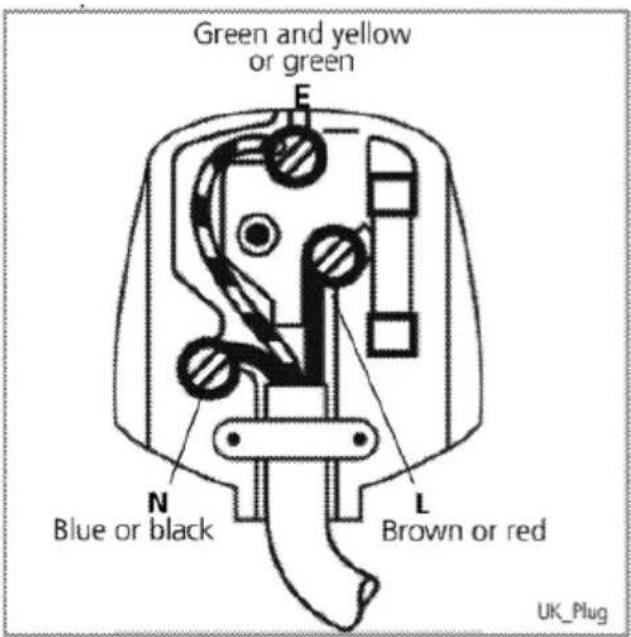
Plug Wiring
The moulded plug on this appliance incorporates a 13 A fuse. Should the fuse need to be replaced an ASTA approved BS1362 fuse of the same rating must be used. Do not forget to refit the fuse cover. In the event of losing the fuse cover, the plug must not be used until a replacement fuse cover has been fitted. Colour of the replacement fuse cover must be the same colour as that visible on the pin face of the plug Fuse covers are available from any good electrical store.
■ Fiting a different plug
As the colours of the wires in the mains lead of this appliance may not correspond with the coloured markings identifying the terminals on your plug, proceed as follows:
Brown cable = L (Live)
Blue cable = N (Neutral)
■ Green/yellow cable must be connected to ground (E) the
- With the alternative plugs a 13 A fuse must be fitted either in the plug or adaptore or in the main fuse box. If in doubt contact a qualified electrician.
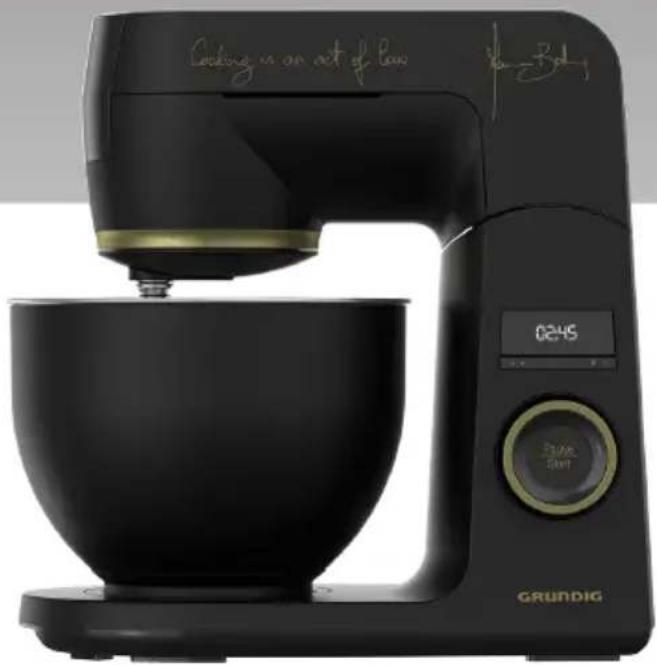
Dear Customer,
Congratulations on purchasing the GRUNDIG Kitchen Machine KMP 8650 MBC.
Please read the following user guide carefully to ensure that you have many years of enjoyment from your quality Grundig product at home.
Responsible trading!

Both internally and for suppliers, GRUNDIG insists on contractually guaranteed social working conditions with fair wages, efficient use of raw materials with continuous reduction in waste of several tonnes of plastic each year - and at least 5 years' availability for all accessories.
For a future worth living.
Grundig.
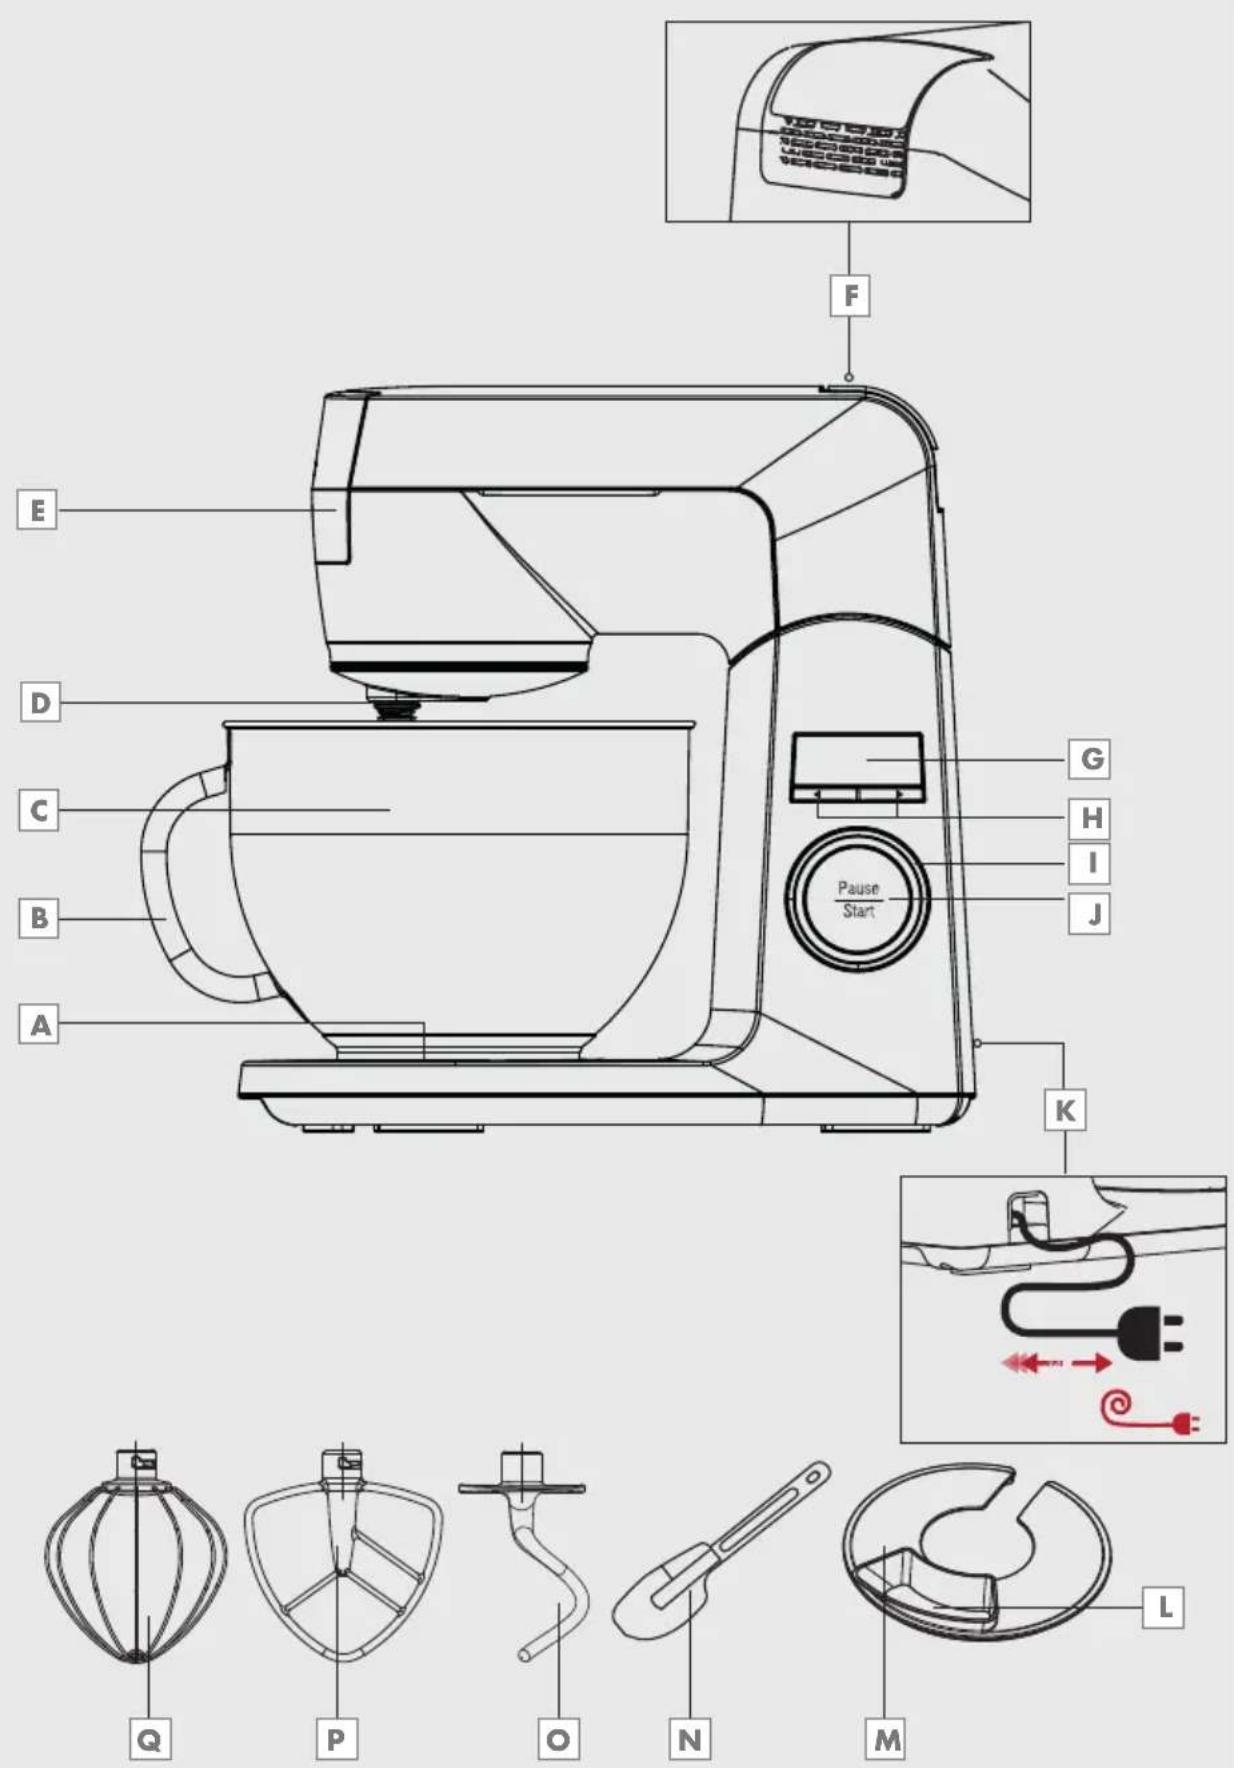
Operating elements
Please see the illustrations on page 3.
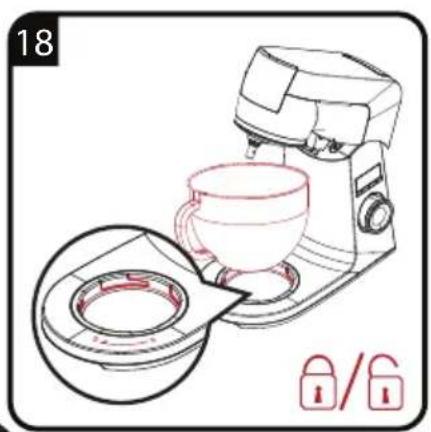
A Bowl base
B Bowl handle
C Bowl
D Accessory mounting point
E Additional accessory inlet
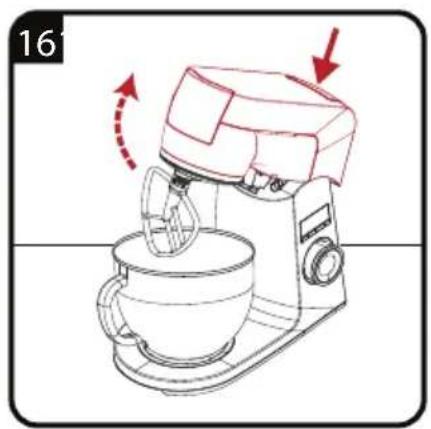
F Button to lift upper body
G LED display
H Time setting buttons
Speed adjustment knob
J Pause/Start button
K Cable hiding bay
L Feeding chute
M Splash guard
N Spatula
Dough Hook
P Beater
Whisker
Intended use
This appliance has been designed for domestic use only. It should not be used commercial purposes.
- Do not use the appliance for anything other than its intended use.
Accessories
Whisker Q
Used to prepare light foods such as cream, whipped cream and eggs.
Dough hook
Used to knead doughs that contain thick ingredients, such as bread dough, and to blend additional ingredients (raisins, fruit chips, chocolate chips etc.) with the dough.
Beater P
Used to blend ingredients that have the consistency of cake batter.
Splash guard M
For safety reasons, you must definitely use this accessory when blending.
Warning
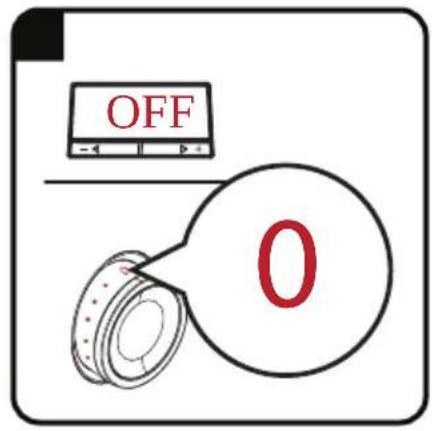
In all installation procedures, make sure that the appliance is unplugged and the speed adjustment knob 1 is in "0" position.
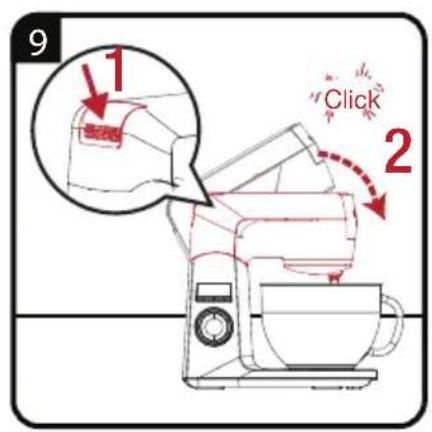
- Do not continue until you hear the click. The upper body may fall down and cause injuries.
Note
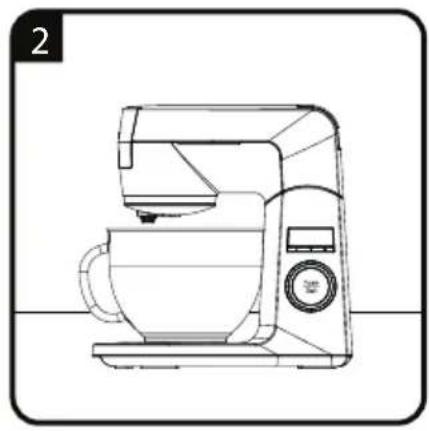
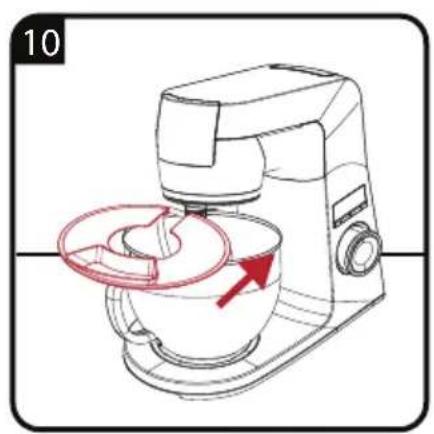
■ Make sure that the upper body is in the higher position when attaching the bowl Ⓒ.
Warning
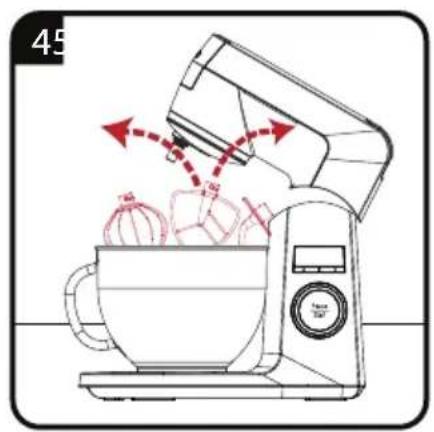
■ Make sure that the accessory is fully seated in place.
Note
Before operating the appliance, place the splash guard M on the bowl C. You can add ingredients through the feeding chute L without lifting the upper body.
Note
The appliance will switch to the auto power saving mode if it is not operated for more than 3 minutes. The LED display G will turn off. You can start stirring or press one of the time setting buttons H to start the appliance again.
Warning
- Your appliance is equipped with slow start technology to prevent the ingredients to be blended from splashing around.
■ Move the speed adjustment knob 1 to "0" position when there is a power outage while the appliance is operating or when it is unplugged. When the power is restored and the appliance is plugged in, start from the 1st step again. The appliance, which has stopped during operation will not start again until you move it to "0" position. Turn the speed regulator to the left in order to select the desired speed level.
Note
The processing time will be displayed in seconds on the LED display G during operation.
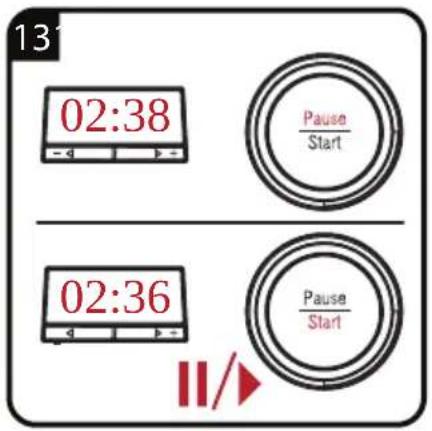
Pause mode
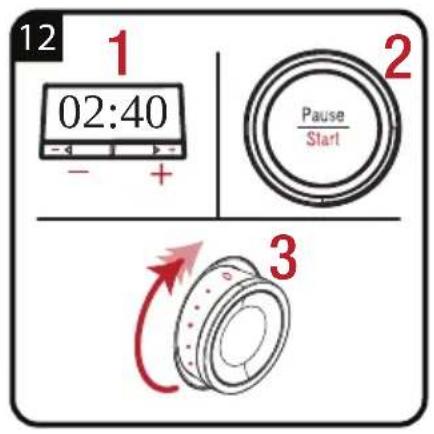
You can press Pause/Start button ☐ at any moment during operation to pause/start the operation of the appliance.
The device will stop operating when you press Pause/Start button ☐. Time counting on the LED display ☐ will also stop.
The time counting will resume when you activate the speed adjustment knob □ again.
Notes
- When you move the speed adjustment knob I to "0" position, the LED display G of the time counter will automatically show 00:00.
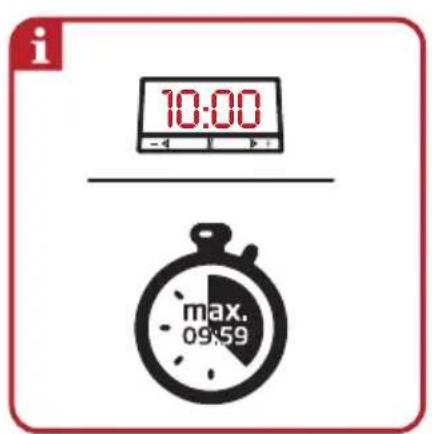
Maximum counting time of the counter is 09:59 (minute-second). It will automatically be reset when it exceeds this value. You need to move the speed adjustment button to "0" position and operate it to activate the counter again. Turn the speed regulator to the left in order to select the desired speed level.
Counter
- You can use the counter function especially for your recipes that require a specific whisking/ blending/kneading duration.
Notes
■ Press and hold the time setting buttons H to fast forward minutes and seconds.
The maximum time you can set is 09:59 (minute-second).
- You can move the speed adjustment knob to "0" position to set the counter to 00:00.
INFORMATION
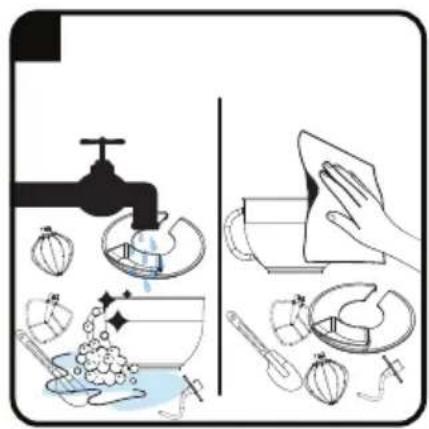
Cleaning and care
Warning
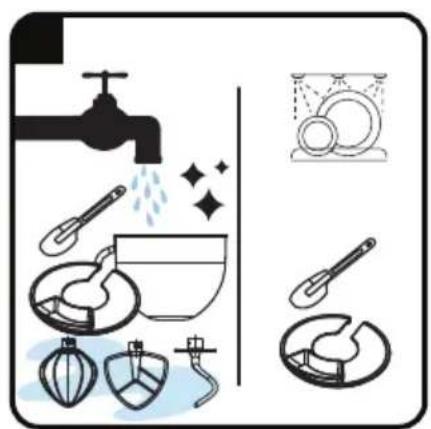
■ Never use gasoline, solvents or abrasive cleaning agents, metal objects or hard brushes to clean the appliance.
- Wait for the appliance to cool down completely.
- Do not wash other accessories in dishwasher.
- Do not immerse the body or the power cord in water or other liquids and do not wash them under water.
Notes
Dry all parts with a soft towel before starting to use the appliance after cleaning it.
It is recommended to clean the appliance right after using it.
Storage
If you do not intend to use the appliance for a long time, please store it carefully.
■ Make sure that the appliance is unplugged and totally dry.
- Do not wind the power cord around the appliance.
■ Store it in a dry and cool place.
- Keep the appliance out of the reach of children.
Handling and transportation
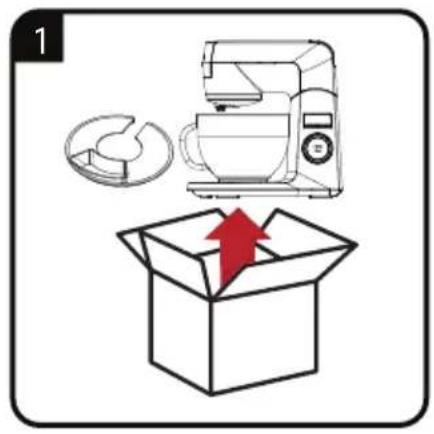
During handling and transportation, carry the appliance in its original packaging. The packaging of the appliance protects it against physical damages.
- Do not place heavy loads on the appliance or on the packaging. The appliance may get damaged.
■ Dropping the appliance may render it non-operational or cause permanent damage.
Compliance with the WEEE Directive and Disposing of the Waste Product:
This product complies with EU WEEE Directive (2012/19/EU). This product bears a classification symbol for waste electrical and electronic equipment (WEEE).
This product has been manufactured with high quality parts and materials which can be reused and are suitable for recycling. Do not dispose of the waste product with normal domestic and other wastes at the end of its service life. Take it to the collection center for the recycling of electrical and electronic equipment. Please consult your local authorities to learn about these collection centers.
Compliance with RoHS Directive
The product you have purchased complies with EU RoHS Directive (2011/65/EU). It does not contain harmful and prohibited materials specified in the Directive.
Package information

Packaging materials of the product are manufactured from recyclable materials in accordance with our National Environment Regulations. Do not dispose of the packaging materials together with the domestic or other wastes. Take them to the packaging material collection points designated by the local authorities.
Technical data

Power supply: 220-240V\~ 50-60Hz
Power: 1000 W
Technical and design modifications reserved!
Please see the cover page of the user manual for initial use, general use and cleaning sections.
Commerce responsible!

natural_image
Close-up of a yellow and white mechanical component with curved surfaces against a dark background (no text or symbols visible)GRUNDIG
WHERE HOME IS
VÂNZĂTOR
Nr. factură: Data:
natural_image
Product lineup featuring kitchen appliances and a cream bun with blueberries (no visible text or labels)For a future worth living.
Grundig.
Betjeningselementer

- KITCHEN MACHINE KMP 8650 MBC
- Plug Wiring
- Responsible trading!
- Operating elements
- Intended use
- Accessories
- Whisker Q
- Dough hook
- Beater P
- Splash guard M
- Warning
- Note
- Pause mode
- Notes
- Counter
- INFORMATION
- Cleaning and care
- Storage
- Handling and transportation
- Compliance with the WEEE Directive and Disposing of the Waste Product:
- Compliance with RoHS Directive
- Package information
- Technical data
- Commerce responsible!
- VÂNZĂTOR
- Betjeningselementer
Brand : GRUNDIG
Model : KMP 8650 MBC
Category : Food Processor