CS 42STE - Saw MCCULLOCH - Free user manual and instructions
Find the device manual for free CS 42STE MCCULLOCH in PDF.
User questions about CS 42STE MCCULLOCH
0 question about this device. Answer the ones you know or ask your own.
Ask a new question about this device
Download the instructions for your Saw in PDF format for free! Find your manual CS 42STE - MCCULLOCH and take your electronic device back in hand. On this page are published all the documents necessary for the use of your device. CS 42STE by MCCULLOCH.
USER MANUAL CS 42STE MCCULLOCH
GBOperator's manual 2-19
SE Bruksanvising 20-37
DK Brugsanvising 38-55
NO Bruksanvisning 56-73
Fl Kayttoohje 74-91
| This machine can be dangerous! Careless or improper use can cause serious injury. | |
| Please read the operator's manual carefully and make sure you understand the instructions before using the machine. | |
| Always use: · eye protection such as non-fogging, vented goggles or face screen · an approved safety helmet · sound barriers (ear plugs or mufflers) to protect your hearing | |
| Never operate a chain saw holding it with one hand only. | |
| Both of the operator's hands must be used to operate the chain saw. | |
| Contact of the guide bar tip with any object must be avoided. | |
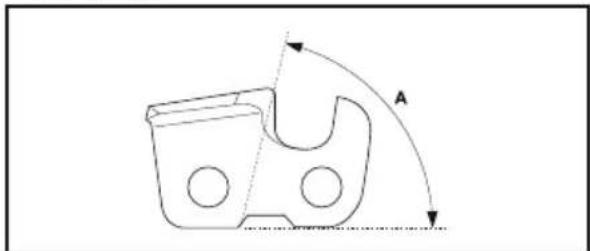
| Measured maximum kickback value. | 45° |
| A-weighted sound pressure level at 7,5 meters (25 feet) according to Australia NSW "Protection of the Environment Operations (Noise Control) Regulation 2008". This data is specified on the label. | XX NOISE dB |
| Noise emission to the environment according to the European Community's Directive. This data is specified in the TECHNICAL DATA section and on the label. | Lxa xxx dB |
| This product is in accordance with applicable EC directives. | CE |
| This product is in accordance with applicable EAC directives. | EAC |
| This product is in accordance with the Australian electromagnetic compatibility (EMC) regulations. | |
| Use unleaded petrol and two-stroke oil mixed at a ratio of 2% (50:1). | +6 |
| 50:1 petrol to oil ratio. | 50:1 |
| Do not use E15 or E85 blended fuels. | E15 E85 |
| Chain oil fill. | |
| The engine is stopped by switching the ignition off using the stop switch. | STOP |
| Primer. | |
| Unlock chain brake. | |
| Lock chain brake. | |
| Chain brake: • not locked (left) • locked (right) | ←→ |
| Chain direction of rotation. |
KNOW YOUR MACHINE
READ THIS INSTRUCTION MANUAL AND SAFETY RULES BEFORE OPERATING YOUR CHAIN SAW. Compare the illustrations with your unit to familiarize yourself with the location of the various controls and adjustments. Save this manual for future reference.
NOTE: The appearance of your product may vary from the item shown.
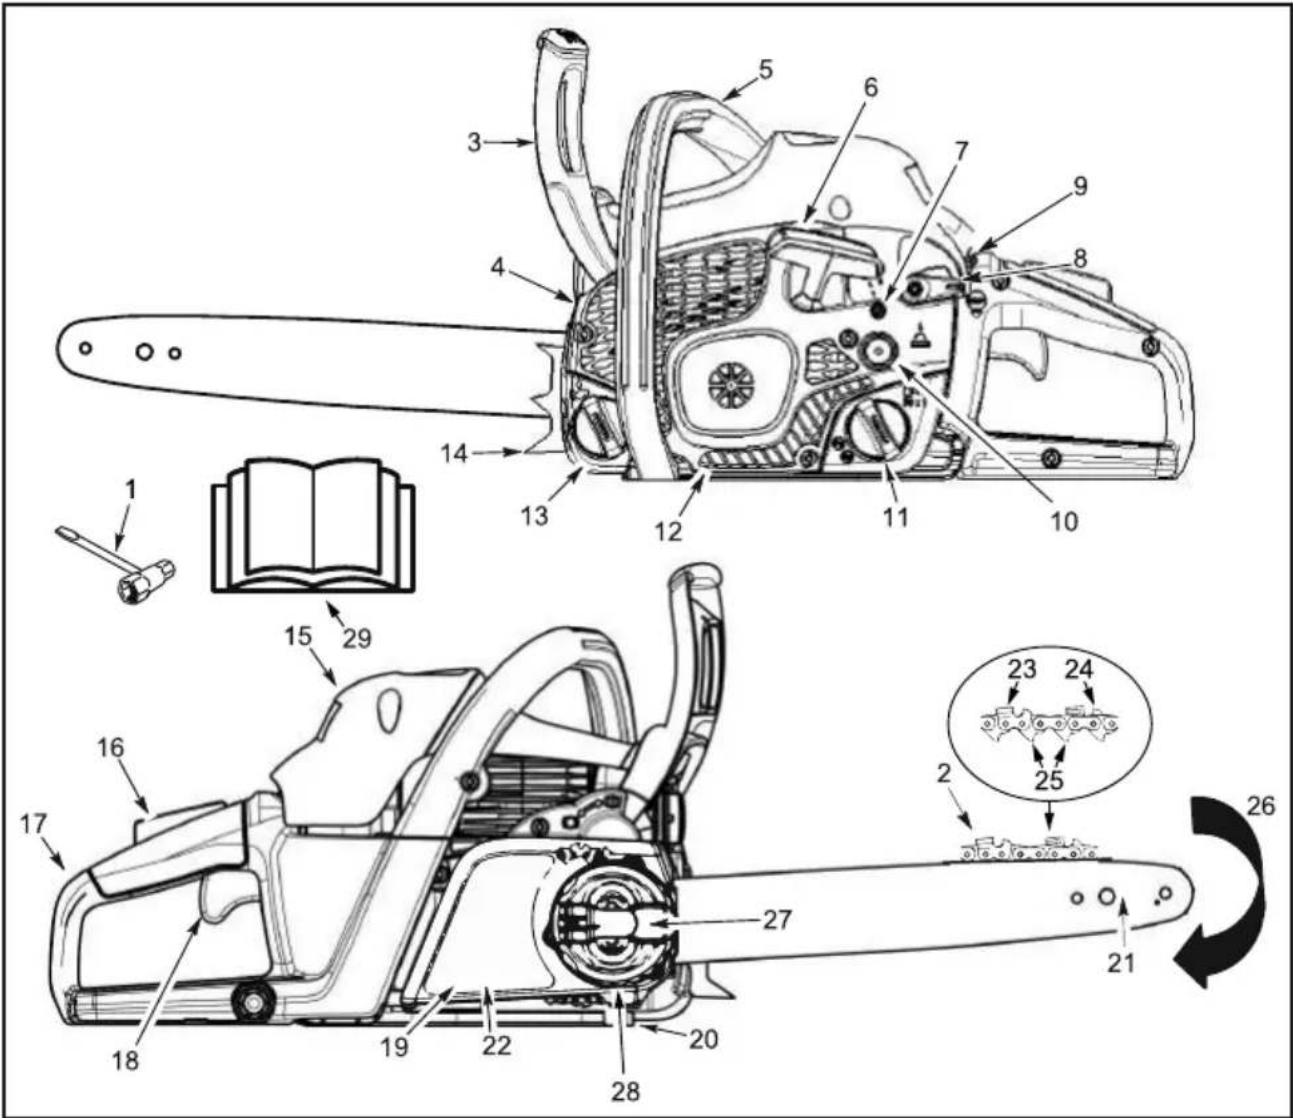
- Combination tool
- Chain
- Front hand guard
- Muffler
- Front handle
- Starter rope
- Idle speed screw
- Start lever
- Stop switch
-
Primer (air purge) bulb
-
Fuel mix fill cap
- Starter housing
- Bar and chain oil fill cap
- Bumper spike
- Cylinder cover
- Throttle lock-out
- Rear handle
- Throttle trigger
- Clutch cover
-
Chain catcher
-
Guide bar
- Chain brake
- Cutters
- Depth gauge
- Drive links
- Chain direction of travel
- Guide bar retaining knob
- Chain tensioning ring
- Manual
SAFETY
WARNING! Always disconnect spark plug wire and place wire where it cannot contact spark plug to prevent accidental starting when setting up, transporting, adjusting or making repairs except carburettor adjustments.
INTRODUCTION
A chainsaw is a high-speed wood-cutting tool. Special safety precautions must be observed to reduce the risk of accidents.
Failure to follow all safety rules and precautions can result in serious injury.
If situations occur which are not covered in this manual, use care and good judgment. If you need assistance, contact your authorized service dealer or call customer support.
PLANNING AHEAD
- Read this manual carefully until you completely understand and can follow all safety rules, precautions, and operating instructions before attempting to use the unit.
- Restrict the use of your saw to adult users who understand and can follow safety rules, precautions, and operating instructions found in this manual.
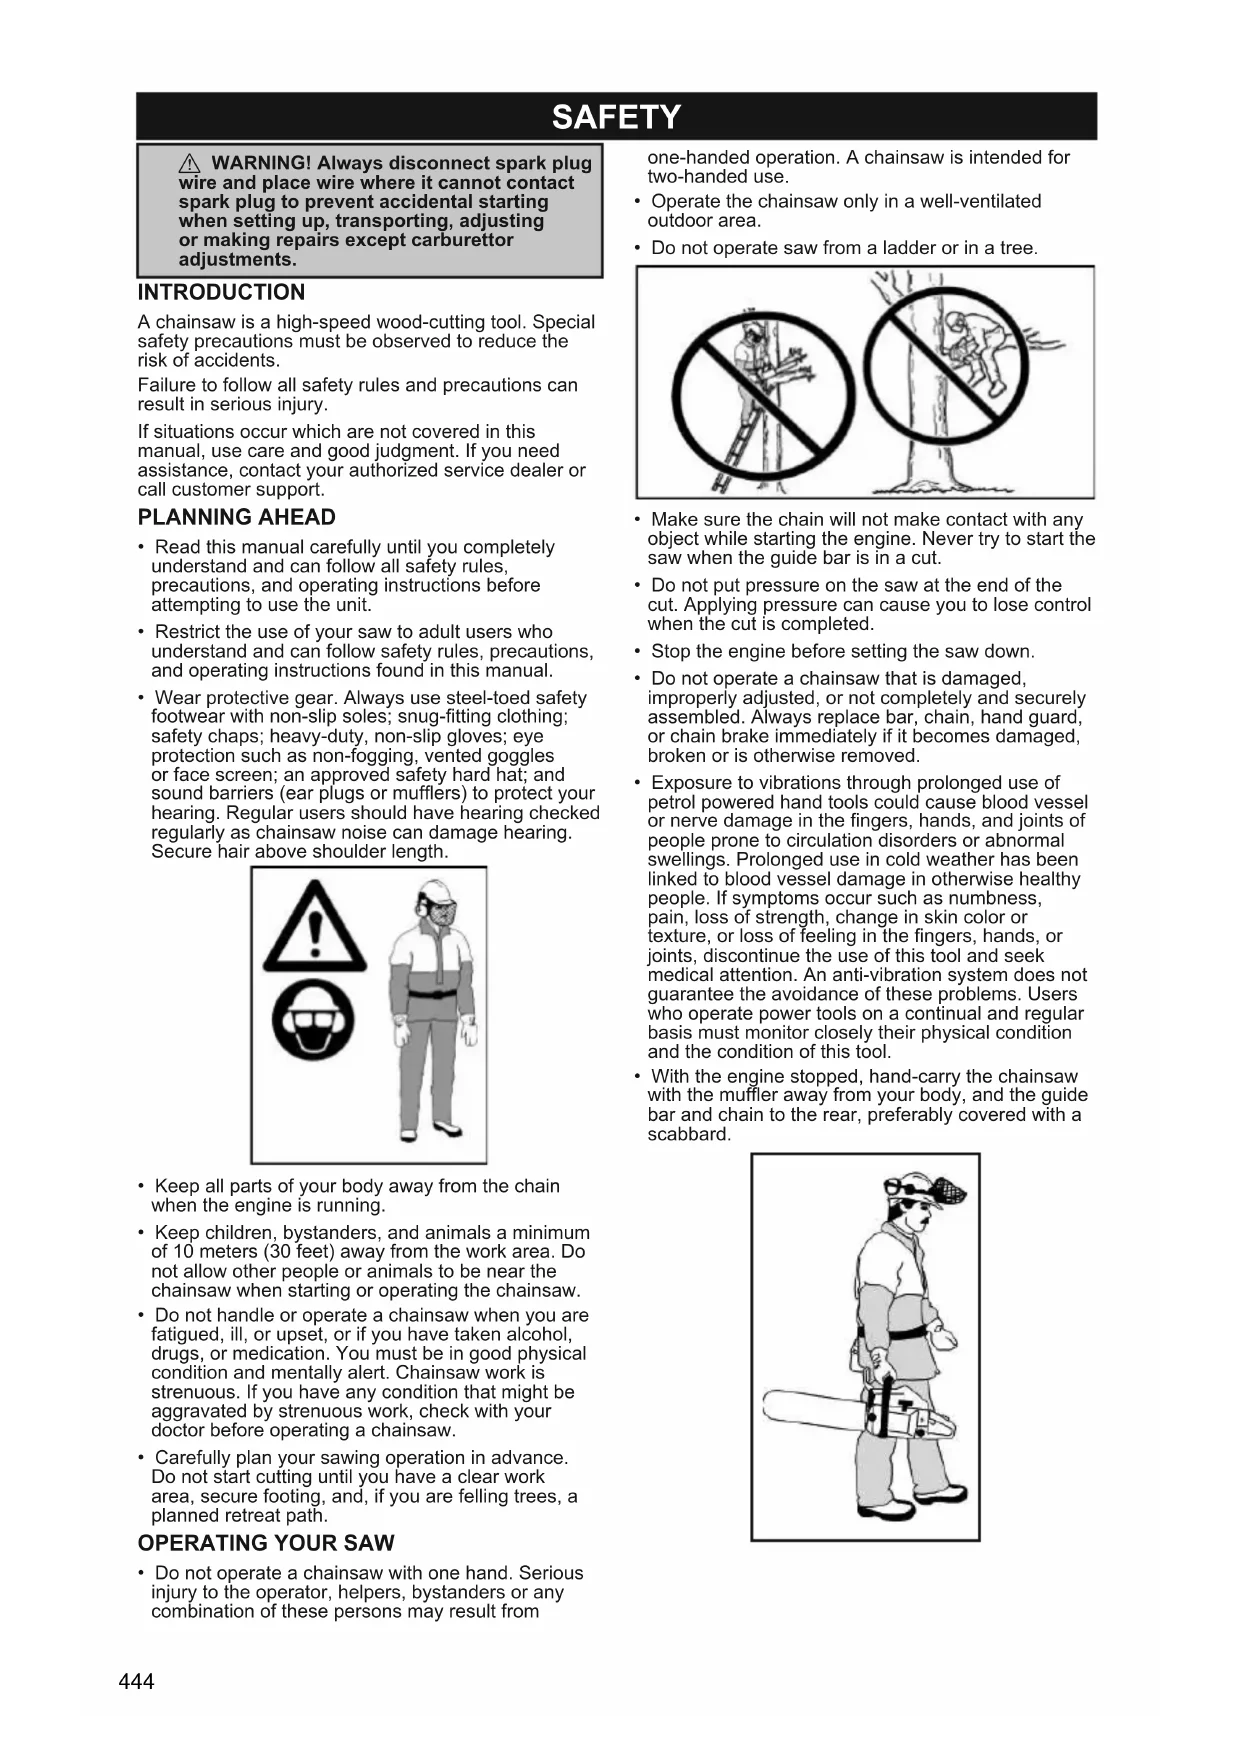
- Wear protective gear. Always use steel-toed safety footwear with non-slip soles; snug-fitting clothing; safety chaps; heavy-duty, non-slip gloves; eye protection such as non-fogging, vented goggles or face screen; an approved safety hard hat; and sound barriers (ear plugs or mufflers) to protect your hearing. Regular users should have hearing checked regularly as chainsaw noise can damage hearing. Secure hair above shoulder length.
- Keep all parts of your body away from the chain when the engine is running.
- Keep children, bystanders, and animals a minimum of 10 meters (30 feet) away from the work area. Do not allow other people or animals to be near the chainsaw when starting or operating the chainsaw.
- Do not handle or operate a chainsaw when you are fatigued, ill, or upset, or if you have taken alcohol, drugs, or medication. You must be in good physical condition and mentally alert. Chainsaw work is strenuous. If you have any condition that might be aggravated by strenuous work, check with your doctor before operating a chainsaw.
- Carefully plan your sawing operation in advance. Do not start cutting until you have a clear work area, secure footing, and, if you are felling trees, a planned retreat path.
OPERATING YOUR SAW
- Do not operate a chainsaw with one hand. Serious injury to the operator, helpers, bystanders or any combination of these persons may result from
one-handed operation. A chainsaw is intended for two-handed use.
- Operate the chainsaw only in a well-ventilated outdoor area.
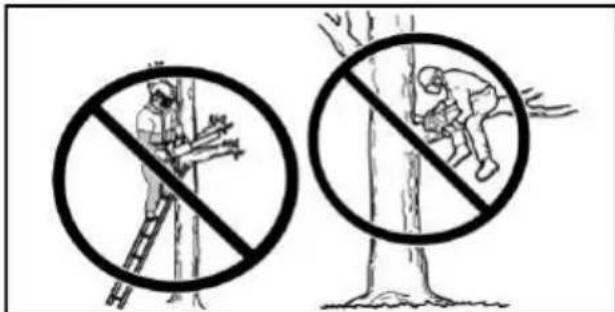
- Do not operate saw from a ladder or in a tree.
- Make sure the chain will not make contact with any object while starting the engine. Never try to start the saw when the guide bar is in a cut.
- Do not put pressure on the saw at the end of the cut. Applying pressure can cause you to lose control when the cut is completed.
- Stop the engine before setting the saw down.
- Do not operate a chainsaw that is damaged, improperly adjusted, or not completely and securely assembled. Always replace bar, chain, hand guard, or chain brake immediately if it becomes damaged, broken or is otherwise removed.
- Exposure to vibrations through prolonged use of petrol powered hand tools could cause blood vessel or nerve damage in the fingers, hands, and joints of people prone to circulation disorders or abnormal swellings. Prolonged use in cold weather has been linked to blood vessel damage in otherwise healthy people. If symptoms occur such as numbness, pain, loss of strength, change in skin color or texture, or loss of feeling in the fingers, hands, or joints, discontinue the use of this tool and seek medical attention. An anti-vibration system does not guarantee the avoidance of these problems. Users who operate power tools on a continual and regular basis must monitor closely their physical condition and the condition of this tool.
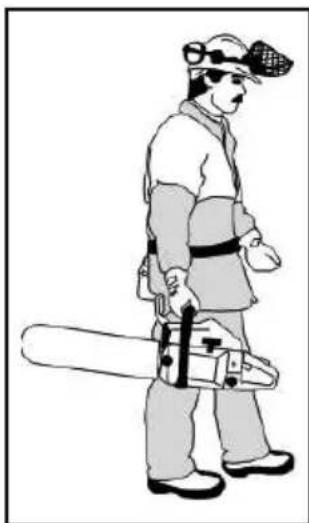
- With the engine stopped, hand-carry the chainsaw with the muffler away from your body, and the guide bar and chain to the rear, preferably covered with a scabbard.
MAINTAINING YOUR SAW
- Have all chainsaw service performed by a qualified service dealer with the exception of the items listed in the maintenance section of this manual. For example, if improper tools are used to remove or hold the flywheel when servicing the clutch, structural damage to the flywheel can occur and cause the flywheel to burst.
- Make certain the saw chain stops moving when the throttle trigger is released. For correction, refer to the MAINTENANCE section for carburettor adjustment.
- Never modify your saw in any way.
- Keep the handles dry, clean, and free of oil or fuel mixture.
- Keep fuel and oil caps, screws, and fasteners securely tightened.
- Use only genuine accessories and replacement parts as recommended.
- Certain regions require by law that many internal combustion engines are to be equipped with a spark arresting screen. If you operate a chainsaw in a locale where such regulations exist, you are legally responsible for maintaining the operating condition of these parts. Failure to do so is a violation of the law. Refer to the MAINTENANCE section for maintenance of the spark arresting screen.
HANDLING FUEL
- Do not smoke while handling fuel or while operating the saw.
- Eliminate all sources of sparks or flame in the areas where fuel is mixed or poured. There should be no smoking, open flames, or work that could cause sparks. Allow engine to cool before refueling.
- Always have fire extinguishing tools available if you should need them.
- Mix and pour fuel in an outdoor area on bare ground; store fuel in a cool, dry, well ventilated place; and use an approved, marked container for all fuel purposes. Wipe up all fuel spills before starting saw.
- Move at least 3 meters (10 feet) from fueling site before starting engine.
- Turn the engine off and let saw cool in a noncombustible area, not on dry leaves, straw, paper, etc. Slowly remove fuel cap and refuel unit.
- Store the unit and fuel in an area where fuel vapors cannot reach sparks or open flames from water heaters, electric motors or switches, furnaces, etc.
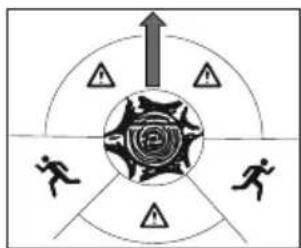
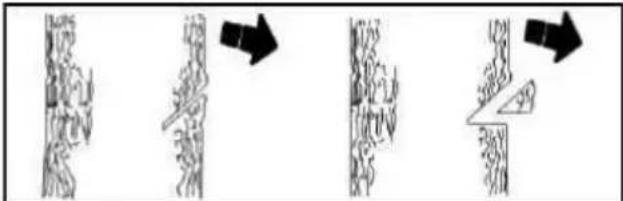
UNDERSTANDING KICKBACK

WARNING! Avoid kickback which can result
in serious injury. Kickback is the backward, upward or sudden forward motion of the guide bar occurring when the saw chain near the upper tip of the guide bar contacts any object such as a log or branch, or when the wood closes in and pinches the saw chain in the cut. Contacting a foreign object in the wood can also result in loss of chainsaw control.
ROTATIONAL KICKBACK
Rotational kickback can occur when the moving chain contacts an object at the upper tip of the guide bar. This contact can cause the chain to dig into the object, which stops the chain for an instant. The result is a lightning fast, reverse reaction which kicks the guide bar up and back toward the operator.
PINCH KICKBACK
Pinch kickback can occur when the wood closes in and pinches the moving saw chain in the cut along the top of the guide bar and the saw chain is suddenly
stopped. This sudden stopping of the chain results in a reversal of the chain force used to cut wood and causes the saw to move in the opposite direction of the chain rotation. The saw is driven straight back toward the operator.
PULL-IN
Pull-in can occur when the moving chain contacts a foreign object in the wood in the cut along the bottom of the guide bar and the saw chain is suddenly stopped. This sudden stopping pulls the saw forward and away from the operator and could easily cause the operator to lose control of the saw.
REDUCING THE CHANCE OF KICKBACK
- Recognize that kickback can happen. With a basic understanding of kickback, you can reduce the element of surprise which contributes to accidents.
- Never let the moving chain contact any object at the tip of the guide bar.
- Keep the working area free from obstructions such as other trees, branches, rocks, fences, stumps, etc. Eliminate or avoid any obstruction that your saw chain could hit while you are cutting. When cutting a branch, do not let the guide bar contact branch or other objects around it.
- Keep your saw chain sharp and properly tensioned. A loose or dull chain can increase the chance of kickback occurring. Follow manufacturer's chain sharpening and maintenance instructions. Check tension at regular intervals with the engine stopped, never with the engine running. Make sure the bar nuts are securely tightened after tensioning the chain.
- Begin and continue cutting at full speed. If the chain is moving at a slower speed, there is greater chance of kickback occurring.
- Use wedges made of plastic or wood. Never use metal to hold the cut open.
- Cut one log at a time.
- Use extreme caution when re-entering a previous cut.
- Do not attempt cuts starting with the tip of the bar (plunge cuts).
- Watch for shifting logs or other forces that could close a cut and pinch or fall into chain.
- Do not twist the saw as the bar is withdrawn from an undercut when bucking.
- Use the reduced-kickback guide bar and low-kickback chain specified for your saw.
MAINTAINING CONTROL
- Keep a good, firm grip on the saw with both hands when the engine is running and don't let go. A firm grip will help you reduce kickback and maintain control of the saw. Keep the fingers of your left hand encircling and your left thumb under the front handlebar. Keep your right hand completely around the rear handle whether you are right handed or left handed. Keep your left arm straight with the elbow locked.
- Position your left hand on the front handlebar so it is in a straight line with your right hand on the rear handle when making bucking cuts. Never reverse right and left hand positions for any type of cutting.
- Stand with your weight evenly balanced on both feet.
- Stand slightly to the left side of the saw to keep your body from being in a direct line with the cutting chain.
- Do not overreach. You could be drawn or thrown off balance and lose control of the saw.
- Do not cut above shoulder height. It is difficult to maintain control of saw above shoulder height.
KICKBACK SAFETY FEATURES
WARNING! The following features are included on your saw to help reduce the hazard of kickback; however, such features will not totally eliminate this danger. As a chainsaw user, do not rely only on safety devices. You must follow all safety precautions, instructions, and maintenance in this manual to help avoid kickback and other forces which can result in serious injury.
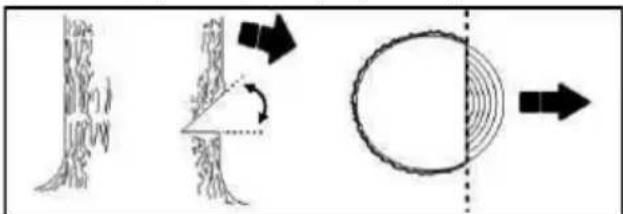
REDUCED KICKBACK GUIDE BAR
The reduced-kickback guide bar is designed with a small radius tip which reduces the size of the kickback danger zone on the bar tip.
LOW-KICKBACK CHAIN
A low-kickback chain is designed with a contoured depth gauge and guard link which deflect kickback force and allow wood to gradually ride into the cutter.
FRONT HAND GUARD
The front hand guard is designed to reduce the chance of your left hand contacting the chain if your hand slips off the front handlebar.
The distance and "in-line" position of the hands provided by the front and rear handles work together to give balance and resistance in controlling the pivot of the saw back toward the operator if kickback occurs.
CHAIN BRAKE
The chain brake is designed to stop the chain in the event of kickback.
NOTE: We do not represent and you should not assume that the chain brake will protect you in the event of a kickback. Do not rely upon any of the devices built into your saw. You should use the saw properly and carefully to avoid kickback.
Repairs on a chain brake should be made by an authorized servicing dealer. Take your unit to the place of purchase if purchased from a servicing dealer, or to the nearest authorized master service dealer.
ASSEMBLY
WARNING: If received assembled, repeat all steps to ensure your saw is properly assembled and all fasteners are secure. Always wear gloves when handling the chain. The chain is sharp and can cut you even when it is not moving!
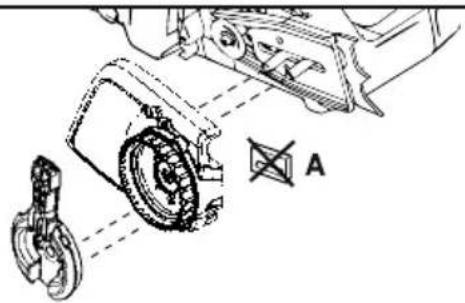
REMOVING THE CLUTCH COVER
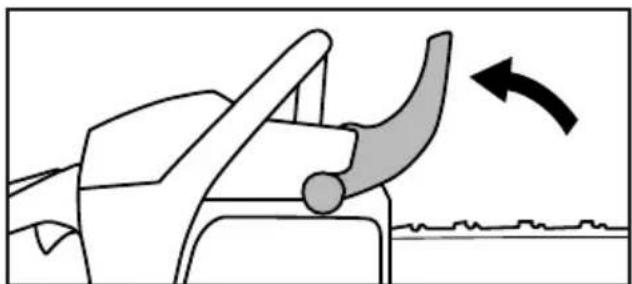
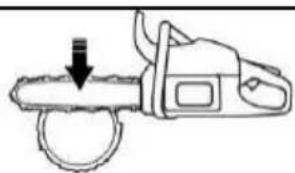
NOTE: Chain brake must be unlocked before clutch cover can be removed or reinstalled on the chain saw. To unlock chain brake, pull the front hand guard back toward the front handle as far as possible (see illustration).
- Check that the chain brake is in the unlocked position by pulling the front hand guard towards the front handle.
NOTE: If clutch cover can not be easily removed from the chain saw, ensure chain brake is unlocked by pulling the front hand guard back toward the front handle as far as possible.
- Remove the plastic shipping spacer (A) if present.
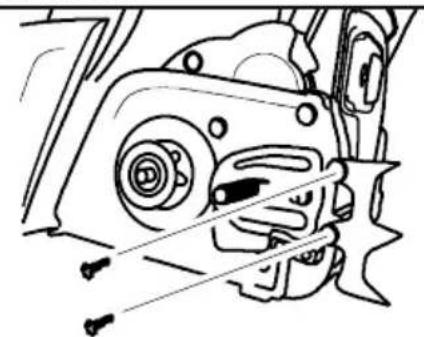
(if not already attached)
The bumper spike may be used as a pivot when making a cut. Attach the bumper spike with the two screws as illustrated.
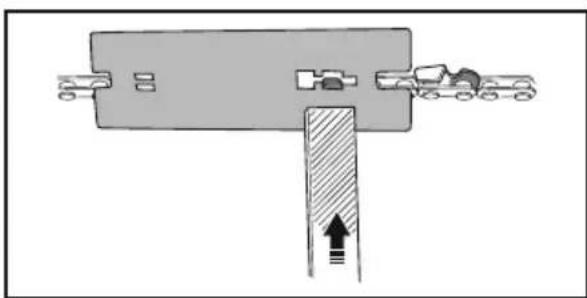
ATTACHING THE GUIDE BAR
(If not already attached)
An adjusting pin and chain tensioning ring is used to adjust the tension of the chain. It is very important when assembling the bar that the adjusting pin located on the adjusting screw aligns into a hole in the bar. Turning the chain tensioning ring will move the adjusting pin up and down the screw. Locate this adjusting pin before you begin mounting the bar onto the saw. See following illustration.
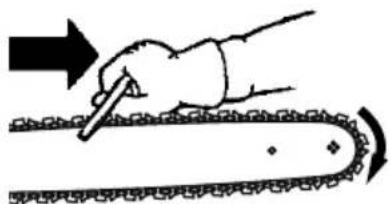
- Loosen and remove guide bar retaining knob completely by lifting lever and turning counterclockwise.
- Remove clutch cover.

- Turn the tensioning ring until the adjusting pin is positioned between the indicator marks (B) on the clutch cover. This should allow the adjusting pin to be near the correct position.
- Slide guide bar with chain on bar bolts until guide bar stops against clutch drum sprocket. Cutters must face in the direction of rotation.
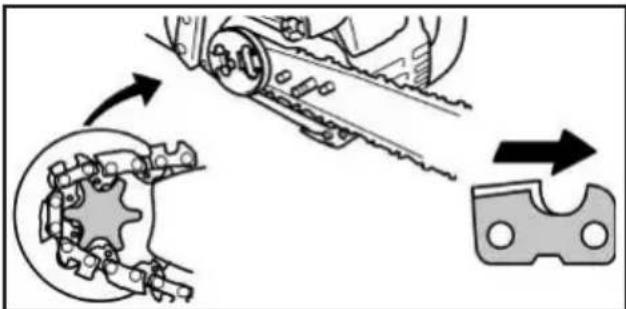
- Check that the drive links of the chain fit correctly on the drive sprocket and that the chain is in the groove on the bar.
- Fit the clutch cover and insert the adjusting pin in the cut-out in the bar.
- Install the guide bar retaining knob finger tight only. Once the chain is tensioned, you will need to tighten guide bar retaining knob.
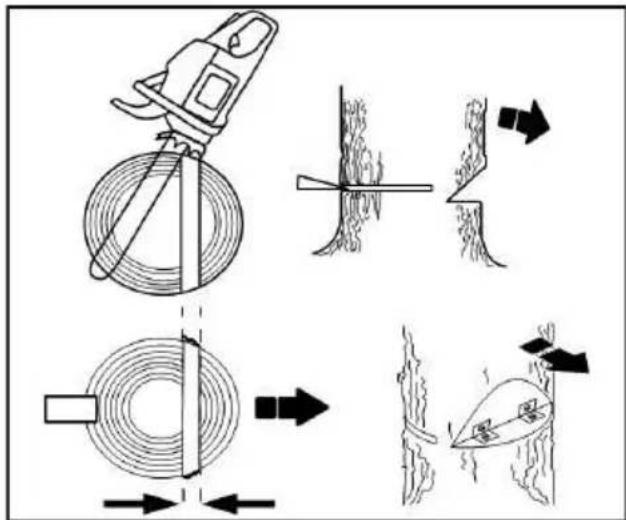
TENSIONING THE CHAIN
(Including units with chain already installed)
WARNING: If the saw is operated with a loose chain, the chain could jump off the guide bar and result in serious injury to the operator and/or damage the chain making it unusable. If the chain jumps off the guide bar, inspect each drive link for damage. Damaged chain must be repaired or replaced.
Chain tension is very important. Chains stretch during use. This is especially true during the first few times you use your saw. Always check chain tension each time before you start the chain saw.
When fitting a new chain, the chain tension has to be checked frequently until the chain is run-in.
A correctly tensioned chain ensures good cutting performance and long life.
CHECKING THE TENSION
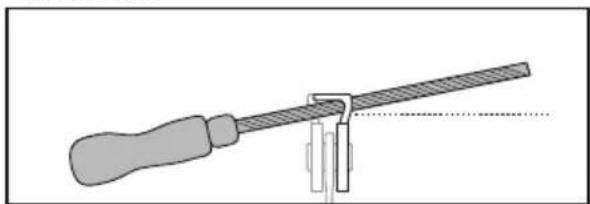
Use a screwdriver to move chain around guide bar. If the chain does not rotate, it is too tight. If the chain is too loose, it will sag below the bar.
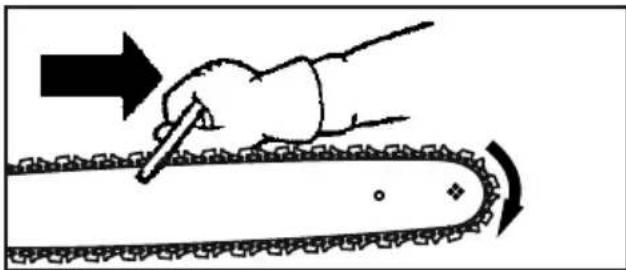
NOTE: The chain is tensioned correctly when the weight of the chain does not cause it to sag below the guide bar (with the chain saw sitting in an upright position), but the chain still moves freely around the guide bar.
ADJUSTING THE TENSION
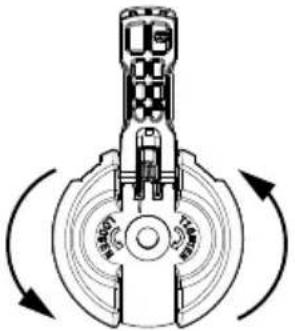
- Lift lever on guide bar retaining knob and turn counterclockwise 1 turn to loosen clutch cover.

NOTE: When adjusting chain tension, make sure the guide bar retaining knob is finger tight only. Attempting to tension the chain when the guide bar retaining knob is tight can cause damage.
- Turn tensioning ring clockwise until chain solidly contacts bottom of guide bar rail.
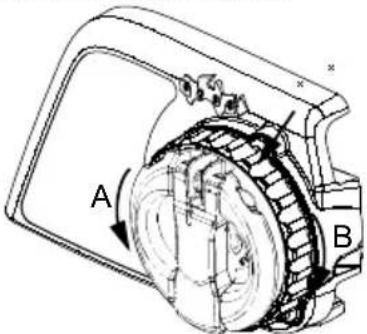
A = counterclockwise (loosen)
B = clockwise (tighten)
- Return lever on guide bar retaining knob to original position.
WARNING: Failure to return lever on guide bar retaining knob to original position could result in serious personal injury or damage to your chain saw.
FUEL HANDLING
FUELING ENGINE

WARNING: Remove fuel cap slowly when fueling.
IMPORTANT: This equipment is designed to operate on unleaded petrol with a minimum 90 octane (ROM), with ethanol blended up to 10% maximum by volume (E-10). Before operation, petrol must be mixed with a good quality synthetic 2-cycle air-cooled engine oil designed to be mixed at a ratio of 50:1.
DO NOT USE automotive oil or marine oil. These oils will cause engine damage. When mixing fuel, follow instructions printed on container. Once oil is added to petrol, shake container momentarily to assure that the fuel is thoroughly mixed. Always read and follow the safety rules relating to fuel before fueling your unit. Purchase fuel in quantities that can be used within 30 days to assure fuel freshness.
CAUTION: Never use straight petrol in your unit. This will cause permanent engine damage and void the limited warranty. Do not use alternate fuels such as ethanol blends above 10% by volume (E-15, E-85) or any methanol blended fuel. Use of these fuels can cause major engine performance and durability problems.
| Petrol, litre Two-stroke | oil, litre |
| 5 0,10 | |
| 10 0,20 | |
| 15 0,30 | |
| 20 0,40 |
BAR AND CHAIN LUBRICATION
The bar and chain require continuous lubrication. Lubrication is provided by the automatic oiler system when the oil tank is kept filled. Lack of oil will quickly ruin the bar and chain.
Too little oil will cause overheating shown by smoke coming from the chain and/or discoloration of the bar. In freezing weather oil will thicken, making it necessary to thin bar and chain oil with a small amount (5 to 10% ) of #1 Diesel Fuel or kerosene. Bar and chain oil must be free flowing for the oil system to pump enough oil for adequate lubrication.
Bar and chain oil is recommended to protect your unit against excessive wear from heat and friction. If bar and chain oil is not available, use a good grade SAE 30 oil.
- Never use waste oil for bar and chain lubrication.
- Always stop the engine before removing the oil cap.
STARTING AND STOPPING
Perform the following steps before every use of the machine:
- Check fuel mixture level
- Check bar lubrication
- Check chain sharpness
NOTE: Chain sharpening is a complicated task that requires special tools. We recommend that you refer chain sharpening to a professional chain sharpener.
- Check chain tension
- Inspect and clean the guide bar
- Check for damaged parts
- Check for loose caps
- Check for loose fasteners
- Check for loose parts
- Check for fuel and oil leaks
NOTE: It is normal for a small amount of oil to appear under the saw after the engine stops. Do not confuse this with a leaking oil tank.
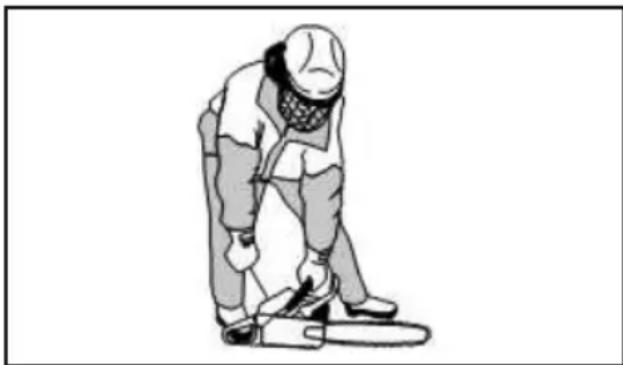
STARTING POSITION
- Lay the chainsaw on a flat surface. The cutting attachment must not be in contact with the ground. Make sure the chain is free to turn without contacting any object.
- Lock the chain brake by pushing forward on the handguard.
- Place your left hand on the handlebar and your right hand on the starter rope. Push your right foot into the rear handle to stabilize the chainsaw.
- Follow the starting instructions.
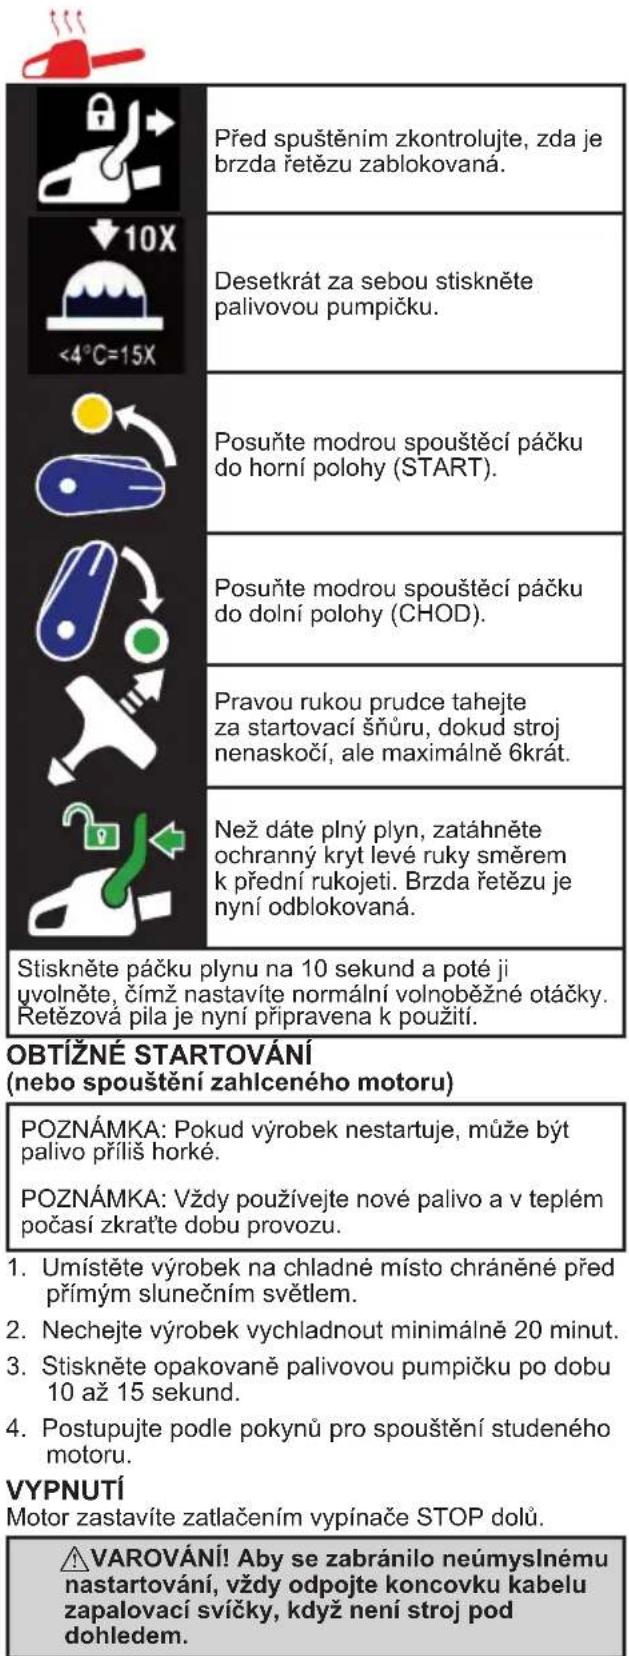
STARTING A COLD ENGINE
Follow these instructions to start your chainsaw. Your chainsaw has a starting reminder decal similar to the one shown below:
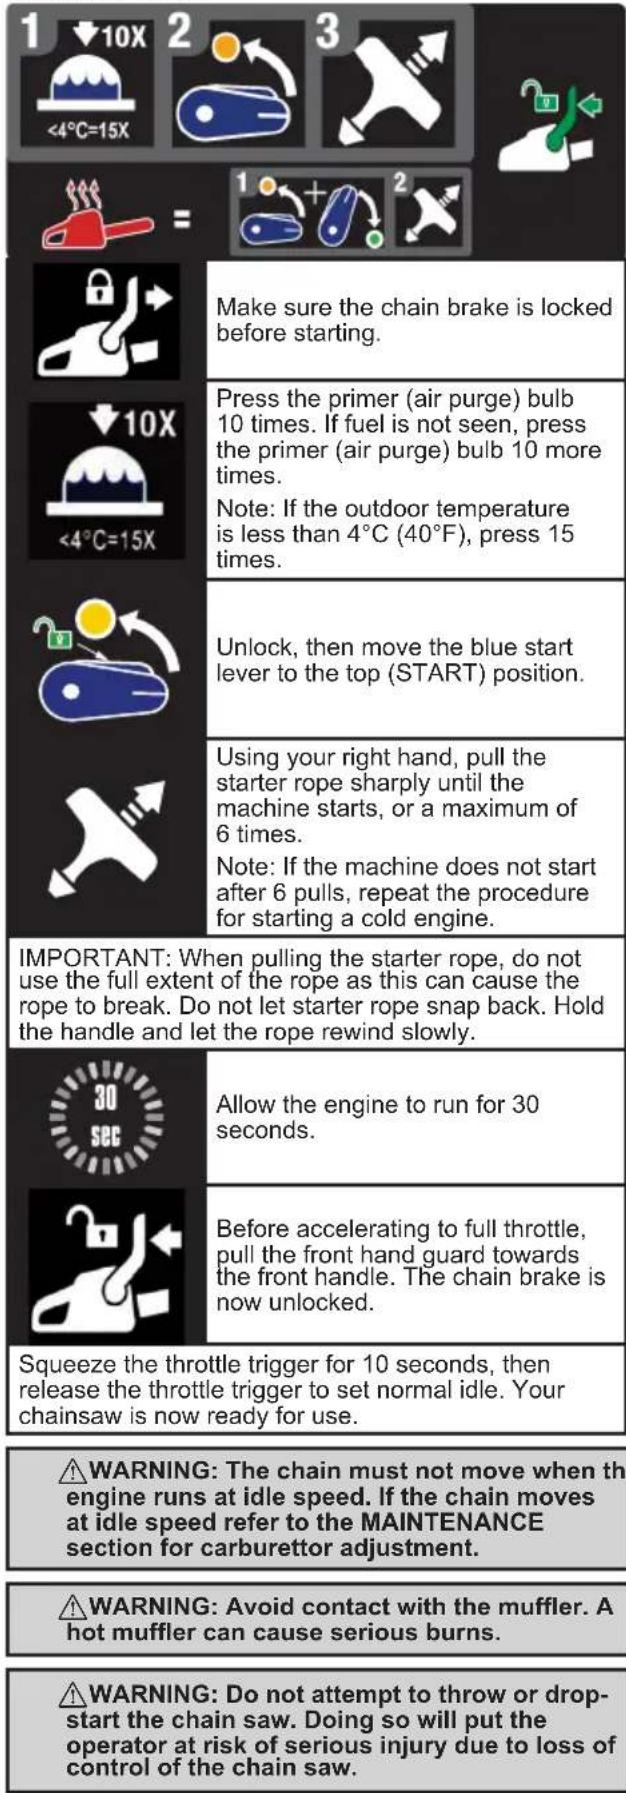
STARTING A WARM ENGINE
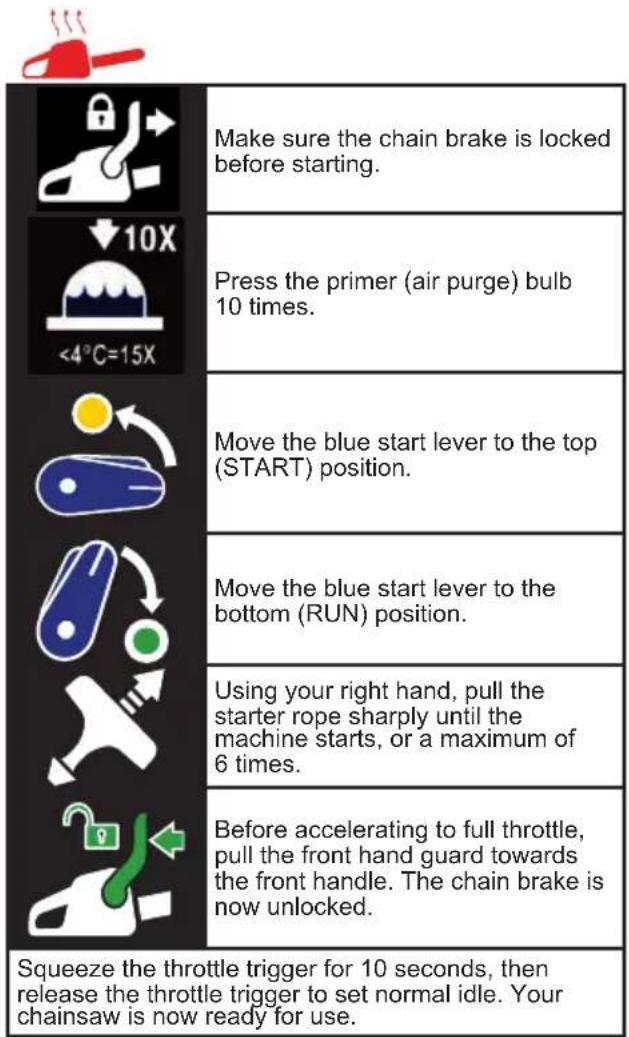
DIFFICULT STARTING (or starting a flooded engine)
NOTE: If the product does not start, the fuel can be too hot.
NOTE: Always use new fuel and decrease the operation time during warm weather.
- Put the product in a cool area away from open sunlight.
- Let the product cool down for 20 minutes at minimum.
-
Press the primer bulb again and again for 10-15 seconds.
-
Obey the procedure to start a cold engine.
STOPPING
To stop the engine push the STOP switch down.
WARNING! To avoid involuntary start up, the spark plug cap must always be removed from the spark plug when the machine is unsupervised.
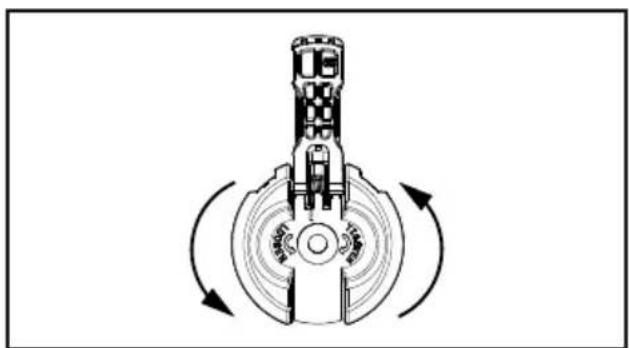
CHAIN BRAKE
WARNING: If the brake band is worn too thin it may break when the chain brake is triggered. With a broken brake band, the chain brake will not stop the chain. The chain brake should be replaced by an authorized service dealer if any part is worn to less than 0.5mm (0.020 in) thick. Repairs on a chain brake should be made by an authorized service dealer.
Take your unit to the place of purchase if purchased from a servicing dealer, or to the nearest authorized master service dealer.
This saw is equipped with a chain brake. The brake is designed to stop the chain if kickback occurs.
The inertia-activated chain brake is locked if the front hand guard is pushed forward, either manually (by hand) or automatically (by sudden movement).
If the brake is already locked, it is unlocked by pulling the front handguard back toward the front handle as far as possible.
When cutting with the saw, the chain brake must be unlocked.
NOTE: The chain brake must be checked several times daily. The engine must be running when performing this procedure.
This is the only instance when the saw should be placed on the ground with the engine running.
Place the saw on firm ground. Grip the rear handle with your right hand and the front handle with your left hand. Apply full throttle by fully depressing the throttle trigger. Activate the chain brake by turning your left wrist against the hand guard without releasing your grip around the front handle. The chain should stop immediately.
CHECKING THE INERTIA ACTIVATING FUNCTION CONTROL
WARNING! When performing the following procedure, the engine must be turned off.
- Grip the rear handle with your right hand and the front handle with your left hand.
- Hold the chainsaw approximately 40-45 centimeters (16-18 inches) above a stump or other wooden surface.
- Release your grip on the front handle and use the weight of the saw to let the tip of the guide bar fall forward and contact the stump. When the tip of the bar hits the stump, the brake should activate.
WORKING TECHNIQUES
PRACTICING YOUR CUTS
Practice cutting a few small logs using the following techniques to get the "feel" of using your saw before you begin a major sawing operation.
- Squeeze the throttle trigger and allow the engine to reach full speed before cutting.
- Begin cutting with the saw frame against the log.
- Keep the engine at full speed the entire time you are cutting.
- Allow the chain to cut for you. Exert only light downward pressure. If you force the cut, damage to the guide bar, chain, or engine can result.
- Release the throttle trigger as soon as the cut is completed, allowing the engine to idle. If you run the saw at full throttle without a cutting load, unnecessary wear can occur to the chain, guide bar, and engine. It is recommended that the engine not be operated for longer than 30 seconds at full throttle.
- To avoid losing control when cut is complete, do not put pressure on saw at end of cut.
- Stop the engine before setting the saw down after cutting.
FELLING A TREE
PLANNING
WARNING! Check for broken or dead branches which can fall while cutting causing serious injury. Do not cut near buildings or electrical wires if you do not know the direction of tree fall, nor cut at night since you will not be able to see well, nor during bad weather such as rain, snow, or strong winds, etc. If the tree makes contact with any utility line, the utility company should be notified immediately.
Carefully plan your sawing operation in advance.
Clear the work area. You need a clear area all around the tree so you can have secure footing.
The chainsaw operator should keep on the uphill side of the terrain as the tree is likely to roll or slide downhill after it is felled.
Study the natural conditions that can cause the tree to fall in a particular direction.
Natural conditions that can cause a tree to fall in a particular direction include:
- The wind direction and speed.
- The lean of the tree. The lean of a tree might not be apparent due to uneven or sloping terrain. Use a plumb or level to determine the direction of tree lean.
- Weight and branches on one side.
- Surrounding trees and obstacles.
Look for decay and rot. If the trunk is rotted, it can snap and fall toward the operator. Check for broken or dead branches which can fall on you while cutting.
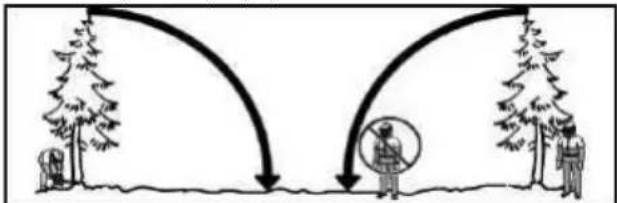
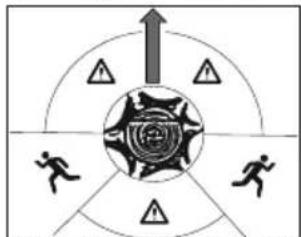
Make sure there is enough room for the tree to fall. Maintain a distance of 2-1/2 tree lengths from the nearest person or other objects. Engine noise can drown out a warning call.
Remove dirt, stones, loose bark, nails, staples, and wire from the tree where cuts are to be made.
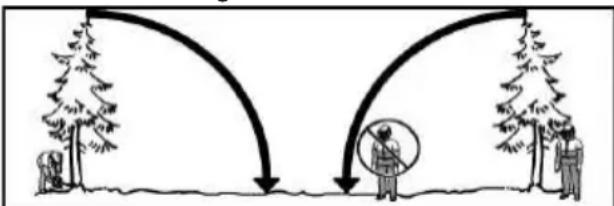
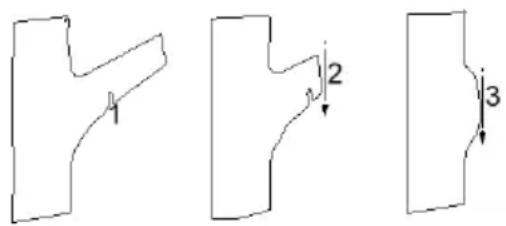
Plan a clear retreat path to the rear and diagonal to the line of fall. Note the danger zone (1), retreat path (2), and felling direction (3) in the following diagram.
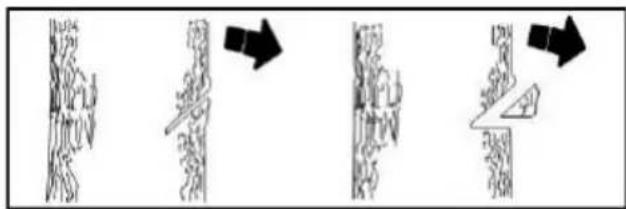
USING THE NOTCH METHOD
The notch method is used to fall large trees. A notch is cut on the side of the tree in the desired direction of fall. After a falling cut is made on the opposite side of tree, the tree will tend to fall into the notch.
NOTE: If the tree has large buttress roots, remove them before making the notch. If using saw to remove buttress roots, keep saw chain from contacting ground to prevent dulling of the chain.
Make the notch cut by cutting the top of the notch first. Cut through 1/3 of the diameter of the tree. Next complete the notch by cutting the bottom of the notch. Once the notch is cut remove the notch of wood from the tree.

After removing the wood from the notch, make the felling cut on the opposite side of the notch. This is done by making a cut about 5 centimeters (2 inches) higher than the center of the notch. This will leave enough uncut wood between the felling cut and the notch to form a hinge. This hinge will help prevent the tree from falling in the wrong direction.
NOTE: Before felling cut is complete, use wedges to open the cut if necessary to control the direction of fall. To avoid kickback and chain damage, use wood or plastic wedges, but never steel or iron wedges.
Be alert to signs that the tree is ready to fall: cracking
sounds, widening of the felling cut, or movement in the upper branches.
As tree starts to fall, stop saw, put it down, and get away quickly on your planned retreat path.
DO NOT cut down a partially fallen tree with your saw. Be extremely cautious with partially fallen trees that may be poorly supported. When a tree doesn't fall completely, set the saw aside and pull down the tree with a cable winch, block and tackle, or tractor.
CUTTING A FALLEN TREE (BUCKING)
Bucking is the term used for cutting a fallen tree to the desired log size.
WARNING! Do not stand on the log being cut. Any portion can roll causing loss of footing and control. Do not stand downhill of the log being cut.
IMPORTANT POINTS:
- Cut only one log at a time.
- Cut shattered wood very carefully; sharp pieces of wood could be flung toward operator.
- Use a sawhorse to cut small logs. Never allow another person to hold the log while cutting and never hold the log with your leg or foot.
- Do not cut in an area where logs, limbs, and roots are tangled such as in a blown down area. Drag the logs into a clear area before cutting by pulling out exposed and cleared logs first.
- Make sure the chain will not strike the ground or any other object during or after cutting.
WARNING! If saw becomes pinched or hung in a log, don't try to force it out. You can lose control of the saw resulting in injury and/ or damage to the saw. Stop the saw, drive a wedge of plastic or wood into the cut until the saw can be removed easily. Restart the saw and carefully reenter the cut. To avoid kickback and chain damage, do not use a metal wedge. Do not attempt to restart your saw when it is pinched or hung in a log.

TYPES OF BUCKING CUTS
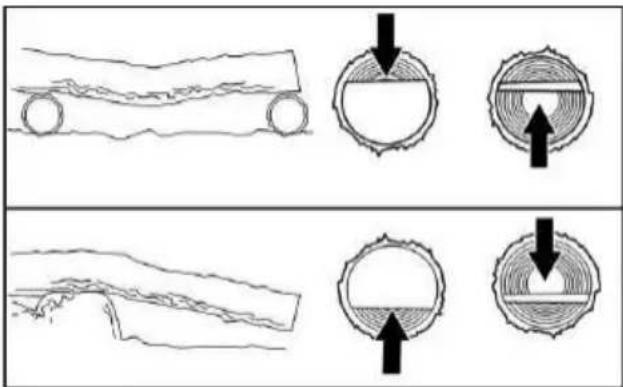
Overcutting begins on the top side of the log with the bottom of the saw against the log. When overcutting use light downward pressure.
Undercutting involves cutting on the underside of the
log with top of saw against the log. When undercutting use light upward pressure. Hold saw firmly and maintain control. The saw will tend to push back toward you.

WARNING! Never turn saw upside down to undercut. The saw cannot be controlled in this position.
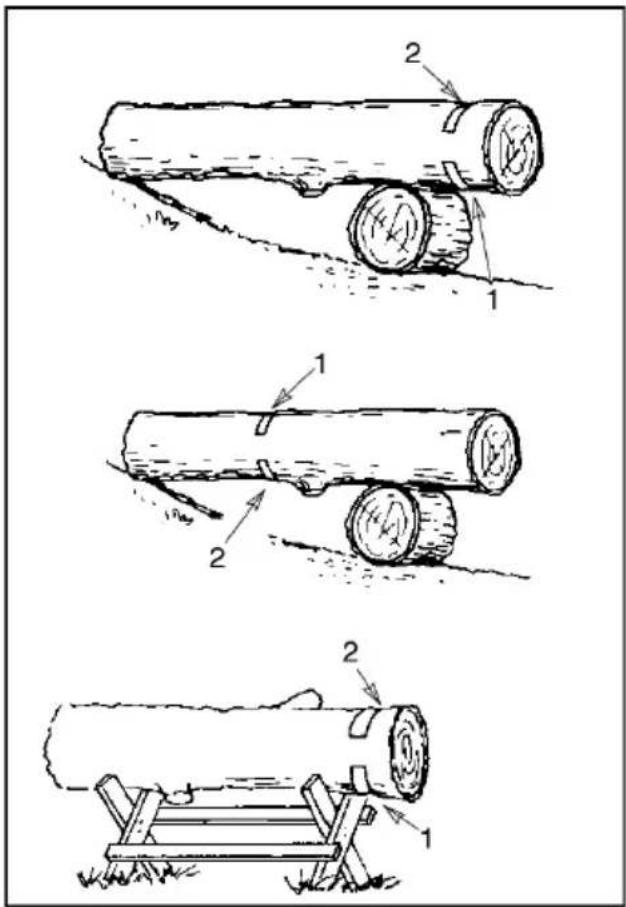
Always make your first cut on the compression side of the log. The compression side of the log is where the pressure of the log's weight is concentrated.
BUCKING WITHOUT A SUPPORT
- Overcut through 1/3 of the diameter of the log.
- Roll the log over and finish with a second overcut.
NOTE: Watch for logs with a compression side to prevent the saw from pinching.
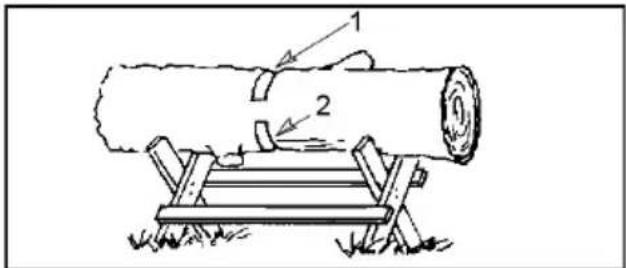
BUCKING USING A LOG OR SUPPORT STAND
- Make the first cut on the compression side of the log. Your first cut should extend 1/3 of the diameter of the log.
- Finish with your second cut.
LIMBING AND PRUNING
WARNING! Be alert for and guard against kickback. Do not allow the moving chain to contact any other branches or objects at the nose of the guide bar when limbing or pruning. Allowing such contact can result in serious injury.
WARNING! Never climb into a tree to limb or prune. Do not stand on ladders, platforms, a log, or in any position which can cause you to lose your balance or control of the saw.
IMPORTANT POINTS
- Work slowly, keeping both hands firmly gripped on the saw. Maintain secure footing and balance.
- Watch out for springpoles. Springpoles are small size limbs which can catch the saw chain and whip toward you or pull you off balance. Use extreme caution when cutting small size limbs or slender material.
- Be alert for springback. Watch out for branches that are bent or under pressure. Avoid being struck by the branch or the saw when the tension in the wood fibers is released.
- Keep a clear work area. Frequently clear branches out of the way to avoid tripping over them.
LIMBING
Always limb a tree after it is cut down. Only then can limbing be done safely and properly.
Leave the larger limbs underneath the felled tree to support the tree as you work.
Start at the base of the felled tree and work toward the top, cutting branches and limbs. Remove small limbs with one cut.
Keep the tree between you and the chain. Cut from the side of the tree opposite the branch you are cutting.
Remove larger, supporting branches with the cutting techniques described in BUCKING WITHOUT A SUPPORT.
Always use an overcut to cut small and freely hanging limbs. Undercutting could cause limbs to fall and pinch the saw.
PRUNING
WARNING! Limit pruning to limbs should height or below. Do not cut if branches are higher than your shoulder. Get a professional to do the job.
- Make the first cut one-third of the way through the bottom of the limb.
- Make the second cut all the way through the limb.
- Make the third overcut leaving a 2.5 to 5 centimeter (1 to 2 inch) collar from the trunk of the tree.
MAINTENANCE
WARNING: Disconnect the spark plug before performing maintenance except for carburettor adjustments.
We recommend all service and adjustments not listed in this manual be performed by an authorized or Master Service Dealer.
GENERAL RECOMMENDATIONS
The warranty on this unit does not cover items that have been subjected to operator abuse or negligence. To receive full value from the warranty, the operator must maintain the unit as instructed in this manual. Various adjustments will need to be made periodically to properly maintain your unit.
IMPORTANT: Have all repairs other than the recommended maintenance described in the instruction manual performed by an authorized service dealer.
If any dealer other than an authorized service dealer performs work on the product, the company may not pay for repairs under warranty. It is your responsibility to maintain and perform general maintenance.
MAINTENANCE SCHEDULE
Before each use
- Check fuel mixture level
- Check bar lubrication
- Check chain tension
- Check chain sharpness
- Check for damaged parts
- Check for loose caps
- Check for loose fasteners
- Check for loose parts
Every 5 hours*
- Inspect and clean air filter
- Inspect and clean chain brake
- Inspect and clean guide bar
Every 25 hours*
- Inspect and clean spark arresting screen and muffler
Yearly
- Replace spark plug
- Replace fuel filter
- Replace air filter
- Each hour of operation is approximately 2 tanks of fuel.
MAINTENANCE PROCEDURES CHECK FOR DAMAGED OR WORN PARTS
Contact an authorized service dealer for replacement of damaged or worn parts.
NOTE: It is normal for a small amount of oil to appear under the saw after engine stops. Do not confuse this with a leaking oil tank.
- STOP Switch - Ensure STOP switch functions properly by pushing the switch down. Make sure engine stops; then restart engine and continue.
- Fuel Tank - Do not use saw if fuel tank shows signs of damage or leaks.
- Oil Tank - Do not use saw if oil tank shows signs of damage or leaks.
CHECK FOR LOOSE FASTENERS AND PARTS
Bar Nuts
- Chain
Muffler
- Cylinder Shield
Air Filter
- Handle Screws
Vibration Mounts
- Starter Housing
- Front Hand Guard
CHECK FUEL MIXTURE LEVEL
See FUELING ENGINE under the OPERATION section.
LUBRICATION
See GUIDE BAR AND CHAIN OIL under the OPERATION section.
INSPECT AND CLEAN THE UNIT AND DECALS
After each use, inspect complete unit for loose or damaged parts. Clean the unit and decals using a damp cloth with a mild detergent. Wipe off unit with a clean dry cloth.
WARNING: Do not clean filter in petrol or other flammable solvent to avoid creating a fire hazard or producing harmful emissions.
A dirty air filter decreases the life and performance of the engine and increases fuel consumption and harmful emissions. Always clean your air filter after 10 tanks of fuel or 5 hours of operation, whichever comes first. Clean more frequently in dusty conditions. A used air filter can never be completely cleaned. It is advisable to replace your air filter with a new one after every 50 hours of operation, or annually, whichever comes first.
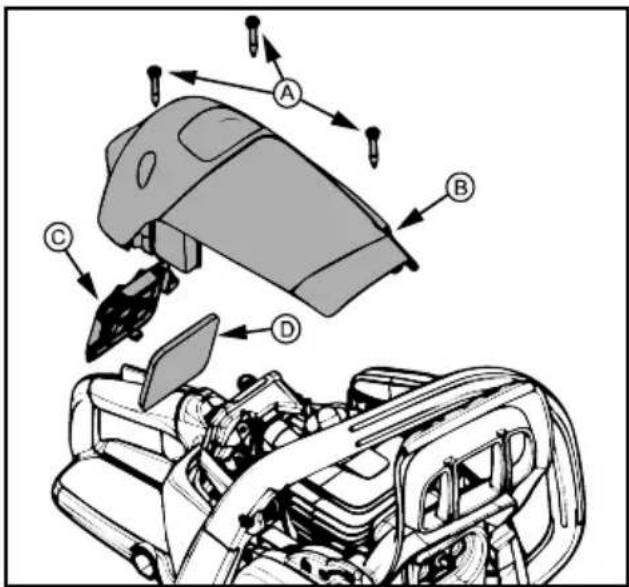
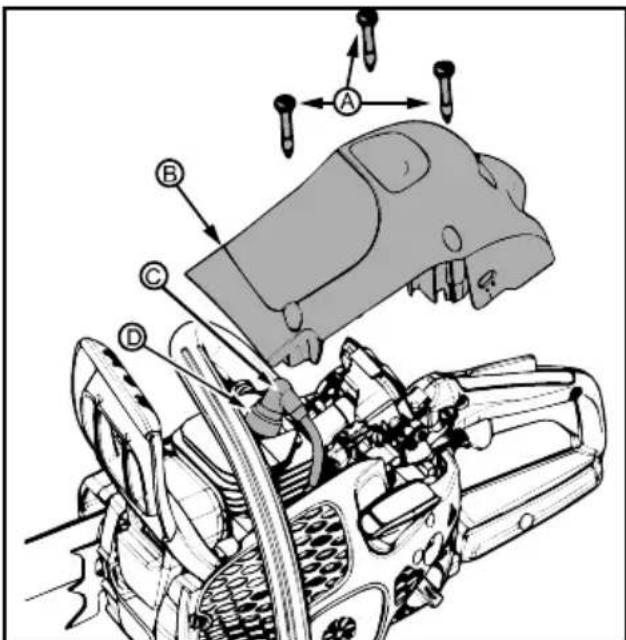
- Loosen the three screws (A) on the cylinder cover (B).
- Remove the cylinder cover.
- Remove the air filter cover (C) and air filter (D).
- Clean the air filter using hot soapy water. Rinse with clean cool water. Air dry completely before reinstalling.
- Reinstall the air filter and air filter cover.
- Reinstall the cylinder cover and three screws Tighten securely to 1,5-2 N-m (13-18 in-lb).
INSPECT MUFFLER AND SPARK ARRESTING SCREEN
As the unit is used, carbon deposits build up on the muffler and spark arresting screen, and must be removed to avoid creating a fire hazard or affecting engine performance.
Replace the spark arresting screen if breaks occur.

CLEANING THE SPARK ARRESTING SCREEN
- Loosen and remove the nut (A) from the exhaust outlet cover (B).
- Remove the exhaust outlet cover.
- Remove the spark arresting screen (C). Handle the screen carefully to prevent damage.
- Clean the spark arresting screen gently with a wire brush. Replace screen if breaks are found.
- Replace any broken or cracked muffler parts.
- Reinstall spark arresting screen, exhaust outlet cover, and nut. Tighten nut securely to 2,8-4 N-m (25-35 in-lb).
REPLACE SPARK PLUG
The spark plug should be replaced each year to ensure the engine starts easier and runs better. Ignition timing is fixed and nonadjustable.
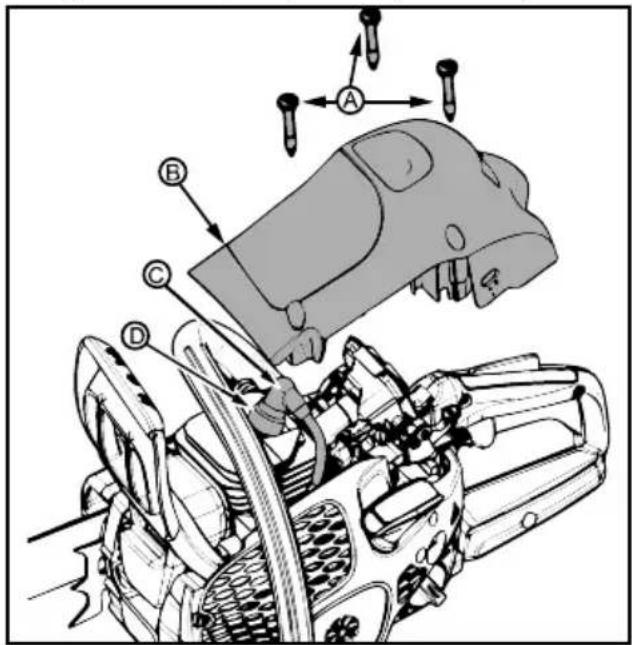
- Loosen the three screws (A) on the cylinder cover (B).
- Remove the cylinder cover.
- Pull off the spark plug boot (C).
- Remove spark plug (D) from the cylinder and discard.
- Install a new spark plug and tighten securely with a 19 mm (3/4 inch) socket wrench to 20-34 N-m (15-25 ft-lb). The spark plug gap should be 0,5 mm (0.02 inch).
-
Reinstall the spark plug boot.
-
Reinstall the cylinder cover and the three screws. Tighten securely to 1,5-2 N-m (13-18 in-lb).
CARBURETTOR ADJUSTMENT
WARNING: The chain will be moving during most of this procedure. Wear your protective equipment and observe all safety precautions. The chain must not move at idle speed.
Indications for idle speed adjustment
The carburetor has been carefully set at the factory. Adjustments may be necessary if you notice any of the following conditions:
The chain moves at idle. See IDLE SPEED-T ADJUSTMENT procedure.
The saw will not idle. See IDLE SPEED-T ADJUSTMENT procedure.
Idle speed-T adjustment
Allow the engine to idle. If the chain moves, the idle is too fast. If the engine stalls, the idle is too slow.
Adjust the speed until the engine runs without chain movement (idle too fast) or stalling (idle too slow).
The idle speed screw is located in the area above the primer (air purge) bulb and is labeled "T".
Turn the idle speed screw (T) clockwise to increase the engine speed.
Turn the idle speed screw (T) counterclockwise to decrease the engine speed.
COOLING SYSTEM
To keep the working temperature as low as possible, the machine is equipped with a cooling system.
The cooling system consists of:
Air intake on the starter
Air guide plate
- Fins on the flywheel
Cooling fins on the cylinder
- Cylinder cover (directs cold air over the cylinder)
Clean the cooling system with a brush after each use, more often in demanding conditions. A dirty or blocked cooling system results in the machine overheating which causes damage to the piston and cylinder.
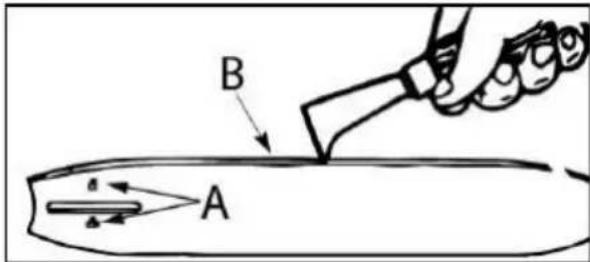
TO SHARPEN THE SAW CHAIN
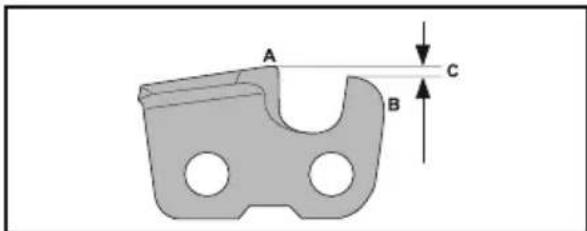
The cutter
The cutting part of the saw chain is called the cutter and consists of a cutting tooth (A) and the depth gauge (B).
The cutters cutting depth is determined by the difference in height between the two, the depth gauge setting (C).

When you sharpen a cutting tooth there are four important factors to remember:
Filing angle.
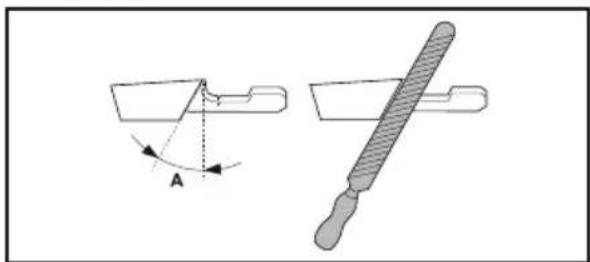
- Cutting angle.
- File position.
- Round file diameter.
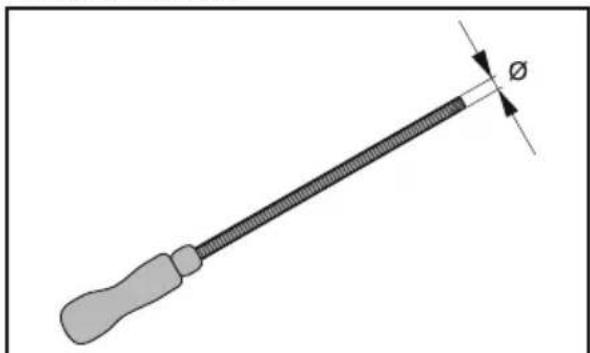
To sharpen the cutting teeth
Use a round file and a file gauge to sharpen the cutting teeth. See the TECHNICAL DATA section of this manual for information on the recommended dimension of the file and gauge for the saw chain installed on your product.
- Make sure that the saw chain is correctly tensioned. A slack chain will move sideways, making it more difficult to sharpen correctly.
- File all teeth on one side first. File the cutting teeth from the inside face and reduce the pressure on the return stroke.
- Turn the product over and file the teeth on the other side.
- File all the teeth to the same length. When the length of the cutting teeth is reduced to 4mm (5/32") the saw chain is worn out and must be replaced.

To adjust the depth gauge setting
Sharpen the cutting teeth before you adjust the depth gauge setting. When you sharpen the cutting tooth (A), the depth gauge setting (C) will decrease. To maintain optimal cutting performance, the depth gauge (B) has to be filed down to achieve the recommended depth gauge setting. See the TECHNICAL DATA section of this manual to find the correct depth gauge setting for your particular chain.
NOTE: This recommendation assumes that the length of the cutting teeth is not reduced excessively.
Use a flat file and depth gauge tool to adjust the depth gauge.
- Put the depth gauge tool above the saw chain. Detailed information regarding how to use the depth gauge tool will be found on the package of the depth gauge tool.
- Use the flat file to file off the tip of the depth gauge that protrudes through the depth gauge tool. The depth gauge setting is correct when you no longer feel resistance as you draw the file along the depth gauge tool.
GUIDE BAR
Conditions which require guide bar maintenance:
- Saw cuts to one side or at an angle.
- Saw has to be forced through the cut.
- Inadequate supply of oil to bar/chain.
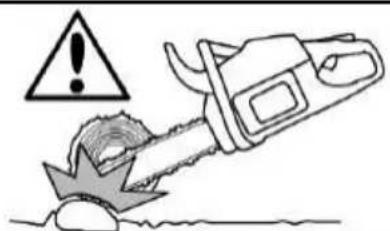
Check the condition of guide bar each time chain is sharpened. A worn guide bar will damage the chain and make cutting difficult.
After each use, push the ON/STOP switch down until the engine stops, then clean all sawdust from the guide bar and sprocket hole.
To maintain guide bar:
- Loosen and remove bar nuts and clutch cover. Remove bar and chain from saw.
- Clean the oil holes (A) and bar groove (B).
- Burring of guide bar rails is a normal process of rail wear. Remove these burrs with a flat file.
- When rail top is uneven, use a flat file to restore square edges and sides.

Replace guide bar when the groove is worn, the guide bar is bent or cracked, or when excess heating or burring of the rails occurs. If replacement is necessary, use only the guide bar specified for your saw in the repair parts list or on the decal located on the chainsaw.
TROUBLESHOOTING
TROUBLESHOOTING TABLE
WARNING: Always stop unit and disconnect spark plug before performing all of the recommended remedies below except remedies that require operation of the unit.
| TROUBLE CAUSE REMEDY | ||
| Engine will not start or will run only a few seconds after starting. | 1. Engine flooded. 2. Fuel tank empty. 3. Spark plug not firing. 4. Fuel not reaching carburettor. | 1. See “Difficult Starting” in STARTING AND STOPPING Section. 2. Fill tank with correct fuel mixture. 3. Install new spark plug. 4. Check for dirty fuel filter; replace. Check for kinked or split fuel line; repair or replace. |
| Engine will not idle properly. 1. Idle speed requires adjustment. 2. Carburettor requires adjustment. | 1. See “Carburettor Adjustment” in the MAINTENANCE Section. 2. Contact an authorized service dealer. | |
| Engine will not accelerate, lacks power, or dies under a load. | 1. Air filter dirty. 2. Spark plug fouled. 3. Chain brake engaged. 4. Carburettor requires adjustment. | 1. Clean or replace air filter. 2. Clean or replace plug and regap. 3. Disengage chain brake. 4. Contact an authorized service dealer. |
| Engine smokes excessively. 1. Too much oil mixed with gasoline. | 1. Empty fuel tank and refill with correct fuel mixture. | |
| Chain moves at idle speed. 1. Idle speed requires adjustment. 2. Clutch requires repair. | 1. See “Carburettor Adjustment” in the MAINTENANCE Section. 2. Contact an authorized service dealer. |
STORAGE
Perform the following steps after each use:
- Allow the engine to cool, and secure the unit before storing or transporting.
- Store chain saw and fuel in a well ventilated area where fuel vapors cannot reach sparks or open flames from water heaters, electric motors or switches, furnaces, etc.
- Store chain saw with all guards in place and position chain saw so that any sharp object cannot accidentally cause injury.
- Store chain saw well out of the reach of children.
SEASONAL STORAGE
Prepare your unit for storage at the end of the season or if it will not be used for 30 days or more.
If your chain saw is to be stored for a period of time:
- Clean saw thoroughly before storage.
- Store in a clean dry area.
- Lightly oil external metal surfaces and guide bar.
- Oil the chain and wrap it in heavy paper or cloth.
FUEL SYSTEM
Fuel stabilizer is an acceptable alternative in minimizing the formation of fuel gum deposits during storage. Add stabilizer to the petrol in the fuel tank or fuel storage container.
Follow the mix instructions found on stabilizer containers. Run engine at least 5 minutes after adding stabilizer.
ENGINE
- Remove spark plug and pour 1 teaspoon of 2-cycle engine oil through the spark plug opening. Slowly pull the starter rope 8 to 10 times to distribute oil.
- Replace spark plug with new one of recommended type and heat range.
- Clean air filter.
- Check entire unit for loose screws, nuts, and bolts. Replace any damaged, broken, or worn parts.
- At the beginning of the next season, use only fresh fuel having the proper petrol to oil ratio.
OTHER
- Do not store petrol from one season to another.
- Replace your petrol container if it starts to rust.
TECHNICAL DATA
TECHNICAL DATA
| CS 42STE (SASA242MC) | |
| Engine | |
| Cylinder displacement, cm3 | 42 |
| Stroke, mm 32 | |
| Idle speed, rpm 2800-3200 | |
| Power, kW 1,5/9000 | |
| Ignition system | |
| Spark plug Husqvarna HQT-1 · | |
| Electrode gap, mm 0,5 | |
| Fuel and lubrication system | |
| Fuel tank capacity, cm3 | 300 |
| Oil pump capacity at 9,000 rpm, ml/min 4-8 | |
| Oil tank capacity, cm3 | 200 |
| Type of oil pump Automatic | |
| Weight | |
| Chain saw without bar or chain, empty tanks 4,9 kg (10,8 lb) | |
| Noise emissions (see note 1) | |
| Sound power level, measured dB(A) 112 | |
| Sound power level, guaranteed LwA dB(A) - Europe 118 | |
| Sound levels (see note 2) | |
| Equivalent sound pressure level at the operator's ear, dB(A) 98,7 | |
| Equivalent vibration levels, a hveq (see note 3) | |
| Front handle, m/s2 | 5,22 |
| Rear handle, m/s2 | 6,24 |
| Chain/bar | |
| Standard bar length 14 in (35 cm), 16 in (40 cm) 18 in (45 cm) | |
| Recommended bar lengths 14 in (35 cm), 16 in (40 cm) 18 in (45 cm) | |
| Usable cutting length | 13.4 in (34 cm), 15.4 in (39 cm) 17.4 in (44 cm) |
| Pitch | 3/8 in (9,52 mm) |
| Thickness of drive links | 1,3 mm (.050 in) |
| Type of drive sprocket/number of teeth | Spur/7 |
| Chain speed at max. power, m/sec | 20 |
Note 1: Noise emissions in the environment measured as sound power (L_WA) in conformity with EC directive 2000/14/EC.
Note 2: Equivalent sound pressure level, according to ISO 22868, is calculated as the time-weighted energy total for different sound pressure levels under various working conditions. Typical statistical dispersion for equivalent sound pressure level is a standard deviation of 1 dB (A).
Note 3: Equivalent vibration level, according to ISO 22867, is calculated as the time-weighted energy total for vibration levels under various working conditions. Reported data for equivalent vibration level has a typical statistical dispersion (standard deviation) of 1m/s^2 .
GUIDE BAR AND SAW CHAIN COMBINATIONS
The following cutting attachments are approved for the models covered in this manual.
| Guide bar | Saw chain | ||||
| Length | Pitch | Gauge | Max. nose radius | Type | Drive links (no.) |
| 35 cm (14 in) | 3/8 in | 1,3 mm (0.05 in) | 9T | UC83G / H37 / 91PX | 52 |
| 40 cm (16 in) | 3/8 in | 1,3 mm (0.05 in) | 9T | UC83G / H37 / 91PX | 56 |
| 45 cm (18 in) | 3/8 in | 1,3 mm (0.05 in) | 9T | UC83G / H37 / 91PX | 62 |
SYMBOLER
PAFYLDNING AF BRENDSTOF

ADVARSEL: Tag brandstofdakslet langsomsf. for pafyldningen.
BLIKJENT MED MASKINEN
STRAMMING AV SAGKJEDET
(gjelder ogsaenheter der kjedet allereder montert)
KVISTING OG BESKJÆRING
VEDLIKEHOLDSPROSEDYRER
Teralevyn vakiopituus 14 in (35 cm), 16 in (40 cm), 18 in (45 cm)
Suositeltu terälevyn pituus 14 in (35 cm), 16 in (40 cm), 18 in (45 cm)
HANDBESCHERMING VOOR
PROGRAMMADIMANUTENZIONE
KARBURAATORI SEADIST AMINE
[1HVDXJRNLWHEHQ]LQR]QXRYLHQRVH]RQRILNLNL
3DNHLVNLWHUEHQ]LQRIEDNAMHLMILVISUDGOMRUI
TECHNINIAI DUOMENYS
TECHNINIAI DUOMENYS
| Kreipiančioj ploksté | Pjuklo grandiné | ||||
| Ilgis | Žingsnis | Tarpo plotis | Maksimalus juostos Žvaigždutës dantuku skaičius | Tipas | Varantieji nareliai (vnt.) |
| 35 cm (14 col.) | 38 col. | 1,3 mm (0,05 col.) | 9T | UC83G / H37 / 91PX | 52 |
| 40 cm (16 col.) | 38 col. | 1,3 mm (0,05 col.) | 9T | UC83G / H37 / 91PX | 56 |
| 45 cm (18 col.) | 38 col. | 1,3 mm (0,05 col.) | 9T | UC83G / H37 / 91PX | 62 |
SIMPOLI
| Delo s tem strojem je lahko nevarno! Če z njim ne ravnate skrbno ali pravilno, lahko povzročite većjo škodo. | |
| Preden začnete z uporabo stroja, natančno preberite navodila za uporabo in se prepičajte, da ste jih razumeli. | |
| Vedno uporabljajte: • zašcit oči, na primer zašcitna očala proti rošenju in s prezračevanjem ali vizir za obraz • odobreno zašcitno Čelado • zašcit zo sluh (ušesne Čepe ali glušnike) | |
| Žage med uporabo nikoli ne držite samo z eno roko. | |
| Med uporabo mora uporabnik motorno Žago držati z obema rokama. | |
| Preprečite dotik konice meça s katerim koli predmetom. | |
| Največja izmerjena vrednost povratnegа udarca. | 45 |
| Raven hrupa A na 7,5 metrih (25 Čevljih) v skladu z avstralsko direktivo NSW "Zašcita okolja pri delu (nadzor hrupa) iz 2008". Podatki so navedeni na nalepki. | NOISE dB |
| Emisija hrupa v okolje v skladu z direktivo Evropske skupnosti. Podatek je naveden v poglavju TEHNIĆNI PODATKI na nalepki. | Lxa xxx xxx xxx xxx xxx xxx xxx xxx xxx xxx xxx xxx xxx xxx xxx xxx xxx xxx xxx xxx xxx xxx xxx xxx xxx xxx xxx xxx xxx xxx xxx xxx xxx xxx xxx xxx xxx xxx xxx xxx xxx xxx xxx xxx xxx xxx xxx xxx xxx xxx xxxx xxx xxx xxx xxx xxx xxx xxx xxx xxx xxx xxx xxx xxx xxx xxx xxx xxx xxx xxx xxx xxx xxx xxx xxx xxx xxx xxx xxx xxx xxx xxx xxx xxx xxx xxx xxx xxx xxx xxx xxx xxx xxx xxx xxx xxx xxx xxx xxx xxx XXX xxx xxx xxx xxx xxx xxx xxx xxx xxx xxx xxx xxx xxx xxx xxx xxx xxx xxx xxx xxx xxx xxx xxx xxx xxx xxx xxx xxx xxx xxx xxx xxx xxx xxx xxx xxx xxx xxx xxx xxx xxx xxx xxx xxx xxx xxx xxx xxx xxx xx xxx xxx xxx xxx xxx xxx xxx xxx xxx xxx xxx xxx xxx xxx xxx xxx xxx xxx xxx xxx xxx xxx xxx xxx xxx xxx xxx xxx xxx xxx xxx xxx xxx xxx xxx xxx xxx xxx xxx xxx xxx xxx xxx xxx xxx xxx xxx xxx xxx x xxx xxx xxx xxx xxx xxx xxx xxx xxx xxx xxx xxx xxx xxx xxx xxx xxx xxx xxx xxx xxx xxx xxx xxx xxx xxx xxx xxx xxx xxx xxx xxx xxx xxx xxx xxx xxx xxx xxx xxx xxx xxx xxx xxx xxx xxx xxx xxx xxx yyy xxx xxx xxx xxx xxx xxx xxx xxx xxx xxx xxx xxx xxx xxx xxx xxx xxx xxx xxx xxx xxx xxx xxx xxx xxx xxx xxx xxx xxx xxx xxx xxx xxx xxx xxx xxx xxx xxx xxx xxx xxx xxx xxx xxx xxx xxx xxx xxx xxx xxx xxx xxx xxx xxx xxx xxx xxx xxx xxx xxx xxx xxx xxx xxx xxx xxx xxx xxx xxx xxx xxx xxx xxx xxx xxx xxx xxx xxx xxx xxx xxx xxx xxx xxx xxx xxx xxx xxx xxx xxx xxx xxx xxx xxx xxx xxx xxx xxx xxx ***. ***. ***. ***. ***. ***. ***. ***. ***. ***. ***. ***. ***. ***. ***. ***. ***. ***. ***. ***. ***. ***. ***. ***. ***. ***. ***. ***. ***. ***. ***. ***. ***. ***. ***. ***. ***. ***. ***. ***. ***. ***. ***. ***. ***. ***. ***. ***. ***. ***. *** ***. ***. ***. ***. ***. ***. ***. ***. ***. ***. ***. ***. ***. ***. ***. ***. ***. ***. ***. ***. ***. ***. ***. ***. ***. ***. ***. ***. ***. ***. ***. ***. ***. ***. ***. ***. ***. ***. ***. ***. ***. ***. ***. ***. ***. ***. ***. ***. ***. *** ***. ***. ***. ***. ***. ***. ***. ***. ***. ***. ***. ***. ***. ***. ***. ***. ***. ***. ***. ***. ***. ***. ***. ***. ***. ***. ***. ***. ***. ***. ***. ***. ***. ***. ***. ***. ***. ***. ***. ***. ***. ***. ***. ***. ***. ***. ***. ***. ***. ***; ***. ***. ***. ***. ***. ***. ***. ***. ***. ***. ***. ***. ***. ***. ***. ***. ***. ***. ***. ***. ***. ***. ***. ***. ***. ***. ***. ***. ***. ***. ***. ***. ***. ***. ***. ***. ***. ***. ***. ***. ***. ***. ***. ***. ***. ***. ***. ***. ***. ***? ***. ***. ***. ***. ***. ***. ***. ***. ***. ***. ***. ***. ***. ***. ***. ***. ***. ***. ***. ***. ***. ***. ***. ***. ***. ***. ***. ***. ***. ***. ***. ***. ***. ***. ***. ***. ***. ***. ***. ***. ***. ***. ***. ***. ***. ***. ***. ***. ***. ***) ***. ***. ***. ***. ***. ***. ***. ***. ***. ***. ***. ***. ***. ***. ***. ***. ***. ***. ***. ***. ***. ***. ***. ***. ***. ***. ***. ***. ***. ***. ***. ***. ***. ***. ***. ***. ***. ***. ***. ***. ***. ***. ***. ***. ***. ***. ***. ***. ***. ***, ***. ***. ***. ***. ***. ***. ***. ***. ***. ***. ***. ***. ***. ***. ***. ***. ***. ***. ***. ***. ***. ***. ***. ***. ***. ***. ***. ***. ***. ***. ***. ***. ***. ***. ***. ***. ***. ***. ***. ***. ***. ***. ***. ***. ***. ***. ***. ***. ***. ***/ ***. ***. ***. ***. ***. ***. ***. ***. ***. ***. ***. ***. ***. ***. ***. ***. ***. ***. ***. ***. ***. ***. ***. ***. ***. ***. ***. ***. ***. ***. ***. ***. ***. ***. ***. ***. ***. ***. ***. ***. ***. ***. ***. ***. ***. ***. ***. ***. ***. ***- ***. ***. ***. ***. ***. ***. ***. ***. ***. ***. ***. ***. ***. ***. ***. ***. ***. ***. ***. ***. ***. ***. ***. ***. ***. ***. ***. ***. ***. ***. ***. ***. ***. ***. ***. ***. ***. ***. ***. ***. ***. ***. ***. ***. ***. ***. ***. ***. ***. ***: ***. ***. ***. ***. ***. ***. ***. ***. ***. ***. ***. ***. ***. ***. ***. ***. ***. ***. ***. ***. ***. ***. ***. ***. ***. ***. ***. ***. ***. ***. ***. ***. ***. ***. ***. ***. ***. ***. ***. ***. ***. ***. ***. ***. ***. ***. ***. ***. ***. ***> ***. ***. ***. ***. ***. ***. ***. ***. ***. ***. ***. ***. ***. ***. ***. ***. ***. ***. ***. ***. ***. ***. ***. ***. ***. ***. ***. ***. ***. ***. ***. ***. ***. ***. ***. ***. ***. ***. ***. ***. ***. ***. ***. ***. ***. ***. ***. ***. ***. ***] ***. ***. ***. ***. ***. ***. ***. ***. ***. ***. ***. ***. ***. ***. ***. ***. ***. ***. ***. ***. ***. ***. ***. ***. ***. ***. ***. ***. ***. ***. ***. ***. ***. ***. ***. ***. ***. ***. ***. ***. ***. ***. ***. ***. ***. ***. ***. ***. ***. ***、 ***、 ***、 ***、 ***、 ***、 ***、 ***、 ***、 ***、 ***、 ***、 ***、 ***、 ***、 ***、 ***、 ***、 ***、 ***、 ***、 ***、 ***、 ***、 ***、 ***、 ***、 ***、 ***、 ***、 ***、 ***、 ***、 ***、 *** *** *** *** *** *** *** *** *** *** *** *** *** *** *** *** *** *** *** *** *** *** *** *** *** *** *** *** *** *** *** *** *** *** *** *** *** *** *** *** *** *** *** *** *** *** *** *** *** *** *** *** *** *** *** *** *** *** *** *** *** *** *** *** *** *** *** *** *** *** *** *** *** *** *** *** *** *** *** *** *** *** *** *** *** *** *** *** *** *** *** *** *** *** *** *** *** *** *** *** ... *** *** *** *** *** *** *** *** *** *** *** *** *** *** *** *** *** *** *** *** *** *** *** *** *** *** *** *** *** *** *** *** *** *** *** *** *** *** *** *** *** *** *** *** *** *** *** *** *** *** *** *** *** *** *** *** *** *** *** *** *** *** *** *** *** *** *** *** *** *** *** *** *** *** *** *** *** *** *** *** *** *** *** *** *** *** *** *** *** *** *** *** *** *** *** *** *** *** *** . *** *** *** *** *** *** *** *** *** *** *** *** *** *** *** *** *** *** *** *** *** *** *** *** *** *** *** *** *** *** *** *** *** *** *** *** *** *** *** *** *** *** *** *** *** *** *** *** *** *** *** *** *** *** *** *** *** *** *** *** *** *** *** *** *** *** *** *** *** *** *** *** *** *** *** *** *** *** *** *** *** *** *** *** *** *** *** *** *** *** *** *** *** *** *** *** *** *** *** ? *** *** *** *** *** *** *** *** *** *** *** *** *** *** *** *** *** *** *** *** *** *** *** *** *** *** *** *** *** *** *** *** *** *** *** *** *** *** *** *** *** *** *** *** *** *** *** *** *** *** *** *** *** *** *** *** *** *** *** *** *** *** *** *** *** *** *** *** *** *** *** *** *** *** *** *** *** *** *** *** *** *** *** *** *** *** *** *** *** *** *** *** *** *** *** *** *** *** *** _ • • • • • • • • • • • • • • • • • • • • • • • • • • • • • • • • • • • • • • • • • • • • • • • • • • • |
A TENGELYKAPCSOLO FEDELENEK ELTAVOLITASA
SPUŠTENI TEPLEHO MOTORU
BRZDA RETÉZU
Roztec 9,52 mm (3/8 palce)
Tloustka vodicich clanku 1,3 mm (0,050 palce)
ROTACNY SPATNY NARAZ
K rotačnému spätnému nárazu moze dojst, ked' sa pohybujúca re'taz dostane do kontaktu s predmetom v hornej spicke vodiacej listy. Kontakt moze sposobit, ze sa re'taz zareže do predmetu, co ju okamžite zastaví. Vysledkom je bleskurychla, spatna reakcia, ktorá odrazí vodiacu listu nahor a spat' smerom k použivatefovi.
SPATNY NARAZ PRI PRISKRIPNUTI
K spätnému nárazu pri priskripnutí föze dojst, ked' sa drevo uzavrie a priskripne pohybujuću sa ret'az pily v reze pozdž hornej āsti spiicky vodiacej listy a ret'az pily sa nahle zastvi. Nahle zastavenie ret'aze ma za následok obratenie sily ret'aze, ktora sa použiva na rezanie dreva a sposobi, Že ret'az sa pohne opacnym smerom jej rotácie. Pil je hnaná priamo spat' k použivatelovi.
VTIAHNOTIE
K vtiahnutiu moze dojst, ked sa pohybujuca sa ret'az v dreve dostane do kontaktu s cudzim predmetom v reze pozdilz dolnej casti spicky vodiacej listry a ret'az pily sa nahle zastavi. Nahle zastavenie t'aha pilu doprodu a prec od pouzivatel'a Iahko moze sposobit, ze nad pilou strati kontrlu.
ZNIZENIE SANCE NA SPATNY NARAZ
Pripustite, ze k spatnému nárazu moze dojst. So základnym pochopenim spatného nárazu mozete znizit prvok prekvapenia, ktory prispieva k urazom.
Nikdy nedovolte, aby sa pohybujica sa refaz dostala do kontaktu s akymkolvek predmetom na spicke vodiacej listy.
Udrziavaje pracovn oblast bez prekazok,ako su iné stromy, vetvy, skaly, ploty, pne atd. Odstrante alebo sa vyhnite prekazke, do ktorei by mohla ret'az pily pri rezani narazit. Pri rezani vetvy zabrante kontaktu vodiacej listy s vetvou alebo inymi predmetmi okolo nej.
- Ret'az pily udrziavaje ostru a spravyne naputu. Uvolfená alebo tupa re'az moze zvyšit sancu, ze dojde k spatněmu narazu. Riad'te sa poukynmi vyrobu pre ostrenie a udrzbu re'aze. V pravidelnych intervaloch kontrlujte naputie, ke'd je motor zestavený, nikdyNie, ke'd beží. Po naputí re'aze sa uistite, ze su matice na liste pavne utiahnute.
- Rezat začnite pri maximálnych otáčkach aPokračujte v rezani tiež pri maximálnych otáčkach. Ak sa re'taz pohybuje pomalsie, existujevacšia sanca, ze dojde k spātnému nárazu.
Použivajte plastové alebo drevené kliny. Na udržiavanie otvoreného rezu nikdy nepouživajte kovové kliny.
Naraz rezte iba jeder kmen.
Pri opatovnom vstupe do predchadzajuceho rezu budte mimoriadne opatni.
Nepokusajte sa o rezy zachinajuce spickou listy (zapichovacie rezy).
Davajte pozor na posun kmerov alebo iné sily, ktoré by mohli uzavriet'rez a priskripn't ret'az alebo spadn't do ret'aze.
ZÁKLADNÉ PRACOVNÉ TECHNIKY
PRECVICOVANIE REZOV
Skor nez zachnete svacsim pilinem, pomocou nasledujucich technik si precvi cate rezanie na niekol'kych mal'ych kmenoch, aby ste ziskali "cit" pre pouzivanie vasej pily.
Pred rezanim stlacte packu plynu a nechajte motor, aby dosiahol maximalne otaky.
- Začnite rezat's rámom píly proti kmenu.
- Nechajte motor bežat na maximálne otáčky po celý Čas rezania.
- Nechajte re't'az, aby rezala za vás. Vyvíjaje iba slabý tlak smerom nadol. Ak budete na rez tlačit silou, može to mat' za následok poškodenie vodiacej lišty, re't'aze alebo motora.
- Po dokončeni rezu co najskó uvolnite páčku plynu, aby motor mohol ist na volnobeh. Ak pustíte pilu na plné plyn bez rezného zaťazenia, ret'az, vodiaca lista a motor sa možu zbytočne opotrebovávat'. Odporúca sa nenechávat' motor bežat' na plné plyn dlhsie ako 30 sekünd.
- Aby ste po dokončeni rezu nestratili kontrolu nad pilou, na konci rezu na nu netlačte.
- Skör ako pilu po rezani položite, zastavte motor.
STÍNANIE STROMU
PLÁNOVANIE
UPOZORNENIE! H'adajte zlomené alebo uschnute vetvy, ktoré mozu spadnú't poças rezania a sposobit' vázne poranenie. Nereze v blizkosti budov ani elektrickych drótov, pokial' nepoznáte smer pádu stromu. Takisto nereze t v noci, pretoze nebudete dobre vidiet', ani v zlom poças, ako dázd', sneh ci silny vietor atd'. Ak sa strom dostane do kontaktu s inžinierskymi siet'ami, ihned' o tom informujte prislušné spolocnost'.
Pilenie si dokladne naplanujte vopred.
Vycistite pracovn oblast. Aby ste mali bezpecny postoj, potrebujete vycistenu oblast' okolo stromu.
Delenie 9,52 mm (3/8 palca)
Hrubka vodiacich clankov 1,3 mm (0,050 palca)
Typ hnacieho kolieska/počet zubov Záberove/7
Rychlost' ret'aze pri maximalmnom vykone, m/sek
20
Poznámka 1: Hladina hluku meraná akustický tlak (Lw) v sulade s europskou smernicou 2000/14/ES.
Standardna duljina vodilice 14" (35 cm), 16" (40 cm), 18" (45 cm)
Preporucene duljine vodilice 14" (35 cm), 16" (40 cm), 18" (45 cm)
Iskoristiva duljina rezanja 13,4" (34 cm), 15,4" (39 cm), 17,4" (44 cm)
Nagib 3 / 8'' (9,52 mm)
Debljina pogonskih chanaka 1,3 mm (0.050")
Vrsta pogonskog zupcanika/broj zubi Ceoni/7
Brzina lanca pri maksimalnoj snagi, m/s 20
Napomena 1: Emisije buke u okolis izmjerene kao jakost zvuka (L_WA) u skladu s EZ direktivom 2000/14/EZ.
Lungime standard a sinei 14 in (35 cm), 16 in (40 cm) 18 in (45 cm)
Lungimile recomandate ale sinei 14 in (35 cm), 16 in (40 cm) 18 in (45 cm)
KAK CHN3NTb BEPOrTHOCTb OTDAuN
HnKOrJa He 3a6bIaBte O Bo3MOxHOOTdAe.YcBOIN npuHHb BO3HNKHOBeHn OTdauN, Bbl MOKeTe cH3NTb CTeneHb HEoKnDaHHOCTn ee BO3HNKHOBeHn, YTO BaXHo dIpy npeDToBpaueHn HecuaCThBix CNYaEB.
HnBkoemcnyuae He donyckaTKe kacaHna DnKyuueCzEybQkAKO-Im6o npedMeTa B BepxHeuactn octpna Hnpabraioe uHbI.
CneHTE 3a TEM, YTObI pa6Oa4 30Ha 6bIa CBO6OHa OT npenrTCTBn, HApPMEp, Dpynx DepeBBeB, BeTBe, KAMHeN, 3a6OpOB, NHeN n T.D. UcTaHnTe Wn CTapaiTeCb N36ExKaT b JIOoTO pEnrTCTBn, C KOtOpBM MoKET POn30Tu CoyadapeHne ue B XOe Cpe3aHnCTBOna nn BetKn. Pnp Pe3Ke BetBn H36eAraTe KOHTaTb WnHbI c DpyHMn BETkAmu ININ NOCTOPOHHMn PpeMetamn.
CneHTe 3a Tem, YTo6bI cEnb 6bIa 3aToeHa n npabInbHo HataHyTa. OcnaBnHnA nn Tynar cEnb yBeNmuBaET BepoTHOCT bOtDaH. BInOnHnTe INcTpyKunn N3rTOBnTeJe IeHN no 3aToUKe n yxOdy 3a CenbIO.Perynphno npOBepaHTe HataKeHne cEN npocctAOBnEHNOHM DmBiratene; HNKOrJa He npOBepaHTe HataKeHne npraBoTAooM dBnIRatene. Pocne HataKeHnA cENy6eDNTecb, YTO raNkUnnHb NaedXHO 3aTAYbI.
HaunhaIte HbInonHnIe pe3ky Ha nonHoCKoPcTn. EcnuCeIb DnKETcC MeHbWei CKOpOCTbIO, BepoTHOCtB OTaunBO3pactaet.
Пльзутесь пл actMaccOBIMNи DepeBHHIMNKNHbIMN.3anpeueHO NOJb3OBAtbcrMetaJIINyecKIMNKNHbIMNДI npdeOTbpaueHnCmBkAHnpe3a.
CpeaTeToJbKONoOHOBBeTKe3apa3.
Будьт ecO6eHNO BHNMaTeIbHbI npN IOBTOpHOM BXOe BpaHee cIeHaHbI pe3.
He nbitaiTeCb pe3aTb, hauHna C BepxHe yactn octpna Hnhbl (Bpe3aHne).
Cneinte 3a CmeueHnem DepeBa n Bo3deNCTBnMn DpyrOro poJa, KOTOpbIe MOyT Bbl3BaT CBmkaHHe pe3a n 3aKaTbcn b INI pINBecTN K NaEHNIO CTBOJHa Hee.
He n3r6aIte npny npn n3BneeyHn HappaJIoueJ uHHb n3 noDnna npn paCnIOBKe.
- POnb3yIeTcB HnpaBnaJIOe 1INHO C nOHNKeHHo OTdAey I cIeMbC Hn3KoN OTdAey, KOToPbIe peKOMeHDoBaHbI dIa Baue IeHNOI nnbl.
YNPABJIEHNE YCTPOICTBOM
HaTe ydepKBaIe Tnny o6eIMn pykAm npa6oTaUeM Dbratene HBe BInyckaIte ee n3 pyk. PpOchbI 3axBaT NOMORAET CHINITb OTdauNy COxpaHNTb KOHTPOB hAD NIOI. NaIbCaAMn neBou pykn OxbaTBiBaIte NepeDHOpyKoRtKy, a BoNbIoN pAnec neBou pyKn DEpKnte NOI 3TOY pyKoRTKo. PpABOn pyKoN NOHcTbNO OBXbaTBaIte 3aDHIOpyKoRtKy, He3AbCmmo TO TORO, ABJIeTeCb IIN BBy npabWOn NIN NEBWoJ. DePKrteJeByIO pyKy BbIPrMaJIeHHoN, 3aФNKcPpyTe JOKOTb.
PacnoJIOXnTe IeByo pyKy Ha nepeDHe pyKoTKe TaKIM o6pa3OM, YTObI pRi BvIOnHEnH paCnIa OHa o6pa3OBAI npMyIO nnHIO C npAoi pyKo, pacNoJoxEHHo Ha 3aJHey pyKoTKe. H nJa KaKx TnOB paCnIOB He MeHraTe nonOKeHnepyk HA npOTNBONIOXHOe.
PacnpedeJnTe CBOB BEc paBHOMepHO Ha o6e HOrn.
CToIe, CmecTnBunbc cnEka BJIeBO OT nINbI,yTO6bl Baue TynOBuIe He haxoDnIOcb Ha oDNHO nnHmC pexyueen cebio.
He npKnaIbIaIte cIIuKOM 6oJIbIX ycINn. BblMOKeTe IOTepaPbAHOBecne n yTpATNb KOHTpObn HADIINIOJ.
He BbIIOJIHnIe pe3ky Ha yOpOBHe BblIeHa. B TAKOM NIOOXeHN CNOXHO KOHTPOINPOBAtb DBNXeHne Nnbl.
CPECTBA IPEIOTBPAUENOYTDAUY
PNEUYPEXDEHNE! Hnke npBBeDeHbI cpeDCTBa
dNCHKeHn pNcKa OTdaun, KOtOpbIM
OChaueHa Baasa ceHHa Nnla, Ondako OH
He MoryT nonHOCTbIO npEDOTbPAHTb OTdauy.
POnb3yAc bCeHNO HnON, He NoJARTECb
NCKNoHTeNbHO Ha npEdoXpAHNTeNbHbIE
cpeCTBa. YTo6bI N36ExKaTb OTdaun INpyrnx
BO3deICTBn, KOTOpBIE npIBoADT K cepBe3HbIM
TpabMam, HeoBXoHMo BblONHbT Bce npabnla
TexHKu 6e3oNaChocTH, HNCTpyKUn n npabnla
TexO6CnykHBaHn, ONnCAHHbIE B daHHOM
pyKOBOdCTBe.
HANPABJIIOUJARIINHA C NOHNJXEHHOIOTDAUYEN
HanpaBnaOuaa HnHa C NOHKeHHo OTdAuey IMeet OCTpne MaIOro paAnuCa, YTO CHNJaet pa3Mepe 30hbl, IDe MOKeT pOn3OHTn OTdAua, B BepXHe yAcTn 1INHbI.
C HN3K0IOTDAUeI
Lcib cnH3KoO tDAeey IMeET npOphiunipOBaHHbI ORpAHnHTeJIb Iy6BnHbI OrpaDInTeJbHOE 3BEHO, YTO oBeCneuBaet OTKnIOHeHne CnJIbI OTDaHn N NOCTepeHHoe Bpe3aHne B DepeBO.
NEPEDHNIUHTOKDPLPYK
PepdHnIuTOK Ipyk CHMkaeT BepoarTHocb KOHTaKaTa neBoi pyKn C cenbIO, KOrDa pyKa CHMaeTcR C npepdHe pyKoRTKn.
PacctoHHe MExdy nepeDHeN 3aDHe pyKoTkAmn INx pacnoIIOKeHne "B JINHHO" ObecEnuBaIoT paBHObecne N yCToHIVBOCTb, NO3BOJRA KOHTPOJIOpOBaTb DBNXeHne INJIbI B HApPaBNeHn IOnb3OBATeNa B CnUyae BO3HNKHOBeHn OtDAH.
TOPMO3 UENI
Topmo3 ceNn ppeHa3HaueH IJIa OCTaHOBKn cIeNn B CJIyae OTdauN.
PIMMEAHHE:MbHe daem rapaHTn HpeKOMHdyem paccntbBaTb Ha To, YTO TOPMO3 cEN 3auNTt Bac Bcnyae OTdau. He cJeDyET BCEeNo NOIaratbcra Ha 3auNTbIe npncnoc6NeHna, KOTOpBIMN OCHaueHa BaWu cenHaa nIIa.Bo n36exHne pscKa OTdauH Heo6xOJMo nOJIb3OBaTcRnIOI npabINbHO N OCTOPOXHO.
PemOH TOpMO3a ueH DoJKeH BbINOHHTbcr CneuaHnCTaMn ABTopu3OBAHHORo cepBnCHORo ceHTpa. OtnabaIte cBoH nHCTpyMeHT B peMOHT NO MeCTy npno6peTeHn, ecn OH npno6peTeH y cepBnCHORo dInepa, INB 6JIkKaIshm rIabHbI abTopu3OBAHHbI cepBnCHbI ceHTp.
CEOPKA
PPEyPPEKDEHNE:Ecnn ycTpoicTBO NOCTaBJIeTcB C6ope, NOBTOpIte BCE ONEpaun, YTObI yBeDnTbcR B PnABnIbHOCTN C6OpKn NIIbI HAdEeKHOCTN BCex KpeIeHn. BcerDa HaeBaIte nepuAtkn Prn o6paueHn C nINoi. LcNb AIBJAEoC TPOIN MoKeT IopAHNTb Bac, Daxke ecnn HaxOHTcB HEnoDBHXHOM COCTOHN!
(B TOM YnCne dnn n nn cy Xye yCTaHOBneHHoU cenbIO)
A PPEUYPEXKDEHNE: Cna6o HataHytae nenb npn pa6ote MOxET BbICCKOHTb N3 HappaBnHOUe WnHbI, YTO npNBedeT K NOyueHIO NOJb3OBaTeJIem Cepbe3HBIX TpaBM N/INN K NOBpeXdEHNO cENI, YTO CDeNAeT HeBO3MOXHbIM ee DaJIbHeJWeE NcNoJIb3OBaHne. EcNI cENb CJIetae T C HApBaBnJOUe WnHbI, IpOBepbTe KaKdoe Beyuue 3BeHo. NobpexDeHyo cENb HeoBXoDIMO OTpeMOHTnpoBaTb INN 3aMeHtB.
HaTajKeHne ueHb BaxHo. B xOJe 3KcNpyatauHn ceHn pactraHbaOTc. 3To RaJIeHne HauBoJee cnIbHO npoBnAETcB hauJaIe 3KcNpyatauHn nIbI. Bcerda nepei 3anyckom cHno nnbl npOBepaTe haTajKeHne cHn.
Pn yctaHOBKe HOBoI cenn CNeDyeT peryIyrpHo npOBepaTb ee HataXeHne, noka cenb He npnpa6oTaetc.
PpabnIbHoe HataKeHne cenn rapaHTnpyET BbICOKoe KaueCTBO pe3Kn IdoJtn Cpok cnYk6bl yCTpoNCTBa.
ПОВЕРКА HATERKEHNY
C NOMOsbO OTBepTKn npokpyTne ZeNB BOKpyr HapnbAIOUeI uHbI. Ecnu ZeNB He npOBopaunBaETcra, OHa HATrya CNIuKOM Tyro. Ecnu ZeNB HATrya CNIuKoM Cna6o, noD uHHoN OHa npOBnCHet.
PIMMEUHNE: LcB HataHyTa npabnIbHO, ecn OHa He npOBncaet NOd CO6CTBeHNbIM BECOM NOD HaprabJIOUe IINHO (pN yCTaHOBKe CEHNO NIIbl B BePTNKaJIbHOE NOLOXKeHne), IN B TO Xe BpEMr CBO6OJHO BpaUaETCBAKpyr HApabJIOUe IINHbI.
PERYUNPOBKA HATXKEHNA
- POnHnMNTe pBlyar HaΦnKcaTope HnpaBnIouSei IINHbI NOBepHNTe erO npOTNB YacOBoi CTpeNKe Ha OAnH O6OpOT, UTObI OcnaBntb KpeNJIeHne KOxya CuenJIeHnI.
PIMMEAHHE: Pnp perynpOBKe HatakeHnnae nn ybeintecb, yTO qKcatop HanpaBnIOueennh3aTAYT TOJIbKO BpyHyIO. NOnbItkHaTaeHnnae eepn np tyro 3aTayHyOM fKcatopeHanpaBnIOueenn hNbl MoKET pNBeCTN K NOIOMKe.
2.ПоворачиBaIteKoJIbIcO MExaHnI3MaHaTЯжЕнЯNo YacOBoi CTpeIKe DoTex NOp, NOKa cIeNb NIIOTHO He npIXMeTcK HIXKHeI CTopoHE uINHbI.

A = npotnb yacobOu cTpeJKN (ocna6neHne)
B = no yacoboi cTpeJIke (3aTjKka)
CMA3KA WINHbI N CEPII
HnHa n ceb Tpe6yIOT peyIrpHo Cma3Kn. Cma3Ka BbINOHNrEcra ABtOMaTHueeCKOn CnCTEmo Cma3Kn, npu ycIOBn, yTO MacJnHbN 6ak NoCTOHHo HAnONHeH. HeOCTaToUHoe KOJIInueCTBO Macna npuBoDHT K 6bICTpOMy I3HaUNBaHnIO UINHbN I cEN.
CnIshKOM MaIOe KOJIueCTBO MacJa PpNBOIDNT K NpeperpeBy, Ha YTO yKa3bIBaet DbIM, NdyuOIT OT cENn, n/nn ObecuBcUeHbHe uINbI. Pnp XoJIoNDHO
IoroJe MacNo CTaHOBnTcra Iyue, No3ToMy MacNo dIy
HbI u cenH Heo6xOaIMo pa3abJrTa HeoBbWM
KoINueCTBOM dIe9bHO TOnnBa N91 nn
kepcnHa (5-10%).Macno dJa WInbI u cenN DoJXHo
CBO6OHO UnpKynIpOBaTB B CnCTeme Cma3Kn, YTO6bl
KOMIOHEHTBI NJIbI NOnyauN MaCNO B DOCTaTOHOM
KOINueCTBe.
Pekomehdyetyc noJb30BaTbcMaCnOM JIy IHHblu cenn, yTo6bl npedoxpaHHT bNnyOT
IOBbIeHHO n3HOCA BCJIeCTBnE HArpeBa n TpeHn. PpN OTCyTCTBnM Macna dny uHbI u ceni MOxHo nCIOJIb3OBAt b MacNo SAE 30 HaJnxKaUeero KaueCTBa.
HnKOrJa He noJIb3yIteCb OTPa6OTAHbIM MacnOM BaueCTBe Cma3Kn UINHb I ueN.
- Ppeid ChrTneM KpbiluK MaCnHOro 6aKa Heo6xOJIMO OCTaHOBtB DBrIgTeJIb.
3ANYCK N OCTAHOBKA
IPOBEPKA PABOTbI TOPMO3A
PIMMEAHHE:Topmo3eHHeo6xOaHMO npOBepaBHeckoBko pa3BdeHb.PnBbIOJHHeH N 3ToI pOueDpybIBuRAteNb DOJIKeH pa60TaTb.
3To eHNCTBHeHbI clyuay, KOrda Nnny Heo6xOJMo NOJoxNt b Ha 3eMJIIO npi paBoTaIOUeM DBrIaTeJe.
IIOXNTe Nnny Ha TBepdyo NOBepxHocTb. 3aKMTe 3aHIOO pyKoRTKy npaBOy pyKO, a nepeDHOIO pyKoRTKy -NeBO. NIOHCTBo OTkPOte DPOCCeJIb, Haxabdo yNOPa pbUar dpocceJI. PnBeDnte B DeINCTBne TOPMO3 cEN, NOBepHyB NEBOE 3aNACTbe K uNTKy dIpy k, HE OITNYCKA NEpeDHOIO pyKoRTKy. Uenb npu 3Tom DOJNXHa HeMeDInHeHO OCTaHOBTBCs.
PPOBEPKA CPABATbIBAHNIOB03ENCTBnEM CNJIbI INHEPUN

I PNEyPEXKDEHNE! PnB BbINOJIHeHNmCAHHO HNXe IPOueDpybI DBNrAteJeBnxKe 6bITb BbIKIOUeH.
- 3aKMMTe 3aHIOpykoTky npaBOy pyKO, a nepeHIOpykoTky -NeBOY.
- YdepxnBaIte cenHyIO nny npin6n3nteBHO B 40-45 cm (16-18 IOImax) HAD 6peBHom IIN dpyroI depEBAHHO NOBepxHOCTbIO.
- Otnyctnte nepeDHHO pyKoRTky n daTe nIne ONyCTNbCn IOB3dEChTBnEM CO6cTBHeHOro BeCa n KocHybCn HRA BepXHM KOHcOM HAnpaBnAIOuei IINHb. KorDa BepXHm KOHeC u INHb yDapNTc o IeHb, DOnJKeH BKJIIOHTbc TOpMO3.
TEXHIMKA PABOTbl
COBEPUEHCTBOBAHNE IPIPHEMOB PE3KN
IopapTKkyTcB B pae3aHn HeckoJbKnx He6oJbux 6peBEN,NCIOJIb3y ONuCAHHbE HNKe npEmbl, YTO6bi "OuTyNTb INCTpyMeHT, IpexJe YEM HaUNHaTb NOINHomACUta6HbIe pa60Tb C erO NCNOJb3OBaHNem.
- PpexJe yem npctynatb K pe3ke, coxMnte pbyar dpoceJIy I daIte DBnIaTeJIHO BbIHTN Ha MAKCImaJIbHbIE 05opObl.
- HauHnHaIe pe3ky, ynepeB pamy nJbI b CTBOJ.
-ДИгATEЛь BCE Времяdoлжен pa60taTb Ha NOHbIX obopotax.
JaTe CEIN Bpe3aTcB C DEpeBO. Oka3bBaIe TOJIbKO JERKOE DAIBHeHne NO HApPABNeHIO BH3.Ecnn PON3BOIDTp pe3ky C yCNIIEM, MOXHO NOBpeDITb HAnpabNIOUOyU OHNHy, UeNB ININ DBIRATenb.
Kak tonbko pe3 BblnoJHHe, OTnycntte pbyar dpocceJI, nepeboaDBirateB b pexim xOIOCToro xOja. EcnI nJa pa6oTaet B pexime noHoro r3a BXOIOCTyo, Uen, HappaBnaUaA uHa u DBiratbeNoDBepraOTc HEnyXhOMy u3Hocy. He peKomeHdyETc, yTo6bl DBiratbePa6oTaN npn noDAue nonHoro ra3a doJbwe 30 cekyHd.
YTo6bI He yTpAITb KOHTpOb HAp NINIOB B MOMeHT OKOHuaHnpe3Kn,He DaBNTe Ha NINy B KOHcpe3Kn. - Ipeep onyckaHnem nIbI nocJe pe3Kn OCTaHaBnBaIte DniratTeB.
BAJIKA DEPEBbEBIJIAHNPOBAHNE

I PEPDYNPPEKDEHNE! Y6eINTEcB OTCyTCTBIMOMAHbIX INN cyNX BeTOK, KOtOpbie TYT yNaCTb, HaneCepBe3HyO TpaBMy. He NITE B HENOCpeDCTBeHNHO 6n3OcTN OTANH N 3JIeKTPnueCKNX KaBEn, ecn Bam13BeCTHO HapPaBHeHne NaDeHn DaPeBa. He NITE DepeBbY B TemHote npn HeNoctaToHOndMocTH INN npn nNoXoN porOe, HApPmep, BpemdoxJa, ChEROnaDa INN npn CpNbHOMrE. Ecn nobaneHHepeDepeBO NoPBednoJe-Im6 KOMMyHKaun, HeMeDNeHHO6bnte 06 3TOM BYynpaBnHOuYO KOMNaHIO.
Ppna pabote c nnoi 3apahe TuaTeNbHO nnHpyte CBOI DeCTBn.
OuHCTnTe pa6oUyIO 3OHy. IpocTpaHCTBO BOKpyr DepeBa DoJHXo 6bITb paCNIeHO n npiroDHO dIra HAdexKHoro pa3MeueHnroNl630BaTeJIa.
I0lb3OBateJIb cHNOIINbI DOnKHeCToTbHa BO3BbIeHNHOuACTNuYAcTka,T.K.IpN BANKe CTBOI DepeBa C BoIbwoBepoTHocTbIO yNaTe NOKaTITcR NOJyKnOH.
O3hakOMbTeCb c eCTeBHeHHbIMN yCIOBnMn, BJIHIOUIMN Ha HapBaJIeHne NaDeHnI DepeBa.
KeCTeBHeHbIM yCNoBnM, BnIyIOUm Ha HApBaJIeHne naHeHn DepeBa, OTHOCrTc CJeDyOuMe:
- HanpaBHeHne n ckOpocb BcTpa.
HaKIOH DepeBa. HaKIOH DepeBa MoXeT 6bITb He OueBnDEH n3-3a HepOBHOCTn IIN HaKIOHa IIOUaIKn. IIN ONpeDeJIeHn HAKOHa DepeBa NcNOJb3yIte OTBe INI yPOBEh.
Becn BcTKn C OJHOH CTOpOHbI. - Okpykaioune depeBbI npenTCTBna.
Ocmotpnte depeBO Ha npEpmET HnHn n TpyxN. Ecn CTbON nopaxKeH HnHbIO, OHO MOKET CLOMaTbCn ynaCTb Ha
NOJB3OBATEJIY. Y6eINTEcB OTCyTCTBNN NOJOMAHHbIX INCyHXBETOK, KOTOpBIE MOYr yNactb Ha Bac B xOJe pe3Kn. Y6eINTEcB, YTO IMeETc DOCTaTOUHO MeCTa DnI NaDeHnA DepeBa. CoXpaHnTe pacCToHnE B 2-1/2 dnnHb DEpeBa D6nKAAuNX NIOeN NnDpyRnx ObBeKTOB. UyM DBnRaTeN MoKeT 3aRnywAtb PneDynpexKeHne 06 OnaCHOtN.
OuHCTnTe DepeBO,Ha KOTOpOM 6yDet BbINOJIHTbCpe3Ka, OT TpR3N,KAMHei, HENIOTHo npNJIeRAIOUeK Kopbl, TBO3Dei, CkOB n IPOBOJOKN.
Bb6epntyntbOTXoJa,paCnoJoxeHHb C3aHn no daHrAHN K HapBaJIeHHIO paHeHHra CTBOJa. O3HaKOMbTeCb c paCnoJoxeHHem 3Ohbl pNcKa (1),nytn OTXoJa (2) n HapBaJIeHHra PaHeHHra (3) Ha cnEduuie cxeme.
HcnoJIb3OBAHHE METOaIIOIMJIA
IЯBaJIK60JIbIX DepeBBeB IpIMHeTcR MeTOI NOIINa. IOnIIIN BInONHReTcRa ToI CTOpOHe DepeBa, HA KOTopyIO erO XOTAT NOBaJIINb. Iocne BInONHeHRAIIOHO pe3a Ha IpOTnBOIOnIOXHOI CTOpOHe DepeBO IMeET TeHdEHNIO NaadTb B CTOpOHy IOIINJla.
PIMMEAHHE:Ecnn ydepeBa KpynHbIe onOpHbIe KOPHN,ydaJIte Nx, npexJe Yem npOn3BOdNTb paCNI. Ppi ydaJIeHNn ONOpHbIX KopHeN C NOMOuBIO cENHOI NIIbl 36eraTe KOHTaKTA ZcH N C 3EmNe, T.K. OT 3TOrO OHa MoKET 3aTyNtBCr.
BbnoHnTe noDnIn, npope3a ero cchaJana cbepxy.
PnpexbTe Ha 1/3 dnaMeTpa depeBa. 3aTeM 3aBepnTe
noDnIn, npope3ab ero cHn3y. Korda noDnIn npope3an,
ydaNITE n3 depeBa Bblpe3aHHyIO dpBeecnHy.
Iocne ydaHnB Bbpe3aHHo DpeBecnHb BblONHtBeBaIOHy pe3 C npTINBOJNOXHOOT NOINJa CTOpOHb. OH BblONHReTc npImepHO Ha 5 cm (2IOHMa) BbiWe ceHTpa NpNNla. BnaOapra 3ToMy MEXy BAIOHyBM pe3OM N IOINJLOM OCTaETCDAOCATAOHO HeBbpe3aHHoDpeBecnHb, Obpa3yUeH HeOnN. HeOnNl NOMORAETn36ExKaTb NaDeHnA DepeBA H HenPabInbHom HanpaBHeHN.

PIMMEUHNE: Yo6b coxpaHnTb KOHTpOB HaHaHnpaBHeHem PaHEny,peep 3aBepSeHEmBaNoOHOro pe3a nI npDeOTbPaueHnE rO CmblKaHNn pRn He06XoDMocTH NcNoJIb3yTe KInHb. YTo6b npDeOTbPaHTb OTdauYIOBpeJdeHne cEN, NOb3yITecb He CTaNbHbIMN INN JKeNE3HbIMN, a DepeBraHHbIMN ININ PIACTMACCOBBIMKINHBaMn.
BHMMaTeIbHo CNeIuTe 3a NoRBeHnEm npN3HaKOB naHeHna, TaKx KaTpeck DepeBa, paCwIpHeHne BaIOUHO Pe3a NIN DmXKeHne BepXHnx BeTOK.
Korda DepeBo NaHnaeT nAdTb, OCTaHOBnTe nnny, noJoxnTe ee n 6bICTpo yXoDnTe no 3apaHee NOIROBHeHHOMy nTyN OTXOJa.
HE cpe3aIte nIIOH He noIHOCTbO ynaBwne
depeBb. ByIbTe Ype3BbUaHIO OCTOpOKHbIB
OTHOWeHnHe NoNHOCTbO yNaBwIX DepeBBeB, INX
NoIOXeHne MoKET 6bITb HeycToOnuBbIM. Ecnn DepeBO
yNAIO He NOHOCTbO, OTIOXKe TnIy B CTOpOHy IN
NOBAInTE DepeBO pRn NOMoUs KaHaTHoJ IeBeEdKn,
TaNIN TpAKTopa.
PA3PE3AHNE IOBAJIENHO DEPEBA (PACINIOBKA)
PacnnoBka -3TO TepmH, O3HaayuOuI pa3pe3aHHe NOBaENHO DEpeBa Ha 6peBHa ONpeJeHoro pa3Mepa.
PPEyPExEHEHHe! He cToTe Ha pa3pe3aemom 6peBHe. IIO6a erO qactb MOxET NOKaTtbcra, YTO npNBeTeK yTpate paBHOBeCnHa He cToTe Ha CKJIOHe HIXe pa3pe3aEMOro 6peBHa.
BAXHbIE 3AMEUAHNIA:
Pa3pe3aIte TOnbKO Ondo 6peBHO 3a pa3.
PexbTe cIOMaHHe DepeBo OueHb octOpoxHO; OCTpbie UeKNMOryOTnetaB B CTopoHy NOnb3OBaTeJIa.
Дя расинлбк He6oIbIuX 6peBEN nOJIb3yIte Ko3JIb. He No3BOJnTe pyrOmy IInu DePkaTb 6peBHO BO Bpem pe3aHnI HepnIepKnBaIte erO Horoi.
He npo3BODnTe pe3ky Ha yuaCTkax, rIe 6peBHa, cyb8 nn KOpHn JExaT BNOBaJIky, HAnpIMep, nocne BaJIKn B3pbIbOM. Pepe NaJom pe3Kn nepetaunte 6peBHa Ha Cbo6oJHOe MeTo, BbltacknBa Chauana DoctynhBi e paCnuueHHbIe CTBOJI.
Cneinte 3a tem, yto6bI cenb nInbI He 3aueennna rpyHT nIN dpyroIN ppeMet BO Bpemr nn Nocne nJHeHn.

PPEyPEXKDEHNE!EcnnnnaokaeTc3aKaTo nn 3actpBWeB 6peBHe, He nbTaIteCb BbTaunTB ee cnNo. BblMOxete ytpaHTb KOHTponb HAd nno,TO npBeTe K TpaBMe n/nn NOBpeXdeHIO nnbl.OctaHOBe NTy, BCTaBBeB Pe3 nactMaccobBn Nn DepeBHHbKnN TaKmO6pa30, YTO6bNnNbO JeKO BbHyTb.3anCTne Nnny n octopoxHo CHOBA BBednteB pez.Bo n36exAHne OTdAnu NOBpeXdeHnueHn He NoB3yTecb MeTaNnueCKHMKnHbMa. He nbTaIteCb 3anyCTNBnny, ecn OHa 3axata nn 3actpna B 6peBHe.

TINbI PACNIOB
Pe3ka Cbepxy HauHaetc Ha BepxHc CTOpOe 6peBHa c Onopo HnKHeuactn NlIbIO CTBOJ. Ppi pe3Ke Cbepxy CJIerKa HaxImaTe Ha Nnly NO HapPabNeHIO BHN3.

Pe3ka cHn3y HaunHaetc C HnKHei CTOpObI 6peBHa cOnopoB BepxHeu qactn nIbI O CTBoJ. Pnppe3ke cHn3y cnerKa HaxImaIte Ha nIpy no HappaJIeHNI BBepx. Kpenko depKeTe nIpy i coXpaHЯIte HaI Hei KOHTpObl. nIIa byet CTpeMntbC8 OTCKOHTb Ha3aI NO HAppaBNeHIO K NOIb3OBaTeJIQ.

PENyPExEHNr! Pnpe3Ke Cn3y He nepeBopauBaTe Nny BBepx Horamn. B TaKOM NOLOXeHn Eo HeBO3MOxHO ynpabJIbTb.
Bcerda deaTe nepBbI pe3 B 30He cKaTn86peBHa.3OHa cKaTnra-3TO cToPOHa,Ha KOTOpOnCKOHcHTpnpOBaHBe6peBHa.
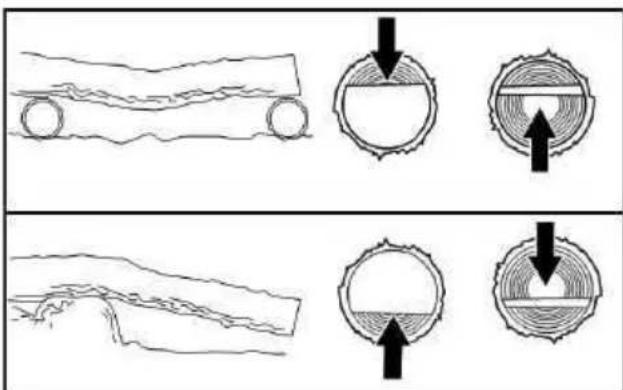
PACNIIOBKA BE3 ONOPbI
- BbINOHNHe pa3pe3 cbepxHa 1/3 dnaMeTpa 6peBHa.
- ПовернITE 6peBHO npOTUBONOJXHOH CTOPHOI BBepxиЗakOHHTe pa3pe3aHne BTOPOI pe3KoI CBepxy.
PIMMEUAHNE: BbINONHnIte pe3ky B 3OHe Cxatna C OCTOPOXHOCTbIO, YTO6bl N36EkaTb 3aueMJIeHnI INJIbl.
PACINIOBKA C INCIOJIb3OBAHHEM BPEBHA IIN KO3IOB
- CdaIeTne npBbI pe3 B 3OHe cKaTn8 6peBHa. Iy6nHa nepBoro pe3a doJxHa coCTaBn8 Tb 1/3 ot dAmetpa 6peBHa.
- Btopo pe3 3aKaHnBaet pacnIOBky.
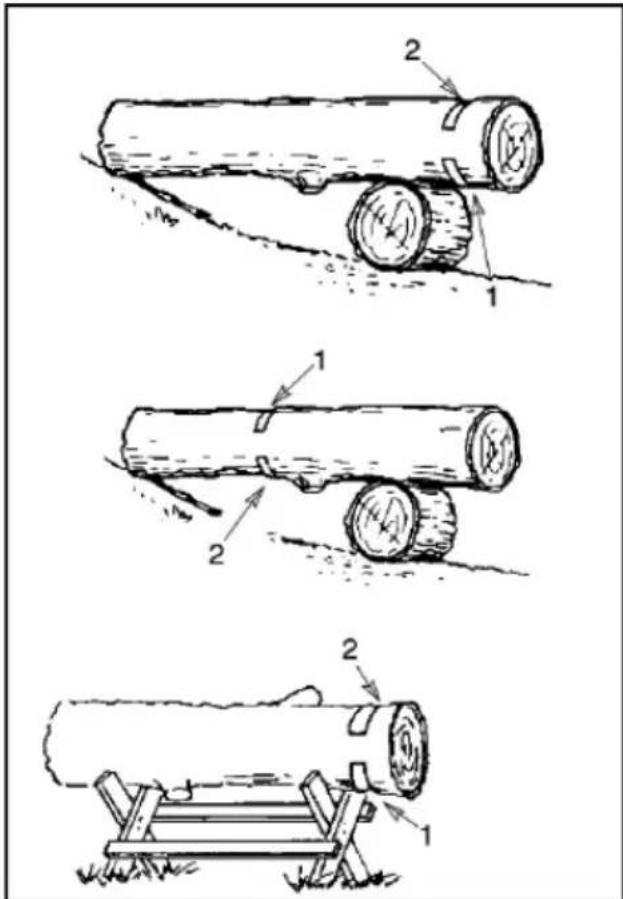
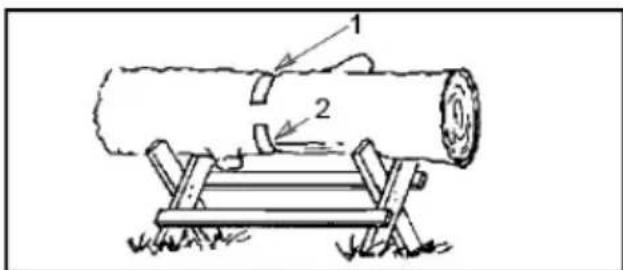
OBPE3KA CYbEB N BETBEN
PDEYNPEXJEHNE! BybTe BHMaTeBnI IN TOBOI K BO3MOXHOI OTDAYe. PnI 06pe3Ke cybeB nJI N BeTBeH He DonyckaIte KacaHn I BnKyuIeCra CebIO DpyHX BetBeN IIN PpeDMeTOB y BepxHero KOHa HAnpaBnaIOUe IuHbI. TaKoe KacaHne MOKe TpNBecTI K cepBe3HOI TpaBMe.
PPEyPExEHE! Hn B KOem Cnyae He B36npaTecb Ha DepeBO DnIg O6pe3Kn CybeB INN BetBeH. He CTOnTe Ha IecTHNuCe, NpAToPOpMe, CTBOJe INN B JIO6OM MecTe, rDe MoXHO NotepaTB paBHOBecne INN yTpATNTb KOHTPONb HAD NINoN.
BAKHBIE 3AMEYAHNIA
Pa6oTaTe MeDneHNO, npOuHO yDePKNBaa UeHHyIO NnIy OBeHMn pykAMn. CoxpaHraTe paBHOBeCne n yCTOnuHBOe NOJoxEHe Hor.
CneIte 3a npyKnHrUIMm CybAIM. 3To cybMaJoropa3Mepa, KOtOpbIe MOYr OKa3aTbc3axBaYeHHbIMn cenbIO uYdApNTb Bac nINnpBecTN K NOTepe paBHOBeCn. ByDbTe OcO6eHBOHMATEJBHbI pN pe3Ke cyhbeb MaJorop a3MepaNN TOHKX BETOK.
- BybTe rTOBbIKOTCKOky.CJeIITe 3a BETBAMN, KOtOpbIe HAKIOHeHb IIN HAXOJrTcN IOd DaBHeHem. CtapaiTeCb N36ExKaTb yJaPa BeToK IIN IINbIB TOT MOMHT, KOrDa HaTJKeHne DpeBeChbIX BOKOH Ocna6eBaet.
Cneinte3aHCTOTo pa6oye 30hbl. NocToHHO ybpaIte Betknc Baawero nytn, YTO6bl He cnOTKHyTbcra.
OBPE3KA CYHB
Obe3aTe cybToIbKO nocJe TORo, KaK DepeBO nOBaJIeHO.ToIbKO B 3TOM cIyae MOxHO obpe3aTb cyb6e3oNaCHO INpabuNbHO.
OctabnIte camble 60JIbWne cyyBcH3y NOBaJIeHHOro DepeBa, YTObI obecneHTb ONopy DepeBa BO Bpemr paOTobl.
HaunhaTe OTOCHOBaHnIepeBaNpOdBnraIteCb B HaprabHeHHBepxUkN, Cpe3aBETKn I cyyB.
YdaJIaIe He6oJIbUWe cyBja 3a OIN pe3.
IpeBO DOJIKHO pacnonaraTbca MExky NOJb3OBaTeJIeM uCenbIO. NINJTE CTBOJ HAnpoTINB BETKN, KOTOPYIO XOTITE O6pe3aTb.
YdaIaIte 6oJIbIWe, ONOpHbIe BeTKn, nCNoJIb3yI npIeMbI, OINCAHHbIe B pa3JeIe "PACNIIOBKA 5E3 ONOPbl".
Ipycpe3aHnHe6oJbuxN CBO6OHO BnCyaux CybeB Ccerda NcnoJb3ynte pe3ky CBepx. Pnp pe3Ke CHn3y cyk MoKET ynaCTb N 3aUemTb Nnny.
OBPE3KA BETBEI
PPEyPExEHEH!OrpaHbTeEcobpe3aHnEM BeTBei, OCHOBaHne KOTOpbIXhaoNTcH He BblIe ypoBn pNeya.He cpe3aHTe BtKn, paCTyUne BblIe 3TOrOypOBH.NIbBbINOJIHeHn 3ToI pa60TbI nprrlacnte npocecnoHa.
- BbINOHNHe nepBbI pe3 CHN3y BeTKn Ha TpeTb ee TOJIUNHbI.
2.Дaniee BbINOJIHITe BTOPOI pe3, NOHOCbIO Cpe3aB Betky. - BbINOHNHTe TpeTn pe3,OTCTyNMB 2,5-5 cm (1-2IOHa)OT CTBOna DepeBa.
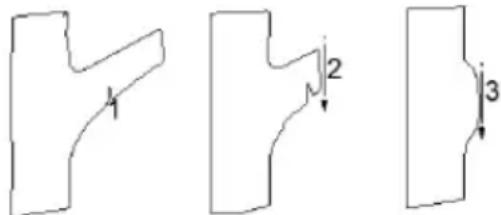
TEXHINQUECKOE OBCJIVXINBAHNE
PENyPEXKHEH:OTcoeHNHe CBeuy 3aKnraHnpeBbINoJHHeHem pa60T no Texnueckomy 06cnyKBAHHO (3a NCKIOUeHHeM pa60T no perynpOBKe Kap6kopaTopa).
IIO6bIe DeiCTBnno 06cnyKuBaHnIO n peryNpOBKe yCtpoiCTBa, He ONICAHHBe B DaHHOM pyKOBOCTBe, DOJXHbI BbINOJIHrTbCABTOpNI3OBAHHbIM NII IaABHbIM CepBnCHbIM ueHTpOM.
OBUINE PEKOMEHDAUIN
IapaHTna Ha nIIy He pacnpoctpaHareTcHa
NoBpeXeHnra, BbI3BaHHbIe He6peXHOCTbIO nII
HeNPaBUNbHbIMN DeIcTBnMn NOnb3OBaTeJIa.
YTo6bI NoJIHOCTbIO BOCNOJb3OBAtbcra rapaHTnei,
NoJIb3OBaTeJIb DoJnxKe Oh opaUaTbcra c yCTpoiCTBOM
CTPORBOoOTBeTCTBnC IHCTpyKuNeI. HAdnEkauee
Texnueckoe ObcnykBaHme NOpda3yMeBaET
perynpHyIO peynipOBky yCTpoiCTBa.
BAXHO:JIIO6bIpe moHTbIpe 6oTbI,OTJNUHbIe OT peKOMHeMy MePONpIraTNI TOxHnueckomy 06cJyKnBaHHIO,ONiCaHHbIX B DaHHOM pyKOBoDCTBE,DOJNHBI BBIOINHrTbCABTOBAAHHIM CEPBNCbIM DInepom.
Ecn peMOHTbIe paOToI npOn3BOJATcR He aBtOpN3OBaHHbIM dInepom, IN CTOnMOCTb He 6yDenB03MeUeHa No rapaHTn. OTBETCTBeHHocTb 3a HaJIeKaUe ee 6Uee TeXHNeCKoe 0cbnyKBAHHe yCTpOJCTBa Jeknt Ha BnaJeJIbe.
Kaackbile 5 yacob pa60tbi*
Ocmotn ouhctka Bo3duuHoro qnlbtpa
OcmoTn OuNCTKa TOpMo3a UeH
- Ocmotp n ouhctka HappaBlaHoueJ WInHbI
KaackbIe 25 yacOB pa6oTbI*
Ocmotn ouhctka nckporacnteBhoCetkn ngyinten
EkeoJHO
3aMeHa CBeu 3aKnHaHn
3aMeHa TOnJIbHbHO 0nJIbTpA
3aMeHa Bo3NyUHoro FnNbTpa
*KaKdbi Yac pa6oTbI Tpe6yeT npImepHo 2 3anpaBOK TOINIBHO 6aka.
PPOUeDyPbI NO YXOy 3A CEHHOI NIOJ
ПОВЕРКHA HAHANUWE NOJOMAHHBIX NIM 3HOWEHHbIX DETALEI
I npoBeHn 3aMeHbIOBpeJdeHHbIX INN 3HOWeHHbIX DeTaneObpaNTecb K ABTOp3OBaHHOMy CepBCHOMy DInIepy.
INPMUEAHHE: B INCnpaBHOM COCTOHNIOcne OCTaHOBKn DBIraTeJIg N3 NIIbI MoKeT BblTeYb He6oJbIoN KOJIueCTBO Macna. 3To He 06raTeJIbHO CBnDETeJIbCTByeT O6 yTeUKe N3 MaCJHoro 6aka.
- IpeeknOHTeNB ON/STOP (BKN/CTON) - npOBepbTe npaBnIbHocTb paOToI nepeKIOHTeNB ON/STOP, npeBeJra ero BHN3. Y6eINTEcB, UTO DBnTaTeNB OCTaHOBNC;
3aynctnte DnBraTeIb CHOBA n npoDJIKNTe npOBepKy.
- TOnnBbHb6aK - npekpatnte noIb3ObaTbcra NIOB B cIyueae,ecINB TOJIINBHom 6ake IMeOTc npN3hAKN NOBpeXdEHn IN yTeKN.
MacnHb6aPnpeKpaTne NOB3OBaTbc nNoB B Cnyae,ecnB MacnHOM 6ake IMeOTc npn3HaKn NOBpeXDeHn NTVteKN.
PPOBEPKA HA HANUHNE HE3ATYbIX KPEJIENH N DETALEN
TaKnUHHbI
Lenb
JnyuHTeJIb
- UNTOK dIa 3aUHTbI UINHdpa
Bo3dyuHbIΦnNbTp
BnHTbI pyKoTOK
Bn6p03aunTHbIe nOBeckn
Koxyctaptepa
IpeepnH uTOK dnyk
IPOBEPKA YPOBHA TOJIINBHOJ CMECN
CM. nyHKT "3APPABKA DBNΓATEJRA TOPINBOM" B pa3dene "3KCPJYATAUJRA".
CMA3KA
CM. nyHKT "CMA3KA UINHbI N LEPIN" B pa3dene "OKCNJIYATAUIN".
ПОВЕРКИЧECTKA YCTPOИCTBA И HAHECEHHbIX CXEM/HADПИСЕN
KaJbI pa3 nocne 3KcNpyataun npOBepaHTe NOHOCbIO BCE yCTPOBCTBO Ha HAnuue HeNCnPaBHbIX NIN NINOxO pnnHHbIX DeTaeJe. NouCTte YCTPOBCTBO HAnHeceHbIe Ha Hero CXEmbl/HaDNnc C NOMoUbIO BnAaXHO TKAHN MRAKOROMOUsero CpeCTBA.
IpoTpnte yctponCTBO uCTOu cyxou TprnKoN.
PPOBEPKA TOPMO3A LENI
CM. nyHKT "TOPMO3 LEPIN B pa3dene "KCNJLYATAUJRA". OYNCTKA BO3DyUHORO FJIbTPA
PNEUYPEXDEHNE:3aepaaetcYnCTNTb
fNtbp6eH3NHOMnnDpyrHMropOuHM
pactBOpHTeEMBO36EkaHHeBO3HKnHOBeHn
noXapaNN0bpa3OBaHnBpehblx BbIbPOcoB.
3arpraHHeHBeO3dyuHoroФnIbTpacKpaaaetcPCKcnykbIn npOn3BODNTeJIbHOCTdbINrATeNHyBENUBAETpACXoTOnNIba n6bem BpeHbIX bIbPoCob.OChCTky BO3dyuHoroФnIbTp aCneYETnpOBdntbNoCte10nonhixuNKIOB3aONHHeHn TOnNIbHO6aka HIN5 YAcOB paBOtB (B3ABNCIMOCHTOTTO, yTO HAcTyNT paHbe).Pp npabote B ycIOBnx 3aNJIeHNOCTH OChKTy BO3dyuHoroФnIbTp HeO6xoJIMBO BINOHNrTa qae. IcNON3BOAHHH Bo3dyuHnhΦnIbTp HeBO3MOxHO OHCTNTb nonHO. PeKOMEHdyETc3aMeHrTB O3dyuHnhΦnIbTp ekeroHO nn NoCte 50 acOB 3KcnNyataunnnnbl.
- Ocna6bTe TPN BnHTa (A) Ha KpbIuke UINHpa (B).
- CHIMITE KpbIuKU cunHnpa.
- CHIMITE KpbIuKy BO3dyuHoro QnIbTpA (C) IN BO3dyuHbI nIbTp (D).
- OuHCTnTe BO3DyHbI ΦnBtP C NOMOuB MblbHOp pactbopa.CnoIOChnTeΦnBtP B uNcTOn XoNOHOr BOe. IINHOCTbIO BbCyUHTeΦnBtP nepeD yCTaHOBkO HA MeCTo.
- YctaHOBnTE Bo3dyuHbI qnIbTp n KpbIuKy BO3dyuHoro qnIbTpra.
- YctaHOBnte KpbIbIky fNbTpA n Tprn BnHTa, 3aTReHyB INX MOMeHToM 1,5-2 H-M (13-18 dIOm-fyHT).
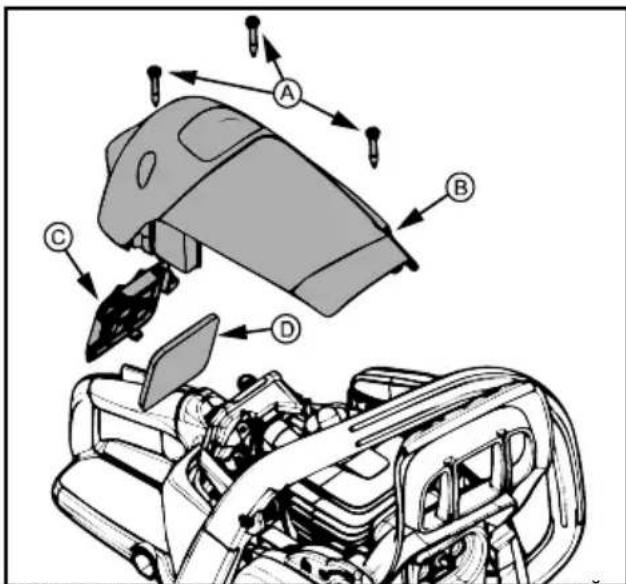
OCMOTPTJYIINTEJIH NCKPOIACITEJIISHO CETK
Ppna p6oTe yctpoCTBa Ha rnyuHTene n NCKporacnteHbHOcTeke o6pa3ayetc cno HaraPap, KOtOpB He06xOdmoydaTb BO n36ekaHne pncKa Bo3NkHOBeHn NOXapa nnUxyDuHnX xapaKTePNC Tk DnIraTeJI.
B cIyae nIOMKn 3aMeHIne NCKporacnteJIbHyO ceTky.
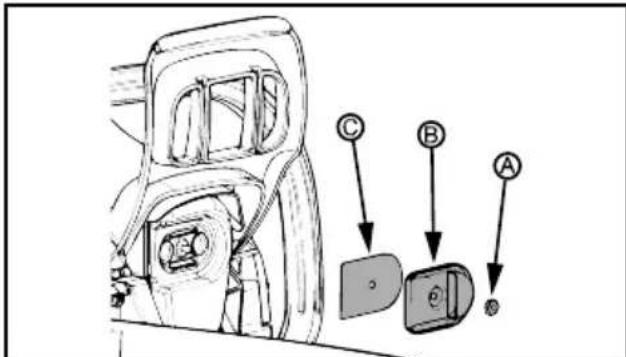
OuNCTRA NCKPOTACNTJEIBHON CETIKI
- Ocna6bTe u CHMMTe raKy (A) KpbIuKn BblNycka oTpa6oTabuX ra3OB (B).
- CHIMMTE KpbIkky BbIyNcKa Otpa6OtaBxNx ra3OB.
- CHIMITE NCKPORACNTBHyTO CTeKy (C).O6paaATecb C NCKPORACNTBHOI CETKOIC OCTOPOXHOCTBIO BO I36exAHne ee NOBpeXdHnI.
- Márko OvnCTne NCKporacnteJIbHyO CETky npOBOnOHTHOIeKoI. PnHnnN NOBpeXdEHH 3aMeHInTe CETky.
- 3aMeHHTe NOBpeXDeHHbIe HIN TpeCHyBwne Yactn IJyWNTeJIa.
- YctaHOBIne NCKporacntelbHyIO CEtKy, KpbIuKy BblNycka Otpa6oTAbux ra3OB n rAky. HAdexHNo 3aTaNHe rAky MOMHTOM 2,8-4 H-M (25-35DIOHM-ΦyHT).
3AMEHA CBEUY 3AXI RAHNA
YTo6bl oecneuHb 60onee neKn 3aynck DnurateJn erO npUyipo paBcy, cneDyET exeroDHO MeHrTb CBeuy 3axirAHn. PerynpOBka 3axirAHn YBJIeTcNoCToHHOn n He MoKet 6bItb N3MeHeHa.
- Ocna6bTe TpN BnHTa (A) Ha KpbIuKe cunHnpa (B).
- CHIMMTE KpbiluKy UINHnHaPa.
- BbTHeHTe rHe3Do CBeu 3axnraHna(C).
- N3BnKeNTe CBeUy 3axnraHn (D) n3 cunHnpa n yTnIN3npynte ee.
5.YCTaHOBnTe HOByIO CBevy 3axirAHnI HAeXHO 3aTnHte ee TopoBBIM KIOUOM Ha 19 MM (3/4 IIOMa) MOMHTOM 20-34 H-M (15-25 IIOm-ФyHT).3a3Op CBeu 3axirAHnI DOJIKeH COCTABnIb 0,5 MM (0,02 IIOMa). - YcTaHOBnTe KOJNaQK CBeH 3aXnHaHn Ha MeCTO.
7.YcTaHOBHTe Ha MeCTO KpbIuKy UINHpa NTPBnHTa. HApExKHO 3aTaNHTe MOMENTOM 1,5-2H-M
(13-18 ДониM-фуNT).
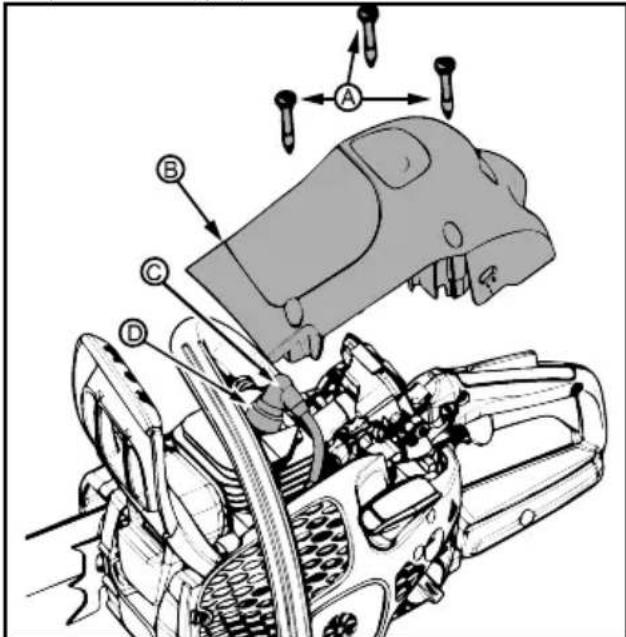
PETYJINPOBKA KAPBIOPATOPA
PPEyPEXEHN: B xoe 6onbwe yac 3ToI npOeAypbl cenb 6ydet DBrTaTbcra. HaeneBte BCE 3aunTHbIe npHaJnEcxHoctn n Co6NoaTe MepbI 6eOnacHOCTn. Ha XoNOCtOM XOdy cenb He DoJXHa DBrTaTbcra.
Yka3aHnnopepynnpOBKe xOIOCTOro XOda
Kap6Iopatop 6bI TuaTeNbHO OTpEryInpoBaH Ha 3aBoJe. PerynipobKa MoKeT NOnHaOdbTbcraB TOM cIyae,ecJIMMeET MeCTO ODo H3 CJIeDyUOxN X 0cSToTeJIbCTB:
- Cenb DnBxkctc Hx OJIOCTOM XOy.Cm. onncanHe npoueepby PEYUNIPOBKA BnHTA T XOIOCTOFOXOA.
-Πιηα He paδοτετ Ha xοποctom xóv. CM.
Onncnne npoeDpypePeyIPOBKA BNHTA T XOIOCTOFOXOA.
PerynnpOBKa BnHTa T xonocToRo xOda
3anynte DnBraTeNb Ha XoNocTOM XOy. Ecnu 1enb DnBxKetc, Yactota BpaueHn XoNocTOrO XoJa CnWkOM BbcOKa. Ecn DnBraTeNb rnoxHET, Yactota BpaueHn XoNocTOrO XoJa CnWkOM Hn3KaJ.
OtperynnpyTe o6opotbTaKIM o6pa3OM, yTo6bl npi npabote DbrnteIeIeNb He DbrntaIacb (CNIUKOM BbICOKa YACTOTA BpaUeHINXoNcTOrO XoJa) INJ NDBuNTeJIb He ITOxHyn (CNIUKOM Hn3KaY aCTota BpaUeHIN XoNcTOrO XoJa).
BnHT perynnpOBKn YacTObI BpaueHnXoNocToRo XOHa HaxOuNTcBbIe NODKaUHbAUoIero HaCoca (HarHeTaTeJI) n NOMeH 6yKBoN "T".
YTO6bI NOBbICNTb YactOTy BpaueHnXoNocTOrO XoJa, NOBepHnTe perynnpoBOuHb BnHT (T) no yacobOJ CTpeJIke.
YTO6bI CHN3NTb YACTOTy BpaueHnXOIOCTORo XOJa, NOBepHnTe perynipOBOHyBn BNHT (T) npOTNB YacOBOCTpeJIKN.
CNCTEMAOXJIAXDEHIN
Дя obecneueHЯ kak MOxHo 6OJee Hn3Ko pa6Oey TeMnepaTypbI yCTpoiCtBO o6OpyDobAoH CnCTeMoI OXJaXDeHЯ.
CoCTAB CNTeMbI OXJaXdEHHa:
Bo3dyxo3a6opnK 6noka cTape
ΦoPmnpoBaTeJIb BO3dUyHOrO NOTOKa
-Дл�асти В entnlaTopa Ha maxobuke
- Pe6pa oxnaqdeHnHa py6aUke cInnHnpa
KpbIkaUINHnpa (ObeCneuNbaeT noauy XoIOHOBO3Dyxa K UINHpy)
PpOBoDInTe OuyCTKy CnCTeMbI OxJaXKeHnue 9eTKoNOCNE KaKDoTIO NcNoJIb3OBaHnue ININ YauSe,ecINNToro Tpe6yHOT yCNOBnRA pa60Tb.3arpa3HeHne ININ3acOpEHNe CnCTeMbI OxJaXKeHnue MOKeT npINBeCTNI K nepErpeBy yCTPOJCTBA IN Bb13BaTb NOBpeJDeHnE NOPuHn INnnHnDa.
3ATOUKA LENI NINbl
Pe3e
Pexyuaa yactb ceiPi Nnbl Ha3bBaetc pe3oM n coCTOIT n3 pexyueero 3y6ca (A) n orpaHnHTeTn rnybHbI (B).
Iy6nHa pe3Kn pe3ca onpeJeIeTcKa Ka pa3Hua MExNy 3TmM DByMa BEnuHAmN, T.H. perynipOBka orpaHnHTenIy6nHbI (C).

Pn 3aTOUKe pexyueero 3y6ua cneDyET yuHTbBaTb YeIpe npametpa:
- YrOJ 3aToUKn.
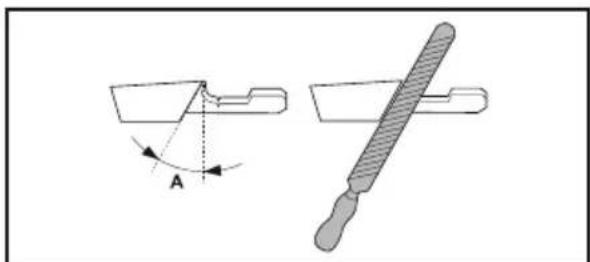
- Yron pe3aHnA.
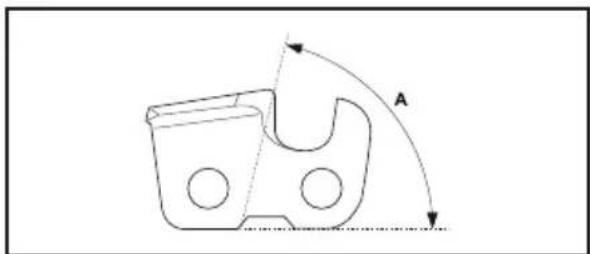
- IonoXeHne HAnnBnka.
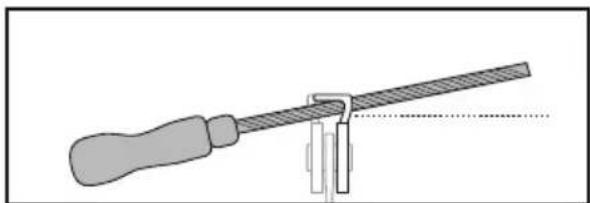
-Диametр кpyrnoTo HannIbHnka.
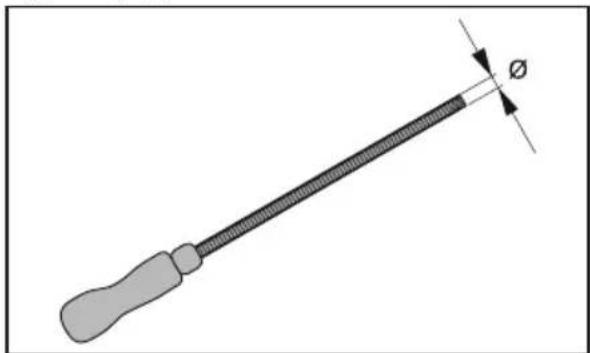
3aToUka pexyuxx 3y6oB
Pn3aToUkepekyuX3y6OUBncNoB3yIteKpyrbln HannbHKn uabOnn dna 3aToUKn.CbeDeHn o peKomeHdyemom pa3Mepe HauNbHnka nua6NoHa dnn cennnbl, yCTaHOBNeHHoHaBaWEm N3dEHN, CM. Bpa3dene"TEXHNUeCKME DAHHbIE"HactoJero pykoBoDCTBa.
- Y6eIntecb, yTO cENb nINbI HATrHyTa npaBnIbHO. Cna6oe HATrKeHHe 3ATpydHReT npaBnIbHyIO 3aToCy.
2.Chayana 3aToHTe BCE 3y6cI C ODNHOCTOPHObI. 3aToHTe peKyuIue 3y6cI CBHyTpEHHe CTOpHObI, yMeHbJaa DaBJeHHe Ha HAnNlbHnK npn ObpaTHOM DnIXKeHN. - IpepeBepHnte n3dene H 3aTOHTe 3y6bI C dpyroI CTOPOHbl.
- IpoTaUBaIte BCE 3y6bI do OJHOH N TOH JE DnINHbI. Ecnn dInHa pexyUeO 3y6a CoCTaBnAET 4 MM (5/32 dIOHMa), cENb PnJIbI CHTaETcN3HOWeHHoN IN NOJNeKNT 3aMeHe.
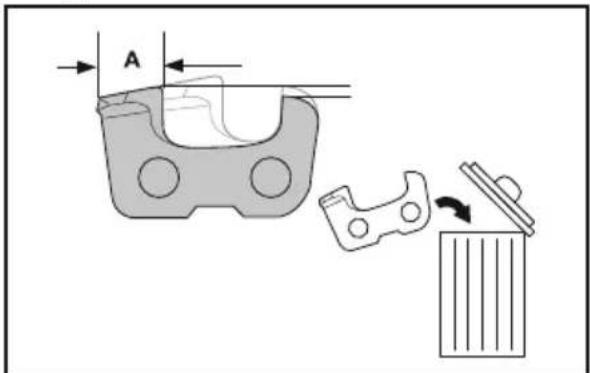
PerynpoBka orpaHnHTeI rny6HHbI
3aToHnTe pexyIe 3y6bI nepeI peryInpOBkO
OrpaHnHTenra rnybHb.IoNce 3aToKn pexuynx
3y6OAB(A) peryInpOBka orpaHnHTenra rnybHb(C)
ymEnhBnTcA. DnA BbINOHNHeNk KaueCTBeHHoN pe3Kn
CneDyET CTOHTb OrpaHnHTenla rnybHb(B) Do
peKOMeHdyemoro 3naeHn. PpaBnBHyO peryInpOBky
OrpaHnHTenra rnybHb.DnA KOHKpeTHoN ceN CM.B
pa3dene "TEXHnueCKNE DAHHbIE" hactoJero
pykoBOdCTBa.

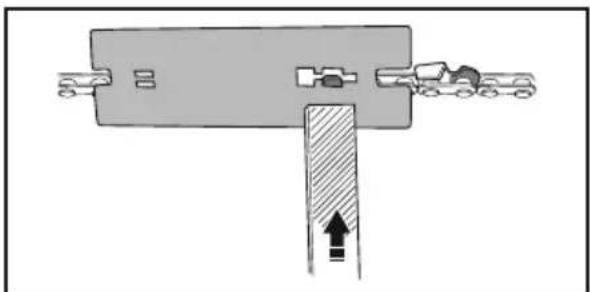
INPMEAHHE:DaHnHa peKOMHeaunn npednonaraet,HTO dInHa pexyux 3y6oB He MeHbWe peKOMeHDoBaHHoN.
IcnoJb3yUte dIpeYIpOBKOn OrpaHcyTEnra Iy6Hbl nIOckn HAnJIbHKN U WabLOH OrpaHcyTEnra Iy6Hbl.
1.YCTAHOBHTe 7a6JIOH ORPAHUNTEIg Iy6NHbI HAD cENbIO Nnbl. IOpPbHOHΦOPMaunr NO nCNOB3OBAHIO 7a6NHOA ORPAHUNTEIg Iy6NHbI pINBeHeHa Ha yNAKOBKe.
2. NcnoJb3yIte nIOCKn HAnuNbHnK dNr cTaNBaHnB BbCTynaOeHnAD WAp6NoHOM qactn OrpaHnHTenr rnybHb. PerynpOBKa orpaHnHTeRrny6bHb CHTaeTc npabNbHO,ecnn npn npoxKeHHn HAnuNbHKoM NO wAbNOHy He yBcTByeTc conpotNBHeHne.
HANPABJIOUJA WHA
TexobnyBaHne HapabnIooe WnHbI Tpe6yETcB CJeNyUOxN CnyuayX:
- Pnna pejekTeToJIbKO C OdHoi CTOpOHbI nn nno yrJOM.
- PnBbINoHHeHN paCnna K nIe Heo6xOaMO npnaraTb N36bItoHoe ycnnne.
- HnHa n ceIb He noJyauT doCTaTOHOro KOnuYeCTBa Cma3Kn.
CocToHHe HnpaBJIIOUe IINHbI CneDyET npOBeprTa KaKdbI pa3 npri 3aTOUKe cenn. N3HOWeHHa HnpaBJIIOUa IINHa npIBODNT K NOBpeXDeHNIO cenn I 3aTpPyHReT pe3ky.
KaKdbi pa3 nocle 3cKnnyatau nnepeBODnTe nepeKIOUaTeIb ON/STOP (BKJI/CTOIT) BHN3 IOxNJaTecb OCTaHOBKN DnurTaTeJRA, 3aTEM OCHNTe OT ONNJOK WNHY N OTBepCTNE 3Be3DOUKN.
PpoeDpyaTexo6cIyKbAHnHaHnpabTIOOeIINHbI:
- Ocna6bte n CHMNTe raikn uHHb i KOKyX cenneHn. CHMNTe CnnJb uHHy uCenb.
- BbINOJIHnTe OuNCTKy OTBepCTnДЯ Macna (A) n na3a WnHb (B).
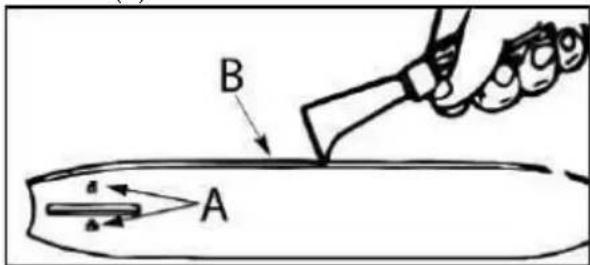
3.Погьнге 3ayceHue Ha HanpaBnIOux 60ptNKax mHbI -O6bHoe RaBneHne npu n3HOce.CHIMTe 3ayceHcblIPOCKHM HANJIbHKOM.
4. EcnBepxHya cactb 6opTnKa HepOBHnA, BOCNoJIb3yIteCb IIOCKIM HAnIIbHnKOM JINr BOCCTaHOBHeNk KBaDpaTHOfOpMbI KpaEB N BOKOBbIX CTOPOH.
3aMeHnTe HnPaBnIouOuI OHNy B CnYae I3Hoc a na3a, ECnI OINHa NOrHynacb INN TpeChyna, INN ECnI NMeet MEcTo I36blTOUhBn HarpeB INN Ype3MepHoe KOINHeCTBO 3ayceHueBa HopTKaX. EcnI Heo6xOAnMo BbINOHNtB 3aMeHy, NCNoJb3yHe ToNbKO TY HApBaPnIouOuO uHNy, KOTopA yKa3aHa B Cnncke 3anachbix qacte NnHa KJIeMe Ha cenHOH nIIe.
ПОИСК И YYSTРАЕНЕ HENСПAPВHOCTЕN
TABINCA NONCKA UYCTPAHEHNA HENCPPABHOCTEIN
I PEPYIPEXKDEHNE: Ipeed BbINOHeHem JIO6bIX pekomEHyEMBX DeICTBn BCerda OCTaHaBnBaTe Nnny n OTcoeHNrTe CBeuy 3axnraHn, 3a NCKJIIOUeHnEM Tex CnyaEB, KOrda Heo6xOdmbie DeiCTBn Tpe6yOT fynkunOpOBAHn yctpoNCTBA.
| HENCIPABHOCTh IPIUHINACIIOBOBUCYCTPAHENIA | |
| Двигаел He 3anucaetcny和平baBOTaET Bcero HeCKoJIbKO CekyHndocne 3anucka. | 1. ДвигаелперетоннentonlVBOM.2. ТОПИВиьбябкпсг.3.Cbeua 3axigarHЯн HeBKNIOUaETC4.ТОПИВо He noctynaeВКapбюратop. |
| Двигаел He pa6OtaeTdoJxHbIMobpa3OM Ha xOLOCTOM XODy. | 1. He6xodnmo OTperuginpoBatbuctoty BpASeHnXoLoCTOroxo.2. He6xodnmo OTperuginpoBatbkap6Iporatop. |
| Двигаел He yckopetcya,pa6OtaeT c HeoCTatoHnoMOUHOCTbU OII IN TINOXHET NOHaHpy3ko. | 1. Bo3duhnyФильтztarp3NeH.N.2.Cbeua 3axigarHЯн 3aPra3HeN.3.BKJIQUeH ToPMo3 ZeH.N.4.He6xodnmo OTperuginpoBatbkap6Iporatop. |
| ДвигаелЧеЗмepHo DbIMt.1. | 36henDioabIteCnIshKomMHOrMaCnA. |
| СelbдИжETcna Ha xOLOCTOMXODy. | 1. He6xodnmo OTperuginpoBatbuctoty BpASeHnXoLOCTOroxo.2.Tpe6yETcpeMoHT CzepIeHn. |
XPAHEHVE
Iocne kaxdoRo nCnoB3OBAHnHa Heo6xOaHMo BbIIOHNHTcJeDyUOnne DeiCTBn:
-ДаиTe DBuRaTeIIO OCTbITb 3aKpeNITe yCTpoIcTBO nepeI nomEueHnEM erO Ha xpaHHeNe nII TpaHCnOpTnpOBkO.
CneNyET XpaHHTb CEHNHYI NINy I TOJINBO BXOPOIO npOBeTPBaEMOM NOMEUeHN, rDe NCKNIQUeH KOHTaKT napOB TOJINBA C NCKpAMN INN OTKpbITbIM NJIameHem OT BOHOHarpeBaTeJeN, 3NEKTODBrATeJeN INN BbIKNUOHTeJeN, neey n T.D.
XpaHnte cHNYu Nny, He CHNMa YNTKN paacnoJoxKIN TBaKIM O6pa3OM, UTO6bI HHKaKne OCTpbie npEdMeTbI He MOrJI CNyauHaHO CTaTB npUHHo TpaBMbl.
XpaHnte ZENHHyI NIIJy I TOnJIINBO B MeCTe, HeDOCTyHOM DnIa DeTei.
CE3OHHOE XPAHEHNE
B KOHcce3oHa nIe enCIn yCTpoNCTBO He 6yJeT
NCNoJIb3OBAtbcra B TeueHHe 60Jee 30 dHei,
NOrTOOBt eero HAnEkaUIM Oba3OM K XpaHeHIO.
Ecn npednojaraetc xpaHntb ceHny nIy dIINTEJbHbI nepNOBpeMeHN:
TtataTeNbHO ouHCTnTe nIy nepei nomeueHneM Ha xpaHHe.
XpaHnte yCtpoNCTBO B YnCTOM cyxom MecTe.
Cnerka cmaxbTe macnOM BheHHe metaJIInueckne NOBepxHOCTN HAnpabJIOUOyU WHy.
HaheCnTe MaCNo Ha BCIO NOBepxHOCtBuN; 3aBepHnTe ee B NIOTHyIO 6ymary nnTkAhb.
TOJIINBHAR CNTEMA
Cta6nH3aTOp TOnJIbRa ABnAeTcnpneMnEmbIM peHeHm DnA CBeDeHnK MNHMMyOTIOKeHn CMOJIbI, pactBopeHHoB TOnJIbBE, BO BpemXpaHeHn. Do6aBBte Cta6nH3aTOp K 6eH3nHy B TOnJIbHBn Bak INB KaHNCTpy DnA XpaHeHn TOJIbBa.
CneDyIe HNCTpyKUINM NO CMeuINBaHInIO, IMHeOUsMCra Ha KaHnCTpe CTaBUN3Atopa. Iocne do6abNeHnCTaBUN3Atopa OCTaBBTe DBNRatEnb pa6oTaTb He MeHee 5 MNHyT.
ДВИГATEЛБ
- CHIMITE CBEuy 3axnraHnI HaJeTBe BOTBepCTne CBEyn 3axnraHnI 2-TaKTHOrO dBnraTeIy aayHyIOxky MOTOpHO macna. MeDneHHo NotAHnTe Whyp cTapTepa 8-10 pa3 dI pyPabHOMePHoro pacnPpeJeHnMa macna.
3aMeHnTe CBeUy 3aXnHaHnHOBOB CBeOy peKoMeHDoBAHHOrTo Tnna n TeNIOBOro pra.
OuCTnTe BO3dyuHbI ΦnIbTp. - PpOBepbTe BCE yCTpoNcTBO Ha HAnuHne Ocna6nEHbIX BNHTOB, rAek N 6oNTOB.3aMeHnTE BCE NOBpeKdEHHbIe, CNOMAHbIe IIN N3HOWeHHbIe DeTaII.
Haunha CJeDyUoHcE3OH, HcNoJIb3yIte ToIbKO CBExeToPJIuBO C HyXHOIpONOpUnei 6eH3nH:Macno.
DONOHHTENbHbIE 3AMEUAHNIA
He noJIb3yIteScb 6eH3nHOM, coXpaHnBwIMcra nocJe npOuNOro ce30Ha.
3aMeHnte KaHnCtpy IJra 6eH3nHa npn nOABBneHn npn3HaKOB pKaBvHbI.
TEXHnueCKNE DAHHbIE
TEXHnueCKNE DAHHbIE
PO3YMIHH CYTHOCTI BIDAAH
YBAGA! YHnKaIe BiDaui, 10 MoKe cnPnHHIn TcePno3Hy TpaMb. BiDa4a- ce pyx nNtKOBoi WnHn Ha3ad, yropy a6o paTobn Pyx ynepei, kNn BnHKnAc, KOnn NaHcOg NnKN Hb AepxHBomy KInCi NnKOBoi WnHn KOtAKTyE 3 6yDb-akm 06'KTOM, TaKIM RKOJa QrJlka, a6o KOnn NaHcUROBa NNkA 3aTNCaETbCra DepeBom y po3pi. KoTAKr 31 cToPOHHm 06'KTOM y DepeBi TaKox MoKe cnPnHHIn BTpaTy KOHTpONHOHa NaHcUROBOIO NnNKoIO.
OBEPTAJIbHA BIDDAU
06epTaIbHa BiDnaua BnHnKae, KOJI NaHcIor y pyci KOHTaKTyE 3 O6'KTOM Ha BEpXhBOMy KINCI NIKKOBOI WHN. Upe3 Take KOHTaKTyBaHHra NaHcIor MoKe 3actpyrHyTn B O6'KTi, 10Ha MNTb 3yNInHb TaNaHcIor. Y pe3yIbTaTI BnHnKae DyKe WBNkN pyx y 3BOpOTHomy HanPnMky, 10 BnTuOBxye NnKOBy ShHy Bropy Ta Ha3aHa onepaTopa.
BIDDAUYABID3AUCEMJIENHH
BiDnau Bi 3aueemHnBnHKae, KOJI NaHOrOBA
NIIKA NAc pyx 3aTnCKaETbCra DepeBOM y po3pii
B3D0BX BepXhBOr KINuNKOoi WnHn, Ta NaHIOROBA
NIIKA pantoBO 3ynHReTcB PaTBoTe 3ynHeHH
NaHOra CnpuHnE 3BOpOTnpyxCnnn NaHOra, Uo
BnKOpCTOByETcB Da nIaHNHaDepeBa, Ta cnpuHnE
pyx NNIkN y 3BOPOTHom HyanpMky OebpTaHH NaHOrA.
NIIKA BNtOBxyeTbCra Ha3ad Ha onepaTopa.
3ATYBAHH
3aTaryBaHHBnHnKaC, KOJI NaHcIg y pyci KOHTaKTy e 3i CTOpOHIM 06'CKTom y po3piI DepeBa B3IOBx HIXHbOi YactHnN NINKOBoI ShmH, a JAnHcIPOBa NINJka paNTOBO 3ynHReTbcra. PANToBa 3ynHkA TargHe NINKy BnepeD BiD onepaTopa I MOnKe NIeKo CnpNHNHTBpTaY ONEpAPOTOM KOHTPONIO HAD NINKOIO.
3MEHUENHHI MOBIPHOCTI BIDAAU
3aBxMn MaTe Ha yBa3i, 10 MoKe TpanNTnc BIDaHa. Po3yMIOnO cHOBHe NOHrTBAIDaYi, MoKHa 3MeHNHTe eFekt HeCNOJIBaHOCTI, YpeE3 RaN'TAKOK BUNHKAO TB HeUaCHI BNAPDKN.
HikonHe Do3BOJnTe NaHcHry B pyci KOHTaKTyBaTn 36ydb-RAKM O6'kTom y BepxHiy qactnHi NIKKOBoI uHH.
TpmaTe pO6Oy 3OHy BiIbHOIO BiTaknx npeuKO, kIHJI DEpeBa, rIKN, KAMHHa, oropoxi, nHI ToIO. YcBaTaTe 6yDb-RAI nepeuKOOni, Ha KIMoKe HauTOBxHYtnc LaHcUROBa NINKa NiD qac pi3AHHa, aO yHnKaTe iX. NiD qac CnJIIOBAHHe IJKn He DonyckaTe, uO6 WInHa NIIKn KOHTaKByBaJa 3 rIKNOU Hi IHsIMn O6'kTAmH HabKOJIo.
- NaHcIg NnKm Mae 3aBKn 6yTu roCTpM Ta HAnExHM YNHOM HaTyrHyTM.Cna6kH aHaTg a6o BnKOpNCTaHH 3aTyPiNeHOrO NaHcIgra NiDnBuNyIOTb WaHCn BnHNKHeHH BiDaHi. DToPmMyTeCb IHCTpyKciu BnObHnka 0do 3aOtHeHH taTexHnHO 6cbnyroBaHH naHcIgA. PeryJPho nepeBiprYe HATR, KOIN DnYrHy 3ynHHeH, I BxKDHomPy pa3i He niD yac po60t nDbryHa. BneBHITbc, 1o raKn ShnH HadiHo 3aTaHyTI nicJa HataRyBaHH JaHaIcIgA.
- POnHaHTe Ta npOdBkyIte p3aHHHa nobHi WbNdkoCTi. RaKIO naHcIpyXaETbcra Ha nobInbHIwim WbNdkoCTi, 3'ABJIeTbc8 6INbWn WAnC BnHNKHeHHB iDdai.
BnKOpNCToByTe nlaCTMaCoBi a6o DepeB'Hi KInHn HikoJH He BnKOpNCToByTe MeTaN dIyYTpMMyBaHHa po3pi3y BiIkPntm.
3a oDnHa3 po3nnIOte Ondy KOJIoNy.
-Будьт ecobио obepexhi nД yac nobtoporo BXOyB nonepednHoi po3pi.
HehamaraTecbpi3aTN,NOUHaOuN3KINHnBpi3aHHN).
CTeXTe,06KoJIoDn,IOpyxHaOTbcra,a6O IHwi HabaHTaKeHHHe3aKnBaJIPO3pi3,He 3aTnCKaJI NaHcIgTa He IaDaJIH Ha HbOrO.
He nobepTaTe nNkky, kUO uHa BnTgHyTa 3 HxHbOro po3pi3y niD yac po3nnIOBaHHa.
BnKOpNCToByTe NnIKOBy 3HnKeHOI BiDnai Ta NaHOr Hn3bKOi BiDnai, npn3HaYeHi Dny ciie nNkn.
KOHTPOJIb HAD IHCTPYMEHTOM
-Пд уac роботи мцho Трмайт eплку oboma pykamv Ta He BiDnyckaite II. Lc Donomoxe 3MeHwntu BiDauy ta 36peperTu KOnTpoJIb HAD NmIKOIO. O6xonitb pyKoRTky naIbZAMn IiBOI pyKN NO OkpyXHoCTi, a BeNkn naneUb liBOI pyKN nokNaIDt b iN nepeHIO pyKoRTky nIKN. TpMaHTne npaby pyKY nobHicTHo HabKOJIo TnIbHOrO 60ky pYKoRTKn He3aJIexKHO BId TORO, Ra Ka pya y Bac po6Oya, npaba qI niBa. TpMaHTne lIby pyKy BnTIRHyTOO Ta npNTnCHITb NiKOTb.
- POKnaIbIb Iby pyky Ha nepeDnIO pykOaTKy TaK, 06 BOHa 3HaxoDnIacb Ha npMIM NIIi3 npaBOIO pykoHO Ha TINbHOMy 6oCi pykOaTKn NiJ cac po3NnIOBaHH. HikoN He MInrTe MiczAm NoTOxKeHH NIOBoI Ta npaBOI pyKn d76yDb-IAKO rpo3NnIOBaHH.
- CtiIte TaK, 106 Bara TiNa piBHomipHo po3noiinacb Ha o6nDi Hor.
CTiIte 6nKHe JIO IBOI CTOPOH NINKN, IO6 TiINO He 3HaxOJINOCb Ha npMIM NiHII 3 NaHcHOrOM, IOPO3nNIOE.
He npiknaaTe dyke BeIMKx 3ycnJIb. MoXHa BtpaTIn pIBHOBary Ta KOHTPOJb HAD NIKKOIO.
He pixTe ha pIBHi Bnue nIeua. Baxko 36epiratN KOHTPOJIb HAD NIIKOIO Ha pIBHi Bnue nIeua.
OCOBJINBOCTI TEXHIKN BE3NEKN IID YAC BIIaU
YBAI! Bka3aHI HnKHe Oco6nNBOcTI, 0O B6ydoBahi B KOHCTpykii nINKN, DOnOMOxyTb 3MeHwHTN BnnaJKn BnHHKeHHe BIdaqi, npote Taki ooc6nBocTI NOBHICTO He ycBaHO TB cIO He6e3neKy. BnKOpNCTOByoHu NaHcPOROy nINKy He NOKlaaIteCb BnKlHOHa 3anO6iXHi Mexahi3Mn. Heo6XiHo DoTPmUyBaTncra BCix 3anO6iXnX 3axoDi, IHCTpykui Ta 3a6e3neCyBaTN TexHlYe O6cnyROByBaHHr, JAK 3a3NaeHO B uBOMy NoCi6HMy,ДЯ yHNKHeHHr BiDaayi Ta iHxN BnNIBiB, Aki MoKyTb CnpuHHITn cepNo3Hi TpaBMn.
ПИЛКОВА 於HA 3HNIXEHOI BIDDAUJI
Пиковашина 3нхkehoi BiДач po3po6JIeHa 3 MaIMMa paDiYcOM KInca shHn, lo 3MeHwye po3mipn He6e3neuHOI 3OnH BiDauChi Ha KInci shHn.
JIAHUJHn3bKOIBIDAAI
JaHcHn3bKoi BiDnai pO3pO6NeHn i3 uiJbHO npJIraIaOHm 06MExyBaYem NODaBAHH Ta 3aNo6iKHOIaHKoI, IKA BiIDbNAe CnNy BiDnai Ta Do3BOJAE NOCTynoBO po3pi3aTN DepeBO.
PIMITKA. Mn He 3aBnaMo, 10 raIbmo NaHOra 3axNCTNb Bac y BnnaKky BiDaayi, I BN He NOBnHi Ha ce po3paxOByBaTn. He NOKnaJaTeCra Ha XoJeH i3 Mexahi3MiB, B6yIOBaHnx y NInKy. BnKOpNCTOByTe NINKy npabNtBHO Ta oBepeXHo dny HnIKHeHHa BiDaayi.
PemOHrTaIbMaJaHcOraTnIKMaeBnKoHyBaTN yNOBHOBaxeHm CepBicHn npedCTaBHn. DocTabe IHCTpymeHT DoMICu npuDbaHH, kUO BIn PnpDbaHn y cepBichoro npedCTaBHnka, a60DoHaN6JIHXyOro yNoBHOBaxeHOr cepBicHOr npedCTaBHnka.
3БИРАHHЯ
YBAGA! JaKIO npncTpiO OTPMaHO B 3i6paHOMy BnJladi, NOBTOPiTb yci dii, a6n nepekoHaTnc, 10o NnKpyapBnIbHo 3i6paHO Ta BCE HAdInHO 3aKpInHeo. 3aBXKn HAdraTe pykabuCi I nIPO6OTn 3 NaHcIOrom. IaHcIg roCTpn, i Hm MoXHa nopizAtncn HabITb y BnnaKax, KOnn BiH He pyxacTbc!
3HIMAHH KPNUKN 3YENJIEHN
IPNMITKA. Ipeed demoHTaxem Ta nobTopHUM yCTaHOBJEHNM KPNsKIMyFTn 3eHNPEHHHa NaHcIROBY NNIky He06xIDHO PO36IOKYBatn rALbMO NaHcIORA. Uo6 po36IOKYBatn rALbMO NaHcIORA, BiTgHiBt kHaNdJI Ha3aI nepeDHI JNTOK dIpyk (INB.IIOCTpaiciio).
- NpekeKaHTeC, 0o NaHcIOrObe raIbMo po36nOKoBaHe, nOraHyBUn nepeDHi NHTOK dJa pyK do npeDhBoI pyKn.
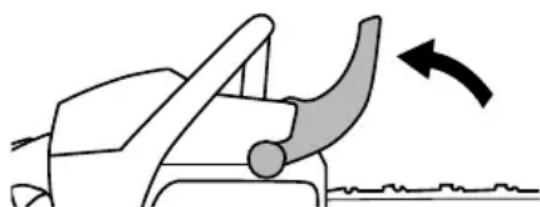
- BiikpyTi b i 3Himitb pfikcatop nIbHOi uHH, nIHNBUN Baxin b I NOBepHyBUN IORO npOTn rOuHHNKOBOI CTpiKN.
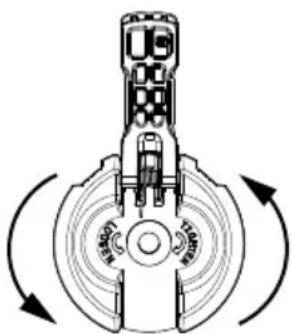
- 3HIMITb KpMkky 3eepnneHHa.
PIMITKA. RaKo KpUkky 3eennHe He Bdaetbcr NERKO 3HrTn 3 NaHcHOrOBoI nnKn, PO3bLOkyTe raBMO NaHcUra, BiTyrHyBUn JaHaJdani Ha3aD nepeDHi INTOK dny pyk.
- BnIMtB CnHTeTnHm 3aNoBHOBaU i3 npOxHN (A), y pa3i noRo HaeBHOCTI.
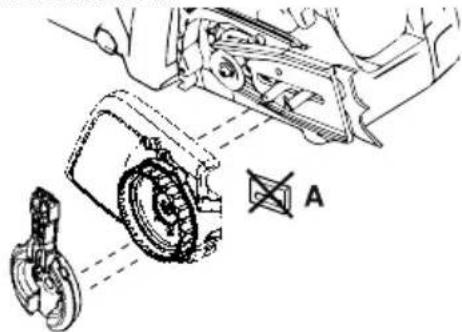
PINEDHANHRIIINHACTORO BYEPA
(KuO He npcHaHO)
IINuactn 6yep MoKe BnKOpncTOByBaTncb y kOcTi oci nobopoTy nic yapoc po3nnIOBAAHH. 3akpiitb IINuactn 6yep DbOMa TBnHTAMN, KIOKA3aHO Ha MaJIIOHky.
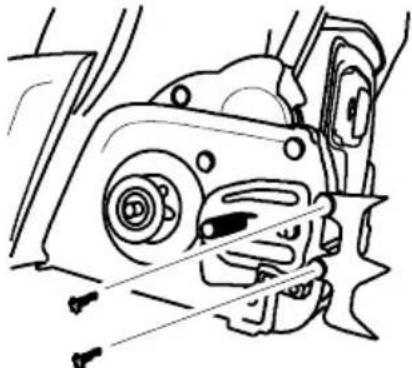
PnEHaHHaNJIbHOIuHH
(KuO He npEHaHO)
HaTAAKHN TBNHT 3 yCTaHOBOUHOI uNIIbKOIO BnKOpNCTOByETbcra IJpeYIIOBAHH HaTAYIaHIOra. Pid Yac 36papHHu XINH dyke BaxJIbNO CNIkyBaTN, Uo6 yCTaHOBOvHu xNIIbKa HA HATXKHOmy TBnHTI BupIBHNACs 3 OTBOPOM y uNHI. IpokpyBuHH RAHTA pyxATmE yCTaHOBOUY uNIIbKy H TaBnHTI BROPy a60 BnH. BidperyIIOte NIOKeHHy yCTaHOBOUHOI uNIIbKn Do NoouAtkY BCTAHOBNeHHu HnHn Ha NIKy. DHB. HAcTyHn MaIIOHOK.

-
NObepTaIe KInbue peryIIOBaHHHaTary NaHcHora, nOKu yCTaHOBOUHa ⅢNINbKa He OINHITbcra MIX iHNkATOpHMn No3Hauchamn (B) Ha KpnuCi 3yennHeHH. LcDIO3BOJNTb BCTaHOBHTn ⅢNINbky B npabINbHe NOIOKeHHr.
-
Hatryte nIbHy uHy 3 IaHcIOrom Ha 60Tn KpInJIeHHa HIN, NOKu BOHa He ONIHITbcr HanpoTH 3y6bactoR KOleca 6apabHa 3ueJIeHHa. Pizui NOBHHi ByTu cnpmOBaHi 3arOCTpeHMM KpaMn B HAnpMky pyxy.

- Npeekohntecra, npnboHa JnHa Ka nHciora BCTAHOBHe Ha npabNtBHO Ha npBOHn 3ipOuci, i 0n HACIO 3HAXODNTbcra B KaHABU nnBHOI uHHN.
- YcTaHOBiTb KpUkky 3eHnJIeHHra TbCtABTe yCTaHOBOUYuNNIbKy BOTBip Ha NnIbHi uHI.
5.YctaHOIBITb NINbHy WnHy,3aTARHyBwnΦikcatop naJIbCuMn,6e3 BnKOpNCtAHHn IHCTpyMeHTIb. Iicra 3aBepueHHHaTAYBaHHn NaHcIora notpi6Ho 3aTARHyTuΦikcatop WnHn 3a DonomorHO BIDNOIBHOro IHCTpyMeHTa.
HATYBAHHIJAHLIOI
(TaKox B IHcTpymeHTax 3i BCTaHOBJeHIM NaHcIOrom)
YBA!JaKIO NnIKA BHKOpNCToBcTbC3i Cna6KO HATrHHTM NaHcIOrOM,BINMOKe BnCKoHTN 3 NnIKOBOI WHH Ta CNpHuHNTH Cepno3Hi TpaBM,aTakOK CNbHO NOxKOHTNC Ta CTaTN HePnDaTHNM DO BnKOpNCtAHN. Y BnAnky 3icKaKyBaHH NaHcIgra i3 WHH NepeBiTe KoxHy npNBIDHy NaHKy Ha npEdmET NoXKOJXeHH. NnKOJXeHH NaHcIg HEO6XiHo BiDpemOnTyBaTn a60 3amHInT.
HaTg NaHcHora e DyKae BaXnBm. NiJ yac BnKOpNCTaHH NaHcIg po3TAYeTBcR. Oco6JIbBO ce CTocyeTbCepuNX pa3IB BnKOpNCTaHH NJIKN. 3aBXd npeBiprAte HATg NaHcIgra nepeD 3anyckOM NJIKN.
NcBCTaHOBJEHHHOBOIaHIOHaIHO HATnNOtpi6Ho NoCTiHo nepeBiprTn, DOKI NaHcIOr He npnpaioctbcra.
PpabnblHn HataI NaHOra e 3anopyko BncoKoi npOykTNBHOCTi p3aHH Ta TpuBaJrO TepMHy cnYk0nnJIKn.
NEPEBIPKA HATIY
3a donomoroh BuKpyTkn cnpo6yute nepecybaTn naHcIg y3D0Bx uHH. KaIO naHcIg He pyxaetbca, BIn HataRHyTu HATo CNbHO. KaIO naHcIg HataRHyTu HATo Cna6ko, BIn npOBncHEHXue uHHN.
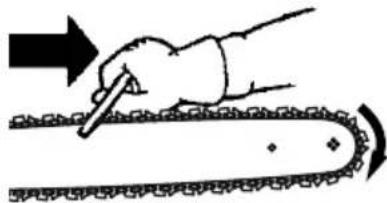
PIMITKA. Hata nganuora Bbaxaetbcn npabnlbHm, kio Bin He npoBnaCne CBOEBO BaroIO nI shHOIO (KOnn nnka nepebyac B rOpnoHTaIbHOMy noJoxeHH), ane naHcIg BCE ue MOKe BiNbHO pyxatnc DOBKOJa WHN.
PERYIIOBAHHH HATAY
1.ПднимьВахиьHaФikcaTopiшИТаNOБерпьНOrO npOTn roDHHNKOBoi CTpiKn Ha 1ОбeрT,цo6BiДуCTNTN KpUkky 3чeпнenneHЯ.
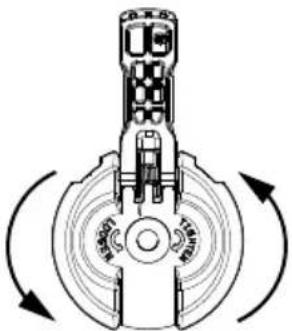
PIMITKA.ⅡIacperyIOBANHHaTaryNaHOra
fikcatop uHHMa6byT3aTyrHyTu TINbKn
nabzMn,6e3 BnKOpNCtAHN IHCTpyMeHTIB.
CnpoBa HATrHyTu NaHcIg 13MiUHO 3aTyrHyTM
fikcatopOMMOKe CnpuHHNTNoIKOxDKeHH.
- NObepHitb KInbue peryIIOBaHHHaTary IaHOra 3a roINHHNKOBIO CTPIKIO, DOKN JNaHcHr IOBHCIO He TopKHETbcra peKN NIIbHOI WHNH.
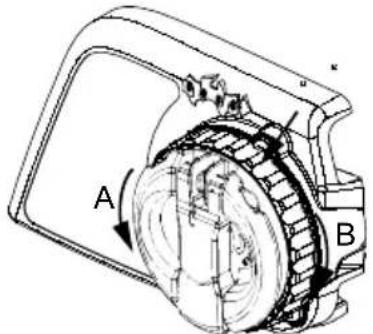
A = npotn roDHHNKOBOoi cTpiJIKN (nocna6JeHNAHATrpy)
B=3a roDHHNKOBIO cTpiIKOIO (3aTyrBaHH)
- NObepHtB BaxiNb Ha φikcatopi nIbHOI uHH y BuxiHe NOIOKeHHr.
YBAI! HeBnKoHaHH uici BmOrn MoKe cnPnUnHHT N0WkoDxHeHH NnIKn Ta npN3BeCTn Do cepNo3HOr TpaBMyBaHH.
IpepeKoXHM BnKOpncTaHHaM
- Ipepebipte piben naibnboi cymiwi
NOPRAOK TEXHICHORO
OBCNYTOBYAHN
NEPEBIPKA HA NPERMET NOUKOJKEHIX ABO 3HOUHEHX DETALEI
3BepHtbcra do aBTOPn3ObaHoro cepbichoro ueHTpy dIa 3amHN NOwKOxKeHX a6o 3HOweHX DeTaJIe.
PIMITKA. IoRa HeBENKOI KINbKcOti ONuBn iD NIKIO nicJ3yNHN DByrHyA e HopMaJIbHm RaUeM He cnD nnyTaTn 3 npOTiKaHHaONNBHO6aKa.
BIMnKaU ON/STOP (YbimK./CTon) - nepekoHaTeCra, 10o BIMnKaU ON/STOP (YbimK./CTon) cyHKIOHyc npaBnIbHO, yCTaHOBBUN Ioro B HNkHIO N03uIIO. NepekoHaTeCra, 10o DnBuHy 3ynHHBCra, a NotIM 3HOBy 3anyctt bno i npodOBxuyte po6Oty.
- PAnNBHn 6ak - npnnHITb KopNCTyBaHHn NIIKOIO B pa3i HaeBHOCTI O3HaK yUkoJKeHb NaINBHorO 6aka a0o Ioro npOTiKaHH.
OINBn6ak- npnnHITb KOpNCTyBaHHa nnkoB pa3i HaeBHOCti 03hak yuKoJKeHb OINBHorO 6aka afo noTPOtikAH.
NEPEBIPKA HADINHOCTI KPINJIENHRA YACTIH
- RaKu ShHH
Jaanior - JnyuHnK
UHOKUJIINIDpa - NobITpyHn fIbTp
ΓBnHTnykoTkn
Bi6po3axnci KpiIeHHa
Kopnyc cTaptepa - Peredhi 3axuchn uHTOK
NEPEBIPKA PIBHRA NAIINBHOI CYMISSI
INB.NYHKT"3APPABKA DBNYHA"Bpo3diJI "EKCIIYATALI".
3MAUUBAHH
INB.NYHKT"ONNBAIJIPINIJKOBOI IHHNAHAHLIOFA"Bpo3diNi"EKCNJYATALIA".
IPEBIPKA TA OUniSeHHr IHCTPYMEHTA MMAPKYBAHH
NcKoKHO BnKOpNCaHnpeBipRyTe BeCb npncptiHa npdeMet po3xntAHnx i NOxKOJKeHX DeTaeNe.
NoocTitb npncpti i MapkyBaHHra DonomoroBOIoroIraHupKn, 3MoOeHOY y M'KOmy MIOUOMy 3acObi.
PpTb npntpiuCToO cyHO TKaHNOIO.
IPEBIPKA TALbMA JIAHIOI
INB.NYHKT"TALbMO JAHUOFA"Bpo3diN "EKCJIYATAUJ".
CHUENHNOBITPRAHOFOIITBTPA
YBAGA! He ouuuyte fiNbTp 6eH3nHom a6o iINHM JERK03aMMCTHM 3acobom, uO6 yHnKHyTHe6e3neKn BnHnKHeHHaNoXeKi a6o yTBopeHHaWKIDNNBnX naNBnHX BNnapOByBaHb.
3a6pydHHeHH NOBITpHoro fInbTp a npn3BONDt bdoCKOpOeHHN CTpOKy cnyXbN noRipweHHa yHKIOHaJIbHnx XapaKTEpNC Tk DBnryHa, a TaKoK 1036JIbWeHHN CNOXIMBAH NAnBa TA BnKnIDIB WkIDINbIX ra3iB. 3aBXn OUYuYte NOBITpHnn KfIbTp nICn KOKHO DecaToI 3anpaBkn 6aka a6o nicn KOKHnx 5 roDnE kCnPyatau, 3anExHo BiToro, Ioo Hactahe paniue. Y 3annEnHomy cepedOBuIc OUYuTe fINbTp qactiwe. YxmbAHn fInbTp He MoXNa NobHCTTO OHCTNTn. PekomeHdyETcBc 3amHOBATn NOBITpHnn fInbTp Ha HOBn NICr KOKHX 50 roDnE ekCnPyatau iabO zoPioHNo, 3aneKHO BiD TO, Ioo HactaHe nepwnm.
- BiDnyctiB Tprn TBnHTN (A) Ha KpnuCi uNJIInHpa (B).
- 3Himits Kpnuky uinihpa.
- 3HIMITb KpUkky NOBITpa (C) i BNTaHITb pINbTp (D).
- Bumnte nobitprn Hn fipbtp rapaoyo Mmibho BOIOI. IponoIooiTB noTO uCTOHO xONODHO BOIOI. Ipeed yCTaHOBJIeHHM IOBHicTIO npocuyitb fipbtp.
- YcTaHOBITb NOIITpHn FInbTp i KpnUky FInbTppa Ha Micue.
- YctaHOBIbHaMicue KpnuKy UJIINHpa Ta HadiHoo 3aTgHIb TpN rBnHTN, DOKNaIauOuN 3yCnIJIa 1,5-2 H·M.
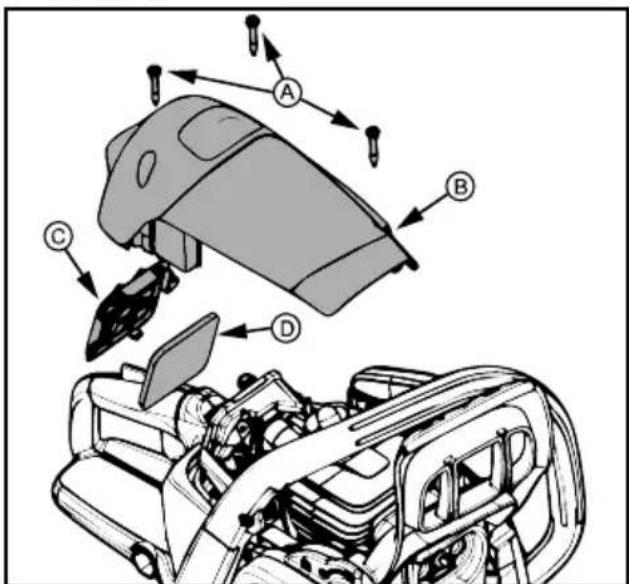
OJRAI JNYUHNA KA TA ICKPOFACHNKA
Iiud BnKOpncTaHHn PnpctpoHa rJyHnky Ta icKporacnka HakoNcYeTbCnHarap, knn noTpioHo BuJaTn, 06 yHnKHytn p33nky BnHnKHeHHn noKeXi a6o noripweHH np6Otn DnBryHa.
3amHItb icpkoracnK, RaIO BiH He 3ynHRe icpn.
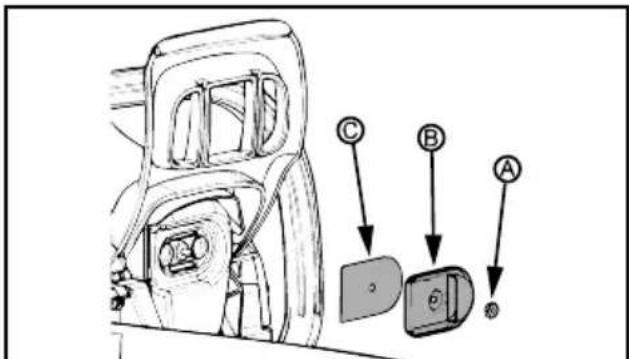
OuHJEEHH TCKPOIACHNKA
- BiDnycTiB i 3HIMiTB rAky (A) 3 KpnuKn BuxionHoro OTbopy (B).
- 3HIMITb KpnuKy BxNtONHOro OTBOpY.
- 3Himitb ickporachNK (C). NObOdbTec8 3 icKporachNKOM o6epexHo, u6 He dOnyCTNTN NOUKoDxKeHb.
4.ДeNiKaTHO NOUcHITb IckporachNk DpoTraHOU ⅢIko.3amHITb IckporachNk,RAuHa HbOMy e po3pNB. - 3amihtb noJamahi a6o po3tpickaHi yactHHIyUHnka.
- YcTaHOBIb Ha Micue iKpOraChNk, KpnIky BuxnonHoro OTbOpy Ta raKy. HadiHo 3aTgHiB raKy i3 3ycnJIpy M 2,8-4 H·M.
3AMIHA CBIyK 3ANAJIOBAHH
Cbyky 3anaIObAHn Heo6xIHo OOpIHO MInrtn Dnra TORO,06 DBuRyH IerKo 3anyckABc Ta Kpaue npaIOBab. INTePban 3anaIObAHn 3MiHHTn He MoXHa.
- BiDnyctIb Tprn rBnuHTn (A) Ha KpnuCi uNInHpa (B).
- 3Himitb KpnuKy cuninHpa.
- BuTarHITb KOBnak CbiKu 3anaJIIOBaHHa(C).
- BntraHrHtB CbiKy 3anaJIIOBaHHa (D) 3 cuniHpa Ta ytni3yIte ii.
5.YctaHOBITb HOBy CbiKy 3anaJIIOBaHHraHaIiHo 3aTHiITb II 19-MM raiKOBN KInOHe m 3ycnIJaM 20-34 H·M. IpomixoK MIX eJeKTpoJamMa cTaHOBHTN O,5 MM - IOBTOPO BCTAHOBITb KOBNK CBIKN 3anaIOBaHHa
7.YcTaHOBIb KpNShky CUniHpa Ta Tpr rBnHTn. HadiiHo 3aTgHtB rBnHTn i3 yCunJlM 1,5-2 H-M.
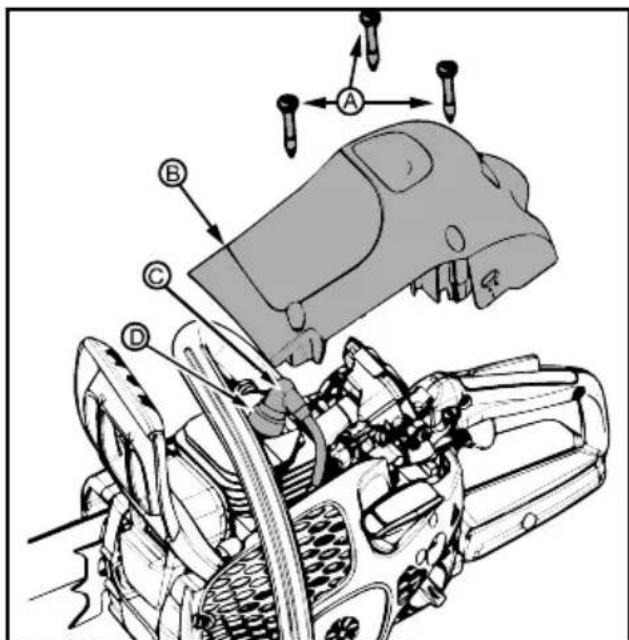
PETYJIROBAHHRAKAPBIOPATOPA
YBA!UnpoOx6iNbwoi qactHn uiei npoueypn laHOr pyxaTmTeBc.BdRHTb 3axnche cnpaJxKeHH Ta doTpmyntecb ycix 3axoIB 6e3neKn. NaHOr He mac pyxaTnc Ha xONoCTOMy xoDi.
O3nHHeo6xHocTi peryIIOBaHHaBnKocTi xonocToRo XOy
Kap6iopatop 6yB peteIbHo BiDpeRyIbOBaHn Ha 3aOdi. PeryIIOBaHH Heo6xIDHO BIKOHyBaTn, kUO BuHnKa e Onda 3 TaKnx yMOB:
JaHcIpyxaeTbcaHaXoNocToMyxoDi.IuB.p03iIN "PErYJIIOBAHHaIbNkoCTIXOJIOCTOTOXOy-T".
Пика He npaioe Ha xoIOCTOMy xd.ДИВ.pO3dI "PErJIOBAHHЯ IWBnIKOCTI XOIOCTOTOXODY-T".
PeryIIOBaHHa WbUdKocTi xOJocTOro xOy-T
IpebeDitb DnBryH hXoNocTn xiJ. RaKIO naHcIor pyxactb, WbNdkictb XONoCTORo XOy HaTTO BeNkA. KaIO dBnryH 3aRJIyXHyB, WbNdkictb XONoCTORo XOy HaTTo MaJa.
PeryIIOHe WbNdkicTB XOJocTOro XOyD, DOKn DBnryH He npaIOBATmE 6e3 pyxu IaHcIora (HaTO BnCOka WbNdkicTB) a60 He nepeCTaHe 3aIpyXaTN (HaTO Hn3bKa WbNdkicTB).
TbHrXoNoCToro XOdy po3TaWOBaHH B o6NaCTi Bnue KhoNn HAcoca Ta n03HaueHm nitepoT.
NObepHbTBnHTxOncTOxOy(T)3a roDHHNKOBoO CTpinKOIO, 06 36InbWHTn WBNkICTb DnryHa.
IObepHITbTbINHT XOIOCTO XOdy (T) npOTn rOAnHHNKOBOI CTPIIKN, 0o6 3MeHNHT NWBnKicTB dBnryHa.
CNCTEMAOXOJIOXEHH
3an6iTn neperpiBaHHIO DnryHa,iHCTpyMeHT 0bnAHaHO CNTeMOIO OxOnOJKeHH.
CnCTema oxoJIoDxKeHHcKJaDaEcTbCra 3 TaKnx KOMIOHeHTIB:
- nobiTpO3a6ipHnK Ha cTapTepi;
HanpMaHaIINIOBITPra;
pe6paHa MaxOBnky;
pebpa oxoJooKeHHa nuiHpi;
KpnuKauninHpa(ckepoByeXonOHe noBITpHa uninHp).
OuNyTe cnTeMy oxoJoxKeHHa itKIO nicJn KOKHOro BnKOpNCtAHn a6o YactiJe, kIoo cboR OBMaraOTb yMOBn. BpydHa a6o 3a6NokOBaHa CnCTema OxoJoxKeHH MoKe CNpUHNHTn nepePrib IHCTpymeHTa, 0o np3BeDe Do noXkoJxKeHH nOpHn i ciJIInDpa.
HAROCTPIOBAHHJAHUIGORA NIKK
Piz
PiaJIbHa YacTnHa IaHUOra IINIK Ha3NBAeTbcra pi3cEm, BOHa CkIaJaEcTbcra 3 piaJIbHorO 3y6a (A) Ta rInbHomipa (B).
IINHnHaPi3AHPi3aBn3Haayebcpi3Hnueo BnCOTN 3y6uJrnnHomipa(C).
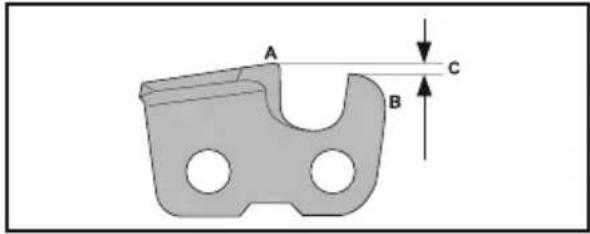
IpiHARoCTpOBaHHi p3aJIbHO r3y6a Tpe6a nAM'rATn npO YoTnpu BaxNBI qakTopn.
Kyt 3aToyBaHHa.

KyTpi3aHHa.
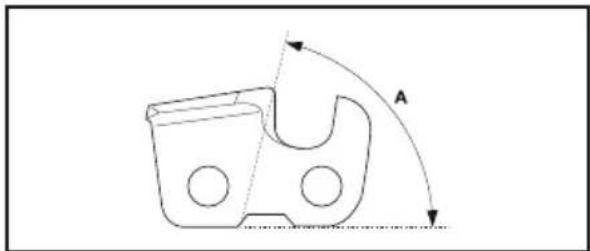
-Пложжнн haHnIka.
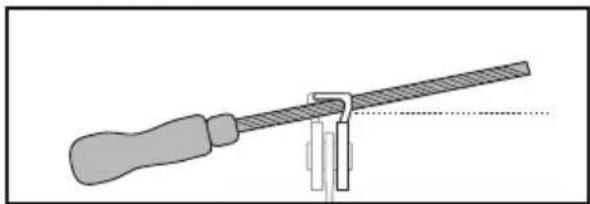
-Дiametр кугноро HanuNka.
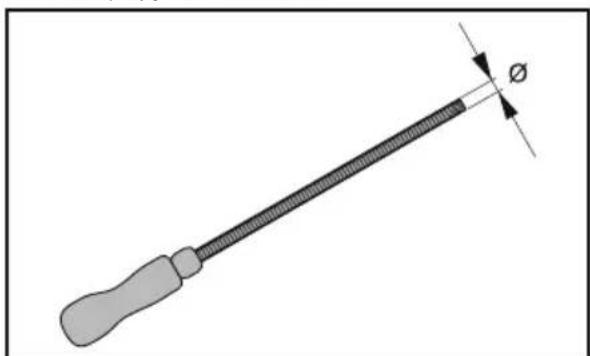
HaroctpoBaHHpiaJbHnx 3y6uiB
HAROCtPbOBAHn p3aIbHnx 3y6uB BKNOPNCOTByTe Kpyrnn HannIOi Iw6NoH dny HAnJka. IHcOpMaio Odo peKomeHDoBAHnx po3MpiB HAnJka Nw6NoHa dny
JaHcIgra NmIKyCTaHOBHeHOro Ha BaWOMy BnPo6i,INB. y po3dini «TEXHIHDAHI»
- IpekoHaTecra, 0n NaHcIg NIIKIOCTaTHbO HATrHyTN. Iocna6JIeHN naHcIg MoKe pyxatncB6iK, 0o 3pO6NtB npOec npabNbHoro HArOCTPBOBaHH6iNbB BaxkM.
- Cnooyatky Haroctpitb Bci 3y6ui Ha oHOMy 6oui. Harocptiptb piaIaIhi 3y6ui Ha BHYtpiHi NOBepxHi; 3MeHsuTe Tnck nIac 3BOPOTHO pyxy.
- NpeBepHITb Nnky i HaroctpiTb 3y6n, L0 3aannnnnc Ha IHOWMY 6oui.
4.Harocptnothe Bc3y6ui do OndaKOB0I DOBXHH. KOni DOBXnHa 3y6uiB 3MeHUIyCTbCra Do 4 MM, NaHlOR nIIKN BBaxacTBcra 3HOweHM i NOro Heo6xIDHO 3AmHHTN.

PeryIIOBaHHBnCOTnIIN6HOMIPA
Iepw HIX HAJauTOBbATn rIN6HOMip, HAROCtpiTB p3aJIbHI 3y6ci. Picna HAROCTpIOBAHH 3y6cIB (A) BUCOTA rIN6HOMIPA (C) 3MeHJyETcbc. Jnra 3a6e3neHHe ONTMAJIbHO npOdyKTHBHOCTi pi3AHN rIN6HOMIP (B) Heo6xIDHO 3aTOHTn, Uo6 DoC8rtn peKOMeHDoBAHOr HalaWITBaHH. IHOpMaui Ipo Bu3NaueHH npAbNJbHOI BucOTn rIN6HOMIPA dN BAuoro NaHcUora dNb. y po3dINI TEXHIH DAHI!.
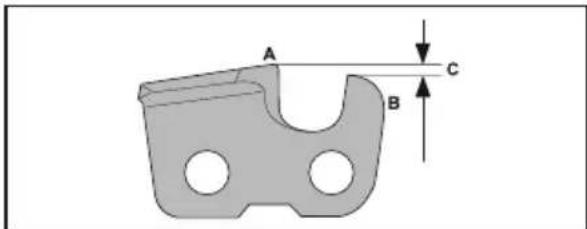
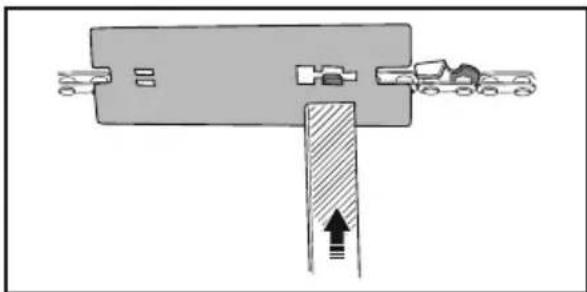
PIMITKA. Lja pekomehdaia jnepeid6aae, 0doBxHnHa piaabHnx 3y6iB He 3aHaT0 3MeHNnaac.
IpypeyHOBAHnrrn6HOMipBnKOpncTOBynte IIOCKnHaHnIOk i npctpi BmIPBOAHn BnCOTn rHbHOMipa.
-
BctaHOBITb npnCTpi dIIN BmIPIOBAHHBNCOTN rIM6HOMIPA NaJNaIcIOM NIIKN.BINbU DeTaNbHa InOpMauiO IoOe EKcnnyatauII npnCTpOo BmIPIOBAHHBNCOTN rIN6HOMIPA 3hAXODNTCBsHa INorO yNAKOBUci
-
3actocobyte nackn Hannook dny CnnoBaaHn Bepxhoi qacttnn rnnbHOMipa, 10 npocobyeTBCR Kp3b npncptpi DnBmipBOAHn BnCOTn rnhomIPA.HanaTuBaHHr nnbHOMIPA6ynde npabnbHM, kqo He BiDyBaCTCBc CnpOTnBy npnpOBeHNi Hannlka no npncTpOIO nBnMipBOaHHn BnCOTn rnnbHOMipa.
ПИЛКОВА LИнHA
YMOBn,3a JIKX Heo6xIDHO BUKOHyBaTn TexHiyHe 06CnyroByBaHHI NIKKOBoI WHN.
- PnIka po3nnHoe tiNbKn 3 oDHorO 60ky a6o niD KyTOM.
-Пилka BIMarae HATNCKaHHBpo3pii.
HeoctaTHnoaOJnBnDo uHHn/naHcIora.
IpebeipnTe cTah nNkoBoI uHH niD yac KoxHoro 3aTooyBaHH NaHOrA.3HOseHa nNkoBa uHa nowKdoKyE naHcUor Ta ycknaadHIOe npOec pO3nnIOBAAHH.
IICJ KOKHO BIKOPNCaHNepeBOBte BIMKau ON/ STOP (YBIMK./CTon) y HNKe NOIOKeHHa Do NOBHOI 3yNNHK DnBHyHa, a NOTIM OChuYTe NIKOBy SiHy Ta OTBip 3yOCArTO KOnca BiD TnPCn.
IopraOK BnKoHaHHaTexHOrO 06cnyroBaHHa HIKOBOI uHH.
- BiKpyTb Ta 3HIMtB rAknuHN Ta Kpnkky 3eennnna. 3HIMtB uNHy Ta NaHcIg iNKn.
2.ПочстITb OINBHI OTBOPN(A)Та npopi3 WmHn(B).

- YTBOpEHn 3aDnPOK y peuNi NnKOBoi uHHN -e 3BnuHn npOec 3HOwUbaHHpeKn.BnDaIITb ci 3aDnPK nJaACKm HAnNKOM.
- RaKuo BepuHa peKn HepiBa, BiHOBt b KBaPaTHI Kpa Ta CTOPOHN NIAckm HANJIKOM.
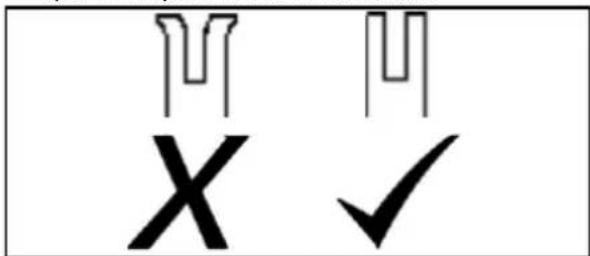
3amHIOte nnKOBu SHHy, kUo npop3 3HOBCR, uHa 3irHynacr YI Trichyla a60 RaKuo peKn HAdmipHO HarpBaHObTcBc YN B HIX yTBOPHObTcBc 6araTO 3aHnPOK. RaUO Heo6xIDHO zAMHHn Tn NNKOBy uHy, BVKNOpCTOByTe NIIe WnHy, UO pN3HaueHa dN piei nnKToBAk3aHa y cNCKy 3anachnx DeTaane a6o Ha apnky Ha naHucorobii nui.
UCYHEHHH HECNPABHOCTEIN
TABNIU YCUHEHHH HECNPABHOCTE
YBAI! 3aBxDn BmNkaTe npCTpi i BnMaTe CBiKu 3anaHOBAHn, nepu HIX BnKOHyBaTH Bci peKoMeHDoBaHI HXyE 3axOHi, 3a BnHTKom Di, kI BnMarAOTb po60Tu npCTpOIO.
TnyxHicTB, kBt 1,5/9000
CnCTema 3aIJIIOBaHH
Cbiyka zanaenHH Husqvama HQT-1
3a3op mix eJekTpoJamM MM 0,5
PAnBHa Ta 3MaayBaJIbHa CnCTema
EMHICTb naJINBHORO 6aka, cm³
300
IpoNyKTHBHCbHaCocAOnnB3a9000o6./XB.MN/XB.4-8
EMHICTbOINBHO6aka,CM
200
TIN HACOCA OINBn ABTomatuHn
Bara
JaHucroBa nnIka 6e3 uHHu NaHcUra Ta 3 npOxHim 6akamn 4,9K
BunpomHOBaHHy wmy (nVB.npumitky 1)
Pibeh 3BykoBoi noTyXHocTi, BmipuBaHH y deun6enax (A) 109
PibHeB 3ByKoBOI NOTyXHOCTI, rapaHTOBaHn LwA dB(A)-Cbpona 115
3BykoBni pibeHb (nVB.npnmItky 2)
EKBiBaIeHTHm pIBeHb 3ByKOBOr TnCKy Ha Byxo onepatopa, dB(A) 98,7
EKBiBaJIeHTHi pIBHi Bi6paui, a hveq (nB. npMItKy 3)
Ipeedny pykoarKa, M/c2
5.22
3aHrypyKoTka, M/c2
6,24
JaHcIor/WHHa
IobxHa cTahdapThoi 35cm,40cm,45cm
IobxHa peKomeHDoBaHOi HINH
35cm,40cm,45cm
Kopncha doBxHa npiaJIbHOI NOBepxHi
34cm,39cm,44cm
Kpok
9,52 MM
TobunHa nepedaBbHx NaHOK
1,3 MM
Tn npBODHOro 3y6aCToRo Koneca / kInbKicTB 3y6uB
Ppma03y6e/7
Ubnkctb naHciora 3a hain6inbwoi notyxhocti, m/c
20
Pnmuitka 1. BnnpomHIOBaHHa WMy B cepeIOBnue, BmiprHe k 3BykoBa nOtYxHicTb (Lw), BiDnOBiAe DnpeKtBi CC 2000/14/EC.
Pnmitka 2. EKBiBaJIeHT pIBH 3ByKOBOr TcCKy, 3riINO 3I cTaNdApTOM ISO 22868, oBucnHoeTbcS y BnIaI cyMn eHepri3a neBHn npomixok uacy 3a pi3HX yMOB npaI Ta pIBHIB 3ByKOBO r TcCKy mOy mOb npaI. TInOBn CTATNCTUHn PO3KnD dIra ekBiBaJIeHTHX pIBHIB 3ByKOBO r TcCKy 3a3Bnua JRBnE co6oIO BiXnHeHH B po3Mpi I dB (A).
Ppimitka 3. Ekbiaent pibra qii, 3riHIO 3i cTahdaptom ISO 22867, ochncnoctbcy y Bnrrjdi cymneepiii 3a neBn npomixok yacy 3a pi3nX yMOB npa ta pIBHB bpaqii. PpeCTabnehi da hi npo ekBbaenTHn pibehb bipaa II MaOtB TINOBy CTATNCHTHy DcncepciO (CTAHAPthe BiXneneHH) B 1 M/e.
KOMBIHAJII WHN TA JAHUCIOIB NIKI
HaBeHeHnKue p3aIbHi HacaKn peKomeHIOBaHO Ira BnKOpNCtAHN 3 MoJeTAM, OINCAHMN B CbOMy noci6Hky.
(AkoBeue He e MOHTnpaHa)
3a perynipaHe Ha HataRaHTo Ha Bepurata ce
n3no3BaT perynpoBueh uΦT n BuHT. MHO e
BaxHo, KOrato CrNo6BaTe uHaTa, perynpaunr
uΦT, pa3noLoKeH Ha BuHTa 3a perynipaHe, da
nonaHte ToHb B OTbOp Ha uHaTa. PnI 3aBbPtaHe
Ha BuHTa perynpaunr uΦT ce npdBuXkBa Harope
H aDony no BuHTa. HamepeTe To3n perynpaU
uΦT, npedn Da 3anOuyhe Te da MOHTpate uHaTa
Bbpxu TpnoHa. Bxke NIOCTpaunrTa NO-dony.

- 3aBbptete npbcteha 3a HaTgAhe,doKaTo perylnpaunr T uΦT 6bDe pa3nOKeH MeKdy HndkaTopHnTe MapknpOBKn (B) Bbpxy Kaaka Ha CbeHNHTeJr. ToBa TpRbBA da No3BOJn Ha perylnpaunr uΦT da 3actane 6IIn3o Do npabnHaTa N03UJn.
2.ПиьзHTe HAnpabNЯBaUaTа WnHa C Bepurata Bbpyx60ntOBTe N,ДOKATO CNpe Do BeHeuHa Ha 6apabHa Ha CbeDInHITeIe. Pe3uTe Tp8Ba Da ca O6bPhATn B Nocokata Ha BbptHe.
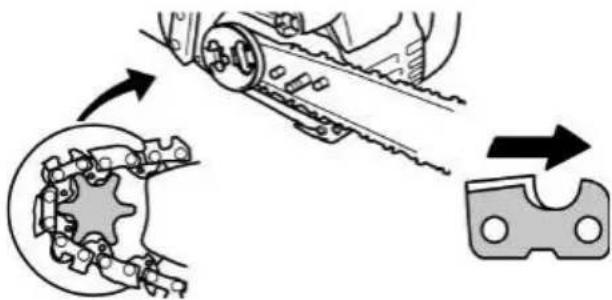
- Поверете дали 3адвжвашиte 3beHa Ha Bepurata nacbat npabnHOB 3aBvKBaunr Beheu daniBepurata npemnhabno Jxne6a Ha shnHata.
- MoHTnpaTe KaNaKa Ha CbEeHInTeN I NoCTaBepeRyIpaunu uΦT B npope3a Ha uHaTa.
- 3aterheTe qnknpaata pukka Ha HaprabnaBaata uHa cAmo Ha pka.Cne KaTO BepnraTa e HaterHata, Tpa6ba Da 3aterHeTe qnknpaata pukka Ha HaprabnaBaata uHa.
OBTRAHE HA BEPNIATA
(BKJIIOHTeJIHO npn MaunHc Beue HCTaJnpaHa Bepura)
PPEyPExEHE: Ako TpnoHbT pa60tn Cpa3xna6eHa Bepura, TMOKe Da OTCKOuN OT HapraBnBaaTaA WnHa N da DOBepe Do cepNo3HO HapaHbAHe Ha OnpaTopa N/INn Do NOBpeDa Ha Bepurata, KoTo Da J HA npaBn Hen3nON3Baema. Ako Bepurata OTCKOuN OT HapraBnBaaTaA WnHa, PPOBepete BCsKa KynncHa npeabkA 3a Nobpea. NobpeDeHa Bepura Tpr6Ba Da ce peMOHTnpa nn 3ameHn.
HaTraHTo Ha Bepurata e MHO BoBaxHo. B npoueca Ha pa6ota Bepurnte ce pa3TaraT. TOba e ocobeno BApHO no BpeMe Ha IIbPBrTe HKOJIko IIbTu, B KOnTO n3NON3BaTe TpnoHa. BuHarn npOBepraBaiTe HaTpaHTo Ha Bepurata npedin BCsKO BKIOUbaHe Ha BepNXHr TpNOH.
PnMOHTnpaHTo Ha HOBa BeprTa Tp6Ba YecTo Da ce npOBepraHaTgAHeTo n, DOKATO Beprata Nache.
PpaBnHO HaTeHaTaTa Bepira npTeXkAba Do6pnpexeux XapakTePncTkn NdbNbKJBBOT.
- HcneTpaaTe n noCTBaTe Bb3dyHnna QmITbp
- INHCNEKTIpaIte nIOuHcTBaIe BepNXHaTa CnnpaKa
- INHCNEKTIpaTne n noOuHCTBaIte HAnpabJraBaaTa Ta HnHa
HaBceKn 25 yaca\*
- HcneKtpaIte n nouchTaBaiTe npedna3HnE ekpan npotNB uckpn uaycnyxa
ExeroaHo
CmeHnTe 3anaNTeHHata CBEU
CmeHnTe rOpBnHnФnTbP
CmehnTe Bb3dyuHHa qHHTbp
*Bcekn yac pa6ota e paBHO3HaueH Ha npi6n3nteHNO 2 pe3epBOapa roPBO.
PPOUeDyPN 3A NODPbXKA
IPOBEPETE 3A IOBPEDEHN IIN N3HOCEHN YACTN
O6bphete Ce KbmyhHOMouee CepBn3 3a3amHa H NOBpeHHeNTe NIN N3HOCEHN YactN
3A5EJEXK: Cnei cnipaHe Ha DnurateIe HOpMaHIO NOI TPOHa Da ce NOBRA MaIKO KOJIueCTBO MaCNo. He 06bPkBaIte TOBa C TeuAa MacNeH pe3epBoap.
- Ппевкнювateн ON/STOP (BKЛ./СПИРАН) - уberete ce, Que npeBknioybaTeJrT ON/STOP (BKJI./CPIPAAH) e n3npaBeH, KATO rO hATnCHeTe. Yberete ce, Que DBnIgATEJIrT CnIPA; cIeD TOBA cTAPtnpaIte NOBTOHO DBNIGATEJIr N npOdbJIkTe.
- Pe3epBoap 3a roPnBO - He n3noJ3BaIte TpnoHa, aKo pe3epBoapbT 3a roPnBO nOKaKe npu3Haun Ha nobpeda nnnpotnuane.
- Pe3epBoap 3a Macno - He n3noI3BaIte TpnoHa, ako pe3epBoapbT 3a Macnlo nokaxe npn3Haun Ha nobpeda nnipOTnuane.
ПОВЕРЕТ 3A PA3XЛАБЕНФИКСТОПИЧАNTI
- Raikn Ha uHata
Bepura
Aycnyx
LInHdpnH npedna3nten
Bb3dyueHΦnITbp
BnHTOBeHaDpbKknte
Bn6paHnnyctpoCTBa
Kopnyc ha cTaptepa - AbarneH noct
PPOBEPRAIHTHBOTOHATOPUBHATA CMEC
Bixte 3APEXDAHE HA DBIATEJI B pa3dena PABOTA.
CMA3BAHE
BnKTe MACJIO 3A HANPABJIARBAUATA IINHA IN BEPNIATA B pa3dena PABOTA.
HNCNEKTIPAITE INIOUCTBAIITE YPEDA INJENEHKNTE
CneB CBAy ynoTpe6a npOBepraBaTe ypeDa 3a pa3XnaBeHn nn NobpeHn YacTn Nocnte ypeDa n neEnKeT, KaTO n3No3BaTe Bna Kbpna CbC cnao noNCTBaun npenapat. N36bpwe Te ypeDa cnuCTa cyxa Kbpna
BnKTe BEPNXHA CINPAUKA B pa3deJa PABOTA.
NOYNCBAHE HA Bb3dUHHN HNJITbP
PNEyIpyKDEHHe: He noCTBaTte pntbpa 6eH3nH nnn dpyr Bb3nJaMeHM pa3TBOpHTen, 3a da n36erHete Cb3daBaHcTo Ha onachOCT OT NOxap nn H3nyckAHeTo Ha BpeHN OTnaDbuHn Ra30Be.
3ambpceHnT Bb3dyIeH fHnTbp HamaIbRa XNBota n npOn3BODnTeJIHOCTTa Ha DnIraTeIy YBeINuBa pa3XoDa HA rOpNBO N BpeHnTE OTnAbYn Ra3OBe. BuHaI npocHTBaIte Bb3duWnH fHnTp CneI 10 pe3epBoapa rOpNBO nn5 caca pOba, KoETo HAcTbnPi bPBO. Ppnp aPbota B3anpaWeHa Cpea NouchTaBnTe No-yeTo. Ynotpe6BaHnBb3dyWeH fHnTp HnKora He MoKe da 6bde HnblHo n3uCtEn. IpenopbUHTenHo e Da CmeHrTe Bb3dyWnH fHnTp C HOB Ha BcEKn 50 yaca pa6oTa nn BeDhBX RoDnUHO, KOETo HAcTbnPi bPBO.
- Pa3xna6eTe Tpnte BnHTa (A) Ha KanaKa Ha cnHbpa (B).
- Cbane Kaana KaHa uHHdbpa.
- CbaIeTe kanaKa Ha Bb3dyuHnA p (C) n Bb3dyuHnA p (D).
- Nocntete Bb3dywnn HcNTbp C nOmoTa Ha canyHeHa BOda. NpIakHete C uNCTa XnaDHa BOda. 13cywTe Ha Bb3dYx HanbNHO, npEi Da ro NOCTABNTe OTHOB.
- MoHTnpaIte OTHOBb3dyuHnra fuiTbp n Kanaka Ha Bb3dyuHnra fuiTbp.
- MoHTnpaIte OTHOBKaIaKa Ha cIIINHbpa I Tpnte BnHTa. 3aTeHHeTe 3dpabo Do 1,5-2 N-m (13-18 in-lb).

NPOBEPKA HA 3AΓIYUHTENI IN PPEIINA3HNA EKPAH HA CBEU T A
C TeueHHe Ha n3non3BaHeTo Ha ypeDa Bbpxy aycnyxa n npedna3nE ekpAH nPOTNB NCKPN CE HATpyNtB BByJepoHN caKdN n Tp6Ba Da ce OTCTpaHrT, 3a da Ce n36eHc C3daBaHe Ha onaCHOCT OT NOXAP IN BLOwabaHe Ha pa6OtaHa Dniratena.
Ako ce noIyat cUyBaHn, CMeHete npedna3nE ekpan npOTNB NCKP.
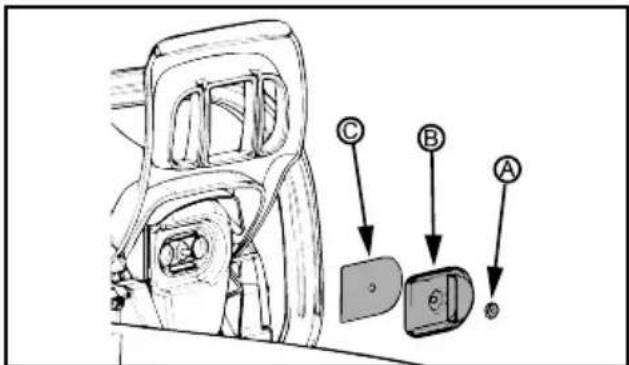
IIOHCTBAHE HA IPREIIA3HnE EKPAH IPOTNB NCKPN
- Pa3xla6te n cbanete raikata (A) ot kanaka ha n3nyckaTeHHnO TBOP (B).
- Cbane Kaana Ka Ha n3nyckaTeHHnO oTBOp.
- CbaIe npEJa3HnE ekpaH npOTnB nckpN (C). Pa6oTe BnMaTeHo C npEJa3HnE ekpaH, 3a Da He ro nobpeDnte.
- Поистeteпpeлma3нЯ ekpan npotnв nckpn BHMMaTeJIHo C TeIeHa YETka.Ako OTkpneTe ChynBaHna, CMeHete ekpaHa.
- CmeheTe BCnKn CuyneHn nn HanykaHn Yactn Ha aycnyxa.
- MoNTpaIte 06paTHo npEpa3HnE ekpaH npOTNB NCKP, KAnaka Ha n3nyckateHnO TbOp nraKata. 3aTeHete 3dpabo raikata do 2,8-4 N-m (25-35 in-lb).
CMRAHA HACBEUHTA
3anaHnHeHa T CBeU Tp6Ba Da ce CMeH BcKa rOHa, 3a da ce rapaHTnpa, Ye DnRatEJIr T ce ce CTapTnpa no- neCHO nIe paBTo NIObpe. BpemTo Ha 3anaBaHe e oKcupaHO He moKe Da ce perynpa
- Pa3xna6eTe Tpnte BnHTa (A) Ha KaNaka Ha cnJINHbpa (B).
- Cbane Kaana Ka Ha cinnnDbpa.
- 13BaTeMaHsOHa Ha 3aNaIInTeHnHa T CBeu (C).
4.ИЗваде Te 3anaJInteHATA CBeU (D) O TcIJIINHbpa nЯ
n3XBbPjTe.
- MoHTpaIte HOBa 3aIaIInTeHa CBeu I aTeHete 3dpabo c 19 MM (3/4 INHa) rIyX raeueH KIOU DO 20-34 N-m (15-25 ft-lb).Pa3cTOrHHeTo Mekdy eNEKtpOnTe Ha 3aIaIInTeHInTe CBeuIN TpR6Ba Da 6bJe 0,5 MM (0,02 INHa).
- IocTabete Ha MRCTO KOH3OJaTa Ha CBeIaTa
- MoHTnpaIte OTHOBKaIaKa Ha cunHbpa I Tpnte BnHTa. 3aTeHrHeTe 3dpao Do 1,5-2 N-m (13-18 in-lb).
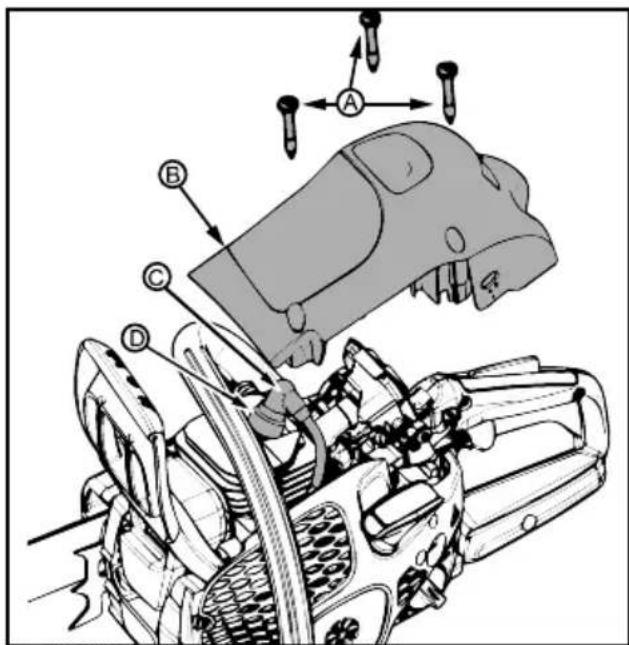
PEIYJINPAHE HA KAPBYPATOP
PPEyPExEHE: Ppe3 no-roJamMaTa Qact OT Ta3n npoceDpya Beprata ue Ce DBNXn. HocTe 3aunTHnte cn cpeCTBa n Cb6IIOdaBaTe BCNUKm MepKn 3a 6e3OnacHOCT Beprata He Tp8Ba Da ce DBrXn Ha npa3EH XoJ.
O3haueHn 3a perynpaHe Ha o6opnte Ha npa3eH xo
KapbpaTopbTe BnMaTeJIHO HAcTpoEH 3aBOda PerynpOBKn MoKe da 6bDaT Heo6xoJIMN, aKO
3a6eJXTe Bb3HnKBaHeTo Ha HrKoe OT CNeDHnTe yCIOBn
Bepurata ce DnKn Ha npa3eH XoJ. BnKTe npoceDpya PEGYINPAHE HA OBOPOTN HA IPA3EH XOJ-T.
TpnoHbT Hma Da ce DnKn Ha npa3eH XoJ. BuxTe npoepypa PEGYUNPAHE HA OOBOPOTN HA IPA3EH XOJ-T.
PerynnpaHe Ha o6oPoTnte Ha npa3eH xoJ T
OCTaBete DnBraTeTna pa6oTn Ha npa3eH xoJ. Ako BepnraTa ce DnKn, o6opOTnte Ha npa3eH xoJ ca TBbpJe BnCKn. Ako DnBraTeTnI3rAcBa, o6opOTnte Ha npa3eH xoJ ca TBbpJe HnCKn.
PerynpaTe o6oPOnTe Taka, Ye DnRatEnrTa da pa60tn 6e3 Da mma DnXKeHne Ha Bepnrata (o6oPOnTe Ha npa3eh XoD ca TBbpDe BnCOKN) INI IN3raCBAHe (o6oPOnTe Ha npa3eh XoD ca TBbpDe HnCKN).
BnHTbT 3a 06OpOTHe Ha npa3eH xoJ ce HAMnpa HA MCTOTO Ha 6aIIOHa Ha NOkaYBaUata NOMna (O6e3Bb3dyuWabaHe) n e O3HaueH c "T".
3aBbptTe BnHTa 3a o6OpOTn Ha npa3eH xoT (T) no YacOBHnKOBaTa CTpeJIka, 3a Da yBeJIuHrTe O6OpOTnTe Ha DnIraTeJI.
3aBbptete BnHTa 3a o6opOTn Ha npa3eH xoT (T)
O6paTHo Ha yacOBHnKOBaTa CTePknKa, 3a Da HAMnTe
O6OpOTnte Ha DnIraTeJI.
CNCTEMA3AOXIAKDAHE
3a noIbpxKaHe Ha KOkOTo e Bb3MOxHO NO-HnCKa pa6oTHa TemnepaTypa MaunHaTa e Cha6deHa Cbc cnCTema 3a OxJaXdaHe.
CnCTemata 3a oxnaXdane Ce cbctOn OT:
CmykaTeIeH Bb3dyXOBoHa CTapTepa
-Пл actина 3a OTBexKaHе Ha Bb3dIyx
- Pe6pa Ha maxOBnka
Oxnaqdaunpe6paHaunHdbpa
- Kanak Ha cuninHbpa (hacoueBa CTydeH Bb3dyx npe3 cuninHbpa)
IOnCTBaTe CnCTeMaTa 3a OxJaKaHaCeTka CneB BcKa yNtpeBa nNo-yeCTo, aKO ycNoBnTa ca No-TexKn. 3AmbpcHeTa OXNaDnteJIHa CnCTema npEn3BnKBA npePraBaHe Ha MaunHaT, KOEt BOJn Do NOBpeKDaHe Ha 6yTaITo n UINHdbpa.
3ATOUBAHE HA BEPUNATA 3A MOTOPEH TPNOH
Pe3eu
PexeataaactHaBepurata3aMOTOpEHTPnoH Ce Hapuape3eucnCeCbctOnOTpexe3b6(A)Maua6 HaNbboouna(B).
DbIbOuHnata Ha p3aHe Ha pe3uTe ce onpeJeIe OTo pa3NIkata BBB BnCOUHnata MeJy DBeTe, HAcTpoiKaTa 3a Maua6 Ha IbIbOuHa (C).

Korato 3aToBate daeH peKeu 3b6, Tp8Ba Da nMaTe npEbnu Yetnpu Baxn foAkTopa:
- bTbHn Ha 3aToyBaHe.
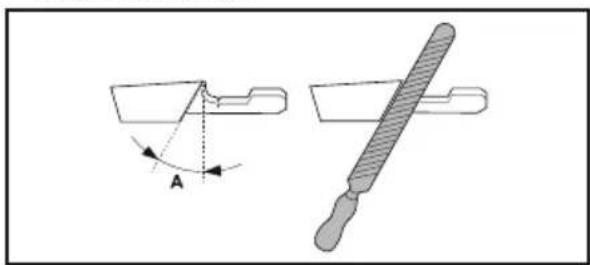
- bbrn ha p3aHe.
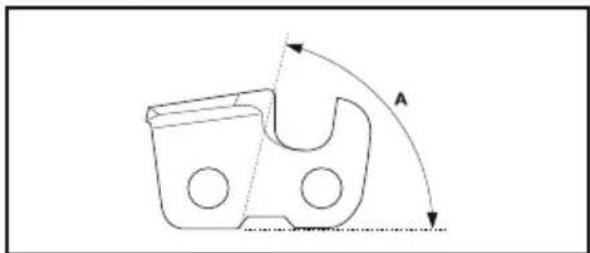
-Пложженин ha nnilata.
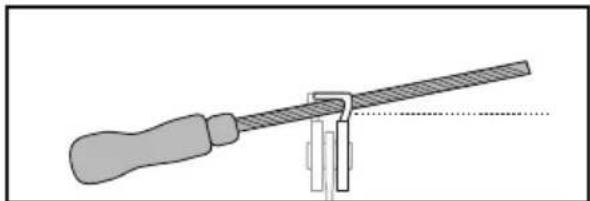
-ДиametbpHaKpbIJaTaNIIa.
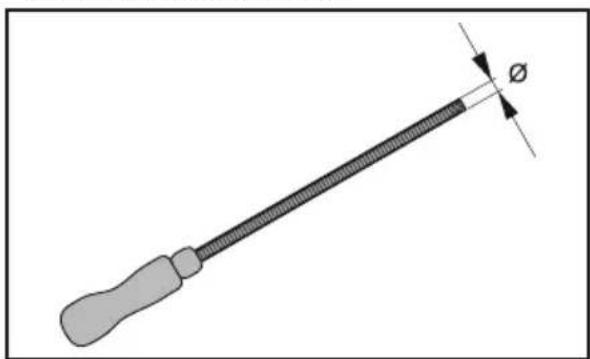
3aToUbaHe Ha pexeunTe 3b6n
3a 3atoBaHe Ha pexeunte 3b6n n3no3BaTe KpbTna
nna nwa5noh 3a Yanpa3eNe. BnKTe pa3dena C
TEXHNECKN XAPAKTEPNCNI HA HactoToTO
pkoBOOCTBO 3a HOpMaunr OTHOCHO npenopbHTeHNITE
pa3MeepHa Nnata Na 6bNoHa 3a Yapna3e 3a BePurata
3a MOTOpEn TpNOH, MoNTnpaHa Ha BaUnn npOdyKT.
- YBepete ce, che Bepnata 3a MOTOpEn TpnoH e npabuHnHO Haterhata. Ako Bepura e npobuchana, Ta e CtpaHnHO HectaBnHa, KOEtO 3aTpPydHbA IpabunHOTO 3aTOUBaHe.
- 1bpo, 3aOte BCnK 36n OT eHa tcaHa.
PiIepeXeUITE 36n OT BbTpEHaTcTaHa n
HamaIraBe HATNcKa Pn BPbuaHe Ha Nnata B
06paTHa Nocoka. - 3aBbptete npodykta n nnneTe 3b6nTe OT pyraTa cTpaHa.
4.ИЗПИЛЕТЕ BCИЧКИ 3ББ NO DO CBДАТА ДБЛЖИHA.KORATo IbIЖИHATA HA peXeUHTE 3ББ CE HAMAN IO 4 MM (5/32")Bepurata 3a MOTOPEN TpnoH e N3HOceHa IN TpЯБВа DA ce CMEHN.
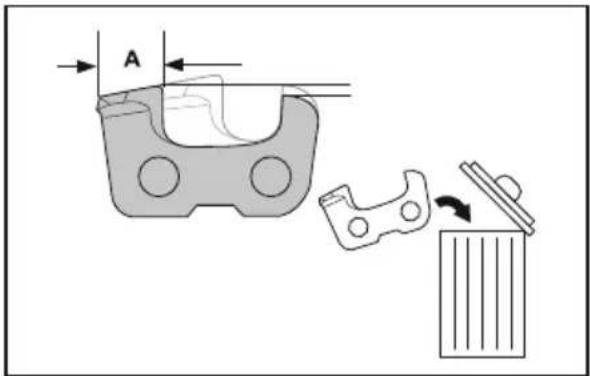
PerynnpaHe Ha HactpoiKaTa 3a Maa6Ha dbl6oHnata
3aTOHepepeeune 3b6n, npEn da perynnapate HAcToKata 3a Mauaab Ha DblboHna. Korato 3aOuBaTepeKeEunrA 3b6(A), HAcToPouKaT aMauaab Ha DblboOnHa (C) HamaIbRa. 3a Da NpDbPxTa ONImaHa eFeKTINBHOCT Ha p3aHe, Maua6bT Ha DblboOnHa (B) TprBa Da ne i3nniNo Do npenOpBuHaHa T HAcToPka 3a Mauaab Ha DblboOnHa. BnKte pa3dena cTEXHnHECKN XAPAKTEPNCTNKn Ha HactoToPo pkoBOcTB0, 3a Da OTKpnHe T AcToPouKa T a Toey Maua6Ha DblboOnHa 3a BaWata KOHKpeTha Bepira.
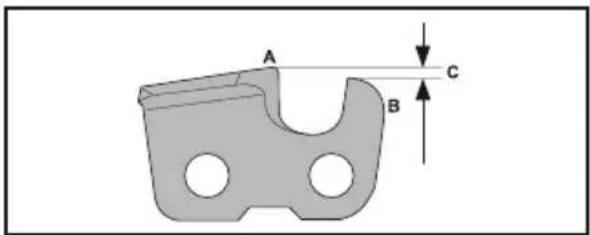
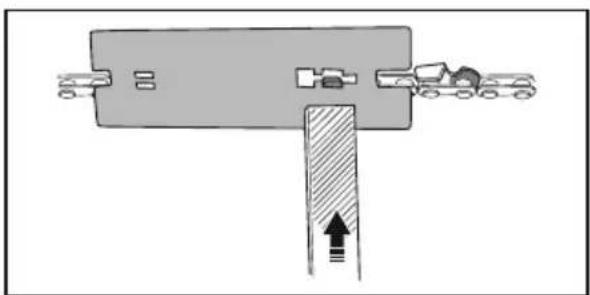
3A6EJIEXKKA: Ta3n npenopbKa npednojara, Ye DblnxHata Ha pexeunTe 3b6n He e npekaneHo HamaJeHa.
N3noJI3BaIte NIOCKa NIIa INHCTpyMeHT 3a N3MepBaHe HaNbIo6OuHa, 3a Da HAcTpOnTe MaUa6a Ha NbIo6OuHnHa.
- NocTabete nHCTpyMeHTa 3a n3MepBaHe Ha
nBbIbOuHHaTHa Hau Bepurata 3a MOTOpEH TpNoH.
Noppo6Ha nHΦOpMaUz HA uHa Ha n3NoJ3BaHe Ha
nHCTpyMeHTa 3a n3MepBaHe Ha nBbIbOuHHa MoKe Da
ce HAMepn BbPxy ONAKOBKaTa My.
2.ИЗнолзВаиTe ПLOСКаТА NINа,3aДaИЗПЛNTe BbpxaHaMaUa6aHaDbIb6OuHnA,CtbpuaIпрe3 INCHTpymeHTa 3a ИЗмepBaHe HaDbIb6OuHnA. HAcTpoiKaTaHaMaUa6aHaDbIb6OuHnAte npabuHnA,KORATo BeYe He yceuate CbIpOTNBneHne DOKATO IpeKapBATE NINaTa BbpyxИNCHTpymeHTa 3a IN3MepBaHe HaDbIb6OuHnA.
HANPABLBAUaIuHA
YcnoBn, npK KOITOn HmHa HyXda OT o6cyXbaHe Ha HapabBaata WHa:
TpnoHbTppeKeHa eHa cTaPaHa nIIOB bRbI.
- TpnoHbT Tp86Ba Da ce HaTnCKa B Cpe3a.
HeoTaTbUHO NOBaHe Ha MacNo KbM uHaTa/ Bepurata.
PpOBepaBaiTe CbCToHHeTo Ha HnPaBnBaAaTa aHa BcEKN bT, KOrato Ce 3aTOyBa Beprata. N3HOceHa HApBaBnBaAa aWHa ae Nobpei Beprata n Pra3aHTo 1e 6bJe TpydNo.
CneBcKa ynoTpeBaHaTnckaIte npeBKnIOuBaTeJIg ON/STOP (BKN./CINPAHE),doKATO DBnIraTeJIrCTpe, CneTOBa NOUcTBaIte DbPBEHITe CTbPROTNHO HAnpabJIBaAaTa 7nHa N OTBopa Ha BeHeua.
3a 06cnykbaHe Ha HanpaBnaBa7a 7nHa:
- Pa3xna6ete n CbaIeTe rauKnte Ha uHnHaTa n Kanaka Ha cBeHNHTeJIa. CbaIeTe uHnHaTa n BepnIra t O TpnoHa.
2.ПОИСТЕ TE OTBOPITE 3a MacNo (A) n KaHaja Ha mHaHa (B).
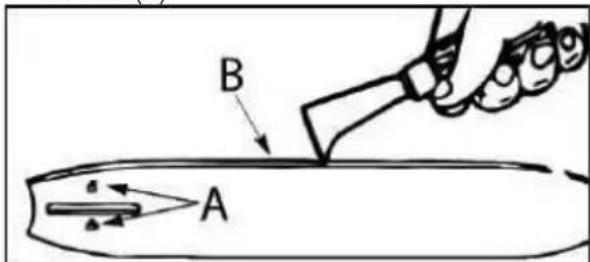
- NOBRABaHTo Ha Yenau No pencaTa Ha HAnpaBnaBaUaTa 1nHa e HopMaJIeN npOec Ha n3HOcBaHe Ha pencaTa.YenaUte Ce npEmaxBat C nIOCKa NIIa.
- Korato rophata NOBbpxHOCT Ha peIcata e HepaBaHbB3CTaHOBeTe npabOBbJIHnTe p6OBe n CTpaHn CIIIOCKa IIJa.

3aemehe HnpaBnaBaata WHa, KOraTo KaHaJIbT ce n3Hocn, HnpaBnaBaata WHa e nperehata
HanykaHa, HN KOrato Bb3HNKe IpeKomepHo HarpBaHe Nn NOBBAHe Ha Yenau No penCITE. AKe e Heo6xOma CmHa, n3No13BaTe eHNCTBeHo HapPabBaMa 7uHa, KOrTo E yOnMeHata B CNcBka Ha pe3epBnTe Yactn 3a BaWn TpnoH nn Ha JneHKata, NOCTabeHa Bbpx MOTOpHn TpNOH.
OTCTPAHRAHE HA HEN3ПРABHOCTN
TABINUCA 3A OTCTPAHRAHE HA HEN3PABHOCTN
I PEPYIPPEKDEHNE: BnHar n cnnpaTe ypeDa n ppeKbCbaTe Bp3KaTa KbM 3anaNTeHaTa CBeu, npedn da n3PbJnHBAte npenopbUbaHnte no-doJy KopeKcN, c N3KnIOyeHne Ha KopeKcNtE, KOnto n3NCKBaT ypeBt Da pa60Tu.
| HEN3NPABHOC T P N U H A K OPEKUCNIA | |
| Двигателов сесторы илRobotсую саMuо Няколков sekyнд спeд стартурах. | 1. Моторь т e задан 2. Розервоггт за горив о пазен 3. С蜱цта на се заалва 4. ГорьOTO He doctura do karbypatopa. |
| Двигателов сеRobотиRobavilno на пазенхoД | 1. ОборOTITE на пазенхoД ИзickВAT рergлuarpe. 2. KarbypatOBТ Има hyжda ot рergluarpe. |
| Моторь се усорь, Няма мочношлл спURA, при наTOBAPBAHe | 1. ЗамрсEN BьЗдун ФИЛТь. 2. ЗамрсEN с蜱ц. 3. Вернхнatable спразчka e заide�ТВА. 4. KarbypatOBТ Има hyжda ot рergluarpe. |
| Двигателов ИлпунSCa пекомернО КOLIMCHESTBO DMМ. | 1. В SFENIHа ИмТьрde MHORO macNo. |
| Вериага се Двики на пазенхoД. | 1.标明пгЕ на пазенхoД ИзickВAT рergлuarpe. 2. С蜱IndITelT Има hyжda ot рergont. |
CbXPAHEHNE
CneB CBAynotpe6a n3nblHbAaTe CNEHNTe CTbnKn:
- Octabete I BnIaTeJIa I n3CTnHe I o6e3Onacete ypeJa npEiN cbXpaHeHne IIN TpaHCnOpTnpaHe.
CbxpaHraBaTe BepnKnna TpnoH n ropnboto Ha DOCTaTbUHO npOBeTpnuBO MRCTO, KbJeTo napITE Ha rOpNBoto Da He MoRat Da DOCTnHaT Do NCKpn NNOTKPNTN PnAmbucn OT HArpeBaTeJI Na BOda, eNEKTPOMOTOp nnnpBKnIOuBaTeJI, neun n dp.
CbxpaHbBaTe BepnKHH TpnoH C MOHTnpAHN BCNU Knpa3nteJIN I RO NOCTabeTeka, Ye Da Hma OnaCHOCT OT CnyaHHO HapaHbAHe Nopadn HAHNETO Ha OCTPN PpeDMtN.
CbxpaHbainTeBepnKnTprnoHdaJeOTo6cera Ha deca.
CE3OHHO CbXPAHEHNE
IoirotBete ypeda 3a cbxpaHHe N KpaHa ce3OHa nn aKo HMa da ce n3noJ3Ba 30 nnn noBeue dHI.
AkoBepnKnHrT TpnoH Tp6Ba Da ce cbxpaHra 3a nepnoD OT BpeMe:
- Nounctete TpnoHa OCHOBn npedn cbxpaHene.
CbxpaaBaIeHaHCTOINCYXOMACTO - JIeKO HAMaxTe C MacNo BbHsHnTe MeTaHnIOBbpxHOCTn HAnpaBraBaUaTAtuSHA.
CmaxTe Bepurata n yyBnTe B de6eNa xaptnna nn Kbpna.
TOPUBHA CNTCTEMA
Cta6nH3aTOp Ha rOpNBTo e npneMnBa aNTepHaTnBa 3a MNHMn3npaHe Ha DOpyckat OTJaraHnHa KAYyK OT rOpNBTO NO BpeMe Ha cbxpaHene IobabeCTabnH3aTOp B 6eH3nHa B pe3epBoapa NnB KOHTeHepa 3a CbXpaHBAhe Ha
TOPUBOTO.
CneBaTe HNCTpyKUInTE 3a CMEcBAHe, O3HaueHn Bbpxy OnakOBkata Ha cTa6nIn3atOpa.CneI do6abABye Ha cTa6nIn3atOp nyche Te DniratJe Da pa60Tu NOHe 5 MNHyTu.
ДВИГATEЛ
I3BaTe 3anaNTenHata CBeu HnHaJeTte 1 YaHaJIbXnUka MOTOPHO MacNo 3a DByTAKTOB DBnraTeI npE3 OTbopa Ha 3anaNTenHata CBeu. DpbnHeTe6abHo BxKeTo 3a CTapTnpaHe 8 do 10 nbTu, 3a da pa3nPpeDenTe MacNoTO
3aMeHeTe CBeUta C HOBa OT npenOpbBaHnTIN TOPIHHe Duaana3OH
-Почиртete Вьздушни Фпнтbp.
- Поберете цени уред за рахлajбени винтоbe, raikn И солтоbe 3amehete BCnukn noBpehen, Chyynen ninn n3nocehen qactn
-ПиЗлочьанeHa CпeДВацяСеЗн,ИЗПОЛЗВa�ТЕ Camo HOBO TROPBO,C HeO6XODIMOTO CbOTHOшЕНe Haбенин И MacNo.
Dpyn
He cbxpanBaBte 6eH3nH OT eINH ce3OH 3a npy
3aMeHete Ty6ata 3a 6eH3nH, aKo 3anOyHe da pBxJcBA.
TEXHINUeCKN XAPAKTEPNUCTUKN
TEXHNUECKXAPAKTEPNCIKN
CS42 STE
(SASA242MC)
Bnataren
OsemHaunHdbpa,cm3
42
XoD,MM32
O6opOTnHa npa3eH xoD, 06/MmN 2800-3200
MoUHOCT, KW 1,5/9000
3anaIteHa cntema
3anaJIteJHa cBeeH Husqvarna HQT-1
Pa3CTOHHmexdy eJeKtpoDHTe,MM0,5
CnCTema Ha 3axpaHbHe/cMa3BaHe
BmecnmoCT Ha pe3epBoapa 3a ropuBO,cm
300
Bmecnmoct Ha macneHaTa nomna npn 9000 o6./MnH., Mn/MnH.4-8
Bmecnmoct Ha pe3epboapa 3a macNo, cm
200
TIN Ha MacneHaT a NOMa ABTomaTuHa
Terno
BepnKeH TpnoH 6e3 uHa n Bepra, npa3Hn pe3epBoapn 4,9 Kt (10,8 Ib)
UMyMOBn emncn (BnxTe 3a6eJekka 1)
HnBO Ha 3BykoBata MoUHocT, m3MepeHa dB(A) 109
HnBO Ha 3BykoBaTa MOUHOCT, rapaHTnpaHa LwA dB(A)-Ebpona 115
HnBaHa 3Byka (BnKTe 3a6eJexKa 2)
EKBNAJEHTHn HbHa Ha 3ByKOBOTo HaIraHe Ha HNBOTo Ha yxOTO 98,7 Ha onepaTopa, dB(A)
EKBNAeHTH HnBa Ha Bn6paqna, a hveq (Bx. 3a6.3)
PpeHa dpbXka, m/s2 5,22
3aHa npbXka, m/s2 6,24
Bepura/naCT
CTaHapHaIbJxHaHa uHaTa 14 in (35 cm), 16 in (40 cm) 18 in (45 cm)
PpenopbUbaHn DblxHHHa nucta 14 in (35 cm), 16 in (40 cm) 18 in (45 cm)
Pone3Ha DbIgHnHa Ha p3aHe
13,4 in (34 cm), 15,4 in (39 cm) 17,4 in (44 cm)
CTbnka
3/8 in (9,52 MM)
Ie6eHnHa hkyinchntepaBKn 1,3 MM (0,050 nHua)
Tn Ha 3aDbNkBaunBeneu/6poi Ha 3b6nte
UHHnHpnuH/7
CKOPoCT Ha Bepurata npu MaKcImaJIHa MoUHOCT, M/CEK
20
3a6eJka 1: UyMOBn EMCIN B OKOHaTa CpeJa, N3MepeHn KaTO 3ByKOBA MOUHOCT (Lw) B CbOTBETCTBne C dIupeKTHBa Ha EO 2000/14/EO.
3a6eJekka 2: EKBBaJIeHTHO TnBO Ha 3ByKOBTO HaIraHe CnopeI ISO 22868 ce onpeJeI Kato BpeMeCbO6pa3eHa cyMa Ha eHeprna 3a pa3NUnHn HnBa Ha 3ByKOBTo HaIraHe npu pa3NUnHy cIIOBnHa pa6ota. TnnuHata CTATNCtUecka DnCnepcna 3a EKBBaJIeHTHO HnBO Ha 3ByKOBTO HaJIraHe e CTAHApTHO OTKIOHeHne ot 1 dB (A).
3a6eJekka 3: EKBuBaJIeHTHO To HbO Ha Bn6paCNIte CnopeI cTaHdApTa ISO 22867 ce onpeJenKaTo BpEmecBo6pa3eHa cyMa Ha eHeprna 3a HbBata Ha Bn6paCNIte npi pa3NHy ycNoBna Ha pa6oTa. OTuTeHInTe DaHHN 3a ekBvBaJIeHTHO To HbO Ha Bn6paCNIte IMat TINNuHa cTaTnCTUYeCKa DnCnepcNra (cTaHdApTHO OKJIOHeHne) ot 1m / s^2
KOMBINAUNOT HANPABJRAUIN UINH IN BEPNI 3A MOTOPEH TPNOH
3a moJeHnTe, pa3rNeDahn B TOBa pbKOBOdCTBO, e ODo6peHo CneHTo pexKeIoo o6OpyDbaHe.
SYNTHPHEHTOY AAYEQONPIONOY
PPOPTAMMA SYNTHPHESH
Piv aTó kαθε xphon
EAEyTe Tn OaOu Tou eivatoc kauoou
EaeyTe Tn AInavon Tns Aapas
EAEyETo TevTwa Tns aauaia
EAEyTe to aKoviua Tns aauoiaos
Eaeyyia aepuEv aaptnmuata
EAEyTeYiTaTneToumuTpeivaexovxahapwoei
ELeyTe yia diataeic kAeiipatoC nou mTOpEi va exouv yaapwoe
Eaeyyia eapntmuata Toumuopei va exouxapwoei
Kαθε 5 ωρε∑
We, Husqvarna AB, SE 561 82 Huskvarna, SWEDEN, declare under our sole responsibility that the represented product:
| Description Gasoline Chainsaw | |
| Brand McCulloch | |
| Platform / Type / Model Platform SASA242MC, representing model CS42STE | |
| Batch Serial number dating | 2018 and onwards |
complies fully with the following EU directives and regulations:
| Directive/Regulation Description | |
| 2006/42/EC “relating to machinery” | |
| 2014/30/EU “relating to electromagnetic compatibility” | |
| 2000/14/EC “relating to outdoor noise” |
Harmonized standards and/or technical specifications applied are as follows;
EN ISO 12100:2010, EN ISO 11681-1:2011, CISPR 12:2007, ISO 14982:2009
In accordance with Annex V, the declared sound values are:
Measured sound power level: 112 dB(A)
Guaranteed sound power level: 118 dB(A)
TÜV Rheinland LGA Products GmbH
Notified Body for Machinery (notified under 0197)
Tillystraße 2 - 90431 Nürnberg, Germany
TUV Rheinland has carried out EC type examination in accordance with the machinery directive's (2006/42/EC) article 12, point 3b. The certifi cate for EC type examination in accordance with annex IX, has the number: BM 50319937
This type examination certifi cate is applicable to all manufacturing locations and Countries of Origin, as stated on the product.
The supplied gasoline chainsaw conforms to the example that underwent EC type examination.
On behalf of Husqvarna AB, SE 561 82 Huskvarna, SWEDEN, 2018-06-08

John Thompson, Product and Marketing Director
Responsible for technical documentation
BG DDDDDDUNa 3D cbOTBdCTeNl-EC
HHe, Husqvarma AB, SE 561 82 Huskvarma, WBEUIN, dKnapnape Ha cBcOcbTeBa OTROBOPHOCT, Ye
npectabehn npdykt
Oncahe BenHOBepKen Tprn
Maoka McCulloch
Nnatfopma/bna/moen Nnatfopma SASA242MC, npedctabraa moen CS42STE
Daptyna,GepeH Hoomp, natypaH ot 2018 r. cnen Toga
TROBAP HAHbNHO HA CENHHTA DNEKTMN Y PERNAHTH Ha EC:
Hapertnepnernayeh Duaaue
2006/42/EQ,“OTHOCHNAUMHNTA”
20143856
2014/30/EC "OTROCHO ENEKTPCMAHHTATA CBBMCTMOUT"
2000/14/EO "OTHOCHU WIMMOBHTC CMHCHN B OKONHATA CPODA
IipunoxKeHHTe xapMoHN3npaHcTahnapn Nnn TaHnueckn CneuPukau ca cneHnTe
EN ISO 12100:2010, EN ISO 11681-1:2011, CISPR 12:2007, ISO 14982:2009
E CbCTBETCTBE C DMDNOXEHME V DEKNADPAHHTE CTOHHOCTH HA 3BYK CA
14AeepHJHHP0H32PukOaMouHoo-112dB(A
VHNEpePnHOHa3yRbAaHaeOHCT.12cB(A)
TJ (Pheinland LCA Products GmbH
Tov Riehman LGA Producn GmbH 2197
10
TillystraBe 2-90431 Numborg, (opMaHnA
TUV Rheinland e nabbwna annrtbahe ha EO TnA B cBtBcTbHe C dneKTHBa OTHoCHO MaunHHOTO
606pydahe (2006/42/EO) 12, ToKa 3b. CepnФkaTbT 3a eBponeckn mntBaHna Ha MoDennte
CBOTRETCBUECAHEKIXaC HOMB:BM50319937
TOU COTATUKKAT 3A HSCNE1BBA HA TUNA B DNOXKAM 3B RCHUK MECTONDOOKHKS HN DOOK3BOCTROU
HIOCTABAHIST EHHHOB BAPWKK TOOH MOTEPKTRBA HA EKAEMENNG, KOHO a HIN PONKOYKH HA MSHTRAHA
100000000000000000000000000000000000000000000000
H
OT HMeTo Ha Husqvarna AB, SE 561 82 Huskvarna, WBEUNA, 2018-06-08 r.
m = 311
KOH TomncbH, npOuykTOB mAPKOTMH DNOCKTOp
OTROPOEH 3a TEXUSHECKATA JOYMEHTAUM
m - 1 0 ;
BA. EU - Deklaracilla uusklaadenosti
Mi. Husovarna AB, SE 561 82 Huskarna, SVEDSKA, iziavlijemo pod punam odnovomoscu da predstavl
Jeni prot208d:
Opis Benzinska motorna pila
Brand McCulloch
Plattorma /tin / model Platforma SASA242MC koia predstayla modele CS42STE
Serjia Seriski broj s datumom od 2018 i nadalje
p oipunsti su u skiau sa silecim Eu direkivama propisima
Direktiva propis
2006/42/EC o ma sinama
2014/30/EU. "p eiklrmannor'noi kompalibilnssli"
2009/14/5G.
2008/14/EC-0 apsjnjcb
Harmonizirani standardi vill tenhike specikacje koje su primijenjene su rako siljedi
EN ISO 12100:2010, EN ISO 11681-1:2011, CISPR 12:2007, ISO 14982:2009
John Thompson, director in marketing i proivide
onlinemembership, direktorial 29 male kastingedogovorans za tabnikiu dokumentaciui
Gogovoran 2a tinn (Rd Gokamntnc)
CS Problasejio shode EU
My, spoleinost Husoyama AB, SE 561 82 Huskyama, SVEDSKO, zcela zodpovedne prohlasuleme, Ze
s#hok
m = 311
john Thompson, Produktov a marketingov feditel
Raeepneppeeppeeppeeppeeppeeppeeppeeppeeppeeppeeppeeppeeppeeppeeppeeppeeppeeppeeppeeppeeppeeppeeppeeppeeppeeppeeppeeppeeppeeppeeppeeppeeppeeppeeppeeppeeppeeppeeppeeppeeppeeppeeppeeppeeppeeppeeppeeppeeppeeppeep
Direkivestenmeiser Besnivele 2026/10/55 hongdow mehth
2006/42E
2014/10/11 1
2014/5/20 angelaendeclektonmagriekk kompa 2014/11/5 2014/11/5
2000/14/ER Veriferende oufendors stj
Harmoniserede standarder ogell erknske specikationer anvend teralgelnd
ENISO12100:2010,ENISO11681-1:2011,CISPR 12:2007,ISO 14982:2009
HaHnne Hnnn nnnn nn nnnn nnnn nnnn nnnn nnnn nnnn nnnn nnnn nnnn nnnn nnnn nnnn nnnn nnnn nnnn nnnn nnnn nnnn nnnn nnnn nnnn nnnn nnnn nnnn nnnn nnnn nnnn nnnn nnnn nnnn nnnn nnnn nnnn nnnn nn
EN ISO 12100:2016. EN ISO 11681-1:2011. CISPR 12:2007. ISO 14982:2009
m = 311
一
Tepydpn ANOENPIVbBvNc
Mioorg McCulloch
DAPINOS (TURC (MAGS)
102
Togio Apo 0C gioe 5n Eoo nyig 2018 kgl ETGYEVEOTG
TJ 0000000000000000000000000000000000000000000000
05
OmyieKavovio 1
2006/42/ER oxikc nXovc
201430(FF, 1y)
2014/307E
2000/14/ER 8xEIRK E TOV GOpUPO DE ECOTEPIKOUXWPOUC
To syn oog yng nng nol 1yikic noynonncnns
10000000000000000000
EN ISO 12100:2010, EN ISO 11681:1:2011, CISPR 12:2013
ZU Pwya e To npapptn a V, o Onau yec T E C nyou EIVa
Mrcui sup 8n xovkig wioe:112dA
112B
E
TUV Rheinland LGA Products GmbH
Kovopn (ovoc)ogofc vig Ta, xmyg atg (kovopnogcn g) yvgr. 197
Tillustra 3-80431 Nijmberg, Germany
1
2iny TOV Rheinland oevynenek eetoo NK 00 opw ddd opqeyd nep
Mnyevn 12 on sin 30. OoR for tou pntonmukv ng ny fxtan nouf FK
1
0000e to hapapn aIX, tna 0 tnc; BM 5031993
To htooninko qinnc ncc eioonc loyui via oec ic evkaotiaoeic npavwnk kai xudec iouaeuork.
1
y 8
TO JAPEXO EVO DAUONPIOVO PEYSIVCS OU QWVEI TO OEY A JIOV UROPANBKE OE ECETAOI TUNOU ER.
Eco ovo proc Inc Husgyarna AB, SE 561 52 Huskyarna, Sounoig. 2018-06-08
- 打心自何
5.4
John Thompson,DeltaOovthnpolovovkai dpKefyK
Yneubuvoc yia thy reynk TK npicwn
Garanteenlndneivomnsusea
TUV Rheinland LGA Products GmbH
Tosutahr nroan mnnnrsubl (tssuhd 0197
Tavivatod Asutod masinate pund (teavitatod 019) Tillutrofo 2-99431 Nizhgorb, Sakoeamoo
Hysd 2-5041 Nmblgy, Gansld
TUV Rheinland on telnud FJ tibikontroll vastavalt masinadirekti (2006/42/FU) artikl 12 puncttle 3h. FU
fuiobikontroll serifikaon, mis vastah lsale IX on tabistatud Emmnna RM 50139937
1
m = 311
(see Thmpanes, I note in the text)
john Thompson, bote- ja urundusch
Tahipilai documents atieni coat vost taio
Tennnse Goknnnnsisouhneest Vastula
m = 311
John Thomasson, Product and Marketing Director
John Thompson, President and Marketing Director John Knisesla documents a documenta lossta wastaya ndustia
2014/5/6 《 relative to a compatible electron magnetic, 2008/14/56. relative to both antiferrous
200/14EC & Relative ad bril extenr 8
EN IUG 13102:2018 ENIUG 14681:2011 CIIGRP 12:2007 ISO 11080:2002
John Thompson, director proizoda marketina
Oeepnpeepnneepnneepnneepnneepnneepnneepnneepnneepnneepnneepnneepnneepnneepnneepnneepnneepnneepnneepnneepnneepnneepnneepnneepnneepnneepnneepnneepnneepnneepnneepnneepnneepnneepnne
Bojent: 2-90431 Nmberg, Nmoterzio
Tilrs32-90431 Numberg,Nenmorszag
A T UV Kneinlnd EK- tipusvizsgalatot vegzett a gepekrol szo1ranyen (200642/ER) 12. Cikkenek, 30 ponta
m = 311
John Thompson, termak- es marketingigazgato
Janae: Anpokata Kedoo zhi as hongzao dzineiu
Apaikss Kec Tarns,McGullant
B
Platfma/ tips model Platfma SASA242MC, atelotne modej CS42ST
- Artista Senjas Hnors 10 2016. gader
piirba aibist sadam ES direktivam un Hoteikurienr
Dirkflva/rogula Apraksils
2006/42/ER\~par n
2014/30/EK par elektromagnetisko sayietciamibu
N2-20 Forming Valence Electrons and Electrons
Wij, Husqvala AB, SE 56182 Huskvala, ZwEDEN, Verkiaren Onder onze aneienveranhtwooreiikreio de he enenrnnnenergerde product.
Berhivirin Kellnsson on hoing
Bessnirig Ktdinzaac
Merk McCullon
Platform / Type / Model Platform SASA242MC, vertagenwoordigd model CS42STE
207, 142, 23, 24, 25, 26, 27, 28, 29, 30, 31, 32, 33, 34, 35, 36, 37, 38, 39, 40, 41, 42, 43, 44, 45, 46, 47, 48, 49, 50, 51, 52, 53, 54, 55, 56, 57, 58, 59, 60, 61, 62, 63, 64, 65, 66, 67, 68, 69, 70, 71, 72, 73, 74, 75, 76, 77, 78, 79,
Hnnn nnnnne nnnnne nnnnne nnnnne nnnnne nnnnne nnnnne nnnnne nnnnne nnnnne nnnnne nnnnne nnnnne nnnnne nnnnne nnnnne nnnnne nnnnne nnnnne nnnnne nnnnne nnnnne nnnnne nnnnne nnnnne nnnnnee nannnee
John Thompson, Product and Marketing Director John.Thompson@thompson.com
Desiyao Mottessna a gasnla
Marea McCullen Bala formula Tino Models, Bala formula SASA342MC
Tatalormaipnmoe Tatalorma 8A8242moe,que reprecaea os mocios 642512
Lote Numero de series referente a 2018 e posterores
Jute Thermo, Pricewater Products Marketing
Directives/Reclamertors:
Directivereglemente D 2006/43/15, attempt to utilise
2000421CE ,alereita uliajelior
2014/30/UE, aferenla compalilitaie electroma 2014/30/UE, aferenla compalilitaie electroma
2000/14/CE,privid 2garnolul extenor
Standardele armonizale si'sau specifi calile lehnice aplicale sunt urmatoarele:
EN ISO 12100:2010, ENISO 11681-1:2011, CISPR 12:2007, ISO 14982:2009
Organismal modn out prnive aporotie (in
H
Tov Rhenland a elecua tese de 12, in conrrnate ca ariculr 12, puncor 3d, dln direcva co prive
In homele companier Husqvma AB,SE 56182 Hsikvarma, SuEDIA, 2018-06-08
二、备查文件
John Thompson, Director de produse sI marketing
2006/4/2EC "O. MCAHWECKOM OFDPOB HUM"
2014/2015 6
2014/30/E0 66 3neKtpomHnTHOn CDBMectHMCTN
2000/14/EC "66 3yHm yMa ot oOpOBAHHa, paMcHHO BHC nMcCHN
CpHMeHAcTcR cHepyucuue cornacobauHce cTaHapTc Hnn TchHneckme Cne Hopkaaiin
EN ISO 12100:2010, EN ISO 11681-1:2011, CISPR 12:2007, ISO 14982:2009
B COOTBeTCTBnC C pInnoKHeHem V 3HaHeHn ypoBn yMa CoINaCHO deKnapaun COCTABNACrT;
VampeHHxpoeHbMOUHOCTNpyka:112no(A)
FADAHIKDRAHHEXOHCHMOUHOEIN
TUV Rheinland LGA Products GmbH
John Thompson, produces a marketing campaign.
Zodnoyedny za technicku dokumentaui
SL Iziaya EU o skladnosti
Pri Hsuvarna AB, SE 561 82 Huskvara, SVEDSKA, na lastno odgovnost Izjavlamo, da je predstavleni izdekler.
Opis, Bencinska molma zaga
Zanuka McCallorh
Plalforma/ysla model Plalforma SASA242MC, palanpcin model CS42STE
Eepi Eepiee 2018 dln
Sena Schjekovik 2016 dale
35 popu hia skn 2 naeunjim dktivam in aedamr
Drekti/AurecbaOpis 2006/4/5/2010
2006/4/21 ES 6 strj
TUV Rheinland LGA Products
Nadlažno telo za masinerjiu (ragistarski broj Q197)
Tillystra2e 2-90431 Nirmem, Nemacka
TUV Rheinland je Iyrfle leiptvapie E7 tina u skladu sa direktvom 3a maifinerdu (2006/42/EC).Cn-12
Tajka 3h. Sertik kat za sipitvane E fina je u sidau sa Aneksoxm IX Uma brol BM 5031993
Que aot hao n rnae eae nee ae ene nee nee nee nee nee nee nee nee nee nee nee nee nee nee nee nee nee nee nee nee nee nee nee nee nee nee nee nee nee nee nee nee nee nee nee nee nee nee nee nee nee nee nee nee nee nee nee nee nee nee
Ova serui kat za pregled se pirmenjuhe na sve proizvodne lokacije 1 zemilje porekla, kao st je havedeno na proizvodu
102203
Isporicena de Rictovira 57
Uima kompanija Husovama AB, SE 561.82 Huskyama, SVEDSKA, 2018-06-08
John Thompson, Product and Marketing director
PBCBb3ByKOBOI NOTyXHOCTI 3nDHO 3 BmIPOBAHHAAH: 112 db(A)
Tangtongyua piroh 3xoxooyonxoccti:118n5(A)
TIYXBheinlandLGADProductsGmbH
F 0107
Tillrtae 200431 Nmber Httanu
Tilysdase 2-96431 Numberg,Himeqima
DOMIMH 10V RHEHNTN BAKOHNA HIKORY HEPBIPKy EC SHPPO 3IYHKUM SO CHTT 12 HVPKIN
PAnE EC "Bpo MaunHn Ta MexaHIm" (2006/42/EC). Homep ceptvphiKata EC 3nInho 3 noatkom IX: BM
50319937
Fert crtuivirn no auouau naneepin 1n pix micui buoofuurte to pauiu uoo
12121212121212121212121212121212121212121212121212121212121212121212121212121212121212121212121212121
H 100000000000000000000000000000000000000000000000
10
DxH TOMPOH, HOPHTED 3 EHTPHB, HAPCHMUTRIN IN APKRTMHN
n
WARNING: Tampering with the engine voids the EU type-approval of this product.
EU V
PDEyPExEHEHnE: HameCATA B DmraTeTn npaBn HeBaNIO EC Oo6peHnToHa TnHa To3n IpOdyKT.
EU V
UPOZORENJE: Neovlaostenim otvaranjem proizvoda ponistava se EU odobrenje tipa ovog proizvoda.
EUV
VYSTRAHA: Manipulace s motorem vede k znepltneni typoveho schvaleni EU tohoto vyrobku.