CS 400T - Saw MCCULLOCH - Free user manual and instructions
Find the device manual for free CS 400T MCCULLOCH in PDF.
User questions about CS 400T MCCULLOCH
0 question about this device. Answer the ones you know or ask your own.
Ask a new question about this device
Download the instructions for your Saw in PDF format for free! Find your manual CS 400T - MCCULLOCH and take your electronic device back in hand. On this page are published all the documents necessary for the use of your device. CS 400T by MCCULLOCH.
USER MANUAL CS 400T MCCULLOCH
natural_image
Symbolic icon of an open book enclosed in a circle (no text or symbols present)CS 420TCS 360T CS 4
Please read the operator's manual carefully and make sure you understand the instructions before using the machine.
ThankyouforchoosingaMcCullochproduct.Youaretherebypartofastorythatstartedlong ago,when the McCulloch Corporation started its manufacturing of engines during World War II. In 1949, when McCulloch introduced its first light one-man chain saw, woodworking would never be thesame again.
The line of innovative chain saws would continue over the decades, and business was expanded, first by airplane and kart engines in the 1950s, then by mini chainsaws in the 1960s. Later, in the 1970sand80s,trimmersand blower/vacswereaddedtothe range.
Today, as a part of the Husqvarna group, McCulloch continues the tradition of powerful engines, technical innovations, and strong designs that have been our hallmarks for more than half a century. Lowering fuel consumption, emissions and noise levels are of top priority to us, as is improving safety and user-friendliness.
We certainly hope that you will be satisfied with your McCulloch product, as it is designed to be your companion for a long time. By following this operators manual's advice on usage, service, and maintenance, its lifespan can be extended. If you should need professional help with repair or service, please use the Service Locator at www.mcculloch.com.
McCullochhasapolicyofcontinuousproductdevelopmentandthereforereservestheright to modifythe designandappearanceofproductswithoutpriornotice.
This manual can also be downloaded at www.mcculloch.com.
IDENTIFICATION OF SYMBOLS

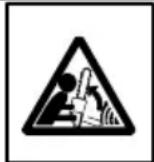
WARNING! This chain sawcanbedangerous!Careless or improper use can cause seriousorevenfatalinjury.

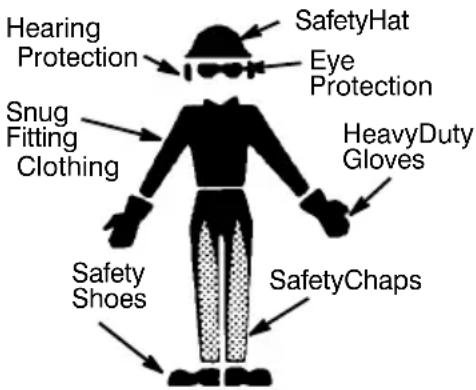
Alwayswearappropriateear protection, eyeprotection and headprotection.
natural_image
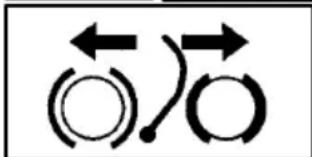
Two circular diagrams with bidirectional arrows, no text or symbols present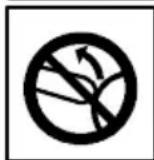
Read and understand the instruction manual before using the chainsaw.
Soundpowerlevel

Soundpressurelevel at7,5 meters

Thisproductisinaccordancewithapplicable ECdirectives.
WARNING! Contacting the guide bar tip with any object shouldbeavoided;tipcontactmaycausetheguidebarto move suddenly upward and backward, which may cause seriousinjury.
IDENTIFICATIONOFSYMBOLS
StartingReminder
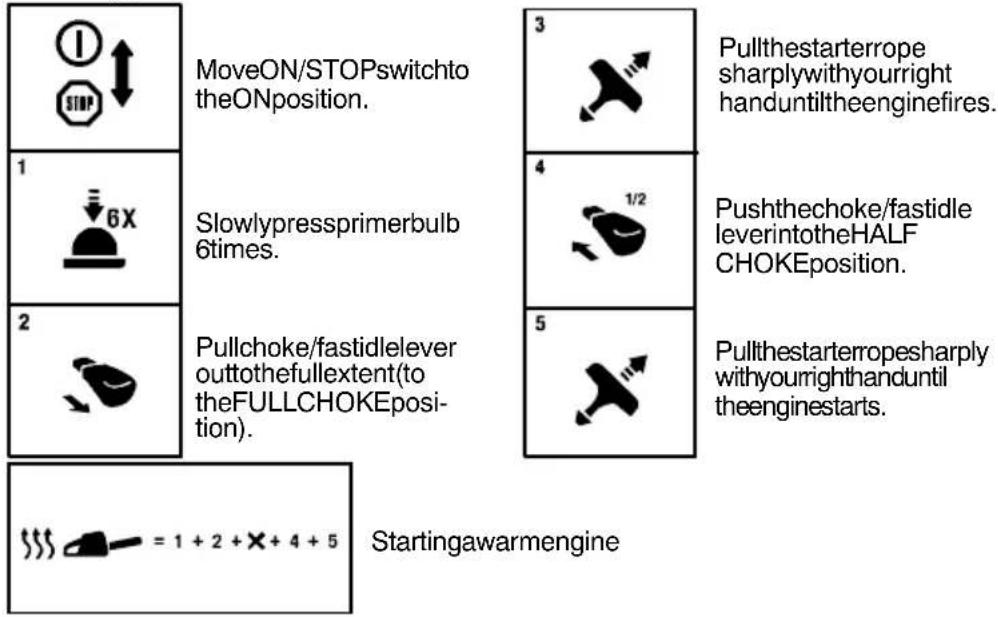
text_image
MoveON/STOPswitchto theONposition. Slowlypressprimerbulb 6times. Pullchoke/fastidlelever outtothefulextent(to theFULLCHOKEposition). Startingawarmengine Pullthestarterrope sharplywithyourright handuntiltheenginefires. Pushthechoke/fastidle leverintotheHALF CHOKEposition. Pullthestarterropesharply withyourrighthanduntil theenginestarts.IDENTIFICATION(WHATISWHAT?)
text_image
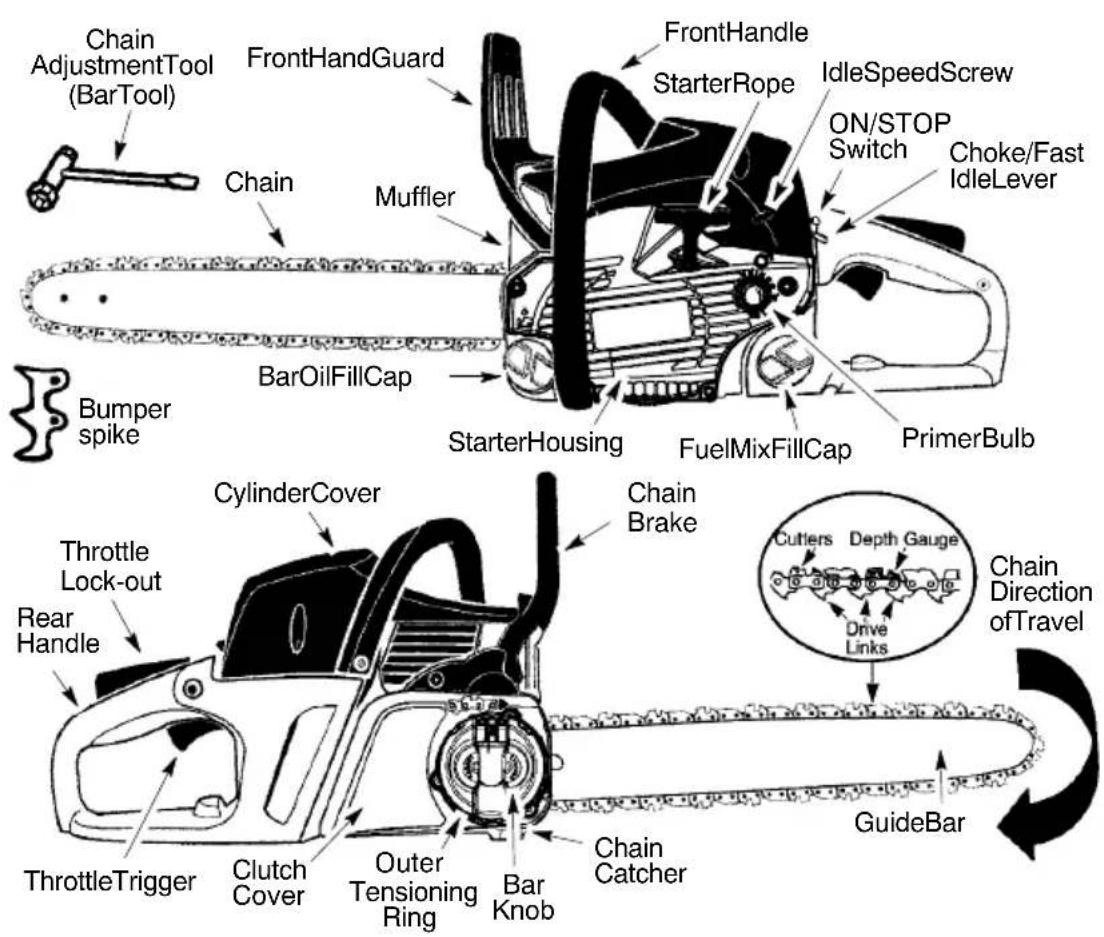
Chain AdjustmentTool (BarTool) FrontHandGuard FrontHandle StarterRope IdleSpeedScrew ON/STOP Switch Choke/Fast IdleLever Chain Muffler BarOilFillCap Bumper spike StarterHousing FuelMixFillCap PrimerBulb CylinderCover Chain Brake Throttle Lock-out Rear Handle Outer Tensioning Ring Bar Knob Chain Catcher GuideBar Cutlers Depth Gauge Drive Links Chain Direction of Travel
WARNING:Alwaysdisconnectspark
plugwireandplacewirewhereitcannotcontactsparkplugtopreventaccidentalstartingwhensettingup,transporting,adjustingormakingrepairsexceptcarburetoradjustments.Thischainsawforforestserviceisonlydesignedforcuttingwood.Becauseachainsawisahigh-speedwood-cuttingtool,specialsafe-typrecautionsmustbeobservedtoreducetheriskofaccidents.Carelessorimproperuseofthistoolcancauseseriousinjury.
PLANAHEAD
- Readthismanualcarefullyuntilyoucompletelyunderstandandcanfollowwallsafety rules, precautions,andoperatinginstructionsbeforeattemptingtousetheunit.
- Restricttheuseofyoursawtoadultusers whounderstandandcanfollowsafety rules, precautions,andoperatinginstructionsfoundinthismanual.
text_image
Hearing Protection Snug Fitting Clothing Safety Hat Eye Protection Heavy Duty Gloves Safety Shoes SafetyChaps- Wearprotective gear. Always use steel-toed safety footwear with non-slipsoles; snug-fitting clothing; heavy-duty, non-slip gloves; eyeprotections such as non-fogging, vented goggles or facescreen; an approved safety hard hat; and sound barriers (earplugs or mufflers) to protect your hearing. Secure hair aboveshoulder length.
- Alwaysuseapprovedhearingprotection. Regularusersshouldhavehearingchecked regularlyaschainsawnoisecandamage hearing.Long--termexposuretonoisecan resultinpermanenthearingimpairment.
- Keepallpartsofyourbodyawayfromthe chainwhentheengineisrunning.
- Keepchildren, bystanders, and animalsa minimum of 10 meters away from the work area. Donotallow other people or animals to be near the chainsaw when starting for operating the chainsaw.
- Donothandleoperateachainsawwhen youarefatigued,ill,orupset,orifyouhave takenalcohol,drugs,ormedication.You mustbeingoodphysicalconditionandmentallyalert.Chainsawworkisstrenuous.If youhaveanyconditionthatmightbeaggravatedbystrenuouswork,checkwithyour doctorbeforeoperatingachainsaw.
- Carefullyplanyoursawingoperationinadvance.Donotstartcuttinguntilyouhavea clearworkarea,securefooting,and,ifyou arefellingtrees,aplannedretreatpath.
OPERATE YOURSAWSAFELY

WARNING:Longterminhalationof
theengine'sexhaustfumes,chainoilmistand dustfromsawdustcanresultinseriouspersonalinjury.

WARNING: Thismachineproduces
anelectromagneticfieldduringoperation.This fieldmayundersomecircumstancesinterfere withactiveorpassivemedicalimplants.Toreducetheriskofseriousorfatalinjury,werecommendpersonswithmedicalimplantsto consulttheirphysicianandthemedicalimplant manufacturerbeforeoperatingthismachine.
- Donotoperateachainsawwithhonehand. Seriousinjurytotheoperator, helpers, bystandersoranycombinationofthesepersonsmayresultfromone-handedoperation. Achainsawisintendedfortwo-handeduse.
- Operatethechainsawonlyinawell-ventilatedoutdoorarea.
- Donotoperatesawfromaladderorinatree, unlessyouarespecificallytrainedtodoso.
- Makesurethechainwillnotmakecontact withanyobjectwhilestartingtheengine. Nevertrytostartthesawwhentheguidebar isinacut.
- Donotputpressureonthesawattheendof thecut. Applyingpressurecancauseyouto losecontrolofthechainsawwhenthecutis completedandmaycauseseriouspersonal injury.
- Stoptheenginebeforesettingthesawdown.
- Donotoperateachainsawthatisdamaged, improperlyadjusted,omotcompletelyand securelyassembled.Alwaysreplacebar, chain,handguard,orchainbrakeimmediatelyifitbecomesdamaged,brokenoris otherwiseremoved.
- With the engine stopped, hand carry the chains saw with them uuffer away from your body, and the guide bar and chaintotherear, preferably covered with ascabbard.
- Securethemachineduringtransport.
CHAINSAW
SAFETYEQUIPMENT
NOTE: In this section, the safety features of thechainsawandtheirfunctionareexplained. Forinspectionandmaintenance,seeinstructions in the CHECKING, MAINTAINING AND SERVICINGCHAINSAWSAFETYEQUIPMENTsection.Seeinstructionsunderthe WHATISWHAT?section,tofindwherethese partsarelocatedonyourchainsaw.Thelife spanofthemachinecanbereducedandthe riskofaccidentscanincreaseifmachinemaintenanceisnotcarriedoutcorrectlyandifserviceand/orrepairsarenotcarriedoutprofessionally.Ifyouneedfurtherinformation,please contactyournearestservicedealer.
- Chainbrake. Yourchainsawisequipped withachainbrakethatisdesignedtostop thechainfrommoving.

WARNING:Thechainbrakeisdeedtostopthechainimmediatelyifyouget kback.Thechainbrakereducestheriskof dents,butonlyyoucanpreventthem.DO TASSUMETHATTHECHAINBRAKE LPROTECTYOUINTHEEVENTOFA KBACK.
- Throttletriggerlock--out. Thethrottle lock--outisdesignedtopreventaccidental operationofthethrottletrigger.
- Chaincatcher. The chaincatcher is designed to catch the saw chain if it breaks.
- Vibrationdampingsystem. Yourchain sawisequippedwithavibrationdamping systemthatisdesignedtominimizevibrationandmakeoperationeasier.
SAFETYNOTICE:Exposureovibrations throughprolongeduseofgasolinepowered handtoolscouldcausebloodvesselomerve damageinthefingers,hands,andjointsofpeoplepronetocirculationdisordersorabnormal swellings.Prolongeduseincoldweatherhas beenlinkedtobloodvesseldamageinotherwisehealthypeople.lfsymptomsoccursuch asnumbness,pain,lossofstrength,changein skincolorortexture,orlossoffelinginthefingers,hands,orjoints,discontinuetheuseof this tool and seek medical attention. An anti-vibrationsystemdoesnotguaranteetheavoidance of these problems. Users who operate power tools on a continual and regular basis mustmonitorcloselytheirphysical condition andtheconditionofthistool.
- ON/STOPswitch.TheON/STOPswitch shouldbeusedtostoptheengine.
CHECKING, MAINTAINING AND SERVICING CHAIN SAW SAFETY EQUIPMENT

WARNING: Never use each chainsaw defective safety equipment. Safety equipment must be inspected and maintained. If your chainsaw does not pass-inction, takes the purpose to your nearest dealer for repair.
- Chainbrake.Brushoffanywooddust,resinanddirtfromthechainbrakeandclutchdrum.Dirtandwearcanimpairoperationofthebrake.For additional information,see OPERATINGYOURUNITsection.
- Throttletriggerlock--out. Check that the throttle trigger can not be operated until the throttlelock--out is pressed.
- Chain catcher. Check that the chain catcher is not damaged and is firmly attached to the body of the chainsaw.
- Vibration damping system. Regularly check the vibration damping units for cracks or deformation. Makes sure the vibration damping units are securely attached to the engine unit and handle unit.
- ON/STOP switch. Start the engine and makesuretheenginestopswhenyoumove theON/STOPswitchtotheSTOPposition.
MAINTAIN YOURSAW IN GOODWORKING ORDER
• Have all chains awservice performed by a qualified service dealer with the exception of the items listed in the maintenance section of this manual. Forexample, if impropertools are used to remove or hold the flywheel whenservicing the clutch, structural damage to the flywheel can occur and cause the flywheel to burst.
- Make certain the saw chain stops moving when the throttle trigger is released. For correction, refer to CARBURETORADJUSTMENTS.
- Nevermodify yoursawinanyway. Use onlyattachments suppliedorspecifically recommendedbythemanufacturer.
- Keep the handles dry, clean, and free of oil or fuel mixture.
- Keepfuelandoilcaps, screws, and fasteners securely tightened.
- Use only McCulloch accessories and replacement parts as recommended.
HANDLEFUEL WITHCAUTION
- Donotsmokewhilehandlingfuelorwhile operatingthesaw.
- Eliminate all sources of spark or flame in the areas where fuel is mixed or poured. There should be no smoking, open flames, or work that could cause sparks. Allow en-ginetocool before refueling.
- Mixandpourfuelinanoutdoorareaonbare ground;storefuel inacool,dry,wellventilatedplace;and usean approved,marked containerforallfuelpurposes. Wipeupall fuelspillsbeforestartingsaw.
- Moveatleast10feet(3meters)fromfuelingsitebeforestartingengine.
- Turntheengineoffandletsawcoolina non-combustiblearea, notondryleaves, straw, paper, etc. Slowlyremovefuelcap andrefuelunit.
- Store the unit and fuel in an area where fuel vapors cannot reach sparks or open flames from waterheaters, electric motors or switches, furnaces, etc.
KICKBACK

WARNING: Avoid kickback which
canresultinserious injury. Kickbackisthe backward, upward or sudden forward motion of the guide bar occurring when the saw chain near the upper tip of the guide bar contacts any objects such as a logarithor branch, or when the wood closes in and pinches the saw chain in the cut. Contacting a foreign object in the wood can also result in loss of chainsaw control.
- Rotational Kickback can occur when the movingchaincontactsanobjectatthe up-pertipoftheguidebar. This contactcan causethechaintodigintotheobject,
GENERAL SAFETY PRECAUTIONS
whichstopsthechainforaninstant. The resultisalightningfast,reversereaction whichkickstheguidebarupandbacktowardtheoperator.
- Pinch-Kickbackcanoccurwhentheth woodclosesinandpinchesthemoving sawchaininthecutalongthetopofthe guidebarandthesawchainissuddenly stopped. This sudden stopping of the chain results in areversal of the chain force used to cut wood and cause the sawtomove in the opposited direction of the chain rotation. Thesawis driven straight back toward the operator.
- Pull-Incanoccurwhenthemovingchain contactsaforeignobjectinthewoodinthe cutalongthebottomoftheguidebarandthe sawchainissuddenlystopped. This sudden stoppingpullsthesawforwardandaway fromtheoperatorandcouldeasilycausethe operatortolosecontrolofthesaw.
AvoidPinch--Kickback:
- Beextremely aware of situations or obstructions that can cause material to pinch the top of otherwise stop the chain.
- Donotcutmorethanonelogatatime.
- Donottwistthesawasthebariswith-drawnfromanundercutwhenbucking.
AvoidPull--In:
•Alwaysbegincuttingwiththeengineatfull speedandthesawhousingagainstwood.
- Usewedgesmadeofplasticorwood. Neverusemetaltoholdthecutopen.
natural_image
Diagram of a mechanical device with a rotating wheel and lever mechanism (no text or symbols)KickbackPath
text_image
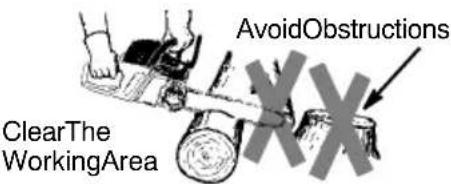
AvoidObstructions ClearThe WorkingAreaREDUCETHECHANCEOF KICKBACK
- Recognizethatkickbackcanhappen. Withabasicunderstandingofkickback, youcanreducetheelementofsurprise whichcontributestoaccidents.
- Neverletthemovingchaincontactanyobjectatthetipoftheguidebar.
- Keeptheworkingareafreefromobstructionssuchasothertrees,branches,rocks, fences,stumps,etc.Eliminateoravoidany obstructionthatyoursawchaincouldhit whileyouarecuttingthroughaparticularlog orbranch.
- Keepyoursawchainsharpandproperly tensioned. A looseordullchaincanincrease thechanceofkickbackoccurring. Follow manufacturer'schainsharpeningandmaintenanceinstructions. Checktensionatregu-
larintervalswiththeenginestopped,never withtheengine running.Makesurethebar clampnutsaresecurelytightenedaftertensioningthechain.
- Beginandcontinuecuttingatfullspeed.If thechainismovingataslowerspeed,there isgreaterchanceofkickbackoccurring.
•Cutonelogatatime. - Useextremec cautionwhenre-enteringa previouscut.
- Donotattemptcutsstartingwiththetipof thebar(plungecuts).
- Watchforshiftinglogsorotherforcethat couldcloseacutandpinchorfallintochain.
- UsetheReduced-KickbackGuideBarand Low-KickbackChainspecifiedforyoursaw.
MAINTAINCONTROL
Standtotheleftof thesaw
natural_image
Illustration of two hands operating a handheld device with a grid and antenna (no text or symbols visible)Neverreverse handpositions

text_image
Thumbo handlebElbowlocked
Thumbonundersideof handlebar
- Keepagood,firmgriponthesawwithboth handswhentheengineisrunninganddon't letgo.Afirmgripwillhelpyoureducekick-backandmaintaincontrolofthesaw.Keep thefingersofyourlefthandencirclingand yourlefthumbunderthefronthandlebar. Keepyourrighthandcompletelyaroundthe rearhandlewhetheryourarerighthandedor lefthanded.Keepyourleftarmstraightwith theelbowlocked.
- Positionyourlefthandonthefronthandle-barsoitisinastraightlinewithyourright handontherearhandlewhenmaking buckingcuts.Neverreverserightandlef handpositionsforanytypeofcutting.
- Standwithyourweightevenlybalancedon bothfeet.
- Standslightlytotheleftsideofthesawto keepyourbodyfrombeinginadirectline withthecuttingchain.
- Donotoverreach.Youcouldbedrawnor throwoffbalanceandlosecontrolofthe saw.
GENERAL SAFETY PRECAUTIONS
- Donotcutaboveshoulderheight.Itisdifficultomaintaincontrolofsawabove shoulderheight."
KICKBACKSAFETYFEATURES

WARNING: The following features
areincludedonyoursawtohelpreducethe hazardofkickback;however,suchfeatureswill nottotallyeliminatethisdangerousreaction.
Asachainsawuser, donotrelyonlyonsafety devices. You must follow wallsafety precautions, instructions, and maintenance in this manual to help avoid kickback and other forces which can result in serious injury.
- Reduced--KickbackGuideBar, designed withasmallradiustipwhichreducesthe sizeofthekickbackdangerzoneonthe bartip.AReduced--KickbackGuideBarhas beendemonstratedtosignificantlyreduce thenumberandseriousnessofkickbacks. ReducedKickback
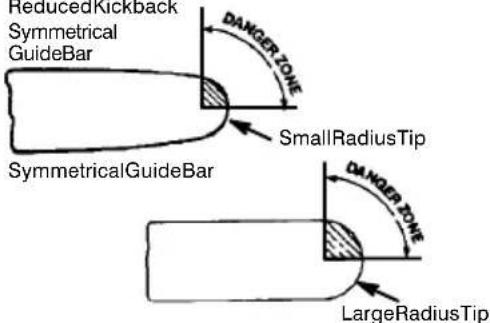
text_image
ReducedKickback Symmetrical GuideBar DANGERTONE SmallRadiusTip SymmetricalGuideBar DANGERTONE LargeRadiusTip- Low--Kickback Chain, designed with a contoured depth gauge and guardlink which deflect kickback force and allow wood to gradually ride into the cutter.
Low-KickbackChain
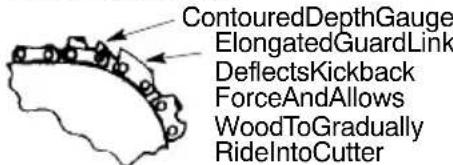
text_image
ContouredDepthGauge ElongatedGuardLink DeflectsKickback ForceAndAllows WoodToGradually RideIntoCutter- Handguard, designed to reduce the chance of your left hand contacting the chain if your hand slip so off the front handle bar.
- Positionoffrontandrearhandlebars, designedwithdistance betweenhandles and "in-line" witheachother. Thespread and "in-line" positionofthehandsprovidedby thisdesignworktogethertogivebalance andresistanceincontrollingthepivotof thesawbacktowardtheoperatorifkick-backoccurs.
WARNING:DONOTRELYUPON
ANY OF THE DEVICES BUILT INTO YOUR SAW. YOU SHOULD USE THE SAW PROPERLYANDCAREFULLYTOAVOID KICKBACK.Reduced--kickbackguidebars andlow--kickbacksawchainsreducethe chanceandmagnitudeofkickbackandare recommended. Yoursawhasalow kickback chainandbaras original equipment.Repairs onachainbrakeshouldbemadebyanauthorizedservicingdealer.Takeyourunitto theplaceofpurchaseifpurchasedfroma servicingdealer,ortothenearestauthorized masterservicedealer.
- Tip contact in some cases may cause a lightningfastreverseREACTION, kicking the guidebarupandbacktowardtheoperator.
- Pinchingthesawchainalongthetop of the guidebarmaypushtheguidebarrapidly backtowardtheoperator.
- Eitherofthesereactionsmaycauseyouto losecontrolofthesawwhichcouldresult inseriousinjury.Donotrelyexclusively upon the safety devices built into your saw.
ASSEMBLY
Protectivegloves(notprovided)shouldbe wornduringassembly.
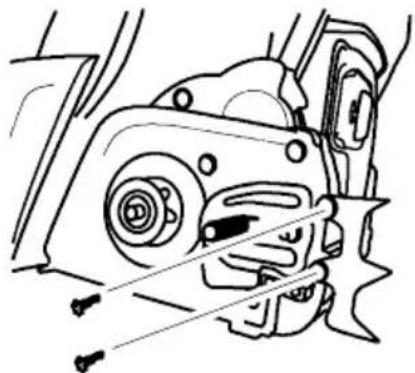
ATTACHINGTHEBUMPER SPIKE(ifnotalreadyattached)
Thebumperspikemaybeusedasapivot whenmakingacut.
- Loosen and remove bar knob completely by lifting lever and turning counterclockwise. Remove clutchcover.
- Attachthebumperspikewiththetwo screwsasillustrated.
natural_image
Technical line drawing of a mechanical component with no visible text or symbolsATTACHINGTHEBARAND CHAIN(ifnotalreadyattached)

WARNING:Recheckeachassemblystepifthesawisreceivedassembled.Alwaysweargloveswhenhandlingthechain. Thechainissharpandcancutyoueven whenitisnotmoving!
- MoveON/STOPswitchtotheSTOPposition.
- Loosenandremovebarknobcompletely byliftingleverandturningcounterclockwise.
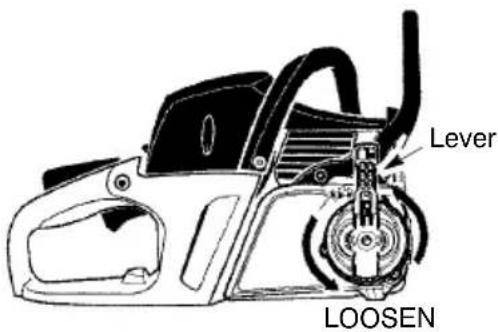
text_image
Lever LOOSEN- Remove clutch cover and plastic ship- pingspacer (if present).
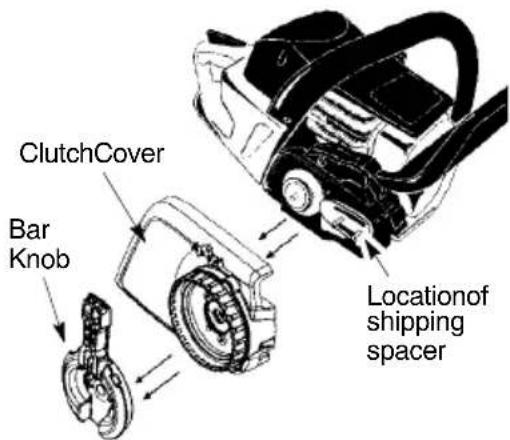
text_image
ClutchCover Bar Knob Locationof shipping spacer4.Slideguidebaronbarboltsuntilguide barstopsagainstclutchdrumsprocket.
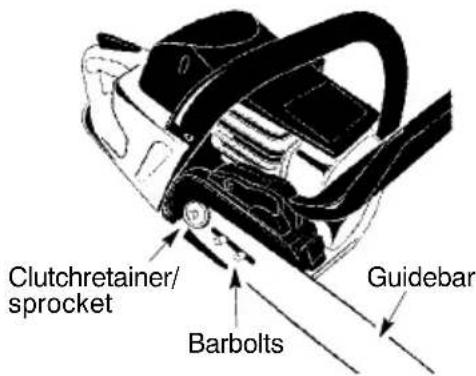
text_image
Clutchretainer/ sprocket Barbolts Guidebar- Carefullyremovethechainfromthepackage. Holdchainwiththedrivelinksas shown.
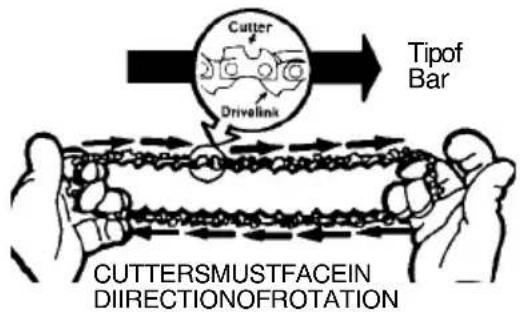
text_image
Cutter Drivelink Tipof Bar CUTTERSMUSTFACEIN DIIRECTIONOFROTATION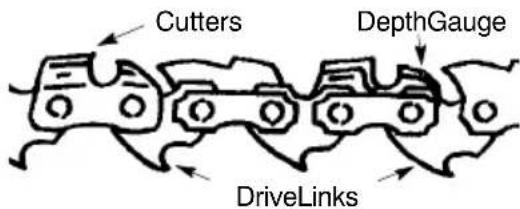
text_image
Cutters DepthGauge DriveLinks- Placechainoverandbehindclutchretainer, fittingthedrivelinksintheclutch drumsprocket.
- Fitbottomofdrivelinksbetween the teethinthesprocketinthenoseofthe guidebar.
8.Fitchaindrivelinksintobargroove. - Pullguidebarforwarduntilchainissnug inguidebargroove.Ensurealldrivelinks areinthebargroove.
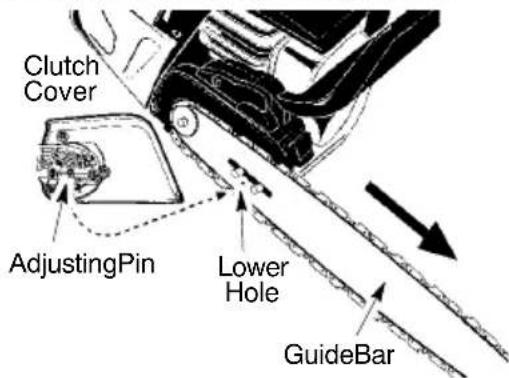
- Installclutchcovermakingsurethead-justingpinispositionedinthelowerhole intheguidebar. Thispinmovesthebar forward(tighteningthechain)andbackward(looseningthechain)astheouter tensioningringisturned.
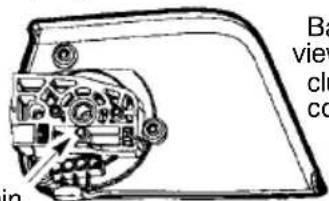
text_image
Ba view clu co inBack viewof clutch cover
Adjustingpin
CAUTION: It is very important when installing the clutch cover that the head adjusting pin aligns into the lower hole in the guide bar. Failure to install the clutch cover correctly may result in permanent damage to your chainsaw.
text_image
Clutch Cover AdjustingPin Lower Hole GuideBar11.Installbarknob.Oncethechainistensioned,youwillneedtotightenbarknob.
ASSEMBLY
CHAINTENSION(including unitswithchainalready installed)

WARNING: Wearprotective gloves whenhandlingchain.Thechainissharpand cancutyouevenwhenitisnotmoving.
NOTE: When adjusting chaintension, makesure the bark nobis fingertight only. Attempting to tension the chain when the bar knobistight can caused damage.
Checkingthetension:
Useascrewdrivertomovechainaroundguide bar. If thechaindoesnotrotate, itistootight. If thechainistooloose, itwillsagbelowthebar.
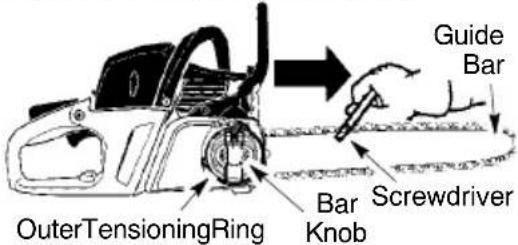
text_image
Guide Bar OuterTensioningRing Bar Knob ScrewdriverAdjustingthetension:
Chaintensionisveryimportant.Chains stretchduringuse.Thisisespeciallytrue duringthefirstfewtimesyouuseyoursaw. Alwayscheckchaintensioneachtimebeforeyoustartthechainsaw.
- Liftleveronbarknobandturncounterclockwise1turntoloosenclutchcover.
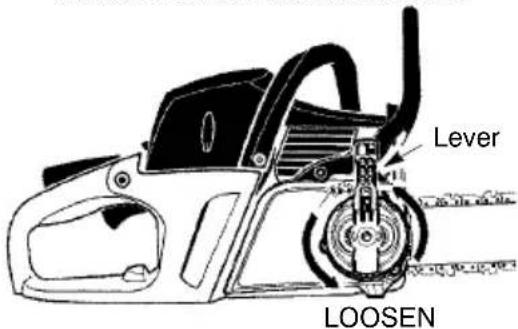
text_image
Lever LOOSEN- Turnoutertensioningring(clockwise) to tightenchainuntilchainsolidlycontacts bottomofguidebarrail.Lifttipofguide barwhileadjustingtension.
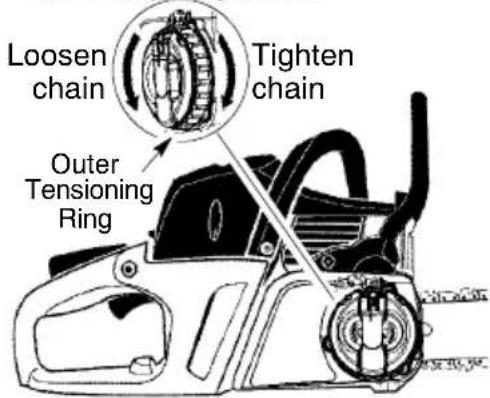
text_image
Loosen chain Tighten chain Outer Tensioning Ring- Usingascrewdriver,movechainaround guidebartoensurealllinksareinbar groove.
- While lifting tip of guide bar, use the lever to tighten bar knob securely (clockwise). Handtightenonly!
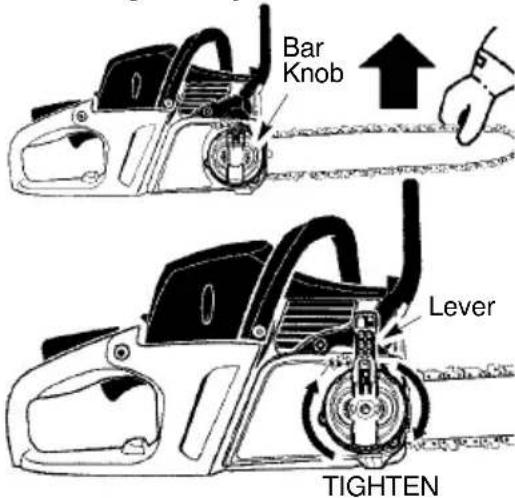
text_image
Bar Knob Lever TIGHTEN- Return leveron barknobto original position.

WARNING:Failuretoreturnleveron
barknobtooriginalpositioncouldresultin seriouspersonalinjuryordamagetoyour chainsaw.
- Useascrewdrivertomovechainaround guidebar.
- If chain does not rotate, it is too tight. Use the lever to loosen bar knob 1 turn (counterclockwise); then, loosen chain by turning the outer tensioning ring (counterclockwise). Retightenbarknob.
- If chainistooloose, it will say below the guide bar. DO NOT operate the saw if the chainisloose.
NOTE: The chain is tensioned correctly when theweightofthechaindoesnotcauseittosag belowtheguidebar(withthechainsawsitting inanuprightposition),butthe chainstill moves.

WARNING: If thesawisoperated withaloosechain,thechaincouldjumpoff theguidebarandresultinseriousinjury.

WARNING: Muffler is very hot during
andafteruse.Donottouchthemuffleroral-lowcombustiblematerialsuchasdrygrass orfueltodoso.
FUEL
Note! Themachineisequippedwithattwo-strokeengineandmustalwaysberunusingamixtureofpetrolandtwo-strokeoil.Itisimportanttoaccuratelymeasuretheamountofoiltobemixedtoensurethatthecorrectmixtureisobtained.Whenmixingsmallamountsoffuel,evensmallinaccuraciescandrasticallyaffecttheratioofthemixture.

WARNING:Alwaysensurethereis
adequateventilationwhenhandlingfuel.
PETROL
- Usegoodqualityunleadedorleadedpetrol.
- Thelowestrecommendedoctanegradeis 90(RON).
- If your unthe enginealower octanegrade than 90 so--called knocking can occur. This gives riseto a highenginetemperature and increased bearing load, which can result in serious engined damage.
- Whenworkingwithcontinuoushighrevs (e.g.limbing)ahigheroctaneisrecommended.
Running--in
Avoldrunningatatohighspeedforextendedperiodsduringthefirst10hours.
TWO-STROKEOIL
- ForbestresultsandperformanceuseUniversal,UniversalpoweredbyMcCulloch two--strokeengineoil,whichisspecially formulatedforouraircooledtwo--stroke engines.
- Neverusetwo-strokeoilintendedforwater-cooledengines, sometimesreferredtoas outboardoil(ratedTCW).
- Neveruseoilintendedforfour--strokeengines.
- Apooroilqualityand/ortoohighoil/fuelratiomayjeopardisefunctionanddecrease thelifetmeofcatalyticconverters.
MIXINGRATIO
1:50(2%)withUniversal,Universalpowered byMcCullochtwo-strokeoil.
1:33(3%)withoilsclassJASOFBorISOEGB formulatedforair-cooled,two-strokeengines.
| Petrol,litreTwo--StrokeOil,litre | ||
| 2%(1:50)3%(1:33) | ||
| 50,10 | 0,15 | |
| 10 | 0,20 | 0,30 |
| 15 | 0,30 | 0,45 |
| 20 | 0,40 | 0,60 |
MIXING
•Alwaysmixthepetrolandoilinaclean containerintendedforfuel.
- Always start by filling half the amount of the petroltobeused. Thenaddtheentire amountofoil. Mix(shake)thefuelmixture. Addtheremainingamountofpetrol.
- Mix (shake) the fuel mixture thoroughly beforefillingthemachine'sfueltank.
- Donotmixmorethanonemonth'ssupply offuelatatime.
- If themachine is not used for sometime the fuel tank should be emptied and cleaned.
CHAINOIL
- We recommend the use of special oil (chainoil) with good adhesion characteristics.
- Neverusewasteoil. This results in damagetotheoilpump, the bar and the chain.
- It is important to use oil of the right grade (suitable viscosity range) to suit the air temperature.
- In temperatures below 0°C (32°F) some oilsbecometooviscous. This can overload the oil pump and result in damage to the oil pump components.
- Contactyourservicedealerwhenchoosingchainoil.
FUELING

WARNING: Taking the following pre-
cautionswilllessentheriskoffire:donot smokeanddonotplaceanyhotobjectsin thevicinityoffuel;alwaysstoptheengine andletitcoolforafewminutesbeforerefueling;whenrefueling,openthefuelcapslowly so that any excess pressure is released gently;tightenthefuelcapcarefullyafterrefueling; always move the machine away fromtherefuelingareaandsourcebefore starting.
Cleantheareaaroundthefuelcap.Clean thefuelandchain oiltanksregularly. Thefuel filtermustbereplacedatleastonceayear. Contaminationinthetankscausesmalfunction.Makesurethefueliswellmixedby shakingthecontainerbeforerefuelling.The capacitiesofthechainoiltankandfueltank arecarefullymatched.Youshouldtherefore alwaysfillthechainoiltankandfueltankat thesametime.

WARNING: Fueland fuelvapourare
highlyflammable. Takecarewhenhandling fuelandchainoil.Beawareoftherisksof fire,explosionandthoseassociatedwithin-halation.

WARNING:Thechainmustnot
movewhentheengineerunsatidlespeed.If thechainmovesatidlespeedrefertoCAR-BURETORADJUSTMENTwithinthis manual.Avoidcontactwiththemuffler.Ahot mufflercancauseseriousburns.
Tostoptheengine, movetheON/STOP switchtotheSTOPposition.
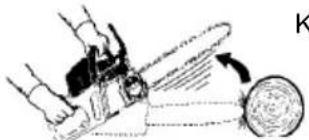
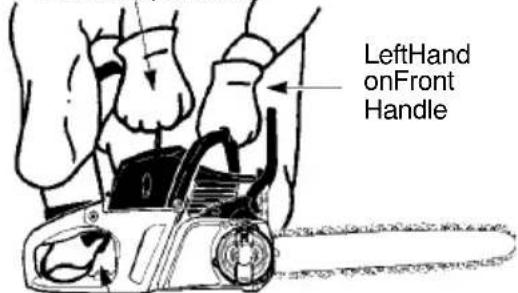
Tostarttheengine, hold the saw firmly on the ground as illustrated below. Makesure the chain is freet to turn without contacting any object.
Use only 15" - 18" (40 - 45 cm) of ropeperpull.
Holdsawfirmlywhilepullingstarterrope.
StarterRopeHandle
text_image
LeftHand onFront HandleRightFootThroughRearHandle
IMPORTANTPOINTSTO REMEMBER
Whenpullingthestarterrope,donotusethefull extentoftheropeasthiscancausetheropeto break.Donotletstarterropesnapback.Hold thehandleandlettheroperewindslowly. Forcoldweatherstarting,starttheunitatfull choke;allowtheenginetowarmupbefore squeezingthethrottletrigger.
NOTE: Donotcutmaterialwiththechoke/fast idleleverattheFULLCHOKEposition.
STARTINGACOLDENGINE (or a warm engine after runningoutoffuel)
NOTE: In the following steps, when the choke/fastidleleverispulledouttothefullextent,thecorrectthrottlesettingforstartingis setautomatically.
text_image
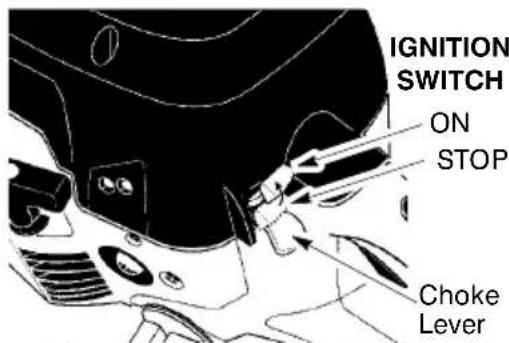
IGNITION SWITCH ON STOP Choke Lever-
Move ON/STOP switch to the ON position.
-
Slowlypressprimerbulb6times.
-
Pulloutchoke/fastidletothefullextent (totheFULLCHOKEposition).
- Pullthestarterropesharplywithyour righthanduntiltheenginefires,which can be heard through a "puff" sound. Then,proceedtothenextstep.
NOTE: If the engines sounds as if it is trying to start before the 5th pull, stop pulling and immediately proceed to then next step.
- Pushthechoke/fastidleleverintothe HALFCHOKEposition.
CHOKE/FASTIDLELEVER
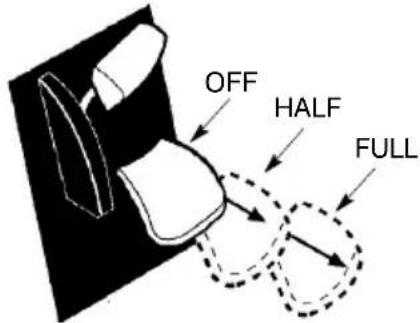
text_image
OFF HALF FULL- Pullthestarterropesharplywithyour righthanduntiltheenginestarts.
- Allow the engine to run for approximately 30 seconds. Then, squeeze and release throttle triggerto allow engine to return to idlespeed.
Thereisasimplifiedstartreminderwith illustrationstodescribeeachsteponthe rearedgeofthechainsaw.

text_image
1 6X 2 3 4 1/2 5
STARTINGAWARMENGINE
- Move ON/STOP switch to the ON position.
- Pullthechoke/fastidleleverouttothe FULLCHOKEpositiontosethefast idle,thenpushtheleverintotheHALF CHOKEposition.
- Slowlypresstheprimerbulb6times.
- Pullthestarterropesharplywithyour righthanduntiltheenginestarts.
- Squeezeandreleasethrottletriggerto allowenginetoreturntoidlespeed.
DIFFICULTSTARTING(orstart-ingafloodedengine)
Theenginemaybefloodedwithtoomuch fuelifithasnotstartedafter10pulls. Floodedenginescanbeclearedofexcess fuelbypushingthechoke/fastidleleverin completely (tothe OFF CHOKEposition) andthenfollowingthewarmenginestarting procedurelistedabove.EnsuretheON/ STOPswitchisintheONposition. Startingcouldrequirepullingthestarterrope handlemanytimesdependingonhowbadly theunitisflooded.Ifenginefailstostart,refertotheTROUBLESHOOTINGTABLE.
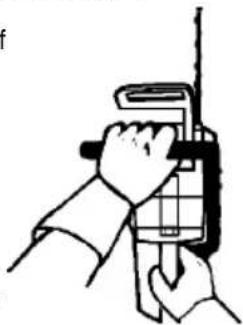
CHAINBRAKE

WARNING: Ensurechainbrakeis
disengaged by pulling the fronthand guard backtoward the fronthandle as faras possible. The chain brakemust bed is engaged before cutting with the saw.
- Thiswise equipped with a chain brake. The brake is designed to stop the chain if kickback occurs.
- Theinertiaactivatedchainbrakeisactivated ifthefronthandguard dispushedforward, eithemanuallyorbycentrifugalforce.
- Ifthebrakeisalreadyactivated,itisdisengagedbypullingthefronthandguardback towardthefronthandleasfaraspossible.
- Whencuttingwiththesaw,thechainbrake mustbedisengaged.
Disengaged
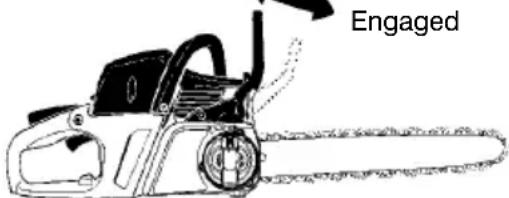
text_image
EngagedIMPORTANTPOINTS

WARNING: Sometimeswoodchips
getstuckintheclutchcovercausingthechain tojam.Alwaysstoptheenginebeforecleaning.
- Checkchaintensionbeforefirstuseandafter1minuteofoperation.SeeCHAINTENSIONintheASSEMBLYsection.
- Cutwoodonly.Donotcutmetal,plastics, masonry,non-woodbuildingmaterials,etc.
- Thebumperspikemaybeusedasapivot whenmakingacut.
- Stopthesawiffthechainstrikesaforeign object. Inspectthesawandrepairpartsas necessary.
- Keepthechainoutofdirtandsand.Evena smallamountofdirtwillquicklydullachain andincreasethepossibilityofkickback.
-
Practicecuttingafewsmallogsusingthe followingtechniquestogetthe"feel"ofusingyoursawbeforeyoubeginamajor sawingoperation.
-
Squeezethethrottletriggerandallowthe enginetoreachfullspeedbeforecutting.
- Begin cutting with the saw frame againstthelog.
- Keeptheengineatfullspeedtheentire timeyouarecutting.
- Allow the chaintocutforyou. Exertonly lightdownward pressure.
-Releasethethrottletriggerassoonas thecutiscompleted,allowingtheenginetoidle.Ifyourunthesawatfull throttlewithoutacuttingload,unnecessarywearcanoccur. - To avoid losing control when cut is complete, donotput pressure on saw at end of cut.
- Stoptheenginebeforesettingthesawdown.
TREEFELLINGTECHNIQUES

WARNING: Fellingatreerequires
chainsawskillsandexperience.Inexperiencedusersshouldnotfelltrees.Donotattemptanytaskthatmakesyoufeeluncomfortableorunsure.

WARNING: Donotcutnearbuildings
orelectricalwiresifyoudonotknowthedirec- tionofreefall,atnightsinceyouwillnot be able to see well, or during bad weather such as rain, snow,orstrongwinds.asfallisunpredictable. Carefullyplanyoursawingoperationinad- vance.Youneedaclearareaallaround the treesoyoucanhavesecurefooting.Check forbrokenordeadbrancheswhichcanfall onyoucausingseriousiusinjury.
Naturalconditionsthatcancauseatreeto fallinaparticulardirectioninclude:
•Thewinddirectionandspeed.
•Theleanofthetree.Theleanofatree mightnotbeapparentduetounevenor sloping terrain. Use a plumb or level to determinethedirectionoftreelean.
•Weightandbranchesononeside.
- Surroundingtreesandobstacles. Lookfordecayandrot.lfthetrunkisrotted,it cansnapandfalltowardtheoperator.Make surethereisenoughroomforthetreetofall. Maintainadistanceof 2-1/2treelengthsfrom thenearestpersonorotherobjects.Engine noisecandrownoutawarningcall.Remove dirt, stones, loose bark, nails, staples, and wire fromthetreewherecutsaretobemade.
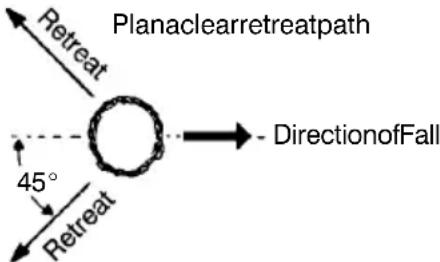
text_image
Planaclearretreatpath Retreat DirectionofFall 45° RetreatFELLINGLARGETREES
(15cmindiameterorlarger)
Thenotchmethodisused tofellarge trees. A notch is cut on the side of the tree in the desireddirectionoffall. Afterafellingcutis madeontheoppositesideoftree,thetree willtendtofallintothenotch.
NOTCHCUTANDFELLINGTHE TREE
- Makenotchcutbycuttingthetopofthe notchfirst. Cutthrough 1/3ofthediameter ofthetree. Nextcomplete thenotchbycuttingthebottomofthenotch.Seeillustration.Oncethenotchiscutremovethe notchofwoodfromthetree.

text_image
Finalcuthere.5cmabove centerofnotch. Firstcut Notch Secondcut 5 cm 5 cm• Afterremovingthewoodfromthenotch, makethefellingcutontheoppositesideof thenotch. Thisisdonebymakingacutabout 5cmhigherthanthecenterofthenotch. Thiswillleaveenoughuncutwoodbetween thefellingcutandthenotchtoformahinge. Thishingewillhelppreventthetreefromfallinginthewrongdirection.
Hingeholdstreeonstumpandhelps controlfall
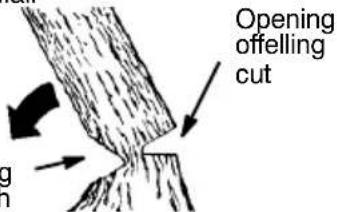
text_image
Opening offelling cut g hNOTE: Beforefellingcutiscomplete, use wedgestoopenthecutwhennecessary to controlthedirectionoffall. To avoidkickback orchaindamage, usewoodorplastic wedges, butneversteelorironwedges.
- Bealerttosignsthatthetreeisreadytofall: crackingsounds,wideningofthefellingcut,omovementintheupperbranches.
- Astreestartstofall, stopsaw, putitdown, andgetawayquicklyonyourplannedretreatpath.
• DONÓTcutdownapartiallyfallentreewith yoursaw.Beextremelycautiouswithpartiallyfallentreesthatmaybepoorlysupported.Whenatreedoesn'tfallcompletely, setthesawasideandpulldownthetreewith acablewinch,blockandtackle,ortractor.
CUTTINGAFALLENTREE
(BUCKING)
Buckingisthetermusedforcuttingafallen treetothedesiredloglength.

WARNING:Donotstandonthelog
beingcut.Anyportioncanrollcausingloss offootingandcontrol.Donotstanddownhill ofthelogbeingcut.
Importantpoints
• Cutonlyonelogatatime.
- Cutshatteredwoodverycarefully; sharp piecesofwoodcouldbeflungtowardoperator.
- Useasawhorsetocutsmalillogs. Never allowanotherpersontholdthelogwhile cuttingandneverholdthelogwithyourleg orfoot. - Donotcutinanareawherelogs, limbs, androotsaretangled.Dragthelogsintoa clearareabeforecuttingbypullingoutexposedandclearedlogsfirst.
TYPESOFCUTTINGUSED FORBUCKING

WARNING:Ifsawbecomespinched
orhunginalog, don't try to force it out. You can lose control of the saw resulting in injury and ordamageto the saw. Stop the saw, drive a wedge of plastic or wood into the cut until the saw can be removed easily. Restart the saw and carefully reenter the cut. Donot attempt to start your saw when it is pinched or hunginalog.
Turn saw OFF and use a plastic or woodenwedgeoforcecutopen.
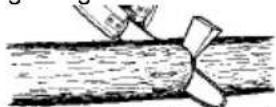
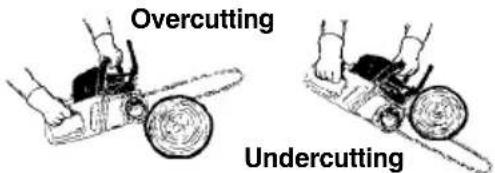
Overcutting begins on the top side of the log withthesawagainstthelog. Whenovercuttinguselightdownwardpressure.
text_image
Overcutting UndercuttingUndercuttinginvolvescuttingontheundersideofthelogwithtopofsawagainststhelog. Whenundercuttinguse lightupward pressure.Holdsawfirmlyandmaintaincontrol. Thesawwilltendtopushbacktowardyou.

WARNING: Never turn saw upside
downtoundercut. Thesawcannotbecontrolledinthisposition.
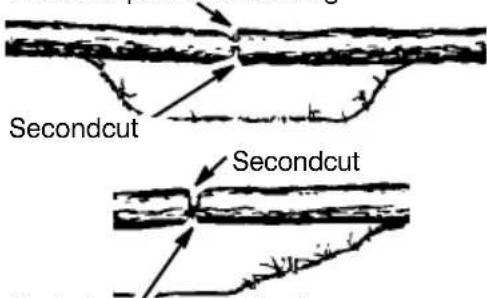
Firstcutonpressuresideoflog
text_image
Secondcut SecondcutFirstcutonpressuresideoflog
BUCKINGWITHOUTA SUPPORT
• Overcut through 1/3 of the diameter of the log.
- Rollthelogoverandfinishwithasecond overcut.
• Givespecialattentionologsunderstrain topreventthesawfrompinching. Make thefirstcutonthepressuresidetorelieve thestressonthelog.
BUCKINGUSINGALOGOR SUPPORTSTAND
- Remember your first cut is always on the pressureside of the log.
- Yourfirstcutshouldextend 1/3ofthe diameterofthelog.
•Finishwithyoursecondcut.
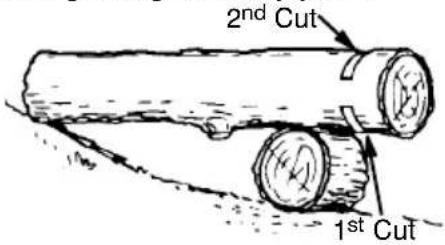
Usingalogforsupport
text_image
2nd Cut 1st Cut
text_image
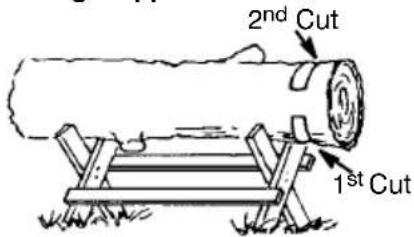
1st Cut 2nd CutUsingasupportstand
text_image
2nd Cut 1st Cut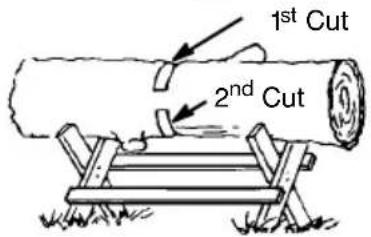
text_image
1st Cut 2nd CutLIMBINGANDPRUNING
WARNING: Bealertforandguard againstkickback. Donotallowthemoving chaintocontactanyotherbranchedorobjects atthenoseoftheguidebarwhenlimbingor pruning. Allowingsuchcontactcanresultin seriousinjury.
WARNING: Never climb into a tree to limborprune.Donotstandonladders,platforms,alog,orinanypositionwhichcancause youtoloseyourbalanceorcontrolofthesaw.
IMPORTANTPOINTS
- Watch out for springpoles. Use extreme cautionwhencuttingsmallsizelimbs.Slendermaterialmaycatchthesawchainandbe whippedtowardyouorpullyouoffbalance.
- Be alert for springback. Watch out for branchesthatarebentorunderpressure. Avoidbeingstruckbythebranchorthe sawwhenthetensioninthewoodfibersis released.
- Keepaclearworkarea.Frequentlyclear branchesoutofthewaytoavoidtripping overthem.
LIMBING
- Always limba tree after it is cut down. Only thencanlimbingbedonesafelyandproperly.
- Leave the larger limbs underneath the felledtreetosupportthetreeasyouwork.
- Startatbaseofthefelledtree andworktowardthetop,cuttingbranchesandlimbs. Removesmalllimbswithonecut.
- Keepthetreebetweenyouandthechainasmuchaspossible.
- Removelarger, supporting branches with the cutting techniques described in BUCKING WITHOUT SUPPORT.
•Alwaysuseanovercuttocutsmalland freelyhanginglimbs.Undercuttingcould causelimbstofallandpinchssaw.
PRUNING
WARNING: Limitpruning to limbs shoulder height or below. Donot cut if branches are higher than your shoulder. Get a professional to do the job.
- Makeyourfistcut 1/3ofthewaythrough thebottomofthelimb.
- Next make a 2nd cut all the way through thelimb. Thencutathirdovercutleaving a3to5cmcollarfrom thetrunkofthetree.
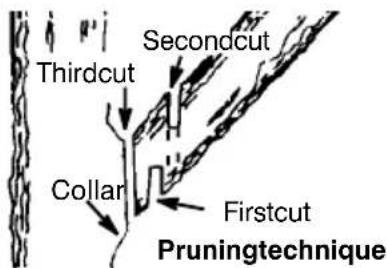
text_image
Secondcut Thirdcut Collar Firstcut Pruningtechnique
WARNING: Impropermaintenance
couldresultinseriousenginedamageorinseriousinjury.

WARNING: Disconnectthespark
plugbeforeperformingmaintenance,except forcarburetoradjustments.
Werecommendallserviceandadjustments notlistedinthismanualbeperformedbyan AuthorizedServiceDealer.
MAINTENANCESCHEDULE
Check:
FuelmixturelevelBeforeeachuse....
BarlubricationBeforeeachuse.....
ChaintensionBeforeeachuse.....
Chainsharpness Beforeeachuse...
Fordamagedparts .. Beforeeachuse
Forloosecaps..... Beforeeachuse
Forloosefasteners .. Beforeeachuse
For loose parts ..... Before each use
InspectandClean:
Bar...... Beforeeachuse
Completesaw..... Aftereachuse
Airfilter .... Every5hours*
Chainbrake .... Every5hours*
Sparkarrestingscreen
andmuffler..... Every25hours*
Replace spark plug . Yearly
Replace fuel filter ... Yearly
Hours of Operation
CHAIN BRAKE

WARNING: If the brake band is worn
too thin it may break when the chain brake is triggered. With abrokenbrakeband, the chain brakewill not stop the chain. The chain brake should be replaced by an authorized service dealer if any part is worst than 0,02" (0,5 mm) thick. Repair on a chain brakes should be made by an authorized service dealer. Take your unit to the place of purchase if purchased from servicing dealer, or to the arest a authorized masters serviced dealer.
CAUTION: Thechainbrakemustbe checked several times daily. The engine mustberunningwhenperformingthisprocedure. Thisistheonlyinstancewhenthesaw shouldbeplacedonthegroundwiththeen-ginerunning.
Placethesawonfirmground.Griptherear handlewithyourrighthandandthefronthandlewithyourlefthand. Applyfullthrottleby fullydepressingthethrottletrigger. Activate the chain brake by turning your left wrist against the hand guard without releasing yourgriparoundthefronthandle.Thechain shouldstopimmediately.
AIR FILTER

CAUTION: Donotcleanfilteringaso-
line or other flammable solvent to avoid creating a fire hazard or producing harmful evaporative emissions.
Cleaning theair filter:
A dirty air filter decreases engine performance and increases fuel consumption and harmful emissions. Always clean after every 5 hour of operation.
-
Cleanthecoverandtheareaarounditto keepdirtandsawdustfrom falling into thecarburetorchamberwhenthecover isremoved.
-
Removethepartsasillustrated.
-
Washthefilterinsoapandwater. Rinse in clean cool water. Air dry completely beforeeinstalling.
-
Reinstallparts.
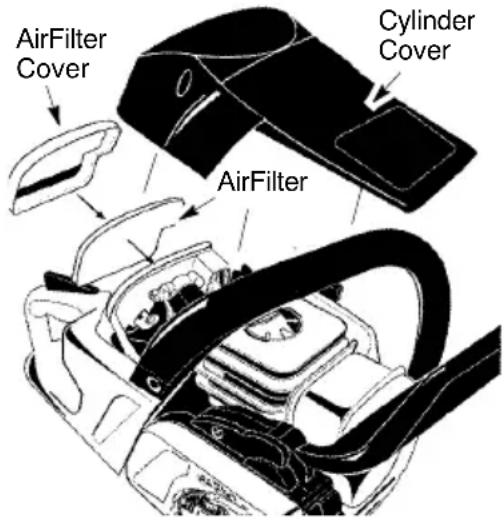
text_image
AirFilter Cover Cylinder Cover AirFilterBAR MAINTENANCE
Ifyoursawcutstooneside,hastobeforced throughthecut,orbeenrunwithanimproper amount of bar lubrication it may be neces- sarytoserviceyourbar.Awornbarwilldam- ageyourchainandmakecuttingdifficult. Aftereachuse,ensureON/STOPswitchis intheSTOPposition,thencleanallsawdust fromtheguidebarandsprockethole.
Tomaintainguidebar:
- Move ON/STOP switch to the STOP position.
- Loosen and remove bar nuts and chain brake. Remove bar and chain from saw.
- Cleantheoilholesandbargrooveaftereach 5hours of operation.
RemoveSawdustFrom GuideBarGroove
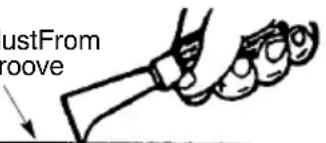
text_image
JustFrom rooveOilHoles
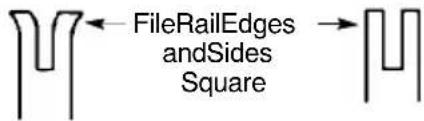
- Burring of guide bar rails is a normal processofrailwear.Removetheseburrs withaflatfile.
- Whenrailtopisuneven, useaflatfiletore-storesquareedgesandsides.
SERVICEANDADJUSTMENTS
text_image
FileRailEdges andSides SquareCorrectGrooveWornGrooveDepthgaugetool
Replaceguidebarwhenthegrooveisworn, theguidebarisbentorcracked, orwhen excessheatingorburringoftherailsoccurs. Ifreplacementisnecessary, useonlytheguide barspecifiedforyoursawintherepairpartslist oronthedecallocatedonthechainsaw.
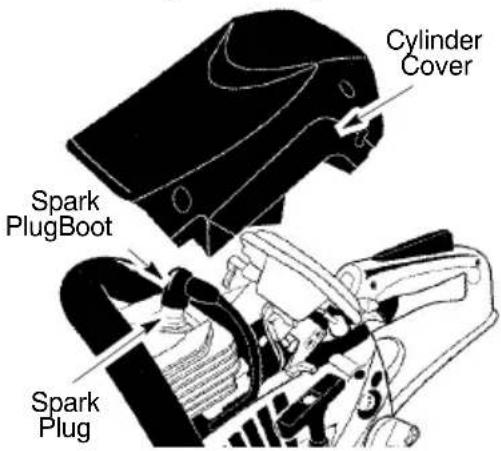
SPARKPLUG
Thesparkplugshouldbereplacedeach yeartoensuretheenginestartseasierand runsbetter.Ignitiontimingisfixedandnon-adjustable.
- Loosen3screwsoncylindercover.
- Removethecylindercover.
3.Pulloffthesparkplugboot. - Removesparkplugfromcylinderand discard.
- Replace with Champion RCJ--7Y spark plug and tightense securely with a 19mm socket wrench. Spark pluggap should be 0.5mm.
- Reinstallthesparkplugboot.
- Reinstallthecylindercoverand3 screws. Tightense securely.
text_image
Cylinder Cover Spark PlugBoot Spark PlugCHAINSHARPENING

WARNING:Improperchainsharpen-
ingtechniquesand/ordepthgaugemaintenance will increase the chance of kickback whichcanresultinseriousinjury.

WARNING: Wearprotective gloves
whenhandlingchain.Thechainissharpand cancutyouevenwhenitisnotmoving. Conditionswhichindicateetheneedforchain sharpening:
- Reductioninsizeofwoodchips. Thesize of the wood chip will decrease as the chain gets duller until it becomes more like a powder than achip. Notethatdeador rottedwoodwillnotproduceagoodchip.
- Sawcutstoonesideoratanangle.
- Sawhastobeforcedthroughthecut.
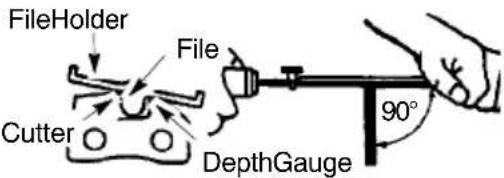
Toolsrequired:
- 5/32inch(4mm)diameterroundfileand fileholder
- Flatfile
- Depthgaugetool
TOSHARPENCHAIN:
- Move ON/STOP switch to the STOP position.
- Checkchainforpropertension.Adjust chaintensionifnecessary.
3.Sharpencutters.
- Tosharpenthecutters, position the file holder level (90°) so that it rests onthetopedgesofthecutter and depth gauge.
NOTE: Thechainhasbothleftand righthandcutters.
text_image
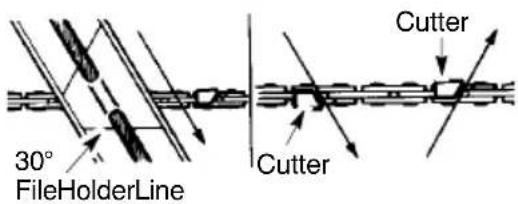
FileHolder File Cutter DepthGauge 90°- Align the 30° file holder marks parallel with the bar and to the center of the chain.
text_image
30° FileHolderLine Cutter Cutter- Sharpencuttersononesideofthe chainfirst.Filefromtheinsideofeach cutter to theoutside.Then,turn the chainsawaroundandrepeattheprocessfortheothersideofthechain.
- File on the forward stroke only. Use 2 or3strokespercuttingedge.
- Keep all cutters the same length whenfiling.
- Fileenoughtoremoveanydamage tocuttingedges(sideplateandtop plateofcutter).
AllCutters SameLength
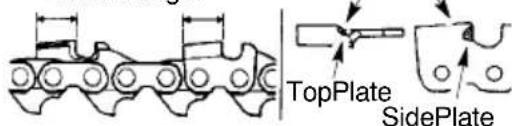
text_image
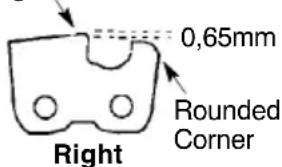
TopPlate SidePlate- Filechaintomeetthespecifications asshown.
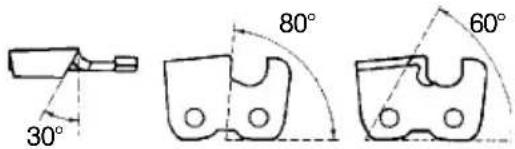
text_image
30° 80° 60°HookAngle
text_image
0,65mm Rounded Corner Right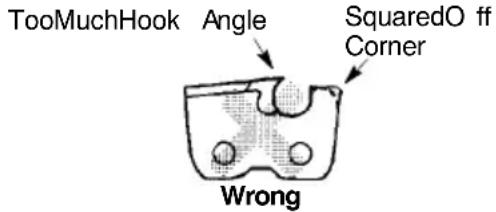
text_image
TooMuchHook Angle SquaredO ff Corner Wrong
WARNING: Maintain the proper hook angleaccordingtothemanufacturer'sspecificationsforthechainyouareusing.Improper hookanglewillincreasethechanceofkickbackwhichcanresultinseriousinjury.
- Check and lower depth gauges.
text_image
DepthGaugeTool File DepthGauge- Placegaugetooloncutter.
- If the depth gauge is higher than the depth gauge tool, file level to the top of the depth gauge tool.
- Maintainroundedfrontcornerof depthgaugewithaflatfile.
NOTE: The very top of the depth gaugeshould be flat with the front halfrounded off with a flat file.
If you require further assistance or are unsure about performing this procedure, contact your authorized serviced dealer.
CARBURETORADJUSTMENT

WARNING:Thechainwillbemoving
duringmostofthisprocedure.Wearyourprotectiveequipmentandobserveallsafetyprecautions.Thechainmustnotmoveatidle speed.
Thecarburetorhasbeencarefullysetatthe factory.Adjustmentsmaybenecessaryif younoticeanyofthefollowingconditions:
- Chain moves at idle. See IDLE SPEED-T adjusting procedure.
- Saw will not idle. See IDLE SPEED-T adjusting procedure.
IdleSpeed-T
Allow engine to idle. If the chain moves, idle istoofast.Iftheenginestalls,idleis tooslow. Adjustspeeduntil engineeruns withoutchain movement(idletoofast)orstalling(idletoo slow). The idle speed screw is located in the area above the primer bulb and is labeled T.
- Turn idle speed screw (T) clockwise to increase enginespeed.
- Turnidlespeedscrew(T)counterclock-wisetodecreaseenginespeed.
STORAGE

WARNING: Stopengineandallowto cool, and secure the unit before storing or transporting in a vehicle. Store unit and fuel in an area where fuel vapors cannot reach sparks or open flames from water heaters, electric motors or switches, furnaces, etc. Store unit with all guards in place. Position so that any sharp object cannot accidentally cause injury to passers by. Store the unit out of reach of children.
- Beforestoring, drainallfuelfromthe unit. Start engine and allow to run until it stops.
- Clean the unit before storing. Pay particular attention to the air intake area, keeping itfreeofdebris.Useamild detergent and spongetocleantheplasticsurfaces.
-
Donotstoretheunitorfuelinaclosedarea where fuel vapors can reach sparks or an openflamefromhotwaterheaters,electric motorsorswitches,furnaces,etc.
-
Store in a dry area out of the reach of children.
- Ensure the machine is cleaned and that a complete service is carried out before long-term storage.
- Theguidebarandchainmustalwaysbe coveredwithascabbardwhen themachine isbeingtransportedorinstorageinorderto prevent accident contact with the sharp chain. Even a non-moving chain can cause serious cuts to yourself or persons you bumpintowithanexposedchain.

CAUTION: It is important to prevent gumdepositsfromforminginessentialfuel system parts such as the carburetor, fuel filter, fuel hose, or fuel tank during storage. Alcoholblended fuels(calledgasohol orusing ethanolormethanol)canattractmoisture whichleadstofuelmixtureseparationand formationofacidsduringstorage.Acidicgas candamagetheengine.
TROUBLESHOOTINGTABLE

WARNING:Alwaysstopunitanddisconnectsparkplugbeforeperformingalloftherecommendedremediesbelowexceptremediesthatrequireoperationoftheunit.
| TROUBLECAUSEREMEDY | ||
| Enginewillnotstartorwillrunonlyafewsecondsafterstarting. | Ignitionswitchoff.Engineflooded.Fueltankempty.Sparkplugnotfiring.Fuelnotreachingcarburetor. | MoveignitionswitchtoON.See“DifficultStarting”inOperationSection.Filltankwithcorrectfuelmixture.Installnewsparkplug.Checkfordirtyfuelfilter;replace.Checkforkinkedorsplitfuelline;repairorreplace. |
| Enginewillnotidleproperly. | Idlespeedrequiresadjustment.Carburetorrequiresadjustment. | See“CarburetorAdjustment”intheServiceandAdjustmentsSection.Contactanaauthorizedservicedealer. |
| Enginewillnotaccelerate,lackspower,ordiesunderaload. | Airfilterdirty.Sparkplugfouled.Chainbrakeengaged.Carburetorrequiresadjustment. | Cleanorreplaceairfilter.Cleanorreplaceplugandregap.Disengagechainbrake.Contactanaauthorizedservicedealer. |
| Enginesmokesexcessively. | Toomuchoilmixedwithgasoline. | Emptyfueltankandrefillwithcorrectfuelmixture. |
| Chainmovesatidlespeed. | Idlespeedrequiresadjustment.Clutchrequiresrepair. | See“CarburetorAdjustment”intheServiceandAdjustmentsSection.Contactanaauthorizedservicedealer. |
TECHNICALDATA
Technicaldata
| CS360TCS400TCS420T | |||
| Engine | |||
| Cylinderdisplacement,cm ^3 | 364042 | ||
| Stroke,mm323232 | |||
| Idlespeed,rpm300030003000 | |||
| Power,kW(Europe)1,3/9000 | 1,5/9000 | 1,6/9000 | |
| Ignitionsystem | |||
| Sparkplug | Champion RCJ-7Y | Champion RCJ-7Y | Champion RCJ-7Y |
| Electrodegap,mm | 0,5 | 0,50,5 | |
| Fuelandlubricationsystem | |||
| FueItankcapacity,litre | 0,3 | 0,30,3 | |
| Oil pump capacity at 8,500 rpm, ml/min | 4 - 8 | 4 - 8 | 4 - 8 |
| Oiltankcapacity,litre | 0,2 | 0,20,2 | |
| Type of oil pump | Automatic | Automatic | Automatic |
| Weight | |||
| Chainsawwithoutbarorchain,emptytanks,kg | 5,5 | 5,55,5 | |
| Soundemissions(seeNote1) | |||
| Soundpowerlevel,measureddB(A)108,7 | 108,7108,7 | ||
| Soundpowerlevel,guaranteedLWA dB(A) | 113 | 113 | 113 |
| Soundlevels(seeNote2) | |||
| Equivalentsoundpressurelevelatthe operators'ear,dB(A) | 99,799,7 | 99,7 | |
| Equivalentvibrationlevels,a hv,eq(seeNote3) | |||
| Fronthandle,m/s ^2 | 2,4 | 2,42,4 | |
| Rearhandle,m/s ^2 | 2,4 | 2,42,4 | |
| Chain/bar | |||
| Standardbarlength,inch/cm | 14/35,16/40,18/45 | ||
| Recommended bar lengths, inch/cm | 14-18 / 35-45 | ||
| Usable cutting length, inch/cm | 13-17 / 34-44 | ||
| Pitch,inch | 0,375/3/8" | ||
| Thicknessofdrivelinks,inch/mm | 0,050/1,3 | ||
| Typeofdrivesprocket/numberofteeth | 6 | ||
| Chainspeedatmax.power,m/sec | 18,5 | ||
Note 1: Noise emissions in the environment measured as sound power ( L_WA )inconformitywithECdirective2000/14/EC.
Note 2: Equivalent sound pressure level, according to ISO 22868, is calculated as the time-weighted energy total for different sound pressure levels under various working conditions. Typical statistical dispersion forequivalentsoundpressure level is a standard deviation of 1 dB(A).
Note 3: Equivalent vibration level, according to ISO 22867, is calculated as the time-weightedenergytotalforvibrationlevelsundervariousworkingconditions.Reported dataforequivalentvibrationlevelhasatypicalstatisticaldispersion(standarddeviation) of1m/s ^2 .
TECHNICALDATA
Bar and chain combinations
The following cutting attachments are approved for model McCulloch CS 360T, CS 400T, and CS420T.
| BarChain | |||||
| Length, Pitch,Gauge,Length, inchinchmmMax.noseradiusTypedrivelinks(no.) | |||||
| 14 | 0,375 / 3/8" | 1,3 | 7T | Husqvarna H37, Universal Outdoor Accessories CHO022 | 52 |
| 16 | 0,375 / 3/8" | 1,3 | 7T | Husqvarna H37, Universal Outdoor Accessories CHO027 | 56 |
| 18 | 0,375 / 3/8" | 1,3 | 7T | Husqvarna H37, Universal Outdoor Accessories CHO032 | 62 |
 |
ECDeclarationofConformity(OnlyappliestoEurope)
We, Husqvarna AB, SE-561 82 Huskvarna, Sweden, tel: +46-36-146500, as authorised representative in the Community, declare that the chainsaw for forest servicemodels
McCulloch CS 360T, CS 400T, and CS 420T SAS-AV with serial numbers dating from 2012 and onwards (theyearisclearlystatedontheratingplate,followedbytheserialnumber), complywiththerequirementsoftheCOUNCIL'SDIRECTIVES:
of17May2006"relatingtomachinery"2006/42/EC;
of 15 December 2004 "relating to electromagnetic compatibility" 2004/108/EC, and applicable supplements; and
of8May2000"relatingtothenoiseemissionsintheenvironment"inaccordancewithAnnex V of 2000/14/EC. For information relating to noise emissions, see Technical data section.
The following standards have been applied: ISO 12100:2010, CISPR 12:2007, ISO 11681-1:2011.
Notified body, 0404, SMP Svensk Maskinprovning AB, Fyrisborgsgatan 3 S-754 50 Uppsala, Sweden, hascarriedoutECtypeexaminationinaccordancewiththemachinery directive's(2006/42/EC)article12, point3b. The certificatesforECtypeexaminationin accordance with annex IX, have the numbers: 0404/12/2359.
ThesuppliedchainsawconformstotheexamplethatunderwentECtypeexamination.
12--10--15

text_image
R sllRonnie E. Goldman, Director of Engineering Authorized representative for Husqvarna AB and responsible for technical documentation
TABLEDESMATIÈRES
text_image
Diagram showing bicycle lane markings with bidirectional arrows and circular loopsnatural_image
Technical line drawing of a mechanical assembly with no visible text or symbolsnatural_image
Technical line drawing of a mechanical assembly with gears and shafts (no text or labels)Goupille deréglage
REPLACEMENTDELABOUGIE
natural_image
Two circular diagrams with bidirectional arrows, no text or symbols presentWARNUNG:VERLASSENSIE
natural_image
Technical line drawing of a mechanical component with no visible text or symbolsnatural_image
Illustration of a hand using a tool to cut or mark a wooden pipe (no text or symbols present)natural_image
Two circular diagrams with bidirectional arrows, no text or symbols presenttext_image
I STOP 1 6X 2text_image
= 1 + 2 + X + 4 + 5Paraarrancarconelmotorcaliente
natural_image
Technical line drawing of a mechanical assembly with no visible text or symbolstext_image
Palanca AFLOJE- Retirelacubiertadelembrague.Retireel separadordeplástico(sipresente).
natural_image
Technical line drawing of a mechanical component with internal gears and housing (no text or symbols)text_image
Palanca AFLOJEnatural_image
Illustration of a tool cutting through a pipe with a cutting tool (no text or symbols)natural_image
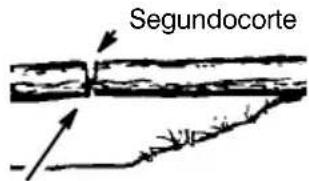
Simple line drawing of a pipe or channel with arrows indicating flow direction (no text or symbols)Segundocorte