KCD50 - Cd player/recorder Soundmaster - Free user manual and instructions
Find the device manual for free KCD50 Soundmaster in PDF.

| Brand | Soundmaster |
| Model | KCD50 |
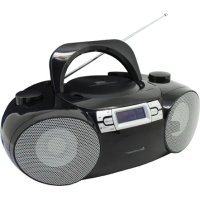
| Product type | CD player/recorder with FM radio and karaoke function |
| Power supply | 9 V DC via mains adapter (not included) or 6 LR14 (size C) batteries |
| Power consumption | 14 W |
| Output power | 2 × 1.2 W |
| FM frequency range | 87.5 – 108 MHz |
| Supported audio formats | Audio CD, CD-R/RW, MP3, WMA |
| Connectors | 3.5 mm AUX IN jack, microphone jack, USB port (playback only), DC input jack |
| Main functions | FM radio with auto scan, CD, USB, AUX playback, repeat, track programming (20 CD, 99 MP3/WMA), karaoke with included microphone |
| Included accessories | Microphone, microphone stand |
| Safety | Class 1 laser, surge protection, auto power-off (ERP2) |
| Cleaning and maintenance | Clean with a soft dry cloth. Do not use detergents or abrasive products |
| Used batteries | Do not dispose of with household waste. Take them to an appropriate collection point |
| Warranty | Consult the retailer or after-sales service |
Frequently Asked Questions - KCD50 Soundmaster
User questions about KCD50 Soundmaster
0 question about this device. Answer the ones you know or ask your own.
Ask a new question about this device
Download the instructions for your Cd player/recorder in PDF format for free! Find your manual KCD50 - Soundmaster and take your electronic device back in hand. On this page are published all the documents necessary for the use of your device. KCD50 by Soundmaster.
USER MANUAL KCD50 Soundmaster
Do not dispose of this product with the normal household waste at the end of its life cycle. Return it to a collection point for the recycling of electrical and electronic devices. This is indicated by the symbol on the product, user manual or packaging
The materials are reusable according to their markings. By reusing, recycling or other forms of utilization of old devices you make an important contribution to the protection of our environment.
Please contact your local authorities for details about collection points.

WARNING
Risk of electric shock Do not open!

Caution: To reduce the risk of electric shock, do not remove the cover (or back). There are no user serviceable parts inside. Refer servicing to qualified service personnel.

This symbol indicates the presence of dangerous voltage inside the enclosure, sufficient enough to cause electric shock.

This symbol indicates the presence of important operating and maintenance instructions for the device.
Used batteries are hazardous waste and NOT to be disposed of with the household waste! As a consumer you are legally obligated to return all batteries for environmentally responsible recycling - no matter whether or not the batteries contain harmful substances*)
Return batteries free of charge to public collection points in your community or shops selling batteries of the respective kind. Only return fully discharged batteries *) marked Cd = cadmium, Hg = mercury, Pb = lead
- Only use mercury and cadmium-free batteries.
- Used batteries are hazardous waste and NOT to be disposed of with the household waste!!!
- Keep batteries away from children. Children might swallow batteries.
- Contact a physician immediately if a battery was swallowed.
- Check your batteries regularly to avoid battery leakage.
- Batteries shall not be exposed to excessive heat such as sunshine, fire or the like.
- CAUTION: Danger of explosion if battery is incorrectly replaced
- Replace only with the same or equivalent type

WARNING
DO NOT INGEST BATTERY, CHEMICAL BURN HAZARD
This product contains a coin/button cell battery. If the coin/button cell battery is swallowed, it can cause severe internal burns in just 2 hours and can lead to death. Keep new and used batteries away from children. If the battery compartment does not close securely, stop using the product and keep it away from children.
If you think batteries might have been swallowed or placed inside any part of the body, seek immediate medical attention.
CAUTION - INVISIBLE LASER RADIATION WHEN OPENING THE COVER OR PRESSING THE SAFETY INTERLOCK. AVOID EXPOSURE TO THE LASER BEAM.
Safety, Environmental and Setup Instructions
- Use the device in dry indoor environments only.
- Protect the device from humidity.
- This apparatus is for moderate climates areas use, not suitable for use in tropical climates countries.
- No objects filled with liquids, such as vases, shall be placed on the apparatus.
- The mains plug or an appliance coupler is used as the disconnect device, the disconnect devices shall remain readily operable.
- Connect this device to a properly installed and earthed wall outlet only. Make sure the mains voltage corresponds with the specifications on the rating plate.
- Make sure the mains cable stays dry during operation. Do not pinch or damage the mains cable in any way.
- A damaged mains cable or plug must immediately be replaced by an authorized service center.
- In case of lightning, immediately disconnect the device from the mains supply.
Children should be supervised by parents when using the device. - Clean the device with a dry cloth only.
- Do NOT use CLEANING AGENTS or ABRASIVE CLOTHS!
- Do not expose the device to direct sunlight or other heat sources.
- Install the device at a location with sufficient ventilation in order to prevent heat accumulation.
- Do not cover the ventilation openings!
- Install the device at a safe and vibration-free location.
- Install the device as far away as possible from computers and microwave units; otherwise radio reception may be disturbed.
- Do not open or repair the enclosure. It is not safe to do so and will void your warranty. Repairs only by authorized service/ customer center.
- No naked flame sources, such as lighted candles, should be placed on the unit.
- When you are necessary to ship the unit store it in its original package. Save the package for this purpose.
- In case of malfunction due to electrostatic discharge or fast transient (burst), remove and reconnect the power supply.
- If the unit is not using for a long period of time, disconnect it from the power supply by unplugging the power plug. This is to avoid the risk of fire.
- The device is equipped with a "Class 1 Laser". Avoid exposure to the laser beam as this could cause eye injuries.
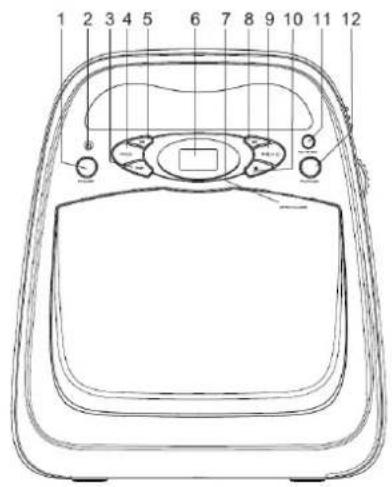
LOCATIONS OF CONTROLS
1 POWER ON/OFF BUTTON
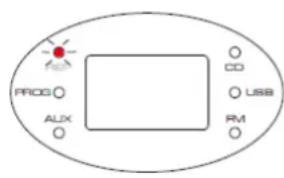
2 POWER INDICATOR
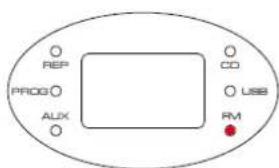
3 REPEAT (REP)
4 PROG
5 SKIP BACK
6 LED DISPLAY
7 CDDOOR
8 SKIP FORWARD
9 /+10
10 STOP
11 FM RESET
12 FM SCAN
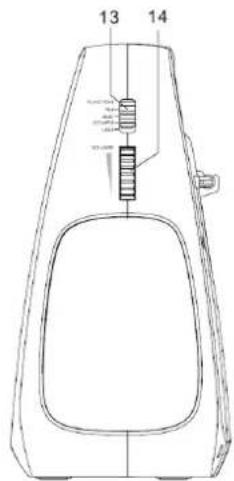
13 FUNCTION SELECTOR
14 VOLUME CONTROL
15 DC INPUT JACK
16 AUX IN JACK
17 MIC JACK
18 USB PORT (FOR PLAYBACK ONLY)
19 BATTERY COMPARTMENT
20 MICROPHONE HOLDER
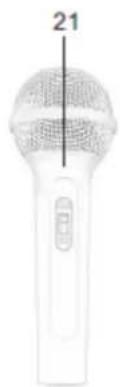
21 MICROPHONE

GETTING STARTED
FM TUNER
This unit is using build-in type FM antenna, you may need to adjust the unit position for maxing signal strength.
CONNECTING POWER
The CD player can be using AC or DC to operate.
For DC battery, please insert 6x UM-2/C size batteries. (battery not included)
For AC power supply:
Before connecting the power, check that the mains voltage on the rating plate which is same as the voltage in your area.
Plug the DC jack into back of the unit plug the AC adaptor (not included) into the wall socket.
The unit is now ready for use.
ON/OFF CONTROL
Press the "POWER" button (1) to turn the unit on:
The display will light and the unit will switch on.
Press the "POWER" button (1) again to switch the unit off.

ENERGY SAVING/ERP2 REGULATION
This device is equipped with an automatic switch off / STANDBY system for energy-saving requirements. This is regulated by an EU-standard and is NOT A MALFUNCTION.
If the CD player turn to standby, press the "POWER" button (1) two times to switch the unit on again. This is ERP2 power management.
ADJUSTING THE VOLUME
- Adjust the "VOLUME" control (14) to increase or decrease the volume level.
SELECTING A SOURCE
You can choose to listen to following sources by using "FUNCTION" switch (13) :
FM
AUX
CD
USB
FM RADIO
Tune to FM radio stations
Position the unit as far as possible from TV, power adapter or other radiation source.
- Set the "FUNCTION" selector (13) to FM position.
- The FM indicator will light on.
Press the "FM SCAN" button (12) to search FM station with strong reception automatically.
- Repeat step 2 to tune to more stations.
- If need to clear or reset the current station to beginning, press "FM RESET" button (11).
LISTENING TO A CD
This player can playback CD, MP3 and WMA audio format.
To select CD operation:
- Set the "FUNCTION" selector (13) to CD position
LOADING DISCS
- Press the Open/Close marking on CD door to open. Display show "OP"
- Gently place a disc on the center spindle with the label up side.
- Once in place, press the center of the disc until it clicks into place on the turntable.
- Close the CD door.
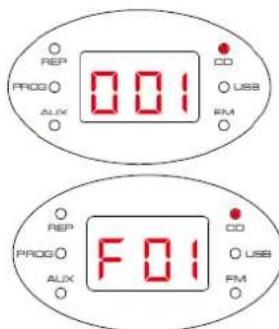
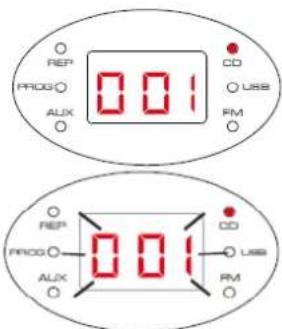
After a few seconds the disc will read and the disc data. For the tracks display 3 digits:
For the CD-MP3/ CD-WMA disc contains folder: F stand for folder and following 2 digits for folder number
UNLOADING A DISC:
If the disc is playing, press the button (10) and wait a few seconds for the disc to stop.
- Press the Open/Close marking on CD door to open.
- Grip the disc at the sides and lift it out of the disc compartment.
CD PLAYBACK
- Load the CD.
- CD playback starts when closed CD door
- If not, press the button (9) to start the CD playing
- Display show the current track number.
- When a CD is playing, pressing the button (9) at any time will pause playback and tracks display blinks.
- Press the button again to re-start playback.
Selecting tracks:
Press the button (5 or 8) briefly to select the previous or next track from the disc. Press and hold the button (5 or 8) to search the passage backward or forward.
Press the and hold the 10 to increase the title number by 10 titles.
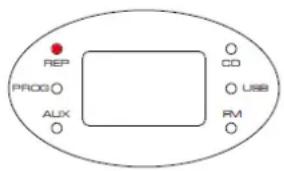
CD REPEAT
You can repeat a single track or the whole disc.
- In CD mode, press the "REP" button (3) to cycle through the options of repeat current track, the REP indicator blinks.
- For Repeat all tracks (whole disc), the "REP" indicator will go stable.
PROGRAM PLAY
For CD disc, you can store a random sequence of up to CD-20 and MP3/WMA- 99 tracks to play in your preferred order.
To store a program track(s):
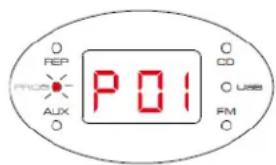
- In CD Stop mode, press the "PROG" button (4).
- Display showing [P01] and "PROG" indicator blinks.
P stand for program and following 2 digits stand for program number.
- Press the or button (5 or 8) to select the track number for the first track you want to program.
- Press the "PROG" button (4) to store this track into the program memory. The track will be store and the program counter will increase to "P02".
- Repeat the above two steps to store the next and subsequent tracks in your program sequence.
- When you have finished entering all tracks in your program, press the button (9) to start the program playing.
To clear a program
- During program playing, press the button (10) twice.
- Open the CD door.
Note: USB program play is same operation.
LISTENING TO AN USB
- Set the function selector to USB position.
- Press button (99 to playback the music.
- The operation procedures are the same as CD playback.
NOTE:
- Compatible storage device (up to 32GB).
- Please do NOT use a USB extension cable to connect your USB flash drive. Such cable can pick up additional interference which can corrupt the data flow.
- Always connect your USB flash drive directly to the USB port without USB extension cable.
- Due to some USB drive manufacturer's non-compliance with the full USB 1.1/ 2.0 standard. A small percentage (about 5% ) of USB flash drive might not be compatible
AUX-IN JACK
- Set the "FUNCTION" selector (13) to AUX position
- Connect your auxiliary device to the 3.5mm AUX IN socket at the back of the unit.
- Turn the "VOLUME" control (14) to set the volume level
- Play your auxiliary device.
There is a "MIC" input jack (17) and included microphone that allow you to sing along with sound of the available sources.
- Plug the provided microphone into "MIC" jack (17).
- Start playback as described on CD PLAYBACK instruction page.
- Slide the MIC's "ON/OFF" switch to the "ON" position and sing along!
- Adjust the "VOLUME" control (14) to desired level.
Note: The microphone sound level was 80% of master volume.
5. To shut off the microphone, slide the "MIC's ON/OFF" switch to the "OFF" position.
Note: Please always switch the "MIC's ON/OFF" to "OFF" position when placing to the unit -MIC holder. Otherwise, very high frequency echo noise will be heard.
TECHNICAL SPECIFICATIONS
DC input: DC 9V, 1000mA
Battery supply DC 9V (6 x "C" SIZE LR14)
Power consumption 14W
Output power: 2 × 1.2W
Frequency range: 87.5-108 MHz (FM)
IMPORTER
CLASS 1 LASER PRODUCT
KLASSE 1 LASER PRODUKT
LUOKAN 1 LASER LAITE
KCLASS 1 LASER APPARAT
PRODUCTO LASER CLASE 1
ATTENTION - RADIATION
LASER INVISIBLE LORSQUE
VOUS OUVREZ LE COUVERCLE
OU APPUYEZ SUR
L'ENCLENCHEMENT DE
SECURITE. EVITEZ TOUTE
EXPOSITION AU RAYON LASER
CLASS 1 LASER PRODUCT
KLASSE 1 LASER PRODUKT
LUOKAN 1 LASER LAITE
KCLASS 1 LASER APPARAT
PRODUCTO LASER CLASE 1
WAARSCHUWING-ONZICTBARE LASERSTRALING WANNEER DE BEHUIZING GEOPEND WORDT OF DE INTERNE BEVEILIGING UITGESCHAKELD. VERMIJD BLOOTSTELLING AAN DE LASERSTRAAL.
CLASS 1 LASER PRODUCT
KLASSE 1 LASER PRODUKT
LUOKAN 1 LASER LAITE
KCLASS 1 LASER APPARAT
PRODUCTO LASER CLASE 1
PRECAUCION - RADIACION INVISIBLE DE LASER AL ABRIR LA TAPA O PULSAR EL INTERBLOQUEO DE SEGURIDAD. EVITE LA EXPOSICION AL HAZ DE LASER.
REPRODUZIR UM PROGRAMA
*) markerade Cd = kadmium, Hg = kvicksilver, Pb = bly

WARNING
SVALJ INTE BATTERI, KEMISKA BRANNSKADOR
KLASSE 1 LASER PRODUKT
VYSTRAHA - NEVIDITEL'NE LASEROVE ZIARENIE PRI OTVORENI KRYTU ALEBO STLACENBEZPECNOSTNEJ POISTKY. NEVYSTAVUJE SA POSOBENIU LASEROVEHO LUCA.
*) Cd = kadmium, Hg = higany, Pb = olom

FIGYELMEZTETÉS
NE NYELJE LE AZ ELEMET, KÉMIAI ÉGÉS VESZÉLYE
D 90556 Cadolzburg, Germany
Tel: +49 9103 71 67 0
Fax: +49 9103 71 67 12
E-Mail: info@soundmaster.de
Internet: www.soundmaster.de
Hereby, Wörlein GmbH declares that this device is in compliance with the essential requirements and other relevant provisions of Directive 2014/53/EU.
A copy of the declaration of conformity can be obtained from the above address.