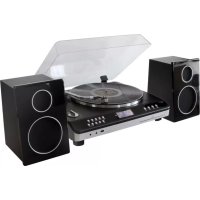
PL550BR - Turntable Soundmaster - Free user manual and instructions
Find the device manual for free PL550BR Soundmaster in PDF.
Document temporarily unavailable
The manual is currently being transferred to our new server. It will be accessible again in a few hours. Thank you for your patience.
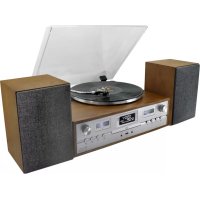
| Product type | Turntable with FM radio, USB MP3 player, recording |
| Brand | Soundmaster |
| Model | PL550BR |
| Power supply | 230 V ~ 50 Hz |
| Power consumption | 20 W |
| Radio frequency range | 87.5 - 108 MHz |
| Output power | 2 × 1.5 W |
| Playback speeds | 33 ⅓ and 45 rpm |
| Supported audio formats | MP3 (via USB) |
| MP3 bitrate | 32 - 256 kbit/s |
| Connectivity | 3.5 mm auxiliary input, RCA line output, 3.5 mm headphone jack, USB port |
| Main functions | Vinyl playback, FM stereo/mono radio, phono/aux recording to USB, USB playback, repeat/random, auto stop |
| Included accessories | Remote control, 45 rpm adapter |
| Batteries for remote control | 2 AAA batteries (not included) |
| Care and cleaning | Clean with a dry cloth only. Do not use detergents or abrasive cloths. |
| Safety | Do not open the device (risk of electric shock). Use in a dry place. Unplug during storms. |
| Repairability | Repair by an authorized center only. Do not repair yourself. |
| Importer | Worlein GmbH, Gewerbestrasse 12, D 90556 Cadolzburg, Germany |
Frequently Asked Questions - PL550BR Soundmaster
User questions about PL550BR Soundmaster
0 question about this device. Answer the ones you know or ask your own.
Ask a new question about this device
Download the instructions for your Turntable in PDF format for free! Find your manual PL550BR - Soundmaster and take your electronic device back in hand. On this page are published all the documents necessary for the use of your device. PL550BR by Soundmaster.