
PL780 - Turntable Soundmaster - Free user manual and instructions
Find the device manual for free PL780 Soundmaster in PDF.
| Product type | Turntable |
| Brand | Soundmaster |
| Model | PL780 |
| Power supply | External AC adapter (DC) included |
| Reading speeds | 33 1/3 and 45 rpm |
| Drive | Belt drive |
| Tonearm | Equilibrated with adjustable counterweight |
| Anti-skating | Adjustable from 0 to 3.5 g |
| Tracking force | Adjustable up to 3.5 g |
| Cartridge | Included (type not specified) |
| Audio outputs | Analog RCA (L+R) with PHONO/LINE switch |
| Bluetooth connectivity | Built-in Bluetooth transmitter |
| USB port | For encoding to computer (Type B) |
| Stroboscope | Built-in for speed verification |
| 45 rpm adapter | Included |
| Protective cover | Included, removable with hinges |
| Rubber mat | Included |
| Included accessories | Platter, belt, mat, 45 rpm adapter, cover, AC adapter, manual |
| Safety | Do not open, risk of electric shock; indoor use only |
| Maintenance | Clean with a dry cloth; do not use detergents |
| Repairability | Entrust to qualified personnel; do not repair yourself |
Frequently Asked Questions - PL780 Soundmaster
User questions about PL780 Soundmaster
0 question about this device. Answer the ones you know or ask your own.
Ask a new question about this device
Download the instructions for your Turntable in PDF format for free! Find your manual PL780 - Soundmaster and take your electronic device back in hand. On this page are published all the documents necessary for the use of your device. PL780 by Soundmaster.
USER MANUAL PL780 Soundmaster
natural_image
Black-and-white photo of a vintage flattex machine with open lid and stand (no visible text or symbols)DEUTSCH
ENGLISH
FRANÇAIS
NEDERLANDS
ITALIANO
PORTUGUÊS
SVENSKA
ČEŠTINA
SLOVENSKÝ
natural_image
Technical line drawing of a mechanical component with an arrow indicating direction (no text or symbols present)
INSTALLATION DES PLATTENTELLERS
Anschlüsse
natural_image
Line drawing of a laptop connected to a rack-mounted device (no text or symbols visible)Copyright by Woerlein GmbH, 90556 Cadolzburg, www.soundmaster.de
Do not dispose of this product with the normal household waste at the end of its life cycle. Return it to a collection point for the recycling of electrical and electronic devices. This is indicated by the symbol on the product, user manual or packaging
The materials are recyclable according to their labeling. By reusing materials or other forms of recycling old devices and packaging, you are making an important contribution to protecting our environment. If necessary, remove batteries and personal data before disposal free of charge and ask your local authority about the responsible disposal point
| WARNING | ! | |
| Risk of electric shockDo not open! |
Caution: To reduce the risk of electric shock, do not remove the cover (or back). There are no user serviceable parts inside. Refer servicing to qualified service personnel.

This symbol indicates the presence of dangerous voltage inside the enclosure, sufficient enough to cause electric shock.

This symbol indicates the presence of important operating and maintenance instructions for the device

Used batteries are hazardous waste and NOT to be disposed of with the household waste! As a consumer you are legally obligated to return all batteries for environmentally responsible recycling – no matter whether or not the batteries contain harmful substances*)
Return batteries free of charge to public collection points in your community or shops selling batteries of the respective kind.
Only return fully discharged batteries ^* marked Cd = cadmium, Hg = mercury, Pb = lead
- Only use mercury and cadmium-free batteries.
- Used batteries are hazardous waste and NOT to be disposed of with the household waste!!!
- Keep batteries away from children. Children might swallow batteries.
- Contact a physician immediately if a battery was swallowed.
- Check your batteries regularly to avoid battery leakage.
- Batteries shall not be exposed to excessive heat such as sunshine, fire or the like.
- CAUTION: Danger of explosion if battery is incorrectly replaced
- Replace only with the same or equivalent type
- Use the device in dry indoor environments only.
- Protect the device from humidity.
- This apparatus is for moderate climates areas use, not suitable for use in tropical climates countries.
Safety, Environmental and Setup Instructions
- No objects filled with liquids, such as vases, shall be placed on the apparatus.
- The mains plug or an appliance coupler is used as the disconnect device, the disconnect devices shall remain readily operable.
- Connect this device to a properly installed and earthed wall outlet only. Make sure the mains voltage corresponds with the specifications on the rating plate.
- Make sure the mains cable stays dry during operation. Do not pinch or damage the mains cable in any way.
- A damaged mains cable or plug must immediately be replaced by an authorized service center.
- In case of lightning, immediately disconnect the device from the mains supply.
- Children should be supervised by parents when using the device.
- Clean the device with a dry cloth only.
- Do NOT use CLEANING AGENTS or ABRASIVE CLOTHS!
- Do not expose the device to direct sunlight or other heat sources.
- Install the device at a location with sufficient ventilation in order to prevent heat accumulation.
- Do not cover the ventilation openings!
- Install the device at a safe and vibration-free location.
- Install the device as far away as possible from computers and microwave units; otherwise radio reception may be disturbed.
- Do not open or repair the enclosure. It is not safe to do so and will void your warranty. Repairs only by authorized service/ customer center.
- No naked flame sources, such as lighted candles, should be placed on the unit.
- When you are necessary to ship the unit store it in its original package. Save the package for this purpose.
- In case of malfunction due to electrostatic discharge or fast transient (burst), remove and reconnect the power supply.
- If the unit is not using for a long period of time, disconnect it from the power supply by unplugging the power plug. This is to avoid the risk of fire.
LOCATION OF CONTROLS
FRONT VIEW

1 45 RPM adaptor
2 Pitch strobe
3 Aluminum platter
4 Metal finishing
5 Center spindle
6 Counterweight
7 Anti-skating
8 Cue lever
9 Tone arm
10 Pitch control
11 Stop / 33 / 45 RPM switch
12 Cartridge
13 Hinges
BACK VIEW

14 Feet
Feet
15 GND Connection thread
16 Analog audio output jacks (L + R)
17 PHONO/LINE/BT selection switch
18 PC encoding
19 DC input connector
20 Power ON/OFF button
INSTALLATION
CONTENT OF DELIVERY
Main unit
AC Adapter
Instruction Manual
Dust cover
Rubber mat
▶ Aluminum platter
45 RPM adapter
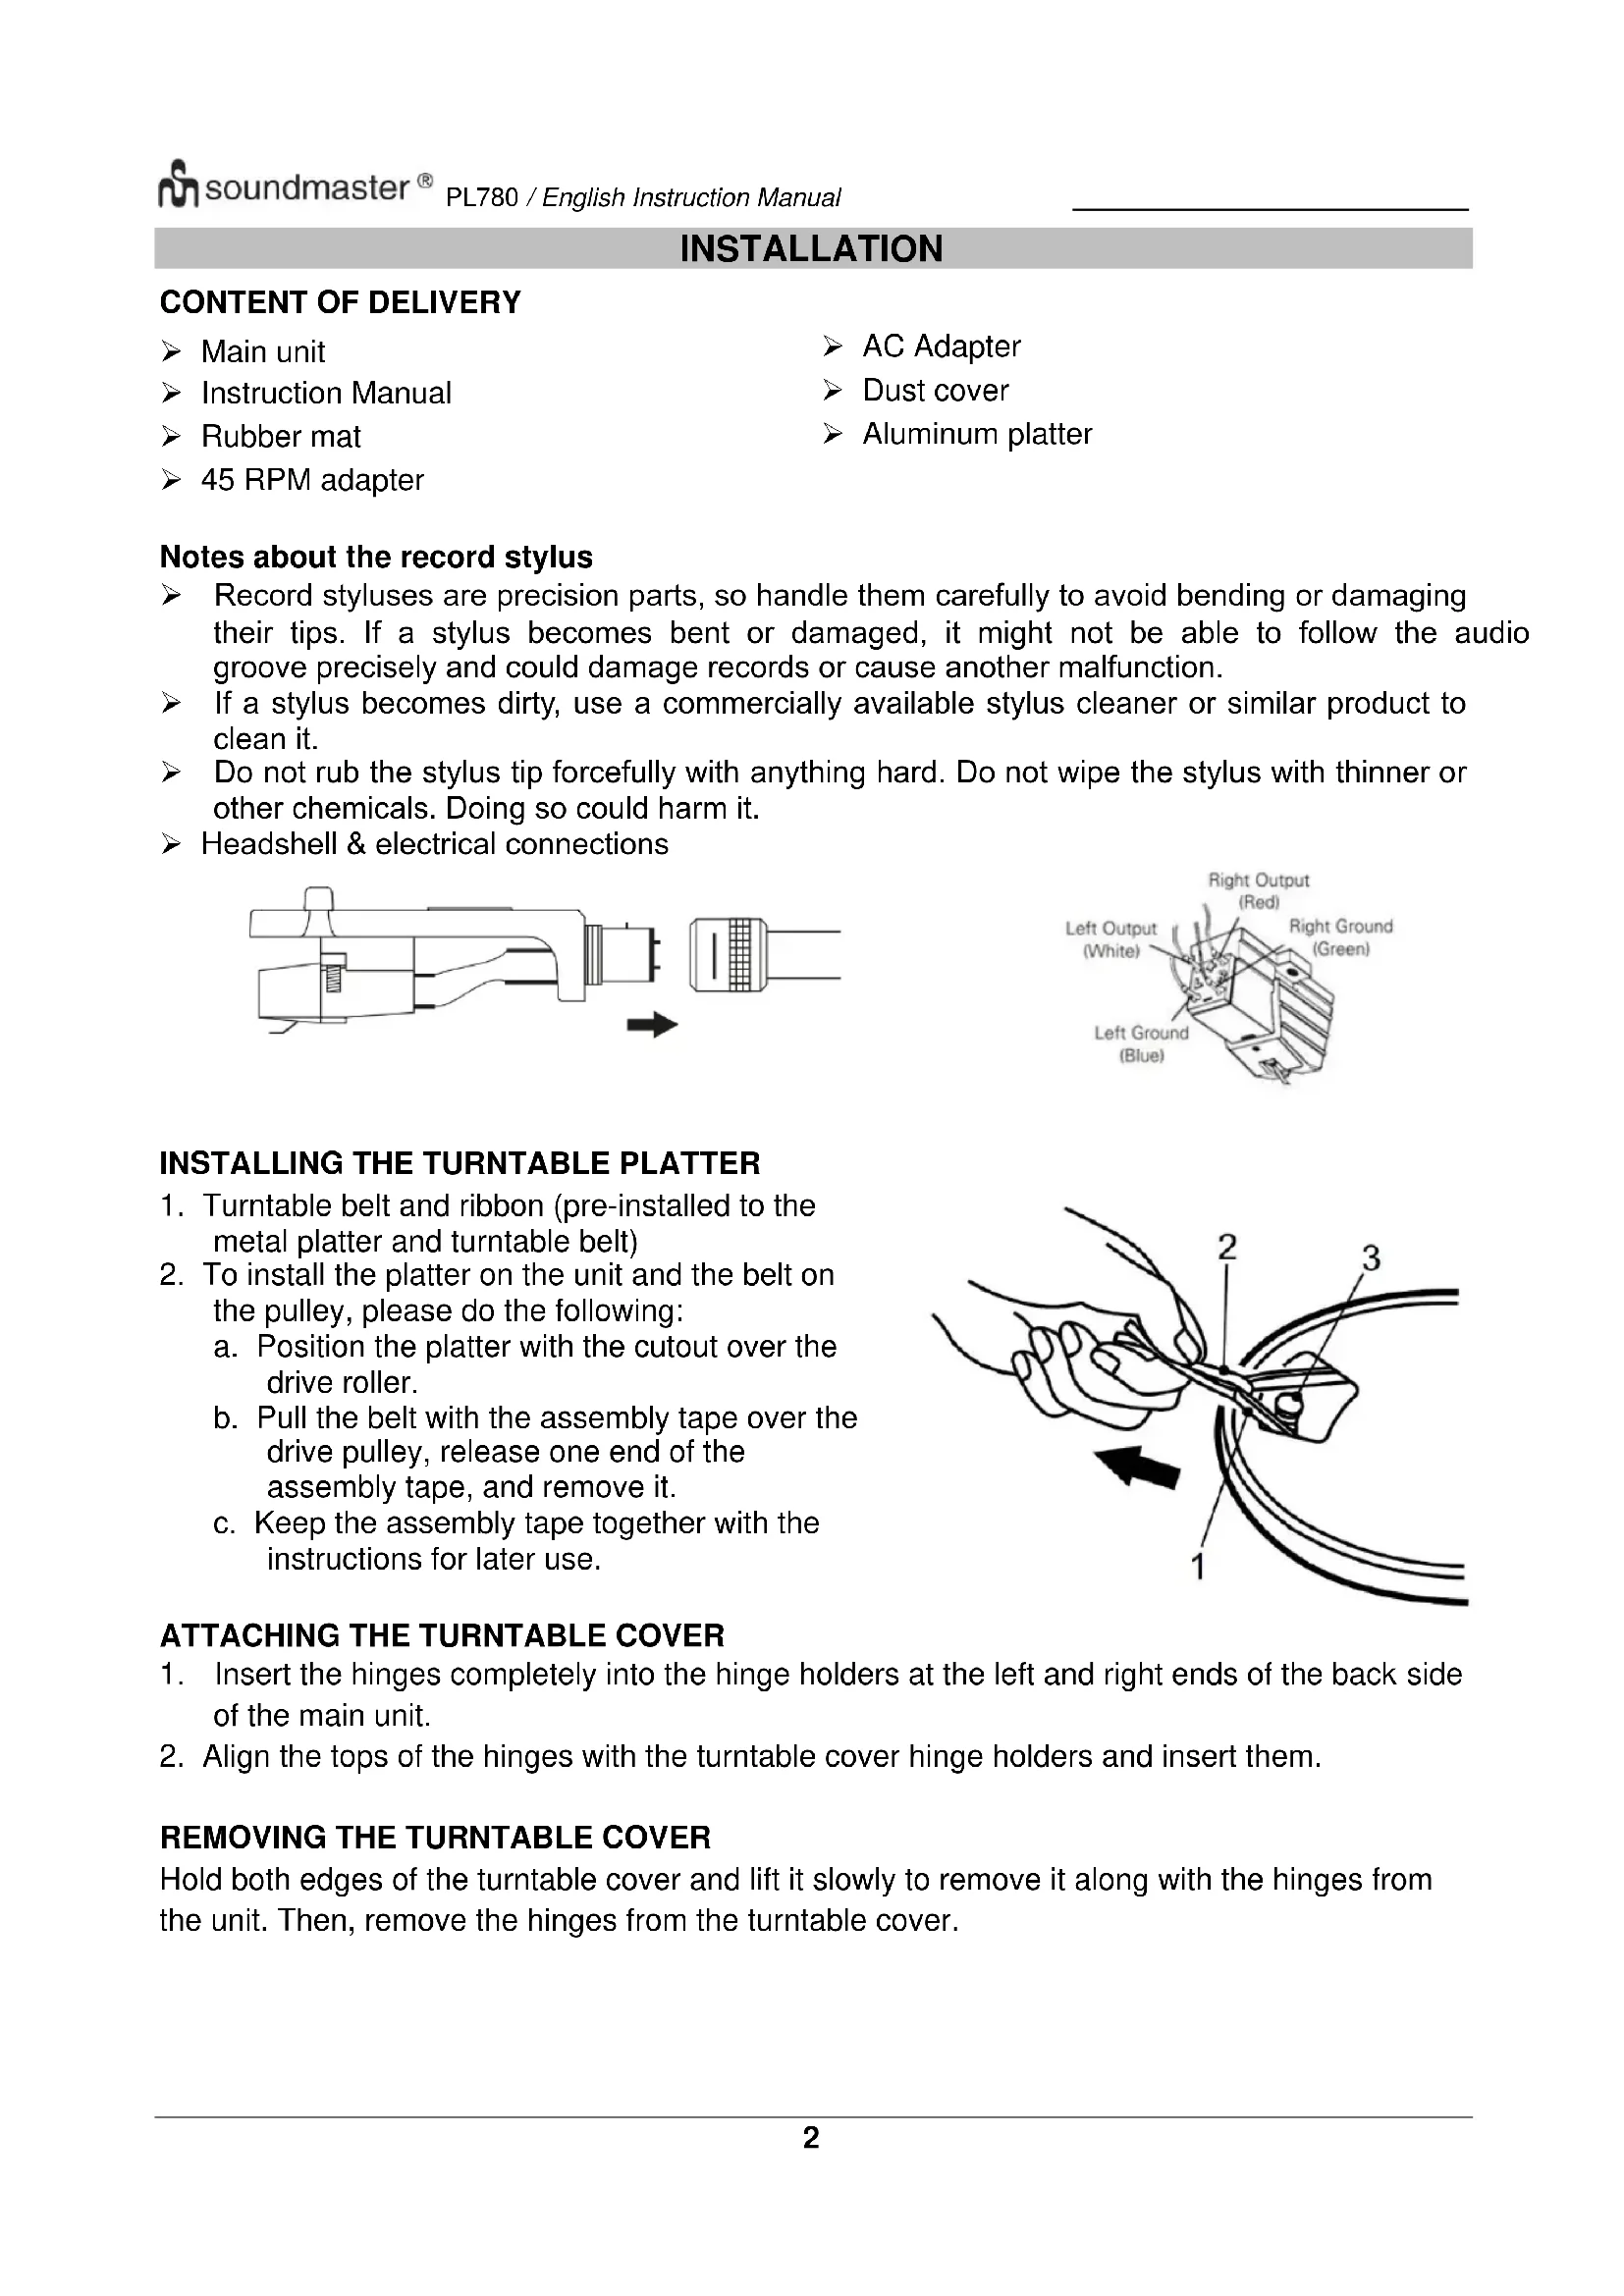
Notes about the record stylus
Record styluses are precision parts, so handle them carefully to avoid bending or damaging their tips. If a stylus becomes bent or damaged, it might not be able to follow the audio groove precisely and could damage records or cause another malfunction.
If a stylus becomes dirty, use a commercially available stylus cleaner or similar product to clean it.
Do not rub the stylus tip forcefully with anything hard. Do not wipe the stylus with thinner or other chemicals. Doing so could harm it.
▶ Headshell & electrical connections

natural_image
Technical line drawing of a mechanical connector with internal components and an arrow indicating direction (no text or symbols)
INSTALLING THE TURNTABLE PLATTER
-
Turntable belt and ribbon (pre-installed to the metal platter and turntable belt)
-
To install the platter on the unit and the belt on the pulley, please do the following:
a. Position the platter with the cutout over the drive roller.
b. Pull the belt with the assembly tape over the drive pulley, release one end of the assembly tape, and remove it.
c. Keep the assembly tape together with the instructions for later use.

ATTACHING THE TURNTABLE COVER
- Insert the hinges completely into the hinge holders at the left and right ends of the back side of the main unit.
- Align the tops of the hinges with the turntable cover hinge holders and insert them.
REMOVING THE TURNTABLE COVER
Hold both edges of the turntable cover and lift it slowly to remove it along with the hinges from the unit. Then, remove the hinges from the turntable cover.
ADJUSTING THE TONE ARM
Level Balance Adjustment
- Set the "ANTI-SKATING" knob to "0".
- Release the arm clamp and move the tonearm to the space between the arm rest and the platter, taking care not to damage the stylus.
- Set the "CUE LEVER" to the down position.
-
Support the headshell's finger-lift with one hand and attain the level balance by turning the counterweight either clockwise or counter-clock wise. "Level balance" means that the tonearm is parallel to the record on the platter and that the tonearm pipe. Therefor should not tilt toward the counterweight side or the headshell side.
-
Return the tonearm to the arm rest and fasten the arm clamp. Since the tracking force is zero when the tonearm is balanced level, turn just the tracking force scale ring in front of the counter-weight and set the "0" on the scale to the index line on the shaft. Be careful not to turn the counterweight otherwise the tonearm will become unbalanced e

Tracking Force Adjustment
Turning the counterweight, set the correct tracking force opposite the index line on the counterweight shaft. The tracking force scale ring has 0.5g steps and one full turn of the counterweight will yield a tracking force of 3.5g
Anti-Skating Adjustment
To adjust the Anti-skating mechanism, turn the “ANTI-SKATING” Knob so that the number corresponding to the required tracking force is opposite the index line. As a rule, the setting of the anti-skating function should correspond to that of the support weight of the needle (3.5 grams).


CONNECTIONS
Analog audio output jacks (L + R)
These output analog audio signals.
The "PHONO EQ" switch setting changes the type of output signal.
Use the included audio cable (or commercially available ones) to connect other equipment to the output jacks of this unit.
PHONO/LINE Selection Switch
LINE: Signals that have been amplified by the built-in equalizer amp are output from the analog audio output jacks.
➢ PHONO: Use this when connecting to equipment that has PHONO inputs.
Caution
When set to ON, if connected to the PHONO inputs of an amplifier, for example, the output from speakers and headphones will be very loud, which could damage equipment or harm hearing.
DC input connector
Do not use any AC adapter other than the one included.
➢ Ensure that the voltage is the same as that indicated on the ac adapter identification plate.
➢ Connect the supplied AC adapter to a properly installed safety power socket and the plug of the cable into the DC IN jack at the back side of the unit.
➢ Unplug the power cord from the outlet when you are not planning to use the unit for an extended period.
BASIC OPERATIONS
Playing records
- Press the "STANDBY/ON" button at the back side of the unit to turn it on.

- Open the turntable cover slowly.
- Place a record on the turntable. When playing a 45 RPM large-hole single record, use the included adapter.
- Turn the "STOP / 33 / 45" switch to 33 or 45 position to start the turntable, it is rotating and blue LED indication is lighting.
- Move the tone arm clasp to release the tone arm.
- Lift the "CUE LEVER".
- You can also leave the cue lever down and moved the raised tone arm over the record and then lower the tone arm slowly to start playback.
- Move the tone arm to the edge of the record or the track where you want to start playback.
- Lower the tone arm slowly until the stylus touches the record and playback begins.
When playback finishes
- Slightly lift the cue lever or the head-shell hook and return the tone arm to its resting position.
- Turn the "STOP / 33 / 45" switch to "STOP" to stop the turntable. When the turntable stops, the blue LED will also become unlit.
How to set pitch
- When the external adapter is connected and powered, turn the pitch function on automatically.
- Use the "PITCH CONTROL" knob in conjunction with the Pitch to vary the platter's rotational speed by as much as +/- 50%.
How to measure pitch
Four rows of strobe dots on the platter edge are designed to measure and verify the platter speed. Just pay attention to the top two rings. The top one for 33 1/3 RPM and the second from the top for 45 RPM
When the corresponding row of strobe dots appears to be stationary, the turntable will be at the operating speed percentage indicated below:
If the dots appear to be moving to the right, the platter is moving below rated speed; if they appear to be moving to the left, the platter is moving above rated speed.
BLUETOOTH® TRANSMITTER
Pairing BLUETOOTH® to Stereo System
- Set the BLUETOOTH ^® receiver device to pairing mode;
- Turn on the unit and set the switch to "BT TR" at the back side. The turntable is ready for connection and the BLUETOOTH® indicator LED light is flashing.
- When the pairing is successfully performed, the turntable BLUETOOTH® indicator LED light is fixed.
- To disable the connection, set the switch to "LINE" or "PHONO" at the back side.
RECORDING WITH A COMPUTER
Connect this record player to a computer using a commercially-available USB cable to convert audio signals from a record to digital data and send them to the computer.
Connecting with a computer
- Connect this record player to a computer using a commercially-available USB cable to convert audio signals from a record to digital data and send them to the computer.

natural_image
Line drawing of a laptop connected to a physical electronic device (no text or symbols present)- Turn the computer on: confirm that the operating system is working correctly.
- Turn the record player on.
- When they are connected, the computer will automatically detect this unit's USB port and identify it as "USB Audio CODEC".
Install "Audacity" software in your computer.
With a computer, you can record the audio from this record player. You must first install a software that can be used for audio recording on the computer. For example, the software "Audacity" for free download.
- Install and open the software.
- Click the "Record" icon in the software. The encoding is going on.
- When finish the encoding, click "STOP" icon.
- Open the Files icon in the software and save the project. The project can be exported in MP3 or other audio format as you like.
The current instruction manual can be downloaded from www.soundmaster.de
Technical changes and misprints reserved.
Copyright by Woerlein GmbH, 90556 Cadolzburg, www.soundmaster.de
Duplication only with the permission of Woerlein GmbH


PROTECTION DE L'ENVIRONNEMENT

natural_image
Technical line drawing of a mechanical connector with an arrow indicating direction (no text or symbols present)
INSTALLATION DU COUVERCLE DE LA PLATINE
natural_image
Line drawing of a computer setup with monitor, keyboard, and mouse (no text or symbols)natural_image
Technical line drawing of a mechanical connector with an arrow indicating direction (no text or symbols present)
DE DRAAITAFELDEKSEL BEVESTIGEN
natural_image
Line drawing of a computer setup with monitor, keyboard, and control panel (no text or symbols)natural_image
Technical line drawing of a mechanical connector with an arrow indicating direction (no text or symbols)
APPLICAZIONE DEL COPERCHIO DEL GIRADISCHI
natural_image
Line drawing of a computer setup with monitor, keyboard, and control panel (no text or symbols)natural_image
Technical line drawing of a mechanical connector with an arrow indicating direction (no text or symbols present)
FIXAR A TAMPA DO GIRA-DISCOS
natural_image
Line drawing of a computer setup with monitor, keyboard, and control panel (no text or symbols)*) markerade Cd = kadmium, Hg = kvicksilver, Pb = bly

VARNING - OSYNLIG LASERSTRÅLNING NÄR DU ÖPPNAR LOCKET ELLER TRYCKER PÅ SÄKERHETSSPÄRREN. UNDVIK EXPONERING FÖR LASERSTRÅLEN.
natural_image
Technical line drawing of a mechanical connector assembly (no text or symbols)
MONTERING AV SKIVSPELARENS LOCK
natural_image
Line drawing of a laptop connected to a physical electronic device (no text or symbols visible)natural_image
Technical line drawing of a mechanical connector with an arrow indicating direction (no text or symbols)
natural_image
Line drawing of a laptop connected to a physical electronic device (no text or symbols visible)Cadolzburg, www.soundmaster.de
natural_image
Technical line drawing of a mechanical connector with an arrow indicating direction (no text or symbols present)
PRIPOJENIE KRYTU GRAMOFÓNU
natural_image
Line drawing of a laptop connected to a physical electronic device (no text or symbols visible)D 90556 Cadolzburg, Germany
Tel: +49 9103 71 67 0
Fax: +49 9103 71 67 12
E-Mail: info@soundmaster.de
Internet: www.soundmaster.de
Hereby, Wörlein GmbH declares that this device is in compliance with the essential requirements and other relevant provisions of Directive 2014/53/EU.
A copy of the declaration of conformity can be obtained from the above address.
- INSTALLATION DES PLATTENTELLERS
- Anschlüsse
- LOCATION OF CONTROLS
- FRONT VIEW
- BACK VIEW
- INSTALLATION
- CONTENT OF DELIVERY
- Notes about the record stylus
- INSTALLING THE TURNTABLE PLATTER
- ATTACHING THE TURNTABLE COVER
- REMOVING THE TURNTABLE COVER
- ADJUSTING THE TONE ARM
- Level Balance Adjustment
- Tracking Force Adjustment
- Anti-Skating Adjustment
- CONNECTIONS
- Analog audio output jacks (L + R)
- PHONO/LINE Selection Switch
- Caution
- DC input connector
- BASIC OPERATIONS
- Playing records
- When playback finishes
- How to set pitch
- How to measure pitch
- BLUETOOTH® TRANSMITTER
- Pairing BLUETOOTH® to Stereo System
- RECORDING WITH A COMPUTER
- Connecting with a computer
- Install "Audacity" software in your computer.
- PROTECTION DE L'ENVIRONNEMENT
- INSTALLATION DU COUVERCLE DE LA PLATINE
- DE DRAAITAFELDEKSEL BEVESTIGEN
- APPLICAZIONE DEL COPERCHIO DEL GIRADISCHI
- FIXAR A TAMPA DO GIRA-DISCOS
- VARNING - OSYNLIG LASERSTRÅLNING NÄR DU ÖPPNAR LOCKET ELLER TRYCKER PÅ SÄKERHETSSPÄRREN. UNDVIK EXPONERING FÖR LASERSTRÅLEN.
- MONTERING AV SKIVSPELARENS LOCK
- PRIPOJENIE KRYTU GRAMOFÓNU
Brand : Soundmaster
Model : PL780
Category : Turntable