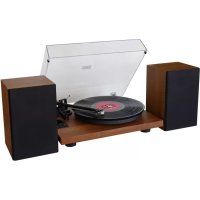
PL895 - Turntable Soundmaster - Free user manual and instructions
Find the device manual for free PL895 Soundmaster in PDF.
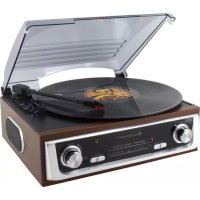
| Product Type | Turntable with DAB+/FM radio, CD player, USB, Bluetooth |
| Power Supply | AC 100-240V~50/60Hz |
| Output Power | 2 x 12.5 W RMS |
| Turntable Speed | 33 and 45 RPM |
| DAB+ Frequency Range | 174.928 – 239.200 MHz |
| FM Frequency Range | 87.5 – 108.00 MHz |
| Number of Preset Stations | 20 FM, 20 DAB+ |
| Supported Audio Formats | CD, MP3 (via USB) |
| Connectivity | Bluetooth (reception), auxiliary input (AUX IN), line output (RCA), headphone |
| USB Recording | CD, turntable, Bluetooth, AUX, DAB/FM |
| Special Functions | Alarm (2), sleep timer, equalizer (POP/CLASSIC/ROCK/JAZZ/FLAT), mute |
| Package Contents | Main unit, speakers, turntable platter, slip mat, dust cover, DAB/FM antenna, instruction manual |
| Safety | Class 1 laser, protection against electric shock, auto power-off after 10 min in standby |
| Maintenance | Clean with a dry cloth, do not use abrasive detergents |
| Repairability | Repairs only by qualified personnel; no user-serviceable parts |
Frequently Asked Questions - PL895 Soundmaster
User questions about PL895 Soundmaster
0 question about this device. Answer the ones you know or ask your own.
Ask a new question about this device
Download the instructions for your Turntable in PDF format for free! Find your manual PL895 - Soundmaster and take your electronic device back in hand. On this page are published all the documents necessary for the use of your device. PL895 by Soundmaster.
USER MANUAL PL895 Soundmaster
natural_image
Vintage electronic music kit with a CD, speaker, and sound block (no visible text or symbols)DEUTSCH
ENGLISH
FRANÇAIS
NEDERLANDS
ITALIANO
PORTUGESE
SVENSKA
SLOVAK
Hersteller
text_image
Technical diagram of a portable radio with labeled parts including two speakers and a CD, showing internal components and control panel.natural_image
Diagram of a battery pack with two batteries and a switch, showing internal components and a downward arrow indicating motion (no text or symbols)GRUNDBEDIENUNG
natural_image
Line drawings showing three hands holding a CD or DVD disc, with one hand pressing up and others holding the disc (no text or symbols present)
natural_image
Diagram of a mechanical assembly with a hook and lever, no text or symbols presenttext_image
Diagram illustrating two mechanical or electrical switch configurations with labeled parts and directional arrowsflowchart
graph TD
    A["Step 1: Roll and expansion"] --> B["Step 2: Rotation and displacement"]
    B --> C["Step 3: Rotation and displacement"]
    C --> D["Step 4: Rotation and displacement"]
Germany Web: www.soundmaster.de
Copyright by Woerlein GmbH, 90556 Cadolzburg, www.soundmaster.de
Do not dispose of this product with the normal household waste at the end of its life cycle. Return it to a collection point for the recycling of electrical and electronic devices. This is indicated by the symbol on the product, user manual or packaging
The materials are recyclable according to their labeling. By reusing materials or other forms of recycling old devices and packaging, you are making an important contribution to protecting our environment. If necessary, remove batteries and personal data before disposal free of charge and ask your local authority about the responsible disposal point.
| WARNINGRisk of electric shockDo not open! |
Caution: To reduce the risk of electric shock, do not remove the cover (or back). There are no user serviceable parts inside. Refer servicing to qualified service personnel.

This symbol indicates the presence of dangerous voltage inside the enclosure, sufficient enough to cause electric shock.
This symbol indicates the presence of important operating and maintenance instructions for the device
Used batteries are hazardous waste and NOT to be disposed of with the household waste! As a consumer you are legally obligated to return all batteries for environmentally responsible recycling – no matter whether or not the batteries contain harmful substances*)
Return batteries free of charge to public collection points in your community or shops selling batteries of the respective kind. Only return fully discharged batteries ^* marked Cd = cadmium, Hg = mercury, Pb = lead
- Only use mercury and cadmium-free batteries.
- Used batteries are hazardous waste and NOT to be disposed of with the household waste!!!
- Keep batteries away from children. Children might swallow batteries.
- Contact a physician immediately if a battery was swallowed.
- Check your batteries regularly to avoid battery leakage.
- Batteries shall not be exposed to excessive heat such as sunshine, fire or the like.
- CAUTION: Danger of explosion if battery is incorrectly replaced
- Replace only with the same or equivalent type
CAUTION - INVISIBLE LASER RADIATION WHEN OPENING THE COVER OR PRESSING THE SAFETY INTERLOCK. AVOID EXPOSURE TO THE LASER BEAM.
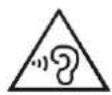
To prevent possible hearing damage, do not listen at high volume levels for long periods
- Use the device in dry indoor environments only.
- Protect the device from humidity.
- This apparatus is for moderate climates areas use, not suitable for use in tropical climates countries.
Safety, Environmental and Setup Instructions
- No objects filled with liquids, such as vases, shall be placed on the apparatus.
- The mains plug or an appliance coupler is used as the disconnect device, the disconnect devices shall remain readily operable.
- Connect this device to a properly installed and earthed wall outlet only. Make sure the mains voltage corresponds with the specifications on the rating plate.
- Make sure the mains cable stays dry during operation. Do not pinch or damage the mains cable in any way.
- A damaged mains cable or plug must immediately be replaced by an authorized service center.
- In case of lightning, immediately disconnect the device from the mains supply.
- Children should be supervised by parents when using the device.
- Clean the device with a dry cloth only.
- Do NOT use CLEANING AGENTS or ABRASIVE CLOTHS!
- Do not expose the device to direct sunlight or other heat sources.
- Install the device at a location with sufficient ventilation in order to prevent heat accumulation.
- Do not cover the ventilation openings!
- Install the device at a safe and vibration-free location.
- Install the device as far away as possible from computers and microwave units; otherwise radio reception may be disturbed.
- Do not open or repair the enclosure. It is not safe to do so and will void your warranty. Repairs only by authorized service/ customer center.
- No naked flame sources, such as lighted candles, should be placed on the unit.
- When you are necessary to ship the unit store it in its original package. Save the package for this purpose.
- In case of malfunction due to electrostatic discharge or fast transient (burst), remove and reconnect the power supply.
- If the unit is not using for a long period of time, disconnect it from the power supply by unplugging the power plug. This is to avoid the risk of fire.
LOCATIONS OF CONTROLS
FRONT VIEW
text_image
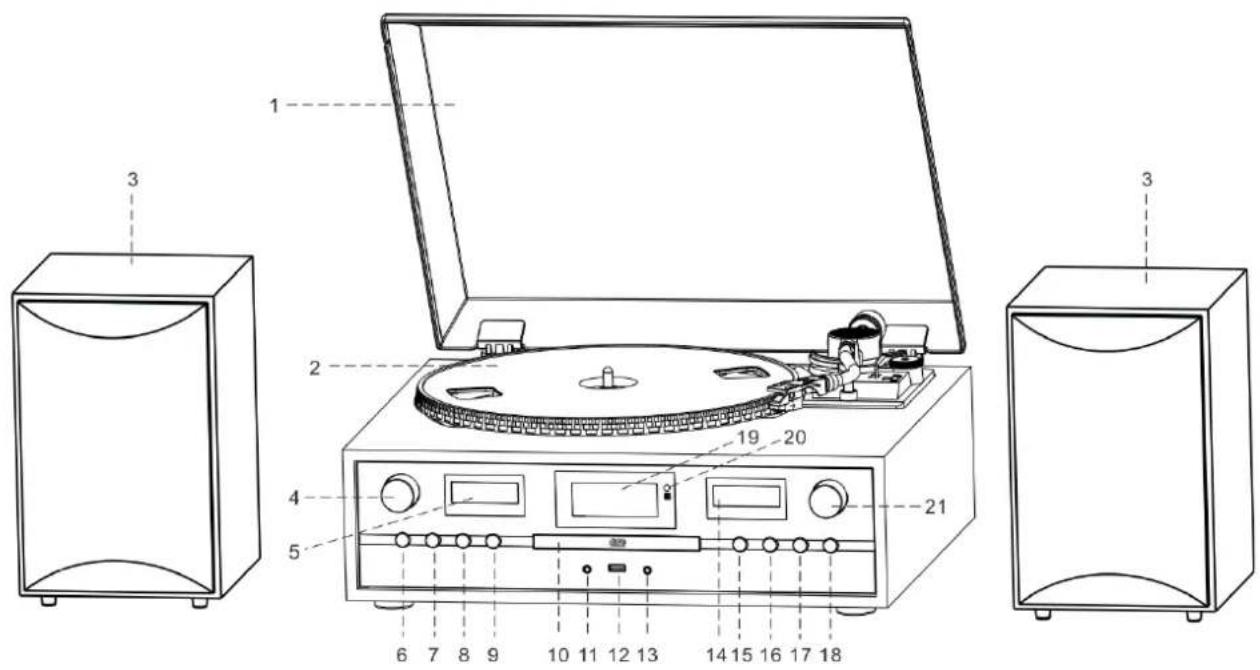
Technical diagram of a portable radio with labeled parts including speaker, receiver, and front panel1 Dustcover
2 Turntable
3 Speaker
4 VOLUME knob
5 Left VU meter
6 STANDBY/MODE button
7 PLAY-MODE button
8 RECORD button
9 OPEN/CLOSE button
10 CD door
11 Headphone Socket
12 USB socket
13 AUX-IN Socket
14 Right VU meter
15 STOP/PRESET button
16 PLAY/MENU button
17 DN/F-R/SCAN button
18 UP/F-F/INFO button
19 LCD display
20 Remote Sensor
21 SELECT/ENTER knob
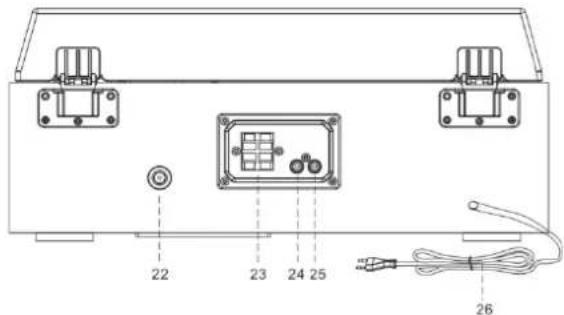
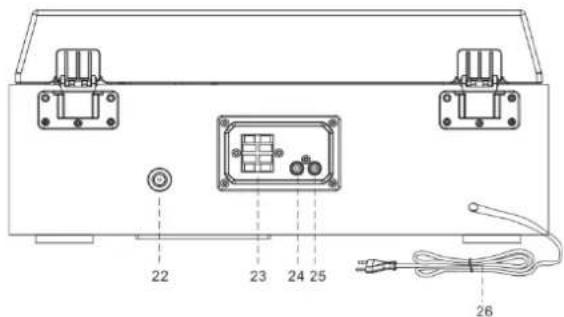
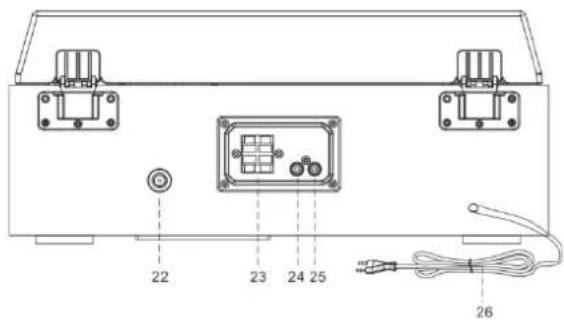
BACK VIEW
text_image
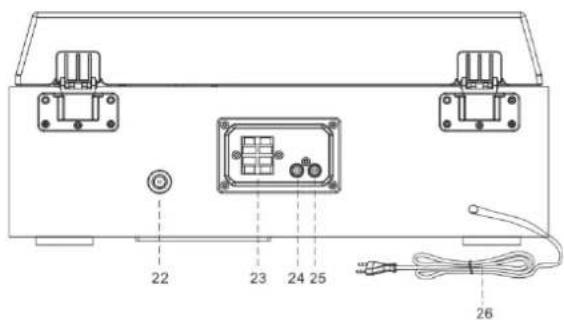
22 23 24 25 2622 Antenna Socket
23 Speaker Terminal
24 Left Line Out Socket
25 Right Line Out Socket
26 AC Power Cord
REMOTE CONTROL
- ▲Open Close
- RECORD
- DN ▶Track backwards
- VOL - Volume
- TUNER/MENU – Tuning/Menu down
- P.MODE - Repeat
- SCAN
- INFO Information
- Power On/Off
- UP ▶Track forwards
- Play/Pause Enter button
- STOP
- VOL + Volume +
- MODE Function
- EQ Sound settings
- MENU
- TUNER/MENU + Tuning/Menu up
- FOLDER
- PRESET
- DELETE
- PROGRAM
- MUTE

text_image
27 28 29 30 31 32 33 34 ▲ I/O ●REC DN ENTER UP ■STOP VOL- VOL+ MODE TUNER MENU P-MODE SCAN INFO MENU FOLDER PROGRAM MUTE DELETE 35 36 37 38 39 40 41 42 43 44 45 46 47 48 soundmaster® ELITE IncNOTE: All of the buttons on the remote control have same function as these buttons at the unit.
TURNTABLE
- Single 45 RPM Adaptor
- Turntable Platter
- Transit Screw
- Counter Weight
- Pitch Control
- Cue Lever
- Speed Selector (33&45 rpm)
- Tone Arm Lock
- Tone Arm with Stylus

text_image
49 50 51 52 53 54 55 56 57CONTENT OF DELIVERY
Main unit
▶ Turntable platter
Dust cover
Instruction manual
▶ Speaker
Slip mat
DAB / FM Antenna
GETTING STARTED
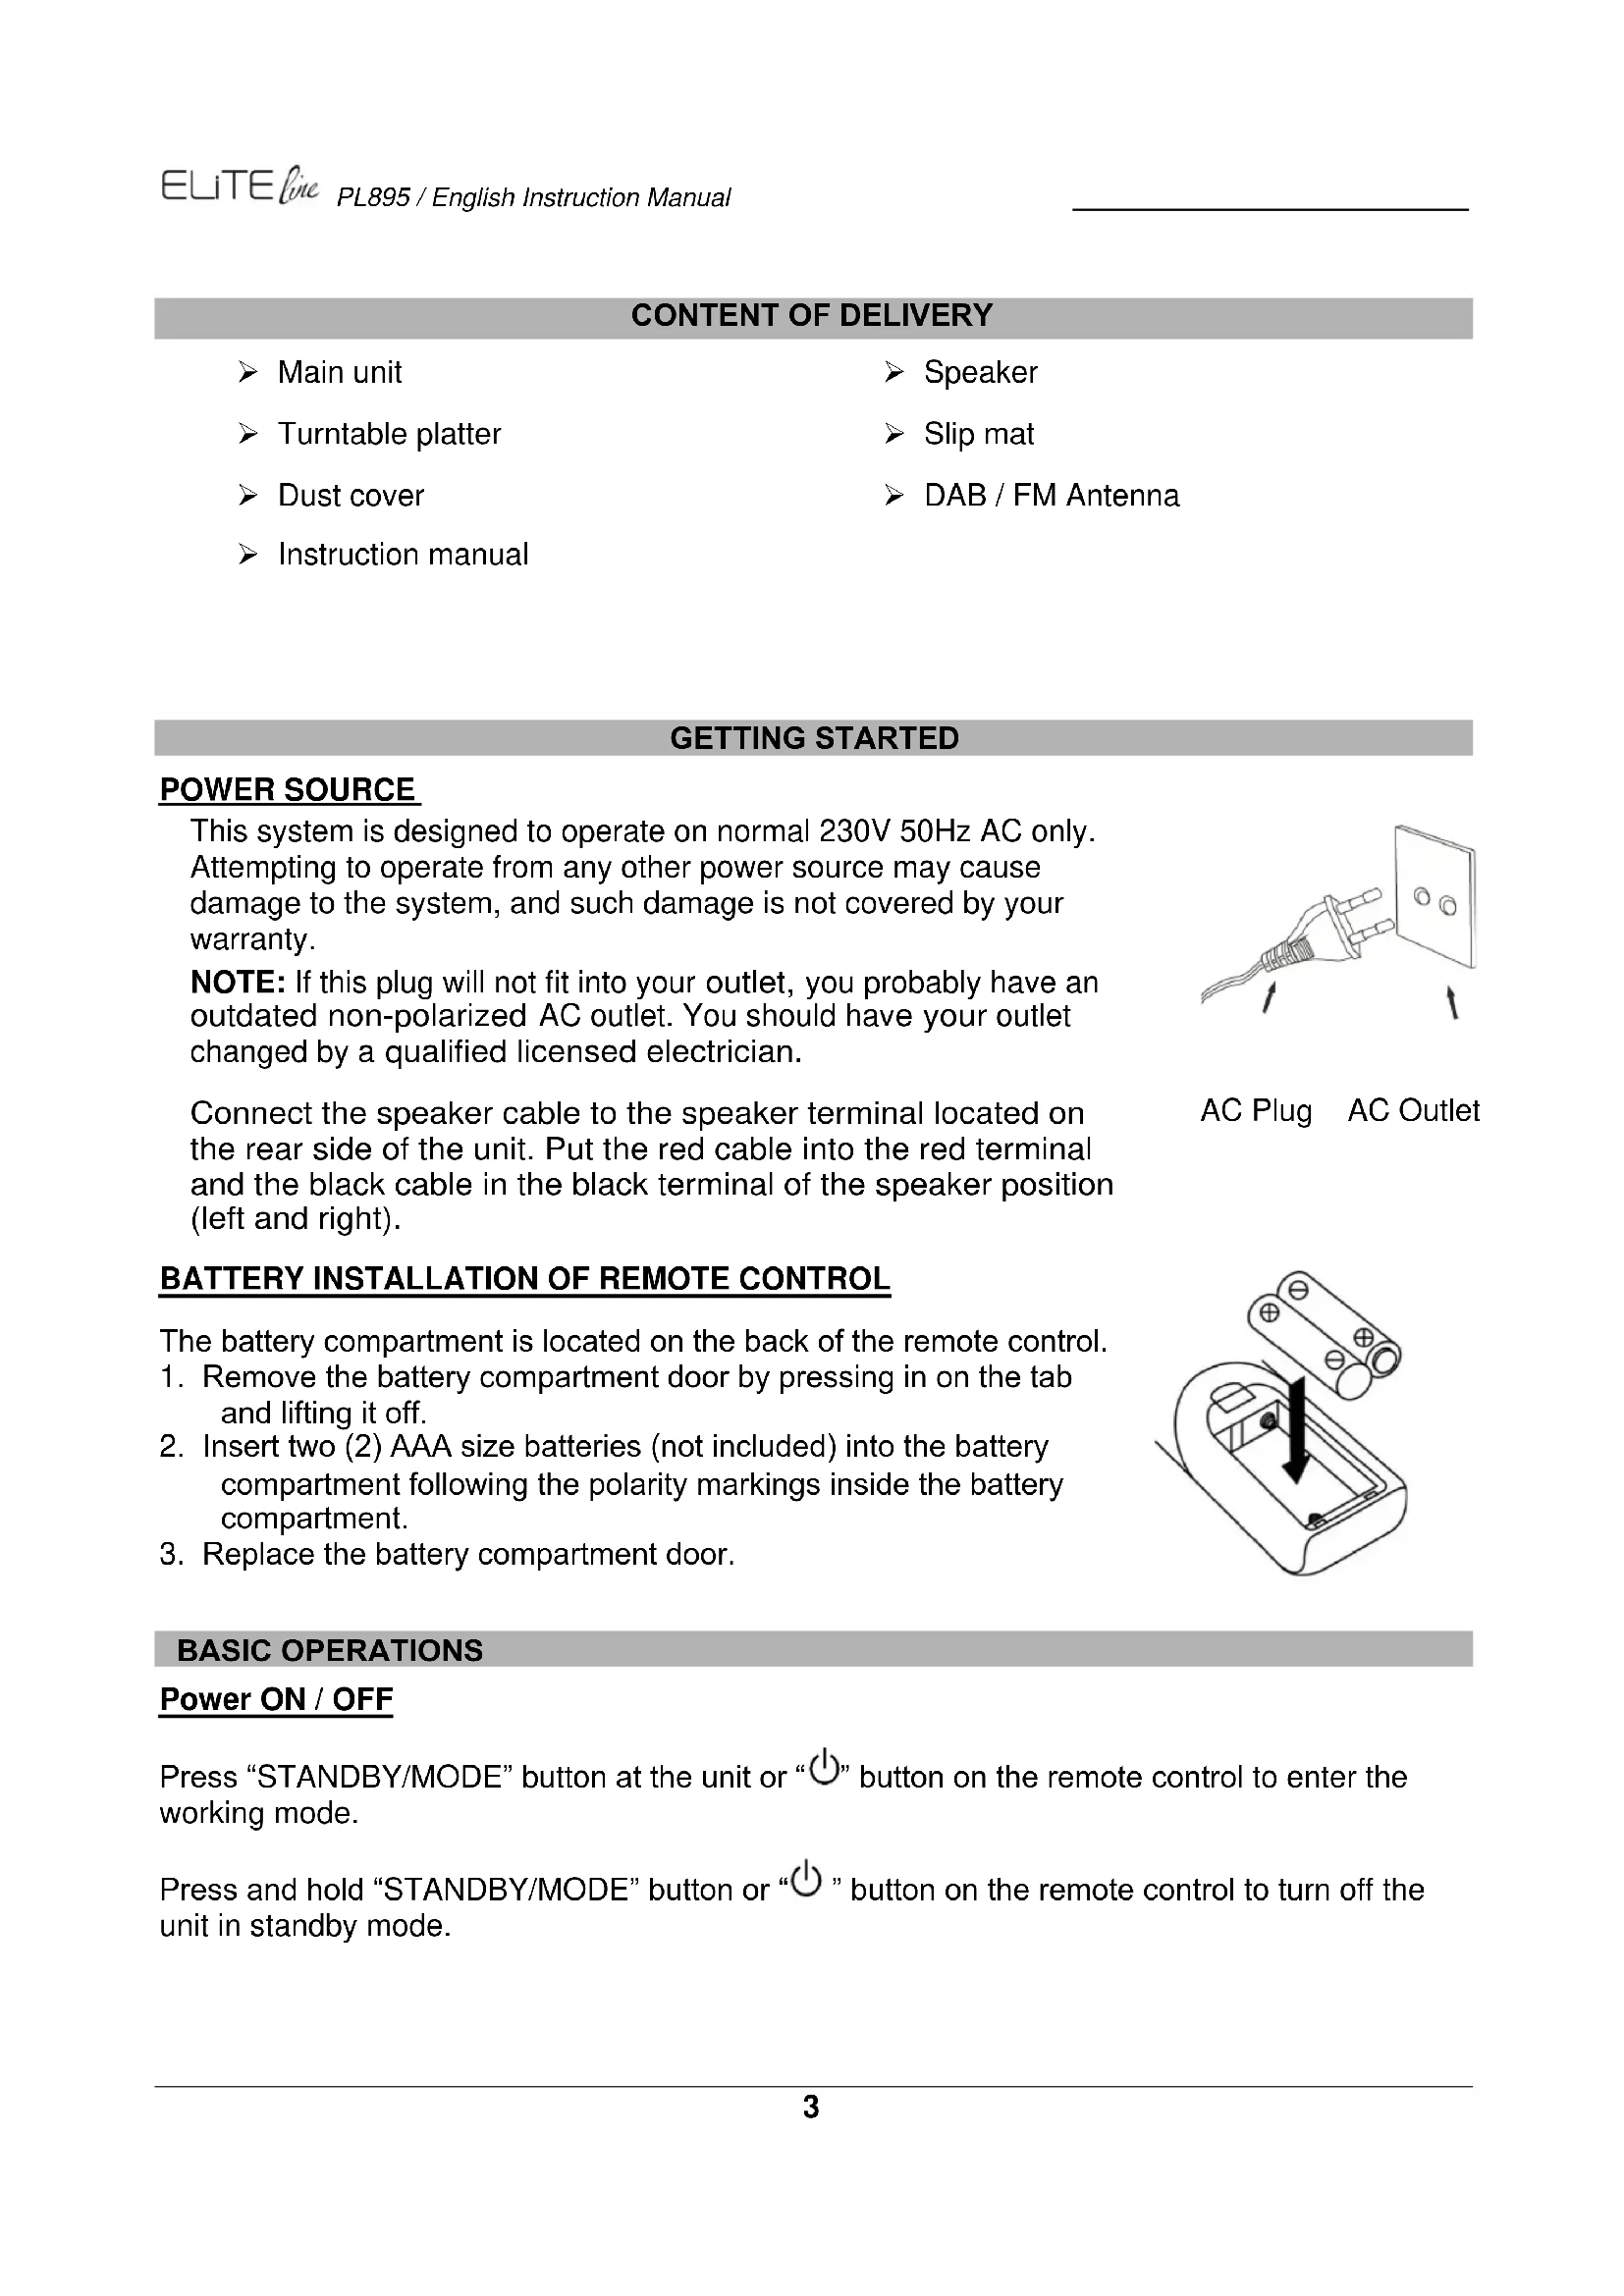
POWER SOURCE
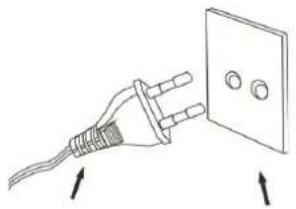
This system is designed to operate on normal 230V 50Hz AC only. Attempting to operate from any other power source may cause damage to the system, and such damage is not covered by your warranty.
NOTE: If this plug will not fit into your outlet, you probably have an outdated non-polarized AC outlet. You should have your outlet changed by a qualified licensed electrician.
Connect the speaker cable to the speaker terminal located on the rear side of the unit. Put the red cable into the red terminal and the black cable in the black terminal of the speaker position (left and right).
natural_image
Simple line drawing of a plug connecting to an open electrical outlet (no text or symbols)AC Plug AC Outlet
BATTERY INSTALLATION OF REMOTE CONTROL
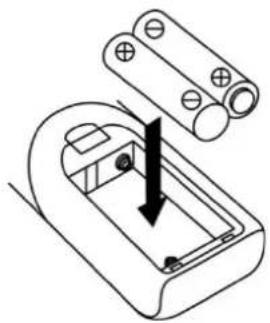
The battery compartment is located on the back of the remote control.
-
Remove the battery compartment door by pressing in on the tab and lifting it off.
-
Insert two (2) AAA size batteries (not included) into the battery compartment following the polarity markings inside the battery compartment.
-
Replace the battery compartment door.
natural_image
Diagram of a battery pack with an arrow indicating a component, no text or symbols presentBASIC OPERATIONS
Power ON / OFF
Press "STANDBY/MODE" button at the unit or "💡" button on the remote control to enter the working mode.
Press and hold "STANDBY/MODE" button or "⏻" button on the remote control to turn off the unit in standby mode.
Selecting Modes
Press the "STANDBY/MODE" button on the unit or the "MODE" button on the remote repeatedly to switch between modes.
Adjusting Volume
Rotate the "VOL" knob on the unit or press "VOL -/+ " buttons on the remote to decrease / increase the volume.
Total 39 level volume and it displays Vol min – Vol max.
ERP power management
If nobody presses and holds the POWER button to turn OFF the unit after stopping playing, the unit will power off automatically after around 10 minutes. Press "STANDBY/ MODE" button on the unit or the "button" button on the remote to wake the device up from standby mode.
DAB OPERATION
- Connect the FM / DAB antenna at the back of the unit.
- Turn the system 'on' and press the "MODE" button to enter into DAB mode. The unit will scan the DAB station automatically till receive the DAB station.
- Press the "TUNER MENU -" or "TUNER MENU +" button or rotate the "SELECT/ENTER" knob to choose the DAB stations manually.
- During DAB playing mode, press "INFO" button to see the information of the playing DAB station on the screen, i.e. Program Type, Ensemble Information, Transponder, Audio Bit-Rate, Signal-Strength, Time/Date, DLS Information.
DAB FULL SCAN
- During DAB mode, press the "PLAY/PAUSE/MODE" button to enter the DAB menu.
- Press the "TUNER MENU -" or "TUNER MENU +" button or rotate the "SELECT/ENTER" knob to choose "Station scan"
- Press the "TUNER MENU -" or "TUNER MENU +" button or rotate the "SELECT/ENTER" knob to choose "Full scan"
The unit scans for all available stations.
DAB Manual tune
- During DAB mode, press the "PLAY/PAUSE/MODE" button to enter the DAB menu.
- Press the "TUNER MENU -" or "TUNER MENU +" button or rotate the "SELECT/ENTER" knob to choose "Station scan"
- Press the "TUNER MENU -" or "TUNER MENU +" button or rotate the "SELECT/ENTER" knob to choose "Manual tune"
You can choose your desired frequency by rotate the "SELECT/ENTER" knob and press it to confirm.
MEMORY FUNCTION IN DAB/FM MODE
- In DAB/FM playing mode, choose the desired radio station. Press the "PRESET" button to get into the preset station list. Choose with the "SELECT/ENTER" knob or the "TUNER MENU -" or "TUNER MENU +" button your desired preset station.
- Press and hold "ENTER" button for 2 seconds to confirm and 'Preset x Stored' will show on the display. (x = selected preset station)
- Repeat the above 1 - 2 steps to program 20 desired DAB stations or 20 FM stations.
- Press the "PRESET" button to get into the preset station list. Choose with the "SELECT/ENTER" knob or the "TUNER MENU -" or "TUNER MENU +" button your desired preset station and press "SELECT/ENTER" to confirm.
FM OPERATION
- Turn on the system and press the "MODE" button to enter into FM mode.
- Press the "SCAN" button to start auto-search the FM stations. Or press and hold the "TUNER MENU+ / TUNER MENU-" buttons to tune the desired radio station. Press "TUNER MENU+" or ""TUNER MENU-" or rotate the "SELECT/ENTER" knob to tune the radio station manually in 50kHz steps.
- If you tune to a FM stereo station, the 'stereo' will show on the display. If you tune to a weaker FM station, the reception will automatically switch to mono. You may press "SELECT" or "ENTER" to change Stereo or Mono mode
- During FM working mode, press "INFO" button to see the following information on the screen: Stereo/mono, Radio Text, Program Type, Signal Strength, Time/Date and Frequency.
This unit works with USB in FAT32 format and with a memory capacity of max. 16 GB
COMPACT DISC CARE
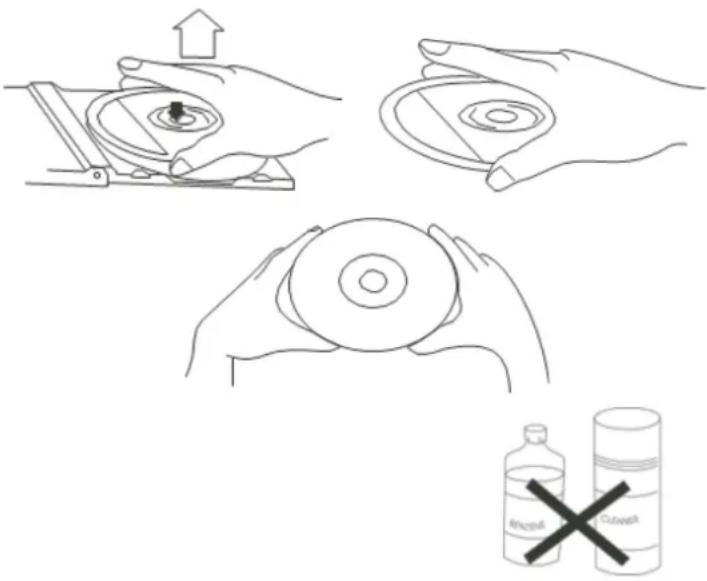
To remove a disc from its storage case, press down on the centre of the case and lift the disc out, holding it carefully by the edges.
Fingerprints and dust should be carefully wiped off the discs recorded surface with a soft cloth. Unlike conventional records, compact discs have no grooves to collect dust and microscopic debris, so gently wiping with a soft cloth should remove most particles. Wipe in a straight line from the inside to the outside of the disc. Small dust particles and light stains will have absolutely no effect on reproduction quality.
text_image
Diagram illustrating hand operating a CD or DVD disc with an open lid, showing correct and incorrect states of cleaning.Note: CD or USB mode have the same operating procedures.
Playing CD or USB
- Turn on the system and press the "MODE" button to enter into CD or USB mode.
- CD: Press the "OP/CL" button to open the CD door. Place a CD with the printed side facing up inside the tray, then close the CD door. The first track will start playback. USB: Insert carefully USB drive in the USB socket. The first track will start playback.
- Press "PLAY/PAUSE" button to pause the playback. The track time will start blinking. Press "PLAY/PAUSE" button again to resume the playback.
- Press "STOP" to stop the playback.
TRACK SKIP AND HIGH SPEED TRACK SEARCH IN CD / USB MODE
- During CD/USB playback, press "UP/F-F" (Fast Forward) or "DN/F.R" (Fast Reverse) button repeatedly will skip to higher or lower tracks. The disc will begin to play from your selected track.
- To rapidly search forward or backward within a track and locate a specific passage of it, press and hold "UP/F.F" or "DN/F.R" button. The player will search forward or backward at a high speed. Release the button when you hear your desired passage and the playback will resume normal from that point.
- To select next folder (Album) press the "FOLDER" button on the remote control.
REPEAT/RANDOM Function
Press the "PLAY-MODE" button on the unit or the "P.MODE" button on the remote control to choose the Repeat-Mode:
ONE: plays the current playing track
ALL: plays the current playing folder (only by MP3-CD or USB)
RAN: Tracks played in random order
MEMORY FUNCTION IN CD/MP3 MODE
- In stop mode, press the "PROGRAM" button on the remote control to enter PROGRAM mode, 'DISC' 'MEM' P00' 'T01' will show on the screen.
- Press the "UP/F.F." button or "DN/F.R" button to select your desired track and then press the "PROGRAM" button to confirm.
- Repeat the step 1 and step 2 to continue to program. Note: You can save a total of 99 MP3 tracks and 99 CD tracks. 'PROGFULL' will show on the screen once over 99 MP3 tracks or 99 CD tracks.
- Press the PLAY/PAUSE button to play the saved tracks, press "UP/F.F" or "DN/F.R" to select a track in the sequence saved.
- Press the "STOP" button twice to leave program mode. The entire program stored in memory is canceled.
BLUETOOTH® FUNCTION
This unit only has a receive function and cannot connect to Bluetooth® Headphones or similar devices.
- Turn on the unit and press "MODE" button to select the Bluetooth® mode.
- Select from your portable device (Smartphone, Tablet...) the ID Bluetooth® tagged as 'PL895', then confirm connection.
- Now you can transfer the music to PL895 and all operations can only be operated from your mobile device.
TURNTABLE OPERATION
IMPROTANT
TO AVOID DAMAGING THE CABINET OR THE PHONO LID, NEVER FORCE THE LID CLOSED. ALWAYS RAISE THE LID TO RELEASE THE LID SUPPORT BRACKET.
DOOR SUPPORT BRACKET, PULL FORWARD TO RELEASE AND LOWER DOOR.
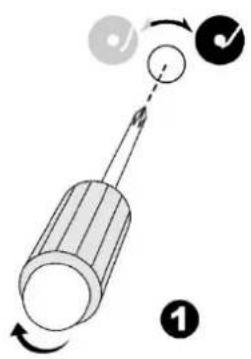
To protect the turntable from damage during transportation, a transit screw is located at the upper right of the turntable platform.
Before playing, please use a screwdriver to turn the transit screw in clockwise direction (screw going down) completely.
natural_image
Diagram of a mechanical assembly with a hook and lever mechanism (no text or symbols)To lock the turntable again for transportation, please turn the screw in counter clockwise direction to lock the mechanism.
Speed alignment using the Pitch adjustment
The turntable speed is preset. By turning the control in the "+" and "-" directions, you can set the speed and thereby influence the sound result according to your ear and personal taste.
text_image
Diagram illustrating a screwdriver with labeled parts and directional arrows, including a checkmark and numbered marker 1.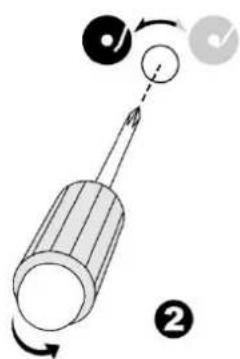
text_image
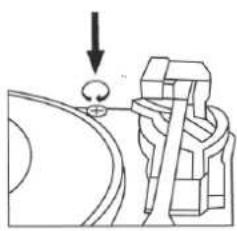
Diagram illustrating a screwdriver's motion with labeled parts and directional arrowsTone arm stopping position alignment
- The position of the tone arm complete playback and return to the rest station can be adjusted at the alignment screw as follow:-
Before starting the alignment, please take out the hole covering rubber:
a. If the system cannot complete the playback of record and return earlier, use a cross head screw driver and turning the alignment screw inside the hole clockwise, the stopping and eject position of the tone arm will move more inward to the center of the record for playback completion.
b. If the system cannot return to rest position automatically after playback of record use a cross head screw driver and turning the alignment screw inside the hole anti-clockwise, the stopping and eject position of the tone arm will move more away from the center of the record for playback completion.
Remark:
- The stopping position is very subjective among difference customers, please select the most suitable position based on your own record collection. The ex-factory setting is based on the most common template.
- Please check the stopping position time by time during adjustment and avoid over turning of the screw inside
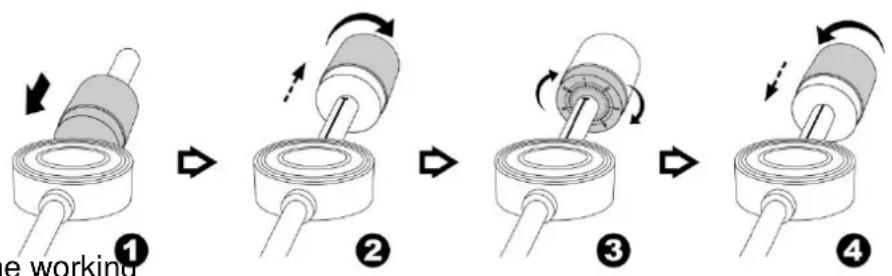
ADJUST THE WEIGHT OF THE STYLUS
- Slide in the counter weight completely into the rear of the tone arm until it reaches the end, turn it clockwise until it clicks with pit inside.
- Twist the counter weight clockwise & backward until it reaches the white line as figure 2
- Twist the counter marking without the counter weight until it reach "3" position
- Twist the counter weight anti-clockwise & inward until it reaches the appropriate working pressure.
flowchart
graph TD
    A["Step 1: Working Component"] --> B["Step 2: Rotation"]
    B --> C["Step 3: Rotation"]
    C --> D["Step 4: Rotation"]
Remark : The working
pressure of the provided stylus is from the range 3 - 4 grams. According to the cartridge manufacturer. All stylus has it own working pressure and please refer to the specification respectively.
PLAYING RECORDS
This system includes a full-size, 2-speed, belt-drive turntable. You can play 33 and 45 rpm records.
- Press the "MODE" button to enter the "PHONO" mode.
- Make sure that you have removed the stylus cover from the stylus and have released the tone arm lock that secured the tone arm to the tone arm rest.
- Set the turntable speed selector to the appropriate speed 33 or 45rpm. If you are playing 45 rpm 'singles', place the 45 rpm adapter on the centre spindle.
- Place your record on the centre spindle.
- Raise the cue lever to lift the tone arm off its rest. Move the tone arm to the edge of the record. The turntable starts automatically. Use the cue lever to gently lower the tone arm onto the record.
- Press the "VOL-/+ " button to the desired level.
- When the tone arm reaches the end of the record it automatically returns to the tone arm rest and the record player stops.
NOTE: Do not turn or stop the turntable manually. Moving or jarring the turntable without securing the tone arm clamp could result in damage to the tone arm.
USB RECORDING
1. CD RECORDING
Recording one track:
- Plug USB drive into USB socket.
- During the playing mode the desired track, press the "RECORD" button one time.
Recording complete disc:
- Plug USB drive into USB socket
- Set the disc in Stop-mode.
- Press the "RECORD" button.
- The track name of the file and "REC" will show on the display. The unit starts recording. To stop the recording, press the "STOP" button.
2. PHONO RECORDING
- Plug USB drive into USB socket
- During the PHONO playing mode, press the "RECORD" button one time, The track name of the file and "REC" will show on the display. The unit starts recording. To stop the recording, press the "STOP" button.
- Plug USB drive into USB socket
- During the BLUETOOTH® playing mode, press the "RECORD" button one time, The track name of the file and "REC" will show on the display. The unit starts recording. To stop the recording, press the "STOP" button.
4. AUX IN RECORDING
- Plug USB drive into USB socket
- During the AUX-IN playing mode, press the "RECORD" button one time, The track name of the file and "REC" will show on the display. The unit starts recording. To stop the recording, press the "STOP" button.
2. DAB/FM RECORDING
- Plug USB drive into USB socket
- During the DAB+ or FM playing mode, press the "RECORD" button one time, The track name of the file and "REC" will show on the display. The unit starts recording. To stop the recording, press the "STOP" button.
NOTE:
BT 320 kbps
CD 320kbps
DAB 320 kbps
FM 320 kbps
Phono 320 kbps
AUX 320 kbps
8
DELETE USB TRACK
Delete one Track:
- During the USB stop mode, press the "DELETE" button on the remote control one time, '1' will show on the display.
- Choose the desired track with the "DN" or "UP" buttons on the remote control.
- Press the "DELETE" button again to confirm the selection. The track will be erased.
AUX IN OPERATION
Press "MODE" button to select the AUX mode. Insert the audio cable (not included) into the matching 'AUX IN' socket of the unit (PL895).
Start the playback of the connected device and you can hear the sound in PL895.
MUTE / EQ OPERATION
During playing mode, press "MUTE" button on the remote control one time, the sound will not be heard from the speakers and 'MUTE' will show on the display; press "MUTE" button or "VOL +/-" button to cancel mute function and the sound can be heard again from the speakers. During playing mode, press "EQ" button to choose the different sound effect from "POP/CLASSIC/ROCK/JAZZ/FLAT", you can choose the desired one.
PHONES OPERATION
During usual operation insert the earphone's cable (not included) into the matching 'PHONES' socket of the unit. Now you can hear the sound exported to your earphones.
Note: Adjust the volume lever lower during the PHONES operation.
To prevent possible hearing damage, do not listen at high volume levels for long periods.
SETTINGS
LANGUAGE SETTING
During FM or DAB playing mode, press "MENU" button and then press "UP" or "DN" to choose 'SYSTEM', press "ENTER" button to confirm.
Press "UP" or "DN" to choose 'Language' and press "ENTER" to confirm enter into "LANGUAGE" setting. You can choose from "EN, FR, DE, IT, ES, SK, DK, PL, NO, FI".
TIME
- Long press the "PLAY/MENU" button to choose System by rotate the "SELECT/ENTER" button, "Main menu" will be shown on the screen.
- Press the "SELECT/ENTER" button, "Time setup" will be shown on the screen.
- Press the "SELECT/ENTER" button again, "Set clock" will be shown on the screen.
- Press the "SELECT/ENTER" button again, "Set clock 00:00"(hour:minute) will be shown on the screen.
- Rotate the "SELECT/ENTER" button and press the "SELECT/ENTER" button to set and confirm the time.
- Rotate the "SELECT/ENTER" button again, "Set date" will be shown on the screen.
- Press the "SELECT/ENTER" button to enter setting date mode, "01-01-2022" will be shown on the screen.
-
Rotate the "SELECT/ENTER" button and press the "SELECT/ENTER" button to set and confirm the date.
-
Rotate the "SELECT/ENTER" button and press the "SELECT/ENTER" button to set and confirm the date.
-
Rotate the "SELECT/ENTER" button again, "Auto update" will be shown on the screen.
-
Press the "SELECT/ENTER" button to enter the setting mode. "From radio" or "No update" will be shown on the screen by rotating the "SELECT/ENTER" button. You may choose the desired update mode by pressing the "SELECT/ENTER" button to confirm.
-
Rotate the "SELECT/ENTER" button once again, "Set 12/24 hour" will be shown on the screen.
-
press the "SELECT/ENTER" button to enter the setting mode. "Set 12 hour" or "Set 24hour" will be shown on the screen by rotating the "SELECT/ENTER" button. You may choose the desired mode by pressing the "SELECT/ENTER" button to confirm.
ALARM
2 different alarms can be set.
- Long press "PLAY/MENU" button to choose System by rotate the "SELECT/ENTER" knob. Press it to confirm.
- Choose "Alarms" and press the "SELECT/ENTER" knob to confirm.
- Choose between ALARM 1 and ALARM 2 and press the "SELECT/ENTER" knob to enter the ALARM settings.
-
You can scroll through the different settings of the Alarm. If you want to change an Alarm setting, choose the point you want to change and press the "SELECT/ENTER" knob.
-
You have following options:
On/Off
Time
Days: Daily, Once, Weekdays, Weekend
➢ Mode: DAB, FM, Buzzer
Volume
Save
- Once you finished the Alarm settings, choose "save" and press the "SELECT/ENTER" button to save the settings.
Your alarm is now activated/deactivated.
SLEEP
- Long press "PLAY/MENU" button to choose System by rotate the "SELECT/ENTER" knob. Press it to confirm.
- Choose "Sleep" and press the "SELECT/ENTER" knob to confirm.
- You can set a sleep timer between 15 and 90 minutes. When the chosen sleep time is over, the unit automatically turns into standby mode.
- Press "SELECT/ENTER" to confirm.
ANNOUNCEMENT
- Long press "PLAY/MENU" button to choose System by rotate the "SELECT/ENTER" knob. Press it to confirm.
- Choose "Announcement" and press the "SELECT/ENTER" knob to confirm.
- Choose between "On" and "Off" and confirm your selection by pressing "SELECT/ENTER"
BACKLIGHT
-
Long press "PLAY/MENU" button to choose System by rotate the "SELECT/ENTER" knob. Press it to confirm.
-
Choose "Backlight" and press the "SELECT/ENTER" knob to confirm.
-
Choose between "Timeout" and "On level"
Timeout: Choose time between 10 and 180 Seconds. Confirm with "SELECT/ENTER"
On level: Choose between On, Medium, Low. Confirm with "SELECT/ENTER"
SW VERSION
- Long press "PLAY/MENU" button to choose System by rotate the "SELECT/ENTER" knob. Press it to confirm.
- Choose "SW-Version" and press the "SELECT/ENTER" knob to confirm.
The currently installed software version is displayed.
FACTORY RESET
In STANDBY or DAB mode.
- Press the "PLAY/MENU" button to choose System "Main menu" will be shown on the screen.
- Rotate the "SELECT/ENTER" button to the factory reset.
- Press the "SELECT/ENTER" button to enter setting resume mode. "Factory reset?" and "
Yes" will be shown on the screen. - Rotate the "SELECT/ENTER" button to choose No or
. - Press the "SELECT/ENTER" button to confirm.
LINE OUT
You can connect the unit to an external amplifier or record player (such as a tape recorder) via the line out jack. To do this, connect the device to a conventional RCA cable that you can get from a specialist dealer.
TECHNICAL SPECIFICATIONS
| Power supply | : AC 100-240V~50/60Hz |
| Frequency Range | : DAB+ 174.928 – 239.200MHz |
| : FM 87.5 – 108.00MHz | |
| Preset Stations | : 20 FM, 20 DAB+ |
| Turntable Speed | : 33 / 45 RPM |
| Audio power output | : 2x 12,5W RMS |
IMPORTER
Germany Web: www.soundmaster.de

text_image
CEThe current instruction manual can be downloaded from www.soundmaster.de Technical changes and misprints reserved.
Copyright by Woerlein GmbH, 90556 Cadolzburg, www.soundmaster.de Duplication only with permission of Woerlein GmbH
PROTECTION DE L'ENVIRONNEMENT

text_image
Technical diagram of a portable radio with labeled parts including speaker, receiver, and display unit1 Housse de protection
2 Plaque tournante
3 haut-parleur
4 VOLUME bouton
5 VU meter
6 STANDBY/MODE bouton
7 PLAY-MODE bouton
8 RECORD bouton
9 OPEN/CLOSE bouton
10 Porte CD
11 Prise casque
\_VUE ARRIÈRE
text_image
22 23 24 25 26SOURCE D'ALIMENTATION
natural_image
Diagram of a battery pack with an arrow indicating downward movement, no text or symbols presentFONCTIONNEMENT DE BASE
Marche/Arrêt
natural_image
Diagram of a mechanical assembly with a tool and a circular component, no text or symbols presentflowchart
graph TD
    A["Step 1: Roll and expansion"] --> B["Step 2: Rotation and displacement"]
    B --> C["Step 3: Rotation and displacement"]
    C --> D["Step 4: Rotation and displacement"]
RÉGLER LE POIDS DE LA POINTE DE LECTURE
text_image
Diagram illustrating a screwdriver's motion with labeled parts and directional arrows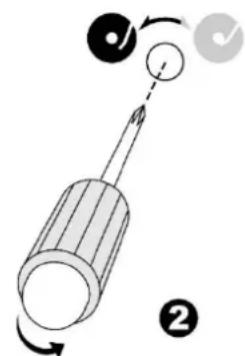
text_image
Diagram illustrating a screwdriver's motion with labeled parts and directional arrowstext_image
Technical diagram of a vintage gramophone with labeled parts including stand, receiver, and speaker unitnatural_image
Diagram of a battery pack with an arrow indicating force or movement, no text or symbols presentALGEMENE BEDIENINGEN
In-/uitschakelen
text_image
Diagram illustrating hand operating a CD or DVD disc with an incorrect labeling, showing correct and incorrect states of use.natural_image
Mechanical diagram showing a tool interacting with a curved surface, no text or symbols presenttext_image
Diagram illustrating a sewing or sewing process with labeled parts and directional arrows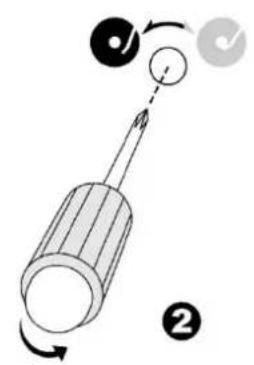
text_image
Diagram illustrating a screwdriver's motion with labeled parts and rotation arrowsflowchart
graph TD
    A["Step ①: Roll pin, arrow indicates rotation"] --> B["Step ②: Rotation arrow, arrow indicates rotation"]
    B --> C["Step ③: Rotation arrow, arrow indicates rotation"]
    C --> D["Step ④: Rotation arrow, arrow indicates rotation"]
text_image
Technical diagram of a portable radio with labeled parts including two speakers and one dials, showing internal components and numbered labels.1 Parapolvere
2 Giradischi
3 Altoparlante
4 Manopola del volume
5 VU meter
6 STANDBY/MODE pulsante
7 PLAY-MODE pulsante
8 RECORD pulsante
9 OPEN/CLOSE pulsante
10 porta CD
11 Presa per cuffie
VISTA POSTERIORE
12 USB presa
13 AUX-IN presa
14 VU meter
15 STOP/PRESET pulsante
16 PLAY/MENU pulsante
17 DN/F-R/SCAN pulsante
18 UP/F-F/INFO pulsante
19 display LCD
20 Sensore remoto
21 SELECT/ENTER pulsante
text_image
22 23 24 25 2622 Antenna presa
23 Terminale altoparlante
24 Line Out presa
natural_image
Diagram of a battery pack with an arrow indicating direction, showing internal components and battery casing (no text or symbols)text_image
Diagram illustrating handwashing and disinfection steps with labeled items: incision, dust removal, and a crossed-out bottle.SALTO TRACCE E RICERCA TRACCE AD ALTA VELOCITÀ IN MODALITÀ CD/USB
natural_image
Diagram of a mechanical assembly with a tool and a circular component, no text or symbols presenttext_image
Diagram illustrating a screwdriver's motion with labeled parts and directional arrows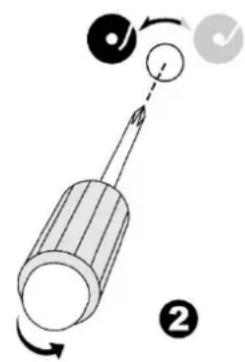
text_image
Diagram illustrating a screwdriver's motion with labeled parts and directional arrowsflowchart
graph TD
    A["Step 1: Roll pin, clockwise arrow"] --> B["Step 2: Rotation arrow, clockwise arrow"]
    B --> C["Step 3: Rotation arrow, clockwise arrow"]
    C --> D["Step 4: Rotation arrow, clockwise arrow"]
text_image
Technical diagram of a portable radio with labeled parts including speaker, receiver, and display unitnatural_image
Simple line drawing of a plug and outlet with two connectors (no text or symbols)Ficha CA
Tomada CA
natural_image
Diagram of a battery pack with an arrow indicating downward movement, no text or symbols presenttext_image
OS No Cover Cucleasenatural_image
Mechanical diagram showing a rotating component with a downward arrow indicating motion (no text or symbols)text_image
Diagram illustrating a screwdriver's motion with labeled parts and directional arrows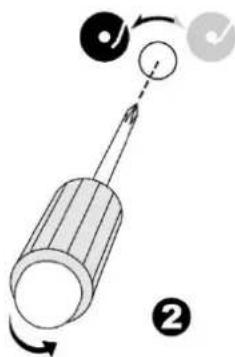
text_image
Diagram illustrating a screwdriver's motion with labeled parts and directional arrows*) markerade Cd = kadmium, Hg = kvicksilver, Pb = bly
VARNING - OSYNLIG LASERSTRÅLNING NÄR DU ÖPPNAR LOCKET ELLER TRYCKER PÅ SÄKERHETSSPÄRREN. UNDVIK EXPONERING FÖR LASERSTRÅLEN.
text_image
Technical diagram of a portable radio with labeled parts including speaker, receiver, and display unit1 Dammskydd
2 Skivspelare
3 Högtalare
4 VOLUME knopp
5 VU meter
6 STANDBY/MODE knapp
7 PLAY-MODE knapp
8 RECORD knapp
9 OPEN/CLOSE knapp
10 CD-dörr
11 Hörlursuttag
12 USB uttag
13 AUX-IN uttag
14 VU meter
15 STOP/PRESET knapp
16 PLAY/MENU knapp
17 DN/F-R/SCAN knapp
18 UP/F-F/INFO knapp
19 LCD skärm
20 Fjärrsensor
21 SELECT/ENTER knapp
UTSIKT BAKÄT
text_image
22 23 24 25 2622 Antennuttag
23 Högtalarterminal
24 Line-out-uttag
25 Line-out-uttag
26 Strömsladd
FJÄRRKONTROLL
natural_image
Diagram of a battery pack with an arrow indicating a process or insertion, no text or symbols present.GRUNDLÄGGANDE ANVÄNDNING
Ström PÅ/AV
MINNESFUNKTION I DAB/FM-LÄGE
text_image
Diagram illustrating hand positioning and cleaning steps of a CD or DVD device, including disc opening, cutting, and disinfection.natural_image
Diagram showing a mechanical assembly with a tool and a circular component, no text or symbols presenttext_image
Diagram illustrating a screwdriver's motion with labeled parts and directional arrows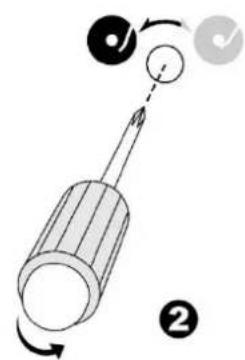
text_image
Diagram illustrating a screwdriver's motion with labeled parts and directional arrowstext_image
Technical diagram of a vintage gramophone with labeled parts including speaker, receiver, and display unit1 Kryt proti prachu
2 Gramofón
3 Reproduktor
4 Gombík HLASITOSTI
5 L'avý VU meter
6 Tlačidlo POHOTOVOSTNÝ
REŽIM
7 Tlačidlo REŽIM PREHRÁVANIA
8 Tlačidlo NAHRAŤ
9 Tlačidlo OTVORIČ/ZATVORIČ
10 Dvierka mechaniky CD
11 Konektor Slúchadiel
12 ^14 Zásuvka USB
natural_image
Simple line drawing of a plug connecting to an open electrical outlet (no text or symbols)natural_image
Diagram of a battery pack with an arrow indicating downward movement, no text or symbols presentZÁKLADNÁ OBSLUHA
ZAPNUTIE/VYPNUTIE
text_image
Diagram illustrating a procedure for cleaning a CD or DVD, showing hand positioning and packaging with 'Alcohol' and 'Cleaner' labels.natural_image
Diagram of a mechanical assembly with a downward arrow indicating force or direction (no text or symbols present)text_image
Diagram illustrating a screwdriver's motion with labeled parts and directional arrows indicating movement.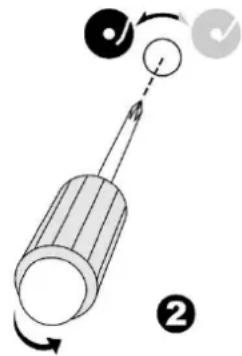
text_image
Diagram illustrating screwdriver tool movement with labeled parts and directional arrowsD 90556 Cadolzburg, Germany
Tel: +49 9103 71 67 0
Fax: +49 9103 71 67 12
E-Mail: info@soundmaster.de
Internet: www.soundmaster.de
Hereby, Wörlein GmbH declares that this device is in compliance with the essential requirements and other relevant provisions of Directive 2014/53/EU.
A copy of the declaration of conformity can be obtained from the above address.