USER MANUAL ER1512 PANASONIC
Operating Instructions
AC/Rechargeable Professional Hair Clipper
Model No. ER1512
| English | 2 | Dansk | 44 | Česky 87 | |
| Deutsch | 9 | Português | 51 | Slovensky 94 | |
| Français | 16 | Norsk | 59 | Magyar 101 | |
| Italiano | 23 | Svenska | 66 | Română 109 | |
| Nederlands | 30 | Suomi | 73 | Türkçe | |
| Espanol | 37 | Polski | 80 | Рusskin 123 | |
Before operating this unit, please read these instructions completely and save them for future use.

WARNING
-
This appliance can be used by children aged from 8 years and above and persons with reduced physical, sensory or mental capabilities or lack of experience and knowledge if they have been given supervision or instruction concerning use of the appliance in a safe way and understand the hazards involved. Children shall not play with the appliance. Cleaning and user maintenance shall not be made by children without supervision.
-
The supply cord cannot be replaced. If the cord is damaged, the AC adaptor should be scrapped.
- Do not use anything other than the supplied AC adaptor and the charging stand for any purpose. Also, do not use any other product with the supplied AC adaptor and the charging stand. (See page 5.)
-
Keep the appliance dry.
-
The following symbol indicates that a specific detachable power supply unit is required for connecting the electrical appliance to the supply mains. The type reference of power supply unit is marked near the symbol.

Thank you for choosing a Panasonic Hair Clipper. Please read all instructions before use.
WARNING
Charging the clipper
- Avoid charging the batteries in direct sunlight or near a radiating heat source.
Cleaning the clipper
Storing the clipper
- Never tamper with moving parts.
CAUTION
Using the clipper
- Check that the blades and the attachments are not damaged before use. Replace them if they are damaged.
- You should not drop the clipper on the floor.
- You should not knock the blades and the attachments against hard objects.
- You should not trim the hair of a pet.
Storing the clipper
- Avoid grabbing the clipper by the power cord, as it may become detached, causing damage or injury.
Before use
- This clipper is designed for professional use to trim hair and beards. Charge it for 8 hours before use for the first time in order to activate the built-in rechargeable batteries. It can be operated on either an AC adaptor or rechargeable batteries. Read all
instructions carefully before use.
- Avoid charging the batteries at temperatures below 0^ or above 35^ .
- The charge status () lamp may blink at an early stage when it is used for the first time or if it has not been used for 6 or more months even if it is fully charged. This is not a malfunction.
Even though the clipper may not be used for an extended period, charge every 6 months to preserve battery life.
- The clipper may become warm during operation and/or charging. This is normal.
- You should not allow permanent wave lotion, hair restorer or hair spray to come into contact with the main body or the blades. Doing so may result in cracking, discoloring or corrosion.
- Before each use, apply oil at the places marked with arrows. (See page 8.)
- Clean the housing using only a cloth slightly dampened with water or a mild soap solution.
- Never use a caustic solution.
- If the clipper is not working properly, have it inspected at an authorized service centre.
- Charge the appliance correctly according to these Operating Instructions. (See page 5 "Charging the hair clipper".)
- This appliance contains batteries that are only replaceable by skilled persons. Please contact an authorized service centre for the details of repair.
Specifications
Power source: See the name plate on the product.
(Automatic voltage conversion)
Motor voltage: 2.4 V---
Charging time: Approx. 1 hour
For more information about the energy efficiency of the product, please visit our website, www.panasonic.com, and enter the model number in the search box.
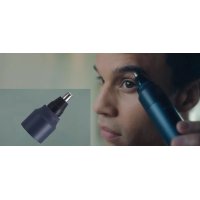
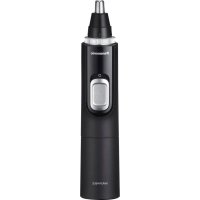
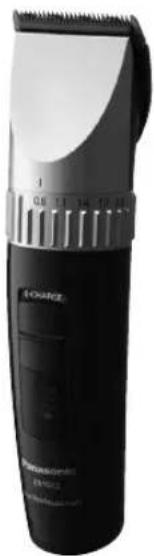
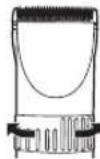
Parts identification
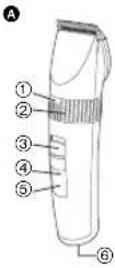
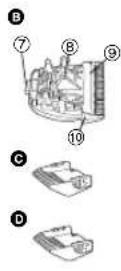

A Main body
① Trimming height indicator
② Dial (Height adjustment control)
③ 0-CHARGE/1 switch
④ Battery capacity lamp
⑤ Charge status ( )
⑥ Appliance socket
Blade
⑦ Mounting hook
⑧ Cleaning lever
⑨ Moving blade
Stationary blade
3 mm comb attachment
4 mm comb attachment
6 mm comb attachment
9 mm comb attachment
12 mm comb attachment
15 mm comb attachment
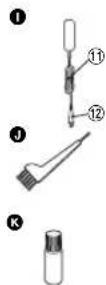
1 AC adaptor (RE9-57)
⑪ Power cord
⑫ Appliance plug
1 Cleaning brush
Oil
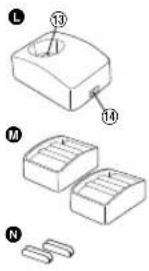
Charging stand (RC9-91)
Charging plug
14 Socket
Comb attachment shelves (× 2)
N Connectors (× 2)
Charge
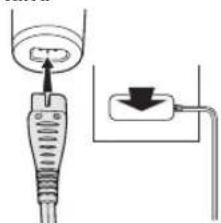
Charging the hair clipper
1 Connect the power cord to the charging stand.
2 Slide the 0-CHARGE/1 switch to "0-CHARGE".
3 Place the clipper on the charging stand and plug in the AC adaptor into an outlet.
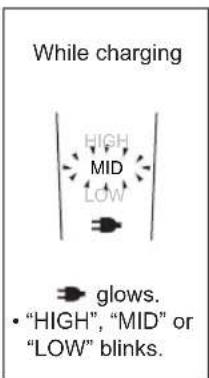
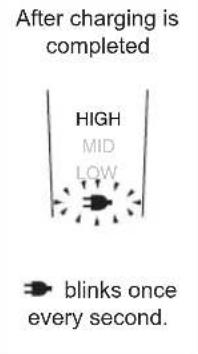
- Charge status ( v )amp glows and charging starts.
- Charging is completed when Charge status ( 警 amp blinks. (Max. 1 hour later)
- 1 full charge will provide approximately 70 minutes of continuous operation.
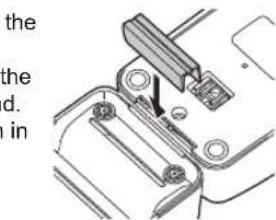
Connecting the comb attachment shelf to the charging stand
Determine the connection position for the charging stand and comb attachment shelf. Firmly insert the connector into the slot at the bottom of the charging stand.
- If the unit wobbles, then further push in the connector since it has not been firmly inserted.
About the LED display
Charging without the charging stand
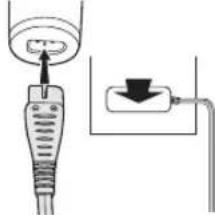
- Slide the 0-CHARGE/1 switch to "0-CHARGE", and insert the appliance plug into the clipper.
- Plug in the AC adaptor into an outlet.
AC operation
If you connect the AC adaptor to the clipper in the same way as for charging, and turn on the power, you can use it even if the battery capacity is low.
- If the clipper does not operate, charge the clipper for approximately 1 minute.
- Be careful not to discharge the battery completely with the power left turned on. It results in shortening the battery life.
Cut
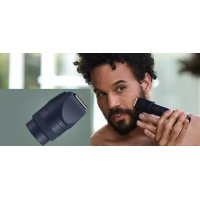
Using the hair clipper
We recommend using the clipper in an ambient temperature range of 0 - 35^. If used outside this range, the appliance may stop operating. Turn the dial clockwise or counterclockwise to adjust the moving blade back and forth to get the desired height. Adjustable in 5 stages from 0.8mm to 2.0mm in 0.3mm steps without attachments.
Actual hair length will be a little longer than the set length.
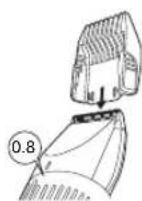
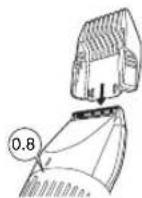
Using the comb attachments
- Select the trimming heights indicated on the insides and sides of the attachments.
2 Set the dial to "0.8" and then mount the attachment to the clipper as illustrated.

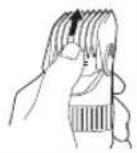
Removing the attachment from the clipper Remove the attachment as illustrated.
English
Care
Blade maintenance
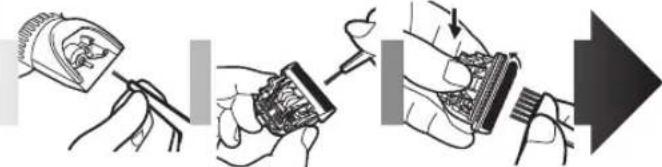
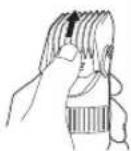
Removing and mounting the blade
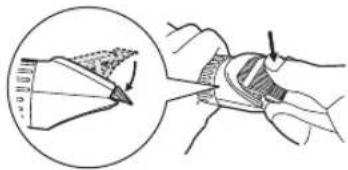
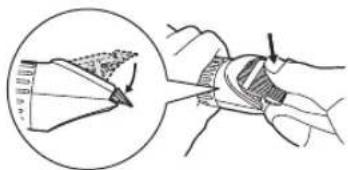
Removing the blade
-
Hold the clipper with the switch facing upward and push the blade with your thumb while catching the blade in your other hand.
-
Be sure to turn off the power before you remove the blade.

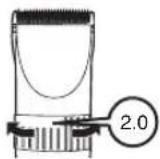
Mounting the blade
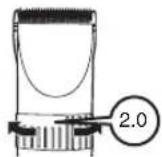
- Set the dial to "2.0".
- Fit the mounting hook into the blade mounting on the clipper and push in until it clicks.
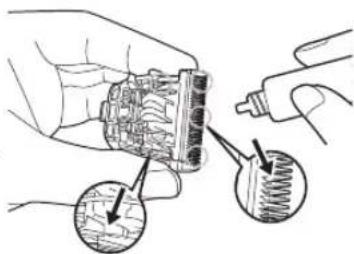
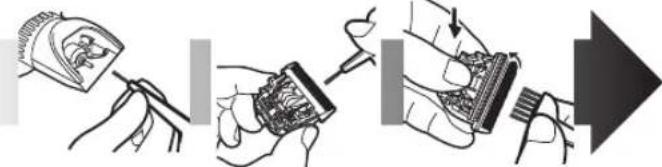
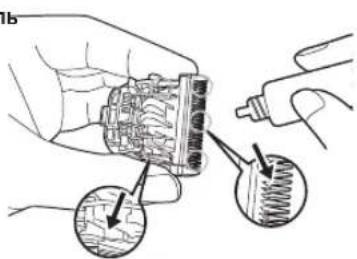
Cleaning the blade
-
Brush off any hairs from the clipper and from around the blade.
-
Remove the blade and brush off the hairs from the blade edge.
-
Brush the hairs out from between the stationary blade and the moving blade while pressing down on the cleaning lever to raise the moving blade.
Lubrication
-
Apply a few drops of the oil to the space between the stationary blade and moving blade.
-
Apply the oil to the clipper before and after each use.
-
Set the dial to "2.0" and then remount the blade on the clipper.
Replacement parts
Replacement part is available at your dealer or Service Centre.
| Replacement parts for ER1512 | Blade WER9902 |
| Oil WES003 | |
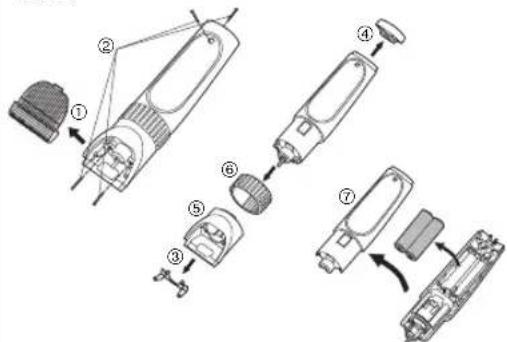
Removing the built-in rechargeable batteries
The batteries are to be disposed of safely.
Remove the built-in rechargeable batteries before disposing of the clipper. Please make sure that the batteries are disposed of at an officially designated location if there is one. Do not dismantle or replace the batteries so that you can use the clipper again. This could cause fire or an electric shock.
Please contact an authorised service centre.
- Disconnect the power cord from the clipper when removing the batteries.
- Perform steps ① to ⑦ and lift the batteries, and then remove them.
For environmental protection and recycling of materials
This clipper contains Nickel-Metal Hydride batteries.
Please make sure that the batteries are disposed of at an officially assigned location, if there is one in your country.
Please read "Disposal of Old Equipment and Batteries" on page 130.
WARNING
"HIGH", "MID" of "LOW" knippert.
"HIGH" (ALTA), "MID" (MEDIA) o "LOW" (BAJA) parpadea.
| Reserveder for ER1512 | Blad WER9902 | |
| Olje WES003 | |
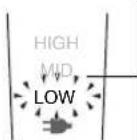
Bliká indikátOR "HIGH (VYSOKÁ)," "MID
(STREDNA) alebo "LOW (NIZKA).
Po ukončeni nabijania
blikáraz za sekundu.
10 minut po
ukončeni nabijania
"HIGH/MID/LOW" soner.
Kullanirken
2026, Oshinohara, Yasu-Shi, Shiga, Japan
YETKILI TEMSILCI
Ithalatci Firma:
Tesan Iletisim A.Ş.
CobançeseMah.Bilge Sok.No:17
34196 Yenibosna- Istanbul
Tel: 02124546070 Faks: 02124546020
www.tesan.com.tr
URUNUN KULLANIM OMRU 7YILDIR
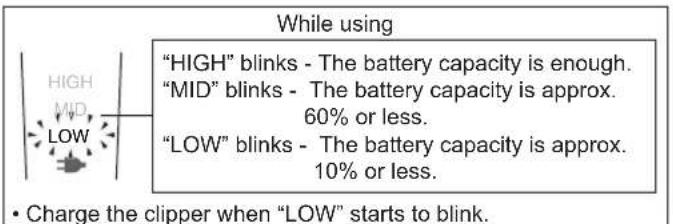
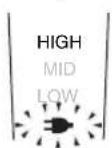
Miraet "HIGH" - EMMKoCTn akkymyIaTopa DOCTaTOUHO.
Miraet "MID" - EMMOKCTb aKKMyJITopa OKO 60% NIN MeHbIe.
Miraet "LOW" - EMKocTb aKKyMnTopa OKO NO 10% INN MeHbWe.
- 3a4ynte MaunHy, ecn muraer "LOW".
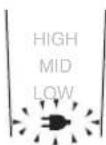
3apKa 6e3 nCnoB3oBaHnna 3apAHOcTOnKn
- YcTaHOBnte nepeKIOUOATeINb
"0-CHARGE/1" B noJooKeHne
"0-CHARGE" IN BCTaBbTe BnIky NOKJIIOUeHnK np6Opy B rHe3do MaunHKn.
- BCTaBbTe BnKy aAnTepa nepemehHoro TOKa B 3neKtpnueckyio po3eTKy.
Pa6oTa OT ceTH nepeMeHHORO TOKa
Ecnn BbI NOcOeHnHTe aadTep nepemehHOrTo kKa MaunHKe nTnCTpNNK, ka np3apJke, BblcmoxTe noIb3oBaTbcra MaunHKo dXpe npH3KOM yPOBHe 3apJa akMyJrTopa.
- Ecnn MaunHka dny ctpnKHe pa6oTaet, To 3apKaIte eB TeeHne 1 MHyTbl.
- He donyckaTte nonHou pa3prdkn akkymnyTopo npn ocTabneHHOM BKNIOYEHHom nITaHm. 3To pNBOINT K cOKpaueHNO cpoka 3KcnplyaTaunn akkymnyTopa.
Ctpnxxka
HcnoJIb3OBaHHe MaunHKn dIra cTpHXKBOJOC
PekomehoBaHHa TemnepaTypa Bo3yxa nnoIb3OBAHMaMunHKo coCTabnEeT 0 ^ C -35 ^ C .PiNCIOB3OBAHm np6opa npu Oueh Hn3Knx nn Oueh BbICOKX Tempeatypax OH MOkET OTKnIOHTbcra.
IbopauBaItepeyIaTOpnoYacBOBCTpeKneHIN npOTUB YACBOB CTePKN,HTObI HAcTpOntBJKeJaEMyIO DnHy CTpNK, BbIDNRag HIN 3aDbNarpa6oHee ne3Bne.
Bo3MOKHbI 5 ypOBHei DnHbI CTpnKKn 6e3 NcNoB3OBAHnHa cadoK -OT 0,8 MM Do 2,0 MM C HHTepBaNOM B 0,3 MM.
IeINCTBNTeINbHAnIINHACTPNKKN6yETHEMHORO60JIbUe yCTAHOBIIeHHOro3HaHeHn.
HcnoIb3OBaHne HacaIOK-rrpe6Hei
- Bb6epnte xenaemyo dnnHy ctpnKKyka3aHHyo C 60KOB N Ha BByTpHHei CTOpOHe HacaDOK.
2 YcTaHOBnTe NOBOPoTHbI nepeKIOuOaTeNb B nONoXeHne "0.8", 3aTeM 3aKePnTe HacaKy Ha MaunHKe, KaK NOKa3aHo Ha pncyHke.
Chrtnhe Hacaikn C mawHKn dny ctpnKk
CHINMTe HacaKky, KaK nokaHa Ho pucyHke.
yxo
YxOa 3apexyuim6nokom
ChTne u yctaHOBka peKyuJero 6Joka
CnTne pexyuero 6Joka
1.ДерхитemaшнкдЯстржнТаK,
YTo6bI BbIKNoTaTeB 6bIn CBepyX, HAdaBnTE 60bnMnAnbEm Ha peKyuN 6Lok, OndOBpeMeHNO npDepkNBAra erO dpyroynpko.
-Перд сгтпem ржуцero 6лoka yбдпсь,чTo nntanHe npibopa otKlIOUeHo.

UctanOBka pexyuzero 6noka
- YcTaHOBnTe NOBOpTHbI nepeKJIouaTeIb B noJoxHeHne "2.0".
- NomeCTIe KpenEHHbI 3aen B depXaTeIb pexyueo 6noka n BcTaBte ero do ueJyka.
OuncTka pexkyoero 6noka
-
YdaHnTe 电TOyKoB BCE BONoCKn C Kopnyca n peKyJero 6noka MaunHKn dJa CTpNkN.
-
CHMNTe pexyun 6n ydaNTe 8toKoB OIOCKN C pexyue KpOMKn.
-
YdaJInte 8eToKoB BOLOCK MEXdy HEnOdBnKbHbIM npaOvHM NeBnMn, Haxmam Ha pbYar OChCTKn, KOTOpBn npINOdHMaet paOoyee neBVe.
Cma3bIbAHneMacJIOm
- HaheCHTe HeCKoJIbKO KaneIb CMA3OuHOro MaCJa B NpocTpaHCTBo MExy HEnoDBrJxHbIM npa6OuMn Je3BnAMy.
Pon3BOnTe Cma3ky MaunHKn KaKdbpa3do INocJe nCnOJIb3OBaHn.
- NpebeDNTe NOBOPHTbI nepeKIOUaTeNB B noLoXHeHne "2.0" uYcTaHOBtpeKyuIm 6nok o6paTHo HA MaunHKy.
CMeHHbIe DeTaII
CmeHHyIOIeTajb MoXHO pnoobpeCTn y DInepa NIN B cepBnCHOM ueHTpe.
Cmehhhe deTann ER1512 Pekyun6nK WER9902
YdaeneHne BcTpoEHnOraKymyIaTopa
O6ecnepe 6e3oanachyuytINn3aunakkymnyrTopOB.
Ipepe ytnn3auee MaunHKn DnA CTPKKn N3BneKeT n3 Hee BCTpoehHbte akymyTAOPHbE 6bataep. IoxanyuCTa, npocLeNTe 3a TEM, YTObblyTN3aun AKKMyNA TOpHBx 6bataep 6bna BbINONHeHa B OfNuaNBHom nyhKTpe npema, pni HauHHn TaKOBOro BAwem rOpe. He pa3bnpaTe n He 3aMeHnTe aKKMyNA TOpHBie 6bataep c ceJIbIO npoJOnJKeHn MCNoB3OBAHn MaunHKn DnA CTPKKn. 3To MoKet npBeCTN K Bo3rOpaHnO INI npaKeHnO 3eKTPnueckm TOKOM. IoxanyiCTa, o6paTntecb B ABtOpN3OBAHbHc cepBnchb CEHTp.
-OTcoeHnHTe cTeBOI uHpy oT MaunHKn Ipeep n3BJeHneHem 6aTaapei.
- BbINOHNITE WArn c① no ⑦, npHNOHMnTe aKKMyIaTOPhie 6aTapei, a 3aTeM n3BNEKHTe IX.

OxpaHaOkpykaIoue cpebl N BToPnHna Ipepepa6tKa OTOxoOB
B daHHoMaaHnKHe dIa cTpNkN MCNoJIb3yEtc HKeJIbMetaIIrrnpndHy aKKMyJrAToP.
Poxanynta, npocneinte 3a tem, yTO6bI yTINn3aun aKKymyTopa 6bIa BbIOJIHeHa B OOpnuaHbHom IyHKTe npEma pN HAnuHn TAKOBOro B BaWe cTpaHe.
YcTaHOBHeHHb npOn3BODHTeMe B nopAKe n.2 CT.5 PeEepaHbHoro 3aKaHa PΦ "O 3aUHe Tnpab Notpe6nTeNe" cPCK cnKy6bln daHoro 13dennpaBeH 7 rOam C DaTbI npOn3BOCTBa pN yCNOHN, YTO 13dennncnoNb3yETcB C TporOM COOTBETCTBN C Hactoae HhCTpyKneH IO EKnPyatauH N PpIMEHMBIMM TEXHueckmM nCTaHdpTAMn.

PahacOHK Kopnp3nH
1006,KaOma,Ocaka 571-8501,YnoHn
CdaHaNoB JaonHn
"INHopmaaNo ObaepHcO cOTXoamn dIg CTpaH, He BXoJuxx B Ebponeckn Coo3"cm. Ha ctp. 139.
English
Disposal of Old Equipment and Batteries Only for European Union and countries with recycling systems
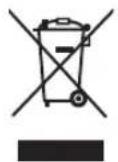
These symbols on the products, packaging, and/or accompanying documents mean that used electrical and electronic products and batteries must not be mixed with general household waste.
For proper treatment, recovery and recycling of old products and batteries, please take them to applicable collection points in accordance with your national legislation.
By disposing of them correctly, you will help to save valuable resources and prevent any potential negative effects on human health and the environment.
For more information about collection and recycling, please contact your local authority.
Penalties may be applicable for incorrect disposal of this waste, in accordance with national legislation.
Note for the battery symbol (bottom symbol) This symbol might be used in combination with a chemical symbol. In this case it complies with the requirement set by the Directive for the chemical involved.
Importer:
Panasonic Marketing Europe GmbH
Authorized Representative in EU:
Panasonic Testing Centre
Winsberging 15, 22525 Hamburg, Germany
Manufactured by:
Panasonic Corporation
1006, Oaza Kadoma, Kadoma City, Osaka, Japan
Deutsch
Panasonic Testing Centre
Winsberging 15, 22525 Hamburg, Deutschland
Hergestellt von:
Panasonic Corporation
1006,Oaza Kadoma,Kadoma City, Osaka, Japan
Français
Panasonic Testing Centre
Winsberging 15, 22525 Hamburg, Allemagne
Fabrique par
Panasonic Corporation
1006, Oaza Kadoma, ville de Kadoma, Osaka, Japan
Italiano
Panasonic Testing Centre
Winsberging 15, 22525 Amburgo, Germania
Fabbricato d.
Panasonic Corporation
Panasonic Testing Centre
Panasonic Testing Centre
Panasonic Testing Centre
Winsberging 15, 22525 Hamburg, Tyskland
Fremstillet af:
Panasonic Corporation
1006, Oaza Kadoma, Kadoma, Osaka, Japan
Portugues
Panasonic Testing Centre
Panasonic Testing Centre
Winsberging 15, 22525 Hamburg, Tyskland
Produser av
Panasonic Corporation
1006, Oaza Kadoma, Kadoma, Osaka, Japan
Svenska
Panasonic Testing Centre
Winsbergring 15, 22525 Hamburg, Tyskland
Tillverkad av:
Panasonic Corporation
1006, Oaza Kadoma, Kadoma, Osaka, Japan
Suomi
Panasonic Testing Centre
Winsberging 15, 22525 Hampuri, Saksa
Valmistaja:
Panasonic Corporation
1006, Oaza Kadoma, Kadoma-kaupunki, Osaka, Japan
Polski
m = 311 ;
Panasonic Testing Centre
Panasonic Testing Centre
Winsberging 15, 22525 Hamburg,Nemecko
Vyrobi:
Panasonic Corporation
1006,Oaza Kadoma,Kadoma City,Osaka,Japonsko
Slovensky
Panasonic Testing Centre
Winsberging 15,2252 Hamburg,Nemecko
Vyrobca:
Panasonic Corporation
1006, Oaza Kadoma, Kadoma City, Osaka, Japonsko
Magyar
Panasonic Testing Centre
Winsberging 15, 22525 Hamburg, Nemetorszag
Gyartotta
Panasonic Corporation
1006, Oaza Kadoma, Kadoma City, Osaka, Japan
Romána
Panasonic Testing Centre
Winsberging 15, 22525 Hamburg, Germania
Fabricat de:
Panasonic Corporation
1006, Oaza Kadoma, Kadoma City, Osaka, Japonia
Türkce
Panasonic Testing Centre
Winsberging 15, 22525 Hamburg, Almanya
Tarafindan Uretilmistir
Panasonic Corporation
1006, Oaza Kadoma, Kadoma Şehri, Osaka, Japonya
Pyccku
HOpMaunno 6paueHHo COTXoAMn dna cTpaH, He BXoAunx B Ebponeckn Co03

IeCTBnE 3TNX CNMBONB paCnpocTpaHReTcR TOJbKO Ha EbponeNckn Co103.
Ecnn Bb co6npaetcB b6pocntb daHHbIe 3nemHtbl, y3HaHTe B MeCThBIX opraHax Bnactn nn y dInlepa, kak CneNyET nocTynatb C OTXoamn TAKOROTnna.
Panasonic Corporation
https://www.panasonic.com
© Panasonic Corporation 2011-2022
EN, DE, FR, IT, NL, SP, DA, PT, NB, SV, FI, PL, CS, SK, HU, RO, TR, RU
Printed in Japan
ER9710151211P Y0611-100722