
CZTAW1 - Air-conditioner PANASONIC - Free user manual and instructions
Find the device manual for free CZTAW1 PANASONIC in PDF.
| Product type | Network adapter for Panasonic AQUAREA air conditioning system |
| Brand | Panasonic |
| Model | CZ-TAW1 |
| Dimensions (H x W x D) | 100 x 70 x 23 mm |
| Weight | Approx. 80 g |
| Power supply | 5 V DC (from indoor unit) |
| Power consumption | Max. 2.5 W |
| Network interfaces | Ethernet (RJ45) and Wi-Fi 2.4 GHz (802.11 b/g/n) |
| USB port | 1 USB port (for advanced configuration) |
| Wireless protocol | 2.4 GHz, IEEE 802.11 b/g/n |
| Main function | Connection of indoor unit to AQUAREA Smart Cloud for remote control |
| LED display | On/off LED, status LED (blue/green/red/white), connection LED |
| Buttons | WPS, registration/reset, control |
| Firmware update | Automatic via Internet (daily check) |
| Browser compatibility | Google Chrome recommended |
| Installation | Reserved for a certified electrician |
| Maintenance | Do not clean with water or a damp cloth; wipe with a dry cloth |
| Safety | Do not touch with wet hands, do not disassemble, stop immediately if abnormality occurs |
| Repairs | Contact the seller or installer; no user-serviceable parts |
| Operating temperature | Not specified, but designed for indoor use |
| Box contents | Network adapter, CD-ROM with software, user manual |
Frequently Asked Questions - CZTAW1 PANASONIC
User questions about CZTAW1 PANASONIC
0 question about this device. Answer the ones you know or ask your own.
Ask a new question about this device
Download the instructions for your Air-conditioner in PDF format for free! Find your manual CZTAW1 - PANASONIC and take your electronic device back in hand. On this page are published all the documents necessary for the use of your device. CZTAW1 by PANASONIC.
USER MANUAL CZTAW1 PANASONIC
Operating Instructions
Network Adaptor
Model No. CZ-TAW1
GB English.2 NL Netherlands..37 Cz Cesky 72
F Frangais.9 N Norsk..44 Polski 79
Italiano 16 Dansk. 51 Tuki ce 86
Espanol. 23 S Svenska. .58 GK EAnyikα 93
D Deutsch. 30 FIN Suomi.. 65
Operating Instructions
Network Adaptor
Model No. CZ-TAW1
Table of Contents
Safety Precautions 2
System Overview 3
Before Installing the Adaptor 3
Parts Identification 4
Connecting Network 4
Starting "AQUAREA Smart Cloud" 5
Reading LED Lamps. 6
Troubleshooting 7
Advanced Setting 7
Switch Operation Chart. 7
Specification 8
Firmware Update Function 8
Software License Information 8
Thank you for purchasing this Panasonic product.
Please read these instructions carefully before using this product, and save this manual for future use.
Safety Precautions
- Read the following "SAFETY PRECAUTIONS" carefully before installation.
- Electrical work must be installed by a licensed electrician. Be sure to use the correct rating and main circuit for the model to be installed.
-
The caution items stated here must be followed because these important contents are related to safety. The meaning of each indication used is as below. Incorrect installation due to ignoring of the instruction will cause harm or damage, and the seriousness is classified by the following indications.
-
Please leave this installation manual with the unit after installation.
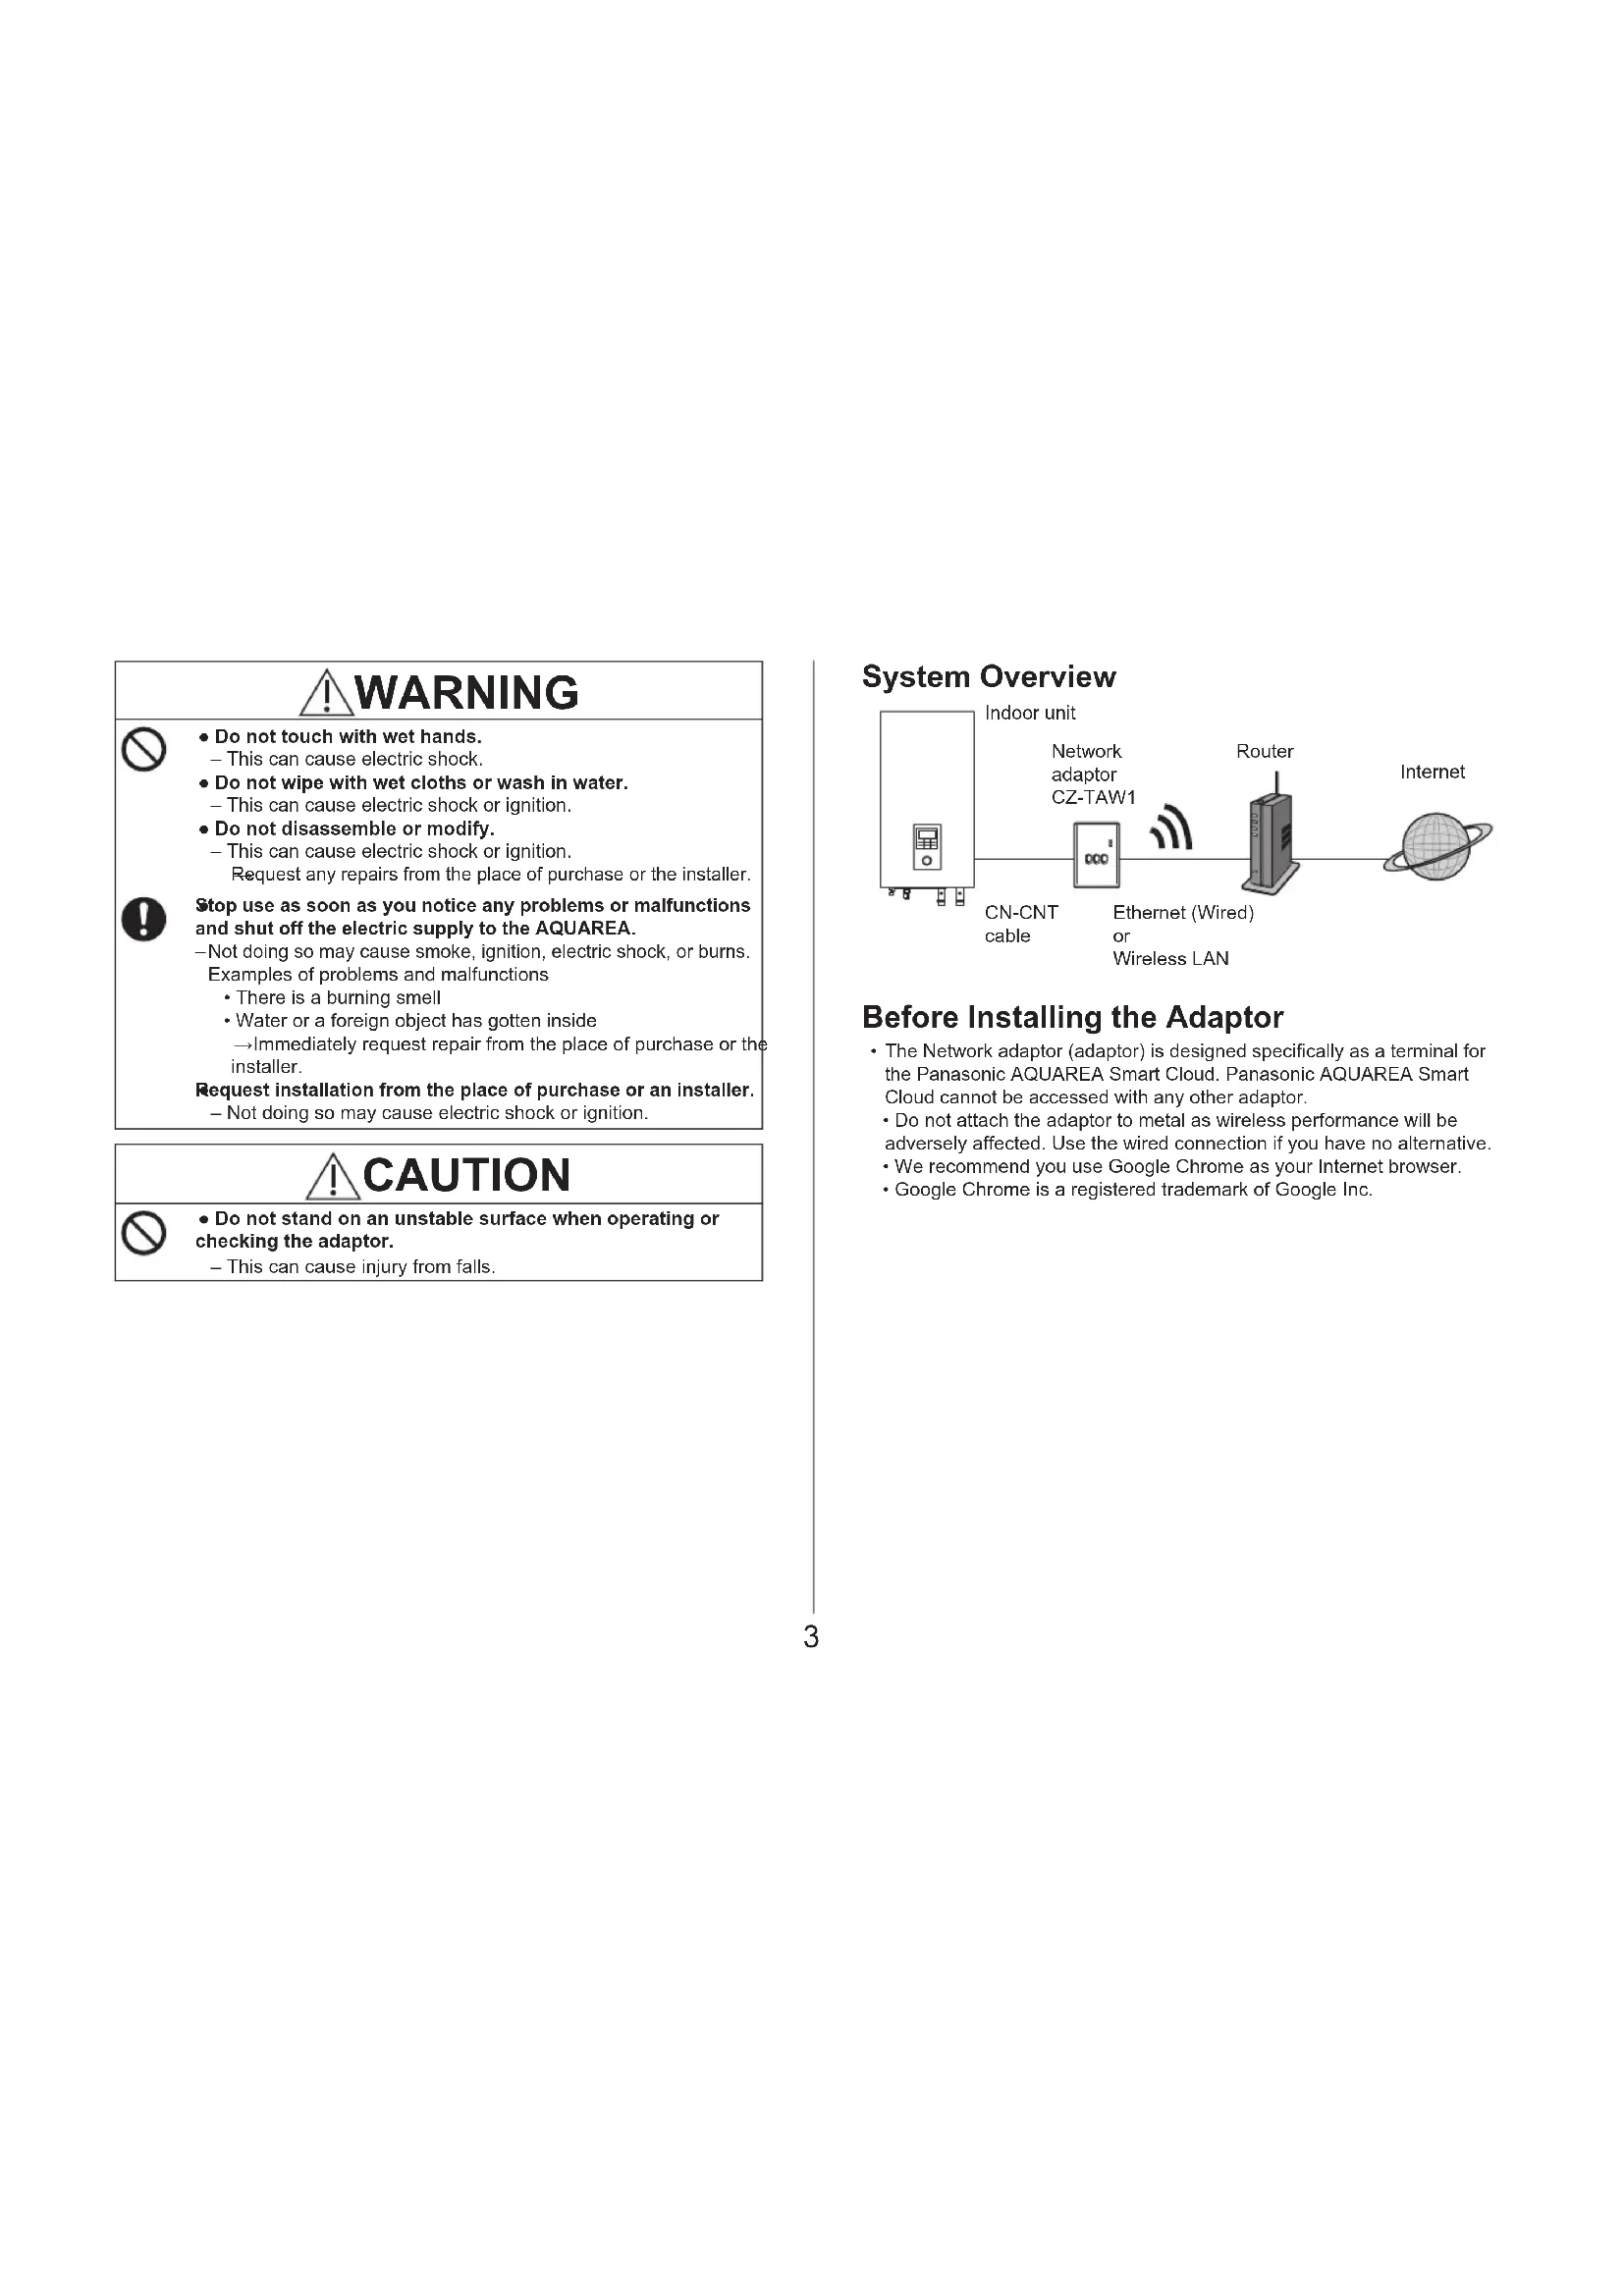
WARNING
This indication shows the possibility of causing death or serious injury.
CAUTION
This indication shows the possibility of causing injury or damage to properties.
The items to be followed are classified by the symbols:

Symbol with white background denotes item that is PROHIBITED from doing.

Symbol with dark background denotes item that must be carried out.
WARNING

-
Do not touch with wet hands.
-
This can cause electric shock.
-
Do not wipe with wet cloths or wash in water.
-
This can cause electric shock or ignition.
-
Do not disassemble or modify.
-
This can cause electric shock or ignition.
Request any repairs from the place of purchase or the installer.

Stop use as soon as you notice any problems or malfunctions and shut off the electric supply to the AQUAREA.
-Not doing so may cause smoke, ignition, electric shock, or burns. Examples of problems and malfunctions
There is a burning smell.
Water or a foreign object has gotten inside
→Immediately request repair from the place of purchase or the installer.
Request installation from the place of purchase or an installer.
- Not doing so may cause electric shock or ignition.
CAUTION

-
Do not stand on an unstable surface when operating or checking the adaptor.
-
This can cause injury from falls.
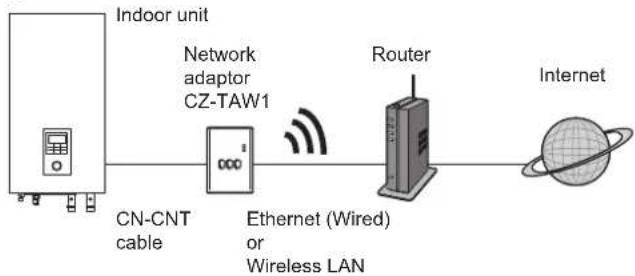
System Overview
Before Installing the Adaptor
- The Network adaptor (adaptor) is designed specifically as a terminal for the Panasonic AQUAREA Smart Cloud. Panasonic AQUAREA Smart Cloud cannot be accessed with any other adaptor.
- Do not attach the adaptor to metal as wireless performance will be adversely affected. Use the wired connection if you have no alternative
We recommend you use Google Chrome as your Internet browser. - Google Chrome is a registered trademark of Google Inc.
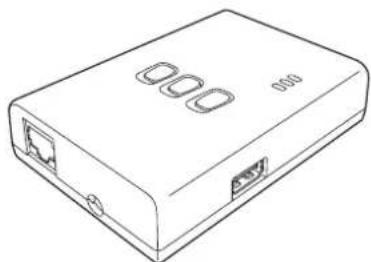
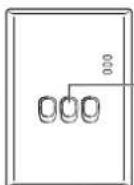
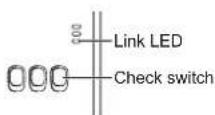
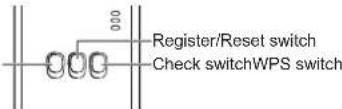
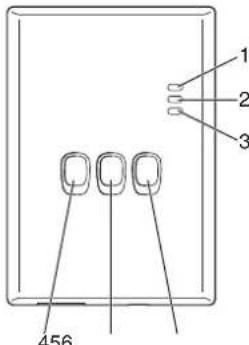
Parts Identification

| No. | Item Description | |
| 1 | Power LED Indicates that the adaptor is being supplied with power. | |
| 2 | Status LED Indicates the status of the adaptor. Blue: Wireless mode Green: Ethernet mode Red: Abnormality White: Timer | |
| 3 | Link LED Indicates the communication status of the adaptor. | |
| 4 | WPS switch Switches WPS ON. | |
| 5 | Register/Reset switch Enables user registration and resetting. | |
| 6 | Check switch Check the communication status of the adaptor. Switches between Ethernet and Wireless modes each time it is pressed and held for 10 seconds. |
Connecting Network
You can establish a connection with the internet with either the Ethernet mode (wired) or the Wireless mode (wireless).
1 Turn on the power supply to the indoor unit. The Power LED lights.
2 The colour of the Status LED indicates the connection mode.

■ When connecting using the Ethernet mode (wired)
1 Check the Status LED is green to confirm that the Ethernet mode is on.
If the Ethernet mode is not on, press and hold the Check switch for 10 seconds to switch to the Ethernet mode.
2 Connect the router and the adaptor with a LAN cable. The Link LED lights to indicate that the connection has been established. Use a shielded LAN cable.
When connecting using the Wireless mode (wireless)
1 Check the Status LED is blue to confirm that the Wireless mode is on.
- If the Wireless mode is not on, press and hold the Check switch for 10 seconds to switch to the Wireless mode.
WPS switch
2 Switch on WPS on the router.
3 Press the WPS switch on the adaptor. The Status LED and Link LED light when communication is established. Refer to Troubleshooting (P.7), "When you cannot connect in the Wireless mode" or "When you cannot connect in the Ethernet mode" when you cannot connect to the network.
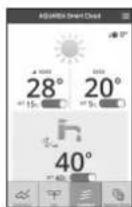
Starting "AQUAREA Smart Cloud"
Use a smartphone to set up the AQUAREA Smart Cloud. -User interface image may change without notification.
1 Access the "AQUAREA Smart Cloud".
https://aquarea-smart.panasonic.com

There is no charge for using this application. Other charges may be incurred for connection and operation, however.
- Updates to the service may mean there are changes to the design of the screen and display.
- You will need a Panasonic ID in order to use the application. If you have not yet registered, first obtain a register for a Panasonic ID (free) by either following the link on the login page or at the following URL. https://csapl.pcpf.panasonic.com/m
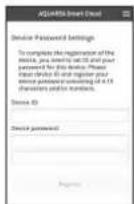
2 Register both the adaptor and the indoor unit.
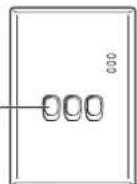
1) Press the Register/Reset switch on the adaptor to enter the user registration mode. (The mode remains active for 30 minutes.)
Register/Reset switch
2) Log into the service using the Panasonic ID you have already obtained.
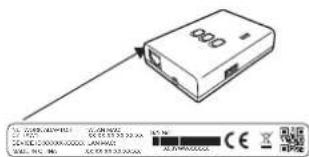
3) Enter the Device ID which is written on the side of the adaptor.
- Skip the letter "-" when entering the Device ID.
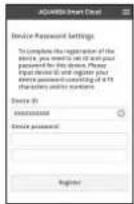
4) Enter a password for the device.
- If you forget the password for the device, you can reset the adaptor and then re-register it.
→P.7 "Switch Operation Chart" - You can give a name and zone name to the indoor unit that helps you identify it.
3 Use the AQUAREA Smart Cloud.
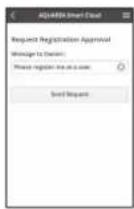
To register an additional user on the indoor unit Multiple users (family members, for example) with different Panasonic IDs can access the same indoor unit.
1 Additional user operations
1) Log into the service using the Panasonic ID of the additional user.
2) Enter the Device ID and Device password that was registered by the owner (the user that initially registered).
3) Enter a message requesting approval from the owner.
- Enter a message so that the owner can identify the person making the request.
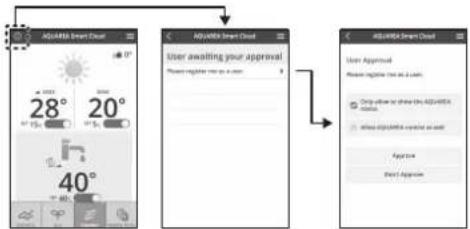
2 Owner (the user that initially registered) operations
1) Log into the service using the Panasonic ID of the owner (the user that initially registered).
If there is a message requesting registration from an additional user,
a "is displayed at the top left of the Top page.
2) Select "0"
The request message from the additional user is displayed.
3) Select the appropriate privileges for the user and approve their request.
After approving, the additional user will also be able to use the AQUAREA Smart Cloud.
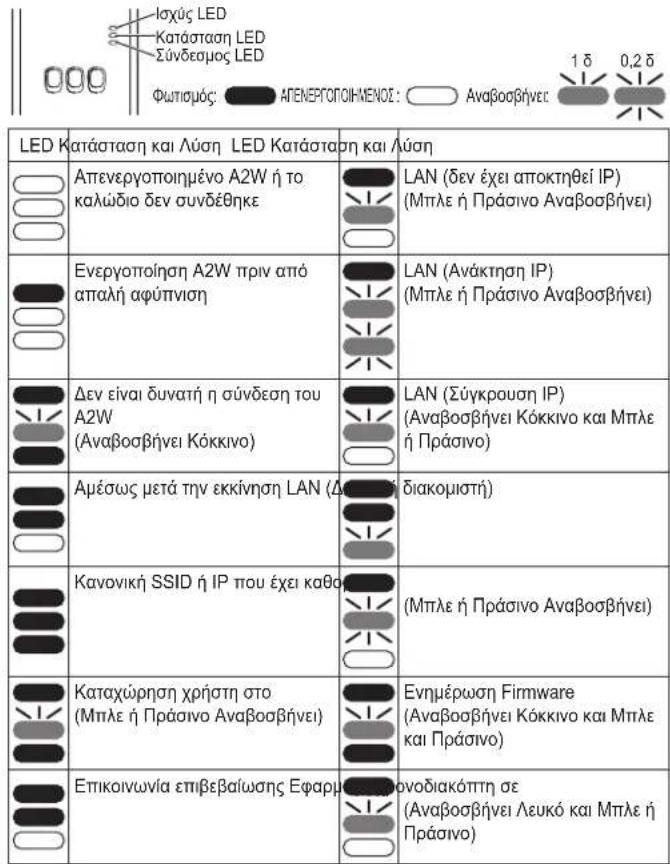
Reading LED Lamps
The lamps light and blink to notify you of the communication status and possible errors.
| LED | Status and Solution LED Status | and | Solution |
| A2W power off or cable not connect | LAN (IP has not been acquired) (Blue or Green Blinking) | ||
| A2W power on before soft wake up | LAN (IP Retrieving) (Blue or Green Blinking) | ||
| A2W cannot connect (Red Blinking) | LAN (IP collision) (Red and Blue or Green Blinking) | ||
| Immediately after startup LAN | interruption) | ||
| Normal SSD or IP specified | (Blue or Green Blinking) | ||
| User registration in (Blue or Green Blinking) | Firmware Updating (Red and Blue and Green Blinking) | ||
| Communication confirmation TI | Implementation in (White and Blue or Green Blinking) |
Troubleshooting
When you cannot connect in the Wireless mode Check the strength of the wireless signal.
How to check the strength of the wireless signal (press the Check switch) You can check the strength of the wireless signal by checking if the Link LED is lighting or blinking.
Strength: GOOD
Strength: NORMAL
Strength: BAD
Strength: IMPOSSIBLE
When there is no problem with the wireless signal but the Status LED does not light
Check the router connections.
- If the wireless signal strength is BAD or worse, connect using the Ethernet mode.
■When you cannot connect in the Ethernet mode
- When the Status LED does not light
Check the LAN cable connections.
Check the router connections.
Advanced Setting
When you want to set the IP of the wired LAN manually
1) Start the IP setting tool on the attached CD-ROM and save the settings to a USB memory device.
2) Attach the USB memory device with the saved settings to the adaptor and press and hold the WPS switch for 10 seconds.
3) The Link LED lights when the settings are complete.
When you want to set the SSID of the wireless LAN manually
1) Start the SSID setting tool on the attached CD-ROM and save the settings to a USB memory device.
2) Detach the USB memory device and then attach to the adaptor and press and hold the WPS switch for 10 seconds.
3) The Link LED lights when the settings are complete.
Switch Operation Chart
| Aim Switch operation Remarks | |
| To switch WPS ON Press the WPS switch. | This is only effective when Wireless mode is on. |
| To register a user Press the Register/ Reset switch. | This is only effective when communications have been established. |
| To check the status of communications Press the Check switch. | LEDs are displayed according to the connection status. |
| To switch between the Ethernet and Wireless modes Press the Check switch for at least 10 seconds. | The settings for each mode are maintained even if you change the mode. |
| To reset the software Press the Register/ Reset switch for at least 10 seconds. | This starts the process for the software to reset itself. When resetting, checks are made for the latest firmware, and this is updated if a new version is available. |
| To specify theSSID manually. (in Wireless mode) Press the WPS switch for at least 10 seconds. | Connection is by WPS/ DHCP if there are no settings to load from the USB memory device. |
| To specify the IP manually. (in Ethernet mode) | |
| To initialize the adaptor | Simultaneously press the WPS switch and the Check switch for at least 10 seconds. This restores the adaptor's settings to the factory defaults. |
Specification
| Input Voltage DC 5 V | (From ID unit) |
| Power consumption Max 2.5 W | |
| Size 100 mm (H) × 70 mm (W) × 23 mm (D) | |
| Mass Approx. 80 g | |
| Interfaces 1 × Wireless LAN, 1 × Ethernet, 1 × USB | |
| Radio protocol 2.4 GHz, 802.11 b/g/n | |
Firmware Update Function
This product has functionality for connecting to the Panasonic firmware update server over the Internet to automatically update the device firmware to the latest version.
To update the firmware, the device checks whether its firmware is the latest version once per day, and if an update is required, the update is applied and the device restarts automatically. Operations are not possible while the device is being restarted (which takes about 1 minute).
Software License Information
This product incorporates the following software:
(1) The software developed independently by or for Panasonic Corporation,
(2) The software owned by third party and licensed to Panasonic Corporation,
(3) The software licensed under the GNU General Public License, Version 2.0 (GPL V2.0).
(4) The software licensed under the GNU LESSER General Public License, Version 2.1 (LGPL V2.1), and/or
(5) Open source software other than the software licensed under the GPL V2.0 and/or LGPL V2.1.
The software categorized as (3) - (5) are distributed in the hope that it will be useful, but WITHOUT ANY WARRANTY, without even the implied warranty of MERCHANTABILITY or FITNESS FOR A PARTICULAR PURPOSE.
Please refer to the detailed terms and conditions thereof shown in the attached CD-ROM.
That CD-ROM is also including a complete machine-readable copy of the corresponding source code covered under GPL V2.0, LGPL V2.1 or the other licenses with the obligation to do so, as well as the respective copyright notice thereof.

Declaration of Conformity (DoC)
Hereby, "Panasonic Corporation" declares that this product is in compliance with the essential requirements and other provisions of Directive 1999/5/EC.
The full text of the EU declaration of conformity is available at the following internet address: http://www.ptc.panasonic.eu/
Authorized Representative: Panasonic Testing Centre, Panasonic Marketing Europe GmbH, Winsberging 15, 22525 Hamburg, Germany. Norway: There are usage restrictions within a radius of 20km from the centre of Ny-Alesund on Svalbard.
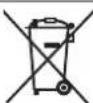
Disposal of Old Equipment
Only for European Union and countries with recycling systems
This symbols on the products, packaging, and/or accompanying documents means that used electrical and electronic products must not be mixed with general household waste.
For proper treatment, recovery and recycling of old products, please take them to applicable collection points in accordance with your national legislation.
By disposing of them correctly, you will help to save valuable resources and prevent any potential negative effects on human health and the environment.
For more information about collection and recycling, please contact your local municipality.
Penalties may be applicable for incorrect disposal of this waste, in accordance with national legislation.
1 Gaaar "AQUAREA Smart Cloud."
https://aquarea-smart.panasonic.com


m = 311 ;
Tabell for knappbetjening. 49
Spesifikasjon 50
Identification of delene. 53
Tilslutningsnetvark 53
Start of "AQUAREA Smart Cloud" 54
Identification of delene
Vettaiierasesine paassytisaaan
Avaywwn twv Aaunnpwv LED. 97
Avtietwion npoalnatwv 98
Pouion ia npoxnpneouc. 98
Aiaypaamaaieitoupyiac Evaaayn.. 98
Ipoiaaypaqec 99
Aetoupyia evnepomegaf firmware. 99
IIInpoopoeic AEdiac Xpnnns Aoyioikou. 99
aεuvapotouyia tnyayopaduto tou pioovtacpanasonic.
Napakaoue diaabe tpoaektia autcig oynie spiv aio T xphan autou Tou Ptoovtoc kai pfaleste auto to exyeipidio yia meaovnikxhon.
PpouaIaeicAoaaIac
△iαβατεπροεκτικα ην ακόλουθη ενότητα «ΠΟΦΥΑΕΙΣ ΑΣΦΑΕΙΔΣ» πριν αίτο τήν εγκατάσταση.
OJnKpOyoKcEpyoic TPEIe va TpaYatoToinBOv atTO evAV OIOIOOTmEvO nKpOyo. Beaiowte 0x npoiotoe T oWOTn OovOaOTIK xO KAI TO KUPIO KUKwua yia To mvTeAIO TRO a YkataOBei
Ta 0toiexia Tpooxns Ta otiova avapepovtai edw npetie va aokolouoovtai biotn auta Ta onmuvtikaepeixoeva oxeticovtae IVy aoqaleia. H evvoia nks kabe evoei nrs xnpoiatoietai eivai otiw s napakatw. Aavbaouevn Ekyataotaan loyewayioicntvEtohns pokaoleei Aabn nZmaia, ka n oobapotaeta Taevovjelta ato tki akOauoec EvoeiEic.
- Papanakaeioe va exeTo Tn apov evxepiio Eykarataoans paiz me novadaetanv Eykaratoaon.
AvaywonrwAaPTnpwvLED
Oi aamtnpeaavabovk aavaoobhivouv ia va oac evnepawouv ia tvkataaon etikovwiac kai mva opalata.
AvtietwTion npoBnmuatow
Vev mopeite va ouvdetheta tny Auaupan aeoupyia EeYTE TIV IOXU TOAoupauo anatoC. 00
Vc v EeyEe Tn Vxou aupauot anuato (natote to diakotm Eeyxou)
Mtnopeite va eYeTe TIV 1xU TOU aupatou onmuatos eVyovtac ev O Suvoepoc LED avaei n avoobnvei.

Ioxus:KAAH
_X_S :KANONIKH
10xUc:KAKH
IaOUs: AADYNATH
Oav dev utapexi kaveva npba nmae to aoupuato nma, aaan lauxvia Kaataoan LED ev avabéi
→EeYTe TIGUVDoeiC TODpOLOyntI.
^* Eav n iouc rou aupauatou anuatac eivai KAKH n xieipotpn, uovdeBite Xpnoiopoowrtn Aetoupyia Ethernet.
v 6v mioe t va uov8eTe ot n eitoupyia Ethernet
- Otav n Auxvia Kaataaotaon LED avapei
→EAEYETIc ouvOeOaic tou kaWoiou LAN.
Eay5TE TIGouvdeoeiToudpoAooynt.
PuroiynipoxwnpnEvouc
Tc oioe 0eEte va pueiote mV IP tou evupaot LAN xepokivnta
1) EKKIVNATE TO epyaIeIOpuBuaIcIg ITO tIouvaTIOpeo CD-ROM KAATOOnKeUoTe Tc puOuieis Oia oukeun Vnuus USB.
2)UvdoTe Tn mvnouokueus USB tic atoOnkeuvee puoiieic stov Tpoaoapoyea, kai kpanote nainveo To diakottn WPS yia 10 deutepoleTTa.
3) Huxvia vudaeoC LG avaetov oAoknpoBouOu pOuioEi.
V θελετεναρθμιετετοSSIDtouaσρμatouLANχερokivnta
1)EKKIVNOTO TOpyaiaiopuBuaNGSSIDoTtouanToevoCD-ROMKAI aTOBnKeUoTeTICpuBuaieC6uAoukeunVnuJus USB.
2) Apaipote Tn mnnun oukeun USB kai otn ouvexia ouvdeote tov npaaapoyea, kai kparntate nainveo to biakottn WPS yia 10 deutepolenta
3)Huxia∑vδεσμοςLDEDαβειστανλοκληρωθούνιρθμειεις.
Diaypauma Aetoupyiae Evalayns

Anawon oumuoppwns (DoC)
Me Tn trapouaa, n "Panasonic Corporation" dNauvei OTI TO pioov auto eivai oupuvo uTic baikc aattainie cki ai aeles oxetikcs tnc onyia 1999/5/EC.
Oi taeus npouv va keteaouv eva atypao tou pwnotou DoC yia ta R&TTE npoiDva ja otu DoC server jac:http://www.ptc.panasonic.eu/ Stoieia eikovwiae Eogouiooetneou Avimpooumou: Panasonic Testing Centre, Panasonic Marketing Europe GmbH, Winsbergring 15, 22525 Hamburg, cepavia Nopjna : utapxouv teipoiqoi otn xphon mea e ia aktiva 20 xiaotpv au to Kevtropo Ny - Alesund stn aInpvt.

Antoppiynaaiwovoukeuwv
Movi yia tvv Eupwnaikn Evwon kai xwpec me ouotnput a avakkawon
To uuBoo auto, mavw oTa TpoioVt, n oukeuaia n/ka Ta auovbEutiké Eyypaia, UTOBOWeI ON XPOJIOOTIOUEVA nAekTpiKa kAnEkoPViKa TpoioVt dEv TPETeI vAToppittovTa OTA KOIKA OIKAKA AToppjmuata.
Papakaooupe Taapadowte Taaiiaipioviyia diayelpi, ETEEPyaaia h/kai avakkawon ouqwva uic voikc diataeic Twv apoiodw axpwv atokoiis.
Me nV opn antopipun autwv wv TPOIOVTW, OUbetaAeTe anv EeOIKOVOpn nolunuTiwu Tropw kai nV atoquyn Tuxov apnvikw vttwnwoewv otN AVpwny uyeia kai to TepiBAAov Fia Tepiaotepes Nlnpopoeic oxetika eN ouayn kai nV avakukwun, npakaaloume aenuuvte iC kata tontouc utnopea gaukoih catoopowTu
E TEPITTOWANAVIKAVOKIACATOPPIUNCAUTOU TOIPOIOVTOEVDEXOVEWVS AETIABHOUV TPOOTIA,AVAOYA E T N VOpOBEOA TOE KAOTEKpAouc.
Manufactured by: Panasonic Corporation
1006 Kadoma, Kadoma City, Osaka, Japan
Importer for Europe: Panasonic Marketing Europe GmbH
Panasonic Testing Centre
Winsberging 15, 22525 Hamburg, Germany
Panasonic Corporation
http://www.panasonic.com
© Panasonic Corporation 2016
CZ-TAW1-OI-1