DCMBA572 - Blower DEWALT - Free user manual and instructions
Find the device manual for free DCMBA572 DEWALT in PDF.
| Product type | Axial blower |
| Brand | DeWalt |
| Model | DCMBA572 |
| Rated voltage | 54 V DC |
| Battery type | Li-Ion |
| Weight (without battery) | 3.1 kg |
| Sound power level (LwA) | 106 dBA (measured) / 107 dBA (guaranteed) |
| Sound pressure level (LpA) | 97 dBA |
| Vibration emission value | < 2.5 m/s² (uncertainty K = 1.5 m/s²) |
| Compatible batteries | DCB546, DCB547, DCB548 (54 V) |
| Compatible chargers | DCB104, DCB107, DCB112, DCB113, DCB115, DCB118, DCB132 |
| Main function | Professional outdoor blowing |
| Speed regulator | Rotary lever (soft start) |
| Switch | Trigger with lock-on |
| Blower tube | Removable, locking via notches and keys |
| Battery charge indicator | 3 green LEDs on some batteries |
| Electronic protection system | Protection against overload, overheating, and deep discharge |
| Maintenance | Clean air vents with compressed air; no lubrication required |
| Cleaning | Damp cloth with mild soap; do not immerse |
| Spare parts | Contact a DeWalt authorized service center |
| Repairability | Repairs by authorized centers only; battery and charger not repairable |
| CE warranty | Conforms to standards EN 60335-1, EN 50636-2-100, directives 2014/30/EU and 2011/65/EU |
Frequently Asked Questions - DCMBA572 DEWALT
User questions about DCMBA572 DEWALT
0 question about this device. Answer the ones you know or ask your own.
Ask a new question about this device
Download the instructions for your Blower in PDF format for free! Find your manual DCMBA572 - DEWALT and take your electronic device back in hand. On this page are published all the documents necessary for the use of your device. DCMBA572 by DEWALT.
USER MANUAL DCMBA572 DEWALT
For at reducere risikoen for persorskade:
Brandfare. Transport of
batteri kan muligvis forarsage brand, hvis batteripolerne uforvarende kommer i kontakt med ledende materialer.
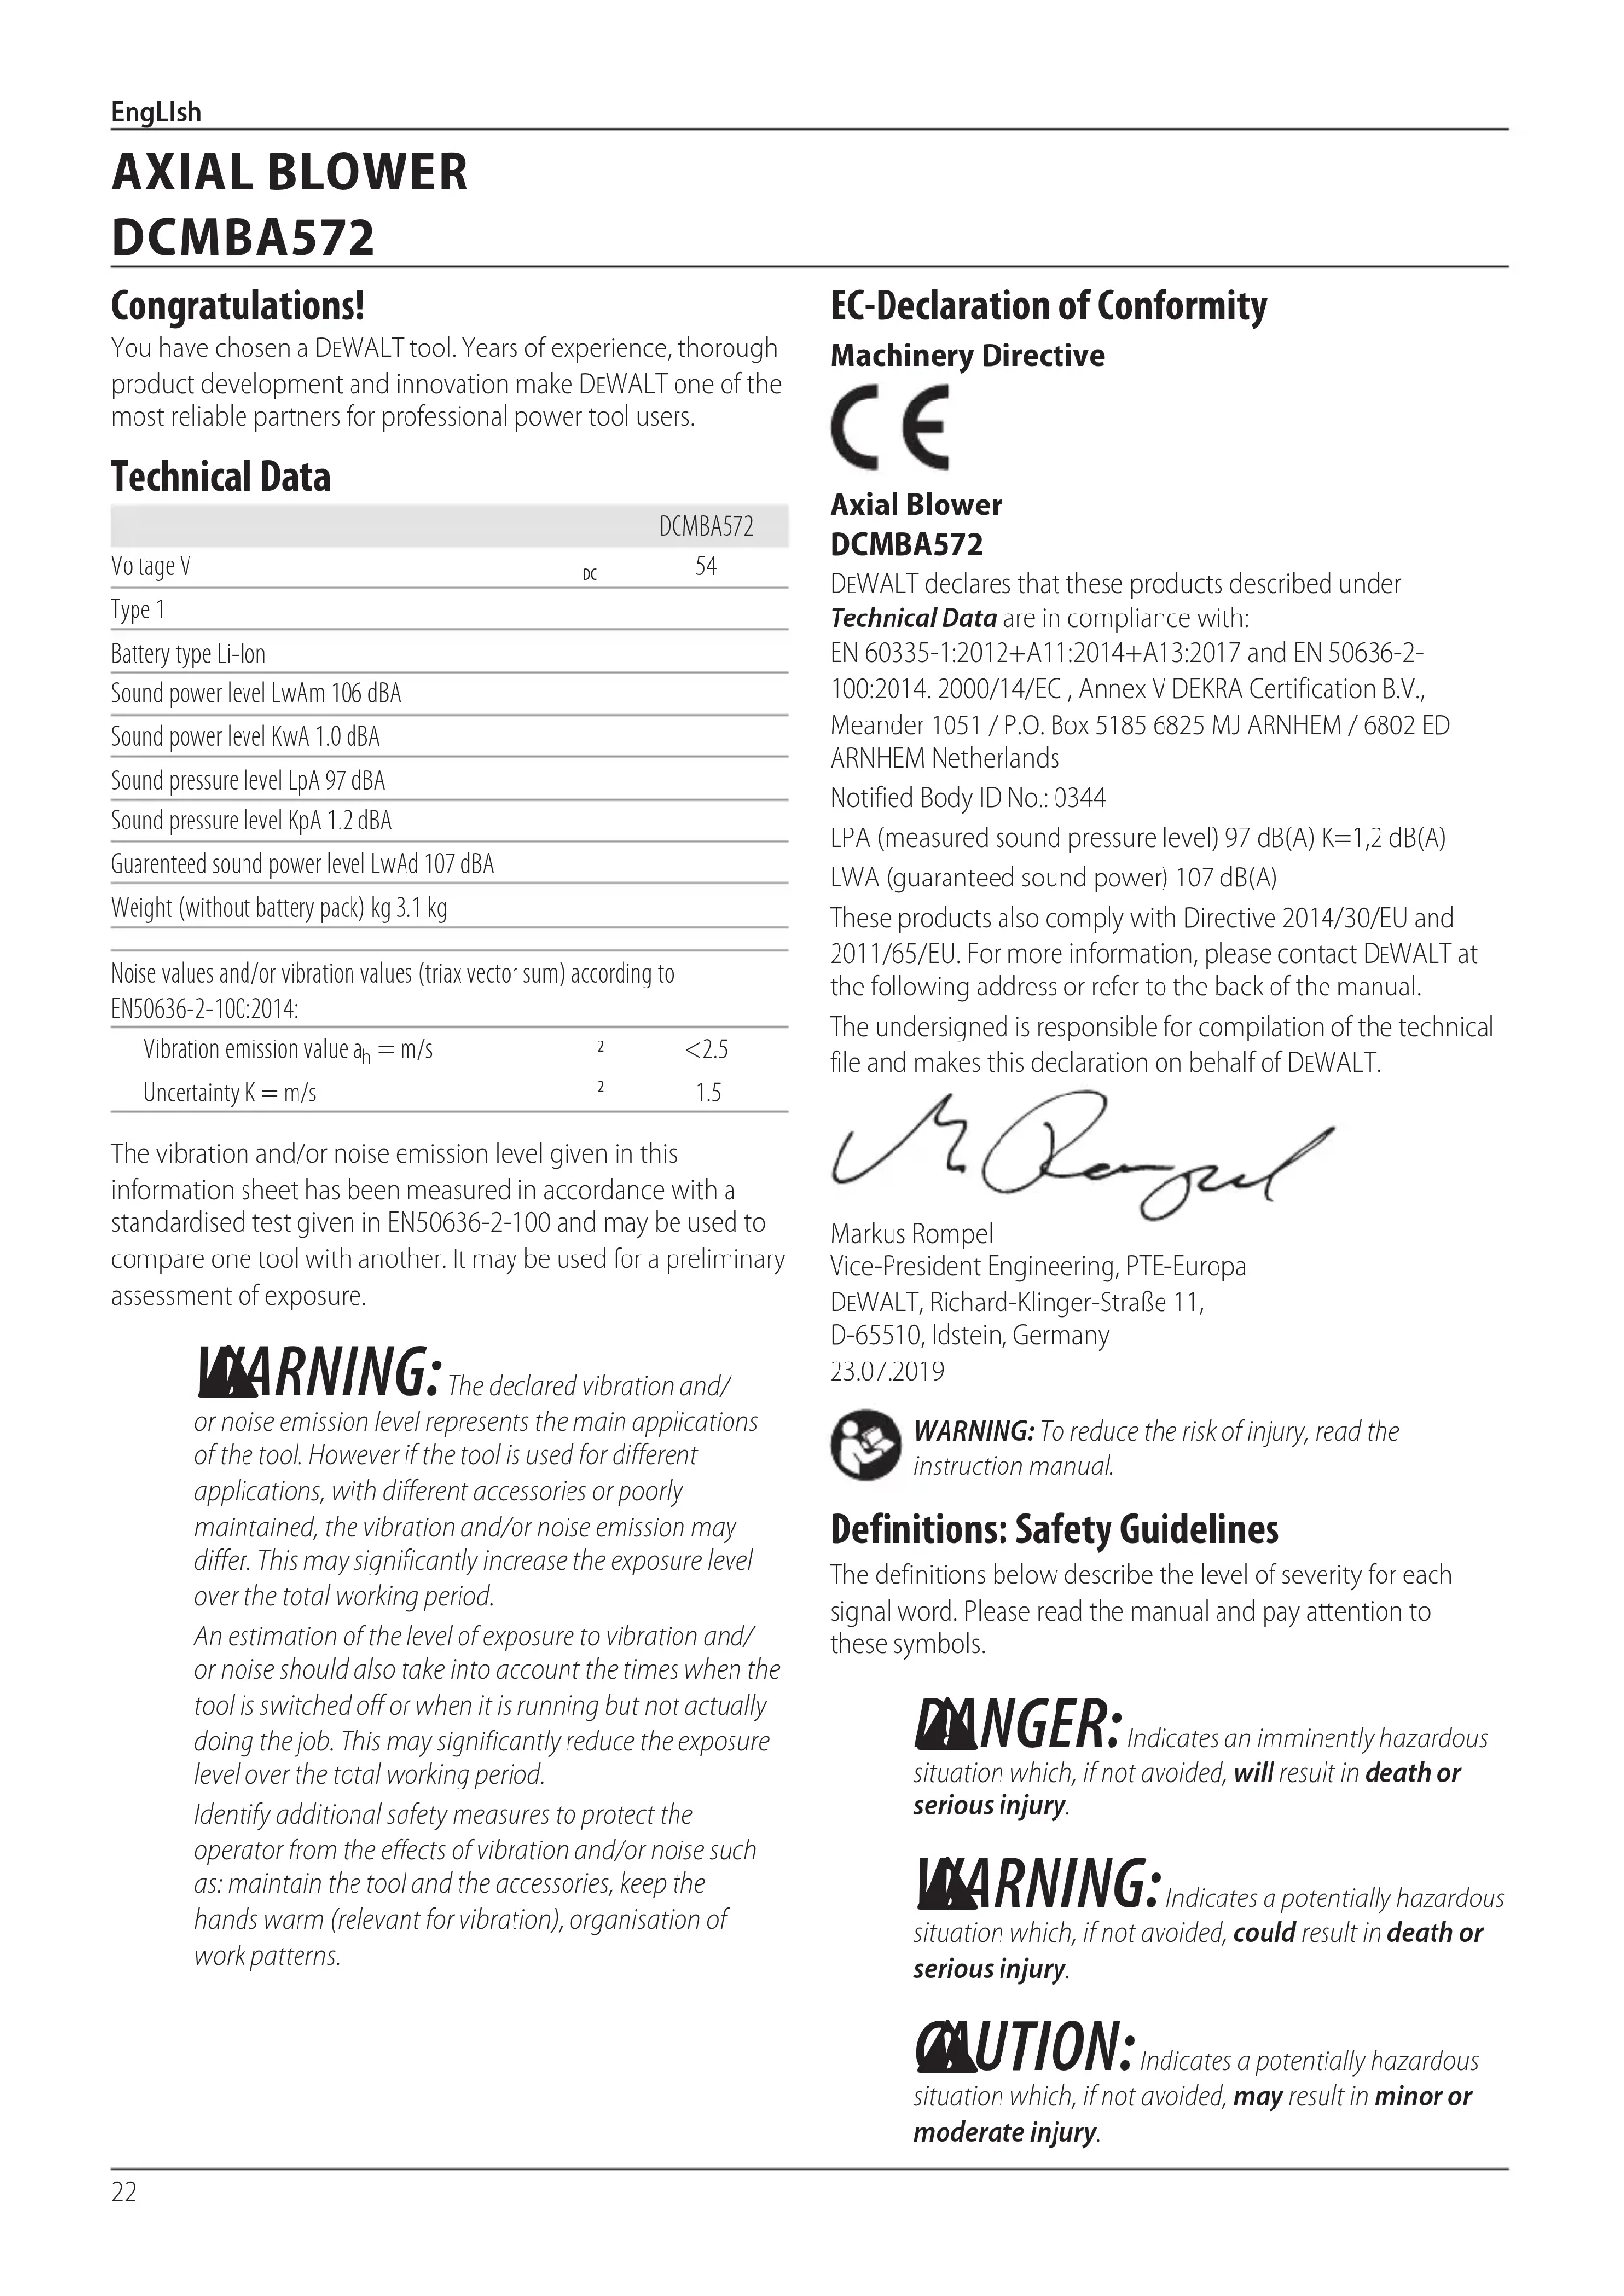
You have chosen a DEWALT tool. Years of experience, thorough product development and innovation make DEWALT one of the most reliable partners for professional power tool users.
Technical Data
| DCMBA572 | ||
| Voltage V | DC | 54 |
| Type 1 | ||
| Battery type Li-Ion | ||
| Sound power level LwAm 106 dBA | ||
| Sound power level KwA 1.0 dBA | ||
| Sound pressure level LpA 97 dBA | ||
| Sound pressure level KpA 1.2 dBA | ||
| Guaranteed sound power level LwAd 107 dBA | ||
| Weight (without battery pack) kg 3.1 kg | ||
| Noise values and/or vibration values (triax vector sum) according to EN50636-2-100:2014: | ||
| Vibration emission value ah = m/s | 2 | <2.5 |
| Uncertainty K = m/s | 2 | 1.5 |
The vibration and/or noise emission level given in this information sheet has been measured in accordance with a standardised test given in EN50636-2-100 and may be used to compare one tool with another. It may be used for a preliminary assessment of exposure.
WARNING: The declared vibration and/or noise emission level represents the main applications of the tool. However if the tool is used for different applications, with different accessories or poorly maintained, the vibration and/or noise emission may differ. This may significantly increase the exposure level over the total working period.
An estimation of the level of exposure to vibration and/or noise should also take into account the times when the tool is switched off or when it is running but not actually doing the job. This may significantly reduce the exposure level over the total working period.
Identify additional safety measures to protect the operator from the effects of vibration and/or noise such as: maintain the tool and the accessories, keep the hands warm (relevant for vibration), organisation of work patterns.
EC-Declaration of Conformity Machinery Directive

Axial Blower DCMBA572
DEWALT declares that these products described under Technical Data are in compliance with:
EN 60335-1:2012+A11:2014+A13:2017 and EN 50636-2-100:2014. 2000/14/EC, Annex V DEKRA Certification B.V., Meander 1051 / P.O. Box 5185 6825 MJ ARNHEM / 6802 ED ARNHEM Netherlands
Notified Body ID No.: 0344
LPA (measured sound pressure level) 97 dB(A) K = 1,2 dB(A)
LWA (guaranteed sound power) 107 dB(A)
These products also comply with Directive 2014/30/EU and 2011/65/EU. For more information, please contact DEWALT at the following address or refer to the back of the manual.
The undersigned is responsible for compilation of the technical file and makes this declaration on behalf of DEWALT.

Markus Rompel Vice-President Engineering, PTE-Europa
D-65510, Idstein, Germany
23.07.2019

WARNING: To reduce the risk of injury, read the instruction manual.
Definitions: Safety Guidelines
The definitions below describe the level of severity for each signal word. Please read the manual and pay attention to these symbols.
DANGER: Indicates an imminently hazardous situation which, if not avoided, will result in death or serious injury.
WARNING: Indicates a potentially hazardous situation which, if not avoided, could result in death or serious injury.
CAUTION: Indicates a potentially hazardous situation which, if not avoided, may result in minor or moderate injury.
| Batteries Chargers/Charge | Times (Minutes) | ||||||||||
| Cat # V | x | Ah Weight (kg) | DCB104 | DCB107 | DCB112 | DCB113 | DCB115 | DCB118 | DCB132 | DCB119 | |
| DCB546 | 18/54 | 6.0/2.0 | 1.05 | 60 270 | 170 | 140 | 90 | 60 | 90 X | ||
| DCB547 | 18/54 | 9.0/3.0 | 1.46 | 75* | 420 | 270 | 220 | 135* | 75* | 135* | |
| DCB548 | 18/54 | 12.0/4.0 | 1.44 | 120 | 540 | 350 | 300 | 180 | 120 | 180 | X |
| DCB181 | 18 | 1.5 | 0.35 | 22 | 70 | 45 | 35 | 22 | 22 | 22 | 45 |
| DCB182 | 18 | 4.0 | 0.61 | 60/40** | 185 | 120 | 100 | 60 | 60/40** | 60 | 120 |
| DCB183/B | 18 | 2.0 | 0.40 | 30 | 90 | 60 | 50 | 30 | 30 | 30 | 60 |
| DCB184/B | 18 | 5.0 | 0.62 | 75/50** | 240 | 150 | 120 | 75 | 75/50** | 75 | 150 |
| DCB185 | 18 | 1.3 | 0.35 | 22 | 60 | 40 | 30 | 22 | 22 | 22 | X |
| DCB187 | 18 | 3.0 | 0.54 | 45 | 140 | 90 | 70 | 45 | 45 | 45 | 90 |
| DCB189 | 18 4.0 | 0.54 | 60 185 | 120 | 100 | 60 | 60 | 120 | |||
Date code 201811475B or later
*Date code 201536 or later
NOTICE: Indicates a practice not related to personal injury which, if not avoided, may result in property damage.
D. notes risk of electric shock.
Dotes risk of fire.
IMPORTANT SAFETY INSTRUCTIONS
READ ALL INSTRUCTIONS BEFORE USING THIS APPLIANCE
When using this appliance, basic safety precautions should always be followed including the following:
WARNING: To reduce the risk of fire, electric shock and injury:
- Do not leave the appliance when connected to power source. Remove the battery pack when not in use and before servicing.
- Do not use on wet surfaces. Do not expose to rain. Store indoors.
- Do not allow appliance to be used as a toy. Close attention is necessary when used by or near children.
- Use this appliance ONLY as described in the manual. Use only recommended attachments.
- Do not use this appliance if it is showing signs of malfunction in any way. If the appliance is not working correctly, has been dropped, damaged, left outdoors, or dropped into water, return it to a service centre.
- Do not handle the appliance with wet hands.
-
Do not put any objects into the openings of the appliance. Do not use the appliance with any opening blocked; keep free of dust, lint, hair and anything else that may reduce air flow.
-
Keep hair, loose clothing, fingers, and all body parts away from the openings and moving parts.
- Turn off all controls before disconnecting from power source.
- Use extra care when cleaning on stairs.
SAVE THESE INSTRUCTIONS
Additional Safety Instructions
WARNING: When using an electric appliance, basic safety precautions should always be followed to reduce risk of fire, electric shock, and personal injury, including the following.
WARNING: Read all safety warnings and all instructions. Failure to follow the warnings and instructions may result in electric shock, fire and/or serious injury.
WARNING: Never allow children, persons with reduced physical, sensory or mental capabilities or lack of experience and knowledge or people unfamiliar with these instructions to use the machine, local regulations may restrict the age of the operator.
To Reduce Risk of Injury:
- Avoid accidental starting. Turn off all controls before removing the battery pack. Be sure switch is in the locked or off position before inserting battery pack. Carrying units with your finger on the switch or inserting the battery pack into a unit with the switch on invites accidents.
- Avoid dangerous environmental conditions - Do not use electric units in damp or wet locations. Don't use the unit in the rain.
Use safety equipment. Always wear eye protection, filter mask if operation is dusty, non-skid safety shoes, or hearing protection must be used for appropriate conditions.
EngLish
- Use the right unit - Do not use this unit for any job except that for which it is intended.
- Inspect the area before using the unit. Remove all debris and hard objects such as rocks, glass, wire, etc. that can ricochet, be thrown, or otherwise cause injury or damage during operation.
- Keep children, bystanders and animals away from the work area a minimum o10 meters when starting or operating the unit.
- Maintain unit with care. Keep unit clean for best and safest performance. Follow instructions for proper maintenance.
- Stay alert - Watch what you are doing. Use common sense. Do not operate unit when you are tired.
- Do not place outlet of blower near eyes or ears when operating.
- Do not operate the machine while people, especially children, or pets are nearby.
- Do not overreach. Keep balance at all times. Always be sure of footing. Walk, never run.
- Do not touch moving hazardous parts before the machine is disconnected from the battery and the moving hazardous parts have come to a complete stop.
- If the machine starts to vibrate abnormally, remove the battery pack and immediately check.
- Do not attempt to clear clogs from unit without first removing the battery.
- Do not immerse any part of the unit in liquid.
- Do not use unit if switch does not turn it on or off. A unit that cannot be controlled with the switch is dangerous and must be repaired.
- Do not allow debris to be ingested into blower intake.
- Do not point unit discharge at self or bystanders.
- Do not use to blow explosive dust, or in areas where air contains explosive dust such as coal, grain, or other combustible material.
- Do not attempt to repair the blower. To assure product safety and reliability, repairs, maintenance, and adjustments should be performed by authorized service centres.
- Do not operate blower in a gaseous or explosive atmosphere. Motors in these units normally spark, and the sparks might ignite fumes.
- Do not overreach. Keep proper footing and balance at all times.
- Never leave blower running unattended. Turn power off.
- Remove the battery pack before connecting the tube.
- Store idle units. When not in use, the unit should be stored in a dry, high or locked-up place - out of reach of children.
- Instructions for compatible batteries and chargers are included for reference in this manual. Read all instruction manuals included with your battery pack or charger. Read all cautionary markings on the charger and battery pack.
- Disconnect the battery pack from the blower before making any adjustments, changing accessories,
servicing, moving or storing the unit. Such preventative safety measures reduce the risk of starting the appliance accidentally.
SAVE THESE INSTRUCTIONS
Residual Risks
In spite of the application of the relevant safety regulations and the implementation of safety devices, certain residual risks cannot be avoided. These are:
Impairment of hearing.
- Risk of personal injury due to flying particles.
- Risk of burns due to accessories becoming hot during operation.
- Risk of personal injury due to prolonged use.
SAVE THESE INSTRUCTIONS
Chargers
DEWALT chargers require no adjustment and are designed to be as easy as possible to operate.
Electrical Safety
The electric motor has been designed for one voltage only. Always check that the battery pack voltage corresponds to the voltage on the rating plate. Also make sure that the voltage of your charger corresponds to that of your mains.

Your DEWALT charger is double insulated in accordance with EN60335; therefore no earth wire is required.
If the supply cord is damaged, it must be replaced by a specially prepared cord available through the DEWALT service organisation.
Mains Plug Replacement (U.K. & Ireland Only)
If a new mains plug needs to be fitted:
- Safely dispose of the old plug.
- Connect the brown lead to the live terminal in the plug.
- Connect the blue lead to the neutral terminal.
WARNING:
the earth terminal.
Follow the fitting instructions supplied with good quality plugs. Recommended fuse: 3 A.
Using an Extension Cable
An extension cord should not be used unless absolutely necessary. Use an approved extension cable suitable for the power input of your charger (see Technical Data). The minimum conductor size is 1mm^2 ; the maximum length is 30m .
When using a cable reel, always unwind the cable completely.
Important Safety Instructions for All Battery Chargers
SAVE THESE INSTRUCTIONS: This manual contains important safety and operating instructions for compatible battery chargers (refer to Technical Data).
- Before using charger, read all instructions and cautionary markings on charger, battery pack, and product using battery pack.
WARNING:
Shock hazard. Do not allow any
liquid to get inside charger. Electric shock may result.
WARNING:
We recommend the use of a
residual current device with a residual current rating of 30mA or less.
CAUTION:
Burn hazard. To reduce the risk DEWALT rechargeable batteries.
Other types of batteries may burst causing personal injury and damage.
CAUTION:
Children should be supervised to
ensure that they do not play with the appliance.
NOTICE:
Under certain conditions, with the
charger plugged into the power supply, the exposed charging contacts inside the charger can be shorted by foreign material. Foreign materials of a conductive nature such as, but not limited to, steel wool, aluminum foil or any buildup of metallic particles should be kept away from charger cavities. Always unplug the charger from the power supply when there is no battery pack in the cavity. Unplug charger before attempting to clean
- DO NOT attempt to charge the battery pack with any chargers other than the ones in this manual. The charger and battery pack are specifically designed to work together.
- These chargers are not intended for any uses other than charging DEWALT rechargeable batteries. Any other uses may result in risk of fire, electric shock or electrocution.
- Do not expose charger to rain or snow.
- Pull by plug rather than cord when disconnecting charger. This will reduce risk of damage to electric plug and cord.
- Make sure that cord is located so that it will not be stepped on, tripped over, or otherwise subjected to damage or stress.
- Do not use an extension cord unless it is absolutely necessary. Use of improper extension cord could result in risk of fire, electric shock, or electrocution.
- Do not place any object on top of charger or place the charger on a soft surface that might block the ventilation slots and result in excessive internal heat.
Place the charger in a position away from any heat source. The
charger is ventilated through slots in the top and the bottom of the housing.
- Do not operate charger with damaged cord or plug—have them replaced immediately.
- Do not operate charger if it has received a sharp blow, been dropped, or otherwise damaged in any way. Take it to an authorised service centre.
- Do not disassemble charger; take it to an authorised service centre when service or repair is required. Incorrect reassembly may result in a risk of electric shock, electrocution or fire.
- In case of damaged power supply cord the supply cord must be replaced immediately by the manufacturer, its service agent or similar qualified person to prevent any hazard.
- Disconnect the charger from the outlet before attempting any cleaning. This will reduce the risk of electric shock. Removing the battery pack will not reduce this risk.
NEVER attempt to connect two chargers together. - The charger is designed to operate on standard 230V household electrical power. Do not attempt to use it on any other voltage. This does not apply to the vehicular charger.
Charging a Battery (Fig. C)
- Plug the charger into an appropriate outlet before inserting battery pack.
- Insert the battery pack 1 into the charger, making sure the battery pack is fully seated in the charger. The red (charging) light will blink repeatedly indicating that the charging process has started.
- The completion of charge will be indicated by the red light remaining ON continuously. The battery pack is fully charged and may be used at this time or left in the charger. To remove the battery pack from the charger, push the battery release button 2 on the battery pack.
NOTE: To ensure maximum performance and life of lithium-ion battery packs, charge the battery pack fully before first use.
Charger Operation
Refer to the indicators below for the charge status of the battery pack.
Charge Indicators

Charging


Fully Charged


Hot/Cold Pack Delay*

*The red light will continue to blink, but a yellow indicator light will be illuminated during this operation. Once the battery pack has reached an appropriate temperature, the yellow light will turn off and the charger will resume the charging procedure.
The compatible charger(s) will not charge a faulty battery pack. The charger will indicate faulty battery by refusing to light.
NOTE: This could also mean a problem with a charger.
If the charger indicates a problem, take the charger and battery pack to be tested at an authorised service centre.
Hot/Cold Pack Delay
When the charger detects a battery pack that is too hot or too cold, it automatically starts a Hot/Cold Pack Delay, suspending charging until the battery pack has reached an appropriate temperature. The charger then automatically switches to the pack charging mode. This feature ensures maximum battery pack life.
A cold battery pack will charge at a slower rate than a warm battery pack. The battery pack will charge at that slower rate throughout the entire charging cycle and will not return to maximum charge rate even if the battery pack warms.
The DCB118 charger is equipped with an internal fan designed to cool the battery pack. The fan will turn on automatically when the battery pack needs to be cooled. Never operate the charger if the fan does not operate properly or if ventilation slots are blocked. Do not permit foreign objects to enter the interior of the charger.
Electronic Protection System
XR Li-Ion tools are designed with an Electronic Protection System that will protect the battery pack against overloading, overheating or deep discharge.
The tool will automatically turn off if the Electronic Protection System engages. If this occurs, place the lithium-ion battery pack on the charger until it is fully charged.
Wall Mounting
These chargers are designed to be wall mountable or to sit upright on a table or work surface. If wall mounting, locate the charger within reach of an electrical outlet, and away from a corner or other obstructions which may impede air flow. Use the back of the charger as a template for the location of the mounting screws on the wall. Mount the charger securely using drywall screws (purchased separately) at least 25.4mm long with a screw head diameter of 7 - 9mm , screwed into wood to an optimal depth leaving approximately 5.5mm of the screw exposed. Align the slots on the back of the charger with the exposed screws and fully engage them in the slots.
Charger Cleaning Instructions
WARNING: Shock hazard. Disconnect the charger from the AC outlet before cleaning. Dirt and grease may be removed from the exterior of the charger using a cloth or soft non-metallic brush. Do not use water or any cleaning solutions. Never let any liquid get inside the tool; never immerse any part of the tool into a liquid.
Battery Packs
Important Safety Instructions for All Battery Packs
When ordering replacement battery packs, be sure to include catalogue number and voltage.
The battery pack is not fully charged out of the carton. Before using the battery pack and charger, read the safety instructions below. Then follow charging procedures outlined.
READ ALL INSTRUCTIONS
- Do not charge or use battery in explosive atmospheres, such as in the presence of flammable liquids, gases or dust. Inserting or removing the battery from the charger may ignite the dust or fumes.
- Never force battery pack into charger. Do not modify battery pack in any way to fit into a non-compatible charger as battery pack may rupture causing serious personal injury.
Charge the battery packs only in DEWALT chargers.
DO NOT splash or immerse in water or other liquids. - Do not store or use the tool and battery pack in locations where the temperature may reach or exceed 40^ (104 F) (such as outside sheds or metal buildings in summer).
- Do not incinerate the battery pack even if it is severely damaged or is completely worn out. The battery pack can explode in a fire. Toxic fumes and materials are created when lithium-ion battery packs are burned.
- If battery contents come into contact with the skin, immediately wash area with mild soap and water. If battery liquid gets into the eye, rinse water over the open eye for 15 minutes or until irritation ceases. If medical attention is needed, the battery electrolyte is composed of a mixture of liquid organic carbonates and lithium salts.
- Contents of opened battery cells may cause respiratory irritation. Provide fresh air. If symptoms persist, seek medical attention.
WARNING: Burn hazard. Battery liquid may be flammable if exposed to spark or flame.
WARNING: Never attempt to open the battery pack for any reason. If battery pack case is cracked or damaged, do not insert into charger. Do not crush, drop or damage battery pack. Do not use a battery pack or charger that has received a sharp blow, been dropped, run over or damaged in any way (i.e., pierced with a nail, hit with a hammer, stepped on). Electric shock or electrocution may result. Damaged battery packs should be returned to service centre for recycling.
WARNING: Fire hazard. Do not store or carry the battery pack so that metal objects can contact exposed battery terminals. For example, do not place the battery pack in aprons, pockets, tool boxes, product kit boxes, drawers, etc., with loose nails, screws, keys, etc.
CAUTION: When not in use, place tool on its side on a stable surface where it will not cause a tripping or falling hazard. Some tools with large battery packs will stand upright on the battery pack but may be easily knocked over.
Transportation
WARNING: Fire hazard. Transporting batteries can possibly cause fire if the battery terminals inadvertently come in contact with conductive materials. When transporting batteries, make sure that the battery terminals are protected and well insulated from materials that could contact them and cause a short circuit. NOTE: Lithium-ion batteries should not be put in checked baggage.
DeWALT batteries comply with all applicable shipping regulations as prescribed by industry and legal standards which include UN Recommendations on the Transport of Dangerous Goods; International Air Transport Association (IATA) Dangerous Goods Regulations, International Maritime Dangerous Goods (IMDG) Regulations, and the European Agreement Concerning The International Carriage of Dangerous Goods by Road (ADR). Lithium-ion cells and batteries have been tested to section 38.3 of the UN Recommendations on the Transport of Dangerous Goods Manual of Tests and Criteria.
In most instances, shipping a DEWALT battery pack will be excepted from being classified as a fully regulated Class 9 Hazardous Material. In general, only shipments containing a lithium-ion battery with an energy rating greater than 100 Watt Hours (Wh) will require being shipped as fully regulated Class 9. All lithium-ion batteries have the Watt Hour rating marked on the pack. Furthermore, due to regulation complexities, DEWALT does not recommend air shipping lithium-ion battery packs alone regardless of Watt Hour rating. Shipments of tools with batteries (combokits) can be air shipped as excepted if the Watt Hour rating of the battery pack is no greater than 100 Whr. Regardless of whether a shipment is considered excepted or fully regulated, it is the shipper's responsibility to consult the latest regulations for packaging, labeling/marking and documentation requirements.
The information provided in this section of the manual is provided in good faith and believed to be accurate at the time the document was created. However, no warranty, expressed or implied, is given. It is the buyer's responsibility to ensure that its activities comply with the applicable regulations.
Transporting the FLEXVOLT™ Battery
The DEWALT FLEXVOLT™ battery has two modes: Use and Transport.
Use Mode: When the FLEXVOLT™ battery stands alone or is in a DEWALT 18V product, it will operate as an 18V battery. When the FLEXVOLT™ battery is in a 54V or a 108V (two 54V batteries) product, it will operate as a 54V battery.
Transport Mode: When the cap is attached to the FLEXVOLT™ battery, the battery is in Transport mode. Keep the cap for shipping.
When in Transport mode, strings of cells are electrically disconnected within the pack resulting in 3 batteries with a
lower Watt hour (Wh) rating as compared to 1 battery with a higher Watt hour rating. This increased quantity of 3 batteries with the lower Watt hour rating can exempt the pack from certain shipping regulations that are imposed upon the higher Watt hour batteries.
For example, the Transport Wh rating might indicate 3 × 36 Wh, meaning 3 batteries of 36 Wh each. The Use Wh rating might indicate 108 Wh (1 battery
Example of Use and Transport Label Marking
Use: 108 Wh
Transport:3x36 Wh
Storage Recommendations
- The best storage place is one that is cool and dry away from direct sunlight and excess heat or cold. For optimum battery performance and life, store battery packs at room temperature when not in use.
- For long storage, it is recommended to store a fully charged battery pack in a cool, dry place out of the charger for optimal results.
NOTE: Battery packs should not be stored completely depleted of charge. The battery pack will need to be recharged before use.
Labels on Charger and Battery Pack
In addition to the pictographs used in this manual, the labels on the charger and the battery pack may show the following pictographs:

Read instruction manual before use.

See Technical Data for charging time.

Do not probe with conductive objects.

Do not charge damaged battery packs.

Do not expose to water.

Have defective cords replaced immediately.

Charge only between 4^ and 40^

Only for indoor use.

Discard the battery pack with due care for the environment.
Charge DEWALT battery packs only with designated DEWALT chargers. Charging battery packs other than the designated DEWALT batteries with a DEWALT charger may make them burst or lead to other dangerous situations.

Do not incinerate the battery pack.

USE (without transport cap). Example: Wh rating indicates 108 Wh (1 battery with 108 Wh).
TRANSPORT (with built-in transport cap). Example: Wh rating indicates 3 x 36 Wh (3 batteries of 36 Wh).
Battery Type
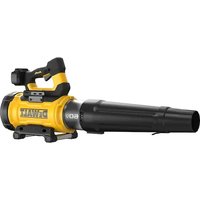
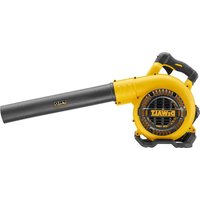
The DCMBA572 operate on a 54 volt battery pack.
These battery packs may be used: DCB546, DCB547, DCB548. Refer to Technical Data for more information.
Package Contents
The package contains:
1 Blower
1 Tube
1 Li-lon battery pack (C1, D1, L1, M1, P1, S1, T1, X1, Y1 models)
2 Li-ion battery packs (C2, D2, L2, M2, P2, S2, T2, X2, Y2 models)
3 Li-ion battery packs (C3, D3, L3, M3, P3, S3, T3, X3, Y3 models)
1 Instruction manual
NOTE: Battery packs, chargers and kitboxes are not included with N models. Battery packs and chargers are not included with NT models. B models include Bluetooth® battery packs.
nOTE: The Bluetooth® word mark and logos are registered trademarks owned by the Bluetooth®, SIG, Inc. and any use of such marks by DEWALT is under license. Other trademarks and trade names are those of their respective owners.
- Check for damage to the tool, parts or accessories which may have occurred during transport.
- Take the time to thoroughly read and understand this manual prior to operation.
Markings on Tool
The following pictograms are shown on the tool:

Read instruction manual before use.

Wear ear protection.

Wear eye protection.

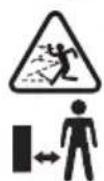
Do not expose the tool to rain or high humidity or leave outdoors while it is raining.
Switch the tool off. Before performing any maintenance on the tool, remove the battery from the tool.
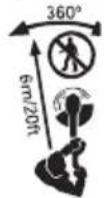
Keep people and animals at least 6 m away from the work area.
Keep bystanders away.

Directive 2000/14/EC guaranteed sound power.
Date Code Position (Fig. A)
The date code 11, which also includes the year of manufacture, is printed into the housing.
Example:
2019 XX XX
Year of Manufacture
Description (Fig. A, C, C)
WARNING: Never modify the power tool or any part of it. Damage or personal injury could result.
1 Battery pack
2 Battery pack release button
3 Trigger switch
4 Cruise control lever
5 Handle
6 Tube
Intended Use
Your appliance has been designed for professional outdoor blowing applications.
DO nOT use under wet conditions or in the presence of flammable liquids or gases.
These blowers are professional power tools.
DO nOT let children come into contact with the tool.
Supervision is required when inexperienced operators use this tool.
- This product is not intended for use by persons (including children) suffering from diminished physical, sensory or mental abilities; lack of experience, knowledge or skills unless they are supervised by a person responsible for their safety. Children should never be left alone with this product.
ASSEMBLY AND ADJUSTMENTS
WARNING: To reduce the risk of serious personal injury, turn tool off and disconnect battery pack before making any adjustments or removing/
installing attachments or accessories. An accidental start-up can cause injury.
WARNING: Use only DEWALT battery packs and chargers.
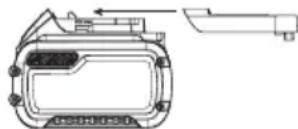
Tube Assembly (Fig. A-C)
CAUTION: Ensure the cruise control lever 4 is in the locked position to prevent the trigger switch 3 from moving and the battery pack 1 is removed before attaching or removing the tube 6. The tube must be attached to the housing 7 before use.
- To attach the tube to the blower, line up the keyways 8 on the side of the tube with the keys 9 on the side of the clear duct opening as shown in Figure B. Push the tube into the blower clear duct until the lock engages the tube.
- Pull on the tube to ensure it is securely in place.
- To remove the tube, insert a screwdriver into the unlocking holes 10 on the sides of the tube to depress the tabs of the clear duct.
- Pull the tube off the clear housing.
Inserting and Removing the Battery Pack from the Tool (Fig. C)
NOTE: Make sure your battery pack 1 is fully charged.
To Install the Battery Pack into the Tool Handle
- Align the battery pack 1 with the rails inside the tool's handle (Fig. C).
- Slide it into the handle until the battery pack is firmly seated in the tool and ensure that you hear the lock snap into place.
To Remove the Battery Pack from the Tool
- Press the release button 2 and firmly pull the battery pack out of the tool handle.
- Insert battery pack into the charger as described in the charger section of this manual.
Fuel Gauge Battery Packs (Fig. C)
Some DEWALT battery packs include a fuel gauge which consists of three green LED lights that indicate the level of charge remaining in the battery pack.
To actuate the fuel gauge, press and hold the fuel gauge button 13. A combination of the three green LED lights will illuminate designating the level of charge left. When the level of charge in the battery is below the usable limit, the fuel gauge will not illuminate and the battery will need to be recharged.
nOTE: The fuel gauge is only an indication of the charge left on the battery pack. It does not indicate tool functionality and is subject to variation based on product components, temperature and end-user application.
Instructions for Use
WARNING: Always observe the safety instructions and applicable regulations.
WARNING: To reduce the risk of serious personal injury, turn tool off and disconnect battery pack before making any adjustments or removing/ installing attachments or accessories. An accidental start-up can cause injury.
WARNING: Do not operate blower without tube securely in place. Never reach down into housing through tube hole.
WARNING: Always slide the lock-off switch to the locked position and remove the battery when:
- You leave blower unattended.
- Checking, adjusting, cleaning, or working on blower.
Proper Hand Position (Fig. A, E)
WARNING: To reduce the risk of serious personal injury, ALWAYS use proper hand position as shown.
WARNING: To reduce the risk of serious personal injury, ALWAYS hold securely in anticipation of a sudden reaction.
Proper hand position requires one hand on the main handle 5.
Switching On (Fig. A, D, E)
CAUTION: Do not point unit discharge at self or bystanders.
CAUTION: Always wear safety glasses. Wear a filter mask if the operation is dusty. Use of gloves, long pants and substantial footwear is recommended. Keep long hair and loose clothing away from openings and moving parts.
To turn the blower on, slide the trigger switch 3.
- To lock the blower on, turn the cruise control lever 4, clockwise as shown in Figure D. The blower runs at higher speeds as the lever turns clockwise. The cruise control lever can also be turned clockwise to start the blower without needing to first depress the trigger switch.
- Hold the sweeper with one hand as shown in Figure E and sweep from side to side with the tube 6 several inches above the hard surface. Slowly advance keeping the accumulated pile of debris in front of you.
MAINTENANCE
Your power tool has been designed to operate over a long period of time with a minimum of maintenance. Continuous satisfactory operation depends upon proper tool care and regular cleaning.
WARNING: To reduce the risk of serious personal injury, turn tool off and disconnect battery pack before making any adjustments or removing/ installing attachments or accessories. An accidental start-up can cause injury.
The charger and battery pack are not serviceable.

Lubrication
Your power tool requires no additional lubrication.

Cleaning
WARNING: Blow dirt and dust out of the main housing with dry air as often as dirt is seen collecting in and around the air vents. Wear approved eye protection and approved dust mask when performing this procedure.
WARNING: Never use solvents or other harsh chemicals for cleaning the non-metallic parts of the tool. These chemicals may weaken the materials used in these parts. Use a cloth dampened only with water and mild soap. Never let any liquid get inside the tool; never immerse any part of the tool into a liquid.
Optional Accessories
WARNING: Since accessories, other than those offered by DEWALT, have not been tested with this product, use of such accessories with this tool could be hazardous. To reduce the risk of injury, only DEWALT recommended accessories should be used with this product.
Consult your dealer for further information on the appropriate accessories.
Protecting the Environment
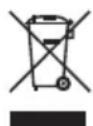
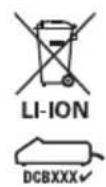
Separate collection. Products and batteries marked with this symbol must not be disposed of with normal household waste.
Products and batteries contain materials that can
be recovered or recycled reducing the demand for raw materials. Please recycle electrical products and batteries according to local provisions. Further information is available at www.2helpU.com.
Rechargeable Battery Pack
This long life battery pack must be recharged when it fails to produce sufficient power on jobs which were easily done before. At the end of its technical life, discard it with due care for our environment:
- Run the battery pack down completely, then remove it from the tool.
- Li-ion cells are recyclable. Take them to your dealer or a local recycling station. The collected battery packs will be recycled or disposed of properly.
SOPLADOR AXIAL
DCMBA572
;Enhorabuena!
LPA (measured sound pressure level) 97 dB(A) K=1,2 dB(A)
LWA (guaranteed sound power) 107 dB(A)
(Isolation double) - outfits
Batterie rechargeable
NOTA: Anything potrebbe, which indicates a problem in the caricabatteria.
Vice-President Engineering, PTE-Europa
DEWALT, Richard-Slinger-Strase 11
Datumcode 201811475B of later
*Datumcode 201536 of later
WAARSCHUWING: Brandgevaar.
i "UN Recommendations on the Transport of Dangerous Goods Manual of Tests and Criteria".
LPA (measured sound pressure level) 97 dB(A) K = 1,2 dB(A) LWA (guaranteed sound power) 107 dB(A)
Auta ta npoiovta oumuopawovtai kai me tic Odyiec 2014/30/EE ka 2011/65/EE. Tia nepioootepe c nnpopoipie c, npakaoume eikoiuvnote me tyn DEWALT otny npakatw 8ieuovon n avatpETE oTo niowepoc tou eyxepiDiou.
O katwI UTOypaPwv Eivai UTEuBuvoc yia Tn ouVtaEn Tou texvikou paKekau kai npaymuToIOe Itv npoua dnlambdaen ek epouc tnc etaipieic DEWALT.

Markus Rompel
Avtipóεδpoc Mηχανολoγiac, PTE Eupωπηc
PROEIONOH: aiaoctoe oles TIC npoeioioeic aoaieac kai oaes tic odnyiec. Hm
tnpnoT wv npoeiDooiOeWv kaiTwv oDnyiwuopei va exei wc anotelEoua nEktpoanlEia, npKayia kai/ noBapoprauataio.
ROEIONOHs: _ kaia nepiwnoynv enitpeyete o naidi, oe atojae iomegaevc oomegakec, aioetapiakec n diavontikec ikavotntec n e Elambdaenepneipiac kai ywano n oae atojaun Eoikeiwéva n Tnapouoe odnyie va xnoiounioooov to npxavnua - toniko kavoviooiu o npoeiv aetouv opia otny nAikia tou xeiipiotn.
Tia va eiooTe tov kivduvo tpaumouo:
Anopuyete Tnv aelntn theon oe leitoupyia tou nlektpikou epaaleiou. Anepeyonoite ola ta xepiotnpia npiv apaipoeTe to naeto mnatapiac. Bebaiwthe otio diakontnc leitoupyiac bioketai otnv aoapaiouevn anepeyonoinev tho eon npiv elayete to naeto mnatapiac. H metapopaovadow me to daktulo stov diakontn n eiaaywn tou naetou mnatapiac o evada oevtov diakontn epeyonoinevo, evai npaktikec nou pokaov atuxmuata.
Anopeuyete Tc ENIKIVDuvec oovhke c npiaovtoc - Mn xpoiopoieite nEeKpiEcs ovaedc oEoic e uypaia n vepo. Mn xpoiopoieite tn ovada uno bpoxn.
Na xpoaiomoiite Eeonlaio a oopaleiac. Nvta va
wpate npoataia maiv, maoka e piato av n leitoupyia
napayi noaikovn, avioiaotika uodmuata aopaleiac
n npoataia akocnpenei va xpooiopoiouvtai onou
Epialaaetai anTc ouvkec.
XpnoiunoieTe Tn owoTH movada-Mn xpoaiuOoiHOeTe Tn ovaia onoiaonote aaln epyaia ano autn ia tvn onoia npoepicetai.
- Eπθεωρησετην περίοχι πριν χροσμοιούησετη μονάδα. Αφαρείτε ὄλa τα Φιολείματα και τα σκληρά ανικείμενα έπως πέτες, γυλία, σύρματα κλή. τα οποί μιπούνν αέξοστρακισόννν ακτιναχτόνν ἡ εποιονόποτε αλλο τρόπονι προλεόουν τραυματιούς Κημία κάτα τη λειουρία.
Kpatate naia, napevipokóevouc kai zwa paqia ano tny nepioxépyaicac o anoataon toulaixiotov 10 etpwv (30 noiw) kat a nV ekkivnon n th xhon tn covadac.
- UvtnpetE Tn movada M npoooyh. dIatnpeite Tn movada Kaapn yia va exte Tnv kautepn kai aqpaaleotepn ano00n. AokoutheiTc odnyie c ia owtn ouvtnpon.
- NapaéveTe OE enaypunvn - PooexTe T Kavete. XpoiooioiTe Tnv Koivn loyikn. Mn xpoiooioiTe Tn muδa oTav eioe koupaevoi.
Mny tootheite to otouio ecaywync tou quontnpa kovta oε μatia n autia kat a thieitoupyia tnc ouokeunc.
Mn xpoiopoie note to mynxavma otav unapoxov kovt a vθpwto kaliaitepa naiia, n katoiikia zwa.
Mny Tevtwveote Unepeoikia. Diatnpite naVt ka n oopponia. NaVt va otnpicote staepa ta nobia aac. BabiTe apyakai e kaia nepiTwn, m npexe.
Mny ayyicTe KIVOUeva eIKivduva npn Touc mynavmaTOC npiv auto anoouvOeI ano Tnu natapia kai ta KIVOUeva eIKivduva npn Eovu akivntoioNtEi PnnpwC.
- Av to μηχάνημα παρούλοει μη φυσιλογίοκς κραδαμούς, αραρέστε το πακέτο μπαταρίας και ελέγξετε αμέως το μηχάνημα.
MnV enixepnoe va kaqapioeTe to nxyavnuo a e npwnon Eppaaenxwpic npwta va apapeoetnvy mntapia.
Mn thioTe kaveva .
Mn xpnoiopoinie t npovada av o diakonntc nct dev tnv evpyoioi e anevpyonoie. Mia ovada tn c onoiac n leitoupyia dev mnpei va eeyxg i e to diakontn ivai enikivuvn kai npenei va eniakevaotei.
MnV eIITpEe va npaouovtai uOaEmuata meo a otyn Eiaaywyr Tou quontnpa.
MnV KATEUoVETe TIV EEOO Tc Movadac npocTov eauo aC npapeuipokouevouc.
Mn xnpoiooieT n ova yia va quoEeE kpnktkec oKovc n epioxec oTou o aepac npieei okovn nou mopel va npokaloei ekpnE, onwoc kovn anto avpaka, ngntpiaká n aallo kaovmu uliko.
Mny enixieipnoe va eniokevaote movoi oac tov quontnpa.ia va diaoxpalaote aopaleia kai aioniotia tou npoiovtoc, oi emakevc, nguvtnpnonkai opuuioic ta npenei va npayatooiouvtai ano eouoioodotneva kevtpa oepic.
Mynxpoaiooie tov quontnpa o atmuopaia nou npieexia aepia n eivai emikivdvyn yia ekpn. Ta oetep oe autec tic movadec ovnuw napayouv onivnopec, kai oivnopec mopoov va npokaloeouv tnv avaplexn avthetaiacewv.
Mny Tevtawveote unepoia. Aiatnpite navta oataepn otpiEeta oia oac kai kaHioopponia.
Notu npv apnvte tv quontnpa e aeitoupyia wpi c emtnpno. Aevpyonoiie tnu npoosoa pemuatoc
ApaieTeTo paKeto mataPiaC npiv ouvdeoTeTov oWlaVa.
Na vlaosote tic movadec nouv xpoiooioite. Otav dev xpoiooioietai, npovada npenei va vlaaooetai oteyvo xwpo nou piaoketai yna kleiodwei -aakpi a no naia.
- Odyiec oxetiká μe ouμbetaec μnatapiec kai φoptiotc πepiaβavovtai oTo EYxEipidio auto yia evnμepwoh oac. Aiaβaote oλa ta exyepidia oyniwouovodouv to naketo μnatapiac n tov φoptiŋoac. Aiaβaote oλe c tic onuvaoc i npooxnc naw oTov φoptiŋkai oTo naketo μnatapiac.
Aooovdeote to naKeto mataipac ano tov quontnpa npiv npaypatonoioeTe onoioeohnotepuOmuic, aalaeTe aEouap, npayatonoioeTe oepic, metapepeTe n aoOnkeuoetn ova. Autou tou elouc ta npolntikaketpaaopaaieacmuwovuvtovkvduvo va teei n ouakeun aelnta e aeitoupyia.
Ynoaieinóevoikivduvoi
Pap Tnv eapoynTw oxekw kavovioow aoaiaic kai
Tnv eapouyn diataeewv aoepaaleic, opioevoi unoaleinóevov kivduovl dev mipovv va anopveuxouv. Autoi evai:
Bλαβητης ακοής.
Kivduvoocomegaatikc c loyew Ekivaaooeewvowomegaiδiwv.
KivduvoecykaumatwV loyW TnC thepuavocTwv aEooovap kataTn Ieitoupyia.
Kivduvoocomegaatikc c loywnapataevncxphoncn.