
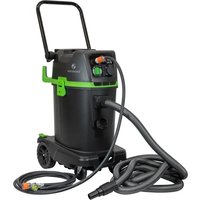
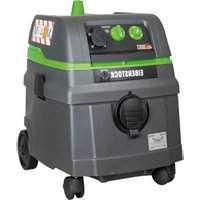
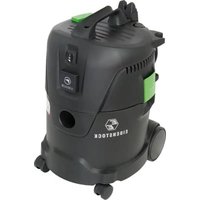
DSS 25 A - Vacuum Cleaner Eibenstock - Free user manual and instructions
Find the device manual for free DSS 25 A Eibenstock in PDF.
| Product Type | Wet and dry vacuum cleaner |
| Brand | Eibenstock |
| Model | DSS 25 A |
| Voltage | 220 – 240 V~ |
| Frequency | 50 – 60 Hz |
| Nominal power | 1200 W |
| Max. power | 1400 W |
| Air flow (blower) | 73 l/s |
| Air flow (hose) | 42 l/s |
| Vacuum (blower) | 270 mbar |
| Vacuum (hose) | 235 mbar |
| Sound pressure | 69.5 dB(A) |
| Protection class | I |
| Dust class | M (AGW ≥ 0.1 mg/m³) |
| Tank capacity | 25 liters |
| Filter type | Pleated polyester filter cartridge + felt bag |
| Power cable | H05VV F 3x1.5 mm² |
| Functions | Wet/dry suction, manual filter cleaning, automatic mode (RA), power tool socket |
| Included accessories | Suction hose, tube, nozzle |
Frequently Asked Questions - DSS 25 A Eibenstock
User questions about DSS 25 A Eibenstock
0 question about this device. Answer the ones you know or ask your own.
Ask a new question about this device
Download the instructions for your Vacuum Cleaner in PDF format for free! Find your manual DSS 25 A - Eibenstock and take your electronic device back in hand. On this page are published all the documents necessary for the use of your device. DSS 25 A by Eibenstock.
USER MANUAL DSS 25 A Eibenstock
Before using the unit, users should be given information, instructions and training in how to use the unit and the substances it should be used for including safe ways to eliminate the suctioned material.
If the connection cable gets damaged or cut during use, do not touch it, but immediately pull the plug out of the socket, Never use the tool with a damaged connection cable.
The tool must neither be wet nor used in humid environment.
- The vacuum device is designed for industrial use. Ideal in combination with an electric tool, on building sites, in workshops, etc.
- Warning!
Vacuum devices are not suitable for aspiration/clearing of toxic dusts.
Class M vacuum devices are suitable for aspiration/ clearing of dry, noncombustible dusts, non-combustible liquids, wood dusts and hazardous dusts with workplace limit values of ≥ 0.1mg / m^3 - Warning!
- Persons (including children) who are, due to their physical, sensory or intellectual abilities or lack of experience or knowledge, unable to safely use the vacuum device should not use it without supervision or instruction by a responsible person.
- Particular caution is advised with children, elderly or infirm persons.
- Do not point nozzle, tube or hose at people or animals.
- Danger!
- Do not operate the vacuum device where there is danger of explosions.
-
Keep away the vacuum device from inflammable gases and substances.
Danger! -
Do not aspirate any combustible or explosive solvents, materials soaked in solvents, explosive dusts, liquids such as petrol, oil, alcohol, diluents or materials hotter then 60^ (140°F).
- Otherwise there will be danger of fire and explosions!
Danger! - Use the socket of the vacuum device only for the purposes defined in the instruction manual.
- In case of any inappropriate usage, improper operation or repair, the producer shall be exempt from liability.
- Do not use any damaged extension lines.
If the connector line of the vacuum device has been damaged, it must be replaced with a special connector line which is available from the producer or their service. - Electric brushes: Do not allow the rotating brushes to get into contact with the power connection line.
- The voltage on the type sign must correspond to the grid voltage.
- After every use and before any maintenance, switch off the vacuum device and pull the power plug.
- Pull on the plug only, not on the line.
- Never plug or pull the power plug with wet hands.
- The socket must be secured via a household fuse with a suitable current rating.
- Never open the vacuum device outdoors in rain or storm.
Danger! - Danger of suffocation
- Keep packaging material such as plastic bags away from children
- Never stand or sit upon the vacuum device.
- Particular caution is advised when ascending stairs. Pay attention to standing safely.
- Do not pull the suction hose and connection line over sharp edges, kink it or shut it.
- Always lay the suction hose and connection line so that nobody may trip over them.
- In case of any leakage of foam or liquid, immediately switch off the vacuum device.
Always keep dry the inside of the lid. - Do not start the vacuum device including its accessories if:
- the vacuum device shows detectable damage (fissures/ cracks);
- the power connection line is defective or shows fissuring or ageing; or
- any invisible defect is suspected (after a fall).
- Do not allow the rotating brushes to get into contact with the power connection line.
- Warning!
-
Use only the brushes supplied with the vacuum device or defined in the instruction manual. Use of any other brushes may pose a safety hazard.
-
Clean and disinfect the vacuum device immediately after use to prevent microbial contamination due to long-term failure to clean it, especially when using the device in food-processing.
- Do not use any steam jets or high-pressure cleaners for cleaning.
- Acids, acetone and solvents may corrode parts of the vacuum device.
- Do not leave the device without supervision. In case of longer interruptions of work, pull the power plug.
- Warning!
- Have repairs been made only by experts, e. g. the producer's service. Use original spare parts only.
- Improperly repaired devices pose a hazard for the user.
Electrical Connection
The suction devices are designed in protection class I. Before starting up, check that the mains voltage and frequency match the data on the type plate. Voltage deviations of +6 to -10% are permissible.
Before use
When unpacking, check that the unit is complete and shows no signs of transport damage. Read all the information carefully. They contain important advice about how to use the unit, safety, maintenance and care. Please keep these operating instructions somewhere safe and pass an to any subsequent owners. We reserve the right to make design and equipment changes.
Ilse original ancestories
Fleece filter bag DSS 25 A / DSS 25 M / DSS 35 M iP
for 25 - 35 L-tank BGIA Class M approved
1 set. = 5 pcs. Order no. 35321000
Plastic emptying bag DSS 25 M / DSS 35 M iP
BGIA class M and H permitted,
1 set = 5 pcs. Order no. 35320000
Filter cassettes Polyester material
BGIA Class M approved
1 set = 2 pcs. Order no. 35301000
For more accessories please refer to our accessories list or contact us.
Fields of application
For wet and drying suctioning.
Dust class M vacuum cleaners are suited to suctioning up/off dry non-flammable dust non-flammable liquids, wood dust and hazardous dust with AGW ≥ 0.1mg / m^3 .
Commissioning
Switch the unit ON/OFF with the switch (2a) in the top section (1) (or switch to automatic mode — see Section operating field).
Operating field
Depending on the unit configuration, the following functions and settings are available:
0 Suction cup > off<
Suction cup > on < without vibration function
A Standby mode for automatic switch-on/switch-off (suction cup is switched on and off by the power tool)
RA Standby mode as 'A' plus automatic filter cleaning.
IR Suction device switched on with automatic shaking function
Suction device on standby The suction device switches on automatically when the tool is switched on. After switching off, the suction device continues to run for approx. 10 seconds. This prevents any residual material from remaining in the hose.
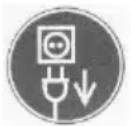
The power socket (2b) is available for connecting an electrical tool.

Caution!
- The electrical tool must be switched off during connection.
- The power socket is permanently supplied with voltage when the plug is in the mains socket regardless of the switch setting.
- In switch setting "0" the power socket could still be used as an extension cable (e.g. for lights).
- Connected load: Suction unit and connected unit max. 16 A.
Pre-selection switch (2d) for minimum volume signal (horn and light) for suction units of the class "M".
In mode A, RA, IR or AR, the following settings should be made depending on the diameter of the hose:
| Hose inner diameter | switch position |
| Ø 35 mm | 70 m³/h |
| Ø 27 mm | 40 m³/h |
| Ø 21 mm | 20 m³/h |
The speed is not regulated. The suction unit always runs at max. speed.
Operation (wet and dry suctioning)
- When the handle pipe is used, the secondary air valve can be used to adjust the suction output.
Pull out the plug after you have finished.
Fix the suction hose in the accessory storage location on the back of the container for storage. - The ends of the hose can be pushed into each other to prevent particles of dirt from coming out.
Dry suctioning
- Only suction with a dry filter, unit and accessories so that the dust does not adhere and harden.
- When vacuuming soot, cement, plaster or similar dusts: Insert a PE disposal bag in the dirt container. Always use PE disposal bags in combination with folded filter cartridges.
- Friction inside the extraction hose causes static electricity to develop during extraction. Operating personnel may receive unpleasant electric shocks while working.
To derive this, we recommend using static charges (Art. no.: 35319000 - optional), an antistatic hose.
Wet suctioning
Suction without a paper filter bag. The filter cassettes are suitable for wet suctioning. The installed sensor switches the motor off when the tank is full. Empty the unit is outlined in Section Emptying the tank. If the unit is not switched off, the restarting safeguard remains effective. The unit will only be ready for operation again after it has been switched off and switched on again.
-
Before emptying, first remove the suction hose from the liquid.
-
Due to the high suction output and the streamlined shape of the tank, a little water may escape from the hose after the unit has been switched off.
- For the subsequent dry suction phase, use a dry filter. In case of frequent changes between dry and wet suctioning, we recommend using a second filter set, preferably polyester filter cassettes.

CAUTION!
Switch the vacuum cleaner off immediately if foam or liquid starts to come out.
Cleaning the filter
The suction unit is fitted with an electro-magnetic filter cleaning device which can shake off any dust adhered to the folded filter cassettes.
Manual cleaning (DSS 25 A, DSS 25 M)
The vibration function (switch setting RA /switch (2a) should be activated at the latest when the volume flow display (2c) (warning lamp) lights up or when the warning signal sounds or when the warning signal sounds or when the suction output sinks.
Automatic cleaning (DSS 25 A, DSS 25 M)
Filter cleaning is performed (switch setting RA/switch (2a) automatically during the next working break when the minimum volume flow level is reached.
Permanent filter cleaning (only DSS 35 M iP)
The vacuum cleaner DSS 35 M iP is fitted with an electromagnetic filter cleaning unit which can be used to shake the dust off the folding filter cassettes. The folding filter cassettes are cleaned alternately so that continuous working can be guaranteed.
Emptying the tank
Only permitted with dusts with AGW's >1mg / m^a
Switch off (2a), disconnect plug, open snap locks (9). Take top section (1) and suction hose from the tank (6). Empty the tank.
Fleece filter bag
To insert or remove the filter bag/emptying bag, remove the top section (1).
To do this, open the side locks (9).
Only use the paper filter bag for dry suctioning.
Inserting the fleece filter bag
Only use fleece filter bags for dry vacuum cleaning.
25 and 50 litre tank on DSS 20 A
Slide the flange completely over the intake socket
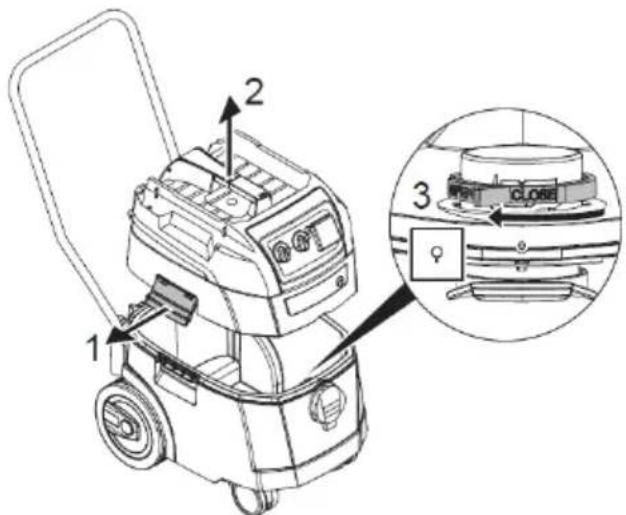
- 25 + 35 | special tank on DSS 25 M and DSS 35 M iP
Turn the red rotary slide inside to position CLOSE to the stop on the marker
Place top section on the container and close the side latches.
Exchanging the fleece filter bag
- Switch off vacuum cleaner.
- Disconnect mains plug.
- Wear appropriate breathing mask.
- Remove suction hose.
- Close off intake socket with cap.
- Open side latches.
- Remove top section.
- Carefully pull the flange off the intake socket and close off the flange.
- Dispose of gathered material in accordance with legal requirements.
Plastic emptying bag
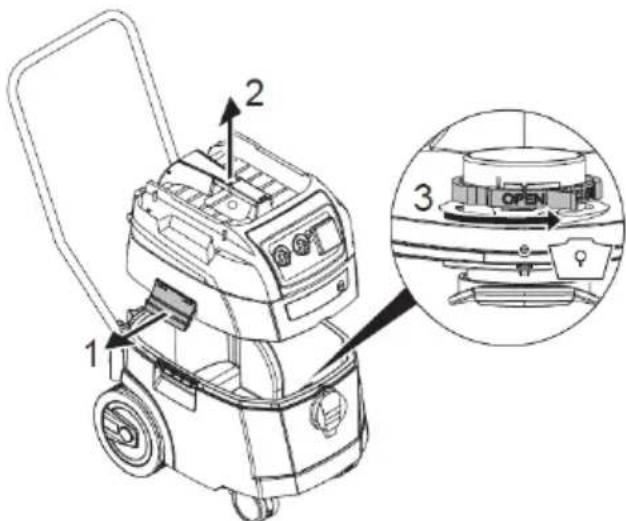
Only the M vacuum cleaner with the special tank and rotary valve in the suction opening are suited for using plastic emptying bags.
Turn the red rotary slide inside to position OPEN to the stop on the marker
Slide the flange completely over the intake socket. Place the upper bag opening over the container rim.
Place top section on the container and close the side latches.
Exchanging the plastic emptying bag
- Set switch to position >AR <
Folded filter cartridges are cleaned automatically.
Residual dust in the filters falls into the bag.
- Switch off vacuum cleaner.
- Disconnect mains plug.
- Wear appropriate breathing mask.
- Remove suction hose.
- Close off intake socket with cap.
- Open side latches.
- Carefully close the PE emptying and disposal bag with the enclosed sealing tape.
- Carefully pull the flange off the intake socket and close off the flange.
- Carefully remove the PE emptying and disposal bag from the container.
- Dispose of gathered material in accordance with legal requirements.
Cleaning
Clean the tank and accessories with water. Wipe the top section (1) with e damp cloth. Allow the tank and the accessories to dry.
Servicing
Before the beginning of maintenance or repair works you have to disconnect the plug from the mains!
If the suction output of the unit decreases and is not improved after the filter cassettes (12) are cleaned, (assuming the tank (6) is empty and the fleece filter bag (13) has been exchanged), then it is time to exchange the filter cassettes (12).
Apply the vibration function to the filter cassettes (12) again before exchanging them. Use a coin or another similar object to turn the catch (5) and the locking bar (4) 90^ in an anticlockwise direction and then press the locking bar (4) backwards. Fold up the hood and lift out the filter cassettes (12). Immediately seal the removed filter cassettes in a dust-proof plastic bag and dispose of as per the statutory regulations. Insert new filter cassettes. Fold down the hood again and exert a little pressure to click it back into position.

If the motor protection filter is soiled, this is an indication that the filter cassettes are defective.
Please exchange both filter cassettes. Wash out the motor protection filter under running water, dry and re-insert.
Level sensors
Clean the level sensors occasionally. Unlock the latches (9) and remove the top section (1). Clean the level sensors with a soft cloth. Reattach the top section (1) again and lock the latches (9).

Troubleshooting
Functional problems are not always the result of unit defects!
| Error | Possible cause | Correction |
| Decrease in suction power | Filter dirty | Clean |
| Fleece filter full | Change | |
| Container full | Emptying | |
| Nozzle, pipes or hose blocked | Clean | |
| Device does not start | Plug in the socket?Power supply?Power cord OK?Appliance cover closed properly?Water sensor has swit-ched off? | |
| Plastic emptying bag is sucked onto the filters | Set the rotary valve to O-PEN ▲. | |
| No suction power when fleece filter bag is inserted in M vacuum cleaners | Set rotary valve to CLOSE ▲ |
Do not intervene further, contact a customer service workshop.
Transport
Insert the closing plug of the vacuum cleaner into the suctionaperture (DSS 25 M and DSS 35 M iP).
The motor head must be securely fixed to the container (close the latches). Place the accessories in a suitable plastic bag and seal the plastic bag or place it in the tool storage compartment.
Plug the ends of the suction hose into each other.
Tests and approvals
Electro-technical tests need to be performed in accordance with the accident prevention guidelines (BGV A3) and in accordance with DIN VDE 0701 Part
1 and Part 3. These tests need to be performed in regular intervals in accordance with DIN VDE 0702 and after maintenance work or modifications. At least once a year, a technical dust inspection needs to be performed by the manufacturer or a qualified person, e.g. to check for damage to the filter, leaks, function of the control equipment.
The suction units are passed successful tested in accordance with IEC/EN 60335-2-69.
Environmental Protection

Raw material recycling instead of waste disposal
To avoid damages on transportation, the power tool has to be delivered in a sturdy packing. Packaging as well as unit and accessories are made of recyclable materials and can be disposed accordingly.
The tool's plastic components are marked according to their material, which makes it possible to remove environmental friendly and differentiated because of available collection facilities.
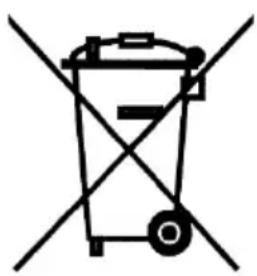
Only for EU countries
Do not dispose of electric tools together with household waste material!
In observance of the European Directive 2012/19/EU on waste electrical and electronic equipment and its implementation in accordance with national law, electric tools that have reached the end of their life must be collected separately and returned to an environmentally compatible recycling facility.
Warranty
According to our general terms of delivery for business dealings, suppliers have to provide to companies a warranty period of 12 months for redhibitory defects (to be documented by invoice or delivery note).
Damages due to natural wear, overstressing or improper handling are excluded from this warranty.
Damages due to material defects or production faults shall be eliminated free of charge by either repair or replacement.
Complaints will be accepted only if the tool is returned in non-dismantled condition to the manufacturer or an authorized Eibenstock service centre.
EU Declaration of Conformity
We hereby declare that the machine described below complies with the relevant basic safety and health requirements of the EC Directives, both in its basic design and construction as well as in the version put into circulation by us. This declaration shall cease to be valid if the machine is modified without our prior approval.
The design of the appliance corresponds to the following pertinent regulations:
EC Machinery Directive
EC Directive EMC
ROHS
2006/42/EU
2014/30/EC
2011/65/EU
EC Machinery Directive 2006/42/EU including amendments:
Category II requirements
Frank Markert
Head of Engineering
Technische gegevens
| DSS 25 A / DSS 25 M | DSS 35 M iP | |||
| Spanning: | 220 - 240 V~ | |||
| Vermogen: | 1200 W | 1400 W | ||
| Max. vermogen | 1400 W | 1600 W | ||
| Frequentie: | 50 – 60 Hz | |||
| Luchtstroom: | 73 l/s* | 42 l/s** | 75 l/s* | 45 l/s** |
| Onderdruk: | 270 mbar * | 235 mbar ** | 280 mbar * | 245 mbar** |
| Geluidsniveau: | 69,5 dB (A) | |||
Fascicolo technique (2006/42/CE) presso:
Depending on the unit configuration, the following functions and settings are available:
YcTpoIcTBo He DoJXHO 6bITb BnaJHbIM I He DoJXHO 3KcPnyaTnpOBAtbcra BO BnaJxHO cpeJe.
0 Pnpcocka n3<
I Pnncska>0Ha<6e3yHKuIN Bn6paun
PexnI rTOBHOCTn dIa aBTOMaTnueCKOTo A BkIOUeHn/ByIKIOUeHn (npcocka BKNIOuAeTcN bIKIOuaeTcN 3JIeKTPoINHCTpyMeHTOM)
RA PeKIM rOTOBHOCtN, KaK «A», ПИUC aBTOMaTnuecka YOuNCTka ΦиNbTpα.
IR BkIIOueHHbI npncocok c aBtOMaTnuecko fynKcneBn6paun
Ibilecoc B pexime OxuaHn Ibliecoc BKIOUaETcABTOMaTNUeCKN TOJbKO npBkIOUeHn HhCTpyMeHTa. PocJe BbIKIOUeHn Pbilecoc npoDOnJaet pa60taB B TeueHne npIMepHo 10 cekyHd. 3To npedotBpauaet OCTaBaHne OCTaTKOB B UHaHre.
Po3eTka (2b) Ha ycTpoiCTBe npedycmOTpeHa dIra nOdkJIIOUeHnRA 3JIeKTPoIHcTpymEHTa.

BHHMaHHe!
- Θлжгггггггггггггггггггггггггггgн.
- Ддддддддддддддддддддддддддддддддддддддддддддддддддддддддддддддддддддддддддддддддддддддддддддддддддддд徳.
- Длжгггггgгg.
- Длжггggg.
- Длжгggg.
- Длжg.
- Длжg.
- Длжg.
- Длжg.
- Длжg.
- Длжg.
- Длжg.
- Длжg.
- Длжg.
- Длжg.
- Длжg.
- Длжg.
- Длжg.
- Длжg.
- Длжg.
- Длжg.
- Длжg.
- Dl
- Dl
- Dl
- Dl
- Dl
- Dl
- Dl
- Dl
- Dl
- Dl
- Dl
- Dl
- Dl
- Dl
- Dl
- Dl
- Dl
- Dl
- Dl
- Dl
- Dl
- Dl
- Dl
- Dl
- Dl
- Dl
- Po3eTka HaxoDntcra NOD HanpJxKeHnEm, KOrda BnIka NOdkJIIOUyeHa K CetN, He3aBNCmO OT NIOJOxEHNy BbIKJIIOuYaTeJIa.
B noIoxeHn BblKlIOuTeJIa 0 pO3eTKa MoKeT nCNoJb3OBaTbcra B KaueCTBe ydInHHTeJIbHOJ npoBOJOKn (HaNPmep,ДЯ OCBeUeHry).
HOMHaJIbHaJ MOUHOCTb: NbJIeCOC IN NOdKJIuOeHHOe yCTPOIcTBo MaKc. 16 A.
B nbilecocax cepn «M» npu yctaHaBnBaHm MmHMaJbHoro NOTOKa BO3dyxa BO3HNkaeT aKKyCTnueckn CNrHaJ n CBeTOBa HndNKaun.
BpeKIme A,RA,IRnAR npedymaTpnaOTc cJeDyUOne HaCTpoiKn B 3aBNCIMoCTn OT dNaMeTp aShaHra:
A B T O M A T N U C E C K A O U N C T K A Φ N J B T P A (D S S 25 A, D S S 25 M)
OuHCTkaФINbTpapnpocxOoNTaBtOMaTnueckn,KOrdaDIOCTnraeTcny Ooka3aTeIb npedBaPnteIbHO yCTaHOBneHHo HAcTPOiKN MmHImaJIbHOrO OsbemaNOTOKaBO3dUxaB TeueHne NocJeDyUoJeuN pay3bl Bpa6OuemzIKNe (pepeKnIOuataIb(2a)BpeximeRA).
HenpepbBna OuncTka pNbTpOB (DSS 35 M iP)
YcTpaHHe HEnCnPaBHOCTeI
Функционьные Hencправно He Bceгда 03нauot Depektb!
YnakOBka, yCTpoIcTBO n npHaJNeJXHOCTN n3rTOBJeHbI n3 nepepa6aTbIBaEMbIX MaTePnaIOB n DOJIxHbI yTNIN3nPOBaTbcra COOTBeTCTByIOUIM O6pa3OM.
Пл actikobbie DeTaH yCToPcTBa HMeHT MapKnpOBky, COOTBeTCTByHOuMoTepeNaIy. 3TO N03BOJare T OcyUeCTBnAryb 3KOJOrnueckn 6e3OpaHyUyTNlN3aunIO NO BvDAM OTXODOB C NOMoCbIPOpeJaRaembIX cNCTEm c6opa.
He BbIbpaCbIbAaIte 3JIeKTPoHnHCTpyMeHTbI B 6bITOBoMycOp!
B COOTBcETCBN C EBpOneiCKo DNpeKTuBOr 2012/19/EU o6
OTXoJax 3JIeKTPuYeCKoro N 3JIeKTPoHnHO O6OpyIDoBaHnI N ee
BHeIepHNEM B HaCuNOHaJIbHOE 3aKOHOdaTeJIbCTBO,
OTpa6OtaHHbIe 3JIeKTPoHnHCTpyMeHTbI DOJXHbI Co6npaTbcra
OTdJIbHo I nepeDaBaTbcra Ha 3KoJIoRnueckn 6e3OnacHyIO
nepepa6OtKy.
3aBHeHne o COOTBeTCTBnE EC
HaCTOaIMMbI3aABJarem,TOyka3aHHoe HnXe yCTpOJCTBO NO CBOeKOHcEaUNIKOHCTpykUIN, a TAKKe B OcyuEcTBHeHOM N DOnyuSeHHOM KnpoJaXe IcNoJIHeHIn OTBeuaET COOTBETCTByUOnM OCHOBbIM Tpe6oBaHnA M6e3OpacHOCTN IN CaHTapHbIM Tpe6oBaHnA M cOrJaCHo DnpeKtTbAM EC. PnBHeCeHN n3MeHeHIn, He CoRNaCoBAHHbIX C HAmN, DaHHoe 3aayBJeHne TepReT CBOIO cnJy.
TexHnueckaДokymeHTaць (2006/42/EC):
Aattnoeic TcKatnyopiaI

- Electrical Connection
- Before use
- Ilse original ancestories
- Fields of application
- For wet and drying suctioning.
- Commissioning
- Operating field
- Caution!
- Pre-selection switch (2d) for minimum volume signal (horn and light) for suction units of the class "M".
- Operation (wet and dry suctioning)
- Dry suctioning
- Wet suctioning
- Cleaning the filter
- Manual cleaning (DSS 25 A, DSS 25 M)
- Automatic cleaning (DSS 25 A, DSS 25 M)
- Permanent filter cleaning (only DSS 35 M iP)
- Emptying the tank
- Fleece filter bag
- Inserting the fleece filter bag
- Exchanging the fleece filter bag
- Plastic emptying bag
- Exchanging the plastic emptying bag
- Cleaning
- Servicing
- Before the beginning of maintenance or repair works you have to disconnect the plug from the mains!
- Level sensors
- Troubleshooting
- Transport
- Tests and approvals
- Environmental Protection
- Raw material recycling instead of waste disposal
- Only for EU countries
- Warranty
- EU Declaration of Conformity
- EC Machinery Directive 2006/42/EU including amendments:
- Technische gegevens
- BHHMaHHe!
- B nbilecocax cepn «M» npu yctaHaBnBaHm MmHMaJbHoro NOTOKa BO3dyxa BO3HNkaeT aKKyCTnueckn CNrHaJ n CBeTOBa HndNKaun.
- A B T O M A T N U C E C K A O U N C T K A Φ N J B T P A (D S S 25 A, D S S 25 M)
- HenpepbBna OuncTka pNbTpOB (DSS 35 M iP)
- YcTpaHHe HEnCnPaBHOCTeI
- 3aBHeHne o COOTBeTCTBnE EC
Brand : Eibenstock
Model : DSS 25 A
Category : Vacuum Cleaner