
PWT 11 A1 - Automatic animal repellent PARKSIDE - Free user manual and instructions
Find the device manual for free PWT 11 A1 PARKSIDE in PDF.
| Product type | Automatic animal repellent |
| Brand | Parkside |
| Model | PWT 11 A1 |
| Power supply | 4 x 1.5 V AA/Mignon/LR6 batteries |
| Max. operating water pressure | 4 bar |
| Max. water jet range | 11 m |
| Horizontal detection angle | approx. 150° |
| Water jet dispersion | 360° |
| Water consumption per activation | 350 to 500 ml |
| Protection rating | IPX4 (splash-proof) |
| Operating temperature | +5 °C to +30 °C |
| Storage temperature | 0 °C to +50 °C |
| Garden hose connection | 13 mm (1/2") |
| Rear connection (water stop) | 26.44 mm (3/4") |
| Detection type | Passive infrared motion sensor (PIR) |
| Jet range adjustment | Rotary selector (MIN to MAX) with locking lever |
| Dispersion angle adjustment | Limit clips and metal clip |
| Detection distance adjustment | Sensitivity selector (levels 1 to 9) + off (0) |
| Included items | Housing with detector, sprinkler unit, ground spike, extension tube, connecting piece, 4 AA batteries, manual |
| Warranty | 3 years |
Frequently Asked Questions - PWT 11 A1 PARKSIDE
User questions about PWT 11 A1 PARKSIDE
0 question about this device. Answer the ones you know or ask your own.
Ask a new question about this device
Download the instructions for your Automatic animal repellent in PDF format for free! Find your manual PWT 11 A1 - PARKSIDE and take your electronic device back in hand. On this page are published all the documents necessary for the use of your device. PWT 11 A1 by PARKSIDE.
USER MANUAL PWT 11 A1 PARKSIDE
WATER ANIMAL REPELLER WITH MOTION SENSOR / WASSERSTRAHL-TIERABWEHR MIT
BEWEGUNGSSSENSOR / JET D'EAU RÉPULSIF POUR ANIMaux AVEC DETECTEUR DE MOUVEMENTS PWT 11 A1
G8 IE
WATER ANIMAL REPELLER WITH MOTION SENSOR
Operating instructions
FR BE
JET D'EAU RÉPULSIF POUR ANIMaux AVEC DETECTEUR DE MOUVEMENTS
Mode d'emploi
CZ
VODNI PAPRSEK S POHYBOVYM SENZOREM NA OCHRANU PROTI ZVIRATUM
Návod k obsluze
SK
VODNY LUC S POHYBOVYM SENZOROM NA OCHRANU PROTI ZVIERATÁM
Návod na obsluhu
DK
VANDSTRÄLE MED BEVÄGELSES-SENSOR TIL AT SKRÄMME DYR VÄK
Before reading, unfold the page containing the illustrations and familiarise yourself with all functions of the device.
DE AT CH
GB/IE Operating instructions Page 1
Information concerning these operating instructions 2
Intended use 2
Warnings 2
Safety. 3
Basic safety instructions 3
Handling batteries 4
Package contents 5
Appliance description 6
Firstuse 7
Inserting/replacing the batteries 7
Assembling and connecting the appliance 8
Requirements for the installation site 8
Operation 10
Adjusting the water jet 10
Switching the appliance on and off, adjusting the detection range 12
Activating the appliance 13
Dismantling 13
Troubleshooting 14
Cleaning 15
Cleaning the appliance 15
Cleaning the filter and sealing rings 15
Storage 15
Disposal 16
Disposal of the appliance 16
Battery disposal 16
Disposal of packaging 17
Appendix 17
Technical specifications 17
Information on the EU Declaration of Conformity 18
Kompernass Handels GmbH warranty 18
Service 21
Impor ter 21
Introduction
Information concerning these operating instructions
Congratulations on the purchase of your new appliance. You have selected a high-quality product. The operating instructions are part of this product. They contain important information about safety, usage and disposal. Before using the product, please familiarise yourself with all operating and safety instructions. Use the product only as described and for the specified range of applications. Retain these operating instructions for future reference. Please also pass these operating instructions on to any future owner.
Intended use
The appliance is exclusively used to gently repel animals in outdoor areas. Commercial or industrial use is not permitted. No liability will be assumed in cases of improper use. No liability will be assumed for damage caused by misuse or improper handling, the use of force or unauthorised modification. The risk is borne solely by the user.
Warnings
The following warnings are used in these operating instructions:
WARNING
A warning at this hazard level indicates a potentially hazardous situation.
Failure to avoid this hazardous situation could result in injuries.
Follow the instructions in this warning notice to prevent injuries.
ATTENTION
A warning at this hazard level indicates a risk of property damage.
Failure to avoid this situation could result in property damage.
Follow the instructions in this warning notice to prevent property damage.
NOTE
A note provides additional information that makes handling the appliance easier for you.
Safety
Basic safety instructions
■ Read all safety warnings and all instructions!
- Check the appliance before every use to make sure it is in perfect condition. Do not use the product if it is damaged in any way.
This appliance may be used by children aged 8 years and above and by persons with limited physical, sensory or mental capabilities or lack of experience and knowledge, provided that they are under supervision or have been instructed on how to use the appliance safely and are aware of the potential risks. Do not allow children to use the appliance as a toy. Cleaning and user maintenance tasks must not be carried out by children unless they are supervised.
■ Do not aim the water jet at electrical equipment!
Do not aim the water jet at people or animals!
Do not drink from the hose!
Open the appliance only when it is dry.
Before use, check the appliance and its supply lines for tightness.
Avoid direct sunlight.
Do not operate the appliance close to naked flames.
The appliance is not frost-proof.
■ After using the appliance, always close the water outlet (tap).
Check the appliance and its supply lines at regular intervals for leaks and fault-free operation.
Repairs to the appliance during the warranty period may only be carried out by a customer service department authorised by the manufacturer. Otherwise, no warranty claims will be considered for any subsequent damages.
Handling batteries
WARNING
The appliance is powered by batteries. Mishandling batteries can cause fires, explosions, leakages or other hazards!
- Keep batteries out of the hands of children. Store batteries out of the reach of children.
If a battery has been swallowed, you must seek medical assistance immediately. - Batteries must never be short-circuited, taken apart, deformed or thrown into a fire.
- Never try to charge non-rechargeable batteries.
Chemicals from leaking or damaged batteries can cause skin irritations when touched. Use suitable protective gloves if this occurs. If you get the liquid on your skin, rinse it off with plenty of water. If the chemicals come into contact with your eyes, rinse them thoroughly with plenty of water, and do not rub them. Consult a physician immediately.
Always use the stated battery type. - Inserting the wrong type of battery can lead to a risk of explosion. Dispose of used batteries as described in the instructions.
- Ensure that the batteries are inserted with the correct polarity. This information is displayed in the battery compartment.
WARNING
If necessary, clean the battery and appliance contacts before inserting the battery.
- Remove the batteries if you do not intend to use the appliance for a long time.
Always remove discharged batteries from the appliance immediately.
Package contents
(See fold-out page for illustrations)
- Main unit with motion detector
- Sprinkler unit
Ground spike with hose connection - Extension tube
- Connecting piece
- 4 × 1.5V batteries AA/Mignon/LR6
These operating instructions
NOTE
- Check the package for completeness and signs of visible damage.
If the delivery is incomplete or damage has occurred as a result of defective packaging or during transport, contact the customer service hotline (see section Service).
Appliance description
(See fold-out page for illustrations)
1 Rotary control (DISTANCE)
Locking lever
3 Sprinkler unit
4 Limiter clips
Metal clip
Connecting piece
Sealing rings
8 Main unit
Motion sensor with red LED
10 Battery compartment cover
11 Protective cover
12 Filter
Connecting piece
14 Sensor sensitivity controller
15 Extension tube
16 Garden hose connection
17 Ground spike
18 Water stop
First use
Inserting/replacing the batteries
The appliance is operated with four 1.5 V AA/Mignon/LR6 batteries (included in delivery).
If necessary, disconnect the appliance from the water connection and switch it off.
Slide the protective cover 11 downwards and remove it (see Fig. 1).
Lift the tab and remove the battery compartment cover (see Fig. 2).
Remove the depleted batteries, if necessary.
Insert four 1.5 V AA/Mignon/LR6 batteries into the battery compartment. Make sure that the polarity is correct, as indicated in the battery compartment. The LED of the motion sensor lights up red briefly. The appliance is now ready for use.
Place the battery compartment cover 10 back on the battery compartment. Make sure that the sealing ring is firmly seated (see Fig. 3).
Slide the protective cover 11 over the battery compartment (see Fig. 4).
- When the batteries are low, the LED of the motion sensor ⑨ flashes red. The batteries should be changed as soon as possible.
Assembling and connecting the appliance
Screw the extension tube 15 clockwise onto the ground spike 17.
Screw the main unit 8 clockwise onto the extension tube 15.
Screw the connecting piece 6 clockwise onto the main unit 8.
Screw the sprinkler unit 3 clockwise onto the connecting piece 6.
Use a quick coupler or adapter to connect a suitable garden hose to the 13~mm (12) garden hose connection 16.
NOTE
If you unscrew the water stop 18 you will have the option to connect another appliance to the 26.44 ~mm (3)4 connection.
- Keep the water tap closed until all the settings have been completed.
Requirements for the installation site
The installation location must meet the following requirements to ensure safe and error-free operation of the appliance:
■ Ensure that no uninvolved persons are affected by the appliance.
■ Ensure that the safety and limiting devices are not rendered unusable.
The ambient temperature must be between +5^ and +30^
Use only clear fresh water.
The motion sensor reacts more effectively when animals to be driven away walk past the appliance instead of walking directly towards the unit.
The field of view of the motion sensor must not be obscured.
The surface of the motion sensor must be kept clean.
The appliance must be stable and secure; otherwise, the recoil of the water jet may knock the appliance over.
If the terrain is uneven, make sure that you set up the appliance so that the motion sensor 9 is no higher than approx. 80~cm above the area to be monitored. Otherwise, the motion sensor 9 cannot detect animals to be repelled.
NOTE
The horizontal detection angle of the motion sensor is approx. 150^ .
At a water pressure of 4 bar, the appliance can spray water up to 11 metres.
The sprinkler unit 3 can rotate up to 360^
False triggering may occur if objects warmer than the ambient temperature are moving in the field of view of the motion sensor. False triggering can also be caused by pets, rapid temperature changes or moving water, such as rain. On very hot days, the motion sensor may not detect passing animals.
The maximum detection range for animals that are to be driven off is approx. 7 metres. Uninvolved third parties who are larger than large animals can be detected beyond 7 metres.
Once you have selected a suitable installation site, push the ground spike deep into the ground.
Operation
NOTE
Make sure the water tap is closed when you move into the detection area of the appliance.
Adjusting the water jet
You have two options when adjusting the water jet that comes out of the sprinkler unit 3.
Adjusting the width:
Press the locking lever ② down and turn the rotary control ① in the MAX direction to increase the width of the water jet (see Fig. 5). When you turn the rotary control ① completely in the MAX direction, the appliance can spray water up to a distance of 11 metres when operating at 4 bar.
Press the locking lever 2 down and turn the rotary control 1 towards MIN to reduce the width of the water jet (see Fig. 5).
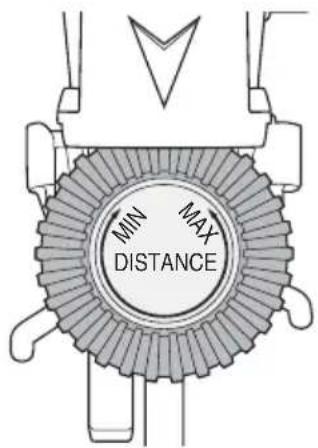
Fig.
5
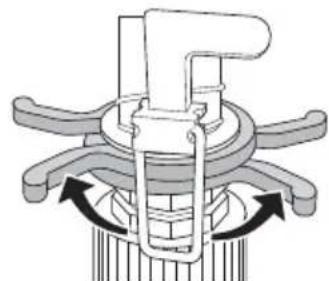
Setting the dispersion angle:
The two limiter clips 4 serve as a stop for the metal clip 5. The metal clip 5 changes its pivoting direction as soon as it strikes against one of the two limiter clips 4.
Increase the distance between the two limiter clips 4 to increase the dispersion of the water jet (see Fig. 6).
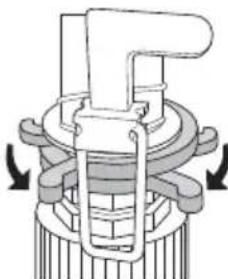
Decrease the distance between the two limiter clips 4 to decrease the dispersion of the water jet (see Fig. 7).
Fold the metal clip ⑤ upwards so that the sprinkler unit ③ rotates 360^ (see Fig. 8).
Switching the appliance on and off, adjusting the detection range
The sensor sensitivity controller 14 is located on the rear side of the appliance. The sensor sensitivity controller 14 has an adjustable range of 0 to 9.
Level 0: The appliance is switched off.
Level 1-9: the higher the level, the more sensitive the motion sensor becomes and the detection range is increased.
Small animals
Detection range 3 m Level 6-7
Detection range 4.5 m Level 8-9
Medium-sized animals
Detection range 3 m Level 4-5
Detection range 4.5 m Level 6-7
Detection range 6 m Level 8-9
Large animals
Detection range 4 m Level 1-3
Detection range 5m Level 4-6
Detection range 7 m Level 7-9
NOTE
Uninvolved third parties who are larger than large animals can be detected beyond 7 metres.
Turn the sensor sensitivity controller 14 clockwise to switch the appliance on and increase the detection range.
Turn the sensor sensitivity controller 14 anticlockwise to reduce the detection range.
Turn the sensor sensitivity controller 14 anticlockwise to level O to switch the appliance off.
Activating the appliance
NOTE
Complete all settings before switching on the appliance.
Turn the sensor sensitivity controller 14 clockwise to switch the appliance on.
Activate the appliance by placing one hand in front of the motion sensor The LED briefly lights up red and a click can be heard. The appliance is activated and the water valve has opened up. The appliance is now ready for use.
Switch on the water tap.
NOTE
- Switch off the tap before you move into the detection field of the appliance.
Dismantling
Switch off the water tap.
Turn the sensor sensitivity controller 14 anticlockwise to level O to switch the appliance off.
Disconnect the garden hose from the garden hose connection 16.
Unscrew the sprinkler unit 3 in an anticlockwise direction from the connecting piece 6.
Unscrew the connecting piece 6 in an anticlockwise direction from the main unit 8.
Unscrew the main unit 8 in an anticlockwise direction from the extension tube 15.
Unscrew the extension tube 15 in an anticlockwise direction from the ground spike 17.
Troubleshooting
The following table will help you identify and rectify minor malfunctions:
| Error Possible cause Remedy | ||
| No water is emitted from the appliance. | No batteries inserted. Insert batteries. | |
| Batteries are depleted. Replace the batteries. | ||
| Appliance is switched off. | Switch the appliance on. | |
| The water tap is switched off. | Switch on the water tap. | |
| The motion sensor ⑨ fails to detect animals. | Refer to the sections Requirements for the installation site and Operation. | |
| The water jet is insufficient. | The appliance is dirty. | Refer to the section Cleaning. |
Cleaning
Cleaning the appliance
CAUTION
To avoid irreparable damage to the appliance, ensure that no moisture can penetrate into the battery compartment during cleaning.
Do not use caustic, abrasive or solvent-based cleaning materials. They can damage the surfaces of the appliance.
Clean the surfaces of the appliance with a soft, dry cloth. For more stubborn dirt, use a slightly damp cloth with some mild detergent.
Cleaning the filter and sealing rings
(see fold-out page)
Unscrew the connecting piece 13 from the main unit 8.
Remove the filter 12 from the main unit 8.
Remove the sealing ring 7 from the connecting piece 13.
Unscrew the connecting piece 6 from the main unit 8.
Remove the sealing ring 7 from the connecting piece 6.
Clean the sealing rings 7 and the filter 12 under running water.
Reinstall the sealing rings 7 and the filter 12 and unscrew the connecting pieces 6/13.
Storage
If you plan not to use the product for a long period, remove the batteries and store it in a clean, dry, frost-free place out of direct sunlight.
Disposal
Disposal of the appliance
The adjacent symbol of a crossed-out wheelie bin means that this appliance is subject to Directive 2012/19/EU. This directive states that this appliance may not be disposed of in the normal household waste at the end of its useful life, but must be taken to specially set-up collection locations, recycling depots or disposal companies.
The disposal is free of charge for the user. Protect the environment and dispose of this appliance properly.

Your local community or municipal authorities can provide information on how to dispose of the worn-out product.

The product is recyclable, subject to extended producer responsibility and is collected separately.
Battery disposal
Batteries should not be disposed of with normal household waste. Consumers are legally obliged to dispose of used batteries at a collection point in their town/district or at a retail store. They may contain poisonous heavy metals and must be disposed of in accordance with the rules for the treatment of hazardous waste. The chemical symbols for heavy metals are as follows:
Cd = cadmium, Hg = mercury, Pb = lead.
Dispose of batteries only when they are fully discharged.
Disposal of packaging

The packaging materials have been selected for their environmental friendliness and ease of disposal and are therefore recyclable. Dispose of packaging materials that are no longer needed in accordance with applicable local regulations.
Dispose of the packaging in an environmentally friendly manner.
Observe the labels on the different packaging materials and separate them as needed. The packaging material is labelled with abbreviations (a) and numbers (b) with the following meanings: 1-7: plastics, 20-22: paper and cardboard, 80-98: composites.
Appendix
Technical specifications
| Power supply | 4 × 1.5 V = DC) AA/Mignon/ LR6 batteries |
| Operating temperature +5 – +30°C | |
| Storage temperature 0 – +50°C | |
| Max. operating water pressure 4 bar | |
| Garden hose connection 16 13 | mm ( 1/2") |
| Connection behind the water stop 18 | 26.44 mm (3/4") |
| Water consumption upon activation | approx. 350 ml–500 ml |
| Range of water jet max. 11 m | |
| Horizontal detection angle of motion sensor | approx. 150° |
| Dispersion of water jet 360° | |
| Protection type IPX4 (splashproof) | |
Information on the EU Declaration of Conformity
CE
This appliance complies with the essential requirements and other relevant regulations of the Electromagnetic Compatibility Directive 2014/30/EU and the RoHS Directive 2011/65/EU.
The complete EU Declaration of Conformity is available from the importer.
This appliance has a 3-year warranty valid from the date of purchase. If this product has any faults, you, the buyer, have certain statutory rights. Your statutory rights are not restricted in any way by the warranty described below.
Warranty conditions
The warranty period starts on the date of purchase. Please keep your receipt in a safe place. This will be required as proof of purchase.
If any material or manufacturing fault occurs within three years of the date of purchase of the product, we will either repair or replace the product for you or refund the purchase price (at our discretion). This warranty service requires that you present the defective appliance and the proof of purchase (receipt) within the three-year warranty period, along with a brief written description of the fault and of when it occurred.
If the defect is covered by the warranty, your product will either be repaired or replaced by us. The repair or replacement of a product does not signify the beginning of a new warranty period.
Warranty period and statutory claims for defects
The warranty period is not prolonged by repairs effected under the warranty. This also applies to replaced and repaired components. Any damage and defects present at the time of purchase must be reported immediately after unpacking. Repairs carried out after expiry of the warranty period shall be subject to a fee.
Scope of the warranty
This appliance has been manufactured in accordance with strict quality guidelines and inspected meticulously prior to delivery.
The warranty covers material faults or production faults. The warranty does not extend to product parts subject to normal wear and tear or to fragile parts which could be considered as consumable parts such as switches, batteries or parts made of glass.
The warranty does not apply if the product has been damaged, improperly used or improperly maintained. The directions in the operating instructions for the product regarding proper use of the product are to be strictly followed. Uses and actions that are discouraged in the operating instructions or which are warned against must be avoided.
This product is intended solely for private use and not for commercial purposes. The warranty shall be deemed void in cases of misuse or improper handling, use of force and modifications / repairs which have not been carried out by one of our authorised Service centres.
Warranty claim procedure
To ensure quick processing of your case, please observe the following instructions:
Please have the till receipt and the item number (e.g. IAN 123456_7890) available as proof of purchase.
- You will find the item number on the type plate on the product, an engraving on the product, on the front page of the operating instructions (below left) or on the sticker on the rear or bottom of the product.
If functional or other defects occur, please contact the service department listed either by telephone or by e-mail.
You can return a defective product to us free of charge to the service address that will be provided to you. Ensure that you enclose the proof of purchase (till receipt) and information about what the defect is and when it occurred.

You can download these instructions along with many other manuals, product videos and installation software at www.lidl-service.com.
This QR code will take you directly to the Lidl service page (www.lidl-service.com) where you can open your operating instructions by entering the item number (IAN) 360872_2007.
Service
GB Service Great Britain
Tel.: 0800 404 7657
E-Mail: kompernass@lidl.co.uk
IE Servicelreland
Tel.: 1890 930 034
(0,08 EUR / Min., (peak))
(0,06 EUR / Min., (off peak))
E-Mail: kompernass@lidl.ie
IAN 360872_2007
Importer
Please note that the following address is not the service address. Please use the service address provided in the operating instructions.
KOMPERNASS HANDELS GMBH
BURGSTRASSE 21
44867 BOCHUM
GERMANY
www.kompernass.com
Inhaltsverzeichnis
Einführung 24
KOMPERNASS HANDELS GMBH
BURGSTRASSE 21
44867 BOCHUM
DEUTSCHLAND
www.kompernass.com
Table des matieres
Introduction 46
Chere cliente, cher client,
Chere cliente, cher client,
KOMPERNASS HANDELS GMBH
BURGSTRASSE 21
44867 BOCHUM
ALLEMAGNE
www.kompernass.com
Inhoud
Inleiding 72
Cd = cadmium, Hg = kwik, Pb = lood.
KOMPERNASS HANDELS GMBH
BURGSTRASSE 21
44867 BOCHUM
DUITSLAND
www.kompernass.com
Obsah
Uvod. 94
KOMPERNASS HANDELS GMBH
BURGSTRASSE 21
44867 BOCHUM
NÉMECKO
www.kompernass.com
Spistresci
Wstep 114
KOMPERNASS HANDELS GMBH
BURGSTRASSE 21
44867 BOCHUM
NIEMCY
www.kompernass.com
Obsah
Uvod. 136
KOMPERNASS HANDELS GMBH
BURGSTRASSE 21
44867 BOCHUM
NEMECKO
www.kompernass.com
Indices
Introduccion 158
KOMPERNASS HANDELS GMBH
BURGSTRASSE 21
44867 BOCHUM
ALEMANIA
www.kompernass.com
Indholdsfortegnelse
Introduktion 180
KOMPERNASS HANDELS GMBH
BURGSTRASSE 21
44867 BOCHUM
TYSKLAND
www.kompernass.com

KOMPERNASS HANDELS GMBH
BURGSTRASSE 21
44867 BOCHUM
GERMANY
www.kompernass.com
Last Information Update · Stand der Informationen · Version des informations · Stand van de informatie
Stav informaci - Stan informaci - Stav informaci - Estado de las informaciones - Tilstand of information:
02/2021-Ident.-No.:PWT11A1-122020-3
IAN 360872_2007