
PSBM 500 A1 - Drill PARKSIDE - Free user manual and instructions
Find the device manual for free PSBM 500 A1 PARKSIDE in PDF.


| Product type | Impact drill |
| Brand | Parkside |
| Model | PSBM 500 A1 |
| Rated voltage | 230–240 V~ 50 Hz |
| Rated input power | 500 W |
| No-load speed | max. 3000 min⁻¹ |
| Impact rate | max. 48000 rpm |
| Chuck clamping range | max. 13 mm |
| Drilling capacity steel | ø max. 10 mm |
| Drilling capacity wood | ø max. 20 mm |
| Drilling capacity concrete | ø max. 13 mm |
| Protection class | II (double insulation) |
| Sound pressure level | 95.2 dB(A) |
| Sound power level | 106.2 dB(A) |
| Vibration emission (concrete drilling) | 12.137 m/s² (K=1.5) |
| Vibration emission (metal drilling) | 5.237 m/s² (K=1.5) |
| Rotation direction | Reversible (right/left) |
| Variable speed | Yes, via variable speed switch |
| Hammer function | Yes, switchable |
| Chuck type | Keyless chuck |
| Included accessories | Auxiliary handle, depth stop, instruction manual |
| Warranty | 3 years |
Frequently Asked Questions - PSBM 500 A1 PARKSIDE
User questions about PSBM 500 A1 PARKSIDE
0 question about this device. Answer the ones you know or ask your own.
Ask a new question about this device
Download the instructions for your Drill in PDF format for free! Find your manual PSBM 500 A1 - PARKSIDE and take your electronic device back in hand. On this page are published all the documents necessary for the use of your device. PSBM 500 A1 by PARKSIDE.
USER MANUAL PSBM 500 A1 PARKSIDE
PERCEUSE A PERCUSSION PSBM 500 A1
FR BE
PERCEUSE A PERCUSSION
Operation and Safety Notes
Translation of original operation manual

FR BE
Before reading, unfold the page containing the illustrations and familiarise yourself with all functions of the device.
GB Operation and Safety Notes Page 35


natural_image
Close-up of a hand operating a drill bit on a wooden workbench, with a small tool nearby (no visible text or symbols)
natural_image
Close-up of a hand using a drill bit to measure a wooden post (no text or symbols visible)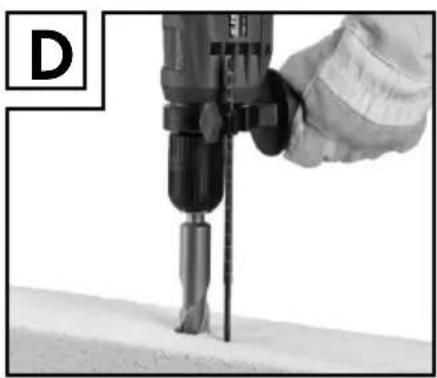
natural_image
Close-up of a hand using a drill bit to work on a surface (no visible text or symbols)
natural_image
Close-up of a hand using a drill bit on a workbench with tools and a small inset bowl nearby (no visible text or symbols)Introduction
Fourniture......Page 7
Perceuse a percussion PSBM 500 A1
- Introduction

Directive Machines (2006/42/EC)
Perceuse a percussion PSBM 500 A1
WAARSCHUWING! Lees alle veilig-
WAARSCHUWING! GIFTIGE STOFFEN!
WAARSCHUWING! GEVAAR VOOR
WAARSCHUWING! GEVAAR VOOR
Date of manufacture (DOM): 08-2012
Serienummer: IAN 78322
Bochum, 31.08.2012
Semi Uguzlu
Semi Uguzlu
Included items Page 37
Technical data......Page 37
General safety advice for electrical power tools
-
Workplace safety......Page 37
-
Electrical safety....Page 38
-
Personal safety......Page 38
-
Careful handling and use of electrical power tools....Page 39
-
Service......Page 39
Safety advice for hammer-action drills....Page 39
Caution utility services! Page 40
Original accessories/attachments Page 40
Before first use
Attaching the auxiliary handle Page 40
Using the depth stop....Page 40
Inserting tools Page 40
First use
Switching on and off....Page 41
Infinitely adjustable speed setting....Page 41
Setting the direction of rotation....Page 41
Switching between drilling/hammer-action......Page 41
Servicing and cleaning......Page 41
Service centre Page 42
Warranty Page 42
Disposal Page 42
Declaration of conformity / Producer......Page 43
| The following pictograms are used in these operating instructions / on the device: | |||
 | Read instruction manual! Drilling | ||
 | Observe caution and safety notes! Impact drilling | ||
 | Caution - electric shock!Danger to life! | Wear hearing protection, dust protection mask, protective gloves and protective glasses. | |
 | Explosive material! | Keep children away from electrical power tools! | |
 | Risk of fire! | Check that the device, mains lead and plug are in good condition! | |
 | Volt (AC) | Dispose packaging and appliance in an environmentally-friendly way! | |
 | Watts (Effective power) Quick-release chuss | ||
 | Safety class II | ||
Impact drill PSBM 500 A1
- Introduction

We congratulate you on the purchase of your new device. You have chosen a high quality product. The instructions for use
are part of the product. They contain important information concerning safety, use and disposal. Before using the product, please familiarise yourself with all of the safety information and instructions for use. Only use the unit as described and for the specified applications. If you pass the product on to anyone else, please ensure that you also pass on all the documentation with it.
- Proper use
The tool is intended for Impact drilling into brick, concrete and stone as well as drilling into wood,
metal, ceramics and plastic (see Fig. B-E). The clockwise / counter clockwise rotation direction switch also allows the device to be used as a driver. Any other use or modification to the device shall be considered as improper use and could give rise to considerable risk of accident. The manufacturer will not accept liability for loss or damage arising from improper use. The device is not intended for commercial use.
Features
1 Quick-action drill chuck
2 Front casing
3 Back casing
4 Changeover switch "drill / percussion drill"
5 Locking button for ON / OFF switch
6 ON/OFF switch
7 Rotational direction switch
8 Depth stop
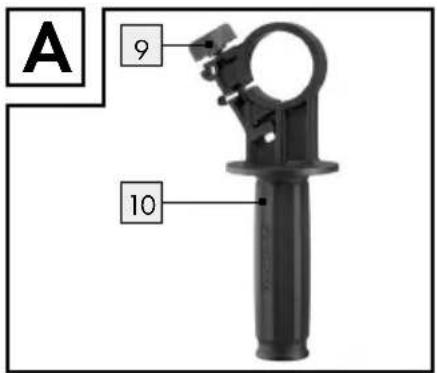
9 Wing screw
10 Additional handle (see Fig. A)
Included items
1 Impact drill PSBM 500 A1
1 Auxiliary handle
1 Depth stop
1 Operating instructions
- Technical data
Nom. voltage: 230-240V\~50Hz
Rated power: 500 W
No-load rotational
speed: max. 3000 min -1
Percussion rate: max. 48000 min
Chuck capacity: max. 13 mm
Drilling in steel: max. ø 10 mm
Drilling in wood: max. ø 20 mm
Drilling in concrete: max. ø 13 mm
Protection class: II/
Noise and vibration data:
Measured values for noise are determined in accordance with EN 60745. The A-weighted noise level of the electrical power tool are typically:
Sound pressure level: 95.2 dB(A)
Sound power level: 106.2 dB(A)
Uncertainty K: 3 dB

Wear ear protection!
Impact drilling in concrete:
Vibration emission value
$$ \alpha_ {h, I D} = 1 2. 1 3 7 \mathrm{m} / \mathrm{s} ^ {2} $$
Uncertainty
$$ K = 1. 5 \mathrm{m} / \mathrm{s} ^ {2} $$
Drilling in metal:
Vibration emission value
$$ a _ {h, D} = 5. 2 3 7 \mathrm{m} / \mathrm{s} ^ {2} $$
Uncertainty
$$ K = 1. 5 \mathrm{m} / \mathrm{s} ^ {2} $$
WARNING! The vibration level specified in these instructions was measured in accordance with an EN 60745 standardised measurement process and can be used to compare equipment. The vibration emission value specified can also serve as a preliminary assessment of the exposure. The vibration level will change according to the application of the electrical tool an in some cases may exceed the value specified in these instructions. Regularly using the electric tool in such a way may make it easy to underestimate the vibration.
Note: If you wish to make an accurate assessment of the vibration loads experienced during a particular period of working, you should also take into account the intervening periods of time when the device is switched off or is running but is not actually in use. This can result in a much lower vibration load over the whole of the period of working.

General safety advice for electrical power tools
WARNING! Read all the safety advice and instructions! Failure to observe the safety advice and instructions may result in electric shock, fire and / or serious injury.
Keep all the safety advice and instructions in a safe place for future reference!
The term "electrical tool" used in the safety advice refers to electrical tools powered by mains electricity (by means of a mains lead) and electrical tools powered by rechargeable batteries (without a mains lead).
1. Workplace safety
a) Keep your working area clean and well lit. Untidy or poorly lit working areas can lead to accidents.
b) Do not work with the device in potentially explosive environments in which there are
inflammable liquids, gases or dusts.
Electrical power tools create sparks, which can ignite dusts or fumes.
c)

Keep children and other people away while you are operating the electrical tool.
Distractions can cause you to lose control of the device.
2. Electrical safety
a) The mains plug on the device must match the mains socket. The plug must not be modified in any way. Do not use an adapter plug with devices fitted with a protective earth. Unmodified plugs and matching sockets reduce the risk of electric shock.
b) Avoid touching earthed surfaces such as pipes, radiators, ovens and refrigerators with any part of your body. There is an increased risk of electric shock if your body is earthed.
c) Keep the device away from rain or moisture. Water entering an electrical device increases the risk of electric shock.
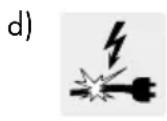
Do not use the mains lead for any purpose for which it was not intended, e.g. to carry the device, to hang up the device or to pull the mains plug out of the mains socket. Keep the mains lead away from heat, oil, sharp edges or moving parts of the device. Damaged or tangled mains leads increase the risk of electric shock.
e) When working outdoors with an electrical power tool always use extension cables that are also approved for use outdoors. The use of an extension cable suitable for outdoor use reduces the risk of electric shock.
f) Use a residual current device (RCD) for protection if operating the electrical power tool in a moist environment is unavoidable. The use of an RCD reduces the risk of electric shock.
3. Personal safety
a) Remain alert at all times, watch what you are doing and always proceed with caution. Do not use the device if you are tired or under the influence of drugs, alcohol or medication. One moment of carelessness when using the device can lead to serious injury.
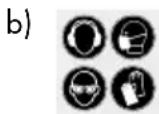
Wear personal protective equipment and always wear safety glasses. The wearing of
personal protective equipment such as dust masks, non-slip safety shoes, safety helmets or ear protectors, appropriate to the type of electrical power tool used and work undertaken, reduces the risk of injury.
c) Avoid unintentional operation of the device. Check that the electrical power tool is switched off before you connect it to the mains, pick it up or carry it. Accidents can happen if you carry the device with your finger on the ON/OFF switch or with the device switched on.
d) Remove any setting tools or spanners before you switch the device on. A tool or spanner left attached to a rotating part of a device can lead to injury.
e) Avoid placing your body in an unnatural position. Keep proper footing and balance at all times. By doing this you will be in a better position to control the device in unforeseen circumstances.
f) Wear suitable clothing. Do not wear loose clothing or jewellery. Keep your hair, clothing and gloves clear of moving parts. Loose clothing, jewellery or long hair can become trapped in moving parts.
g) If vacuum dust extraction and collection devices are fitted do not forget to check that they are properly connected and correctly used. The use of these devices reduces the hazard presented by dust.
4. Careful handling and use of electrical power tools
a) Do not overload the device. Always use an electrical power tool that is intended for the task you are undertaking. By using the right electrical power tool for the job you will work more safely and achieve a better result.
b) Do not use an electrical power tool if its switch is defective. An electrical power tool that can no longer be switched on and off is dangerous and must be repaired.
c) Pull the mains plug from the socket before you make any adjustments to the device, change accessories or when the device is put away. This precaution is intended to prevent you from unintentionally starting the device.
d) When not in use always ensure that electrical power tools are kept out of reach of children. Do not let anyone use the device if he or she is not familiar with it or has not read the instructions and advice. Electrical power tools are dangerous when they are used by inexperienced people.
e) Look after the device carefully. Check that moving parts are working properly and move freely. Check for any parts that are broken or damaged enough to detrimentally affect the functioning of the device. Have damaged parts repaired before you use the device. Many accidents have their origins in poorly maintained electrical power tools.
f) Keep cutting tools clean and sharp. Carefully maintained cutting tools with sharp cutting edges are less likely to jam and are easier to control.
g) Use the electrical power tool, accessories, inserted tools etc. in accordance with these instructions and advice, and the stipulations drawn up for this particular type of device. In doing this, take into account the working conditions and the task in hand. The use of electrical
power tools for purposes other than those intended can lead to dangerous situations.
5. Service
a) Have your device repaired at the service centre or by qualified specialist personnel using original manufacturer parts only. This will ensure that your device remains safe to use.

Safety advice for hammer-action drills
■ Use the auxiliary handle supplied with the device. Loss of control of the tool can lead to injury.
Always wear ear protection when using percussion drills.
Exposure to noise can cause hearing loss.
- Secure the workpiece. Use clamps or a vice to grip the workpiece firmly.
If a dangerous situation arises, pull the mains plug immediately out of the mains socket.
■ Always work with the mains lead leading away from the rear of the device.
- Do not allow the ventilation slots to become covered while the device is operating. Do not insert any objects into the ventilation slots.
■ DANGER OF FIRE FROM FLY-

ING SPARKS! Drilling or abrading metal creates flying sparks.
Always make sure that nobody is placed in any danger and that there are no inflammable materials near the working area.
WARNING! HAZARDOUS DUSTS!
Working with harmful / poisonous dusts presents a danger to health for the tool operator and any persons in the vicinity.

Wear safety glasses and a dust protection mask!
- Avoid drilling paints containing lead or other substances hazardous to health.
- Do not drill or abrade materials containing asbestos. Asbestos is a known carcinogen.
- Do not drill moist materials or damp surfaces.
- When working with electrical tools, hold them firmly in both hands and make sure that your footing is secure.
Using both your hands to hold electrical tools ensures safer operation of them.
If the inserted tool jams, switch off the electrical power tool immediately. Be prepared for high reaction torques as they may cause kickback.
■ Always keep the device clean, dry and free of oil or grease. - Only handle the electrical tool by means of the insulated handling surfaces when you are carrying out jobs where the insertion tool may come into contact with hidden power supply lines or its own power cable. Contact with a live electrical wire also makes metal parts of the electrical tool live and leads to electric shock.
- Keep your workplace clean and tidy.
Mixing materials is particularly dangerous. Dust from light metals can burn or explode. - Wait until the electrical tool has come to a standstill before putting it down.
The insertion tool could get caught up in something and this may lead to control of the electrical tool being lost.
- Caution utility services!
⚠️ DANGER! Ensure that you do not strike electrical cables, gas or water pipes when you are working with the electrical power tool. Check a wall using a suitable detector before you drill or cut slots.
●Originalaccessories/attachments
Use only the accessories and attachments detailed in the operating instructions.
The use of inserted tools or accessories other than those recommended in the operating instructions could lead to you suffering an injury.
- Before first use
WARNING! DANGER OF INJURY!
Switch the device off and pull the plug out of the mains socket before carrying out any work on the device.
- Attaching the auxiliary handle
NOTE: For safety reasons this tool must always be used with the auxiliary handle 10 in place.
☐ Turn the wing screw 9 anti-clockwise and swivel the additional handle 10 into the desired position.
☐ Then tighten the wing screw 9 again.
- Using the depth stop
Open the wing screw 9.
☐ Make sure that the toothing on the depth stop 8 is pointing downwards.
☐ Pull the depth stop 8 out as far as necessary so that the distance between the tip of the drill and the tip of the depth stop corresponds to the desired drilling depth.
□ Firmly tighten the wing screw 9.
- Inserting tools
Quick-action drill chuck:
☐ Take firm hold of the back casing 3 of the quick-action drill chuck 1 and turn the front casing 2 until the tool can be inserted.
□ Insert the tool.
Take firm hold of the back casing 3 of the quick-action drill chuck 1 and turn the front casing 2 firmly shut.
Assembly tools for screws and nuts:
☐ When using screwdriver bits, always use a universal bit holder.
To screw things in, always switch the changeover switch "drill/percussion drill" 4 to the right to position.
- First use
- Switching on and off
When operating the hammer-action drill you can select between intermittent or continuous operation mode. In either mode the device functions as follows:
To switch on intermittent operation mode:
☐ Press the ON / OFF switch 6.
To switch off intermittent operation mode:
☐ Release the ON / OFF switch 6.
Switching continuous operation on:
☐ Press and hold the ON / OFF switch 6 down and press the locking button 5.
To switch off continuous operation mode:
☐ Press and then release the ON / OFF switch 6.
●Infinitelyadjustable speed setting
The ON/OFF switch 6 has a variable speed control.
☐ Pressing the ON / OFF switch 6 increases the speed.
- Setting the direction of rotation
□ With the rotational direction switch 7 you can change the rotational direction of the electrical tool.
NOTE: This is, however, not possible when the ON/OFF switch 6 is pressed down.
NOTE: Hold the appliance in the direction of work.
Clockwise rotation:
☐ Push the rotational direction switch 7 to the right in order to drill and to screw in screws.
Anticlockwise rotation:
☐ Push the direction of rotation switch 7 to the left to slacken a screw or screw it out.
- Switching between drilling / hammer-action
Note: The hammer-action drilling mode is intended for drilling into brick, concrete and stone only.
Note: The drill / hammer-action switch 4 must only be moved after the device has come to a standstill.
Drilling:
☐ Set the drill / hammer-action switch 4 to the right into the 12 position.
Impact drilling:
☐ Set the drill / hammer-action switch 4 to the left into the T position.
● Servicing and cleaning
WARNING! DANGER OF INJURY!
Switch the device off and pull the plug out of the mains socket before carrying out any work on the device.
☐ Do not allow any liquids to enter the device. Use a cloth to clean the device.
□ Clean the device after you have finished using it.
☐ Do not under any circumstances use petrol or strong solvents.
□ Store the device in a dry room.
● Service centre
WARNING! Have your device repaired only by qualified specialist personnel using original manufacturer parts only.
This will ensure that your device remains safe to use.
WARNING! If the plug or mains lead needs to be replaced, always have the replacement carried out by the manufacturer or his service centre. This will ensure that your device remains safe to use.
- Warranty
The warranty for this appliance is for 3 years from the date of purchase. The appliance has been manufactured with care and meticulously examined before delivery. Please retain your receipt as proof of purchase. In the event of a warranty claim, please make contact by telephone with our Service Department. Only in this way can a post-free despatch for your goods be assured.
The warranty covers only claims for material and manufacturing defects, but not for transport damage, for wearing parts or for damage to fragile components, e.g. buttons or batteries. This product is for private use only and is not intended for commercial use.
The warranty is void in the case of abusive and improper handling, use of force and internal tampering not carried out by our authorized service branch. Your statutory rights are not restricted in any way by this warranty.
The warranty period will not be extended by repairs made unter warranty. This applies also to replaced and repaired parts. Any damage and defects extant on purchase must be reported immediately after unpacking the appliance, at the latest, two days after the purchase date. Repairs made after the expiration of the warranty period are subject to payment.
GB Service Great Britain
Tel.: 0871 5000 720 (0,10 GBP/Min.)
e-mail: kompernass@lidl.co.uk
IAN 78322
- Disposal

The packaging is wholly composed of environmentally-friendly materials that can be disposed of at a local recycling centre.

Do not dispose of electrical power tools with the household rubbish!
In accordance with European Directive 2002 / 96 / EC, worn out electrical power tools must be collected separately and taken for environmentally compatible recycling.
Contact your local refuse disposal authority for more details of how to dispose of your worn-out devices.
- Declaration of conformity / Producer €
We, Kompernaß GmbH, the person responsible for documents: Mr Semi Uguzlu, Burgstr. 21, D-44867 Bochum, Germany, hereby declare that this product complies with the following standards, normative documents and EU directives:
Machinery Directive (2006/42/EC)
EU Low Voltage Directive (2006/95/EC)
Electromagnetic Compatibility (2004/108/EC)
Applicable harmonized standards
EN 60745-1/A11:2010
EN 60745-2-1:2010
EN 55014-1/A2:2011
EN 55014-2/A2:2008
EN 61000-3-2/A2:2009
EN 61000-3-3:2008
Type / Description of product:
Impact drill PSBM 500 A1
Date of manufacture (DOM): 08-2012
Serial number: IAN 78322
Bochum, 31.08.2012

Semi Uguzlu
- Quality Manager -
We reserve the right to make technical modifications in the course of further development.
KOMPERNASS GMBH
Burgstraße21
D-44867Bochum
© by ORFGEN Marketing
Version des informations · Stand van de informatie


- PERCEUSE A PERCUSSION PSBM 500 A1
- PERCEUSE A PERCUSSION
- FR BE
- Introduction
- - Introduction
- WAARSCHUWING! Lees alle veilig-
- WAARSCHUWING! GIFTIGE STOFFEN!
- WAARSCHUWING! GEVAAR VOOR
- General safety advice for electrical power tools
- Before first use
- First use
- Servicing and cleaning......Page 41
- Service centre Page 42
- Warranty Page 42
- Disposal Page 42
- Declaration of conformity / Producer......Page 43
- Impact drill PSBM 500 A1
- - Proper use
- Features
- Included items
- - Technical data
- Noise and vibration data:
- Wear ear protection!
- Impact drilling in concrete:
- Drilling in metal:
- Keep all the safety advice and instructions in a safe place for future reference!
- Workplace safety
- inflammable liquids, gases or dusts.
- Electrical safety
- Personal safety
- Careful handling and use of electrical power tools
- Service
- Safety advice for hammer-action drills
- WARNING! HAZARDOUS DUSTS!
- ●Originalaccessories/attachments
- Use only the accessories and attachments detailed in the operating instructions.
- - Before first use
- WARNING! DANGER OF INJURY!
- - Attaching the auxiliary handle
- - Using the depth stop
- - Inserting tools
- Quick-action drill chuck:
- Assembly tools for screws and nuts:
- - First use
- - Switching on and off
- To switch on intermittent operation mode:
- To switch off intermittent operation mode:
- Switching continuous operation on:
- To switch off continuous operation mode:
- ●Infinitelyadjustable speed setting
- - Setting the direction of rotation
- Clockwise rotation:
- Anticlockwise rotation:
- - Switching between drilling / hammer-action
- Drilling:
- Impact drilling:
- ● Servicing and cleaning
- ● Service centre
- - Warranty
- - Disposal
- - Declaration of conformity / Producer €
- Applicable harmonized standards
- Type / Description of product:
- Date of manufacture (DOM): 08-2012
Brand : PARKSIDE
Model : PSBM 500 A1
Category : Drill