
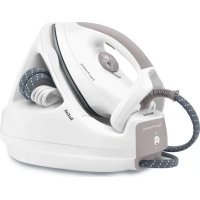
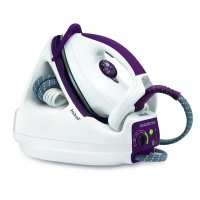
FV5350E0 - Iron press TEFAL - Free user manual and instructions
Find the device manual for free FV5350E0 TEFAL in PDF.
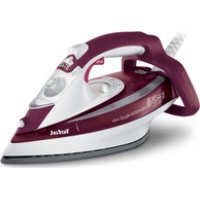
| Product type | Steam iron (steam iron) |
| Brand | Tefal |
| Model | FV5350E0 |
| Power supply | 220-240 V |
| Soleplate type | Autoclean Catalys® (depending on model) or Ultragliss (depending on model) |
| Anti-scale system | Removable anti-scale rod + self-cleaning |
| Steam function | Constant steam with Power Zone trigger |
| Spray function | Dampening laundry |
| Vertical steaming | Yes |
| Dry ironing | Yes |
| Auto-Stop safety | Automatic shut-off after 8 min on heel or 30 s on soleplate (depending on model) |
| Anti-drip function | Yes (depending on model) |
| Iron rest | Extra Stable Heel |
| Cord management | Easycord system (winding) |
| Recommended water type | Tap water, 50/50 mix with demineralized water if very hard water |
| Soleplate maintenance | Clean with soft damp cloth on warm soleplate |
| Anti-scale rod maintenance | Monthly soak in white vinegar or lemon juice (4 hours) |
| Self-cleaning | Monthly Self Clean recommended |
| Usage | Household use only |
Frequently Asked Questions - FV5350E0 TEFAL
User questions about FV5350E0 TEFAL
0 question about this device. Answer the ones you know or ask your own.
Ask a new question about this device
Download the instructions for your Iron press in PDF format for free! Find your manual FV5350E0 - TEFAL and take your electronic device back in hand. On this page are published all the documents necessary for the use of your device. FV5350E0 by TEFAL.
USER MANUAL FV5350E0 TEFAL
natural_image
Black and white image of a Tefal iron iron with visible brand logo and handle (no text or symbols on the device itself)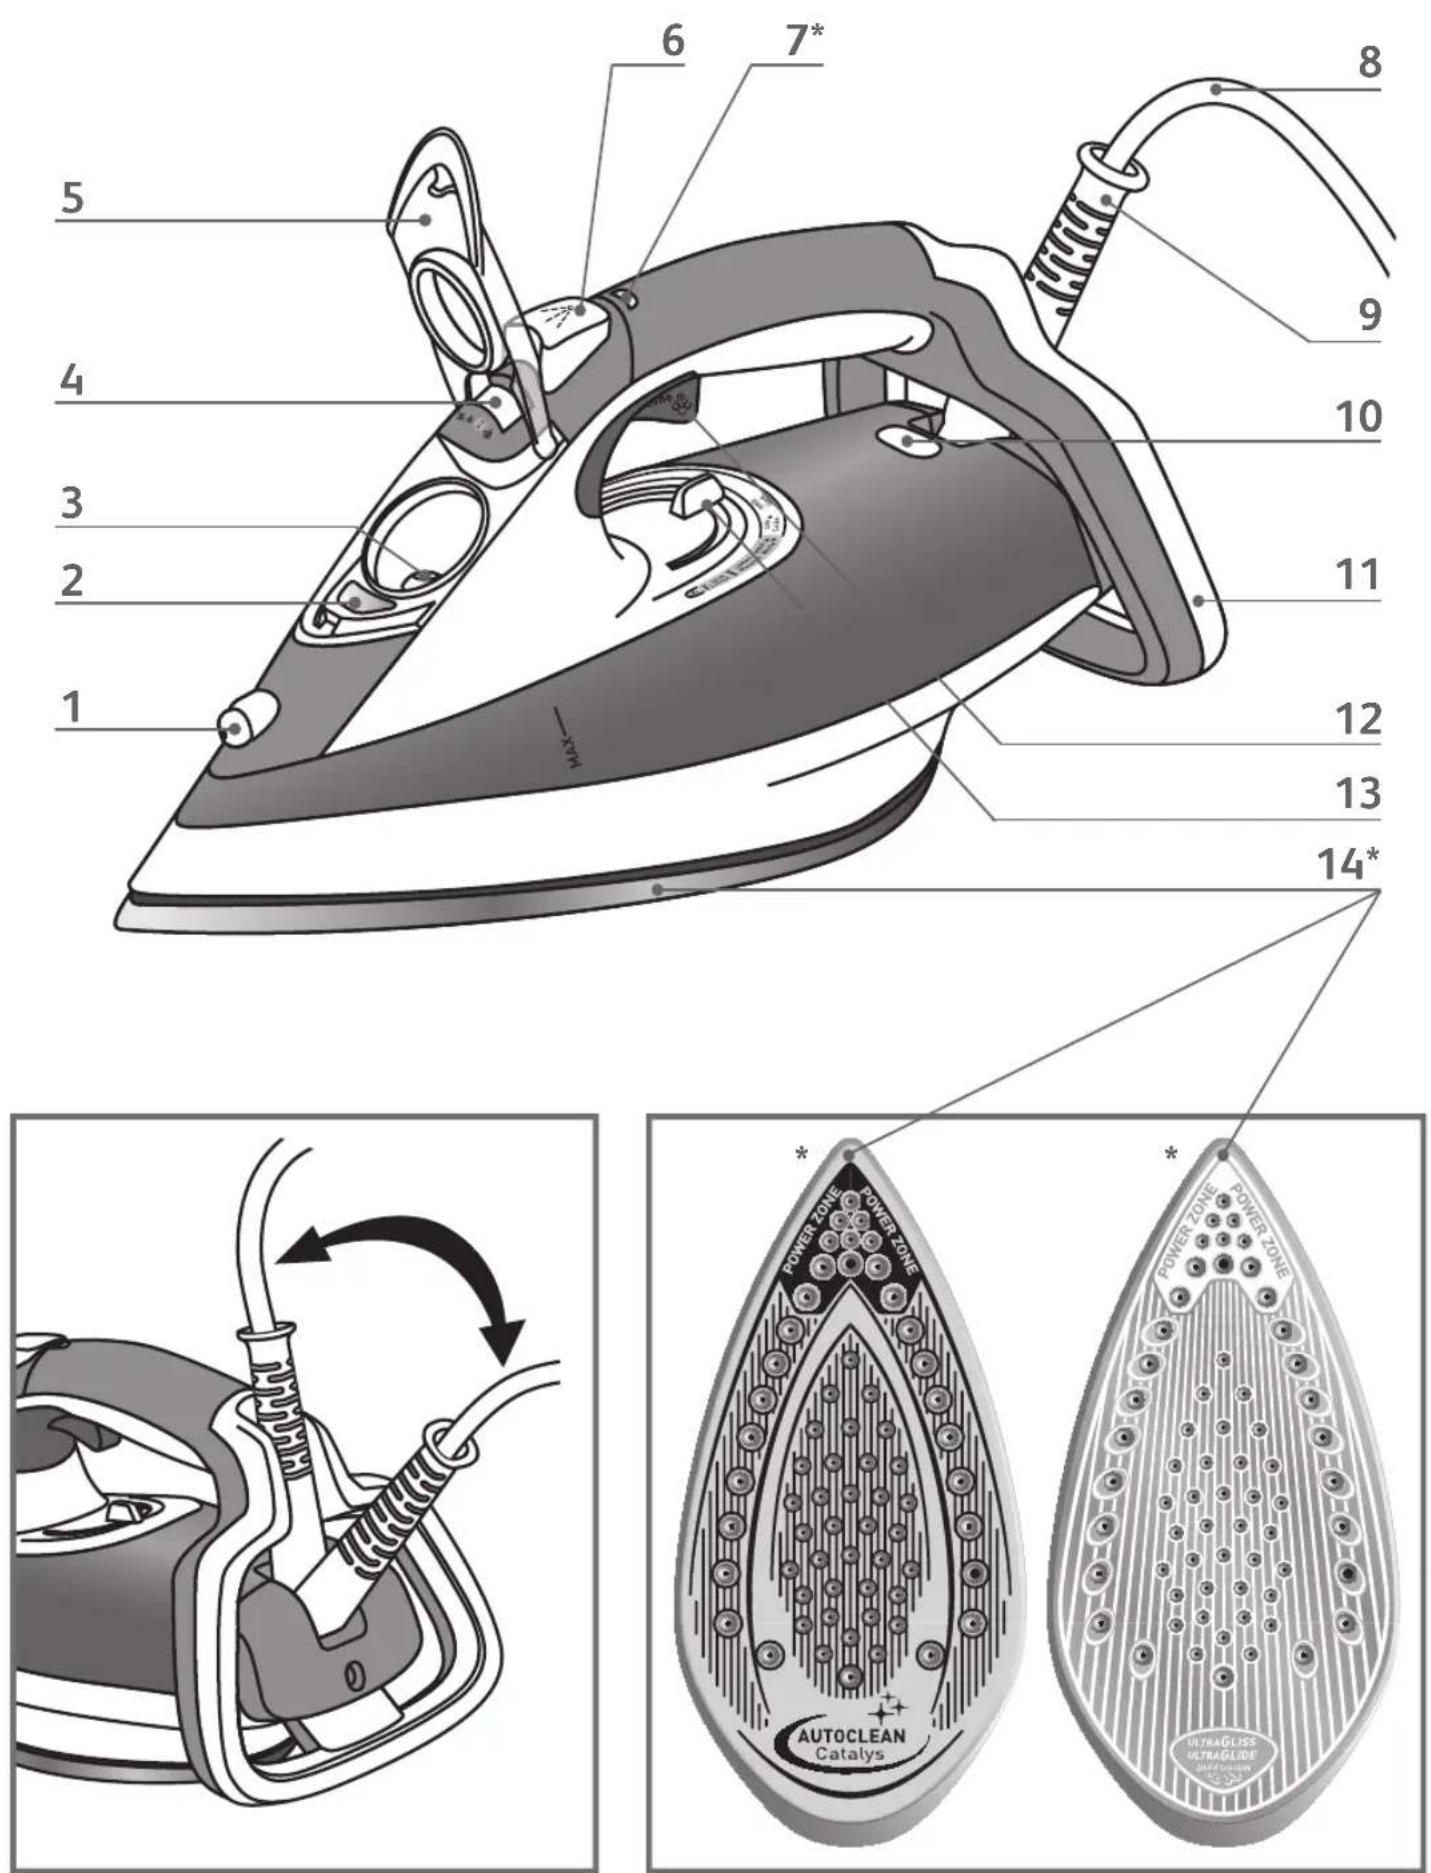
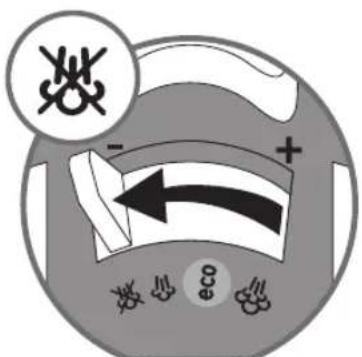
fig.1 fig.2 fig.3 fig.4
natural_image
Diagram of a mechanical component with an arrow indicating rotational motion (no text or symbols)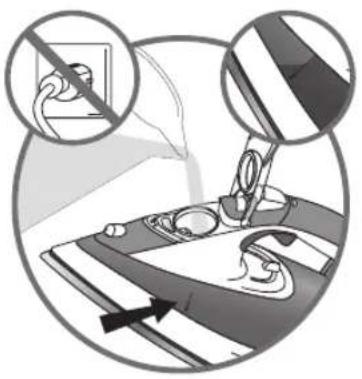
natural_image
Illustration of a hand using a tool to interact with a device, showing no text or symbols present.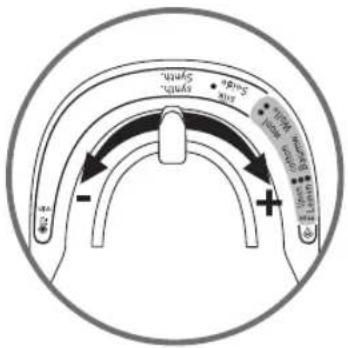
natural_image
Circular grayscale illustration of a car with a lightning bolt inside, no text or symbols presentfig.5 fig.6 fig.7 fig.8
natural_image
Illustration of a person using a tool to lift a smoke from a steam iron, enclosed in a circular frame (no text or symbols)fig.9 fig.10 fig.11 fig.12
natural_image
Illustration of a hand using a tool to adjust or install a mechanical component, with no visible text or symbols.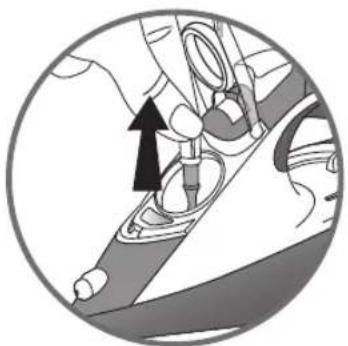
natural_image
Mechanical assembly diagram showing a hand operating a tool with an arrow indicating direction (no text or symbols present)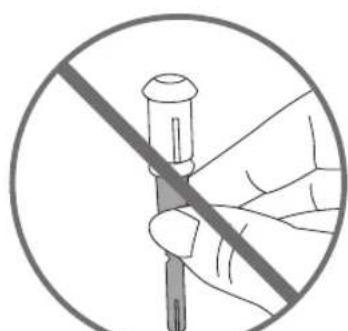
natural_image
Illustration of a hand holding a screwdriver against a diagonal line (no text or symbols)fig.13 fig.14 fig.15 fig.16
natural_image
Illustration of a person using a steam iron to clean or wear the air (no text or symbols visible)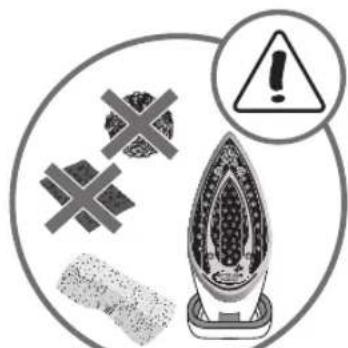
fig.17 fig.18 fig.19
natural_image
Illustration of a steam iron inside a circular frame with directional arrows indicating motion (no text or symbols)For your safety
- Read the instructions carefully before using your appliance for the first time and retain for future reference.
- This appliance complies with the technical rules and standards for safety currently in force (Electromagnetic Compatibility, Low Voltage, environment).
- This appliance is not intended for use by persons (including children) with reduced physical, sensory or mental capabilities, or lack of experience and knowledge, unless they have been given supervision or instruction concerning use of the appliance by a person responsible for their safety.
- Children should be supervised to ensure that they do not play with the appliance.
- Warning! The voltage of your electrical installation must correspond to that of the iron (220V-240V). Connecting to the wrong voltage may cause irreversible damage to the iron and will invalidate the guarantee.
- This iron must always be plugged into an earthed socket. If using a mains extension lead, ensure that it is correctly rated (16A), with an earth.
- If the electrical cord becomes damaged, it must be immediately replaced by an Approved Service Centre to avoid any danger.
- The appliance should not be used if it has fallen, if it has obvious damage, if it leaks or does not operate correctly. Never dismantle your appliance: have it inspected by an Approved Service Centre, so as to avoid any danger.
- Never immerse your iron in water!
- Do not unplug your appliance by pulling on the cord. Always unplug your appliance: before filling or rinsing the water tank, before cleaning it, after each use.
- Never leave the appliance unattended when it is connected to a power source; if it has not cooled down for approximately 1 hour.
- Your appliance gives off steam, which may cause burns, especially when you are ironing on a corner or edge of the ironing board. Never direct the steam towards people or animals.
- Your iron should be used and placed on a stable surface. When you put your iron onto its iron rest, make sure that the surface on which you put it is stable.
- This product has been designed for domestic use only. Any commercial use, inappropriate use or failure to comply with the instructions, the manufacturer accepts no responsibility and the guarantee will not apply.
Environment protection first!
i Your appliance contains valuable materials which can be recovered or recycled.
Leave it at a local civic waste collection point.

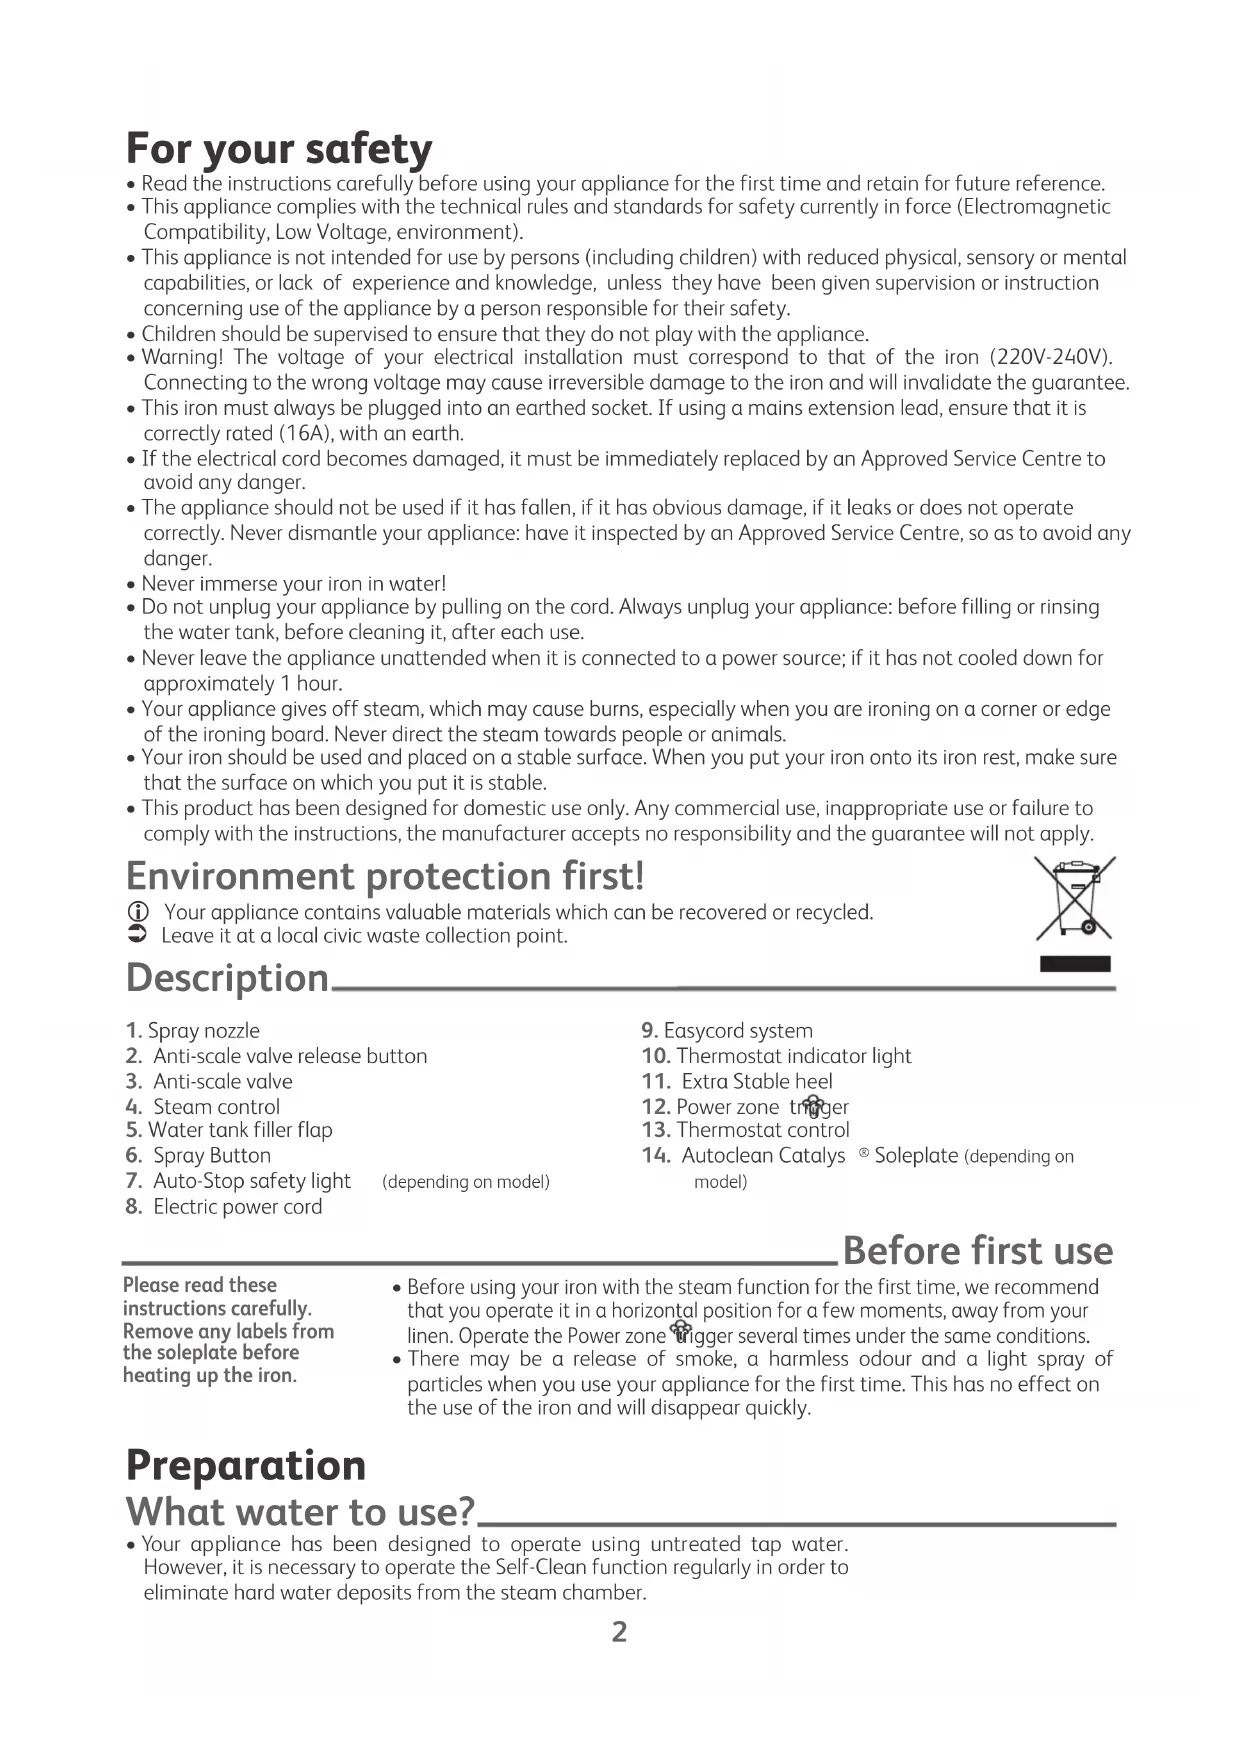
Description
- Spray nozzle
- Anti-scale valve release button
- Anti-scale valve
- Steam control
- Water tank filler flap
- Spray Button
- Auto-Stop safety light (depending on model)
-
Electric power cord
-
Easycord system
- Thermostat indicator light
- Extra Stable heel
- Power zone trigger
- Thermostat control
- Autoclean Catalys ^® Soleplate (depending on model)
Before first use
Please read these instructions carefully. Remove any labels from the soleplate before heating up the iron.
- Before using your iron with the steam function for the first time, we recommend that you operate it in a horizontal position for a few moments, away from your linen. Operate the Power zone trigger several times under the same conditions.
- There may be a release of smoke, a harmless odour and a light spray of particles when you use your appliance for the first time. This has no effect on the use of the iron and will disappear quickly.
Preparation
What water to use?
- Your appliance has been designed to operate using untreated tap water. However, it is necessary to operate the Self-Clean function regularly in order to eliminate hard water deposits from the steam chamber.
- Never use water containing additives (starch, scents, softeners, etc.), or water produced by condensation (e.g. water from tumble-driers, refrigerators, air conditioners, rain water). The types of water contain organic waste or mineral elements that can cause spitting, brown staining, or premature wear of the appliance.
If your water is very hard, it is possible to mix tap water with store-bought distilled or demineralised water in the following proportions:
- 50% tap water,
- 50% distilled or demineralised water.
Filling the water tank
Fill the tank up to the "MAX".
Never fill the appliance by holding it directly under the tap.
Do not remove the anti-scale valve to fill the water tank.
- Unplug your iron before filling it.
- Set the steam control to fig.1.
• Take the iron in one hand and tilt it slightly, with the point uppermost. - Open the water tank lid – fig.2.
- Fill the tank up to the "MAX" line – fig.3.
- Close the flap of the water tank.
Use
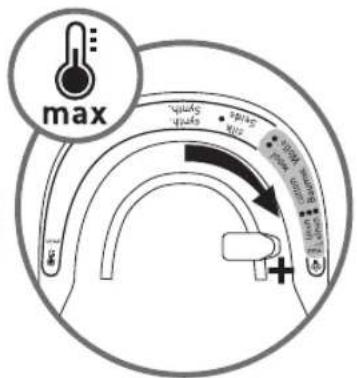
Adjust the temperature and the steam
- Set the thermostat control – fig.4, referring to the table below.
- The thermostat light comes on. It will go out when the soleplate is hot enough – fig.5.
| FABRIC | POSITION OF THERMOSTAT CURSOR | STEAM SETTING POSITION |
| LINEN COTTON WOOL |  |    |
| SILK / SYNTHETIC (Polyester, Acetate, Acrylic, Nylon) | ● |  |
RECOMMENDATIONS
- Select setting and save 20% energy compare with the maximum position.
- Your iron heats up quickly: so begin by ironing fabrics that are ironed at low temperatures first, then go on to those requiring a higher temperature,
- If you turn down the thermostat, wait until the thermostat light comes back on before beginning to iron again,
- When ironing fabrics with mixed fibres, set the ironing temperature for the most delicate fibre. For delicate fabrics we recommend testing the fabric first on an inconspicious place eg (inside the hem).

= STEAM ZONE
In order to avoid water dripping from the iron onto the linen:
- Turn off the steam when ironing silk or synthetic fabrics.
- Set it at the minimum position for wool.
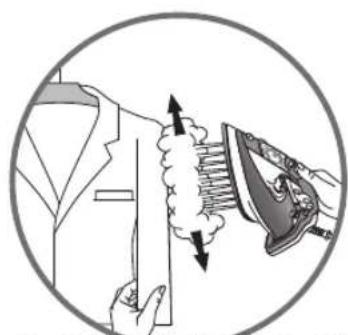
Spray Function (spray)
Make sure that there is water in the tank before using this button.
- Whether steam or dry ironing, you are able to use the spray button to dampen laundry to remove stubborn creases – fig.6.
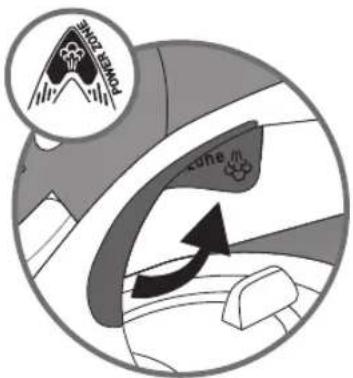
Obtain more steam
- Turn the thermostat to "MAX" or "●●●".
- Operate the Power zone trigger from time to time – fig.7.
- To avoid drips, leave an interval of a few seconds between operations.
.Vertical steam ironing
Hold the iron a few centimetres from the fabric to avoid burning delicate fabrics.
Every five pulses return the iron to a horizontal position.
- Hang the garment on a hanger and hold the fabric slightly taut with one hand. The steam is very hot, so you should always do this with the garment on a hanger – never iron clothes which someone is wearing.
- Set the thermostat control to "MAX" – fig.8.
- Operate the Power zone 📋 trigger by pulsing – fig.7 moving the iron from top to bottom – fig.9.
Dry ironing
- Set the temperature for the fabric to be ironed.
- Set the steam control to fig.1.
- You may start ironing when the thermostat light goes out.
Extra Functions
Autoclean Catalys® Soleplate (depending on model)
- Your iron is equipped with a self-cleaning soleplate which works by catalysis.
- Its exclusive coating helps continuously eliminate all the impurities generated by normal use.
- It is recommended that you always stand your iron on his heel to preserve its self-cleaning coating.
Integral anti-scale system
Your iron is equipped with an integral anti-scale system. This system will help to provide:
- a better ironing quality with a constant flow of steam,
- lasting performance from your appliance.
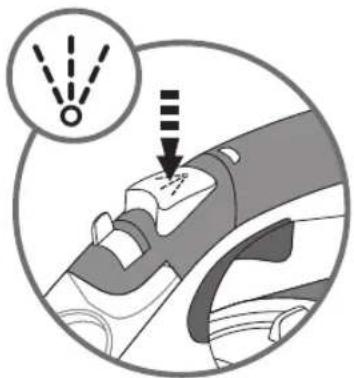
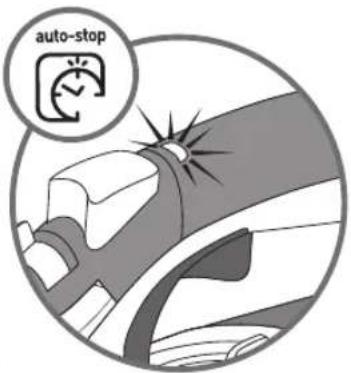
Auto-Stop safety feature (depending on model).
The auto-stop light will be lit during normal use!
- The electronic system cuts off the electric power and the Auto-Stop warning light flashes if the iron is left vertically on its heel for more than 8 minutes, or in a horizontal position for more than 30 seconds – fig.10.
• To restart the iron, just move it gently until the warning light stops flashing.
Anti-drip function (depending on model)
- When the iron is no longer hot enough to produce steam, the water feed will stop automatically to avoid dripping.
Maintenance and cleaning
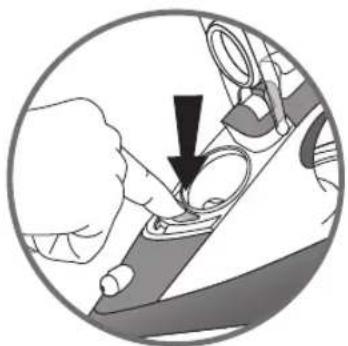
Cleaning the anti-scale valve (once a month).
- Unplug your iron and empty the water tank.
- Adjust the steam setting to "Eco".
- To remove the anti-scale valve, open the water tank lid and press the release button – fig.11 and then pull the valve upwards – fig.12.
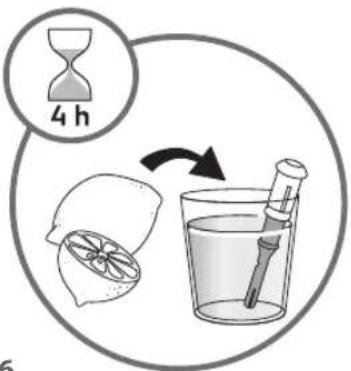
- Soak the valve in a cup of white spirit vinegar or plain lemon juice for 4 hours – fig.14.
- Rinse the valve under running water.
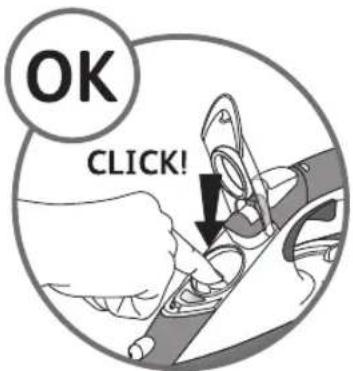
- Replace the anti-scale valve; press until it clicks in to place – fig.15.
Be careful!
- Never touch the end of the valve – fig.13.
- The iron will not function without the anti-scale valve.
Self-cleaning
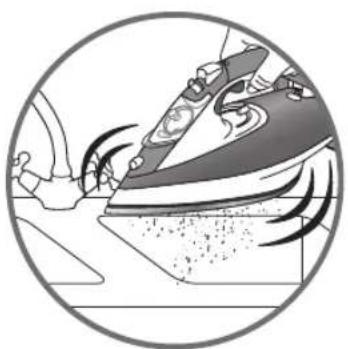
The self-cleaning function helps to slow down scaling in your iron.
In order to extend the life of your iron, use the Self-Cleaning function once a month.
- Fill the tank of your iron with untreated tap water. Stand the iron on it's heel with the thermostat set to "Max" and heat it up.
- When the thermostat light goes out, unplug the iron and hold it in a horizontal position, over a sink. Remove the anti-scale valve – fig.11-12 (see previous chapter).
- Shake the iron gently, over the sink, until some of the water in the water tank (with the impurities) has flowed out through the soleplate – fig.16.
- At the end of the operation, replace the anti-scale valve; press it in until it clicks – fig.15.
- Plug the iron back in and leave it resting on its heel for two minutes to dry the soleplate.
- Clean the soleplate with a damp, non-metallic cloth while it is still warm.
Cleaning the soleplate
Your steam iron is fitted with a self-cleaning soleplate (depending on model):
- The exclusive active coating helps continuously eliminate all the impurities generated by the normal day-to-day use of the iron.
- However, if you iron using an unsuitable programme, some traces may be left which require manual cleaning. In this case, it is recommended that
Attention!
The use of a scouring pad will cause damage to your soleplate's self-cleaning (depending on model) coating – fig.17.
you use a soft damp cloth on the warm soleplate, in order not to damage the surface.
Your steam iron is fitted with an Ultraglide soleplate (depending on model):
- Clean the soleplate with a damp, non-metallic cloth while it is still warm.
Never use aggressive or abrasive products.
.Storing your iron
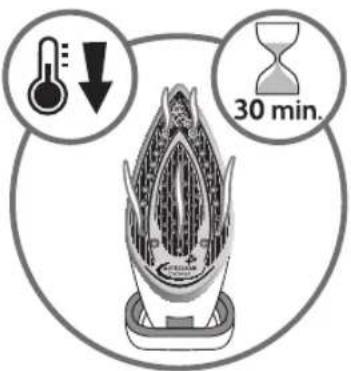
- Unplug the iron and wait for the soleplate to cool down – fig.18.
- Empty the water tank and set the steam control to .A little water may remain in the tank.
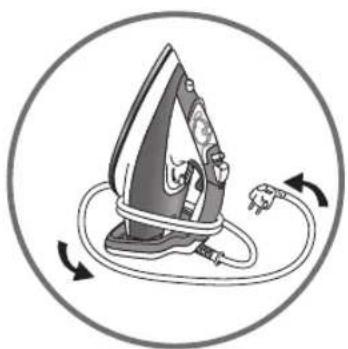
- Wind the cord around the heel at the back of the iron. Store the iron on its heel – fig.19.
If there is a problem
| PROBLEM POSSIBLE CAUSES SOLUTIONS | ||
| Water drips from the holes in the soleplate. | The chosen temperature is too low and does not allow for the formation of steam. | Position the thermostat in the steam range (from •• to MAX). |
| You are using steam while the iron is not hot enough. | Wait until the thermostat light goes out. | |
| You are using the Power zone trigger too often. | Wait a few seconds between each use of the Power zone button. | |
| There is too much steam. Reduce the steam. | ||
| You have stored the iron horizontally, without emptying it and without setting it to 🌿 | See the section "Storing your iron". | |
| The anti-scale valve is not fully inserted. Rep | ace the anti-scale valve: press down until it clicks into place. | |
| Brown streaks come through the holes in the soleplate and stain the linen. | You are using chemical descaling agents. Do | not add any descaling agents to the water in the water tank. |
| You are not using the right type of water. Per | form a self-cleaning operation and consult the section "What water to use?" | |
| Fabric fibres have accumulated in the holes of the soleplate and are burning. | Perform the self-cleaning operation and clean the soleplate with a damp sponge. Vacuum the holes of the soleplate from time to time. | |
| The soleplate is dirty or brown and can stain the linen. | You are ironing with an inappropriate setting (temperature too high). | Clean the soleplate as indicated above. Select the appropriate setting. |
| Your linen has not been rinsed sufficiently or you are using starch. | Clean the soleplate as indicated above. Always spray starch onto the reverse side of the fabric to be ironed. | |
| There is little or no steam. | The water tank is empty. Fill the water tank. | |
| The anti-scale valve is dirty. Clean the anti-scale valve. | ||
| Your iron has a build-up of scale. Clean the anti-scale valve and carry out a selfclean. | ||
| Your iron has been used dry for too long. Carry out a self-clean. | ||
| The soleplate is scratched or damaged. | You have placed your iron flat on a metallic rest-plate or ironed over a zip. You have cleaned your soleplate with an abrasive or metal pad. | Always set your iron on its heel. Try to avoid ironing over zips. Refer to the chapter "Clean the soleplate". |
| Your soleplate is releasing particles. | Scale is building up on the soleplate. | Carry out a self-clean operation. |
| Water is running out of the water tank flap. | You have not closed the water tank flap properly. | Check that the water tank flap is locked properly. |
| Steam or water leak from the iron as you finish filling the tank. | The steam control is not set to the position. | Check that the steam control is set to the position. |
| The spray does not spray. | There is not enough water in the water tank. | Fill up the water tank. |
Für Ihre Sicherheit
Autoclean Catalys Taban® (modeline göre)
= PRASOWANIE PRZY UŻYCIU PARY


- For your safety
- Environment protection first!
- Description
- Before first use
- Preparation
- What water to use?
- Filling the water tank
- Use
- Adjust the temperature and the steam
- RECOMMENDATIONS
- Spray Function (spray)
- Obtain more steam
- .Vertical steam ironing
- Dry ironing
- Extra Functions
- Autoclean Catalys® Soleplate (depending on model)
- Integral anti-scale system
- Auto-Stop safety feature (depending on model).
- Anti-drip function (depending on model)
- Maintenance and cleaning
- Cleaning the anti-scale valve (once a month).
- Self-cleaning
- Cleaning the soleplate
- Your steam iron is fitted with an Ultraglide soleplate (depending on model):
- .Storing your iron
- Für Ihre Sicherheit
- Autoclean Catalys Taban® (modeline göre)
Brand : TEFAL
Model : FV5350E0
Category : Iron press