
Ultimate Autoclean FV9545 - Iron press TEFAL - Free user manual and instructions
Find the device manual for free Ultimate Autoclean FV9545 TEFAL in PDF.
| Product type | Steam iron press |
| Brand | Tefal |
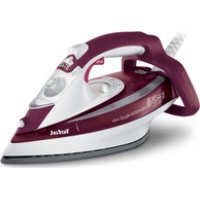
| Model | Ultimate Autoclean FV9545 |
| Water tank capacity | 350 ml |
| Power | Not specified |
| Thermostat | Autosteam Control with 8 programs |
| Anti-scale system | Integrated Anti-Calc Plus system with removable anti-scale rod |
| Anti-drip function | Yes, integrated into Autosteam Control |
| Automatic safety shut-off | Yes (8 min on heel, 30 sec flat) |
| Soleplate | Self-cleaning (Autoclean Catalys or Ultragliss depending on model) |
| Vertical steam | Yes, for steaming hanging clothes |
| Spray | Yes, for dampening laundry |
| Super press | Yes, delivers an extra burst of steam |
| Anti-slip heel | Yes, extra large heel with anti-slip pad |
| Recommended maintenance | Monthly cleaning of the anti-scale rod and self-cleaning |
Frequently Asked Questions - Ultimate Autoclean FV9545 TEFAL
User questions about Ultimate Autoclean FV9545 TEFAL
0 question about this device. Answer the ones you know or ask your own.
Ask a new question about this device
Download the instructions for your Iron press in PDF format for free! Find your manual Ultimate Autoclean FV9545 - TEFAL and take your electronic device back in hand. On this page are published all the documents necessary for the use of your device. Ultimate Autoclean FV9545 by TEFAL.
USER MANUAL Ultimate Autoclean FV9545 TEFAL
1 Spray
2 Thermostat indicator
3 Antiscale valve grip
4 Dry/Steam control
5 Spray Button
6 Shot of Steam Button
7 Auto-Stop safety warning light (depending on model)
8 Gel comfort handle (depending on model)
9 Electric power cord
10 Extra-large heel with non-slip pad
11 Opening button to water tank
12 Integral anti-scale system
13 Thermostat indicator light
14 Autosteam Control Thermostat
15 Gliss/Glide Protect™ autoclean soleplate (according to model)Ultraglide Diffusion soleplate (according to model) Autoclean Catalys soleplate (according to model)
16 Water tank filler hole
EN
Before using for the first time
Warning!
Remove any labels from the soleplate before heating up the iron (depending on model).
Warning! Before using your iron with the steam function for the first time, we recommend that you operate it in a horizontal position for a few moments, away from your linen, i.e. press the Shot of Steam button a few times.
During the first few uses, a harmless odour and a small amount of smoke may be given off.
This has no effect on the use of the iron and will disappear quickly.
What water to use?
Your appliance has been designed to function with untreated tap water. However, it is necessary to operate the Self-Clean function regularly in order to eliminate hard water deposits from the steam chamber.
If your water is very hard (check with your local water authority), it is possible to mix tap water with store-bought distilled or demineralised water in the following proportions: - 50% tap water, - 50% distilled or demineralised water.
Types of water not to use?
Heat concentrates the elements contained in water during evaporation. The types of water listed below contain organic waste or mineral elements that can cause spitting, brown staining, or premature wear of the appliance: water from dothes dryers, scented or softened water, water from refrigerators, batteries or air conditioners, pure distilled or demineralised water or rain water should not be used in your Tefal iron. Also do not to use boiled, filtered or bottled water.
Use
Steam ironing
-
Filling the water tank
-
Unplug your iron before filling it.
-
Set the steam control to DRX - fig. 1.1.
-
Take the iron in one hand and tilt it slightly, so that you can see the water tank filling fige 3.
- To open the water tank, press the button. 2.
- Fill the water tank fig. 3 up to the mark "MAX". The mark MAX corresponds to a capacity of 350ml
- Close the water tank cover until you hear a click. 4.
-
You can now plug in your iron.
-
Choose your ironing programme
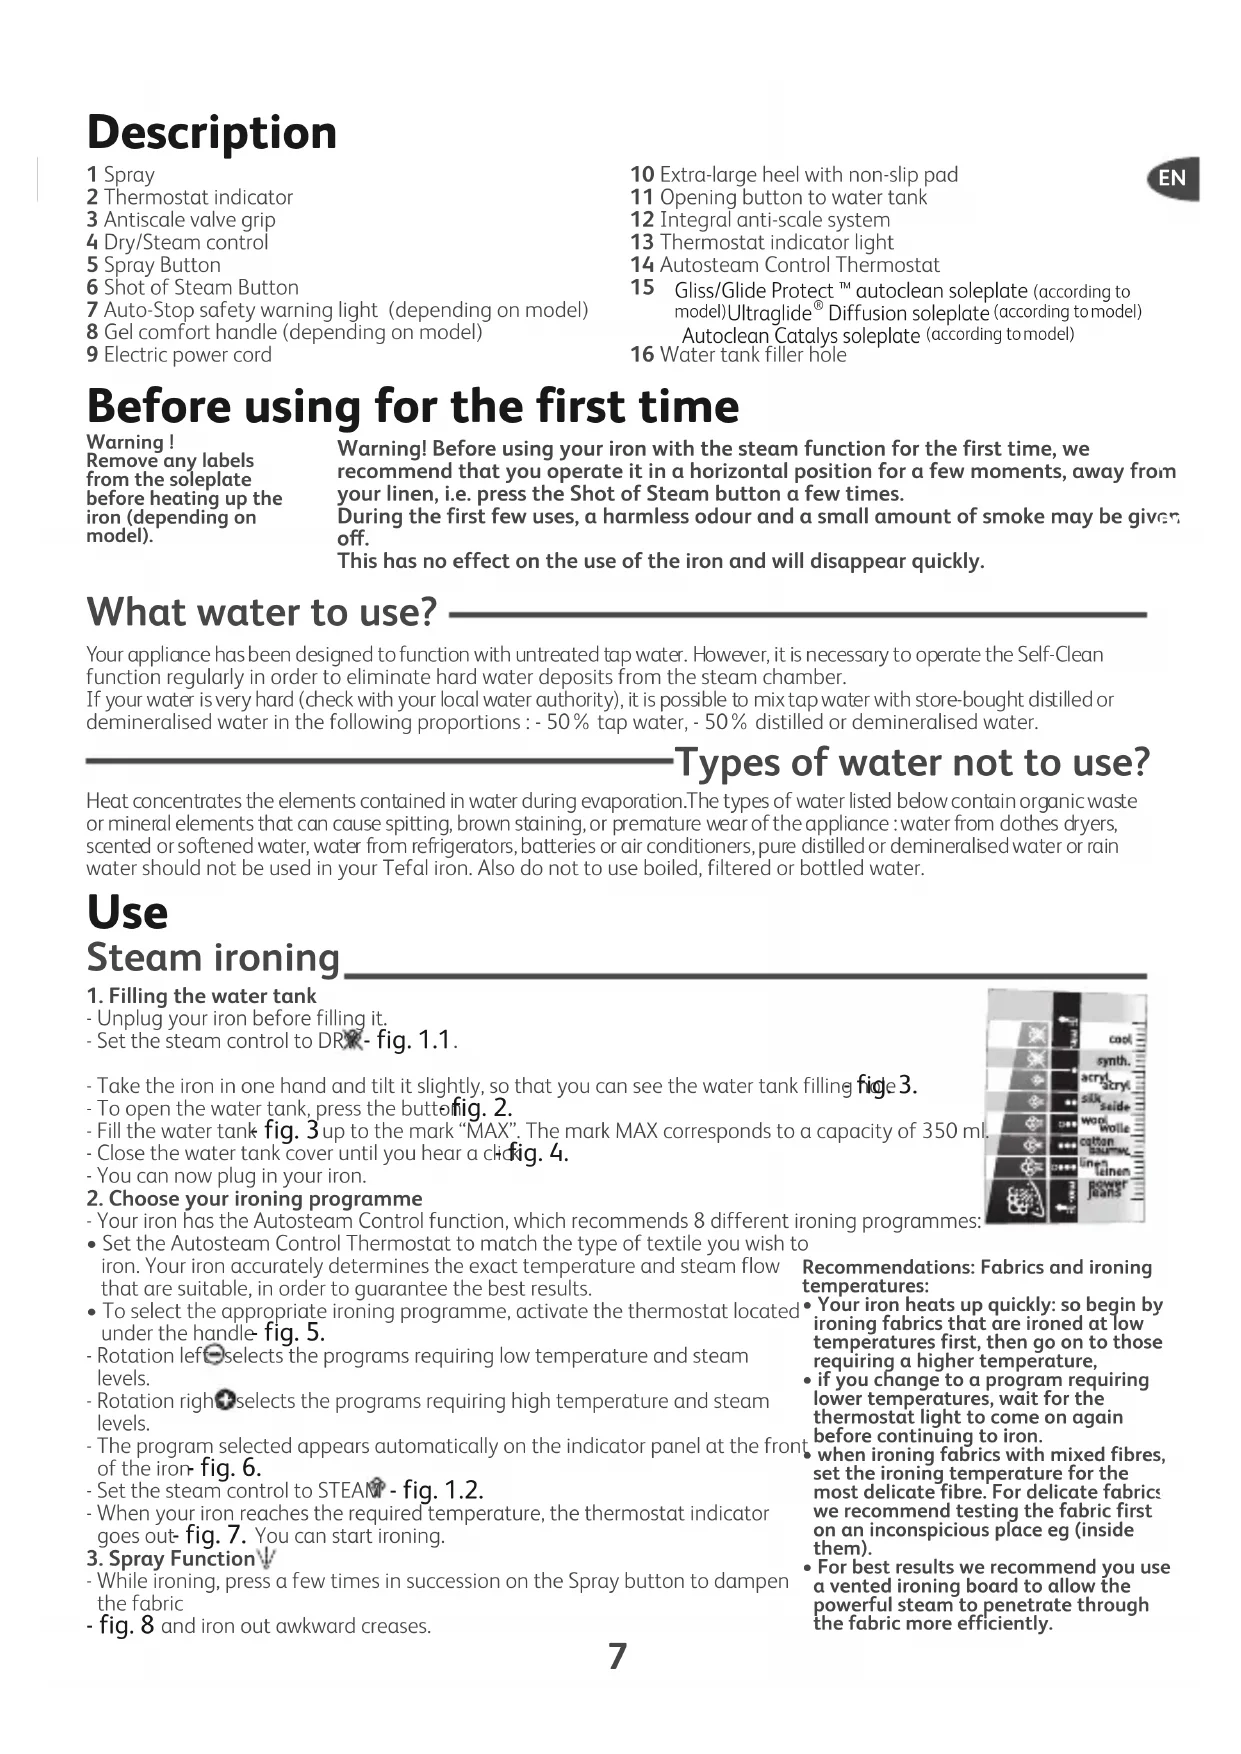
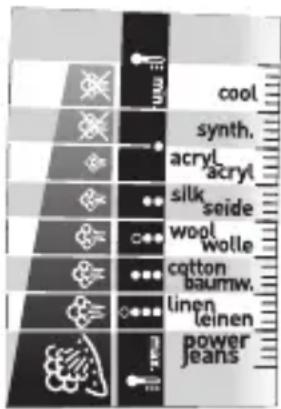
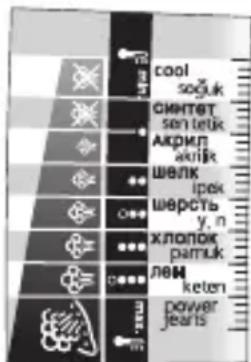
- Your iron has the Autosteam Control function, which recommends 8 different ironing programmes:
- Set the Autosteam Control Thermostat to match the type of textile you wish iron. Your iron accurately determines the exact temperature and steam flow that are suitable, in order to guarantee the best results.
- To select the appropriate ironing programme, activate the thermostat located under the handle fig. 5.
- Rotation left selects the programs requiring low temperature and steam levels.
- Rotation right selects the programs requiring high temperature and steam levels.
- The program selected appears automatically on the indicator panel at the front of the iron fig. 6.
- Set the steam control to STEAK - fig. 1.2.
- When your iron reaches the required temperature, the thermostat indicator goes out. Fig. 7. You can start ironing.
- Spray Function
- While ironing, press a few times in succession on the Spray button to dampen the fabric
- fig. 8 and iron out awkward creases.

Recommendations: Fabrics and ironing temperatures:
- Your iron heats up quickly: so begin by ironing fabrics that are ironed at low temperatures first, then go on to those requiring a higher temperature,
- if you change to a program requiring lower temperatures, wait for the thermostat light to come on again before continuing to iron.
when ironing fabrics with mixed fibres, set the ironing temperature for the most delicate fibre. For delicate fabrics we recommend testing the fabric first on an inconspicious place eg (inside them). -
For best results we recommend you use a vented ironing board to allow the powerful steam to penetrate through the fabric more efficiently.
-
For more steam (shot of steam button)
-
Press the Shot of Steam button from time to time. Fig. 9.
-
Wait a few seconds between each shot before pressing the button again.
5. Vertical steam ironing
-
Ideal for removing creases from suits, jackets, skirts, hanging curtains etc
-
Hang the garment on a hanger and hold the fabric slightly taut with one hand. The steam is very hot, so you should always do this with the garment on a hanger – never while someone is wearing it.
-
Set your thermostat to MAXfig. 10.
-
Press the Shot of Steam button ( ) repeatedly fig. 9 moving the iron from top to bottomfig. 11.
-
Hold the iron a few centimetres from the fabric to avoid burning delicate fabrics.
6. Anti-Calc Plus System
- You iron is equipped with an integral anti-scale syste. fig. 12.
- This system will help to provide :
- a better ironing quality with a constant flow of steam,
- a longer life for your iron.
7. Anti-drip function
- Autosteam Control, i.e. the automatic selection of the ironing programme depending on the fabrics selected, makes it possible to reduce steam flow at low temperatures and prevents your iron from dripping water onto your linen.
8. Auto-Stop safety feature (depending on model)
-
For your safety, the electronic system cuts off the power and the autopost indicator light. When the Auto-Stop flashes-fig. 13 when: warning light is on, it
-
The iron remains motionless for more than 8 minutes on its heel.
- The iron remains flat or on its side for more than 30 seconds.
- To restart the iron, just move it gently until the warning light stops flashing.
9. Gliss/Glide Protectautoclean - Autoclean Catalys soleplatedepending on model)
- Your iron is equipped with a catalytic self-cleaning soleplate.
- Its exclusive coating removes all impurities generated by normal use.
- It is recommended that you always rest your iron on its support base to preserve its self-cleaning coating.
ing coating. Dry Ironing
- Choose your ironing program.
- Set the steam control to DRX - fig. 1.1.
- You may start ironing when the thermostat light goes out.
Caring for your iron
BE CAREFUL! Unplug your iron and let it cool down before cleaning it.
Cleaning the anti-calc valve (once per month)
- Unplug your iron and empty the water tank.
- To remove the antiscale valve, set your thermostat on the position M.10, warning: the steam control must be set to STEAM (fig.1.2) during the cleaning phase and the thermostat must be set to MAX (fig.10).
Never touch the end of the valve
- Soak the valve in a cup of white vinegar or plain lemon juice for 4 hofig. 16.
- Rinse the valve under running water.
- Replace the anti-calc valve.
The iron will not function without the anti-calc valve
1. Self-cleaning
In order to extend the life of your iron, use the Self-Cleaning function once a month.
-
Set the iron to DRY - fig. 1.1.
-
Fill the water tank to maximum.
-
Set the iron on his heel, with the water tank full, and set the thermostat to 10.
-
When the thermostat light goes out, unplug the iron and hold it in a horizontal position, over a sink.
-
Set the steam control to STEAM, - fig. 1.2
-
Remove the anti-calc valve.
-
Shake the iron gently, over the sink, until some of the water in the water tank (with the impurities) has flowed out through the soleplate.
-
At the end of the operation, push the anti-calc valve back into position.
-
Turn the iron back on for 2 minutes, setting it on its heel, to dry the soleplate.
-
Unplug the iron, and when the soleplate is just warm, wipe it with a soft cloth.
2. Cleaning the soleplate
Your iron has a self-clean soleplate (according to the model):
Recommendations: the self-cleaning function helps to slow down the scaling up of your iron.
- Warning! Use of an abrasive cloth will damage the self-cleaning coating on the soleplate.
-
The steam control position must necessarily be on STEAM (fig.1.2) in order to remove or replace the iron's antiscale rod.
-
Its exclusive active coating eliminates all impurities that can be generated under normal conditions of use.
-
Ironing with an incorrect program can however leave traces that may require manual cleaning. In this case, it is recommended that you use a soft damp cloth on the still warm soleplate so as not to damage the coating.
Attention! The use of a scouring pad will cause damage to your soleplate's self-cleaning coating (fig.17)

Your steam iron is fitted with an Ultraglide soleplate (depending on model):
- Never use aggressive or abrasive products.
- When the soleplate is still warm, wipe with a damp cloth
Storing your iron
- Unplug the iron and wait for the soleplate to cool down.
- Empty the water tank and set the steam control to DXY- fig. 1.1. A little water may remain in the tank.
-
Wind the cord not too tightly around the heel at the back of the iron.
-
Store the iron on its heel.
Environment

Environment protection first!
① Your appliance contains valuable materials which can be recovered or recycled.
Leave it at a local civic waste collection point.
If there is a problem?
| Problem Possible causes | Solutions | |
| ·Water drips from the holes in the soleplate. | ·You are using the Shot of Steam button too often. ·You have stored the iron horizontally, without emptying it and without setting it to DRY. | ·Wait a few seconds between each use of the button. ·See the section "Storing your iron". |
| ·Brown streaks come through the holes in the soleplate and stain the linen. | ·You are using chemical descaling agents. ·You are using pure distilled/demineralised or softened water. ·Your linen is not rinsed sufficiently or you have ironed a new garment before washing it. | ·Do not add any descaling agents to the water in the water tank. ·See section "Types of water not to use?" ·See section "Cleaning the soleplate". ·Ensure linen is rinsed thoroughly to remove any soap deposits or chemicals on new garments which may be sucked up by the iron. |
| ·The soleplate is dirty or brown and can stain the linen. | ·You have ironed with an unsuitable programme (temperature too high). ·You are using starch. | ·Select the appropriate program.Refer to the chapter "Clean the soleplate" ·Spray starch on the underside of the fabric to be ironed. |
| ·There is little or no steam. | ·The water tank is empty. ·The anti-calc valve is dirty. ·Your iron has a build-up of scale. ·Your iron has been used dry for too long. | ·Fill it. ·Clean the anti-calc valve. ·Clean the anti-calc valve and carry out a self-clean. ·Carry out a self-clean. ·Wait for the soleplate to reach the correct temperature. |
| ·The soleplate is scratched or damaged. | ·You have placed your iron flat on a metallic rest-plate or ironed over a zip. ·You have cleaned your soleplate with an abrasive or metal pad. | ·Always set your iron on its heel. ·Try to avoid ironing over zips. ·Refer to the chapter "Clean the soleplate". |
| ·Water is leaking out through the water tank cover. | ·You have not closed the water tank cover properly. | ·Make sure the water tank cover has clicked shut. |
| ·Steam or water come from the iron as you finish filling the tank. | ·The steam control is not set to the DRY position | ·Check that the steam control is set to the DRY position |
| ·The spray and/or shot of steam do not work. | ·The water is empty. ·Fill the water. | |
| ·Water leaks out of the front of the iron. | ·You have exceeded the level MAX when filling the water tank. | ·Empty the surplus water out of the water tank. |
Name of manufacturer : CALOR S.A.S 3.12 104
220-240V a.c. 2010-2400W
220-240 V a.c. 2185-2600W
50/60Hz
Made in France
If you have any problem or queries, please contact our Customer Relations
team first for expert help and advice.
845 602 1454 - UK / (01) 677 4003 - Ireland
or consult our website - www.tefal.co.uk
Description
1 Spray
2 Tableau de bord thermostat
3 Préhension tige anti-calcaire
4 Commande Sec / Vapeur
5 Touche Spray
6 Touche Superpressing
7 Voyant Auto-Stop (selon modele)
8 Poignée comfort gel (selon
modèle)
6. Anti-Kalk Plus system
6. Anti-Calc Plus system
5. Vertical toyglatting
- Ideelt til ä fjäre bredter på dresser, jakker, skjørt, gardiner,...
- Heng plagget på en kleshenger, og strekk stoffetlett. Da dampen er veldig varm, ma du alltid glatte toyet på en kleshenger og aldri en person.
Tkanine in temperature likanja:
- Likalnik se hitro segreje: začnite s tkaninami, ki se likajo pri nizki temperaturi, konçajte pa s tistimi, ki zahtevajo visjo temperaturo;
- Ce ze lite uporabiti program za likanje z nižjo temperaturo, preden pricnete z likanjem počakajte, da se kontrlna lučka termostata ponovno przyge.
- Ce likate tkanino Iz mesanih vlaken: temperaturo regulirajte za likanje najobcutljivejsih vlaken.
5. Gladite navpicno
He dokocbaite Bbpxa Ha naTpoHa
- OctaBeTe NaTPOHa Da KusHe 4 Yaca B YaaS C 6yI OcET NIN C HAtypaJIeH JIMMOHOB cFig. 16.
-ИЗплakне NaTpOHa C Yeшma Hа BODa. - NocTaBete ro o6paTHo Ha MrcTOTO My.
IOTnra He pa60n 6e3 npoTnBO-BapOBNKOBnaTPOH
1. CamonoynCTBaHe
EINn Nt MeceHNO n3BbPwBaIe CaMONoCHCTBaHe, 3a Da yDbJXHTe XNBOTA Ha IOTN.
-Поставете Perуларopa на napа в поэць SE8 - fig.1.1.
-ПocтаветеюпаяВизпраьенонохеньe,спьлелpeзервогин hactpoi TepmoctataHaNo3uIGNMAX:fig.10.
-Korato CBETINHHNRT INHIDKATop yrache, n3KJIIOUeTe IOTnraTЯ NOCTaBeTe H YMNBALHnka.
-ИЗвадепрOTиВО-BаРOBИКOBИЯ NaTpoH.
-Пocтавete Perуларopa 3anapaВ поця STEAM (Фиг.1.2)
- JIeKo pa3knaaTe xOpn3OHTaJIHO IOTnRA NaI yMnBaJIHnKa, DOKaTO qAcT OT BOJATA (3aeJNO CbC 3ambpCtJEInTe) n3TeHe pE3 PIOUaTa.
- Cnei n3BbPwBaHe Ha Ta3n Opepaun, BbPheTe o6paTHO npOTnBO
Haunr cBET: CamonOnuHCTBaHETO npedOTbpaTBA OTnaraHETo HA KOTNeKAMbk B IOTnTa.
TBHMaHHe! N03nUraTa 3a napa 3aBjXnTeJHO TpR6Ba Da 6bJe Bbpxy IAPA (mR.1.2.) 3a da MoXeTe da 3BaJNTeN da CNOXte O6paTHO CTbJcHTeO IpOTNB KOTJIeK KaMbK Ha BaWataIOTN.
BHHMaHHe! n3nOJ3BaHeto Ha a6pa3nBHa r6a noBpeXda camOnoUncTbaUcTo ce nokpntne Ha Baawata rnaedeua nobbpxHOCT (fur.17)
BapOBIKOBINaTPOHHa MRCTOMY.
-
OTHOBO BKHIOUeTe IOTnra 3a 2 MNHyTN, KaTOI NOCTaBtE BBB BepTnKaJHNO NIOLOXeHne, 3a Da N3cbxHe NIOUaTa.
-
N3KIIIOUeTe IOITnRA Tn KOraTO IIIOuTa NOn3CTnHe, n3TpniTe R C MeKa KbPna.
autoclean (B 3aBcHMOCTN OT MOJIEN)
IOnoUba Ultragliss Diffusion (B 3aBnCmOCTN OT MOdJI)
IOnoosBa Autoclean Catalys (B 3aBnCmOCTN OT MOeNi)
16 OTBepCTne DnI 3aIOJIHeHnpe3epByapa
Kakyu BODy NcNoJb3OBaTb?
BaH np6bOp n3rOToBnE hI pyabOc BODonpoBOHO BDOJ. TeM He MeHee, Iy anaen HAcNn Heo6xOIMO peYraPHO npOBOnTb cAmooHNCKy KamepbI napoo6pa3OBAHN. B Cnyae oueh JxcetKo BObl (CBeJeHn MOXHO NOnyHTB MyHnUaJIbHOM ynpabLeHHn IIN B YnpabLeHHn BOOChA6KeHH) MOXHO CMeUNBaTB BOOnpOBOHDHyIO NOKyHIO demnhepaIn3OBaHNyIO BDOBy CneDyUOx npONopuix: - 50% BOOnpOBOHOBDoI, - 50% demnhepaIn3OBaHNHO BDObl.
Kakyu Bovy HeIb3a IcNoIb30BaTb?
Bo Bpem nCnpenHn TepIIO cnOco6CTByET KOHcHTpaunu COepeKuauxxCB BOeBeueCTB.
HekOTOpbIE BnDbI BOdbI COePkAT OprAhnueckne OTXoDbI MmHepaJIbHbIe CoIN, KOTOpbIE MOrY BbIBaTb NOBJIeHne 6pb3r, KopuHReBbIO TOTEKOB NIN IpeXJDeBpeMeHHbI IN3HOC npBopa. K TaKIM BnDAM BOdbI OTHCNTcR DeMnHepaJIN3OBAHHa BOda, BOda IN3 CyUInIKN DnB6JIbA apOMaTN3IpOBaHHa INI CMgHeHHa BOda, BOda IN3 paJaNaTOPOB ININ KOHdINIOHEPOB, INCTINIIINpOBaHHa IN DOxKeBaBBOda. IOGTOMy He peKOMeHNyETcNcNOJIb3OBAbTB BoNy CJeDyIOUX BnIDOB.
Исpenь3OBaHne
Глaxeнец napom
1. 3anolnntpepeepbyap
-Передзалоннемpe3epByapaOTKJIIOHTeYTOI.
- YctahOBInTe KhoNkY npaHn npaB noLoXeHne BE3 nA - fig.1.1.
-Bo3bMTe yTIOg OINHOpyKoN i CnErga HAKIOHHTe erO, depXa NDOOWBOB BHNafig. 3.
-ДЯТOrOуTOtObIOTKpbITbCTBOpKype3ePbByapa,HaxMnTeHaKHOnIky -fig.2.
- 3aNoJIHnTe pe3epByap BOIoI - fig. 3do OTMeTKN «MAX». OTMeTKa MAX COOTBeTCTByET Obemy, paBHOMy 350 MII.
- 3akpoTe CTBOpky pe3epByapa do ueJyka - fig.4.
- Bb moKTe NOJIKIOHTyTIOK CETN.
2. BbIepeHte Hxhbl pexkM
-BaW yTIOg o6bOyOBaH fynKcIeN Autosteam Control, KOTopRa Bb6npaet 8 npOrpamM rJaKeHHa
B 3aBnCmOCTN OT TINa BbIpaHHo TKaHn, BaW yTIOr TOUHO ONpeJeINT HeoXoIMMbIe ypoB Tempeatypbl NMOHOCtB NOaHn napa, rapaHTnpyUOuNe HauNyuHn pe3yIbTaT rJaKeHn.
-Дя Вьбopa COOTBECTBByOuSeI npOrpaMMbI rJaXeHnI NOBepHInTe TepMOcTaT, pacNoJIOxEHHbI NOp pyKo - fig. 5.
- BpaueHne npOTnB YacOBON CTpeKb : Bbl MOxTe yCTaHOBNTb pexIM C 60JIe Hn3KoI Tempepatypon N Mehblm pacXODom napa.
-BpaueHne no yacobO Bbl MOKeTe yCTaHOBnTb peKIM C 60Jee BBICOKo TempeatypoN 60JIbShm pacXODom npa.
- Lüφpa BbIbpaHOro pexIma aBtOMaTnueckn NOBJIeTcR Ha NaHeJi ynpabJIeHnja, paCnoJIOXeHHoB npeJeHne Yactn yTjora - fig. 6.
-CIOMOJIbIO COOTBeTCTBHyUoJe KHOJIKYCTaHOBInTepeXIM"Tap"-fig.1.2.
- KaTToIbKO yIor HarpeETcA DO HxHHOI TemnepaTypbI, CBeTOBOINHINKAtOp - fig. 7. nOracHT. Bbl MOXeTe HaHHaTb FJIaUNTb.
3.YBnaxHHe 6enb8 (nylbBepn3aTOp)
-Bnpocece rnaeHnBbMOKeTe c6pb3HyTb 6eJIbe BOOn, HeCKOJIbKO pa3 HaXaB HA KHOKnY npIbBepn3aTopa - fig.8 3TO NOMOKeT Bam n36abNTbcr OT HeHyKhbIX CKlaIOK.
4.ПolyчENEсиьногорapa(superpressing)
-BpemrO T BpeMeHn HaxkMaIte Ha KhoNky Npaun npoBoro yDapa - fig. 9.
- INHTepBaJI MEXJy DByM RAHaxTnA MIOJKeH 6bITb He MeHbWe HECKOJIbKINx CEkyH.
PpakTuueckn COBET:
Pa3JIuHbIe TkaHn I
TemnepatypraIaxKeHn:
- YTHOR HarpeBaetc86bIcTpo: NaunHaTe rnaKeHne c TkaHei, KOToPbIe Tpe6yIOT 6oJee Hn3KoI TEMnepaTypb1, a 3aTem nepeuNTe K 6eJIbIO, KOTOpoe CneDyET rJaIITb npN 6oJee BbICOKOI TemnepaType;
- EcIny Bby YcTaHOBnIN peXnM, Tpe6yIoUm 6oJIe Hn3KoI TempeaTpybI, He rJaDbTe cpa3Y: NdoXdnte, Noka CBETOBO INHdkaTOp 3aRopITcBHOBb.
- Pn rnaKeHn 6eIb, CunTOrO u3 pa3nUHbIX TkaHei, yCTaHaBnBaIte TemnepaTpy B pacYe Ha camyIO HexHyIO TKaHb.
5. BepTKkaJIbHoe OtnapnBaHne
- IneJIbHbI MeToD, nO3BOLJIOUm N36ExKaTb 3aflaxJBBaHnE HeHyXhBix CKlaIOK Ha KOCTIOMAX, INIXkaKx, IO6KaX, 3aHaBeCKaX I T.I.
Be3 npOTnBOU3BecTKOBORO CtepxHryTIOr He pa6oTae
1. BbInOJIHHTe cAmOoUncTy
IyBvHueHHcPcKa CnyKbI yTIORa BbINONHnTe CamooNCTky OIN pa3 B MOTHOKeHHo HAKHI.
YcTaHOBInTe KhONky noaun npa B noLoXeHne 6E3 PA fig.1.1.
-Пoctabteуногаоchobанe,Заллntepe3epByapBdoиuyctaHOBNTeTePMoCTaВnoLoKeTgMAX
Korda cunha JAMnocha Norachet, BbIKIOUHTe TIOI IN DEpXHTe eHOpaOBHoi.
-CHIMMTEIPTOBON3BecTkoBbI CTePKeHb.
- YcTaHOBnTe nepeKIOuHaTeIb Steam Control B noJIoXeHne IAP (pnc. 1.2)
- CnErga BCTPAXINBAIte yTIOH naIpaKOBHOB B TROP3OHTaJIbHOM NIOXeHIM, NOKA BOJa (c 3a) He BbITEeYepe3 IIOIOWBY.
- Tocne 3Toro yCTaHOBnTe npOTUBON3BcEeKOBbI CTepKeHb Ma MeTO.
-Notabte yTIOH naIpy-ONOpy IN BKLIOUHTe eOHa IBeMHNytb, YTO6bI BBICyWHTb NOIOOWBy.
- BbikJIOUHTe yTIOI n pOToTne eIe TENNyIOIoOuBY MrgKoI TpAIKoI.
2. OuNTka nooWbbl
Baw yTIO rOchauen cAmoouHuaUouecnoDooBoi (B 3aBncmOCTn OT moJeIN):
BHHMaHHe!IcnoIb3OBAHHe a6pa3aIBHO r6Kn pnpBOJNT K NOBpeKJeHIO caOOUaIoUeOra NOKpbTnnaNooWbbl.
- YHnKaJIbHOe NOKpbITne, OCHOBaHHoe Ha npHcUne KaTaN3aTopa, No3BOLJeT HeNpepbIBHO ydaJIrTb 3aIpy3HeHn, KOtOpbl NOBJIOTcR npHOPMaJIbHOM NCNoJIb3OBAHnYyTOra
OHaKo,ecnIgIraJrAaKn HcNIOb3yETcHecooTBeCTByIOuaI npOrpamMa,HaNoIOUBE Moryt OCTaBaTcBc CneDbI,KOTOpBIE NOTppeYIO TNCKn BpyHyIO. B Taknx clyuayx peKomeHDoBaHO IpotnpaB eue TeNnyIO IOOuBY MAnKO IN BnaXHO TpRikKo, KOTopA
BHHMaHHe!IJI TORO yTO6bI Bbl MORIN BbIHyTb HIN NOCTaBnTB Ha MecTo cTePKeHb DnIc6OpaHaKUN, peryJrTOP npa DoJXeH 6bITb OB3aTeNbHOM NoPAJke YCTAHOBJe B noJoxHe NAR (pnc.1.2)
BHMHNE!NcnoIb3OBAHNE R a6pa3nBHOI r6KMOXET NOBpeDITb camoouHaIOUeecr NOKpbTne nooBbl yTOra(pnc.17)
- BbIKHouHTe YTIOI NaITe NOOWBc OCTbITb.
- Onopokhnte pe3epByap n yctahOBHTe peryIaTOp B noLoXeHne 6E3 IAA- fig. 1.1. He cTpaUHO, ecIn HEmHOro BOdbIOCTaHETcB pe3epByape.
- Hamotaite shyp nitaHnHa duIy, pacnoIoxeHHyO c3aIyTiora.
- NocTaBbTe yTIOr Ha nIaTy-onopy.

He 3arpa3nHre OkpykaioyIO cpey!
①Baw npnbop coedepnT MaepnaJIb, KOToPbIe MOxHO nepepa60TaT b INCNoJIb3OBA Tb BTOpNHO.
OTdaiTe eeroBnyHKTc6opBaBtOpcbipbra.
Oxpana okpykaioe ipebl
| Helenajdkn Bo3moxhhe | Pruvnihb Cnocob yctpahenia | |
| ·Boa noTeKaet chepe3 OTBepCTn B noDoWBe. | ·BbCnIshKOM qacto HaxmMaete Ha KhoNkU noDauni napOBoro ydapa. ·YtJrXpAHINCE B TROP3OHTalbHom noLoXeHIn, pe3epByap He 6bl onopoxHeH, a perylanTop He 6bl yctahOBlen B noLoXeHne BE3 PAPA. | ·Co6JIouJaTe INTepBaI B HeCKOJIbKO CeKHynd nepeed kackdbm HaxaTneM. CM.pazdeI"XpaHEnie yTIOra". |
| ·KoruncheBte noTeKn i3 noDoWBb nauchAot 6elbe. | ·IcNoJIb3OBAHne XIMNUeCKNX pnoDyKTOB dIy udaJeHnna HAKIIIN. ·BbI cNoJIb3YeTe BOy He peKOMHeNOBaHNO BOVIIa. | ·He no6abJIaTe B pe3epByap HnKaKHX cpeIcStI dIy ydaJeHnna HAKIIIN. ·O6paTIteCb K pa3dJeY"KakUo BOy He cIeDy nCNoJIb3OBA Tb". |
| ·Fpy3NaHn KoprUnHeBa naDoWBa nauchAot 6elbe. | ·ДЯ rIaJexHnRbIb3OBAI NcNoJIb3OBAI HnEOuXoJauy nporgammy (co cIaIshKOM bIcOkoTtempepatyro). ·БeJIbe HeNDCTaTOH NOpOLOckaHO IaII Xe Bbl nCNoJIb3OBAI KpaxMaI. | ·Bb6epIte HuxhBn pexKIM. CMOTpIte nparpo « OChSTka noDoWBb ». ·Pa36pbIz3rBaIte KpaxMaI Na I3HaHOCHyU CTOPOHy I3dEJIa, KOtopoe Bbl rIaIte. |
| ·He3NaHTeNbHoe KOJIueCTBO IaII OTCytCTBVe napa. | ·Pe3epByap NcyT. ·IprObON3BeCTKOBbl cTePrXeHb 3aRpy3NeH. ·OTLOXeHne HAKIIIN B yTIORe. ·YtJr cIaIshKOM dOJIro nCNoJIb3OBAclS 6e3 napa. | ·3aONHte erO. ·OChSTte IprObON3BeCTKOBbl cTePrXeHb. ·OChSTte IprObON3BeCTKOBbl cTePrXeHb II BbIOJIhTe camOooNCTKy. ·BbIOJIhTe camOooNCTKy. |
| ·Ha noDoWBn Po8BIAOTc3aRpy3HeHn prn HOpMaJIbHOM nCNoJIb3OBAHn. | ·AktIBnIPoBaHn CnCTema "aHTN-KaJIpy". ·BbI chIcTIbn NoOuBv By c NMOUbTo abpa3aIBHOn IaII MetaLIuNECKoI rY6Kn. | ·PiOJOxDte KOrDa NoDOWBa HargPeTcI Do HeOBxoIDMoT Tempepatybl. ·CMOTpIte nparpaΦ «OChSTka noDoWBbl'. |
| ·I3 OTBepCTn pe3epByaTe cachT Boda. | BbI pIooX 3aKpbIbn CTBOPKu pe3epByaapa. | ·Y6eIITeCSB V TOM, YTO CTBOPKa pe3epByaapa xOPOIo 3aKpbIta (do IeLNuKA). |
| ·Iprn 3aIqOIHeHn pe3epBya o6pa3yETc4 nap. | ·PeryIaTOp napa He 6bl yCTaHOBLeH B noLOXeHne BE3 PAPAX (fig.1.1) | ·Y6eIITeCSB, YTO peryIaTOp noDAuHnapa HaxOJItCSB B noLOXeHn B E3 PAA (fig.1.1) |
| ·CnpRe n/IIaN «KNonKa napOBoro ydapa» He ΦyHKsIOHnpyU. | ·B pe3epByape Het BOdsI. ·3aONHite pe3epByap | BoDoy. |
| ·I3 nepeIeHn qactn yTIOra BbTEKaET Boda. | ·Bo Bpem 3aONlHeHn pe3epBya Ap Bbl npeBbICnl yroBENb MAX. | ·YdaJIte nI3JIuSeK BoDsI n3 pe3epByapa. |
PnIIO6bIX DpyrNX BO3MOXHbIX HEnOlaKkx O6paaAteCb B ABTOpN3OBaHHbI CepBnCHbI ueHTp InpOBepKn yTiora.
3JIeKtpnueckne yTIOrnc npooyBlaJxHnTeJem Tefal FV95xxxx, FV94xxxx
I3roTOBHeHO BOΦpaHcIN IJxOJIINHra "GROUPE SEB", France
(Groupe SEB, Chemin du Petit Bois Les 4 M - BP 172 69134 Ecully Cedex France)
IpynCE5,IMMHNIOITNByaJe4M-6117269134KIOJI N CepeKcΦpaHc
OΦnuaIbHbI npedctaBnteIb, mnpoptep - 3AO "rpynnna CEB-BoCTOK"
125171, r. MockBa, Лениградский, Д. 16A, стр. 3 тел. 213-32-32
HOpMaunOceTnKauuN:
- CeptnuΦnKaT COoTBeTCTBnR Nc TC RU C-FR.AF27.B.00393
Cpok DiecTBn c 11.12.2013 no 10.12.2018
- Bыдан OC OOO «ИНТЕРСАДAPT»
COOTBETCTBYIOT Tpe6OBaHnM:
TP TC 004/2011 "O 6e30nacHOCTHn3KOBJbTHORO
obopyoBaHnra", yTB. PeuHenem KTC ot 16.08.
2011r.Ng768.
TP TC 020/2011 "3JIeKtpomarHHTaOBMeCTUMOCTb
TEXHnuecknx CpeDCTB",YTB.PeHneHnem
KTC or 09.12.2011r. No879.
Cpok cnykbu 3denejna 2 rda c da tbi npodaxn.

Onnc
1ПульвериЗаТора
2IhOpMauiHa Ta6JnUka TepMOCTata
3 CtpnKeH dIa 360py HaKIny
4 KhoNka «Be3 napn/nap
5 KhoIka npJIbBepn3aTopa
6 Khonka noaqui napoboro yapy
7 CnHaJIbHa IaMNoUka
ABTOMaTHUHO BIDKIOUeHHRA
(3aJExHO BiD MoJeI)
8 Pyka 3 rJIeBIM HaIOBHeHHaM IJRA 3pyHOCTi (3aJIexHO BID MOJIeI)
9UHypKINBHeHH
10ПIDOWBa36IbIeHOIBEJIuHn3 npOKJaIKOIO,IIO3aNo6irae KOB3aHHIO
11 BiDkPITTpe3epByapa
12 IHTeIPOBaHa CnCTema npOTn HAKINy
13 Cunha JAMnoyka Tepmoctata
14 Tepmoctat Autosteam Control
15 PiooBa Gliss/Glide Protect autoclean (B 3aIexKHOCTi BID MoDeni) PiooBa Ultragliss Diffusion (B 3aIexKHOCTi BID MoDeni) PiooBa (B 3aIexKHOCTi BID MoDeni)
16 OTBipДлЯЗanOBHeHHpe3epByapa
Hikoli He doTopkaTecrdo KInuKa CTpnXn
-ПомICTITи npOTnBaHnHn CTpHXeHb Ha 4 FOiHn y CkIaHky i3 6IIM CnIPTOBm OcTOM a6O HATypaJIbHm JINMOHHM COKOM- fig.16.
-Помпт ectpижьпд КраHOM.
BctaHObiTb NOro Ha Micue.
Бe3 npOTnBaHЯHOrO cTpNXHЯ npaçka He npaçioe
1.BukohaiTe camoouHnHn
IIOOBXeHH TepMIny Cnyk6n npackn BIKOHyTe cAmOChuENHa Ha Micra.
- BctaHOBIb KhoNkY noaui napB noJIOKeHHB E3 IAPn fig. 1.1.
- IocTaBTe npacky 3 NOBHm pe3epByapom Ha niDcTabKy, NOBepHiTb TepMOCTaY NOJIOXeHHMax. fig.10.
- Koln Cngna hna na mnocha norache, BmKHiB npacky i Tpmae II ha paKOBHIO.
-BinMItb npotnbAnHHN CTpNxKeHb.
- YctahOBiBt bnepeMnKa npu y noLoXeHHa STEAM (MaI.1.2)
- 3Ierka ctpuyyTe npacku Haia paKOBHIOU y rOpN3OHTaIbHOMy IonoXeHHi, NOKI BOJa (i3 3a6pydHeHnMn) He Bnteue YpeE3 NiDoWBy.
-ПсяцьогвбтпргваннгийСчхжьHaMiCue.
- IocTaBte npacky Ha n'aty-onopy i BBimKHITb ii Ha dBi XBUNHN, 0o6 BnCysuHTn niOswBy.
-BmKHiB npacky i npoTpiB ii Te nnIy nIOu By M'koH raHicpKOIO.
2.OuHnEHHn iDOWBN
LapopBa npacka 6nlaHaHa aBTOOuHcHIO niOoBIO (3aJeKHO BID MoDJI):
- Ybara! BnKOpNCTaHHa 6pa3nBHOiIg6Kn npzBODInb do nOuKOJxHHeHcAMooHCHOro NOKpTTT niOoBu.
PpakTuHa nopada: CamoouHennn nonepdxkae yTbopeHHn HAKnny.
Ybara! 063nTn a6o NOCTABNTn Ha Micce CTPNXeHb nPTu HAKnIy, peryJrTOP napu NOBHeH 6TuO6OB'3KOBO V noLoXeHHi VAPEUR (MaI.1.2)
Ybara! BnKOpncTaanr r6kn 3abpa3NBHOro MaTepiany N0wKOJxye NOKpTTI niOswBn, kce camoochnyetybcma.17)
- YhiKaJIbHe NOKpTTT aIapOM KaTani3aTopa Do3B0JIe 6e3nepePBHO BuaJAIaTI a6pydHeHH, kI BUNHkaOTb npHOPMaJIbHOMy BUKOpNCTaHHI npackn.
OHaK, KIOI npacyBaHH BnKOpNCToBc HEBINOBiHa nporpama, Ha NiOuBI MOKyb 3aIIuWATCA CINI, Aki NOTpe6yHb YIeHHBpyHy. B TaKnx BnAqkax peKOMeHDoBaHO npotnpaTn Ie TENLy nIOoBy M'KO Yo BAONOrO raHicPKO, 0o Do3BOJIe yHNIKHHTN OIKoJKeHH NOKpTTT.
LnapoBnnpacko6laHaHa niouOuUltragliss (B3aIeXHocTi BId moJei):
3a6opohreBcBVKOpncTOByBatn arpecbHb a6o a6pa3NBH 3ac06n.
3ДиСИОТe YISeHЯ Ⅲe TENIOI nIDOWBn 3a DONOMORO BONOROI raHupK.
36epirahnny npackn
-BmKHTb npacky i daTne niOswBi oxoJohTyN.
- CnpoxhItb pe3epByap i BCTaHObitb peryIaTOp y noJIOKeHnB E3 IAM- fig. 1.1. Hicoro cTpaunHoro, kIoo He3HaUHa KInbKicTb BOOn 3aJIuWntbcra y pe3epByapi.
- HamotaTe uHyp kNbIeHHa Na duIy, po3TaUObAHy no3aIy npackn
- NocctaTe npacky ha n'aty-onopy.
HabkoJnshc cepeobnse

He 3abpyndHIOte OTOuyOue cepedobuunei
①Baùnpiūnād miCTntb MaTepiān, yaki MoxHa nepepo6ntu i BnKOpncTaTn 1e pa3.
BiDaaTe Ioro B nyKt 360py BTOpcuOBnH.
Moxlnbi HecnpabHocti?
| Hecnpabnocti MoxJIbvi npri | HnHn CnOci6 ycunenHЯ | |
| ·BoJa πiДтikae chepez otвориу πiДошВi. | ·Bn HaNTo chacto HatNcKaete Ha KhoNk Yu pOdaChi napOBOrO ydApU. ·Ippacka 36eRipalacr y ropn3oHTaIbHOMy noLoXeHHi, pe3eRpyap He 6bV BInOpoxHeHMy, a peryJrTOp He 6bV BCTaHOBLeHMy y noLoXeHnHa 5E3 IAPN. | ·ДotprnMuyTeCsr iIteRbany u Y deKilbka cekYnd nepeD KOxHm HATNcKaHNMy. ·ДИВ. poZdiL "36eRipAHnPy npaCKn". |
| ·KorUnHeBi πiДtboKni 3 πiДошВi 3a6pudHIOuTb 6iIN3Hy. | ·BVKOPnCTaHnR XIMiHnX npOdyKTiB dIra BnDalaENHry haknpy. ·BVKOPnCTaHnR BoDi NHepeKOMeHDoBaHO BnDy | ·He IdoBaaiTe Do pe3eRpya pOzDnHx 3aco6iB dIra BnDalaENHry haknpy. ·3BepHITbcSry Do po3diNv «Jky BoDy BnKOpnstobvBAtn?» |
| ·БрudnA abO korUnHeBa πiДошВa 3a6pudHIOe 6iIN3Hy. | ·Bn IpracyBaII 3a HeCTaHdarpTHOIO npOgrpAmOIO (HaNDTo BnCoka Tempepatya). ·Blin3Ha HeDcStaTHb O npOpoIoSeHa a6o Bn BnKOpnstAa N KPOXMaIb. | ·Bn6eRiB Heo6xIaHn PexKIM. 3BepHITbO do po3diNv «OchUeHnN pIdoWbN’. ·PozPinIOte KpOxMaIb Ha 6iK, 3BopOTHI do npacvBaHnN. |
| ·He3NaUHa KIbKicTb abO BVDcTyHnic TbpNi. | ·Pe3eRpyap nopOxHni. ·IprOtnBaHnHni CTpIXeHb 3a6pUdHEnH. ·BVDkLnAdEHHa NAcHpy U npacSi. ·Ipracka NaIdTo DOBRO BnKOpnstTOBvBaIaIc8 be3 npaN. | ·3aONBnITb Iyoro. ·OChSTiB IprOtnBaHnHnN CTpIXeHb. ·OChSTiB IprOtnBaHnHnN CTpIXeHb i BnKOHaiTe CamOOnuIeHnN. ·BnKOHaiTe CamOOnuIeHnN. |
| ·3aIexJHo BvD moDeni. | ·AktIBoBOHaCa SICTeMa "aHTN-KpAII". ·Bn OChUeBaII niOIObBy abPa3NbHO U RbKOIO a6o MetaIeBOIO citKOIO. | ·3aueKaaiTe, kOLn NiOoBHa HarpiEtbc Da Heo6xIaHoi Tempepatyrn. ·3BepHITbcSry Do po3diNv «OchUeHnN pIdoWbN’. |
| ·BoDa npocOhyetbc Chpe3 KpIshKу pe3eRpyaba. | ·Bn IporAno 3aKpIhN KpIshKу pe3eRpyaba. | ·IpeBepiTe NaDiHnicTb 3aKpIbTTa KpIshKu pe3eRpyaba (do KlauzanHn). |
| ·BoDa BvtIkae i3 OTbopy pe3eRpyaba. | ·Bn IporAno 3aKpIhN pe3eRpyab npO6ko (fig.1.1) | ·IpeKoHaIteCs, ilo npObKa pe3eRpya par 3aKpIa i 3haxOJITbcS y npOloXeHnI "3amok 3aKpIaTI (fig.1.1). |
| ·PozPinlIObav i/a60 cyIepnapa He npaIooTb. | ·B pe3eRpyaI HemaC BoDi. ·3aIyIte BoDy B pe3eRpya. | |
| ·BoDa BvtIkae 3 nepeDnboi ChactnHn npackn. | ·Bn IpeBvIaII pIbeH MAX npri NaOpBHeHni pe3eRpya. | ·BnIyIte NaDnIooK 3 pe3eRpya. |
Pn6ydb-kynx IHux MOKINBHX HecnpaBHOCTx 3BeptaTecra do ABTopu3ObaHoro cepbichoro ceHTpy dny nepebipkn npackn.
Kirjeldus
1 Pihusti
2 Termostaadi naidik
3 Katlakivieemaldusvarda pea
4 Funktsoon kuiv / aur
5 Piserdusnupp
6 Tugeva surve nupp
7 Automaatseiskamise (Auto-Stop) margutuli (vastavalt mudelile)
8 Ergonoomiline geelkaepide (vastavalt mudelile)
9 Toitejuhe
10 Eriti kindel kand Extra Stable
11 Paagiava
12 Integreeritud lupjumisvastane suteem
13 Termostaadi margutuli
14 Autosteam Control termostaat
15 Gliss/Glide ProtectTM autoclean tald (olenevalt mudelist) Ultragliss Diffusion tald (olenevalt mudelist)
Autoclean Catalys tald (olenevalt madelist)
16 Paagi taiteava.

- Before using for the first time
- What water to use?
- Types of water not to use?
- Use
- Steam ironing
- Vertical steam ironing
- Anti-Calc Plus System
- Anti-drip function
- Auto-Stop safety feature (depending on model)
- Gliss/Glide Protectautoclean - Autoclean Catalys soleplatedepending on model)
- Caring for your iron
- Cleaning the anti-calc valve (once per month)
- Never touch the end of the valve
- The iron will not function without the anti-calc valve
- Self-cleaning
- Cleaning the soleplate
- Storing your iron
- Environment
- Environment protection first!
- If there is a problem?
- Description
- Anti-Kalk Plus system
- Vertical toyglatting
- Gladite navpicno
- He dokocbaite Bbpxa Ha naTpoHa
- IOTnra He pa60n 6e3 npoTnBO-BapOBNKOBnaTPOH
- CamonoynCTBaHe
- EINn Nt MeceHNO n3BbPwBaIe CaMONoCHCTBaHe, 3a Da yDbJXHTe XNBOTA Ha IOTN.
- Kakyu BODy NcNoJb3OBaTb?
- Kakyu Bovy HeIb3a IcNoIb30BaTb?
- Исpenь3OBaHne
- Глaxeнец napom
- 3anolnntpepeepbyap
- BbIepeHte Hxhbl pexkM
- 3.YBnaxHHe 6enb8 (nylbBepn3aTOp)
- 4.ПolyчENEсиьногорapa(superpressing)
- BepTKkaJIbHoe OtnapnBaHne
- Be3 npOTnBOU3BecTKOBORO CtepxHryTIOr He pa6oTae
- BbInOJIHHTe cAmOoUncTy
- OuNTka nooWbbl
- He 3arpa3nHre OkpykaioyIO cpey!
- Oxpana okpykaioe ipebl
- 3JIeKtpnueckne yTIOrnc npooyBlaJxHnTeJem Tefal FV95xxxx, FV94xxxx
- Onnc
- Hikoli He doTopkaTecrdo KInuKa CTpnXn
- Бe3 npOTnBaHЯHOrO cTpNXHЯ npaçka He npaçioe
- 1.BukohaiTe camoouHnHn
- 2.OuHnEHHn iDOWBN
- 36epirahnny npackn
- HabkoJnshc cepeobnse
- Moxlnbi HecnpabHocti?
- Kirjeldus
Brand : TEFAL
Model : Ultimate Autoclean FV9545
Category : Iron press