LWU501 - Projector Christie - Free user manual and instructions
Find the device manual for free LWU501 Christie in PDF.



| Technical Specifications | WUXGA resolution (1920 x 1200), 5,000 lumens brightness, 10,000:1 contrast, DLP technology |
|---|---|
| Connectivity | HDMI, VGA, USB, RS-232, RJ-45 |
| Usage | Ideal for business presentations, education, and events, with easy installation and enhanced portability. |
| Maintenance | Filters to be cleaned regularly, lamp replacement recommended after 3,000 hours of use in normal mode. |
| Security | Overheat protection, PIN code lock, connection security. |
| General Information | Weight: 3.5 kg, Dimensions: 31 x 24 x 10 cm, Warranty: 3 years on the projector, 1 year on the lamp. |
Frequently Asked Questions - LWU501 Christie
User questions about LWU501 Christie
0 question about this device. Answer the ones you know or ask your own.
Ask a new question about this device
Download the instructions for your Projector in PDF format for free! Find your manual LWU501 - Christie and take your electronic device back in hand. On this page are published all the documents necessary for the use of your device. LWU501 by Christie.
USER MANUAL LWU501 Christie
LiveViewer Application
User Manual
020-000543-02
LiveViewer6 Application User's Manual
NOTE
• The manufacturer assumes no responsibility for any errors that may appear in this manual.
• The reproduction, transfer or copy of all or any part of this document is not permitted without express written consent.
Trademark acknowledgment
- Power Point ^ , Internet Explorer ^ , Windows ^ , Windows Vista ^ and Aero ^ are registered trademarks of Microsoft Corporation in the U.S. and/or other countries.
All other trademarks are the properties of their respective owners.
Caution
The Software is being delivered to you “AS IS” and Christie Digital Systems USA, Inc. (CHRISTIE) make no warranty as to its use or performance. CHRISTIE AND ITS SUPPLIERS, INCLUDING BUT NOT LIMITED TO CHRISTIE, DO NOT AND CANNOT WARRANT THE PERFORMANCE OR RESULTS YOU MAY OBTAIN BY USING THE SOFTWARE. EXCEPT TO THE EXTENT PROHIBITED BY LAW IN YOUR JURISDICTION, CHRISTIE AND ITS SUPPLIERS MAKE NO WARRANTIES CONDITIONS, REPRESENTATIONS, OR TERMS (EXPRESS OR IMPLIED WHETHER BY STATUTE, COMMON LAW, CUSTOM, USAGE OR OTHERWISE) AS TO ANY MATTER IN CONNECTION WITH THE SOFTWARE, INCLUDING WITHOUT LIMITATION NONINFRINGEMENT OF THIRD PARTY RIGHTS, MERCHANTABILITY, INTEGRATION, SATISFACTORY QUALITY, OR FITNESS FOR ANY PARTICULAR PURPOSE.
You agree that the Software will not be shipped, transferred or exported into any country or used in any manner prohibited by the United States Export Administration Act or any other applicable export laws, restrictions or regulations (collectively the “Export Laws”). In addition, if the Software is identified as export controlled items under the Export Laws, you represent and warrant that you are not a citizen, or otherwise located within, an embargoed nation (including without limitation Iran, Iraq, Syria, Sudan, Libya, Cuba, North Korea, and Serbia) and that you are not otherwise prohibited under the Export Laws from receiving the Software. All rights to Use the Software are granted on condition that such rights are forfeited if you fail to comply with the terms of this Agreement.
Contents
1 Features....3
1.1 Display Mode....3
1.1.1 Single PC mode....3
1.1.2 Multi PC mode....3
1.2 Multi Projector Mode....4
1.3 Moderator Control Mode 4
2 Compatibility....5
2.1 Hardware and software requirements for computer....5
2.2 Software versions....5
2.3 UpdatingLiveViewer....6
3 Starting withLiveViewer 7
3.1 InstallingLiveViewer 7
3.2 Connecting to the network....9
3.2.1 LaunchLiveViewer....9
3.2.2 Select Connection method 9
3.2.3 Passcode....13
3.2.4 Configuring Network Setting Manually 19
3.2.5 Connection and transmission 22
3.2.6 Connection error 23
3.3 Starting the Network Presentation ....24
3.3.1 Display Mode....24
3.3.2 Presenter Mode 24
3.3.3 Display User Name 25
3.3.4 Multi Projector Mode....25
3.3.5 Moderator Control Mode 26
4LiveViewerOperation 27
4.1 Main menu and Operating buttons....27
4.1.1 Menu Type 27
4.1.2 Operating buttons....27
4.1.3 Displaying the Status 29
4.1.4 Switching the display mode....30
4.2 Multi Projector Control window 30
4.3 Moderator Control window....31
4.4 Option menu....32
4.5 Profile data....34
4.5.1 Outline of Profile data....34
4.5.2 Making Profile data....34
4.5.3 Editing Profile data 35
4.5.4 Registering My Connection 35
Appendix 36
1 Features
The LiveViewer software can translate images and audio from a computer to the projector via wireless LAN or wired LAN. This software has a variety of features that helps comfortable presentation and easy connection.
1.1 Display Mode
InLiveViewer, there are two display modes, Single PC mode and Multi PC mode.
1.1.1 Single PC mode
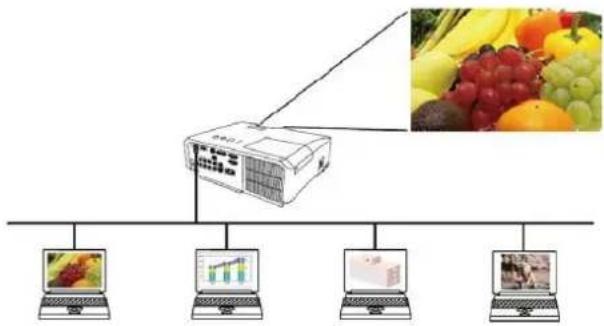
The Single PC mode can display images in full screen and replay audio from one computer to the projector via wireless LAN or wired LAN.
■ Presenter Mode
In the Single PC mode, the projector can be occupied by one computer and can block access from any other computers (if Presenter Mode is set to on in LiveViewer). While making your presentation, you don't need to worry that the image on screen will be unexpectedly switched to an image sent by another computer. Presenter Mode can be set to on in the option menu in the LiveViewer.
flowchart
graph TD
    A["Central Device"] --> B["Device 1"]
    A --> C["Device 2"]
    A --> D["Device 3"]
    A --> E["Device 4"]
    A --> F["Device 5"]
1.1.2 Multi PC mode
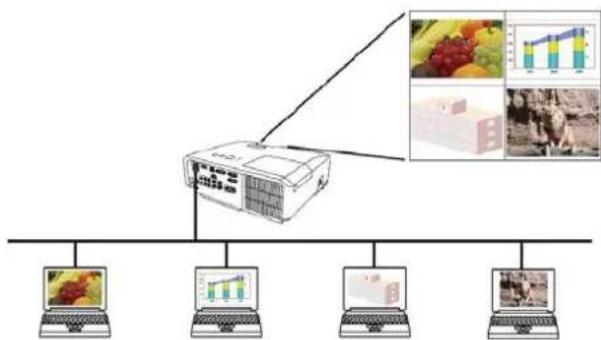
The projector can display images of up to four computers of connected at the same time.
NOTE
• Audio cannot be sent in the Multi PC mode.
flowchart
graph TD
    A["Central Unit"] --> B["Device 1"]
    A --> C["Device 2"]
    A --> D["Device 3"]
    A --> E["Device 4"]
    A --> F["Device 5"]
    A --> G["Output Image 1"]
    A --> H["Output Image 2"]
    A --> I["Output Image 3"]
    A --> J["Output Image 4"]
1.2 Multi Projector Mode
In the Multi Projector mode, up to 12 projectors can connect with the computer via wireless or wired LAN simultaneously.
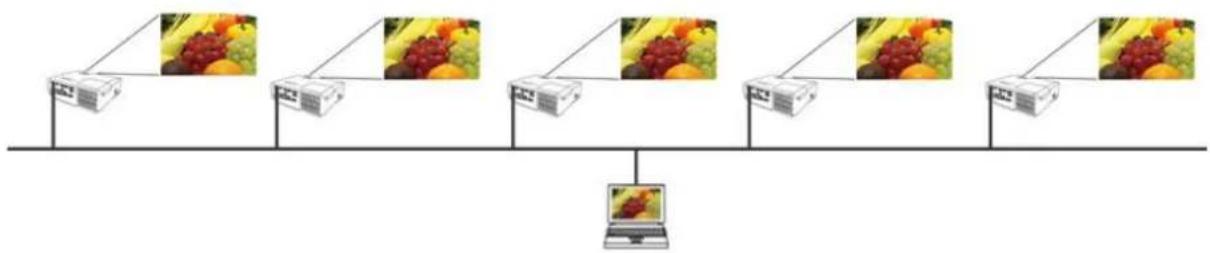
flowchart
graph TD
    A["Server 1"] --> B["Server 2"]
    B --> C["Server 3"]
    C --> D["Server 4"]
    D --> E["Server 5"]
    E --> F["Server 6"]
    F --> G["Server 7"]
    G --> H["Server 8"]
    H --> I["Server 9"]
    I --> J["Server 10"]
    style A fill:#f9f,stroke:#333
    style B fill:#f9f,stroke:#333
    style C fill:#f9f,stroke:#333
    style D fill:#f9f,stroke:#333
    style E fill:#f9f,stroke:#333
    style F fill:#f9f,stroke:#333
    style G fill:#f9f,stroke:#333
    style H fill:#f9f,stroke:#333
    style I fill:#f9f,stroke:#333
    style J fill:#f9f,stroke:#333
1.3 Moderator Control Mode
A computer can be set to Moderator (Host) that can control all other computers (Clients) connected with the projector via wireless LAN or wired LAN. Since Clients cannot control theLiveViewer and the projector, the Host can proceed with the program as arranged smoothly and safety.
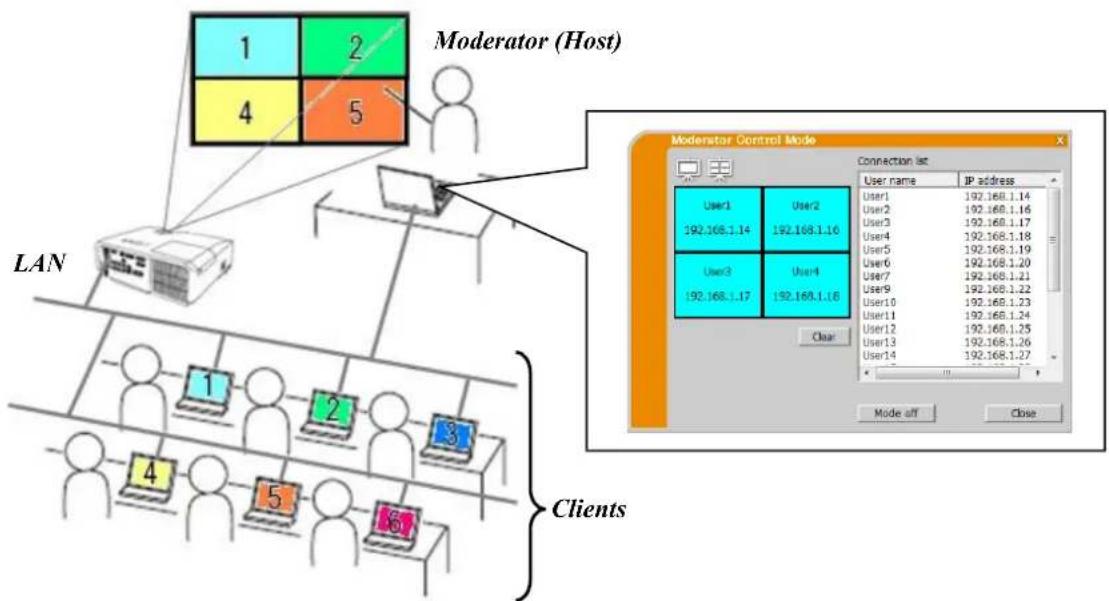
flowchart
graph TD
    subgraph_Host["Moderator (Host)"]
        A1["1"] --> B1["2"]
        A2["4"] --> B2["5"]
    end
    subgraph_LAN["LAN"]
        C1["1"] --> D1["2"]
        C2["3"] --> D2["4"]
        C3["5"] --> D3["6"]
    end
    subgraph_Clients["Clients"]
        E1["1"] --> F1["2"]
        E2["3"] --> F2["4"]
        E3["5"] --> F3["6"]
    end
    G["Moderator Control Mode"] --> H["Connection list"]
    H --> I["IP address"]
    I --> J["User1: 192.168.1.14"]
    I --> K["User2: 192.168.1.16"]
    I --> L["User3: 192.168.1.17"]
    I --> M["User4: 192.168.1.18"]
    I --> N["User5: 192.168.1.19"]
    I --> O["User6: 192.168.1.20"]
    I --> P["User7: 192.168.1.21"]
    I --> Q["User8: 192.168.1.22"]
    I --> R["User9: 192.168.1.23"]
    I --> S["User10: 192.168.1.24"]
    I --> T["User11: 192.168.1.25"]
    I --> U["User12: 192.168.1.26"]
    I --> V["User13: 192.168.1.27"]
    I --> W["User14: 192.168.1.27"]
    H --> X["Mode off"]
    H --> Y["Close"]
2 Compatibility
2.1 Hardware and software requirements for computer
| OS | Windows® XP | Home Edition / Professional |
| Windows Vista® | Home Basic / Home Premium / | |
| (Service Pack 1 or later) | Business / Enterprise / Ultimate | |
| Windows® 7 | Starter / Home Basic / Home Premium / | |
| Professional / Enterprise / Ultimate | ||
| Windows® 8 / Windows® 8 Pro / Windows® 8 Enterprise | ||
| Windows® 8.1 / Windows® 8.1 Pro / Windows® 8.1 Enterprise | ||
| Graphic card | VGA: 640x480 or higher (recommended XGA: 1024x768) | |
| 65,536 simultaneous colors or higher | ||
| CPU | Pentium 4 (2.8 GHz or higher) | |
| Hard disk space | 100MB or higher | |
| Web browser | Internet Explorer® (6.0 or higher) | |
| CD-ROM/DVD-ROM drive | ||
| Wireless LAN | IEEE802.11b/g/n | |
2.2 Software versions
Check and confirm before you install the LiveViewer if its version suits to the projector model you are going to connect to. The correct software version depends upon the projector model that you have. If the version is not matched with the projector, the software may not work properly.
If you use the models network functions are available not listed in the table below, check the group of projector models written in the User's Manual of the projector.
| LiveViewer Version | Group of Projector Models | |
| Group A | Group B | |
| LX41 LW41 and etc. | LX501 LX601i LW401 LW551i LWU421 LWU501i DXG1051 DWX951 DWU951 DHD951 DWX851 DWU851 DHD851 and etc. | |
| 4.1x^* | √ | - |
| 4.2x^* | √ | - |
| 4.3x | √ | √ |
| 5.xx | √ | √ |
| 6.xx | √ | √ |
“x” in the version means 0 or greater.
^* Only Windows ^ 32-bit version.
NOTE for the computer
- Improper OS version or driver software for network adapter on your computer may prevent images from being transmitted correctly. It is highly recommended that you check for OS and driver updates.
- Depending on the type of wireless network device and computer you are using, the projector may not be able to communicate properly with your computer, even if the computer you are using is equipped with built-in wireless LAN functionality. If communication problems occur, please use a Wi-Fi certified wireless network device.
- In case you useLiveViewer in Windows Vista ^ or Windows ^ 7, Aero ^ Glass cannot be used while the computer image is displayed to the projector.
- When installingLiveViewer in Windows Vista ^® , Windows ^® 7 or Windows ^® 8, the UAC (User Account Control) warning message is displayed.
- Your computer needs to meet the minimum hardware requirement of your OS.
- The LiveViewer does not work on Windows Vista ^® that is not updated to Service Pack 1 or later. Please install the latest Service Pack on your Windows Vista ^® .
- Video transfer through network may not be supported depending on combination of computer hardware and software. In this case, video/computer cable is preferable.
- Depending on the specification of your computer, the computer may slow down due to high CPU usage when the LiveViewer is running.
- The screen size will be shrinked and then transmitted to the projector if the screen size of computer is greater than WXGA/XGA. The transmitting speed may delay than usual due to processing shrinking. For higher transmission speed, it is recommended to set the resolution of computer screen to WXGA/XGA. Please refer to the manuals of your computer or Windows for the settings.
NOTE for the projector
- The network communication control is disabled while the projector is in standby mode if the STANDBY MODE item in the SETUP menu of the projector is set to SAVING. Please connect the network communication to the projector after setting the STANDBY MODE to NORMAL.
2.3 Updating LiveViewer
Please check and get the latest version from the Christie Web site.
http://www.christiedigital.com
Some functions explained in this manual require the LiveViewer Version 6.xx. ("x" in the version means 0 or greater.)
3 Starting with LiveViewer
This section explains the process of usingLiveViewer. The outline of the process is as follows:
STEP 1. Install theLiveViewerapplication (below)
STEP 2. Connect to the network (9)
The Quick Connection feature prepares some options for connecting to the projector. You can select one that meets your requirements.
Select From List
▶ Passcode connection
Profile connection
▶ History connection
▶ Manual connection
My Connection
In some cases, there are several projectors connected to the same network. Before you send your image, confirm that the right projector is selected.
STEP 3. Start Network Presentation (24)
The LiveViewer main menu will be on screen. Now, you can send your images to the projector through the network.
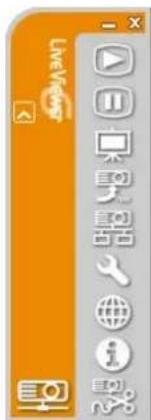
text_image
LIVEMARK +Fig.3.a LiveViewer Main menu
3.1 Installing LiveViewer
In order to useLiveViewer, you first need to install the software from the CD enclosed with the projector onto all computers that you want to connect to your network projector.
The following procedures show you how to installLiveViewer to a computer with Windows® 7.
- Turn on the computer and log on as Administrator.
- Shut down all other applications.
-
Insert the accompanying CD-ROM into the computer's CD-ROM/DVD-ROM drive.
-
After a moment, the Choose Setup Language dialog will appear as shown on the right. Select the language you will use in the list and click [OK].
NOTE
- If the Choose Setup Language dialog doesn't appear, proceed as follows: (1) Click on the [start] button in the toolbar and select "Run". (2) Enter 'E:\setup.exe' and then press [OK].

If your CD-ROM/DVD-ROM drive is not drive E on your computer, you will need to replace E with the correct drive letter assigned to your CD-ROM/DVD-ROM drive.
- If the software of same version has been already installed, you will be asked if you wish to uninstall. Select "Yes" to do so. Click [Cancel] button, then uninstallation will be canceled. If you uninstalled the software by miss-operation, please re-install the software from the first steps.
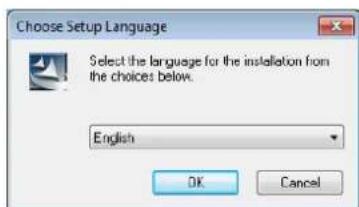
text_image
Choose Setup Language Select the language for the installation from the choices below. English OK Cancel-
After a moment, the Welcome dialog will appear as shown on the right. Press the [Next].
-
The License Agreement dialog appears. If you accept it, select "I accept the terms of the license agreement" and press the [Next].
-
The Choose Destination Location dialog appears. Press the [Next].
NOTE
- The 'C: \Program Files\Projector Tools\LiveViewer6' folder will be created and the program will be installed into that folder. If you wish to install to a different folder, click [Browse] and select another folder.
-
The Select Program Folder dialog appears. Confirm the program folder name. If "Projector Tools" is okay, press the [Next] to continue. If not enter the desired folder name and then press [Next].
-
After a moment, installation will complete and the Setup Complete dialog will appear as shown on the right. Click [Finish].
√ To confirm that the software as been properly installed, press the [start] button on the toolbar, select All Programs and then select the Projector Tools folder.
√ “LiveViewer” will appear in that folder if the installation was successful.
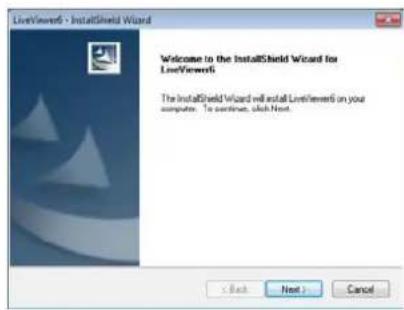
text_image
LiveView6 - InstallShield Wizard Welcome to the InstallShield Wizard for LiveView6 The InstallShield Wizard will install LiveView6 on your computer. To continue, click Next. < Back Next > Cancel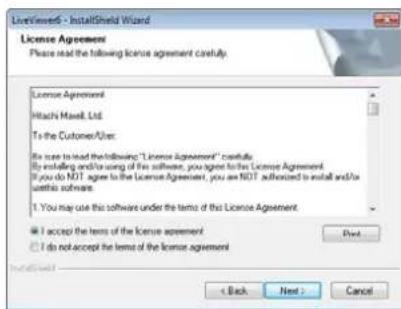
text_image
InstallShield - InstallShield Wizard License Agreement Please read the following license agreement carefully. License Agreement Hach N Haskell, Ltd. To the Customer/User: It uses to load the following "License Agreement" carefully. By replacing and/or using of this software, you agree to the License Agreement. If you do NOT agree to the License Agreement, you are NOT authorized to install and/or unreal this software. I. You may use this software under the terms of this License Agreement. I accept the terms of the license agreement I do not accept the terms of the license agreement Back Next > Cancel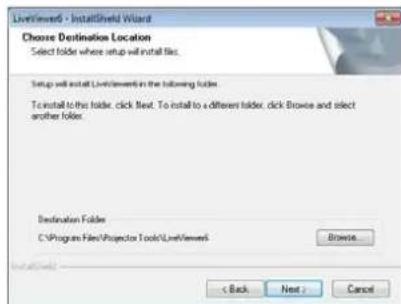
text_image
LiveWindow - InstallShield Wizard Choose Destination Location Select folder where setup will install files. Setup will install LiveWindow in the following folder. To install to this folder, click Next. To install to a different folder, click Browse and select another folder. Destination Folder C:\Program Files\Projection Tools\LiveWindow Browse... < Back Next > Cancel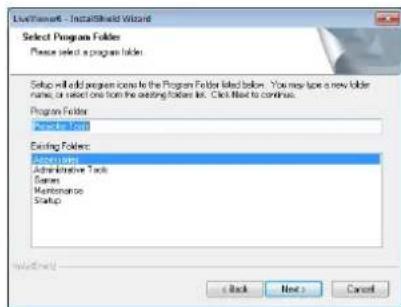
text_image
LiveWindow - InstallShield Wizard Select Program Folders Please select a program folder. Setup will add program icons to the Program Folder listed below. You may have a new folder name, or select one from the existing folder list. Click Next to continue. Program Folder Existing Folder Existing Administrative Tools Games Maintenance Startup Back Next > Cancel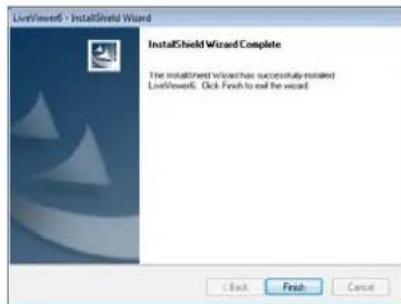
text_image
LiveView6 - InstallShield Wizard InstallShield Wizard Complete The installed wizard has successfully rotated LiveView6. Click Finish to end the wizard. < Back Finish Cancel3.2 Connecting to the network
LiveViewer provides several options for connecting to your network projector. You can choose one that best meets your system and user needs. The descriptions here are based on the case that Windows ^® 7 is installed in your computer.
NOTE
• Picture quality may deteriorate or audio output may be interrupted due to low data transfer rate caused by low communication band between computer and projector when multiple computers are communicating with projector.
- If you try to connect via network to the projector which another computer has been using as a USB display, it might reduce transfer rate causing deterioration of image quality or interruption of audio output.
3.2.1 Launch LiveViewer
Start theLiveViewer software in your computer, using one of the methods below:
Double click the "LiveViewer" icon on the Desktop in your computer
Select "start" → "All Programs" → "Projector Tools" → LiveViewer6 on Windows® menu.
Then, proceed to item "3.2.2 Select Connection method". (9)
NOTE
• LiveViewer cannot be started if "LiveViewer Lite for USB" is running on your computer.
- A message dialog appears if a problem has occurred or to present to you information. Read and deal with the message if it appears. About the messages, refer to "Appendix A Messages" (11) 36).
3.2.2 Select Connection method
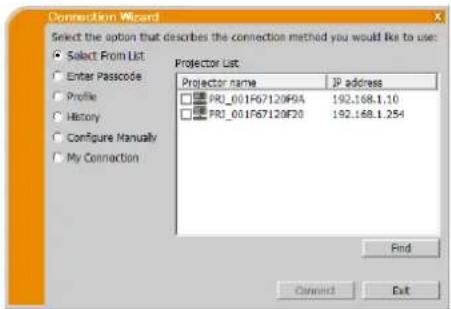
To start LiveViewer on your computer, the following menu appears. Select the option that describes the connection method you want to use.
○ Select From List
Proceed to item "3.2.2.1 Selecting from List". (10)
○ Enter Passcode Proceed to item "3.2.2.2 Passcode connection". (10)
○ Profile Proceed to item “3.2.2.3 Profile connection”. (11)
○ History Proceed to item “3.2.2.4 History connection”. (11)
○ Configure Manually Proceed to item "3.2.2.5 Configuring manually". (☐ 12)
○ My Connection Proceed to item “3.2.2.6 Selecting My Connection”. (12)
text_image
Connection Wizard Select the option that describes the connection method you would like to use: Select From List Enter Passcode Profile History Configure Manually My Connection Projector List Projector name IP address PR1_001F67120F9A 192.168.1.10 PR1_001F67120F20 192.168.1.254 Find Connect Exit3.2.2.1 Selecting from List
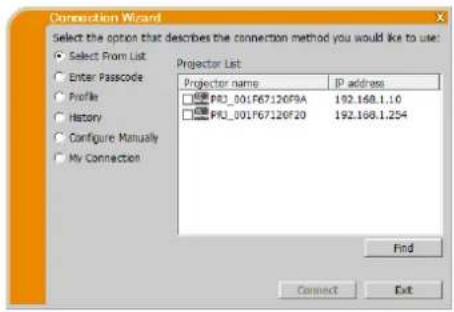
Before selecting this item, your computer and projectors need to be connected to the same network. If the connection is already established, select the "Select From List". The Projector List, a list of the projectors connected to the network will appear in the window. Select the projectors you want to use and check their boxes. Then click [Connect]. The connecting process starts.
Proceed to item "3.2.5 Connection and transmission". (☐ 22)
You can check the status of the connection by the following icon on projector list.
text_image
Connection Wizard Select the option that describes the connection method you would like to use: Select From List Enter Passcode Profile History Configure Manually My Connection Projector List Projector name IP address P8_001F67126F9A 192.168.1.10 P8_001F67126F20 192.168.1.254 Find Connect Exit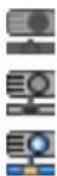
: The network connection to the projector is not established yet.
: The network connection is established, but the image transmission is on hold.
: The network connection is established and the images on the computer are being sent to the projector.
NOTE
- You can select up to 12 projectors at the same time from the list.
- When you select multiple projectors, the Multi Projector mode is selected automatically. ([1] 25)
• You may not find any projector on the list under your network condition. Please click [Find].
3.2.2.2 Passcode connection
If you want to use the Passcode for connecting to the projector, select "Enter Passcode". A list of available network adapters and input boxes for Passcode will appear in the window. The Passcode is given by the projector on screen. Simply input the Passcode into LiveViewer to connect the network projector.
Select the network adapter you want to use and check its box, and enter the Passcode of the projector you are currently trying to connect to. Then click [Connect]. The connecting process starts.
Proceed to item "3.2.5 Connection and transmission". (☐ 22)
For more detail about Passcode, refer to "3.2.3 Passcode" (13).
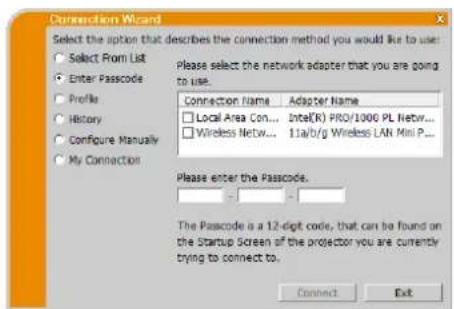
text_image
Connection Wizard Select the option that describes the connection method you would like to use. Select From List Enter Passcode Profile History Configure Manually My Connection Please select the network adapter that you are going to use. Connection Name Adapter Name Local Area Con... Intel(R) PRO/1000 PL Netw... Wireless Netw... 11a/b/g Wireless LAN Mini P... Please enter the Passcode. The Passcode is a 12-digit code, that can be found on the Startup Screen of the projector you are currently trying to connect to. Connect ExitNOTE
• You cannot connect when there is no available network adapter on your computer.
• You may need to set IP address and other network settings manually under your network conditions.
3.2.2.3 Profile connection
If you want to use the profile data for connecting to your network projector, select "Profile". Profile list, which is a list of stored profile data will appear in the window. It is required to store the profile data in advance.
Select the 'Profile' data you want to use and check its box. Then click [Connect]. The connecting process starts.
Proceed to item "3.2.5 Connection and transmission". (☐ 22)
For more detail about profile, refer to "4.5 Profile data" (34).
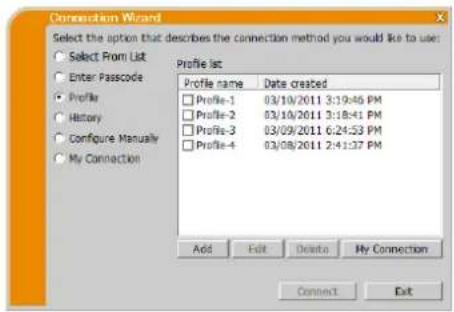
text_image
Connection Wizard Select the option that describes the connection method you would like to use: Select From List Enter Passcode Profile History Configure Manually My Connection Profile list Profile name Data created Profile-1 03/10/2011 3:19:45 PM Profile-2 03/10/2011 3:18:41 PM Profile-3 03/09/2011 6:24:23 PM Profile-4 03/08/2011 2:41:37 PM Add Edit Delete My Connection Connect ExitNOTE
• To check the setting in a profile data, follow the process below.
√ Choose a 'Profile' data that you want to check.
√ Move the mouse cursor to the 'Profile' and click the right button on the mouse to display a pop-up menu.
√ Select the "Properties" in the pop-up menu, and click the left button on the mouse. The setting information of the selected 'Profile' data is shown.
- If the DHCP is set on in the projector, the network connection between the projector and computer may not be established since IP address may be varied. If you would like to use the profile connection, it is recommended that you set DHCP to off in the projector.
3.2.2.4 History connection
If you want to use the History data for connecting to the projector, select "History". The History list of connection, which is a list of projectors connected in past will appear in the window.
Select the History data you want to use and check its box. Then click [Connect]. The connecting process starts.
Proceed to item "3.2.5 Connection and transmission". (☐ 22)
If you want to copy a History record to a profile data, select one of the History records and click [Register to profile]. The profile data cannot be erased automatically.
For more detail about profile, refer to "4.5 Profile data". (34)
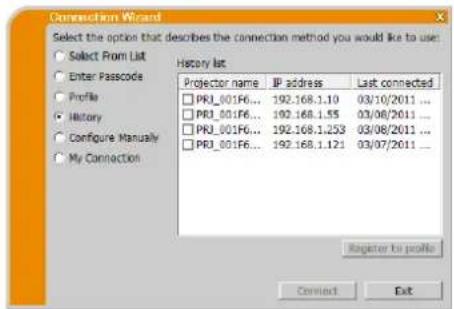
text_image
Connection Wizard Select the option that describes the connection method you would like to use Select From List Enter Passcode Profile History Configure Manually My Connection History list Projector name IP address Last connected PRJ_001F6... 192.168.1.10 03/10/2011 ... PRJ_001F6... 192.168.1.55 03/08/2011 ... PRJ_001F6... 192.168.1.253 03/08/2011 ... PRJ_001F6... 192.168.1.121 03/07/2011 ... Register to profile Connect ExitNOTE
- The number of the History record is maximum 20. When the 21st data is stored, the oldest record among the 20 will be overwritten.
- The date & time information in each History record is renewed when the network is connected by using the History record.
- If the DHCP is set to on in the projector, the network connection between the projector and computer may not be established since IP address can vary. If you would like to use the History connection, it is recommended that you set DHCP to off in the projector.
3.2.2.5 Configuring manually
If you want to set the connection manually, select "Configure Manually". A list of available network adapters will appear in the window.
Select the network adapter you want to use and check its box, and click [Next].
Proceed to item "3.2.4 Configuring Network Setting Manually". (19)
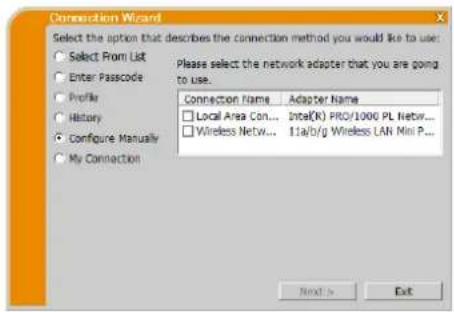
text_image
Connection Wizard Select the option that describes the connection method you would like to use. Select From List Enter Passcode Profile History Configure Manually My Connection Please select the network adapter that you are going to use... Connection Name Adapter Name Local Area Con... Intel(K) PRO/1000 PL Netw... Wireless Netw... 11a/b/g Wireless LAN Mini P... Next > ExitNOTE
- Up to 12 projectors can be connected at the same time.
- When multiple projectors are connected, the Multi Projector mode is selected automatically. (12 25)
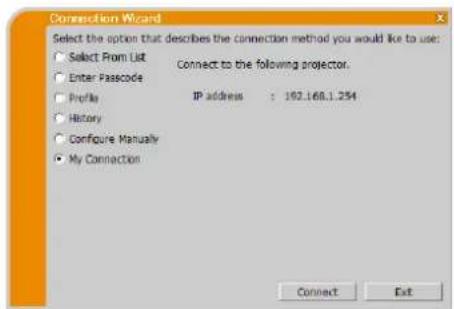
3.2.2.6 Selecting My Connection
If you select the My Connection, the computer is connected to the projector through the network by using profile data that is pre-assigned to My Connection.
Select "My Connection" and click [Connect]. The computer immediately starts the connecting process to the projector.
Proceed to item "3.2.5 Connection and transmission". (☐ 22)
text_image
Connection Wizard Select the option that describes the connection method you would like to use: Select From List Enter Passcode Profile History Configure Manually My Connection Connect to the following projector. IP address : 192.168.1.254 Connect ExtNOTE
- If the DHCP is set to on in the projector, the network connection between the projector and computer may not be established since IP address can vary. If you would like to use My Connection, it is recommended that you set DHCP to off in the projector.
• If no profile data is assigned to My Connection, it cannot be used.
3.2.3 Passcode
The unique Passcode system brings you very quick and simple connection to the network. The Passcode is a code that expresses the network setting in the projector. When you input the Passcode in theLiveViewer software on your computer, the network settings of the projector and computer are matched and the connection will be established immediately. The section is intended to explain how to use the Passcode.
NOTE
- The Passcode system does not work under the conditions below. If your system meets one of them, please set the connection manually after you input the Passcode.
1) Encryption is used.
2) Unique SSID is used.
The factory default SSID are 4 of below;
Factory default SSID 1: wireless
Factory default SSID 2: WLANProjector1
Factory default SSID 3: WLANProjector2
Factory default SSID 4: WLANProjector3
3) Subnet mask is not Class A or B or C.
Class A:(255.0.0.0), Class B:(255.255.0.0), Class C:(255.255.255.0)
3.2.3.1 Getting the Passcode
The Passcode is 12-digit code consisting of alphanumeric characters (1-9 and A-Z). The Passcode is displayed on the projector screen.
◆ Projector Models Group: A
There are two methods to get the Passcode from the projector.
Method 1
√ Turn on the projector, and make sure that the projector image is on screen.
√ Press the COMPUTER button on the remote control or INPUT button on the projector to select the LAN as input port.
√ If there is no signal on the LAN port, you can find the Passcode on screen.
Method 2
√ Turn on the projector, and make sure that the projector image is on screen.
√ Press the MENU button on the remote control or the ▲/▼/◄/► buttons on the projector to show the menu on screen.
√ Use the ▲/▼ cursor buttons to select ADVANCED MENU and use the ▶ cursor button to enter the item.
√ Use the ▲/▼ cursor buttons to select NETWORK, and use the ▶ cursor button to enter the item.
√ Use the ▲/▼ cursor buttons to select INFORMATION, and use the ▶ cursor button to display the INFORMATION.
√ The Passcode appears at the top in the INFORMATION window.
NOTE
- Use method 2 when you project your computer image by theLiveViewer, or when the LAN port is not selected as input source.
- If there is no communication between the projector and computer for five minutes, the Passcode will be changed.
◆ Projector Models Group: B
There are two methods to get the Passcode from the projector.
Method 1
√ Turn on the projector, and make sure that the projector image is on screen.
√ Press the COMPUTER button on the remote control or INPUT button on the projector to select the LAN as input port.
√ If there is no signal on the LAN port, you can find the Passcode on screen.
Method 2
√ Turn on the projector, and make sure that the projector image is on screen.
√ Press the MENU button on the remote control or the ▲/▼/◄/► buttons on the projector to show the menu on screen.
√ Use the ▲/▼ cursor buttons to select ADVANCED MENU and use the ▶ cursor button to enter the item.
√ Use the ▲/▼ cursor buttons to select NETWORK, and use the ▶ cursor button to enter the item.
√ Use the ▲/▼ cursor buttons to select the WIRELESS INFORMATION or WIRED INFORMATION depending on the type of connection you use, and press the ▶ cursor button.
√ The Passcode appears at the top in the "INFORMATION" window.
NOTE
- Use method 2 when you project your computer image by theLiveViewer, or when the LAN port is not selected as input source.
• If there is no communication between the projector and computer for five minutes, the Passcode will be changed. - There are two types of the Passcode, PASSCODE_WIRELESS and PASSCODE_WIRED. Select proper type you want to use referring to the following images.
| PASSCODE WIRELESS | PASSCODE WIRED |
a) Direct connection between the projector and computer  | a) The projector connected to computer by the wired LAN 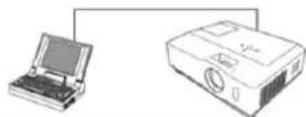 |
b) The projector connected to an access point by the wireless LAN 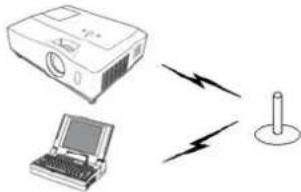 | b) The projector connected to an access point by the wired LAN 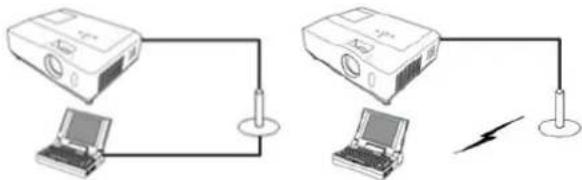 |
3.2.3.2 Entering the Passcode
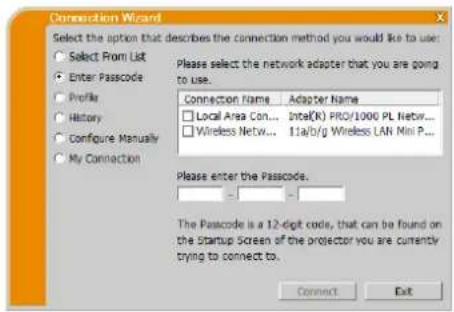
After you select the network adapter you want to use, enter Passcode in the menu of LiveViewer divided 4-digit each in 3 boxes (total 12-digit).
Example: PASSCODE 1234-5678-9ABC
Refer to "3.2.2.2 Passcode connection" to proceed. (10)
text_image
Connection Wizard Select the option that describes the connection method you would like to user. Select From List Enter Passcode Profile History Configure Manually My Connection Please select the network adapter that you are going to use. Connection Name Adapter Name Local Area Con... Intel(K) PRO/1000 PL Netw... Wireless Netw... 11a/b/g Wireless LAN Mini P... Please enter the Passcode. The Passcode is a 12-digit code, that can be found on the Startup Screen of the projector you are currently trying to connect to. Connect ExitNOTE
- When entering the Passcode, capital and small letters are not distinguished.
- If the manual setting screen is displayed, please follow the item "3.2.3.3 Manual Configuration".(☐ below)
3.2.3.3 Manual Configuration
After you input the Passcode (above), you are required to input the network setting manually if you use any encryption code or your unique SSID or subnet mask except Class A/B/C (13).
NOTE
• If you require the network setting information on the projector, follow these procedures:
◆ Projector Models Group: A
√ Turn on the projector, and make sure that the projector image is on screen.
√ Press the MENU button on the remote control or the ▲/▼/◄/► buttons on the projector to show the menu on screen.
√ Use the ▲/▼ cursor buttons to select ADVANCED MENU, and use the ▶ cursor button to enter the item.
√ Use the ▲/▼ cursor buttons to select NETWORK, and use the ▶ cursor button to enter the item.
√ Use the ▲/▼ cursor buttons to select INFORMATION, and press the ▶ cursor button.
√ The setting will be displayed in the NETWORK_INFORMATION box.
◆ Projector Models Group: B
√ Turn on the projector, and make sure that the projector image is on screen.
√ Press the MENU button on the remote control or the ▲/▼/◄/► buttons on the projector to show the menu on screen.
√ Use the ▲/▼ cursor buttons to select ADVANCED MENU, and use the ▶ cursor button to enter the item.
√ Use the ▲/▼ cursor buttons to select NETWORK, and use the ▶ cursor button to enter the item.
√ Use the ▲/▼ cursor buttons to select the WIRELESS INFORMATION or WIRED INFORMATION depending on the type of connection you use, and press the ▶ cursor button.
√ The setting will be displayed in the "INFORMATION" window.
Wireless LAN
The required information depends on how you connect the projector and computer.
Direct connection between the projector and computer.
Proceed to item "3.2.3.4 Direct connection between the projector and computer". (☐ 16)
The projector connected to an access point by the wired LAN.
Proceed to item "3.2.3.5 The projector connected to an access point by the wired LAN". (☐ 17)
The projector connected to an access point by the wireless LAN.
Proceed to item "3.2.3.6 The projector connected to an access point by the wireless LAN". (18)
Wired LAN
If you use the wired LAN, proceed to item "3.2.3.7 Wired LAN". (☐ 18)
3.2.3.4 Direct connection between the projector and computer
(Projector Models Group: B)
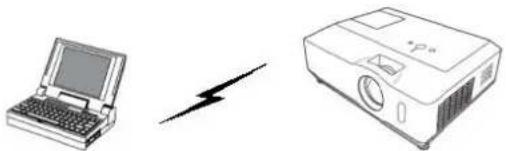
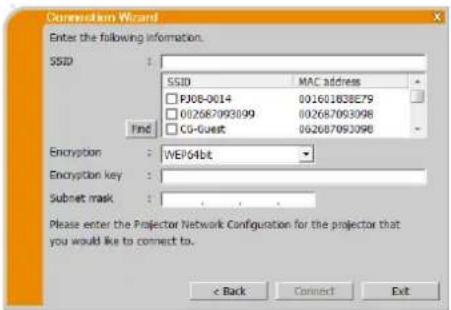
√ Enter the following information that is set in the projector. ^*
SSID: wireless (example)
Encryption: WEP64bit (example)
Encryption key ^2 : ^**** (example)
Subnet mask *^3 : 255.255.255.128 (example)
√ Click [Connect]
The connecting process via wireless LAN starts.
Proceed to item "3.2.5 Connection and transmission". (☐ 22)
natural_image
Illustration of a laptop, a lightning bolt, and a projector (no text or symbols)Fig.3.2.3.4: Direct connection between the projector and computer
text_image
Compression Wizard Enter the following information. SSID : SSID MAC address □ PJ08-0014 001601838E79 □ 002687093099 002687093098 □ CG-Guest 002687093098 Find Encryption : WEP64bit Encryption key : Subset mask : Please enter the Projector Network Configuration for the projector that you would like to connect to. < Back Connect ExitNOTE
• * / To find the network setting on the projector, refer to the NOTE. (15)
- Click [Find] to update SSID list.
- * 2 If you use encryption, you need to set it. Contact the network administrator to check the encryption key that is set in the projector. The encryption key is always shown as “**********”.
• ^*3 If you use subnet mask except Class A/B/C, please set it.
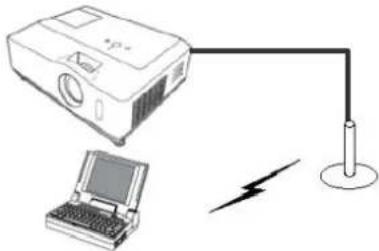
3.2.3.5 The projector connected to an access point by the wired LAN
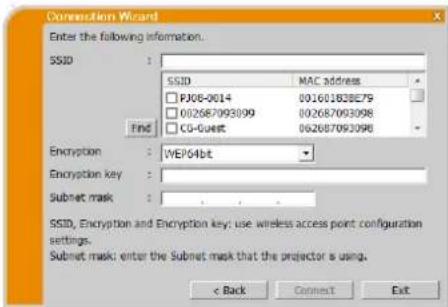
√ The setting on the access point *. Enter the following information.
SSID: WirelessAccessPoint (example)
Encryption: WEP64bit (example)
Encryption key *2: ******* (example)
√ The setting on the projector ^*3
Enter the following information.
Subnet mask *4: 255.255.255.128 (example)
√ Click [Connect].
The connecting process starts.
Proceed to item "3.2.5 Connection and transmission". (☐ 22)
natural_image
Diagram showing a projector connected to a laptop and a vertical cable with a lightning bolt (no text or symbols)Fig.3.2.3.5: The projector connected to an access point by the wired LAN
text_image
Connection Wizard Enter the following information... SSID : SSID MAC address PJ06-0014 001601838E79 002687093099 002687093098 CG-Guest 062687093098 Find Encryption : WE/04bit Encryption key : Subnet mask : SSID, Encryption and Encryption key: use wireless access point configuration settings. Subnet mask: enter the Subnet mask that the projector is using. < Back Connect ExitNOTE
• *1 Contact the network administrator to find out the setting on the access point.
- Click [Find] to update SSID list.
- *2 If you use encryption, you need to set it. Contact the network administrator to check the encryption key that is set in the access point. The encryption key is always shown as “**********”.
• *3 To find the network setting on the projector, refer to the NOTE. (11 15)
• *4 If you use subnet mask except Class A/B/C, please set it.
3.2.3.6 The projector connected to an access point by the wireless LAN
(Projector Models Group: B)
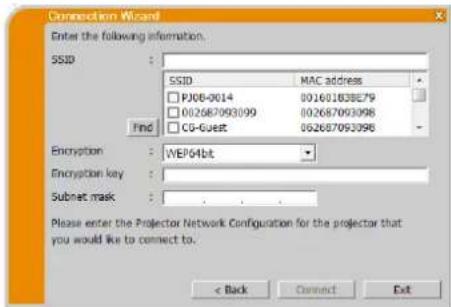
√ The setting on the access point ^* .
Enter the following information.
SSID: WirelessAccessPoint (example)
Encryption: WEP64bit (example)
Encryption key *2: ***** (example)
√ The setting on the projector ^*3
Enter the following information.
Subnet mask ^*4 : 255.255.255.128 (example)
√ Click [Connect].
The connecting process via wireless LAN starts.
Proceed to item "3.2.5 Connection and transmission". (☐ 22)
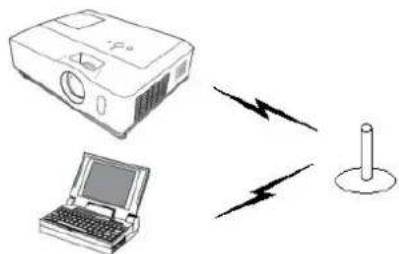
natural_image
Illustration of a projector, laptop, and power cord with lightning bolt symbols (no text or labels)Fig.3.2.3.6: The projector connected to an access point by the wireless LAN
text_image
Connection Wizard Enter the following information. SSID : SSID MAC address PJB0-0014 00160183BE79 002687093099 002687093098 CG-Guest 002687093098 Find Encryption : WEP04bit Encryption key :_ Subset mask :_ Please enter the Projector Network Configuration for the projector that you would like to connect to. < Back Connect ExitNOTE
• * 1 Contact the network administrator to find out the setting on the access point.
- Click [Find] to update SSID list.
- *2 If you use encryption, you need to set it. Contact the network administrator to check the encryption key that is set in the access point. The encryption key is always shown as “**********”.
• *3 To find the network setting on the projector, refer to the NOTE. (15)
• *4 If you use subnet mask except Class A/B/C, please set it.
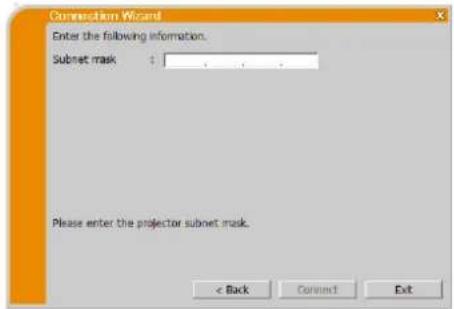
3.2.3.7 Wired LAN
√ Enter the following information that is set in the projector.
Subnet mask ^*1 : 255.255.255.128 (example)
√ Click [Connect].
The connecting process starts.
Proceed to item "3.2.5 Connection and transmission". (☐ 22)
text_image
Connection Wizard Enter the following information. Subnet mask : Please enter the projector subnet mask. < Back Connect ExitNOTE
• *If you use subnet mask except Class A/B/C, please set it.
3.2.4 Configuring Network Setting Manually
All the settings for the network connection between the projector and computer have to be input manually if you select "Configure Manually" in the menu of LiveViewer connection method.
The information to be input for a manual configuration will vary, depending on how you want to connect the projector and computer.
Wireless LAN
The required information depends on how you connect the projector and computer.
Direct connection between the projector and computer.
Proceed to item "3.2.4.1 Direct connection between the projector and computer" (☐ below)
The projector connected to an access point by the wired LAN.
Proceed to item "3.2.4.2 The projector connected to an access point by the wired LAN" (☐ 20)
The projector connected to an access point by the wireless LAN.
Proceed to item "3.2.4.3 The projector connected to an access point by the wireless LAN" (21)
Wired LAN
If you use the wired LAN, proceed to item "3.2.4.4 Wired LAN" (☐ 21).
3.2.4.1 Direct connection between the projector and computer
(Projector Models Group: B)
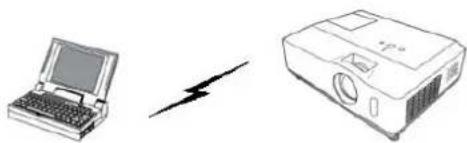
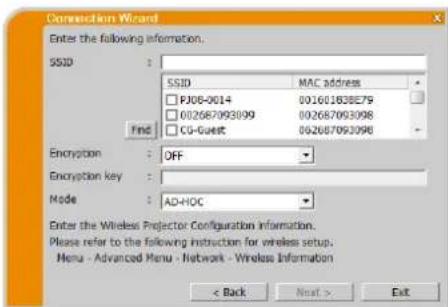
√ Enter the following information that is set in the projector. */
SSID: wireless (example)
Encryption: WEP64bit (example)
Encryption key *2: ***** (example)
Mode: AD-HOC
√ Click [Next].
√ Enter the following information that is set in the projector. * ^1
IP address: 192.168.1.10 (example)
√ Click [Add]. The IP address is added to the list.
Subnet mask: 255.255.255.0 (example)
√ Click [Connect].
The connecting process via wireless LAN to all the projectors in the list starts.
Proceed to item "3.2.5 Connection and transmission". (22)
NOTE
• * To find the network setting on the projector, refer to the NOTE. (1.1 15)
- Click [Find] to update SSID list.
• * 2 If you use encryption, you need to set it. Contact the network administrator to check the encryption key that is set in the projector. The encryption key is always shown as "*******"
- Up to 12 IP addresses can be registered on the list.
- * 1 To find the network setting on the projector, refer to the NOTE. (1) 15) - Click [Find] to update SSID list. - * 2 If you use encryption, you need to set it. Contact the network administrator to check the encryption key that is set in the projector. The encryption key is always shown as "**********". - Up to 12 IP addresses can be registered on the list.
natural_image
Illustration of a laptop, a lightning bolt, and a projector (no text or symbols)Fig.3.2.4.1: Direct connection between the projector and computer
text_image
Connection Wizard Enter the following information. SSID : SSID MAC address PJ06-0014 001601838E79 002687093099 002687093098 CG-Guest 002687093098 Find Encryption : OFF Encryption key : Mode : AD-HOC Enter the Wireless Projector Configuration Information. Please refer to the following instruction for wireless setup. Menu - Advanced Menu - Network - Wireless Information < Back Next > Exit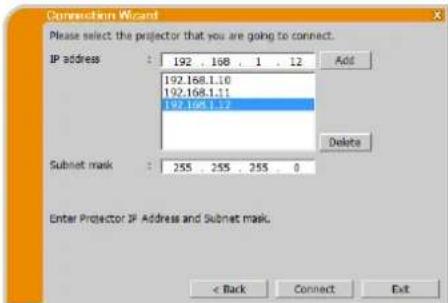
text_image
Connection Wizard Please select the projector that you are going to connect. IP address : 192 . 168 . 1 . 12 Add 192.168.1.10 192.168.1.11 192.168.1.12 Delete Subset mask : 255 . 255 . 255 . 0 Enter Projector IP Address and Subnet mask. < Back Connect Exit3.2.4.2 The projector connected to an access point by the wired LAN
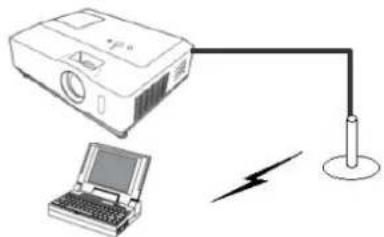
√ The setting on the access point * Enter the following information.
SSID: WirelessAccessPoint (example)
Encryption: WEP64bit (example)
Encryption key *2: ***** (example)
Mode: INFRASTRUCTURE
√ Click [Next].
√ The setting on the projector ^4
Enter the following information
IP address: 192.168.1.10 (example)
√ Click [Add]. The IP address is added to the list.
Subnet mask: 255.255.255.0 (example)
√ Click [Connect].
The connecting process starts.
Proceed to item "3.2.5 Connection and transmission". (☐ 22)
natural_image
Diagram showing a projector connected to a laptop and a power cord with a lightning bolt (no text or symbols)Fig.3.2.4.2: The projector connected to an access point by a LAN cable
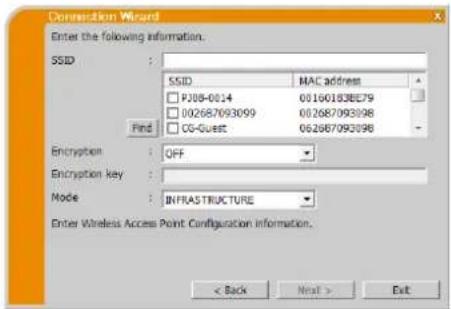
text_image
Connection Wizard Enter the following information. SSID : SSID MAC address FJ08-0014 0160183BE79 002687093099 012687093098 CG-Guest 062687092098 Find Encryption : OFF Encryption key : Mode :INFRASTRUCTURE Enter Wireless Access Point Configuration Information. < Back Next > ExitNOTE
- *Contact the network administrator to find out the setting on the access point.
- Click [Find] to update SSID list.
- *2 If you use encryption, you need to set it. Contact the network administrator to check the encryption key that is set in the access point. The encryption key is always shown as “**********”.
• ^*3 To find the network setting on the projector, refer to the NOTE. (15) - Up to 12 IP addresses can be registered on the list.
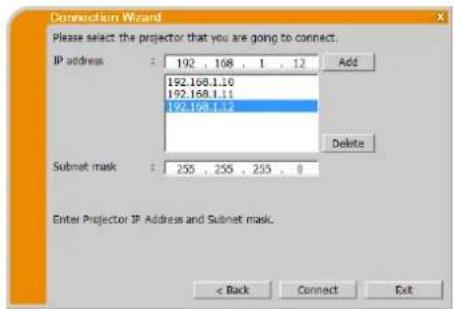
text_image
Connection Wizard Please select the projector that you are going to connect. IP address: 192 . 108 . 1 . 12 Add 192.168.1.10 192.168.1.11 192.168.1.12 Delete Subnet mask: 255 . 255 . 255 . 0 Enter Projector IP Address and Subnet mask. < Back Connect Exit3.2.4.3 The projector connected to an access point by the wireless LAN
(Projector Models Group: B)
√ The setting on the access point *
Enter the following information.
SSID: WirelessAccessPoint (example)
Encryption: WEP64bit (example)
Encryption key *2: ***** (example)
Mode: INFRASTRUCTURE
√ Click [Next].
√ The setting on the projector ^*3
Enter the following information.
IP address: 192.168.1.10 (example)
√ Click [Add]. The IP address is added to the list.
Subnet mask: 255.255.255.0 (example)
√ Click [Connect].
The connecting process via wireless LAN to all the projectors in the list starts.
Proceed to item "3.2.5 Connection and transmission". (☐ 22)
NOTE
- * ^1 Contact the network administrator to find out the setting on the access point.
- Click [Find] to update SSID list.
- *2 If you use encryption, you need to set it. Contact the network administrator to check the encryption key that is set in the access point. The encryption key is always shown as “**********”.
• * 3 To find the network setting on the projector, refer to the NOTE. (15) - Up to 12 IP addresses can be registered on the list.
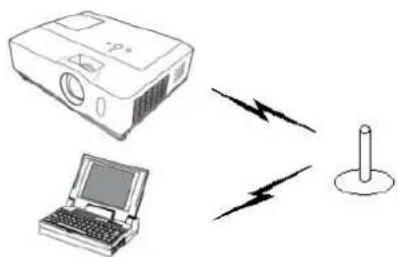
natural_image
Illustration of a projector, laptop, and power cord with lightning bolt symbols (no text or labels)Fig.3.2.4.3: The projector connected to an access point by the wireless LAN
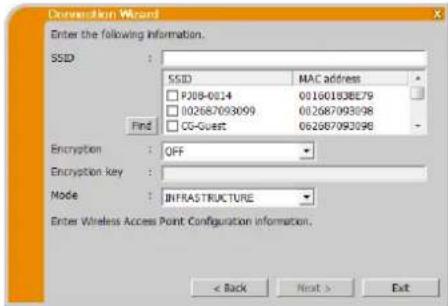
text_image
Connection Wizard Enter the following Information. SSID : SSID MAC address P208-0014 001601838E79 002687093099 002687093098 CO-Guest 002687093098 Find Encryption : OFF Encryption key :_ Mode :INFRASTRUCTURE Enter Wireless Access Point Configuration information. < Back Next > Exit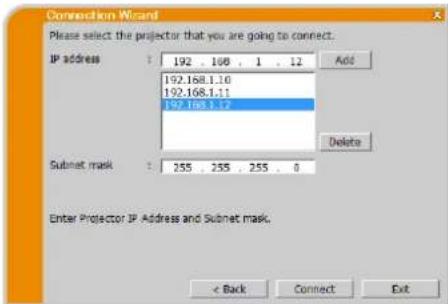
text_image
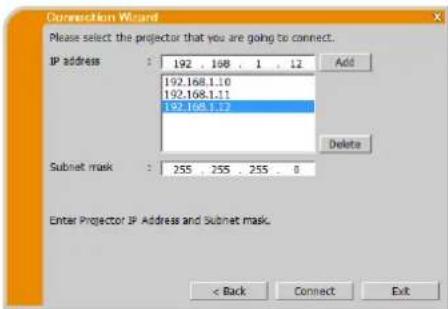
Connection Wizard Please select the projector that you are going to connect. IP address : 192 . 108 . 1 . 12 Add 192.168.1.10 192.168.1.11 192.168.1.12 Delete Subnet mask : 255 . 255 . 255 . 0 Enter Projector IP Address and Subnet mask. < Back Connect Exit3.2.4.4 Wired LAN
√ Enter the following information that is set in the projector. */
IP address: 192.168.1.10 (example)
√ Click [Add]. The IP address is added to the list.
Subnet mask: 255.255.255.128 (example)
√ Click [Connect].
The connecting process starts.
Proceed to item "3.2.5 Connection and transmission". (☐ 22)
text_image
Connection Wizard Please select the projector that you are going to connect. IP address : 192 . 168 . 1 . 12 Add 192.168.1.10 192.168.1.11 192.168.1.12 Subnet mask : 255 . 255 . 255 . 0 Enter Projector IP Address and Subnet mask. < Back Connect ExitNOTE
• * 1 To find the network setting on the projector, refer to the NOTE. (☐ 15)
- Up to 12 IP addresses can be registered on the list.
3.2.5 Connection and transmission
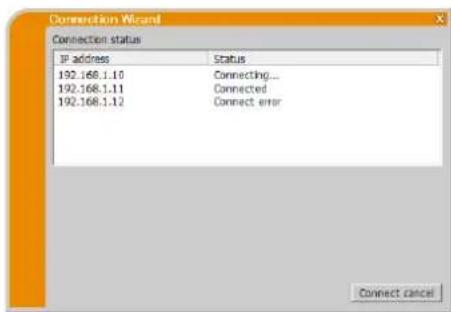
3.2.5.1 Confirmation Connection status
Connection status menu appears when you click [Connect] and connecting process starts. You can check the process from the [Status] field.
When all the projectors are connected, the Connection list will appear. To cancel the connections, click [Connect cancel].
If there are any connections which had established before [Connect cancel] was clicked, Connection list will appear after the connecting process is canceled.
Proceed to item "3.2.5.2 Connection List". (below)
An error message will appear if there is a connection error.
Proceed to item "3.2.6 Connection error". (☐ 23)
text_image
Connection Wizard Connection status IP address Status 192.168.1.10 Connecting... 192.168.1.11 Connected 192.168.1.12 Connect error Connect cancelNOTE
• The connection is canceled and time out error when it cannot connect over one minute.
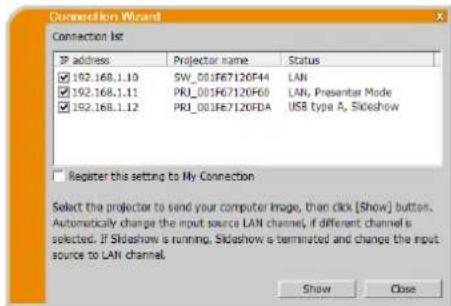
3.2.5.2 Connection List
All projectors are connected, the Connection list will appear.
Click the check box of the projector you want to transmit the image to and click [Show].
The input port of the projector is automatically switched to LAN and image transmission starts.
Proceed to item "4 LiveViewer Operation" (27).
If you select [Close], then the LiveViewer main menu is displayed in stand-by mode. (Stand-by mode is the state where there is no image transmission, although the network connection is established.) The transmission starts when you click display mode button or start capture button on the LiveViewer main menu.
text_image
Connection Wizard Connection list IP address Projector name Status ✓ 192.168.1.10 SW_001F67120F44 LAN ✓ 192.168.1.11 PRI_001F67120F60 LAN, Presenter Mode ✓ 192.168.1.12 PRI_001F67120FDA USB Type A, Sideshow Register this setting to My Connection Select the projector to send your computer image, then click [Show] button. Automatically change the input source LAN channel, if different channels is selected. If Sideshow is running, Sideshow is terminated and change the input source to LAN channel. Show CloseNOTE
- Up to 12 projectors can be connected at the same time.
- If you want to register one of the settings of connection as My Connection, check the "Register this setting to My Connection". After the registration of My Connection, the data will be shown in the Profile list.
3.2.6 Connection error
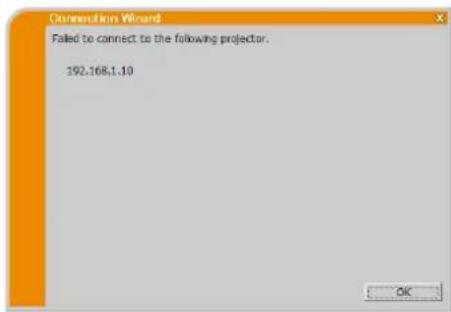
When the connection to the projector could not be established, an error message, "Failed to connect to the following projector." will be displayed.
Click [OK], then the LiveViewer main menu is displayed even though the network connection is not established. Click connect button on the LiveViewer main menu to go back to "3.2.2 Select Connection method". (☐ 9)
If you tried to connect to plural projectors and there are any projectors their connection were established, the Connection list will appear after you click [OK].
text_image
Connection Wizard Failed to connect to the following projector. 192.168.1.10Proceed to item "3.2.5.2 Connection List". (22)
NOTE
- Check the network setting in the projector especially if you use My Connection, and retry the connection from item "3.2.2 Select Connection method". (☐ 9)
3.3 Starting the Network Presentation
This chapter explains the Network Presentation feature with which you can project computer images transmitted through a network.
The LiveViewer allows you to project images from one or multiple computers by connecting the projector to an existing network without using computer cables. This Network Presentation feature helps you to smoothly make your presentations and conduct conferences.
To start the Network Presentation, select the LAN port as the input source on the projector and click the start capture button on the LiveViewer.
3.3.1 Display Mode
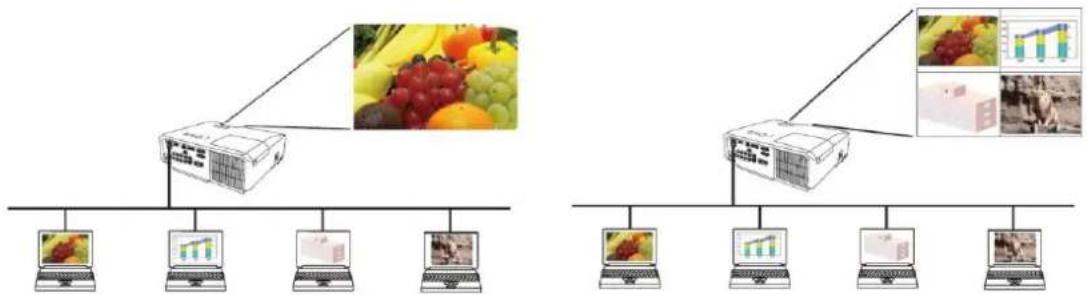
InLiveViewer, there are two display modes, Single PC mode and Multi PC mode.
Single PC mode
The projector displays images sent by one computer. Also audio can be sent by one computer. (☐ 32)
Multi PC mode
The projector can display images of up to four computers of connected at the same time.
flowchart
graph TD
    A["Server Rack 1"] --> B["Laptop 1"]
    A --> C["Laptop 2"]
    A --> D["Laptop 3"]
    A --> E["Laptop 4"]
    A --> F["Laptop 5"]
    G["Data Visualization: Fruit Image & Image"] --> A
    H["Data Visualization: Fruit Image & Image"] --> G
    I["Data Visualization: Fruit Image & Image"] --> H
NOTE
• Audio cannot be sent in the Multi PC mode.
- When multiple computers are connected and try to communicate with one projector, data transfer performance may decrease.
- When motion pictures are displayed on screen of the projector, it is not recommended to connect more than five computers with the projector.
- When multiple computers are connected to one projector, it is recommended to consult with network administrator to establish suitable connection environment with less load given to network as possible.
• Picture quality may deteriorate or audio output may be interrupted due to low data transfer rate caused by low communication band between computer and projector when multiple computers are communicating with projector.
- If you try to connect via network to the projector which another computer has been using as a USB display, it might reduce transfer rate causing deterioration of image quality or interruption of audio output.
3.3.2 Presenter Mode
In the Single PC mode, the projector can be occupied by one computer and can block access from any other computer, if the Presenter Mode is selected in LiveViewer. While making your presentation, you don't need to worry that the image on screen is unexpectedly switched to an image sent by another computer. Presenter Mode can be set to on in the option menu in the LiveViewer.
3.3.3 Display User Name
A user name can be set in LiveViewer, which is displayed on screen while presenting. So, viewers know whose image is currently displayed on screen.
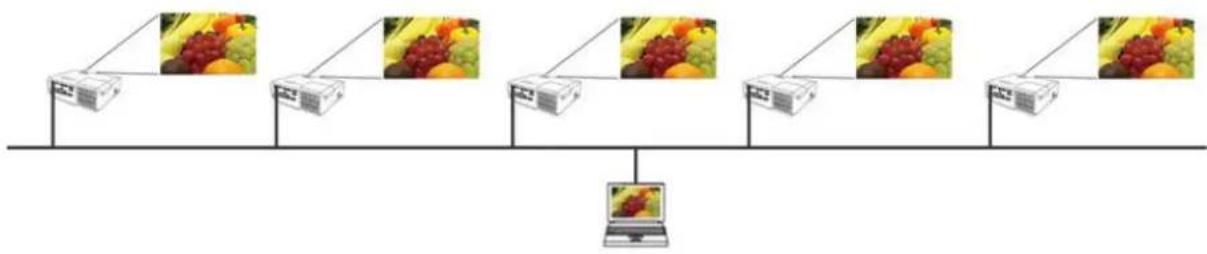
3.3.4 Multi Projector Mode
The projectors and your computer are in Multi Projector mode when plural projectors are connected to your computer. In the Multi Projector mode, up to 12 projectors can connect with the computer via wireless or wired LAN simultaneously.
flowchart
graph TD
    A["Server Rack 1"] --> B["Laptop"]
    C["Server Rack 2"] --> B
    D["Server Rack 3"] --> B
    E["Server Rack 4"] --> B
    F["Server Rack 5"] --> B
    G["Server Rack 6"] --> B
    H["Server Rack 7"] --> B
    I["Server Rack 8"] --> B
    J["Server Rack 9"] --> B
    K["Server Rack 10"] --> B
    L["Server Rack 11"] --> B
    M["Server Rack 12"] --> B
    N["Server Rack 13"] --> B
    O["Server Rack 14"] --> B
    P["Server Rack 15"] --> B
    Q["Server Rack 16"] --> B
    R["Server Rack 17"] --> B
    S["Server Rack 18"] --> B
    T["Server Rack 19"] --> B
    U["Server Rack 20"] --> B
NOTE
• Audio cannot be sent in the Multi Projector mode.
• The Presenter Mode is canceled in all projectors when one of them canceled it in the Multi Projector mode.
- Multi PC mode is NOT available in the Multi Projector mode.
- Transfer performance may decrease in the Multi Projector mode.
- Display mode button ☐ on the LiveViewer main menu is automatically changed to Multi Projector mode button ☐ in the Multi Projector mode. (☐ 27)
• It is recommended to connect computer and multiple projectors wired for Multi Projector mode.
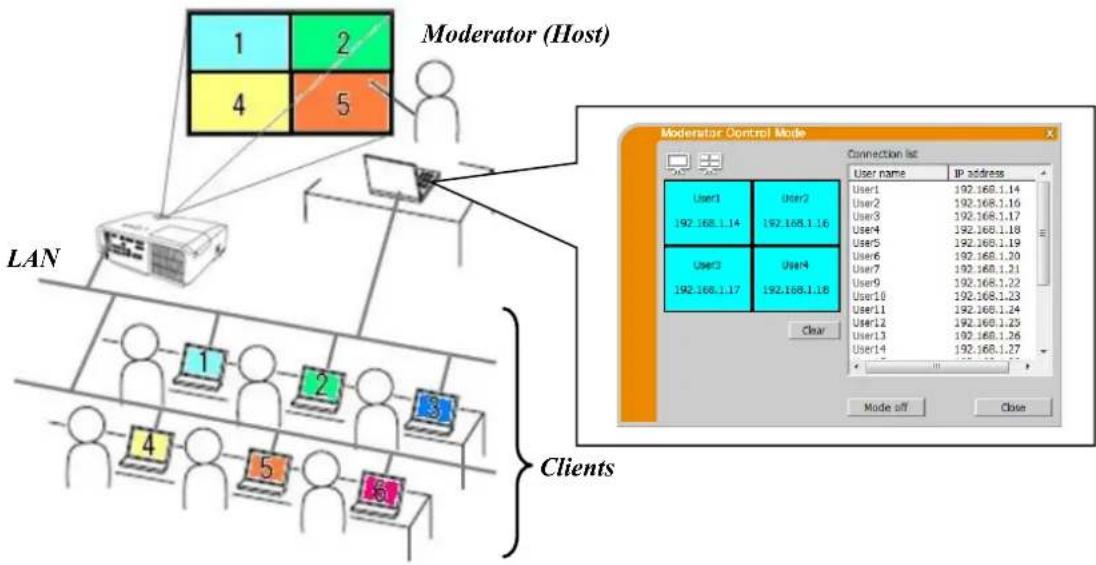
3.3.5 Moderator Control Mode
A computer can be set to Moderator (Host) that can control all other computers (Clients) connected with the projector via wireless or wired LAN. Since Clients cannot control the LiveViewer and the projector, the Host can proceed with the program as arranged smoothly and safety. (Projector Models Group: B)
flowchart
graph TD
    subgraph_Host["Host"]
        A["1"] --> B["2"]
        C["4"] --> D["5"]
    end
    subgraph_Clients["Clients"]
        E["1"] --> F["2"]
        G["3"] --> H["4"]
        I["5"] --> J["6"]
    end
    A --> K["LAN"]
    C --> K
    D --> K
    E --> K
    F --> K
    G --> K
    H --> K
    I --> K
    J --> K
    K --> L["Monitor Device"]
    L --> M["Connection List"]
    M --> N["User name: IP address"]
    M --> O["User1: 192.168.1.14"]
    M --> P["User2: 192.168.1.16"]
    M --> Q["User3: 192.168.1.17"]
    M --> R["User4: 192.168.1.18"]
    M --> S["User5: 192.168.1.19"]
    M --> T["User6: 192.168.1.20"]
    M --> U["User7: 192.168.1.21"]
    M --> V["User8: 192.168.1.22"]
    M --> W["User9: 192.168.1.23"]
    M --> X["User10: 192.168.1.24"]
    M --> Y["User11: 192.168.1.25"]
    M --> Z["User12: 192.168.1.26"]
    M --> AA["User13: 192.168.1.27"]
    M --> AB["User14: 192.168.1.27"]
    M --> AC["Clear"]
    AC --> AD["Mode off"]
    AC --> AE["Close"]
NOTE
• Up to 50 computers, including the Host computer, can join one group of the Moderator Control mode.
- Only one computer can be set as Moderator.
- When a computer is set as Moderator, once all computers including the Moderator connected to the same projector stop image transmission.
- The Presenter mode is NOT available in the Moderator Control mode.
- The Moderator Control mode can be canceled by force when the network is restarted in the projector menu or Web Control on a web browser is executed.
4 LiveViewer Operation
When you get the connection between your projector and computer, the LiveViewer main menu will be shown on the computer screen. On the main menu you can configure settings and operate functions to send your images to the projector.
4.1 Main menu and Operating buttons
4.1.1 Menu Type
There are two types of the LiveViewer main menu, Easy and Advanced, which can be switched on screen. When LiveViewer is started or the connection is not established, Advanced type will be shown first.
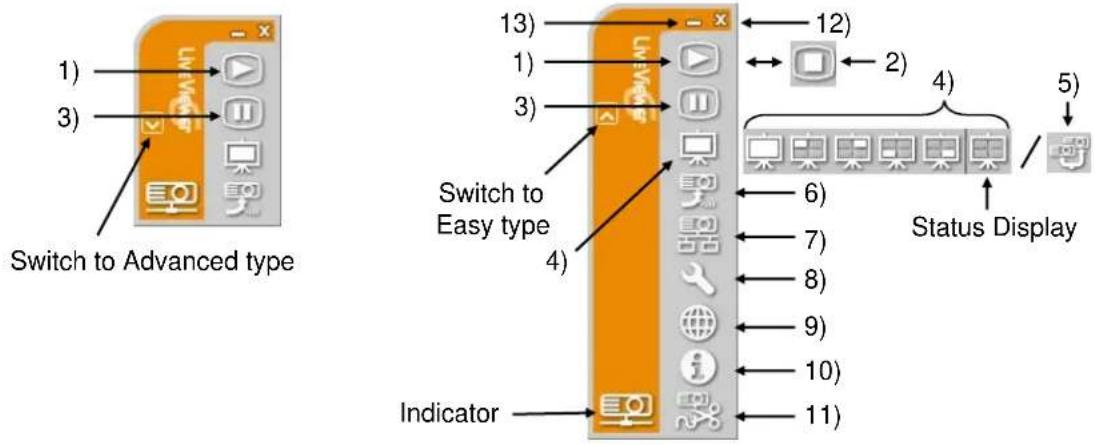
The transmission to the projector is started and the images will be displayed. The display mode will be the Single PC mode at first. After that, the last display mode will be applied.
NOTE
• The start capture button cannot be operated if someone has already been Moderator.
- The primary image is displayed in multi-display environment.
2) Stop capture button
Start capture button is automatically changed to stop capture button when image transmission starts. The image transmission is stopped.
NOTE
• Images may not be displayed on screen, if the start/stop capture buttons are clicked repeatedly.
3) Hold button
The image on screen is temporally frozen. The last image before the button is clicked remains on screen. You can revise the image data on your computer without showing it on the projector's screen.
NOTE
• The Multi Projector mode button cannot operate until the screen unfreezes.
4) Display mode buttons (☐ 30)
Display mode switches between Single PC mode and Multi PC mode.
Also the image transmission can be started or stopped.
5) Multi Projector mode button
Display mode button is automatically changed to Multi Projector mode button in the Multi Projector mode.
The Multi Projector Control window appears. (30)
6) Moderator Control mode button (Projector Models Group: B)
The computer is set to the Moderator and the Moderator Control window appears. (31)
NOTE
- The Moderator Control mode button and start capture button cannot be operated if somebody connected to same projector has already been Moderator.
• The Moderator Control mode button cannot be clicked in the Multi Projector mode.
7) Connect button
The dialog to select the connection method is displayed.
For details, refer to the section "3.2.2 Select Connection method. (9)
8) Option button
The option menu is displayed.
Starts the Web browser on your computer and displays the Web Control screen to control one projector and change various settings for the projector.
NOTE
- "Web Control" cannot control multiple projectors at the same time. In the Multi Projector mode, a window with all connected projectors listed is displayed when Web Control button is clicked. Select one projector you want to control.
10) Information button
The version of LiveViewer is displayed.
The network is disconnected.
12) Exit button
The network is disconnected andLiveViewer is closed.
13) Minimize button
The main menu is closed, and only theLiveViewer icon is displayed on the task tray in your computer.
Double-click the icon in the task tray to relaunch the main menu.
Connected

Disconnected

Not connected

Hold

Fig.4.b Task tray Icon
4.1.3 Displaying the Status
4.1.3.1 Indicator
The indicator shows the following status.
| Indicator | Status | Note |
 | Not connected | The network connection to the projector is not established yet. |
 | Hold | The network connection is established, but the image transmission is on hold. |
 | Connected | The network connection is established and the images on the computer are b sent to the projector. The indicator blinks while the connection is in progres: |
 | Disconnected | The network connection to the projector is disconnected. |
4.1.3.2 Status Display in Multi PC mode
The icon is displayed at the right end of the display mode buttons. One of the following icons are designed to inform you how many and which of the quarter screens are in use in Multi PC mode.
| Status | Status icon |
| No computer is on screen | [KEZ] |
| One computer is on screen. | [Y480] |
| Two computers are on screen. |  |
| Three computers are on screen. | [TYH7] |
| Four computers are on screen. |  |
NOTE
- The status display is refreshed in every four seconds.
- If status cannot be acquired, it will not be refreshed.
4.1.4 Switching the display mode
LiveViewer has Single PC mode and Multi PC mode. These modes can be switched on the main menu.
√ Click the display mode button on the main menu. The buttons below are displayed.
√ Select from 1) to 5) buttons, and click it.
1) Single PC mode button: Switches to the Single PC mode. Your image is displayed full screen.
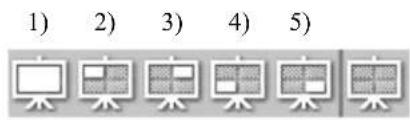
2) - 5) Multi PC mode buttons: Switches to the Multi PC mode. Your image is displayed on a quarter screen as identified in the button.
The projector screen is switched to the mode selected above, and the transmission of your computer image will be started to display your image on the screen.
The icon of the display mode button - on the main menu is replaced by the icon you selected.
NOTE
• Image transmission will be stopped in the following situations:
When you click the Single PC mode button while the projector is in the Single PC mode
When you click one of the Multi PC mode buttons while the projector is in the Multi PC mode
- When Multi PC mode is selected, the projector screen is automatically divided into four zones.
- When the screen or one of the areas occupied by another computer is selected, the image transmission from that computer will be put on hold and the image of the currently specified computer will be displayed.
4.2 Multi Projector Control window
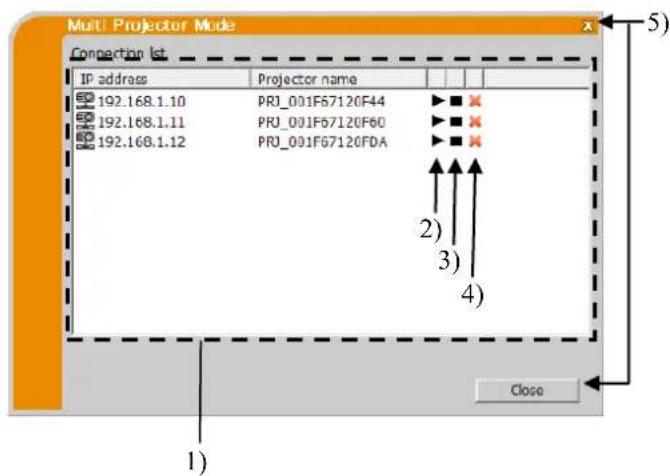
In the Multi Projector mode, up to 12 projectors can be connected and controlled individually or simultaneously.
1) Connection list
All of the connected projectors are displayed in the list.
2) Start capture button
The transmission to the projector is started and the images will be displayed
3) Stop capture button
The image transmission is stopped.
4) Disconnect button
The network is disconnected. The disconnected projector disappears from the Connection list.
5) Close button
Close the Multi Projector Control window and back to theLiveViewer main menu.
text_image
Multi Projector Mode Connection list IP address Projector name 192.168.1.10 PRI_001F67120F44 192.168.1.11 PRI_001F67120F60 192.168.1.12 PRI_001F67120FDA 5) 2) 3) 4) Close 1)You can check the status of the connection by the following icon on Connection list.


: The network connection is established, but the image transmission is on hold.
: The network connection is established and the images on the computer are being sent to the projector.
4.3 Moderator Control window
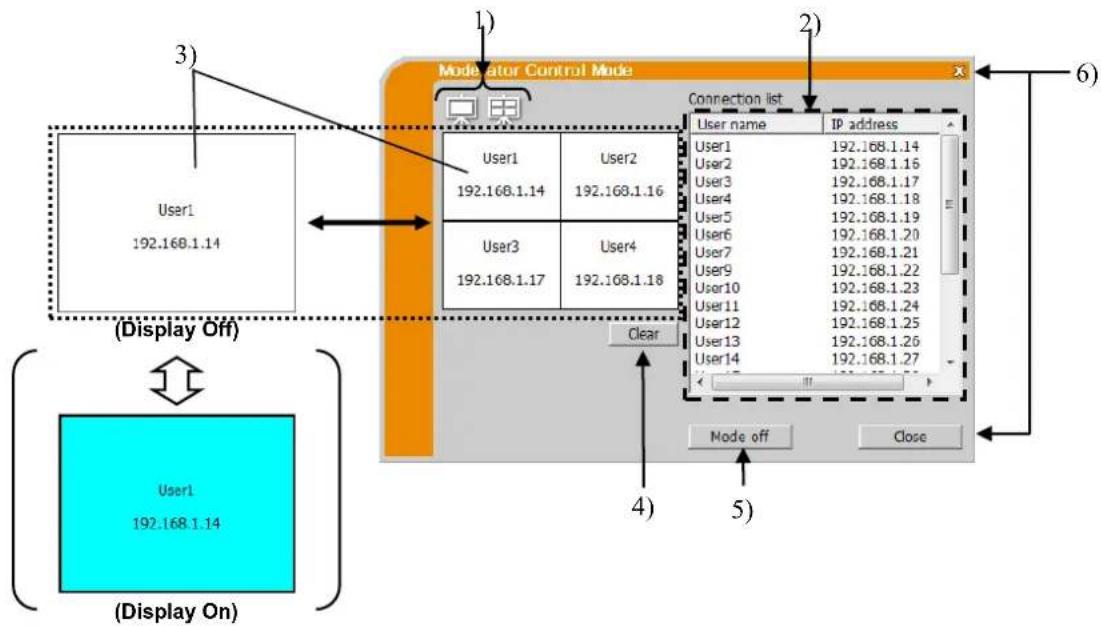
A computer can be set to Moderator (Host) that can control all other computers (Clients) connected with the projector. (Projector Models Group: B)
flowchart
graph TD
    A["User1 192.168.1.14"] --> B["Motorator Control Mode"]
    B --> C["Connection list"]
    C --> D["User name IP address"]
    D --> E["User1 192.168.1.14"]
    D --> F["User2 192.168.1.15"]
    D --> G["User3 192.168.1.17"]
    D --> H["User4 192.168.1.18"]
    D --> I["User5 192.168.1.19"]
    D --> J["User6 192.168.1.20"]
    D --> K["User7 192.168.1.21"]
    D --> L["User9 192.168.1.22"]
    D --> M["User10 192.168.1.23"]
    D --> N["User11 192.168.1.24"]
    D --> O["User12 192.168.1.25"]
    D --> P["User13 192.168.1.26"]
    D --> Q["User14 192.168.1.27"]
    B --> R["Clear"]
    R --> S["Display Off"]
    S --> T["User1 192.168.1.14"]
    T --> U["(Display On)"]
    U --> V["Mode off Close"]
1) Display mode buttons (☐ 30)
Display mode switches between Single PC mode and Multi PC mode.
2) Connection list
All computers connected to the same projector as the Moderator connected to are displayed in the list.
3) Display window
The information of the computers whose images are displayed on screen of the projector is displayed. Drag and drop the computer from the Connection list onto this area to display the image on screen of the projector. Image transmission is started/stopped each time the window is clicked. In the Multi PC mode, the window is divided into four zones the same as the screen. Each zone can be manipulate independently and the information is displayed for each.
4) Clear button
Clears the Display window and stops image transmission to the projector.
5) Mode off button
Cancels the Moderator Control mode. The Display window is cleared and image transmission to the projector stops.
6) Close button
Closes the Moderator Control window and back to theLiveViewer main menu.
4.4 Option menu
Clicking the option button displays the option menu on screen.
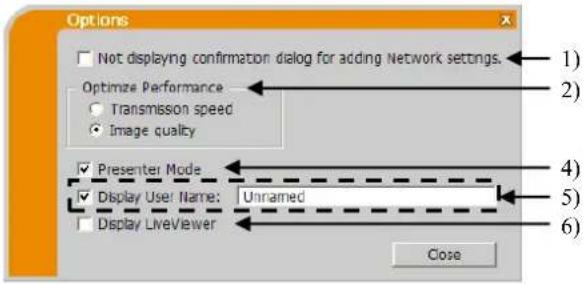
text_image
Options Not displaying confirmation dialog for adding Network settings. Optimize Performance Transmission speed Image quality Presenter Mode Display User Name: Unnamed Display LiveViewer Close 1) 2) 4) 5) 6)Fig. 4.c Option menu of Projector Models Group: A
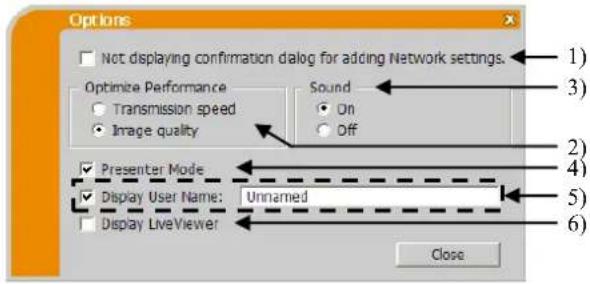
text_image
Options Not displaying confirmation dialog for adding Network settings. Optimize Performance Transmission speed Image quality Sound On Off Presenter Mode Display User Name: Unnamed Display LiveViewer CloseFig. 4.d Option menu of Projector Models Group: B
1) Not displaying confirmation dialog for adding Network settings.
If checked – The confirmation dialog for adding a network configuration (☐ 37) is not displayed when you connect the computer to the projector.
If unchecked - The dialog is always displayed (Default behavior).
2) Optimize Performance
LiveViewer captures computer screen in JPEG data and sends the JPEG data to the projector. LiveViewer has two options that have different compression rate of JPEG data.
Transmission speed: Speed takes priority over image quality. It makes JPEG compression rate higher. The screen on the projector is rewritten quicker because the transferred data is smaller, but the image quality is worse.
Image Quality: Image quality takes priority over speed. It makes JPEG compression rate lower. The screen on the projector is rewritten slower because the transferred data is larger, but the image quality is better.
3) Sound (only for Projector Models Group: B)
Audio transmission can be selected valid (On) or invalid (Off). The default setting is On.
4) Presenter Mode
In the Single PC mode, the projector can be occupied by one computer and can block access from any other computer, if the Presenter mode is selected in LiveViewer. While making your presentation, you don't need to worry that the image on screen is unexpectedly switched to an image sent by another computer. If you want to turn it on, put a check mark in the check box.
NOTE
• If the Multi PC mode is selected, the setting for the Presenter mode is invalid.
- When switching from the Multi PC mode to the Single PC mode, the Presenter mode setting of the computer is valid.
- The Presenter mode is set valid in factory default setting.
5) Display User Name
A user name that is up to 20 letters can be input by using alphanumeric characters. The user name can be displayed on the projector screen, so you can find out whose image is currently on the screen. If the check box is not marked, the information is not sent to the projector.
6) Display LiveViewer
If you want to display LiveViewer application window to the screen of the projector, please check the box.
NOTE
- WhenLiveVieweris used in Windows ^® 8,the setting of "DisplayLiveViewer" is always on.
4.5 Profile data
4.5.1 Outline of Profile data
The network setting to connect the projector and computer can be stored as a profile data. Once the data is stored, all you need to do is to select the data to connect to the network. It is recommended when the same network connection is often used.
4.5.2 Making Profile data
√ Select "Profile" and click [Add] in the menu of LiveViewer connection method.
√ “Create new profile” will come up. If you have already made 20 profile data, you cannot make a new one, until you delete a stored data. Input all information required for your network connection. If you want to clear all information you input, click [Clear].
√ Click [OK], after all information is set. If you don't want to store it, click [Cancel].
√ The new profile data is shown in the Profile list, if you click [OK].
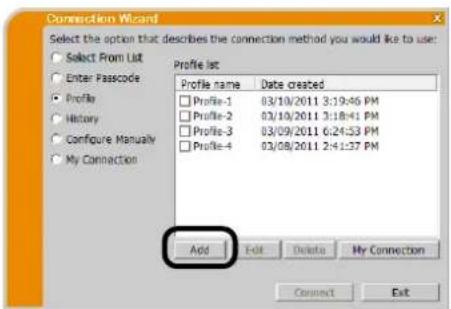
text_image
Connection Wizard Select the option that describes the connection method you would like to use: Select From List Enter Passcode Profile History Configure Manually My Connection Profile list Profile name Data created Profile-1 03/10/2011 3:19:46 PM Profile-2 03/10/2011 3:18:41 PM Profile-3 03/09/2011 6:24:53 PM Profile-4 03/08/2011 2:41:57 PM Add Edit Delete My Connection Connect ExitNOTE
- When you make a new profile, it is strongly recommended to check that the new profile works properly by selecting the data at the profile connection.
- If you change a network adapter on your computer, make a new profile for the adapter.
- Up to 20 profiles can be registered. If 20 profiles already exist, the box cannot be checked.
- The Profile name is assigned by LiveViewer automatically if you registered the profile data as My Connection from the Connection list. The name will be shown in the Profile list.
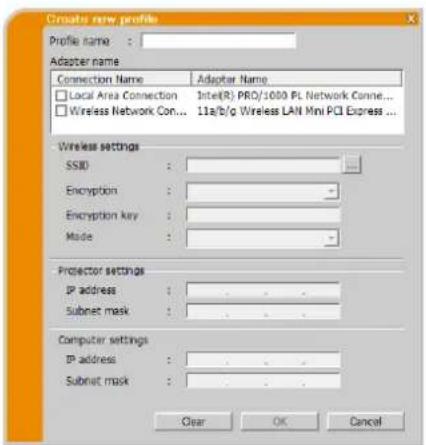
text_image
Create new profile Profile name : Adapter name Connection Name Adaptor Name Local Area Connection Intel(R) PRO/1000 PL Network Conne... Wireless Network Con... 11a/b/g Wireless LAN Mini PCI Express ... Wireless settings SSID : Encryption : - Encryption key : - Mode : - Projector settings IP address : - Subnet mask : - Computer settings IP address : - Subnet mask : - Clear OK Cancel4.5.3 Editing Profile data
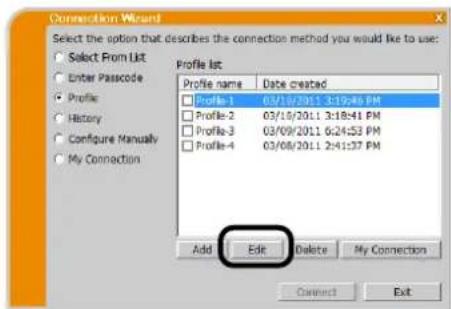
√ Select "Profile", and select one of the profiles listed in the menu of LiveViewer connection method.
√ Click [Edit].
√ The "Edit profile" screen will come up.
√ Edit the information required to be revised. If you want to clear all information you input, click [Clear].
√ Click [OK], after the editing is completed. If you don't want to store it, click [Cancel].
√ The edited profile data is stored and shown in the Profile list with the new Date created information, if you click [OK].
NOTE
- When you make a new profile, it is strongly recommended to check that the new profile works properly by selecting the data at the profile connection.
text_image
Connection Wizard Select the option that describes the connection method you would like to use: Select From List Enter Passcode Profile History Configure Manually My Connection Profile list Profile name Date created Profile 1 03/10/2011 3:19:46 PM Profile-2 03/10/2011 3:18:41 PM Profile-3 03/09/2011 6:24:53 PM Profile-4 03/08/2011 2:41:37 PM Add Edit Delete My Connection Connect Exit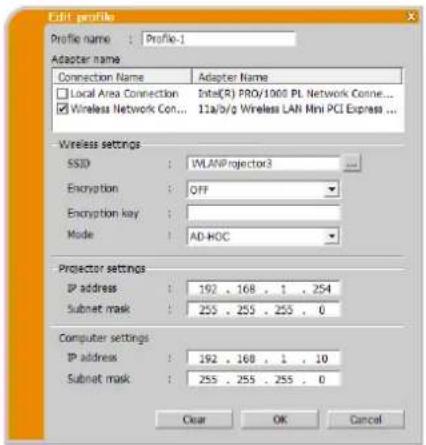
text_image
Edit profile Profile name : Profile-1 Adapter name Connection Name Adapter Name Local Area Connection:Inte(R) PRO/1000 PL Network Conne... Wireless Network Con... 11a/b/g Wireless LAN Mini PCI Express ... Wireless settings SSID : WLANProjector3 Encryption : OFF Encryption key : Mode : AD-HOC Projector settings IP address : 192 . 168 . 1 . 254 Subnet mask : 255 . 255 . 255 . 0 Computer settings IP address : 192 . 168 . 1 . 10 Subnet mask : 255 . 255 . 255 . 0 Clear OK Cancel4.5.4 Registering My Connection
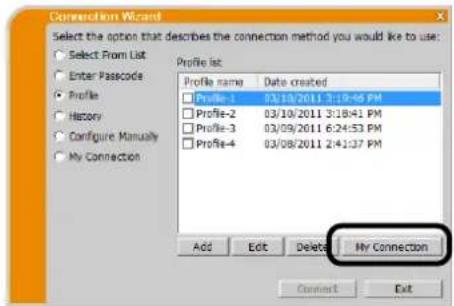
One profile can be registered as 'My Connection' to be often used. Once registered, all you need to do is to select My Connection to connect to the network.
√ Click [My Connection].
√ The "Add My Connection" screen will come up. The currently selected profile data for the My Connection is shown with a check mark in the list.
√ Select one profile listed in the window and put a mark in the check box.
√ Click [OK], then the window is closed. If you don't want to select a new one, click [Cancel].
You can also register My Connection from the Connection list displayed after the network connection is established. For details, refer to the section "3.2.5.2 Connection List". (☐ 22).
text_image
Connection Wizard Select the option that describes the connection method you would like to use: Select From List Enter Passcode Profile History Configure Manually My Connection Profile list: Profile name Date created Profile-1 03/10/2011 3:19:45 PM Profile-2 03/10/2011 3:18:41 PM Profile-3 03/09/2011 6:24:53 PM Profile-4 03/08/2011 2:41:37 PM Add Edit Delete My Connection Connect Exit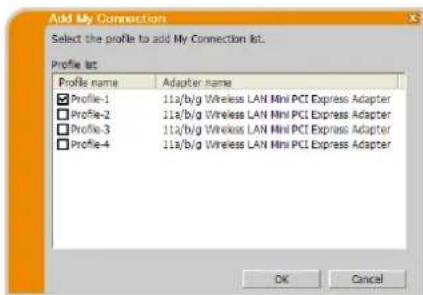
text_image
Add My Connection Select the profile to add My Connection list. Profile list: Profile name Adapter name ✓ Profile-1 11a/b/g Wireless LAN Mini PCI Express Adapter ✓ Profile-2 11a/b/g Wireless LAN Mini PCI Express Adapter ✓ Profile-3 11a/b/g Wireless LAN Mini PCI Express Adapter ✓ Profile-4 11a/b/g Wireless LAN Mini PCI Express Adapter OK CancelNOTE
- In the list, all profile data are shown no matter which network adapter is selected. You can register a profile that is not for currently selected network adapter as My Connection.
Appendix
A Messages
The following message dialogs appear if a problem has occurred or to present to you information. Read and deal with the messages if they appear.
Message 1: A network connection was not established.
This message is displayed in the case that the projector is not connected with a LAN cable to your computer when wired LAN is selected. Be sure that the projector is connected with a LAN cable to your computer.
Click [OK] to return to the previous screen.
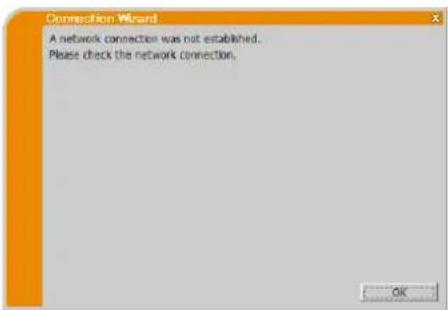
text_image
Connection Wizard A network connection was not established. Please check the network connection.Message 2: The number of computer connection exceeds the limit (max. 50).
The projector has already reached the maximum number of network connections.
Click [OK], and the LiveViewer main menu is displayed.
Please retry after disconnecting one (or more) of the connected computers.
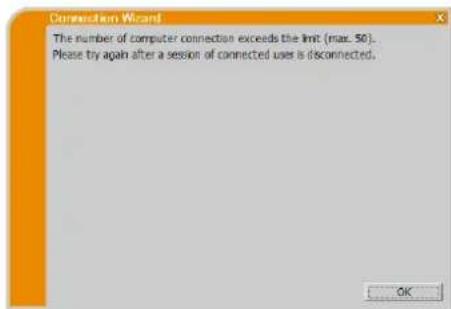
text_image
Connection Wizard The number of computer connection exceeds the limit (max. 50). Please try again after a session of connected uses is disconnected.Message 3: A network connection could not be established.
Windows ^® prevented network configuration changes because you may have not logged into Windows ^® under Administrator authority. Click [OK] to return to the previous screen.
Consult with the network administrator to log in under Administrator authority. Once log out from Windows ^® , log in again with
Administrator authority and return to "3.2 Connecting to the network". (9)
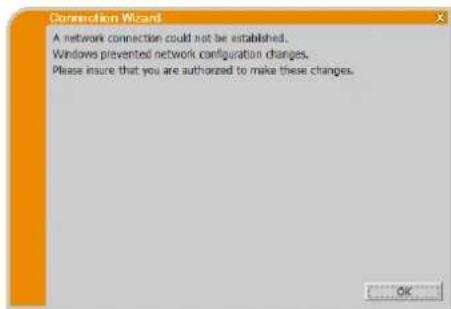
text_image
Connection Wizard A network connection could not be established. Windows prevented network configuration changes. Please insure that you are authorized to make these changes.Message 4: Are you sure you want to connect the selected projector?
This message appears when the wireless adapter you selected is already in use with another network connection.
To connect, click [Yes].
Proceed to item "3.2.5 Connection and transmission". (☐ 22)
Click [No] to return to the previous screen.
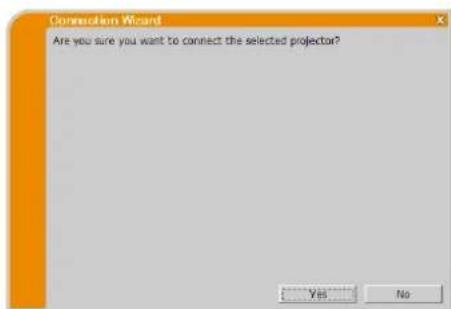
text_image
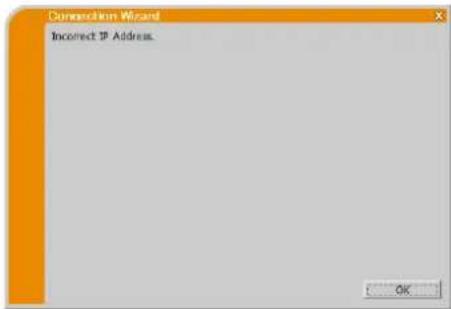
Connection Wizard Are you sure you want to connect the selected projector? Yes NoMessage 5: Incorrect Passcode.
The incorrect Passcode was input.
Click [OK] to return to the "Enter Passcode" screen.
Check the Passcode on the projector screen and enter the code again. (13)
text_image
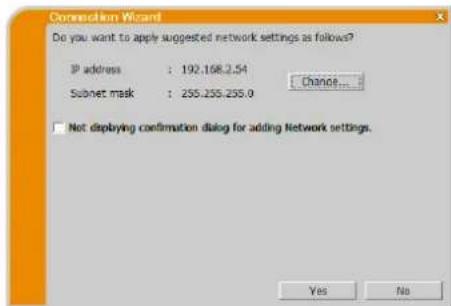
Conversion Wizard Incorrect IP Address. OKMessage 6: Do you want to apply suggested network settings as follows?
This dialog will be displayed when you need to change a Network configuration on your computer in order to connect to the projector. Confirm with your network administrator if the Network configuration on the dialog is OK. Then click [Yes]. If you don't want to apply the Network configuration on the dialog, click [No]. If you want to add the Network configuration manually, click [Change]. A new dialog will be displayed to add a network configuration as shown on the right hand side. Please enter IP address and subnet mask of your computer. Then click [OK].
text_image
Connection Wizard Do you want to apply suggested network settings as follows? IP address : 192.168.2.54 Subnet mask : 255.255.255.0 Chance... Not displaying confirmation dialog for adding Network settings. Yes NoNOTE
- If you checked "Not displaying confirmation dialog for adding Network settings" option, this dialog will not show up the next time. If you would like to change the setting, click option button on theLiveViewer main menu and uncheck "Not displaying confirmation dialog for adding Network settings" option.
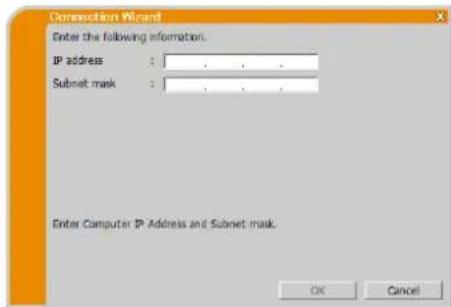
text_image
Conversation Wizard Enter the following information. IP address : Subset mask : Enter Computer IP Address and Subnet mask. OK CancelMessage 7: An IP Address overlaps with the IP Address of the projector you are trying to connect to.
This message appears when the IP address on your computer is the same as that of the projector. Since different IP addresses are required, click [OK] and enter proper IP address.
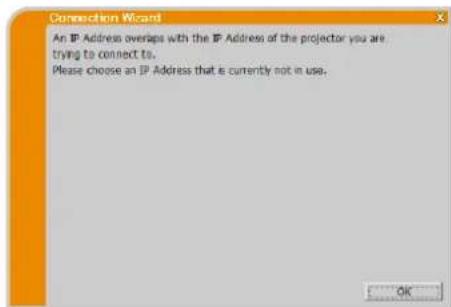
text_image
Connection Wizard An IP Address overlaps with the IP Address of the projector you are trying to connect to. Please choose an IP Address that is currently not in use.Message 8: Incorrect IP Address.
This message appears when an incorrect IP address on your computer is set.
Click [OK] and enter proper IP address.

text_image
Connection Wizard Incorrect IP Address. OKMessage 9: A Network Configuration Conflict exists.
This message comes up when the network connection mode you set in the computer does not match with the mode of the projector. Please verify your network configuration setting on the projector and computer.
Click [OK], then theLiveViewer main menu is displayed even though the network connection is not established.
Click connect button on the LiveViewer main menu to go back to "3.2.2 Select Connection method". (9)
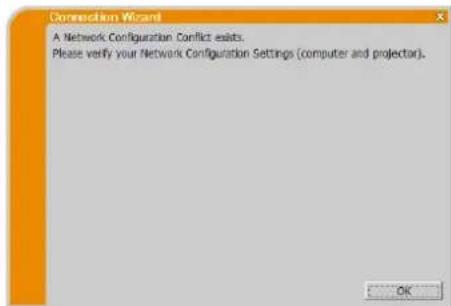
text_image
Connection Wizard A Network Configuration Conflict exists. Please verify your Network Configuration Settings (computer and projector). OKMessage 10: There is a projector already connected with your computer.
This message appears when there is a projector already connected with your computer.
Click [Yes] if you disconnect the current connection. New connection is established.
Click [No] if you keep the current connection with establishing new connection. (Multi Projector mode)
Click [Cancel] if new connection cannot be established and keep current connection.
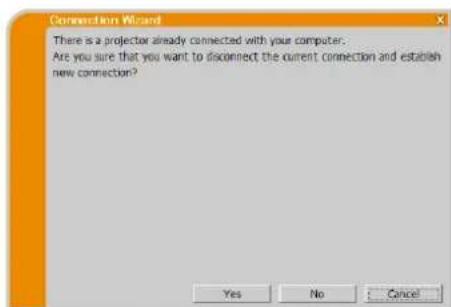
text_image
Connections Wizard There is a projector already connected with your computer. Are you sure that you want to disconnect the current connection and establish new connection? Yes No CancelNOTE
- Up to 12 projectors can be connected at the same time.
- When multiple projectors are connected to, the Multi Projector mode is selected automatically. (25)
- "No" cannot be clicked when there are already 12 connected projectors.
Message 11: In order to connect to the selected projector, you need to disconnect from the current projector.
This message appears when the number of connected projectors exceeds the maximum number.
Click [Yes] if you disconnect the current connection. New connection is established.
Click [No] if new connection cannot be established and keep current connection.
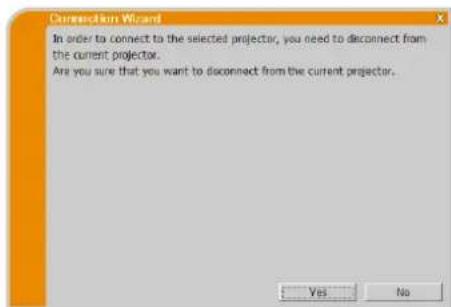
text_image
Connection Wizard In order to connect to the selected projector, you need to disconnect from the current projector. Are you sure that you want to disconnect from the current projector.Message 12: This projector is currently in use (Presenting) by another user.
The projector you want to send your images to is occupied by another computer in the Presenter mode.
Click [OK], then theLiveViewer main menu is displayed in stand-by mode.
Retry to send your images, after the Presenter mode is off.
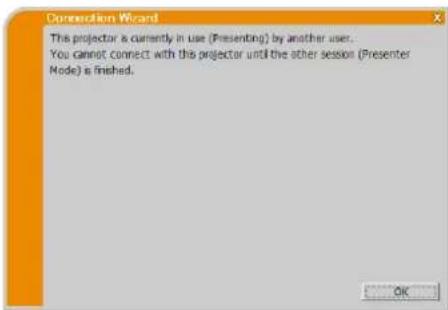
text_image
Conversion Wizard This projector is currently in use (Presenting) by another user. You cannot connect with this projector until the other session (Presenter Mode) is finished.Message 13: A Slideshow is currently running on the projector that you are trying to display to. (PC-Less Presentation Mode).
The projector you want to send your images to is in the Slideshow mode in the PC-LESS Presentation.
Click [Yes], then the projector will stop the Slideshow and switch the input port to LAN. Your computer starts image transmission.
Click [No], then the projector remains in the Slideshow mode, and the LiveViewer main menu is displayed in stand-by mode on your computer.
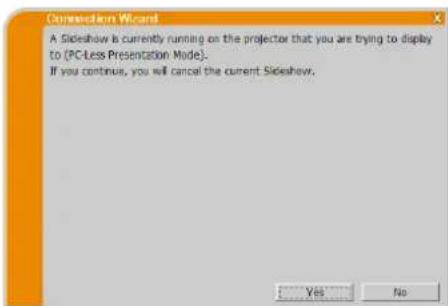
text_image
Connection Wizard A Sideshow is currently running on the projector that you are trying to display to (PC-Less Presentation Mode). If you continue, you will cancel the current Sideshow. Yes NoMessage 14: Are you sure you want to change the input channel of the Projector to 'LAN'?
The projector is not set to the LAN as an input signal.
Click [Yes], and the projector is switched to the LAN.
Click [No], then the projector remains as it is, and the LiveViewer main menu is displayed in the stand-by mode on your computer.
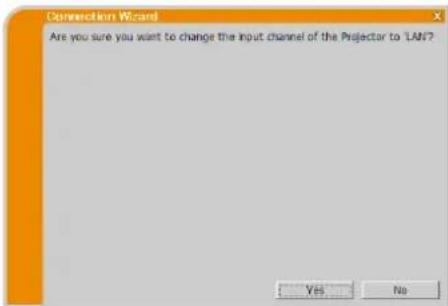
text_image
Connection Wizard Are you sure you want to change the input channel of the Projector to LAN? Yes NoMessage 15: Are you sure that you want to turn on the network adapter?
The screen is displayed in the case that the selected network adapter is invalid.
Click [Yes] to turn it on. Proceed to item "3.2.5 Connection and transmission". (☐ 22)
Click [No] to not turn it on. The screen is back to the previous one to select another network adapter.
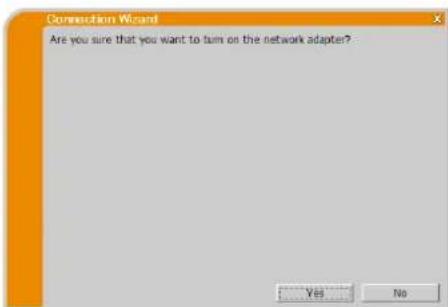
text_image
Connection Wizard Are you sure that you want to turn on the network adapter? Yes NoMessage 16: It cannot be connected because improper native resolution panel projector is selected.
This message is displayed when the projectors with different native panel resolutions are trying to connect to same computer.
Click [OK], then the LiveViewer main menu is displayed even though the network connections with selected projectors are not established.
Click connect button on the LiveViewer main menu to go back to "3.2.2 Select Connection method". (☐ 9)
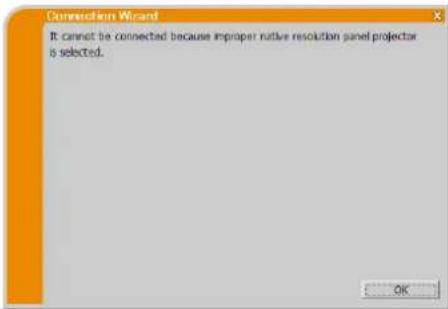
text_image
Connection Wizard It cannot be connected because improper native resolution panel projector is selected. OKMessage 17: Since moderator control mode of connected projector (IP address: ***.***.***.***) becomes effective, Multi Projector mode is canceled.
This message appears when the Multi Projector mode is canceled, since Moderator Control mode of connected projector becomes effective by another computer.
Click [OK], and the LiveViewer main menu is displayed.
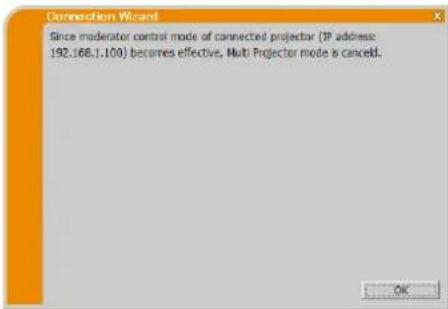
text_image
Connection Wizard Since moderator control mode of connected projector (IP address: 192.168.1.100) becomes effective, Multi Projector mode is cancelled.Message 18: You can not operate while moderator control mode is activated.
The projector is occupied by another computer in the Moderator Control mode.
Click [OK], and theLiveViewer main menu is displayed.
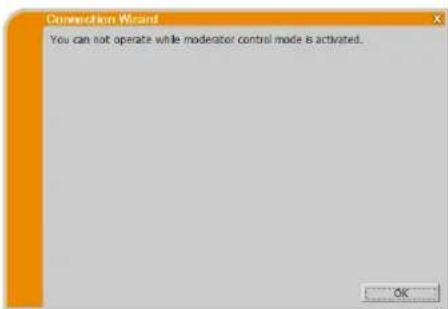
text_image
Connection Wizard You can not operate while moderator control mode is activated. OKB Trouble Shooting
| Problem | Likely Cause | Things to Check | Reference Page Number | |
| No image | The projector is not turned on. | Is the projector's lamp on? | - | |
| The projector's input source isn't switched to LAN. | Is the projector switched to LAN? | - | ||
| Connection to the Network | The projector that you want to connect to is not found on the list of available projectors | The computer and/or projector's network settings are not configured correctly. | Check the network configurations of the computer and projector. If you change the projector's settings, turn off the projector's AC power and then turn it on again. If you simply put the projector in standby power mode and then turn it on again, the new settings might not take effect. | 15 |
| Firewall software other than Windows® Firewall is installed in your computer. | Refer to the manual for the firewall software and take one of the following actions:- Remove LiveViewer from blocking item list- Disable the firewall software while using LiveViewer | - | ||
| Cannot communicate | The computer and/or projector's network settings are not configured correctly. | Check the network configurations of the computer and projector. | 15 | |
| The projector's input source isn't switched to LAN. | Is the projector switched to LAN? | - | ||
| An access point is used, and your computer is connected to the access point via wireless LAN. | Use network utilities that may come with your computer or wireless LAN adapter to establish wireless network connection. For details, refer to the manual of the computer or the adapter. | - | ||
| Network Presentation | The projected image is rather slow compared to that of the computer | Using the Multi PC mode or the Multi Projector mode. | Use the Single PC mode. | 24 |
| The projector isn't capable of relaying dynamic images such as PowerPoint® animation at full speed. | Switching the priority to ‘Transmission Speed’ under the option menu may help to improve speed. | 32 | ||
| The compression rate being used for image transmission is too low. | ||||
| Network Presentation (continued) | No Image | Using Photo Gallery Slide Show in Windows Vista®. | LiveViewer cannot send computer screen data while using Windows Vista® Photo Gallery Slide Show. Please close Photo Gallery Slide Show before using LiveViewer. | - |
| Using Photo Viewer Slide Show in Windows® 7. | LiveViewer cannot send computer screen data while using Windows® 7 Photo Viewer Slide Show. Please close Photo Viewer Slide Show before using LiveViewer. | - | ||
| Poor communication between the computer and projector. | Click the stop capture button from the LiveViewer main menu to disconnect the computer and projector. Next, click the start capture button in the main menu to reconnect the computer and projector.If the projector still does not show any image (black screen), exit from LiveViewer and try again. | 27 | ||
| Can't display movies correctly. | In some combinations of computer's video card and application software, there is a possibility that true image - especially movies played by media player - cannot be transferred to the projector with LiveViewer. | If there is a video acceleration level adjustment function in your application, please try to adjust it. For details, refer to the manual of your application. | - | |
| Images contain lots of interference. | The compression rate being used for image transmission is too high. | Try setting the priority to 'Image Quality' in the LiveViewer option menu. You may experience a drop in speed. | 32 | |
| Neither transparency nor translucency effects (Glass) | LiveViewer does not support these features of Windows® Aero®. | Change the effect other than "Glass". | - | |
| Cannot select Moderator Control mode. | Using Multi Projector mode. | Stop the Multi Projector mode. | 30 | |
| Other computer is already set to Moderator. | Cancel the current Moderator and select new Moderator. | 31 | ||
| Network Presentation (continued) | No Audio | Audio is off. | Set “Sound” ‘On’ in the option menu of LiveViewer. | 32 |
| Using the Multi PC mode or the Multi Projector mode. | Use the Single PC mode. | 30 | ||
| Audio not supported on some models. | Check the model name of the projector and group of the projector models. Audio transmission is available only for Projector Models Group: B. | 5 | ||
| Mute or low volume is selected on the projector. | Check the audio settings on the projector. | - | ||
| Mute or low volume is selected on your computer. | Check the audio settings on your computer. | - | ||
| Poor communication between the computer and projector. | Once set ‘Off’ the “Sound” in the option menu of LiveViewer, then set it ‘On’ again.If the projector still does not produce any sound, restart LiveViewer. | 32 | ||
| If audio output cannot be obtained even though above countermeasures are applied, install LiveViewer again. | 7 | |||
| Network Presentation (continued) | Sound interruption | The computer is connected to or disconnected from peripheral equipment with HDMITM cable, so that the audio configuration on the computer is changed while using LiveViewer. | Please restart LiveViewer. | 9 |
| When multiple computers are communicating with the projector, low communication band between the computers and the projector makes data transfer rate lower and may interrupt the sound. | Please check your network connection. | - | ||
| USB equipment (USB storage device, USB wireless adapter, or others) is connected to USB TYPE A port of the projector.Sound might be interrupted till the firmware of the projector transacts driver embedding that starts just after insertion of the device.In addition, sound may be interrupted while the USB wireless adapter is searching SSID. The adapter searches SSID repeatedly until wireless communication is established. | Wait for a while. Transaction of embedding driver takes up to 30 seconds.Check following items in NETWORK - WIRELESS SETUP menu of the projector, too if you inserted USB wireless adapter. Refer to the User's Manual of the projector for the details of WIRELESS SETUP menu.WIRELESS SETUP confirmation items- MODE- ENCRYPTION- SSIDPlease disconnect the USB wireless adapter when the access point or computer connected to is not working or wireless LAN is not used.Even though the issue is not resolved, reconnect LiveViewer. | - | ||
| Network Presentation (continued) | Noise comes from the speakers in the projector even though computer does not output sound. | Mute function in audio playback software like Windows® Media Player is used. | When computer does not output audio, making LiveViewer “Sound” ‘Off’ decreases noise. | 32 |
| USB equipment (USB storage device, USB wireless adapter and so on) is connected to USB TYPE A port of the projector. | ||||
| Iris feature of the projector is activated. | When computer does not output audio, making LiveViewer “Sound” ‘Off’ decreases sound noise.When active iris is not used, set “ACTIVE IRIS” to “OFF” using projector menu.Refer to the User’s Manual of the projector for the detail of “ACTIVE IRIS”. | 32 | ||
| Others- Information displayed in the screens of LiveViewer is incorrect.- The projector does not respond.- Image on screen is frozen. | Communication between the projector and computer is not working well.Network functions of the projector are not working well. | Click the stop capture button from the LiveViewer main menu to disconnect the computer and projector. Next, click the start capture button in the main menu to reconnect the computer and projector.Even though the issue is not resolved, reconnect LiveViewer. | 27 | |
The Software is being delivered to you “AS IS” and Christie Digital Systems USA, Inc. (CHRISTIE) make no warranty as to its use or performance. CHRISTIE AND ITS SUPPLIERS, INCLUDING BUT NOT LIMITED TO CHRISTIE, DO NOT AND CANNOT WARRANT THE PERFORMANCE OR RESULTS YOU MAY OBTAIN BY USING THE SOFTWARE. EXCEPT TO THE EXTENT PROHIBITED BY LAW IN YOUR JURISDICTION, CHRISTIE AND ITS SUPPLIERS MAKE NO WARRANTIES CONDITIONS, REPRESENTATIONS, OR TERMS (EXPRESS OR IMPLIED WHETHER BY STATUTE, COMMON LAW, CUSTOM, USAGE OR OTHERWISE) AS TO ANY MATTER IN CONNECTION WITH THE SOFTWARE, INCLUDING WITHOUT LIMITATION NONINFRINGEMENT OF THIRD PARTY RIGHTS, MERCHANTABILITY, INTEGRATION, SATISFACTORY QUALITY, OR FITNESS FOR ANY PARTICULAR PURPOSE.
You agree that the Software will not be shipped, transferred or exported into any country or used in any manner prohibited by the United States Export Administration Act or any other applicable export laws, restrictions or regulations (collectively the “Export Laws”). In addition, if the Software is identified as export controlled items under the Export Laws, you represent and warrant that you are not a citizen, or otherwise located within, an embargoed nation (including without limitation Iran, Iraq, Syria, Sudan, Libya, Cuba, North Korea, and Serbia) and that you are not otherwise prohibited under the Export Laws from receiving the Software. All rights to Use the Software are granted on condition that such rights are forfeited if you fail to comply with the terms of this Agreement.
Table des matières
text_image
Choose Setup Language Select the language for the installation from the choices below. English OK Canceltext_image
LiveView6 - InstallShield Wizard Welcome to the InstallShield Wizard for LiveView6 The InstallShield Wizard will install LiveView6 on your computer. To continue, click Next < Back Next > Cancel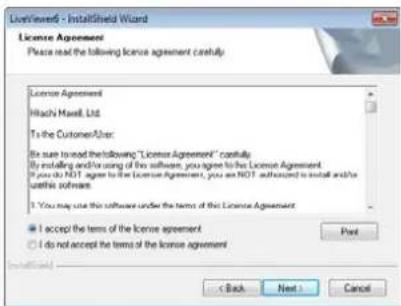
text_image
License Agreement Please read the following license agreement carefully. License Agreement Wachi Maxwell, Ltd. To the CustomerAfter: By sure to read the following "License Agreement" carefully: By installing and/or using of the software, you agree to the License Agreement. If you do NOT agree to the License Agreement, you are NOT authorized to install and/or the useful software. 1 You may use this software under the terms of the License Agreement. ● I accept the terms of the license agreement ○ I do not accept the terms of the license agreement < Back Next > Cancel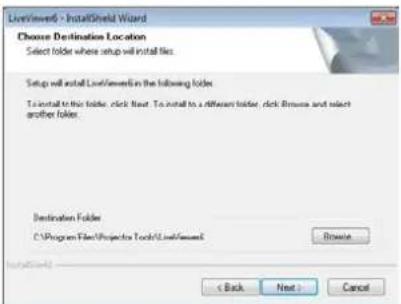
text_image
LiveWindow > InstallShield Wizard Choose Destination Location Select folder where setup will install files. Setup will install LiveWindow in the following folder. To install to this folder, click next. To install to a different folder, click Browse and select another folder. Destination Folder CSProgram Files/Projectors Tools/LiveWindow Browse < Back Next > Cancel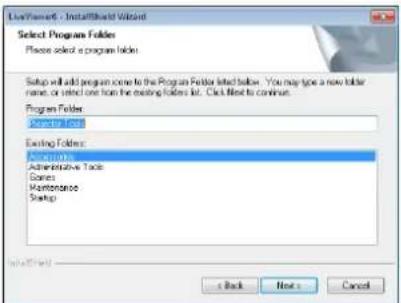
text_image
InstallShield - InstallShield Wizard Select Program Folder Please select a program folder. Setup will add program come to the Program Folder listed folder. You may type a new folder name, or select one from the existing folders list. Click list to continue. Program Folder: Project Files Existing Folders: A Manager Administrative Tools Games Maintenance Startup Back Next Cancel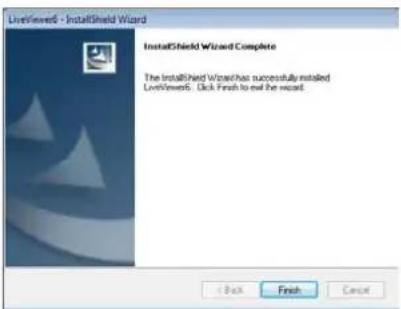
text_image
LiveViewers - InstallShield Wizard InstallShield Wizard Complete The InstallShield Wizard has successfully installed LiveViewers. Click Finish to exit the wizard.text_image
Connection Wizard Select the option that describes the connection method you would like to use: Select From List Enter Passcode Profile History Configure Manually My Connection Projector List Projector name IP address PR1_001F67120F9A 192.168.1.10 PR1_001F67120F20 192.168.1.254 Find Connect Exittext_image
Connection Wizard Select the option that describes the connection method you would like to use: Select From List Enter Passcode Profile History Configure Manually My Connection Projector List Projector name IP address PRJ_001F67120F9A 192.168.1.10 PRJ_001F67120F20 192.168.1.254 Find Connect Exittext_image
Connection Wizard Select the option that describes the connection method you would like to use: Select From List Enter Passcode Profile History Configure Manually My Connection Please select the network adapter that you are going to use. Connection Name Adapter Name Local Area Con... Intel(K) PRO/1000 PL Netw... Wireless Netw... 11a/b/g Wireless LAN Mini P... Please enter the Passcode... The Passcode is a 12-digit code, that can be found on the Startup Screen of the projector you are currently trying to connect to. Connect Exittext_image
Connection Wizard Select the option that describes the connection method you would like to use: Select From List Enter Passcode Profile History Configure Manually My Connection Profile list Profile name Data created Profile-1 03/10/2011 3:19:46 PM Profile-2 03/10/2011 3:18:41 PM Profile-3 03/09/2011 6:24:53 PM Profile-4 03/08/2011 2:41:37 PM Add Edit Delete My Connection Connect Exittext_image
Connection Wizard Select the option that describes the connection method you would like to use: Select From List Enter Passcode Profile History Configure Manually My Connection History list: Projector name IP address Last connected PRJ_001F6... 192.168.1.10 03/10/2011 ... PRJ_001F6... 192.168.1.55 03/08/2011 ... PRJ_001F6... 192.168.1.253 03/08/2011 ... PRJ_001F6... 192.168.1.121 03/07/2011 ... Register to profile Connect Exittext_image
Connection Wizard Select the option that describes the connection method you would like to use: Select From List Enter Passcode Profile History Configure Manually My Connection Please select the network adapter that you are going to use. Connection Name Adapter Name Local Area Con... Ete(K) PRO/1000 PL Netw... Wireless Netw... 11a/b/g Wireless LAN Mini P... Next > ExitREMARQUE
text_image
Connection Wizard Select the option that describes the connection method you would like to use: Select From List Enter Passcode Profile History Configure Manually My Connection Connect to the following projector. JP address : 192.168.1.254 Connect ExitREMARQUE
text_image
Connection Wizard Select the option that describes the connection method you would like to use: Select From List Enter Passcode Profile History Configure Manually My Connection Please select the network adapter that you are going to use... Connection Name Adapter Name Local Area Con... Intel(R) PRO/1000 PL Netw... Wireless Netw... 11a/b/g Wireless LAN Mini P... Please enter the Passcode. The Passcode is a 12-digit code, that can be found on the Startup Screen of the projector you are currently trying to connect to. Connect ExitREMARQUE
natural_image
Illustration of a laptop, lightning bolt, and projector (no text or symbols)text_image
Connection Wizard Enter the following information. SSID : SSID MAC address #J08-0014 01160183BE79 #02687093099 012687093098 CG-Guest 062687093098 Find Encryption : WEP64bit Encryption key :_ Subset mask :_ Please enter the Projector Network Configuration for the projector that you would like to connect to. < Back Connect ExitREMARQUE
natural_image
Diagram showing a projector connected to a laptop and a power cord with a lightning bolt (no text or symbols)text_image
Connection Wizard Enter the following information. SSID : SSID MAC address □ PJ06-0014 001601838E79 □ 002687093099 002687093098 □ CG-Guest 002687093098 Find Encryption : WEP64bit Encryption key :_ Subset mask :_. SSID, Encryption and Encryption key: use wireless access point configuration settings. Subset mask: enter the Subset mask that the projector is using. < Back Connect ExitREMARQUE
Encryption (Cryptage):
WEP64bit (exemple)
Encryption key (Clé de cryptage) *2: ******* (exemple)
natural_image
Illustration of a projector, laptop, and power cord with lightning bolt symbols (no text or labels)text_image
Connection Wizard Enter the following information. SSID : SSID MAC address PJ08-0014 00160183BE79 002687093099 002687093098 CG-Guest 002687093098 Find Encryption: WEP64bit Encryption key : Subnet mask : Please enter the Projector Network Configuration for the projector that you would like to connect to. < Back Connect ExitREMARQUE
text_image
Connection Wizard Enter the following information. Subnet mask : Please enter the projector subnet mask. < Back Connect ExitREMARQUE
√ Enter the following information that is set in the projector.
SSID: wireless (exemple)
Encryption (Cryptage): WEP64bit (exemple)
Encryption key (Clé de cryptage) *2:
********** (exemple)
Mode (mode): AD-HOC
IP address (Adresse IP): 192.168.1.10 (exemple)
natural_image
Illustration of a laptop, a lightning bolt, and a projector (no text or symbols)text_image
Connection Wizard Enter the following information. SSID : SSID MAC address PJ08-0014 001601838E79 002687093099 002687093098 CG-Guest 002687093098 Find Encryption : OFF Encryption key : Mode : AD-HOC Enter the Wireless Projector Configuration Information. Please refer to the following instruction for wireless setup. Menu - Advanced Menu - Network - Wireless Information < Back Next > Exit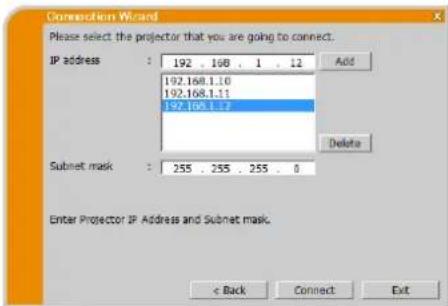
text_image
Connection Wizard Please select the projector that you are going to connect. IP address : 192 . 168 . 1 . 12 Add 192.168.1.10 192.168.1.11 192.168.1.17 Delete Subnet mask : 255 . 255 . 255 . 0 Enter Projector IP Address and Subnet mask. < Back Connect ExitMode (mode): INFRASTRUCTURE
IP address (Adresse IP): 192.168.1.10 (exemple)
natural_image
Diagram showing a projector connected to a laptop and a power cord with a lightning bolt (no text or symbols)text_image
Connection Wizard Please select the projector that you are going to connect. IP address : 192 . 168 . 1 . 12 Add 192.168.1.10 192.168.1.11 192.168.1.12 Delete Subnet mask : 255 . 255 . 255 . 0 Enter Projector IP Address and Subnet mask. < Back Connect ExitEncryption (Cryptage):
WEP64bit (exemple)
Encryption key (Clé de cryptage) *2:
******* (exemple)
Mode (mode): INFRASTRUCTURE
IP address (Adresse IP): 192.168.1.10 (exemple)
natural_image
Illustration of a projector, laptop, and power cord with lightning and ground symbols (no text or labels)text_image
Connection Wizard Please select the projector that you are going to connect. IP address : 192 . 108 . 1 . 12 Add 192.168.1.10 192.168.1.11 192.168.1.12 Delete Subnet mask : 255 . 255 . 255 . 0 Enter Projector IP Address and Subnet mask. < Back Connect ExitIP address (Adresse IP): 192.168.1.10 (exemple)
text_image
Connection Wizard Please select the projector that you are going to connect. IP address : 192 . 168 . 1 . 12 Add 192.168.1.10 192.168.1.11 192.168.1.12 Delete Subnet mask : 255 . 255 . 255 . 0 Enter Projector IP Address and Subnet mask. < Back Connect ExitREMARQUE
text_image
Connection Wizard Connection status IP address Status 192.168.1.10 Connecting... 192.168.1.11 Connected 192.168.1.12 Connect error Connect cancelREMARQUE
text_image
Connection Wizard Connection list IP address Projector name Status ✓ 192.168.1.10 SW_001F67120F44 LAN ✓ 192.168.1.11 PRI_001F67120F60 LAN, Presenter Mode ✓ 192.168.1.12 PRI_001F67120FDA USB type A, Sideshow Register this setting to My Connection Select the projector to send your computer image, then click [Show] button. Automatically change the input source LAN channel, if different channel is selected. If Sideshow is running, Sideshow is terminated and change the input source to LAN channel. Show CloseREMARQUE
text_image
Connection Wizard Failed to connect to the following projector. 192.168.1.10REMARQUE
text_image
Options Not displaying confirmation dialog for adding Network settings. Optimize Performance Transmission speed Image quality Presenter Mode Display User Name: Unnamed Display LiveViewer Closetext_image
Options Not displaying confirmation dialog for adding Network settings. Optimize Performance Transmission speed Image quality Sound On Off Presenter Mode Display User Name: Unnamed Display LiveViewer Close 1) 3) 2) 4) 5) 6)text_image
Connection Wizard Select the option that describes the connection method you would like to use: Select From List Enter Passcode Profile History Configure Manually My Connection Profile list Profile name Date created Profile-1 03/10/2011 3:19:46 PM Profile-2 03/10/2011 3:18:41 PM Profile-3 03/09/2011 6:24:53 PM Profile-4 03/08/2011 2:41:37 PM Add Edit Delete My Connection Connect Exit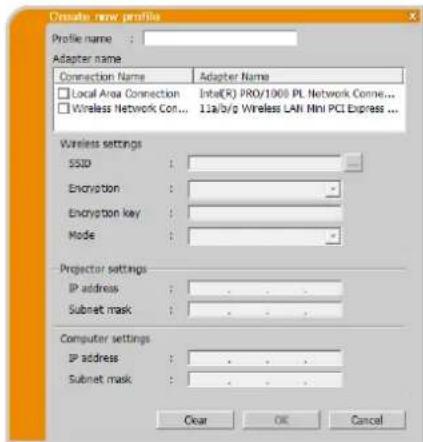
text_image
Create new profiles Profile name : Adapter name Connection Name Adapter Name Local Area Connection Intra(R) PRO/1000 PL Network Conne... Wireless Network Con... 11a/b/g Wireless LAN Mini PCI Express ... Wireless settings SSID : Encryption : - Encryption key : - Mode : - Projector settings IP address : . Subnet mask : . Computer settings IP address : . Subnet mask : . Clear OK Canceltext_image
Projector Connection Select the option that describes the connection method you would like to use: Select From List Enter Passcode Profile History Configure Manually My Connection Profile list Profile name Date created Profile-1 03/10/2011 3:19:46 PM Profile-2 03/10/2011 3:18:41 PM Profile-3 03/09/2011 6:24:53 PM Profile-4 03/08/2011 2:41:37 PM Add Edit Delete My Connection Connect Exit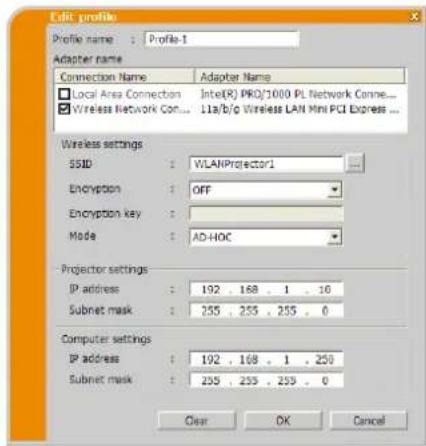
text_image
Edit profile Profile name : Profile-1 Adapter name Connection Name Adapter Name Local Area Connection:Inte(R) PRO/1000 PL Network Conne... Wireless Network Con... 11a/b/g Wireless LAN Mini PCI Express ... Wireless settings SSID : WLANProjector1 Encryption : OFF Encryption key : Mode : AD-HOC Projector settings IP address : 192 . 168 . 1 . 10 Subnet mask : 255 . 255 . 255 . 0 Computer settings IP address : 192 . 168 . 1 . 250 Subnet mask : 255 . 255 . 255 . 0 Clear OK Canceltext_image
Projector Connection Select the option that describes the connection method you would like to use Select From List Enter Passcode Profile History Configure Manually My Connection Profile list Profile name Data created Profile-1 03/10/2011 3:12:46 PM Profile-2 03/10/2011 3:18:41 PM Profile-3 03/09/2011 6:24:53 PM Profile-4 03/08/2011 2:41:37 PM Add Edit Delete My Connection Connect Exit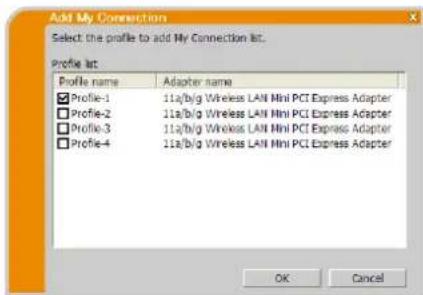
text_image
Add My Connection Select the profile to add My Connection list. Profile list: Profile name Adapter name ✓ Profile-1 11a/b/g Wireless LAN Mini PCI Express Adapter ✓ Profile-2 11a/b/g Wireless LAN Mini PCI Express Adapter ✓ Profile-3 11a/b/g Wireless LAN Mini PCI Express Adapter ✓ Profile-4 11a/b/g Wireless LAN Mini PCI Express Adapter OK CancelREMARQUE
Message 1: A network connection was not established
text_image
Connection Wizard A network connection was not established. Please check the network connection.Message 2: The number of computer connection exceeds the limit (max. 50).
text_image
Connection Wizard The number of computer connection exceeds the limit (max. 50). Please try again after a session of connected user is disconnected.Message 3: A network connection could not be established.
text_image
Connection Wizard A network connection could not be established. Windows prevented network configuration changes. Please insure that you are authorized to make these changes.Message 4: Are you sure you want to connect the selected projector?
text_image
Conversation Wizard Are you sure you want to connect the selected projector? Yes NoMessage 5: Incorrect PassCode
text_image
Connection Wizard Incorrect IP Address. OKMessage 6: Do you want to apply suggested network settings as follows?
text_image
Connection Wizard Do you want to apply suggested network settings as follows? IP address : 192.168.2.54 Subnet mask : 255.255.255.0 Change... Not displaying confirmation dialog for adding Network settings. Yes NoREMARQUE
text_image
Connection Wizard Enter the following information. IP address : Subnet mask : Enter Computer IP Address and Subnet mask. OK CancelMessage 7: An IP Address overlaps with the IP Address of the projector you are trying to connect to.
text_image
Connection Wizard An IP Address overlaps with the IP Address of the projector you are trying to connect to. Please choose an IP Address that is currently not in use.Message 8: Incorrect IP Address.
text_image
Connection Wizard Incorrect IP Address. OKMessage 9: A Network Configuration Conflict exists.
text_image
A Network Configuration Conflict exists. Please verify your Network Configuration Settings (computer and projector). OKMessage 10: There is a projector already connected with your computer.
text_image
Connection Wizard There is a projector already connected with your computer. Are you sure that you want to disconnect the current connection and establish new connection? Yes No CancelREMARQUE
Message 11: In order to connect to the selected projector, you need to disconnect from the current projector.
text_image
Connection Wizard In order to connect to the selected projector, you need to disconnect from the current projector. Are you sure that you want to disconnect from the current projector.Message 12: This projector is currently in use (Presenting) by another user.
text_image
Conversion Wizard This projector is currently in use (Presenting) by another user. You cannot connect with this projector until the other session (Presenter Mode) is finished.Message 13: A Slideshow is currently running on the projector that you are trying to display to (PC-Less Presentation Mode).
text_image
Connection Wizard A Sideshow is currently running on the projector that you are trying to display to (PC-Less Presentation Mode). If you continue, you will cancel the current Sideshow. Yes NoMessage 14: Are you sure you want to change input channel of Projector to LAN?
text_image
Connection Wizard Are you sure you want to change the input channel of the Projector to LAN? Yes NoMessage 15: Are you sure that you want to turn on network adapter?
text_image
Connection Wizard Are you sure that you want to turn on the network adapter? Yes NoMessage 16: It cannot be connected because improper native resolution panel projector is selected.
text_image
Connection Wizard It cannot be connected because improper native resolution panel projector is selected. OKMessage 17: Since moderator control mode of connected projector (IP address: ***.***.***.***) becomes effective, Multi Projector mode is canceled.
text_image
Connection Wizard Since moderator control mode of connected projector (IP address: 192.168.1.100) becomes effective. Multi Projector mode is cancelled.Message 18: You can not operate while moderator control mode is activated.
text_image
Connection Wizard You can not operate while moderator control mode is activated. OKThe Software is being delivered to you “AS IS” and Christie Digital Systems USA, Inc. (CHRISTIE) make no warranty as to its use or performance. CHRISTIE AND ITS SUPPLIERS, INCLUDING BUT NOT LIMITED TO CHRISTIE, DO NOT AND CANNOT WARRANT THE PERFORMANCE OR RESULTS YOU MAY OBTAIN BY USING THE SOFTWARE. EXCEPT TO THE EXTENT PROHIBITED BY LAW IN YOUR JURISDICTION, CHRISTIE AND ITS SUPPLIERS MAKE NO WARRANTIES CONDITIONS, REPRESENTATIONS, OR TERMS (EXPRESS OR IMPLIED WHETHER BY STATUTE, COMMON LAW, CUSTOM, USAGE OR OTHERWISE) AS TO ANY MATTER IN CONNECTION WITH THE SOFTWARE, INCLUDING WITHOUT LIMITATION NONINFRINGEMENT OF THIRD PARTY RIGHTS, MERCHANTABILITY, INTEGRATION, SATISFACTORY QUALITY, OR FITNESS FOR ANY PARTICULAR PURPOSE.
You agree that the Software will not be shipped, transferred or exported into any country or used in any manner prohibited by the United States Export Administration Act or any other applicable export laws, restrictions or regulations (collectively the “Export Laws”). In addition, if the Software is identified as export controlled items under the Export Laws, you represent and warrant that you are not a citizen, or otherwise located within, an embargoed nation (including without limitation Iran, Iraq, Syria, Sudan, Libya, Cuba, North Korea, and Serbia) and that you are not otherwise prohibited under the Export Laws from receiving the Software. All rights to Use the Software are granted on condition that such rights are forfeited if you fail to comply with the terms of this Agreement.
Inhalt
1 Funktionen....3
1.1 Display-Modus....3
1.1.1 Einzel-PC-Modus....3
1.1.2 Multi-PC-Modus....3
text_image
Choose Setup Language Select the language for the installation from the choices below. English OK CancelHINWEIS
text_image
LiveView6 - InstallShield Wizard Welcome to the InstallShield Wizard for LiveView6 The InstallShield Wizard will install LiveView6 on your computer. To continue, click Next < Back Next > Cancel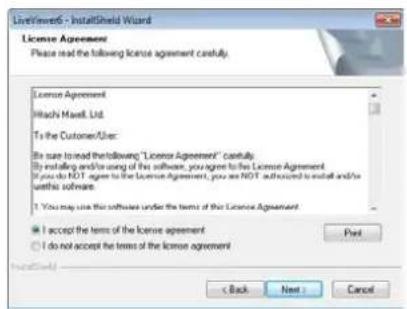
text_image
Installment - InstallShield Wizard License Agreement Please read the following license agreement carefully. License Agreement Washi Mawell, Ltd. To the Customer/User: By sure to read the following "License Agreement" carefully By installing and/or using of the software, you agree to the License Agreement If you do NOT agree to the License Agreement, you are NOT authorized to install and/or write this software. I You may use this software under the terms of the License Agreement I accept the terms of the license agreement I do not accept the terms of the license agreement Back Next Cancel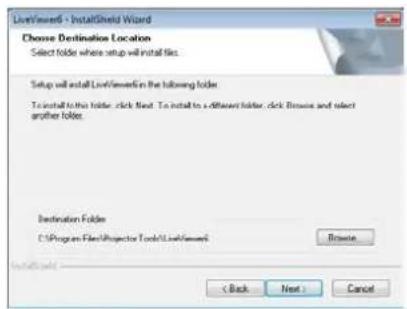
text_image
LiveWindow - InstallShield Wizard Choose Destination Location Select folder where setup will install files. Setup will install LiveWindow in the following folder. To install to this folder, click Next. To install to a different folder, click Browse and select another folder. Destination Folder C:\Program Files\Project\Tools\LiveWindow Browse < Back Next > Cancel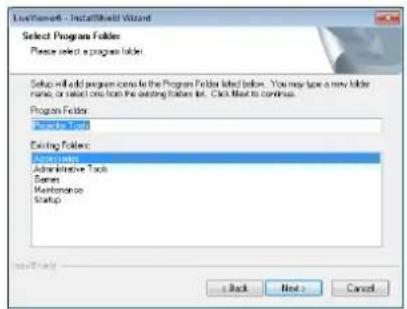
text_image
EnviSoftware - InstallShield Wizard Select Program Folders Please select a program folder. Setup will add program cons to the Program Folder listed below. You may have a new folder name, or select one from the existing folders list. Click Next to continue. Program Folder Edit your folder Existing folders Administrative Tools Barnes Maintenance Startup Back Next > Cancel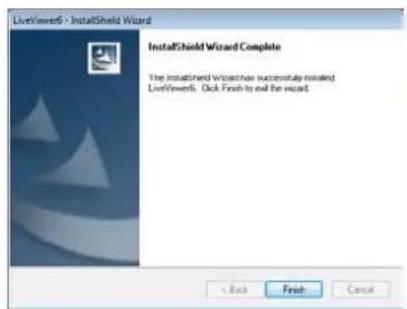
text_image
LiveWindow5 - InstallShield Wizard InstallShield Wizard Complete The installed Wizard has successfully installed LiveWindow5. Click Finish to exit the wizard.text_image
Connection Wizard Select the option that describes the connection method you would like to use: Select From List Enter Passcode Profile History Configure Manually My Connection Projector List Projector name IP address PR3_001F67120F9A 192.168.1.10 PR3_001F67120F20 192.168.1.254 Find Connect Exittext_image
Connection Wizard Select the option that describes the connection method you would like to user: Select From List Enter Passcode Profile History Configure Manually My Connection Projector List Projector name IP address PR_001F67120F9A 192.168.1.10 PR_001F67120F20 192.168.1.254 Find Connect Exittext_image
Connection Wizard Select the option that describes the connection method you would like to use: Select From List Enter Passcode Profile History Configure Manually My Connection Please select the network adapter that you are going to use. Connection Name Adapter Name Local Area Con... Intel(R) PRO/1000 PL Netw... Wireless Netw... 11a/b/g Wireless LAN Mini P... Please enter the Passcode. The Passcode is a 12-digit code, that can be found on the Startup Screen of the projector you are currently trying to connect to. Connect Exittext_image
Connection Wizard Select the option that describes the connection method you would like to use: Select From List Enter Passcode Profile History Configure Manually My Connection Profile list Profile name Date created Profile-1 03/10/2011 3:19:45 PM Profile-2 03/10/2011 3:18:41 PM Profile-3 03/09/2011 6:24:53 PM Profile-4 03/08/2011 2:41:37 PM Add Edit Delete My Connection Connect ExitHINWEIS
text_image
Connections Wizard Select the option that describes the connection method you would like to user: Select From List Enter Passcode Profile History Configure Manually My Connection History list Projector name IP address Last connected PRJ_001F6... 192.168.1.10 03/10/2011 ... PRJ_001F6... 192.168.1.55 03/08/2011 ... PRJ_001F6... 192.168.1.233 03/08/2011 ... PRJ_001F6... 192.168.1.121 03/07/2011 ... Register to profile Connect ExitHINWEIS
text_image
Connection Wizard Select the option that describes the connection method you would like to use: Select From List Enter Passcode Profile History Configure Manually My Connection Please select the network adapter that you are going to use. Connection Name Adapter Name Local Area Con... Intel(K) PRO/1000 PL Netw... Wireless Netw... 11a/b/g Wireless LAN Mini P... Next > ExitHINWEIS
text_image
Connection Wizard Select the option that describes the connection method you would like to use: Select From List Enter Passcode Profile History Configure Manually My Connection Connect to the following projector. IP address : 192.168.1.254 Connect ExitHINWEIS
text_image
Connection Wizard Select the option that describes the connection method you would like to use. Select From List Enter Passcode Profile History Configure Manually My Connection Please select the network adapter that you are going to use. Connection Name Adapter Name Local Area Con... Intel(R) PRO/1000 PL Netw... Wireless Netw... 11a/b/g Wireless LAN Mini P... Please enter the Passcode. The Passcode is a 12-digit code, that can be found on the Startup Screen of the projector you are currently trying to connect to. Connect ExitHINWEIS
natural_image
Illustration of a laptop, a lightning bolt, and a projector (no text or symbols)text_image
Connection Wizard Enter the following information. SSID : SSID MAC address PJ06-0014 001601838E79 012687093099 002687093098 CG-Guest 002687093098 Find Encryption : WEP04bit Encryption key : Subset mask : ... Please enter the Projector Network Configuration for the projector that you would like to connect to. < Back Connect ExitHINWEIS
natural_image
Diagram showing a projector connected to a laptop and a power cord with a lightning bolt (no text or symbols)text_image
Compression Wizard Enter the following information. SSID : SSID MAC address PJ00-0014 001601838E79 002687093099 002687093098 CG-Guest 002687093096 Find Encryption : WEP64bit Encryption key : Subnet mask : SSID, Encryption and Encryption key: use wireless access point configuration settings. Subnet mask: enter the Subnet mask that the projector is using. < Back Connect ExitHINWEIS
natural_image
Illustration of a projector, laptop, and wireless signal icons (no text or symbols)text_image
Connection Wizard Enter the following information. SSID : SSID MAC address PJ08-0014 001601838E79 022687093099 022687093098 CG-Guat 022687093098 Find: Encryption : WEP64bit Encryption key : Subset mask : Please enter the Projector Network Configuration for the projector that you would like to connect to. < Back Comnect ExitHINWEIS
text_image
Connection Wizard Enter the following information. Subset mask Please enter the projector subnet mask. < Back Connect ExitHINWEIS
Mode (Modus): AD-HOC
natural_image
Illustration of a laptop, lightning bolt, and projector (no text or symbols)text_image
Conversion Wizard Enter the following information. SSID : SSID MAC address PJ06-0014 001601838E79 002687093099 002687093098 CG-Guest 052687093098 Find Encryption : OFF Encryption key : Mode : AD-HOC Enter the Wireless Projector Configuration Information. Please refer to the following instruction for wireless setup. Menu - Advanced Menu - Network - Wireless Information < Back Next > Exit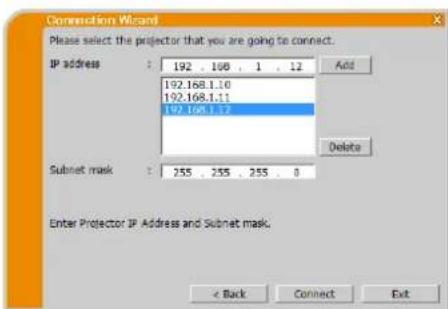
text_image
Connection Wizard Please select the projector that you are going to connect. IP address : 192 . 108 . 1 . 12 Add 192.168.1.10 192.168.1.11 192.168.1.12 Delete Subnet mask : 255 . 255 . 255 . 0 Enter Projector IP Address and Subnet mask. < Back Connect ExitMode (Modus): INFRASTRUCTURE
natural_image
Diagram showing a projector connected to a laptop and a power cord with a lightning bolt (no text or symbols)text_image
Conversion Wizard Please select the projector that you are going to connect. IP address : 192 . 108 . 1 . 12 Add 192.168.1.10 192.168.1.11 192.168.1.12 Delete Subset mask : 255 . 255 . 255 . 8 Enter Projector IP Address and Subnet mask. < Back Connect ExitMode (Modus): INFRASTRUCTURE
natural_image
Illustration of a projector, laptop, and power cord with lightning and ground symbols (no text or labels)text_image
Communication Wizard Please select the projector that you are going to connect. IP address : 192 . 108 . 1 . 12 Add 192.168.1.10 192.168.1.11 192.168.1.12 Subnet mask : 255 . 255 . 255 . 0 Delete Enter Projector IP Address and Subnet mask. < Back Connect Exit3.2.4.4 Herkömmliches LAN
text_image
Communication Wizard Please select the projector that you are going to connect. IP address : 192 . 168 . 1 . 12 Add 192.168.1.10 192.168.1.11 192.168.1.12 Subnet mask : 255 . 255 . 255 . 0 Delete Enter Projector IP Address and Subnet mask. < Back Connect ExitHINWEIS
text_image
Connection Wizard Connection status IP address Status 192.168.1.10 Connecting... 192.168.1.11 Connected 192.168.1.12 Connect error Connect CancelHINWEIS
3.2.5.2 Connection List
text_image
Connection Wizard Connection list IP address Projector name Status 192.168.1.10 SW_001F67120F44 LAN 192.168.1.11 PRI_001F67120F60 LAN, Presenter Mode 192.168.1.12 PRI_001F67120FDA USB type A, Slideshow Register this setting to My Connection Select the projector to send your computer image, then click [Show] button. Automatically change the input source LAN channel, if different channel is selected. If Slideshow is running, Slideshow is terminated and change the input source to LAN channel. Show CloseHINWEIS
text_image
Connection Wizard Failed to connect to the following projector. 192.168.1.10HINWEIS
flowchart
graph TD
    A["User1\n192.168.1.14"] --> B["(Anzeige aus)"]
    B --> C["User1\n192.168.1.14"]
    C --> D["Node off"]
    D --> E["Clear"]
    E --> F["Connection list"]
    F --> G["User name\nIP address\nUser1\n192.168.1.14\nUser2\n192.168.1.16\nUser3\n192.168.1.17\nUser4\n192.168.1.18\nUser5\n192.168.1.19\nUser6\n192.168.1.20\nUser7\n192.168.1.21\nUser9\n192.168.1.22\nUser10\n192.168.1.23\nUser11\n192.168.1.24\nUser12\n192.168.1.25\nUser13\n192.168.1.26\nUser14\n192.168.1.27"]
    F --> G
    G --> H["Node off"]
    H --> I["Close"]
    I --> J["Node off"]
    J --> K["Close"]
    K --> L["Node off"]
    L --> M["Node off"]
    M --> N["Node off"]
    N --> O["Node off"]
    O --> P["Node off"]
    P --> Q["Node off"]
    Q --> R["Node off"]
    R --> S["Node off"]
    S --> T["Node off"]
    T --> U["Node off"]
    U --> V["Node off"]
    V --> W["Node off"]
    W --> X["Node off"]
    X --> Y["Node off"]
    Y --> Z["Node off"]
text_image
Options Not displaying confirmation dialog for adding Network settings. Optimize Performance Transmission speed Image quality Presenter Mode Display User Name: Untreated Display LiveViewer Close 1) 2) 4) 5) 6)text_image
Connection Wizard Select the option that describes the connection method you would like to use: Select From List Enter Passcode Profile History Configure Manually My Connection Profile list Profile name Data created Profile-1 03/10/2011 3:19:46 PM Profile-2 03/10/2011 3:18:41 PM Profile-3 03/09/2011 6:24:53 PM Profile-4 03/08/2011 2:41:37 PM Add Exit Delete My Connection Connect ExitHINWEIS
text_image
Projector Connection Select the option that describes the connection method you would like to use: Select From List Enter Passcode Profile History Configure Manually My Connection Profile list Profile name Data created Profile-1 03/10/2011 3:19:46 PM Profile-2 03/10/2011 3:18:41 PM Profile-3 03/09/2011 6:24:53 PM Profile-4 03/08/2011 2:41:37 PM Add Edit Delete My Connection Connect Exit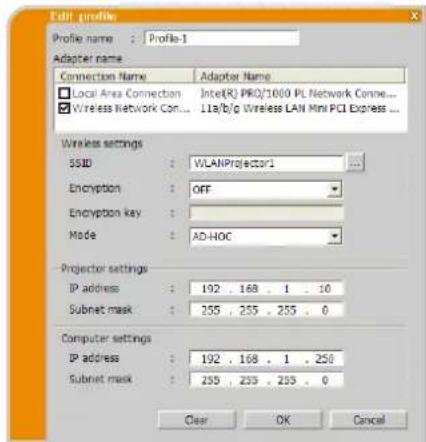
text_image
Edit profile Profile name : Profile-1 Adapter name Connection Name Adapter Name Local Area Connection:Inte(R) PRO/1000 PL Network Conne... Wireless Network Con... 11s/b/g Wireless LAN Mini PCI Express ... Wireless settings SSID : WLANProjector1 Encryption : OFF Encryption key : Mode : AD-HOC Projector settings IP address : 192 . 168 . 1 . 10 Subnet mask : 255 . 255 . 255 . 0 Computer settings IP address : 192 . 168 . 1 . 250 Subnet mask : 255 . 255 . 255 . 0 Clear OK Canceltext_image
Provider Connection Select the option that describes the connection method you would like to use: Select From List Enter Passcode Profile History Configure Manually My Connection Profile list Profile name Data created Profile-1 03/10/2011 2:19:46 PM Profile-2 03/10/2011 3:18:41 PM Profile-3 03/09/2011 6:24:53 PM Profile-4 03/08/2011 2:41:37 PM Add Edit Delete My Connection Connect Exit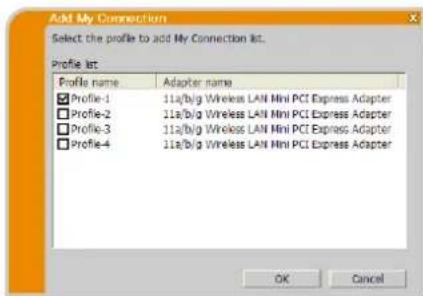
text_image
Add My Connection Select the profile to add My Connection list. Profile list: Profile name Adapter name ✓ Profile-1 11a/b/g Wireless LAN Mini PCI Express Adapter ✓ Profile-2 11a/b/g Wireless LAN Mini PCI Express Adapter ✓ Profile-3 11a/b/g Wireless LAN Mini PCI Express Adapter ✓ Profile-4 11a/b/g Wireless LAN Mini PCI Express Adapter OK CancelHINWEIS
Meldung 1: A network connection was not established.
text_image
Connection Wizard A network connection was not established. Please check the network connection.Meldung 2: The number of computer connection exceeds the limit (max. 50).
text_image
Connection Wizard The number of computer connection exceeds the limit (max. 50). Please try again after a session of connected user is disconnected.Meldung 3: A network connection could not be established.
text_image
Connection Wizard A network connection could not be established. Windows prevented network configuration changes. Please insure that you are authorized to make these changes.Meldung 4: Are you sure you want to connect the selected projector?
text_image
Connection Wizard Are you sure you want to connect the selected projector? Yes NoMeldung 5: Incorrect PassCode.
text_image
Connection Wizard Incorrect IP Address. OKMeldung 6: Do you want to apply suggested network settings as follows?
text_image
Connection Wizard Do you want to apply suggested network settings as follows? IP address : 192.168.2.54 Subnet mask : 255.235.235.0 Chance... Not displaying confirmation dialog for adding Network settings. Yes NoHINWEIS
text_image
Connection Wizard Enter the following information. IP address : Subset mask : Enter Computer IP Address and Subnet mask. OK CancelMeldung 7: An IP Address overlaps with the IP Address of the projector you are trying to connect to.
text_image
Connection Wizard An IP Address overlaps with the IP Address of the projector you are trying to connect to. Please choose an IP Address that is currently not in use.Meldung 8: Incorrect IP Address.
text_image
Conversion Wizard Incorrect IP Address. OKMeldung 9: A Network Configuration Conflict exists.
text_image
Connection Wizard A Network Configuration Conflict exists. Please verify your Network Configuration Settings (computer and projector). OKMeldung 10: There is a projector already connected with your computer.
text_image
Connection Wizard There is a projector already connected with your computer. Are you sure that you want to disconnect the current connection and establish new connection? Yes No CancelHINWEIS
Meldung 11: In order to connect to the selected projector, you need to disconnect from the current projector.
text_image
Connection Wizard In order to connect to the selected projector, you need to disconnect from the current projector. Are you sure that you want to disconnect from the current projector. Yes NoMeldung 12: This projector is currently in use (Presenting) by another user.
text_image
Conversion Wizard This projector is currently in use (Presenting) by another user. You cannot connect with this projector until the other session (Presenter Mode) is finished.Meldung 13: A Slideshow is currently running on the projector that you are trying to display to (PC-Less Presentation Mode).
text_image
Connection Wizard A Sideshow is currently running on the projector that you are trying to display to (PC-Less Presentation Mode). If you continue, you will cancel the current Sideshow. Yes NoMeldung 14: Are you sure you want to change the input channel of the Projector to 'LAN'?
text_image
Connection Wizard Are you sure you want to change the input channel of the Projector to LAN? Yes NoMeldung 15: Are you sure you want to change the input channel of the Projector to LAN?
text_image
Connection Wizard Are you sure that you want to turn on the network adapter? Yes... NoMeldung 16: It cannot be connected because improper native resolution panel projector is selected.
text_image
Connection Wizard It cannot be connected because improper native resolution panel projector is selected. OKMeldung 17: Since moderator control mode of connected projector (IP address: ***.***.***.***) becomes effective, Multi Projector mode is canceled.
text_image
Connection Wizard Since moderator control mode of connected projector (IP address: 192.168.1.100) becomes effective, Multi Projector mode is cancel.Meldung 18: You can not operate while moderator control mode is activated.
text_image
Connection Wizard You can not operate while moderator control mode is activated. OKB Fehlersuche
The Software is being delivered to you “AS IS” and Christie Digital Systems USA, Inc. (CHRISTIE) make no warranty as to its use or performance. CHRISTIE AND ITS SUPPLIERS, INCLUDING BUT NOT LIMITED TO CHRISTIE, DO NOT AND CANNOT WARRANT THE PERFORMANCE OR RESULTS YOU MAY OBTAIN BY USING THE SOFTWARE. EXCEPT TO THE EXTENT PROHIBITED BY LAW IN YOUR JURISDICTION, CHRISTIE AND ITS SUPPLIERS MAKE NO WARRANTIES CONDITIONS, REPRESENTATIONS, OR TERMS (EXPRESS OR IMPLIED WHETHER BY STATUTE, COMMON LAW, CUSTOM, USAGE OR OTHERWISE) AS TO ANY MATTER IN CONNECTION WITH THE SOFTWARE, INCLUDING WITHOUT LIMITATION NONINFRINGEMENT OF THIRD PARTY RIGHTS, MERCHANTABILITY, INTEGRATION, SATISFACTORY QUALITY, OR FITNESS FOR ANY PARTICULAR PURPOSE.
You agree that the Software will not be shipped, transferred or exported into any country or used in any manner prohibited by the United States Export Administration Act or any other applicable export laws, restrictions or regulations (collectively the “Export Laws”). In addition, if the Software is identified as export controlled items under the Export Laws, you represent and warrant that you are not a citizen, or otherwise located within, an embargoed nation (including without limitation Iran, Iraq, Syria, Sudan, Libya, Cuba, North Korea, and Serbia) and that you are not otherwise prohibited under the Export Laws from receiving the Software. All rights to Use the Software are granted on condition that such rights are forfeited if you fail to comply with the terms of this Agreement.
Índice
text_image
Screenshot of a software interface toolbar with icons for media, video, audio, and other content categories.Fig.3.a LiveViewer Menú principal
3.1 Instalación de "LiveViewer"
text_image
Choose Setup Language Select the language for the installation from the choices below. English OK Canceltext_image
LiveView6 - InstallShield Wizard Welcome to the InstallShield Wizard for LiveView6 The InstallShield Wizard will install LiveView6 on your computer. To continue, click Next < Back Next > Cancel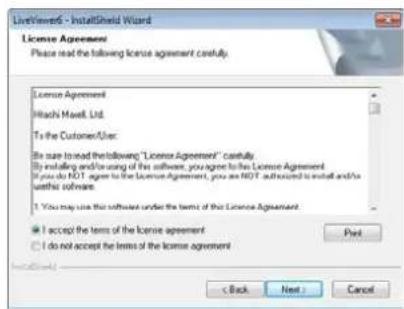
text_image
License Agreement Please read the following license agreement carefully. License Agreement Washi Mawell, Ltd. To the Customer/User: It can read the following "License Agreement" carefully. By installing and/or using of the software, you agree to the License Agreement. If you do NOT agree to the License Agreement, you are NOT authorized to install and/or the useful software. 1 You may use this software under the terms of the License Agreement. ■ I accept the terms of the license agreement □ I do not accept the terms of the license agreement < Back Next > Cancel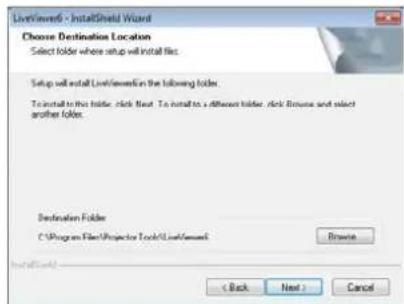
text_image
LiveWindow - InstallShield Wizard Choose Destination Location Select folder where setup will install files. Setup will install LiveWindow in the following folder. To install to this folder, click Next. To install to a different folder, click Browse and select another folder. Destination Folder C:\Program Files\Projector Tools\LiveWindow Browse < Back Next > Cancel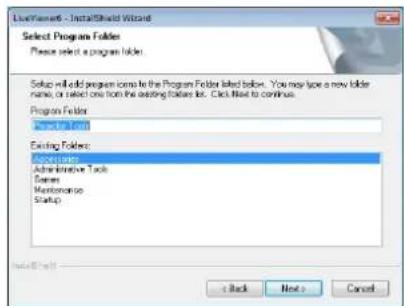
text_image
LiveWindow - InstallShield Wizard Select Program Folders Please select a program folder. Setup will add program icons to the Program Folder listed below. You may have a new folder name, or select one from the existing folder list. Click like to continue. Program Folder Create a form Existing Folders Administrative Tools Forms Maintenance Startup Back Next Cancel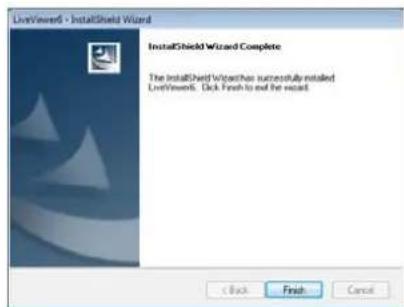
text_image
LiveView6 - InstallShield Wizard InstallShield Wizard Complete The InstallShield Wizard has successfully installed LiveView6. Click Finish to exit the recall. < Back Finish Canceltext_image
Connection Wizard Select the option that describes the connection method you would like to user: Select From List Enter Passcode Profile History Configure Manually My Connection Projector List Projector name IP address PR3_001F67120F9A 192.168.1.10 PR3_001F67120F20 192.168.1.254 Find Connect Exittext_image
Connection Wizard Select the option that describes the connection method you would like to user: Select From List Enter Passcode Profile History Configure Manually My Connection Projector List Projector name IP address □PR_001F671209A 192.168.1.10 □PR_001F67120F20 192.168.1.254 Find Connect Exittext_image
Connection Wizard Select the option that describes the connection method you would like to user: Select From List Enter Passcode Profile History Configure Manually My Connection Please select the network adapter that you are going to use. Connection Name Adapter Name Local Area Con... Dite(K) PRO/1000 PL Netw... Wireless Netw... 11a/b/g Wireless LAN Mini P... Please enter the Passcode. The Passcode is a 12-digit code, that can be found on the Startup Screen of the projector you are currently trying to connect to. Connect Exittext_image
Connection Wizard Select the option that describes the connection method you would like to use: Select From List Enter Passcode Profile History Configure Manually My Connection Profile list Profile name Data created Profile-1 03/10/2011 3:19:46 PM Profile-2 03/10/2011 3:18:45 PM Profile-3 03/09/2011 6:24:53 PM Profile-4 03/08/2011 2:41:57 PM Add Delete My Connection Connect ExitNOTA
text_image
Connection Wizard Select the option that describes the connection method you would like to use: Select From List Enter Passcode Profile History Configure Manually My Connection History list Projector name IP address Last connected PR3_001F6... 192.168.1.10 03/10/2011 ... PR3_001F6... 192.168.1.55 03/08/2011 ... PR3_001F6... 192.168.1.253 03/08/2011 ... PR3_001F6... 192.168.1.121 03/07/2011 ... Regulator to profile Connect ExitNOTA
text_image
Connection Wizard Select the option that describes the connection method you would like to use: Select From List Enter Passcode Profile History Configure Manually My Connection Please select the network adapter that you are going to use. Connection Name Adapter Name Local Area Con... Intel(K) PRO/1000 PL Netw... Wireless Netw... 11a/b/g Wireless LAN Mini P... Next > ExitNOTA
text_image
Connection Wizard Select the option that describes the connection method you would like to use: Select From List Enter Passcode Profile History Configure Manually My Connection Connect to the following projector. IP address : 192.168.1.254 Connect ExitNOTA
text_image
Connection Wizard Select the option that describes the connection method you would like to use: Select From List Enter Passcode Profile History Configure Manually My Connection Please select the network adapter that you are going to use. Connection Name Adapter Name Local Area Con...:Intel(R) PRO/1000 PL Netw... Wireless Netw... 11a/b/g Wireless LAN Mini P... Please enter the Passcode. The Passcode is a 12-digit code, that can be found on the Startup Screen of the projector you are currently trying to connect to. Connect ExitNOTA
natural_image
Illustration of a laptop and a projector with a lightning bolt symbol (no text or labels)text_image
Connection Wizard Enter the following Information. SSID : SSID MAC address PJ08-0014 00160183BE79 002687093099 002687093098 CG-Quest 002687093098 Find: Encryption : WEP64bit Encryption key : Subset mask : Please enter the Projector Network Configuration for the projector that you would like to connect to. < Back Connect ExitNOTA
natural_image
Diagram showing a projector connected to a laptop and a power cord with a lightning bolt (no text or symbols)text_image
Connection Wizard Enter the following information. SSID : SSID MAC address PJ06-0014 001601838E79 002687093099 002687093098 CG-Guest 002687093098 Find: Encryption : WEP/4bit Encryption key : Subnet mask : SSID, Encryption and Encryption key: use wireless access point configuration settings. Subnet mask: enter the Subnet mask that the projector is using. < Back Connect ExitNOTA
natural_image
Illustration of a projector, laptop, and wireless signal components (no text or symbols)text_image
Connection Wizard Enter the following information: SSID : SSID MAC address PJ08-0014 001601838E79 002687093099 002687093098 CG-Guest 002687093098 Find Encryption : WEI/04bit Encryption key : Subnet mask : Please enter the Projector Network Configuration for the projector that you would like to connect to. < Back Connect ExitNOTA
text_image
Connection Wizard Enter the following information. Subnet mask : Please enter the projector subnet mask. < Back Connect ExitNOTA
natural_image
Illustration of a laptop, a lightning bolt, and a projector (no text or symbols)text_image
Compression Wizard Enter the following information. SSID : SSID MAC address P308-0014 001601838E79 002687093099 002687093098 CG-Guest 062687093096 Find Encryption : OFF Encryption key : Mode : AD-HOC Enter the Wireless Projector Configuration Information. Please refer to the following instruction for wireless setup. Menu - Advanced Menu - Network - Wireless Information < Back Next > Exit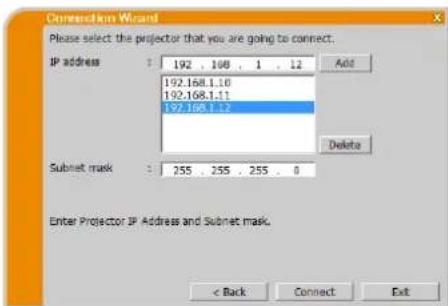
text_image
Connection Wizard Please select the projector that you are going to connect. IP address : 192 . 108 . 1 . 12 Add 192.168.1.10 192.168.1.11 192.168.1.12 Delete Subnet mask : 255 . 255 . 255 . 0 Enter Projector IP Address and Subnet mask. < Back Connect Exit√ The setting on the access point * Enter the following information.
natural_image
Diagram showing a projector connected to a laptop and a power cord with a lightning bolt (no text or symbols)text_image
Connection Wizard Please select the projector that you are going to connect.. IP address : 192 . 168 . 1 . 12 Add 192.168.1.10 192.168.1.11 192.168.1.12 Delete Subset mask : 255 . 255 . 255 . 0 Enter Projector IP Address and Subnet mask. < Back Connect ExitMode (Modo): INFRASTRUCTURE
√ Haga clic en [Next].
natural_image
Illustration of a projector, laptop, and power cord with lightning bolt symbols (no text or labels)text_image
Connection Wizard Please select the projector that you are going to connect. IP address : 192 . 168 . 1 . 12 Add 192.168.1.10 192.168.1.11 192.168.1.12 Subnet mask : 255 . 255 . 255 . 0 Enter Projector IP Address and Subnet mask. < Back Connect Exit3.2.4.4 LAN alámbrica
text_image
Command Wizard Please select the projector that you are going to connect. IP address : 192 . 168 . 1 . 12 Add 192.168.1.10 192.168.1.11 192.168.1.12 Delete Subnet mask : 255 . 255 . 255 . 0 Enter Projector IP Address and Subnet mask. < Back Connect ExitNOTA
text_image
Connection Wizard Connection status IP address Status 192.166.1.10 Connecting... 192.168.1.11 Connected 192.168.1.12 Connect error Connect cancelNOTA
text_image
Connection Wizard Connection list: 3P address Projector name Status ✓ 192.168.1.10 SW_001F67120F44 LAN ✓ 192.168.1.11 PRI_001F67120F60 LAN, Presenter Mode ✓ 192.168.1.12 PRI_001F67120FDA USB Type A, Sideshow Register this setting to My Connection Select the projector to send your computer image, then click [Show] button. Automatically change the input source LAN channel, if different channel is selected. If Sideshow is running, Sideshow is terminated and change the input source to LAN channel. Show CloseNOTA
text_image
Connection Wizard Failed to connect to the following projector. 192.168.1.10NOTA
flowchart
graph TD
    A["Host 1"] --> B["LAN"]
    C["Host 2"] --> B
    D["Host 4"] --> B
    E["Host 5"] --> B
    B --> F["Clients"]
    style A fill:#f9f,stroke:#333
    style C fill:#f9f,stroke:#333
    style D fill:#f9f,stroke:#333
    style E fill:#f9f,stroke:#333
    style B fill:#ccf,stroke:#333
    style F fill:#ccf,stroke:#333
    subgraph 'Moderator Control Mode'
        direction TB
        User1["User1\n192.168.1.14"] --> User2["User2\n192.168.1.16"]
        User2 --> User3["User3\n192.168.1.17"]
        User3 --> User4["User4\n192.168.1.18"]
        User4 --> User5["User5\n192.168.1.19"]
        User5 --> User6["User6\n192.168.1.20"]
        User6 --> User7["User7\n192.168.1.21"]
        User7 --> User9["User9\n192.168.1.22"]
        User9 --> User10["User10\n192.168.1.23"]
        User10 --> User11["User11\n192.168.1.24"]
        User11 --> User12["User12\n192.168.1.25"]
        User12 --> User13["User13\n192.168.1.26"]
        User13 --> User14["User14\n192.168.1.27"]
    end
    subgraph 'Moderator Control Mode'
        direction LR
        User1 --> User2 --> User3 --> User4 --> User5 --> User6 --> User7 --> User9 --> User10 --> User11 --> User12 --> User13 --> User14
        User2 --> User3 --> User4 --> User5 --> User6 --> User7 --> User9 --> User10 --> User11 --> User12 --> User13 --> User14
        User3 --> User4 --> User5 --> User6 --> User7 --> User9 --> User10 --> User11 --> User12 --> User13 --> User14
        User4 --> Clear
        User5 --> Clear
        User6 --> Clear
        User7 --> Clear
        User9 --> Clear
        User10 --> Clear
        User11 --> Clear
        User12 --> Clear
        User13 --> Clear
        User14 --> Clear
    end
NOTA
text_image
Options Not displaying confirmation dialog for adding Network settings. Optimize Performance Transmission speed Image quality Presenter Mode Display User Name: Unnamed Display LiveViewer Close 1) 2) 4) 5) 6)text_image
Options Not displaying confirmation dialog for adding Network settings. Optimize Performance Transmission speed Image quality Sound On Off Presenter Mode Display User Name: Unnamed Display LiveViewer Close 1) 2) 3) 4) 5) 6)text_image
Connection Wizard Select the option that describes the connection method you would like to use: Select From List Enter Passcode Profile History Configure Manually My Connection Profile list Profile name Data created Profile-1 03/10/2011 3:19:46 PM Profile-2 03/10/2011 3:18:41 PM Profile-3 03/09/2011 6:24:53 PM Profile-4 03/08/2011 2:41:37 PM Add Edit Delete My Connection Connect Exit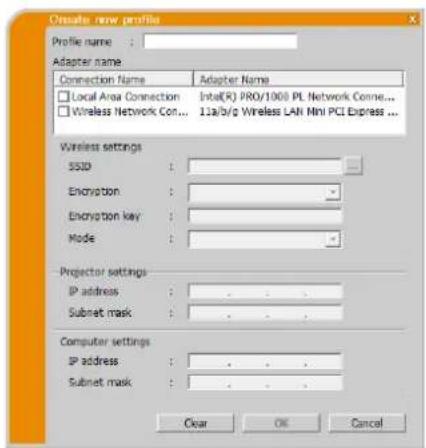
text_image
Create new profile Profile name : Adapter name Connection Name Adapter Name Local Area Connection Inta(R) PRO/1000 PL Network Conne... Wireless Network Con... 11a/b/g Wireless LAN Mini PCI Express ... Wireless settings SSID : Encryption : Encryption key : Mode : Projector settings IP address : Subnet mask : Computer settings IP address : Subnet mask : Clear OK Canceltext_image
Projector Connection Select the option that describes the connection method you would like to use: Select From List Enter Passcode Profile History Configure Manually My Connection Profile list Profile name Date created Profile-1 03/10/2011 3:19:46 PM Profile-2 03/10/2011 3:18:41 PM Profile-3 03/09/2011 6:24:53 PM Profile-4 03/08/2011 2:41:37 PM Add Edit Delete My Connection Connect Exit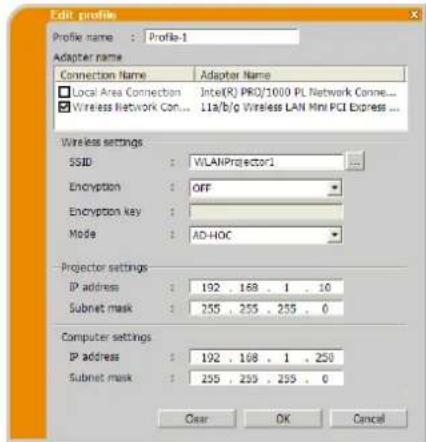
text_image
Edit profile Profile name : Profile-1 Adapter name Connection Name Adapter Name Local Area Connection:Inte(R) PRO/1000 PL Network Conne... Wireless Network Con... 11a/b/g Wireless LAN Mini PCI Express ... Wireless settings SSID : WILANProjector1 Encryption : OFF Encryption key : Mode : AD-HOC Projector settings IP address : 192 . 168 . 1 . 10 Subnet mask : 255 . 255 . 255 . 0 Computer settings IP address : 192 . 168 . 1 . 258 Subnet mask : 255 . 255 . 255 . 0 Clear OK Canceltext_image
Projector Connection Select the option that describes the connection method you would like to use: Select From List Enter Passcode Profile History Configure Manually My Connection Profile list: Profile name: Data created Profile-1 03/10/2011 3:19:46 PM Profile-2 03/10/2011 3:18:41 PM Profile-3 03/09/2011 6:24:53 PM Profile-4 03/08/2011 2:41:37 PM Add Edit Delete My Connection Connect Exit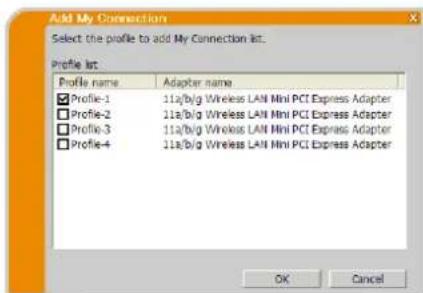
text_image
Add My Connection Select the profile to add My Connection list. Profile list: Profile name Adapter name ✓ Profile-1 11a/b/g Wireless LAN Mini PCI Express Adapter ✓ Profile-2 11a/b/g Wireless LAN Mini PCI Express Adapter ✓ Profile-3 11a/b/g Wireless LAN Mini PCI Express Adapter ✓ Profile-4 11a/b/g Wireless LAN Mini PCI Express Adapter OK CancelNOTA
Mensaje 1: A network connection was not established.
text_image
Connection Wizard A network connection was not established. Please check the network connection.Mensaje 2: The number of computer connection exceeds the limit (max. 50).
text_image
Connection Wizard The number of computer connection exceeds the limit (max. 50). Please try again after a session of connected user is disconnected.Mensaje 3: A network connection could not be established.
text_image
Connection Wizard A network connection could not be established. Windows prevented network configuration changes. Please ensure that you are authorized to make these changes.Mensaje 4: Are you sure you want to connect selected projector?
text_image
Connection Wizard Are you sure you want to connect the selected projector? Yes Notext_image
Conversion Wizard Incorrect IP Address. OKMensaje 6: Do you want to apply suggested network settings as follows?
text_image
Connection Wizard Do you want to apply suggested network settings as follows? IP address : 192.168.2.54 Subnet mask : 255.255.255.0 Change... Not displaying confirmation dialog for adding Network settings. Yes NoNOTA
text_image
Connection Wizard Enter the following information. IP address : Subnet mask : Enter Computer IP Address and Subnet mask. OK CancelMensaje 7: An IP Address overlaps with the IP Address of the projector you are trying to connect to.
text_image
Connection Wizard An IP Address overlaps with the IP Address of the projector you are trying to connect to. Please choose an IP Address that is currently not in use.text_image
Connection Wizard Incorrect IP Address. OKMensaje 9: A Network Configuration Conflict exists.
text_image
Connection Wizard A Network Configuration Conflict exists. Please verify your Network Configuration Settings (computer and projector). OKMensaje 10: There is a projector already connected with your computer.
text_image
Connections Wizard There is a projector already connected with your computer; Are you sure that you want to disconnect the current connection and establish new connection? Yes No CancelNOTA
Mensaje 11: In order to connect to the selected projector, you need to disconnect from the current projector.
text_image
Connection Wizard In order to connect to the selected projector, you need to disconnect from the current projector. Are you sure that you want to disconnect from the current projector.Mensaje 12: This projector is currently in use (Presenting) by another user.
text_image
Conclusion Wizard This projector is currently in use (Presenting) by another user. You cannot connect with this projector until the other session (Presenter Mode) is finished.Mensaje 13: A Slideshow is currently running on projector that you are trying to display to (PC-Less Presentation Mode).
text_image
Connection Wizard! A Sideshow is currently running on the projector that you are trying to display to (PC-Less Presentation Mode). If you continue, you will cancel the current Sideshow. Yes NoMensaje 14: Are you sure you want to change input channel of Projector to LAN?
text_image
Connection Wizard Are you sure you want to change the input channel of the Projector to LAN? Yes NoMensaje 15: Are you sure that you want to turn on network adapter?
text_image
Connection Wizard Are you sure that you want to turn on the network adapter? Yes NoMensaje 16: It cannot be connected because improper native resolution panel projector is selected.
text_image
Connection Wizard It cannot be connected because improper native resolution panel projector is selected. OKMensaje 17: Since moderator control mode of connected projector (IP address: ***.***.***.***) becomes effective, Multi Projector mode is canceled.
text_image
Connection Wizard Since moderator control mode of connected projector (IP address: 192.168.1.100) becomes effective, Multi Projector mode is cancelled.Mensaje 18: You can not operate while moderator control mode is activated.
text_image
Connection Wizard You can not operate while moderator control mode is activated. OKThe Software is being delivered to you “AS IS” and Christie Digital Systems USA, Inc. (CHRISTIE) make no warranty as to its use or performance. CHRISTIE AND ITS SUPPLIERS, INCLUDING BUT NOT LIMITED TO CHRISTIE, DO NOT AND CANNOT WARRANT THE PERFORMANCE OR RESULTS YOU MAY OBTAIN BY USING THE SOFTWARE. EXCEPT TO THE EXTENT PROHIBITED BY LAW IN YOUR JURISDICTION, CHRISTIE AND ITS SUPPLIERS MAKE NO WARRANTIES CONDITIONS, REPRESENTATIONS, OR TERMS (EXPRESS OR IMPLIED WHETHER BY STATUTE, COMMON LAW, CUSTOM, USAGE OR OTHERWISE) AS TO ANY MATTER IN CONNECTION WITH THE SOFTWARE, INCLUDING WITHOUT LIMITATION NONINFRINGEMENT OF THIRD PARTY RIGHTS, MERCHANTABILITY, INTEGRATION, SATISFACTORY QUALITY, OR FITNESS FOR ANY PARTICULAR PURPOSE.
You agree that the Software will not be shipped, transferred or exported into any country or used in any manner prohibited by the United States Export Administration Act or any other applicable export laws, restrictions or regulations (collectively the “Export Laws”). In addition, if the Software is identified as export controlled items under the Export Laws, you represent and warrant that you are not a citizen, or otherwise located within, an embargoed nation (including without limitation Iran, Iraq, Syria, Sudan, Libya, Cuba, North Korea, and Serbia) and that you are not otherwise prohibited under the Export Laws from receiving the Software. All rights to Use the Software are granted on condition that such rights are forfeited if you fail to comply with the terms of this Agreement.
Contenuto
1 Caratteristiche 3
text_image
Choose Setup Language Select the language for the installation from the choices below. English OK Canceltext_image
LiveShield - InstallShield Wizard Welcome to the InstallShield Wizard for LiveShield The InstallShield Wizard will install LiveShield on your computer. To continue, click Next. < Back Next > Cancel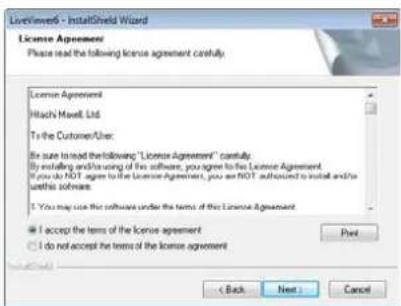
text_image
LiveWindow - InstallShield Wizard License Agreement Please read the following license agreement carefully. License Agreement Wachi Meavit, Ltd. To the Customer/User: In case to read the following: "License Agreement" carefully. By installing and/or using of the software, you agree to fix License Agreement. If you do NOT agree to the License Agreement, you are NOT authorized to install and/or the software. I You may use the software under the terms of this License Agreement. I accept the terms of the license agreement I do not accept the terms of the license agreement Next < Back Next Cancel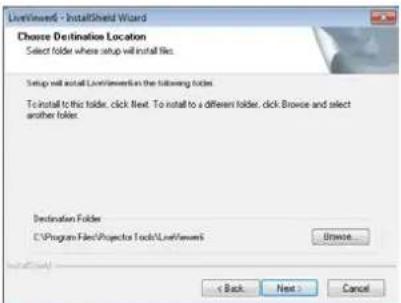
text_image
LiveWindow - InstallShield Wizard Choose Destination Location Select folder where setup will install files. Setup will install LiveWindow on the following folder. To install to this folder, click Next. To install to a different folder, click Browse and select another folder. Destination Folder C:\Program Files\Projection Tools\LiveWindow5 Browse... < Back Next > Cancel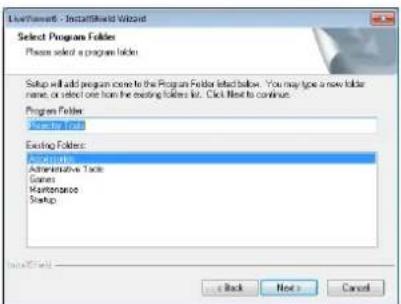
text_image
LiveWindow - InstallShield Wizard Select Program Folders Please select a program folder. Setup will add program come to the Program Folder installed below. You may type a new folder name, or select one from the existing folders list. Click Next to continue. Program Folder: New Path Existing Folders: Administrative Task Games Maintenance Startup Back Next Cancel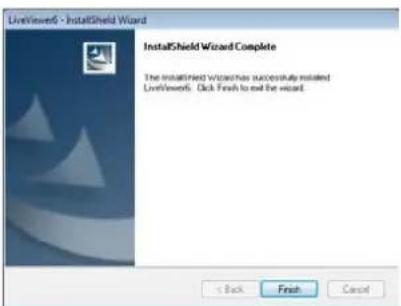
text_image
LiveViewd - InstallShield Wizard InstallShield Wizard Complete The InstallShield Wizard has successfully installed LiveViewd. Click Finish to exit the wizard. < Back Finish Canceltext_image
Connection Wizard Select the option that describes the connection method you would like to use: Select From List Enter Passcode Profile History Configure Manually My Connection Projector List Projector name IP address PR1_001F67120P9A 192.168.1.10 PR3_001F67120F20 192.168.1.254 Find Connect Exittext_image
Connection Wizard Select the option that describes the connection method you would like to use: Select From List Enter Passcode Profile History Configure Manually My Connection Projector List Projector name IP address PR0_001F67126F9A 192.168.1.10 PR0_001F67126F20 192.168.1.254 Find Connect Exittext_image
Connection Wizard Select the option that describes the connection method you would like to use. Please select the network adapter that you are going to use. Connection Name Adapter Name Local Area Con... Intel(R) PRO/1000 PL Netw... Wireless Netw... 11a/b/g Wireless LAN Mini P... Please enter the Passcode. The Passcode is a 12-digit code, that can be found on the Startup Screen of the projector you are currently trying to connect to. Connect Exittext_image
Connection Wizard Select the option that describes the connection method you would like to user: Select From List Enter Passcode Profile History Configure Manually My Connection Profile list Profile name Data created Profile-1 03/10/2011 3:19:45 PM Profile-2 03/10/2011 3:18:41 PM Profile-3 03/09/2011 6:24:53 PM Profile-4 03/08/2011 2:41:37 PM Add Exit Delete My Connection Connect ExitNOTA
text_image
Connection Wizard Select the option that describes the connection method you would like to use: Select From List Enter Passcode Profile History Configure Manually My Connection History list Projector name IP address Last connected PRJ_001F6... 192.168.1.10 03/10/2011 ... PRJ_001F6... 192.168.1.55 03/08/2011 ... PRJ_001F6... 192.168.1.253 03/08/2011 ... PRJ_001F6... 192.168.1.121 03/07/2011 ... Register to profile Connect ExitNOTA
text_image
Connection Wizard Select the option that describes the connection method you would like to use: Select From List Enter Passcode Profile History Configure Manually My Connection Please select the network adapter that you are going to use. Connection Name Adapter Name Local Area Con... Intel(K) PRO/1000 PL Netw... Wireless Netw... 11a/b/g Wireless LAN Mini P... Next > ExitNOTA
text_image
Connection Wizard Select the option that describes the connection method you would like to user: Select From List Enter Passcode Profile History Configure Manually My Connection Connect to the following projector. IP address : 192.168.1.254 Connect ExitNOTA
text_image
Connection Wizard Select the option that describes the connection method you would like to user. Select From List Enter Passcode Profile History Configure Manually My Connection Please select the network adapter that you are going to use. Connection Name Adapter Name Local Area Con... Intel(R) PRO/1000 PL Netw... Wireless Netw... 11a/b/g Wireless LAN Mini P... Please enter the Passcode. The Passcode is a 12-digit code, that can be found on the Startup Screen of the projector you are currently trying to connect to. Connect ExitNOTA
natural_image
Illustration of a laptop, a lightning bolt, and a projector (no text or symbols)text_image
Connection Wizard Enter the following information. SSID : SSID MAC address □ PJ06-0014 001601838E79 □ 002687093099 002687093098 □ CG-Guest 002687093098 Find Encryption : WEP/64bit Encryption key : Subset mask : Please enter the Projector Network Configuration for the projector that you would like to connect to. < Back Connect ExitNOTA
natural_image
Diagram showing a projector connected to a laptop and a power cord with a lightning bolt (no text or symbols)text_image
Connection Wizard Enter the following information. SSID : SSID MAC address P108-0014 001601838E79 002687093099 002687093098 CG-Guest 002687093098 Find Encryption : WEP54bit Encryption key :_ Subset mask :_. SSID, Encryption and Encryption key: use wireless access point configuration settings. Subset mask: enter the Subnet mask that the projector is using. < Back Connect ExitNOTA
natural_image
Illustration of a projector, laptop, and wireless signal icons (no text or symbols)text_image
Connection Wizard Enter the following information. SSID : SSID MAC address PJ06-0014 001601838E79 002687093099 002687093098 CG-Guest 002687093098 Encryption ::\WEP64bit Encryption key :: Subnet mask :: Please enter the Projector Network Configuration for the projector that you would like to connect to. < Back Connect ExitNOTA
text_image
Connection Wizard Enter the following information. Subnet mask : Please enter the projector subnet mask. < Back Connect ExitNOTA
natural_image
Illustration of a laptop, lightning bolt, and projector (no text or symbols)text_image
Connection Wizard Enter the following information. SSID : SSID MAC address PJ0B-0014 001601838E79 012687093099 002687093098 CG-Cuest 062687093098 Find Encryption : OFF Encryption key : Mode : AD-HOC Enter the Wireless Projector Configuration Information. Please refer to the following instruction for wireless setup. Menu - Advanced Menu - Network - Wireless Information < Back Next > Exit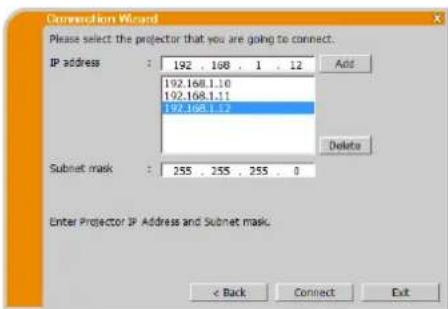
text_image
Connection Wizard Please select the projector that you are going to connect. IP address : 192 . 168 . 1 . 12 Add 192.168.1.10 192.168.1.11 192.168.1.12 Delete Subnet mask : 255 . 255 . 255 . 0 Enter Projector IP Address and Subnet mask. < Back Connect ExitNOTA
natural_image
Diagram showing a projector connected to a laptop and a power cord with a lightning bolt (no text or symbols)text_image
Connection Wizard Please select the projector that you are going to connect. IP address : 192 . 168 . 1 . 12 Add 192.168.1.10 192.168.1.11 192.168.1.12 Subnet mask : 255 . 255 . 255 . 0 Delete Enter Projector IP Address and Subnet mask. < Back Connect Exitnatural_image
Illustration of a projector, laptop, and power cord with lightning bolt symbols (no text or labels)text_image
Connection Wizard Please select the projector that you are going to connect. IP address : 192 . 168 . 1 . 12 Add 192.168.1.10 192.168.1.11 192.168.1.12 Delete Subnet mask : 255 . 255 . 255 . 0 Enter Projector IP Address and Subnet mask. < Back Connect Exittext_image
Connection Wizard Please select the projector that you are going to connect. IP address : 192 . 168 . 1 . 12 Add 192.168.1.10 192.168.1.11 192.168.1.12 Delete Subnet mask : 255 . 255 . 255 . 8 Enter Projector IP Address and Subnet mask. < Back Connect ExitNOTA
text_image
Connection Wizard Connection status IP address Status 192.166.1.10 Connecting... 192.168.1.11 Connected 192.168.1.12 Connect error Connect cancelNOTA
text_image
Connection Wizard Connection list IP address Projector name Status ✓ 192.168.1.10 SW_001F67120F44 LAN ✓ 192.168.1.11 PRI_001F67120F60 LAN, Presenter Mode ✓ 192.168.1.12 PRI_001F67120FDA USB type A, Sideshow Register this setting to My Connection Select the projector to send your computer image, then click [Show] button. Automatically change the input source LAN channel, if different channels is selected. If Sideshow is running, Sideshow is terminated and change the input source to LAN channel. Show CloseNOTA
text_image
Connection Wizard Failed to connect to the following projector. 192.168.1.10text_image
Options Not displaying confirmation dialog for adding Network settings. Optimize Performance Transmission speed Image quality Presenter Mode Display User Name: Unnamed Display LiveViewer Close 1) 2) 4) 5) 6)text_image
Options Not displaying confirmation dialog for adding Network settings. Optimize Performance Transmission speed Image quality Sound On Off Presenter Mode Display User Name: Unnamed Display LiveViewer Closetext_image
Connection Wizard Select the option that describes the connection method you would like to use: Select From List Enter Passcode Profile History Configure Manually My Connection Profile list Profile name Data created Profile-1 03/10/2011 3:19:46 PM Profile-2 03/10/2011 3:18:41 PM Profile-3 03/09/2011 6:24:53 PM Profile-4 03/08/2011 2:41:57 PM Add Edit Delete My Connection Connect Exit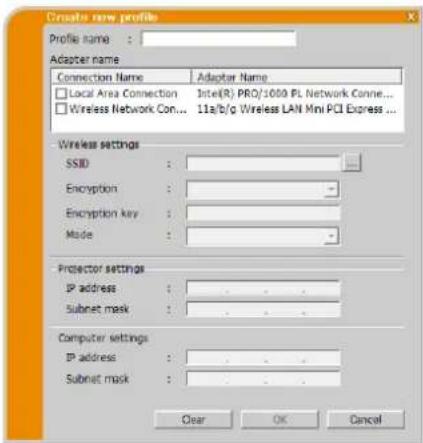
text_image
Create new profile Profile name : Adapter name Connection Name Adaptor Name Local Area Connection Intel(R) PRO/1000 PL Network Conne... Wireless Network Con... 11a/b/g Wireless LAN Mini PCI Express ... Wireless settings SSID : Encryption : - Encryption key : - Mode : - Projector settings IP address : . Subnet mask : . Computer settings IP address : . Subnet mask : . Clear OK Canceltext_image
Proxy for Connection Select the option that describes the connection method you would like to use! Select From List Enter Passcode Profile History Configure Manually My Connection Profile list Profile name Date created Profile-1 03/10/2011 3:19:46 PM Profile-2 03/10/2011 3:18:41 PM Profile-3 03/09/2011 6:24:53 PM Profile-4 03/08/2011 2:41:37 PM Add Edit Delete My Connection Connect Exit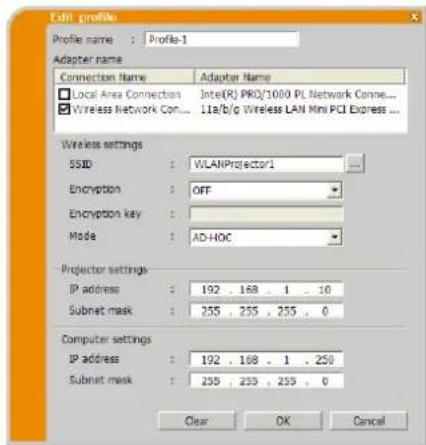
text_image
Edit profiles Profile name : Profile-1 Adapter name Connection Name Adapter Name □ Local Area Connection:Inte(R) PRO/1000 PL Network Conne... ☑ Wireless Network Con... 116/b/g Wireless LAN Mini PCI Express ... Wireless settings SSID : WLANProjector1 Encryption : OFF Encryption key : Mode : AD-HOC Projector settings IP address : 192 . 168 . 1 . 10 Subnet mask : 255 . 255 . 255 . 0 Computer settings IP address : 192 . 168 . 1 . 250 Subnet mask : 255 . 255 . 255 . 0 Clear OK Canceltext_image
Prejardor Connection Select the option that describes the connection method you would like to use Select From List Enter Passcode Profile History Configure Manually My Connection Profile list Profile name Date created Profile-1 03/10/2011 3:12:46 PM Profile-2 03/10/2011 3:18:41 PM Profile-3 03/09/2011 6:24:53 PM Profile-4 03/08/2011 2:41:37 PM Add Edit Delete My Connection Connect Exit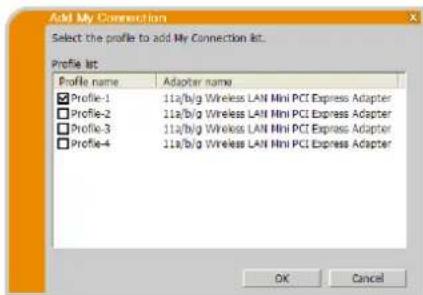
text_image
Add My Connection Select the profile to add My Connection list. Profile list: Profile name Adapter name Profile-1 11a/b/g Wireless LAN Mini PCI Express Adapter Profile-2 11a/b/g Wireless LAN Mini PCI Express Adapter Profile-3 11a/b/g Wireless LAN Mini PCI Express Adapter Profile-4 11a/b/g Wireless LAN Mini PCI Express Adapter OK CancelNOTA
Messaggio 1: A network connection was not established.
text_image
Connection Wizard A network connection was not established. Please check the network connection.Messaggio 2: The number of computer connection exceeds the limit (max. 50).
text_image
Connection Wizard The number of computer connection exceeds the limit (max. 50). Please try again after a session of connected users is disconnected. OKMessaggio 3: A network connection could not be established.
text_image
A network connection could not be established. Windows prevented network configuration changes. Please insure that you are authorized to make these changes.Messaggio 4: Are you sure you want to connect the selected projector?
text_image
Connection Wizard Are you sure you want to connect the selected projector? Yes Notext_image
Connection Wizard Incorrect IP Address. OKMessaggio 6: Do you want to apply suggested network settings as follows?
text_image
Connection Wizard Do you want to apply suggested network settings as follows? IP address : 192.168.2.54 Subnet mask : 255.255.255.0 Change... Not displaying confirmation dialog for adding Network settings. Yes NoNOTA
text_image
Connection Wizard Enter the following information. IP address : Subnet mask : Enter Computer IP Address and Subnet mask. OK CancelMessaggio 7: An IP Address overlaps with the IP Address of the projector you are trying to connect to.
text_image
Connection Wizard An IP Address overlaps with the IP Address of the projector you are trying to connect to. Please choose an IP Address that is currently not in use.Messaggio 8: Incorrect IP Address.
text_image
Conversion Wizard Incorrect IP Address. OKMessaggio 9: A Network Configuration Conflict exists.
text_image
Connection Wizard A Network Configuration Conflict exists. Please verify your Network Configuration Settings (computer and projector). OKMessaggio 10: There is a projector already connected with your computer.
text_image
Connection Wizard There is a projector already connected with your computer. Are you sure that you want to disconnect the current connection and establish new connection? Yes No CancelNOTA
Messaggio 11: In order to connect to the selected projector, you need to disconnect from the current projector.
text_image
Connection Wizard In order to connect to the selected projector, you need to disconnect from the current projector. Are you sure that you want to disconnect from the current projector.Messaggio 12: This projector is currently in use (Presenting) by another user.
text_image
Conversion Wizard This projector is currently in use (Presenting) by another user. You cannot connect with this projector until the other session (Presenter Mode) is finished.Messaggio 13: A Slideshow is currently running on the projector that you are trying to display to (PC-Less Presentation Mode).
text_image
Connection Wizard A Sideshow is currently running on the projector that you are trying to display to (PC-Less Presentation Mode). If you continue, you will cancel the current Sideshow. Yes NoMessaggio 14: Are you sure you want to change the input channel of the Projector to LAN?
text_image
Connection Wizard Are you sure you want to change the input channel of the Projector to LAN? Yes NoMessaggio 15: Are you sure that you want to turn on the network adapter?
text_image
Connection Wizard Are you sure that you want to turn on the network adapter? Yes NoMessaggio 16: It cannot be connected because improper native resolution panel projector is selected.
text_image
Connection Wizard It cannot be connected because improper native resolution panel projector is selected. OKMessaggio 17: Since moderator control mode of connected projector (IP address: \*\*\*.\*\*\*.\*\*\*.\*\*\*) becomes effective, Multi Projector mode is canceled.
text_image
Connection Wizard Since moderator control mode of connected projector (IP address: 192.166.1.100) becomes effective, Multi Projector mode is cancel.Messaggio 18: You can not operate while moderator control mode is activated.
text_image
Connection Wizard You can not operate while moderator control mode is activated.The Software is being delivered to you “AS IS” and Christie Digital Systems USA, Inc. (CHRISTIE) make no warranty as to its use or performance. CHRISTIE AND ITS SUPPLIERS, INCLUDING BUT NOT LIMITED TO CHRISTIE, DO NOT AND CANNOT WARRANT THE PERFORMANCE OR RESULTS YOU MAY OBTAIN BY USING THE SOFTWARE. EXCEPT TO THE EXTENT PROHIBITED BY LAW IN YOUR JURISDICTION, CHRISTIE AND ITS SUPPLIERS MAKE NO WARRANTIES CONDITIONS, REPRESENTATIONS, OR TERMS (EXPRESS OR IMPLIED WHETHER BY STATUTE, COMMON LAW, CUSTOM, USAGE OR OTHERWISE) AS TO ANY MATTER IN CONNECTION WITH THE SOFTWARE, INCLUDING WITHOUT LIMITATION NONINFRINGEMENT OF THIRD PARTY RIGHTS, MERCHANTABILITY, INTEGRATION, SATISFACTORY QUALITY, OR FITNESS FOR ANY PARTICULAR PURPOSE.
You agree that the Software will not be shipped, transferred or exported into any country or used in any manner prohibited by the United States Export Administration Act or any other applicable export laws, restrictions or regulations (collectively the “Export Laws”). In addition, if the Software is identified as export controlled items under the Export Laws, you represent and warrant that you are not a citizen, or otherwise located within, an embargoed nation (including without limitation Iran, Iraq, Syria, Sudan, Libya, Cuba, North Korea, and Serbia) and that you are not otherwise prohibited under the Export Laws from receiving the Software. All rights to Use the Software are granted on condition that such rights are forfeited if you fail to comply with the terms of this Agreement.
Innhold
1 Funksjoner 3
1.1 Visningsmodus....3
1.1.1 Enkelt PC-modus ....3
1.1.2 Flere PC-modus....3
1.2 Flerprojektormodus....4
1.3 Moderatorkontrollmodus 4
2 Kompatibilitet....5
text_image
Choose Setup Language Select the language for the installation from choices below. English OK Canceltext_image
LiveView6 - InstallShield Wizard Welcome to the InstallShield Wizard for LiveView6 The InstallShield Wizard will install LiveView6 on your computer. To continue, click Next. < Back Next > Cancel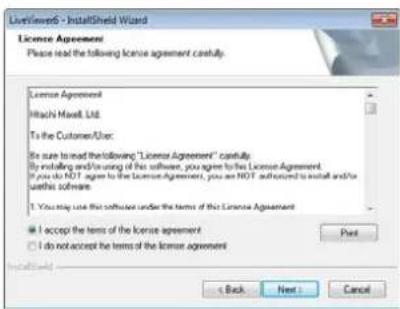
text_image
InstallShield - InstallShield Wizard License Agreement Please read the following license agreement carefully. License Agreement Hitachi Maxwell Ltd. To the Customer/User: Is sure to read the following "License Agreement" carefully. By installing and/or using of this software, you agree to the License Agreement. If you do NOT agree to the License Agreement, you are NOT authorized to install and/or or write this software. I. You may use this software under the terms of the License Agreement I accept the terms of the license agreement Do not accept the terms of the license agreement Back Next Cancel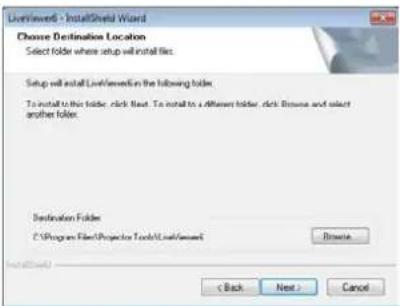
text_image
LiveWindow - InstallShield Wizard Choose Destination Location Select folder where setup will install files. Setup will install LiveWindow in the following folder. To install to this folder, click Next. To install to a different folder, click Browse and select another folder. Destination Folder C:\Program Files\Projection Tools\LiveWindow Browse < Back Next > Cancel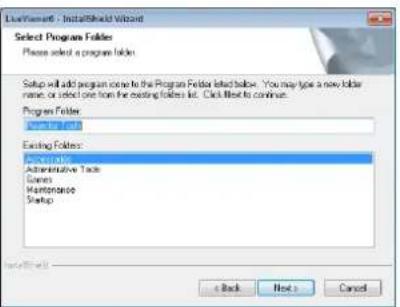
text_image
LiveWindow - InstallShield Wizard Select Program Folders Please select a program folder. Setup will add program scope to the Program Folder selected below. You may type a new folder name or select one from the existing folders list. Click Next to continue. Program Folder: Existing Folder: Administrative Tools Forms Maintenance Startup Back Next > Cancel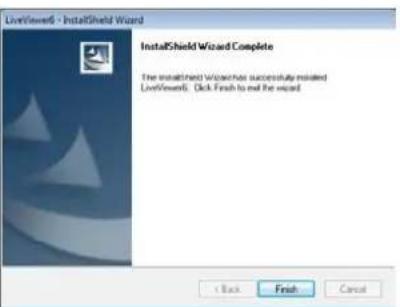
text_image
InstallShield Wizard Complete The installShield Wizard has successfully installed InstallShield - Dick Finish to exit the wizard.text_image
Connection Wizard Select the option that describes the connection method you would like to use: Select From List Enter Passcode Profile History Configure Manually My Connection Projector List Projector name IP address PR3_001F67120F0A 192.168.1.10 PR3_001F67120F20 192.168.1.254 Find Connect Exit3.2.2.1 Velge fra liste
text_image
Connection Wizard Select the option that describes the connection method you would like to use: Select From List Enter Passcode Profile History Configure Manually My Connection Projector List Projector name IP address P8_001F67126F9A 192.168.1.10 P8_001F67126F20 192.168.1.254 Find Connect Exit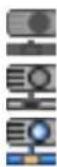
text_image
Connection Wizard Select the option that describes the connection method you would like to user. Select From List Enter Passcode Profile History Configure Manually My Connection Please select the network adapter that you are going to use. Connection Name: Adapter Name Local Area Con... Intel(R) PRO/1000 PL Netw... Wireless Netw... 11a/b/g Wireless LAN Mini P... Please enter the Passcode. The Passcode is a 12-digit code, that can be found on the Startup Screen of the projector you are currently trying to connect to. Connect ExitMERK
- Du kan ikke tilkoble när det ikke er tilgjengelig nettverksadapter på datamaskinen.
- Det kan hende du må sette IP-adresse og andre nettverksinnstillinger manuelt under dine nettverksforhold.
3.2.2.3 Tilkobling via profil
text_image
Connection Wizard Select the option that describes the connection method you would like to use: Select From List Enter Passcode Profile History Configure Manually My Connection Profile list Profile name Data created Profile-1 03/10/2011 3:19:46 PM Profile-2 03/10/2011 3:18:41 PM Profile-3 03/09/2011 6:24:53 PM Profile-4 03/08/2011 2:41:37 PM Add Exit Delete My Connection Connect ExitMERK
text_image
Connection Wizard Select the option that describes the connection method you would like to use: Select From List Enter Passcode Profile History Configure Manually My Connection History list Projector name IP address Last connected PRJ_001F6... 192.168.1.10 03/10/2011 ... PRJ_001F6... 192.168.1.55 03/06/2011 ... PRJ_001F6... 192.168.1.253 03/08/2011 ... PRJ_001F6... 192.168.1.121 03/07/2011 ... Regulate to profile Connect ExitMERK
text_image
Connection Wizard Select the option that describes the connection method you would like to use: Select From List Enter Passcode Profile History Configure Manually My Connection Please select the network adapter that you are going to use. Connection Name Adapter Name Local Area Con... Intel(K) PRO/1000 PL Netw... Wireless Netw... 11a/b/g Wireless LAN Mini P... Next > ExitMERK
text_image
Connection Wizard Select the option that describes the connection method you would like to use: Select From List Enter Passcode Profile History Configure Manually My Connection Connect to the following projector. IP address : 192.168.1.254 Connect ExitMERK
text_image
Connection Wizard Select the option that describes the connection method you would like to use: Select From List Enter Passcode Profile History Configure Manually My Connection Please select the network adapter that you are going to use. Connection Name Adapter Name Local Area Con...:Intel(R) PRO/1000 PL Netw... Wireless Netw... 11a/b/g Wireless LAN Mini P... Please enter the Passcode. The Passcode is a 12-digit code, that can be found on the Startup Screen of the projector you are currently trying to connect to. Connect ExitMERK
natural_image
Illustration of a laptop, a lightning bolt, and a projector (no text or symbols)Fig.3.2.3.4: Direkte forbindelse mellom projektor og datamaskin
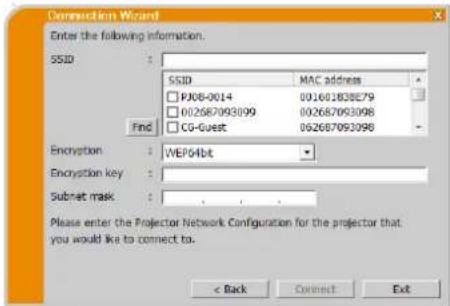
text_image
Connection Wizard Enter the following information. SSID : SSID MAC address □ PJ08-0014 001601838E79 □ 002687093099 002687093098 □ CG-Guest 002687093098 Find Encryption: WEP04bit Encryption key: Subnet mask: Please enter the Projector Network Configuration for the projector that you would like to connect to. < Back Comect ExtMERK
Encryption (Kryptering):
WEP64bit (eksempel)
Encryption key (Koderingsnøkkel) *2:
********** (eksempel)
natural_image
Diagram showing a projector connected to a computer via a cable with a lightning bolt (no text or symbols)Fig.3.2.3.5: Projektoren er koblet til et tilkoblingspunkt via kablet LAN
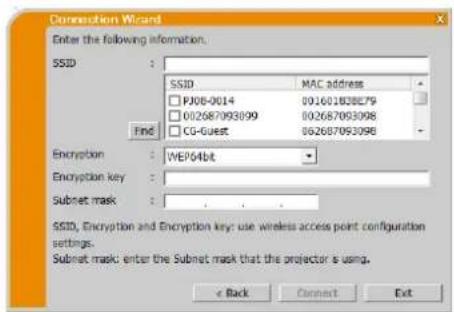
text_image
Connection Wizard Enter the following information. SSID : SSID MAC address □ PJ06-0014 001601838E79 □ 002687093099 002687093098 □ CG-Guest 002687093098 Find Encryption : WEP64bit Encryption key :_ Subset mask :_. SSID, Encryption and Encryption key: use wireless access point configuration settings. Subset mask: enter the Subset mask that the projector is using. < Back Comment ExitMERK
natural_image
Illustration of a projector, laptop, and power cord with lightning and signal icons (no text or symbols)Fig.3.2.3.6: Projektoren er tilkoblet til et tilkoblingspunkt via trådløs LAN
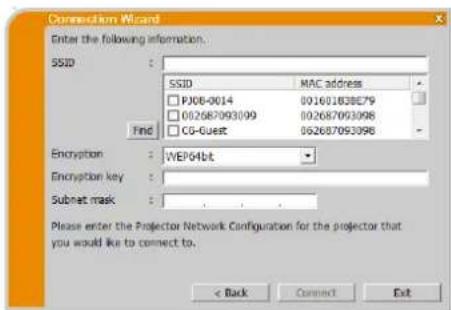
text_image
Connection Wizard Enter the following information. SSID : SSID MAC address PJ06-0014 00160183BE79 002687093099 002687093098 CG-Guest 002687093098 Find: Encryption : WEP04bit Encryption key : Subnet mask : Please enter the Projector Network Configuration for the projector that you would like to connect to. < Back Connect ExitMERK
text_image
Connection Wizard Enter the following information. Subset mask : Please enter the projector subset mask. < Back Connect ExitMERK
• *1 Hvis du bruker Subnet mask untatt Klasse A/B/C, vennligst still inn manuelt.
3.2.4 Configuring Network Setting Manually
Alle innstillinger for nettverkstilkoblingen mellom projektoren og datamaskinen må legges inn manuelt hvis du velger "Configure Manually (Manuell konfigurering)" i menyen på LiveViewer tilkoblingsmetode.
Mode (Modus): AD-HOC
√ Klikk [Next].
natural_image
Illustration of a laptop, a lightning bolt, and a projector (no text or symbols)Fig.3.2.4.1: Direkte forbindelse mellom projektor og datamaskin
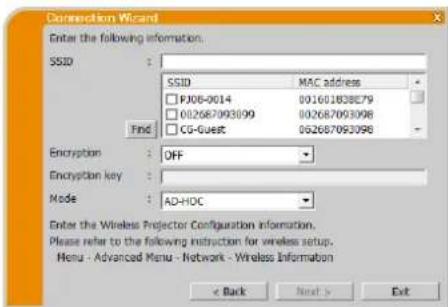
text_image
Configuration Wizard Enter the following information. SSID : SSID MAC address PJ06-0014 001601838E79 012687093099 002687093098 CG-Guest 002687093098 Find Encryption : OFF Encryption key : Mode : AD-HOC Enter the Wireless Projector Configuration Information. Please refer to the following instruction for wireless setup. Menu - Advanced Menu - Network - Wireless Information < Back Next > Exit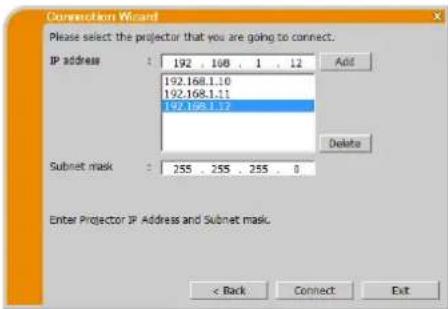
text_image
Conversation Wizard Please select the projector that you are going to connect. IP address : 192 . 108 . 1 . 12 Add 192.168.1.10 192.168.1.11 192.168.1.12 Delete Subnet mask : 255 . 255 . 255 . 0 Enter Projector IP Address and Subnet mask. < Back Connect Exit3.2.4.2 Projektoren er koblet til et tilkoblingspunkt via kablet LAN
√ Innstillingen av tilkoblingspunktet.*
Encryption (Kryptering):
WEP64bit (eksempel)
Encryption key (Koderingsnøkkel) ^*2 :
********** (eksempel)
Mode (Modus): INFRASTRUCTURE
√ Klikk [Next].
Subnet mask (Subnettmaske):
255.255.255.0 (eksempel)
√ Klikk [Connect].
Tilkoblingsprosessen starter.
natural_image
Diagram showing a projector connected to a laptop and a power cord with a lightning bolt (no text or symbols)Fig.3.2.4.2: Projektoren er koblet til et tilkoblingspunkt via kablet LAN
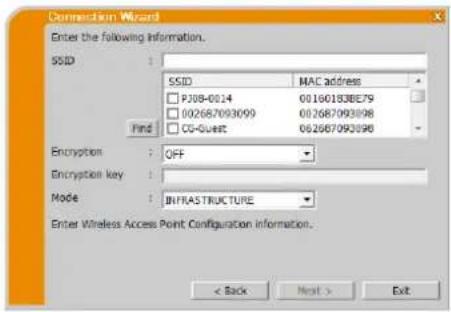
text_image
Connection Wizard Enter the following information. SSID : SSID MAC address P308-0014 0160183BE79 002687093099 012687093098 CG-Guest 062687093098 Find Encryption : OFF Encryption key : Mode : INFRASTRUCTURE Enter Wireless Access Point Configuration information. < Back Next > Exit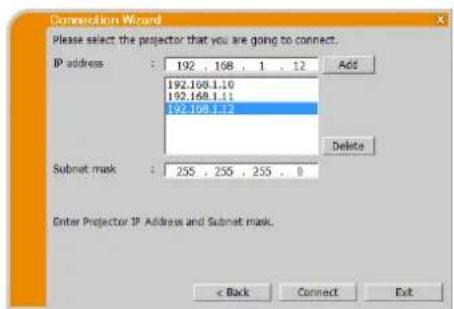
text_image
Connection Wizard Please select the projector that you are going to connect. IP address : 192 . 168 . 1 . 12 Add 192.168.1.10 192.168.1.11 192.168.1.12 Delete Subnet mask : 255 . 255 . 255 . 0 Enter Projector IP Address and Subnet mask. < Back Connect ExitMode (Modus): INFRASTRUCTURE
√ Klikk [Next].
natural_image
Illustration of a projector, laptop, and power cord with lightning bolt symbols (no text or labels)Fig.3.2.4.3: Projektoren er tilkoblet til et tilkoblingspunkt via trådløs LAN
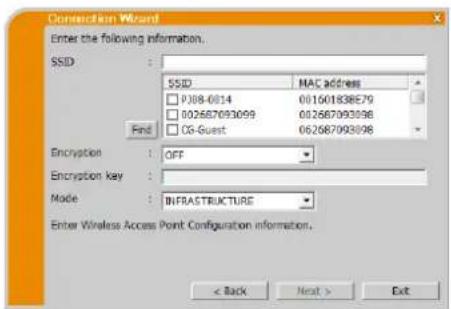
text_image
Connection Wizard Enter the following information. SSID : SSID MAC address P308-0014 011601838E79 002687093099 012687093098 CG Guest 062687093098 Find Encryption : OFF Encryption key : Mode :INFRASTRUCTURE Enter Wireless Access Point Configuration information. < Back Next > ExitMERK
text_image
Connection Wizard Please select the projector that you are going to connect. IP address : 192 . 108 . 1 . 12 Add 192.168.1.10 192.168.1.11 192.168.1.12 Delete Subnet mask : 255 . 255 . 255 . 0 Enter Projector IP Address and Subnet mask. < Back Connect Exit3.2.4.4 Fast LAN
text_image
Connection Wizard Please select the projector that you are going to connect. IP address : 192 . 108 . 1 . 12 Add 192.168.1.10 192.168.1.11 192.168.1.12 Delete Subnet mask : 255 . 255 . 255 . 0 Enter Projector IP Address and Subnet mask. < Back Connect ExitMERK
text_image
Connection Wizard Connection status IP address Status 192.168.1.10 Connecting... 192.168.1.11 Connected 192.168.1.12 Connect error Connect cancelMERK
text_image
Connection Wizard Connection list IP address Projector name Status 192.168.1.10 SW_001F67120F44 LAN 192.168.1.11 PRI_001F67120F60 LAN, Presenter Mode 192.168.1.12 PRI_001F67120FDA USB Type A, Slideshow Register this setting to My Connection Select the projector to send your computer image, then click [Show] button. Automatically change the input source LAN channel, if different channel is selected. If Slideshow is running, Slideshow is terminated and change the input source to LAN channel. Show CloseMERK
text_image
Connection Wizard Failed to connect to the following projector. 192.168.1.10 OKMERK
flowchart
graph TD
    A["User1 192.168.1.14"] --> B["Node"]
    B --> C["User1"]
    C --> D["Node"]
    D --> E["User2"]
    E --> F["Node"]
    F --> G["User3"]
    G --> H["Node"]
    H --> I["User4"]
    I --> J["Node"]
    J --> K["User5"]
    K --> L["Node"]
    L --> M["User6"]
    M --> N["Node"]
    N --> O["User7"]
    O --> P["Node"]
    P --> Q["User8"]
    Q --> R["Node"]
    R --> S["User9"]
    S --> T["Node"]
    T --> U["User10"]
    U --> V["Node"]
    V --> W["User11"]
    W --> X["Node"]
    X --> Y["User12"]
    Y --> Z["Node"]
    Z --> AA["User13"]
    AA --> AB["Node"]
    AB --> AC["User14"]
    AC --> AD["Node off"]
    AD --> AE["Close"]
    AF["Node"] --> AG["Connection list"]
    AG --> AH["IP address"]
    AH --> AI["User name"]
    AI --> AJ["IP address"]
    AJ --> AK["User1"]
    AK --> AL["IP address"]
    AL --> AM["User2"]
    AM --> AN["IP address"]
    AN --> AO["User3"]
    AO --> AP["IP address"]
    AP --> AQ["User4"]
    AQ --> AR["IP address"]
    AR --> AS["User5"]
    AS --> AT["IP address"]
    AT --> AU["User6"]
    AU --> AV["IP address"]
    AV --> AW["User7"]
    AW --> AX["IP address"]
    AX --> AY["User8"]
    AY --> AZ["IP address"]
    AZ --> BA["User9"]
    BA --> BB["IP address"]
    BB --> BC["User10"]
    BC --> BD["IP address"]
    BD --> BE["User11"]
    BE --> BF["IP address"]
    BF --> BG["User12"]
    BG --> BH["IP address"]
    BH --> BI["User13"]
    BI --> BJ["IP address"]
    BJ --> BK["User14"]
1) Visningsmodusknappene (30)
Visningsmodus skifter mellom Enkelt PC-modus og Flere PC-modus.
2) Koblingsliste
text_image
Options Not displaying confirmation dialog for adding Network settings. Optimize Performance Transmission speed Image quality Presenter Mode Display User Name: Unnamed Display LiveViewer Close 1) 2) 4) 5) 6)text_image
Options Not displaying confirmation dialog for adding Network settings. Optimize Performance Transmission speed Image quality Sound On Off Presenter Mode Display User Name: Unnamed Display LiveViewer Close 1) 2) 3) 4) 5) 6)text_image
Connection Wizard Select the option that describes the connection method you would like to use: Select From List Enter Passcode Profile History Configure Manually My Connection Profile list Profile name Data created Profile-1 03/10/2011 3:19:46 PM Profile-2 03/10/2011 3:18:41 PM Profile-3 03/09/2011 6:24:53 PM Profile-4 03/08/2011 2:41:57 PM Add Edit Delete My Connection Connect ExitMERK
text_image
Connection Wizard Select the option that describes the connection method you would like to use: Select From List Enter Passcode Profile History Configure Manually My Connection Profile list Profile name Date created Profile 1 03/10/2011 3:19:46 PM Profile-2 03/10/2011 3:18:41 PM Profile-3 03/09/2011 6:24:53 PM Profile-4 03/08/2011 2:41:37 PM Add Edit Delete My Connection Connect Exit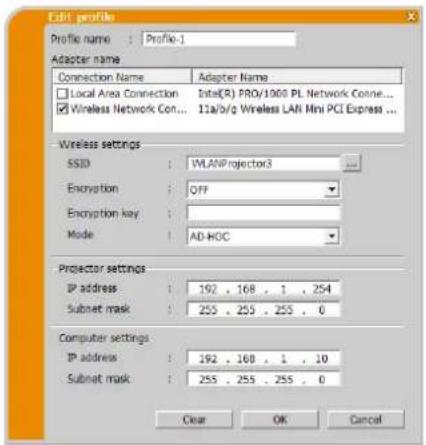
text_image
Edit profiles Profile name : Profile-1 Adapter name Connection Name Adapter Name Local Area Connection:Inte(R) PRO/1000 PL Network Conne... Wireless Network Con... 11a/b/g Wireless LAN Mini PCI Express ... Wireless settings SSID : WLANProjector3 Encryption : OFF Encryption key : Mode : AD-HOC Projector settings IP address : 192 . 168 . 1 . 254 Subnet mask : 255 . 255 . 255 . 0 Computer settings IP address : 192 . 168 . 1 . 10 Subnet mask : 255 . 255 . 255 . 0 Clear OK Canceltext_image
Connection Wizard Select the option that describes the connection method you would like to use: Select From List Enter Passcode Profile History Configure Manually My Connection Profile list: Profile name Date created Profile-1 03/10/2011 3:19:45 PM Profile-2 03/10/2011 3:18:41 PM Profile-3 03/09/2011 6:24:53 PM Profile-4 03/08/2011 2:41:37 PM Add Edit Delete My Connection Connect Exit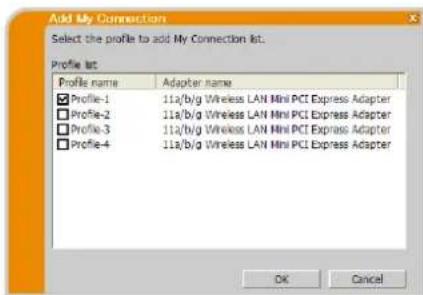
text_image
Add My Connection Select the profile to add My Connection list. Profile list: Profile name Adapter name ✓ Profile-1 11a/b/g Wireless LAN Mini PCI Express Adapter ✓ Profile-2 11a/b/g Wireless LAN Mini PCI Express Adapter ✓ Profile-3 11a/b/g Wireless LAN Mini PCI Express Adapter ✓ Profile-4 11a/b/g Wireless LAN Mini PCI Express Adapter OK CancelMERK
Melding 1: A network connection was not established.
Denne meldingen vises i tilfelle projektoren ikke er koblet til en LAN-kabel til datamaskinen när kablet LAN er valgt. Kontroller at prosjektøren er tilkoblet med en LAN kabel tilPC-en din. Klikk [OK] for å gå tilbake til forrige skjermbilde.
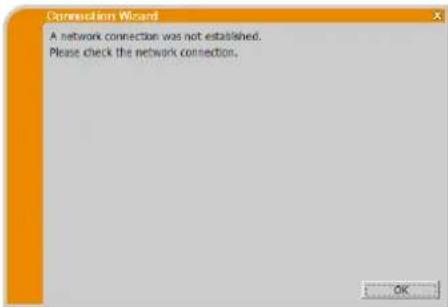
text_image
Connection Wizard A network connection was not established. Please check the network connection.Melding 2: The number of computer connection exceeds the limit (max. 50).
Projektoren har allerede nädd maksimalt antall nettverkstilkoblinger. Klikk [OK] og LiveViewer hovedmeny vises.
text_image
Connection Wizard The number of computer connection exceeds the limit (max. 50). Please try again after a session of connected user is disconnected.Melding 3: A network connection could not be established.
text_image
Connection Wizard A network connection could not be established. Windows prevented network configuration changes. Please ensure that you are authorized to make these changes.Melding 4: Are you sure you want to connect the selected projector?
Denne meldingen vises når den trådløse adapteren du valgte allerede er i bruk med en annen nettverkstilkobling.
text_image
Connection Wizard Are you sure you want to connect the selected projector? Yes NoMelding 5: Incorrect Passcode
text_image
Conversion Wizard Incorrect IP Address. OKMelding 6: Do you want to apply suggested network settings as follows?
Dialogboksen vil bli vist när du må endre en nettverkskonfigurasjon på datamaskinen for å koble den til projektoren.
text_image
Connection Wizard Do you want to apply suggested network settings as follows? IP address : 192.168.2.54 Subnet mask : 255.255.255.0 Change... Not displaying confirmation dialog for adding Network settings. Yes NoMERK
text_image
Connection Wizard Enter the following information. IP address : Subnet mask : Enter Computer IP Address and Subnet mask. OK CancelMelding 7: An IP Address overlaps with the IP Address of the projector you are trying to connect to.
Denne meldingen vises når IP-adressen på datamaskinen er den samme som på projektoren. Siden forskjellige IP-adresser er nødvendig, klikk på [OK] og skriv riktig IP-adresse.
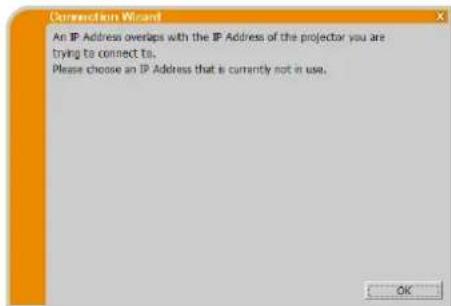
text_image
Connection Wizard An IP Address overlaps with the IP Address of the projector you are trying to connect to. Please choose an IP Address that is currently not in use.Melding 8: Incorrect IP Address.
text_image
Connection Wizard Incorrect IP Address. OKMelding 9: A Network Configuration Conflict exists.
text_image
Connection Wizard A Network Configuration Conflict exists. Please verify your Network Configuration Settings (computer and projector). OKMelding 10: There is a projector already connected with your computer.
text_image
Connection Wizard There is a projector already connected with your computer. Are you sure that you want to disconnect the current connection and establish new connection? Yes No Cancel_MERK
Melding 11: In order to connect to the selected projector, you need to disconnect from the current projector.
text_image
Connection Wizard In order to connect to the selected projector, you need to disconnect from the current projector. Are you sure that you want to disconnect from the current projector.Melding 12: This projector is currently in use (Presenting) by another user.
Projektoren du vil sende bildene til er opptatt med en annen maskin i presentasjonsmodusen.
text_image
Connection Wizard This projector is currently in use (Presenting) by another user. You cannot connect with this projector until the other session (Presenter Mode) is finished.Melding 13: A Slideshow is currently running on the projector that you are trying to display to (PC-Less Presentation Mode).
Projektoren du vil sende bildene til er i lysbildeframvisningsmodus i UTEN PCpresentasjonen.
text_image
Connection Wizard A Sideshow is currently running on the projector that you are trying to display to (PC-Less Presentation Mode). If you continue, you will cancel the current Sideshow. Yes NoMelding 14: Are you sure you want to change the input channel of the Projector to LAN?
text_image
Connection Wizard Are you sure you want to change the input channel of the Projector to LAN? Yes NoMelding 15: Are you sure that you want to turn on the network adapter?
text_image
Connection Wizard Are you sure that you want to turn on the network adapter? Yes NoMelding 16: It cannot be connected because improper native resolution panel projector is selected.
text_image
Connection Wizard It cannot be connected because improper native resolution panel projector is selected. OKMelding 17: Since moderator control mode of connected projector (IP address: ***.***.***.***) becomes effective, Multi Projector mode is canceled.
Denne meldingen vises när Flerprojektormodus avsluttes, ettersom Moderatorkontrollmodus for tilkoblet projektor blir effektiv av en annen datamaskin. Klikk [OK] og LiveViewer hovedmeny vises.
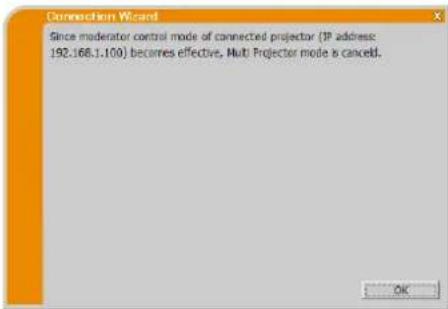
text_image
Connection Wizard Since moderator control mode of connected projector (IP address: 192.168.1.100) becomes effective, Multi Projector mode is cancelled.Melding 18: You can not operate while moderator control mode is activated.
Projektoren er okkupert av en annen datamaskin i Moderatorkontrollmodus. Klikk [OK] og LiveViewer hovedmeny vises.
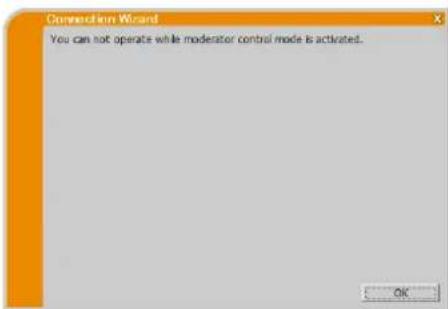
text_image
Connection Wizard You can not operate while moderator control mode is activated.B Feilsøking
The Software is being delivered to you “AS IS” and Christie Digital Systems USA, Inc. (CHRISTIE) make no warranty as to its use or performance. CHRISTIE AND ITS SUPPLIERS, INCLUDING BUT NOT LIMITED TO CHRISTIE, DO NOT AND CANNOT WARRANT THE PERFORMANCE OR RESULTS YOU MAY OBTAIN BY USING THE SOFTWARE. EXCEPT TO THE EXTENT PROHIBITED BY LAW IN YOUR JURISDICTION, CHRISTIE AND ITS SUPPLIERS MAKE NO WARRANTIES CONDITIONS, REPRESENTATIONS, OR TERMS (EXPRESS OR IMPLIED WHETHER BY STATUTE, COMMON LAW, CUSTOM, USAGE OR OTHERWISE) AS TO ANY MATTER IN CONNECTION WITH THE SOFTWARE, INCLUDING WITHOUT LIMITATION NONINFRINGEMENT OF THIRD PARTY RIGHTS, MERCHANTABILITY, INTEGRATION, SATISFACTORY QUALITY, OR FITNESS FOR ANY PARTICULAR PURPOSE.
You agree that the Software will not be shipped, transferred or exported into any country or used in any manner prohibited by the United States Export Administration Act or any other applicable export laws, restrictions or regulations (collectively the “Export Laws”). In addition, if the Software is identified as export controlled items under the Export Laws, you represent and warrant that you are not a citizen, or otherwise located within, an embargoed nation (including without limitation Iran, Iraq, Syria, Sudan, Libya, Cuba, North Korea, and Serbia) and that you are not otherwise prohibited under the Export Laws from receiving the Software. All rights to Use the Software are granted on condition that such rights are forfeited if you fail to comply with the terms of this Agreement.
Inhoud
1 Kenmerken....3
1.1 Weergavemodus....3
1.1.1 Enkel-PC-modus....3
1.1.2 Multi-PC-modus....3
1.2 Multi-projectormodus ....4
1.3 Moderator-besturingsmodus ....4
text_image
Choose Setup Language Select the language for the installation from the choices below. English OK Canceltext_image
LiveView6 - InstallShield Wizard Welcome to the InstallShield Wizard for LiveView6 The InstallShield Wizard will install LiveView6 on your computer. To continue, click Next < Back Next > Cancel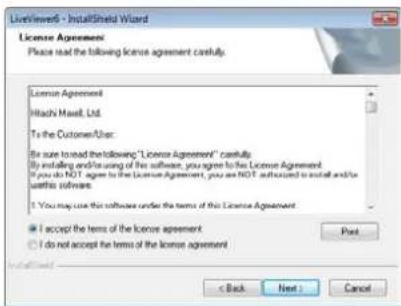
text_image
LiveShield - InstallShield Wizard License Agreement Please read the following license agreement carefully. License Agreement Hitachi Hash, Ltd. To the Customer/User: Be sure to read the following "License Agreement" carefully. By installing and/or using of the software, you agree to the License Agreement. If you do NOT agree to the License Agreement, you are NOT authorized to install and/or write this software. I. You may use this software under the terms of this License Agreement. I accept the terms of the license agreement Do not accept the terms of the license agreement < Back Next > Cancel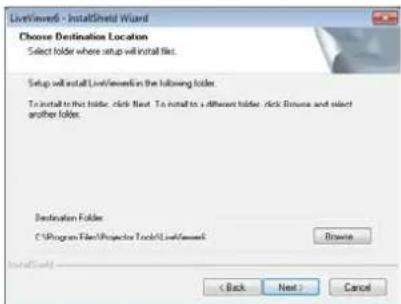
text_image
LiveWindow - InstallShield Wizard Choose Destination Location Select folder where setup will install files. Setup will install LiveWindow in the following folder. To install to this folder, click Next. To install to a different folder, click Browse and select another folder. Destination Folder C:\Program Files\Projection Tools\LiveWindow\ Browse < Back Next > Cancel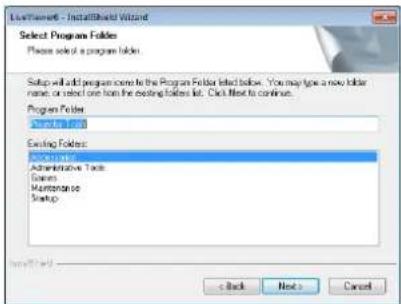
text_image
Installment - InstallShield Wizard Select Program Folders Please select a program folder. Setup will add program come to the Program Folder listed below. You may type a new folder name or select one from the existing folders list. Click Next to continue. Program Folder Administrative Tools Administrative Tools Maintenance Startup Existing Folders: Administrative Tools Maintenance Startup < Back Next > Cancel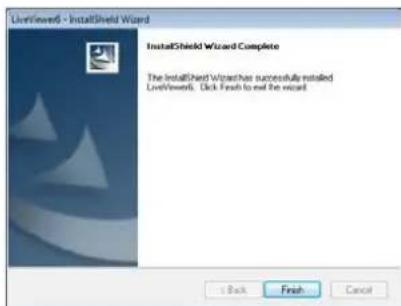
text_image
LiveViews - InstallShield Wizard InstallShield Wizard Complete The InstallShield Wizard has successfully installed LiveViews. Click Finish to exit the wizard.text_image
Connection Wizard Select the option that describes the connection method you would like to user: Select From List Enter Passcode Profile History Configure Manually My Connection Projector List Projector name JP address PR1_001F67120F9A 192.168.1.10 PR1_001F67120F20 192.168.1.254 Find Connect Exittext_image
Connection Wizard Select the option that describes the connection method you would like to user: Select From List Enter Passcode Profile History Configure Manually My Connection Projector List Projector name IP address □PR_001F671209A 192.168.1.10 □PR_001F67120F20 192.168.1.254 Find Connect Exittext_image
Connection Wizard Select the option that describes the connection method you would like to use: Select From List Enter Passcode Profile History Configure Manually My Connection Please select the network adapter that you are going to use. Connection Name Adapter Name Local Area Con... Intel(K) PRO/1000 PL Netw... Wireless Netw... 11a/b/g Wireless LAN Mini P... Please enter the Passcode. The Passcode is a 12-digit code, that can be found on the Startup Screen of the projector you are currently trying to connect to. Connect Exit3.2.2.3 Profielverbinding
text_image
Connection Wizard Select the option that describes the connection method you would like to use: Select From List Enter Passcode Profile History Configure Manually My Connection Profile list Profile name Date created Profile-1 03/10/2011 3:19:45 PM Profile-2 03/10/2011 3:18:41 PM Profile-3 03/09/2011 6:24:53 PM Profile-4 03/08/2011 2:41:37 PM Add Edit Delete My Connection Connect ExitN.B.
text_image
Connections Wizard Select the option that describes the connection method you would like to user: Select From List Enter Passcode Profile History Configure Manually My Connection History list Projector name IP address Last connected PRJ_001F6... 192.168.1.10 03/10/2011 ... PRJ_001F6... 192.168.1.55 03/08/2011 ... PRJ_001F6... 192.168.1.233 03/08/2011 ... PRJ_001F6... 192.168.1.121 03/07/2011 ... Register to profile Connect ExitN.B.
text_image
Connection Wizard Select the option that describes the connection method you would like to use: Select From List Enter Passcode Profile History Configure Manually My Connection Please select the network adapter that you are going to use. Connection Name Adapter Name Local Area Con... Intel(R) PRO/1000 PL Netw... Wireless Netw... 11a/b/g Wireless LAN Mini P... Next > ExitN.B.
text_image
Connection Wizard Select the option that describes the connection method you would like to use: Select From List Enter Passcode Profile History Configure Manually My Connection Connect to the following projector. IP address : 192.168.1.254 Connect ExitN.B.
text_image
Connection Wizard Select the option that describes the connection method you would like to user. Select From List Enter Passcode Profile History Configure Manually My Connection Please select the network adapter that you are going to use. Connection Name Adapter Name Local Area Con... Intel(K) PRO/1000 PL Netw... Wireless Netw... 11a/b/g Wireless LAN Mini P... Please enter the Passcode. The Passcode is a 12-digit code, that can be found on the Startup Screen of the projector you are currently trying to connect to. Connect ExitN.B.
natural_image
Illustration of a laptop, a lightning bolt, and a projector (no text or symbols)Afb.3.2.3.4: Directe verbinding tussen de projector en de computer.
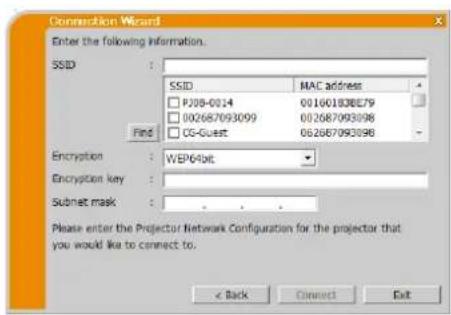
text_image
Connection Wizard Enter the following information. SSID : SSID MAC address PJ08-0014 00160183BE79 002687093099 002687093098 CG-Guest 062687093098 Find Encryption : WEP64bit Encryption key :_ Submit mask :_ Please enter the Projector Network Configuration for the projector that you would like to connect to. < Back Connect ExitN.B.
natural_image
Diagram showing a projector connected to a laptop and a power cord with a lightning bolt (no text or symbols)text_image
Connection Wizard Enter the following information. SSID : SSID MAC address PJ06-0014 001601838E79 002687093099 002687093098 CG-Guest 002687093098 Find Encryption : WEP/04bit Encryption key : Subnet mask : SSID, Encryption and Encryption key: use wireless access point configuration settings. Subnet mask: enter the Subnet mask that the projector is using. < Back Connect ExitN.B.
natural_image
Illustration of a projector, laptop, and power cord with lightning bolt symbols (no text or labels)text_image
Connection Wizard Enter the following information. SSID : SSID MAC address PJ08-0014 001601838E79 002687093099 002687093098 CG-Guest 002687093098 Find Encryption : WEPG4bit Encryption key : Subset mask : Please enter the Projector Network Configuration for the projector that you would like to connect to. < Back Connect ExitN.B.
text_image
Connection Wizard Enter the following information. Subset mask : Please enter the projector subnet mask. < Back Connect ExitN.B.
Mode (Modus): AD-HOC
√ Klik op [Next].
natural_image
Illustration of a laptop, a lightning bolt, and a projector (no text or symbols)text_image
Connection Wizard Enter the following information. SSID : SSID MAC address PJ08-0014 001601838E79 002687093099 002687093098 CG-Cuest 002687093098 Find Encryption : OFF Encryption key : Mode : AD-HOC Enter the Wireless Projector Configuration Information. Please refer to the following instruction for wireless setup. Menu - Advanced Menu - Network - Wireless Information < Back Next > ExitN.B.
text_image
Connection Wizard Please select the projector that you are going to connect. IP address : 192 . 168 . 1 . 12 Add 192.168.1.10 192.168.1.11 192.168.1.12 Delete Subnet mask : 255 . 255 . 255 . 0 Enter Projector IP Address and Subnet mask, < Back Connect ExitMode (Modus): INFRASTRUCTURE
√ Klik op [Next].
natural_image
Diagram showing a projector connected to a laptop and a power cord with a lightning bolt (no text or symbols)text_image
Connection Wizard Please select the projector that you are going to connect. IP address : 192 . 168 . 1 . 12 Add 192.168.1.10 192.168.1.11 192.168.1.12 Subnet mask : 255 . 255 . 255 . 0 Delete Enter Projector IP Address and Subnet mask. < Back Connect ExitMode (Modus): INFRASTRUCTURE
√ Klik op [Next].
natural_image
Illustration of a projector, laptop, and power cord with lightning and ground symbols (no text or labels)text_image
Connection Wizard Please select the projector that you are going to connect. IP address : 192 . 168 . 1 . 12 Add 192.168.1.10 192.168.1.11 192.168.1.12 Delete Subnet mask : 255 . 255 . 255 . 0 Enter Projector IP Address and Subnet mask. < Back Connect Exit3.2.4.4 Bedraad LAN.
text_image
Connection Wizard Please select the projector that you are going to connect. IP address : 192 . 168 . 1 . 12 Add 192.168.1.10 192.168.1.11 192.168.1.12 Delete Subnet mask : 255 . 255 . 255 . 0 Enter Projector IP Address and Subnet mask. < Back Connect ExitN.B.
text_image
Connection Wizard Connection status IP address Status 192.168.1.10 Connecting... 192.168.1.11 Connected 192.168.1.12 Connect error Connect cancelN.B.
text_image
Connection Wizard Connection list: IP address Projector name Status ✓ 192.168.1.10 SW_001F67120F44 LAN ✓ 192.168.1.11 PRI_001F67120F60 LAN, Presenter Mode ✓ 192.168.1.12 PRI_001F67120FDA USB type A, Sideshow Register this setting to My Connection Select the projector to send your computer image, then click [show] button. Automatically change the input source LAN channel, if different channel is selected. If Sideshow is running, Sideshow is terminated and change the input source to LAN channel. Show CloseN.B.
text_image
Connection Wizard Failed to connect to the following projector. 192.168.1.10For details, refer to the section "3.2.2 Selecteer de verbindingsmethode. (☐ 9)
8) Optieknop
De verbinding is verbroken

Niet aangesloten

Hold

Afb.4.b Systeem tray icoon.
text_image
Options Not displaying confirmation dialog for adding Network settings. Optimize Performance Transmission speed Image quality Presenter Mode Display User/ Name: Unnamed Display LiveViewer Closetext_image
Options Not displaying confirmation dialog for adding Network settings. Optimize Performance Transmission speed Image quality Sound On Off Presenter Mode Display User Name: Unnamed Display LiveViewer Closetext_image
Connection Wizard Select the option that describes the connection method you would like to use: Select From List Enter Passcode Profile History Configure Manually My Connection Profile list Profile name Data created Profile-1 03/10/2011 3:19:46 PM Profile-2 03/10/2011 3:18:41 PM Profile-3 03/09/2011 6:24:53 PM Profile-4 03/08/2011 2:41:57 PM Add Edit Delete My Connection Connect Exit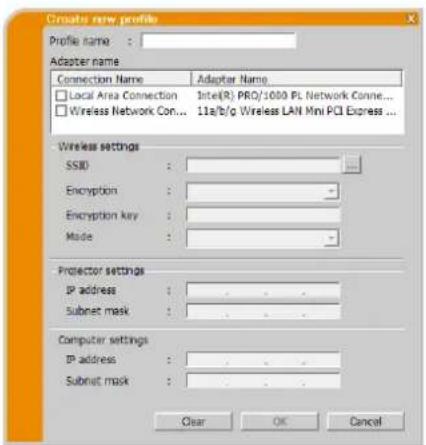
text_image
Create new profile Profile name : Adapter name Connection Name Adapter Name Local Area Connection Intel(R) PRO/1000 PL Network Conne... Wireless Network Con... 11a/b/g Wireless LAN Mini PCI Express ... Wireless settings SSID : Encryption : - Encryption key : - Mode : - Projector settings IP address : - Subnet mask : - Computer settings IP address : - Subnet mask : - Clear OK Canceltext_image
Proxy for Connection Select the option that describes the connection method you would like to use! Select From List Enter Passcode Profile History Configure Manually My Connection Profile list Profile name Date created Profile-1 03/10/2011 3:19:46 PM Profile-2 03/10/2011 3:18:41 PM Profile-3 03/09/2011 6:24:53 PM Profile-4 03/08/2011 2:41:37 PM Add Edit Delete My Connection Connect Exit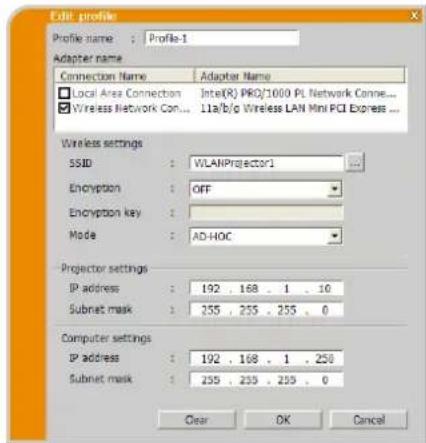
text_image
Edit profile Profile name : Profile-1 Adapter name Connection Name Adapter Name Local Area Connection:Inte(R) PRO/1000 PL Network Conne... Wireless Network Con... 11a/b/g Wireless LAN Mini PCI Express ... Wireless settings SSID : WLANProjector1 Encryption : OFF Encryption key : Mode : AD-HOC Projector settings IP address : 192 . 168 . 1 . 10 Subnet mask : 255 . 255 . 255 . 0 Computer settings IP address : 192 . 168 . 1 . 250 Subnet mask : 255 . 255 . 255 . 0 Clear OK Canceltext_image
Projector Connection Select the option that describes the connection method you would like to user: Select From List Enter Passcode Profile History Configure Manually My Connection Profile list Profile name Data created Profile-1 03/10/2011 3:19:46 PM Profile-2 03/10/2011 3:18:41 PM Profile-3 03/09/2011 6:24:53 PM Profile-4 03/08/2011 2:41:37 PM Add Edit Delete My Connection Connect Exit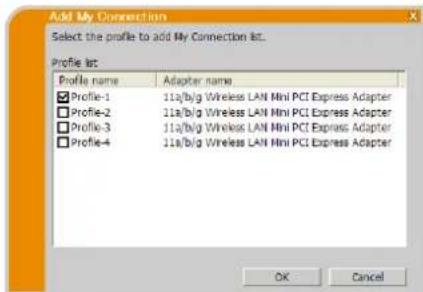
text_image
Add My Connection Select the profile to add My Connection list. Profile list Profile name Adapter name ✓ Profile-1 11a/b/g Wireless LAN Mini PCI Express Adapter ✓ Profile-2 11a/b/g Wireless LAN Mini PCI Express Adapter ✓ Profile-3 11a/b/g Wireless LAN Mini PCI Express Adapter ✓ Profile-4 11a/b/g Wireless LAN Mini PCI Express Adapter OK CancelN.B.
Bericht 1: A network connection was not established.
text_image
Connection Wizard A network connection was not established. Please check the network connection.Bericht 2: The number of computer connection exceeds the limit (max. 50).
text_image
Connection Wizard The number of computer connection exceeds the limit (max. 50). Please try again after a session of connected user is disconnected.Bericht 3: A network connection could not be established.
text_image
Connection Wizard A network connection could not be established. Windows prevented network configuration changes. Please insure that you are authorized to make these changes.Bericht 4: Are you sure you want to connect the selected projector?
text_image
Connection Wizard Are you sure you want to connect the selected projector? Yes NoBericht 5: Incorrect PassCode.
text_image
Conversion Wizard Incorrect IP Address. OKBericht 6: Do you want to apply suggested network settings as follows?
text_image
Connection Wizard Do you want to apply suggested network settings as follows? IP address : 192.168.2.54 Subnet mask : 255.255.255.0 Change... Not displaying confirmation dialog for adding Network settings. Yes NoN.B.
text_image
Conversation Wizard Enter the following information. IP address : Subset mask : Enter Computer IP Address and Subnet mask. OK CancelBericht 7: An IP Address overlaps with the IP Address of the projector you are trying to connect to.
text_image
Connection Wizard An IP Address overlaps with the IP Address of the projector you are trying to connect to. Please choose an IP Address that is currently not in use.Bericht 8: Incorrect IP Address.
text_image
Connection Wizard Incorrect IP Address. OKBericht 9: A Network Configuration Conflict exists.
text_image
A Network Configuration Conflict exists. Please verify your Network Configuration Settings (computer and projector). OKBericht 10: There is a projector already connected with your computer.
text_image
Connection Wizard There is a projector already connected with your computer. Are you sure that you want to disconnect the current connection and establish new connection? Yes No CancelN.B.
Bericht 11: In order to connect to the selected projector, you need to disconnect from the current projector.
text_image
Connection Wizard In order to connect to the selected projector, you need to disconnect from the current projector. Are you sure that you want to disconnect from the current projector.Bericht 12: This projector is currently in use (Presenting) by another user.
text_image
Connection Wizard This projector is currently in use (Presenting) by another user. You cannot connect with this projector until the other session (Presenter Mode) is finished.Bericht 13: A Slideshow is currently running on the projector that you are trying to display to. (PC-Less Presentation Mode)
text_image
Connection Wizard A Sideshow is currently running on the projector that you are trying to display to (PC Less Presentation Mode). If you continue, you will cancel the current Sideshow. Yes NoBericht 14: Are you sure you want to change the input channel of the Projector to LAN?
text_image
Connection Wizard Are you sure you want to change the input channel of the Projector to LAN? Yes NoBericht 15: Are you sure that you want to turn on the network adapter?
text_image
Connection Wizard Are you sure that you want to turn on the network adapter? Yes NoBericht 16: It cannot be connected because improper native resolution panel projector is selected.
text_image
Connection Wizard It cannot be connected because improper native resolution panel projector is selected.Bericht 17: Since moderator control mode of connected projector (IP address: ***.***.***.***) becomes effective, Multi Projector mode is canceled.
text_image
Connection Wizard Since moderator control mode of connected projector (IP address: 192.168.1.100) becomes effective, Multi Projector mode is cancel. OKBericht 18: You can not operate while moderator control mode is activated.
text_image
Connection Wizard You can not operate while moderator control mode is activated. OKThe Software is being delivered to you “AS IS” and Christie Digital Systems USA, Inc. (CHRISTIE) make no warranty as to its use or performance. CHRISTIE AND ITS SUPPLIERS, INCLUDING BUT NOT LIMITED TO CHRISTIE, DO NOT AND CANNOT WARRANT THE PERFORMANCE OR RESULTS YOU MAY OBTAIN BY USING THE SOFTWARE. EXCEPT TO THE EXTENT PROHIBITED BY LAW IN YOUR JURISDICTION, CHRISTIE AND ITS SUPPLIERS MAKE NO WARRANTIES CONDITIONS, REPRESENTATIONS, OR TERMS (EXPRESS OR IMPLIED WHETHER BY STATUTE, COMMON LAW, CUSTOM, USAGE OR OTHERWISE) AS TO ANY MATTER IN CONNECTION WITH THE SOFTWARE, INCLUDING WITHOUT LIMITATION NONINFRINGEMENT OF THIRD PARTY RIGHTS, MERCHANTABILITY, INTEGRATION, SATISFACTORY QUALITY, OR FITNESS FOR ANY PARTICULAR PURPOSE.
You agree that the Software will not be shipped, transferred or exported into any country or used in any manner prohibited by the United States Export Administration Act or any other applicable export laws, restrictions or regulations (collectively the “Export Laws”). In addition, if the Software is identified as export controlled items under the Export Laws, you represent and warrant that you are not a citizen, or otherwise located within, an embargoed nation (including without limitation Iran, Iraq, Syria, Sudan, Libya, Cuba, North Korea, and Serbia) and that you are not otherwise prohibited under the Export Laws from receiving the Software. All rights to Use the Software are granted on condition that such rights are forfeited if you fail to comply with the terms of this Agreement.
Conteúdo
text_image
Orange interface toolbar with white icons representing media and video control functionsFig.3.a LiveViewer Menu principal
3.1 Instalar o "LiveViewer"
text_image
Choose Setup Language Select the language for the installation from the choices below. English OK Canceltext_image
LiveView6 - InstallShield Wizard Welcome to the InstallShield Wizard for LiveView6 The InstallShield Wizard will install LiveView6 on your computer. To continue, click Next < Back Next > Cancel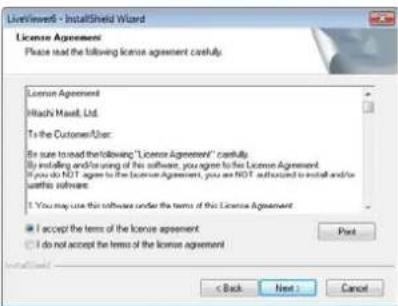
text_image
LiveWindows - InstallShield Wizard License Agreement Please read the following license agreement castfully. License Agreement Hitachi Hash, Ltd. To the Customer/User: Be sure to read the following: "License Agreement" castfully By installing and/or using of the software, you agree to the License Agreement If you do NOT agree to the License Agreement, you are NOT authorized to install and/or write this software. I You may use this software under the terms of the License Agreement I accept the terms of the license agreement Do not accept the terms of the license agreement Back Next Cancel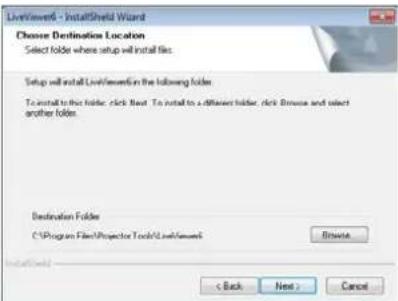
text_image
LiveWindow - InstallShield Wizard Choose Destination Location Select folder where setup will install files. Setup will install LiveWindow in the following folder. To install to the folder, click Next. To install to a different folder, click Browse and select another folder. Destination Folder C:\Program Files\Projection Tool\LiveWindow Browse < Back Next > Cancel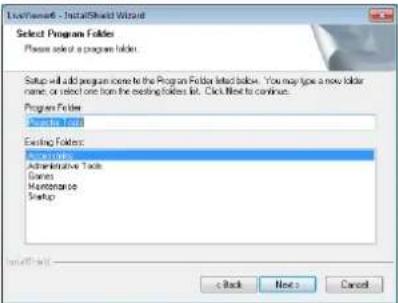
text_image
Select Program Folders Please select a program folder. Setup will add program content to the Program Folder listed below. You may type a new folder name, or select one from the existing folders list. Click Next to continue. Program Folder Existing Folder Existing Manager Administrative Tools Games Maintenance Startup Back Next > Cancel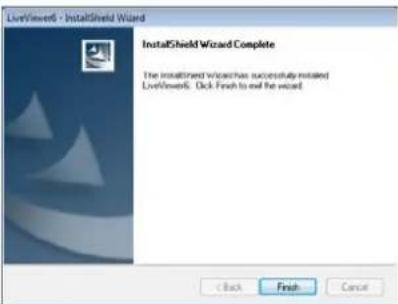
text_image
LiveViewert - InstallShield Wizard InstallShield Wizard Complete The installered Wizard has successfully installed LiveViewert. Click Finish to exit the wizard. Back Finish Cancel3.2 Ligação à rede
text_image
Connection Wizard Select the option that describes the connection method you would like to use Select From List Enter Passcode Profile History Configure Manually My Connection Projector List Projector name IP address □PR3_001F67126F9A 192.168.1.10 □PR3_001F67126F20 192.168.1.254 Find Connect Exit3.2.2.1 Seleccionar a partir da lista
text_image
Connection Wizard Select the option that describes the connection method you would like to user: Select From List Enter Passcode Profile History Configure Manually My Connection Projector List Projector name address PR3_001F67120F9A 192.168.1.10 PR3_001F67120F20 192.168.1.254 Find Connect Exittext_image
Connection Wizard Select the option that describes the connection method you would like to use: Select From List Enter Passcode Profile History Configure Manually My Connection Please select the network adapter that you are going to use. Connection Name Adapter Name Local Area Con... Dite(R) PRO/1000 PL Netw... Wireless Netw... 11a/b/g Wireless LAN Mini P... Please enter the Passcode. The Passcode is a 12-digit code, that can be found on the Startup Screen of the projector you are currently trying to connect to. Connect Exittext_image
Connection Wizard Select the option that describes the connection method you would like to user: Select From List Enter Passcode Profile History Configure Manually My Connection Profile list Profile name Data created Profile-1 03/10/2011 3:19:46 PM Profile-2 03/10/2011 3:18:41 PM Profile-3 03/09/2011 6:24:53 PM Profile-4 03/08/2011 2:41:37 PM Add Exit Delete My Connection Connect ExitNOTA
text_image
Connection Wizard Select the option that describes the connection method you would like to use: Select From List Enter Passcode Profile History Configure Manually My Connection History list Projector name IP address Last connected PR3_001F6... 192.168.1.10 03/10/2011 ... PR3_001F6... 192.168.1.55 03/06/2011 ... PR3_001F6... 192.168.1.253 03/08/2011 ... PR3_001F6... 192.168.1.121 03/07/2011 ... Register to profile Connect ExitNOTA
text_image
Connection Wizard Select the option that describes the connection method you would like to use: Select From List Enter Passcode Profile History Configure Manually My Connection Please select the network adapter that you are going to use. Connection Name Adapter Name Local Area Con... Intel(K) PRO/1000 PL Netw... Wireless Netw... 11a/b/g Wireless LAN Mini P... Next > ExitNOTA
text_image
Connection Wizard Select the option that describes the connection method you would like to use: Select From List Enter Passcode Profile History Configure Manually My Connection Connect to the following projector. IP address : 192.168.1.254 Connect ExitNOTA
text_image
Connection Wizard Select the option that describes the connection method you would like to user. Select From List Enter Passcode Profiles History Configure Manually My Connection Please select the network adapter that you are going to use. Connection Name Adapter Name Local Area Con... Intel(K) PRO/1000 PL Netw... Wireless Netw... 11a/b/g Wireless LAN Mini P... Please enter the Passcode. The Passcode is a 12-digit code, that can be found on the Startup Screen of the projector you are currently trying to connect to. Connect ExitNOTA
natural_image
Illustration of a laptop, lightning bolt, and projector (no text or symbols)text_image
Connection Wizard Enter the following information. SSID : SSID MAC address PJ08-0014 001601838E79 012687093099 002687093098 CG-Guest 062687093098 Find Encryption : WEPG4bit Encryption key : Subset mask : ... Please enter the Projector Network Configuration for the projector that you would like to connect to. < Back Connect ExitNOTA
natural_image
Diagram showing a projector connected to a laptop and a power cord with a lightning bolt (no text or symbols)text_image
Construction Wizard Enter the following information. SSID : Find SSID MAC address PJ08-0014 001601838E79 002687093099 002687093098 CG-Guest 052687093098 Encryption: WEP64bit Encryption key : Subnet mask : SSID, Encryption and Encryption key: use wireless access point configuration settings. Subnet mask: enter the Subnet mask that the projector is using. < Back Connect ExitNOTA
natural_image
Illustration of a projector, laptop, and charging station (no text or symbols)text_image
Connection Wizard Enter the following information. SSID : SSID MAC address □ PJ0B-0014 00160183BE79 □ 002687093099 002687093098 □ CG-Guest 002687093098 Find Encryption : WEP64bit Encryption key :_ Subset mask :_ Please enter the Projector Network Configuration for the projector that you would like to connect to. < Back Connect ExitNOTA
text_image
Connections Wizard Enter the following information. Subnet mask : Please enter the projector subnet mask. < Back Connect ExitNOTA
natural_image
Illustration of a laptop, a lightning bolt, and a projector (no text or symbols)text_image
Connection Wizard Enter the following information. SSID : SSID MAC address P108-0014 001601838E79 002687093099 002687093098 CG-Guest 002687093098 Find Encryption : OFF Encryption key : Mode : AD-HOC Enter the Wireless Projector Configuration information. Please refer to the following instruction for wireless setup. Menu - Advanced Menu - Network - Wireless Information < Back Next > Exit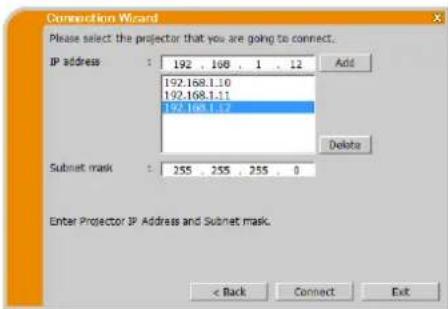
text_image
Construction Wizard Please select the projector that you are going to connect. IP address : 192 . 108 . 1 . 12 Add 192.168.1.10 192.168.1.11 192.168.1.12 Delete Subnet mask : 255 . 255 . 255 . 0 Enter Projector IP Address and Subnet mask. < Back Connect ExitMode (Modo): INFRASTRUCTURE
√ Clique no [Next].
natural_image
Diagram showing a projector connected to a laptop and a power cord with a lightning bolt (no text or symbols)text_image
Connection Wizard Please select the projector that you are going to connect. IP address : 192 . 168 . 1 . 12 Add 192.168.1.10 192.168.1.11 192.168.1.12 Subnet mask : 255 . 255 . 255 . 0 Enter Projector IP Address and Subnet mask. < Back Connect ExitMode (Modo): INFRASTRUCTURE
√ Clique no [Next].
natural_image
Illustration of a projector, laptop, and power cord with lightning and ground symbols (no text or labels)text_image
Connection Wizard Please select the projector that you are going to connect. IP address : 192 . 168 . 1 . 12 Add 192.168.1.10 192.168.1.11 192.168.1.12 Delete Subnet mask : 255 . 255 . 255 . 0 Enter Projector IP Address and Subnet mask. < Back Connect Exittext_image
Connection Wizard Please select the projector that you are going to connect. IP address : 192 . 168 . 1 . 12 Add 192.168.1.10 192.168.1.11 192.168.1.17 Subnet mask : 255 . 255 . 255 . 0 Delete Enter Projector IP Address and Subnet mask. < Back Connect ExitNOTA
text_image
Connection Wizard Connection status IP address Status 192.168.1.10 Connecting... 192.168.1.11 Connected 192.168.1.12 Connect error Connect cancelNOTA
text_image
Connection Wizard Connection list IP address Projector name Status ✓ 192.168.1.10 SW_001F67120F44 LAN ✓ 192.168.1.11 PRI_001F67120F60 LAN, Presenter Mode ✓ 192.168.1.12 PRI_001F67120FDA USB type A, Slideshow Register this setting to My Connection Select the projector to send your computer image, then click [Show] button. Automatically change the input source LAN channel, if different channel is selected. If Slideshow is running, Slideshow is terminated and change the input source to LAN channel. Show CloseNOTA
text_image
Connection Wizard Failed to connect to the following projector. 192.168.1.10 OKNOTA
flowchart
graph TD
    A["User1\n192.168.1.14"] --> B["(Ecrã desligado)"]
    B --> C["User1\n192.168.1.14"]
    C --> D["(Ecrã ligado)"]
    D --> E["User1\n192.168.1.14"]
    E --> F["User1\n192.168.1.14"]
    F --> G["User1\n192.168.1.14"]
    G --> H["User1\n192.168.1.14"]
    H --> I["User1\n192.168.1.14"]
    I --> J["User1\n192.168.1.14"]
    J --> K["User1\n192.168.1.14"]
    K --> L["User1\n192.168.1.14"]
    L --> M["User1\n192.168.1.14"]
    M --> N["User1\n192.168.1.14"]
    N --> O["User1\n192.168.1.14"]
    O --> P["User1\n192.168.1.14"]
    P --> Q["User1\n192.168.1.14"]
    Q --> R["User1\n192.168.1.14"]
    R --> S["User1\n192.168.1.14"]
    S --> T["User1\n192.168.1.14"]
    T --> U["User1\n192.168.1.14"]
    U --> V["User1\n192.168.1.14"]
    V --> W["User1\n192.168.1.14"]
    W --> X["User1\n192.168.1.14"]
    X --> Y["User1\n192.168.1.14"]
    Y --> Z["User1\n192.168.1.14"]
    Z --> AA["User1\n192.168.1.14"]
    AA --> AB["User3\n192.168.1.17"]
    AB --> AC["User3\n192.168.1.17"]
    AC --> AD["User3\n192.168.1.17"]
    AD --> AE["User3\n192.168.1.17"]
    AE --> AF["User3\n192.168.1.17"]
    AF --> AG["User3\n192.168.1.17"]
    AG --> AH["User3\n192.168.1.17"]
    AH --> AI["User3\n192.168.1.17"]
    AI --> AJ["User3\n192.168.1.17"]
    AJ --> AK["User3\n192.168.1.17"]
    AK --> AL["User3\n192.168.1.17"]
    AL --> AM["User3\n192.168.1.20"]
    AM --> AN["User3\n192.168.1.20"]
    AN --> AO["User3\n192.168.1.20"]
    AO --> AP["User3\n192.168.1.20"]
    AP --> AQ["User3\n192.168.1.20"]
    AQ --> AR["User3\n192.168.1.20"]
    AR --> AS["User3\n192.168.1.20"]
    AS --> AT["User3\n192.168.1.20"]
    AT --> AU["User3\n192.168.1.20"]
    AU --> AV["User3\n192.168.1.20"]
    AV --> AW["User3\n192.168.1.20"]
    AW --> AX["User3\n192. 5 5 5 5 5 5 5 5 5 5 5 5 5 5 5 5 5 5 5 5 5 5 5 5 5 5 5 5 5 5 5 5 5 5 5 5 5 5 5 5 5 5 5 5 5 5 5 5 5 5 0"]
text_image
Options Not displaying confirmation dialog for adding Network settings. Optimize Performance Transmission speed Image quality Presenter Mode Display User Name: Unnamed Display LiveViewer Close 1) 2) 4) 5) 6)text_image
Options Not displaying confirmation dialog for adding Network settings. Optimize Performance Transmission speed Image quality Sound On Off Presenter Mode Display User Name: Unnamed Display LiveViewer Close 1) 3) 2) 4) 5) 6)text_image
Connection Wizard Select the option that describes the connection method you would like to user: Select From List Enter Passcode Profile History Configure Manually My Connection Profile list Profile name Data created Profile-1 03/10/2011 3:19:46 PM Profile-2 03/10/2011 3:18:41 PM Profile-3 03/09/2011 6:24:53 PM Profile-4 03/08/2011 2:41:37 PM Add Edit Delete My Connection Connect ExitNOTA
text_image
Proxy for Connection Select the option that describes the connection method you would like to use! Select From List Enter Passcode Profile History Configure Manually My Connection Profile list Profile name Date created Profile-1 03/10/2011 3:19:46 PM Profile-2 03/10/2011 3:18:41 PM Profile-3 03/09/2011 6:24:53 PM Profile-4 03/08/2011 2:41:37 PM Add Edit Delete My Connection Connect Exit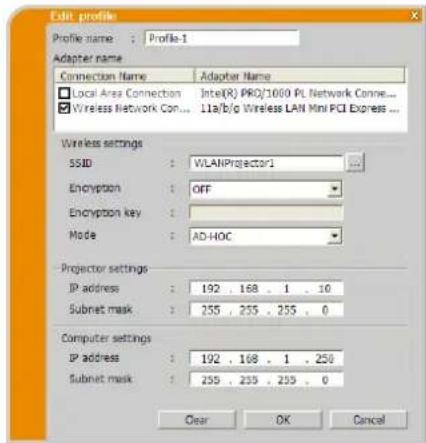
text_image
Edit profile Profile name : Profile-1 Adapter name Connection Name Adapter Name Local Area Connection:Inte(R) PRO/1000 PL Network Conne... Wireless Network Con... 11a/b/g Wireless LAN Mini PCI Express... Wireless settings SSID : WLANProjector1 Encryption : OFF Encryption key : Mode : AD-HOC Projector settings IP address : 192 . 168 . 1 . 10 Subnet mask : 255 . 255 . 255 . 0 Computer settings IP address : 192 . 168 . 1 . 250 Subnet mask : 255 . 255 . 255 . 0 Clear OK Canceltext_image
Projector Connection Select the option that describes the connection method you would like to user: Select From List Enter Passcode Profile History Configure Manually My Connection Profile list Profile name Date Created Profile-1 03/10/2011 3:12:46 PM Profile-2 03/10/2011 3:18:41 PM Profile-3 03/09/2011 6:24:53 PM Profile-4 03/08/2011 2:41:37 PM Add Edit Delete My Connection Connect Exit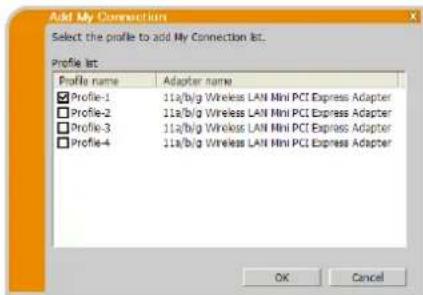
text_image
Add My Connection Select the profile to add My Connection list. Profile list: Profile name Adapter name ✓ Profile-1 11a/b/g Wireless LAN Mini PCI Express Adapter ✓ Profile-2 11a/b/g Wireless LAN Mini PCI Express Adapter ✓ Profile-3 11a/b/g Wireless LAN Mini PCI Express Adapter ✓ Profile-4 11a/b/g Wireless LAN Mini PCI Express Adapter OK CancelNOTA
Mensagem 1: A network connection could not be established.
text_image
Connection Wizard A network connection was not established. Please check the network connection.Mensagem 2: The number of computer connection exceeds the limit (max. 50).
text_image
Connection Wizard The number of computer connection exceeds the limit (max. 50). Please try again after a session of connected user is disconnected.Mensagem 3: A network connection could not be established.
text_image
Connection Wizard A network connection could not be established. Windows prevented network configuration changes. Please insure that you are authorized to make these changes.Mensagem 4: Are you sure you want to connect the selected projector?
text_image
Connection Wizard Are you sure you want to connect the selected projector? Yes Notext_image
Connection Wizard Incorrect IP Address. OKMensagem 6: Do you want to apply suggested network settings as follows?
text_image
Connection Wizard Do you want to apply suggested network settings as follows? IP address : 192.168.2.54 Subnet mask : 255.255.255.0 Chance... Not displaying confirmation dialog for adding Network settings. Yes NoNOTA
text_image
Connection Wizard Enter the following information. IP address : Subset mask : Enter Computer IP Address and Subnet mask. OK CancelMensagem 7: An IP Address overlaps with the IP Address of the projector you are trying to connect to.
text_image
Connection Wizard An IP Address overlaps with the IP Address of the projector you are trying to connect to. Please choose an IP Address that is currently not in use.text_image
Connection Wizard Incorrect IP Address. OKMensagem 9: A Network Configuration Conflict exists.
text_image
Connection Wizard A Network Configuration Conflict exists. Please verify your Network Configuration Settings (computer and projector). OKMensagem 10: There is a projector already connected with your computer.
text_image
Connections Wizard There is a projector already connected with your computer; Are you sure that you want to disconnect the current connection and establish new connection? Yes No CancelNOTA
Mensagem 11: In order to connect to the selected projector, you need to disconnect from the current projector.
text_image
Connection Wizard In order to connect to the selected projector, you need to disconnect from the current projector. Are you sure that you want to disconnect from the current projector.Mensagem 12: The projector is currently in use (Presenting) by another user.
text_image
Connection Wizard This projector is currently in use (Presenting) by another user. You cannot connect with this projector until the other session (Presenter Mode) is finished.Mensagem 13: A Slideshow is currently running on the projector that you are trying to display to (PC-Less Presentation Mode).
text_image
Convention Wizard A Sideshow is currently running on the projector that you are trying to display to (PC-Less Presentation Mode). If you continue, you will cancel the current Sideshow. Yes NoMensagem 14: Are you sure you want to change the input channel of the Projector to LAN?
text_image
Connection Wizard Are you sure you want to change the input channel of the Projector to LAN? Yes NoMensagem 15: Are you sure that you want to turn on the network adapter?
text_image
Connection Wizard Are you sure that you want to turn on the network adapter? Yes NoMensagem 16: It cannot be connected because improper native resolution panel projector is selected.
text_image
Connection Wizard It cannot be connected because improper native resolution panel projector is selected. OKMensagem 17: Since moderator control mode of connected projector (IP address: \*\*\*.\*\*\*.\*\*\*.\*\*\*) becomes effective, Multi Projector mode is canceled.
text_image
Connection Wizard Since moderator control mode of connected projector (IP address: 192.166.1.100) becomes effective, Multi Projector mode is cancel.Mensagem 18: You can not operate while moderator control mode is activated.
text_image
Connection Wizard You can not operate while moderator control mode is activated. OKThe Software is being delivered to you “AS IS” and Christie Digital Systems USA, Inc. (CHRISTIE) make no warranty as to its use or performance. CHRISTIE AND ITS SUPPLIERS, INCLUDING BUT NOT LIMITED TO CHRISTIE, DO NOT AND CANNOT WARRANT THE PERFORMANCE OR RESULTS YOU MAY OBTAIN BY USING THE SOFTWARE. EXCEPT TO THE EXTENT PROHIBITED BY LAW IN YOUR JURISDICTION, CHRISTIE AND ITS SUPPLIERS MAKE NO WARRANTIES CONDITIONS, REPRESENTATIONS, OR TERMS (EXPRESS OR IMPLIED WHETHER BY STATUTE, COMMON LAW, CUSTOM, USAGE OR OTHERWISE) AS TO ANY MATTER IN CONNECTION WITH THE SOFTWARE, INCLUDING WITHOUT LIMITATION NONINFRINGEMENT OF THIRD PARTY RIGHTS, MERCHANTABILITY, INTEGRATION, SATISFACTORY QUALITY, OR FITNESS FOR ANY PARTICULAR PURPOSE.
You agree that the Software will not be shipped, transferred or exported into any country or used in any manner prohibited by the United States Export Administration Act or any other applicable export laws, restrictions or regulations (collectively the “Export Laws”). In addition, if the Software is identified as export controlled items under the Export Laws, you represent and warrant that you are not a citizen, or otherwise located within, an embargoed nation (including without limitation Iran, Iraq, Syria, Sudan, Libya, Cuba, North Korea, and Serbia) and that you are not otherwise prohibited under the Export Laws from receiving the Software. All rights to Use the Software are granted on condition that such rights are forfeited if you fail to comply with the terms of this Agreement.
目录
1 特点....3
1.1 显示模式....3
text_image
Vertical toolbar with icons representing media and information services in ChineseLiveViewer 主菜单
3.1 安装LiveViewer
natural_image
Illustration of a laptop, lightning bolt, and projector (no text or symbols)natural_image
Diagram showing a projector connected to a laptop and a power cord with a lightning bolt (no text or symbols)natural_image
Illustration of a projector, laptop, and wireless signal icons (no text or symbols)natural_image
Illustration of a laptop, a lightning bolt, and a projector (no text or symbols)natural_image
Diagram showing a projector connected to a laptop and a power cord with a lightning bolt (no text or symbols)natural_image
Illustration of a projector, laptop, and power cord with lightning bolt symbols (no text or labels)text_image
1 2 4 5 조절기(业主局) LAN Connection 8 IP Address IP Address IP Address IP Address IP Address IP Address IP Address IP Address IP Address IP Address IP Address IP Address IP Address IP Address IP Address IP Address IP Address IP Address IP Address IP Address IP Address IP Address IP Address IP Address IP Address IP Address IP Address IP Address IP Address IP Address IP Address IP Address IP Address IP AddressCHRISTIE
2 호환성
text_image
Welcome to the Beneficial Wizard for Beneficial The new software version allows us to use computer. To continue, click Back.
text_image
Software - Standard Model Access Agreement Please note that the following (this or applicable) is: Access Agreement Width Width: 1.0 To the Appendix Box By not to be displayed in this software, "Access Agreement" is available. By adding any terms using your software, you want to access the software If you are required to use the Access Agreement, you can't switch to another tool on the software. For any other terms, please follow the rules of the Access Agreement. It is not the type of the Access Agreement. I should not apply the terms of the Access Agreement.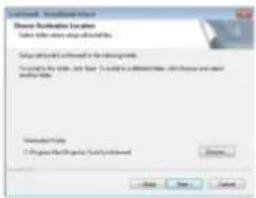
text_image
Database Location Settings Table 10 Options: All available tables and files. Database found all contained in the following table: To create a table, but there is no additional table or server used to access any other table. Database name: A. Google The Database Facility Limited Browse... Add... Save... Cancel
CHRISTIE
3.2 네트워크 연결
text_image
Connection Method Based the label that Affects this connection method as, would be to use Select from: Show: Profile: Profile name: Date dated Profile 1: 00/00/2011 2:00:46.99 Profile 2: 00/00/2011 2:00:46.99 Profile 3: 00/00/2011 2:00:53.89 Profile 4: 00/00/2011 2:00:57.99 Profile 5: 00/00/2011 2:01:07.99 No Connection: Add List Insert My Connection Cancel알림
text_image
Add the format that contains this connection method you would be to use Add File List File Properties F96 F97 F98 F99 C:\Program Files\N My ConnectionCHRISTIE
3.2.2.5 수동으로 구성
text_image
Computer Model Select the connection. Find whether the connection method can would file to any Select Event List Enter Preferences Please select the network identifier that you are using it to use. Profile Connection Name: Indirect Name Local View Con: Smart PDF USB 8.0, None... Windows Name: Display Windows LAN File (*.txt) Customs Manuals No Connection Next > Next >알림
text_image
Connection Work Select the settings that based on the connection method you would be to use Select User List Enter Patterns Connect to the following options: Balance If address: 102.106.1.204 History Configure Manuals No Connection Cancel OK알림
text_image
Connection Method Select the option that describes the connection method you should be done. Select User List Select Function Profile Name: Configure Manual My Connection Please refer to the Options... Description Name: Adapter Name Local Name: (100) (45, 46, 47, 48) Local Name: (100) (45, 46, 47, 48) Local Name: (100) (45, 46, 47, 48) The Preference is a C-Target code. That can be found on the status of the connection to the projector you are currently being used in the context. OK알림
natural_image
Diagram showing a projector and a laptop connected to a power plug via lightning (no text or symbols)text_image
SSID: wireless (예) Encryption (암호방식): WEP64bit (예) Encryption key(암호화 키)2: ******** (예) Mode(모드): AD-HOC√다음을 클릭합니다.[Next].
Mode(모드): INFRASTRUCTURE
√다음을 끴릭합니다.[Next].
√ 프로젝터 설정.
다음 정보를 입력합니다.
IP address(IP 주소): 192.168.1.10 (예)
SSID: WirelessAccessPoint (OE)
Encryption (암호방식): WEP64bit (에)
Mode(모드): INFRASTRUCTURE
√다음을 끴릭합니다. [Next].
√ 프로젝터 설정.
다음 정보를 입력합니다.
IP address(IP 주소): 192.168.1.10 (에)
natural_image
Illustration of a projector and a laptop connected to a power cord (no text or symbols)text_image
Create the following information: CDD File Format Format name: Mode Format Name: Auto Port Configuration Information. + Add Next > Next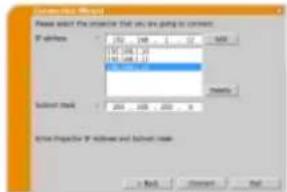
text_image
Connect Wizard Please select the interface that you're going to comment. IP address: 152.148.1.30 IP address: 152.148.1.30 Subnet mask: 200.000.000.0 Insert Project for IP address and subnet mask + Back Cancel Next알림
text_image
Connection Wizard Project Name: Project name: Status: SP143.008.1.13 SP143.008.1.13 SP143.008.1.13 SP143.008.1.13 SP143.008.1.13 SP143.008.1.13 SP143.008.1.13 SP143.008.1.13 SP25.007.009 SP25.007.009 SP25.007.009 USB Type 6, Selection Register the activity to No Connection Tested this project for send user response image, then click [Send] Author: Repharmatic change the word using USB channel, if different channels is selected, if destination is setting, destination is terminated and change the input wire to USB channel. Show CloseCHRISTIE
3.2.6 연결 오류
text_image
Connection Mask Fixed to correct for the following parameters: ISO 686.0.1 (S) OK안림
flowchart
graph TD
    A["Market Data Control Mode"] --> B["User1"]
    A --> C["User2"]
    A --> D["User3"]
    A --> E["User4"]
    A --> F["User5"]
    A --> G["User6"]
    A --> H["User7"]
    A --> I["User8"]
    A --> J["User9"]
    A --> K["User10"]
    A --> L["User11"]
    A --> M["User12"]
    A --> N["User13"]
    A --> O["User14"]
    A --> P["User15"]
    A --> Q["User16"]
    A --> R["User17"]
    A --> S["User18"]
    A --> T["User19"]
    A --> U["User20"]
    A --> V["User21"]
    A --> W["User22"]
    A --> X["User23"]
    A --> Y["User24"]
    A --> Z["User25"]
    A --> AA["User26"]
    A --> AB["User27"]
    A --> AC["User28"]
    A --> AD["User29"]
    A --> AE["User30"]
    A --> AF["User31"]
    A --> AG["User32"]
    A --> AH["User33"]
    A --> AI["User34"]
    A --> AJ["User35"]
    A --> AK["User36"]
    A --> AL["User37"]
    A --> AM["User38"]
    A --> AN["User39"]
    A --> AO["User40"]
    A --> AP["User41"]
    A --> AQ["User42"]
    A --> AR["User43"]
    A --> AS["User44"]
    A --> AT["User45"]
    A --> AU["User46"]
    A --> AV["User47"]
    A --> AW["User48"]
    A --> AX["User49"]
    A --> AY["User50"]
1) 표시 모드 버튼(□ 30)
text_image
Custime Not displaying confirmation delay for adding network settings Outcomes Performance Transmission speed Image quality Properties Mode Displayed User Name: [Unnamed] Display Lockdown 1) 2) 4) 5) 6) Closetext_image
Options Not displaying confirmation dialog for adding network settings. Optimize Performance Transmission speed Image quality Sound On Off 1) 2) 3) 4) 5) 6) Presenter Mode Display User Names: Unopened Display UserName Closetext_image
Structure Wizard Select the following: What is the structural method, you should be to use. SELECT SYSTEMS Form 10.0000000000000000000000000000000000000000000000000000000000000000000000000000000000000000000000000000 Profile 1 Profile 2 Profile 3 Profile 4 Profile 5 Profile 6 Profile 7 Profile 8 Profile 9 Profile 10 Profile 11 Profile 12 Profile 13 Profile 14 Profile 15 Profile 16 Profile 17 Profile 18 Profile 19 Profile 20 Profile 21 Profile 22 Profile 23 Profile 24 Profile 25 Profile 26 Profile 27 Profile 28 Profile 29 Profile 30 Profile 31 Profile 32 Profile 33 Profile 34 Profile 35 Profile 36 Profile 37 Profile 38 Profile 39 Profile 40 Profile 41 Profile 42 Profile 43 Profile 44 Profile 45 Profile 46 Profile 47 Profile 48 Profile 49 Profile 50 Profile 51 Profile 52 Profile 53 Profile 54 Profile 55 Profile 56 Profile 57 Profile 58 Profile 59 Profile 60 Profile 61 Profile 62 Profile 63 Profile 64 Profile 65 Profile 66 Profile 67 Profile 68 Profile 69 Profile 70 Profile 71 Profile 72 Profile 73 Profile 74 Profile 75 Profile 76 Profile 77 Profile 78 Profile 79 Profile 80 Profile 81 Profile 82 Profile 83 Profile 84 Profile 85 Profile 86 Profile 87 Profile 88 Profile 89 Profile 90 Profile 91 Profile 92 Profile 93 Profile 94 Profile 95 Profile 96 Profile 97 Profile 98 Profile 99 Profile 100알림
text_image
Create new profiles Profile name: Adapter name: Converter Name: Adapter Name Clear Area Converter: Internet (RPG) (USB) Network Graphs Windows Network Graphs: 1326 Windows LAN-Net EXPLC System Internet settings width: Description: Configuration Area: Mode: Processor settings IP address: Substr. mask: Computer settings IP address: Substr. mask:CHRISTIE
4.5.3 프로파일 데이터 편집
text_image
Switch Connection Select the system that contains the connection method to play the next to us. Select from List Show Mode: Profile 40 Profile name: Profile 2 Profile 1 Profile 3 Profile 4 Profile 5 Profile 6 Profile 7 Profile 8 Profile 9 Profile 10 Profile 11 Profile 12 Profile 13 Profile 14 Profile 15 Profile 16 Profile 17 Profile 18 Profile 19 Profile 20 Profile 21 Profile 22 Profile 23 Profile 24 Profile 25 Profile 26 Profile 27 Profile 28 Profile 29 Profile 30 Profile 31 Profile 32 Profile 33 Profile 34 Profile 35 Profile 36 Profile 37 Profile 38 Profile 39 Profile 40 Profile 41 Profile 42 Profile 43 Profile 44 Profile 45 Profile 46 Profile 47 Profile 48 Profile 49 Profile 50 Profile 51 Profile 52 Profile 53 Profile 54 Profile 55 Profile 56 Profile 57 Profile 58 Profile 59 Profile 60 Profile 61 Profile 62 Profile 63 Profile 64 Profile 65 Profile 66 Profile 67 Profile 68 Profile 69 Profile 70 Profile 71 Profile 72 Profile 73 Profile 74 Profile 75 Profile 76 Profile 77 Profile 78 Profile 79 Profile 80 Profile 81 Profile 82 Profile 83 Profile 84 Profile 85 Profile 86 Profile 87 Profile 88 Profile 89 Profile 90 Profile 91 Profile 92 Profile 93 Profile 94 Profile 95 Profile 96 Profile 97 Profile 98 Profile 99 Profile 100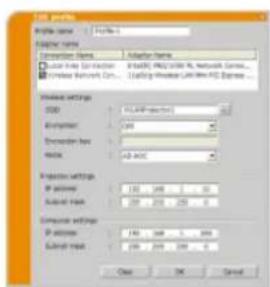
text_image
IP address Profile name: IP file Adapter name: Converter Name: Adapter Name Driver line selection: Interrupt PKS/USB ML network Series... Network Network Cn: 1200 Windows LAN/MS NT Express Embedded settings: USB: 16.4M-DCB Allocation: 240 Ethernet hex: Mask: 42-AOC Adapter settings: IP address: 150, 140, 130, 120, 110 External mask: 258, 270, 258, 240, 230 External settings: IP address: 150, 140, 130, 120, 110, 100 External mask: 258, 270, 258, 240, 230 Clear OK Cancel4.5.4 내 연결 등록
메시지 1: A network connection was not established.
text_image
Comprised Flags A network canonical vector additional Please check the relative connection.메시지 2: The number of computer connection exceeds the limit (max. 50).
text_image
Connection Wizard The number of telephone connections available on print format (RT). Please start after a session of connected user to connection.메시지 3: A network connection could not be established.
CHKISTIE
메시지 6: Do you want to apply suggested network settings as follows?
text_image
Conductor Wizard For you want to apply targeted network settings as follows? IP address: 1952.008.0.34 Subtotal mode: 206.208.205.0 Change... Not displaying confirmation details for utilizing network settings. OK Cancel알림
text_image
Connection Wizard Enter the following fields: IP address: 1 S/NOS mask: 1 Enter Computer IP Address and S/NOS mask. OK CancelCHKISTIE
메시지 9: A Network Configuration Conflict exists.
text_image
Connection Read A Network Configuration Comfort says. Please verify your Network Configuration (Hedge Coordinate and Projector) OK메시지 10: There is a projector already connected with your computer.
text_image
Connection Method There is a product should be combined with input computers. Are you want that you want to discount the current connection and whether new connections?CHKISTIE
메시지 12: This projector is currently in use (Presenting) by another user.
text_image
Connection Wizard This product is currently in use. Descriptive by another user. You cannot contact with the product and the other user. Descriptive Message is displayed.메시지 13: A Slideshow is currently running on the projector that you are trying to display to. (PC-Less Presentation Mode).
text_image
Searcher Word A Selection is currently useful for the project that you are here to make to PC as a presentation tool. If you continue, you will about the current version.메시지 14: Are you sure you want to change the input channel of the Projector to 'LAN'?
메시지 16: It cannot be connected because improper native resolution panel projector is selected.
text_image
Inference Wizard It cannot be performed because any options are selected. a selected.메시지 17: Since moderator control mode of connected projector (IP address: ***.***.***.***) becomes effective, Multi Projector mode is canceled.
text_image
Composite Wizard Core projector control needs of converted projector IP address 200,148.1.035 business office, 368 Projector needs to convert.메시지 18: You can not operate while moderator control mode is activated.
text_image
Product Quality You can not qualify with healthy customers as satisfied.B 문제 해결
The Software is being delivered to you “AS IS” and Christie Digital Systems USA, Inc. (CHRISTIE) make no warranty as to its use or performance. CHRISTIE AND ITS SUPPLIERS, INCLUDING BUT NOT LIMITED TO CHRISTIE, DO NOT AND CANNOT WARRANT THE PERFORMANCE OR RESULTS YOU MAY OBTAIN BY USING THE SOFTWARE. EXCEPT TO THE EXTENT PROHIBITED BY LAW IN YOUR JURISDICTION, CHRISTIE AND ITS SUPPLIERS MAKE NO WARRANTIES CONDITIONS, REPRESENTATIONS, OR TERMS (EXPRESS OR IMPLIED WHETHER BY STATUTE, COMMON LAW, CUSTOM, USAGE OR OTHERWISE) AS TO ANY MATTER IN CONNECTION WITH THE SOFTWARE, INCLUDING WITHOUT LIMITATION NONINFRINGEMENT OF THIRD PARTY RIGHTS, MERCHANTABILITY, INTEGRATION, SATISFACTORY QUALITY, OR FITNESS FOR ANY PARTICULAR PURPOSE.
You agree that the Software will not be shipped, transferred or exported into any country or used in any manner prohibited by the United States Export Administration Act or any other applicable export laws, restrictions or regulations (collectively the “Export Laws”). In addition, if the Software is identified as export controlled items under the Export Laws, you represent and warrant that you are not a citizen, or otherwise located within, an embargoed nation (including without limitation Iran, Iraq, Syria, Sudan, Libya, Cuba, North Korea, and Serbia) and that you are not otherwise prohibited under the Export Laws from receiving the Software. All rights to Use the Software are granted on condition that such rights are forfeited if you fail to comply with the terms of this Agreement.
Innehåll
1 Funktioner....3
text_image
Orange toolbar with icons representing media and information services including play, video, computer, and globetext_image
Choose Setup Language Select the language for the installation from the choices below. English OK Canceltext_image
LiveView6 - InstallShield Wizard Welcome to the InstallShield Wizard for LiveView6 The InstallShield Wizard will install LiveView6 on your computer. To continue, click Next < Back Next > Cancel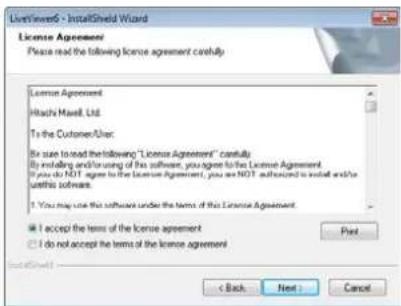
text_image
LiveWindow - InstallShield Wizard License Agreement Please read the following license agreement carefully. License Agreement Hachi Maxwell, Ltd. To the Customer/Other: We use to read the following "License Agreement" carefully. By installing and/or using of this software, you agree to the License Agreement. If you do NOT agree to the License Agreement, you are NOT authorized to install and/or use this software. You may use this software under the terms of this License Agreement. I accept the terms of the license agreement Do not accept the terms of the license agreement < Back Next Cancel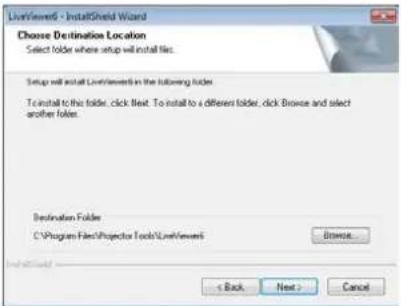
text_image
LiveView6 - InstallShield Wizard Choose Destination Location Select folder where setup will install files. Setup will install LiveView6 in the following folder. To install to this folder, click Next. To install to a different folder, click Browse and select another folder. Destination Folder C:\Program Files\Projection Tools\LiveView6 Browse... < Back Next > Cancel
text_image
LiveVersion - InstallShield Wizard Select Program Folder Please select a program folder. Setup will add program icons to the Program Folder listed below. You may type a new folder name or select one from the existing folder list. Click filled to continue. Program Folder Existing Folder Existing Folders: Back Forward Administrative Tools Games Maintenance Startup + Back Next > Cancel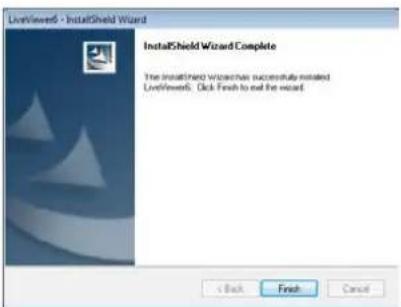
text_image
LiveViewed - InstallShield Wizard InstallShield Wizard Complete The InstallShield Wizard has successfully installed LiveViewed. Click Finish to exit the wizard.text_image
Connection Wizard Select the option that describes the connection method you would like to use: Select From List Enter Passcode Profile History Configure Manually My Connection Projector List Projector name IP address PR3_001F67126P9A 192.168.1.10 PR3_001F67126F20 192.168.1.254 Find Connect Exittext_image
Connection Wizard Select the option that describes the connection method you would like to use: Select From List Enter Passcode Profile History Configure Manually My Connection Projector List Projector name IP address PR3_001F67120F9A 192.168.1.10 PR3_001F67120F20 192.168.1.254 Find Connect Exit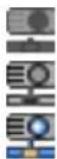
text_image
Connection Wizard Select the option that describes the connection method you would like to user. Select From List Enter Passcode Profile History Configure Manually My Connection Please select the network adapter that you are going to use. Connection Name Adapter Name Local Area Con... Intel(K) PRO/1000 PL Netw... Wireless Netw... 11a/b/g Wireless LAN Mini P... Please enter the Passcode. The Passcode is a 12-digit code, that can be found on the Startup Screen of the projector you are currently trying to connect to. Connect ExitNOTERA
text_image
Connection Wizard Select the option that describes the connection method you would like to use: Select From List Enter Passcode Profile History Configure Manually My Connection Profile list Profile name Data created Profile-1 03/10/2011 3:19:46 PM Profile-2 03/10/2011 3:18:41 PM Profile-3 03/09/2011 6:24:53 PM Profile-4 03/08/2011 2:41:37 PM Add Delete My Connection Connect ExitNOTERA
text_image
Connection Wizard Select the option that describes the connection method you would like to use: Select From List Enter Passcode Profile History Configure Manually My Connection History list Projector name IP address Last connected PR3_001F6... 192.168.1.10 03/10/2011 ... PR3_001F6... 192.168.1.55 03/08/2011 ... PR3_001F6... 192.168.1.253 03/08/2011 ... PR3_001F6... 192.168.1.121 03/07/2011 ... Regulat to profile Connect ExitNOTERA
text_image
Connection Wizard Select the option that describes the connection method you would like to use: Select From List Enter Passcode Profile History Configure Manually My Connection Please select the network adapter that you are going to use. Connection Name Adapter Name Local Area Con... Intel(K) PRO/1000 PL Netw... Wireless Netw... 11a/b/g Wireless LAN Mini P... Next > ExitNOTERA
text_image
Connection Wizard Select the option that describes the connection method you would like to use: Select From List Enter Passcode Profile History Configure Manually My Connection Connect to the following projector. IP address : 192.168.1.254 Connect ExitNOTERA
There are two methods to get the Passcode from the projector.
> Metod 1
3.2.3.2 Knappa in Passcode
text_image
Connection Wizard Select the option that describes the connection method you would like to use: Select From List Enter Passcode Profile History Configure Manually My Connection Please select the network adapter that you are going to use. Connection Name Adapter Name Local Area Con... Intel(R) PRO/1000 PL Netw... Wireless Netw... 11a/b/g Wireless LAN Mini P... Please enter the Passcode. The Passcode is a 12-digit code, that can be found on the Startup Screen of the projector you are currently trying to connect to. Connect ExitNOTERA
natural_image
Illustration of a laptop, a lightning bolt, and a projector (no text or symbols)text_image
Connection Wizard Enter the following information. SSID : SSID MAC address PJ06-0014 001601838E79 002687093099 002687093098 CG-Guest 002687093098 Find Encryption : WEP64bit Encryption key : Subnet mask : Please enter the Projector Network Configuration for the projector that you would like to connect to. < Back Connect ExitNOTERA
natural_image
Diagram showing a projector connected to a laptop and a power cord with a lightning bolt (no text or symbols)text_image
Compression Wizard Enter the following information. SSID : SSID MAC address PJ08-0014 00160183BE79 002687093099 002687093098 CG-Guest 002687093098 Find Encryption: WEI/64bit Encryption key: Subnet mask: SSID, Encryption and Encryption key: use wireless access point configuration settings. Subnet mask: enter the Subnet mask that the projector is using. < Back Connect ExitNOTERA
natural_image
Illustration of a projector, laptop, and wireless signal icons (no text or symbols)text_image
Connection Wizard Enter the following information. SSID : SSID MAC address PJ08-0014 001601838E79 002687093099 002687093098 CG-Guest 002687093098 Find Encryption: WEB/64bit Encryption key: Subnet mask: Please enter the Projector Network Configuration for the projector that you would like to connect to. < Back Connect ExitNOTERA
text_image
Connection Wizard Enter the following information. Subset mask : Please enter the projector subnet mask. < Back Connect ExitNOTERA
natural_image
Illustration of a laptop, lightning bolt, and projector (no text or symbols)text_image
Conversion Wizard Enter the following information. SSID : SSID MAC address PJ08-0014 002601838E79 002687093099 002687093098 CG-Guest 002687093098 Find Encryption : OFF Encryption key : Mode : AD-HOC Enter the Wireless Projector Configuration Information. Please refer to the following instruction for wireless setup. Menu - Advanced Menu - Network - Wireless Information < Back Next > Exit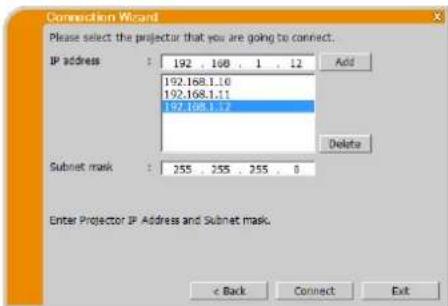
text_image
Connection Wizard Please select the projector that you are going to connect. IP address : 192 . 108 . 1 . 12 Add 192.168.1.10 192.168.1.11 192.168.1.12 Subnet mask : 255 . 255 . 255 . 0 Delete Enter Projector IP Address and Subnet mask. < Back Connect ExitIP address(IP-adress): 192.168.1.10 (exempel)
√ Klicka [Add]. IP-adressen lags till i listan.
Subnet mask(Nätmask): 255.255.255.0 (exempel)
√ Klicka [Connect]. Anslutningsprocessen startar.
natural_image
Diagram showing a projector connected to a laptop and a vertical power outlet with a lightning bolt (no text or symbols)text_image
Connection Wizard Please select the projector that you are going to connect. IP address : 192 . 168 . 1 . 12 Add 192.168.1.10 192.168.1.11 192.168.1.12 Delete Subnet mask : 255 . 255 . 255 . 0 Enter Projector IP Address and Subnet mask. < Back Connect ExitIP address(IP-adress): 192.168.1.10 (exempel)
√ Klicka [Add]. IP-adressen lags till i listan.
Subnet mask(Nätmask): 255.255.255.0 (exempel)
√ Klicka [Connect].
natural_image
Illustration of a projector, laptop, and power cord with lightning bolt symbols (no text or labels)text_image
Compression Wizard Please select the projector that you are going to connect. IP address : 192 . 168 . 1 . 12 Add 192.168.1.10 192.168.1.11 192.168.1.12 Delete Subnet mask : 255 . 255 . 255 . 0 Enter Projector IP Address and Subnet mask. < Back Connect Exit3.2.4.4 Trådbundet LAN
IP address(IP-adress): 192.168.1.10 (exempel)
√ Klicka [Add]. IP-adressen lags till i listan.
Subnet mask(Nätmask): 255.255.255.128 (exempel)
√ Klicka [Connect].
Anslutningsprocessen startar.
text_image
Connection Wizard Please select the projector that you are going to connect. IP address : 192 . 168 . 1 . 12 Add 192.168.1.10 192.168.1.11 192.168.1.12 Delete Submet mask : 255 . 255 . 255 . 0 Enter Projector IP Address and Submet mask. < Back Connect ExtNOTERA
text_image
Connection Wizard Connection status IP address Status 192.168.1.10 Connecting... 192.168.1.11 Connected 192.168.1.12 Connect error Connect cancelNOTERA
text_image
Connection Wizard Connection list IP address Projector name Status ✓ 192.168.1.10 SW_001F67120F44 LAN ✓ 192.168.1.11 PRI_001F67120F60 LAN, Presenter Mode ✓ 192.168.1.12 PRI_001F67120FDA USB type A, Sideshow Register this setting to My Connection Select the projector to send your computer image, then click [show] button. Automatically change the input source LAN channel, if different channels is selected. If Sideshow is running, Sideshow is terminated and change the input source to LAN channel. Show CloseNOTERA
text_image
Connection Wizard Failed to connect to the following projector. 192.168.1.10: The network connection is established, but the image transmissions on hold.
: The network connection is established and the images on the computer are being sent to the projector.
4.3 Moderatorkontrollfönster
flowchart
graph TD
    A["User1\n192.168.1.14"] --> B["(Visiting Av)"]
    B --> C["User1\n192.168.1.14"]
    C --> D["(Visiting På)"]
    D --> E["User1\n192.168.1.14"]
    E --> F["User1\n192.168.1.14"]
    F --> G["User1\n192.168.1.14"]
    G --> H["User1\n192.168.1.14"]
    H --> I["User1\n192.168.1.14"]
    I --> J["User1\n192.168.1.14"]
    J --> K["User1\n192.168.1.14"]
    K --> L["User1\n192.168.1.14"]
    L --> M["User1\n192.168.1.14"]
    M --> N["User1\n192.168.1.14"]
    N --> O["User1\n192.168.1.14"]
    O --> P["User1\n192.168.1.14"]
    P --> Q["User1\n192.168.1.14"]
    Q --> R["User1\n192.168.1.14"]
    R --> S["User1\n192.168.1.14"]
    S --> T["User1\n192.168.1.14"]
    T --> U["User1\n192.168.1.14"]
    U --> V["User3\n192.168.1.17"]
    V --> W["User3\n192.168.1.17"]
    W --> X["User3\n192.168.1.17"]
    X --> Y["User3\n192.168.1.17"]
    Y --> Z["User3\n192.168.1.17"]
    Z --> AA["User3\n192.168.1.17"]
    AA --> AB["User3\n192.168.1.17"]
    AB --> AC["User3\n192.168.1.17"]
    AC --> AD["User3\n192.168.1.17"]
    AD --> AE["User3\n192.168.1.17"]
    AE --> AF["User3\n192.168.1.17"]
    AF --> AG["User3\n192.168.1.17"]
    AG --> AH["User3\n192.168.1.17"]
    AH --> AI["User3\n192.168.1.17"]
    AI --> AJ["User3\n192.168.1.17"]
    AJ --> AK["User3\n192.168.1.17"]
    AK --> AL["User3\n192.168.1.17"]
    AL --> AM["User3\n192.168.1.17"]
    AM --> AN["User3\n192.168.1.17"]
    AN --> AO["User3\n192.168.1.17"]
    AO --> AP["User3\n192.168.1.17"]
    AP --> AQ["User3\n192.168.1.17"]
    AQ --> AR["User3\n192.168.1.17"]
    AR --> AS["User3\n192.168.1.17"]
    AS --> AT["User3\n192.168.1.17"]
    AT --> AU["User3\n192.168.1.17"]
    AU --> AV["User3\n192.168.1.17"]
    AV --> AW["User3\n192.168.1.17"]
    AW --> AX["User3\n192.168.1.17"]
    AX --> AY["User3\n192. 0 0 0 0 0 0 0 0 0 0 0 0 0 0 0 0 0 0 0 0 0 0 0 0 0 0 0 0 0 0 0 0 0 0 0 0 0 0 0 0 0 0 0 0 0 0 0 0 0 0 5"]
text_image
Options Not displaying confirmation dialog for adding Network settings. Optimize Performance Transmission speed Image quality Presenter Mode Display User Name: Unnamed Display LiveViewer Closetext_image
Options Not displaying confirmation dialog for adding Network settings. Optimize Performance Transmission speed Image quality Sound On Off Presenter Mode Display User Name: Unnamed Display LiveViewer CloseFig. 4.d Option-meny för Projektormodell grupp: B
text_image
Connection Wizard Select the option that describes the connection method you would like to use: Select From List Enter Passcode Profile History Configure Manually My Connection Profile list Profile name Date created Profile-1 03/10/2011 3:19:46 PM Profile-2 03/10/2011 3:18:41 PM Profile-3 03/09/2011 6:24:53 PM Profile-4 03/08/2011 2:41:37 PM Add Edit Delete My Connection Connect ExitNOTERA
text_image
Projector Connection Select the option that describes the connection method you would like to use: Select From List Enter Passcode Profile History Configure Manually My Connection Profile list Profile name Date created Profile-1 03/10/2011 3:19:46 PM Profile-2 03/10/2011 3:18:41 PM Profile-3 03/09/2011 6:24:53 PM Profile-4 03/08/2011 2:41:37 PM Add Edit Delete My Connection Connect Exit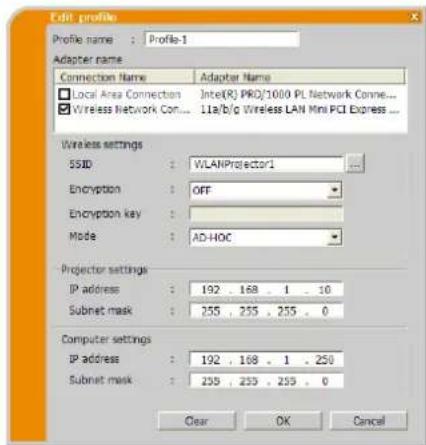
text_image
Edit profile Profile name : Profile-1 Adapter name Connection Name Adapter Name Local Area Connection:Inte(R) PRO/1000 PL Network Conne... Wireless Network Con... 11a/b/g Wireless LAN Mini PCI Express ... Wireless settings SSID : WLANProjector1 Encryption : OFF Encryption key : Mode : AD-HOC Projector settings IP address : 192 . 168 . 1 . 10 Subnet mask : 255 . 255 . 255 . 0 Computer settings IP address : 192 . 168 . 1 . 250 Subnet mask : 255 . 255 . 255 . 0 Clear OK Cancel4.5.4 Registrera Min anslutning
text_image
Projector Connection Select the option that describes the connection method you would like to use: Select From List Enter Passcode Profile History Configure Manually My Connection Profile list Profile name Date created Profile-1 03/10/2011 3:10:46 PM Profile-2 03/10/2011 3:18:41 PM Profile-3 03/09/2011 6:24:53 PM Profile-4 03/08/2011 2:41:37 PM Add Edit Delete My Connection Connect Exit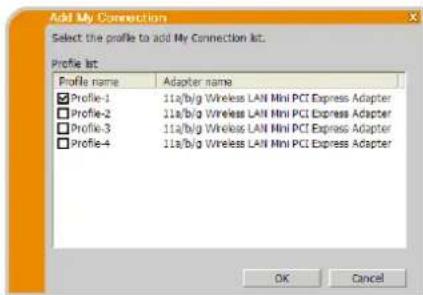
text_image
Add My Connection Select the profile to add My Connection list. Profile list: Profile name Adapter name ✓ Profile-1 11a/b/g Wireless LAN Mini PCI Express Adapter ✓ Profile-2 11a/b/g Wireless LAN Mini PCI Express Adapter ✓ Profile-3 11a/b/g Wireless LAN Mini PCI Express Adapter ✓ Profile-4 11a/b/g Wireless LAN Mini PCI Express Adapter OK CancelNOTERA
Meddelande 1: A network connection was not established.
text_image
Connection Wizard A network connection was not established. Please check the network connection.Meddelande 2: The number of computer connection exceeds the limit (max. 50).
text_image
Connection Wizard The number of computer connection exceeds the limit (max. 50). Please try again after a session of connected user is disconnected.Meddelande 3: A network connection could not be established.
text_image
Connection Wizard A network connection could not be established. Windows prevented network configuration changes. Please insure that you are authorized to make these changes.Meddelande 4: Are you sure you want to connect the selected projector?
text_image
Connection Wizard Are you sure you want to connect the selected projector? Yes NoMeddelande 5: Incorrect Passcode.
text_image
Connection Wizard Incorrect IP Address.Meddelande 6: Do you want to apply suggested network settings as follows?
text_image
Connection Wizard Do you want to apply suggested network settings as follows? IP address : 192.168.2.54 Subnet mask : 255.255.255.0 Chance... Not displaying confirmation dialog for adding Network settings. Yes NoNOTERA
text_image
Connection Wizard Enter the following information. IP address : Subset mask : Enter Computer IP Address and Subnet mask. OK CancelMeddelande 7: An IP Address overlaps with the IP Address of the projector you are trying to connect to.
text_image
Connection Wizard An IP Address overlaps with the IP Address of the projector you are trying to connect to. Please choose an IP Address that is currently not in use.Meddelande 8: Incorrect IP Address.
text_image
Connection Wizard Incorrect IP Address. OKMeddelande 9: A Network Configuration Conflict exists.
text_image
Connection Wizard A Network Configuration Conflict exists. Please verify your Network Configuration Settings (computer and projector). OKMeddelande 10: There is a projector already connected with your computer.
text_image
Connection Wizard There is a projector already connected with your computer; Are you sure that you want to disconnect the current connection and establish new connection? Yes No CancelNOTERA
Meddelande 11: In order to connect to the selected projector, you need to disconnect from the current projector.
text_image
Connection Wizard In order to connect to the selected projector, you need to disconnect from the current projector. Are you sure that you want to disconnect from the current projector.Meddelande 12: This projector is currently in use (Presenting) by another user.
text_image
Conversion Wizard This projector is currently in use (Presenting) by another user. You cannot connect with this projector until the other session (Presenter Mode) is finished.Meddelande 13: A Slideshow is currently running on the projector that you are trying to display to. (PC-Less Presentation Mode).
text_image
Connection Wizard A Sideshow is currently running on the projector that you are trying to display to (PC-Less Presentation Mode). If you continue, you will cancel the current Sideshow. Yes NoMeddelande 14: Are you sure you want to change the input channel of the Projector to 'LAN'?
text_image
Connection Wizard Are you sure you want to change the input channel of the Projector to LAN? Yes NoMeddelande 15: Are you sure that you want to turn on the network adapter?
text_image
Connection Wizard Are you sure that you want to turn on the network adapter? Yes... NoMeddelande 16: It cannot be connected because improper native resolution panel projector is selected.
text_image
Connection Wizard It cannot be connected because improper native resolution panel projector is selected. OKMeddelande 17: Since moderator control mode of connected projector (IP address: \*\*\*.\*\*\*.\*\*\*.\*\*\*) becomes effective, Multi Projector mode is canceled.
text_image
Connection Wizard Since moderator control mode of connected projector (IP address: 192.168.1.100) becomes effective, Multi Projector mode is cancel.Meddelande 18: You can not operate while moderator control mode is activated.
text_image
Connection Wizard You can not operate while moderator control mode is activated.B Felsökning
The Software is being delivered to you “AS IS” and Christie Digital Systems USA, Inc. (CHRISTIE) make no warranty as to its use or performance. CHRISTIE AND ITS SUPPLIERS, INCLUDING BUT NOT LIMITED TO CHRISTIE, DO NOT AND CANNOT WARRANT THE PERFORMANCE OR RESULTS YOU MAY OBTAIN BY USING THE SOFTWARE. EXCEPT TO THE EXTENT PROHIBITED BY LAW IN YOUR JURISDICTION, CHRISTIE AND ITS SUPPLIERS MAKE NO WARRANTIES CONDITIONS, REPRESENTATIONS, OR TERMS (EXPRESS OR IMPLIED WHETHER BY STATUTE, COMMON LAW, CUSTOM, USAGE OR OTHERWISE) AS TO ANY MATTER IN CONNECTION WITH THE SOFTWARE, INCLUDING WITHOUT LIMITATION NONINFRINGEMENT OF THIRD PARTY RIGHTS, MERCHANTABILITY, INTEGRATION, SATISFACTORY QUALITY, OR FITNESS FOR ANY PARTICULAR PURPOSE.
You agree that the Software will not be shipped, transferred or exported into any country or used in any manner prohibited by the United States Export Administration Act or any other applicable export laws, restrictions or regulations (collectively the “Export Laws”). In addition, if the Software is identified as export controlled items under the Export Laws, you represent and warrant that you are not a citizen, or otherwise located within, an embargoed nation (including without limitation Iran, Iraq, Syria, Sudan, Libya, Cuba, North Korea, and Serbia) and that you are not otherwise prohibited under the Export Laws from receiving the Software. All rights to Use the Software are granted on condition that such rights are forfeited if you fail to comply with the terms of this Agreement.
Содержание
1 Функции.... 3
text_image
Orange interface toolbar with play, monitor, gear, globe, and megaphone iconstext_image
Choose Setup Language Select the language for the installation from the choices below. English OK Canceltext_image
LiveView6 · InstallShield Wizard Welcome to the InstallShield Wizard for LiveView6 The InstallShield Wizard will install LiveView6 on your computer. To continue, click Next < Back Next > Cancel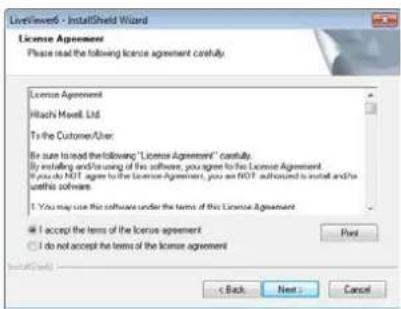
text_image
LiveWindow - InstallShield Wizard License Agreement Please read the following license agreement carefully. License Agreement Hashi Meell, Ltd. To the Customer/User: In user to read the following "License Agreement" carefully. By installing and/or using of the software, you agree to the License Agreement. If you do NOT agree to the License Agreement, you are NOT authorized to install and/or use this software. I You may use the software under the terms of this License Agreement. I accept the terms of the license agreement I do not accept the terms of the license agreement Next < Back Next > Cancel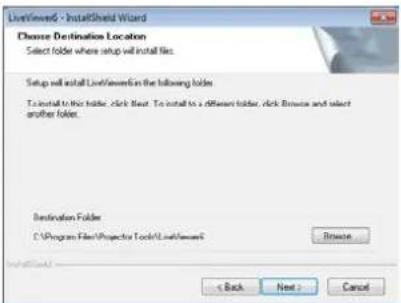
text_image
LiveWindow - InstallShield Wizard Choose Destination Location Select folder where setup will install files. Setup will install LiveWindow in the following folder: To install to this folder, click Next. To install to a different folder, click Browse and select another folder. Destination Folder C:\Program Files\Projection Tools\LiveWindow6 Browse < Back Next > Cancel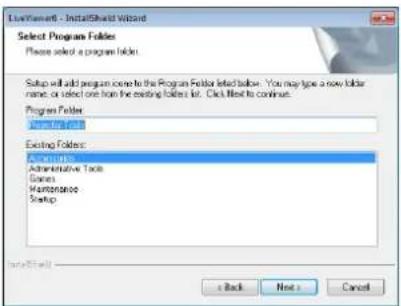
text_image
InstallShield - InstallShield Wizard Select Program Folder Please select a program folder. Setup will add program complete to the Program Folder listed below. You may type a new folder name or select one from the existing folders list. Click Next to continue. Program Folder InstallShield Existing Folders: Administrative Tools Stores Maintenance Startup Back Next Cancel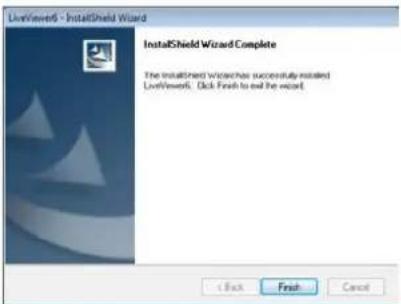
text_image
LiveView5 - InstallShield Wizard InstallShield Wizard Complete The InstallShield Wizard has successfully installed LiveView5. Click Finish to end the forecast.text_image
Connection Wizard Select the option that describes the connection method you would like to use: Select From List Enter Passcode Profile History Configure Manually My Connection Projector List Projector name IP address PR1_001F67126F9A 192.168.1.10 PR1_001F67126F20 192.168.1.254 Find Connect Exittext_image
Connection Wizard Select the option that describes the connection method you would like to use: Select From List Enter Passcode Profile History Configure Manually My Connection Projector List Projector name IP address PR3_001F67120F9A 192.168.1.10 PR3_001F67120F20 192.168.1.254 Find Connect Exit
text_image
Connection Wizard Select the option that describes the connection method you would like to user. Select From List Enter Passcode Profile History Configure Manually My Connection Please select the network adapter that you are going to use. Connection Name Adapter Name Local Area Con... Intel(K) PRO/1000 PL Netw... Wireless Netw... 11a/b/g Wireless LAN Mini P... Please enter the Passcode. The Passcode is a 12-digit code, that can be found on the Startup Screen of the projector you are currently trying to connect to. Connect Exittext_image
Connection Wizard Select the option that describes the connection method you would like to use: Select From List Enter Passcode Profile History Configure Manually My Connection Profile list Profile name Data created Profile-1 03/10/2011 3:19:46 PM Profile-2 03/10/2011 3:18:41 PM Profile-3 03/09/2011 6:24:53 PM Profile-4 03/08/2011 2:41:37 PM Add Edit Delete My Connection Connect Exittext_image
Connection Wizard Select the option that describes the connection method you would like to use: Select From List Enter Passcode Profile History Configure Manually My Connection History list Projector name IP address Last connected PR1_001F6... 192.168.1.10 03/10/2011 ... PR1_001F6... 192.168.1.55 03/06/2011 ... PR1_001F6... 192.168.1.253 03/06/2011 ... PR1_001F6... 192.168.1.121 03/07/2011 Register to profile Connect Exttext_image
Connection Wizard Select the option that describes the connection method you would like to user. Select From List Enter Passcode Profile History Configure Manually My Connection Please select the network adapter that you are going to use. Connection Name Adapter Name Local Area Con... Intel(K) PRO/1000 PL Netw... Wireless Netw... 11a/b/g Wireless LAN Mini P... Next > ExitПРИМЕЧАНИЕ
text_image
Connection Wizard Select the option that describes the connection method you would like to use: Select From List Enter Passcode Profile History Configure Manually My Connection Connect to the following projector. IP address : 192.168.1.254 Connect ExitПРИМЕЧАНИЕ
text_image
Connection Wizard Select the option that describes the connection method you would like to use: Select From List Enter Passcode Profile History Configure Manually My Connection Please select the network adapter that you are going to use. Connection Name Adapter Name Local Area Con... Intel(R) PRO/1000 PL Netw... Wireless Netw... 11a/b/g Wireless LAN Mini P... Please enter the Passcode. The Passcode is a 12-digit code, that can be found on the Startup Screen of the projector you are currently trying to connect to. Connect ExitПРИМЕЧАНИЕ
natural_image
Illustration of a laptop, lightning bolt, and projector (no text or symbols)text_image
Connection Wizard Enter the following Information. SSID : SSID MAC address P208-0014 00160183BE79 002687093099 002687093098 CG-Quest 002687093098 Find Encryption : WEP64bit Encryption key : Submit mask :_ _ Please enter the Projector Network Configuration for the projector that you would like to connect to. < Back Commit ExitПРИМЕЧАНИЕ
natural_image
Diagram showing a projector connected to a laptop and a power cord with a lightning bolt (no text or symbols)text_image
Connection Wizard Enter the following information. SSID : SSID MAC address P300-0014 001601838E79 002687093099 002687093098 CG-Guest 062687093098 Find Encryption: WEP64bit Encryption key: Subnet mask: SSID, Encryption and Encryption key: use wireless access point configuration settings. Subnet mask: enter the Subnet mask that the projector is using. < Back Connect ExitПРИМЕЧАНИЕ
natural_image
Illustration of a projector, laptop, and power cord with lightning and ground symbols (no text or labels)text_image
Connection Wizard Enter the following information. SSID : SSID MAC address PJ06-0014 001601838E79 002687093099 002687093098 CG-Guest 002687093098 Find Encryption: WEI/04bit Encryption key : Subnet mask : Please enter the Projector Network Configuration for the projector that you would like to connect to. < Back Connect ExitПРИМЕЧАНИЕ
text_image
Connection Wizard Enter the following information. Submit mask : Please enter the projector subnet mask. < Back Connect ExitПРИМЕЧАНИЕ
natural_image
Illustration of a laptop, a lightning bolt, and a projector (no text or symbols)text_image
Connection Wizard Enter the following information. SSID : SSID MAC address PJ06-0014 001601838E79 002687093099 002687093098 CG-Guest 092687093096 Find Encryption : OFF Encryption key : Mode : AD-HOC Enter the Wireless Projector Configuration Information. Please refer to the following instruction for wireless setup. Menu - Advanced Menu - Network - Wireless Information < Back Next > Exit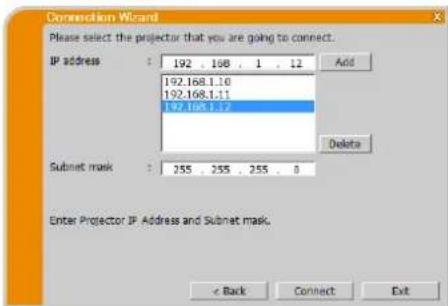
text_image
Connection Wizard Please select the projector that you are going to connect. IP address : 192 . 108 . 1 . 12 Add 192.168.1.10 192.168.1.11 192.168.1.12 Subnet mask : 255 . 255 . 255 . 0 Delete Enter Projector IP Address and Subnet mask. < Back Connect Exitnatural_image
Diagram showing a projector connected to a laptop and a power cord with a lightning bolt (no text or symbols)text_image
Connection Wizard Please select the projector that you are going to connect. IP address : 192 , 168 , 1 , 12 Add 192.168.1.10 192.168.1.11 192.168.1.12 Delete Submit mask : 255 , 255 , 255 , 0 Enter Projector IP Address and Subnet mask. < Back Connect Exitnatural_image
Illustration of a projector, laptop, and capacitor with lightning bolt symbols (no text or labels)text_image
Connection Wizard Please select the projector that you are going to connect. IP address : 192 . 168 . 1 . 12 Add 192.168.1.10 192.168.1.11 192.168.1.12 Subnet mask : 255 . 255 . 255 . 0 Delete Enter Projector IP Address and Subnet mask. < Back Connect Exittext_image
Communication Wizard Please select the projector that you are going to connect. IP address : 192 . 168 . 1 . 12 Add 192.168.1.10 192.168.1.11 192.168.1.12 Delete Subnet mask : 255 . 255 . 255 . 0 Enter Projector IP Address and Subnet mask. < Back Connect ExitПРИМЕЧАНИЕ
text_image
Connection Wizard Connection status IP address Status 192.168.1.10 Connecting... 192.168.1.11 Connected 192.168.1.12 Connect error Connect cancelПРИМЕЧАНИЕ
text_image
Connection Wizard Connection list: IP address Projector name Status ✓ 192.168.1.10 SW_001F67120F44 LAN ✓ 192.168.1.11 PRI_001F67120F60 LAN, Presenter Mode ✓ 192.168.1.12 PRI_001F67120FDA USB type A, Sideshow Register this setting to My Connection Select the projector to send your computer image, then click [Show] button. Automerically change the input source LAN channel, if different channel is selected. If Sideshow is running, Sideshow is terminated and change the input source to LAN channel. Show CloseПРИМЕЧАНИЕ
text_image
Connection Wizard Failed to connect to the following projector. 192.168.1.10ПРИМЕЧАНИЕ
text_image
Options Not displaying confirmation dialog for adding Network settings. Optimize Performance Transmission speed Image quality Presenter Mode Display User: Name: Unnamed Display LiveViewer Close 1) 2) 4) 5) 6)text_image
Options Not displaying confirmation dialog for adding Network settings. Optimize Performance Transmission speed Image quality Sound On Off Presenter Mode Display User Name: Unnamed Display LiveViewer Closetext_image
Connection Wizard Select the option that describes the connection method you would like to use: Select From List Enter Passcode Profile History Configure Manually My Connection Profile list Profile name Data created Profile-1 03/10/2011 3:19:46 PM Profile-2 03/10/2011 3:18:41 PM Profile-3 03/09/2011 6:24:53 PM Profile-4 03/08/2011 2:41:57 PM Add Edit Delete My Connection Connect Exit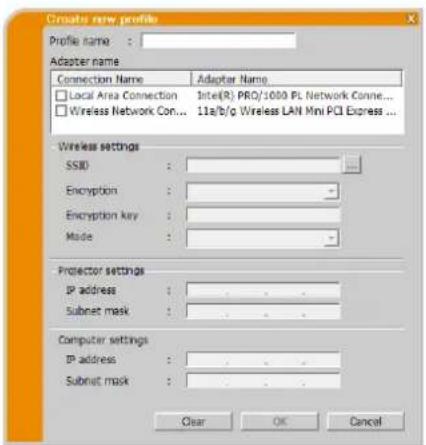
text_image
Create new profile Profile name : Adapter name Connection Name Adapter Name Local Area Connection Intel(R) PRO/1000 PL Network Conne... Wireless Network Con... 11a/b/g Wireless LAN Mini PCI Express ... Wireless settings SSID : Encryption : - Encryption key : - Mode : - Projector settings IP address : - Subnet mask : - Computer settings IP address : - Subnet mask : - Clear OK Canceltext_image
Projector Connection Select the option that describes the connection method you would like to use: Select From List Enter Passcode Profile History Configure Manually My Connection Profile list Profile name Date created Profile-1 03/10/2011 8:19:46 PM Profile-2 03/10/2011 3:18:41 PM Profile-3 03/09/2011 6:24:53 PM Profile-4 03/08/2011 2:41:37 PM Add Edit Delete My Connection Connect Exit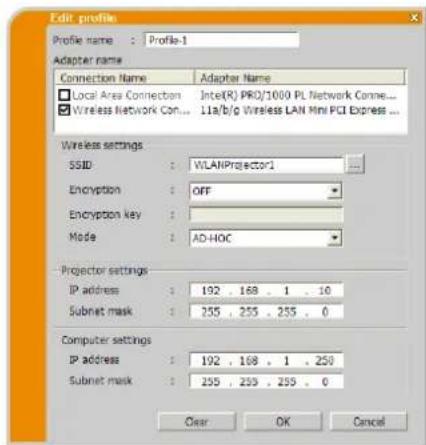
text_image
Edit profile Profile name : Profile-1 Adapter name Connection Name Adapter Name Local Area Connection:Inte(R) PRO/1000 PL Network Conne... Wireless Network Con... 11a/b/g Wireless LAN Mini PCI Express... Wireless settings SSID : WLANProjector1 Encryption : OFF Encryption key : Mode : AD-HOC Projector settings IP address : 192 168 1 10 Subnet mask : 255 255 255 0 Computer settings IP address : 192 168 1 258 Subnet mask : 255 255 255 0 Clear OK Canceltext_image
Projector Connection Select the option that describes the connection method you would like to user: Select From List Enter Passcode Profile History Configure Manually My Connection Profile list Profile name Data created Profile-1 03/10/2011 3:19:46 PM Profile-2 03/10/2011 3:18:41 PM Profile-3 03/09/2011 6:24:53 PM Profile-4 03/08/2011 2:41:37 PM Add Edit Delete My Connection Connect Exit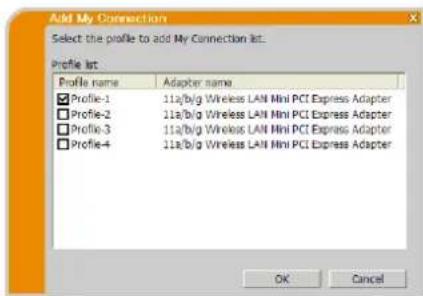
text_image
Add My Connection Select the profile to add My Connection list. Profile list Profile name Adapter name Profile-1 11a/b/g Wireless LAN Mini PCI Express Adapter Profile-2 11a/b/g Wireless LAN Mini PCI Express Adapter Profile-3 11a/b/g Wireless LAN Mini PCI Express Adapter Profile-4 11a/b/g Wireless LAN Mini PCI Express Adapter OK CancelПРИМЕЧАНИЕ
Сообщение 1: A network connection was not established.
text_image
Connection Wizard A network connection was not established. Please check the network connection.Сообщение 2: The number of computer connection exceeds the limit (max. 50).
text_image
Connection Wizard The number of computer connection exceeds the limit (max. 50). Please try again after a session of connected user is disconnected. OKСообщение 3: A network connection could not be established.
text_image
Connection Wizard A network connection could not be established. Windows prevented network configuration changes. Please insure that you are authorized to make these changes.Сообщение 4: Are you sure you want to connect the selected projector?
text_image
Connection Wizard Are you sure you want to connect the selected projector? Yes Notext_image
Communication Wizard Incorrect IP Address. OKСообщение 6: Do you want to apply suggested network settings as follows?
text_image
Connection Wizard Do you want to apply suggested network settings as follows? IP address : 192.168.2.54 Subnet mask : 255.255.255.0 Change... Not deploying confirmation dialog for adding network settings. Yes NoПРИМЕЧАНИЕ
text_image
Connection Wizard Enter the following information. IP address 1 Subnet mask 1 Enter Computer IP Address and Subnet mask. OK CancelСообщение 7: An IP Address overlaps with the IP Address of the projector you are trying to connect to.
text_image
Connection Wizard An IP Address overlaps with the IP Address of the projector you are trying to connect to. Please choose an IP Address that is currently not in use.text_image
Connection Wizard Incorrect IP Address. OKСообщение 9: A Network Configuration Conflict exists.
text_image
Connection Wizard A Network Configuration Conflict exists. Please verify your Network Configuration Settings (computer and projector). OKСообщение 10: There is a projector already connected with your computer.
text_image
Connection Wizard There is a projector already connected with your computer; Are you sure that you want to disconnect the current connection and establish new connection? Yes No CancelПРИМЕЧАНИЕ
сообщение 11: In order to connect to the selected projector, you need to disconnect from the current projector.
text_image
Connection Wizard In order to connect to the selected projector, you need to disconnect from the current projector. Are you sure that you want to disconnect from the current projector.Сообщение 12: This projector is currently in use (Presenting) by another user.
text_image
Connection Wizard This projector is currently in use (Presenting) by another user. You cannot connect with the projector until the other session (Presenter Mode) is finished.сообщение 13: A Slideshow is currently running on the projector that you are trying to display to. (PC-Less Presentation Mode).
text_image
Connection Wizard A Sideshow is currently running on the projector that you are trying to display to (PC Less Presentation Mode). If you continue, you will cancel the current Sideshow. Yes NoСообщение 14: Are you sure you want to change the input channel of the Projector to 'LAN'?
text_image
Connection Wizard Are you sure you want to change the input channel of the Projector to "LAN?" Yes NoСообщение 15: Are you sure that you want to turn on the network adapter?
text_image
Connection Wizard Are you sure that you want to turn on the network adapter? Yes NoСообщение 16: It cannot be connected because improper native resolution panel projector is selected.
text_image
Connection Wizard It cannot be connected because improper native resolution panel projector is selected. OKСообщение 17: Since moderator control mode of connected projector (IP address:***.***.***.***) becomes effective, Multi Projector mode is canceled.
text_image
Connection Wizard Since moderator control mode of connected projector (IP address: 192.168.1.100) becomes effective, Multi Projector mode is cancelled.Сообщение 18: You can not operate while moderator control mode is activated.
text_image
Connection Wizard You can not operate while moderator control mode is activated... OKThe Software is being delivered to you “AS IS” and Christie Digital Systems USA, Inc. (CHRISTIE) make no warranty as to its use or performance. CHRISTIE AND ITS SUPPLIERS, INCLUDING BUT NOT LIMITED TO CHRISTIE, DO NOT AND CANNOT WARRANT THE PERFORMANCE OR RESULTS YOU MAY OBTAIN BY USING THE SOFTWARE. EXCEPT TO THE EXTENT PROHIBITED BY LAW IN YOUR JURISDICTION, CHRISTIE AND ITS SUPPLIERS MAKE NO WARRANTIES CONDITIONS, REPRESENTATIONS, OR TERMS (EXPRESS OR IMPLIED WHETHER BY STATUTE, COMMON LAW, CUSTOM, USAGE OR OTHERWISE) AS TO ANY MATTER IN CONNECTION WITH THE SOFTWARE, INCLUDING WITHOUT LIMITATION NONINFRINGEMENT OF THIRD PARTY RIGHTS, MERCHANTABILITY, INTEGRATION, SATISFACTORY QUALITY, OR FITNESS FOR ANY PARTICULAR PURPOSE.
You agree that the Software will not be shipped, transferred or exported into any country or used in any manner prohibited by the United States Export Administration Act or any other applicable export laws, restrictions or regulations (collectively the “Export Laws”). In addition, if the Software is identified as export controlled items under the Export Laws, you represent and warrant that you are not a citizen, or otherwise located within, an embargoed nation (including without limitation Iran, Iraq, Syria, Sudan, Libya, Cuba, North Korea, and Serbia) and that you are not otherwise prohibited under the Export Laws from receiving the Software. All rights to Use the Software are granted on condition that such rights are forfeited if you fail to comply with the terms of this Agreement.
Sisältö
1 Ominaisuudet....3
text_image
Choose Setup Language Select the language for the installation from the choices below. English OK CancelHUOM!
text_image
LiveView6 - InstallShield Wizard Welcome to the InstallShield Wizard for LiveView6 The InstallShield Wizard will install LiveView6 on your computer. To continue, click Next < Back Next > Cancel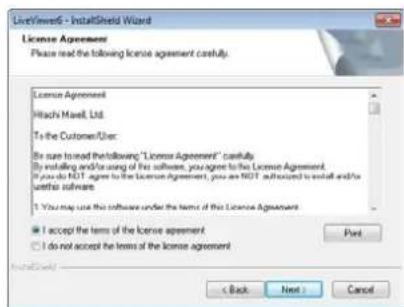
text_image
LiveWindow - InstallShield Wizard License Agreement Please read the following license agreement carefully. License Agreement Hitachi Macell, Ltd. To the Customer/User: By sure issued the following: "License Agreement" carefully By installing and/or using of this software, you agree to the License Agreement. If you do NOT agree to the License Agreement, you are NOT authorized to install and/or or adjust this software. 1. You may use this software under the terms of this License Agreement.I accept the terms of the license agreement
○ I do not accept the terms of the license agreement < Back Next > Cancel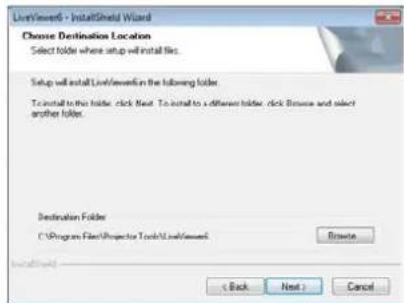
text_image
LiveViewers - InstallShield Wizard Choose Destination Location Select folder where setup will install files. Setup will install LiveViewers in the following folder: To install to this folder, click Next. To install to a different folder, click Browse and select another folder. Destination Folder C:\Program Files\Projection Toolkit\LiveViewer Browse < Back Next > Cancel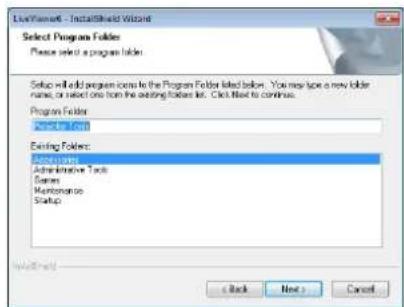
text_image
LiveWindow - InstallShield Wizard Select Program Folders Please select a program folder. Setup will add program icons to the Program Folder listed below. You may have a new folder name, or select one from the existing folders list. Click Next to continue. Program Folder: Existing Folder: Program: Administrative Tools Games Maintenance Startup Back Next Cancel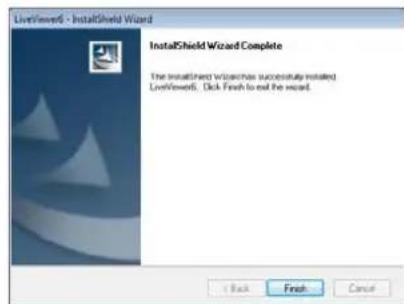
text_image
LiveWindow6 - InstallShield Wizard InstallShield Wizard Complete The installed wizard has successfully installed LiveWindow6. Click Finish to exit the wizard.text_image
Connection Wizard Select the option that describes the connection method you would like to use: Select From List Enter Passcode Profile History Configure Manually My Connection Projector List Projector name IP address PR1_001F67126F9A 192.168.1.10 PR3_001F67126F20 192.168.1.254 Find Connect Exit3.2.2.1 Listasta valinta
text_image
Connection Wizard Select the option that describes the connection method you would like to use: Select From List Enter Passcode Profile History Configure Manually My Connection Projector List Projector name PR0_001F67120F9A PR0_001F67120F23 address 192.168.1.10 192.168.1.254 Find Connect Exit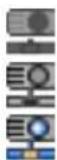
text_image
Connections Wizard Select the option that describes the connection method you would like to use. Select From List Enter Passcode Profile History Configure Manually My Connection Please select the network adapter that you are going to use. Connection Name Adapter Name Local Area Con... Intel(K) PRO/1000 PL Netw... Wireless Netw... 11a/b/g Wireless LAN Mini P... Please enter the Passcode. The Passcode is a 12-digit code, that can be found on the Startup Screen of the projector you are currently trying to connect to. Connect ExitHUOM!
text_image
Connection Wizard Select the option that describes the connection method you would like to use: Select From List Enter Passcode Profile History Configure Manually My Connection Profile list Profile name Data created Profile-1 03/10/2011 3:19:46 PM Profile-2 03/10/2011 3:18:41 PM Profile-3 03/09/2011 6:24:53 PM Profile-4 03/08/2011 2:41:37 PM Add Delete My Connection Connect ExitHUOM!
text_image
Connection Wizard Select the option that describes the connection method you would like to use: Select From List Enter Passcode Profile History Configure Manually My Connection History list Projector name IP address Last connected PR3_001F6... 192.168.1.10 03/10/2011 ... PR3_001F6... 192.168.1.55 03/08/2011 ... PR3_001F6... 192.168.1.253 03/08/2011 ... PR3_001F6... 192.168.1.121 03/07/2011 ... Register to profile Connect ExitHUOM!
text_image
Connection Wizard Select the option that describes the connection method you would like to use: Select From List Enter Passcode Profile History Configure Manually My Connection Please select the network adapter that you are going to use. Connection Name Adapter Name Local Area Con... Intel(K) PRO/1000 PL Netw... Wireless Netw... 11a/b/g Wireless LAN Mini P... Next > ExitHUOM!
text_image
Connection Wizard Select the option that describes the connection method you would like to use: Select From List Enter Passcode Profile History Configure Manually My Connection Connect to the following projector. IP address : 192.168.1.254 Connect ExitHUOM!
Tehdasasetus SSID 1: wireless
Tehdasasetus SSID 2: WLANProjector1
Tehdasasetus SSID 3: WLANProjector2
Tehdasasetus SSID 4: WLANProjector3
There are two methods to get the Passcode from the projector.
Menetelmä 1
text_image
Connection Wizard Select the option that describes the connection method you would like to use: Select From List Enter Passcode Profile History Configure Manually My Connection Please select the network adapter that you are going to use... Connection Name Adapter Name Local Area Con... Intel(R) PRO/1000 PL Netw... Wireless Netw... 11a/b/g Wireless LAN Mini P... Please enter the Passcode. The Passcode is a 12-digit code, that can be found on the Startup Screen of the projector you are currently trying to connect to. Connect ExitHUOM!
natural_image
Illustration of a laptop, a lightning bolt, and a projector (no text or symbols)text_image
Connection Wizard Enter the following information. SSID : SSID MAC address PJ06-0014 001601838E79 002687093099 002687093098 CG-Guest 062687093098 Find Encryption : WEP04bit Encryption key : Subset mask : Please enter the Projector Network Configuration for the projector that you would like to connect to. < Back Cancel ExitHUOM!
natural_image
Diagram showing a projector connected to a laptop and a vertical cable with a lightning bolt (no text or symbols)text_image
Compression Wizard Enter the following information. SSID : SSID MAC address PJ08-0014 001601838E79 002687093099 002687093098 CG-Guest 002687093098 Find Encryption : WEP64bit Encryption key :_ Subset mask :__ SSID, Encryption and Encryption key: use wireless access point configuration settings. Subset mask: enter the Subnet mask that the projector is using. < Back Connect ExitHUOM!
natural_image
Illustration of a projector, laptop, and wireless signal icons (no text or symbols)text_image
Connection Wizard Enter the following information. SSID : SSID MAC address □ PJ08-0014 00160183BE79 □ 002687093099 002687093098 □ CG-Guest 002687093098 Find: Encryption : WEP/4bit Encryption key : Subnet mask : ... Please enter the Projector Network Configuration for the projector that you would like to connect to. < Back Connect ExitHUOM!
text_image
Connection Wizard Enter the following information. Submet mask : Please enter the projector subnet mask. < Back Connect ExitHUOM!
natural_image
Illustration of a laptop, a lightning bolt, and a projector (no text or symbols)text_image
Connection Wizard Enter the following information. SSID : SSID MAC address PJ06-0014 001601838E79 002687093099 002687093098 CG-Guest 002687093098 Find Encryption : OFF Encryption key : Mode : AD-HOC Enter the Wireless Projector Configuration Information. Please refer to the following instruction for wireless setup. Menu - Advanced Menu - Network - Wireless Information < Back Next > Exit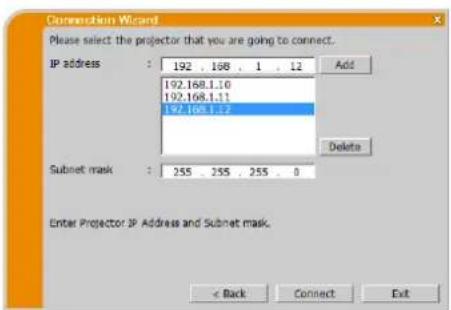
text_image
Connection Wizard Please select the projector that you are going to connect. IP address : 192 . 168 . 1 . 12 Add 192.168.1.10 192.168.1.11 192.168.1.12 Delete Subnet mask : 255 . 255 . 255 . 0 Enter Projector IP Address and Subnet mask. < Back Connect Exitnatural_image
Diagram showing a projector connected to a laptop and a power cord with a lightning bolt (no text or symbols)text_image
Connection Wizard Please select the projector that you are going to connect. IP address : 192 . 168 . 1 . 12 Add 192.168.1.10 192.168.1.11 192.168.1.12 Delete Subnet mask : 255 . 255 . 255 . 0 Enter Projector IP Address and Subnet mask. < Back Connect Exitnatural_image
Illustration of a projector, laptop, and battery with lightning bolt symbols (no text or labels)text_image
Connection Wizard Please select the projector that you are going to connect. IP address : 192 . 168 . 1 . 12 Add 192.168.1.10 192.168.1.11 192.168.1.12 Delete Subnet mask : 255 . 255 . 255 . 0 Enter Projector IP Address and Subnet mask. < Back Connect Exit3.2.4.4 Langallinen LAN
text_image
Connection Wizard Please select the projector that you are going to connect. IP address : 192 . 168 . 1 . 12 Add 192.168.1.10 192.168.1.11 192.168.1.12 Delete Submit mask : 255 . 255 . 255 . 0 Enter Projector IP Address and Subnet mask. < Back Connect ExitHUOM!
text_image
Connection Wizard Connection status IP address Status 192.168.1.10 Connecting... 192.168.1.11 Connected 192.168.1.12 Connect error Connect cancelHUOM!
text_image
Connection Wizard Connection list IP address Projector name Status ✓ 192.168.1.10 SW_001F67120F44 LAN ✓ 192.168.1.11 PRI_001F67120F60 LAN, Presenter Mode ✓ 192.168.1.12 PRI_001F67120FDA USB type A, Sideshow Register this setting to My Connection Select the projector to send your computer image, then click [Show] button. Automatically change the input source LAN channel, if different channel is selected. If Sideshow is running, Sideshow is terminated and change the input source to LAN channel. Show CloseHUOM!
text_image
Connection Wizard Failed to connect to the following projector. 192.168.1.10HUOM!
text_image
Options Not displaying confirmation dialog for adding Network settings. Optimize Performance Transmission speed Image quality Presenter Mode Display User Name: Unnamed Display LiveViewer Close 1) 2) 4) 5) 6)text_image
Options Not displaying confirmation dialog for adding Network settings. Optimize Performance Transmission speed Image quality Sound On Off Presenter Mode Display User Name: Unnamed Display LiveViewer Close 1) 3) 2) 4) 5) 6)text_image
Connection Wizard Select the option that describes the connection method you would like to use: Select From List Enter Passcode Profile History Configure Manually My Connection Profile list Profile name Data created Profile-1 03/10/2011 3:19:46 PM Profile-2 03/10/2011 3:18:41 PM Profile-3 03/09/2011 6:24:53 PM Profile-4 03/08/2011 2:41:57 PM Add Edit Delete My Connection Connect Exit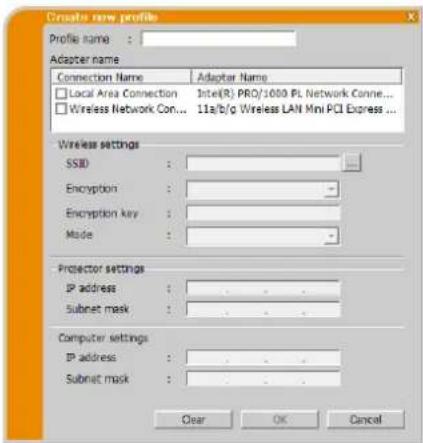
text_image
Create new profile Profile name : Adapter name Connection Name Adaptor Name Local Area Connection Intel(R) PRO/1000 PL Network Conne... Wireless Network Con... 11a/b/g Wireless LAN Mini PCI Express ... Wireless settings SSD : Encryption : - Encryption key : - Mode : - Projector settings IP address : . Subnet mask : . Computer settings IP address : . Subnet mask : . Clear OK Canceltext_image
Projector Connection Select the option that describes the connection method you would like to use: Select From List Enter Passcode Profile History Configure Manually My Connection Profile list Profile name Date created Profile-1 03/10/2011 3:19:46 PM Profile-2 03/10/2011 3:18:41 PM Profile-3 03/09/2011 6:24:53 PM Profile-4 03/08/2011 2:41:37 PM Add Edit Delete My Connection Connect Exit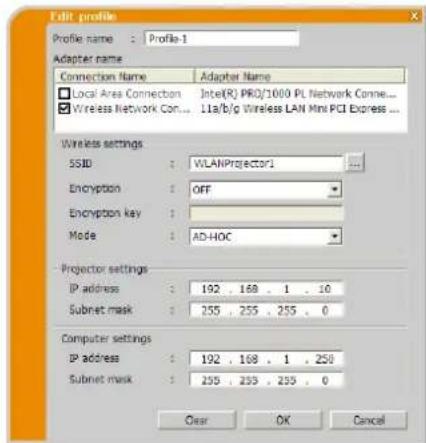
text_image
Edit profile Profile name : Profile-1 Adapter name Connection Name Adapter Name Local Area Connection:Inte(R) PRO/1000 PL Network Conne... Wireless Network Con... 11a/b/g Wireless LAN Mini PCI Express ... Wireless settings SSID : WLANProjector1 Encryption : OFF Encryption key : Mode : AD-HOC Projector settings IP address : 192 . 168 . 1 . 10 Subnet mask : 255 . 255 . 255 . 0 Computer settings IP address : 192 . 168 . 1 . 250 Subnet mask : 255 . 255 . 255 . 0 Clear OK Canceltext_image
Projector Connection Select the option that describes the connection method you would like to use: Select From List Enter Passcode Profile History Configure Manually My Connection Profile list Profile name Data created Profile-1 03/10/2011 3:19:46 PM Profile-2 03/10/2011 3:18:41 PM Profile-3 03/09/2011 6:24:53 PM Profile-4 03/08/2011 2:41:37 PM Add Edit Delete My Connection Connect Exit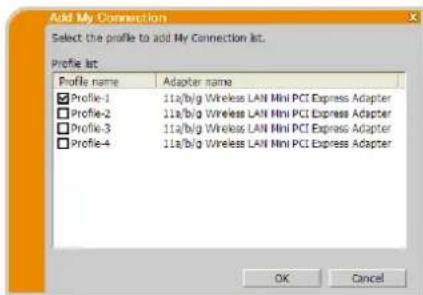
text_image
Add My Connection Select the profile to add My Connection list. Profile list: Profile name Adapter name ✓ Profile-1 11a/b/g Wireless LAN Mini PCI Express Adapter ✓ Profile-2 11a/b/g Wireless LAN Mini PCI Express Adapter ✓ Profile-3 11a/b/g Wireless LAN Mini PCI Express Adapter ✓ Profile-4 11a/b/g Wireless LAN Mini PCI Express Adapter OK CancelHUOM!
Viesti 1: A network connection was not established.
text_image
Connection Wizard A network connection was not established. Please check the network connection.Viesti 2: The number of computer connection exceeds the limit (max. 50).
text_image
Connection Wizard The number of computer connection exceeds the limit (max. 50). Please try again after a session of connected user is disconnected.Viesti 3: A network connection could not be established.
text_image
Connection Wizard A network connection could not be established. Windows prevented network configuration changes. Please insure that you are authorized to make these changes.Viesti 4: Are you sure you want to connect the selected projector?
text_image
Connection Wizard Are you sure you want to connect the selected projector? Yes NoViesti 5: Incorrect Passcode.
text_image
Instructions Wizard Incorrect IP Address. OKViesti 6: Do you want to apply suggested network settings as follows?
text_image
Connection Wizard Do you want to apply suggested network settings as follows? IP address : 192.168.2.54 Subnet mask : 255.255.255.0 Change... Not displaying confirmation dialog for adding Network settings. Yes NoHUOM!
- If you checked "Not displaying confirmation dialog for adding Network settings" option, this dialog will not show up the next time. If you would like to change the setting, click option button on theLiveViewer main menu and uncheck "Not displaying confirmation dialog for adding Network settings" option.
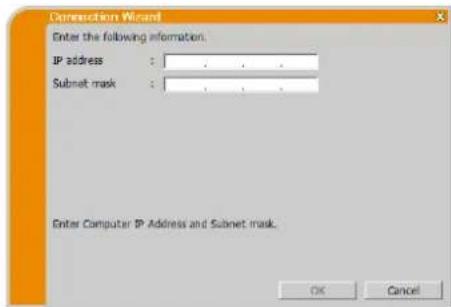
text_image
Connection Wizard Enter the following information. IP address : Subnet mask : Enter Computer IP Address and Subnet mask. OK CancelViesti 7: An IP Address overlaps with the IP Address of the projector you are trying to connect to.
text_image
Connection Wizard An IP Address overlaps with the IP Address of the projector you are trying to connect to. Please choose an IP Address that is currently not in use.Viesti 8: Incorrect IP Address.
text_image
Connection Wizard Incorrect IP Address. OKViesti 9: A Network Configuration Conflict exists.
text_image
Connection Wizard A Network Configuration Conflict exists. Please verify your Network Configuration Settings (computer and projector). OKViesti 10: There is a projector already connected with your computer.
text_image
Connection Wizard There is a projector already connected with your computer. Are you sure that you want to disconnect the current connection and establish new connection? Yes No CancelHUOM!
Viesti 11: In order to connect to the selected projector, you need to disconnect from the current projector.
text_image
Connection Wizard In order to connect to the selected projector, you need to disconnect from the current projector. Are you sure that you want to disconnect from the current projector.Viesti 12: This projector is currently in use (Presenting) by another user.
text_image
Circumulation Wizard This projector is currently in use (Presenting) by another user. You cannot connect with this projector until the other session (Presenter Mode) is finished.Viesti 13: A Slideshow is currently running on the projector that you are trying to display to. (PC-Less Presentation Mode).
text_image
Connection Wizard! A Sideshow is currently running on the projector that you are trying to display to (PC-Less Presentation Mode). If you continue, you will cancel the current Sideshow. Yes NoViesti 14: Are you sure you want to change the input channel of the Projector to 'LAN'?
text_image
Connection Wizard Are you sure you want to change the input channel of the Projector to LAN? Yes NoViesti 15: Are you sure that you want to turn on the network adapter?
text_image
Connection Wizard Are you sure that you want to turn on the network adapter? Yes NoViesti 16: It cannot be connected because improper native resolution panel projector is selected.
text_image
Connection Wizard It cannot be connected because improper native resolution panel projector is selected. OKViesti 17: Since moderator control mode of connected projector (IP address: ***.***.***.***) becomes effective, Multi Projector mode is canceled.
text_image
Connection Wizard Since moderator control mode of connected projector (IP address: 192.168.1.100) becomes effective, Multi Projector mode is cancelled.Viesti 18: You can not operate while moderator control mode is activated.
text_image
Connection Wizard! You can not operate while moderator control mode is activated. OKB Vianetsintä
The Software is being delivered to you “AS IS” and Christie Digital Systems USA, Inc. (CHRISTIE) make no warranty as to its use or performance. CHRISTIE AND ITS SUPPLIERS, INCLUDING BUT NOT LIMITED TO CHRISTIE, DO NOT AND CANNOT WARRANT THE PERFORMANCE OR RESULTS YOU MAY OBTAIN BY USING THE SOFTWARE. EXCEPT TO THE EXTENT PROHIBITED BY LAW IN YOUR JURISDICTION, CHRISTIE AND ITS SUPPLIERS MAKE NO WARRANTIES CONDITIONS, REPRESENTATIONS, OR TERMS (EXPRESS OR IMPLIED WHETHER BY STATUTE, COMMON LAW, CUSTOM, USAGE OR OTHERWISE) AS TO ANY MATTER IN CONNECTION WITH THE SOFTWARE, INCLUDING WITHOUT LIMITATION NONINFRINGEMENT OF THIRD PARTY RIGHTS, MERCHANTABILITY, INTEGRATION, SATISFACTORY QUALITY, OR FITNESS FOR ANY PARTICULAR PURPOSE.
You agree that the Software will not be shipped, transferred or exported into any country or used in any manner prohibited by the United States Export Administration Act or any other applicable export laws, restrictions or regulations (collectively the “Export Laws”). In addition, if the Software is identified as export controlled items under the Export Laws, you represent and warrant that you are not a citizen, or otherwise located within, an embargoed nation (including without limitation Iran, Iraq, Syria, Sudan, Libya, Cuba, North Korea, and Serbia) and that you are not otherwise prohibited under the Export Laws from receiving the Software. All rights to Use the Software are granted on condition that such rights are forfeited if you fail to comply with the terms of this Agreement.
Spis treści
1 Funkcje 3
text_image
Orange toolbar with icons representing media and information management functions like play, video, and globetext_image
Choose Setup Language Select the language for the installation from the choices below. English OK Canceltext_image
LiveView6 - InstallShield Wizard Welcome to the InstallShield Wizard for LiveView6 The InstallShield Wizard will install LiveView6 on your computer. To continue, click Next < Back Next > Cancel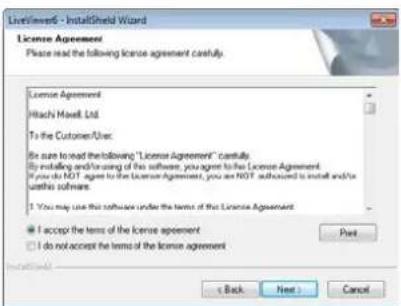
text_image
InstallShield - InstallShield Wizard License Agreement Please read the following license agreement carefully. License Agreement Hitachi Meavit Ltd. To the Customer/User. Be sure to read the following: "License Agreement" carefully. By installing and/or using of the software, you agree to the License Agreement. If you do NOT agree to the License Agreement, you are NOT authorized to install and/or or this software. I You may use this software under the terms of the License Agreement. I accept the terms of the license agreement I do not accept the terms of the license agreement Back Next Cancel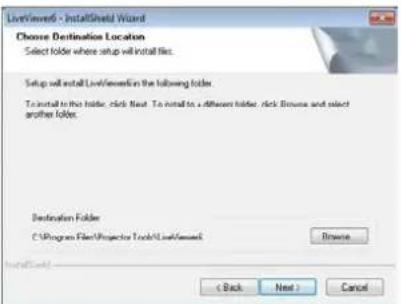
text_image
LiveWindow - InstallShield Wizard Choose Destination Location Select folder where setup will install files. Setup will install LiveWindow in the following folder. To install to this folder, click Next. To install to a different folder, click Browse and select another folder. Destination Folder C:\Program Files\Projection Tools\LiveWindow Browse < Back Next > Cancel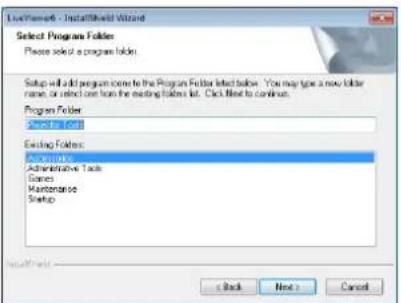
text_image
LiveProgram - InstallShield Wizard Select Program Folder Please select a program folder. Setup will add program come to the Program Folder selected below. You may type a new folder name, or select one from the existing folders list. Click Next to continue. Program Folder Used to Edit Existing Folder: Administrative Tools Services Maintenance Setup Back Next Cancel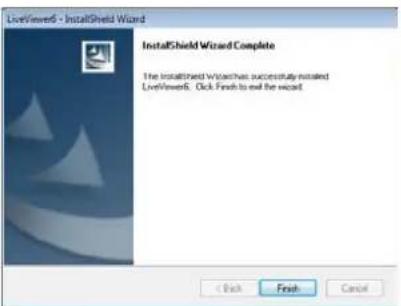
text_image
LiveView6 - InstallShield Wizard InstallShield Wizard Complete The InstallShield Wizard has successfully installed LiveView6. Click Finish to exit the wizard.text_image
Connection Wizard Select the option that describes the connection method you would like to user: Select From List Enter Passcode Profile History Configure Manually My Connection Projector List Projector name IP address PR1_001F67120F9A 192.168.1.10 PR3_001F67120F20 192.168.1.254 Find Connect Exittext_image
Connection Wizard Select the option that describes the connection method you would like to user Select From List Enter Passcode Profile History Configure Manually My Connection Projector List Projector name IP address PR1_001F67126P9A 192.168.1.10 PR1_001F67126F20 192.168.1.254 Find Connect Exit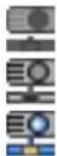
text_image
Connection Wizard Select the option that describes the connection method you would like to use: Select From List Enter Passcode Profile History Configure Manually My Connection Please select the network adapter that you are going to use. Connection Name Adapter Name Local Area Con... Intel(R) PRO/1000 PL Netw... Wireless Netw... 11a/b/g Wireless LAN Mini P... Please enter the Passcode. The Passcode is a 12-digit code, that can be found on the Startup Screen of the projector you are currently trying to connect to. Connect Exittext_image
Connection Wizard Select the option that describes the connection method you would like to user: Select From List Enter Passcode Profile History Configure Manually My Connection Profile list Profile name Data created Profile-1 03/10/2011 3:19:45 PM Profile-2 03/10/2011 3:18:41 PM Profile-3 03/09/2011 6:24:53 PM Profile-4 03/08/2011 2:41:37 PM Add Exit Delete My Connection Connect ExitUWAGA
text_image
Connection Wizard Select the option that describes the connection method you would like to use: Select From List Enter Passcode Profile History Configure Manually My Connection History list Projector name IP address Last connected PR3_001F6... 192.168.1.10 03/10/2011 ... PR3_001F6... 192.168.1.55 03/06/2011 ... PR3_001F6... 192.168.1.253 03/06/2011 ... PR3_001F6... 192.168.1.121 03/07/2011 ... Regener to profile Connect Exittext_image
Connection Wizard Select the option that describes the connection method you would like to use: Select From List Enter Passcode Profile History Configure Manually My Connection Please select the network adapter that you are going to use... Connection Name Adapter Name Local Area Con... Intel(R) PRO/1000 PL Netw... Wireless Netw... 11a/b/g Wireless LAN Mini P... Next > ExitUWAGA
text_image
Connection Wizard Select the option that describes the connection method you would like to use: Select From List Enter Passcode Profile History Configure Manually My Connection Connect to the following projector. IP address : 102.168.1.254 Connect ExitUWAGA
text_image
Connection Wizard Select the option that describes the connection method you would like to use: Select From List Enter Passcode Profile History Configure Manually My Connection Please select the network adapter that you are going to use. Connection Name: Adapter Name Local Area Con... Intel(K) PRO/1000 PL Netw... Wireless Netw... 11a/b/g Wireless LAN Mini P... Please enter the Passcode. The Passcode is a 12-digit code, that can be found on the Startup Screen of the projector you are currently trying to connect to. Connect ExitUWAGA
natural_image
Illustration of a laptop, a lightning bolt, and a projector (no text or symbols)text_image
Connection Wizard Enter the following information. SSID : SSID MAC address PJ08-0014 001601838E79 002687093099 002687093098 CG-Guest 002687093096 Find Encryption : WEP64bit Encryption key : Subnet mask : ... Please enter the Projector Network Configuration for the projector that you would like to connect to. < Back Connect ExitUWAGA
natural_image
Diagram showing a projector connected to a laptop and a power cord with a lightning bolt (no text or symbols)text_image
Connection Wizard Enter the following information. SSID : Find: SSID MAC address PJ08-0014 00160183BE79 002687093099 002687093098 CG-Guest 002687093096 Encryption : WEP/64bit Encryption key : Subnet mask : SSID, Encryption and Encryption key: use wireless access point configuration settings. Subnet mask: enter the Subnet mask that the projector is using. < Back Connect ExitUWAGA
natural_image
Illustration of a projector, laptop, and wireless signal components (no text or symbols)text_image
Conversion Wizard Enter the following information. SSID : SSID MAC address □ PJ08-0014 001601838E79 □ 002687093399 002687093398 □ C0-Guest 002687093398 Find Encryption : WEP64bit Encryption key : Subset mask : Please enter the Projector Network Configuration for the projector that you would like to connect to. < Back Cancel ExitUWAGA
text_image
Connection Wizard Enter the following information. Subset mask : Please enter the projector subnet mask. < Back Connect ExitUWAGA
natural_image
Illustration of a laptop and a projector with a lightning bolt symbol (no text or labels)text_image
Connection Wizard Enter the following information. SSID : SSID MAC address PJ08-0014 001601838E79 002687093099 002687093098 CG-Guest 062687093098 Find Encryption : OFF Encryption key : Mode : AD-HOC Enter the Wireless Projector Configuration Information. Please refer to the following instruction for wireless setup. Menu - Advanced Menu - Network - Wireless Information < Back Next > Exit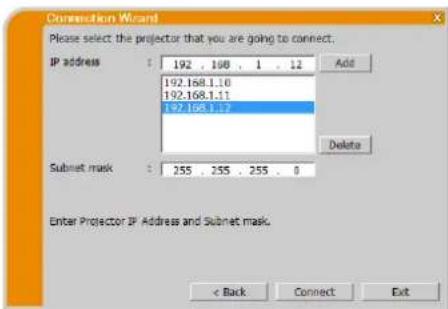
text_image
Connection Wizard Please select the projector that you are going to connect. IP address : 192 . 108 . 1 . 12 Add 192.168.1.10 192.168.1.11 192.168.1.17 Delete Subnet mask : 255 . 255 . 255 . 0 Enter Projector IP Address and Subnet mask. < Back Connect Exitnatural_image
Diagram showing a projector connected to a laptop and a power cord with a lightning bolt (no text or symbols)text_image
Connection Wizard Please select the projector that you are going to connect. IP address : 192 . 168 . 1 . 12 Add 192.168.1.10 192.168.1.11 192.168.1.12 Delete Subnet mask : 255 . 255 . 255 . 0 Enter Projector IP Address and Subnet mask. < Back Connect Exitnatural_image
Diagram showing a projector, laptop, and power cord with lightning and ground symbols (no text or labels)text_image
Connection Wizard Please select the projector that you are going to connect. IP address : 192 . 168 . 1 . 12 Add 192.168.1.10 192.168.1.11 192.168.1.12 Subnet mask : 255 . 255 . 255 . 0 Enter Projector IP Address and Subnet mask. < Back Connect Exittext_image
Connection Wizard Please select the projector that you are going to connect. IP address : 192 . 108 . 1 . 12 Add 192.168.1.10 192.168.1.11 192.168.1.12 Subnet mask : 255 . 255 . 255 . 0 Enter Projector IP Address and Subnet mask. < Back Connect ExitUWAGA
text_image
Connection Wizard IP address Status 192.168.1.10 Connecting... 192.168.3.11 Connected 192.168.3.12 Connect error Connect cancelUWAGA
text_image
Connection Wizard Connection list IP address Projector name Status 192.168.1.10 SW_001F67120F44 LAN 192.168.1.11 PRI_001F67120F60 LAN, Presenter Mode 192.168.1.12 PRI_001F67120FDA USB Type A, Sideshow Register this setting to My Connection Select the projector to send your computer image, then click [Show] button. Automatically change the input source LAN channel, if different channels is selected. If Sideshow is running, Sideshow is terminated and change the input source to LAN channel. Show CloseUWAGA
text_image
Connection Wizard Failed to connect to the following projector. 192.168.1.10| Statusu | Ikona statusu |
| No computer is on screen | [05WA] |
| One computer is on screen. |  |
| Two computers are on screen. | [GXW8] |
| Three computers are on screen. |  |
| Four computers are on screen. |  |
UWAGA
text_image
Options Not displaying confirmation dialog for adding Network settings. Optimize Performance Transmission speed Image quality Presenter Mode Display User Name: Unnamed Display LiveViewer Close 1) 2) 4) 5) 6)text_image
Options Not displaying confirmation dialog for adding network settings. Optimize Performance Transmission speed Image quality Sound On Off Presenter Mode Display User Name: Inscribed Display LiveViewer Close 1) 3) 2) 4) 5) 6)text_image
Connection Wizard Select the option that describes the connection method you would like to use: Select From List Enter Passcode Profile History Configure Manually My Connection Profile list Profile name Data created Profile-1 03/10/2011 3:19:46 PM Profile-2 03/10/2011 3:18:41 PM Profile-3 03/09/2011 6:24:53 PM Profile-4 03/08/2011 2:41:57 PM Add Edit Delete My Connection Connect Exit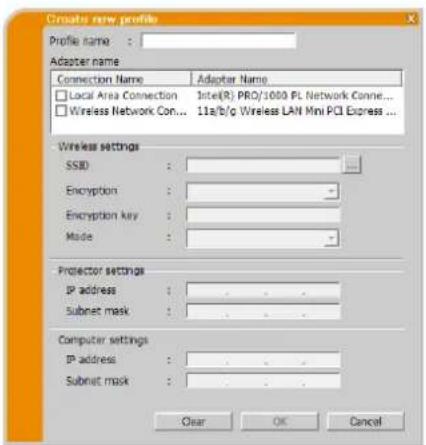
text_image
Create new profile Profile name : Adapter name Connection Name Adapter Name Local Area Connection Intel(R) PRO/1000 PL Network Conne... Wireless Network Con... 11a/b/g Wireless LAN Mini PCI Express ... Wireless settings SSID : Encryption : - Encryption key : - Mode : - Projector settings IP address : - Subnet mask : - Computer settings IP address : - Subnet mask : - Clear OK Canceltext_image
Connection Wizard Select the option that describes the connection method you would like to use: Select From List Enter Passcode Profile History Configure Manually My Connection Profile list Profile name Data created Profile-1 03/10/2011 3:19:06 PM Profile-2 03/10/2011 3:18:41 PM Profile-3 03/09/2011 6:24:53 PM Profile-4 03/09/2011 2:41:37 PM Add Edit Delete My Connections Connect Exit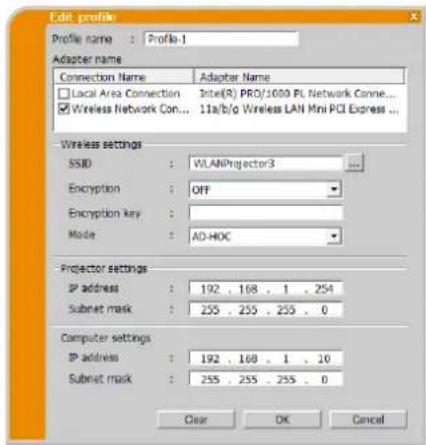
text_image
Edit profile Profile name : Profile-1 Adapter name Connection Name Adapter Name Local Area Connection Intel(R) PRO/1000 PL Network Conne... Wireless Network Con... 11a/b/g Wireless LAN Mini PCI Express ... Wireless settings SSID : WLANProjector3 Encryption : OFF Encryption key : Mode : AD-HOC Projector settings IP address : 192 . 168 . 1 . 254 Subnet mask : 255 . 255 . 255 . 0 Computer settings IP address : 192 . 168 . 1 . 10 Subnet mask : 255 . 255 . 255 . 0 Clear OK Canceltext_image
Connection Wizard Select the option that describes the connection method you would like to use: Select From List Enter Passcode Profile History Configure Manually My Connection Profile list: Profile name Date created Profile-1 03/10/2011 3:19:46 PM Profile-2 03/10/2011 3:18:41 PM Profile-3 03/09/2011 6:24:53 PM Profile-4 03/08/2011 2:41:37 PM Add Edit Delete My Connection Connect Exit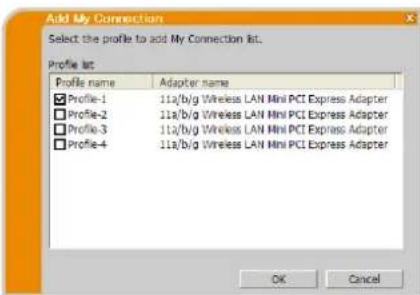
text_image
Add My Connection Select the profile to add My Connection list. Profile list: Profile name Adapter name Profile-1 11a/b/g Wireless LAN Mini PCI Express Adapter Profile-2 11a/b/g Wireless LAN Mini PCI Express Adapter Profile-3 11a/b/g Wireless LAN Mini PCI Express Adapter Profile-4 11a/b/g Wireless LAN Mini PCI Express Adapter OK CancelUWAGA
Komunikat 1: A network connection was not established.
text_image
Connection Wizard A network connection was not established. Please check the network connection.Komunikat 2: The number of computer connection exceeds the limit (max. 50).
text_image
Connection Wizard The number of computer connection exceeds the limit (max. 50). Please try again after a session of connected user is disconnected.Komunikat 3: A network connection could not be established.
text_image
Connection Wizard A network connection could not be established. Windows prevented network configuration changes. Please insure that you are authorized to make these changes.Komunikat 4: Are you sure you want to connect the selected projector?
text_image
Connection Wizard Are you sure you want to connect the selected projector? Yes NoKomunikat 5: Incorrect Passcode.
text_image
Conversion Wizard Incorrect IP Address. OKKomunikat 6: Do you want to apply suggested network settings as follows?
text_image
Connection Wizard Do you want to apply suggested network settings as follows? IP address : 192.168.2.54 Subnet mask : 235.235.235.0 Change... Not displaying confirmation dialog for adding network settings. Yes NoUWAGA
text_image
Connection Wizard Enter the following information. IP address : Subset mask : Enter Computer IP-Address and Subnet mask. OK CancelKomunikat 7: An IP Address overlaps with the IP Address of the projector you are trying to connect to.
text_image
Connection Wizard An IP Address overlaps with the IP Address of the projector you are trying to connect to. Please choose an IP Address that is currently not in use.Komunikat 8: Incorrect IP Address.
text_image
Connection Wizard Incorrect IP Address. OKKomunikat 9: A Network Configuration Conflict exists.
text_image
Connection Wizard A Network Configuration Conflict exists. Please verify your Network Configuration Settings (computer and projector). OKKomunikat 10: There is a projector already connected with your computer.
text_image
Connection Wizard There is a projector already connected with your computer. Are you sure that you want to disconnect the current connection and establish new connection? Yes No CancelUWAGA
Komunikat 11: In order to connect to the selected projector, you need to disconnect from the current projector.
text_image
Connection Wizard In order to connect to the selected projector, you need to disconnect from the current projector. Are you sure that you want to disconnect from the current projector.Komunikat 12: This projector is currently in use (Presenting) by another user.
text_image
Connection Wizard This projector is currently in use (Presenting) by another user. You cannot connect with this projector until the other session (Presenter Mode) is finished.Komunikat 13: A Slideshow is currently running on the projector that you are trying to display to. (PC-Less Presentation Mode).
text_image
Connection Wizard A Sideshow is currently running on the projector that you are trying to display to (PC-Less Presentation Mode). If you continue, you will cancel the current Sideshow. Yes NoKomunikat 14: Are you sure you want to change the input channel of the Projector to 'LAN'?
text_image
Connection Wizard Are you sure you want to change the input channel of the Projector to LAN? Yes NoKomunikat 15: Are you sure that you want to turn on the network adapter?
text_image
Connection Wizard Are you sure that you want to turn on the network adapter? Yes... NoKomunikat 16: It cannot be connected because improper native resolution panel projector is selected.
text_image
Connection Wizard It cannot be connected because improper native resolution panel projector is selected. OKKomunikat 17: Since moderator control mode of connected projector (IP address: \*\*\*.\*\*\*.\*\*\*.\*\*\*) becomes effective, Multi Projector mode is canceled.
text_image
Connection Wizard Since moderated control mode of connected projector (IP address: 192.168.1.100) becomes effective, Multi Projector mode is cancelled.Komunikat 18: You can not operate while moderator control mode is activated.
text_image
Omnicronium Wizard You can not operate while moderator control mode is activated. OKThe Software is being delivered to you “AS IS” and Christie Digital Systems USA, Inc. (CHRISTIE) make no warranty as to its use or performance. CHRISTIE AND ITS SUPPLIERS, INCLUDING BUT NOT LIMITED TO CHRISTIE, DO NOT AND CANNOT WARRANT THE PERFORMANCE OR RESULTS YOU MAY OBTAIN BY USING THE SOFTWARE. EXCEPT TO THE EXTENT PROHIBITED BY LAW IN YOUR JURISDICTION, CHRISTIE AND ITS SUPPLIERS MAKE NO WARRANTIES CONDITIONS, REPRESENTATIONS, OR TERMS (EXPRESS OR IMPLIED WHETHER BY STATUTE, COMMON LAW, CUSTOM, USAGE OR OTHERWISE) AS TO ANY MATTER IN CONNECTION WITH THE SOFTWARE, INCLUDING WITHOUT LIMITATION NONINFRINGEMENT OF THIRD PARTY RIGHTS, MERCHANTABILITY, INTEGRATION, SATISFACTORY QUALITY, OR FITNESS FOR ANY PARTICULAR PURPOSE.
You agree that the Software will not be shipped, transferred or exported into any country or used in any manner prohibited by the United States Export Administration Act or any other applicable export laws, restrictions or regulations (collectively the “Export Laws”). In addition, if the Software is identified as export controlled items under the Export Laws, you represent and warrant that you are not a citizen, or otherwise located within, an embargoed nation (including without limitation Iran, Iraq, Syria, Sudan, Libya, Cuba, North Korea, and Serbia) and that you are not otherwise prohibited under the Export Laws from receiving the Software. All rights to Use the Software are granted on condition that such rights are forfeited if you fail to comply with the terms of this Agreement.
目次
1 主な機能 .... 3
1.1 表示モード....3
natural_image
Illustration of a laptop, a lightning bolt, and a projector (no text or symbols)natural_image
Diagram showing a projector connected to a laptop and a power outlet with a lightning bolt (no text or symbols)natural_image
Illustration of a projector, laptop, and power cord with lightning bolt symbols (no text or labels)natural_image
Illustration of a laptop, a lightning bolt, and a projector (no text or symbols)natural_image
Diagram showing a projector connected to a laptop and a power cord with a lightning bolt (no text or symbols)natural_image
Illustration of a projector, laptop, and power cord with lightning and ground symbols (no text or labels)text_image
① ② ③ ④ ⑤Republic of South Africa
ph: +27 (0)11 510 0094
Singapore
ph:+65 6877-8737
Spain
ph+3491633999
United Arab Emirates
ph:+97143206688
United Kingdom
ph: +44 (0) 116977 000