LW551i - Projector Christie - Free user manual and instructions
Find the device manual for free LW551i Christie in PDF.



User questions about LW551i Christie
0 question about this device. Answer the ones you know or ask your own.
Ask a new question about this device
Download the instructions for your Projector in PDF format for free! Find your manual LW551i - Christie and take your electronic device back in hand. On this page are published all the documents necessary for the use of your device. LW551i by Christie.
USER MANUAL LW551i Christie
LiveViewer Application
User Manual
020-000543-02
LiveViewer6 Application User's Manual
NOTE
The manufacturer assumes no responsibility for any errors that may appear in this manual.
The reproduction, transfer or copy of all or any part of this document is not permitted without express written consent.
Trademark acknowledgment
- Power Point, Internet Explorer, Windows, Windows Vista and Aero are registered trademarks of Microsoft Corporation in the U.S. and/or other countries.
All other trademarks are the properties of their respective owners.
Caution
The Software is being delivered to you "AS IS" and Christie Digital Systems USA, Inc. (CHRISTIE) make no warranty as to its use or performance. CHRISTIE AND ITS SUPPLIERS, INCLUDING BUT NOT LIMITED TO CHRISTIE, DO NOT AND CANNOT WARRANTY THE PERFORMANCE OR RESULTS YOU MAY OBTAIN BY USING THE SOFTWARE. EXCEPT TO THE EXTENT PROHIBITED BY LAW IN YOUR JURISDICTION, CHRISTIE AND ITS SUPPLIERS MAKE NO WARRANTY CONDITIONS, REPRESENTATIONS, OR TERMS (EXPRESS OR IMPLIED WHETHER BY STATUTE, COMMON LAW, CUSTOM, USAGE OR OTHERWISE) AS TO ANY MATTER IN CONNECTION WITH THE SOFTWARE, INCLUDING WITHOUT LIMITATION NONINFRINGEMENT OF THIRD PARTY RIGHTS, MERCHANTABILITY, INTEGRATION, SATISFACTORY QUALITY, OR FITNESS FOR ANY PARTICULAR PURPOSE.
You agree that the Software will not be shipped, transferred or exported into any country or used in any manner prohibited by the United States Export Administration Act or any other applicable export laws, restrictions or regulations (collectively the "Export Laws"). In addition, if the Software is identified as export controlled items under the Export Laws, you represent and warrant that you are not a citizen, or otherwise located within, an embargoed nation (including without limitation Iran, Iraq, Syria, Sudan, Libya, Cuba, North Korea, and Serbia) and that you are not otherwise prohibited under the Export Laws from receiving the Software. All rights to Use the Software are granted on condition that such rights are forfeited if you fail to comply with the terms of this Agreement.
Contents
1 Features. 3
1.1 Display Mode 3
1.1.1 Single PC mode 3
1.1.2 Multi PC mode 3
1.2 Multi Projector Mode 4
1.3 Moderator Control Mode 4
2 Compatibility 5
2.1 Hardware and software requirements for computer 5
2.2 Software versions 5
2.3 Updating-liveViewer 6
3 Starting with VLCiewer 7
3.1 Installing VLCviewer 7
3.2 Connecting to the network 9
3.2.1 Launch Viewer 9
3.2.2 Select Connection method 9
3.2.3 Passcode 13
3.2.4 Configuring Network Setting Manually 19
3.2.5 Connection and transmission 22
3.2.6 Connection error 23
3.3 Starting the Network Presentation 24
3.3.1 Display Mode 24
3.3.2 Presenter Mode 24
3.3.3 DisplayUserName 25
3.3.4 Multi Projector Mode 25
3.3.5 Moderator Control Mode 26
4.4 LiveViewer Operation 27
4.1 Main menu and Operating buttons 27
4.1.1 Menu Type 27
4.1.2 Operating buttons 27
4.1.3 Displaying the Status 29
4.1.4 Switching the display mode 30
4.2 Multi Projector Control window 30
4.3 Moderator Control window 31
4.4 Option menu 32
4.5 Profile data 34
4.5.1 Outline of Profile data 34
4.5.2 Making Profile data 34
4.5.3 Editing Profile data 35
4.5.4 Registering My Connection 35
Appendix 36
1 Features
The VLCiewer software can translate images and audio from a computer to the projector via wireless LAN or wired LAN. This software has a variety of features that helps comfortable presentation and easy connection.
1.1 Display Mode
In VLCiewer, there are two display modes, Single PC mode and Multi PC mode.
1.1.1 Single PC mode
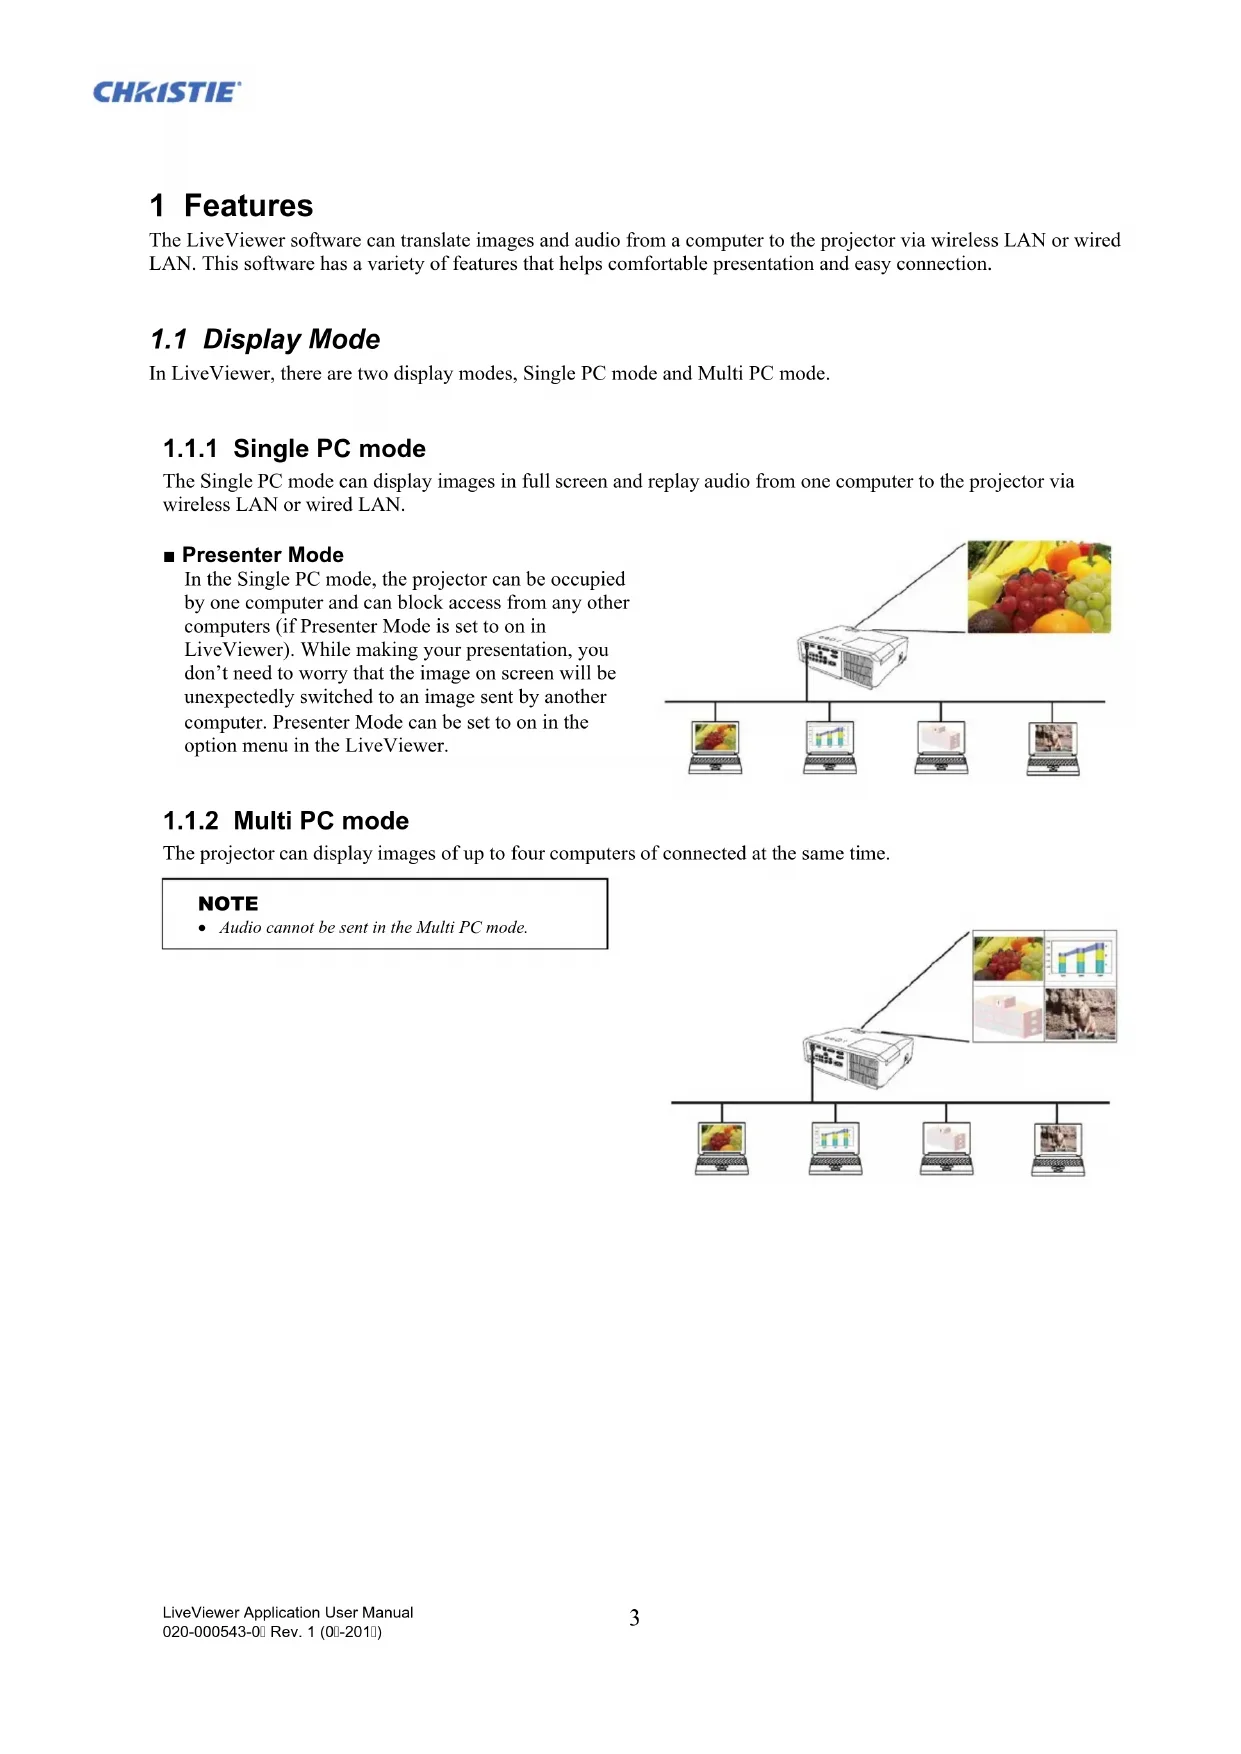
The Single PC mode can display images in full screen and replay audio from one computer to the projector via wireless LAN or wired LAN.
Presenter Mode
In the Single PC mode, the projector can be occupied by one computer and can block access from any other computers (if Presenter Mode is set to on in VLC viewer). While making your presentation, you don't need to worry that the image on screen will be unexpectedly switched to an image sent by another computer. Presenter Mode can be set to on in the option menu in the VLC viewer.
1.1.2 Multi PC mode
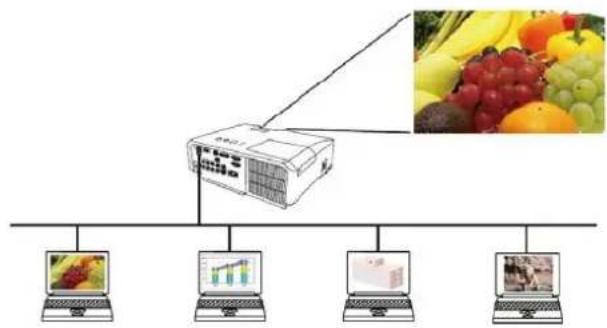
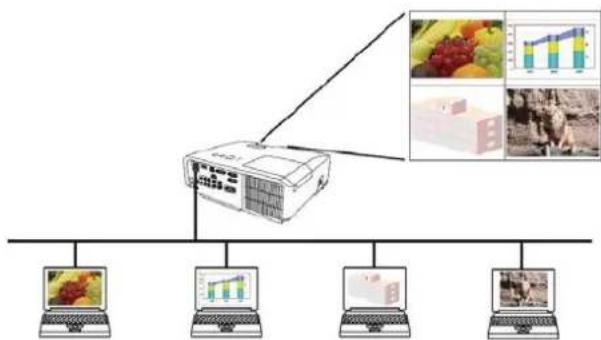
The projector can display images of up to four computers of connected at the same time.
NOTE
Audio cannot be sent in the Multi PC mode.
1.2 Multi Projector Mode
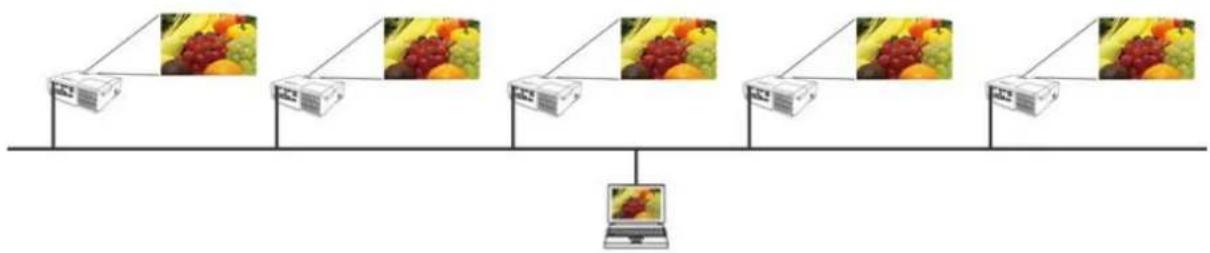
In the Multi Projector mode, up to 12 projectors can connect with the computer via wireless or wired LAN simultaneously.
1.3 Moderator Control Mode
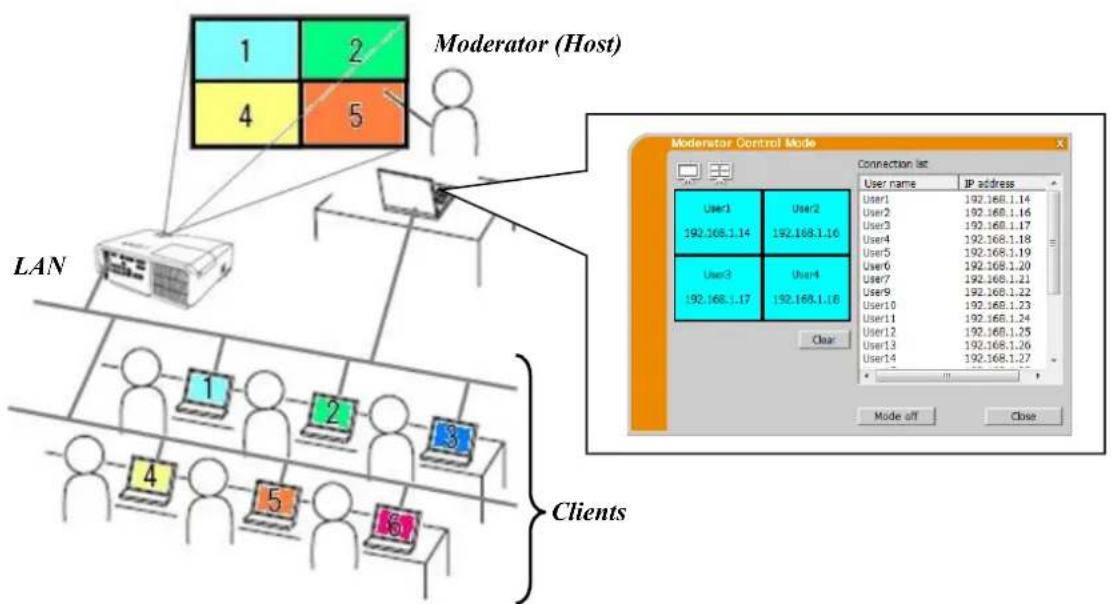
A computer can be set to Moderator (Host) that can control all other computers (Clients) connected with the projector via wireless LAN or wired LAN. Since Clients cannot control the VLCiewer and the projector, the Host can proceed with the program as arranged smoothly and safety.
2 Compatibility
2.1 Hardware and software requirements for computer
OS
WindowsXP
Home Edition / Professional
Windows Vista®
Home Basic / Home Premium /
(Service Pack 1 or later)
Business / Enterprise / Ultimate
Windows® 7
Starter / Home Basic / Home Premium /
Professional / Enterprise / Ultimate
Graphic card
Windows® 8 / Windows® 8 Pro / Windows® 8 Enterprise
Windows® 8.1 / Windows® 8.1 Pro / Windows® 8.1 Enterprise
VGA: 640x480 or higher (recommended XGA: 1024x768)
65,536 simultaneous colors or higher
Pentium 4 (2.8 GHz or higher)
100MB or higher
Internet Explorer® (6.0 or higher)
CPU
IEEE802.11b/g/n
Hard disk space
Web browser
CD-ROM/DVD-ROM drive
Wireless LAN
2.2 Software versions
Check and confirm before you install the VLCiewer if its version suits to the projector model you are going to connect to. The correct software version depends upon the projector model that you have. If the version is not matched with the projector, the software may not work properly.
If you use the models network functions are available not listed in the table below, check the group of projector models written in the User's Manual of the projector.
| LiveViewer Version | Group of Projector Models | |
| Group A | Group B | |
| LX41 LW41 and etc. | LX501 LX601i LW401 LW551i LWU421 LWU501i DXG1051 DDX951 DWU951 DHD951 DWX851 DWU851 DHD851 and etc. | |
| 4.1x* | ✓ | - |
| 4.2x* | ✓ | - |
| 4.3x | ✓ | ✓ |
| 5.xx | ✓ | ✓ |
| 6.xx | ✓ | ✓ |
"x" in the version means 0 or greater.
*Only Windows® 32-bit version.
NOTE for the computer
- Improper OS version or driver software for network adapter on your computer may prevent images from being transmitted correctly. It is highly recommended that you check for OS and driver updates.
Depending on the type of wireless network device and computer you are using, the projector may not be able to communicate properly with your computer, even if the computer you are using is equipped with built-in wireless LAN functionality. If communication problems occur, please use a Wi-Fi certified wireless network device. - In case you use LiveViewer in Windows Vista or Windows 7, Aero Glass cannot be used while the computer image is displayed to the projector.
- When installing LiveViewer in Windows Vista, Windows 7 or Windows 8, the UAC (User Account Control) warning message is displayed.
- Your computer needs to meet the minimum hardware requirement of your OS.
The LiveViewer does not work on Windows Vista that is not updated to Service Pack 1 or later. Please install the latest Service Pack on your Windows Vista.
Video transfer through network may not be supported depending on combination of computer hardware and software. In this case, video/computer cable is preferable.
Depending on the specification of your computer, the computer may slow down due to high CPU usage when the LiveViewer is running.
The screen size will be shrinked and then transmitted to the projector if the screen size of computer is greater than WXGA/XGA. The transmitting speed may delay than usual due to processing shrinking. For higher transmission speed, it is recommended to set the resolution of computer screen to WXGA/XGA. Please refer to the manuals of your computer or Windows for the settings.
NOTE for the projector
The network communication control is disabled while the projector is in standby mode if the STANDBY MODE item in the SETUP menu of the projector is set to SAVING. Please connect the network communication to the projector after setting the STANDBY MODE to NORMAL.
2.3 Updating-liveViewer
Please check and get the latest version from the Christie Web site.
http://www.christiedigital.com
Some functions explained in this manual require the Viewer Version 6.xx. ("x" in the version means 0 or greater.)
3 Starting with Viewer
This section explains the process of using VLC viewer. The outline of the process is as follows:
STEP 1. Install the Viewer application (below)
STEP 2. Connect to the network (9)
The Quick Connection feature prepares some options for connecting to the projector. You can select one that meets your requirements.
Select From List
Passcode connection
Profile connection
History connection
Manual connection
My Connection
In some cases, there are several projectors connected to the same network. Before you send your image, confirm that the right projector is selected.
STEP 3. Start Network Presentation (24)
The Viewer main menu will be on screen. Now, you can send your images to the projector through the network.
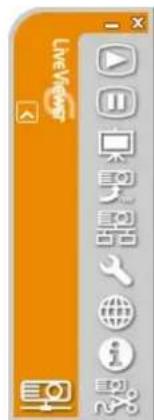
Fig.3.a Viewer Main menu
3.1 Installing Viewer
In order to use VLCiewer, you first need to install the software from the CD enclosed with the projector onto all computers that you want to connect to your network projector.
The following procedures show you how to install VLCiewer to a computer with Windows 7.
- Turn on the computer and log on as Administrator.
- Shut down all other applications.
- Insert the accompanying CD-ROM into the computer's CD-ROM/DVD-ROM drive.
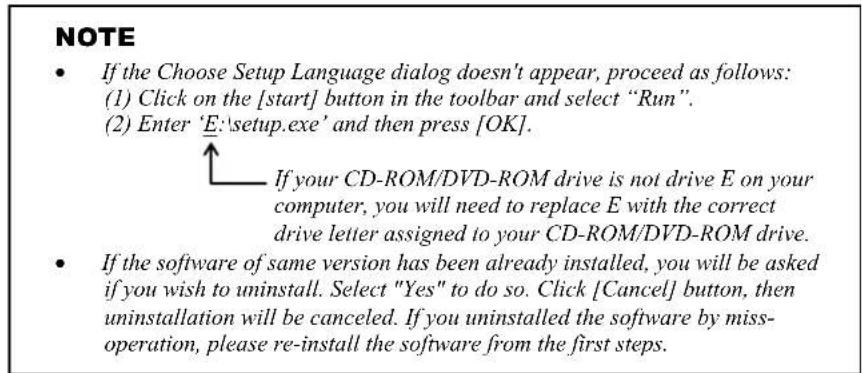
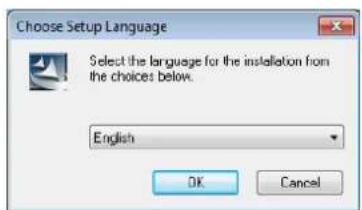
- After a moment, the Choose Setup Language dialog will appear as shown on the right. Select the language you will use in the list and click [OK].
-
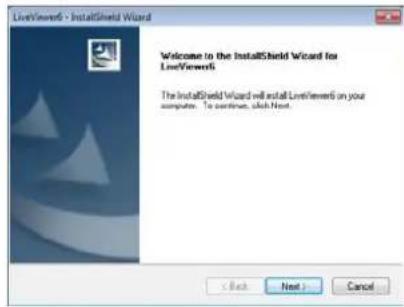
After a moment, the Welcome dialog will appear as shown on the right. Press the [Next].
-
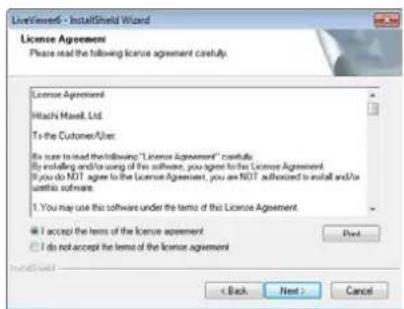
The License Agreement dialog appears. If you accept it, select "I accept the terms of the license agreement" and press the [Next].
-
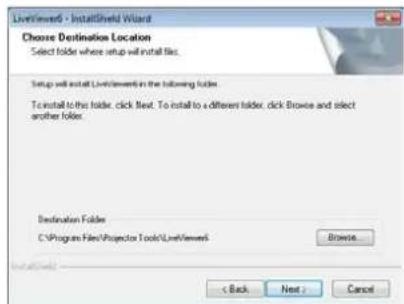
The Choose Destination Location dialog appears. Press the [Next].
NOTE
The 'C:\Program Files\Projector Tools\Livewer6' folder will be created and the program will be installed into that folder. If you wish to install to a different folder, click [Browse] and select another folder.
-
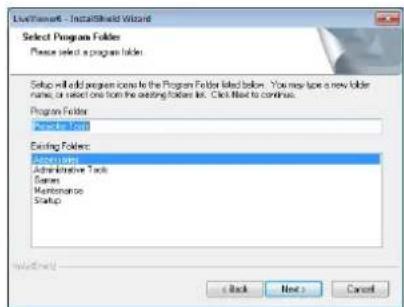
The Select Program Folder dialog appears. Confirm the program folder name. If "Projector Tools" is okay, press the [Next] to continue. If not enter the desired folder name and then press [Next].
-
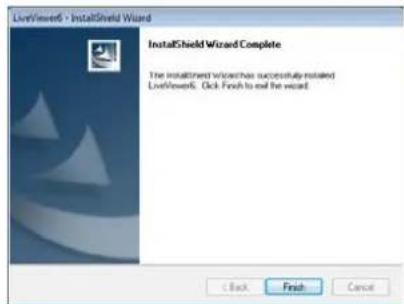
After a moment, installation will complete and the Setup Complete dialog will appear as shown on the right. Click [Finish].
To confirm that the software as been properly installed, press the [start] button on the toolbar, select All Programs and then select the Projector Tools folder.
- "LiveViewer" will appear in that folder if the installation was successful.
3.2 Connecting to the network
LiveViewer provides several options for connecting to your network projector. You can choose one that best meets your system and user needs. The descriptions here are based on the case that Windows 7 is installed in your computer.
NOTE
- Picture quality may deteriorate or audio output may be interrupted due to low data transfer rate caused by low communication band between computer and projector when multiple computers are communicating with projector.
If you try to connect via network to the projector which another computer has been using as a USB display, it might reduce transfer rate causing deterioration of image quality or interruption of audio output.
3.2.1 Launch Viewer
Start the VLCiewer software in your computer, using one of the methods below:
Double click the "Viewer" icon on the Desktop in your computer
Select "start" "All Programs" "Projector Tools" "Viewer6 on Windows® menu.
Then, proceed to item "3.2.2 Select Connection method". (9)
NOTE
- LiveViewer cannot be started if "LiveViewer Lite for USB" is running on your computer.
- A message dialog appears if a problem has occurred or to present to you information. Read and deal with the message if it appears. About the messages, refer to "Appendix A Messages" (136).
3.2.2 Select Connection method
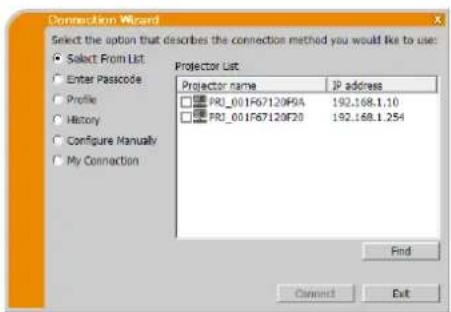
To start VLCviewer on your computer, the following menu appears. Select the option that describes the connection method you want to use.
Select From List
Proceed to item "3.2.2.1 Selecting from List". (10)
O Enter Passcode
Proceed to item "3.2.2.2 Passcode connection". (10)
Profile
Proceed to item "3.2.2.3 Profile connection". (11)
History
Proceed to item "3.2.2.4 History connection". (11)
ConfigureManually
Proceed to item "3.2.2.5 Configuring manually". (12)
My Connection
Proceed to item "3.2.2.6 Selecting My Connection". (12)
3.2.2.1 Selecting from List
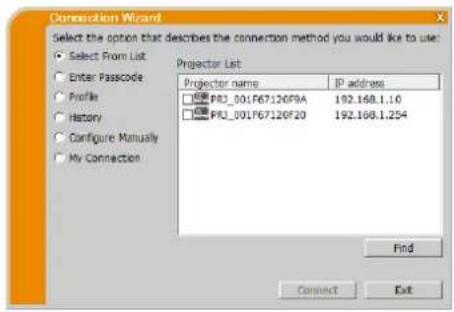
Before selecting this item, your computer and projectors need to be connected to the same network. If the connection is already established, select the "Select From List". The Projector List, a list of the projectors connected to the network will appear in the window. Select the projectors you want to use and check their boxes. Then click [Connect]. The connecting process starts.
Proceed to item "3.2.5 Connection and transmission". (22)
You can check the status of the connection by the following icon on projector list.
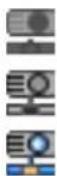
: The network connection to the projector is not established yet.
: The network connection is established, but the image transmission is on hold.
: The network connection is established and the images on the computer are being sent to the projector.
NOTE
- You can select up to 12 projectors at the same time from the list.
- When you select multiple projectors, the Multi Projector mode is selected automatically. (I25)
- You may not find any projector on the list under your network condition. Please click [Find].
3.2.2.2 Passcode connection
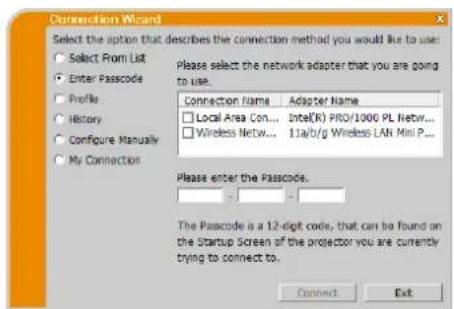
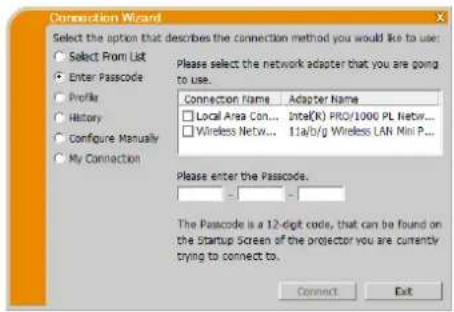
If you want to use the Passcode for connecting to the projector, select "Enter Passcode". A list of available network adapters and input boxes for Passcode will appear in the window. The Passcode is given by the projector on screen. Simply input the Passcode into VLC viewer to connect the network projector.
Select the network adapter you want to use and check its box, and enter the Passcode of the projector you are currently trying to connect to. Then click [Connect]. The connecting process starts.
Proceed to item "3.2.5 Connection and transmission". (22)
For more detail about Passcode, refer to "3.2.3 Passcode" (13).
NOTE
- You cannot connect when there is no available network adapter on your computer.
You may need to set IP address and other network settings manually under your network conditions.
3.2.2.3 Profile connection
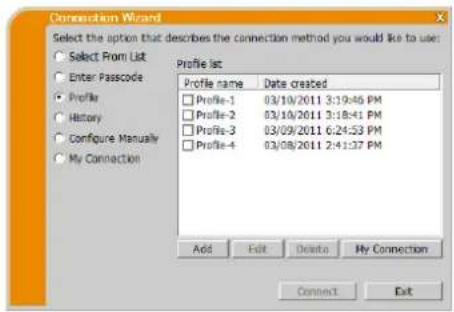
If you want to use the profile data for connecting to your network projector, select "Profile". Profile list, which is a list of stored profile data will appear in the window. It is required to store the profile data in advance.
Select the 'Profile' data you want to use and check its box. Then click [Connect]. The connecting process starts.
Proceed to item "3.2.5 Connection and transmission". (22)
For more detail about profile, refer to "4.5 Profile data" (34).
NOTE
To check the setting in a profile data, follow the process below.
Choose a 'Profile' data that you want to check.
Move the mouse cursor to the 'Profile' and click the right button on the mouse to display a pop-up menu.
Select the "Properties" in the pop-up menu, and click the left button on the mouse. The setting information of the selected 'Profile' data is shown.
If the DHCP is set on in the projector, the network connection between the projector and computer may not be established since IP address may be varied. If you would like to use the profile connection, it is recommended that you set DHCP to off in the projector.
3.2.2.4 History connection
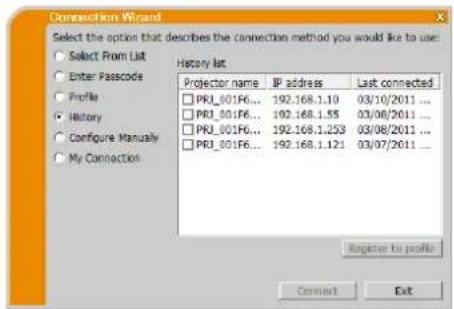
If you want to use the History data for connecting to the projector, select "History". The History list of connection, which is a list of projectors connected in past will appear in the window.
Select the History data you want to use and check its box. Then click
[Connect]. The connecting process starts.
Proceed to item "3.2.5 Connection and transmission". (22)
If you want to copy a History record to a profile data, select one of the History records and click [Register to profile]. The profile data cannot be erased automatically.
For more detail about profile, refer to "4.5 Profile data". (34)
NOTE
The number of the History record is maximum 20. When the 21st data is stored, the oldest record among the 20 will be overwritten.
The date & time information in each History record is renewed when the network is connected by using the History record.
If the DHCP is set to on in the projector, the network connection between the projector and computer may not be established since IP address can vary. If you would like to use the History connection, it is recommended that you set DHCP to off in the projector.
3.2.2.5 Configuring manually
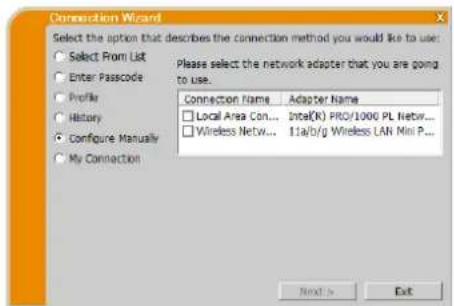
If you want to set the connection manually, select "Configure Manually". A list of available network adapters will appear in the window.
Select the network adapter you want to use and check its box, and click [Next].
Proceed to item "3.2.4 Configuring Network Setting Manually". (19)
NOTE
- Up to 12 projectors can be connected at the same time.
- When multiple projectors are connected, the Multi Projector mode is selected automatically. (L 25)
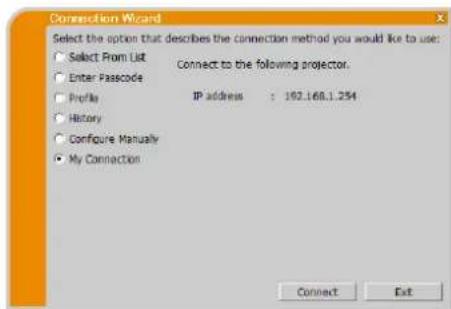
3.2.2.6 Selecting My Connection
If you select the My Connection, the computer is connected to the projector through the network by using profile data that is preassigned to My Connection.
Select "My Connection" and click [Connect]. The computer immediately starts the connecting process to the projector.
Proceed to item "3.2.5 Connection and transmission". (22)
NOTE
If the DHCP is set to on in the projector, the network connection between the projector and computer may not be established since IP address can vary. If you would like to use My Connection, it is recommended that you set DHCP to off in the projector.
If no profile data is assigned to My Connection, it cannot be used.
3.2.3 Passcode
The unique Passcode system brings you very quick and simple connection to the network. The Passcode is a code that expresses the network setting in the projector. When you input the Passcode in the VLC viewer software on your computer, the network settings of the projector and computer are matched and the connection will be established immediately. The section is intended to explain how to use the Passcode.
NOTE
- The Passcode system does not work under the conditions below. If your system meets one of them, please set the connection manually after you input the Passcode.
1) Encryption is used.
2) Unique SSID is used.
The factory default SSID are 4 of below;
Factory default SSID 1: wireless
Factory default SSID 2: WLANProjector1
Factory default SSID 3: WLANProjector2
Factory default SSID 4: WLANProjector3
3) Subnet mask is not Class A or B or C.
Class A:(255.0.0.0), Class B:(255.255.0.0), Class C:(255.255.255.0)
3.2.3.1 Getting the Passcode
The Passcode is 12-digit code consisting of alphanumeric characters (1-9 and A-Z). The Passcode is displayed on the projector screen.
Projector Models Group: A
There are two methods to get the Passcode from the projector.
Method 1
Turn on the projector, and make sure that the projector image is on screen.
Press the COMPUTER button on the remote control or INPUT button on the projector to select the LAN as input port.
If there is no signal on the LAN port, you can find the Passcode on screen.
Method 2
Turn on the projector, and make sure that the projector image is on screen.
Press the MENU button on the remote control or the / / buttons on the projector to show the menu on screen.
Use the / cursor buttons to select ADVANCED MENU and use the cursor button to enter the item.
Use the / cursor buttons to select NETWORK, and use the cursor button to enter the item.
Use the / cursor buttons to select INFORMATION, and use the cursor button to display the INFORMATION.
The Passcode appears at the top in the INFORMATION window.
NOTE
- Use method 2 when you project your computer image by the VLC viewer, or when the LAN port is not selected as input source.
If there is no communication between the projector and computer for five minutes, the Passcode will be changed.
Projector Models Group: B
There are two methods to get the Passcode from the projector.
Method 1
Turn on the projector, and make sure that the projector image is on screen.
Press the COMPUTER button on the remote control or INPUT button on the projector to select the LAN as input port.
If there is no signal on the LAN port, you can find the Passcode on screen.
Method 2
Turn on the projector, and make sure that the projector image is on screen.
Press the MENU button on the remote control or the / / buttons on the projector to show the menu on screen.
Use the / cursor buttons to select ADVANCED MENU and use the cursor button to enter the item.
Use the / cursor buttons to select NETWORK, and use the cursor button to enter the item.
Use the / cursor buttons to select the WIRELESS INFORMATION or WIRED INFORMATION depending on the type of connection you use, and press the cursor button.
The Passcode appears at the top in the "INFORMATION" window.
NOTE
- Use method 2 when you project your computer image by the VLC viewer, or when the LAN port is not selected as input source.
If there is no communication between the projector and computer for five minutes, the Passcode will be changed. - There are two types of the Passcode, PASSCODE_WIRELESS and PASSCODE_WIED. Select proper type you want to use referring to the following images.
| PASSCODE WIRELESS | PASSCODE WIRED |
| a) Direct connection between the projector and computer | a) The projector connected to computer by the wired LAN |
| b) The projector connected to an access point by the wireless LAN | b) The projector connected to an access point by the wired LAN |
3.2.3.2 Entering the Passcode
After you select the network adapter you want to use, enter Passcode in the menu of VLCiewer divided 4-digit each in 3 boxes (total 12-digit).
Example: PASSCODE 1234-5678-9ABC
Refer to "3.2.2.2 Passcode connection" to proceed. (10)
NOTE
- When entering the Passcode, capital and small letters are not distinguished.
If the manual setting screen is displayed, please follow the item "3.2.3.3 Manual Configuration".(□ below)
3.2.3.3 Manual Configuration
After you input the Passcode (above), you are required to input the network setting manually if you use any encryption code or your unique SSID or subnet mask except Class A/B/C (13).
NOTE
If you require the network setting information on the projector, follow these procedures:
Projector Models Group: A
Turn on the projector, and make sure that the projector image is on screen.
Press the MENU button on the remote control or the / / / buttons on the projector to show the menu on screen.
Use the / cursor buttons to select ADVANCED MENU, and use the cursor button to enter the item.
Use the / cursor buttons to select NETWORK, and use the cursor button to enter the item.
Use the / cursor buttons to select INFORMATION, and press the cursor button.
The setting will be displayed in the NETWORK INFORMATION box.
Projector Models Group: B
Turn on the projector, and make sure that the projector image is on screen.
Press the MENU button on the remote control or the / / / buttons on the projector to show the menu on screen.
Use the / cursor buttons to select ADVANCED MENU, and use the cursor button to enter the item.
Use the / cursor buttons to select NETWORK, and use the cursor button to enter the item.
Use the / cursor buttons to select the WIREFLESS INFORMATION or WIRED INFORMATION depending on the type of connection you use, and press the cursor button.
The setting will be displayed in the "INFORMATION" window.
Wireless LAN
The required information depends on how you connect the projector and computer.
Direct connection between the projector and computer.
Proceed to item "3.2.3.4 Direct connection between the projector and computer". (16)
The projector connected to an access point by the wired LAN.
Proceed to item "3.2.3.5 The projector connected to an access point by the wired LAN". (17)
The projector connected to an access point by the wireless LAN.
Proceed to item "3.2.3.6 The projector connected to an access point by the wireless LAN". (18)
Wired LAN
If you use the wired LAN, proceed to item "3.2.3.7 Wired LAN". (18)
3.2.3.4 Direct connection between the projector and computer
(Projection Models Group: B)
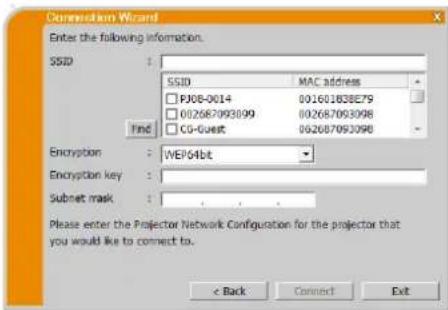
Enter the following information that is set in the projector. * /
SSID: wireless (example)
Encryption: WEP64bit (example)
Encryption key *: ******************************************************************************************************* example)
Subnet mask *255.255.255.128 (example)
Click [Connect]
The connecting process via wireless LAN starts.
Proceed to item "3.2.5 Connection and transmission". (22)


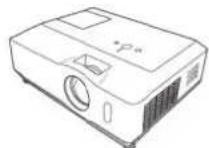
Fig.3.2.3.4: Direct connection between the projector and computer
NOTE
* To find the network setting on the projector, refer to the NOTE. (15)
- Click Find to update SSID list.
If you use encryption, you need to set it. Contact the network administrator to check the encryption key that is set in the projector. The encryption key is always shown as "***".
^3 If you use subnet mask except Class A/B/C, please set it.
3.2.3.5 The projector connected to an access point by the wired LAN
The setting on the access point. Enter the following information.
SSID: WirelessAccessPoint (example)
Encryption: WEP64bit (example)
Encryption key ^2 : *****************************************************************************************************
The setting on the projector ^*3 Enter the following information.
Subnet mask*4: 255.255.255.128 (example)
Click [Connect].
The connecting process starts.
Proceed to item "3.2.5 Connection and transmission". (22)
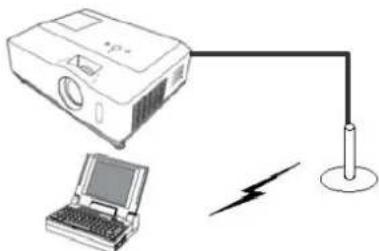
Fig.3.2.3.5: The projector connected to an access point by the wired LAN
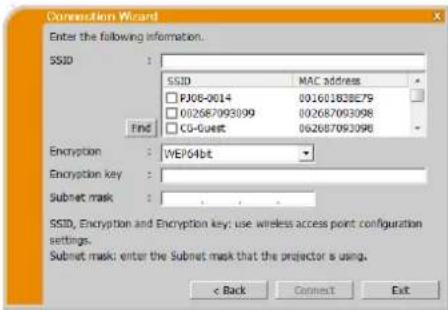
NOTE
- Contact the network administrator to find out the setting on the access point.
- Click [Find] to update SSID list.
^2 If you use encryption, you need to set it. Contact the network administrator to check the encryption key that is set in the access point. The encryption key is always shown as “*”.
^3 To find the network setting on the projector, refer to the NOTE. (L15)
^4 If you use subnet mask except Class A/B/C, please set it.
3.2.3.6 The projector connected to an access point by the wireless LAN
(Projection Models Group: B)
The setting on the access point*/.
Enter the following information.
SSID: WirelessAccessPoint (example)
Encryption: WEP64bit (example)
Encryption key ^2 : ****************************************************************************************************** example
The setting on the projector*3
Enter the following information.
Subnet mask*f: 255.255.255.128 (example)
Click [Connect].
The connecting process via wireless LAN starts.
Proceed to item "3.2.5 Connection and transmission". (22)
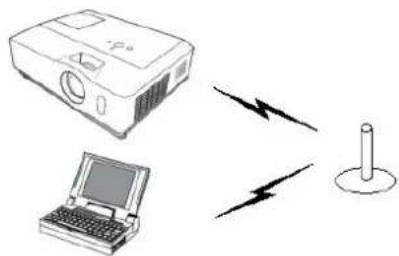
Fig.3.2.3.6: The projector connected to an access point by the wireless LAN
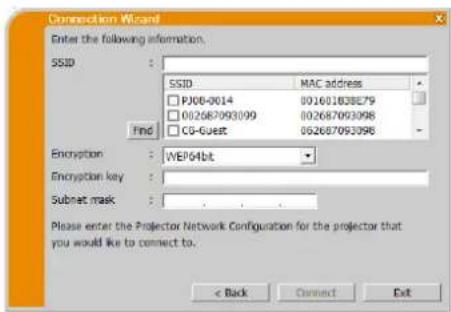
NOTE
- Contact the network administrator to find out the setting on the access point.
- Click [Find] to update SSID list.
^2 If you use encryption, you need to set it. Contact the network administrator to check the encryption key that is set in the access point. The encryption key is always shown as “**”.
To find the network setting on the projector, refer to the NOTE. (15)
^4 If you use subnet mask except Class A/B/C, please set it.
3.2.3.7 Wired LAN
Enter the following information that is set in the projector.
Subnet mask*255.255.255.128 (example)
Click [Connect].
The connecting process starts.
Proceed to item "3.2.5 Connection and transmission". (22)
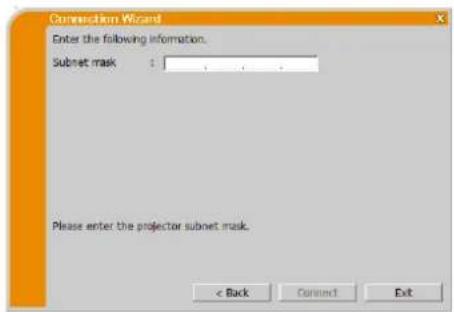
NOTE
^*I If you use subnet mask except Class A / B / C, please set it.
3.2.4 Configuring Network Setting Manually
All the settings for the network connection between the projector and computer have to be input manually if you select "Configure Manually" in the menu of VLC viewer connection method.
The information to be input for a manual configuration will vary, depending on how you want to connect the projector and computer.
Wireless LAN
The required information depends on how you connect the projector and computer.
Direct connection between the projector and computer.
Proceed to item "3.2.4.1 Direct connection between the projector and computer" (below)
The projector connected to an access point by the wired LAN.
Proceed to item "3.2.4.2 The projector connected to an access point by the wired LAN" (H 20)
The projector connected to an access point by the wireless LAN.
Proceed to item "3.2.4.3 The projector connected to an access point by the wireless LAN" (21)
Wired LAN
If you use the wired LAN, proceed to item "3.2.4.4 Wired LAN" (21).
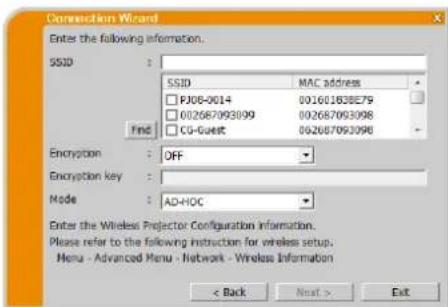
3.2.4.1 Direct connection between the projector and computer
(Projection Models Group: B)
Enter the following information that is set in the projector. *
SSID: wireless (example)
Encryption: WEP64bit (example)
Encryption key*: *** (example)
Mode:AD-HOC
Click [Next].
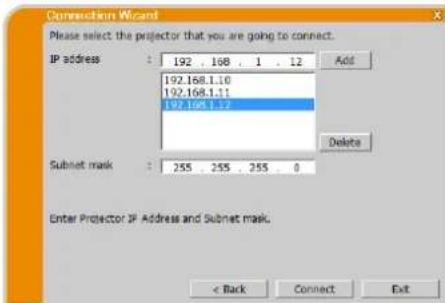
Enter the following information that is set in the projector.
IP address: 192.168.1.10 (example)
Click [Add]. The IP address is added to the list.
Subnet mask: 255.255.255.0 (example)
Click [Connect].
The connecting process via wireless LAN to all the projectors in the list starts.
Proceed to item "3.2.5 Connection and transmission". (22)
NOTE
To find the network setting on the projector, refer to the NOTE. (15)
- Click [Find] to update SSID list.
* If you use encryption, you need to set it. Contact the network administrator to check the encryption key that is set in the projector. The encryption key is always shown as
- Up to 12 IP addresses can be registered on the list.
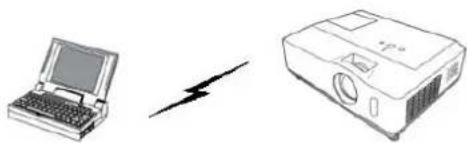
Fig.3.2.4.1: Direct connection between the projector and computer
3.2.4.2 The projector connected to an access point by the wired LAN
The setting on the access point Enter the following information.
SSID: WirelessAccessPoint (example) Encryption: WEP64bit (example) Encryption key ^2 : ****************************************************************************************************** Mode: INFRASTRUCTURE
Click [Next].
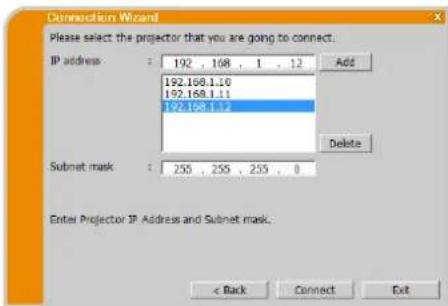
The setting on the projector*3 Enter the following information IP address: 192.168.1
Click [Add]. The IP address is added to the list. Subnet mask: 255.255.255.0 (example)
Click [Connect].
The connecting process starts.
Proceed to item "3.2.5 Connection and transmission". (22)
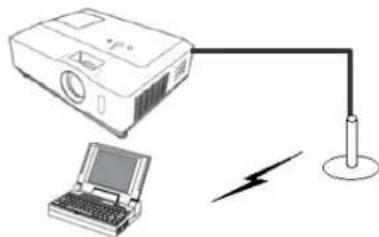
Fig.3.2.4.2: The projector connected to an access point by a LAN cable
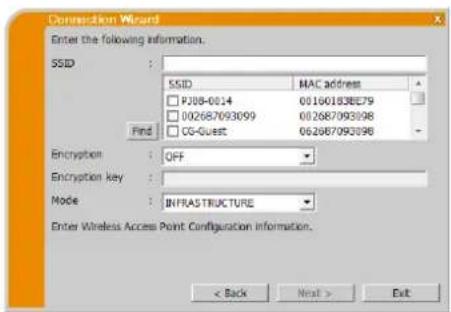
NOTE
^f Contact the network administrator to find out the setting on the access point.
- Click [Find] to update SSID list.
^2 If you use encryption, you need to set it. Contact the network administrator to check the encryption key that is set in the access point. The encryption key is always shown as “***”.
^3 To find the network setting on the projector, refer to the NOTE. (11 15)
- Up to 12 IP addresses can be registered on the list.
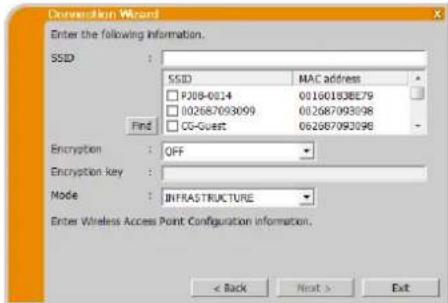
3.2.4.3 The projector connected to an access point by the wireless LAN
(Projection Models Group: B)
The setting on the access point
Enter the following information.
SSID: WirelessAccessPoint (example)
Encryption: WEP64bit (example)
Encryption key ^2 : ****************************************************************************************************** example
Mode: INFRASTRUCTURE
Click [Next].
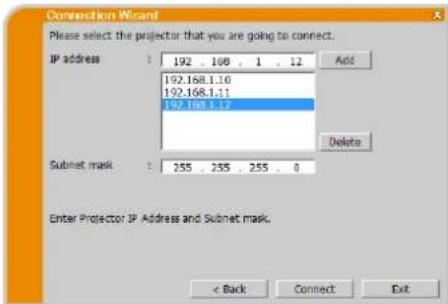
The setting on the projector*3
Enter the following information.
IP address: 192.168.1.10 (example)
Click [Add]. The IP address is added to the list.
Subnet mask: 255.255.255.0 (example)
Click [Connect].
The connecting process via wireless LAN to all the projectors in the list starts.
Proceed to item "3.2.5 Connection and transmission". (22)
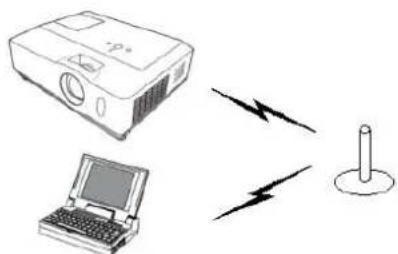
Fig.3.2.4.3: The projector connected to an access point by the wireless LAN
NOTE
- Contact the network administrator to find out the setting on the access point.
- Click [Find] to update SSID list.
^2 If you use encryption, you need to set it. Contact the network administrator to check the encryption key that is set in the access point. The encryption key is always shown as “***”.
* To find the network setting on the projector, refer to the NOTE. (15) - Up to 12 IP addresses can be registered on the list.
3.2.4.4 Wired LAN
Enter the following information that is set in the projector. *
IP address: 192.168.1.10 (example)
Click [Add]. The IP address is added to the list.
Subnet mask: 255.255.255.128 (example)
Click [Connect].
The connecting process starts.
Proceed to item "3.2.5 Connection and transmission". (22)

NOTE
^* To find the network setting on the projector, refer to the NOTE. (15)
- Up to 12 IP addresses can be registered on the list.
3.2.5 Connection and transmission
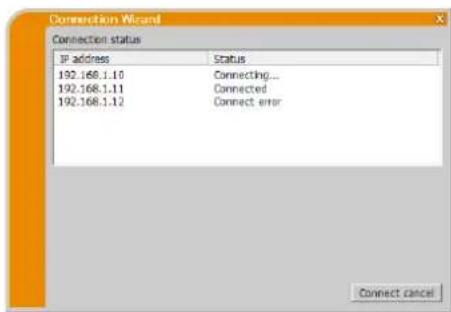
3.2.5.1 Confirmation Connection status
Connection status menu appears when you click [Connect] and connecting process starts. You can check the process from the [Status] field.
When all the projectors are connected, the Connection list will appear. To cancel the connections, click [Connect cancel].
If there are any connections which had established before [Connect cancel] was clicked, Connection list will appear after the connecting process is canceled.
Proceed to item "3.2.5.2 Connection List". (below)
An error message will appear if there is a connection error.
Proceed to item "3.2.6 Connection error". (23)
NOTE
The connection is canceled and time out error when it cannot connect over one minute.
3.2.5.2 Connection List
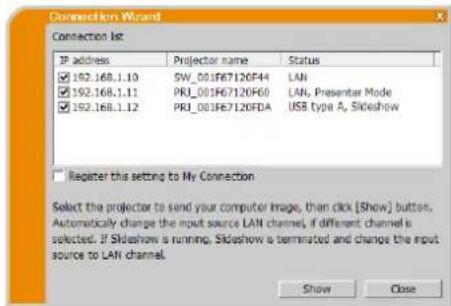
All projectors are connected, the Connection list will appear.
Click the check box of the projector you want to transmit the image to and click [Show].
The input port of the projector is automatically switched to LAN and image transmission starts.
Proceed to item "4 Viewer Operation" (27).
If you select [Close], then the Viewer main menu is displayed in stand-by mode. (Stand-by mode is the state where there is no image transmission, although the network connection is established.) The transmission starts when you click display mode button or start capture button on the Viewer main menu.
NOTE
- Up to 12 projectors can be connected at the same time.
If you want to register one of the settings of connection as My Connection, check the "Register this setting to My Connection". After the registration of My Connection, the data will be shown in the Profile list.
3.2.6 Connection error
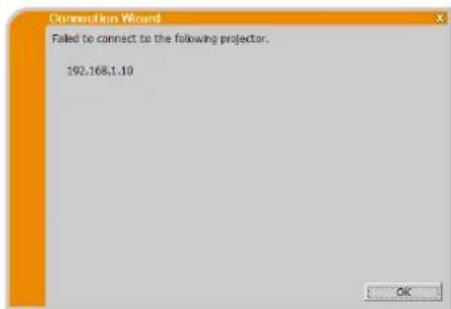
When the connection to the projector could not be established, an error message, "Failed to connect to the following projector." will be displayed.
Click [OK], then the Viewer main menu is displayed even though the network connection is not established. Click connect button on the Viewer main menu to go back to "3.2.2 Select Connection method". (9)
If you tried to connect to plural projectors and there are any projectors their connection were established, the Connection list will appear after you click [OK].
Proceed to item "3.2.5.2 Connection List". (22)
NOTE
- Check the network setting in the projector especially if you use My Connection, and retry the connection from item "3.2.2 Select Connection method". (19)
3.3 Starting the Network Presentation
This chapter explains the Network Presentation feature with which you can project computer images transmitted through a network.
The Viewer allows you to project images from one or multiple computers by connecting the projector to an existing network without using computer cables. This Network Presentation feature helps you to smoothly make your presentations and conduct conferences.
To start the Network Presentation, select the LAN port as the input source on the projector and click the start capture button on the VLCiewer.
3.3.1 Display Mode
In VLCiewer, there are two display modes, Single PC mode and Multi PC mode.
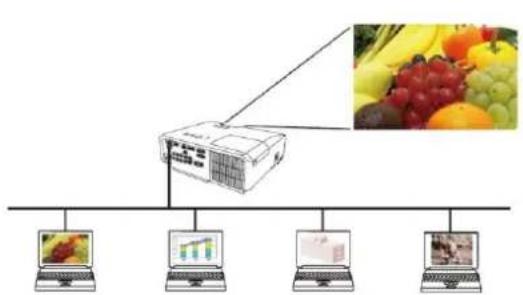
Single PC mode
The projector displays images sent by one computer. Also audio can be sent by one computer. (32)
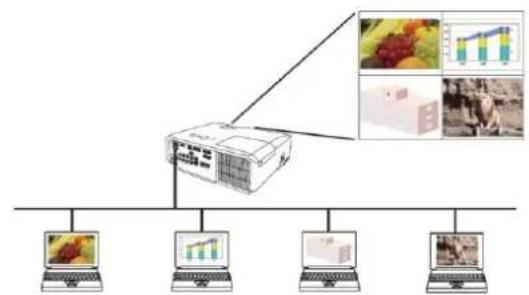
Multi PC mode
The projector can display images of up to four computers of connected at the same time.
NOTE
Audio cannot be sent in the Multi PC mode.
- When multiple computers are connected and try to communicate with one projector, data transfer performance may decrease.
- When motion pictures are displayed on screen of the projector, it is not recommended to connect more than five computers with the projector.
- When multiple computers are connected to one projector, it is recommended to consult with network administrator to establish suitable connection environment with less load given to network as possible.
Picture quality may deteriorate or audio output may be interrupted due to low data transfer rate caused by low communication band between computer and projector when multiple computers are communicating with projector.
If you try to connect via network to the projector which another computer has been using as a USB display, it might reduce transfer rate causing deterioration of image quality or interruption of audio output.
3.3.2 Presenter Mode
In the Single PC mode, the projector can be occupied by one computer and can block access from any other computer, if the Presenter Mode is selected in VLCiewer. While making your presentation, you don't need to worry that the image on screen is unexpectedly switched to an image sent by another computer. Presenter Mode can be set to on in the option menu in the VLCiewer.
3.3.3 DisplayUserName
A user name can be set in情况来看, which is displayed on screen while presenting. So, viewers know whose image is currently displayed on screen.
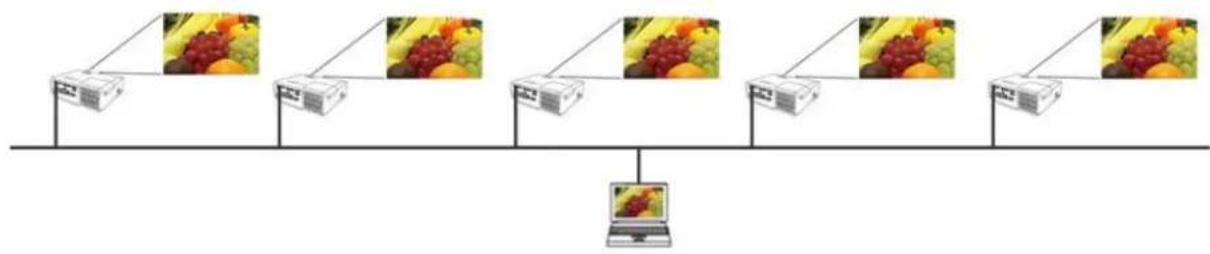
3.3.4 Multi Projector Mode
The projectors and your computer are in Multi Projector mode when plural projectors are connected to your computer. In the Multi Projector mode, up to 12 projectors can connect with the computer via wireless or wired LAN simultaneously.
NOTE
- Audio cannot be sent in the Multi Projector mode.
The Presenter Mode is canceled in all projectors when one of them canceled it in the Multi Projector mode. - Multi PC mode is NOT available in the Multi Projector mode.
- Transfer performance may decrease in the Multi Projector mode.
- Display mode button on the Viewer main menu is automatically changed to Multi Projector mode button in the Multi Projector mode. (U27)
It is recommended to connect computer and multiple projectors wired for Multi Projector mode.
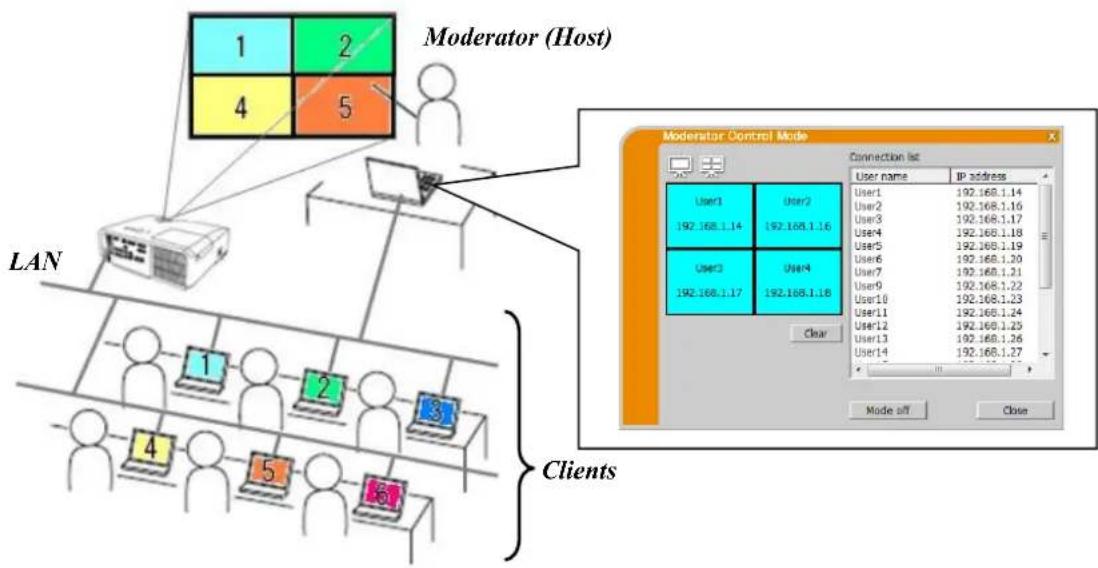
3.3.5 Moderator Control Mode
A computer can be set to Moderator (Host) that can control all other computers (Clients) connected with the projector via wireless or wired LAN. Since Clients cannot control the VLC viewer and the projector, the Host can proceed with the program as arranged smoothly and safety. (Projector Models Group: B)
NOTE
Up to 50 computers, including the Host computer, can join one group of the Moderator Control mode.
- Only one computer can be set as Moderator.
- When a computer is set as Moderator, once all computers including the Moderator connected to the same projector stop image transmission.
The Presenter mode is NOT available in the Moderator Control mode.
The Moderator Control mode can be canceled by force when the network is restarted in the projector menu or Web Control on a web browser is executed.
4 livew viewer Operation
When you get the connection between your projector and computer, the VLCiewer main menu will be shown on the computer screen. On the main menu you can configure settings and operate functions to send your images to the projector.
4.1 Main menu and Operating buttons
4.1.1 Menu Type
There are two types of the Viewer main menu, Easy and Advanced, which can be switched on screen. When Viewer is started or the connection is not established, Advanced type will be shown first.
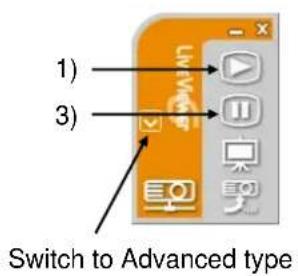
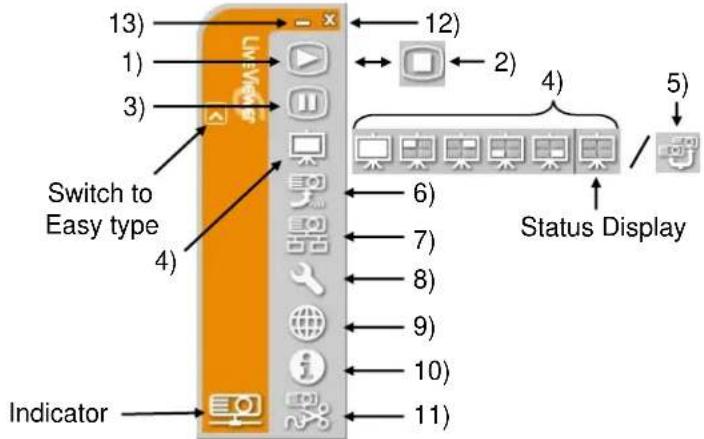
Fig.4.a Viewer6 main menu (Easy type / Advanced type)
4.1.2 Operating buttons
1) Start capture button
The transmission to the projector is started and the images will be displayed. The display mode will be the Single PC mode at first. After that, the last display mode will be applied.
NOTE
The start capture button cannot be operated if someone has already been Moderator.
- The primary image is displayed in multi-display environment.
2) Stop capture button
Start capture button is automatically changed to stop capture button when image transmission starts. The image transmission is stopped.
NOTE
Images may not be displayed on screen, if the start/stop capture buttons are clicked repeatedly.
3) Hold button
The image on screen is temporally frozen. The last image before the button is clicked remains on screen. You can revise the image data on your computer without showing it on the projector's screen.
NOTE
The Multi Projector mode button cannot operate until the screen unfreezes.
4) Display mode buttons (30)
Display mode switches between Single PC mode and Multi PC mode.
Also the image transmission can be started or stopped.
5) Multi Projector mode button
Display mode button is automatically changed to Multi Projector mode button in the Multi
Projector mode.
The Multi Projector Control window appears. (30)
6) Moderator Control mode button (Projector Models Group: B)
The computer is set to the Moderator and the Moderator Control window appears. (31)
NOTE
The Moderator Control mode button and start capture button cannot be operated if somebody connected to same projector has already been Moderator.
The Moderator Control mode button cannot be clicked in the Multi Projector mode.
7) Connect button
The dialog to select the connection method is displayed.
For details, refer to the section 3.2.2 Select Connection method. (9)
8) Option button
The option menu is displayed.
Starts the Web browser on your computer and displays the Web Control screen to control one projector and change various settings for the projector.
NOTE
- "Web Control" cannot control multiple projectors at the same time. In the Multi Projector mode, a window with all connected projectors listed is displayed when Web Control button is clicked. Select one projector you want to control.
10) Information button
The version of情况来看
The network is disconnected.
12) Exit button
The network is disconnected and VLC viewer is closed.
13) Minimize button
The main menu is closed, and only the
Viewer icon is displayed on the task tray in your computer.
Double-click the icon in the task tray to relaunch the main menu.
Connected

Disconnected

Not connected

Hold

Fig.4.b Task tray Icon
4.1.3 Displaying the Status
4.1.3.1 Indicator
The indicator shows the following status.
| Indicator | Status | Note |
| Not connected | The network connection to the projector is not established yet. | |
| Hold | The network connection is established, but the image transmission is on hold. | |
| Connected | The network connection is established and the images on the computer are sent to the projector. The indicator blinks while the connection is in progress. | |
| Disconnected | The network connection to the projector is disconnected. |
4.1.3.2 Status Display in Multi PC mode
The icon is displayed at the right end of the display mode buttons. One of the following icons are designed to inform you how many and which of the quarter screens are in use in Multi PC mode.
| Status | Status icon |
| No computer is on screen | |
| One computer is on screen. | |
| Two computers are on screen. | |
| Three computers are on screen. | |
| Four computers are on screen. |
NOTE
The status display is refreshed in every four seconds.
- If status cannot be acquired, it will not be refreshed.
4.1.4 Switching the display mode
LiveViewer has Single PC mode and Multi PC mode. These modes can be switched on the main menu.
Click the display mode button on the main menu. The buttons below are displayed.
Select from 1) to 5) buttons, and click it. 1) Single PC mode button: Switches to the Single PC mode. Your image is displayed full screen.
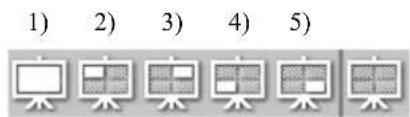
2) - 5) Multi PC mode buttons: Switches to the Multi PC mode. Your image is displayed on a quarter screen as identified in the button.
The projector screen is switched to the mode selected above, and the transmission of your computer image will be started to display your image on the screen.
The icon of the display mode button on the main menu is replaced by the icon you selected.
NOTE
- Image transmission will be stopped in the following situations:
When you click the Single PC mode button while the projector is in the Single PC mode
When you click one of the Multi PC mode buttons while the projector is in the Multi PC mode
- When Multi PC mode is selected, the projector screen is automatically divided into four zones.
- When the screen or one of the areas occupied by another computer is selected, the image transmission from that computer will be put on hold and the image of the currently specified computer will be displayed.
4.2 Multi Projector Control window
In the Multi Projector mode, up to 12 projectors can be connected and controlled individually or simultaneously.
1) Connection list
All of the connected projectors are displayed in the list.
2) Start capture button
The transmission to the projector is started and the images will be displayed
3) Stop capture button
The image transmission is stopped.
4) Disconnect button
The network is disconnected. The disconnected projector disappears from the Connection list.
5) Close button
Close the Multi Projector Control window and back to the Viewer main menu.
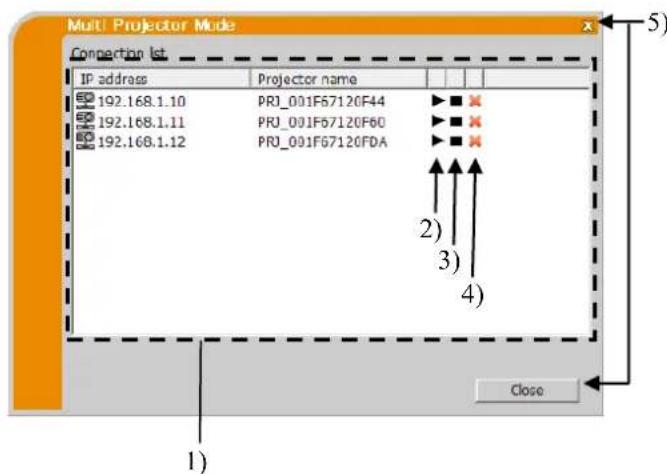
You can check the status of the connection by the following icon on Connection list.


: The network connection is established, but the image transmission is on hold.
: The network connection is established and the images on the computer are being sent to the projector.
4.3 Moderator Control window
A computer can be set to Moderator (Host) that can control all other computers (Clients) connected with the projector. (Projector Models Group: B)
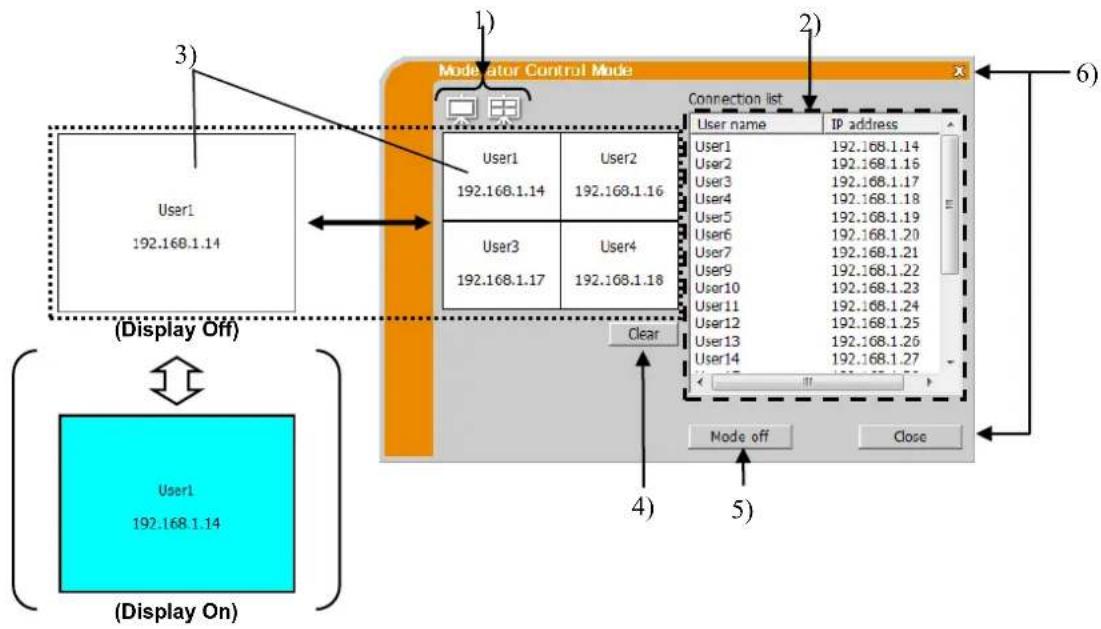
1) Display mode buttons (30)
Display mode switches between Single PC mode and Multi PC mode.
2) Connection list
All computers connected to the same projector as the Moderator connected to are displayed in the list.
3) Display window
The information of the computers whose images are displayed on screen of the projector is displayed. Drag and drop the computer from the Connection list onto this area to display the image on screen of the projector. Image transmission is started/stopped each time the window is clicked.
In the Multi PC mode, the window is divided into four zones the same as the screen. Each zone can be manipulate independently and the information is displayed for each.
4) Clear button
Clears the Display window and stops image transmission to the projector.
5) Mode off button
Cancels the Moderator Control mode. The Display window is cleared and image transmission to the projector stops.
6) Close button
Closes the Moderator Control window and back to the Viewer main menu.
4.4 Option menu
Clicking the option button displays the option menu on screen.
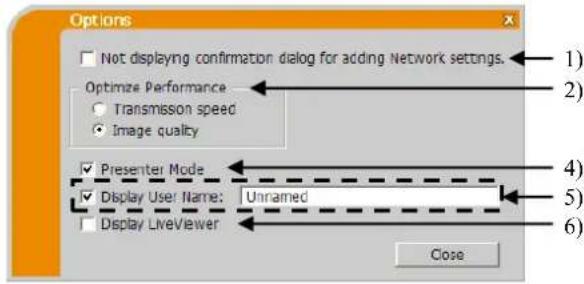
Fig. 4.c Option menu of Projector Models Group: A
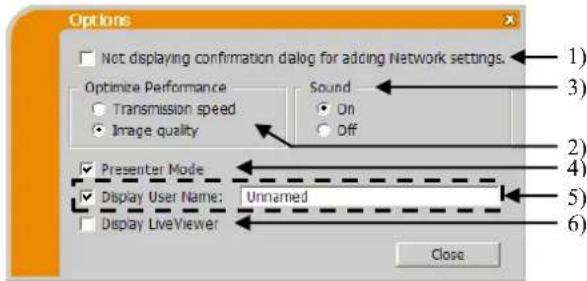
Fig. 4.d Option menu of Projector Models Group: B
1) Not displaying confirmation dialog for adding Network settings.
If checked - The confirmation dialog for adding a network configuration (37) is not displayed when you connect the computer to the projector.
If unchecked - The dialog is always displayed (Default behavior).
2) Optimize Performance
LiveViewer captures computer screen in JPEG data and sends the JPEG data to the projector. Viewer has two options that have different compression rate of JPEG data.
Transmission speed: Speed takes priority over image quality. It makes JPEG compression rate higher. The screen on the projector is rewritten quicker because the transferred data is smaller, but the image quality is worse.
Image Quality: Image quality takes priority over speed. It makes JPEG compression rate lower. The screen on the projector is rewritten slower because the transferred data is larger, but the image quality is better.
3) Sound (only for Projector Models Group: B)
Audio transmission can be selected valid (On) or invalid (Off). The default setting is On.
4) Presenter Mode
In the Single PC mode, the projector can be occupied by one computer and can block access from any other computer, if the Presenter mode is selected in VLC viewer. While making your presentation, you don't need to worry that the image on screen is unexpectedly switched to an image sent by another computer. If you want to turn it on, put a check mark in the check box.
NOTE
If the Multi PC mode is selected, the setting for the Presenter mode is invalid.
- When switching from the Multi PC mode to the Single PC mode, the Presenter mode setting of the computer is valid.
The Presenter mode is set valid in factory default setting.
5) Display User Name
A user name that is up to 20 letters can be input by using alphanumeric characters. The user name can be displayed on the projector screen, so you can find out whose image is currently on the screen. If the check box is not marked, the information is not sent to the projector.
6) Display Viewer
If you want to display VLCviewer application window to the screen of the projector, please check the box.
NOTE
- When,《Viewer is used in Windows ^ 8, the setting of "Display,《Viewer" is always on.
4.5 Profile data
4.5.1 Outline of Profile data
The network setting to connect the projector and computer can be stored as a profile data. Once the data is stored, all you need to do is to select the data to connect to the network. It is recommended when the same network connection is often used.
4.5.2 Making Profile data
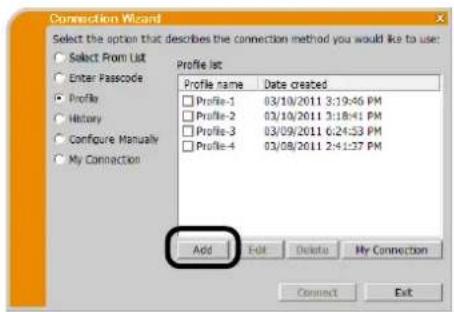
Select "Profile" and click [Add] in the menu of VLCiewer connection method.
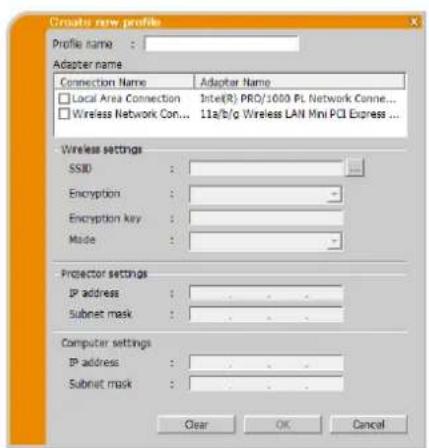
"Create new profile" will come up. If you have already made 20 profile data, you cannot make a new one, until you delete a stored data. Input all information required for your network connection. If you want to clear all information you input, click [Clear].
Click [OK], after all information is set. If you don't want to store it, click [Cancel].
The new profile data is shown in the Profile list, if you click [OK].
NOTE
- When you make a new profile, it is strongly recommended to check that the new profile works properly by selecting the data at the profile connection.
- If you change a network adapter on your computer, make a new profile for the adapter.
Up to 20 profiles can be registered. If 20 profiles already exist, the box cannot be checked. - The Profile name is assigned by Viewer automatically if you registered the profile data as My Connection from the Connection list. The name will be shown in the Profile list.
4.5.3 Editing Profile data
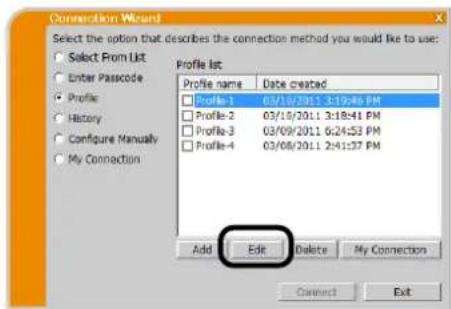
Select "Profile", and select one of the profiles listed in the menu of VLCviewer connection method.
Click [Edit].
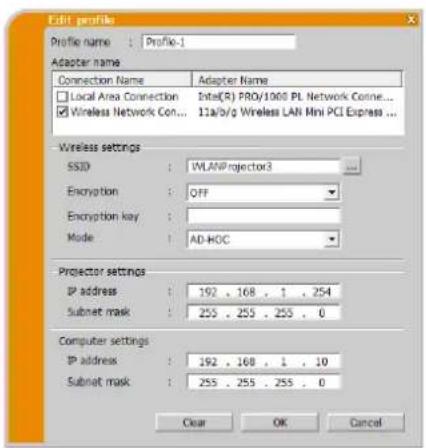
The "Edit profile" screen will come up.
Edit the information required to be revised. If you want to clear all information you input, click [Clear].
Click [OK], after the editing is completed. If you don't want to store it, click [Cancel].
The edited profile data is stored and shown in the Profile list with the new Date created information, if you click [OK].
NOTE
- When you make a new profile, it is strongly recommended to check that the new profile works properly by selecting the data at the profile connection.
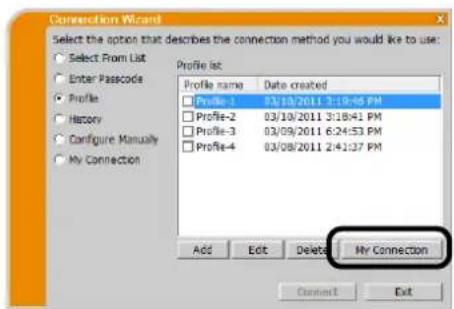
4.5.4 Registering My Connection
One profile can be registered as 'My Connection' to be often used. Once registered, all you need to do is to select My Connection to connect to the network.
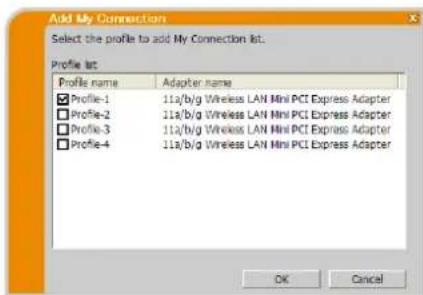
Click [My Connection].
- The "Add My Connection" screen will come up. The currently selected profile data for the My Connection is shown with a check mark in the list.
Select one profile listed in the window and put a mark in the check box.
Click [OK], then the window is closed. If you don't want to select a new one, click [Cancel].
You can also register My Connection from the Connection list displayed after the network connection is established. For details, refer to the section "3.2.5.2 Connection List". (22)
NOTE
- In the list, all profile data are shown no matter which network adapter is selected. You can register a profile that is not for currently selected network adapter as My Connection.
Appendix
A Messages
The following message dialogs appear if a problem has occurred or to present to you information. Read and deal with the messages if they appear.
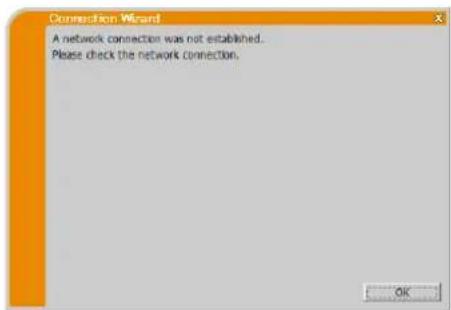
Message 1: A network connection was not established.
This message is displayed in the case that the projector is not connected with a LAN cable to your computer when wired LAN is selected. Be sure that the projector is connected with a LAN cable to your computer.
Click [OK] to return to the previous screen.
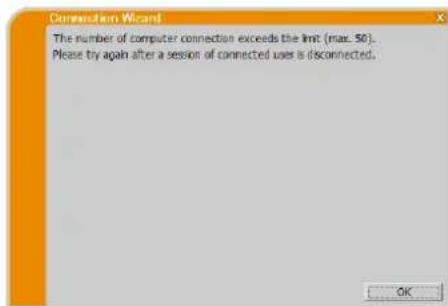
Message 2: The number of computer connection exceeds the limit (max. 50).
The projector has already reached the maximum number of network connections.
Click [OK], and the VLC viewer main menu is displayed.
Please retry after disconnecting one (or more) of the connected computers.
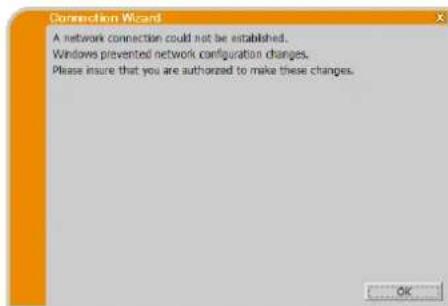
Message 3: A network connection could not be established.
Windows® prevented network configuration changes because you may have not logged into Windows® under Administrator authority. Click [OK] to return to the previous screen.
Consult with the network administrator to log in under Administrator authority. Once log out from Windows, log in again with Administrator authority and return to "3.2 Connecting to the network". (9)
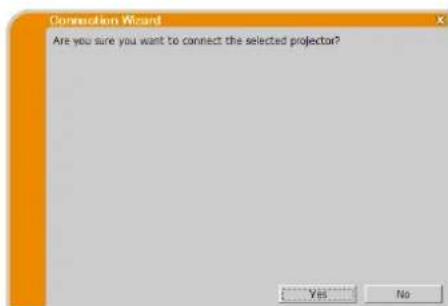
Message 4: Are you sure you want to connect the selected projector?
This message appears when the wireless adapter you selected is already in use with another network connection.
To connect, click [Yes].
Proceed to item "3.2.5 Connection and transmission". (22)
Click [No] to return to the previous screen.
Message 5: Incorrect Passcode.
The incorrect Passcode was input.
Click [OK] to return to the "Enter Passcode" screen.
Check the Passcode on the projector screen and enter the code again.
(13)
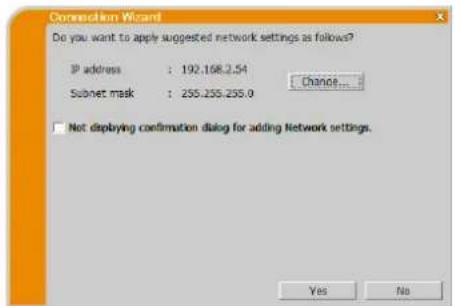
Message 6: Do you want to apply suggested network settings as follows?
This dialog will be displayed when you need to change a Network configuration on your computer in order to connect to the projector. Confirm with your network administrator if the Network configuration on the dialog is OK. Then click [Yes].
If you don't want to apply the Network configuration on the dialog, click [No].
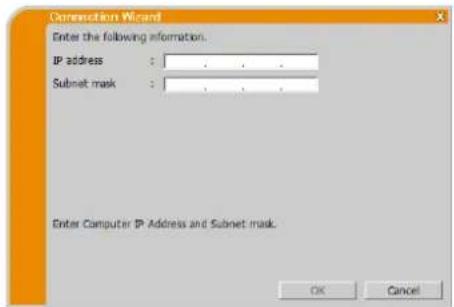
If you want to add the Network configuration manually, click [Change]. A new dialog will be displayed to add a network configuration as shown on the right hand side. Please enter IP address and subnet mask of your computer. Then click [OK].
NOTE
- If you checked "Not displaying confirmation dialog for adding Network settings" option, this dialog will not show up the next time. If you would like to change the setting, click option button on the VLCiewer main menu and uncheck "Not displaying confirmation dialog for adding Network settings" option.
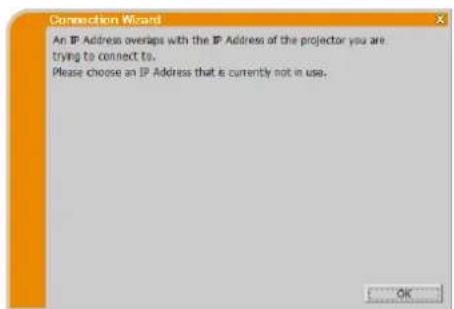
Message 7: An IP Address overlaps with the IP Address of the projector you are trying to connect to.
This message appears when the IP address on your computer is the same as that of the projector. Since different IP addresses are required, click [OK] and enter proper IP address.
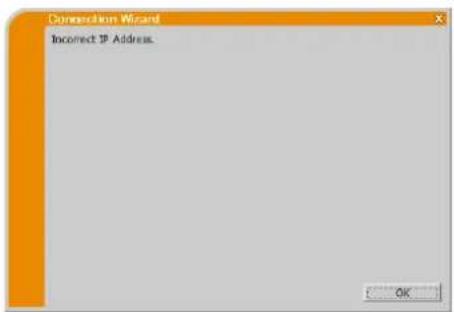
Message 8: Incorrect IP Address.
This message appears when an incorrect IP address on your computer is set.
Click [OK] and enter proper IP address.
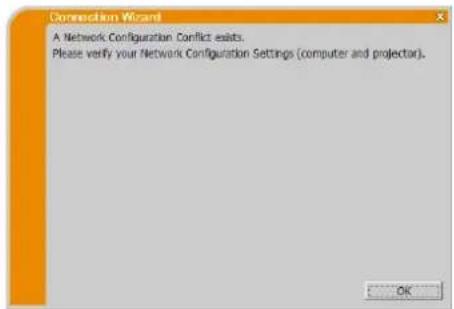
Message 9: A Network Configuration Conflict exists.
This message comes up when the network connection mode you set in the computer does not match with the mode of the projector.
Please verify your network configuration setting on the projector and computer.
Click [OK], then the Viewer main menu is displayed even though the network connection is not established.
Click connect button on the VLCiewer main menu to go back to "3.2.2 Select Connection method". (9)
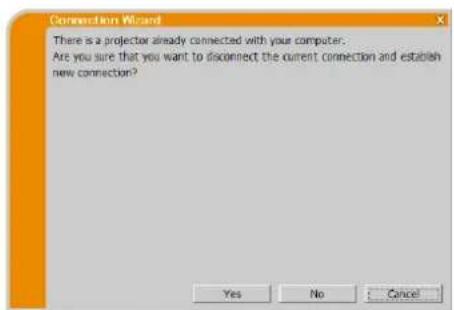
Message 10: There is a projector already connected with your computer.
This message appears when there is a projector already connected with your computer.
Click [Yes] if you disconnect the current connection. New connection is established.
Click [No] if you keep the current connection with establishing new connection. (Multi Projector mode)
Click [Cancel] if new connection cannot be established and keep current connection.
NOTE
- Up to 12 projectors can be connected at the same time.
- When multiple projectors are connected to, the Multi Projector mode is selected automatically. (25)
- "No" cannot be clicked when there are already 12 connected projectors.
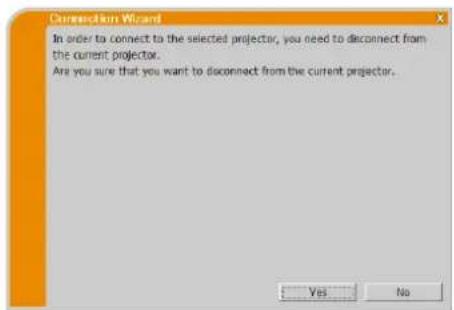
Message 11: In order to connect to the selected projector, you need to disconnect from the current projector.
This message appears when the number of connected projectors exceeds the maximum number.
Click [Yes] if you disconnect the current connection. New connection is established.
Click [No] if new connection cannot be established and keep current connection.
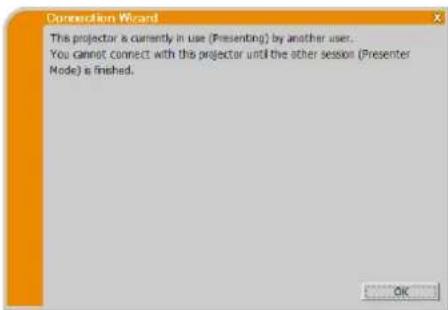
Message 12: This projector is currently in use (Presenting) by another user.
The projector you want to send your images to is occupied by another computer in the Presenter mode.
Click [OK], then the Viewer main menu is displayed in stand-by mode.
Retry to send your images, after the Presenter mode is off.
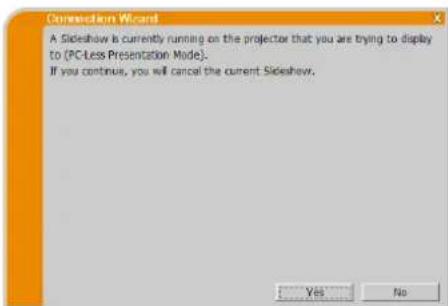
Message 13: A Slideshow is currently running on the projector that you are trying to display to. (PC-Less Presentation Mode).
The projector you want to send your images to is in the Slideshow mode in the PC-LESS Presentation.
Click [Yes], then the projector will stop the Slideshow and switch the input port to LAN. Your computer starts image transmission.
Click [No], then the projector remains in the Slideshow mode, and the Viewer main menu is displayed in stand-by mode on your computer.
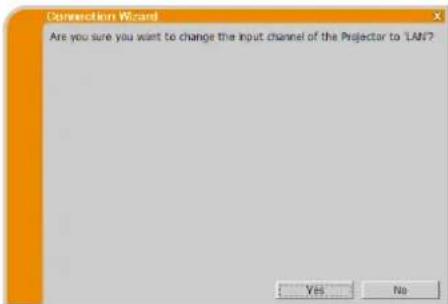
Message 14: Are you sure you want to change the input channel of the Projector to 'LAN'?
The projector is not set to the LAN as an input signal.
Click [Yes], and the projector is switched to the LAN.
Click [No], then the projector remains as it is, and the VLC viewer main menu is displayed in the stand-by mode on your computer.
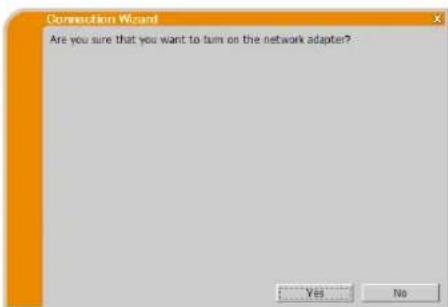
Message 15: Are you sure that you want to turn on the network adapter?
The screen is displayed in the case that the selected network adapter is invalid.
Click [Yes] to turn it on. Proceed to item "3.2.5 Connection and transmission". (22)
Click [No] to not turn it on. The screen is back to the previous one to select another network adapter.
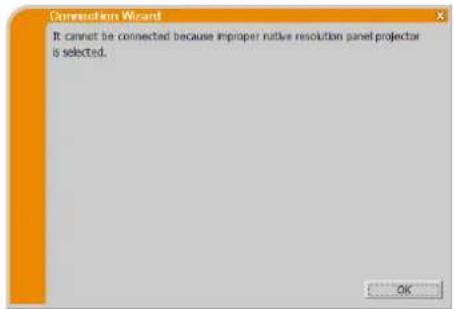
Message 16: It cannot be connected because improper native resolution panel projector is selected.
This message is displayed when the projectors with different native panel resolutions are trying to connect to same computer.
Click [OK], then the VLC viewer main menu is displayed even though the network connections with selected projectors are not established.
Click connect button on the VLCiewer main menu to go back to "3.2.2 Select Connection method". (9)
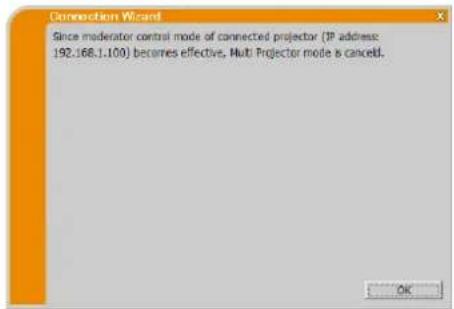
Message 17: Since moderator control mode of connected projector (IP address: ********* becomes effective, Multi Projector mode is canceled.
This message appears when the Multi Projector mode is canceled, since Moderator Control mode of connected projector becomes effective by another computer.
Click [OK], and the Viewer main menu is displayed.
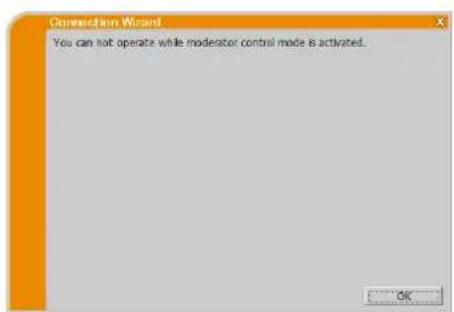
Message 18: You can not operate while moderator control mode is activated.
The projector is occupied by another computer in the Moderator Control mode.
Click [OK], and the Viewer main menu is displayed.
B Trouble Shooting
| Problem | Likely Cause | Things to Check | Reference Page Number | |
| No image | The projector is not turned on. | Is the projector's lamp on? | - | |
| The projector's input source isn't switched to LAN. | Is the projector switched to LAN? | - | ||
| Connection to the Network | The projector that you want to connect to is not found on the list of available projectors | The computer and/or projector's network settings are not configured correctly. | Check the network configurations of the computer and projector. If you change the projector's settings, turn off the projector's AC power and then turn it on again. If you simply put the projector in standby power mode and then turn it on again, the new settings might not take effect. | 15 |
| Firewall software other than Windows® Firewall is installed in your computer. | Refer to the manual for the firewall software and take one of the following actions:- Remove VLCiewer from blocking item list- Disable the firewall software while using VLCiewer | - | ||
| Cannot communicate | The computer and/or projector's network settings are not configured correctly. | Check the network configurations of the computer and projector. | 15 | |
| The projector's input source isn't switched to LAN. | Is the projector switched to LAN? | - | ||
| An access point is used, and your computer is connected to the access point via wireless LAN. | Use network utilities that may come with your computer or wireless LAN adapter to establish wireless network connection. For details, refer to the manual of the computer or the adapter. | - | ||
| Network Presentation | The projected image is rather slow compared to that of the computer | Using the Multi PC mode or the Multi Projector mode. | Use the Single PC mode. | 24 |
| The projector isn't capable of relaying dynamic images such as PowerPoint® animation at full speed. | Switching the priority to 'Transmission Speed' under the option menu may help to improve speed. | 32 | ||
| The compression rate being used for image transmission is too low. | ||||
| Network Presentation (continued) | No Image | Using Photo Gallery Slide Show in Windows Vista®. | Viewer cannot send computer screen data while using Windows Vista® Photo Gallery Slide Show. Please close Photo Gallery Slide Show before using Viewer. | - |
| Using Photo Viewer Slide Show in Windows® 7. | Viewer cannot send computer screen data while using Windows® 7 Photo Viewer Slide Show. Please close Photo Viewer Slide Show before using Viewer. | - | ||
| Poor communication between the computer and projector. | Click the stop capture button from the Viewer main menu to disconnect the computer and projector. Next, click the start capture button in the main menu to reconnect the computer and projector. If the projector still does not show any image (black screen), exit from Viewer and try again. | 27 | ||
| Can't display movies correctly. | In some combinations of computer's video card and application software, there is a possibility that true image - especially movies played by media player - cannot be transferred to the projector with Viewer. | If there is a video acceleration level adjustment function in your application, please try to adjust it. For details, refer to the manual of your application. | - | |
| Images contain lots of interference. | The compression rate being used for image transmission is too high. | Try setting the priority to 'Image Quality' in the Viewer option menu. You may experience a drop in speed. | 32 | |
| Neither transparency nor translucency effects (Glass) | Viewer does not support these features of Windows® Aero®. | Change the effect other than "Glass". | - | |
| Cannot select Moderator Control mode. | Using Multi Projector mode. | Stop the Multi Projector mode. | 30 | |
| Other computer is already set to Moderator. | Cancel the current Moderator and select new Moderator. | 31 | ||
| Network Presentation (continued) | No Audio | Audio is off. | Set “Sound” ‘On’ in the option menu of VLC viewer. | 32 |
| Using the Multi PC mode or the Multi Projector mode. | Use the Single PC mode. | 30 | ||
| Audio not supported on some models. | Check the model name of the projector and group of the projector models. Audio transmission is available only for Projector Models Group: B. | 5 | ||
| Mute or low volume is selected on the projector. | Check the audio settings on the projector. | - | ||
| Mute or low volume is selected on your computer. | Check the audio settings on your computer. | - | ||
| Poor communication between the computer and projector. | Once set ‘Off’ the “Sound” in the option menu of VLC viewer, then set it ‘On’ again. If the projector still does not produce any sound, restart VLC viewer. | 32 | ||
| If audio output cannot be obtained even though above countermeasures are applied, install VLC viewer again. | 7 | |||
| Network Presentation (continued) | Sound interruption | The computer is connected to or disconnected from peripheral equipment with HDMI™ cable, so that the audio configuration on the computer is changed while using VLC viewer. | Please restart VLC viewer. | 9 |
| When multiple computers are communicating with the projector, low communication band between the computers and the projector makes data transfer rate lower and may interrupt the sound. | Please check your network connection. | - | ||
| USB equipment (USB storage device, USB wireless adapter, or others) is connected to USB TYPE A port of the projector. | Wait for a while. Transaction of embedding driver takes up to 30 seconds. | - | ||
| Sound might be interrupted till the firmware of the projector transacts driver embedding that starts just after insertion of the device. | Check following items in NETWORK - WIRELESS SETUP menu of the projector, too if you inserted USB wireless adapter. Refer to the User's Manual of the projector for the details of WIRELESS SETUP menu. WIRELESS SETUP confirmation items - MODE - ENCRYPTION - SSD | - | ||
| In addition, sound may be interrupted while the USB wireless adapter is searchingSSID. The adapter searchesSSID repeatedly until wireless communication is established. | Please disconnect the USB wireless adapter when the access point or computer connected to is not working or wireless LAN is not used. Even though the issue is not resolved, reconnect VLC viewer. | |||
| Network Presentation (continued) | Noise comes from the speakers in the projector even though computer does not output sound. | Mute function in audio playback software like Windows® Media Player is used. | When computer does not output audio, making VLC viewer "Sound" 'Off' decreases noise. | 32 |
| USB equipment (USB storage device, USB wireless adapter and so on) is connected to USB TYPE A port of the projector. | ||||
| Iris feature of the projector is activated. | When computer does not output audio, making VLC viewer "Sound" 'Off' decreases sound noise. | 32 | ||
| When active iris is not used, set "ACTIVE IRIS" to "OFF" using projector menu. Refer to the User's Manual of the projector for the detail of "ACTIVE IRIS". | ||||
| Others - Information displayed in the screens of VLC viewer is incorrect. - The projector does not respond. - Image on screen is frozen. | Communication between the projector and computer is not working well. Network functions of the projector are not working well. | Click the stop capture button from the VLC viewer main menu to disconnect the computer and projector. Next, click the start capture button in the main menu to reconnect the computer and projector. Even though the issue is not resolved, reconnect VLC viewer. | 27 | |
The Software is being delivered to you "AS IS" and Christie Digital Systems USA, Inc. (CHRISTIE) make no warranty as to its use or performance. CHRISTIE AND ITS SUPPLIERS, INCLUDING BUT NOT LIMITED TO CHRISTIE, DO NOT AND CANNOT WARRANTY THE PERFORMANCE OR RESULTS YOU MAY OBTAIN BY USING THE SOFTWARE. EXCEPT TO THE EXTENT PROHIBITED BY LAW IN YOUR JURISDICTION, CHRISTIE AND ITS SUPPLIERS MAKE NO WARRANTY CONDITIONS, REPRESENTATIONS, OR TERMS (EXPRESS OR IMPLIED WHETHER BY STATUTE, COMMON LAW, CUSTOM, USAGE OR OTHERWISE) AS TO ANY MATTER IN CONNECTION WITH THE SOFTWARE, INCLUDING WITHOUT LIMITATION NONINFRINGEMENT OF THIRD PARTY RIGHTS, MERCHANTABILITY, INTEGRATION, SATISFACTORY QUALITY, OR FITNESS FOR ANY PARTICULAR PURPOSE.
You agree that the Software will not be shipped, transferred or exported into any country or used in any manner prohibited by the United States Export Administration Act or any other applicable export laws, restrictions or regulations (collectively the "Export Laws"). In addition, if the Software is identified as export controlled items under the Export Laws, you represent and warrant that you are not a citizen, or otherwise located within, an embargoed nation (including without limitation Iran, Iraq, Syria, Sudan, Libya, Cuba, North Korea, and Serbia) and that you are not otherwise prohibited under the Export Laws from receiving the Software. All rights to Use the Software are granted on condition that such rights are forfeited if you fail to comply with the terms of this Agreement.
Table des matieres
Encryption (Cryptage):
WEP64bit (example)
Encryption key (Clé de cryptage)*:
***************************************************************************************************** (Example)
Enter the following information that is set in the projector.
SSID: wireless (example)
Encryption (Cryptage): WEP64bit (example)
IP address (Adresse IP): 192.168.1.10 (example)
Encryption (Cryptage):
WEP64bit (example)
Mode (mode): INFRASTRUCTURE
Cliquez sur [Next].
IP address (Adresse IP): 192.168.1.10 (example)
IP address (Adresse IP): 192.168.1.10 (exemple)
Message 1: A network connection was not established
Message 2: The number of computer connection exceeds the limit (max. 50).
Message 3: A network connection could not be established.
Message 4: Are you sure you want to connect the selected projector?
Message 6: Do you want to apply suggested network settings as follows?
Message 7: An IP Address overlaps with the IP Address of the projector you are trying to connect to.
Message 8: Incorrect IP Address.
Message 9: A Network Configuration Conflict exists.
Message 10: There is a projector already connected with your computer.
Message 11: In order to connect to the selected projector, you need to disconnect from the current projector.
Message 12: This projector is currently in use (Presenting) by another user.
Message 13: A Slideshow is currently running on the projector that you are trying to display to (PC-Less Presentation Mode).
Message 14: Are you sure you want to change input channel of Projector to LAN?
Message 15: Are you sure that you want to turn on network adapter?
Message 16: It cannot be connected because improper native resolution panel projector is selected.
Message 17: Since moderator control mode of connected projector (IP address: ***.***.***) becomes effective, Multi Projector mode is canceled.
Message 18: You can not operate while moderator control mode is activated.
The Software is being delivered to you "AS IS" and Christie Digital Systems USA, Inc. (CHRISTIE) make no warranty as to its use or performance. CHRISTIE AND ITS SUPPLIERS, INCLUDING BUT NOT LIMITED TO CHRISTIE, DO NOT AND CANNOT WARRANTY THE PERFORMANCE OR RESULTS YOU MAY OBTAIN BY USING THE SOFTWARE. EXCEPT TO THE EXTENT PROHIBITED BY LAW IN YOUR JURISDICTION, CHRISTIE AND ITS SUPPLIERS MAKE NO WARRANTY CONDITIONS, REPRESENTATIONS, OR TERMS (EXPRESS OR IMPLIED WHETHER BY STATUTE, COMMON LAW, CUSTOM, USAGE OR OTHERWISE) AS TO ANY MATTER IN CONNECTION WITH THE SOFTWARE, INCLUDING WITHOUT LIMITATION NONINFRINGEMENT OF THIRD PARTY RIGHTS, MERCHANTABILITY, INTEGRATION, SATISFACTORY QUALITY, OR FITNESS FOR ANY PARTICULAR PURPOSE.
You agree that the Software will not be shipped, transferred or exported into any country or used in any manner prohibited by the United States Export Administration Act or any other applicable export laws, restrictions or regulations (collectively the "Export Laws"). In addition, if the Software is identified as export controlled items under the Export Laws, you represent and warrant that you are not a citizen, or otherwise located within, an embargoed nation (including without limitation Iran, Iraq, Syria, Sudan, Libya, Cuba, North Korea, and Serbia) and that you are not otherwise prohibited under the Export Laws from receiving the Software. All rights to Use the Software are granted on condition that such rights are forfeited if you fail to comply with the terms of this Agreement.
Inhalt
1 Funktionen 3
1.1 Display-Modus 3
Mode (Modus): AD-HOC
Mode (Modus): INFRASTRUCTURE
Encryption key (Schlüssel)*
******** (Beispiel)
Mode (Modus): INFRASTRUCTURE
3.2.5.2 Connection List
Meldung 1: A network connection was not established.
Meldung 2: The number of computer connection exceeds the limit (max. 50).
Meldung 3: A network connection could not be established.
Meldung 4: Are you sure you want to connect the selected projector?
Meldung 6: Do you want to apply suggested network settings as follows?
Meldung 7: An IP Address overlaps with the IP Address of the projector you are trying to connect to.
Meldung 8: Incorrect IP Address.
Meldung 10: There is a projector already connected with your computer.
Meldung 11: In order to connect to the selected projector, you need to disconnect from the current projector.
Meldung 12: This projector is currently in use (Presenting) by another user.
Meldung 13: A Slideshow is currently running on the projector that you are trying to display to (PC-Less Presentation Mode).
Meldung 14: Are you sure you want to change the input channel of the Projector to 'LAN'?
Meldung 15: Are you sure you want to change the input channel of the Projector to LAN?
Meldung 16: It cannot be connected because improper native resolution panel projector is selected.
Meldung 17: Since moderator control mode of connected projector (IP address: ***.***.***) becomes effective, Multi Projector mode is canceled.
Meldung 18: You can not operate while moderator control mode is activated.
The Software is being delivered to you "AS IS" and Christie Digital Systems USA, Inc. (CHRISTIE) make no warranty as to its use or performance. CHRISTIE AND ITS SUPPLIERS, INCLUDING BUT NOT LIMITED TO CHRISTIE, DO NOT AND CANNOT WARRANTY THE PERFORMANCE OR RESULTS YOU MAY OBTAIN BY USING THE SOFTWARE. EXCEPT TO THE EXTENT PROHIBITED BY LAW IN YOUR JURISDICTION, CHRISTIE AND ITS SUPPLIERS MAKE NO WARRANTY CONDITIONS, REPRESENTATIONS, OR TERMS (EXPRESS OR IMPLIED WHETHER BY STATUTE, COMMON LAW, CUSTOM, USAGE OR OTHERWISE) AS TO ANY MATTER IN CONNECTION WITH THE SOFTWARE, INCLUDING WITHOUT LIMITATION NONINFRINGEMENT OF THIRD PARTY RIGHTS, MERCHANTABILITY, INTEGRATION, SATISFACTORY QUALITY, OR FITNESS FOR ANY PARTICULAR PURPOSE.
You agree that the Software will not be shipped, transferred or exported into any country or used in any manner prohibited by the United States Export Administration Act or any other applicable export laws, restrictions or regulations (collectively the "Export Laws"). In addition, if the Software is identified as export controlled items under the Export Laws, you represent and warrant that you are not a citizen, or otherwise located within, an embargoed nation (including without limitation Iran, Iraq, Syria, Sudan, Libya, Cuba, North Korea, and Serbia) and that you are not otherwise prohibited under the Export Laws from receiving the Software. All rights to Use the Software are granted on condition that such rights are forfeited if you fail to comply with the terms of this Agreement.
Indices
1 Characteristicas. 3
1.1 Modo de visualizacion 3
1.1.1 Modo PC Unico 3
1.1.2 Modo PC Molecule 3
History (Historical)
The setting on the access point Enter the following information.
SSID: WirelessAccessPoint (ejemplo)
Encryption (Cifrado): WEP64bit (ejemplo)
Encryption key (Clave de encryptacion) ^2 : * (ejemplo)
Mode (Modo): INFRASTRUCTURE
Mode (Modo): INFRASTRUCTURE
Haga cli en [Next].
Mensaje 1: A network connection was not established.
Mensaje 3: A network connection could not be established.
Mensaje 4: Are you sure you want to connect selected projector?
Mensaje 6: Do you want to apply suggested network settings as follows?
Mensaje 7: An IP Address overlaps with the IP Address of the projector you are trying to connect to.
Mensaje 10: There is a projector already connected with your computer.
Mensaje 11: In order to connect to the selected projector, you need to disconnect from the current projector.
Mensaje 12: This projector is currently in use (Presenting) by another user.
Mensaje 13: A Slideshow is currently running on projector that you are trying to display to (PC-Less Presentation Mode).
Mensaje 14: Are you sure you want to change input channel of Projector to LAN?
Mensaje 15: Are you sure that you want to turn on network adapter?
Mensaje 16: It cannot be connected because improper native resolution panel projector is selected.
Mensaje 17: Since moderator control mode of connected projector (IP address: ********** becomes effective, Multi Projector mode is canceled.
Mensaje 18: You can not operate while moderator control mode is activated.
The Software is being delivered to you "AS IS" and Christie Digital Systems USA, Inc. (CHRISTIE) make no warranty as to its use or performance. CHRISTIE AND ITS SUPPLIERS, INCLUDING BUT NOT LIMITED TO CHRISTIE, DO NOT AND CANNOT WARRANTY THE PERFORMANCE OR RESULTS YOU MAY OBTAIN BY USING THE SOFTWARE. EXCEPT TO THE EXTENT PROHIBITED BY LAW IN YOUR JURISDICTION, CHRISTIE AND ITS SUPPLIERS MAKE NO WARRANTY CONDITIONS, REPRESENTATIONS, OR TERMS (EXPRESS OR IMPLIED WHETHER BY STATUTE, COMMON LAW, CUSTOM, USAGE OR OTHERWISE) AS TO ANY MATTER IN CONNECTION WITH THE SOFTWARE, INCLUDING WITHOUT LIMITATION NONINFRINGEMENT OF THIRD PARTY RIGHTS, MERCHANTABILITY, INTEGRATION, SATISFACTORY QUALITY, OR FITNESS FOR ANY PARTICULAR PURPOSE.
You agree that the Software will not be shipped, transferred or exported into any country or used in any manner prohibited by the United States Export Administration Act or any other applicable export laws, restrictions or regulations (collectively the "Export Laws"). In addition, if the Software is identified as export controlled items under the Export Laws, you represent and warrant that you are not a citizen, or otherwise located within, an embargoed nation (including without limitation Iran, Iraq, Syria, Sudan, Libya, Cuba, North Korea, and Serbia) and that you are not otherwise prohibited under the Export Laws from receiving the Software. All rights to Use the Software are granted on condition that such rights are forfeited if you fail to comply with the terms of this Agreement.
Contenuo
1 Caratteristica 3
Professional/Enterprise/Ultimate
Scheda grafica
Windows® 8 / Windows® 8 Pro / Windows® 8 Enterprise
Windows® 8.1 / Windows® 8.1 Pro / Windows® 8.1 Enterprise
VGA: 640x480 o superiore (XGA consigliata: 1024x768)
Messaggio 1: A network connection was not established.
Messaggio 2: The number of computer connection exceeds the limit (max. 50).
Messaggio 3: A network connection could not be established.
Messaggio 4: Are you sure you want to connect the selected projector?
Messaggio 6: Do you want to apply suggested network settings as follows?
Messaggio 7: An IP Address overlaps with the IP Address of the projector you are trying to connect to.
Messaggio 9: A Network Configuration Conflict exists.
Messaggio 10: There is a projector already connected with your computer.
Messaggio 11: In order to connect to the selected projector, you need to disconnect from the current projector.
Messaggio 12: This projector is currently in use (Presenting) by another user.
Messaggio 13: A Slideshow is currently running on the projector that you are trying to display to (PC-Less Presentation Mode).
Messaggio 14: Are you sure you want to change the input channel of the Projector to LAN?
Messaggio 15: Are you sure that you want to turn on the network adapter?
Messaggio 16: It cannot be connected because improper native resolution panel projector is selected.
Messaggio 17: Since moderator control mode of connected projector (IP address: ***.***.***) becomes effective, Multi Projector mode is canceled.
Messaggio 18: You can not operate while moderator control mode is activated.
The Software is being delivered to you "AS IS" and Christie Digital Systems USA, Inc. (CHRISTIE) make no warranty as to its use or performance. CHRISTIE AND ITS SUPPLIERS, INCLUDING BUT NOT LIMITED TO CHRISTIE, DO NOT AND CANNOT WARRANTY THE PERFORMANCE OR RESULTS YOU MAY OBTAIN BY USING THE SOFTWARE. EXCEPT TO THE EXTENT PROHIBITED BY LAW IN YOUR JURISDICTION, CHRISTIE AND ITS SUPPLIERS MAKE NO WARRANTY CONDITIONS, REPRESENTATIONS, OR TERMS (EXPRESS OR IMPLIED WHETHER BY STATUTE, COMMON LAW, CUSTOM, USAGE OR OTHERWISE) AS TO ANY MATTER IN CONNECTION WITH THE SOFTWARE, INCLUDING WITHOUT LIMITATION NONINFRINGEMENT OF THIRD PARTY RIGHTS, MERCHANTABILITY, INTEGRATION, SATISFACTORY QUALITY, OR FITNESS FOR ANY PARTICULAR PURPOSE.
You agree that the Software will not be shipped, transferred or exported into any country or used in any manner prohibited by the United States Export Administration Act or any other applicable export laws, restrictions or regulations (collectively the "Export Laws"). In addition, if the Software is identified as export controlled items under the Export Laws, you represent and warrant that you are not a citizen, or otherwise located within, an embargoed nation (including without limitation Iran, Iraq, Syria, Sudan, Libya, Cuba, North Korea, and Serbia) and that you are not otherwise prohibited under the Export Laws from receiving the Software. All rights to Use the Software are granted on condition that such rights are forfeited if you fail to comply with the terms of this Agreement.
Innhold
1 Funksjoner 3
1.1 Visningsmodus 3
1.1.1 Enkelt PC-modus 3
1.1.2 Flere PC-modus.. 3
My Connection (Min tilkobling)
Fabrikstandard SSID 1: wireless
Fabrikstandard SSID 2: WANProjector
Fabrikstandard SSID 3: WLANProjector2
Fabrikstandard SSID 4: WLANProjector3
3) Subnettaske er/DDe Klasse A eller B eller C.
Klasse A:(255.0.0.0), Klasse B:(255.255.0.0), Klasse C:(255.255.255.0)
3.2.3.1 Å fã passkoden
Encryption (Kryptering):
WEP64bit (eksempel)
Encryption key (Koderingsnokkel) *: ******************************************************************************************************* (eksempel)
Subnet mask (Subnettmaske) *255.255.255.128 (eksempel)
Klikk [Connect].
Koblingsprosessen via tradløs LAN starter.
Encryption (Kryptering):
WEP64bit (eksempel)
Encryption key (Koderingsnokkel) ^2 : ****************************************************************************************************** (eksempel)
Encryption (Kryptering):
WEP64bit (eksempel)
Encryption key (Koderingsnøkkel) ^2 :
******************************************************************************************************* (eksempel)
Innstillingen pa prosjektoren.
Skriv inn ffolgende informasjon.
Subnet mask (Subnettmaske) ^d :
255.255.255.128 (eksempel)
Klikk [Connect].
Koblingsprosessen via tradløs LAN starter.
3.2.4 Configuring Network Setting Manually
Encryption (Kryptering):
WEP64bit (eksempel)
Encryption key (Koderingsnøkkel) ^*2 :
******************************************************************************************************* (eksempel)
Mode (Modus): INFRASTRUCTURE
Klikk [Next].
Subnet mask (Subnettmaske):
255.255.255.0 (eksempel)
Klikk [Connect].
Tilkoblingsprossessen starter.
Mode (Modus): INFRASTRUCTURE
Klikk [Next].
Melding 1: A network connection was not established.
Melding 2: The number of computer connection exceeds the limit (max. 50).
Melding 3: A network connection could not be established.
Melding 4: Are you sure you want to connect the selected projector?
Denne meldingen vises nár den tradlose adapteren du valgte allerede cr i bruk mcd en annen nettverkstilkobling.
Melding 5: Incorrect Passcode
Melding 6: Do you want to apply suggested network settings as follows?
Melding 7: An IP Address overlaps with the IP Address of the projector you are trying to connect to.
Denne meldingen vises nár IP-adressen på datamaskinen er den samme som på projektoren. Siden forskjellige IP-adresser er nodsvendig, klikk på [OK] og skriv riktig IP-adresse.
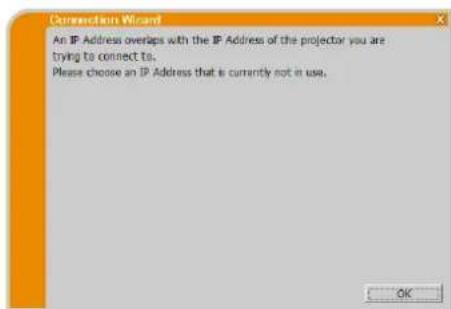
Melding 8: Incorrect IP Address.
Denne meldingen vises nár en feil IP-adresse er satt på datamaskinen. Klikk [OK], og angi riktig IP-adresse.

Melding 9: A Network Configuration Conflict exists.
Melding 10: There is a projector already connected with your computer.
Melding 11: In order to connect to the selected projector, you need to disconnect from the current projector.
Denne meldingen vises nár antall tilkoblde projektorer overstiger det maksimale antallet.
Melding 12: This projector is currently in use (Presenting) by another user.
Projektoren du vil scende bildene til er opptatt med en annen maskin i presentasjonsmodusen.
Melding 13: A Slideshow is currently running on the projector that you are trying to display to (PC-Less Presentation Mode).
Projektoren du vil scnde bildene til er i lysbildeframvisningsmodus i UTEN PCpresentasjonen.
Melding 14: Are you sure you want to change the input channel of the Projector to LAN?
Projektoren cr ikke innstilt med LAN som inngangssignal. Klikk [Yes], og projektoren skifter til LAN.
Melding 15: Are you sure that you want to turn on the network adapter?
Melding 16: It cannot be connected because improper native resolution panel projector is selected.
Melding 17: Since moderator control mode of connected projector (IP address: ***.***.***) becomes effective, Multi Projector mode is canceled.
Denne meldingen viscs nár Flerprojektormodus avsluttes, ettersom Moderatorkontrollmodus for tilkoblet projetor blir effektiv av en annen datamaskin.
Melding 18: You can not operate while moderator control mode is activated.
Projektoren er okkupert av en annen datamaskin i Moderatorkontrollmodus.
The Software is being delivered to you "AS IS" and Christie Digital Systems USA, Inc. (CHRISTIE) make no warranty as to its use or performance. CHRISTIE AND ITS SUPPLIERS, INCLUDING BUT NOT LIMITED TO CHRISTIE, DO NOT AND CANNOT WARRANTY THE PERFORMANCE OR RESULTS YOU MAY OBTAIN BY USING THE SOFTWARE. EXCEPT TO THE EXTENT PROHIBITED BY LAW IN YOUR JURISDICTION, CHRISTIE AND ITS SUPPLIERS MAKE NO WARRANTY CONDITIONS, REPRESENTATIONS, OR TERMS (EXPRESS OR IMPLIED WHETHER BY STATUTE, COMMON LAW, CUSTOM, USAGE OR OTHERWISE) AS TO ANY MATTER IN CONNECTION WITH THE SOFTWARE, INCLUDING WITHOUT LIMITATION NONINFRINGEMENT OF THIRD PARTY RIGHTS, MERCHANTABILITY, INTEGRATION, SATISFACTORY QUALITY, OR FITNESS FOR ANY PARTICULAR PURPOSE.
You agree that the Software will not be shipped, transferred or exported into any country or used in any manner prohibited by the United States Export Administration Act or any other applicable export laws, restrictions or regulations (collectively the "Export Laws"). In addition, if the Software is identified as export controlled items under the Export Laws, you represent and warrant that you are not a citizen, or otherwise located within, an embargoed nation (including without limitation Iran, Iraq, Syria, Sudan, Libya, Cuba, North Korea, and Serbia) and that you are not otherwise prohibited under the Export Laws from receiving the Software. All rights to Use the Software are granted on condition that such rights are forfeited if you fail to comply with the terms of this Agreement.
Inhoud
1 Kenmerken. 3
1.1 Weergavemodus 3
1.1.1 Enkel-PC-modus 3
1.1.2 Multi-PC-modus 3
1.2 Multi-projectormodus 4
1.3 Moderator-besturingsmodus 4
2 5
2.1 Vereiste pc-hardware en -software 5
2.2 Softwareversies 5
2.3 "LiveViewer" updaten 6
(Service Pack 1 of later)
Enterprise / Ultimate
Windows® 7
Starter / Home Basic / Home Premium /
Professional / Enterprise / Ultimate
Grafische kaart
Windows® 8 / Windows® 8 / Windows® 8 Enterprise
Windows® 8.1 / Windows® 8.1 Pro / Windows® 8.1 Enterprise
VGA: 640x480 of hoger (aanbevolen XGA: 1024x768)
CD-ROM/DVD-ROM station
Draadloze LAN
2.2 Softwareversies
3.2.2.3 Profielverbinding
Fabrieksinstelling SSID 1: wireless
Fabrieksinstelling SSID 2: WLANProjector1
Fabrieksinstalling SSID 3: WLANProjector2
Fabrieksinstalling SSID 4: WLANProjector3
3) Het Subnetmasker is nicht van classe A , B of C .
Klasse A:(255.0.0.0),Klasse B:(255.255.0.0),Klasse C:(255.255.255.0)
Encryption (Encrypted):
Mode (Modus): AD-HOC
Klik op [Next].
Encryption (Encrypted):
Mode (Modus): INFRASTRUCTURE
Klik op [Next].
3.2.6 Verboundingsfout
2) Optimize Performance (Optimaliser prestaties)
Bericht 1: A network connection was not established.
Bericht 2: The number of computer connection exceeds the limit (max. 50).
Bericht 3: A network connection could not be established.
Verbindingmakemethetnetwork".(9)
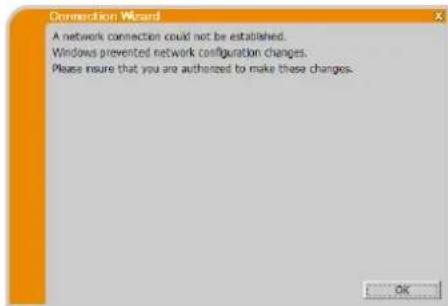
Bericht 4: Are you sure you want to connect the selected projector?
Bericht 6: Do you want to apply suggested network settings as follows?
Bericht 7: An IP Address overlaps with the IP Address of the projector you are trying to connect to.
Bericht 8: Incorrect IP Address.
Bericht 9: A Network Configuration Conflict exists.
Bericht 10: There is a projector already connected with your computer.
Bericht 11: In order to connect to the selected projector, you need to disconnect from the current projector.
Bericht 12: This projector is currently in use (Presenting) by another user.
Bericht 13: A Slideshow is currently running on the projector that you are trying to display to. (PC-Less Presentation Mode)
Bericht 14: Are you sure you want to change the input channel of the Projector to LAN?
Bericht 15: Are you sure that you want to turn on the network adapter?
Bericht 16: It cannot be connected because improper native resolution panel projector is selected.
Bericht 17: Since moderator control mode of connected projector (IP address: \*\*\*\*\*\*\*\*\*\* becomes effective, Multi Projector mode is canceled.
Bericht 18: You can not operate while moderator control mode is activated.
The Software is being delivered to you "AS IS" and Christie Digital Systems USA, Inc. (CHRISTIE) make no warranty as to its use or performance. CHRISTIE AND ITS SUPPLIERS, INCLUDING BUT NOT LIMITED TO CHRISTIE, DO NOT AND CANNOT WARRANTY THE PERFORMANCE OR RESULTS YOU MAY OBTAIN BY USING THE SOFTWARE. EXCEPT TO THE EXTENT PROHIBITED BY LAW IN YOUR JURISDICTION, CHRISTIE AND ITS SUPPLIERS MAKE NO WARRANTY CONDITIONS, REPRESENTATIONS, OR TERMS (EXPRESS OR IMPLIED WHETHER BY STATUTE, COMMON LAW, CUSTOM, USAGE OR OTHERWISE) AS TO ANY MATTER IN CONNECTION WITH THE SOFTWARE, INCLUDING WITHOUT LIMITATION NONINFRINGEMENT OF THIRD PARTY RIGHTS, MERCHANTABILITY, INTEGRATION, SATISFACTORY QUALITY, OR FITNESS FOR ANY PARTICULAR PURPOSE.
You agree that the Software will not be shipped, transferred or exported into any country or used in any manner prohibited by the United States Export Administration Act or any other applicable export laws, restrictions or regulations (collectively the "Export Laws"). In addition, if the Software is identified as export controlled items under the Export Laws, you represent and warrant that you are not a citizen, or otherwise located within, an embargoed nation (including without limitation Iran, Iraq, Syria, Sudan, Libya, Cuba, North Korea, and Serbia) and that you are not otherwise prohibited under the Export Laws from receiving the Software. All rights to Use the Software are granted on condition that such rights are forfeited if you fail to comply with the terms of this Agreement.
Contudo
1 Characteristicas. 3
1.1 Modo de exibicao 3
1.1.1 Modo PC individual 3
1.1.2 Modo PC multiplo 3
1.2 Modo Projector Mulplo 4
1.3 Modo de Controlo do Moderador 4
2 5
2.1 Requisitos de hardware e software para PC 5
2.2 Versoes de software 5
2.3 Actualizar o "LiveViewer" 6
3 Iniciar o VLCviewer. 7
Mode (Modo): INFRASTRUCTURE
Clique no [Next].
A configuracao no projector.*j
Mensagem 1: A network connection could not be established.
Mensagem 2: The number of computer connection exceeds the limit (max. 50).
Mensagem 3: A network connection could not be established.
Mensagem 4: Are you sure you want to connect the selected projector?
Mensagem 6: Do you want to apply suggested network settings as follows?
Mensagem 7: An IP Address overlaps with the IP Address of the projector you are trying to connect to.
Mensagem 10: There is a projector already connected with your computer.
Mensagem 11: In order to connect to the selected projector, you need to disconnect from the current projector.
Mensagem 12: The projector is currently in use (Presenting) by another user.
Mensagem 13: A Slideshow is currently running on the projector that you are trying to display to (PC-Less Presentation Mode).
Mensagem 14: Are you sure you want to change the input channel of the Projector to LAN?
Mensagem 15: Are you sure that you want to turn on the network adapter?
Mensagem 16: It cannot be connected because improper native resolution panel projector is selected.
Mensagem 17: Since moderator control mode of connected projector (IP address: \*\*\*\*\*\*\*\*\*\* becomes effective, Multi Projector mode is canceled.
Mensagem 18: You can not operate while moderator control mode is activated.
O projector éocupado por及其他 computador no modo de Controlo do Moderador.
The Software is being delivered to you "AS IS" and Christie Digital Systems USA, Inc. (CHRISTIE) make no warranty as to its use or performance. CHRISTIE AND ITS SUPPLIERS, INCLUDING BUT NOT LIMITED TO CHRISTIE, DO NOT AND CANNOT WARRANTY THE PERFORMANCE OR RESULTS YOU MAY OBTAIN BY USING THE SOFTWARE. EXCEPT TO THE EXTENT PROHIBITED BY LAW IN YOUR JURISDICTION, CHRISTIE AND ITS SUPPLIERS MAKE NO WARRANTY CONDITIONS, REPRESENTATIONS, OR TERMS (EXPRESS OR IMPLIED WHETHER BY STATUTE, COMMON LAW, CUSTOM, USAGE OR OTHERWISE) AS TO ANY MATTER IN CONNECTION WITH THE SOFTWARE, INCLUDING WITHOUT LIMITATION NONINFRINGEMENT OF THIRD PARTY RIGHTS, MERCHANTABILITY, INTEGRATION, SATISFACTORY QUALITY, OR FITNESS FOR ANY PARTICULAR PURPOSE.
You agree that the Software will not be shipped, transferred or exported into any country or used in any manner prohibited by the United States Export Administration Act or any other applicable export laws, restrictions or regulations (collectively the "Export Laws"). In addition, if the Software is identified as export controlled items under the Export Laws, you represent and warrant that you are not a citizen, or otherwise located within, an embargoed nation (including without limitation Iran, Iraq, Syria, Sudan, Libya, Cuba, North Korea, and Serbia) and that you are not otherwise prohibited under the Export Laws from receiving the Software. All rights to Use the Software are granted on condition that such rights are forfeited if you fail to comply with the terms of this Agreement.
目录
1 特点 3
1.1 显示模式 3
Enterprise /Ultimate
Windows® 7
Starter / Home Basic / Home Premium /
Professional/Enterprise/Ultimate
Windows® 8 / Windows® 8 Pro / Windows® 8 Enterprise
Windows® 8.1 / Windows® 8.1 Pro / Windows® 8.1 Enterprise
VGA:640x480 12345678
65.536 1000
CPU
Pentium4(2.8GHz)
100MB
Internet Explorer® 6.0 立即下载
CD-ROM/DVD-ROM 三
EEE802.11b/g/n
2.2 个正周期 = /3
LiveViewer
S无其则者,而专言之于国。
HIOI EIOEIOI 1
在如:在的,自
SSID: wireless (oit)
Encryption (at 1) WEP64bit (0f)
IP address(IP 华士): 192.168.1.10 (ot)
Transmission speed (台·s): 50000000000000000000000000000000000000000000000000000
中
[1] 1: A network connection was not established.
LAN 列目:I00000000000000000000000000000000000000000000000000000000000000000000000000000000000000000
[1]2: The number of computer connection exceeds the limit (max. 50).
[3]: A network connection could not be established.
CHRISTIE
AIA&:IncorrectPasscode.
[1] Do you want to apply suggested network settings as follows?
F 1
[1]8: Incorrect IP Address.
K 10
![Christie LW551i - [1]8: Incorrect IP Address. - 1](/content/2026/03/531365/images/ccfce6cd71a9c1f942221ec8b33cbde575ee6b9ae7830e350c72da568d5062de.jpg)
T: A Network Configuration Conflict exists.
Ie 电
F 1
10: There is a projector already connected with your computer.
12: This projector is currently in use (Presenting) by another user.
I01JH
台登录普
四
F1
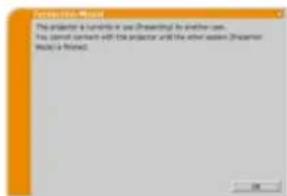
[13: A Sideshow is currently running on the projector that you are trying to display to. (PC-Less Presentation Mode).]
D1T
金
[Yes]
LANO 1
d.
LiveViewerPC
五人
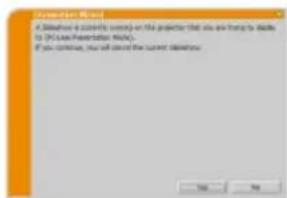
14: Are you sure you want to change the input channel of the Projector to LAN?
FIOLORETHOJILIHTKTHANLANTOEETTJNTT
[Yes]
[No]
LiveViewer 越非 电电电电电电电电电电电电电电电电电电电电电电电电电电电电电电电电电电电电电电电电电电电电电电电电电电电电电电电电电电电电电电电电电电电电电
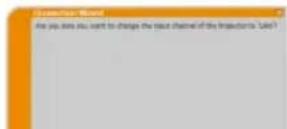
CHRISTIE
[16]: It cannot be connected because improper native resolution panel projector is selected.
E1E1E1E1E1E1E1E1E1E1E1E1E1E1E1E1E1E1E1E1E1E1E1E1E1E1E1E1E1E1E1E1E1E1E1E1E1E1E1E1E1E1E1E1E1E1E1E1E1E1E
[OK]番默默哉希士蕃默默哉希卡是贝的向里贝克译贝
LiveViewer 建设用表 页
图
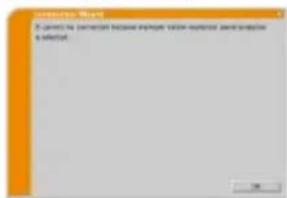
[17]: Since moderator control mode of connected projector (IP address: ********* becomes effective, Multi Projector mode is canceled.
18: You can not operate while moderator control mode is activated.
中日
The Software is being delivered to you "AS IS" and Christie Digital Systems USA, Inc. (CHRISTIE) make no warranty as to its use or performance. CHRISTIE AND ITS SUPPLIERS, INCLUDING BUT NOT LIMITED TO CHRISTIE, DO NOT AND CANNOT WARRANTY THE PERFORMANCE OR RESULTS YOU MAY OBTAIN BY USING THE SOFTWARE. EXCEPT TO THE EXTENT PROHIBITED BY LAW IN YOUR JURISDICTION, CHRISTIE AND ITS SUPPLIERS MAKE NO WARRANTY CONDITIONS, REPRESENTATIONS, OR TERMS (EXPRESS OR IMPLIED WHETHER BY STATUTE, COMMON LAW, CUSTOM, USAGE OR OTHERWISE) AS TO ANY MATTER IN CONNECTION WITH THE SOFTWARE, INCLUDING WITHOUT LIMITATION NONINFRINGEMENT OF THIRD PARTY RIGHTS, MERCHANTABILITY, INTEGRATION, SATISFACTORY QUALITY, OR FITNESS FOR ANY PARTICULAR PURPOSE.
You agree that the Software will not be shipped, transferred or exported into any country or used in any manner prohibited by the United States Export Administration Act or any other applicable export laws, restrictions or regulations (collectively the "Export Laws"). In addition, if the Software is identified as export controlled items under the Export Laws, you represent and warrant that you are not a citizen, or otherwise located within, an embargoed nation (including without limitation Iran, Iraq, Syria, Sudan, Libya, Cuba, North Korea, and Serbia) and that you are not otherwise prohibited under the Export Laws from receiving the Software. All rights to Use the Software are granted on condition that such rights are forfeited if you fail to comply with the terms of this Agreement.
Inneháll
1 Funktioner. 3
1.1 Visningslage 3
1.1.1 Single PC-lage.. 3
1.1.2 Multi PC-lage 3
1.2 Flerprojektorlage 4
1.3 Moderator kontrolläge 4
2 Kompatibilitet 5
1) Kodning anvands.
2)Unik SSID anvands.
There are two methods to get the Passcode from the projector.
Metod 1
3.2.3.2 Knappa in Passcode
IP address(IP-adress): 192.168.1.10 (exempel)
Klicka [Add]. IP-adressen lags till i listen.
Subnet mask(Natmask): 255.255.255.0 (exempel)
Klicka [Connect].
Anslutningsforarde via tradlost LAN till alla projektorer i listen starter.
IP address(IP-adress): 192.168.1.10 (exempel)
Klicka [Add]. IP-adressen lags till i listen.
Subnet mask(Natmask): 255.255.255.0 (exempel)
Klicka [Connect].
IP address(IP-adress): 192.168.1.10 (exempel)
Klicka [Add]. IP-adressen lags till i listen.
Subnet mask(Nätmask): 255.255.255.0 (exempel)
Klicka [Connect].
Anslutningsforfarde via tradlost LAN till alla projektorer i listen startar.
Fortssittpunkt"3.2.5Anslutningochoverforing".(22)
NOTE
: The network connection is established, but the image transmissions on hold.
: The network connection is established and the images on the computer are being sent to the projector.
4.3 Moderatorkontrollfönster
Meddelande 1: A network connection was not established.
Meddelande 2: The number of computer connection exceeds the limit (max. 50).
Meddelande 3: A network connection could not be established.
Meddelande 4: Are you sure you want to connect the selected projector?
Meddelande 6: Do you want to apply suggested network settings as follows?
Meddelande 7: An IP Address overlaps with the IP Address of the projector you are trying to connect to.
Meddelande 8: Incorrect IP Address.
Detta meddelandc visas nar en felaktig IP-adress har stallts in for din dator.
Meddelande 10: There is a projector already connected with your computer.
Detta meddelande visas Near det redan ar en projektor ansluten till din dator.
Klicka pa [Yes] om du vill koppla bort aktuell anslutning. Ny anslutning etableras.
Meddelande 11: In order to connect to the selected projector, you need to disconnect from the current projector.
Detta mcdcdlande visas naralet anslutna projektorer overstiger maximalt antal.
Klicka på [Yes] om du vill koppla bort aktuell anslutting. Ny anslutting etableras.
Meddelande 12: This projector is currently in use (Presenting) by another user.
Meddelande 13: A Slideshow is currently running on the projector that you are trying to display to. (PC-Less Presentation Mode).
Meddelande 14: Are you sure you want to change the input channel of the Projector to 'LAN'?
Meddelande 15: Are you sure that you want to turn on the network adapter?
Meddelande 16: It cannot be connected because improper native resolution panel projector is selected.
Meddelande 17: Since moderator control mode of connected projector (IP address: ***.***.***) becomes effective, Multi Projector mode is canceled.
Detta meddelande visan nar Flerprojektorlage avbryts, da Moderator kontrollage for ansluten projetor blir effektiv for annan dator. Klicka pa [OK] om du vill aterga till foregående skärn.
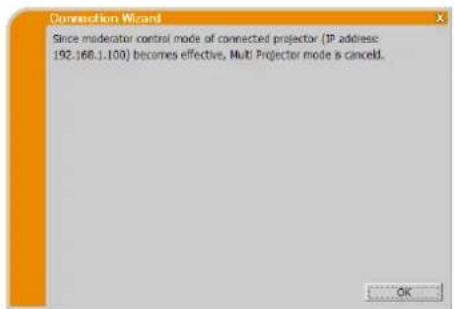
Meddelande 18: You can not operate while moderator control mode is activated.
The Software is being delivered to you "AS IS" and Christie Digital Systems USA, Inc. (CHRISTIE) make no warranty as to its use or performance. CHRISTIE AND ITS SUPPLIERS, INCLUDING BUT NOT LIMITED TO CHRISTIE, DO NOT AND CANNOT WARRANTY THE PERFORMANCE OR RESULTS YOU MAY OBTAIN BY USING THE SOFTWARE. EXCEPT TO THE EXTENT PROHIBITED BY LAW IN YOUR JURISDICTION, CHRISTIE AND ITS SUPPLIERS MAKE NO WARRANTY CONDITIONS, REPRESENTATIONS, OR TERMS (EXPRESS OR IMPLIED WHETHER BY STATUTE, COMMON LAW, CUSTOM, USAGE OR OTHERWISE) AS TO ANY MATTER IN CONNECTION WITH THE SOFTWARE, INCLUDING WITHOUT LIMITATION NONINFRINGEMENT OF THIRD PARTY RIGHTS, MERCHANTABILITY, INTEGRATION, SATISFACTORY QUALITY, OR FITNESS FOR ANY PARTICULAR PURPOSE.
You agree that the Software will not be shipped, transferred or exported into any country or used in any manner prohibited by the United States Export Administration Act or any other applicable export laws, restrictions or regulations (collectively the "Export Laws"). In addition, if the Software is identified as export controlled items under the Export Laws, you represent and warrant that you are not a citizen, or otherwise located within, an embargoed nation (including without limitation Iran, Iraq, Syria, Sudan, Libya, Cuba, North Korea, and Serbia) and that you are not otherwise prohibited under the Export Laws from receiving the Software. All rights to Use the Software are granted on condition that such rights are forfeited if you fail to comply with the terms of this Agreement.
CoepkaHne
1 ΦyHKiH.. 3
1.1 PeknM oTo6paKeHHa 3
1.1.1 PeknM OJHO KOMIbIOTepa.. 3
1.1.2 PeKHM HeCKOJIbKHX KOMIIbIOTePOB 3
1.2 PeKHM HeCKoJIbKHX IpoeKTopoB 4
1.3 PeKHM yIpaJIeHnMoIepaTopa 4
2 COBmecTHMOCTb. 5
2.1 Tpe6oBaHHK aIIIapATHOMy H IPOrpaMMHOMy o6ecIeEHNIO KOMIbIOTepa.... 5
2.2 Bepcnn IpoIpaMMHoro o6ecIeHnn 5
2.3 O6HOBJeHHeIpoIpaMMHOrO o6ecIeueHHa "LiveViewer" 6
3 Haayao paobotb c nporpaMMo1 Viewer 7
3.1 YcraIOBka IporpaMMHoro oecieueHHa "LiveViewer" 7
3.2 IopKJIIOueHne K ceTH 9
3.2.1 3aIyCTHe IporpaMMy Viewerer.. 9
3.2.2 BbIeHTe cnooc noikJIOueHH 9
3.2.3 IapoiIb 13
3.2.4 YcTaHOBka HacTpoE K cETn BpyHyIO 19
3.2.5 IopKJIOUeHne Hpepa 22
3.2.6 Ommbka IopKluOeHn 23
3.3 BkIIOueHHe yHKIIIN "CteBaIpe3eHTaIIH" 24
3.3.1 PeknM oTo6paKcHn.. 24
3.3.2 PeknM IIpe3eHTaIIIN 24
3.3.3 HmHcToHHka 25
3.3.4 PeknM HeckoJIbKHX IIpoeKTopOB 25
3.3.5 PeKHM yIpaBJIeHnMoIEpaTopa 26
4 IcnoJb3OBAHHe IporpaMMbI LiveViewer. 27
4.1 TJIaBHOe MeHIO H KHOIIKN yIpaBJIeHHN 27
4.1.1 BnI MeHIO 27
4.1.2 KhoIIyIpaBJIeHHra 27
4.1.3 OTo6paJKeHHe coCToHaHn 29
4.1.4 IpeekJIIOueHHe peKHaMa oTo6paKeHHa 30
4.2 OKnO yIpaBJIeHHa HeCKoJIbKHMn IpoeKTopamn 30
4.3 Okno ynpaBJIeHHMa MoepaTopa 31
4.4 MeHIO onnn 32
4.5 IpoΦHJIb JaHHbIX 34
4.5.1 O63op IpoΦnJIaHaHbIX 34
4.5.2 Co3JaHHe IpoΦnJIaHHbIX 34
4.5.3 PeJaKTnPoBaHne IpoΦnIaHHbIX 35
4.5.4 PernctpaIIH npoHJI Moe IIOKJIIOueHHe 35
IIpHIOJKeHne 36
1ФункциN
IporpaMa LiveViewer MoKet BbIOHTb H3O6paKeHn H 3Byk c KOMTbTepeHa IpoeKTOp C NOMIOJIbIO
6ecPiPOBOHOJ IOKaJIbHOJ CETn HIN IPOBOHOJ IOKaJIbHOJ CETn. DaHHa IporpaMa OblaJaet MHOKeCTBOM
fYHKIIH, o6ecIeHuOIIx yIO6HyIO IIpe3eHTaIIIO H IIPOcTOE IIOKIOueHne.
1.1 Pexum omo6paxeHua
Ipn HcIOJIb3OBAHH IIporpaMMbl LiveViewer BO3MOXHO IBa peKHMa OTO6paXeHHN - OIHORO KOMIIbIOTepa H HeCKoJIbKHX KOMIIbIOTepOB.
1.1.1 Pexim Ondoro KommbioTepa
B peKHMe OJHOrO KOMIbIOTepa MoKHO OTO6paKaTb H3O6paKeHHa HpOeKTope B IOJIHOkPaHHOM peKHMe H BOCIIPOH3BOIDHTb 3ByK C OJHO ROMIbIOTcpa C IIMOUbIO 6ccIIpOBOIHOH JOKAJbHO cETH HJIN IIpoBOIHOH JOKAJbHO cETH.
PexkIM Ppe3eHTaCm
B pckHMc OIOIOKOIMBIOTepa IIPOeKTop MOKeT 6bITb 3aHHT OHNM KOMIIIBOTepOM H 6JIOKHPoBaTB IOCTyI C JIO6bIX IpyTHX KOIMBIOTepOB,ecIN B Iporpamme LiveViewer BbI6paH Presenter Mode (PckHM IIpe3eHTaHH).B xOJe IIpe3eHTaHHMOKHO He 6ecNOKoHTbcra O TOM, YTO H3O6paKeHHe Ha 3KpaHe HEOXKHaHNO IIpeKJIIOHTcra HA 3O6paKeHHe, OTIIpaBJIeHHoe IpyTM KOMIIIBOTepOM. PeKHM IIpe3eHTaHH MOKeT 6bITb 3aHaB B MeHIO OIIHH IporpamMb LiveViewer.
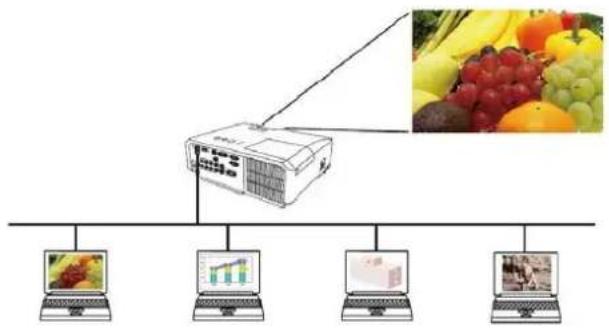
1.1.2 Pexim HeckoJIbKInx KomnIbItepOB
Ipoektop MOKeT OIOHOBpemEHIOKA3bIBaTB H3o6paKeHHc4 KOMIIbIOTepOB MaKCHMaJIbHO.
ПРIMECHEN
Ipeada 36kyko6o20 cuh7a 6 peXcme HeckoJbKux KOMnbiomepo8 ne603moJua.
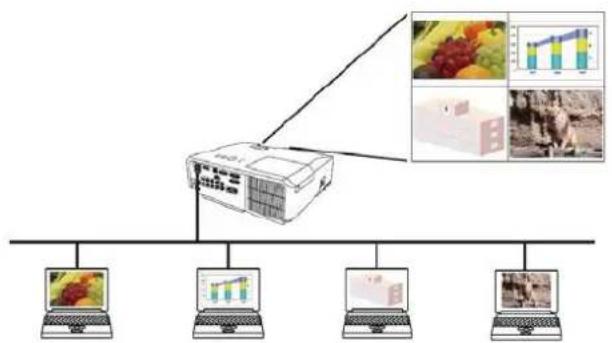
1.2 Pexum HeckoJIbKux npoeKmopoe
BpeKHMHeeCKOJIbKHX IIPOeKTopOB MoKHO OIIIOHBpeMeHHO IIOIJIHOHTb K KOMIIbIOTepy 10 12 IIPOeKTopOB c IOMOUIbIO 6ecIIpOBOHoi HIN IIPOBOIDHOJ JOKaJIbHOI cETH.
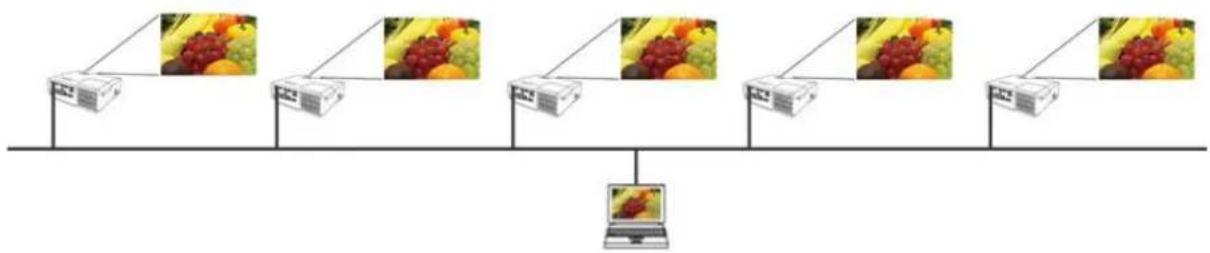
1.3 Pekum ynpaeneHua modepamopa
KOMIbIOTeP MOJHO yCTaHOHTB B peKM MoIEpaTopa (XoCTa), KOToPbM MOKeT yIpaBJIbTB BCEMH OCTaJIbHbIMN KOMIbIOTePAMN (KJIHeHTaMH), IIOKJIIOueHHbIMN K IIpoEKTOpy C IIOMOUbIO 6ecIPOBOHOJ IOKAJIbHOJ cETH HIN IIPOBOHOJ IOKAJbHOJ cETH. IIOCKOJIbKy KJIHeHTb HE MOrTy IIPaBJIbTB IIporpAMMoI LiveViewer N IIpoEKTOpOM, XOCT MOKeT 6e3OTKa3HO H 6e3OIIacHO pa6OtaTb C IIporpAMMOJ.
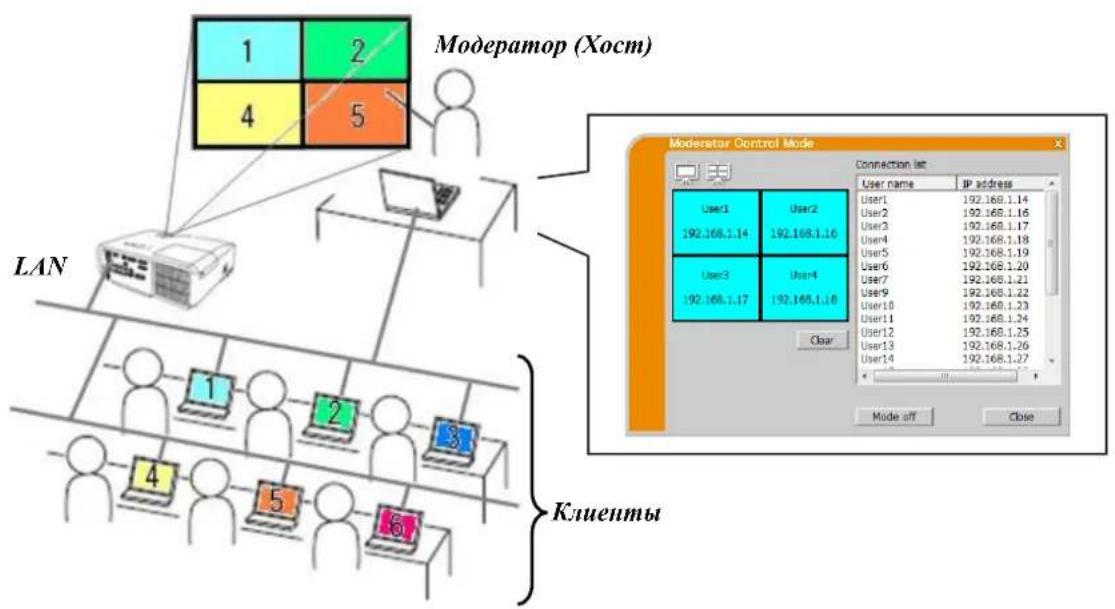
2 COBmecTUMOCTb
2.1 Tpe6oBaHua K annapamHomu u npo2paMMHomy oecneueHuO kOmblomepa
OnepaHnHaA cnCTema
WindowsXP
Windows Vista®
(ПakETобновеня 1ип6олee no3dн)
Windows® 7
Home Edition / Professional
Home Basic / Home Premium / Business / Enterprise / Ultimate
Starter / Home Basic / Home Premium / Professional / Enterprise / Ultimate
LentpaBn npoeccop
Pnata rpaФнк
Побстразнctв ЗжсткогдИСКа Be6-б03peBaTeЛь
Ppivod CD-ROM/DVD-ROM
BecnpoBOnHa nokanbHa cetb
Windows® 8 / Windows® 8 Pro / Windows® 8 Enterprise
Windows® 8.1 / Windows® 8.1 Pro / Windows® 8.1 Enterprise
Pentium 4 (2,8 Tt nn Bblwe)
VGA: 640x480 nII BbIe (peKoMeHdyetcXGA: 1024x768)
65 536 CBetOB NJI BbIe
100 MБ nIN 6OJIbSe
ΦyHKnHg 6bIcTpRo IIOKIIIOChHHIpeDlaT BapHaHTB IOKIIIOChHH K IpOeKTopy. H3 Hx MoKHO Bb6paTB BapHaHT, COOTBeCTByIOH NBAIHMM Tpe6oBaHHM.
Bb6op H3 cHncka
IIOKJIIOUeHne c npoJem
PiKIOUeHHc HMOOHTIOIPOHJIA
PiKIOUOCHINcIIOMOIIbIOHCTOPHN
Полкюченьруную
MocIOJIKIIOUCHINc
B HcKOTopbIX cIyauX B OdyH CcTb MOKET 6bITb BKIOUChO HecKOJIbKO IIpoeKTopoB. B OTOM cIyuae IpeEi OTIIpaKBON H3O6paKeHHaY6eINTEcb, YTO BbIbpaH HyKbI IIpoeKTop.
NYHKT 3. 3anyctnte ceTeByo nppe3eHTaunio (24)
HaKpaHnOBHTcTgIaBHOe MeHIO IpOppaMMb LiveViewer. IocJIe 3TOrO MOKHO OTIIpaJBITb H3O6paXeHHN B IIPOeKTOp YpeE3 cETb.
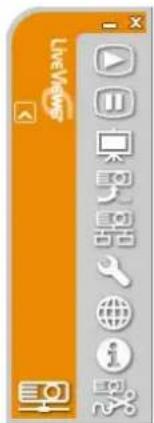
Pnc.3.a TnaBHOe MeHIO npoRpaMMbI LiveViewer
3.1 YcmaHOBka npo2paMMHO2O oecneueHna "LiveViewer"
IINIOJIb3OBaHnI IporpAMMbI LiveViewer cHaJaI Heo6xoIHMo yCTaHOHTb IpOprpAMMHoe 06ceHcHHe c Dc, pIIJIaRaEMOrO K IpoeKTopy, Ha Bce KOMIbIOTepB, KOITOpBHe HxKHO IOIKJIOOHHTb K ceTeBOMy IpoeKTopy. CNeYIOUIne IPOUeIpybI NOKa3bIAoT, KaK yCTaHOHTb LiveViewer Ha KOMIbIOTep c Windows7.
- BkIOHHTe KOMIbIoTe H BOIIITe B CnCTeMy B KaIEcTBe aIMHHNtPaTopa.
2.3akpoirBceOCTaJIbHbIePnJIOKeHNr. - BCTaBbTe BXOJIINH B KOMIIIEKT IOCTaBKN KOMIIaKT-DNCK B CD-ROM/DVD-ROM INCKOBOD KOMIbIOTepa.
- Translation Yepe3 onpeJeIeHIOe Bpem IIOBHTcI HaJIOTOBoe OKHO Choose Setup Language, IpeCTaJIeHIOe cIpaBA. BbI6epHTe HJKBII aIITcP B IcpeHIC n HAKMHTc KHOIKy [OK].
ПРМЕЧАНС
Ecu duao2o0oe okno "Choose Setup Language" ne nonaemcn, bnuuume ciedyouue deicmua:
(1) Hanaumme khonky [Ilyck] ha naeneu uncmpymuhenmo u obibepume
"Bbnoaumb..."
(2)BedomeE:setup.exe u na:kmume[OK].
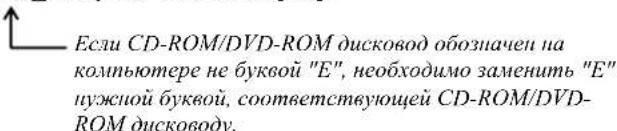
Eci npoepamma 3mou jce cepuu yice ycmanohena, nonumcn bompoc o neobxodmuocmu ydaenu. Bbepume "Ja" dyaeduenu. Haumme khonky [Cancel] u ydaienue npoepammba oydem ommeneno. Eci npoepamma ydaiena no ouuke, ycmaunobume ee biobb, naunna c nepoi npoueypbi.
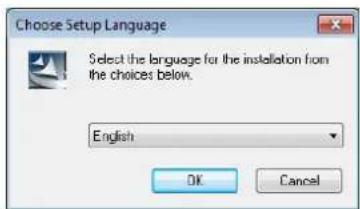
-
Translation Yepe3 onpeJeHHeB Bpem IIOBHTc HnAIOROBoe OKHO Welcome, pEcnTabHeHHe cnpaba. HaKMHTe KHOIky [Next].
-
IIOBHTcI dHaJIOT cJIHcE3HOHHbIM cOrJIaIIeHHem. EcJH BbI coJIacHI, BbI6epHTe «I accept the terms of the license agreement» n HaxMHTe [Next].
-
IIOBHTcra JHaIOT BbI6Opa MecTa yCTaHOBKn. HaxMITE KHOIIKy [Next].
ПРМЕЧАНС
-
Byem cosdana nanka C:\Program Files\Projector Tools\Livewer6, u npozpamma byem ycmanoeena 8nee. ycmanoeku npozpammb 8 dpzyy no nanky, nahcmume [Browse] u b6bepume dpzyy no nanky.
-
IIOBHTcI HaJIOrOBoe OKHO Select Program Folder. IIOITBepInTe HMa IIaIKn IINI IIpoIpaMMbI. EcJH "Projector Tools" Bac yctpaHbAcT, HaxMHTe KHOIIKy [Next] IINI IIPOIoJIKeHnE. EcJH HeT, BBeJIte HxKHOe HMa IIaIKN, a 3aTeM HaXMHTe KHOIIKy[Next].
-
Yepe3 KOpOTKoe BpEm yCTaHOBka 3aBepuHTcra, H Ha 3KpaHe KOMIbIOTePa IIOBHTcra dHaJIor 3aBepuHnry YcTAHOBKn, IIpeCTaBIeHHb cIIpaBa. HaKMITE KHOIIky [Finish].
YTO6bIy6cHITbcB IpaBnHbHOCTN yCTaHOBKN IIporpAMMbI, HAKMNTe KHOIIKy [PiCK] Ha NaHeIN HnCtpyMeHTOB, Bbi6epHTe "Bce IporpAMMbI", a 3aTeM IauKy IporpAMMbI Projector Tools.
EcJyycTahOBka 3aBepHHeHa ycHHeHO, B 3ToI IaJIke IIOBHTcR "LiveViewer".
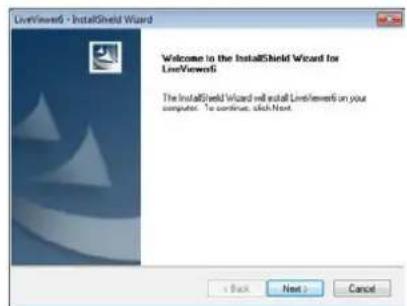
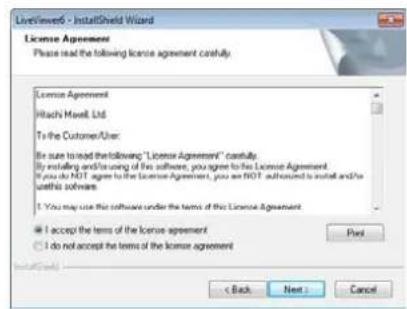
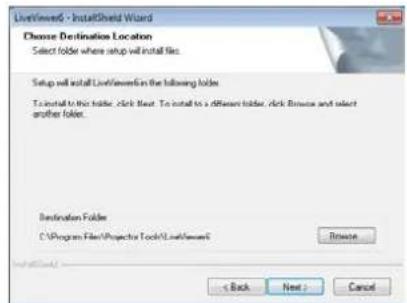
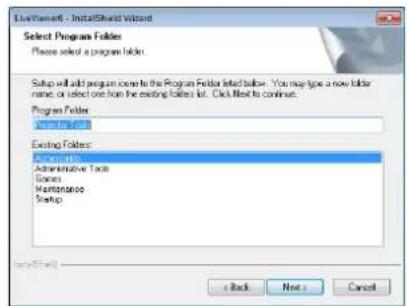
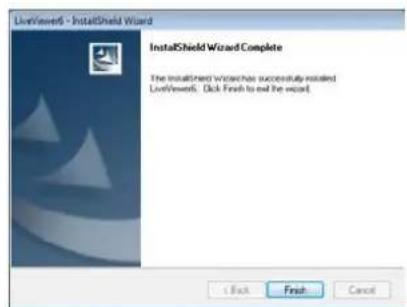
3.2 NooknoueHue Kcemu
IporpaMa LiveViewer o6ecieuHbAe HcKoJIbKO BapHaHTOB IOIKIOueHHa K cTeBOMy IpoeKTOpy. H3 HHX MOKHO Bb6paTb BapHaHT, HauJyUHM 6pa3OM COOTBcETByIOUHN CHCTEM N IOTpe6HOCTM IOJIb3OBAeJI. OINCAHNA B daHOM DOkymCHTe IIpHBCdEHI JIa CUYHAR HcIOJIb3OBAHn Windows7.
ПРМЕЧАНС
Hu3Ka 6KOpocmb nepedaHbIX, 6b3BaHHa HedocmamooHou uupuHou noIOcbi KaHa c63u MeOcdy KOMnbIomepom u npoeKmopom 60 6peMn oBmua daHbmu MeKdy HeCKoJIbKmu KOMnbIomepaMu u npoeKmopom, Moicem npueecmu KyyduueHko Kauecmoa u3Obaocenmu u npepb6aHuro 36yka.
Ipu nonbimke nookouenueepe3 cemk npoekmopy, komopbu uonobyemc npyzum kombnomepmdu 106paekuen USB,mo moecnpueecmu knocceu ockopcmnepea,umo b13oem yxyduene kaecma uO6paekuenu nnpepbuaune b6boda 38ka.
Select From List (Bb16op n3 cinnka)
IpeiIInTe K nyHKTy "3.2.2.1 Bb6op Hc cncka" (10)
Enter Passcodc (BboI npo.I)
IpeenIITRE K npHkTy "3.2.2.2 IooKIOOeHne c npaoiem". (10)
Profic (IpoΦn.Ib)
Ipeennte K nyKry "3.2.2.3 IopKnnoeHne c HOMOJIIO npoHnJ". (11)
History (Hctopn)
IpeiHnte K nyHKrty 3.2.2.4 IIOKIOueHne c HOMOIOIO HcTOpHH" (11)
ConfigureManually(HactpoikaBpyHyio)
IpeeiHrTe K nyKry "3.2.2.5 KoHfHrypupobAHne BpyHyio". (12)
My Connection (Moe noKIOueHne)
Ipeennte K nyHkry 3.2.2.6 Bb6op Mocro noKIOueHnra. (12)
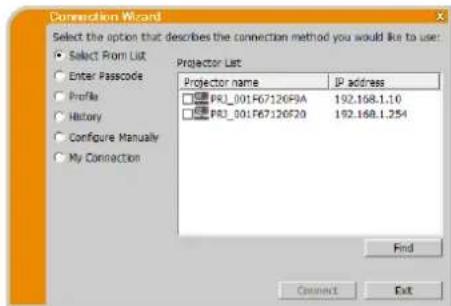
3.2.2.1 Bb6op n3 cnncka
Ipeen Bb6opom 3TOIyHKTa KOMNBoTeP IN IpoeKToBIOJIKHbI 6bIB IOKJIIOHeHbIK OIOHOcTn.EcIN IOKJIIOHeHne yKe ycTAHOBJeHO, Bb6epHTe "Select From List (Bb60p H3 cInncKa).B OKHe IIOBHTcra Projector List (CINcOK IpoeKToPOB), KOtOpBII pCCTaBIACT CO6O CNCOK IpoeKToPOB, IOKJIIOUChHHbIX K cETH. Bb6epHTe IpoeKToBb, KOtOpBe HYKHO HcIOJB3OBaTB, H ycTAHOBHTe PJIaJKK. 3aTeM HaKMHTe KHOJIky [Connect]. HaHHeTcR IpoIEcc IOKJIIOHeHn.
IpeeiINTEKnyHKrty"3.2.5PioknoeHHe Hpeiaa". (22)
CtarycIOKIOUOCHHMOKHO IPOBcPHTb C HOMOUsbIO CJIeIyIOUero 3NaUka B cINcKe IPOEKTROPOB.
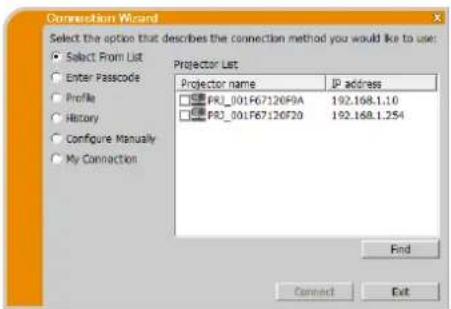

:IOKJIIOUeHHe K cETn Hc yCTaHOJIeHO.
:IIOJIIOUeHHe K cetn ycTaHOBJIeHo, HO IpeJaua H3o6paJKeHH BpeMeHHO OCTaHOBJeHa.
: IIOJIIOHHeHKe C cetn ycTaHOBJIeHo, H3O6paKeHHI NpeJaOTcK c KOMIbHTepa B IIpoEKTOp.
ПРМЕЧАНС
Bcnucke moochno odnoepemnho bibpambdo 12 npoekmopoe.
- Ipu b6bope nckoibkux npoekmopoe 6ydem a6mamuuecku b6bpant peum ncekoibkux npoekmopoe. (125)
B 3abucumocmu om ccmohn cemu 6 cnucke moek me 6bmb nu odno npoekmopa.
Haemume knonky[Find].
3.2.2.2 Поdkлоченс napolem
EcINI INIIOKIIIOUChHn K IPOeKTOpy HJxKHO HCIOJIb3OBArB IapOIb, Bb6epHTe napaMeTp "Enter Passcode (BBOJ napoi)." B OKHe IIOBtcaIOCTyINHbIe cTeBBIe aIaITePbI N OKHa IINB BOJa IAPOI. IPOeKTOp OTObpaxKaET IAPOIb HA EKpaHE. IPOcTO BBeIITe IAPOIb B IporpamMe LiveViewer IINIOKIIIOUChHn ceTeBOrO IPOeKTOpa. Bb6epHTe cTeBOH aAIITeP, KOTOpBHyKHO HcIOJIb3OBArB, ycTAHOBHTE cRO fIAJOK, H BBeIITe IAPOIb IPOeKTOpA, K KOTOPOMY IIbITaeTec IIIOKIIIOHTbcra B HAcTOruM Momet. 3aTeM HaKMITE KONIKy[Connect]. HaHcTe TPOuecc IOKIIIOUChHn.
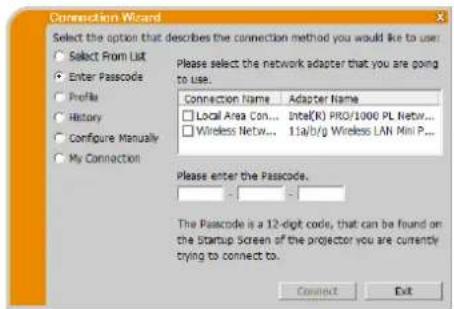
Ipeepnnte K nyHkTy"3.2.5 IIOKIOHcHHe H npepaa". (B 22)
IIIIOJIyueHHH6OJIeEOJIoApO6HOHHΦOpMaHHo IAPoJIe cm. “3.2.3 IIapoi” (13).
ПРМЕЧАНС
- Ppu omycmcmuu 6 kOmnbomepe docymnbbx cemebix adanmepob nookuoyene dyem nebo3mockno.
B 3aucumocmu om ccmnna cemu moem nompeobambcg puyu ycmaoumb IP-adpec u dpyue hcmpouku cemu.
3.2.2.3 NpoknoueHne c nomooBIO npoФнla
EcnI IJI INIKIOHHeN K CeTeBOMy IpoeKToPny Heo6XOHNMO HcIOJIb3OBaTb IpoΦHJIb DaHHbIX, BbIbepHTe IapamEtpr“Profile (PiOphJIb)”.B OKHe IIOBHTcR Profilc list (CINcOK IpoΦHJIe), KOtOpbI IIpeIctABJIeT cO60I CINcOK CoXpaHEHHbIX IpoΦHJIeI DaHHbIX. 2TO Heo6XoHNMO IJIa coXpaHEHHra IpoΦHJIa DaHHbIX 3apaHee.
Bb6pnte daHbIe 'Profile (PpoHn), KOTOpH HxKHO HCIOBtB, HycaHOBe erO fJAKo. 3aTeM HaKMHTe KHOIKy[Connect].HaHcTcIIPOUcc IIIOKIOUChHn.
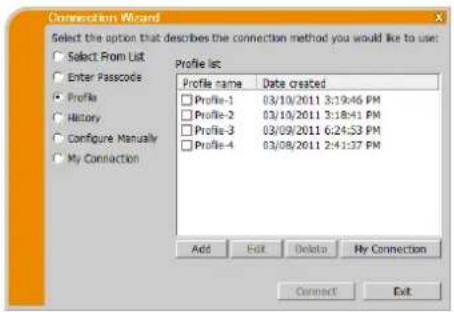
IpecnHntc K nyHKry"3.2.5 IooKIOOeHHe H nepea#a". (22)
JIOIpyeHH6OJIee IIOIpO6Hoi HhOpMaHIN O IpOoHJIe cm. “4.5 IIpoOuIb dAHHbIX” (34).
ПРМЕЧАНС
-Ди npobepku hacmpoek 6 npoduie dahnhcx ciedyime npubedeHHou huKe npoueype.
Bb6epume npofoa dbnhhbx dna npoeepku.
Iepemecmme Kypcop K npofoio daHbix u ueKhume npaou Khonkou Mbuu o mO6paKeHua 8cn1b6auoeo Meuo.
Bbepume oom Mmo "Properties" uueKnme neou Knoonkou Mblu.
OmoopaKaemcaunupopmaua o nacmpouke 6 bipannom npoepae daaix.
EcnHa npoekmope ycmohoe DNCHP, cemeoe nokkouenue npoekmopu u Komnbomepa he603mocho 3a 1IP- apecaEcn neo6xodmo uocno630amb nokkouenue c nomouyio npoipnpe, pekomendyemcna ycmahobum b npoekmope napamemp DHCP 6bikouenhoe noioxcene.
3.2.2.4 NpokJIoueHne c nOmoosbIO nCTOpH
EcJINIIOKIIIOUcHnK IIOPOeTOpy HUxKHO HcIOJIb3OBaTB JaHHbc HCTOPHN, Bbl6epHTe Iapametp "History (Nctopn).B OKHe IIOBAHTcR History list (CINHCOK NCTOPHN) IOKIIIOUcHnI, IIpeCTaBIAIOHm co6oI cINcOK IIOeKTOPOB, IOIKIOUaBIIIHXcR B IPOIIOM.
Bb6epHte NaHHbIe HcTOpHH, KOtOpyIO HyXHO HcNoJIb3OBaTB, HycTaHOBHTE ee _II aKoK. 3aTe mHaKMHTe KHOIKy[Connect]. HaHTcra IIpoIEcc NIOKJIOHeHH.
Ipeennte K nyHKty3.2.5 PoiKnoeHne Hpeea.
EcH Bam Tpe6yctcckoiHPOBaTb 3aHHCb HCTOpHN B IpOphiHb DaHHbIX, BbIbepHTe 3aHHCb HCTOpHN HHaKMHTe [Register to profile] (3apeHCTpHPOBaTb B BHe IpoΦHie). IpOphiHb DaHHbIX He MoKet 6bITb YdaJIeH ABTomATnueckn.
JIIOJIyueHn6oJIee IIOJPO6HO HhOOPMaHIN O IpoΦHJIe cm. “4.5 IIOPOΦHJIb DAHHbIX”. (34)
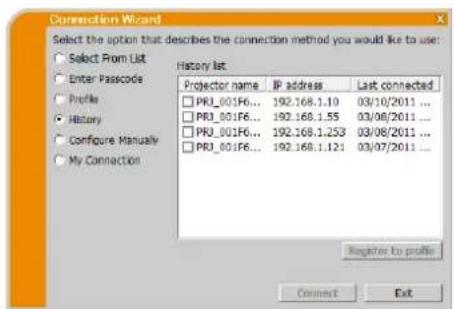
ПРМЕЧАНС
Makumabhoe uucno sanuceu umopuu pa6no 20. Ipu coxpanenu 21-uzanucu, ona sanucbgaemna mecmocamou cmapou u3 20 tanucannux panee.
Hnfoopmau o dame u 6peenu kaocdu tanucu ucmopuu obnooeemcn npu nodknoeenu K cemu c nomoubu 3anucu 6 ucmopuu.
EcnHa npoekmope ycmanohn DHCP, cemeo nokkiouehne npoekmopua KOMnbomepa he603moicno 3a u3menenip IP-adpeca. Ecu neobxodmo uonob36amb nooknoeuec nomoubuucmopuu pekomehyemc ycmnoumb npoekmope napamemp DHCP bbluoeuoene noiokeune.
3.2.2.5 KOnΦnIpynpOBAHne BpyHyIO
EcJIN NOKJIIOHHe HJxHO HaCTPOHTBpyHyIO, Bb6epHTe InapaMeTp "Configure Manually (HacTpoIka BpyHyIO).B OKHe IOBAETCAIOCTyIIHbC cctCBbc aaiITcpebl.
Bb6epHTe ceTeBOH aIaIITEp, KOtOpb HxKHO HcIOJIb3OBaTB, H yctaHOBHr cro fJiaKoK, a 3aTcM HaxMHTe KHOIKy[Next].
IpeeiHHTe K IyHKTy"3.2.4 YcTaHOBka HacTpOcK cETH BpyHyIO". (19)
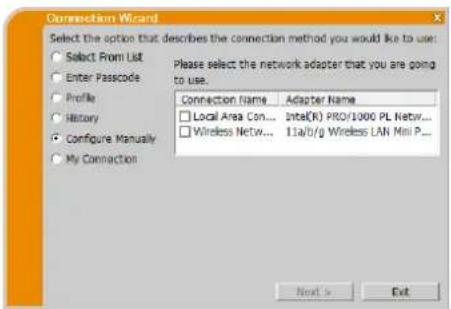
ПРМЕЧАНС
OOnoBpeMeHIO moHIO noKmoUumb do 12 npoekmopoe.
Ipu noekuouenu nckoibkux npoekmop06 byem a6mamuecku b6bpant pecxum neckoibkux npoekmop06. (25)
3.2.2.6 Bb6op Moero nooknueHna
Pn Bb6ope Moero IIOKIOUOeHNA KOMIbIOTep IIOKIOUOaETcR K
IPOeKTOpy IO cTeN C IIOMOIIbIO DaHHbIX IPOoHINRA, KOToPbc 3apaHec
3aHaBb IJIpeXHMa"My Connection (Moe IIOKIOUOeHne)"
Bb6epHTe npaMeTp "My Connection (Moe IIOKIOUOeHne)" H
HAKMITE KHOIIKy [Connect]. KOMIbIOTep HeMeJIeHNO HaHHeT
IPOeCC NIOKIOUOeHNA K IPOeKTOpy.
Ipeenntc K npkty"3.2.5 PoiKIOUeHne H npeaay". (22)
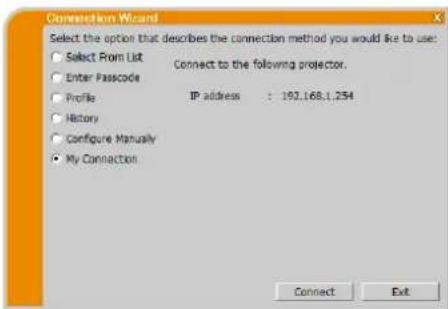
PIMMEUHNE
Ecnu na npoekmope ycmano6hen DHCP, ceme6oe nokknouehne npoekmopua KOMnbomepa he603moJcno u3-aa 1P- apeca. Ecnu neoxodumucno83oambMoe nokkouehue, peKomehooyemc ymaHOobum 6 npoekmope napamemp DHCP 6biknoeienoe noioxeneue.
Ecnn peKuma Moe nookouenue he 3adaa daanbhe npofu,peKum He moocem bttb ucoNo.308aH.
3.2.3 NapoiB
YHHKAJIbHAA cHCTeMa IapOJIe HIO3BOJIaET OueH 6bIcTpo H IPOcTO IOIKIOHTbcR K CetH. IApOJIb - 3TO KOJ, XapaKTEpH3yIOUH cTeByIO HAcTPOJky IPOeKTopa. B cIyuae BBOJa IAPoJIa B IporpaMMe LiveViewer Ha KOMIIbIOTpe, HAcTPOJKN cTeH IPOeKTopa H KOMIIbIOTepa 6yUyt corlaobAHbI, H IOIKIOUChHe 6yIcT HEmdJIeHHO yctAHOBJIeHO. B OTom pa3JeIe ONHCAHO, KaK IOJIb3OBaTBcR IapOJIem.
ПРМЕЧАНС
Cucmema napoleu ne pabomaem npu cledyouux ycooux. Ecu baua cuemema coombemcmeyem odomy u3 nux, ycmanosume nooknoenue 6pyhny noce 60da napoiia.
1) Hcnno3b3yemcKaKoDupo8anue..
2) Mcno7b3yemcnyuHa7b6n b SSID.
B Kauecmee 3abodckux SSID ucnno3yionmc ciedyioque 4 koda;
3aodckou SSID 1: wireless
3aeodckou SSID 2:WLANProjector1
3a60dckoi SSID 3:WLANProjector2
3aodckou SSID 4: WLANProjector3
3) Macka nodcemu ne omioumcKkiacy A,B uiu C.
KraaccA:(255.0.0.0),Kraacc B:(255.255.0.0),Kraacc C:(255.255.255.0)
3.2.3.1 ПolyчENE napoly
IapoiB - 10 12-pa3pAIIb KOI, coCTOaIIH H3 6yKB H uHΦp ("1-9" H "A-Z"). IapoiB oTO6paKaCTc H aEkpAne IpoeKTopa.
Frpyma moJeIe IpoekTopoB:A
CyueTbye Tba cnoo6a noIyueHnna npOJIa ot IpoekTopa.
> Cnoco6 1
BkIIOHTe IPOeKToP H y6eHITecb, YTO IPOeKToP NOKa3bIbAet H3O6paKeHHe Ha 9kahe.
HaKaTb KHOIIKyCOMPUTERHaIyJIteIINCTaHIOHHOROyIpaBJIeHHN HINKHOIIKyINPUTHa IIPOCKTOPcIIBi6opaLANB KaueCtBC BXoIHoro IopTa.
EcHn CnHaI Ha nopt LAN He noctynaet,napoIb oTo6pkaeTc H aKpaHe.
> Cnoco6 2
BkIIOHTe npoeKTo n y6eHNTeB, TTO npoeKTo noka3bIbaT n3o6paKeHHe Ha 3KpaHe.
HaXMMTe KHOINKy MENU Ha IyIbte DnCTaHIOHHOro yIpaBJIeHHra HIn KHOIIKN / / / Ha IIPOCKTOpe, YTO6bI BBIEcTH MeHIO HA OKpaH.
√ИиJOJIb3yIte KHOIIKN Kypcopa / IJIa BbI6opa "TIOJPOB.MEHIO" H KhoIIKy Kypcopa IJIa BXOJa B IIyHKT MEHIO.
√ИспοЛьзУгTe KНОПКи Курсopa / ДЯ BыБОра CETb И KНОПКу Курсopa ДЯ BXODaВpyHKT MCHIO.
√Ииьугскногнкypcopa △/▼ДЯБыбopaПинКТа INHΦOPMAIIHAИ KHOIIky Kypcopa トлго6paЖенпунКТа INHΦOPMAIIHA.
√ IapOJIb IOBHTcB B OKHe HHΦOPMAIIJIA.
ПРМЕЧАНС
- Hcno3yme cnoc6 2, k02da u3o6paaceneue c KOMnbIomepa 6b6odumca Ha 3Kpah npu nomou npoepaMnOzo
0ecneueHn "LiveViewer" u1u k02da 6 kauecmbe ucmouhka 6xodHOzo cuzhaia 6b6pan nopm LAN.
Eeu nookouenue meky npoekmopum u konmbiomepm ne npocxodum 6 meuenue 5 Munym, napob Meiremca.
Гушиma MODEJIeI npoektoropB: B
CyueTByeIbA cnoo6a Iouyene HapoiO rIpoektopa.
> Cnoco61
BknHHTe npoeKTo n y6eHNTeCb, TTO npoeKTo noka3bIbAet H3O6paKeHHe Ha 3kpaHe.
HaKaTaB KHOIkyCOMPUTERHaNyIbTe InCTaHIOHHOynpAbeHHN KHOIkyINPUT Ha IpoocKTope DIA Bb6opa LAN B KaecTBe BXOHOro IopTa.
EcJIN cHnHaI Ha IIOpI LAN He IOctynaer, IapOJIb OTo6paKaercaI HA 3KpaHe.
> Cnoco62
BknHHTe npoeKTo n y6eHNTeCb, TIO npoeKTo noka3bIbaert H3o6paKeHHe Ha 9kpaHe.
HaXMMTe KHOINy MENU Ha IyIbte IInCTaHIOHHO yIpaBJIeHHN HIN KHOITK / / / Ha IIPOeKTOpE, YTO6bI BBIEcTH MeHO HA OKpaH.
√ИиJOIb3yIte KHOIIKN Kypcopa ▲/▼ДЯ BbI6opa “ПОДРОБ.MEHIO"н.KHONKY Kypcopa IJIYBXOJaB NYPHT MEHIO.
√ИспOTьЗУITE KHOПКИ KYPcopa / LJIЯ BbI6opa CETb N KHOПКу KYPcopa LJIЯ BXOДaВ IpyHKT MCHIO.
√ NcIOJIb3yIe KHOIIKN Kypcopa ▲/▼ IJIY BbI6opa NyHKTa CBEJEHHO O BECTIPOBOJ.LAN HIN CBEJEHHIO O IIPOBOJHO LAN B 3aBnCHMOCTH OT THIIA HcIOJIb3ycmOrO IIOJKIOUChN, H NaKMHTe KHOIIKY Kypcopa>.
IAPoJIbIOBHTcB BcpxHcM yTJy BOKHe "CBEDEHHA".
ПРИМЕЧАНС
Hcnob3yume cnoco 2, k0da u3o6paicene c KOMnbomepa 6b6odumca Ha 3kpan npu nomou npoeammmno 0becneueiue "LiveViewer" uu Ko2da 6 kauecmbe ucmouuka 6xodn0c cuuaa 6b6pan nopm LAN.
Ecu nodkuoyene Meocdy npoekmopom u KOMnbomepom He npoucxodum meuehue 5 Muhym,napoB Mehaemca.
Cyuecmeyem dba muna Passcode (Haporeu), HAPOLIB BECIIPOBOU u HAPOLIB IIPOBOHbI LAN. Bb6epume coombemcmyouui mun dya uno1b3o6anu, c6epaa cb cledyouumu u3o6paekenuu.
HeiopeCdtBcHIOE IOKIIIOUChIe IPOcKTopa K KOMIbIOTepy.
IpeiHnTe K IyHKTy "3.2.3.4 HEnocpeIcTBHeHoe NIOKJIIOHeHne IpoeKTopa K KomIbIOpEpy". (16)
ПОДКИJOUEHINHIIPOEKTROPAK KOMIIBIOTEpy c HOMOIOBIO IOPOBOHOJIOKAJIbHOcETH.
IpeiHTe K nyHKTy"3.2.3.5 IooKJIIOueHHe IpoeKTopa K TOTKe IOCTyNa C HOMOIIbIO IPOBOHOJIOKAJIbHOcTH". (17)
ПОДКИJOUEHNEIPOEKTOPAKTOKEIOCTYNAcHOMOINIBIO6ecIPOBOHOJIOKAJBHOIceTH.
IpeeHTe K IyHKrty3.2.3.6 IoKJIIOUcHHe IpoeKTopa K TocTyNa C HOMOIIbIO 6ecIpOBoHOJIOKAJIbHOI cETn." (18)
IpoBoHaHa JIOkaJIbHa nCeTb
IIpn HcIOJIb3OBAHH IIpoBOHIO JOKaJIbHOI cETN IcpeHNTc K IIyHKTy "3.2.3.7 IIpoBoHnA JIOKaJIbHa cetb". (118)
3.2.3.4 HenocpeDCTBeHHoe noKluoyHne npoeKTopa K KomnbIOTepy
HakmHTe KhoIky [Connect]
HaHHeTcI IpoIeCC IIIOKIIIOueHnIepe3 6ecIIpOBoIDHyIO JIOKaJIbHyIO CcIb.
IpeenHrTe K nyHKry"3.2.5 IIOKIOeHne H nepeaqa". (22)

Pnc.3.2.3.4: HeIOscpeIcTBeHHoe IOIKIOHoeHne IpoekTopa K KOMIIbIOTepy
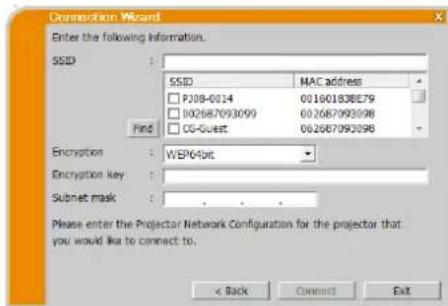
ПРМЕЧАНС
* ymo6bu naumceme6be nacmpouku npoekmopa,cm.IIPIMEYAHHE.15
- Haokumme knonky [Find] dan obnohuehen chncka SSID.
* Eucnoobsyemra uuppobanue,neobxodmo eoe nacmpoumb. Opaumecb kaadmuuncmpamopy cemu dna noyuene Knuuua uuppobannu, ymanoaeauoo 6 npoekmope. Kuou uuppobannu 6ceda omobpaicaemc kak
^*3 Ipuucno6306anuu nodmacku,he cooombcmbyioueui kiaacy A/B/C, zadaime ee.
3.2.3.5 IopKnIouHe npoeKTopa K ToUke DoCTyNa C NOMOuH IO npOBoHOJIOKAJIbHOcTn
Hacpoika Ha ToKe IocTyHa.
BcHrTe cIeIyIOuyIO HOpMaunIO.
SSID: WirelessAccessPoint (npumep)
Encryption(KoДированe):
WEP64bit (npmep)
Encryption key(KnouuΦpOBAH) 2
********** (npimep)
HactpoiknpoekTopa.*3
BBeHTe cIeIyIOIyIO HOpMaIIHO.
Subnet mask(Macka noDCTe) ^*d
255.255.255.128 (npimep)
HakMTe KhoNky [Connect].
HaHHeTcI pOeess IIOKJIIOueHH.
IpeeiHnTe K nyKToy3.2.5 IIOKnIOueHne H npeea". (22)
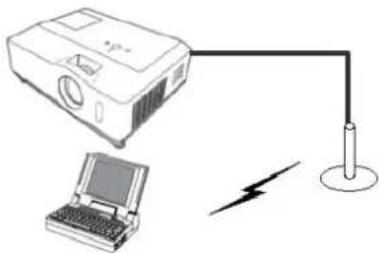
Pnc.3.2.3.5:IOJIKHOUeHHe IPOeKTopa K TOUKe IOCTyIIa C IIMOIOIIO IPOBOHOH JIOKAJIbHOH CETN
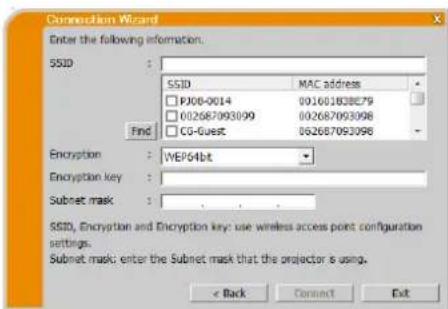
ПРIMECHEN
*Iohyuume y admuucmpamopy cemu unhopmauuo o hacmpouke 6 moke docmyna.
HaKmune kHonky [Find] dioobohoeu cnuCKa SSID.
*Ecuonnoyemca uuppobanaue,neoxbodmo eoo nacpmoub.Obpamumecb k admnucmpamopy cemu dnoyuhenka codupobanu,ycmanohcenho 6 moke docmyn.Kou uuppobanur 6ceda omobpaacaemc KAK"**
*Hmobshtauu cembehe hacmpouku npoekmopa, cm. IPIMMEAHINE. (15)
*Ipu ucnno3oanu nodmacu, ne coombemcmoyoue kiaccy A/B/C, sadaime ee.
SSID: WirelessAccessPoint (nppmep)
Encryption(KoДированe):
WEP64bit (npmep)
Encryption key(KnouuΦpOBAH) 水
********** (npimep)
IP address(IP-aDpec): 192.168.1.10 (npimep)
Hakmte KIOKy [Add]. K cHncky 6yIcT IO6aBJIeI IP-aIpc.
Subnet mask(Macka noDCTeN): 255.255.255.0 (npimep)
HaxMMTe KHOIIKy [Connect].
HaHHeTc npoeeC NOKIOueHnYepe3 6ecnpoBOHyO JOKaJIbHyO cTb.
IpeeiHrTe K nyHKry3.2.5 IIOKIIIOeHne H nepea#a". (22)
ПРМЕЧАНС
*Tmoobhaumcembehehacmpouku npoekmopa,CM. IIPMEYAHNE.(15)
HaKmume knonky [Find] ooboheneu cnucka SSID.
* Eucnohyemue uuppoanue, neoobxodmo eo hacmpomb. Obpamumecb k admuuucmpamopy cemu dnoiyuena Knoa uuppoanua, ymanobienzo 6 npoekmope. Knou uuppoanua bceeda omobpaacaemca ka""****".
Bcnucke mozcho zapeucmpupobamb do 12 IP-adpecoe.
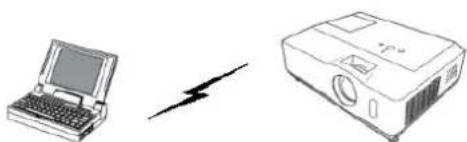
Pnc.3.2.4.1: HeioocpeIcTBeHHoe IIOIKIOUeHHe IpoeKTopa K KOMIIbHTepy
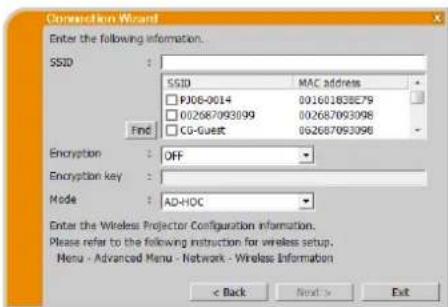
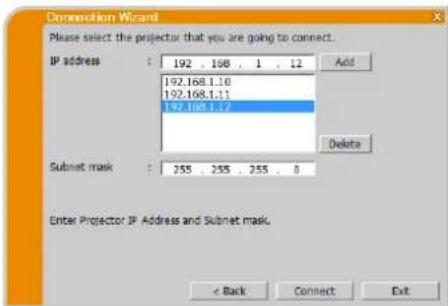
3.2.4.2 IopKJIIOUeHne npoeKTopa K ToUKe DOCTyNa C NOMOUsbIO npOBoHOJ NOKaJIbHOJ CETN
Hacpoika Ha Toque IocTyia.
Bbcntc cIeIyIOuyIO HOpMaunIO.
SSID: WirelessAccessPoint (npupe)
Encryption(KoДированe):
WEP64bit (npumep)
Encryption key(KnouuΦpOBAH) 水
**** (npumep)
Mode(PeknM): INFRASTRUCTURE
HaKMHTe KHOINKy [Next].
HacpoNka npocKtopa.
BBeHTe CIEyIOUyIO HOpMaUNIO.
IP address(IP-aDpec): 192.168.1.10 (npimep)
HakmHTe KhoKy [Add]. K cInncKy 6yJeT IO6aBJIeN IP-aIpec.
Subnet mask(Macka noDCTeN):
SSID: WirelessAccessPoint (npupe)
Encryption(KoДированe):
WEP64bit (npumep)
Encryption key(Knouu npobna) *2
**** (npumep)
Mode(PeknM): INFRASTRUCTURE
Haxmte KhoNky [Next].
IP address(IP-aDpec): 192.168.1.10 (nprimep)
HaKMHTe KHOJIky [Add].K cHnCKy 6yJeT IO6aBJIeH IP-aIpec.
Subnet mask(Macka noctu):
255.255.255.128 (npimep)
HaKMHTe KHOIky [Connect].
HaHHeTcI pOeCC IIOKJIIOueHn.
IpeepaHTe K npHkTу"3.2.5 IopKnloueHne Hpepa". (22)
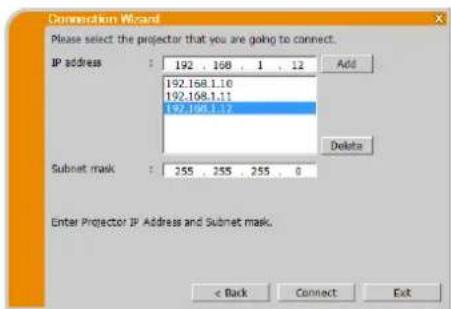
ПОНМЕЧАНС
* /ymo6b taumceme6be hacmpouku npoekmopa,cm.IIPIMEYAHHE.(15
BcnueKe mochoaapezucmpupo6ambdo 12 IP-adpecoe.
3.2.5 Поdkлочип поразачa
3.2.5.1 NoTBePKeHHe CTeTyCa noKnIOueHnONfimraion
Ipn HaukaTHN KHOHN [Connect] IOBHTcMaHIO Connection status (CtaTyc NOKIOueHH), HauHHeTc IPOIEcc IIOKIOueHH.
JaHHb IIpoUeCC MoKHO IIpoBepaB B IOJIe [Status (CtaTyc)].Ipn IIOKIOueHH BCEx IpoEKTOpOB IOBHTcA Connection list (CINcOK IOKIOUChH).DIA OTMcHb IIOKIOUChH NAAKMHTc KHOIKy [Connect cancel (OTMeHa IOKIOUChHRA).EcJINpePd HauKaTHem KHOHN [OTMeHa IOKIOUChH] 6blJYcTAHOBJHEb KaKHe-JIHO OIOKIOUeHH,IOcJIe OTMeHb IIOECCA IOKIOUeHHIOBHTc CINcOK IOKIOUCHHH.
IpeenHnTe K nyHKTy "3.2.5.2 CnHcOK noKJIOueHH". (HnKe)
B cIyue oIIIN6KN IIOKJIIOUeHnI IOBNTc coo6IeHne 06 OIIIN6Ke.
Ipeennte K nyHKTy "3.2.6 OHH6ka HNOKIOHcHn" (123)
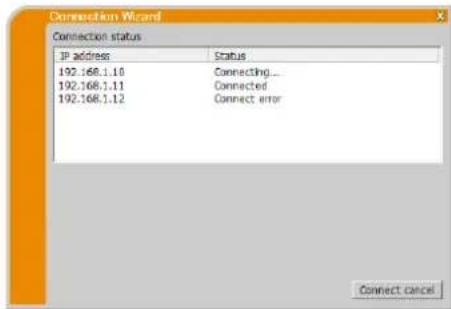
ПРИМЕЧАНС
Eeu ne ydaemn nookouumbc 6 meuehne odho Muhymbi, nookoue hue byem ommeheu u noaumc ouuoka u3 a npebuiuen spemenu okuudun.
3.2.5.2 Cnncok noKJIOueHn
Bce npoeKTopb 6yuyT NOJKNIOHcHb, H IOBHTCg Connection list (CINCOK NIOJIIOHOeHH).YCTaHOBHTe JIaxoK IpoeKTopa,Ha KOTOpbH NyKHO IIpepaTb H3O6paKeHHe, H NaKMHTe KHOIKy [Show]. BXoIHHOIoprnpoeKTopa 6yJeT aBTOMaTHueckn IIpekeKIOUeH B pcKHM LAN n HAuHcTcHpeJaAaH3O6paKeHH.
Ipeennte K nyHKty "4 HcnoJb3OBAHne IpoIpaMMb1 LiveViewer" (27).
B cnyuac Bb6opa npapamepta[Close] 6ydet OTO6paKeHc rJabHoe MeHIO Iporpammbl LiveViewer B pexnme OxHJaHHa. (PekHM OxHuaHHa - pcKHM, IIpn KOTOPOM IepaHa H3O6paKeHHa He BbIIOJIHeTcra, HecMOTpr Ha yctaHOBJeHHoec ceteBOe coeINHeHHe.) Ipcdaa HaHHTcra IocIc HaKaTHa KHOIIKN PCKHM aTO6paKeHHa HIN KHOIIKN CTapt B TJIaBHOM MEHIO Iporpammbl LiveViewer.
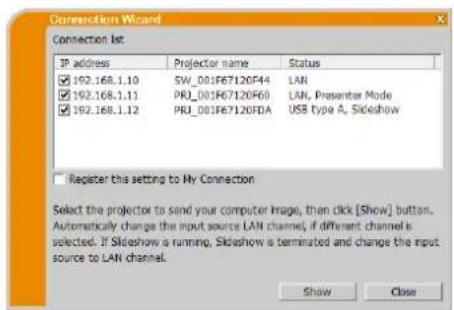
ПРМЕЧАНС
- OooepeMeuio MoKcuo nokcuouumb do 12 npoekmopob.
Eeu neobxodmo zapeucmpupoamb odny u3 hacpoek paspeuen kak Moe nooknohenue, ycmahoume fiaok "Register this setting to My Connection (zapeucmpupoamb dahyu hacpmoy kak Moe nooknohenue)". Iocie pesumpuu napempa Moe nooknohenue dahnbte oyym omobpaencn6 cnue npofutei.
3.2.6 Own6ka noDkJIooHnA
Korda IIIOKJIIOHHe H K IPOeKTopy He MoKer 6bIb yCTaHOBJIeHO, IIOBJIeTc coo6HHe 06 OIIH6Ke "Failed to connect to the following projector."(He ydaIOcb IIIOKJIIOHHTbcra K cJIeMyIOUeMcy IPOeKtopy.).
HaKMMTe KhoNkky[OK], nocJe Hero 6yIeT OTo6paKeHo rJaBHO MeHIO pporpamMbI LiveViewer, xOra cTeBOc NIOKIIIOUChHe HC yCTaHOBJIcHO.
IIaKMNTe KHOIIKy IOIJIKIIIOUcHNE BΓJIABHOM MCHIO IPOpPAMMBi LiveViewer INIA BO3BpaTAKIyHKTy "3.2.2 BbI6epHTe cIocO6 IIOKIIIOUeHHN". (9)
IIpnIOHbITKcIOIJKIOUeHHK HcckKOJIbKM IIPOeKTopaMHycTaIOBKe COeINHeHHc HeKOToPbIMN IIPOeKTopaMn IocJe HaKaTHaKN KO] IOBAHTcA Connection list (CINcOKIOIKIOUeHH).
IpeeiHnTe K nyHKTy "3.2.5.2 Cnncoc noKIOeHH" (22)
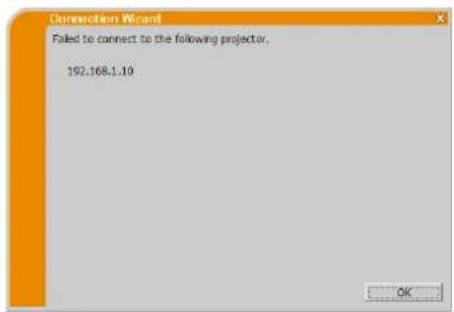
ПРИМЕЧАНЕ
- Ipooepe me hacmpoyk cemu npoekmop, ocobenno 6 ciuyae ucnlo3oanu bapuaHma Moe nookouenue, u no6mopume nonbmyk nodknouenura, naunna cn nykma"3.2.2 Bbepume cnocob nookouenura". (9)
3.3 BkIoueHue yHKquu "CemeBa npesHaua
B daHIO mpaIe IooNcbBaetc yHKnna "CeteBaIpe3eHTaun"KOTOPa II03BOJIeT BbBOJHTb Ha 3kpan IpeIaBaEMbc Hce3 cETb H3O6paKeHHc KOMIIbOTepa.
IporpamHOC 66CCHcHHe "LiveViewer" IO3BOJIAET BbBOIDITb Ha 3KpaH H3O6paKcHn C OINHO IN HecKOJIbKHX KOMIBOTepOB 3a cHTIOIKTHOueHn IPOeKTOPA K cyIeCTByIOe CEITH 6e3 HCIOJIb3OBAHN Ka6eJeN KOMTbOTepa. FyHKIIIN "CetEBAR IIpe3EHTAUNI" IO3BOJIAET JIEKO JEJIaTB IIpe3EHTAUNI N IPOBOJITb KOHdpeHUN.
Ia3aHcyCa cTeBOI Ipe3eHTaHH Bb6epHTe IIOPT LAN B KaueCTBc HcTOUHKa BXOHOTo CnIHAA IIpoekTopa HAKMHTe KHOIKy CTAPB IIPOpPamme LiveViewer.
3.3.1 PexkM oTo6paKeHnA
Ipn HcnoB3OBAHHn IporpaMMb1 LiveViewer BO3MOxHO Iba peKHa OTO6paKeHn - OHOrO KOMIBOTepa HNECKOJIbKHX KOMIBOTepOB.
PcKHM OJHO KOMIbIOTepa
IpoekTop IOKa3bIbAcET H3O6paKeHHc OJIOHO KOMIIbIOTepa. AyINOCHHaJI TaKKe MOKe IIOJaBaTbcA C OJHOKO KOMIIbIOTepa. (32)
PeKHM HeCKOJIbKHX KOMIIbIOTepOB
IpoekTop MOKET OJHOBpemcHIO IOKa3bBaTb H06paKeHHc 4 KOMIIbIOTepOB MAKCHMaJIbHO.
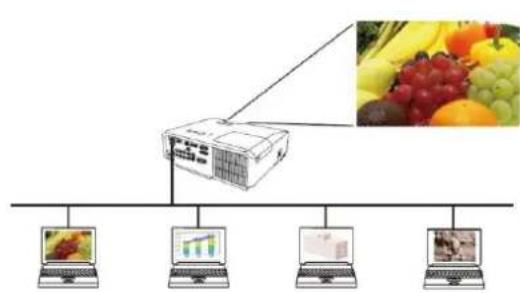
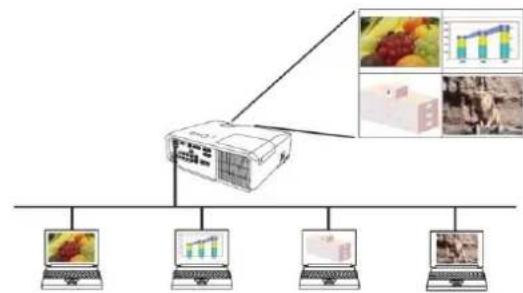
ПРМЕЧАНС
- Ipeada 38kyko02o cuzhaia 6 peicume Hecko1bKux KMOmbiopeop He6o3MoOcha.
- Ipu nodkuuenu hneckoibkux kOmnbomepo u nonbimke c63u c odhu npoekmopom oobem nepedabaembx danhbx Moecem yMeunbuumbcra.
- Ipu omobpaqhenu na 3kpane npoekmopa dbuxuuxc uobpaqhenu he pekomendyemcn noKnovamb K npoekmopy 60ee nmu Komnbomepoe.
Ipu nooknoeenu K odomy npoekmopy heckoibkux kombbiomepoe pekomendyemcn npokoncymbupoabmc c admuucmpamopomcemu, umo6b obecneumb coomemcmbyouue yc08n nooknoenm C mnnmaibnoi naepy3koi n cebm.
HuKra KcOpocmb nepedaun daHbix, b63BaHHa HedocmamooH uunpuHou noIOcbi KaHaI c63u Meckdy KomnbomepOM u npoeKmopOM 60 ePema oMeHa daHbMu MeCdy HeCKoBkuMu KomnbomepaM u npoeKmopOM MoKem npueecmu Kxyduenuo kauecma uOsbpaKcnH u nnppeb1aHnO 36yka.
Ipu nonbnke nokcuouenue ue3 cemk npoekmopy, komobu ucnobayemc dpyum konmbomepmd 1u 306paekuen USB, mmo moecn npuecmu K chxckenu ckopcmu nepeda, umo b306em yxyduene kayecma u306paekuenu u npepbuaane 6b6oda 36ka.
3.3.2 Pexim Ppe3eHTaun
B pcKHMc OJIOHO KOMIIbIOTepa IIPOCKTOp MOKET 6bITb 3aIHr OJIMM KOMIIbIOTcpOM H 6JIOKNPOBaTb IOCTYIN C IIO6bIX JpyTHX KOMIIbIOTepOB, ecH N B IIporpamme "LiveViewer" Bb6paH peKHM IIpe3eHTaINN. B xOJe IIpe3eHTaINN MOKHO He becIOKOHTbcra O TOM, YTO H3o6paJKeHHe Ha 3KpaH HeOJXHaHHO IIpeKJIIOHTcra Ha H3o6paJKeHHe, OTIIpaBJIeHHoe IpyHM KOMIIbIOTepOM. PeKHM IIpe3eHTaINN MOKET 6bITb 3aIHaH B MeHIO ONINN IIporpAMMb LiveViewer.
3.3.3 IMMa nCTOuHnKa
B nporpaMme LiveViewer MOxH0 yctaHOHTb HMa IIOJIb3OBATeJIa, OTO6paKaemoe Ha 9KpaHe BO BpeMnpe3eHTaUNH. To IO3BOJIaET OIpEeJIHTb, KOMy IIpHaIJIeXHT H3o6paKeHHc, OTO6paKaemoc B HactoIIH MOpEH Na 9KpaHc.
3.3.4 Pexim HeckoJIbKIn npoeKTopOB
IpiH IIOKJIIOUeHHN K KOMIIbIOTepy HeCKOJIbKHX IIPOeKTOPOB IIPOeKTOP H KOMIIbIOTep HAXOJITcBpeKHMecKOBkHX IIPOcKTOPOB. B pcKHMc HcckOJIbKHX IIPOcKTOPOB MOKHo OIOHOpcMeHHIO IOIKJIOHTb K KOMIIbIOTepy 10 12 IIPOeKTOPOB c IIOMOIbIO 6ecIIPOBOIHOH HIN IIPOBOIHOH JIOKAJIbHO cETn.
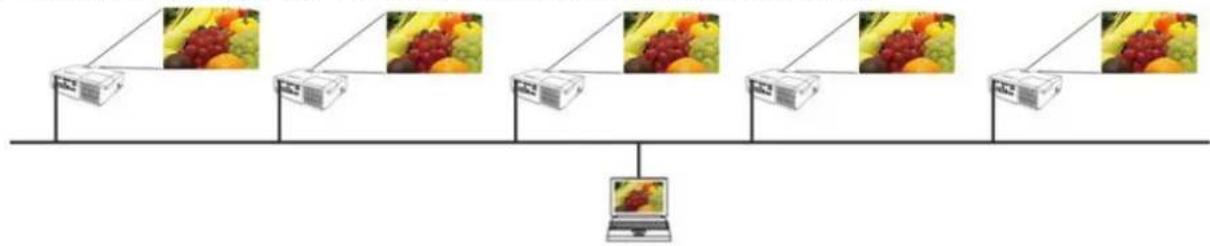
ПРИМЕЧАНС
- Ipeodaya 36yko02o cuhaia 6 peKumie necko1bkux npoekmopoe he603moekna.
- PeKum npe3eunmauu dyem ommeu nn bcex npoekmopax, cau odun u3 nuX omMeum e2o b peKume necko16kux npoekmop06.
- Peum neckoikx Kombiomepo 6 peumneckokx npoekmop.
Bpeucume hckoibkux npoekmopos obeM nepedaacmbx daHHbIX MOICem yMehbunumbcra.
BpeKume neckoikux npoekmopob Knonka peKuma omobpaacenue aannom Menno npospammbi LiveViewer abmamuuecku u3menumcna Kaonky peKuma neckoikux npoekmopoe (27) - Pekomehyemra nooknouumb kounbiomep u heckoibko npoekmop6, coedunennhbx dra "Pecuma neckoibkux npoekmop6".
3.3.5 Pexim ynpaBneHnMoepaTopa
KOMIbIOTep MOxHObHTB BpeKHM MoePaTopa (XoCTa), KOTOpB MOKeY npaBJrTB BCEMH OCTaJIbHbIMN KOMIbIOTepaMn (KJHeHTaMH), IOKJIHOeHHbIMN K IpoeKTopy. IocKOJIbKy KJIHeNTb HE MOrYT ynpaBJrTB IIporpaMMo LiveViewer H IpoeKTopom, XoCT MOKcT 6c3OTKa3Ho H 6c3OHaCHO pa6oTaTb C IIporpaMMo. (FpyIIHa moJeIe N IpoeKTopoB: B)
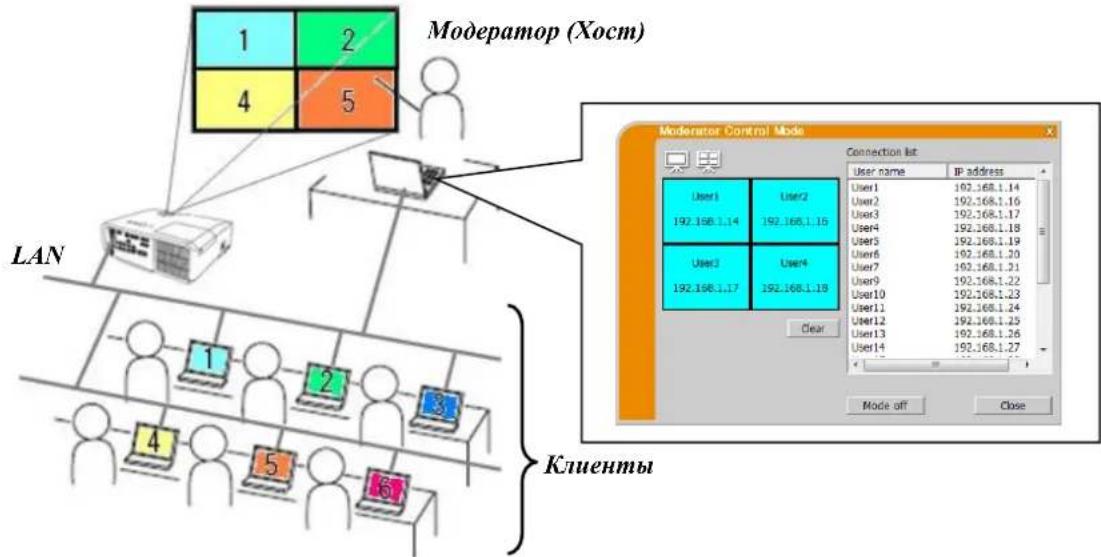
ПРМЕЧАНС
B odny epynny pekumya npaienu moepamopa moo no obedunm do 50 konmbomepoe, knoa xocm-koombep.
B Kauecmse Modepamopa MoKHO ycmahobum boKO odun KOMmbomep.
Ipu ycmnoBke KOMnbiopepa 6 kauecmbe modepamopa 8ce KOMnbiopepb, 6kouan modepamopa, nodKuoene bke odnomy npoekmopy, npekpanam nepedaay uOobpaJcena.
- PeKcUm npeseunmauH EIOCTVIIIEH a peKcUm ynpaaenmu Modepaop.
- PeKum ynpaIeHua ModepamopA MoXcem 6bIMb omMehen npunHydumeBno npu nepezanycke cemu 6 MeHIO npoekmopa HUU bInHeHHU ynpaIeHua no cemu c nomoubu 6e6-obospeameia.
IpiH 3aIycke Ipepaun H3o6paKeHHa KHOIIKa cTapt ABOTOMaTHueCKn H3MeHHTCHa KHOIIKy cTOII.
IpepaH3o6paKeHH pekpaaetc.
ПРИМЕЧАНЕ
Hsobpaenue He moeym omobpaacmba ha okpane, eeu haucummb konk cmapcmon hckokp a3 noopd.
3) Khonka nay3a
H3o6paJxHe Ha 3KpaHe BpeMeHHO octaHaBnHbAeTc. H3o6paJxHe, KOtOpoe OTo6paKaIocb IHO KaTHN KHOIIKN, OCTaEtCn HA 3KpaHe. IIpH 3TOM MOKHO IIPOcMaIpHBaTb H3o6paJxHe Ha KOMIIbIOTepc, He IIOka3bIBaHx Ha 3KpaHe IIpoEKTopa.
ПРМЕЧАНС
Kuonka peXcuma neckoIbKux npoeKmopob 1ue 6ydem fynkuunupoeamb do mex nop, noka okpanne bblidem u3 peXcuma npuocmanohku.
4) Khonkpekmma oTo6paxeHn30
PekHM OTo6paKeHH 6yIET IpeKJIIOuATbcr MeKJy peKHMOM OIHORO KOMIIbIOTepa H peKHMOM HeckoJIbKHX KOMIIbIOTcpOB.
TaKKe MoKHO 3aIyckatb HIO octaHaBIBBaT IIpeJaUy H3O6paKeHH.
5) Khonka peKIma HeckOJIbKnx npoeKTopoB
BpeKHMe HeCKOJIbKHX IIpoEKTOPOB KHOIIka peKHMa OTO6paXeHHaBTOMaTHUeCKH H3MeHHTcHa KHOIIky peKHMa HeCKOJIbKHX IIpoEKTOPOB
PONBTCsOKHO yipabJIeHHHeCKOJIbKHMn IpoeKTopamn. (30)
6) Khonka pexkma ynpablenn moepatopa (pyma mojeien npoeKtopoB; B)
KOMIbIOTepeyETyCTAHOBJIeH BpeKHMMOJepaTopa H NIOBHTcR OKHO yIpabJIeHHM MOJepaTopa. (31)
ПРМЕЧАНС
Khonka peucma ynpaenna modepamopa u konka cmapm ue dyom fykuohupoab, ecu kmo-lu6, yce nodkuouenbuk omomy jne npoekmopy, yjce eniemcna modepamopum.
Khonka pekuma ynpaenu modepamopaebyem nacummbc6 pekueme necko7kux npoekmopoe.
7) Khonky nodknioueHna
Byet oro6paKeHO dHaIIOROBOe OKHO bIb6opa cIOco6a IOKJIIOueHn.
Iop06noctncm.Bpa3ne“3.2.2Bb6epHrte cnooc noKIOUeHH.(9)
8) Khonka onu
Byet OTo6paKeHo MeHIO OIIIN.
9) Khonka YnpaBJeHne no ceTb
Iysck Be6-063peBaTeHa BaIeM KOMIbIOTepE H OTo6paKeHHe 3KpaHa YIpaBJIeHHe IIO ceTIN JyIpaBJIeHHN OIHMM IpoeKTopoM H3MeHeHH pa3JInHbIX HAcTpOe IpoeKTopa.
ПРМЕЧАНС
"Ynpaenue no cemu" ie moec em ucnolb6amcbra ynpaeneu neckokbmu npoekmopamu oohopemehno. B peicume heckokkux npoekmop0 npu haacamuu konku npaeienu no cemu oydem omobpaencno okno co cnuckom cxex nokkuuehix npoekmop0. Bbepume odun npoekmop, ynpaeneu komopbmy hiocho ocuyecm7mb.
BceIOKJIIOUeIIIbIe IPOeKToPbI 6yIyT OTo6paKeHbIB CnIcKe.
2) Khonka cTapT
HaHHaTcH IpepaHa Ha IpOeKToP, H3o6paKeHH OTo6paKaIoTcH.
3) Khonka cTOn
IpepaHn3o6paKHeHH npekpaaactc.
4) Khonka oTkJluyeHna
OTKIOHHe cTn. OTKIOeHHb II pOeKTop HcE3HET N3 CINCKA IOKIOHcHn.
5) Khonka BbIXoDa
3aKpOHTe OKHO yIpaBJIeHH HeCKOJIbKHMn IpoEKTopAMH H BepHHTecb B TJIaBHoe MeH0 IIpoIpaMMbl LiveViewer.
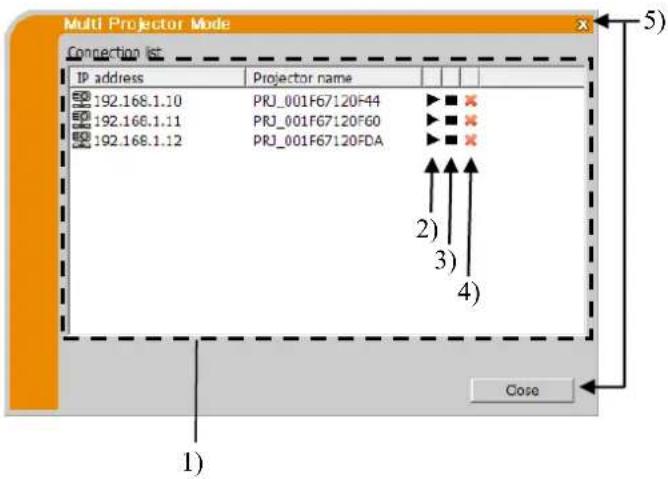
CTatycIOIKIOUcHnMoKHOIPOBCpHTbCIMOOuBIO CJCyIOUcero 3NaUKa B CINCKe IOIKIOUcHn.
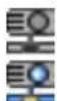
: PIOKIOUeHHe K cetn yctaHOJIeHo, HO IIpeJaHa H3O6paJKeHH BpeMeHHo OCTaHOJIeHa.
: PoiKIOUeHHe K cETn yctAHOBJIeHO, H3O6paKcHnI IpeJaOTcE KOMIIbIOTepa B IIpoEKTOp.
4.3 Okho ynpaelenu Modepamopa
KOMIbIOTep MOKHO yCTaHOBHTB BpeKHM MoIEpaTopa (XoCTa), KOtOpH MOnKer YIIpaJIaTb BCEMN OCTaJIbHbIMN KOMIbIOTepaMH (KJIHeHTAMH), IOIKJIIOUeHHbIMN K IPOeKTOpy. (FpyIINa MoJeJen IPOeKToPob: B)
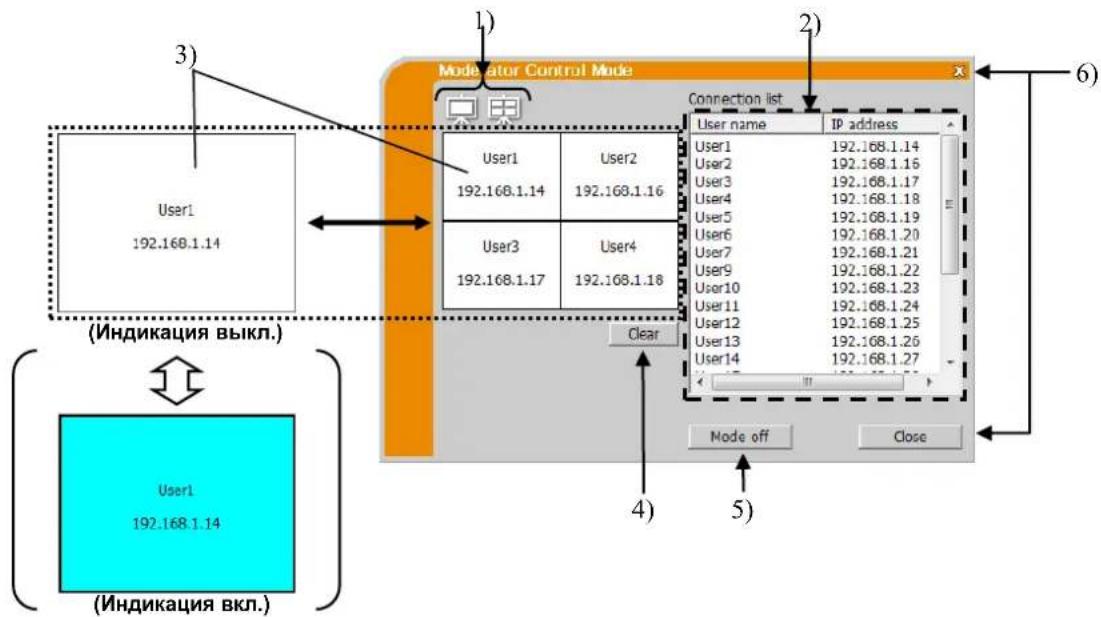
1) Khonka pexkma oTo6paKeHnA (30
PcKHM OTO6paXHH 6yIeT IpeKJIHOaTBcRA MckIy peKHMOM OJHORO KOMIBOTepa H peKHMOM HCEKOJIbKHX KOMIBOTepOB.
2) Connection list (Cnncok nodklouhen)
B cIncke 6yIyT OTo6paKeHb BCE KOMIIbIOTepe, IIOKJIIOueHHbIE K TOMy Jx e IIPOeKTOpy, K KOtOpOMY IIOKJIIOUeH MoIepaTOP.
3) Okho oTo6paKeHn
ByeT OTo6paKaTbCn HhOpMaIIH N KOMIbIOTepaM, H3OpaKeHH KOTopbIX OTo6paKaOTcHa 3KpaHe.
IIIBBOa H3O6paKeHH Ha 3KpaH IIpoEKTopa IepTaWHTe KOMIbIOTep H3 CINNcKa IIOKIIIOUeHH B 3Ty
0bactb. IepCaHa H3O6paKeHH 6yET HaHHATbc/OCtAHABJIbATbcpN KaJdOM HaKaTHN OToro OKHa.
BpeKHM HeCKoJIbKHX KOMIbIOTepOB OKHO 6yET pa3JeIeHO Ha qETbpe 3OHbI, KaN 3KpaH. KaKdo3OH
MOxHO 6yET yIpaBJIbTb OTJeMbHO, H hOpMaIIH 6yET OTo6paKaTbCn IIA KaKdo3OHbI.
4) KhonkaClear(ouncTk)
OuHCTka OKHa OTo6paKcHn HnpckpaUcHHe Ipeaun H3o6paKeHHn Ha npoeKTrop.
5) KhonkaMode off (peXmMa BbIKJ.)
OTMeHa peKHMa yIpaBHeHn moepaTopa. OkHO oTo6paJKeHH 6yIeT OHHHeHO n IpeJaHa H3O6paKeHH Ha IIpoCKTOp 6yIeT OCTAHOBJIeHa.
6) KhoNka BbIXoDa
3aKpbTHe OKHa yIpaBJIeHnMoIEpaTopa H BO3BpAr B IJIaBHOe MeHIO IIporpaMMb1 LiveViewer.
4.4 MeHIO onuU
EcJH HauKaTb Ha KhoIky OuHH, Ha 3KpaHc OTo6paKaetc MeHIO OIIHH.
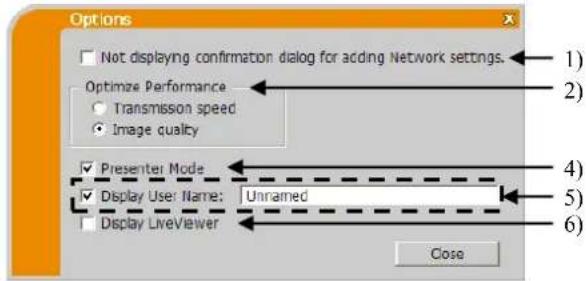
Pnc.4.cMeIO onnnIpynnb MoJeIe IpoekTopoB:A
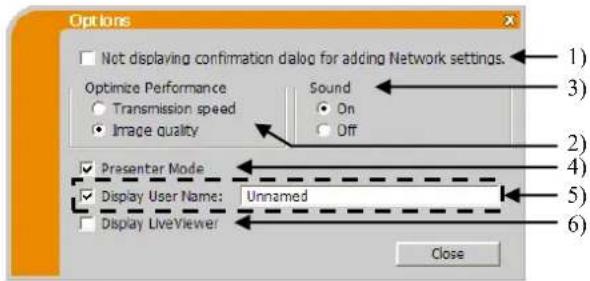
Pnc.4.dMeHIO OIIHIN rpynnbI MoJeJIe IpoeKTopoB:B
1) Not displaying confirmation dialog for adding Network settings.(Дианoroboe okho Ддь Ввда настpoек сети He Вьвовпся На Зкразн.)
B cIyae yctaHOBKn ⅡHaIOROBOe OKHO IOITBeKJHeHH IJI IO6AbJIeHH KOnΦHpyaHH cETn (37) He 6yTeT OTObpaKaTbcg IIpH IOIKJIIOueHH KOMIIbIOTepa K IIpoEKTopy. B cIyae cHTHNaKKa - HaIOROBOc OKHO BceTa 6yTeT OTObpaKaTbcg (IOBcEHHc H yMOJIuaHHIO).
2) Optimize Performance (OnTmM3aunpa6oTbI)
Iporpma "LiveViewer" 3axBaTBiBaet H3o6paKeHne OkaHa KOMTbIOTepa B oOpMaTe JPEG nOTPiabJIeT cro Ha IpoekTop. Iporpma "LiveViewer" IO3BOJIaET BbIbPaTb OdHy H3 DByx CTcNcHei CKaTHn DaHHbIX B oOpMaTe JPEG.
Transmission speed (Ckopoctb nepeda): PpHMeHaeTcE cHn ckopoctb BaxKHee KaYeCTBa H3o6paKeHH. CTepeH cKaTHJ JPEG pH nToM bHIIe. H3o6paKeHHe Ha 3KpaHe IIpoekTopa CmHaeTc 6bIcTpee, IIOCKOJIbky OObem IpeJaBAeMBIX DaHHbIX MeHbIIe, HO KaueCTBO H3o6paKeHH pH nToM HHXe.
Image Quality (KauecTBO n3o6paXeHn): PpHmehrTeC eTn KaueCTBO H3o6paXeHn BaKHee ckopocTH.
CTeHeB cKaTHJ JPEG npr OToM HnKe. N3o6paKeHne Ha OKpaHe IpoEeTopa CmehAeTcMeJIeHHe,IOCKOJIbKy 06bem IpeJaBAeMbIX JaHHbIX 60JIbIIe, HO KaueCTBO H3o6paKeHHI pNOTOM BblIIIE.
3)Sound (3Byk)(TOJIbKOДЯгурпьmoDEJEN npoekTopob:B)
Ipeaay aynocnHaia MoKet 6bItb Bb6paHa DeiCTBHTeJbHO (On (Bk)) HIn HeJeCTBHTeJbHO (Off (Bki)).HacptoiKoi no yMOHaHHIO ABTaeTc 3HaueHne On (Bk).
4) Presenter Mode (Pexm Ppe3eHTaunn
B peKHMe OJHOrO KOMIbIOTepa IIpoEKTop MOKeT 6bITb 3aHrT OJHHM KOMIIbIOTepom H 6IOKHPOBaT bOCTyI c JIO6bIX IpyTHX KOMIIbIOTepOB, eCIN B IporpAmME "LiveViewer" BblpaH peKHM Ipe3eHTaHH. B xOJe Ipc3cHTaHH MOKHO He 6ccIOKoHTbcra O TOM, YTO H306paKHeHH Ha 3KpaHC HCOKNJaHHIO HcpeCKIIIOHTcra Ha H306paKHeHH, OTIIpaBJIeHHoe IpyTHM KOMIIbIOTepOM. IJIY BKIOUeHHN peKHMa yCTaHOBHTe OTOT fJIAKOK.
ПРМЕЧАНС
Ecu b6pan peum ncko1b6kux kmmbiomepo6, hcmpouka peum npesmaquu ne deicmyem.
- Ipu nepekiouenu u3 peicma heckolbux kombbiomepo6 peucum odno zo kombbiomepa hacmpoika peicuma npezenmauu 6 kombbiomepe deucmeyem.
Pecum npezenmauyn ymanoien na akmuibn ypoenb npu naaibnoi acmpouke 3aboda no ymoanuo.
5) Display User Name (Имяисточника)
HMa IIOJIb3OBaTeJII DIIHHoJ IO 20 CHMBOJOB MOXHO BBecTH C HOMOIIbIO 6yKBEHHO-IIIΦPOBbIX CMBOJIOB. HMr IIOJIb3OBaTcJI MOKCT OTObpaKaTbC HA 3KpaIc IIPOeKTOpA, IIOTOMY MOXIO BBycIHHTb, Ybc H3O6paKcIIHnB HAcToIIM MOMeHT OTObpaKaTcR Ha 3KpaHe. EcJIN 3OT ΦJaKOK He yctAHOBJIeH, 3Ta HfOpMaIIHnHa IIPOeKTOp Hc IpeIaTcR.
6) Display-liveViewer(Отобрази综合体LiveViewer)
EcnHaKpaHnpoekTopaHyxHO OTO6pa3HTb OKHO IporpaMMb1 LiveViewer, yctaHOBHTe OTJkaOK.
ПРМЕЧАНС
- Ipu ucnno1b3o8aunu npocpaMmbi LiveViewer 6 Windows ⑧ 8 nacmpouka "DisplayLiveViewer" 6ydem 6ce2da 6KIOUcHnA.
4.5 PpOΦuJIb daHHbIX
4.5.1 O63op npoФиЯ daHHbIX
CetBbIe HacTPOiKN IINIOKIIIOueHn IIOeKTopa H KOMIbIOTepa MoTy 6bITb COxpaHebl KaK IIpoOHHJIN DaHHbIX. IocJIc coXpAHCHN NAnHbIX IINIOKIIIOueHn K CcTH IOCTaTOUHO BbIbPaTb OTN daHHbc. PckOMChIyETcR npH acTOM HcIOJIb3OBAHH OdHOro CeTEBOI IOIKIIIOueHn.
4.5.2 Co3dahne npoФиЯ daHHbIX
BbIbepHTe npaMetp "Profile (PiPoiHJIb) HnHaKMITE KHOIIky [Add]BmHIO cHOCo6a IIOKIIIOUcHIN IIporpAMMb LiveViewer.
IIOBHTc npHrJaIIeHne "Create new profile" (Co3aTb HOBb IpoΦnJIb). EcIn yKe co3aHO 20 npoHJcN daHHbIX, Co3aTb HOBb MoKHO, ToJIbKO ydaJIbCOxpaHeHHbIe JaHHbIe.BBeJIITe BCIO HhΦOpMaIIHIO, Heo6XOIMyIO Da BAJIeTO CeTEBOI IOIKIOueHNN. JIA CTnPaHHa BBeJeHHOIN HΦOpMaIIHN HAKMITE [Clear].
HaKMHTe KHOIIky [OK], NocJe BBeIeHnB Cei HhOpMaIH. ECH BBHc XOTHTc coXpaHrTB cc, HaKMHTc [Cancel].
Ipn HauKaTHN KHOHN [OK] B Profile list (CnncKe npoHnei) 6yETIOKA3AHOBBI IIpOHHbJaHHbIX.
ПРМЕЧАНС
- Ipu cosdaauu no6o2 npofua hacmoa mebho pekomohyemcn npoeepumnb npabuibocmb paobmy u60o2 npofua, 6b1pa6 daHHbe dnookKIOUeHnC nomoubuO mO2o npofua.
- Ecmu cmehume cemeou adanmep na cboem konmbomepe, co3aune ho6bte dahbte npofoia dya anampe.
Moeknoapezucmpupo6am do 20 npodue.Ecu 20 npodueyce cyuecmeyem, daaibu dkaok neb3ymanoumb.
B cyuae peucmpauu npoohn danhbx 6 kayecme napamempa Moe noekouene 6 cnueke nookouen,napamemp Profile name (Hm npo) byem aomamueecku na3naen npo2pamou LiveViewer. Ha3baue 6ydem nokaana 6 cnuek npoepieu.
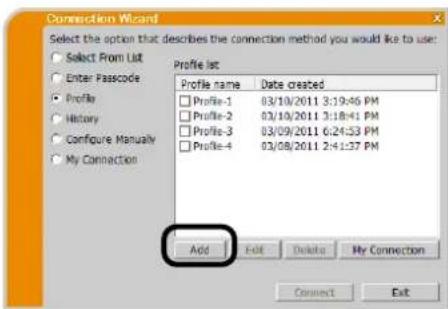
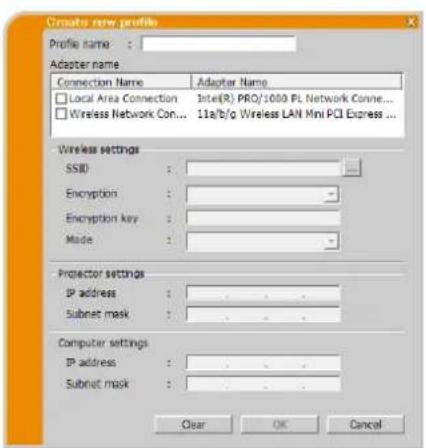
4.5.3 PeDaKtIpoBaHnne npoФиЯ DaHHbIX
Bb6epHTe npaMeIp "Profile (PiPoΦH) H Bb6epHTe OHH HnpoΦHcH, IpeueHCJIeHHB IN MeHIO cHOCo6a NODKIIIOUChHn HPOIpaMMb LiveViewer.
Hakmnte [Edit].
IIOBHTc8 OKHO "Edit profile" (PeJaKTHpoBaTb IIpoΦHJIb).
BHeCHTe HxKbIe H3MeHHeHH. IJIa CTnpaHnBce BBeJeHHoB OKHe HhΦopMaunn HaKMHTe [Clear].
HaKMHTe KHOIIky [OK] nocJe 3aBepHcHHpeJAKTHPOBaHH. ECHN BbI He XOTHTe COXpaHb HhOpMaHIO, HaKMHTe[Cancel].
Ipn HaxaTHN KHOHN [OK] orpeJaKTHPOBaHHbI npoHJIb daHHbIX 6yJeT coXpaHeH IIIOKa3aH B Profile list (CInncke npoΦnei) c HOBoI HhΦopMaIIHei Date created (Jata co3JAAH).
ПРМЕЧАНС
- Ipu co3dauu noo2o npofu hacmme1bho pekomendyemcn npoeepum npabuibocmb paobmy noo2o npofu, 6bipaa daHbte o noKluueHua c nomoubu 3mo2o npofu.
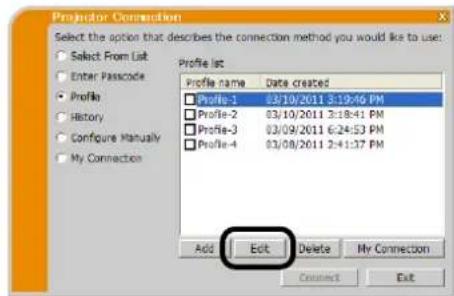
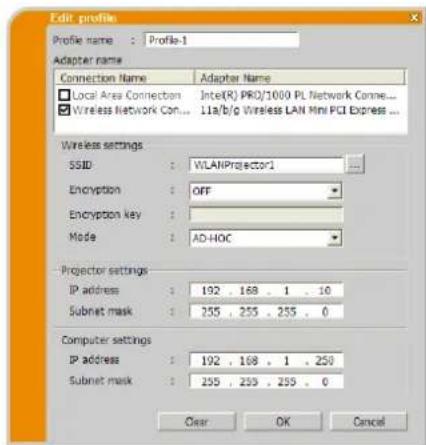
4.5.4 Perinctpaun npoФnla Moe nodkloucheHne
OHH npoHb, KOTOpB 6yCT HAcTo HcIOJIb3OBaTbC, MoKHO 3apeHCTpHPOBaTb B KaueCTBe IapAmETpa My Connection (Moe IOIKIOUChHe).IocJc pcHCTpaHH DaHHbIX IJI IOIKIOUChHH K cETn IOCTaTOuHO BB6paTb npoHb Moe IOIKIOUeHne.
Hakmte KhoIky My Connection.
OTo6pa3ntcra OKHO "Add My Connection" (Io6aHTb Moe IIOKIIIOueHne). TckyIIN Bbl6paHHb IIpoΦHb DaHHbIX "Moc IIOKIIIOueHne" OTMeH E CINCKe RaJIOUKOI.
Bb6epHTe OHH H3 IIpoΦHJIeH, IpepeHcJIeHHbIX BOKHC, HOTMeTbTe erO JIaXKOM.
HaKMHTe KHOIIky [OK], OKHO 3aKpoETc. EcJIN BbI He XOTHTe BbIbpaTb HOBbI IIpOΦJIb, HaKMHTe [Cancel].
MoKHO TaKKe 3apeHCTpnpoBaTb Moe IOIKIOueHHe B CINHKe IIOKIOueHH, OTO6paKeHHOM IOcJIe yCTaHOBKn CeTeBOrO IIOKIOueHH. IIOpo6HoCTn CM. B pa3JeIe"3.2.5.2 CIncoK IOIKIOueHH". (22).
ПРМЕЧАНС
Bomomcnuekneokazahdaanhebcexnpofoe,nesabucmo om mzo,kaokcemeo adannepbapn.Bkaecme npamempa Moe noekouenue moKHO zapezucmpupobamb npoH, komopui ne npednaauen dA cemu, b6pauu 6 nacmonuui MOMem.
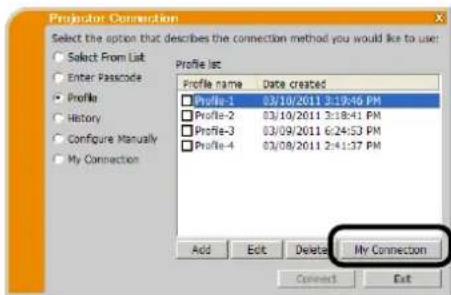
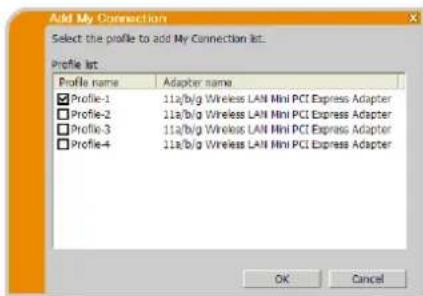
PpniloxKeHne
A Coo6uēnna
Pn BO3HKnHOBcHH HPO6IcMb HIN HcO6xoHMOCTb BbBOa HhOpMaHN IOBHTc CICdyIOCC HnAIOROOC OKHO CCO6HHeHEm. Ecn NOBRTc COo6HHeH, IPOHTTE HN BBIOJHTe Heo6xHMbIe DeHCTBn.
Coobuchene 1: A network connection was not established.
3TO COO6HHe 6yIcT OTo6paKcHO B TOM cIyHac, cCJIN IPOeKTop H IOIKIOCH K KOMIIbIOTcpe C IOMOUIIO Ka6cJI JOKaJIbHO CTe H IIpH BbIbOpE IPOBOIHOn JOKaJIbHO CTeH. Y6eIITecB, YTO IPOeKTop AIOIKIOHEK KOMIIbIOTepy C IOMOUIIO cTeBOr KO6JIa.
HaKMHTe KHOITy [OK]IIN B03BpaTa K IpeMbIyIeMy 3KpaHy.
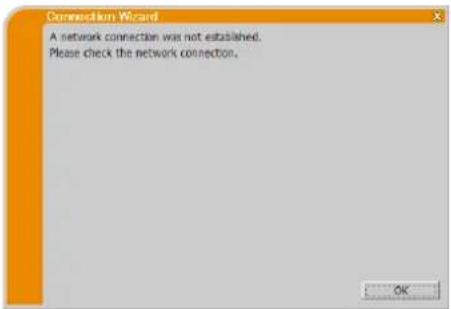
Coo6eHne 2: The number of computer connection exceeds the limit (max. 50).
IpoektopIOCTHIMAKCHMajbHOrO YnCJIa CeTeBbIX IOIKIOueHH. HAKMHTe KHOIIky [OK],IOcJIe Yero 6yIet OTO6paKeHo rJABHoe MEOI IporpAMMb LiveViewer.
IOBTOPHTe IOIbITKy IOCJIe OTKIOUcEHn OJHOrO (HIN HeCKoJIbKHX) IOIKJIOUcEHHBIX KOMIIbIOTepOB.
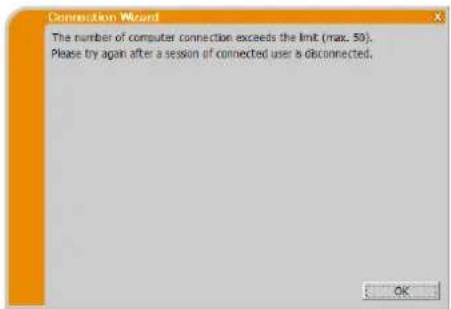
CoobeseHne 3: A network connection could not be established.
CnCTema Windows® npcIOTbpaTHHa H3McHcHnB KOHpHpyaHH cETH, NocKoJIbKy BbI He BOIIIN B CnCTeMy Windows® c IpaBaMH aIMHHcTpaTopa.
HaKMMTc KHOIky [OK] IJIa BO3BpaTa K IIpcIbIyIcMy 3KpaIy.
PpOKOHcyJIbTHpyIteCb C aIMHHNCTpaTopOM cETH IO BOIIPOcy BXOJa
c IIpaBaAMn aIMHHNCTpaTopa. PocJIe BbIXoJa H3 ChCTeMbl Windows
CHOBA BOJNTc C IIpaBaAMn aIMHHNCTpaTopa N BcPHTccb K IIyHKTy
"3.2 PIOIKIOHHe N K cETH". (9)
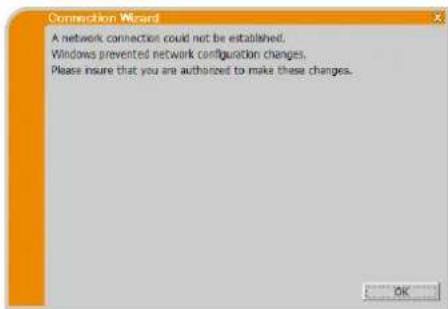
Coobene 4: Are you sure you want to connect the selected projector?
To coo6HHe He OTo6paKaeTcK, KOrTa BbI6paHHb aHaTep 6ccIIpoBOuHO cTeH yKe HcIOJIb3yEc TaIpyrOc cTeCBORIOIOJIIOUOHeH.
IIIOIJKIOHCHHAKATb [Yes].
PipeiHnTE K IyHKrty3.2.5 IIoIKIOUcHNC H Ipepaa". (22)
HaKMHTe KHOJky [No] IITBAO3Bpata K IpeBbIyIeMy 3kpaHy.
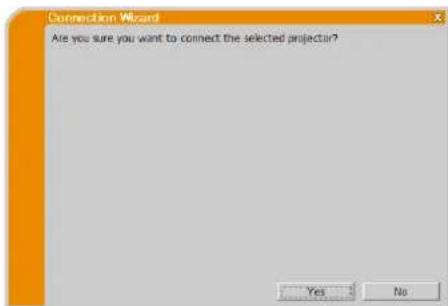
CoobSeHne 5: Incorrect Passcode.
BcEeH HeBcpHbI npoJIb.
HaKMHTe KHOIIky [OK] IJIa BO3BpaTa B OKHO "Enter Passcode (BBOI npoJI).
IpoBepbTe IapOJIb Ha 3KpaHe IpoeKTopa H cHOBa BBeHrTe KOJ. (13)
Coo6eHne 6: Do you want to apply suggested network settings as follows?
JaHHoe IHaJIoroBOe OKHO IOBHTcK, KOrIa Bam NOTpe6yETc H3MCHHtB KOIIHrypaUIO CcTH Ha BaIcEM KOMIIbIOTpc, YTO6bl IIOJKJIOHTbcR K IIPOCKTopy.
O6paHTTEcB K aMHHHCTpaTOpy cetn, HTO6b IIOITBepNTb IpaBnIbHOCTb KOHfHpyaHH cetn B IHaIOrOBOM OKHe. 3aTeM HAKMHTe KHOIIKy[Yes].
EcJH BHe XOTHTe PIPMEHrTb KOHpyaHIO ceTH B JHaIOrOBOM OKHe, HAKMHTe KHOJIky[No].
EcJIN BBXOTHTe IO6aBHTb KOHfHrypaIIHcETN BpyHyIO, HauKMHTe KHOIky[Change]. OTo6pa3HTcHOBoc IHaJIOTOBOC OKHO IJIa IO6aBJIeHHKoHfHrypaIIH cETN, KaK Ioka3aHO cPiPba. BBeJIHTe IP-aIpcE H MaCKy IIOcETH CBOERO KOMIbIOTepa. 3aTeM HaXMHTe KHOIky[OK].
ПРИМЕЧАНС
Ipu ycmanoekfiaokka Not displaying confirmation dialog for adding Network settings. (Duaioooe OKno d8 60da hacmpoek cemu He b6oodumc Hkpan.) duaioofoe OKno He dyem omobpaamcbc 6 cledyouu pa3. Ecu uynho u3menub hacmpouky, hkmume KHomky onmu 62aabHom MeHIO npozpammb LiveViewer u ybepume fiaok "duaioofoe OKno d8 60da hacmpoek cemu He b6oodumc Ha kpan."
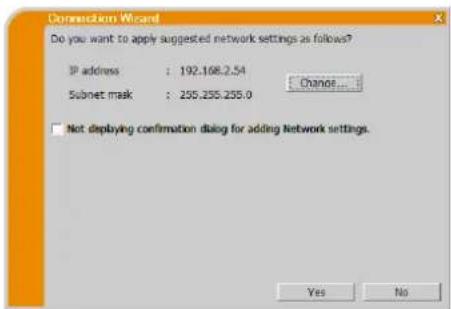
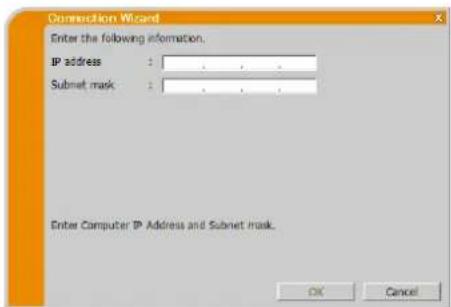
Coo6eHne 7: An IP Address overlaps with the IP Address of the projector you are trying to connect to.
To coo6HHe HOBJIeTc,ecn IP-aIpec BaIIero KOMIbIOTepa COBIIaAer C IPOeKTopom. NocKOJIbKy IP-aIpeca IOJIKbI OTINuATbcra, HaxMHTe KHOIIky [OK] IN BBeINrte HaJIeXaIIIN IP- aIpec.
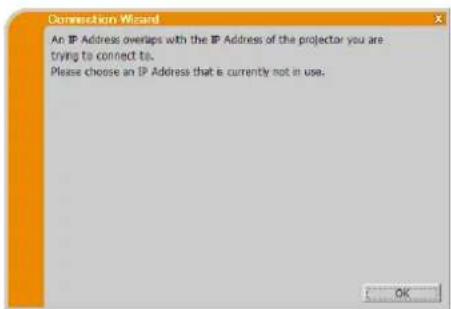
Co06eHne 8: Incorrect IP Address.
3TO COO6HHe HIOBJIeTcB CJIyAc yCTaHOBKn Ha KOMIbIOTepc HeipabNIIbHOrO IP-aIpeca.
HaKMHTc KHOIIKy [OK] IN BBCDHTe IpaBnIbIbIy IP-aIpccc.
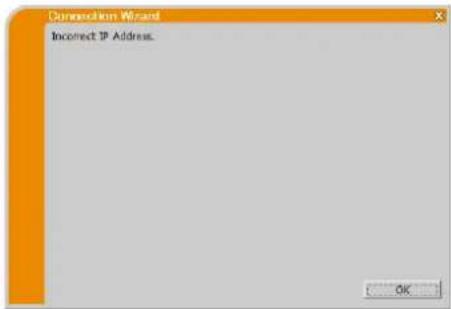
Co06eHne 9: A Network Configuration Conflict exists.
3TO COOIIIEHNE IIOBJIeTcK, KOrJa peKHM IIOKIIIOueHnK cetH, 3aIaHHBb B KOMIbIOTpe, He COOTBeTCTByeT peKHMy IpoeKTopa. IpoBepbte HacIPOiKN KOHPhIpyaUNn CETn Ha IpoeKTope n KOMIbIOTpe.
HaKMnTe KhoNky [OK], nocTe yero 6yJeT oTo6paKeHo rTaBHOe McHIO IIpOprpaMMbI LiveViewer, xOTa CTeBOc IOnKIIIOueHHe Hc yCTaHOBJIO.
HaKMHTe KHOIIky IIOJIKIIOueHHeTHaBHOM MeHIO IIpoIpaMMbI LiveViewer IOB3BpTa K IyHKTy "3.2.2 BbI6epHTe cnoocO 1IOKJIIOueHnna"(9)

Coo6eHne 10: There is a projector already connected with your computer.
3TO COO6HHe HIOBJIeTc Hn HaJIuHn IIpoEKTopa, yKe IIOJKJIOHeHHOro K BaIIIEMy KOMIbIOTepy.
HaKMnTE KHOIIky [Yes] JIM OTKJIIOueHHe TEKYIIErO IIOKJIIOueHHe. ByCT yCTaHOBJIEHO HOBOc IOKJIIOueHNC.
HaKMHTe KHOIIky[No] coXpaHcHHe TKeYIeTo IIOKJIIOueHH npu yCTaHOBKe HOBOr IOIKJIOueHH. (PeXHM HeCKOJIbKHX IIPOCKTOpOB)
HaKMnTe KhoIky [Cancel], ecJH HOBOE IOJIKIOHe H He HyKHO yCTaHaBJIHBaTb, H HYKHO COxpaHHTb TeKYIeE IOJIKIOHeH.
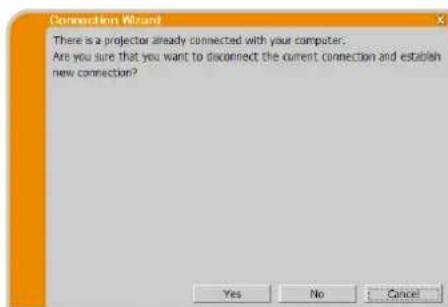
ПРМЕЧАНС
- Odoepemenuo moxno nookuoyumb do 12 npoekmopoe.
Ipu nookuohuu hckoibkux npoekmop06 byem aomamuecku 6bipan peicum heckoibkux npoekmop06. (1125)
Eciu yice noidknoeho 12 npoekmopoo, knony "No" h6o3moocno dyem haicamb.
Coo6eHne 11: In order to connect to the selected projector, you need to disconnect from the current projector.
TO COOIEHNE NOBJIETcE, ECIN HNcIO IOKIOHCHBIX IPOCKTROPOB IIpCBbIaCT MaKCHMaJIbHOC HNCIO.
HaKMnTe KHOIky [Yes] IJIOTKJIOUeHHe TKyIIErO IOIKJIOUeHn. ByET yCTaHOBJEHO HOBOE IOIKJIOUeHne.
HaXMMTe KHOIky [No], ecJH HOBOe IOKIOUOHe He HyxHo yCTaHaBJIHBaTb, H HyKHO COxpaHHTb TEKyIeE IOKIOUOHe.
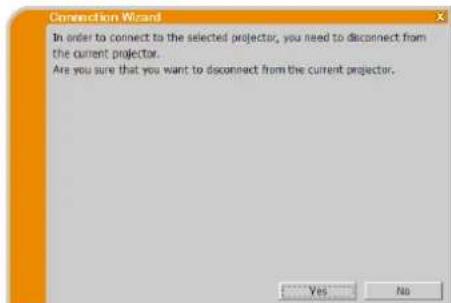
Coo6eHne 12: This projector is currently in use (Presenting) by another user.
Ipoektop,Ha KOTOpBn BbXOTHTe OTIIpaBHTb H3O6paKeHHa,3aHrT dpYHM KOMIIbIOTepom BpeKHMc Presenter.
HaKMHTe KhoIky [OK], nocJIe 0TOB PcXHMe OxHnAHHa OKpaHc OTo6pKaaretraabHoe MeHIO nporpaMMb "LiveViewer".
IOBTOPHTe IIOIbHTKy OTIpaBHTb H3O6paXeHHa IOcJIe OTKJIHOueHHa peKHa IIpe3CHTaun.
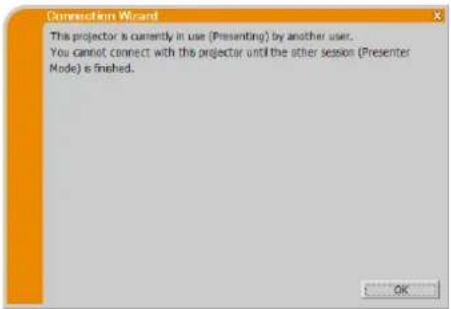
Coo6eHne 13: A Slideshow is currently running on the projector that you are trying to display to. (PC-Less Presentation Mode).
IPOCKTOP, HAI KOTOPBI BIX XOTHTC OTIIpaBHTH3O6paKcHHA, DEMOHCTpHPyET CIAJIDHOY BpeKHMpe3eHTaHH 6e3 PC.
HaKMHTc KHOIIky [Ycs], IIpH OTOM IpoeKTop ocTaHOBHT cJaI-IOy H IIpeKIOOH TBOIOH IOpt Ha LAN. KomIbIOTep NaHET IIpeJauy N3O6paKeHHa.
Haxmte KhoIky [No], nocne 3TOro npoeKToP ocTaetcBpeKHMe cJauH-10oy, HnHa 3KpaHc KOMIIbIOTepa OTO6paKaCTcB JxUicM pcKHMc rIaBHOC mHIO IIporpamMbI "LiveViewer".
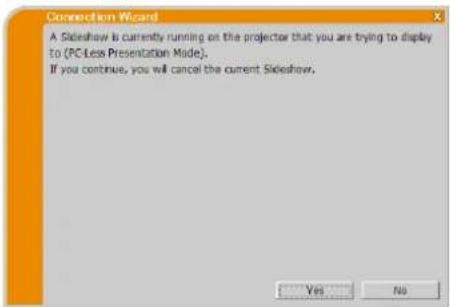
Coo6eHne 14: Are you sure you want to change the input channel of the Projector to 'LAN'?
Ha IIpoKTopc LAN Ic yctaHOBICh B KaueCTBc BXOIIHO crHnAJa. HaKMHTe KhoNky [Yes], IocJIe 3TOro IIpoEKTOp IpeKJIIOHTcR HA LAN.
HaKMHTe KhoIky [No], TOrIa IIpoEKTOp ocTaHETcB IIpeXHeM peKHMc, H Ha 3KpaHe KOMIIbOTepa B pcKHMc OxHuaHHa 6ydet OIO6paKeHO IJIABHO MeHIO IIporpAMMb LiveViewer.
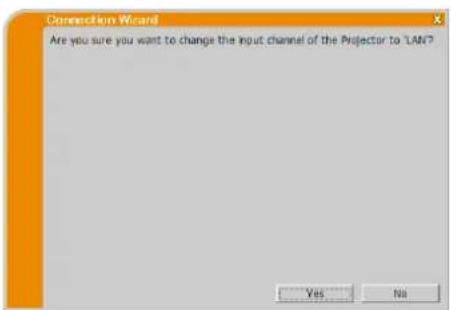
Co06eHne 15: Are you sure that you want to turn on the network adapter?
TOT kpaI OTO6pKaactc, cCIN Bb6paHbI aAANTep cCTN HOpMaJIbHO He fYHKIIIOHHPyeT.
HaKMHTe KHOIIky [Yes] IJIa cRO BKIIIOUcHnI. IIpeeiIHTe K IyHKTy "3.2.5 IIOKIOUOHeHne Hpepa". (22)
HaKMHe KHOIIky[No], YTO6bI He BKIOIOuATb eTo. Ipn 3OM 6yJeT BbIOJIHeH BO3BpaT Ha IIpeIbIyIINN EKpaH, IO3BOJIAIOII INBbIbpaT bpyrO CEteBOI aIaITep.
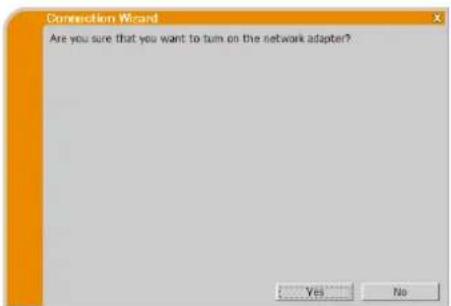
Coo6eHne 16: It cannot be connected because improper native resolution panel projector is selected.
3TO COO6HHe H OTo6paKaetc IIpH IIOIbITke IIOKIIIOueHHa K OIOHOMY KOMIBOTpy IIOeKTopoB C pa3HBIM CO6CTBCHHbIM pa3peHHeHem IINCIJIe.
HaKMNTc KHOIky [OK], IocJIe cero 6yIeT OTO6paKHeO TJIaBHOC MeHIO IIpoIpaMMbI LiveViewer, XOTa CeTeBOe IOIKIIIOueHHe K BB6paHHOMY IIpoEKTopy He yCTaHOBJieHO.
HaKMHTc KHOIIKy IIOKJIIOUChHc B TJIABHOM MCHIO IIporpaMMbI LiveViewer JIA BO3Bpata K IyHKTy "3.2.2 BbI6epHrte cnoco6 IOIKJIOUChHra". (9)
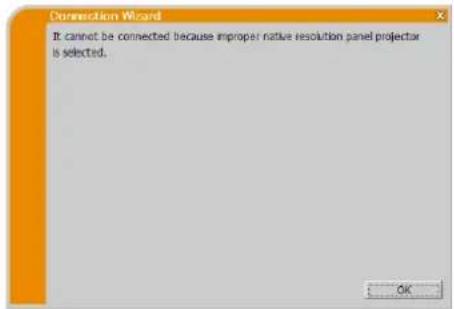
Coobuchne 17: Since moderator control mode of connected projector (IP address: \*\*\*\*\*\*\*\*\*\* becomes effective, Multi Projector mode is canceled.
3To coo6HHe HOBBHeTc HnO tMeHe peKHM HeCKoTBkHX IPOeKTopoB,IOCKoJIbKy peKHM yIpaBJeHH MaepaTopa IOIKJIOeHHOro IPOeKTopa HCIOJIb3yeTc npyTHM KOMIIbHTepOM. HaKMnte KHOUY [OK],IOcIE Ycero 6yEt OTO6paKeHo TnaBHoe MEHIO IPOrpaMMb LiveViewer.

Co06eHne 18: You can not operate while moderator control mode is activated.
IpoeKTop 3aHHT npYHM KOMIIbIOTepoM B peJHMe yIpaJIeHHN MoIepaTopa.
HaKMHTe KHOIIky [OK], IIOcJIe yero 6yIeT OTO6paKeH OJIaBHOe MCHIO IIPOrpaMMbI LiveViewer.
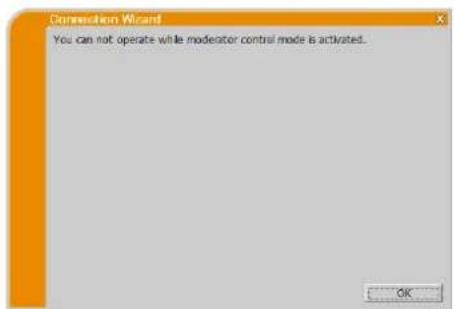
B POnck uYcTpaHHe HeNcnpaBHOCTe
| ПюбLEMа | Верогная ручни | Пробегка | Homep стразиць |
| Изобравенье отсутствауET | Пюбкове не вклоуне. | Ламma пюевская? | - |
| Источник вховно синILA пюевская песлкове на песлкове на LAN. | Пюевский поедиму не LAN? | - | |
| Ненильно сокондурированы сетевныеhaltrosу komlbotera и/эл пюевская. | Пюberьто кonsideratively сени komlbotera и пюевская. В стугелей. Стугелей стугелей стугелей стугелей стугелей стугелей стугелей стугелей стугелей стугелей стугелей стугелей стугелей стугелей стугелей стугелей стугелей стугелей стугелей стугелей сelu Сelu Сelu | 15 | |
| Пюевский к с Пюв仟ч下的 К Пюв仟ч下的 К Пюв仟ч下的 К Пюв仟ч下的 К Пюв仟ч下的 К Пюв仟ч下的 К Пюв仟ч下的 К Пюв仟ч下的 К Пюв仟ч下的 К Пюв仟ч下的 К Пюв仟ч下的 К Пюв仟ч下的 К Пюв仟ч下的 К Пюв仟ч下的 К Пюв仟ч下的 К Пюв仟ч下的 К Пюв仟ч下的 К Пюв仟ч下的 К Пюв仟ч下的 К Пюв仟ч下的 К Пюв仟ч下的 К Пюв仟ч下的 К Пюв仟ч下的 К П Пюв仟ч下的 К Пюв仟ч下的 К Пюв仟ч下的 К Пюв仟ч下的 К Пюв仟ч下的 К Пюв仟ч下的 К Пюв仟ч下的 К Пюв仟ч下的 К Пюв仟ч下的 К Пюв仟ч下的 К Пюв仟ч下的 К О О О О О О О О О О О О О О О О О О О О О О О О О О О О О О О О О О О О О О О О О О О О О О О О О О О О О О | С С М M M M M M M M M M M M M M M M M M M M M M M M M M M M M M M M M M M M M M M M M M M M M M M M M M M I I I I I I I I I I I I I I I I I I I I I I I I I I I I I I I I I I I I I I I I I I I I I I I I I I I | - | |
| Ненильно сокондурированы сетевныеhaltrosу komlbotera и/эл пюевская. | Пюевский поедиму неelan komlbotera и пюевская. Б Б Б Б Б Б Б Б Б Б Б Б Б Б Б Б Б Б Б Б Б - - - - - - - - - - - - - - - - - - - - - - - - - - - - - - - - - - - - - - - - - - - - - - - - - - - - - - - - - - - - - - - - - - - - - - - - - - - - - - - - - - - - - - - - - - - - - - - - - - - - - | ||
| Пюв仟ч下的 К Пюв仟ч下的 К Пюв仟ч下的 К Пюв仟ч下的 K Пюв仟ч下的 K Пюв仟ч下的 K Пюв仟ч下的 K Пюв仟ч下的 K Пюв仟ч下的 K Пюв仟ч下的 K Пюв仟ч下的 K Пюв仟ч下的 K Пюв仟ч下的 K Пюв仟ч下的 K Пюв仟ч下的 K泳 Пюв仟ч下的 K泳 | Ненильно сокондурированы сетевныеhaltrosу komlbotera и/эл пюевская. Н M M M M M M M M M M M M M M M M M M M M M M M M M M M M M M M M M M M M M M M M M M M M M M M M M K - - - - - - - - - - - - - - - - - - - - - - - - - - - - - - - - - - - - - - - - - - - - - - - - - - - - - - - - - - - - - - - - - - - - - - - - - - - - - - - - - - - - - - - - - - - - - - - - - - - | - | |
| Ненильно сокондурированы сетевныеhaltrosу komlbotera и/эл пюевская. Н M M M M M M M M M M M M M M M M M M M M M M M M M M M M M M - - - - - - - - - - - - - - - - - - - - - - - - - - - - - - - - - - - - - - - - - - - - - - - - - - - - - - - - - - - - - - - - - - - - - - - - - - - - - - - - - - - - - - - - - - - - - - - - - - - - - - - - - - - - - - - - - - - - - - - - - - - - - - - - - - - - - - - - - - - - - - - - - - - - - - - - - - - - - - - - - - - - - - - - - - - - - - - - - - - - - - - - - - - - - - - - - - - - - - . - - - - - - - - - - - - - - - - - - - - - - - - - - - - - - - - - - - - - - - - - - - - - - - - - - - - - - - - - - - - - - - - - - - - - - - - - - - - - - - - - - - - - - - - - - - - - - - - - - - > - - - - - - - - - - - - - - - - - - - - - - - - - - - - - - - - - - - - - - - - - - - - - - - - - - - - - - - - - - - - - - - - - - - - - - - - - - - - - - - - - - - - - - - - - - - - - - - - - - - - - |
The Software is being delivered to you "AS IS" and Christie Digital Systems USA, Inc. (CHRISTIE) make no warranty as to its use or performance. CHRISTIE AND ITS SUPPLIERS, INCLUDING BUT NOT LIMITED TO CHRISTIE, DO NOT AND CANNOT WARRANTY THE PERFORMANCE OR RESULTS YOU MAY OBTAIN BY USING THE SOFTWARE. EXCEPT TO THE EXTENT PROHIBITED BY LAW IN YOUR JURISDICTION, CHRISTIE AND ITS SUPPLIERS MAKE NO WARRANTY CONDITIONS, REPRESENTATIONS, OR TERMS (EXPRESS OR IMPLIED WHETHER BY STATUTE, COMMON LAW, CUSTOM, USAGE OR OTHERWISE) AS TO ANY MATTER IN CONNECTION WITH THE SOFTWARE, INCLUDING WITHOUT LIMITATION NONINFRINGEMENT OF THIRD PARTY RIGHTS, MERCHANTABILITY, INTEGRATION, SATISFACTORY QUALITY, OR FITNESS FOR ANY PARTICULAR PURPOSE.
You agree that the Software will not be shipped, transferred or exported into any country or used in any manner prohibited by the United States Export Administration Act or any other applicable export laws, restrictions or regulations (collectively the "Export Laws"). In addition, if the Software is identified as export controlled items under the Export Laws, you represent and warrant that you are not a citizen, or otherwise located within, an embargoed nation (including without limitation Iran, Iraq, Syria, Sudan, Libya, Cuba, North Korea, and Serbia) and that you are not otherwise prohibited under the Export Laws from receiving the Software. All rights to Use the Software are granted on condition that such rights are forfeited if you fail to comply with the terms of this Agreement.
Sisaltö
1 Ominaisuudet 3
1.1 Näytömuoto 3
Tehdasasetus SSID 1: wireless
Tehdasasetus SSID 2: WLANProjector1
Tehdasasetus SSID 3: WLANProjector2
Tehdasasetus SSID 4: WLANProjector3
There are two methods to get the Passcode from the projector.
> Menetelma 1
SSID: WirelessAccessPoint
(esimerkki)
Encryption (Koodaus):
SSID: WirelessAccessPoint
(esimerkki)
Viesti 1: A network connection was not established.
Viesti 2: The number of computer connection exceeds the limit (max. 50).
Viesti 3: A network connection could not be established.
Viesti 4: Are you sure you want to connect the selected projector?
Viesti 6: Do you want to apply suggested network settings as follows?
- If you checked "Not displaying confirmation dialog for adding Network settings" option, this dialog will not show up the next time. If you would like to change the setting, click option button on the VLCviewer main menu and uncheck "Not displaying confirmation dialog for adding Network settings" option.
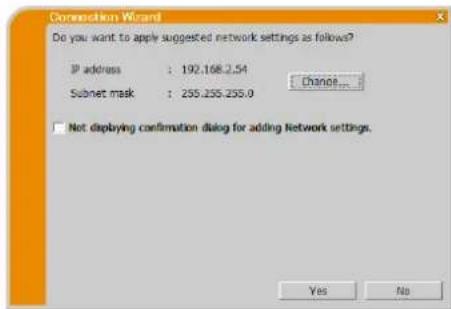
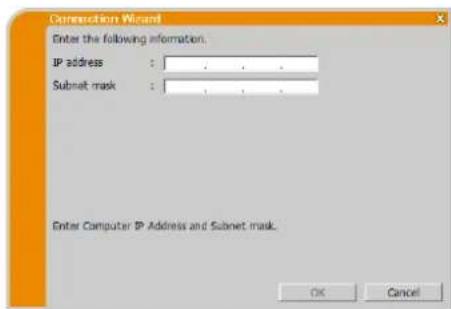
Viesti 7: An IP Address overlaps with the IP Address of the projector you are trying to connect to.
Viesti 8: Incorrect IP Address.
Viesti 9: A Network Configuration Conflict exists.
Viesti 10: There is a projector already connected with your computer.
Viesti 11: In order to connect to the selected projector, you need to disconnect from the current projector.
Viesti 12: This projector is currently in use (Presenting) by another user.
Viesti 13: A Slideshow is currently running on the projector that you are trying to display to. (PC-Less Presentation Mode).
Viesti 14: Are you sure you want to change the input channel of the Projector to 'LAN'?
Viesti 15: Are you sure that you want to turn on the network adapter?
Viesti 16: It cannot be connected because improper native resolution panel projector is selected.
Viesti 17: Since moderator control mode of connected projector (IP address: *********** becomes effective, Multi Projector mode is canceled.
Viesti 18: You can not operate while moderator control mode is activated.
The Software is being delivered to you "AS IS" and Christie Digital Systems USA, Inc. (CHRISTIE) make no warranty as to its use or performance. CHRISTIE AND ITS SUPPLIERS, INCLUDING BUT NOT LIMITED TO CHRISTIE, DO NOT AND CANNOT WARRANTY THE PERFORMANCE OR RESULTS YOU MAY OBTAIN BY USING THE SOFTWARE. EXCEPT TO THE EXTENT PROHIBITED BY LAW IN YOUR JURISDICTION, CHRISTIE AND ITS SUPPLIERS MAKE NO WARRANTY CONDITIONS, REPRESENTATIONS, OR TERMS (EXPRESS OR IMPLIED WHETHER BY STATUTE, COMMON LAW, CUSTOM, USAGE OR OTHERWISE) AS TO ANY MATTER IN CONNECTION WITH THE SOFTWARE, INCLUDING WITHOUT LIMITATION NONINFRINGEMENT OF THIRD PARTY RIGHTS, MERCHANTABILITY, INTEGRATION, SATISFACTORY QUALITY, OR FITNESS FOR ANY PARTICULAR PURPOSE.
You agree that the Software will not be shipped, transferred or exported into any country or used in any manner prohibited by the United States Export Administration Act or any other applicable export laws, restrictions or regulations (collectively the "Export Laws"). In addition, if the Software is identified as export controlled items under the Export Laws, you represent and warrant that you are not a citizen, or otherwise located within, an embargoed nation (including without limitation Iran, Iraq, Syria, Sudan, Libya, Cuba, North Korea, and Serbia) and that you are not otherwise prohibited under the Export Laws from receiving the Software. All rights to Use the Software are granted on condition that such rights are forfeited if you fail to comply with the terms of this Agreement.
Spis tresci
1 Funkcje 3
| Statusu | Ikona statusu |
| No computer is on screen | |
| One computer is on screen. | |
| Two computers are on screen. | |
| Three computers are on screen. | |
| Four computers are on screen. |
UWAGA
Komunikat 1: A network connection was not established.
Komunikat 2: The number of computer connection exceeds the limit (max. 50).
Komunikat 3: A network connection could not be established.
Komunikat 4: Are you sure you want to connect the selected projector?
Komunikat 6: Do you want to apply suggested network settings as follows?
Komunikat 7: An IP Address overlaps with the IP Address of the projector you are trying to connect to.
Komunikat 8: Incorrect IP Address.
Komunikat 9: A Network Configuration Conflict exists.
Komunikat 10: There is a projector already connected with your computer.
Komunikat 11: In order to connect to the selected projector, you need to disconnect from the current projector.
Komunikat 12: This projector is currently in use (Presenting) by another user.
Komunikat 13: A Slideshow is currently running on the projector that you are trying to display to. (PC-Less Presentation Mode).
Komunikat 14: Are you sure you want to change the input channel of the Projector to 'LAN'?
Click [No], then the projector remains as it is, and the VLC viewer main menu is displayed in the stand-by mode on your computer.
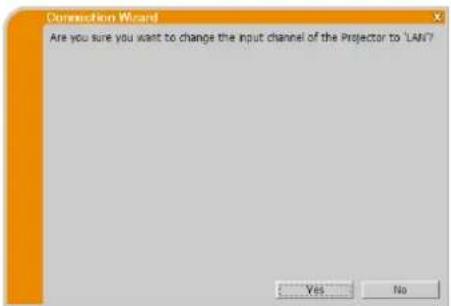
Komunikat 15: Are you sure that you want to turn on the network adapter?
Komunikat 16: It cannot be connected because improper native resolution panel projector is selected.
Komunikat 17: Since moderator control mode of connected projector (IP address: \*\*\*\*\*\*\*\*\*\* becomes effective, Multi Projector mode is canceled.
Komunikat 18: You can not operate while moderator control mode is activated.
The Software is being delivered to you "AS IS" and Christie Digital Systems USA, Inc. (CHRISTIE) make no warranty as to its use or performance. CHRISTIE AND ITS SUPPLIERS, INCLUDING BUT NOT LIMITED TO CHRISTIE, DO NOT AND CANNOT WARRANTY THE PERFORMANCE OR RESULTS YOU MAY OBTAIN BY USING THE SOFTWARE. EXCEPT TO THE EXTENT PROHIBITED BY LAW IN YOUR JURISDICTION, CHRISTIE AND ITS SUPPLIERS MAKE NO WARRANTY CONDITIONS, REPRESENTATIONS, OR TERMS (EXPRESS OR IMPLIED WHETHER BY STATUTE, COMMON LAW, CUSTOM, USAGE OR OTHERWISE) AS TO ANY MATTER IN CONNECTION WITH THE SOFTWARE, INCLUDING WITHOUT LIMITATION NONINFRINGEMENT OF THIRD PARTY RIGHTS, MERCHANTABILITY, INTEGRATION, SATISFACTORY QUALITY, OR FITNESS FOR ANY PARTICULAR PURPOSE.
You agree that the Software will not be shipped, transferred or exported into any country or used in any manner prohibited by the United States Export Administration Act or any other applicable export laws, restrictions or regulations (collectively the "Export Laws"). In addition, if the Software is identified as export controlled items under the Export Laws, you represent and warrant that you are not a citizen, or otherwise located within, an embargoed nation (including without limitation Iran, Iraq, Syria, Sudan, Libya, Cuba, North Korea, and Serbia) and that you are not otherwise prohibited under the Export Laws from receiving the Software. All rights to Use the Software are granted on condition that such rights are forfeited if you fail to comply with the terms of this Agreement.
目次
1 主機機能 3
1.1 表示一 3
丁才尔卜 SSID #1: wireless
徳才ルト SSID #2: WLANProjector1
3.2.3.6 3.2.3.6 3.2.3.6 3.2.3.6 3.2.3.6 3.2.3.6 3.2.3.6 3.2.3.6 3.2.3.6 3.2.3.6 3.2.3.6 3.2.3.6 3.2.3.6 3.2
Republic of South Africa
ph+27(0)115100094
Singapore
ph:+656877-8737
Spain
ph:3491633990
United Arab Emirates
ph:+97143205688
United Kingdom
ph-44(0)1189775000