PowerConnect W620 - Controller DELL - Free user manual and instructions
Find the device manual for free PowerConnect W620 DELL in PDF.



| Product Type | Wireless LAN (WLAN) controller |
| Brand | Dell |
| Model | PowerConnect W620 |
| Dimensions (H x W x D) | 4.5 x 32 x 17.3 cm |
| Weight | Approximately 1.5 kg |
| Power Supply | 100-240 VAC, 50-60 Hz, 115 W max (PoE included) |
| Maximum Power Consumption | 115 Watts |
| Total PoE Budget | 78 Watts (19.5 W per port on ports 0 to 3) |
| Network Ports | 8 10/100Base-T Ethernet ports (including 4 PoE) + 1 Gigabit 10/100/1000Base-T port |
| Serial Console Port | RJ-45 (RS-232) with included DB9 adapter |
| USB Ports | 1 USB 2.0 port (supports EVDO, storage, printer) |
| ExpressCard Slot | Yes (for EVDO device) |
| Maximum Supported Access Points | 8 |
| Required Software | ArubaOS 5.0.2 or later |
| Operating Temperature | 0 °C to 40 °C |
| Operating Humidity | 5% to 95% non-condensing |
| Storage Temperature | 0 °C to 50 °C |
| Storage Humidity | 5% to 95% non-condensing |
| Safety Standards | FCC Class B, EN 55022/55024, IEC/EN 60950, CE, cTUVus, CB Scheme |
| Package Contents | Controller, power cord, flat serial cable, rubber feet, RJ-45/DB9 console adapter, quick start guide, legal documents |
| Status LEDs | Power (solid green), Status (green/red/orange), Link/Activity per port, 100/1000, PoE |
| Maintenance and Cleaning | Clean with a dry, soft cloth. Do not use liquid or abrasive cleaners. Disconnect the device before cleaning. |
| Disposal | Compliant with WEEE directive. Do not dispose of with household waste. Refer to the SERI document or www.dell.com for recycling. |
Frequently Asked Questions - PowerConnect W620 DELL
User questions about PowerConnect W620 DELL
0 question about this device. Answer the ones you know or ask your own.
Ask a new question about this device
Download the instructions for your Controller in PDF format for free! Find your manual PowerConnect W620 - DELL and take your electronic device back in hand. On this page are published all the documents necessary for the use of your device. PowerConnect W620 by DELL.
USER MANUAL PowerConnect W620 DELL
Dell PowerConnect W-620 Controller
Installation Guide
Copyright
© 2010 Aruba Networks, Inc. AirWave®, Aruba Networks®, Aruba Mobility Management System®, and other registered marks are trademarks of Aruba Networks, Inc. Dell™, the DELL™ logo, and PowerConnect™ are trademarks of Dell Inc.
All rights reserved. Specifications in this manual are subject to change without notice.
Originated in the USA. Any other trademarks appearing in this manual are the property of their respective companies.
Open Source Code
Certain Aruba products include Open Source software code developed by third parties, including software code subject to the GNU General Public License (GPL), GNU Lesser General Public License (LGPL), or other Open Source Licenses. The Open Source code used can be found at this site:
http://www.arubanetworks.com/open_source
Legal Notice
The use of Aruba Networks, Inc. switching platforms and software, by all individuals or corporations, to terminate other vendors' VPN client devices constitutes complete acceptance of liability by that individual or corporation for this action and indemnifies, in full, Aruba Networks, Inc. from any and all legal actions that might be taken against it with respect to infringement of copyright on behalf of those vendors.
Contents
Preface....5
General Overview....5
Related Documentation....5
Contacting Dell....5
Chapter 1 About the W-620 Controller....7
Minimum Software Requirements....7
Hardware Model Overview....8
Front View....8
ExpressCard Slot 8
Port LEDs 8
Rear View....9
AC Power Socket 9
10/100BaseT Ethernet Ports 9
10/100/1000Base-T Gigabit Ethernet Port....9
Serial Console Port 10
Serial Console Port Adaptor....10
USB Ports 10
Media Eject Button 11
LED Status Indicators 11
Chapter 2 W-620 Series Installation....13
Physical Installation....13
Tabletop Deployment....13
Initial Setup and Network Connectivity....13
Appendix A Specifications, Safety, & Compliance 15
Specifications 15
Physical Specifications 15
Power Management Specifications ....15
Operating Specifications 15
Storage Specifications....15
Safety and Regulatory Compliance 15
FCC Class B Device 16
NOM Information (Mexico Only)....16
Additional Regulatory Compliance and Safety....16
Proper Disposal of Dell Equipment....16
European Union RoHS 17
Preface
This preface includes the following information:
• An overview of the contents of this manual
• A list of related documentation for further reading
• Aruba support and service information
General Overview
- Chapter 1, "About the W-620 Controller" on page 7 provides a detailed hardware overview of the Aruba 620.
- Chapter 2, "W-620 Series Installation" on page 13 provides rack mounting and installation instructions.
- Appendix A, "Specifications, Safety, & Compliance" on page 15 includes product technical specifications, safety, and regulatory compliance information.
Related Documentation
The following documentation are referred to in this guide and are considered components of the complete documentation set needed for a successful installation and management of an Dell Controller.
• Dell PowerConnect ArubaOS 5.0 Quick Start Guide
• Dell PowerConnect ArubaOS 5.0 User Guide
• Dell PowerConnect ArubaOS 5.0 Command Line Reference
Contacting Dell
| Web Site Support | |
| Main Site www.dell.com | |
| Support Site support.dell.com | |
| Documentation support.dell.com/manuals | |
| Software https://download.dell-pcw.com | |
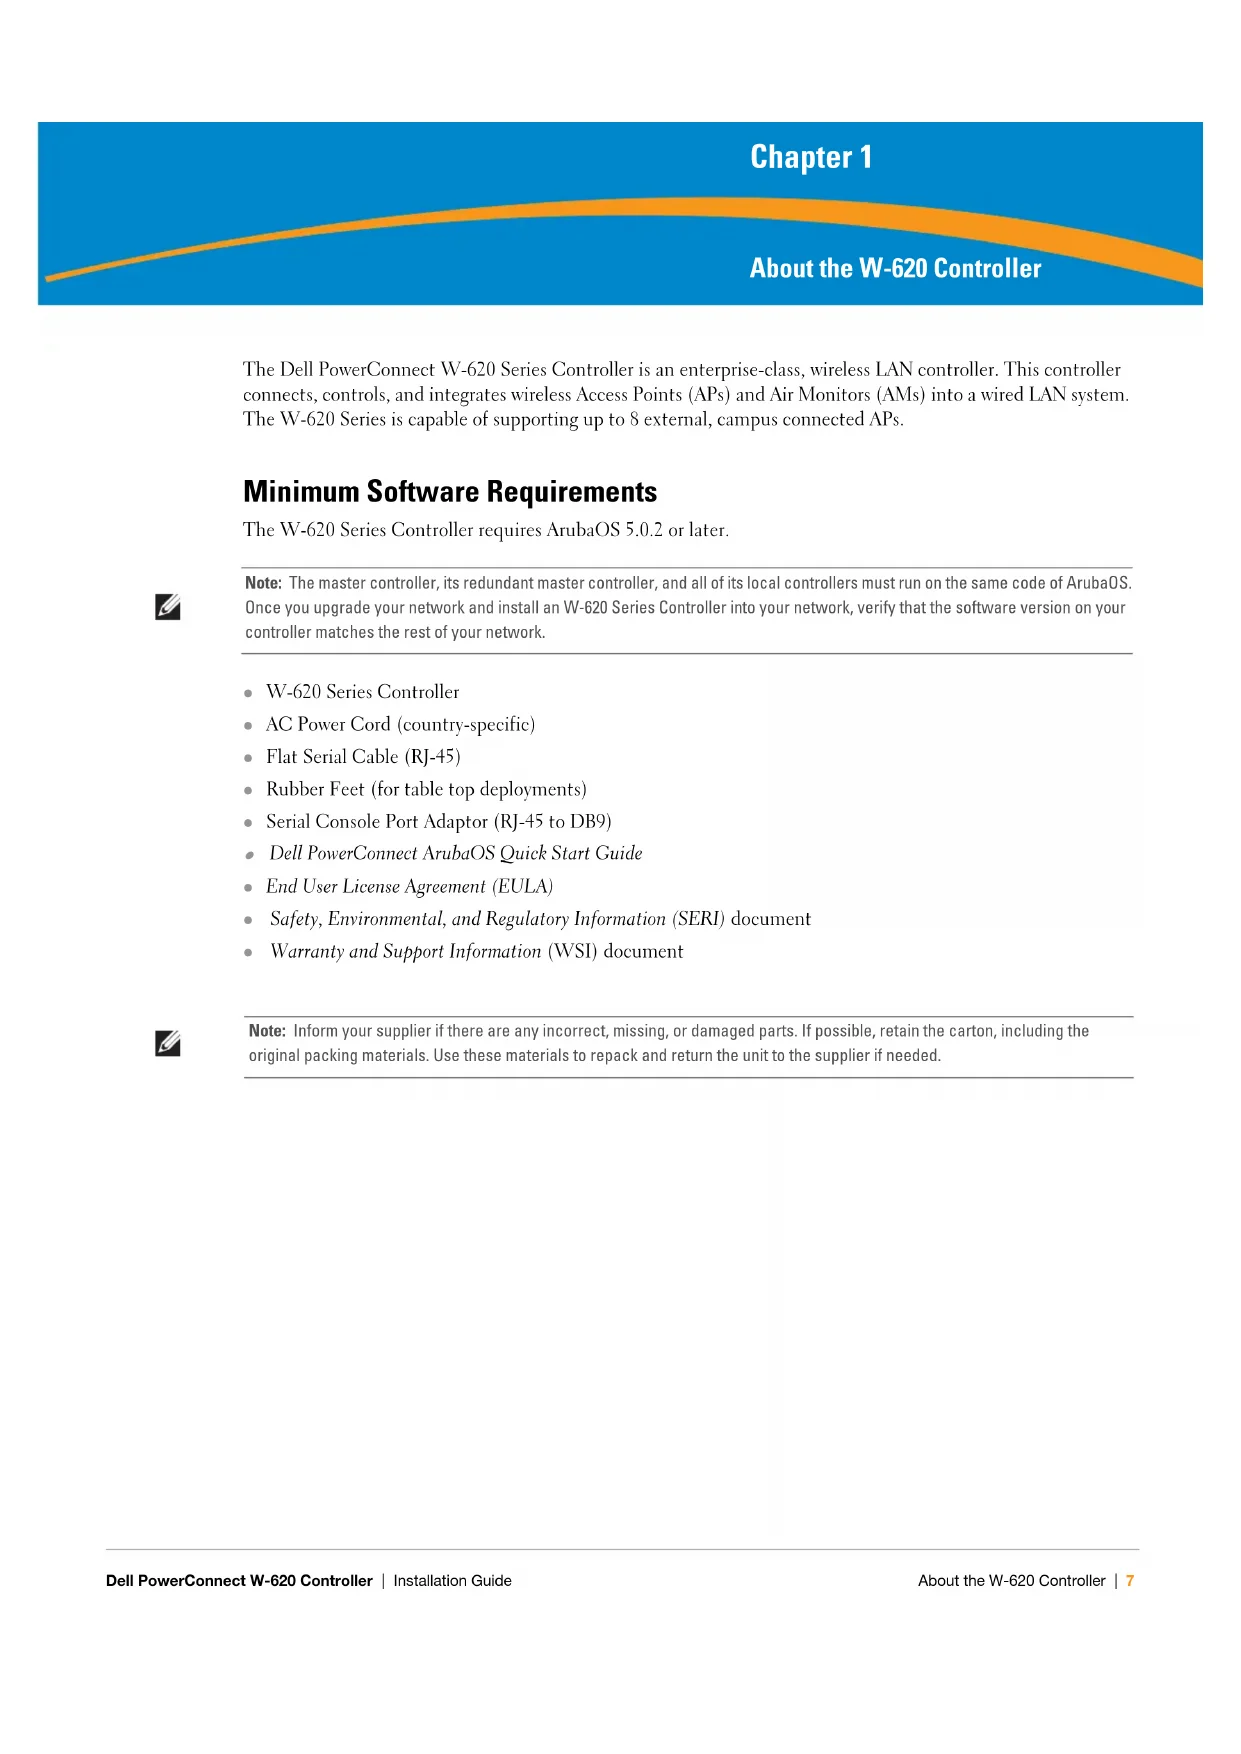
The Dell PowerConnect W-620 Series Controller is an enterprise-class, wireless LAN controller. This controller connects, controls, and integrates wireless Access Points (APs) and Air Monitors (AMs) into a wired LAN system. The W-620 Series is capable of supporting up to 8 external, campus connected APs.
Minimum Software Requirements
The W-620 Series Controller requires ArubaOS 5.0.2 or later.

Note: The master controller, its redundant master controller, and all of its local controllers must run on the same code of ArubaOS. Once you upgrade your network and install an W-620 Series Controller into your network, verify that the software version on your controller matches the rest of your network.
• W-620 Series Controller
• AC Power Cord (country-specific)
- Flat Serial Cable (RJ-45)
• Rubber Feet (for table top deployments)
• Serial Console Port Adaptor (RJ-45 to DB9)
• Dell PowerConnect ArubaOS Quick Start Guide
• End User License Agreement (EULA)
• Safety, Environmental, and Regulatory Information (SERI) document
• Warranty and Support Information (WSI) document

Note: Inform your supplier if there are any incorrect, missing, or damaged parts. If possible, retain the carton, including the original packing materials. Use these materials to repack and return the unit to the supplier if needed.
Hardware Model Overview
Front View
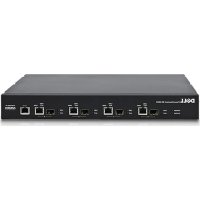
Figure 1 W-620 Series Front View
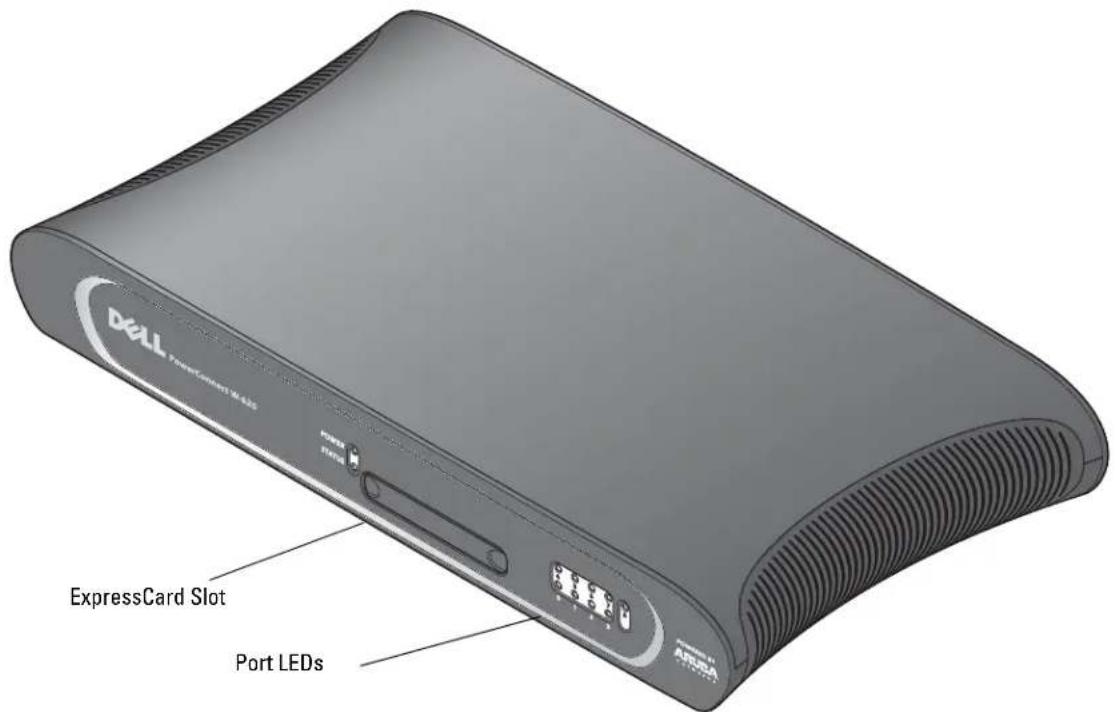
ExpressCard Slot
The W-620 Series is equipped with one ExpressCard slot, which can be used with an EVDO device.
Port LEDs
In non-rack deployments, the W-620 Series is placed with the front facing out. This allows the cables to be hidden and create a more aesthetically pleasing look. Therefore, a set of LEDs displaying link activity on the ports is placed on this side. For information about the behavior of these LEDs, see Table 3.
Rear View
Figure 2 W-620 Series Series Rear View
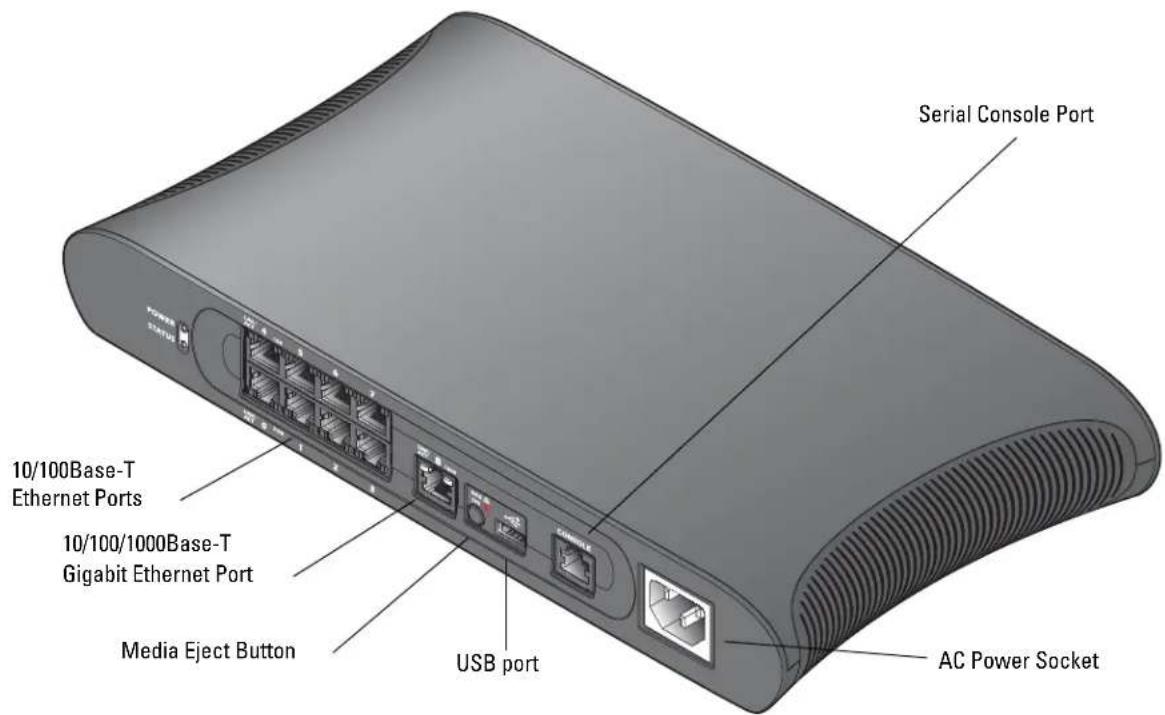
AC Power Socket
The W-620 Series supports integrated AC powering and the AC power socket on the rear of the unit is for use with an AC power cord (country-specific). Refer to Appendix A, “Specifications, Safety, & Compliance” on page 15 for power specification details.
10/100BaseT Ethernet Ports
There are eight 10/100BaseT Ethernet ports on the W-620 Series. Ports 0 through 3 support Power over Ethernet (PoE). Ports 4 through 7 do not support PoE and do not have a PoE LED. Instead, they have an LED labeled 100, which indicates interface speed. For information about LED behavior, see Table 3.
10/100/1000Base-T Gigabit Ethernet Port
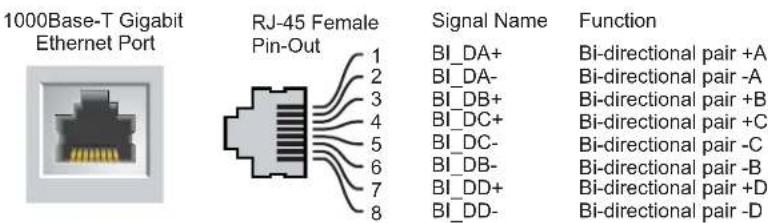
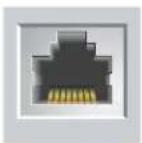
There is one 10/100/1000Base-T Gigabit Ethernet (RJ-45) port on the W-620 Series. Gigabit Ethernet uses all eight wires and each pair is used in a bi-directional fashion, meaning the same pairs are used for both data transmission and reception. Figure 3 illustrates the CAT-5 pin-out found on an RJ-45 connector. The CAT-5 pin-out pairs the following pins on a 10/100/1000Base-T Gigabit Ethernet port: 1/2, 3/6, 4/5, and 7/8.
Figure 3 Gigabit Ethernet Port Pin-Out
Serial Console Port
A serial console port (see Figure 4) is provided for connection to a terminal, allowing for direct local management. The port's RJ-45 female connector accepts an RS-232 serial cable with a male connector.
Figure 4 Serial Console Port Pin-Out
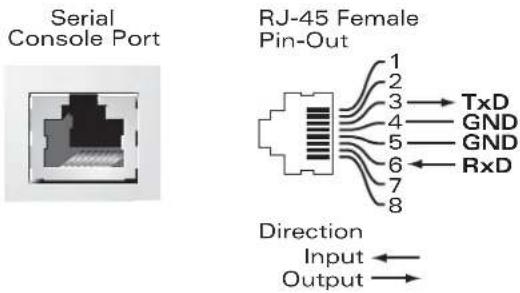
Communication settings for the serial port are indicated in Table 1.
Table 1 Console Terminal Settings
| Baud Rate | Data Bits | Parity | Stop Bits | Flow Control |
| 9600 8 None | 1 None |
Caution: Do not connect an AP to the serial console port. The serial console port is compatible only with RS-232 devices. Non-RS-232 devices, such as APs, are not supported.
Serial Console Port Adaptor
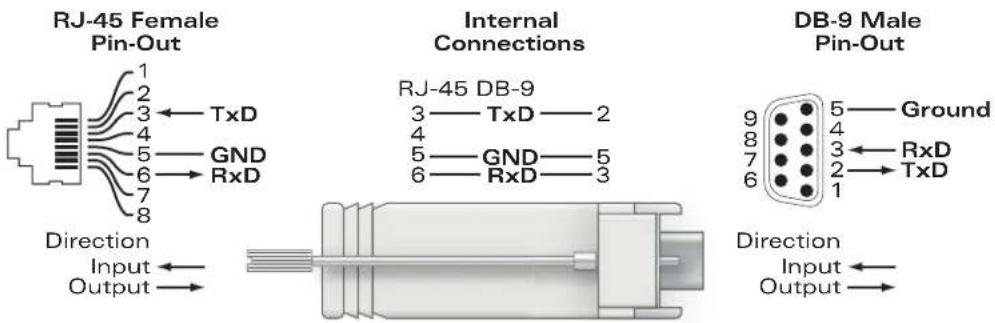
A modular adaptor can be used to convert the RJ-45 (female) connector to a DB9 (male) connector. Refer to Figure 5 for complete details.
Figure 5 RJ-45 (female) to DB9 (male) Modular Adaptor Conversion
USB Ports
The W-620 Series has one USB 2.0 interface. This interface allows the use of EVDO/HISPDA modem, flash or disk storage devices, or a printer. For more information about configuring and using USB devices with the W-620 Series, see the ArubaOS User Guide.

Media Eject Button
The W-620 Serics is equipped with a media eject button, which allows users to eject a storage device safely and place the system in standby. When the button is pushed, the storage media device attached to the controller via USB are unmounted. Printers and EVDO devices are unaffected.
Pushing the media eject button changes the state of the W-620 Series; the table below describes the states and LED behaviors associated with use of the media eject button.
Table 2 Media Eject Button LED Behavior
| Initial State | LED State | Action | Status LED | Function | LED Action Completed |
| NAS Media Operational | Green-solid Press | and hold media eject button for 1 to 5 seconds only | Amber-flashing Un-mount | NAS media Amber-solid | |
| NAS Media Unmounted | Amber-solid Press | and hold media eject button for 1 to 5 seconds only | Amber-flashing Mount | attached NAS device, and return to fully functional operation | Green-solid |
| Operational Green-solid Press and hold | media eject button for more than 5 seconds only | Red-flashing Controller | goes into Standby | Red-solid | |
| Operating with NAS Media un-mounted | Amber-solid Press | and hold media eject button for more than 5 seconds only | Red-flashing Controller | goes into Standby | Red-solid |
| Standby | Red-solid | Press media eject button | Amber-flashing | Controller wake-up | Green-solid |
LED Status Indicators
Table 3 W-620 Series LED Status Indicators
| LED | Label | Function | Indicator | Status |
| Power | POWER | Input Power Status Indicator | On (Solid Green) | Power on |
| Off | No Power | |||
| Status | STATUS | Module Status Indicator | On (Solid Green) | Device is operational |
| On (Solid Red) | Device failed or is in Standby | |||
| On (Solid Amber) Device is loading software | ||||
| Off | No power | |||
| 10/100/1000Base-T Port | LNK/ACT | Link/Activity Status Indicator | On (Solid Green) | Link has been established |
| On (Flashing Green) Port is transmitting or receiving data | ||||
| Off | No link on port | |||
| 1000 | Interface Speed | On (Solid Green) | 1000 Mbps | |
| Off | 10/100 Mbps | |||
| 10/100Base-T Ports | LINK/ACT | Link/Activity Status Indicator | On (Solid Green) | Link has been established |
| On (Flashing Green) Port is transmitting or receiving data | ||||
| Off | No link on port | |||
Table 3 W-620 Series LED Status Indicators
| LED | Label | Function | Indicator | Status |
| PoE PoE Status | Indicator On (Solid Green) PoE is | being provided | ||
| On (Solid Amber) The attached device has requested PoE, but PoE is not being provided by the port | ||||
| Off PoE is not being provided | ||||
| 100 Interface Speed On (Solid Green) 100 Mbps | ||||
| Off 10 Mbps | ||||
Chapter 2
W-620 Series Installation
The following tools and equipment are required for installation of a W-620 Series controller.
• AC Power Cord (country-specific)
• Any ethernet cables required for your deployment
Physical Installation
Tabletop Deployment
To deploy an W-620 Series controller on a flat surface, such as a tabletop:
- Insert the four rubber mounting feet to the bottom of the unit.
- Place the unit on a hard flat surface.
Initial Setup and Network Connectivity
Once the physical installation is complete, run the initial setup on the controller to configure the IP address and other basic system information. For complete details and instructions, refer to the Dell PowerConnect ArubaOS Quick Start Guide for the software version installed on your controller.
Specifications
Physical Specifications
Device Dimensions :
• Height 1.75" (45 mm)
- Width 12.6" (320 mm)
• Depth 6.8" (173 mm)
Power Management Specifications
• AC Input Voltage: 100-240 V, Universal Input
• AC Input Frequency: 50-60 Hz
• Maximum power consumption: 115 Watts
• Power over Ethernet total capacity: 78 Watts
• Power over Ethernet capacity per port: 19.5 Watts
Operating Specifications
- Operating Temperature Range: 0°C to 40°C (32°F to 104°F)
• Operating Humidity Range: 5% to 95% (RH), non-condensing
Storage Specifications
• Storage Temperature Range: 0°C to 50°C (32°F to 122°F)
• Storage Humidity Range: 5% to 95% (RH), non-condensing
Safety and Regulatory Compliance
Dell provides a multi-language document containing country specific restrictions and additional safety and regulatory information for all Dell hardware products. The Dell PowerConnect W-Series Safety, Environmental, and Regulatory Information document is included with this product.
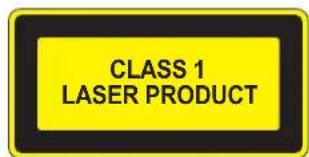

Caution: Use of controls or adjustments of performance or procedures other than those specified in this manual may result in hazardous radiation exposure.
This product complies with 21 CFR Chapter 1, Subchapter J, Part 1040.10, and IEC 60825-1: 1993, A1: 1997, A2: 2001, IEC 60825-2: 2000.
For continued compliance with the above laser safety standards, only approved Class 1 modules from our approved vendors should be installed in Aruba products.
FCC Class B Device
This equipment has been tested and found to comply with the limits for a Class B digital device, pursuant to part 15 of the FCC Rules. These limits are designed to provide reasonable protection against harmful interference in a residential installation. This equipment generates, uses and can radiate radio frequency energy and, if not installed and used in accordance with the instructions, may cause harmful interference to radio communications. However, there is no guarantee that interference will not occur in a particular installation. If this equipment does cause harmful interference to radio or television reception, which can be determined by turning the equipment off and on, the user is encouraged to try to correct the interference by one or more of the following measures:
• Reorient or relocate the receiving antenna.
- Increase the separation between the equipment and receiver.
- Connect the equipment into an outlet on a circuit different from that to which the receiver is connected.
- Consult the dealer or an experienced radio/ TV technician for help (we can modify this to advise to seek help of the professional installer).
For a complete list of Country Specific Regulations please speak with your Dell Representative.
NOM Information (Mexico Only)
The following information is provided on the device described in this document in compliance with the requirements of the official Mexican standards (NOM):
Importer: Dell Inc. de Mexico, S.A. de C.V. Pasco de la Reforma 2620-11° Piso Col. Lomas Atlas 11950 Mexico, D.F.
Model Number: 620
• Supply Voltage: 100-240 V AC
• Frequency: 47-63 Hz
• Current consumption: 1.8 A
Additional Regulatory Compliance and Safety
• EN 55022 Class B
EN 55024
IEC/EN 60950
CE Marking
• cTUVus Marked
• CB Scheme Certified
Proper Disposal of Dell Equipment
For the most current information on Global Environmental Compliance and Dell products please refer to the Dell PowerConnect W-Series Safety, Environmental, and Regulatory Information document is included with this product or see our website at www.dell.com.
European Union RoHS
RoHS
Dell products also comply with the EU Restriction of Hazardous Substances Directive 2002/95/EC (RoIIS). EU RoIIS restricts the use of specific hazardous materials in the manufacture of electrical and electronic equipment. Specifically, restricted materials under the RoHS Directive are Lead (including Solder used in printed circuit assemblies), Cadmium, Mercury, Hexavalent Chromium, and Bromine. Some Dell products are subject to the exemptions listed in RoHS Directive Annex 7 (Lead in solder used in printed circuit assemblies). Products and packaging will be marked with the "RoHS" label shown at the left indicating conformance to this Directive.
Dell PowerConnect W-620 Controller

Emplacement ExpressCard....8
Port Ethernet 10/100/1000Base-T Gigabit....9
Port console série 10
Port Ethernet 10/100/1000Base-T Gigabit

Puerto Gigabit Ethernet 10/100/1000Base-T


Port Ethernet 10/100/1000Base-T Gigabit....9
Port Konsol Serial....10
Adaptor Port Konsol Serial 10
Port USB 10
Port Ethernet 10/100/1000Base-T Gigabit
Ada satu port (RJ-45) Ethernet Gigabit 10/100/1000Base-T pada Seri W-620. Ethernet Gigabit menggunakan kedclapan kawat dan setiap pasangan digunakan seccara dua arah, yang berarti pasangan yang sama digunakan baik untuk pengiriman maupun penerimaan data. Gambar 3 menunjukkan pin keluar KAT-5 yang terdapat pada konektor RJ-45. Pin keluar KAT-5 menyandingkan pin berikut ini pada port Ethernet Gigabit 10/100/1000Base-T: 1/2, 3/6, 4/5, dan 7/8.
Gambar 3 Pin Keluar Port Ethernet Gigabit
Port Ethernet
Gigabit 1000Base-T
16 FCC Class B Device
- (הכלהה) NOM
16.
- Dell
17......"בְרָהִיֹתָהִיֹתָהִיֹתָהִיֹתָהִיֹתָהִיֹתָהִיֹתָהִיֹתָהִיֹתָהִיֹתָהִיֹתָהִיֹת RoHS
אַלְרָה
| www.dell.com | |
| support.dell.com | |
| support.dell.com/manuals | |
| https://download.dell-pcw.com |
Bi-directional pair +A
Bi-directional pair -A
Bi-directional pair +B
Bi-directional pair +C
Bi-directional pair -C
Bi-directional pair -B
Bi-directional pair +D
Bi-directional pair -D
תְרָה בְּרַעֹם
19.5: Power over Ethernet
הכלה
Dell PowerConnect W-Series, Dell PowerConnect W-Series, Dell PowerConnect W-Series, Dell PowerConnect W-Series, Safety, Environmental, and Regulatory Information
.www.dell.com
EU Restriction of Hazardous Substances Directive -7 (Dell) Dell 1980. EU RoHS .2002/95/EC (RoHS)


- Dell PowerConnect W-620 Controller
- Copyright
- Open Source Code
- Legal Notice
- Contents
- Preface....5
- Chapter 1 About the W-620 Controller....7
- Chapter 2 W-620 Series Installation....13
- Appendix A Specifications, Safety, & Compliance 15
- Preface
- General Overview
- Related Documentation
- Minimum Software Requirements
- Hardware Model Overview
- Front View
- ExpressCard Slot
- Port LEDs
- Rear View
- AC Power Socket
- 10/100BaseT Ethernet Ports
- 10/100/1000Base-T Gigabit Ethernet Port
- Serial Console Port
- Serial Console Port Adaptor
- USB Ports
- Media Eject Button
- LED Status Indicators
- Chapter 2
- W-620 Series Installation
- Physical Installation
- Tabletop Deployment
- Initial Setup and Network Connectivity
- Specifications
- Physical Specifications
- Power Management Specifications
- Operating Specifications
- Storage Specifications
- Safety and Regulatory Compliance
- FCC Class B Device
- NOM Information (Mexico Only)
- Additional Regulatory Compliance and Safety
- Proper Disposal of Dell Equipment
- European Union RoHS
- RoHS
- Port Ethernet 10/100/1000Base-T Gigabit
- Puerto Gigabit Ethernet 10/100/1000Base-T
- Gambar 3 Pin Keluar Port Ethernet Gigabit
- אַלְרָה
- תְרָה בְּרַעֹם
- הכלה
Brand : DELL
Model : PowerConnect W620
Category : Controller