
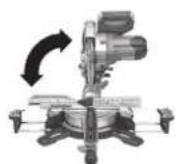
KGS 305 M - Saw METABO - Free user manual and instructions
Find the device manual for free KGS 305 M METABO in PDF.
| Product type | Compound miter saw with sliding feature |
| Brand | Metabo |
| Model | KGS 305 M |
| Blade diameter | 305 mm |
| Blade arbor | 30 mm |
| Power supply | Mains 230 V, 50 Hz |
| Cut types | Straight, miter, bevel, compound miter, grooves |
| Miter angle range | 0° to 45° left and right with detent stops |
| Bevel range | 0° to 45° left (up to 47° with button), 0° to 45° right |
| Sliding feature | Yes, for large workpieces |
| Cut line indicator | Yes (PCL by LED, blade shadow) |
| Pivoting blade guard | Yes |
| Workpiece stop | Adjustable with removable extra profile |
| Clamping device | Yes, for wide or narrow workpieces |
| Side table extensions | Yes, retractable and removable |
| Dust bag | Yes, included |
| Dust extraction connection | Yes, 44/58/100 mm sleeve with optional adapter |
| Blade lock | Yes, button for locking |
| Safety lock | Yes, for start-up |
| Maintenance | Regular cleaning of sawdust, blade change, adjustment of stop and bevel |
| Spare parts | Saw blades, table inserts, extraction accessories, etc. |
| Repairability | By Metabo service (see www.metabo.com) |
Frequently Asked Questions - KGS 305 M METABO
User questions about KGS 305 M METABO
0 question about this device. Answer the ones you know or ask your own.
Ask a new question about this device
Download the instructions for your Saw in PDF format for free! Find your manual KGS 305 M - METABO and take your electronic device back in hand. On this page are published all the documents necessary for the use of your device. KGS 305 M by METABO.
USER MANUAL KGS 305 M METABO
natural_image
Three metal cutting machines with visible blade and workpiece, no text or symbols present
| KS 216 M | KGS 216 M KGS | 254 M KGS | 305 M | KGS 18 LTX BL 216 | KGS 18 LTX BL 254 | KGS 18 LTX BL 305 | ||||
| *1) Serial Number | 10216.. 13 | 216.. 13254.. 13305... 14 | 216... 14254... 14 | 305... | ||||||
| U | V | 220-240 V ~ (50-60 Hz) | 220-240 V ~ (50-60 Hz) | 110-120 V ~ (50-60 Hz) | 220-240 V ~ (50-60 Hz) | 220-240 V ~ (50-60 Hz) | 110-120 V ~ (50-60 Hz) | 18 V 18 V | 18 V | |
| I | A | 5.3 | 5.6 | 11,6 A | 7,5 | 8,0 | 15 A | - | - | - |
| F | A | T 10 A | T 10 A | T 16 A | T 10 A | T 10 A | T 16 A | - | - | - |
| P_1 | kW | 1,1 kW (S1)1,35 kW (S6 20%) | 1,2 kW (S1)1,5 kW (S6 20%) | 1,45 kW (S1)1,8 kW (S6 20%) | 1,6 kW (S1)2,0 kW(S6 20%) | 1,5 kW (S1) | - | - | - | |
| IP | - | IP 20 | IP 20 | IP 20 | IP 20 | - | - | - | ||
| n_0 | /min, rpm | 5000 | 5000 | 4500 | 3700 | 5000 | 4000 | 3700 | ||
| v_0 | m/s | 57 | 57 | 60 | 59 | 57 | 53 | 59 | ||
| D | mm | 216 | 216 | 254 | 305 | 216 | 254 | 305 | ||
| d | mm | 30 | 30 | 30 | 30 | 30 | 30 | 30 | ||
| b | mm | 2,4 | 2,4 | 2,6 | 3,0 | 2,4 | 2,6 | 3,0 | ||
| A | mm | 477 x 463 x 490 | 710 x 476 x 512 | 726 x 485 x 543 | 780 x 500 x 657 | 710 x 476 x 512 | 726 x 485 x 543 | 780 x 500 x 657 | ||
| m | kg | 8,4 | 13.4 | 16 | 18,6 | 12,8 | 14,8 | 17,4 | ||
| D_1-i | mm | 35 | 35 | 35 | 35 | 35 | 35 | 35 | ||
| D_1-a | mm | 41 | 41 | 41 | 41 | 41 | 41 | 41 | ||
| D_2 | m^3/h | 460 | 460 | 460 | 460 | 460 | 460 | 460 | ||
| D_3 | Pa | 530 | 530 | 530 | 530 | 530 | 530 | 530 | ||
| D_4 | m/s | 20 | 20 | 20 | 20 | 20 | 20 | 20 | ||
| L_pA/K_pA | dB(A) | 85,4/3 | 85,5/3 | 86,6/3 | 87,4/3 | 91/3 | 91/3 | 98/3 | ||
| L_WA/K_WA | dB(A) | 98,4/3 | 98,5/3 | 99,6/3 | 100,4/3 | 101/3 | 100/3 | 107/3 | ||
| KS 216 M | |||||
| b x h (mm) 0° | 15° 22,5° | 30° | 45° | ||
| 0° | 120 x 60 | 110 x 60 | 105 x 60 | 100 x 60 | 80 x 60 |
| 45° | 120 x 45 | 110 x 45 | 105 x 45 | 100 x 45 | 80 x 45 |
| KGS 216 M, KGS 18 LTX BL 216 | |||||
| b x h (mm) | 0° | 15° | 22,5° | 30° | 45° |
| 0° | 305 x 70 | 295 x 70 | 280 x 70 | 260 x 70 | 215 x 70 |
| 45° | 305 x 40 | 295 x 40 | 280 x 40 | 260 x 40 | 215 x 40 |
| KGS 254 M, KGS 18 LTX BL 254 | |||||
| b x h (mm) | 0° | 15° | 22,5° | 30° | 45° |
| 0° | 305 x 92 | 295 x 92 | 280 x 92 | 260 x 92 | 215 x 92 |
| 45° | 305 x 48 | 295 x 48 | 280 x 48 | 260 x 48 | 215 x 48 |
| KGS 305 M, KGS 18 LTX BL 305 | ||||||
| b x h (mm) | 0^ | 15^ | 22,5^ | 30^ | 45^ | 60^ |
| 0^ | 305 x 110 | 309 x 110 | 296 x 110 | 273 x 110 | 215 x 110 | 160 x 110 |
| 45^ L | 305 x 55 | 295 x 55 | 280 x 67 | 260 x 67 | 215 x 67 | ---- |
| 45^ R | 305 x 40 | 295 x 40 | 280 x 40 | 260 x 40 | 215 x 40 | 160 x 40 |

*2) 2014/30/EU, 2006/42/EC, 2011/65/EU
*3) EN 62841-1:2015, EN 62841-3-9:2021, EN IEC 63000:2018

2022-03-09, Bernd Fleischmann
Original instructions
Table of Contents
- Declaration of Conformity
- Specified Conditions of Use
- General Safety Information
- Special Safety Instructions
- Overview
- Setup and transport
- Machine Details
- Initial Operation
- Operation
- Care and Maintenance
- Tips and Tricks
- Accessories
- Repairs
- Environmental Protection
- Troubleshooting Guide
- Technical Specifications
1. Declaration of Conformity
We, being solely responsible, hereby declare that these chop and mitre saws, identified by type and serial number *1), meet all relevant requirements of directives *2) and standards *3). Technical documents for *4) - see page 4.
For UK only:
UK We as manufacturer and authorized person to compile the technical file, see *4) on page 4, hereby declare under sole responsibility that these chop and mitre saws, identified by type and serial number *1) on page 4, fulfill all relevant provisions of following UK Regulations S.I. 2016/1091, S.I. 2008/1597, S.I. 2012/3032 and Designated Standards EN 62841-1:2015, EN 62841-3-9:2021, EN IEC 63000:2018
2. Specified Conditions of Use
The mitre saw is suited for longitudinal and cross cuts, inclined cuts, mitre cuts and double mitre cuts.
Only for KGS...: In addition, it can also create grooves.
Only materials for which the respective saw blade is suited may be machined (approved saw blades see chapter 12. Accessories).
The permitted dimensions of the workpieces must be complied with (see chapter 16. Technical Data).
Workpieces with round or irregular cross-section (such as firewood) must not be cut, as they cannot be held securely during the cutting process. When sawing a thin workpiece laid on its edge, a suitable guide must be used for firm support.
Any other use does not comply with the intended purpose. Unspecified use, modification of the device or use of parts that have not been tested and approved by the manufacturer can cause unforeseeable damage!
3. General Safety Information

For your own protection and for the protection of your electrical tool, pay attention to all parts of the text that are with this symbol!

WARNING – Reading the operating instructions will reduce the risk of injury.
Pass on your power tool only together with these documents.
General Power Tool Safety Warnings

WARNING – Read all safety warnings, instructions, illustrations and
specifications provided with this power tool. Failure to follow all instructions listed below may result in electric shock, fire and/or serious injury.
Keep all safety instructions and information for future reference! The term "power tool" in the warnings refers to your mains-operated (corded) power tool or battery-operated (cordless) power tool.
3.1 Work area safety
a) Keep work area clean and well lit. Cluttered or dark areas invite accidents.
b) Do not operate power tools in explosive atmospheres, such as in the presence of flammable liquids, gases or dust. Power tools create sparks which may ignite the dust or fumes.
c) Keep children and bystanders away while operating a power tool. Distractions can cause you to lose control.
3.2 Electrical safety
a) Power tool plugs must match the outlet. Never modify the plug in any way. Do not use any adapter plugs with earthed (grounded) power tools. Unmodified plugs and matching outlets will reduce risk of electric shock.
b) Avoid body contact with earthed or grounded surfaces, such as pipes, radiators, ranges and refrigerators. There is an increased risk of electric shock if your body is earthed or grounded.
c) Do not expose power tools to rain or wet conditions. Water entering a power tool will increase the risk of electric shock.
d) Do not abuse the cord. Never use the cord for carrying, pulling or unplugging the power tool. Keep cord away from heat, oil, sharp edges or moving parts. Damaged or entangled cords increase the risk of electric shock.
e) When operating a power tool outdoors, use an extension cord suitable for outdoor use. Use of a cord suitable for outdoor use reduces the risk of electric shock.
f) If operating a power tool in a damp location is unavoidable, use a residual current device (RCD) protected supply. Use of an RCD reduces the risk of electric shock.
3.3 Personal safety
a) Stay alert, watch what you are doing and use common sense when operating a power tool. Do not use a power tool while you are tired or under the influence of drugs, alcohol or medication. A moment of inattention while operating power tools may result in serious personal injury.
b) Use personal protective equipment. Always wear eye protection. Protective equipment such as dust mask, non-skid safety shoes, hard hat, or hearing protection used for appropriate conditions will reduce personal injuries.
c) Prevent unintentional starting. Ensure the switch is in the off-position before connecting to power source and/or battery pack, picking up or carrying the tool. Carrying power tools with your finger on the switch or energising power tools that have the switch on invites accidents.
d) Remove any adjusting key or wrench before turning the power tool on. A wrench or a key left attached to a rotating part of the device may result in personal injury.
e) Do not overreach. Keep proper footing and balance at all times. This enables better control of the power tool in unexpected situations.
f) Dress properly. Do not wear loose clothing or jewellery. Keep your hair and clothing away from moving parts. Loose clothes, jewellery or long hair can be caught in moving parts.
g) If devices are provided for the connection of dust extraction and collection facilities, ensure these are connected and properly used. Use of dust extraction can reduce dust-related hazards.
h) Do not let familiarity gained from frequent use of tools allow you to become complacent and ignore tool safety principles. A careless action can cause severe injury within a fraction of a second.
3.4 Use and handling of the power tool
a) Do not force the power tool. Use the correct power tool for your application. The correct power tool will do the job better and safer at the rate for which it was designed.
b) Do not use the power tool if the switch does not turn it on and off. Any power tool that cannot be controlled with the switch is dangerous and must be repaired.
c) Disconnect the plug from the power source and/or remove the battery pack, if detachable, from the power tool before making any adjustments, changing accessories, or storing power tools. Such preventive safety measures reduce the risk of starting the power tool accidentally.
d) Store idle power tools out of the reach of children. Do not allow persons unfamiliar with the power tool or these instructions to operate the power tool. Power tools are dangerous in the hands of untrained users.
e) Maintain power tools and accessories with care. Check for misalignment or binding of moving parts, breakage of parts and any other condition that may affect the power tool's operation. If damaged, have the power tool repaired before use. Many accidents are caused by poorly maintained power tools.
f) Keep cutting tools sharp and clean. Properly maintained cutting tools with sharp cutting edges are less likely to bind and are easier to control.
g) Use the power tool, accessories, tool bits etc. in accordance with these instructions. taking into account the working conditions and the work to be performed. Use of the power tool for operations different from those intended could result in a hazardous situation.
h) Keep handles and grasping surfaces dry, clean and free from oil and grease. Slippery handles and grasping surfaces do not allow for safe handling and control of the tool in unexpected situations.
3.5 Battery tool use and care
a) Always charge the batteries only in chargers recommended by the manufacturer. Chargers designed for a specific type of battery may pose a fire hazard when used together with other battery types.
b) Use only the batteries provided for this purpose in the power tools. Use of any other battery packs may create a risk of injury and fire.
c) When battery pack is not in use, keep it away from other metal objects, like paper clips, coins, keys, nails, screws or other small metal objects, that can make a connection from one terminal to another. Shorting the battery terminals together may cause burns or a fire.
d) Under abusive conditions, liquid may be ejected from the battery. Avoid contact. If contact accidentally occurs, flush with water. If liquid contacts eyes, additionally seek medical help. Escaping battery fluid can cause skin irritation or burns.
e) Do not use damaged or modified batteries. Damaged or modified batteries may behave unpredictably and lead to fire, explosion or risk of injury.
f) Do not expose the battery pack to fire or excessive temperatures. Fire or temperatures above 130 °C can cause an explosion.
g) Follow all instructions on charging and never charge the battery or the cordless tool outside the temperature range indicated in the operating instructions. Charging improperly or at temperatures outside the specified range may damage the battery and increase the risk of fire.
3.6 Service
a) Have your power tool serviced by a qualified repair person using only identical replacement parts. This will ensure that the safety of the power tool is maintained.
b) Never service damaged batteries. Any servicing of batteries should only be carried out by the manufacturer or authorised customer service points.
3.7 Additional Safety Instructions
- These operating instructions are intended for people with basic technical knowledge regarding the operation of a machine like this or similar electrical power tools. Inexperienced persons are strongly advised to seek competent
ENGLISHen
advise and guidance from an experienced person before operating this machine.
– The manufacturer assumes no liability for any damage caused by neglect of these operating instructions.
Information in these instructions is marked as under:

Danger!
Risk of personal injury or environmental damage.

Risk of electric shock!
Risk of personal injury by electric shock.

Entanglement hazard!
Risk of personal injury by body parts or clothing being drawn into the rotating saw blade.

Caution!
Risk of material damage.

Note:
Additional information.
4. Special Safety Instructions
a) Mitre saws are intended to cut wood or wood-like products, they cannot be used to cut ferrous materials such as bars, rods, studs etc. Abrasive dust causes moving parts such as the lower guard to jam. Sparks from abrasive cutting will burn the lower guard, the kerf insert and other plastic parts.
b) Use clamps to support the workpiece whenever possible. If supporting the workpiece by hand, you must always keep your hand at least 100 mm from either side of the saw blade. Do not use this saw to cut pieces that are too small to be securely clamped or held by hand. If your hand is placed too close to the saw blade, there is an increased risk of injury from blade contact.
c) The workpiece must be stationary and clamped or held against both the fence and the table. Do not feed the workpiece into the blade or cut "freehand" in any way. Unrestrained or moving workpieces could be thrown at high speeds, causing injury.
d) Only for KGS....: Push the saw through the workpiece. Do not pull the saw through the workpiece. To make a cut, raise the saw head and pull it out over the workpiece without cutting, start the motor, press the saw head down and push the saw through the workpiece. Cutting on the pull stroke is likely to cause the saw blade to climb on top of the workpiece and violently throw the blade assembly towards the operator.
e) Never cross your hand over the intended line of cutting either in front or behind the saw blade. Supporting the workpiece "cross handed" i.e. holding the workpiece to the right of the saw blade with your left hand or vice versa is very dangerous.
f) Never reach behind the fence when the saw blade is rotating, with either hand closer than 100 mm from either side of the saw blade, to remove wood scraps, or for any other reason while the blade is spinning. The proximity of the spinning saw blade to your hand may not be obvious and you may be seriously injured.
g) Inspect your workpiece before cutting. If the workpiece is bowed or warped, clamp it with the outside bowed face toward the fence. Always make certain that there is no gap between the workpiece, fence and table along the line of the cut. Bent or warped workpieces can twist or shift and may cause binding on the spinning saw blade while cutting. There should be no nails or foreign objects in the workpiece.
h) Do not use the saw until the table is clear of all tools, wood scraps, etc. except for the workpiece. Small debris or loose pieces of wood or other objects that contact the revolving blade can be thrown with high speed.
i) Cut only one workpiece at a time. Stacked multiple workpieces cannot be adequately clamped or braced and may bind on the blade or shift during cutting.
j) Ensure the mitre saw is mounted or placed on a level, firm work surface before use. A level and firm work surface reduces the risk of the mitre saw becoming unstable.
k) Plan your work. Every time you change the bevel or mitre angle setting, make sure the adjustable fence is set correctly to support the workpiece and will not interfere with the blade or the guarding system. Without turning the tool "ON" and with no workpiece on the table, move the saw blade through a complete simulated cut to assure there will be no interference or danger of cutting the fence.
I) Provide adequate support such as table extensions, saw horses, etc. for a workpiece that is wider or longer than the table top. Workpieces longer or wider than the mitre saw table can tip if not securely supported. If the cut-off piece or workpiece tips, it can lift the lower guard or be thrown by the spinning blade.
m) Do not use another person as a substitute for a table extension or as additional support. Unstable support for the workpiece can cause the blade to bind or the workpiece to shift during the cutting operation pulling you and the helper into the spinning blade.
n) The cut-off piece must not be jammed or pressed by any means against the spinning saw blade. If confined, i.e. using length stops, the cut-off piece could get wedged against the blade and thrown violently.
o) Always use a clamp or a fixture designed to properly support round material such as rods or tubing. Rods have a tendency to roll while being cut, causing the blade to "bite" and pull the work with your hand into the blade.
p) Let the blade reach full speed before contacting the workpiece. This will reduce the risk of the workpiece being thrown.
q) If the workpiece or blade becomes jammed, turn the mitre saw off. Wait for all moving parts to stop and disconnect the plug from the power source and/or remove the battery pack. Then work to free the jammed material. Continued sawing with a jammed workpiece could cause loss of control or damage to the mitre saw.
r) After finishing the cut, release the switch, hold the saw head down and wait for the blade to stop before removing the cut-off piece. Reaching with your hand near the coasting blade is dangerous.
s) Only for KGS 254 M, KGS 305 M, KGS 18 LTX BL 216, KGS 18 LTX BL 254, KGS 18 LTX BL 305: Hold the handle firmly if you are completing an incomplete saw cut or if you release the switch before the saw head has reached its lowest position. The braking action of the saw may cause the saw head to be suddenly pulled downward, causing a risk of injury.
4.1 Additional Safety Instructions
- Please also observe the special safety instructions in the respective chapters.
- Where applicable, follow the legal directives or regulations for the prevention of accidents.

General hazards!
- Consider environmental conditions:
- When working long stock use suitable supports.
- The machine shall only be started and operated by persons familiar with the machine and who are at any time aware of the dangers associated with the operation of such machines. Persons under 18 years of age may use this machine only in the course of their vocational training, under the supervision of an instructor.
- Keep bystanders, particularly children, out of the danger zone. Do not permit other persons to touch the machine or power cable while it is running.
- Avoid overheating of the saw teeth.
- When sawing plastic, avoid melting of the plastic.

Risks of personal injury and crushing ving parts!
- Do not operate the machine without installed guards.
- Always keep sufficient distance to the saw blade. Use suitable feeding aids, if necessary. Keep sufficient distance to driven components when operating this machine.
- Wait for the saw blade to come to a complete stop before removing cutoffs, scrap, etc. from the work area.
- Cut only stock of dimensions that can be safely held during cutting.
- Use clamping devices or a vice to hold the workpiece. It is held safer by these devices than by your hand.
- Do not attempt to stop the saw blade by pushing the workpiece against its side.
- Remove the mains plug from the socket or remove the detachable battery pack before carrying out any settings, maintenance or repairs.
- If the device is not in use, pull the mains plug or remove the detachable battery pack.

Cutting hazard, even with the cutting standstill!
- Wear gloves when changing cutting tools.
- Store saw blade in such manner that nobody will get hurt.

Danger from kickback of the saw head blade gets caught in the workpiece and w head suddenly kicks back)!
- Select a saw blade suited for the material to be cut.
- Keep the handle tight. When the saw blade enters the workpiece, the risk of kickback is particularly high.
- Cut thin or thin-walled workpieces only with fine-toothed saw blades.
• Always use sharp saw blades. Replace damaged saw blades immediately. There is an increased risk of kickback if a blunt sawtooth gets caught in the workpiece's surface. - Do not jam any work pieces.
- If in doubt, check work piece for inclusion of foreign matter (e.g. nails or screws).
- Never cut several work pieces at the same time – and also no bundles containing several individual pieces. Risk of personal injury if individual pieces are caught by the saw blade uncontrolled.
- Only for KGS.: When making grooves avoid lateral pressure on the saw blade - use a clamping device.

Entanglement hazard!
- Ensure that during operation no parts of the body or clothing can be caught and drawn in by rotating components (no ties no gloves, no clothes with wide sleeves; contain long hair with a hairnet).
- Never cut workpieces to which ropes, cords, strings, cables or wires are attached or which contain such materials.

Hazard generated by insufficient nal protection gear!
- Wear hearing protection.
- Wear safety glasses.
- Wear dust mask.
- Wear suitable work clothes.
- Wear non-slip footwear.
- Wear gloves when handling saw blades and rough workpieces. Carry saw blades in a container.

Risk of injury by inhaled wood dust!
- Work only with a suitable dust collector attached to the saw. The dust extraction unit must comply with the values stated in chapter 16..
Reducing Dust Exposure:
- Some of the dust created using this power tool may contain chemicals known to cause cancer, allergic reactions, respiratory disease, birth defects or other reproductive harm. Some examples of such substances are, lead (in paint containing lead), additives used for wood treatment (chromate, wood preservatives), some wood types (such as oak or beech dust).
- The risk from exposure to such substances will depend on how long the user or nearby persons are being exposed.
- Do not let particles enter the body.
- To reduce exposure to these substances: work in a well ventilated area and wear protective equipment, such as dust masks that are specially designed to filter out microscopic particles.
- Observe the relevant guidelines for your material, staff, application and place of application (e.g. occupational health and safety regulations, disposal).
- Collect the particles generated at the source, avoid deposits in the surrounding area.
- Use the supplied dust collection unit and a suitable extraction unit. In this way, fewer particles enter the environment in an uncontrolled manner.
- Reduce dust exposure with the following measures:
– do not direct the escaping particles and the exhaust air stream towards yourself or nearby persons or towards dust deposits,
- use an extraction unit and/or an air purifier,
- ensure good ventilation of the workplace and keep it clean using a vacuum cleaner. Sweeping or blowing stirs up dust.
– Vacuum or wash protective clothing. Do not blow, beat or brush protective gear.

Hazard generated by modification of machine or use of parts not tested and served by the equipment manufacturer
- Assemble the machine in strict accordance with these instructions.
- Use only parts approved by the manufacturer. This applies especially to:
- saw blades (for order numbers, refer to chapter 12. Accessories).
- Safety devices.
– Cutting line display
- Do not change any parts.
- Ensure that the speed indicated on the saw blade is at least the same as the max. speed indicated on the saw.

Hazard generated by machine defects!
- Before every use check the machine for possible damage: before operating the machine all safety devices, protective guards or slightly damaged parts need to be checked for proper function as specified. Check to see that all moving parts work properly and do not jam. All parts must be correctly installed and fulfil all conditions necessary to ensure perfect operation of the unit.
- Do not used any damaged or contorted saw blades.

Risk of injury by noise!
- Wear hearing protection.

Danger from blocking workpieces or
workpiece parts!
If blockage occurs:
-
switch machine off,
-
Pull the mains plug or remove the detachable battery pack,
- wear gloves,
- Clear the blockage using a suitable tool.
4.2 Special safety instructions for cordless machines:
Remove the battery pack from the machine before making any adjustments, changing tools, maintaining or cleaning.

Protect battery packs from water and moisture!

Do not expose battery packs to fire!
Do not use faulty or deformed battery packs! Do not open battery packs!
Do not touch or short circuit battery pack contacts!

A slightly acidic, flammable fluid may leak from defective Li-Ion battery packs!

If battery fluid leaks out and comes into contact with your skin, rinse immediately with plenty of water. If battery fluid leaks out
and comes into contact with your eyes, wash them with clean water and seek medical attention immediately!
If the machine is defective, remove the battery pack from the machine.
Transport of Li-Ion battery packs:
The shipping of Li-Ion battery packs is subject to laws related to the carriage of hazardous goods (UN 3480 and UN 3481). Inform yourself of the currently valid specifications when shipping Li-Ion battery packs. If necessary, consult your freight forwarder. Certified packaging is available from Metabo.
Only send the battery pack if the housing is intact and no fluid is leaking. Remove the battery pack from the machine for sending. Prevent the contacts from short-circuiting (e.g. by protecting them with adhesive tape).
4.3 Symbols on the machine (depends on model)

Read instructions.

Never place hands into running saw blade.

Hazard area Keep fingers, hands, and arms out of this area if possible.

Wear protective goggles and ear protectors.

Never operate the tool in a damp or wet environment.

CAUTION Do not stare at operating lamp.
4.4 Safety Devices
Retractable blade guard (5)
The retractable blade guard protects against unintentional contact with the saw blade and from chips flying about.
Safety lock (26)
The machine can only be switched on if the safety lock (right or left) is depressed.
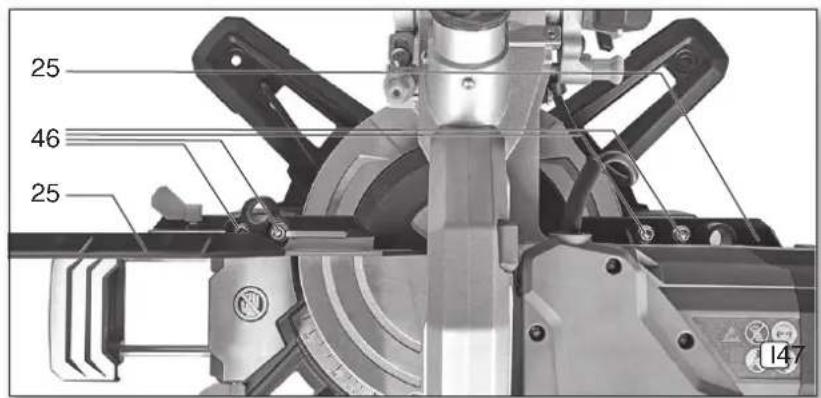
Parallel guide/ ripping fence (25)
The parallel guide/ ripping fence prevents that the workpiece can be moved during the cutting process. During operation, the parallel guide/ ripping fence always has to be installed.
Make sure the additional profile (33) is set correctly to support the workpiece in the best manner possible and will not interfere with the blade or the guard. Lock with the locking lever (34).
Without turning the tool on and with no workpiece on the table, move the saw blade through a complete simulated cut to assure there will be no interference or danger of cutting the additional profile (33).
An incorrectly adjusted additional profile (33) can, in the event of sloped cuts and double mitre cuts,
get in contact with the saw blade and thus lead to serious injuries.
The additional profile (33) at the parallel guide/ripping fence has to be moved for inclined cuts after loosening the locking lever (34).
Only for KGS...305...(see Fig. A): This machine has an additional profile on the right and left (33). For specialised cuts, it may be necessary to remove an additional profile (33). To remove it, push the profile so that the 2 triangles are across from one another. In this position, the additional profile (33) can be pulled off from the top. After completing the cut, re-attach the additional profile (33) so that it is not lost.
5. Overview
See page 2.
The illustrations are regarded as exemplary for all devices. Therefore, the equipment of your device may differ from the illustrations.
1 Closing the chip bag
2 Chip bag
3 Dust extraction port
4 Stand bracket
5 Retractable blade guard
6 Longitudinal stop
7 Table
8 Turntable
9 Table insert
10 Locking lever for turntable
11 Pawl for snap-in positions of the turntable *
12 Set screw for pulling device*
13 Allen key / tool storage for Allen key
14 Work clamp
15 Table extension
16 Locking lever of the table width extension
17 Saw blade lock
18 Saw handle
19 Cutting line display
20 Carrying handle / handles *
21 Hook for cable winding *
22 Locking lever for setting the angle of inclination
23 Locking button (to extend the angle of inclination by +/- 2 °)
24 Transport lock
25 Parallel guide / ripping fence
26 Safety lock
27 On/off switch of the saw
28 Switch for the cutting line display
29 Battery pack release button *
30 Capacity indicator button
31 Capacity and signal indicator *
32 Battery pack*
* depends on model / equipment
6. Setup and transport
KS 216 M: Mount locking lever for pitch adjustment (22)
(See page 2, fig. top right)
- Swivel turntable (8) to 0° position.
- Unscrew the fixing screw from the hexagonal bolt.
- Put the locking lever (22) onto the hexagonal bold and tighten in clockwise direction.
- Pull off the locking lever (22) and put it back onto the hexagonal bolt in an approximately horizontal position and tighten it with the fastening screw.
Install handle (20) if required (depending on model)
• Fix the handle (20) as pictured.
Install table width extension (15) if required (depending on model)
- Remove right and left table width extension from the transport packaging.
-
Insert the table width extension with folding length guide (6) on the right side. Ensure the correct side, since it will be difficult to remove if the sides are mixed up.
-
Push in the button (35) and push the guide rails of the table width extensions (15) fully into the mounts. The button (35) will snap into place and the table width extensions are mounted.
ENGLISHen
- Set the desired table width and lock the table width extensions with the locking lever (16).
- To support particularly long workpieces, the two side table width extensions (15) can be removed and connected together (see Fig. B), in order to place them anywhere within the room. After use, always re-attach to the machine.

Note:
To remove the table width extension (see Fig. B): Pull out to the stop so that the knob (35) can be pushed in through the opening on the back side (for instance with the Allen wrench). Pull the table width extension all the way out.
Only for KGS... 305: If needed, pull out stand bracket
- Undo the 2 socket screws with which the stand bracket (4) is fixed to the underside.
- Pull out the stand bracket (4) as far as it goes and fix by tightening the 2 socket screws.

Caution!
Do not transport the saw at the stand bracket (4). Installation
The device has to be mounted on a stable support for safe working.
- The support can be either a suitable mitre saw base frame, a firmly mounted work top or work bench.
- Even when machining larger workpieces the device has to have a secure stand.
- Long workpieces must get additional support with suitable accessories.

Note:
For mobile use, the device can also be fixed to a plywood or coreboard panel (500 mm x 500 mm, at least 19 mm thick) using screws. During use, the panel has to be fixed to a work bench using screw clamps.
- Fix device to the support using screws.
- Loosen transport lock (24): Push saw head slightly downwards and hold. Pull out transport lock (24).
- Swivel saw head slightly upwards.
Transport
- Swivel saw head downwards and push in transport lock (24).
- Only for KGS.: Lock the pulling device in the front position using the set screw (12).
- Optimally, swivel the turntable (8) 45° to the right.

Caution!
Do not hold the saw at the protective installations during transport. Do not transport the saw at the stand bracket (4).
- Lift and carry the device using the carrying handles (20) (equipment-dependent).
Alternative option: push both table width extensions (15) all the way in and lock using the locking lever (16). Lift the machine on both table width extensions (15) and carry it.
7. Machine Details
7.1 On/Off switch motor
Switching on the motor:
- Press in and hold the safety locking lever (26) (right or left).
- Press and hold the on/off switch (27).
- Release the safety locking mechanism (26). Switching off the motor:
- Release on/off switch (27).
7.2 Cutting line display (19)
In the "Precision Cut Line System" (PCL), an LED placed above the saw blade throws an exact shadow of the saw blade on the workpiece. This means calibration is not required.
-
Activate PCL by pressing the button (28).
-
Lower the saw blade to just a few centimetres over the workpiece, in order to create an exact cutting line.
- Align the workpiece to the cutting line display.
In cordless devices, the light is activated by briefly pressing the On/Off switch (27). After short break, the light goes off (sleep mode) and is automatically reactivated when resuming work. If the light is not needed, it can be deactivated using the switch (28) to save battery power.

Danger!
Do not direct the light beam into the eyes of people or animals.
7.3 Setting the angle of inclination
After loosening the locking lever (22), the saw can be infinitely inclined between 0° and 45° to the left of the vertical position (38).
Press the locking button (23) during the adjustment process in order to also set angles up to 47^ to the left of the vertical/ up to 2^ to the right of the vertical.
Only for KGS...305... The saw can also be adjusted to the right of vertical: release the locking lever (22) AND pull the knob (39) forward. The saw can now be tilted to any position between 0° and 45° to the right of vertical (38). Press the locking button (23) during the adjustment process in order to also set angles up to 47° to the right of the vertical.

Danger!
In order for the angle of inclination not to change when cutting, the locking lever (22) of the swivel arm has to be tightened.
Only for KGS...305..., KS 216 M: You can adapt the position of the locking lever according to your requirements: pull out locking lever, turn and push in the desired position and let engage.
7.4 Turntable
Only for KGS...: For mitre cuts, the turntable (8) can be turned to the desired angle after releasing the locking button (10) and pressing the pawl (11). In this manner the cutting angle to the support edge of the workpiece is adjusted.
Only for KS...: For mitre cuts, the turntable can be turned to the desired angle after releasing the locking button (10). In this manner the cutting angle to the support edge of the workpiece is adjusted.

Danger!
In order for the mitre angle not to change during cutting, the locking handle (10) of the turntable has to be tightened (also in the stop positions!).
7.5 Only for KGS...: Pulling device
Using the pulling device, also larger workpieces with greater cross sections can be cut. The pulling device can be used for all types of cuts (straight cuts, mitre cuts, slanted cuts and double mitre cuts, and cutting of grooves).
If the pulling device is not required, lock the pulling device in the rear position using the set screw (12).
7.6 Only for KGS...: Cutting depth limitation
Together with the pulling device the cutting depth limitation (48) permits the cutting of grooves.
Turn the set screw and fix with the counter nut. The cutting depth limitation can be deactivated, if the parallel guide (49) is pushed towards the rear.
8. Initial Operation
8.1 Connect chip sack / chip and dust extraction unit

Danger!
Some types of wood dust (e.g. beech, oak, ash) may cause cancer when inhaled.
- Only use a suitable dust extraction unit or installed dust sack.
– In addition, use a dust mask, as not all saw dust is collected or extracted.
- Regularly empty the dust sack. Wear a dust mask while emptying the sack.
If you operate the device with the supplied dust sack:
- Attach the dust sack (2) to the chip extraction adapter nozzle (3). Ensure that the closure (1) of the dust sack is closed.
If you connect the device to a dust extraction unit: - Use a suitable adapter to connect it to the chip extraction adapter nozzle (see chapter 12. "Accessories").
- Ensure that the dust extraction unit meets the requirements stated in chapter 16. "Technical Specifications".
- Observe the dust collector's operating instructions as well!
8.2 Installing the workpiece clamping device
The workpiece clamping device (14) can be installed in two positions:
- For wide workpieces: Insert the workpiece clamping device into the rear drilling (36) of the table.
- For narrow workpieces: Insert the workpiece clamping device into the front drilling (37) of the table.
8.3 For mains powered machines only

Danger! High voltage
Operate machine only on a power source meeting the following requirements (see also chapter 16. "Technical Specifications"):
- Mains voltage and system frequency must conform to the voltage and frequency shown on the machine's rating label;
- fuse protection by a residual current operated device (RCD) of 30 mA sensitivity;
- outlets properly installed, earthed or grounded, and tested.
- Make sure the power supply cable is out of the way, so that it does not interfere with the work and does not pose a tripping hazard or will get damaged.
- Use only rubber-jacketed extension cables with sufficient lead cross-section (3 × 1.5 mm ^2 ).
- Use extension cables for outdoor areas. When working outdoors, only use the correspondingly marked extension cable approved for this purpose.
- Avoid accidental start-up. Ensure that the on/off switch is switched off when inserting the plug in the socket.
8.4 For cordless machines only
- Avoid accidental start-up. Before fitting the battery pack, make sure that the machine is switched off.
Battery pack
Charge the battery pack (32) before use. Recharge the battery pack if performance diminishes.
Instructions on charging the battery pack can be found in the operating instructions of the Metabo charger.
Battery packs have a capacity and signal display (31) (depends on design variant):
- Press the button (30), the LEDs indicate the charge level. - The battery pack is almost empty and must be recharged if one LED is flashing.
Removing and inserting the battery pack Removal: press the battery pack release button (29) and pull the battery pack (32) forwards.
To insert: Slide the battery pack (32) in until it engages.
9. Operation
- Before starting work, check to see that the following are in proper working order.
- Assume proper operating position:
– at the front of the saw;
- in front of the saw;
- next to the line of cut.

Danger!
Always fasten the workpiece with the workpiece clamping device (14).

Danger of crushing!
When inclining or swivelling the saw head, never reach into the hinge area or below the device!
- Hold the saw head during inclination.
- Use during work:
- work support – for long stock, which would otherwise fall off the table on completion of the cut;
- dust sack or dust extraction unit.
- Cut only stock of dimensions that can be safely held during cutting.
- Always hold the workpiece down on the table and do not jam it. Do not attempt to stop the saw blade by pushing the workpiece against its side. Risk of personal injury if the saw blade is blocked.
9.1 Straight cuts
Starting position:
- Transport lock (24) pulled out.
– Saw head swivelled upwards. - Only for KGS...: Cutting depth limitation (49) deactivated.
- Turntable is in 0^ position, locking button (10) for turntable is tightened.
- The inclination of the swivel arm to the vertical is 0^ , locking lever (22) for inclined position is tightened.
- Only for KGS...: Pulling device all the way back.
- Only for KGS...: The locking screw (12) of the pulling device is released.
- Set workpiece stop (25): Release the locking lever (34). Move the additional profile (33) (KGS...305...: the additional profiles) in such a way that the workpiece is supported in the best manner possible and will not interfere with the blade or the guard. Fix in place using the locking lever (34).
Cutting the workpiece:
- Push the workpiece against the parallel guide/ripping fence and clamp using the workpiece clamping device (14).
- Only for KGS.: For wider workpieces: pull the saw head forwards (towards the operator) (pulling device).
- Activate the safety lock (26), press on/off switch (27) and keep pressed.
- Slowly lower the saw head at the handle all the way down and, if required, push towards the rear (away from the operator). During the sawing process press on the workpiece just enough for the motor speed not to lower too much.
- Cut work piece in a single pass.
- Release the on/off switch (27) and slowly let the saw head swivel back into the upper starting position.
9.2 Mitre cuts
Starting position:
- Transport lock (24) pulled out.
– Saw head swivelled upwards. - Only for KGS...: Cutting depth limitation (49) deactivated.
- Inclination of the swivel arm to the vertical is 0^ , locking lever (22) for inclination setting is tightened.
- Only for KGS...: Pulling device all the way back.
- Only for KGS...: The locking screw (12) of the pulling device is released.
- Set workpiece stop (25): Release the locking lever (34). Push the
additional profile (33) (KGS...305...: the additional profiles) all the way toward the saw blade, so that the workpiece is supported as well as possible. Fix in place using the locking lever (34).
Cutting the workpiece:
- Loosen the locking handle (10) of the turntable and loosen safety catch for KGS...: (11).
- Set the desired angle.
- Tighten the locking button (10) of the turntable.
- Cut workpiece, as described for "Straight cuts".
9.3 Inclined cuts
Starting position:
- Transport lock (24) pulled out.
– Saw head swivelled upwards. - Only for KGS...: Cutting depth limitation (49) deactivated.
- Turntable is in 0^ position, locking button (10) for turntable is tightened.
- Only for KGS...: The locking screw (12) of the pulling device is released.
- Only for KGS...: Pulling device all the way back.
- Set workpiece stop (25):
Release the locking lever (34). Move the additional profile (33) (KGS...305...: the additional profiles) in such a way that the workpiece is supported in the best manner possible and will not interfere with the blade or the guard. Fix in place using the locking lever (34).
Only for KGS...305...: For certain angle settings, it may be necessary to remove one of the additional profiles (33). To remove it, push the profile so that the 2 triangles are across from one another. In this position, the additional profile (33) can be pulled off from the top. After completing the saw cut, re-attach the additional profile (33) so that it is not lost.
Cutting the workpiece:
- Loosen the locking lever (22) for the inclination setting at the rear side of the saw.
- Slowly tilt the swivel arm into the desired position. For details see chapter 7.3.
- Tighten the locking lever (22) for the inclination setting.
- Cut the workpiece, as described for "Straight cuts".
The double mitre cut is a combination of mitre cut and inclined cut. This means, the workpiece is cut at an angle to the rear contact edge and at an angle to the top.

Danger!
With a double mitre cut, the saw blade is easier accessible due to the steep inclination – this results in a higher risk of injury. Always keep sufficient distance to the saw blade!
Starting position:
- Transport lock (24) pulled out.
– Saw head swivelled upwards. - Only for KGS...: Cutting depth limitation (49) deactivated.
– Lock the turn table in the desired position.
– Swivel arm inclined at desired angle to the workpiece surface and locked. For details see chapter 7.3. - Only for KGS...: The locking screw (12) of the pulling device is released.
- Only for KGS...: Pulling device all the way back.
- Set workpiece stop (25): Release the locking lever (34). Move the additional profile (33) (KGS...305...: the additional profiles) in such a way that the workpiece is supported in the best manner possible and will not interfere with the blade or the guard. Fix in place using the locking lever (34).
Only for KGS...305...: For certain angle settings, it may be necessary to remove one of the additional profiles (33). To remove it, push the profile so that the 2 triangles are across from one another. In this position, the additional profile (33) can be pulled off from the top. After completing the saw cut, re-attach the additional profile (33) so that it is not lost.
Cutting the workpiece:
- Cut the workpiece, as described for "Straight cuts".
9.5 Only for KGS...: Sawing grooves

Note:
The cutting depth limitation together with the pulling device permits the cutting of grooves. This does not result in a separating cut, but only a cut of a certain depth is effected in the workpiece.
Risk of kickback!
When cutting grooves it is particularly important that no lateral pressure is exerted on the saw blade. Otherwise, the saw head might suddenly kick back! Use a clamping device when cutting grooves. Avoid lateral pressure on the saw head.
Starting position:
- Transport lock (24) pulled out.
– Saw head swivelled upwards. - Swivel arm inclined at desired angle to the workpiece surface and locked. For details see chapter 7.3.
– Lock the turn table in the desired position. - Set screw (12) of the pulling device has been loosened.
– Pulling device at the very rear.
Cutting the workpiece:
- Set the cutting depth limitation (48) to the desired cutting depth and fix with counter nut. Push the stop of the cutting depth limitation (49) to the front.
- Loosen safety lock (26) and swivel saw head downwards to check the set cutting depth:
- Effect trial cut.
- If required, repeat steps 1 and 3 until the desired cutting depth has been set.
- Cut the workpiece, as described for "Straight cuts".
10. Care And Maintenance

Danger!
Prior to all maintenance and cleaning jobs pull the mains plug or remove the detachable battery pack (32).
– Repair and maintenance work other than described in this section should only be carried out by qualified specialists.
- Replace damaged parts, in particular safety installations, only with original parts. Parts not approved by the equipment manufacturer can cause unforeseeable damage.
– Check to see that all safety devices are operational again after each service.
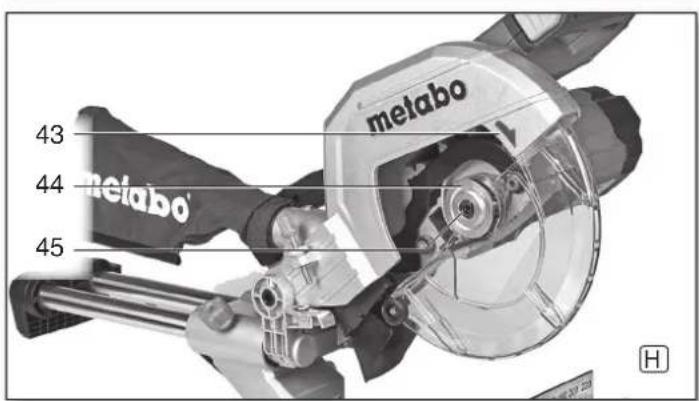
10.1 Saw blade change

Risk of burning!
Directly after cutting the saw blade can be very hot. Let a hot saw blade cool down. Do not clean the hot saw blade with combustible liquids.

Risk of injury, even with the blade at till!
When loosening and tightening the tensioning screw (40) the retractable blade guard (5) has to be swivelled over the saw blade. Wear gloves when changing blades.
- Pull the mains plug or remove the detachable battery pack (32).
- Put the saw head in the upper position.
ENGLISHen
- Lock saw blade: press the locking button (17) and turn the saw blade with the other hand until the locking button engages. Hold down the locking button.
- Remove the tensioning screw with washer (40) on the saw blade shaft with Allen key (13) in clockwise direction (left-hand thread!).
- Push the retractable blade guard (5) up and hold.
- Carefully remove outer flange (41) and saw blade (42) from the saw blade shaft and close again the retractable blade guard.

Danger!
Do not use cleaning agents (e.g. to remove resin residue) that could corrode the light metal components of the saw; the stability of the saw would be adversely affected.
- Cleaning the clamping surfaces:
– Saw blade shaft (45),
- saw blade (42),
- outer flange (41),
- inner flange (44).

Danger!
Place inner flange properly! If this is not the case, the saw can block or the saw blade could work loose. The inner flange is in the correct position if the ring groove points towards the saw blade and the flat side to the motor.
-
Put on inner flange (44).
-
Push the retractable blade guard (5) up and hold.
-
Place a new saw blade - pay attention to direction of rotation: Seen from the left (open) side, the arrow on the saw blade has to correspond to the direction of the arrow (43) on the saw blade cover!

Danger!
Use only saw blades, which fulfil the requirements and specifications listed in these operating instructions.
Use only saw blades designed for the maximum speed (see "Technical Specifications") – if unsuitable or damaged saw blades parts are used, parts can be ejected due to centrifugal force in an explosive-type manner.
Saw blades intended for cutting wood or similar materials have to conform to EN 847-1.
Do not use:
– saw blades made of high-alloy speed steel (HSS);
– damaged saw blades;
-cut-off wheel blades.

Danger!
– Mount saw blade using only genuine parts.
- Do not use loose-fitting reducing rings; the saw blade could work loose.
- Saw blades have to be mounted in such way that they do not wobble or run out of balance and cannot work loose during operation.
-
Close again retractable blade guard (5).
-
Slide on outer flange (41) - The flat side has to point towards the motor!
-
Put on the tensioning screw with the washer (40) in anti-clockwise direction (left-hand thread) and tighten by hand.
-
Lock saw blade: press the locking button (17) and turn the saw blade with the other hand until the locking button engages. Hold down the locking button.

Danger!
- Do not extend the hexagon wrench.
- Do not tighten the tensioning screw by hitting the hexagon wrench.
-
Firmly tighten the tensioning screw (40) using the hexagon wrench (13).
-
Check function. To do so, swivel the saw head down:
- when folding down the retractable blade guard, it has to provide free access to the saw blade without touching other parts.
- When folding the saw upwards into the starting position, the retractable blade guard has to cover the saw blade automatically.
- Rotate the saw blade manually. You should be able to rotate the saw blade into any possible position without touching other parts.
10.2 Table insert change

Danger!
With a damaged table insert (9) there is a risk of small parts getting stuck between table insert and saw blade, blocking the saw blade. Replace damaged table inserts immediately!
- Remove screws at table insert. If required, rotate turntable and incline saw head to be able to reach the screws.
- Remove table insert.
- Insert new table insert.
- Tighten the screws at the table insert.
10.3 Adjust parallel guide/ripping fence
- Loosen Allen screws (46).
- Adjust the parallel guide/ripping fence (25) in such a way that it is exactly perpendicular to the saw blade when the turntable engages in the 0^ position.
- Tighten the Allen screws (46).
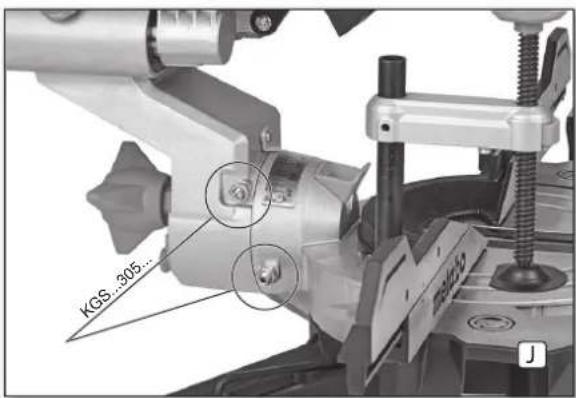
10.4 Adjust the tilt setting
The adjusting screws (47) for setting the tilt are located on the left and right of the machine. For KGS 305 they are also in the upper area (0°) (see Fig. J):
KGS/KS...: left screw = 0°, right screw = 45° KGS 305 M: left screw = 45° to the left, top screw = 0°, right screw = 45° to the right
Loosen the hexagonal locking nuts, adjust the Inbus adjusting screw slightly, and then fix in place again using the hexagonal locking nut. Check the tilt setting using a square. If necessary, repeat procedure.
10.5 Reset the clamping lever
Only if necessary: If insufficient clamping force is achieved when using the lever (16) and (34), they can be adjusted.
Unscrew the Torx screw in the lever, remove the lever and put it back onto the hexagonal bolt with a slight twist. Tighten it again using the Torx screw.
10.6 Cleaning the device
Remove chips and saw dust with vacuum cleaner or brush from:
- adjustment installations
- controls;
- motor vent slots;
- space under table insert;
- Cutting line display (remove the saw blade, clean with a cloth or soft brush.)
- Protective cover system
10.7 Storage of device

Danger!
- Store the device in such a way that it cannot be put into operation by unauthorised personnel.
- Ensure that the stationary device cannot cause injury.

Caution!
- Do not store the saw outdoors, in unprotected areas or in damp or wet locations.
10.8 Maintenance
Prior to each use
- Remove saw chips with vacuum or brush.
- Check power cable and power cable plug or battery pack for damage; if necessary have damaged parts replaced by a qualified electrician.
- Check all movable parts if they can be moved freely across the entire range of movement.
- Check all screwed joints, retighten if necessary.
- Check reset function of the saw head (saw head has to return to the upper starting position by means of spring force), if required have spring replaced.
- Slightly oil guide elements.
Regularly, depending on conditions of use
11. Tips and Tricks
- Use appropriate supports on the left and right of the saw for long workpieces.
- Hold workpiece on the right of the saw blade for suitable cuts.
- When cutting small pieces, use additional guide (a suitable wooden board attached with screws to the guide of the device, can be used as additional guide).
- When cutting a curved (contorted) board (50) place the convex side at the parallel guide/ripping fence.
- Do not cut workpiece upright, but flat on the turntable.
12. Accessories
Use only original Metabo or CAS (Cordless Alliance System) battery packs and accessories.
Use only accessories that fulfil the requirements and specifications listed in these operating instructions.
A Spray for maintenance and care for the removal of resin residues and to preserve the metal surfaces. 0911018691
B Extraction adapter "Multi" for the connection of extraction hoses with 44, 58 or 100 mm adapter 0910058010
C Metabo all-purpose vacuum cleaner (see catalogue)
D Stands:
Universal machine stand UMS 631317000 Mobile stand KSU 251 Mobile 629007000 Stand KSU 251 629005000 Stand KSU 401 629006000
E Roller stand:
RS 420 0910053353
F Chargers: ASC 145, etc.
G Battery packs with different capacities. Buy battery packs only with voltage suitable for your power tool.
Order no.: 625369000 (8.0 Ah, LiHD) Order no.: 625368000 (5.5 Ah, LiHD) etc.
Saw blades for KS 216 M / KGS 216 M:
H Saw blade Power Cut Wood - professional 628009000
216 × 2.4 / 1.8 × 30 24 WZ 5° neg for longitudinal and transverse cuts in solid wood
I Saw blade Precision Cut Classic 628060000
216 × 2.4 / 1.8 × 30 40 WZ 5° neg for longitudinal and transverse cuts in solid wood and chipboard
J Saw blade Multi Cut Classic 628066000 216 × 2.4 / 1.8 × 30 60 FZ/TZ 5° neg
for longitudinal and transverse cuts in coated materials, laminate, plastic and aluminium profiles
Saw blades for KGS 254 M:
K Saw blade Precision Cut Classic 628061000 254 × 30 × 2.4 / 1.8,48 WZ 5" neg for longitudinal and transverse cuts in solid wood and chipboard
L Saw blade Multi Cut - professional 628223000 254 × 30 × 2.4 /1.6, 80 FZ/TZ 5° neg for longitudinal and transverse cuts in coated materials, laminate, plastic and aluminium profiles
Saw blades for KGS 305 M:
M Saw blade Precision Cut Classic 628064000 305 × 30 × 2.4 /1.8,56 WZ 5° neg for longitudinal and transverse cuts in solid wood and chipboard
N Saw blade Multi Cut 628091000 305 x 30 x 2.8/2.0 96 FZ/TZ 5° neg, for longitudinal and transverse cuts in coated materials, laminate, plastic and aluminium profiles
Saw blades for KGS 18 LTX BL 216:
- Saw blade "cordless cut wood - classic" 628065000
216×1.8/1.2×3040WZ5°
for longitudinal and transverse cuts in solid wood and chipboard
Saw blades for KGS 18 LTX BL 254:
P Saw blade "cordless cut wood - classic" 628690000
254x2,2/1,6x30mm 48 WZ
for longitudinal and transverse cuts in solid wood and chipboard
Saw blades for KGS 18 LTX BL 305:
Q Saw blade "cordless cut wood - classic" 628693000
305x2,2/1.6x30mm 56 WZ
for longitudinal and transverse cuts in solid wood and chipboard
For a complete range of accessories, see www.metabo.com or the catalogue.
13. Repairs

Danger!
Repair of power tools must be carried out by qualified electricians only!
A defective mains cable must be replaced only with a special, original mains cable from Metabo available from the Metabo service.
If you have Metabo power tools that require repairs, please contact your Metabo service centre. For addresses see www.metabo.com.
You can download a list of spare parts from www.metabo.com.
14. Environmental Protection
Observe national regulations on environmentally compatible disposal and on the recycling of disused machines, packaging and accessories.
Packaging materials must be disposed of according to their labelling in accordance with municipal guidelines. Further information can be found at www.metabo.com in the “Service” section.

Only for EU countries: never dispose of power tools in your household waste!
According to European Directive 2012/19/
EU on Waste from Electric and Electronic Equipment and implementation in national law, used power tools must be collected separately and recycled in an environmentally-friendly manner.
15. Troubleshooting Guide
Following you will find a description of problems and faults that you may remedy yourself. If the corrective measures described here do not help, kindly refer to chapter 13. "Repairs".

Danger!
There are particularly many accidents in connection with problems and faults. Therefore keep in mind:
- Prior to each correction of faults, pull the mains plug or remove the detachable battery pack (32).
- Check to see that all safety devices are operational after each fault service.
No trimming function
Transport lock activated:
- pull out transport lock.
Cutting power too low
Saw blade blunt (possibly tempering marks on blade body);
Saw blade unsuitable for the material (see chapter 12."Accessories");
Saw blade contorted:
- Replace saw blade (see chapter 10. "Maintenance").
Saw vibrates strongly / saw blade does not run in a circular manner
Saw blade contorted:
- Replace saw blade (see chapter 10. "Maintenance").
Saw blade not installed properly:
- Install saw blade properly (see chapter 10. "Maintenance").
- Turn the saw blade toward the interior flange in this position if necessary.
Turntable hard to turn
Chips under turntable:
- remove chips.
Cutting line indicator light is very weak
When using wood rich in resin, the LED may become soiled.
• In this case, clean the lens with benzine.
16. Technical Specifications
Explanatory notes regarding the specifications on page 4.
Subject to change in accordance with technical progress.
U = mains voltage / voltage of battery pack I = Rated power
F =Min. fuse protection
P_1 =rated input power
IP = protection class
n_0 = No - load speed
v_0 = Max. cutting speed
D = saw blade diameter (outer)
d = saw blade hole (inside)
b = max. tooth width of the saw blade
A =dimensions (lxwxh)
m =weight
Requirements for chip and dust extraction unit:
D_1 =connection diameter of the extraction nozzle
D_2 =minimum air throughput
D_3 = minimum negative pressure at extraction nozzle
D_4 = minimum air speed at extraction nozzle Maximum cross-section of workpiece, see table on page 4.
Values measured as per EN 62841.
Permitted ambient temperature during operation: -20 °C (-4°F) to 50 °C (120°F) (limited performance with temperatures below 0 °C (32°F)). Permitted ambient temperature for storage: 0 °C (32°F) to 30 °C (86°F).
Recommended ambient temperature when charging: 0 °C to 40 °C
\~ AC Power
--- direct current
Machine in protection class II
The technical specifications quoted are subject to tolerances (in compliance with relevant valid standards).

Emission values
These values make it possible to assess the emissions from the power tool and to compare different power tools. The actual load may be higher or lower depending on operating conditions, the condition of the power tool or the accessories used. Please allow for breaks and periods when the load is lower for assessment purposes. Arrange protective measures for the user, such as organisational measures based on the adjusted estimates.
Typical A-effective perceived sound levels
(according to EN 62841):
L_pA =sound pressure level
L_WA =acoustic power level
K_pA, K_WA = Uncertainty

Wear ear protectors!
Notice originale
Table des Matières
D Supports : Support de machine universel UMS 631317000 Support mobile KSU 251 Mobile 629007000 Support KSU 251629005000 Support KSU 401629006000
L Lame de scie Multi Cut - professional 628223000
WAARSCHUWING – Lees alle
Transport van Li-ion-occupacks:
H Zaagblad Power Cut Wood - professional 628009000
O Zaagblad "cordless cut wood - classic" 628065000
P Zaagblad "cordless cut wood - classic" 628690000
Q Zaagblad "cordless cut wood - classic" 628693000
Zaagvermogen is te laag
N. ordine: 625369000 (8,0 Ah, LiHD)
N. ordine: 625368000 (5,5 Ah, LiHD) ecc.
Lame per KS 216 M / KGS 216 M:
H Lama Power Cut Wood - professional 628009000
H Hoja de sierra Power Cut Wood - professional 628009000
L Hoja de sierra Multi Cut - professional 628223000
--- Corriente continua
H Lâmina de serra Power Cut Wood - professional
628009000
L Lâmina de serra Multi Cut - professional 628223000
254 x 30 x 2,4/1,6 80 FZ/TZ 5° neg
- Remover as aparas.
--- Corrente contínua
Best.nr: 625369000 (8,0 Ah, LiHD)
Best.nr: 625368000 (5,5 Ah, LiHD) osv.
Sågklingor till KS 216 M/KGS 216 M:
H Sågklingor Power Cut Wood - professional 628009000
Tilausnro: 625369000 (8,0 Ah, LiHD)
Tilausnro: 625368000 (5,5 Ah, LiHD) ym.
Sahanterät KS 216 M / KGS 216 M:
H Sahanterä Power Cut Wood - professional 628009000
Fare for innklemming!
Grip aldri inn i hengselområdet eller under apparatet när saghodet vippes eller svinges!
• Hold saghodet godt fast under helling.
- Brukunder arbeidet:
NORSKno
Sagblad for KS 216 M / KGS 216 M:
H Sagblad Power Cut Wood - professional 628009000
216 × 2,4 / 1,8 × 30 24 WZ 5° neg for saging på langs og på tvers i massivt tre
I Sagblad Precision Cut Classic 628060000 216 × 2,4 / 1,8 × 30 40 WZ 5° neg for saging på langs og på tvers i massivt tre og kryssfinèr
Sagblader for KGS 254 M:
K Sagblad Precision Cut Classic 628061000 254 x 30 x 2,4/1,8 48 WZ 5° neg for saging på langs og på tvers i massivt tre og kryssfinèr
- Sagblad "cordless cut wood - classic" 628065000
216×1,8/1,2×30 40 WZ 5°
for saging på langs og på tvers i massivt tre og kryssfinèr
Sagblader for KGS 18 LTX BL 254:
P Sagblad "cordless cut wood - classic" 628690000
254x2,2/1,6x30mm 48 WZ
for saging på langs og på tvers i massivt tre og kryssfinèr
Sagblader for KGS 18 LTX BL 305:
Q Sagblad "cordless cut wood - classic" 628693000
305x2,2/1,6x30mm 56 WZ
for saging på langs og på tvers i massivt tre og kryssfinèr
H Savklinge Power Cut Wood - professional 628009000
O Savklinge "cordless cut wood - classic" 628065000
P Savklinge "cordless cut wood - classic" 628690000
Liqunpwqhi hnuwifh hwpjwd unwfiwmi dunwif:
Lufomqqnecwgnaf dImu]mdffil.p unmfiwnp lunf t. lnuwifp hmplud unmfiwnp dImuflqfil.ph dmuhfi:

Ulpfmeimfi qnuflq:
Lw|wqqnewgn# yliwnjwdktp wnwfwnl lwni impufih dwnkph lwni hwnqunuh ktpufmeumh jwnhklp iwnuhi:

Фиспрнржб:
Uwvmqqncengnul fynlpwljuli dfmufilp hptpm uwmufi:

3mgml.
Lpwgnghs mbqlnpjn6:
4. Uklmmflqnlpjml hmmnly gnignulgbp
Ucmplun qkmmh hbfml (25)
Zlthwlp wqwhnqlaii l, uqnqduh duwfuulq dcwlqlan qlonwlp hqmfi nhpfp: Uqnq npdwphklng hklwnp wqmwwnlp wknt f wkwnnpjmd 1hih:
Zw###p#t'f, up odu###y##p#llu (33) filem t, u##n##p#ndh de###j## y###### p## h##p#nf ### h sh ##ps#nf ##qgh u##dunw#hfi ##f upcunw#hjs ##wnj#l#: S#futl u#b#s (34) [dw]n]:
Tunjofmih ikfthimih iqngfiklp h mwnuig yenlphyn qhnuqlp uqquh qhu, lphlophwulkl upngh uwph wdqnyswului cmpduuig, npwtuqih hwnuqultp, np zhuhi jyushymuhtp h oduhnywl upnqhih yinhuwukulud hupudufh (33) ywnuig yhu:
Bph odmfinml uqnplpll (33) uqnll k mupnglmd, mmq ck wshjwi wnd uqngludflph lww lphliwlyh unagludflph duwfuwl, wli hupan l qhylyl uhwluwnlhlli l dwu lqunnludflph uqnfimn qunfiml:
Thq lqnpludflip lqnunwpllu odwifquly upuφhlp (33) dcuwlqlnq nkuulh hfuwlh jpu wihpudlcn l, uikquwplu luhkwnhlhj mfgmannvlg (34) hkrnn:
Uhwj GKS...305...amplukhp qayfucu (wt'u hup A). Uw quphp uawhp u wqhp odunqih upwnh (33): Zmwuh hupmdftkhp hwnmp odunqih upwnh upwnh upn l wifdpdeu [43] hwh; Zuwhp hwnp utqnompdt ywjmtn, np 2 wnuhjm bktpp Uhwj ahujwig nh: Uw qupnfad odunqih upwnh upwnh t (33) hwjhi nhqh qlp: Uwpqufp lquwqgh upn hkan odunqih upwnh (33) hwnhp hkan wtqnompht, upwnh upn shnp:
5. Cfiphufinp filmpmqpmpynli
Slu ly 2:
Uhpfl,pp pl,plud Lfi gauqunpupjufi fuqnwnlqul puap uwpfl,ph hundup: Zlukwmp, Ql,p qnpdhf ipwlqwqip humpn t uwpptpulti Uhpwmppiwdhg:
5 Zhunqngh upwunqulihy upwnjuli
6 bplwjglh dwnngdwl hliwl
7 Ukynfi
8 Μυνυλη αθηωδί
9 Utqu6h 6kpuhp
10 Ubkanqhs p#iwiq q#nnjyn oknqsh hwnfwp
11 Uanliwl' qhpfp wlpwqgljmc hudwp upmnlny wkynfip qpm:*
12 9qnq hwpdwpw6fgh ulbwnwlhy wqntnwnlq *
21.8bfbthy
13 ৬kpfhli ৬kgwlihuunnl ৯uupawli / ৬kpfhli ৬kgwlihuunnl ৯uupawlih ৯uuhqwhluhi ৯uunyul
14 Ucuylq]nq qlanwL[b/fω]ωωqωωρωωμ[ωδf] δqψy hmpfωρωθf
15 Ulqwlh pfqwpawlhy
16 Uknuhli pfiqmpamhlsh ulknuhli 18ml
17 Uqngh ulwylwnwlh ulkwnwlhs
18 Uqugh pntiwl
- Stqnqphl gmwnwnwnwnwnwnwnwnwnwnwnwnwnwnwnwnwnwnwnwnwnwnwnwnwnwnwnwnwnwnwnwnwnwnwnwnwnwnwnwnwnwnwnwnwnwnwnwnwnwnwnwnwnwnwnwnwnwnwnwnwnwnwnwnwnwnwnwnwnwnwnwnwnwnwnwnwnwnwnwnwnwnwnwnwnwnwnwnwnwnwnwnwnwnwnwnwnwnwnwnnnnqphl (34) upwwhnL: Oduaqwhp upnqphll (33) KGS...305...anqhlqkh qlnqfaclvd oduaqwhp upnqphllqthpp) wjbnwhn wktnqwhn l, npqnqwh qemhynl qnuqwh htauwwpwh yudwqwhu uwwghndh: Qnaqphp zunfwr t qnhmwh nwlmnwwwhy hwa upncnnqwhy upnnqwhh: Uapnwqhl tnynwhwhh ydwwh (34) ibngwnl:
Lahwunpwnunludh unngal.
- Umhupukf umpfp lynqslmgh dmpnqng hwnmp wthwuwulgh dwjpncl:
- The question th^2f , question of question unghg

Фиспримб:
- Upqkluŋmú k, uŋngp yŋmhŋmukl qnmú lquú jnliuŋ mwnpudfniú nnmug δndlqngh:
10.8 Stjoummupnli
Ukiti cwhmqnpdking mnwg
• UmfptL qmynmphtp qpóhími lqniú yncklqmi lm]:
- Ummqthj EJ. Uimgqwhi jupp h bupwqwhp qwi dawpulqgwuhfi plnlp, hwnqllbL, np dhuwduwfglp slwuf, kph wihpmetban lthf ummiqhtap wthaf t yhnwmpfih npwuf:
• UmmqL plnp cmpdlnq ümukpl wifpwnlufi
cmpdnliwlnpjmflp wehwnwnlifwjhl n9 plnqqphnijpntf:
_wnpplpwpwp, hw|v|w hhpwnuwi/cwhmqnpduwi _wqjimfifikp
- Unmqbl ptnp qunnwnwlquhli shwgnulikpp, wthpwdlcuncpjufi qnyfucf aqlL:
- Uniqb1 uqngh cpswliuh hluunuupd fntighfu (quwliuh ndh filpqnrdntpjuap uqngh cpswliuh qlunf k dtpwnfum kluhtanuylh ylpff' pmpapufm itph), wihpwdewnrpiuhi nyufniu fhoj by quwliuh.
• Φλρικωλή χαηλή ραπρ ανησηρής υωρρληρ:
11. Oqunwlwrj lunphnlpnglp
E Ughylglpml lquqlwly. RS 420 0910053353
F 4mmwhl2 undpulnglibp. ASC 145 l wll undblgibp
G U'upunqngfghh phtp unpppt bqnnpipnj 6ktf dtp qnpshfp hwnfup hwnqwnwnuugb hqnnpipnj mukqn uqnlpnqgktp: Yun quondlpblw hwnfup' 625369000 (8,0 UJ, LiHD) Yun upundlpblw hwnfup' 625368000 (5,5 UJ, LiHD) L wll dqnkldp
Uqagh alqulmwnwlplp KS 216 M / KGS 216 M ünntgibp hwnmp.
H Uqnyh alqujwnwL Power Cut Wood - wpmphluhniwL 628009000
216 × 2,4 / 1,8 × 30 24 WZ 5° neg U'huwqunp chuwjwh lphuwjfuwlhh le fuwjfuwlhh lonpu|wdfgllph hnuimp
I Uqngh uqwluwul Precision Cut Classic 628060000 216 × 2,4 / 1,8 × 30 40 WZ 5° neg Ufhuqunp chuwuh l qhwjuwunuclqnqushi uwylph lphwjfu h lmjfimlhl qnwjmdffkph hunfmp
J Uqngh uqnlmnmh Multi Cut Classic 628066000 216 × 2,4 / 1,8 × 30 60 FZ/TZ 5° neg Umnlmw hyniptph, lwnptlmnh, ywnunlmnmuh b wlntshb upmllltykph klpnlymfuh b wlntshgh qnpulmdfukph hnump:
Uqagh alquunwah KGS 254 M ünqlh hundup
K Uqnqh uqnqmmwh Precision Cut Classic 628061000 254 x 30 x 2,4/1,8 48 WZ 5° neg Uphwqunp whuqh l phuqnwnwcknwqhli wwltp h klpwjfuqh l jwylquh p hnplwdffllph hwdup
L Uyngh upnphkunfiml upmqummh Multi Cut Classic 628223000
254 x 30 x 2,4/1,6 80 FZ/TZ 5° neg Dunlmd fynpkph, umfliunnh, uqmmunmwnngh h mwnfblh wpndhlgph lphwglwlgh h jwfgwlgh hqnplwdfgph hwdup:
Uqagh alwulwnwl KGS 305 M ünqljh hundup.
M Uqngh uqwunwnlq Precision Cut Classic 628064000 305 x 30 x 2,4/1,8 56 WZ 5° neg Uwhqnnp whqnjh l whpnnnnwcknwjhli wvtkph tplqwjdwlyh l wqfwlyh lqnplwdeffglph hwdup
N Uŋngh vŋməfənmh Multi Cut 628091000 305 x 30 x 2,8/2,0 96 FZ/TZ 5° neg, Unnuɪd s jnptph, uŋpʃnunh, uŋwunununungh h uŋvulph uŋpmljukph tplqwnfndh h uŋfʊnhj lqupludfikph həndup:
Uqngh alqwjwnwlglp KGS 18 LTX BL 216 ànnlglph hwnùnp.
O Uŋngh uŋquŋmwnly Precision Cut Classic 628065000 216 × 1,8 / 1,2 × 30 40 WZ 5° Uphuqnnp uhpunh b phuqnnnwctqnuqhi wvtgph tplquyjiowlh b lquyjiowlh bupuqwsefglp huduap
Uqngh alqulmmwllp KGS 18 LTX BL 254 ünnkibph hwnmp.
P Uqngh ujwnlwwuq «cordless cut wood - classic» 628690000 254x2,2/1,6x30a4 48 WZ
U'huwunp qhwjnh h qhwunwnwctnwjhi uwlkph kplqwjfuwhh
h Luwjfuwhh lqnpiuodffkph hwnup
Uprgh ulpmjmmhlikp KGS 18 LTX BL 305
mmlqlikp hnmmp.
Q Uqng[h ulqu]wnwll «cordless cut wood - classic» 628693000
305x2,2/1,6x30ff 56 WZ
U'huwqunp qunjuh h qunjuuunwncnqujhfi uwlLpH bplqufuiqh
h Lmjfimqh hnuplmdfikph hwnmp
lpuqnglyh yuupwqmlkpl wlpnqswlqu dpwqqhli
dwlnpwnfwnl hwnup wjgklkf www.metabo.com lpuq
oqnllkf lqunnwnqhg:
13. Чьрніпрічні

dunfiqwnlp E:
Lkhpmpulqufi qopdphfikph ukpmpfmpnqnup wknt f hpwlpwfggh shwjfi hwnnli dwuliwqunfikph hnquhg:
^1 ^2 ^3 ^4 ^5 ^6 ^7 ^8 ^9 ^10 ^11 ^12 ^13 ^14 ^15 ^16 ^17 ^18 ^19 ^20 ^21 ^22 ^23 ^24 ^25 ^26 ^27 ^28 ^29 ^30 ^31 ^32 ^33 ^34 ^35 ^36 ^37 ^38 ^39 ^40 ^41 ^42 ^43 ^44 ^45 ^46 ^47 ^48 ^49 ^50 ^51 ^52 ^53 ^54 ^55 ^56 ^57 ^58 ^59 ^60 ^61 ^62 ^63 ^64 ^65 ^66 ^67 ^68 ^69 ^70 ^71 ^72 ^73 ^74 ^75 ^76 ^77 ^78 ^79 ^80 ^81 ^82 ^83 ^84 ^85 ^86 ^87 ^88 ^89 ^90 ^91 ^92 ^93 ^94 ^95 ^96 ^97 ^98 ^99 ^^^^^^^^^,
Metabo Lkhpwpwqhi qnpdffkph qlpwfpqnqfwh hawup qhutf 2tp Metabo lkphwjngmghli: Znugkfbpp hqnkltf www.metabo.com lqufl dpu.
Φμφωρφθιη ματυκρβ gmδιλρ ιμροη θf δικρπασίας
www.metabo.com ιμγήg:
Stktylnpynfi qfupnli huiwup.
Zwduwunwnuufwlnpjuhi hawdwnwnqhp' No EA3C RU C-DE.HA80.B.00858/21, qapdaui l, ulquud 27.09.2021 ahfbyh 26.09.2026 p., upihl t: «rjwnfniqn Ukprnhjphnu» «Pjwnfniqh zwuwnwnqnqpuwi zhuwunwni Umf', wpnwnwnqpf hawdwnwnqnqpuwi dwpndh npugh, hwngt (hpund. l qapdaufktnpjuwi) 153032, fncwnwnnqih 'twcmlpiqh, buhduq hluwunulqum, f. rjwnfniqh, qh. Uwndlwnwnpund, u. 1, hla.' (4932)77-34-67, lL, hwngh' info@i-f-s.ru, zmwnnwnpmpqnfu ihqwmyqhp Ne RA.RU.11BJ08 mn 24.03.16 p.:
U.punqnpluf kphlp' Qhluuunuf
U.pinnppn' «Metabowerke GmbH»,
Metaboallee 1, D-72622 Nuertingen, 91.pufuwfuw
L Multi Cut - professional apa tecemi 628223000
Objed. č.: 625369000 (8,0 Ah, LiHD)
Objed. č.: 625368000 (5,5 Ah, LiHD)
apod.
H Saeketas Power Cut Wood - professional 628009000
P Saeketas "cordless cut wood - classic" 628690000
L_WA^pA =helivōimsuse tase
K_pA, K_WA = määramatus
A = matmenys (lxPxA)
m =svoris
n0 =ātrums tukšgaitā


- Original instructions
- Table of Contents
- Declaration of Conformity
- For UK only:
- Specified Conditions of Use
- General Safety Information
- General Power Tool Safety Warnings
- Work area safety
- Electrical safety
- Personal safety
- Use and handling of the power tool
- Battery tool use and care
- Service
- Additional Safety Instructions
- ENGLISHen
- Special Safety Instructions
- Additional Safety Instructions
- General hazards!
- Risks of personal injury and crushing ving parts!
- Cutting hazard, even with the cutting standstill!
- Danger from kickback of the saw head blade gets caught in the workpiece and w head suddenly kicks back)!
- Entanglement hazard!
- Hazard generated by insufficient nal protection gear!
- Risk of injury by inhaled wood dust!
- Reducing Dust Exposure:
- Hazard generated by modification of machine or use of parts not tested and served by the equipment manufacturer
- Hazard generated by machine defects!
- Risk of injury by noise!
- Danger from blocking workpieces or
- workpiece parts!
- Special safety instructions for cordless machines:
- Transport of Li-Ion battery packs:
- Symbols on the machine (depends on model)
- Safety Devices
- Retractable blade guard (5)
- Safety lock (26)
- Parallel guide/ ripping fence (25)
- Overview
- See page 2.
- The illustrations are regarded as exemplary for all devices. Therefore, the equipment of your device may differ from the illustrations.
- Setup and transport
- KS 216 M: Mount locking lever for pitch adjustment (22)
- (See page 2, fig. top right)
- Install handle (20) if required (depending on model)
- Install table width extension (15) if required (depending on model)
- Note:
- Only for KGS... 305: If needed, pull out stand bracket
- Caution!
- Do not transport the saw at the stand bracket (4). Installation
- Transport
- Machine Details
- On/Off switch motor
- Cutting line display (19)
- Danger!
- Setting the angle of inclination
- Turntable
- Only for KGS...: Pulling device
- Only for KGS...: Cutting depth limitation
- Initial Operation
- Connect chip sack / chip and dust extraction unit
- Installing the workpiece clamping device
- For mains powered machines only
- Danger! High voltage
- For cordless machines only
- Battery pack
- Operation
- Danger of crushing!
- Straight cuts
- Starting position:
- Cutting the workpiece:
- Mitre cuts
- Inclined cuts
- Only for KGS...: Sawing grooves
- Risk of kickback!
- Care And Maintenance
- Saw blade change
- Risk of burning!
- Risk of injury, even with the blade at till!
- Table insert change
- Adjust parallel guide/ripping fence
- Adjust the tilt setting
- Reset the clamping lever
- Cleaning the device
- Storage of device
- Maintenance
- Prior to each use
- Regularly, depending on conditions of use
- Tips and Tricks
- Accessories
- Saw blades for KS 216 M / KGS 216 M:
- Saw blades for KGS 254 M:
- Saw blades for KGS 305 M:
- Saw blades for KGS 18 LTX BL 216:
- Saw blades for KGS 18 LTX BL 254:
- Saw blades for KGS 18 LTX BL 305:
- Repairs
- Environmental Protection
- Troubleshooting Guide
- No trimming function
- Cutting power too low
- Saw vibrates strongly / saw blade does not run in a circular manner
- Turntable hard to turn
- Cutting line indicator light is very weak
- Technical Specifications
- Emission values
- Wear ear protectors!
- Notice originale
- Table des Matières
- Transport van Li-ion-occupacks:
- Zaagvermogen is te laag
- Lame per KS 216 M / KGS 216 M:
- Fare for innklemming!
- NORSKno
- Sagblad for KS 216 M / KGS 216 M:
- Sagblader for KGS 254 M:
- Sagblader for KGS 18 LTX BL 254:
- Sagblader for KGS 18 LTX BL 305:
- Uklmmflqnlpjml hmmnly gnignulgbp
- Ucmplun qkmmh hbfml (25)
- Cfiphufinp filmpmqpmpynli
- Slu ly 2:
- Uhpfl,pp pl,plud Lfi gauqunpupjufi fuqnwnlqul puap uwpfl,ph hundup: Zlukwmp, Ql,p qnpdhf ipwlqwqip humpn t uwpptpulti Uhpwmppiwdhg:
- 21.8bfbthy
- Lahwunpwnunludh unngal.
- Фиспримб:
- Stjoummupnli
- Ukiti cwhmqnpdking mnwg
- _wnpplpwpwp, hw|v|w hhpwnuwi/cwhmqnpduwi _wqjimfifikp
- Oqunwlwrj lunphnlpnglp
- Чьрніпрічні
- dunfiqwnlp E:
Brand : METABO
Model : KGS 305 M
Category : Saw