
Chef XL KVL4110 - Food Processor KENWOOD - Free user manual and instructions
Find the device manual for free Chef XL KVL4110 KENWOOD in PDF.
| Product Type | Food Processor |
| Brand | Kenwood |
| Model | Chef XL KVL4110 |
| Dimensions (L x D x H) | Approx. 41 x 27 x 37 cm |
| Weight | Approx. 13.4 kg |
| Power supply | 220-240 V, 50-60 Hz, 1500 W |
| Bowl capacity | 6.7 L (stainless steel) |
| Speeds | Variable speed with pulse position (P) |
| Main functions | Kneading, mixing, whipping |
| Included accessories | K-beater, whisk, dough hook, spatula, splash cover |
| Bowl material | Stainless steel |
| Safety | Overload protection, automatic stop, lockable head |
| Maintenance and cleaning | Bowl and accessories are hand wash or dishwasher safe (except motor unit) |
| Spare parts and repairability | Authorized Kenwood repair centers, legal warranty |
| Country of manufacture | China |
| General information | Maximum power based on mini chopper/grinder; CE compliant; grounding required |
Frequently Asked Questions - Chef XL KVL4110 KENWOOD
User questions about Chef XL KVL4110 KENWOOD
0 question about this device. Answer the ones you know or ask your own.
Ask a new question about this device
Download the instructions for your Food Processor in PDF format for free! Find your manual Chef XL KVL4110 - KENWOOD and take your electronic device back in hand. On this page are published all the documents necessary for the use of your device. Chef XL KVL4110 by KENWOOD.
USER MANUAL Chef XL KVL4110 KENWOOD
- Important Safety Information 3-4
Plug and Fuse Information 4 - Care and Cleaning 5-6
- Parts List 7-8
- To Use Your Stand Mixer 9-13
Usage Diagrams and Usage Instructions 9-11
Usage Chart 11-12
O Recipes 13
- To Fit And Use Your Splashguard 14
Usage Diagrams and Usage Instructions 14 - Tool Adjustment 15
Usage Diagrams and Usage Instructions 15
Service and Customer Care 16 - Troubleshooting Guide 17
Important Safety Information
- Read these instructions carefully and retain for future reference.
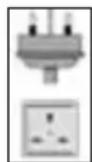
- Before using for the first time, remove all packaging and any labels. (All labels on the base of the machine should not be removed). Wash the parts, see :Care and Cleaning.
- If the plug or cord is damaged it must, for safety reasons, be replaced by Kenwood or an authorised Kenwood repairer in order to avoid a hazard.
- Always turn the speed control to 'O' OFF position and unplug before fitting or removing tools/attachments, after use and before cleaning.
- Always keep body parts, hair and jewellery and loose clothing away from moving parts and fitted attachments.
- Never leave the machine on unattended.
- Never use a damaged machine. Get it checked or repaired: see 'Service and Customer Care'
- Never put your fingers into the hinge mechanism.
- Never let the cord hang down where a child could grab it.
- Never operate the Stand Mixer with the head in the raised position.
- Never let the power unit, cord or plug get wet.
- Ensure that the bowl is always fitted when operating the appliance when using a bowl tool.
- Never use an unauthorised attachment.
- Do not use more than outlet (Bowl tool socket, Slow speed outlet and High speed outlet) at a time.
- Never exceed the maximum quantities and speeds stated in the Recommended Usage Chart.
- When using an attachment, read the safety instructions that come with it.
Take care when removing bowl tools after extended use as they may get hot.
Take care when lifting this appliance as it is heavy. - Ensure the head is locked and that the bowl, tools, outlet cover and cord are secure before lifting.
- Do not move or raise the mixer head with an attachment fitted as the Stand Mixer could become unstable.
- Do not operate your appliance near the edge or overhanging the work surface or apply force to an attachment when fitted, as this may cause the unit to become unstable and tip over, which may result in injury.
- When moving the appliance always pick up by the pedestal base and mixer head.
- Misuse of your appliance can result in injury.
- The short power-supply cord is used to reduce risk resulting from becoming entangled in or tripping.
- Extension cords may be used if care is exercised in their use.
-
If an extension cord is used:
-
The marked electrical rating of the extension cord should be at least the same as or greater than the electrical rating of the appliance.
-
The cord should be arranged so that it will not drape over the countertop or tabletop where it can be pulled on by children or tripped over unintentionally.
-
The extension cord should be an earthed-type 3-wire cord. The electrical rating of the appliance is listed on the bottom of the unit.
-
This appliance shall not be used by children. Keep the appliance and its cord out of reach of children.
Children should be supervised to ensure that they do not play with the appliance. - Appliances can be used by persons with reduced physical, sensory or mental capabilities or lack of experience and knowledge if they have been given supervision or instruction concerning use of the appliance in a safe way and if they understand the hazards involved.
- The maximum rating is based on the mini chopper/mill attachment that draws the greatest load. Other attachments may draw less power.
- Only use the appliance for its intended domestic use. Kenwood will not accept any liability if the appliance is subject to improper use, or failure to comply with these instructions.
Power Consumption
- With Speed Control in "O" Position
Automatic switching to OFF Mode: Not applicable.
Off Mode Power: ≤ 0.3W .
Plug and Fuse Information
Before plugging in
- Make sure your electricity supply is the same as the one shown on the underside of the power unit.
Important - Plug and Fuse Information
The wires in the cord are coloured as follows:
Blue = Neutral, Brown = Live, Green/Yellow = Earth.
THIS APPLIANCE MUST BE EARTHED
- If the plug is cut off it must be DESTROYED IMMEDIATELY. An electric shock hazard may arise if an unwanted non-rewireable plug is inadvertently inserted into a socket outlet.
- If the plug supplied with your appliance has a fuse fitted and the fuse fails it must be replaced with one of the same rating.
Note:
- For non-rewireable Plug Type G the fuse cover MUST be refitted when replacing the fuse. If the fuse cover is lost then the plug must not be used until a replacement can be obtained. The correct fuse cover is identified by colour and a replacement may be obtained from your Kenwood Authorised Repairer (see Service).
Plug Type G
- This appliance conforms to EC Regulation 1935/2004 on materials and articles intended to come into contact with food.
Care and Cleaning
Always switch off and unplug before cleaning.
- A little grease may appear at the slow speed outlet ② when you first use it. This is normal - just wipe it off.
Power Unit, Outlet Covers and Head Cover
- Wipe with a damp cloth, then dry (including the feet on the underside of the machine).
- Never use abrasives or immerse in water.
Bowl
- Wash by hand, then dry thoroughly or wash in the dishwasher.
- Never use a wire brush, steel wool or bleach to clean your stainless steel bowl. Use vinegar to remove limescale.
- Keep away from heat (cooker tops, ovens, microwaves).
Tools & Splashguard
- Wash by hand, then dry thoroughly.
| × | × | √ | |
| √ | √ | × | |
| × | √ | × | |
| × | √ | × | |
| × | √ | × | |
| √ | √ | × | |
| √ | √ | × |

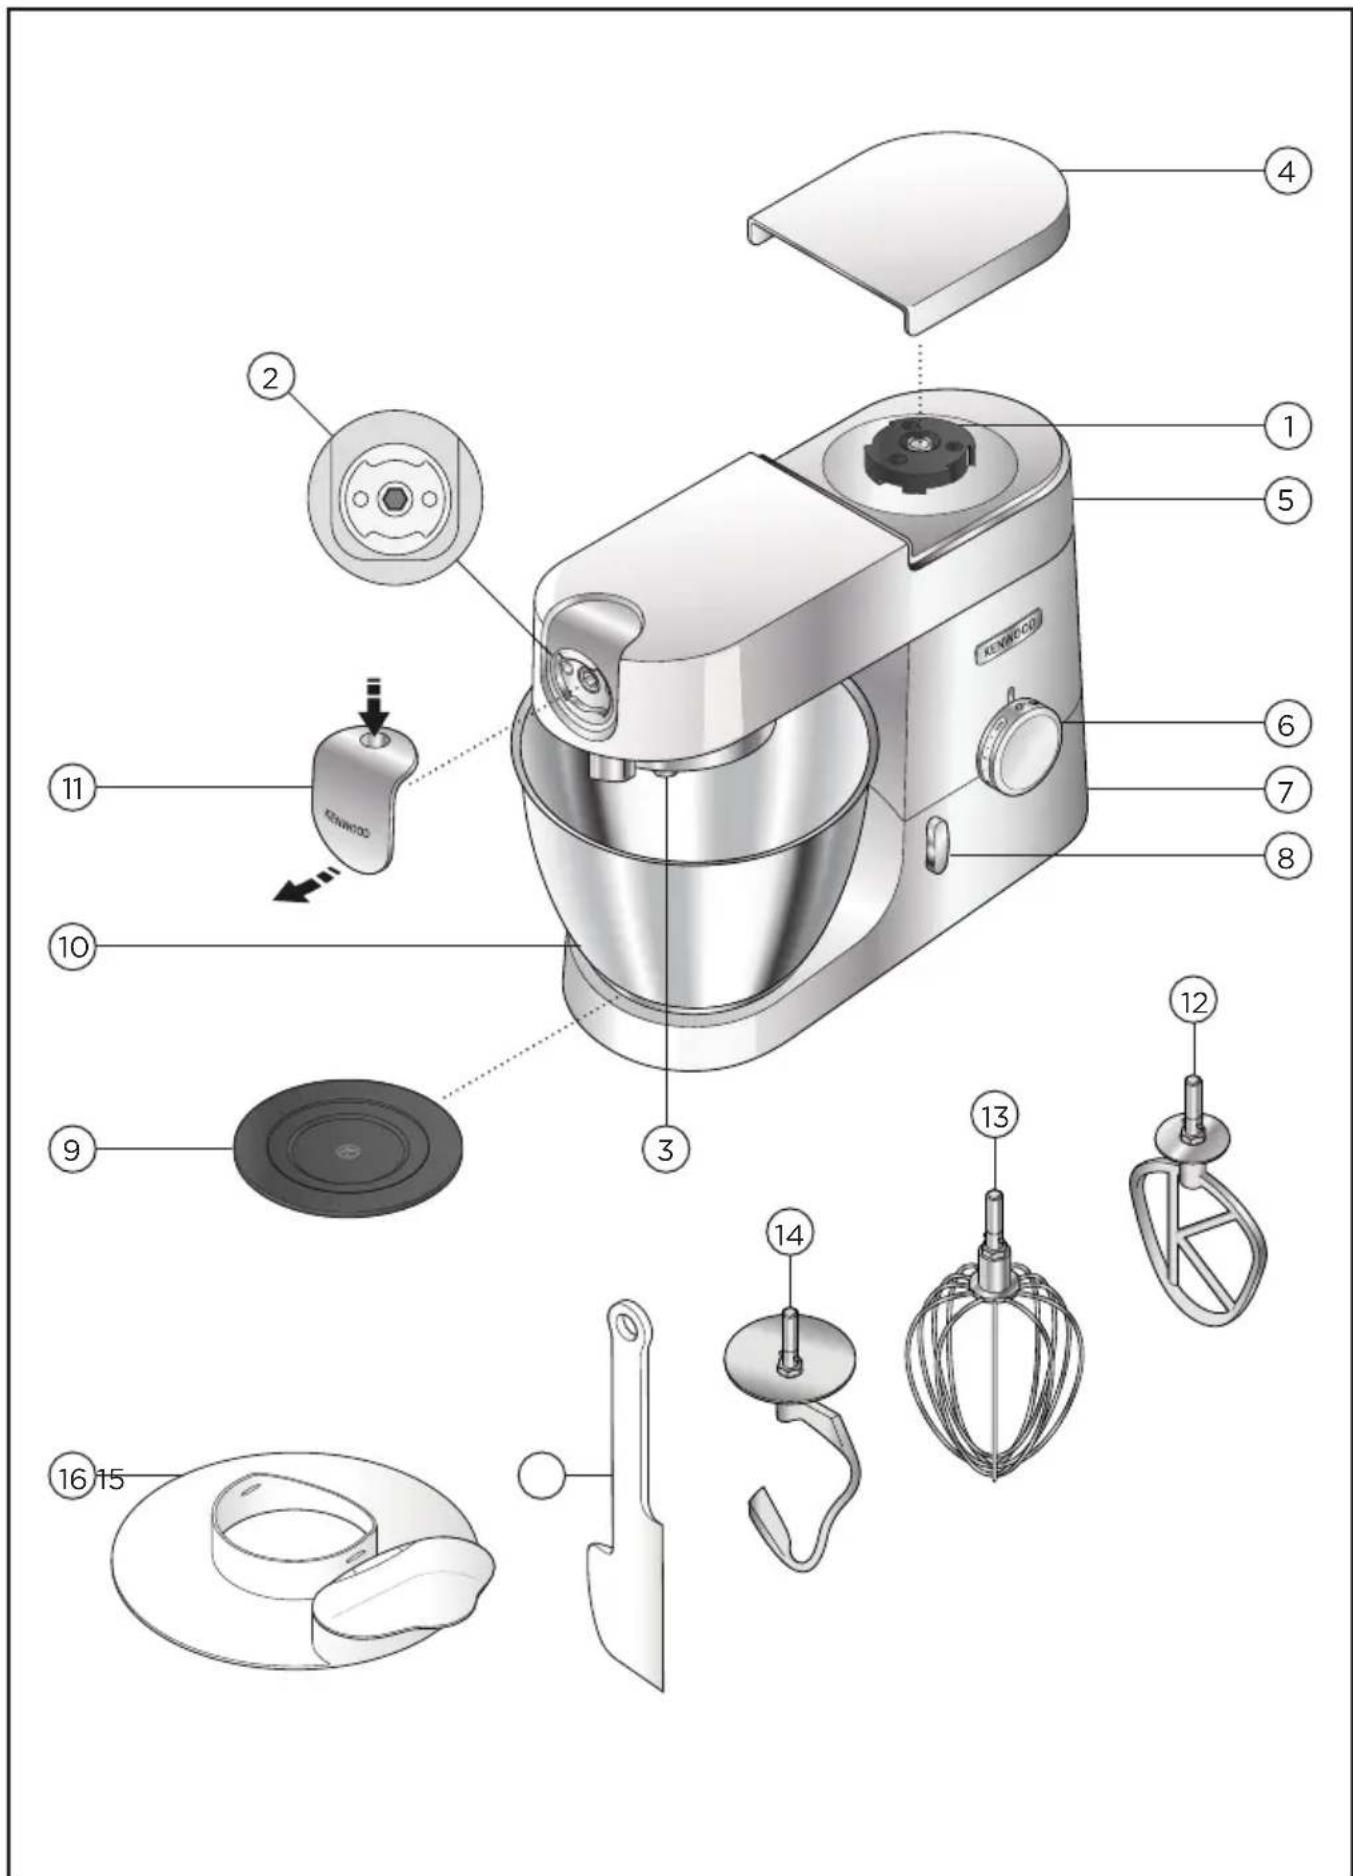
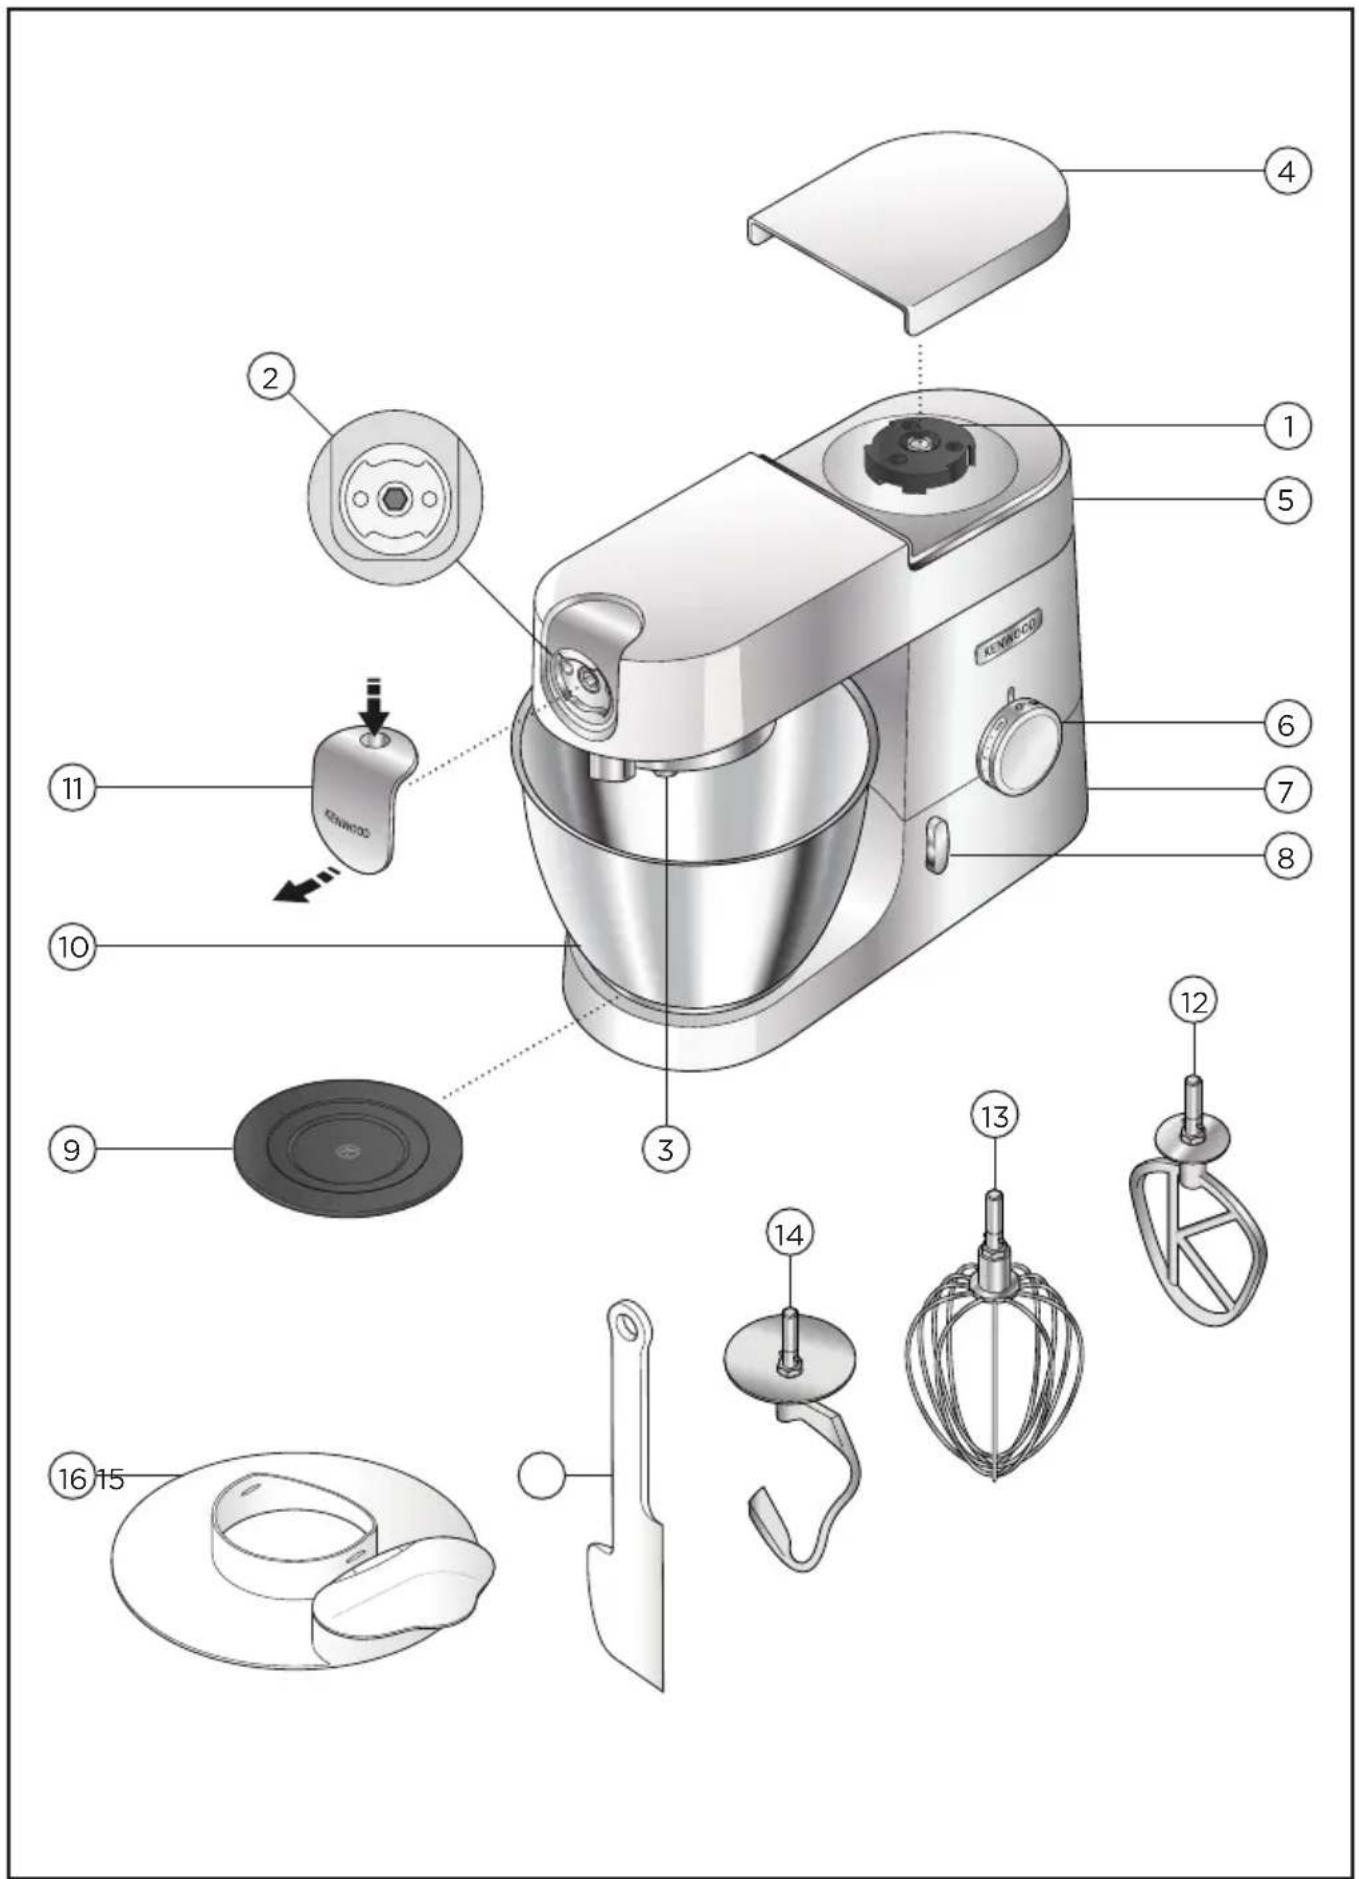
Attachment Outlets
High-speed outlet
② Slow-speed outlet
Bowl tool socket
Mixer
High speed outlet cover
⑤ Mixer head
Speed and pulse control
⑦ Power unit
Head release lever
Bowl seating pad
Bowl
Slow speed outlet cover
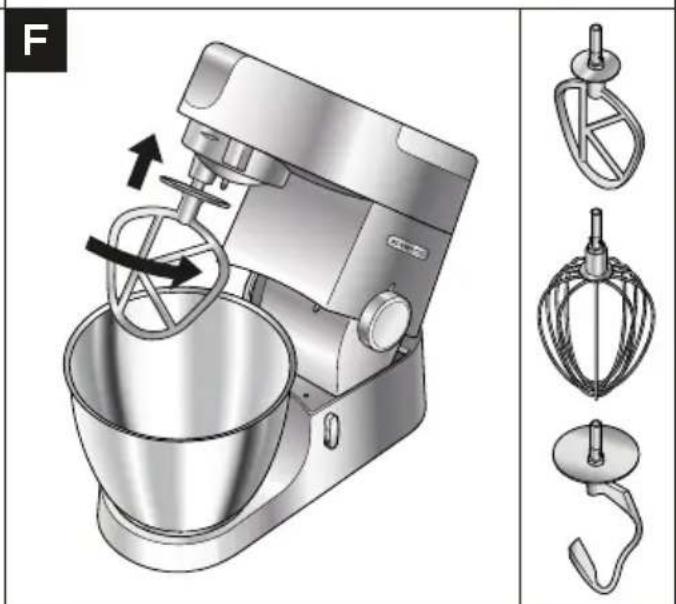
12 K-Beater
13 Whisk
Dough tool
Spatula
16 Splashguard
Usage Diagrams and Usage Instructions


Important
- Ensure that no bowl tools are fitted or stored in the bowl when using other outlets.
- Do not use the whisk for heavy mixtures (all in one cakes and creaming fat & sugar) as you could damage it.
- Never exceed the maximum capacities and speeds stated - you may overload the machine.
- When creaming fat and sugar for cake mixes, always use the fat at room temperature or soften it first.
- Ensure the feet and work surface are clean and dry before using the product.
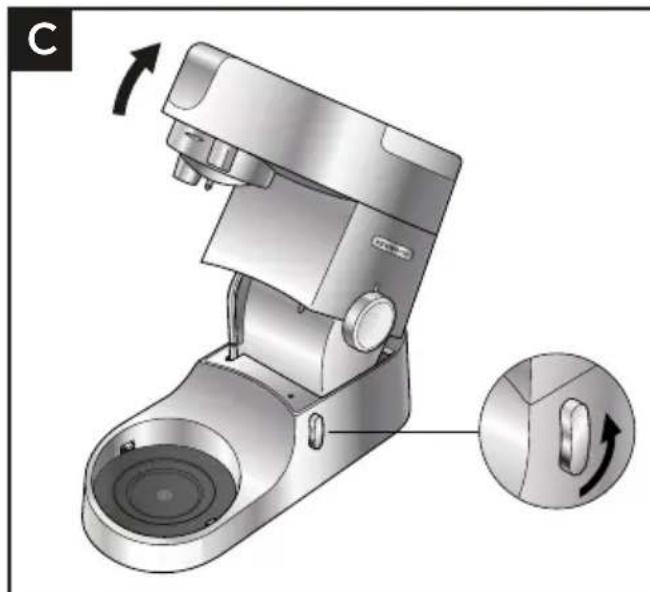
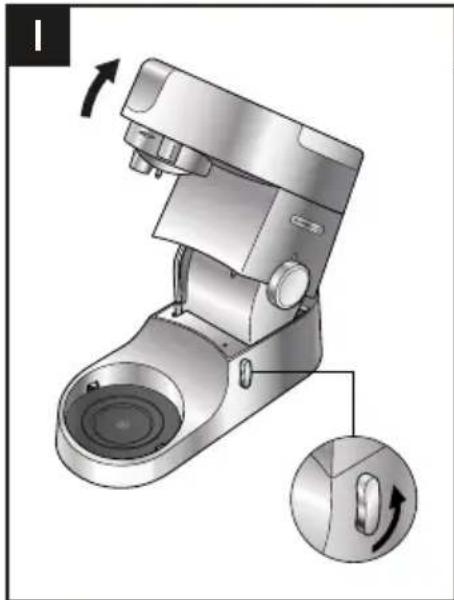
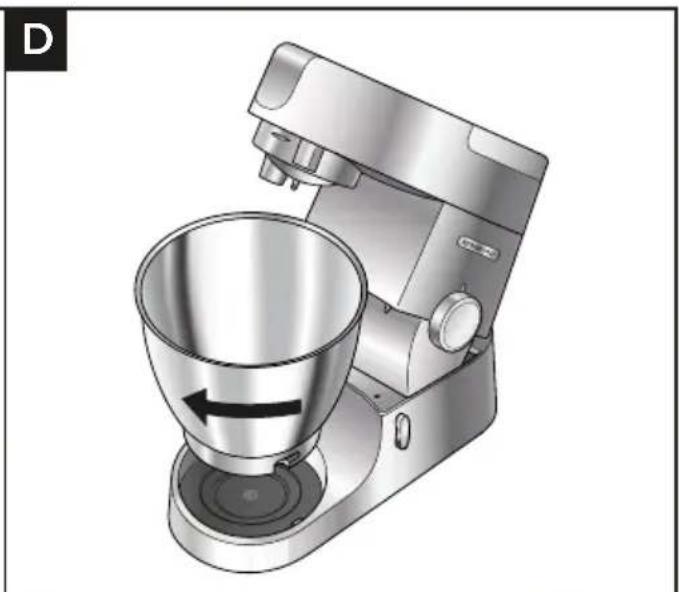
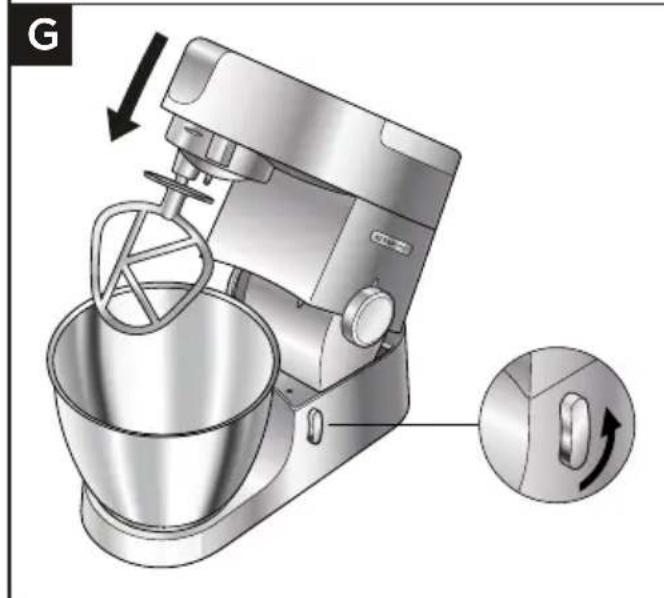
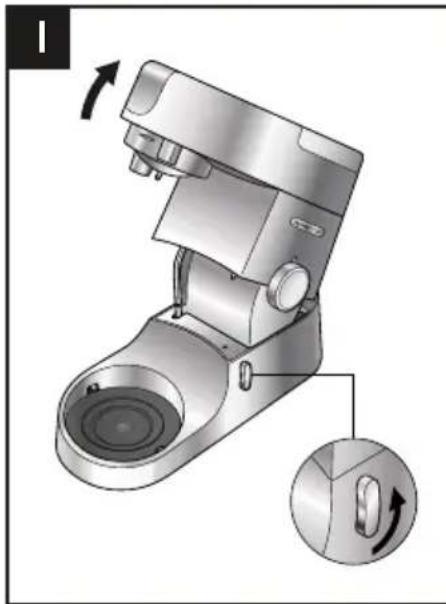
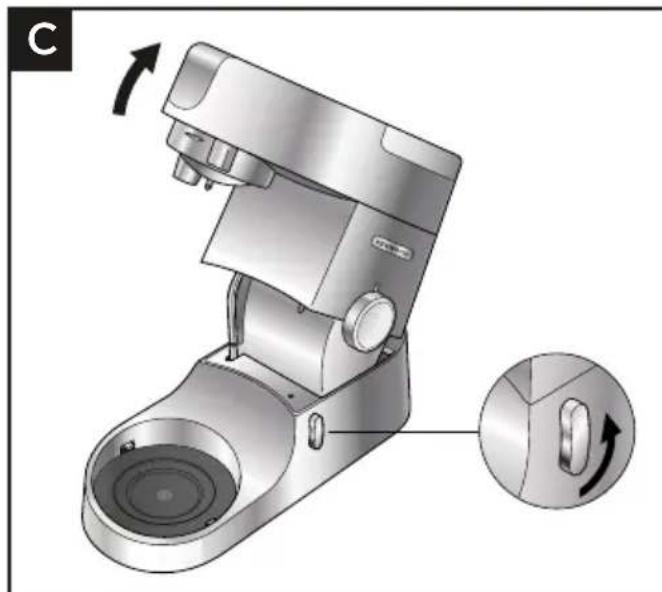
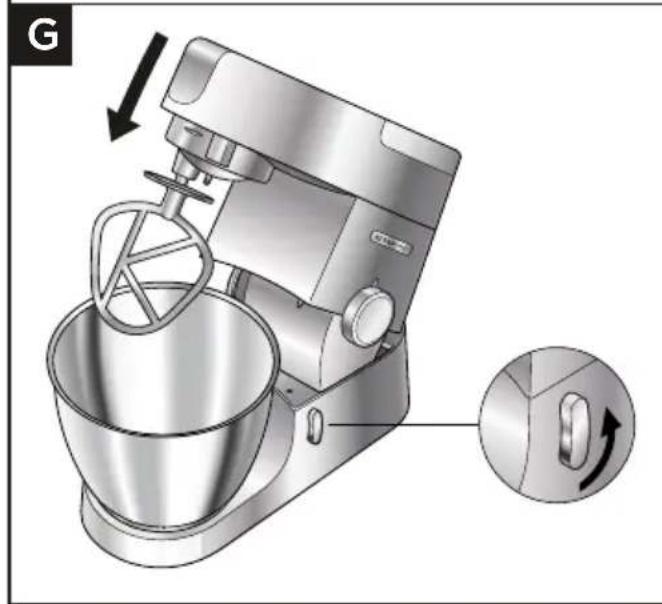
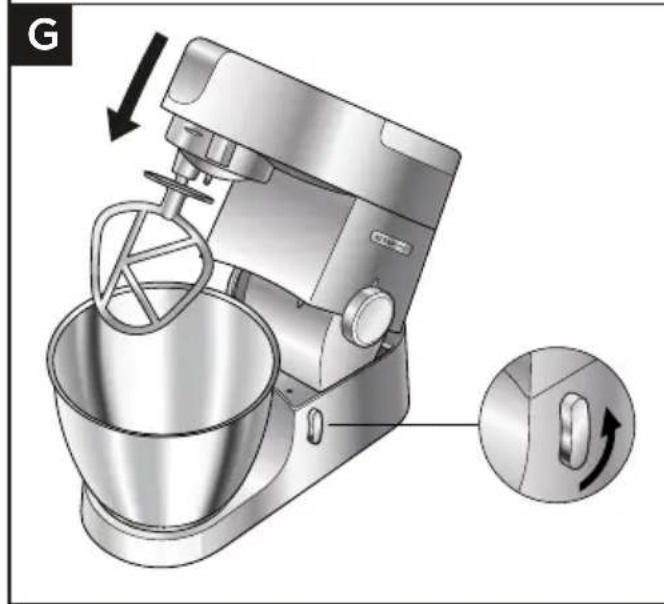
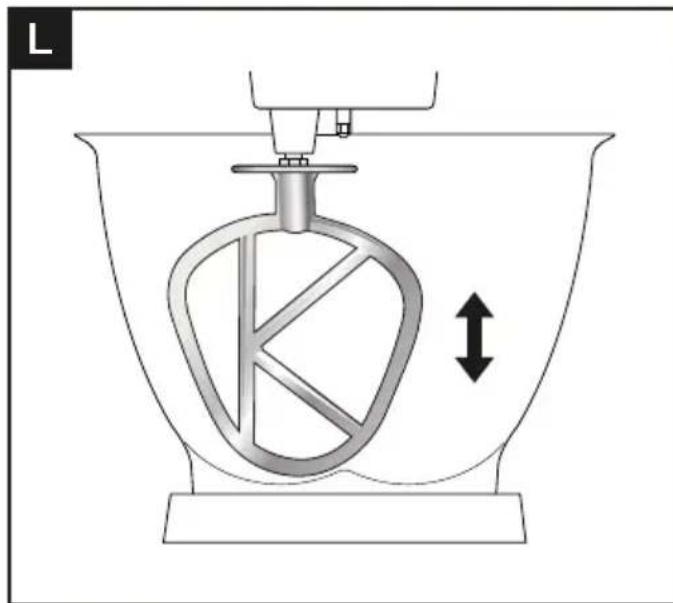
1 Turn the head lift lever anti-clockwise and raise the mixer head until it locks.
Ensure the bowl seating pad is correctly fitted with the symbol uppermost.
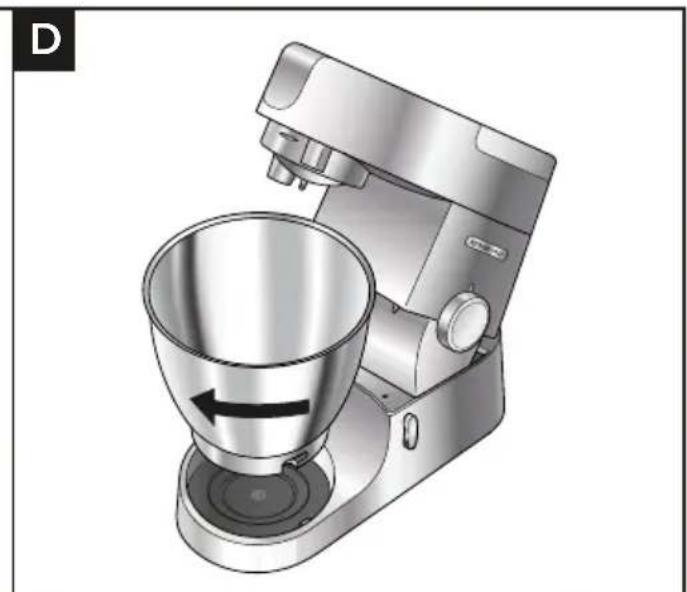
2 Fit the bowl on the base, press down and turn clockwise to secure in position.
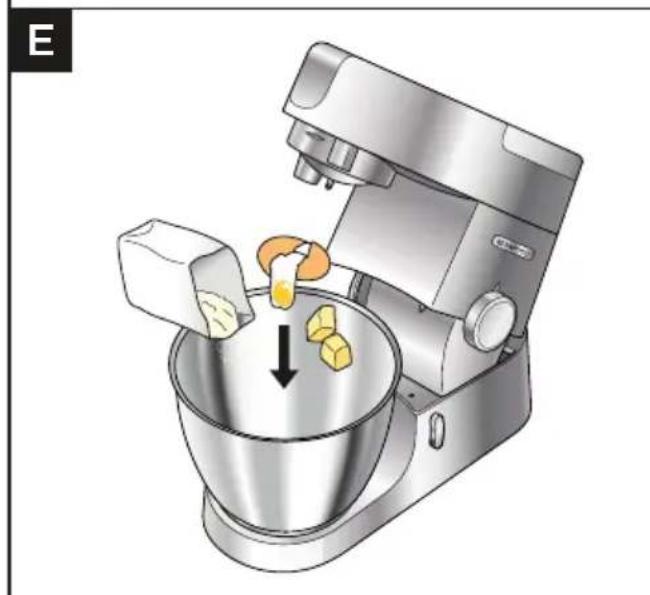
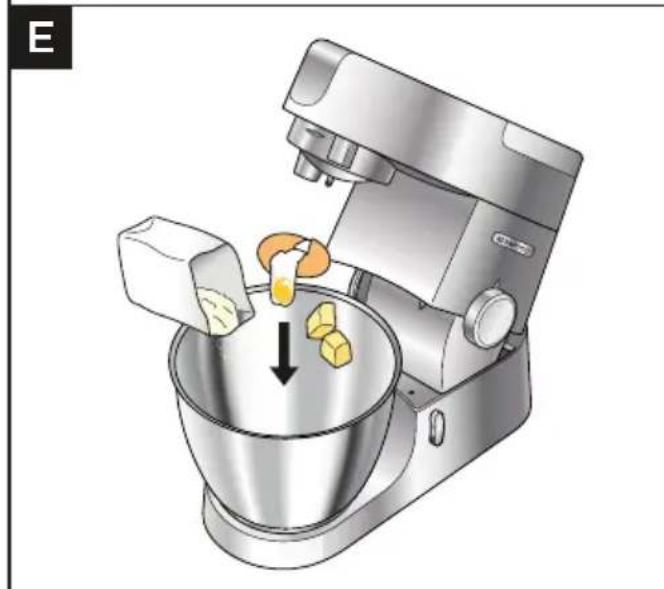
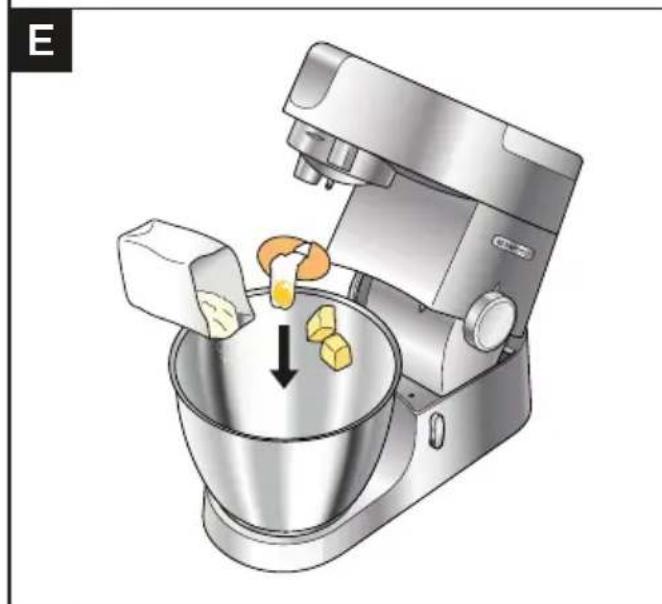
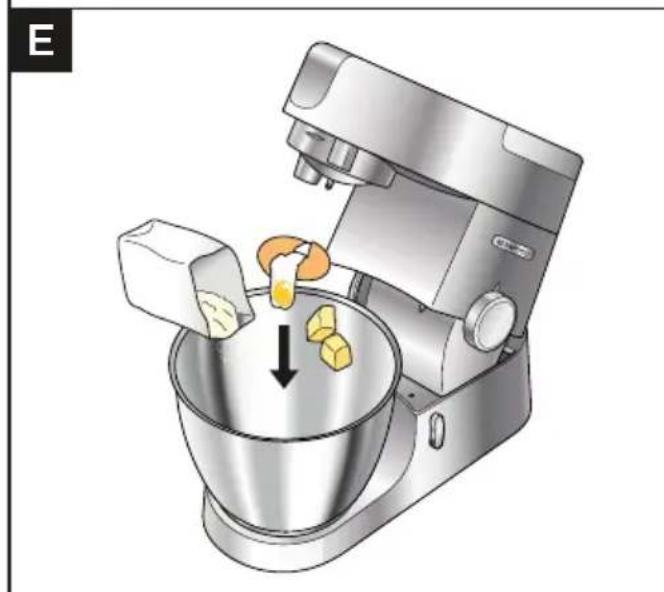
3 Add the required ingredients to the bowl.
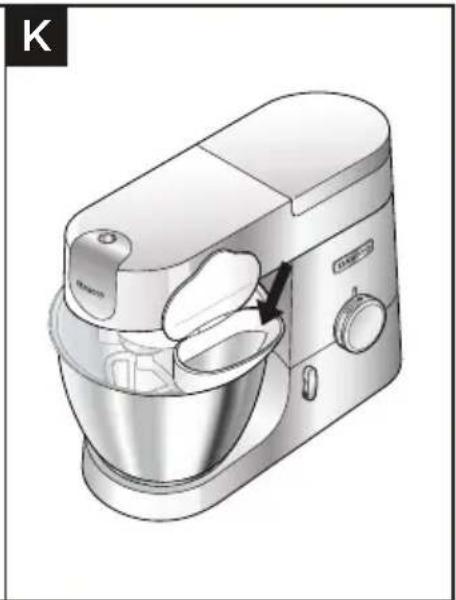
4. Place the required tool into the socket. Then push up and turn the tool to lock into position.
5 Lift the mixer head slightly then turn the head-lift lever anti-clockwise and lower the mixer head until it locks.
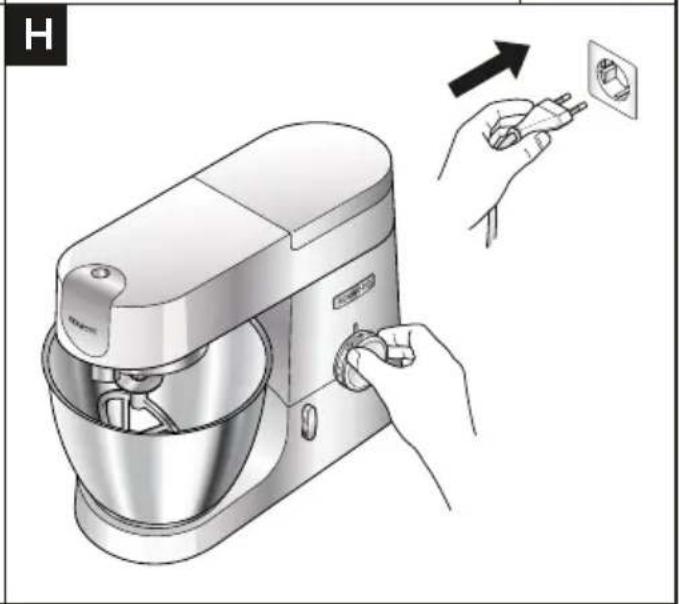
6 Plug into the power supply. Start the machine by turning the speed control to the desired speed setting. Use the pulse (P) position for short bursts of maximum speed.
7 Start the machine by turning the speed control to the desired speed setting. Use the pulse (P) position for short bursts of maximum speed.
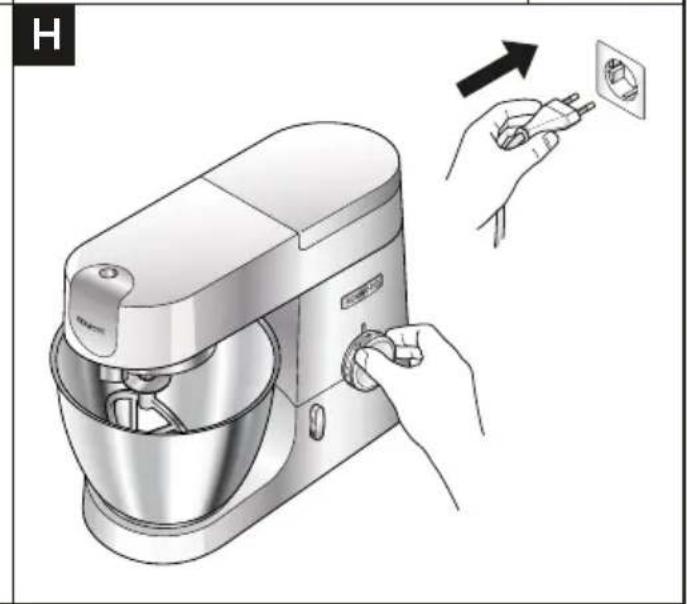
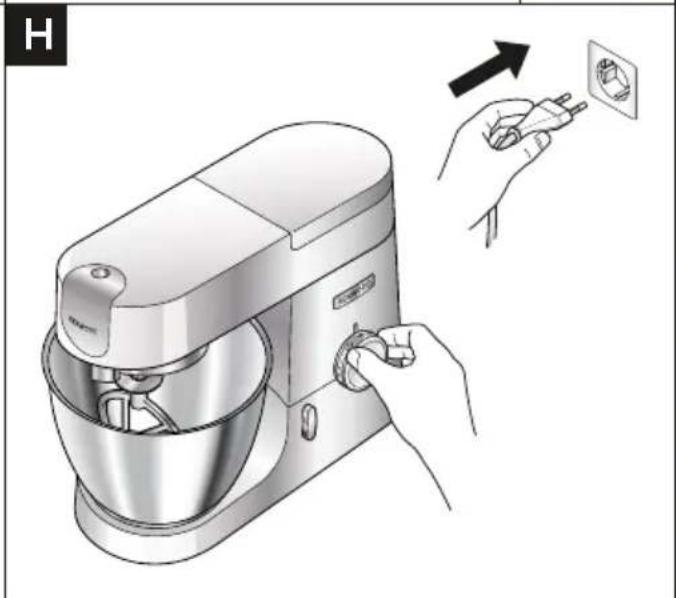
8 After use, return the speed control to 'O' OFF position and unplug your Stand Mixer.
9 Release the tool by turning clockwise to unlock from the tool socket and then remove.
Hints and Tips
- If the K-Beater or Whisk are not picking up ingredients from the bottom of the bowl refer to the "Tool Adjustment" section.
- To fully incorporate the ingredients stop mixing and scrape down the bowl with the spatula frequently.
- To avoid splashing of ingredients gradually increase the speed.
Hints and Tips - K-Beater
- When creaming fat and sugar for cake mixes, always use the fat at room temperature or soften it first.
Use cold ingredients for pastry unless your recipe says otherwise.
Hints and Tips - Whisk
- Best results achieved when eggs are at room temperature.
- Before whisking egg whites, make sure there is no grease or egg yolk on the whisk or the bowl.
Hints and Tips - Dough Tool
- If you hear the machine labouring, switch off, remove half the dough and do each half separately.
Yeast
- Dried yeast (the type that needs reconstituting): pour the warm water into the bowl. Then add the yeast and the sugar and leave to stand for about 10 minutes until frothy.
- Fresh yeast: crumble into the flour.
Other types of yeast: follow the manufacturer's instructions. - Put the dough into a greased polythene bag or a bowl covered with a tea towel. Then leave somewhere warm until doubled in size.
Usage Chart
| (MAX) | (Mins) | |||
| KVC30 KVL | 40 | |||
| 2 kg 3 kg Min-Max 5-10 | ||||
| 680 g 910 g | 10.5-2 | |||
| 500 g x10 | 1 kg x20 | Min-Max 1 | ||
| 900 g 1.5 | kg Min-Max 5-10 | |||
| (MAX) | (L (Mins) | |||
| KVC30 KVL | 40 | |||
| 12 16 Min-Max 1½-2 | ||||
| 4-8°C | 1 L 2 L Min-Max 1½-3 | |||
| 250 g 500 g 200 g | Min-Max 1-1½ | 1½ | ||
| Mayo | 180 ml x2 | Max 1-1½ | ||
| 620 g 930 g Min-Max | 4-6 | |||
| KVC30 KVL40 | (Mins) | ||||
| Min Max | Min Max | ||||
| x 500 g = 350 g H2O | x 1.36 kg = 952 g H2O | x 500 g = 350 g H2O | x 1.6 kg = 960 g H2O | Min-15 | |
| 500 g 280 g 225 g | 1.3 kg 760 g 605 g | 500 g 280 g 225 g | 1.6 kg 800 g 720 g | Min-15 | |
| 300 g 600 g | 1-2 4-5 | ||||
Pizza Dough
500g Flour
30g Olive Oil
7g Salt
7g Yeast
300ml Water
1 Fit the bowl to the stand mixer.
2 Add all of the ingredients.
3 Fit the dough hook and lower the head.
4 Mix on minimum speed for 1 minute.
5 Knead on speed 1 for 4 minutes.
6 Shape the dough into a ball on a floured work surface.
7 Cover the dough with a damp tea towel and leave to rest for 30-40 minutes in a warm place.
8 Divide into 2 and roll out into two 15cm pizza bases.
9 Transfer to a semolina covered baking tray. Garnish/top your pizza and bake for 10-15 minutes at 240^ .
Chilli Marinade
200g Clear Runny Honey
1Chilli (whole)
20g Crunchy Peanut Butter
Seasoning
1 Place all the ingredients into the mini chopper/mill.
2 Fit the attachment to the Stand Mixer and allow the ingredients to settle around the blade.
3 Switch to max speed for 4 seconds.
4 Use as required.
Note: Mini chopper/mill attachment available to purchase separately.
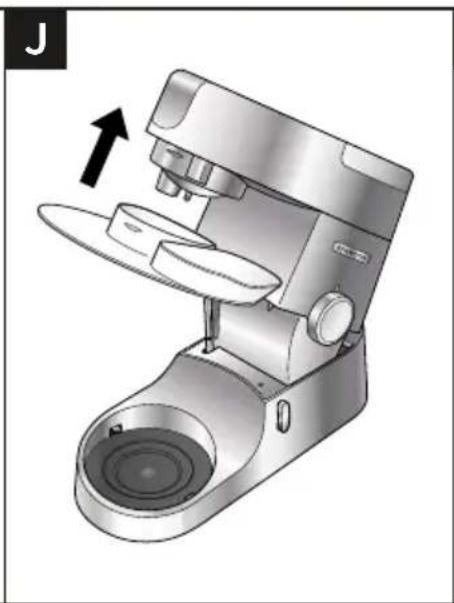
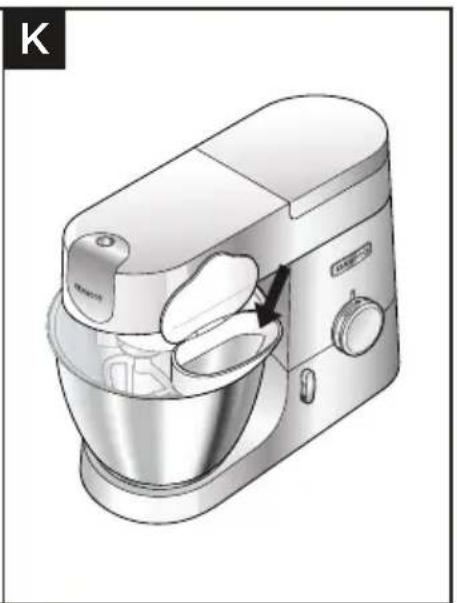
To Fit and Use Your Splashguard
Usage Diagrams and Usage Instructions
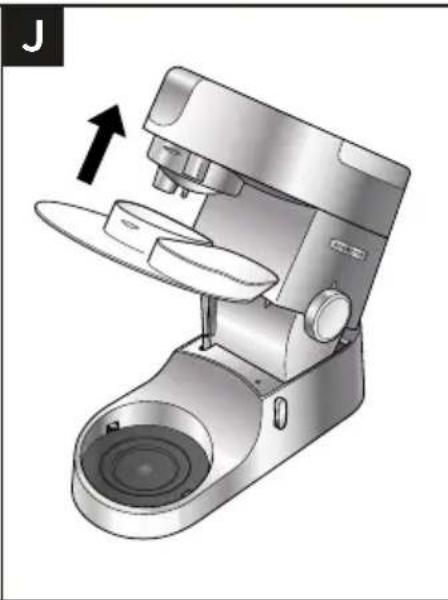
Important
- During mixing, ingredients can be added directly to the bowl via the hinged section of the splashguard.
- You do not need to remove the splashguard to change tools.
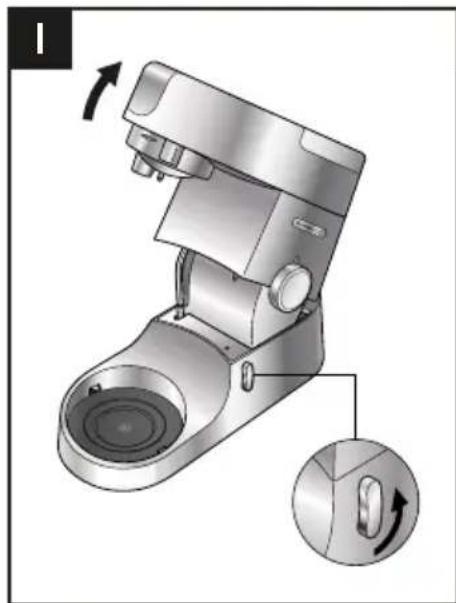
1 Raise the mixer head until it locks.
2 Fit the bowl onto the base.
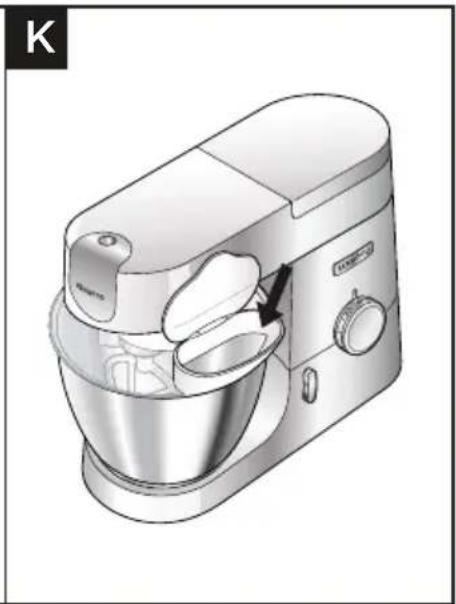
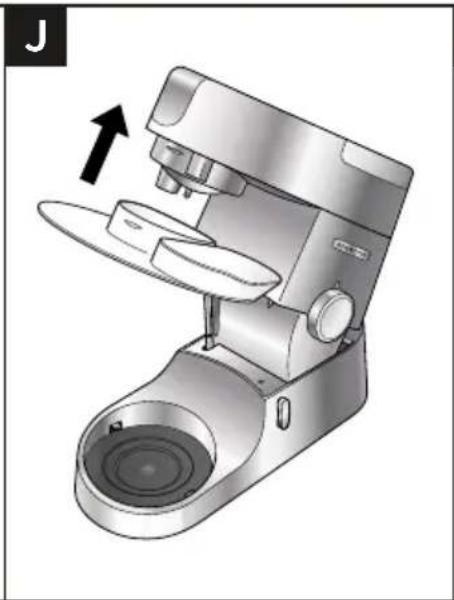
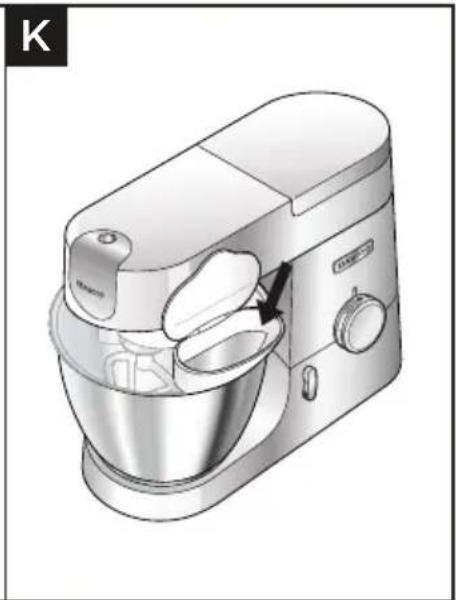
3 Push the splashguard onto the underside of the mixer head until fully located. The hinged section should be positioned as shown.
4 Insert required tool.
5 Lower the mixer head.
6 Remove the splashguard by raising the mixer head and pushing it down.
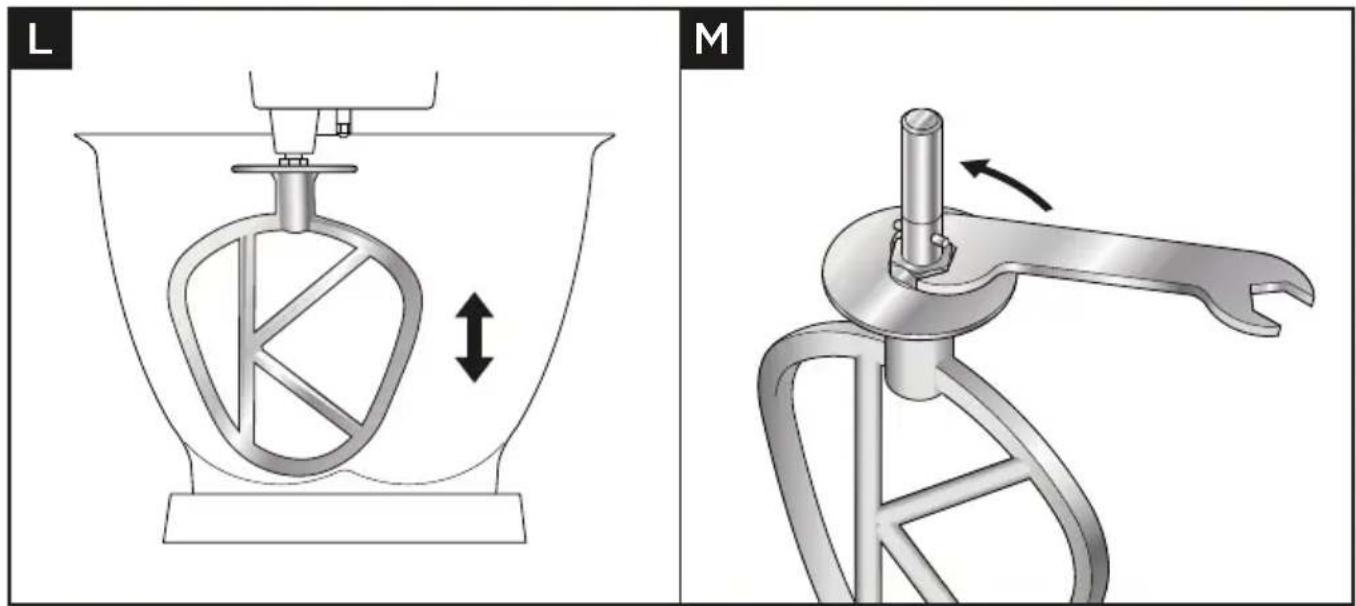
Tool Adjustment
Usage Diagrams and Usage Instructions

Important
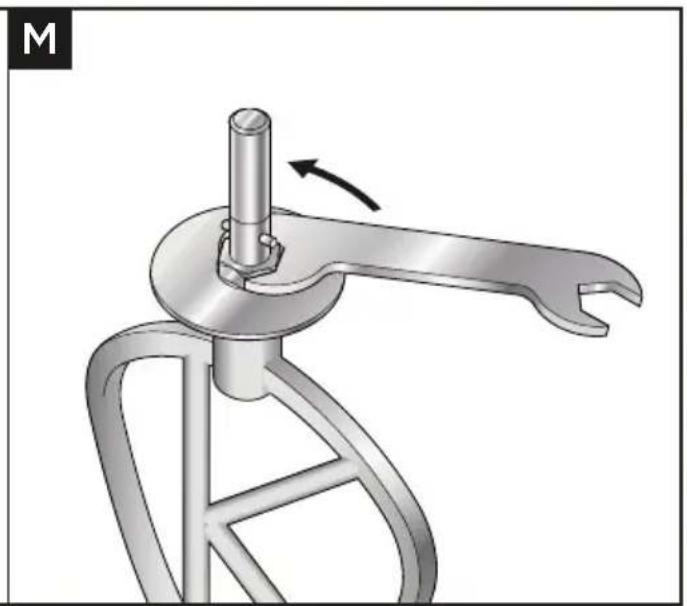
- The tools are set to the correct height for the bowl supplied in the factory and should not require adjustment.
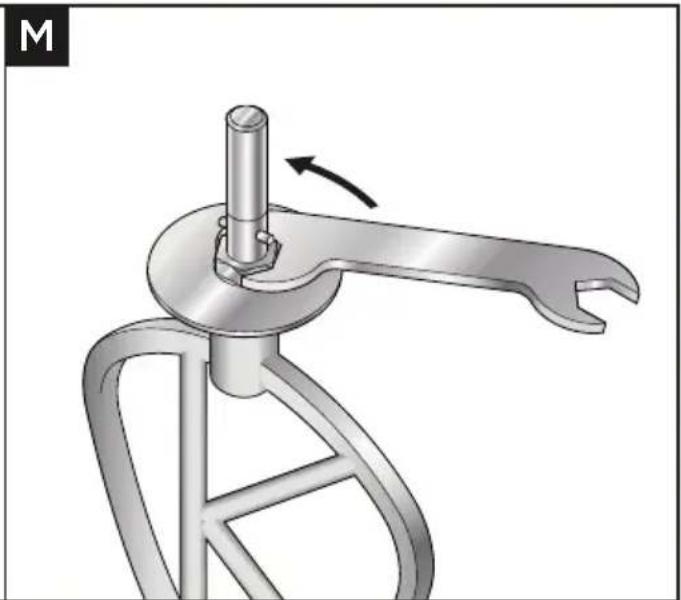
However, if you wish to adjust the tool use a suitable sized spanner:
TYPE: KVC30 = 15mm
TYPE: KVL40 = 19mm
1 Unplug the appliance.
2 Raise the mixer head and insert the whisk or beater.
3 Lower the mixer head. If the clearance needs to be adjusted, raise the mixer head and remove the tool. Ideally the whisk and K-Beater should be almost touching the bottom of the bowl.
4 Using a suitable spanner loosen the nut sufficiently to allow adjustment of the shaft. To lower the tool closer to the bottom of the bowl, turn the shaft anti-clockwise. To raise the tool away from the bottom of the bowl turn the shaft clockwise.
5 Re-tighten the nut.
6 Fit the tool to the mixer and lower the mixer head. (Check its position see points above).
7 Repeat the above steps as necessary until the tool is set correctly. Once this is achieved tighten the nut securely.
Note: Spanner shown is for illustration purpose only.
Dough Tool
This tool is set at the factory and should require no adjustment.
If you experience any problems with the operation of the appliance, before calling for assistance refer to the Troubleshooting Guide' or visit www.kenwoodworld.com. UK
If you need help with:
- using your appliance or
servicing, spare parts or repairs (in or out of guarantee)
call Kenwood customer care on 0345 222 0458. Have your model number (e.g. TYPE KVC30/KLV40) and date code (5 digit code e.g. 23T04) ready. They are on the underside of the power unit. - Spares and Attachments
call 0844 557 3653.
Other countries
- If you experience any problems with the operation of your appliance, before requesting assistance refer to the 'Troubleshooting Guide' section in the manual or visit www.kenwoodworld.com.
- Please note that your product is covered by a warranty, which complies with all legal provisions concerning any existing warranty and consumer rights in the country where the product was purchased.
- If your Kenwood product malfunctions or you find any defects, please send it or bring it to an authorised KENWOOD Service Centre. To find up to date details of your nearest authorised KENWOOD Service centre visit www.kenwoodworld.com or the website specific to your Country.
- Designed and engineered by Kenwood in the UK.
Made in China.
IMPORTANT INFORMATION FOR CORRECT DISPOSAL OF THE PRODUCT IN ACCORDANCE WITH THE EUROPEAN DIRECTIVE ON WASTE ELECTRICAL AND ELECTRONIC EQUIPMENT (WEEE)
At the end of its working life, the product must not be disposed of as urban waste. It must be taken to a special local authority differentiated waste collection centre or to a dealer providing this service.
| Problem Cause Solution | ||
| The whisk, K-Beater knocks against the bottom of the bowl or not reaching the ingredients in the bottom of the bowl. | Tool at the wrong height and needs adjusting. | Adjust the height using a suitable spanner - see “Tool Adjustment” section. |
| Slow speed attachment cannot be fitted. | Check your attachment is compatible for use with your model. Twist connection system required (Model KAX) TWIST | Attachment must have the KAX twist connection system TWIST to fit the outlet. If you own attachments featuring the Bar Connection System you will need to use the KATO02ME adaptor to connect these to the Twist Connection System on your Stand Mixer. For more information visit www.kenwoodworld.com/twist. |
| The Stand Mixer stops during operation. | Overload protection or overheat system activated. Maximum capacity exceeded. | Unplug and check for obstruction or overloading. Turn the speed control to “O” and then restart. If the machine will not operate, remove some of the ingredients to reduce the load and restart. If this still does not resolve the problem, unplug and allow to stand for 15 minutes. Plug in and reselect the speed. If the machine does not restart following the above procedure contact “customer care” for further advice. |
Nederlands
| × | × | √ | |
| √ | √ | × | |
| × | √ | × | |
| × | √ | × | |
| × | √ | × | |
| √ | √ | × | |
| √ | √ | × |

| × | × | √ | |
| √ | √ | × | |
| × | √ | × | |
| × | √ | × | |
| × | √ | × | |
| √ | √ | × | |
| √ | √ | × |

| × | × | √ | |
| √ | √ | × | |
| × | √ | × | |
| × | √ | × | |
| × | √ | × | |
| √ | √ | × | |
| √ | √ | × |

Zubehör-Anschlüsse
| × | × | √ | |
| √ | √ | × | |
| × | √ | × | |
| × | √ | × | |
| × | √ | × | |
| √ | √ | × | |
| √ | √ | × |

| × | × | √ | |
| √ | √ | × | |
| × | √ | × | |
| × | √ | × | |
| × | √ | × | |
| √ | √ | × | |
| √ | √ | × |

| × | × | √ | |
| √ | √ | × | |
| × | √ | × | |
| × | √ | × | |
| × | √ | × | |
| √ | √ | × | |
| √ | √ | × |

| × | × | √ | |
| √ | √ | × | |
| × | √ | × | |
| × | √ | × | |
| × | √ | × | |
| √ | √ | × | |
| √ | √ | × |

Udtag til tilbehør
| × | × | √ | |
| √ | √ | × | |
| × | √ | × | |
| × | √ | × | |
| × | √ | × | |
| √ | √ | × | |
| √ | √ | × |

Uttag für tillbehör
① Hoghastighetsuttag
② Laghastighetsuttag
Skalutttag
Mixer
| × | × | √ | |
| √ | √ | × | |
| × | √ | × | |
| × | √ | × | |
| × | √ | × | |
| √ | √ | × | |
| √ | √ | × |

Tilbehøruttak
Hoyhastighetsuttak
② Lavhastighetsuttak
3 Redskapskontakt til bolle
Mikser
| × | × | √ | |
| √ | √ | × | |
| × | √ | × | |
| × | √ | × | |
| × | √ | × | |
| √ | √ | × | |
| √ | √ | × |

| × | × | √ | |
| √ | √ | × | |
| × | √ | × | |
| × | √ | × | |
| × | √ | × | |
| √ | √ | × | |
| √ | √ | × |

Eklenti Çişloslari
Yuksek hiz icikisi
Dusuk hiz icikisi
3 Kase alet suketi
Mikser
Yuksek hiz cikisi kapaqi
⑤ Mikser kafasi
6 Hiz ve puls kontrlü
Guc unitesi
Kafa aça ma kolu
9 kase altligi
10 Kase
Yavashizlidi kapak
12 KciriPci
13 CiriPici
14 Hamur aleti
15 Spatula
16 Sicrama koruyucusu

| × | × | √ | |
| √ | √ | × | |
| × | √ | × | |
| × | √ | × | |
| × | √ | × | |
| √ | √ | × | |
| √ | √ | × |

| × | × | √ | |
| √ | √ | × | |
| × | √ | × | |
| × | √ | × | |
| × | √ | × | |
| √ | √ | × | |
| √ | √ | × |

Meghajtók nyílasai
| × | × | √ | |
| √ | √ | × | |
| × | √ | × | |
| × | √ | × | |
| × | √ | × | |
| √ | √ | × | |
| √ | √ | × |
Gniazda nasadek
| × | × | √ | |
| √ | √ | × | |
| × | √ | × | |
| × | √ | × | |
| × | √ | × | |
| √ | √ | × | |
| √ | √ | × |

O ABToMaTuYeCKn nepexoB peKIM OFF (peKIM BbIKIoUeHn): He npImeHIMO.
O MoUHOCbBpeKIMe BbIKAUOueHnra: 0.3BT
Ipea IoakaueHnem K cTeN 3AektponntaHna
-
Y6eIntecb B TOM,ЧTO HanpЯженье заektocetиВ BaшeM DOME COOTBeTCTByeT yka3aHHOMy Na ochOBaHnN əAektponpnpopa.
OCTOPOXHO! PIPBOP AOJXEH Bblb 3A3EMAEH.
-Пибop coOTBeTCTByeT AnpeKtIbe EC 1935 / 2004 o MaTePnAax n N3eAynx,прднЗаЧeHHbIX AAN KONTaTc C NIISeBbIMn PPOdYKTamN. -
Пара чистков 06язаTeьнов Выкалочи Te Аль Крпспбор И OTcoeДиНITE erOOT cETN.
- Пи пьвом Испоьзовани На мосте НИЗКOCKОСТHorO OTВерст MOжET NOЯВИТбСЕНМОНУЖИРНО ГАlaет. ДTo HopMaΛБHÖ - почTo ВыITрпЕ erO.
| × | × | √ | |
| √ | √ | × | |
| × | √ | × | |
| × | √ | × | |
| × | √ | × | |
| √ | √ | × | |
| √ | √ | × |

THe3daAAnKpePAnEHHaCaOk
① BbICOKOCKOPoCTHoe OTBepCTne
② Hn3KockopocThoe OTBepCTne
3 He3doAHAcAOKaW
MnKcep
KpbIiKa BbICOKOCKOPoCTHO OTBepCTHe
⑤ FOnOBKa MmKcepa
6 PeryAraTOp cKOpocTu + mNpyAcbHbI peKIM
7 BAOK 3AekTpoDBBnraTeA
8 Pbyar pa36AOKnOBoBkn roAOBKn
OnopHnpoKaaKaAaAs
0 Yawa
1 KpbIuKa Hn3KOCKOPoCTHO OTBepCTN
12 K-06pa3HaHaCaΔKa
13 BeHnyk
14 HacaKaAIAA3aMeCa TecTa
15 AonaTka
16 KpbIuKaAIAaUHTbIOT6pbI3r
Cxembl n HcTpykunn no NcnoAb3OBaHnIO

BaxHo
- Пи IncnoIb3OBaHnДpyrnx OTBepCTn y6eAnTecb,чToВЧаSe He yCTaHOBaeHbI N He xpaHЯTcR HnKaKne HacaDKN AЯЧSiN.
He nCnoAbyTe BeHnK dAЯ npuROTOBaeHra rYcTBIX Cmecen (HaNPmep, TOpTOB "BCE B OADHom" mIa B36NBaHna Jknpa N caxapa) - 3TO MOKeT npuBeCTN K erO IOBpeXeHNIO. - Hnkorda He npeBbIaIte yka3aHHyIO HopMy 3arpy3KN I CKOPoCTN: eTO MOKeT npNBecTN K neperpy3Ke np6opa.
- Пи В3бИВаHи Кира И саха ДЯ пи�OTOBeHЯ CmeсeДАТОТВЖИр BCERdadoJKeH 6bITb KOMHaTHOH TempeaTpybl IANпeДВapNTeMbHO pa3MЯчEN.
- Перацлобзоваимприбopa y6eANTecb, уTo HOЖКИ pa6очаг NOBepxHocTb.YIcTbIe n cyXHe.
1 NobeprHnTe pblaKOK rOAOBKn IpOTnB yacOBoCtpeAkn I NOAHMnTe rOAOBky Mnkcepa Do fNkcaun.
YdoctOBepbTecb, yTo nOaCTaBka dAaJy aShn C fNkCaTOPOM yCTaHOBHeHa npaBnIbHo - 06o3NaueHne K Ha AnuceBOI CTOpOHe.
2 YctaHOBHTe yau Ha NOCTABky I NOTOAKNHTe No YacOBONCTpeAke DO fHKcaUN.
3 NomeCTIe INHpeAneHTbI AAn CMeUINBaHnB YaUy.
4 BcTaBbTe HxKHyU HacaKy B rHe3do. HaXMMte N NOBepHnTe HacaKy, yTo6bl 3aΦNKcnpoBaTb.
5 CλeRka npnOaHmIte roAOBky MInKcepa, 3aTeM NOBepHnte pbiayxok rOAOBkn npOTNB yacOBoN CTpeAKn IN ONyCTnTE roAOBky MInKcepa DO fHKcauIN.
6 ΠoДКЛочNTe KИСТОУнку ПИТАнЯ.ВКЛочNTe npибop,yCTaHOVBpeRyAryTop CKOPOCTnHa HUxHHyIO OTMeTky.ДЯ KOpOTKnx BCnAeCKOB MaKcMmaBHoN cKOpOCTn NOLOXKeHne «IMnyAchbI peKIM (P)».
7 BkIoUHTe MaunHy, NOBepHyB peryAraTOp ckopocTn B HuyKHO noAoXKeHne. Icnoa3yIte NmnybChbI peKIM (P) dA BkIoUeHnMaunHbI Ha MaKcImaBHyIO ckopocTb Ha KOPOTKHe npomexkyTKn BpeMeHN.
8 NocLe BbINOAnHeHnA DeIcTBnA NOBepHnTe peryAaTOp ckopocTn B noAoKeHne "O" (Bbik.) n OTKaIOUHTe KxOHHyo MaunHy oT cetn NiTaHn.
9 OTKpyTHe HacaKy No YacOBoN CTpeAke, UTo6bI pa36AoKInpoBaTb ee, a 3aTeM CHIMITE.
CObeTbI npekomeHaaun
- EcAn K-06pa3HaJa HacaKa, BeHUn KpeMOB36uBaTeAe He 3aXBaTbIbaOT INHrpEaHeNTbI Co dHa qaun, 6paTntecb K pa3deAy "PeryanpoBka nHcTpymeHTa".
- YTo6bI NOAHOCTbIO CMeUaTb BCE INHrpeDneHTbl, YacTo AeAaiTe nepepbIBbI B pa6oTe MaunHbI N COCKpe6aIe Te TectO C Yaun AOnaTKoN.
- 4To6bI He pa36pb3rNBaTb INHpeAneHTbl, NOCTeNEHHO yBeAUNBaTe cKOpocTb.
Cobetbl n pekomehdaun - K-06pa3Ha hacaKa
- Ддя поученя налuyшinx pe3yabTaTOB Bcergda nCNoAByTe CnBOUHoe MacLo ImaprapinKOMHaTHOH TempepaTpybl npn nprirotOBaehn TOPTOB.
- AIIy npnroTOBAnHn BblneuKn nCNOa3yIe XoAoHbIe INHpeDnEHTbl, KpOme CAYaA, KOrDa B peCenTe yKa3aHo HHOe.
Cobetbl n peKomeHdaaun - BehvnK
HaunyUne pe3yAbaTbI DOCTnraOTc npN nCNOaB3OBaHn RnC KOMHaTHoN TempePaTypbl.
- NpeaB36nBaHneMaYHbIX 6eKOB, y6eNTecb, qTO Ha BeHcKe n YaWe HET Xnpa nn YnHOrO XkeTka.
Cobetbl npekomeHdaaun - HacaKa AAn 3ameca Tecta
ECAH Bbl Cblnte,TO MaunHa C Tpyom CnpaBAreTc C nepemuBaHnEM,OTKAHOHTe, 13BAeKNTe NAOBHy Tecta IN BBMeMaTe KaJdyIO NAOBHy NO OTaeAhoCTN.
Apoxk
Cyxne Apoxk (Tn APoKKe, KOToPbIe HeO6XoAMo pa3BOaNTb BOaOn):HaAeTe TEPON BODB V aWy. 3aTeM do6abte Apoxk n caxap n octabte Ha 10 MInyTdo NORAEHN Pehbl.
CbeXne ApoXXN NOKPOWNTe B MyKy.
- Apyrnne BnAbI ApoxxKei: cAeMyTe yKa3aHnM npOn3BOAnTeA.
- IomeCTIe Tecto B Cma3aHHbIM KINPOM NOAN3TnAeHOBbIM NaKeT NAn YaUy, HApKpbITyUO
YaHbIM NOANOTeHcEM. OctabBe B TeNAm MeCTe, NOKa O6bEm Tecta He yBeeNunTCR
BABOE.
Ta6ʌnca pekomeHdyemoro nCnoB3OBaHn
| (MAKC) | (L (Mнутbl) | |||
| KVC30 KVL | 40 | |||
| 2 кг 3 кг | Min-Max (Mин-Макс) | 5-10 | ||
| 680 r 910 r | 10,5-2 | |||
| 500 r x10 | 1 кг x20 | Min-Max (Mин-Макс) | 1 | |
| 900 r 1,5 | КГ | Min-Max (Mин-Макс) | 5-10 | |
| (MAKc) | (L (Minhytbi) | |||
| KVC30 KVL | 40 | |||
| 12 16 | Min-Max (Min-Makc) | 1½-2 | ||
| 4-8°C | 1 Λtrp 2 Λtrp | Min-Max (Min-Makc) | 1½-3 | |
| 250 r 500 r 200 r | Min-Max (Min-Makc) | 1-1½ | ||
| Mayo | 180 mA x2 | Max (Makc) | 1-1½ | |
| 620 r 930 r | Min-Max (Min-Makc) | 4-6 | ||
| KVC30 KVL40 | (L (Minhyundai) | |||||
| Мин Мaks | Мин Мaks | |||||
| x 500 r H2O = 350 r | x 1,36 k H2O = 952 r | x 500 r H2O = 350 r | x 1,6 k H2O = 960 r | Min-1 (Min-1) | 5 | |
| 500 r 280 r 225 r | 1,3 k 760 r 605 r | 500 r 280 r 225 r | 1,6 k 800 r 720 r | Min-1 (Min-1) | 5 | |
| 300 r 600 r | 1-2 4-5 | |||||
Tecto AAA Nnucbl
500 r Myk
30 OANBKOBOOMACAA
7rcoa
7rApokkkei
300 MA BOΔBI
1 YctahOBInTe yaHy Ha KkyxOHHyo MaShinHy.
2 O6aBbTe Bce INHrpeAneHTbl.
3 YctaHOBInTe KpOK AAn TeCTa NOnyCTHTe rOAOBHyU Yaactb.
4 CmeuTaHa MmHMaBHOCKOPoCTN B TeueHne 1MnHyTbI.
5 BbimeuBaIte Ha ckopocTn 1B TeueHne 4 MInHyT.
6Пидайт ectу ФорMy shapa, nomecTINB ero Ha noCbIaHHyO myKoI pa6oyuIO NOBepxHOCtB.
7 HakpoTe TecTo BAAJHbIM yaHbIM NOAOTeHcEm N ocTaBbTe Ha 30-40 MInyT B TeIaOM MeCTe.
8 Pa3deIaHTe Ha 2 uactn n paKaTaIte B aBe OCHOBbl AAnuCbI dNaMeTpom 15 cm.
9 IpepeoxnTe Ha 3acbinaHbI MaHKo npOTnBeHb. YKpaCbTe Nnucy rapHnpBIMn do6aBkAm/ nokpbITnem m BbIneKaIte 10-15 mHyT npi TemepaType 240^
MapnHaC nepcem nn
200 r npo3paHoro JnAkoTo Meda
1 nepeu nn
20r(1cTooobaaOxxka)AOMKOr apaxucoBOrMaC
Ppnpaba
1 NomeCTIe BCE INHrpEaNEHTbI B MUNH IN3MeaBcHTeA/B MeaBHNu.
2 NocoeHnTe HacaKy K KyxOHHO MaunHe n paCNOXKeIe INHpeAnEHTbI BOKpyr HOKeBOrO 6AoKa.
3 BkHouHTe np6op Ha MaKcMaBHyIO CKOpocTb Ha 4 ckyHdbI.
4 Icnoa3yI Te no Ha3HaueHIO.
Приимеанно: HabcaKa - МИн-иЗмeьчтЕв/Мeьнца пpoobpeTaetc rOTdeMbHO.
KaK yCTaHOBNTb I NOAb3OBAtbcra YcTPOIcTBOM AIA 3aUHTbI OT 6pbI3r
Cxembl n HcTpyKznn no NcNoAb3OBaHnIO

Baxho
BoBpeMa nepemeunBaHnI INHpeaENtbl MoryT aO6abAraTbcB yauy uepe3 noaBeWeHHyU Ha neTAX KpbuXky AAn 3aunTbI OT 6pb13r.
- AaBbINOAnHeHnCMeHbI HacaDOK KpbIWKy Aa3aUNTbI OT 6pb3r CHImaTb He Tpe6yeTc.
1NoHnMnte rOAnBky MmKcepa Do ee fNkcauIN.
2 YctaHOBInTe YaIy Ha OCHOBaHne.
3 HaBnHbTe KpbIuKy dAaNtbl OT 6pbI3r Ha HxKHOU YaCTb rOAOBKn MInKcepap, OoNBuNCb erO noHoi nocaKn. WapHnpHa cekun DaOAnXHa 6bITb paCnoAoKeHa, KaK POKa3aHO Ha pncyHke.
4 BcTaBbTe HyKHyU HacdKy.
5 Onyctnte roAOBky MUKcepa.
6 YdaAte KpbIshky dAra 3aunTbI OT 6pb3r, npnnoHnB rOAnOBky Mnkcepa n NOaToakHyB ee BHN3.
Cxembl n HcTpyKcnn no NcNoAb3OBaHnIO
BaxHo
Ha 3aBoe HacaKn OTpepyAnpoBaHbI NOB BbcOTy YaH, BXOJaueB KOMnAeKT nocTabKn, H He Tpe6yOT peryAnpoBKn. UTo6bl OTpepyAnpoBaT hacaKy, nCnoB3yIte IOnxOJaun RaeyHbIN KaIOU:
TYPE: KVC30 = 15 MM
TYPE: KVL40 = 19 MM
1OTKAUOHTe np6op oT ceTn.
2 NOpHmnte rOABky MInKcepa IN BCTaBbTe BeHnK nN B36nBaAky.
3 OnyCTnTe roAOBky MmKcepa. EcH Heo6xOAMo OTpepyAUPoBaTb 3a3Op, NOAHMITE roAOBky MmKcep a n CHIMITE HaCaAky. B IeaaBHom BapnaHTe BeHUn K-O6pa3Ha HacAdKa DOAnXHbl NoUTN KacaTbCra DnryaShn.
4 C nOMOJIIO NOxODJIero RaeyHOro KAHOa OTKpyTITe raIKy, YTO6bl MoKHO 6blOperyIpOBaTB NIOAOKeHHe BaA. YTO6bl ONyCTNTb HacaKDy 6ANKe K DHy qAùn, NOBepHInTe BAI pOTINB YACOBON CTpeAKN.
YTo6bI npINOHrTb HacaKy, NOBepHnTe BaA no YacBOB CTpeAKe.
53akpytnte raKy.
6 YctaHOBNTe HacaKyu Ha MeCTO N ONyCTnTe rOAOBky MmKcepa. (IpoBepbTe nooXKeHne HacaKn, CM. BblWepepeuNCaEHhble nyHKtbl).
7 NOBTOPRA Te BblweOpncaHHyIO npOeApy AO Tex nop, noka HacaKa He 6yDeT yCTaHOBHe NaPabNbHo. KaK ToIbKO HacaKa 3aMyET Heo6xOdImoe NoIoXeHne, TuaTebHO 3akpyTITe raiKy.
PnmeaHHe: raeuHbIKAIOU npeCTaBAn H NCKAOUYTeABHO B NIAIOCTpaTINHBbIX CEeAix.
HacaKa AAn 3aMeca Tecta
IopoxkeHne daHHoHa cAdKn yCTaHaBAnBaetc npOn3BoaNTeAem n He Tpe6yeT DaBHeiXnpeyeCTaHOBOK.
- EcAn B pa6oTe np6opap Bo3HKn KaKne-AN6o HnOaAKn, nepeA o6paueHnem B cayk6y POndApKKn IpoTuTte pa3deA «Ta6Anuca NOncKa n UcTpaneHnra HeNCnpaBHOCTe» B DaHHOM pyKOBOACTBe IAn 3aINTe Ha caIT www.kenwoodworld.com.
- ПомнITE, сTo Ha np6op pacnpoctpaHЯeTcra pahTn, OTbeauOuza Bcem 3akOHhbIM ПОLOЖЕняМ OTHOCHTeA bHo cyueCTbYIOUeI rapaHTn I npab Notpe6nteA B Toi cTpaHe, rde np6op 6bl npno6peTeH.
- Пи ВОЗнКовени НсспаВноCTN B pa6Ote пибopa Kenwood ИИ пи
-об hapжени КкINX-АИбО DeФeKTOB, NOЖаУйСТа, OTпpaBbTe ИИ пипесHTе пибор
-В abTOpИЗпOBaHHbI сервICbI ueHtp KENWOOD. AkTyaMbHbie KOHTaKTbIe DAHHbIe
-сервICbIX ueHTpoB KENWOOD Bbl haIeTe Ha caITe www.kenwoodworld.com ИИ на
-caITe ДЯ BaшeI CTpaHbl.
CnpoeKtnpoBaHO npa3pa6oTaHO kOMnHaHnei Kenwood, CoeAnHeHHoe KopoAeBCTBO.
CdaHOBKuTae.
BAKHAR INHΦOPMAUJN IO NIPABINbHOY YTHAN3AUIN N3DEANr COIACHO DNPEKTNBE EC NO YTHAN3AUIN 3AEKTPNUECKOTO N 3AEKTPOHNO OBOPYDOBAHnR (WEEE)
No nCTeueHn cpoKa CnyK6bl N3AeAne HeIb3a Bbl6paCbIBaTb KaK 6blTOBble (rOPOdCKne) OTXoAbI.
I3eAne cAeYET nepeaTb B CneuaHbHbIK KOMMyHaHbHbIK NyHKT pa3eAhoC6opa OTXoOB, MeCTHOe yUpeKdEHeNnB INpeApnTne, OKa3bIBaIOOee NOo6Hbe ycayr.
IHHOpMaun O KOe DaTbI NPOIN3BOADCTBa MOKeT HAXODNTCBa Ha HIXHeN NOBepxHocTN IpoAkyTA nn OKoAo Ta6AnuKn C TexHnueCKmN daHHbIM. KoA DaTbI NOKa3aH B BVae KOna RoDa n Meca, 3a KOTOpbIM CaeDyET HOMep HeDeaN.
OBPATNTE BHIMAHNE: NepBbIe ABe ZnΦpbl O6O3HaayoT roA, nocAeHne ABe ZnΦpbl -npaKobBn HOpem HeJeA rOda.
Hanpimep:4-Я HeeelaЯHBapra 2024 roda = 24TO4
Kayinci3dk TypaIbI MaHbI3AbI aKnapaT
OcbIHyckaybIKTapdbIMKnTOKbIHb3KHeKelewekeTe naaHaHyfacKaTaHbI3.
- Aʌfaʌn naɪdaʌaʌhʊ yʌdɒbɪHʌda 6ykiʌ KaɪTaʌmæ Meŋ JɔʌncɒpMaʌapɒbɪ aʌbɪn TaCTaɪhɒt. (Kʌpɒbɪʌfɒbɪ HerɪzɪHærɪ aʌknapaTTbɪk TaKTaɪwʌhɒbɪ aʌbɪn TaCTayfə 6oʌmaɪdɒt.) BæʌweɪkTepeɪ jxyy, Mɒɪha 6θʌimɒi kɑpaɪhɒt: «Kytɪm Jɔːcay Jɔːhe Ta3aʌaay».
- Erep asha hemece ka6eA b 3aKbIMdaAFAH 6oAca, oA kayinci3dk MaKcaTbIHda kayintiHaAdbH any ywiH Kenwood hemece eKiIeTTi Kenwood keHdeywici TapanbHaH aybICTbIPblAbyI KepeK.
Kypaaapdbi/TipkeMepepi opHaTnac 6ypbH Hemece aabin TaCTaMac 6ypbH, KOaHaFahHn KeiH JHe Ta3aMaMac 6ypbH, apkaan JbIaMbIK peTTeriiH «O» eWipyI KyniHe KoBIn, po3eTKaDaH aKbIpaTbIHbI3.
- DeHe MywnepeiH3di, WAsbHbI3dbI, 3eprepik 6ynbIMApbIHbI3dbI XaHe KeH KNIMepH3di Ko3FaAatbH 6oikTepeH XaHe 6ekitTireh TipkeMeepdeH apKaWah aAlic YCTaHbI3.
KypbIaFbIHb eWkaWah KapaycbI3 KaAdbipMaHbl3.
3aKbIMdaAFAH KypaaABy AcyN KypbIABcBIn KOaHa6aHbI3. OHbl TeKceptiH3 Hemece XeHdTeHi3: «Kbi3Met Kepcety XaHe TyTbHyLbIApFa KeHeC» 6aImiH KapaHbI3.
- Ewkaawan CaycaKaTapbIHbI3AbI TOncaAmMeXaHn3MRe CaMaHaB13.
- BaanapdbH TapTybl MymKIN Jepre eWkaaah CbIMAbI caA6bipTaBIn KOImHaB13.
- Ac MaunHaHbH 6acbl Kofapbl KeTepiReH KaFaHdaa eWkaWah KOAnaH6aHbI3.
KyaT 6aH,cbIMaHbI HeMece aHaHbI eWkaWah bIFaAdaMaHbI3.
ToCTaFaH KypaaBih NaIaAahraH Ke3e, KypbIaFbIHbIH Kymbic 6apbcihda ToCTaFaHHbIH OPhaTbIAFaHbIH aYhemi Ke3 XeTKi3iHi3.
EwkawaH pyKcAT etiAmereH TipKeMeHi naAaHa6aHbI3.
- Bip yaKbITTa 6ipHeWe WbIFbICTbl (TOCTaFaH KypaAihbIH WbIFbcbl XeHe TEmH XblAaMbIKTbl WbIFbIC) naAaHa6ahbl3.
- YcblbIaTbIH KOaHbIC KeCTecIHde KOpceTIaReH MaKcMaAdbI MeaWepeP MeH XblAaMbIKTapdaH eWkaWah acnHbI3.
TipkeMeHi KoAaHFaH Ke3e, OHbIme H bipre 6epiTeIH kayinci3ik HvCKayApblH OkblHbI3.
OaapbIH bICTbIK 60AbyI MymKIn 6oAfaHbIKTaH, y3aK yaKbIT KOaHaHcH CoT a6aK KypaaapbIH aFaH Ke3de a6aHaHbI3.
Oa ybip 6oAfaHbIKTaH OcbI KypaAdbI KeTepeReH Ke3e a6aHaHbI3.
KeTepMec 6ypbH, 6acbHbH KYbINTaFaHbH XaHe Ta6aFbHbH, KaPaAapbHbH, cbIPTkbl KaKaNTapbI MeH cbIMhbH Kayinci3eHdipiAreHH TeKcepiH3.
MukcepaH 6acbH 6ekitIaReH KOHdbipfbImeH Ko3FaN KOTepMeHi3, ac yKypbIAfbICbl TypaKcbI3 6OaYbIMyMKiH.
KypbIaFbIHbI KneK MaHaBbHda XyMbic icTeTneHi3 Hemece KymbIC 6etKeiHe HbIFbIN TypaTBHdAeTIN KOIMahBi3 Hemece TipkeMe opHaTbIAFaH Ke3De OFAH Kyu TycipMeH3, ce6e6i 6vKypbIaFbIHbIH TypaKcbI3DaHbIn, ayapblBn KeTyIHe JxHe HtNkecHde 3aKbIM aAyf aKeayi MymKiH.
KypbIaFbIHbIXblXkbITKaH Ke3De apkaWah TyfbipbIK Heri3iHe HKeHe MUKcep 6acbHaH YcTaHbI3.
Kypaaabdi Aypbic KoAaH6ay HAtnkeciHde 3aKbIM Keayi MymKiH.
Kbicka Kyat cbmbi watacy Hemece anaTTbIK ewiN KaIy caAapbIHn 6oAaTbIH Kayinti a3aHTy ywiH KOAnaHblAdbI.
- ¥3apTKbIi6aycbIMΔapΔbl aca MyKnT 6oΛfah JαFΔaɪΔa naɪΔaʌaHγfa 6oΛΔbl.
- Y3apTKbIw 6aycblIMaI naIaIaHFaH KaFdaIa:
- Y3apTKbIcBIMHbIH TaH6aHaHfAH əLeKtpAik KepceTkiWTepi KeMHde KypblAfblHbIH əLeKtpAik KepceTkiWTepiHe TeH HemeCe OdaH Jkofapbl 6oAbyi Kepek.
- BaycibMdbI acy yCTeIHHeH HeMece yCTeAIN yCTiHI TaKtaBHaH ca6bipan TypMaTbIHdA eITn opHaAacTbipy Kepek, Kepi KaFdaa 6aAaIap OaH TapTBIn KaYbI HeMece baKaayCb3Da OFAH cyPiH KaAybIMykH.
- ¥3apTKbI6aycbIM Jkepre TynbIKTaIFaH, 3 cbIMAbI 6OaYbI KepeK. KypblfblHbIH 3eKtpiK CnnaTTaMaIapbl KypblfblHbIH TeMeHrI XaFbIHda KepceTIaReH.
BvI KypaaDbI 6aAanap KoaaaH6ay KepeK. KypaMeh OHbIH CbIMbIH 6aAanapdbIH KOaJI XeTneTIH Xepre KOyibHbI3.
KypbIaFbImeH OINHaMaybIH KaMTaMaCbI3 eTy yWIn 6aAanapDbI KaDaFaAay KaXeT.
- Byan Kypaan OanapabH KypaanbKayinci3 KoAnaHybTypaBn Hycaybepicce Hemece baca aamhbH 6akblaybHa 6oLca xHe OanapdbH TybHdabyb MymkiH Kayin TypaBn Tycihir 6oLca, biimi Hemece TaXipnbeci XeTKiikci3 Hemece fN3nKaBik, ce3y Hemece onlay Kaibeti Haap aadap KoAnaHyfa apHaFaH.
MaKcMaAdbI MAn eH yKeH KyTeMeHi aAaTbIH MNHN YOpNep/YCaKaTaFblw TipKeMeciHe HerizdeAeDi. 3re TipKeMeAeP a3bipak KyTeMeHi aAbyi MYMKiH.
KypbIbHbI TeK yI wapyaCbHa 6aIIaHbICTbI KOaHaHbIHbI3. Erep KypbIaFbI e3 MinDeTIHe caMakCaTTa KOaHaHbIMaca Hemece 6epiIreH NcaybIKTbI AypbIC cKaTaMaFaH JkaDaIa Kenwood KomnHaNcbl eKahdai KayaanKepeiikTi e3 MOHbHa aMaIbI.
KyaT WblfbHbl
XbIaMbIK peTteriWi «O» KyniHDe
O O LIPYAI peKIMRe aBToMaTTbI TypDe aYbICy: KoAaHbI MaNAbI.
o Θwippyi pejkm kyaTbI: s0,3 Bt.
Tokka Kocnac 6ypbH
KoAmeh KyybIbI3, OdaH KeiH MyKnT KypFaTbIbI3.
| × | × | √ | |
| √ | √ | × | |
| × | √ | × | |
| × | √ | × | |
| × | √ | × | |
| √ | √ | × | |
| √ | √ | × |
KoHAbipfbl WbIfbICTapbl
① Kofapbi XblAaMAbIK WbIFbICbi
② Baray XbiAaMbIK WbIFbcB
3 TocTaFaH Xa6AbfBihBih YawbIfbl
Apaaaactbipfblw
Kofapbl XbIaMbIKTbi WbIFbcIHbH KaKnafbl
5 ApaacTbipfbIu 6acbi
6 KbIaAMbIK NeH NmnybCTi 6ackapy
⑦ Kyat 6eAiri
BacbH 6ocaty nIHtiperi
Ta6aKtbl KOIO NANTcbl
10 ToctaraH
Bary XblAaMbIKTbi WblfbcHbIH KaKaFaBl
12 K-TaAkaHdaFbIu
13 1
14 KaMbpKyppaAbl
15 KaaKawa
16 1

PnAaHny AnarpaMaIapbl XHe naAaHny HycKayApbl


MaHbi3Abi
BaKa 1bIfBicTapaNaHaHFaH Ke3e,TOCTaFaHa eKkaHa KaopA OPhaTbAmFaHbHa Hemece CaTaBIn TpyMaFaHbHa Ke3 XeTKi3iH3.
- Byfay KypaBn KOIO KocnaIap ywiH (MbicaBb, Kypama TopTTap Hemece KiIereMeh KaHT CnAKTbl) naAaHa6aHb13, aITnCe KypaA 3aKbIMdaAByb MymKiH.
KepceTiareH MaKcMaAdbI cbIbIMAbIbIKTapaH acbipyfa 6oMaNAbI, ce6eBi MaunHaFa apTbIK KYK caAblHybl MymKiH.
KeKC KaHTbI MeH TyHfAH MaNDbI apaAactbIPFaH Ke3e MaNdbI yHemi 6oAmTeMnepaTypacbIHda naAdaAahbIHbI3 Hemece OHbl KymCapTbIHbI3.
-БиIMbI NaaAahy aAdbIHda TipeKTeP MeH Kymbc 6eTi Ta3a api Kypfak ekeHHe Ke3 Xetki3iH3.
1 BacbH KETepy NiHTiperiHe caFAT TiIHe KapcbI 6ypan, apaaactbipfbuW ywbH opHbHa KyAblTaNFAHwa KETepiHi3. Ta6aKtBIO NANTacbiHa 6eArici Xofapbl Kapan caAihFaHbH TeKcepiHi3.
2 Ta6aKbI Heri3re caBIn, OHbl KaAynbHda Kayinci3eHApy ywiH, TeMeH 6acbIn, cfarT tiAi 6afbltbImeH 6ypaHbI3.
3 Tnicti INHrpeDneHTTepdiapaAacTbpaTbIH bIDBCKa caABHbI3.
4 KaKeTTi Ka6DbIKTbI YraMbIKKa opHaTbIHbI3. OdaH KeiH 6acbln Ka6DbIKTbI 6eKiTy yuH aHaAdbipbIHbI3.
5 ApaaactbipfbiW ywbH wamaBk eTeepin, 6acbH KeTepy niHTiperin caFaT tIiHe Kapcbi 6ypan, apaaactbipfbiW ywbH KYbINTaFAHwa TycipiH3.
6 Kyat Ke3iHe KocbHbI3. KbIaMbIKbI 6acapy TeTirIH KaKeTTI KbIAaMbIK napameTpIe 6ypan, MaunHaHb icke KocbHbI3. MakcmaAdbI KbIAaMbIKbIH KbICKa NmnybcTepi ysiH nmmNybc (P) Kyin naaAahbHbI3.
7 Ac MaunHaHbI XblAaMdbIK 6acKapydbI aHaIbIbIPbIN, KepeKTi XblAaMdbIKTbI TaHdaN KOcbIHb3. Mnybc Kyih (P) KblcKa MaKcMaIbI XblAaMdbIKTaFbI Ke3eKTep ywiH KOaHaHbIHb3.
8 KoIaHbICTaH KeiH KblAaMdbIK 6ackapybiH O' OFF KyiHe KeItipin, ac MaunHaB3dbI KyaT Ke3iHe H aKbipaTbIHbI3.
9 Ka6bIKbI aMy yWih OHbI cafT Tii 6aftbIme Xa6bIK YawbIFbIHah 6ocatbn aBbHb3.
Kehectep
Erep K-TaKaHaFbIw TocTaFaHHbIH TybiHn HrpeAeHTTepi XnHaMaCa, «KypaAdbipetTey» 6aIMin KaapHbI3.
KeKC KaHTbI MeH TyHfAH MaIaI apaAactbIPfAH Ke3de MaIaI yHemi 6eAMe TemnepaTypacbIHda NaIaAahbIHbI3 Hemece OHbl KymCapTbIHbI3.
- INHpeAneHTTepDi IaMbipaTnac ywiH, XbiAaMbIKTbI JyueApTTbIPbIHbl3.
KeHecTeP - K-TaAkaHaFaBbIa
TopTTapAbI JkacaFaHda JkaKcbI HTeTnxKeIe K0A JkeTkizy yUin apKaaHaN 6eMaTeMnepaTypacbIHdaFbI capbI MaM MeH MaprapuHdi naJaAaHaHbIbI3.
PeuTte 6acaIa KepceTIme, nactfa cybIK uHrpeDneHTTePdi naaAahbHb3.
KeHecTeP - Byfay KypaAbi
Kymbiptka 6eAme TemnepaTpaCbIHda 6oFAH Ke3de y3dk HtNKelepre KoAKeTeAi.
KymbiptKa aFbIH waiKay aAdbIHda waiKaFbIHTa Hemece TOCTaHaMaHemece KymblptKa capbcbi KOKTbIFbHa Ke3 XeTKi3iHi3.
KehecTepe-Kambip KypaAbl
MaunhaBH KInB H KyMbIC ICTeN KaTkaBH eCTiceH3, OHbl eWipin, KaMbpBtH JapTBicBtH 1bIfapBn, ap6ip XapTbcHa 6eK-6eK icTeH3.
AWbITKbl
KenTIpiAreh aWbITKbl (KaI-Ta XacayFa KaXeT Typi):TOCTaHaHFa KblbI cy KyNbHbI3. OdaH KeiH aWbITKbl MeH KaHT Kocbl, Ke6ikTeHreHwe WamameH 10 MmHyTk aAdbipbHbI3..
Ta3aawbITKbl:YHfaayHaTbIHbI3.
AusbitKbHbH 6acKa TypAepi: eHdpywi HcyckayApbH opBHaHbI3.
KaMbipAbMaHHaH PAACTNK KaIbIKKa Hemece ac yu cyaricimeh Xa6bIaFaH TOCTaHaFcaAbl3. CoaH KeiH eKi ece KeTepiReHwe XbljXepre KOnbln KoBhl3.
PnAaAnHy KeCTeci
| (MAKC.) | (L (MNH.) | |||
| KVC30 KVL | 40 | |||
| 2 кг 3 кг | Min-Max (MNH. - Мaktion) | 5-10 | ||
| 680 r 910 r | 10,5-2 | |||
| 500 r x10 | 1 кг x20 | Min-Max (MNH. - Мaktion) | 1 | |
| 900 r 1,5 | КГ | Min-Max (MNH. - Мaktion) | 5-10 | |
| (MAKC.) | (L (Mн.) | |||
| KVC30 KVL40 | ||||
| 12 16 | Min-Max (Mин. - Макс) | 1½-2 | ||
| 4-8°C | 1 AmTp 2 AmTp | Min-Max (Mин. - Макс) | 1½-3 | |
| 250 r 500 r 200 r | Min-Max (Mин. - Макс) | 1-1½ | ||
| Mayo | 180 Ma x2 | Max (Maкс) | 1-1½ | |
| 620 r 930 r | Min-Max (Mин. - Макс) | 4-6 | ||
| KVC30 KVL40 | (L)(Mн.) | ||||
| Мин. Мakc. Мин. Мakc. | |||||
| x 500 rH2O=350 r | x 1.36 kRrH2O=952 r | x 500 rH2O=350 r | x 1.6 kRrH2O=960 r | Min-1(Mин.-1) | 5 |
| 500 r280 r225 r | 1.3 kRr760 r605 r | 500 r280 r225 r | 1.6 kRr800 r720 r | Min-1(Mин.-1) | 5 |
| 300 r 600 r | 1-2 4-5 | ||||
Пица Камбірь
500¥H
30 r 3ənTuH Maibl
7T¥3
7raaibITKbl
300Mwcy
1 ToCTaFaHabI acy KypblfbcHa caIbIbI3.
2 Bapabik INHrpneENHTepa caAblb3.
3 KaMbipfa apHaAFAH iArekTi opHaTbIn, 6acbIH TEmeH TyciPiH3.
4 MHHMaAdbI XbIaMdbIKTa1 MHyT apaacTbipbHbI3.
5 1-xxblAaMAbkTa4 MNHyT NHeH3.
6 KaMbipAbI yH ceiAreh Kymbic 6eTiHde wap etin niWihHei3.
7 KaMbipAbIbIMKbIA ac yu cyaricimeH kaybin, kbiabj Kepde 30-40 MNHyTkKaaAdbipbHb3.
8 26eaike 6eain, 215 cm-aiK niuca Heri3iHe KaaybHb3.
9 Kapma ce6iAren nicipme Ta6aKa caIbIbI3. NucuHbI 6e3eHApin, 240 °CTemnepaTpyada 10-15 mHyT nicipiHi3.
Ka6bIKTbI 6ypblw MapHaDbI
200 r cynbik afbin TypfaH 6a
1aui6ypbiuw(TyreA)
20r(1waikacbIK)KepKaHfak6eAikTepi6ap Ma
aemdeyi
1 Bapbik INHpeAneHTTepi KiWKeHTa YCaKaTaBliWka/YHTaKtAflWka caAbHb3.
2 TipkeMeIepiH ac yN KypblfbcbHa caIbIn, INHrepAeHTTePiH aMa c aHaacbHa caIbHybHa MymkiHdk 6epiH3.
3 4cekyHkaMaKc XbIaMabIKKa KOCbIHb3.
4 KaKeT 6oFaHda naIaIaHbIHb3.
EckepTne: LzaBbH ycaKaTaBbIw/AnipMeH TIPkEmecin 6eAek caTbIn aNyfa 6oAaBl.
PnAaAnHy AnarpaMaIapbl XHe PnAaAnHy HycKayApbl
MaHbl3Abi
- Apaactbipy Ke3iHde INHpeAneHTTepdi WaMbipaydaH KOpFaydbH 6eKITiAreH 6eAimi apKblb Ta6aKa TikeAen Kocyfa 6oAabi.
Kypaapabaybipy ywiH wawbpaydaH KopFayabi aBIn TaCaybHKaKeTJKOK.
1 OλκγλbɪntaʌfaHwa, apaaactbɪpflbɪw 6acbɪn kæTepeɪhɪz.
2 Ta6aKtbl Heri3re caAblHbI3.
3 OApHbHa ToaBIFbIMaH caaBH6aHbIHwa apaaactbipfbIb 6acbIHbIH TeMeHri KaFbHa 1wAusbpaTkbIbIcAaHbI3. BeKITIAreH 6aIMin KepctiAreHdEe cay Kepek.
4 KaKeTTi KypaAdbI caAibiHbI3.
5 Apaactbipfbib6acbiH ToMeHDeTiHi3.
6 ApaAactbipfbl 6acbH KeTepy XHe OHbI TeMeH KapaB bacy apKblbI WaaMbipaydaH KopFaydbI aBlbI3.
PnAaHny AnarpaMaIapbl XHe naAaHny HycKayApbl

MaHbl3Abi
- Xka6bikTap 3aybitneH kaMTbIaHaH TOCTaFaHfa Aypbc 6nIKtKe opHaTbIaBIn, petteydi KaKet eTnei. CoHda da erep ci3 xka6bIKtbi peTTerH3 KeAce, Aypbc 0AWeMa i COMbIHbI 6paTbIH KAIATTI KOAnaHbIHbI3. TYPE: KVC30 = 15 MM TYPE: KVL40 = 19 MM
1 AcnantbkyaTKe3iHeHaXbIpaTbHbl3.
2 Apaaactbipfbiu 6acbiH KeTeepi, uaiKaFbiH Hemece TaAkaHAdaftiEhri3iH3.
3 Apaactbipfbi 6acbiH TeMeHDeTHiErepcaHbIay peTteYi KaKeTe etce, apaaactbipfbi 6acbiH KeTeepin, Xa6bIKtbi aAIn TactaHbi. WaiKaBiw neH K-TaAkaHdaFbi TOCTaFaHHbi H Ty6iHe Aepik XaHaCybl KepeK.
4 Caikec combiHbI 6ypaHTbIH KAIATI KOAnaHbIN, 6iAKTI peTtey MymKIn 6oAaTHaia combiHbI 6ocatbHbI3. Ka6bIKbI TOCTaFAH Ty6iHe XaKBH opHaTy ywiH 6iAKTI caFaT TiAHiH 6aftbHa Kapcbl 6ypbHbI3. Ka6bIKbTI TOCTaFAH Ty6iHe H aBic opHaTy ywiH 6iAKTI caFAT TiAHiH 6aftbImeH 6ypbHbI3.
5 COMbIHAbi KaTaNpaHbI3
6 Ka6bIKbI apaaactbipfbwka 6eKITIN, apaaactbipfbW 6acbiH TeMeHDeTIi3. (OhbIH KyiH TeKcePiH3, Kofapbda KaapaHbI3).
7 KepeK 6oAca, KofapbIaFbI KaaMAdapBbI Ka6bIK AypbIC OPhaTbIaMaHaHwa KaiTaaHbI3. OaH KeiH COMbIHbI aKbIPbIH 6ypaHbI3. EKePTV; COMbIHbI 6vpaTbIH KiT TEK CypETtev MaKCaTbImeH KepcTeiAreH.
KaMbp KypaAbl
Bya6abik 3aybTTa opHaTbIaDbj KHe petTeydi KaKeTe tnei.
KypbIbIHbIH KymbcIHda KaHdAn Da 6oMaCbIH akaybIK TybIHaNTbIH 6oLca, KEMeK cypamac 6ypbIH, HcckaybIKTaFBI «AkybIKTapBj KOHO HcckaybIFbi» 6eIMiH kapaHbI3 Hemece www.kenwoodworld.com TopabHa eTIH3.
- ΘHIM ΘHIMDi caTbIn aAFAh eAderi TyTbHywbl KyKbIKTapbl MeH Ke3 KeAReH 6ap KeniADEMere KaTbICTbl 6apBbIK 3aHdapFa cAkec KeniADEMemH 6epiAeTIH 1eCKepiHi3.
Kenwood eHimi dypbic kymbic icTeMece Hemece KaHaa da 6oAMacbIH KEMWIIAKTep Ta6bIraH 6oIcA, OHbl ekIaETTI KENWOOD KbI3MeT KepeCyOpTaABIFbHa aKeAIiH3 HeMece 6epin Xi6epiH3. EHN KaBbH opHaACKaH KENWOOD KbI3MeT KepeCyOpTaABIFbHbIH XaHaPbIraFah DepeKTepiH www.kenwoodworld.com Topa6bHaH Hemece eAIH3re TAH Be6-TopaNTAH KapaHbI3.
Bipikkeh Kopoabdkteri Kenwood komnaHnrcbKo6aHaH KHe Kacan WbIfapFaH.
- KbItaɪda xkacaɪfaH.
3AEKTP XΘHE ΘAEKTPOHΔbIK KAZABdIKTbIH KAAΔbIKTAPbl BOHbIHWA EYPONΛbIK (WEEE) ΣIPEKTNBAMEH BIPRE KOΛAHAIBlAATbIH ΘHIMΔI ΔYPbIC TACTAYFA APHAΛFAH MAHbI3Δbl MΩAIMETTEP
3KyMbICbIH TOKTaTKaH Ke3de, eHIM KaAaAblk KaAdbIK CNaKTbI naHaFA acbipbIMaybl KepeK. OKaAaBikTapDbI CbHbINTaHTbIH KbI3MeTTi aTKapaTbIH JepriAkti 6nAikTi apHaBl MekeMecine HeMece Ocb Kbl3MeTTi bepuSi caTyUbIHbIH opTaAflbHa Xi6epiAyi kepeK.
Kyn KoDbI TypaBla aKnapaT ci3diH eHiMiHizhi TEmeHri 6eaiirHe Hemece kectehi iwi Meh KaHbIHda opHaAacBy MymkiH. Kyh KoDbI Kbl, aN KoTaPbHaH KeHH anTa Hemipi TypiHde KepcetieDi.
EckepTne: AFAWkbI eki caH KblfA, aI COHfbI eKI caH anTa caHBiHa KaTbICTbl 60aAbI.
Mbicaa:4-anTaKaHTap,2024=24TO4
| Yʌri TYPE: KVC30 | TYPE: KVL40 |
| Kepney | 220-240B |
| Герц 50 - 60Гц | |
| Ватт 1200 | Вт |
| Сактушарлары: Temnéрау: ра: +5°C кэне +45°C apальны bIаflадылб; < 80% | |
| Сакту мерзimi | Шектусíз. |
| Кьдmet керсету мерзimi | 2 кыл (тayapаларын.apнайы Турелу ушин 5 кыл). |
| Тастушарлары | Эковогияльк талалларfa сад тасту керек. |
| Тасьмалдayшарлары | Тасьмалдay keziнde лактырuya кэне Ша мадан Тыс дірідeyгі коа берілмey керек. |
| Сатушарлары | Сатушарларын éндірuyші бeлгіlemейді, бірак ai'maкък, у'llьк кэнe хаыкаралык epexkeлөр мөн стэндарларfa сад boлу керек. |
THdipywihMeKeHkaibl:
Kenwood Limited, New Lane, Havant, Hampshire PO9 2NH, UK
LWafbIMdapabi Ka6biAayfa eKlAeTTi YNBIM XHe MMNOPdTaywbl:
"△eAoHn" AAK, Pecen, 127055, Mackey kaacbl, Kewe CyueBcka
27yni,3Kypblabim
TeA:+7(495)781-26-76
| Акayльк Себен Шewим | ||
| Шайкаfbii HeMece К-ТаЖындаftы TOCTaFAHFa COFblAы Hemece TOCTaFAH Tu6iHderi Курмдac БeALikTepe reжтnei. | Жабдыктар дурьс emec биiktikte opналackан Жэhe petTeydi кожет etezi. | Биiktikti combIHdbI 6ураITbIH KIAT apKbIbI peTTeHiz - «Жабдыктbi petTey» 6eALimn kapaHbI3. |
| Баяу_JжblДамыктbi Кондырfbllap БekiTiamei. | КондырfbllapdbIn moDElb ТурIMEN yuIeMdi ekeHIN Tekcepiniz. Буpay Kocy Жуиeci taan erilezi. (KAX moDei) | КондырfbllapdbI 6bIFbICKa 6eKITy УшIN oLAP KAX bypay Kocy Жуиecine caikec 6oLfahBi ЖeH. Еер КОндырfbllapbIbI 3 naHeMbdi Kocy xуиecine caikec keLce, OHda ci3re ac MaSHHaNbI3da БурAN KOCU xуиecIN KOlaDAny UwIn opamada KaMTbIaFAN KAT002ME ЖаФactbIPfbIbH KOLDAHу кожET. KocbIMsa aknapaT ywiH www.kenwoodworld.com/twist. |
| ЖуMbic 6apbICbIHda acym kombaiHbI TOKtaIы. | Аca xуктелундEN корfay Hemece Kbl3dbIpudah сakTay xуиeci xуMbic ЖасaIbI. МaksmaIbI сblbIMbIbIK MelaWepi actbl. | KyaT Ke3iHEn aXbipatbIn, aca xуктелгEH IN Tekcepiniiz. Жылдамык baskapbyH 'O' КуиIE KeITipin, kaTа кocbIbI3. Еер машиа xуmbic jacamaca, kei6bp Kypamdac 6eIkTeperIN xуктелYiH a3aIBy T ywiH aLbIn TactaHbI3 Da KaITo KocbIbI3.Еер 6vI da MoeCEleni ueWnece, kyaT Ke3iHEn aXbipaTbI, 15 MInyTka KaalbipbIbI3. KyaT Ke3iHep KocbIbI, KblAdmabIKbTI KaITo TaHdaHbI3. Еер apaIaCtBIPfbIsh XofapbIaFbI apeketterdeH eKiH KaITo KocbIaMaca, apbI kapaR KeHec UwH IN «TytbIHybIaPbI KOLDaY» БaIIaHbICbIHbI3. |
Slovenčina
| × | × | √ | |
| √ | √ | × | |
| × | √ | × | |
| × | √ | × | |
| × | √ | × | |
| √ | √ | × | |
| √ | √ | × |

Vystupy pre prislušenstvo
Ta rOAnBky 3MiUyBaay.
HeBipHe BnKOpncTaHnY CbOTo npNAAdy MoKe npNBecTn Do TpaBM.
- Κιοδ 3ΗΝΙΝΙΝΙ έρηκ 3απλγΤυΒαῦν ἀς Φύρι aδό ΣΝΟΤιΚαῦν ηερεῖν ἡνθότου, BικΟριστΟγέΤβς KΟρΟΤΚη Μερεχών Φύρι.
- MoXHa BnKOpNCToBvBaTn NODOBxuByaui, RaIIO AOtpmMyIOTbcra 3axoAn 6e3neKn.
- YKlO BnKOpNCToBByTbcNoOBKyBaU:
- 3a3NaueHi eAleKtpnHi Noka3HnKn NODOBKyBaay MaOTb 6yTn npHaMHi He HxKuIMN 3a eAleKtpnHi Noka3HnKn npAa dy.
- Lhnp He noBHHen 3BncaTn 3 nobepxhi cToA, 06 Noro He cxonnn aTn abo xTOcb BnnaKOBHe nepeueeINBCa Ype3 Hboro.
-
Побжьач мас 6утп 3a3eмLEM Tрboxповдн mshypom.Еаektpruhi noka3нки пиаду 3a3hauehi Na И�нkiч actnHi.
-
Κεη πριλαδ He πρισχαγεναι ἀλα BικορικτaHη ἀΙΤβMι. Tριμαῖτe πριλαδ i χΗρ ποδαλί Biδ ἀΙτεŋ.
He 3aIshaIte dITei6e3 HaIy i He O3BOAJeTe im rpaTnca i3 npuAdom.
He pekomeHdyEcKopncTyBaTnCzIIM npnaadom ocobam i3 o6mxeHnMI i3uHNMu a6o MeHTaIbHnMI MOKANBOCTaMn a6o TUM, XTO MaE HeOCTaTHbO docbiy B noRo ekcnayataci. BnuieHa3BaHnM ocobam DO3BOBIAeTbcra KopncTyBaTnCpnaadom TiIbKn NiCAY npoxoJKeHH iHCTpyKTaJy TaPiHa HaFIAADOM dOCBiJeHoI AIOHNi I JIKUO BOHn POZymIoTB NOB'3aHI 3 cIm pni3nKi.
MaKcMaIbHe HaBaHTaXeHHa 6a3yETbcra Ha HacaIi MiHi-IOpI6HOBaHa/ IHCTpyMeHTy IAA NepemEIAHOBAHn, kA MaE Ha6iABwe HabaHTaXeHH. IHsi HacAdKN MoKyTb MaTI MeHsI HabaHTaXeHHa. - Κeɪ npɪʌaɪd npɪən3NaueHn BnKʌOuHɒ dʌr BnKOpNCTaHŋ y nɒbʊti. Kompaɪhɪ Kenwood He Hece BiʌnobɪdaʌbHoCTi 3a HeBɪnOBɪdHe BnKOpNCTaHŋ npɪʌaʌy abo npʊyuʃeHHŋ npabɪʌ ekCnʌyaTauüi, BnKʌaɪdEHNx y ciŋ iHCTpykciii.
- Wash by hand, then dry thoroughly.
| × | × | √ | |
| √ | √ | × | |
| × | √ | × | |
| × | √ | × | |
| × | √ | × | |
| √ | √ | × | |
| √ | √ | × |

OTBOPN AAN KpINAAEHNAHacaOK
BucokowBnKichn npBiA
② Hn3bKOWBuDKiCHN npNBiA
3 Hhi3do iHCTpyMeHTy qaWJ
Mikcep
KpnuKa BncoKoWbNdkiChOr npNbOaY
⑤ ΓΟΑΒΚa Mικερα
6 PeryuAToP WbNdkoCTi + imnyAbCHn peKIM
7 BAnok eAeKtpoDbnryHa
Baxkibpo36oKyBaHHraOABKN
9PiCTaBkaAraYaui3phiKCaTOpom
0 Yawa
1 KpnuKa Hn3bKOWBnAICHO npNBOdy
12 K-HacaKa
BInHnK
14 IHctpymeHTAraTicTa
15 AonaTka
3axnCT Biδ 6pun3ok

Cxem Ta iHctpykuii ABy BnKOpncTaHHa


BaXaNBO
-Пдчсвикорпстаннг iHшиx OTbopib y yaшi He MoKyTb 3HaXoДNTncb iHCTpyMeHTN.
He BnKOpNCToBvIe BiHnK AAn BaXKnx CymiWei (BnIuKy TIny «Bce B ODHOMy», Knp AAn KpeMy i cyKOp), OckIaBkn BN MoKeTe NOnWKoAHTN BiHnK.
HikoI He nepeBnUyTe MaKcMaAByN X NOKa3HnKiB; Ye MoKe npN3BeCTn DO nepeBaHTaXeHHa KOM6aHa.
-ПдчасзмшуваннжиpyiцукpyдясymiшидяTOPTIB,3aBXKIN BnKOpNCTOBynte
ЖирКIMHaTHoi TeMnepaTypn a6o nonepaHbO po3m'kaWitb noRo.
- Pered BnKOpNCTaHnM npAaDy, nepeKoHaTecb, 0n HixKn npAaDy Ta po6Oa NOBepxHry ncti Ta cyXi.
1 NOBepHITb BaKlB NiOMy rOaOBKn Mikcepa npOTn rOaNHHNKoBOi CTpiAkn Ta NiHimItb roAOBky MIKcep a Do ii fikcau y BepxHBOMy nooKeHHi.
IpekeHaItecra, niCTabKy dAa3 fikcatopom 6yAo BCTaHO BpABnABHO -
no3HaUka Ha AnuBoOMy 6oCi.
2 BcTaHOBITb YaSy Ha niCTabKy, HATNCHTb i NOBepHiTb ii 3a rOAnHHNKOBIO, 06 3aΦikCyBaTN B cBOMy NAOJKeHHI.
3 OdaTe BiIOBIAH iIHRpeiEHTN B MUCy AAn 3MiUyBaHHa.
4 BCTaBTe nOTpi6Hy hacaKv B rHi3do. NOTIM HATnCHiTb Ta NOBepHITb iHCTpyMeHT dA 6IoKyBaHHra NIOAOKeHHI.
5 TpouKnPiHimItb roAOBky Mikcepa, a NOTIM NOBepHiTb BaXiAB NiIOMy roAOBKn MlKcepapnpOTN rOAnHHNKOBoi CTpiAKN IOnycTIb roAOBky MlKcepaa o ikcaii.
6 IiKIOHTb npAAaD o MepeKi KINBHeHn. BntaTe pepyAToP WBNkOcTi Ha nOtpiHy WBnKicTb AAnycky. AAn KOpOTKnx cepi MaKcMaIbHOI WBNkOcTi BnKOpNCtOBnyTe NoLoKeHHr imNyAbciB (P).
7 3aynctiMbMaunHy, noBepHyBwn peryAToP wBnKoCTi B nOtpi6He noLoxKeHH. BnKopncToByTe imnybChn peKm (P) dA kopoTknx cIaeckIB makcmaBhoI WBnKoCTi.
8 IicA BnKOpncTahHn NOBepHiTb peryAaTOp WBNkOcTi B noAoJKeHHa O' (BmKn.) i BiKaIOUChIb KxOHHy MaunHy.
9 BiakpyiTb IHctpymeHT 3a rOaNHHKOBIO CTpiAko, 06 po36oKYBaTN, a Notim 3HiIMtB.
IiKa3Kn Ta npaH
- YKsqo K-hacaKa, BInHoc a6o hacaKa 36nBaHHB eRshKIB He iHaHimaTb iHrpeiEHTN 3 DaHa yAài, 3BepHiTbcra do po3diy "HaAaHTyBaHHIhCTpyMeHTy"
- Αλγ ΝOBHOrO 3MiUByaHHaC BiA YAcY BmNkaTe KxOHn KOM6aH i 3HImaTe 3aʌnʌkN iHRpeJeHTiB 3i CTiHOK YaSi 3a DOnOMorO OOnaTKn.
- Lio6 yHnKHyTu po36pni3kyBaHH iHrpeiEHTiB, 36iAByTe WbNkICTb NOCTynOBO.
PiKa3Kn Ta npaAn - K-HacaAka
- Дя крашоу peуытату, пд час пи�otуваннл nporig 3abxdn BnKopuctobynte MacAo Ta Maprapin KIMHaTHoi TemnepaTyPi.
-Дя npirotoybaHЯ 3do6HOro TicTa BnKOpncToByIte XOAnDi iHrpdeiEHTN,Якsoу pecentax He 3a3HaueHo iHaKWe.
PiKa3Kn Ta npaAn - BiHnuOK
- Λλγ Δοςρανηνην ἀνεύκαμιχ πεύλβατιν 36υναήτε λημί πρι κιΜαθήτι τέμηρατιρί.
- Persh hix 36nbaTn yechi 6ilkn, nepekoHaTecr, 10 Ha BInyKu Ta BCEpeDnH i aWl HeMae 3aAnuKIB KInpy Ta YCHoro JKOBTka.
IiKa3K Ta npaH - IHCTpyMeHT AAn Ticta
- YKUO npuAAyOBiABHIOE PO6OTy, BUMKHITb NOrO, BNIMITb NOOBHy TICTa Ta nepeMiuaTe KOxHy NoOBHy OKpEmo.
ApiXaXi
Cyxi Apixk (Tn APiXkIB, kI Heo6xIDHO po36aBNTn Do nOtpi6Hoi KOHCnCTeHii): HaNtTe TENy BOy y uay. Iicra 2b0rO dOdaTe apixkTi cykop i 3aunu Te np6An3Ho Ha 10 XBNH, DOKn He 3'ABTbcra niHa.
CbiXi ApixAxi: noKpnwiTy bOpouHNo.
- IHHI TUNN ApixkXib: BIKOHyIte iHCTpyKlII BUPo6Hnka.
BuklaTb ticTo y noiieHOBn naket 3MaueHn Jnpor a6o Mncky hakpy Kxohm pyuHnKOM. 3aunItb y TeNaomy Mici nokn He 36iabntbcra Babihi .
- INCTpyMeHTn HaaaHTOBaHI Ha notpi6Hy BnCOTy AaH, 0o DOaETbCBy KOMnAeKTI, Ta He nOITpe6bYbTb peryAIOBaHHa. BTim, kIoo BN 6aKaTe HaaaHTyBaTn IHCTpyMeHT, BnKOpNCTOBvBaIte KaIOU BiAnOBiADHO pO3Mipy: TYPE: KVC30 = 15 MM TYPE: KVL40 = 19 MM
1 BiakHouitb npnAaB iD Mepekei eEeKtponocTaayHra.
2 IiHIMITb rOAnOBky MlKcepa Ta BCTaHOBIb BiHNyOK qN 36nBaAky.
3 Onyctitb roIobky mikcepa. RaKUo Tpe6a BiAperyAIOBAtn npomixok, iHIMITb roIobky mikcepa Ta 3HiMItb HacaKy. B iDeaIbHomy BnnaAky BiHnOk nn K-hacaKa noBHHi MaJxke TopKaTncs dHa Haai.
4 3a donomoro raikoboro kaohya noTpipbno diamepy BiKpyTb raKy TaK, 06n MoJha 6yAo BHKoHaTN peYauOBaHHBaLy. 6o6 onyCTnTn HacaKy HxKye Do dHa yawi, NOBepHITb BaAnpoTn RoAHHHKOBoi cTpiAKn. 6o6nPiHNrN HacaKy Bnue, NOBepHITb BaA 3a RoAHHHKOBOO CTpiAkoI.
5 3aKpyiTbraIky.
6 YctahOBiTb HacaKy Ta onyctiTb roAOBky mikcepa. (IpepeIte II nooKeHHa (AIBNTbcBnue 3a3NaueH i NyKtN).
7 IOBTOIte Bnue Ha3BaHIpnoeAypu, DOKn HacaKy He 6yde BCTaHO npabNbHo. TiBkn-Ho npabNbHe NpOxKeHHra HacaKn 3HaJdeHo, 3aKpyTiTb Ta 3aTgHiTb raiKy.
PnIMtKa:raKOBN KIOU OKA3aHNI ANIe IIOCTpaJIi.
IhctpyMeHTAAR Ticta
HacaKy byo npabnAbHo halaTobAo Bnpo6HnKOM i BOHa He notpe6ye HiaKnx peYIOBaHb.
- RaKuo B po60ti npuAay BuHnKAn 6yAb-RAKi HeNoAaKn, NepeA 3BepHeHHaM AO CAYK6nPiATPmKn IpoHTaIe Po3dIA «Noci6HnK i3 ycHHeHHa HecnpaBHOCTeR» B cboMy Noci6Hnky a6o 3aIITb Ha caT www.kenwoodworld.com.
- PAM'TaITe, 10 Ha npNAAAD NOUINPcETbCra rapaHTiA, 10 BiADNOBIAe BCIM 3aKOHnM NOLOXKeHHaM 10do icHyOoi rapaHTi Ta npab CnoxNBa a B Ti KpaHl, De npNAAd 6yB npuδbAH.
- Пи винкненhi HecnpaBHOCTi Bpo60ti npnAky Kenwood a6o npn BnRAeHHi 6y6-b-kynx DeΦeKTIb, 6y6b AACKa, HadiuAITb a6o npnHeciTb npnAaB aBTOpN3OBaHni cepBicHni UeHTp KENWOOD. AkTyaaHki KOHTaKTHi daHI cepBichx ueHTpiB KENWOOD Bu 3HaJaTe Ha caTti www.kenwoodworld.com a6o Ha caTl DAЯ BaWoI kpaHn.
CnpoeKToBaHO Ta po3po6AeHO KOMnHaieIO Kenwood, CnoAyuHe KopoAIBCTBO.
3po6AeHO B Kntai.
BAXANBA IHΦOPMAIgCTOCOBHO HAAEXHOI YTNIA3AUII IPOADYKTY 3IADHO13 ANPEKTINBOIO IPO YTNIA3AUIO EAEKTPNUHORO TA EAEKTPOHHO OBAADHAHHA (WEEE)
Iicra 3akihueHH TepmiHy eKcnayatauii He BnKnDaTte ue npuaa3 iHsmmno6yTOBmBiXoamn.
BidheciB npnAaD o MicceBoro cneuaIbHoro aBTOpu3OBaHO rO ceHTpy 3bnpaHH BixoiaB a6o do dnaepa, knn moKe Haadatn Taki nocayn.
| الل الل الل الل الل الل الل الل الل الل الل الل الل الل الل الل الل الل الل الل الل الل الل الل الل الل الل الل الل الل الل الل الل الل � الل الل الل الل الل الل الل الل الل الل الل الل الل الل الل الل الل الل الل الل الل الل الل الل الل الل الل الل الل الل الل الل الل | |
| Twist plaf kax jn shar al TlWST connection system . connection system . connection system . connection system . connection system . connection system . connection system . connection system . connection system . connection system . connection system . connection system . connection system . connection system . connection system . connection system . connection system . connection system . connection system . connection system . connection system . connection system . connection system . connection system . connection system . connection system . . . . . . . . . . . . . . . . . . . . . . . . . . . . . . . . . . . . . . . . . . . . . . . . . . . . . . . . . . . . . . . . . . . . . . . . . . . . . . . . . . . . . . . . . . . . . . . . . . . . .. KATO02ME jn sha Twist plaf n tal Twist plaf lq Twist plaf lq Twist plaf lq Twist plaf lq www.kenwoodworld.com/twist | Twist plaf jn sha kax jn sha gaz . connection system . connection system . connection system . connection system . connection system . connection system . connection system . connection system . connection system . connection system . connection system . connection system . connection system . connection system . connection system . connection system . connection system . connection system . connection system . connection system . connection system . connection system . connection system . connection system . connection sys . connection sys . connection sys . connection sys . connection sys . connection sys . connection sys . connection sys . connection sys . connection sys . connection sys . connection sys . connection sys . connection sys . connection sys . connection sys . connection sys . connection sys . connection sys . connection sys . connection sys . connection sys . connection sys . connection sys . connection sys . connectionsys . connection sys . connection sys . connection sys . connection sys . connection sys . connection sys . connection sys . connection sys . connection sys . connection sys . connection sys . connection sys . connection sys . connection sys . connection sys . connection sys . connection sys . connection sys . connection sys . connection sys . connection sys . connection sys . connection sys . connection sys . connection Sys . connection sys . connection sys . connection sys . connection sys . connection sys . connection sys . connection sys . connection sys . connection sys . connection sys . connection sys . connection sys . connection sys . connection sys . connection sys . connection sys . connection sys . connection sys . connection sys . connection sys . connection sys . connection sys . connection sys . connection sys . connection SYS . connection sys . connection sys . connection sys . connection sys . connection sys . connection sys . connection sys . connection sys . connection sys . connection sys . connection sys . connection sys . connection sys . connection sys . connection sys . connection sys . connection sys . connection sys . connection sys . connection sys . connection sys . connection sys . connection sys . connection sys . connection syst . connection syst . connection syst . connection syst . connection syst . connection syst . connection syst . connection syst . connection syst . connection syst . connection syst . connection syst . connection syst . connection syst . connection syst . connection syst . connection syst . connection syst . connection syst . connection syst . connection syst . connection syst . connection syst . connection syst . connection syst . connection sys . connection sys . connection sys . connection sys . connection sys . connection sys . connection sys . connection sys . connection sys . connection sys . connection sys . connection sys . connection sys . connection sys . connection sys . connection sys . connection sys . connection sys . connection sys . connection sys . connection sys . connection sys . connection sys . connection sys . connectionSys . connection sys . connection sys . connection sys . connection sys . connection sys . connection sys . connection sys . connection sys . connection sys . connection sys . connection sys . connection sys . connection sys . connection sys . connection sys . connection sys . connection sys . connection sys . connection sys . connection sys . connection sys . connection sys . connection sys . connection sys . connectionSYS . connection sys . connection sys . connection sys . connection sys . connection sys . connection sys . connection sys . connection sys . connection sys . connection sys . connection sys . connection sys . connection sys . connection sys . connection sys . connection sys . connection sys . connection sys . connection sys . connection sys . connection sys . connection sys . connection sys . connection sys . connection s connection sys . connection sys . connection sys . connection sys . connection sys . connection sys . connection sys . connection sys . connection sys . connection sys . connection sys . connection sys . connection sys . connection sys . connection sys . connection sys . connection sys . connection sys . connection sys . connection sys . connection sys . connection sys . connection sys . connection sys . connection sys .connection sys . connection sys . connection sys . connection sys . connection sys . connection sys . connection sys . connection sys . connection sys . connection sys . connection sys . connection sys . connection sys . connection sys . connection sys . connection sys . connection sys . connection sys . connection sys . connection sys . connection sys . connection sys . connection sys . connection sys . connection sys . connection sys . connection sys . connection sys . connection sys . connection sys . connection sys . connection sys . connection sys . connection sys . connection sys . connection sys . connection sys . connection sys . connection sys . connection sys . connection sys . connection sys . connection sys . connection sys . connection sys . connection sys . connection sys . connection sys . connection sys . connection sys connection sys connection sys connection sys connection sys connection sys connection sys connection sys connection sys connection sys connection sys connection sys connection sys connection sys connection sys connection sys connection sys connection sys connection sys connection sys connection sys connection sys connection sys connection sys connection sys connection sys connection sys connection sys connection sys connection sys connection sys connection sys connection sys connection sys connectionsys connection sys connection sys connection sys connection sys connection sys connection sys connection sys connection sys connection sys connection sys connection sys connection sys connection sys connection sys connection sys connection sys connection sys connection sys connection sys connection sys connection sys connection sys connection sys connection sys connection sys connection sys connection sys connection sys connection sys connection sys connection sys connection sys connection sys |
K 1111111111111111111111111111111111111111
J 1
Jaua Jaua Jaua Jaua Jaua Jaua Jaua Jaua Jaua Jaua Jaua Jaua Jaua Jaua Jaua Jaua Jaua Jaua Jaua Jaua Jaua Jaua Jaua Jaua Jaua Jaua Jaua Jaua Jaua Jaua Jaua Jaua Jaua Jaua JAUA JAUA JAUA JAUA JAUA JAUA JAUA JAUA JAUA JAUA JAUA JAUA JAUA JAUA JAUA JAUA JAUA JAUA JAUA JAUA JAUA JAUA JAUA JAUA JAUA JAUA JAUA JAUA JAUA JAUA JAUA JAUA JAUA JAUA
Kenwood Jll
aalai aalai lalai alalalalalalalalalalalalalalal
(WEEE)
aaii i 1
p
40
2 1
y j y j j j j j j j j j j j j j j j j j j j j j j j j j j j j j j j j j j j j j j j j j j j j j j j j j j j j j j j j j j j j j j j jj
. 1
.
.
.
.
.
.
.
.
.
.
.
.
.
.
.
.
.
.
.
.
.
.
.
.
.
.
.
.
.
.
.
.
.
.
.
.
.
.
.
.
.
.
.
.
.
.
.
.
.
.
.
.
.
.
.
.
.
.
.
.
.
.
.
.
.
.
.
.
.
.
.
.
.
.
.
.
.
.
.
.
.
.
.
.
.
.
.
.
.
.
.
.
.
.
.
.
.
.
.
.
.
.
.
.
.
.
.
.
.
.
.
.
.
.
.
.
.
.
.
.
.
.
.
.
.
.
.
.
.
.
.
.
.
.
K
K
K
K
K
K
K
K
K
K
K
K
K
K
K
K
K
K
K
K
K
K
K
K
K
K
K
K
K
K
K
K
K
K
K
K
K
K
K
K
K
K
K
K
K
K
K
K
K
K
K
J 1

. 1
1
1 1
·
1
b1b2·s b_n > 0
J 7
1jai
= ( x1,y1) , = ( x2,y2)
jzjj1 1y
令 = V
= PA = V
[{a}{1} = 2;{a}{2} = - 4;{ 3,4} ]
Jolil 1bll j4s ilblw
| × | × | √ | |
| √ | √ | × | |
| × | √ | × | |
| × | √ | × | |
| × | √ | × | |
| √ | √ | × | |
| √ | √ | × |
a
j 1
a
a 1
J 1
1,4,5
1
aui bui
a
sgl iie gaii 1g jgiisll gaii lnnn
.
()
Jg
JbU JgU 8
.
1
.
Jglii jie 11 11 11 11 11 11 11 11 11 11
J L( 2 + k)
jlll pccn no sill lal yla
a a a a a a a a a a a a a a a a a a a a a a
y
yoo 1
Jx
Jnwoob J 1
1
aal
"O" 2
. 1
.1g·,≤:(JlaI) Off g
y
e aagaaaagaaagaaagaaagaaagaaagaaagaaagaaagaaagaaagaaagaaagaaagaaagaaagaaagaaagaaagaaagaaagaaagaaagaaagaaagaaagaaagaaagaaagaaagaaagaaagaaagaaagaaagaaagaaagaaagaaagaaagaaagaa
jll
J 1
a 2004/1935 aabjj j
rrr^2 - r^2r^2 0xu w7 d8c
V
179 - 17 f( x) = x + a2 - xx + 1 > 0
rr - r
10kt1 ①
1-1
( {rr}{r}{0} - r{r}{2} ) ( p \mid x = {x1x11111111111111111111111111111111111111111111111111111111111
四四四 S APQ = S AQP + S QPQ
jjr1g1l1
rrv
S OBC = S COD + S BOC - S BOC
P
x1 = -b - ^2 - 4ac2a,y1 = -b + ^2 - 4ac2a
lg( x) = 2x - x + 1x < 1x
Kenwood Ltd
New Lane
Havant
Hampshire
PO9 2NH
kenwoodworld.com

- Important Safety Information
- Power Consumption
- Plug and Fuse Information
- Before plugging in
- Important - Plug and Fuse Information
- THIS APPLIANCE MUST BE EARTHED
- Note:
- Plug Type G
- Care and Cleaning
- Power Unit, Outlet Covers and Head Cover
- Bowl
- Tools & Splashguard
- Attachment Outlets
- Mixer
- Usage Diagrams and Usage Instructions
- Important
- Hints and Tips
- Hints and Tips - K-Beater
- Hints and Tips - Whisk
- Hints and Tips - Dough Tool
- Yeast
- Pizza Dough
- Chilli Marinade
- To Fit and Use Your Splashguard
- Tool Adjustment
- Dough Tool
- Other countries
- IMPORTANT INFORMATION FOR CORRECT DISPOSAL OF THE PRODUCT IN ACCORDANCE WITH THE EUROPEAN DIRECTIVE ON WASTE ELECTRICAL AND ELECTRONIC EQUIPMENT (WEEE)
- Nederlands
- Zubehör-Anschlüsse
- Udtag til tilbehør
- Uttag für tillbehör
- Tilbehøruttak
- Mikser
- Eklenti Çişloslari
- Meghajtók nyílasai
- Gniazda nasadek
- Ipea IoakaueHnem K cTeN 3AektponntaHna
- THe3daAAnKpePAnEHHaCaOk
- MnKcep
- Cxembl n HcTpykunn no NcnoAb3OBaHnIO
- BaxHo
- CObeTbI npekomeHaaun
- Cobetbl n pekomehdaun - K-06pa3Ha hacaKa
- Cobetbl n peKomeHdaaun - BehvnK
- Cobetbl npekomeHdaaun - HacaKa AAn 3ameca Tecta
- Apoxk
- Tecto AAA Nnucbl
- MapnHaC nepcem nn
- KaK yCTaHOBNTb I NOAb3OBAtbcra YcTPOIcTBOM AIA 3aUHTbI OT 6pbI3r
- Cxembl n HcTpyKznn no NcNoAb3OBaHnIO
- Cxembl n HcTpyKcnn no NcNoAb3OBaHnIO
- HacaKa AAn 3aMeca Tecta
- BAKHAR INHΦOPMAUJN IO NIPABINbHOY YTHAN3AUIN N3DEANr COIACHO DNPEKTNBE EC NO YTHAN3AUIN 3AEKTPNUECKOTO N 3AEKTPOHNO OBOPYDOBAHnR (WEEE)
- Kayinci3dk TypaIbI MaHbI3AbI aKnapaT
- KyaT WblfbHbl
- Tokka Kocnac 6ypbH
- KoHAbipfbl WbIfbICTapbl
- Apaaaactbipfblw
- PnAaHny AnarpaMaIapbl XHe naAaHny HycKayApbl
- MaHbi3Abi
- Kehectep
- KeHecTeP - K-TaAkaHaFaBbIa
- KeHecTeP - Byfay KypaAbi
- KehecTepe-Kambip KypaAbl
- AWbITKbl
- PnAaAnHy KeCTeci
- Пица Камбірь
- Ka6bIKTbI 6ypblw MapHaDbI
- PnAaAnHy AnarpaMaIapbl XHe PnAaAnHy HycKayApbl
- MaHbl3Abi
- KaMbp KypaAbl
- 3AEKTP XΘHE ΘAEKTPOHΔbIK KAZABdIKTbIH KAAΔbIKTAPbl BOHbIHWA EYPONΛbIK (WEEE) ΣIPEKTNBAMEH BIPRE KOΛAHAIBlAATbIH ΘHIMΔI ΔYPbIC TACTAYFA APHAΛFAH MAHbI3Δbl MΩAIMETTEP
- Slovenčina
- Vystupy pre prislušenstvo
- OTBOPN AAN KpINAAEHNAHacaOK
- Mikcep
- Cxem Ta iHctpykuii ABy BnKOpncTaHHa
- BaXaNBO
- IiKa3Kn Ta npaH
- PiKa3Kn Ta npaAn - K-HacaAka
- PiKa3Kn Ta npaAn - BiHnuOK
- IiKa3K Ta npaH - IHCTpyMeHT AAn Ticta
- ApiXaXi
- IhctpyMeHTAAR Ticta
- BAXANBA IHΦOPMAIgCTOCOBHO HAAEXHOI YTNIA3AUII IPOADYKTY 3IADHO13 ANPEKTINBOIO IPO YTNIA3AUIO EAEKTPNUHORO TA EAEKTPOHHO OBAADHAHHA (WEEE)
- p
- y
- Kenwood Ltd
Brand : KENWOOD
Model : Chef XL KVL4110
Category : Food Processor