
Instax Square SQ20 - Camera FUJIFILM - Free user manual and instructions
Find the device manual for free Instax Square SQ20 FUJIFILM in PDF.
| Product type | Hybrid digital camera with built-in instant printer |
| Brand | Fujifilm |
| Model | Instax Square SQ20 |
| Dimensions (L × D × H) | 119 mm × 50 mm × 127 mm |
| Weight | 390 g (without cassette or memory card) |
| Film type | Fujifilm Instax Square instant film (sold separately) |
| Film size | 86 mm × 72 mm (image: 62 mm × 62 mm) |
| Power supply | Built-in lithium-ion battery (rechargeable via USB, charging time 2-3 h) |
| Sensor | 1/5-inch CMOS, primary color filter |
| Effective pixels | 1920 × 1920 |
| Lens | Fixed focal length 33.4 mm (35 mm equivalent), aperture F2.4 |
| Focus | Single autofocus (contrast detection) and continuous (video), range 10 cm to ∞ |
| Shutter speed | 1/7500 s to 1/2 s (Auto), up to 10 s in Bulb mode |
| ISO sensitivity | 100-1600 (Auto) |
| Storage | Internal memory (approx. 50 images) + microSD/microSDHC card |
| Screen | 2.7-inch color LCD (≈230,000 dots) |
| Built-in flash | Range: approx. 50 cm to 8 m |
| Video recording | 800 × 800 pixels, 15 fps, H.264 (without sound) |
| Shooting modes | Standard, Double exposure, Long exposure (Bulb), Splitter, Collage, Time sequence |
| Image effects | 21 filters (18 photo, 3 video), brightness adjustment, vignette |
| Printing | 12.5 dots/mm (318 dpi), 256 levels per color, time ≈12 s |
| Maintenance | Clean with a dry cloth, avoid solvents; protect from moisture and sand |
| Operating temperature | +5 °C to +40 °C |
Frequently Asked Questions - Instax Square SQ20 FUJIFILM
User questions about Instax Square SQ20 FUJIFILM
0 question about this device. Answer the ones you know or ask your own.
Ask a new question about this device
Download the instructions for your Camera in PDF format for free! Find your manual Instax Square SQ20 - FUJIFILM and take your electronic device back in hand. On this page are published all the documents necessary for the use of your device. Instax Square SQ20 by FUJIFILM.
USER MANUAL Instax Square SQ20 FUJIFILM
User's Guide/Trouble shooting/Safety precautions
Notes on Disposing of the Camera ... 5
Part Names 6
Display on the LCD Monitor .7
Using the selector buttons 7
Using the command dial 7
Attaching the Strap 8
Attaching the Hand Strap 8
Attaching the Shoulder Strap (Purchased Separately) 8
Charging the Battery 9
Charging status indication 9
Turning the Camera on/off 10
Checking Remaining Battery Life. 10
Performing Initial Settings 11
Function Setting for the Shutter Button....12
Loading/Removing the INSTAX
SQUARE Film Pack 13
Loading the Film Pack 13
Unloading a Used Film Pack 13
Basic Photography and Playback ....14
Taking a Picture 14
Viewing Images 15
Changing the Playback Display 15
Shooting a Movie and Playback ....16
Shooting a Movie 16
Playing back Movies 17
Changing the number of images on the monitor. 17
Printing. 18
Adjusting/Processing Images (Eff ect)...20
Filter. 20
Adjusting the Brightness 21
Vignette 21
More on Photography 22
Using AF/AE Lock 22
Using the Self Timer 22
Using the Flash 23
Taking a Self Portrait (Self e) 23
Changing the Shooting Mode 24
Selecting a Shooting Mode 24
Shooting Mode 24
Printing from Print History (Reprint) ....27
Using a Memory Card 28
Inserting the Memory Card 28
Printing Images Taken with another Camera....28
Copying Images to the Computer...29
Shooting Menu 30
Playback Menu 31
Setup Menu. 32
SPECIFICATIONS 33
TROUBLESHOOTING 35
IMPORTANT SAFETY NOTICE 38
After reading this User's Guide, keep it in a safe, easy to find place where you can refer to it if needed.
Before using the camera, check the following.

Make sure supplied accessories are included in the package.


Read "IMPORTANT SAFETY NOTICE" (Page 38) for safety use.


Read this User's Guide before using the camera.
Supplied Accessories
USB cable for charging (1)
Hand strap (1)

- User's Guide (1)
Notes on Disposing of the Camera
EN
A built-in lithium ion battery is used for this camera.
When you dispose of the camera, follow your local regulations and dispose of it properly.
Please refer to the supplied CONTACT INFORMATION sheet for inquiry.
If your country or region is not included in the sheet, please contact your local distributor.
CAUTION
Do not remove the built-in battery by yourself; otherwise, you may be injured.

Disposal of Electric and Electronic Equipment in Private Households
Disposal of used Electrical & Electronic Equipment
(Applicable in the European Union and other European countries with separate collection systems)
This symbol on the product, or in the manual and in the warranty, and/or on its packaging indicates that this product shall not be treated as household waste.
Instead it should be taken to an applicable collection point for the recycling of electrical and electronic equipment.
By ensuring this product is disposed of correctly, you will help prevent potential negative consequences to the
environment and human health, which could otherwise be caused by inappropriate waste handling of this product.
The recycling of materials will help to conserve natural resources. For more detailed information about recycling of this product, please contact your local city office, your household waste disposal service or the shop where you have purchased the product.
In Countries outside of EU: If you wish to discard this product, please contact your local authorities and ask for the correct way of disposal.

This Symbol on the batteries or accumulators
indicates that those batteries shall not be
treated as Household waste.
For customers in Turkey:
EEE Complies with Directive.
Part Names
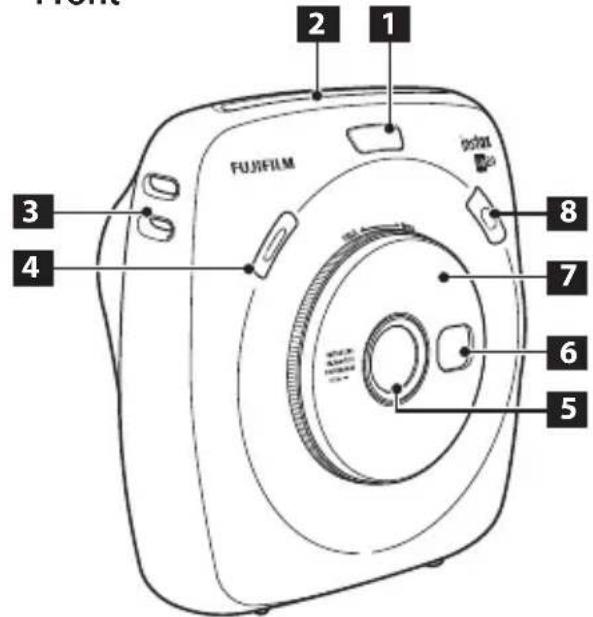
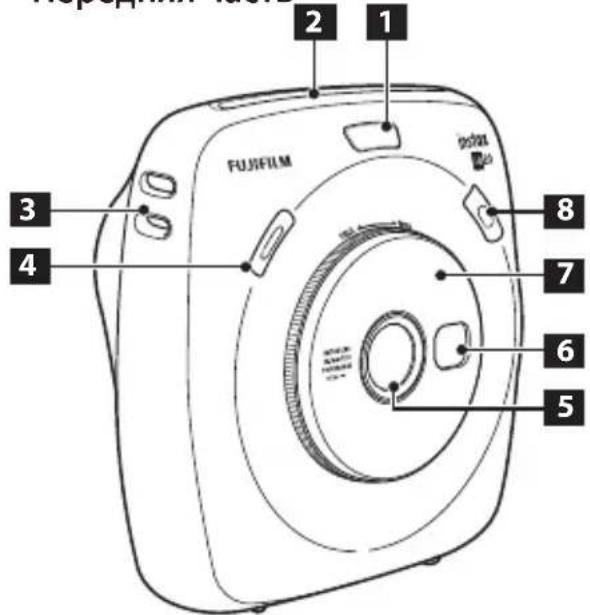
Front
1 Flash/Self timer lamp
2 Film ejection slot
3 Strap hook
4 Shutter button (Right)
5 Lens
Selfie mirror
7 Zoom ring
8 Shutter button (Left)
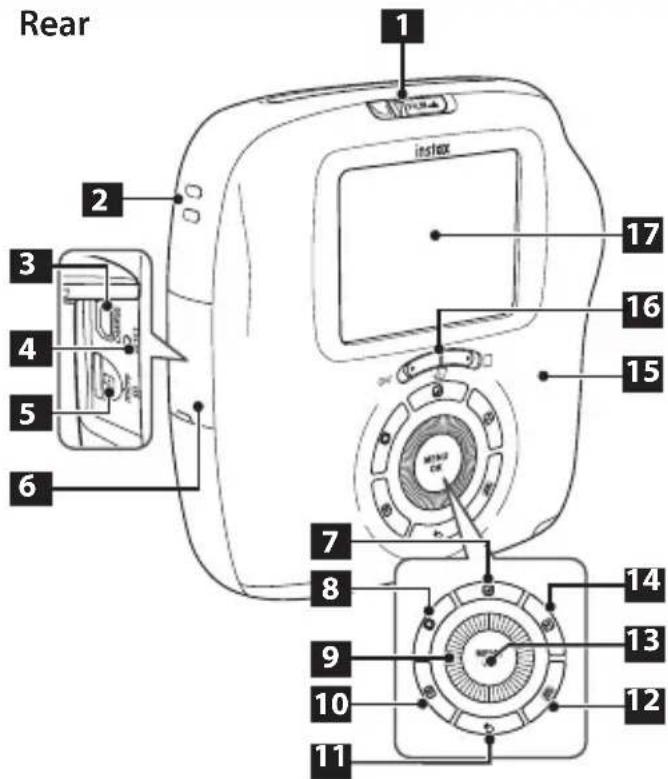
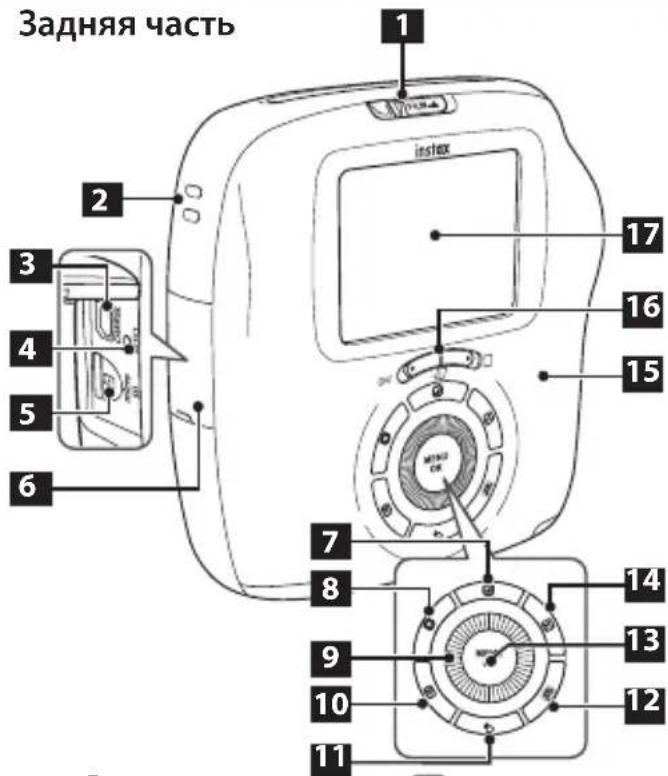
Film door lock
2 Strap hook
3 USB port
4 Reset button
Micro SD card slot
6 Card slot cover
Filter) button
8 (Vignette) button
9 Selector button/ Command dial
10 (Playback) button
Back) button
12 (Print) button
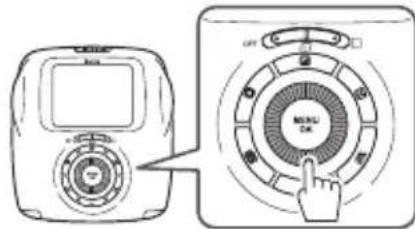
13 MENU/OK button
14 (Brightness) button
15 Film door
Power switch (Still picture/Movie)
LCD Monitor
Display on the LCD Monitor
EN
Pressing the Back) button displays information below. Some items are not shown depending on the file type to shoot.
Shooting
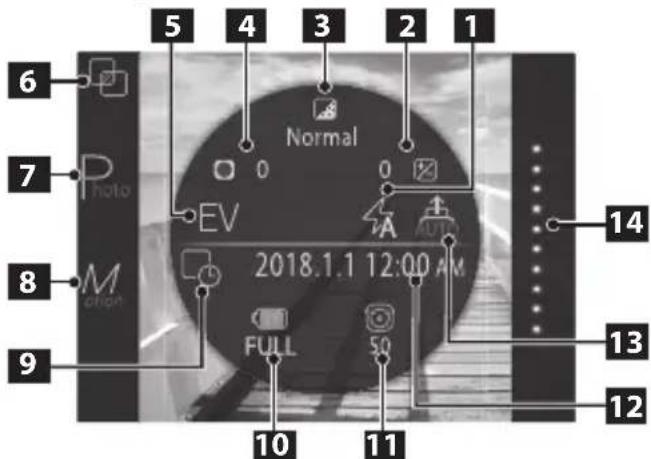
1 Flash mode (Page 23)
2 Brightness adjustment (Page 21)
Filter
Page 20) Vignette
4 (Page 21) Exposure
5 compensation (Page 30)
6 Shooting mode (Page 24)
Still picture shooting (Page 10)
Movie shooting (Page 10)
9 Date/time print setting *2 (Page 32)
Battery level
Page 10 Number of available
11 frames *3 (Page 14)
Current date/time (Page 32)
13 Auto print (Page 30)
Film remaining (Page 19)
1 Not displayed when STANDARD is selected.
2 The icon is displayed in gray when the date/time print setting is disabled.
*3 When a memory card is inserted, the icon appears on the number.
If the number of available frames is under 10, the icon on the number turns red.
A remaining time is displayed while shooting a movie.
Playback
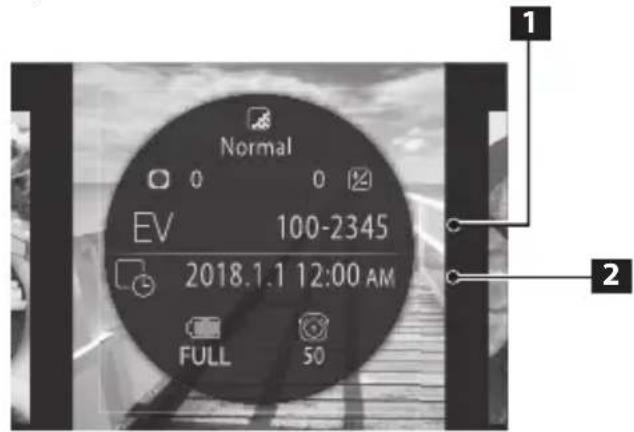
1 Frame number
2 Shooting date/time
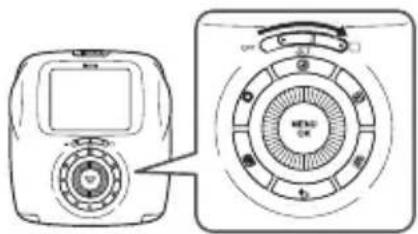
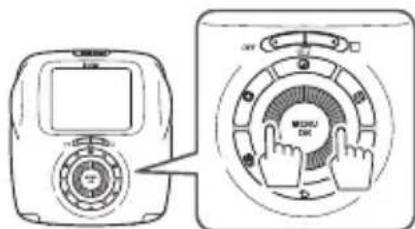
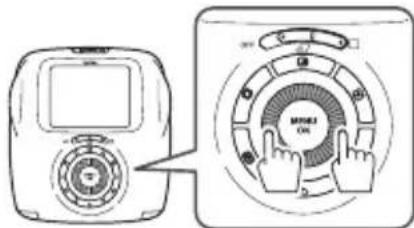
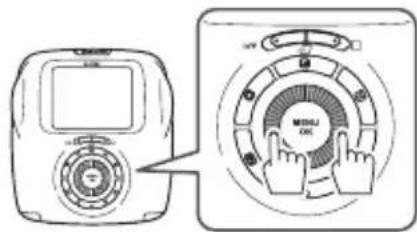
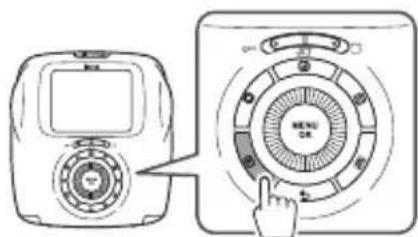
Using the selector buttons
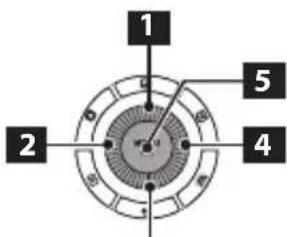
3
1 Move cursor up
2 Move cursor left
3 Move cursor down
4 Move cursor right
Confirms selection
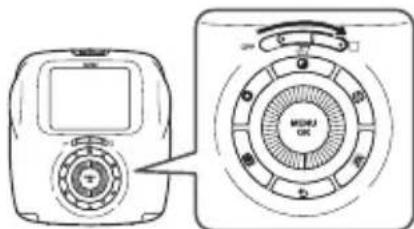
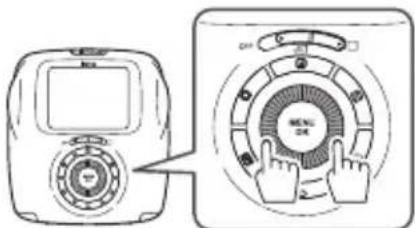
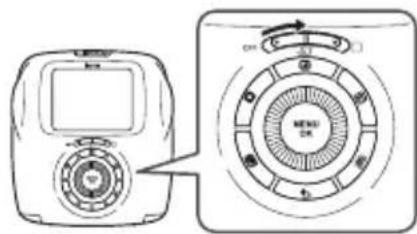
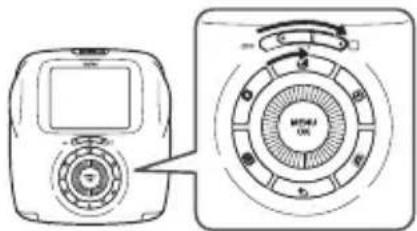
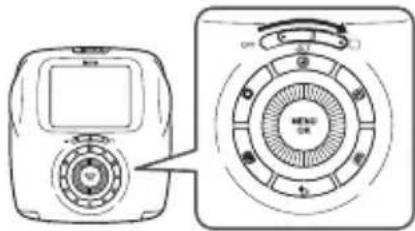
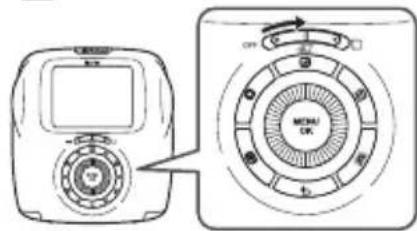
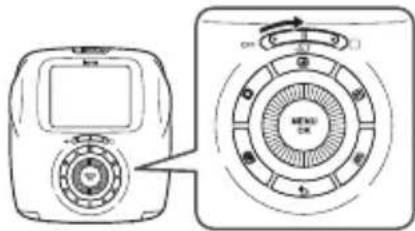
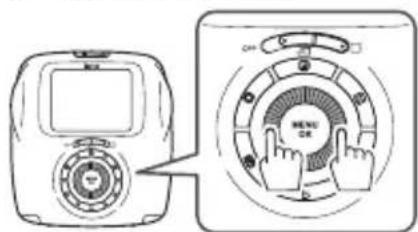
Using the command dial
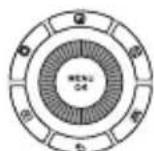
Use the command dial on the following occasions.
- Selecting a menu or item
- Changing playback display (Page 15)
- Adjusting the value of image effect (Pages 20 to 21)
- Selecting a frame when printing from a movie file (Page 18)
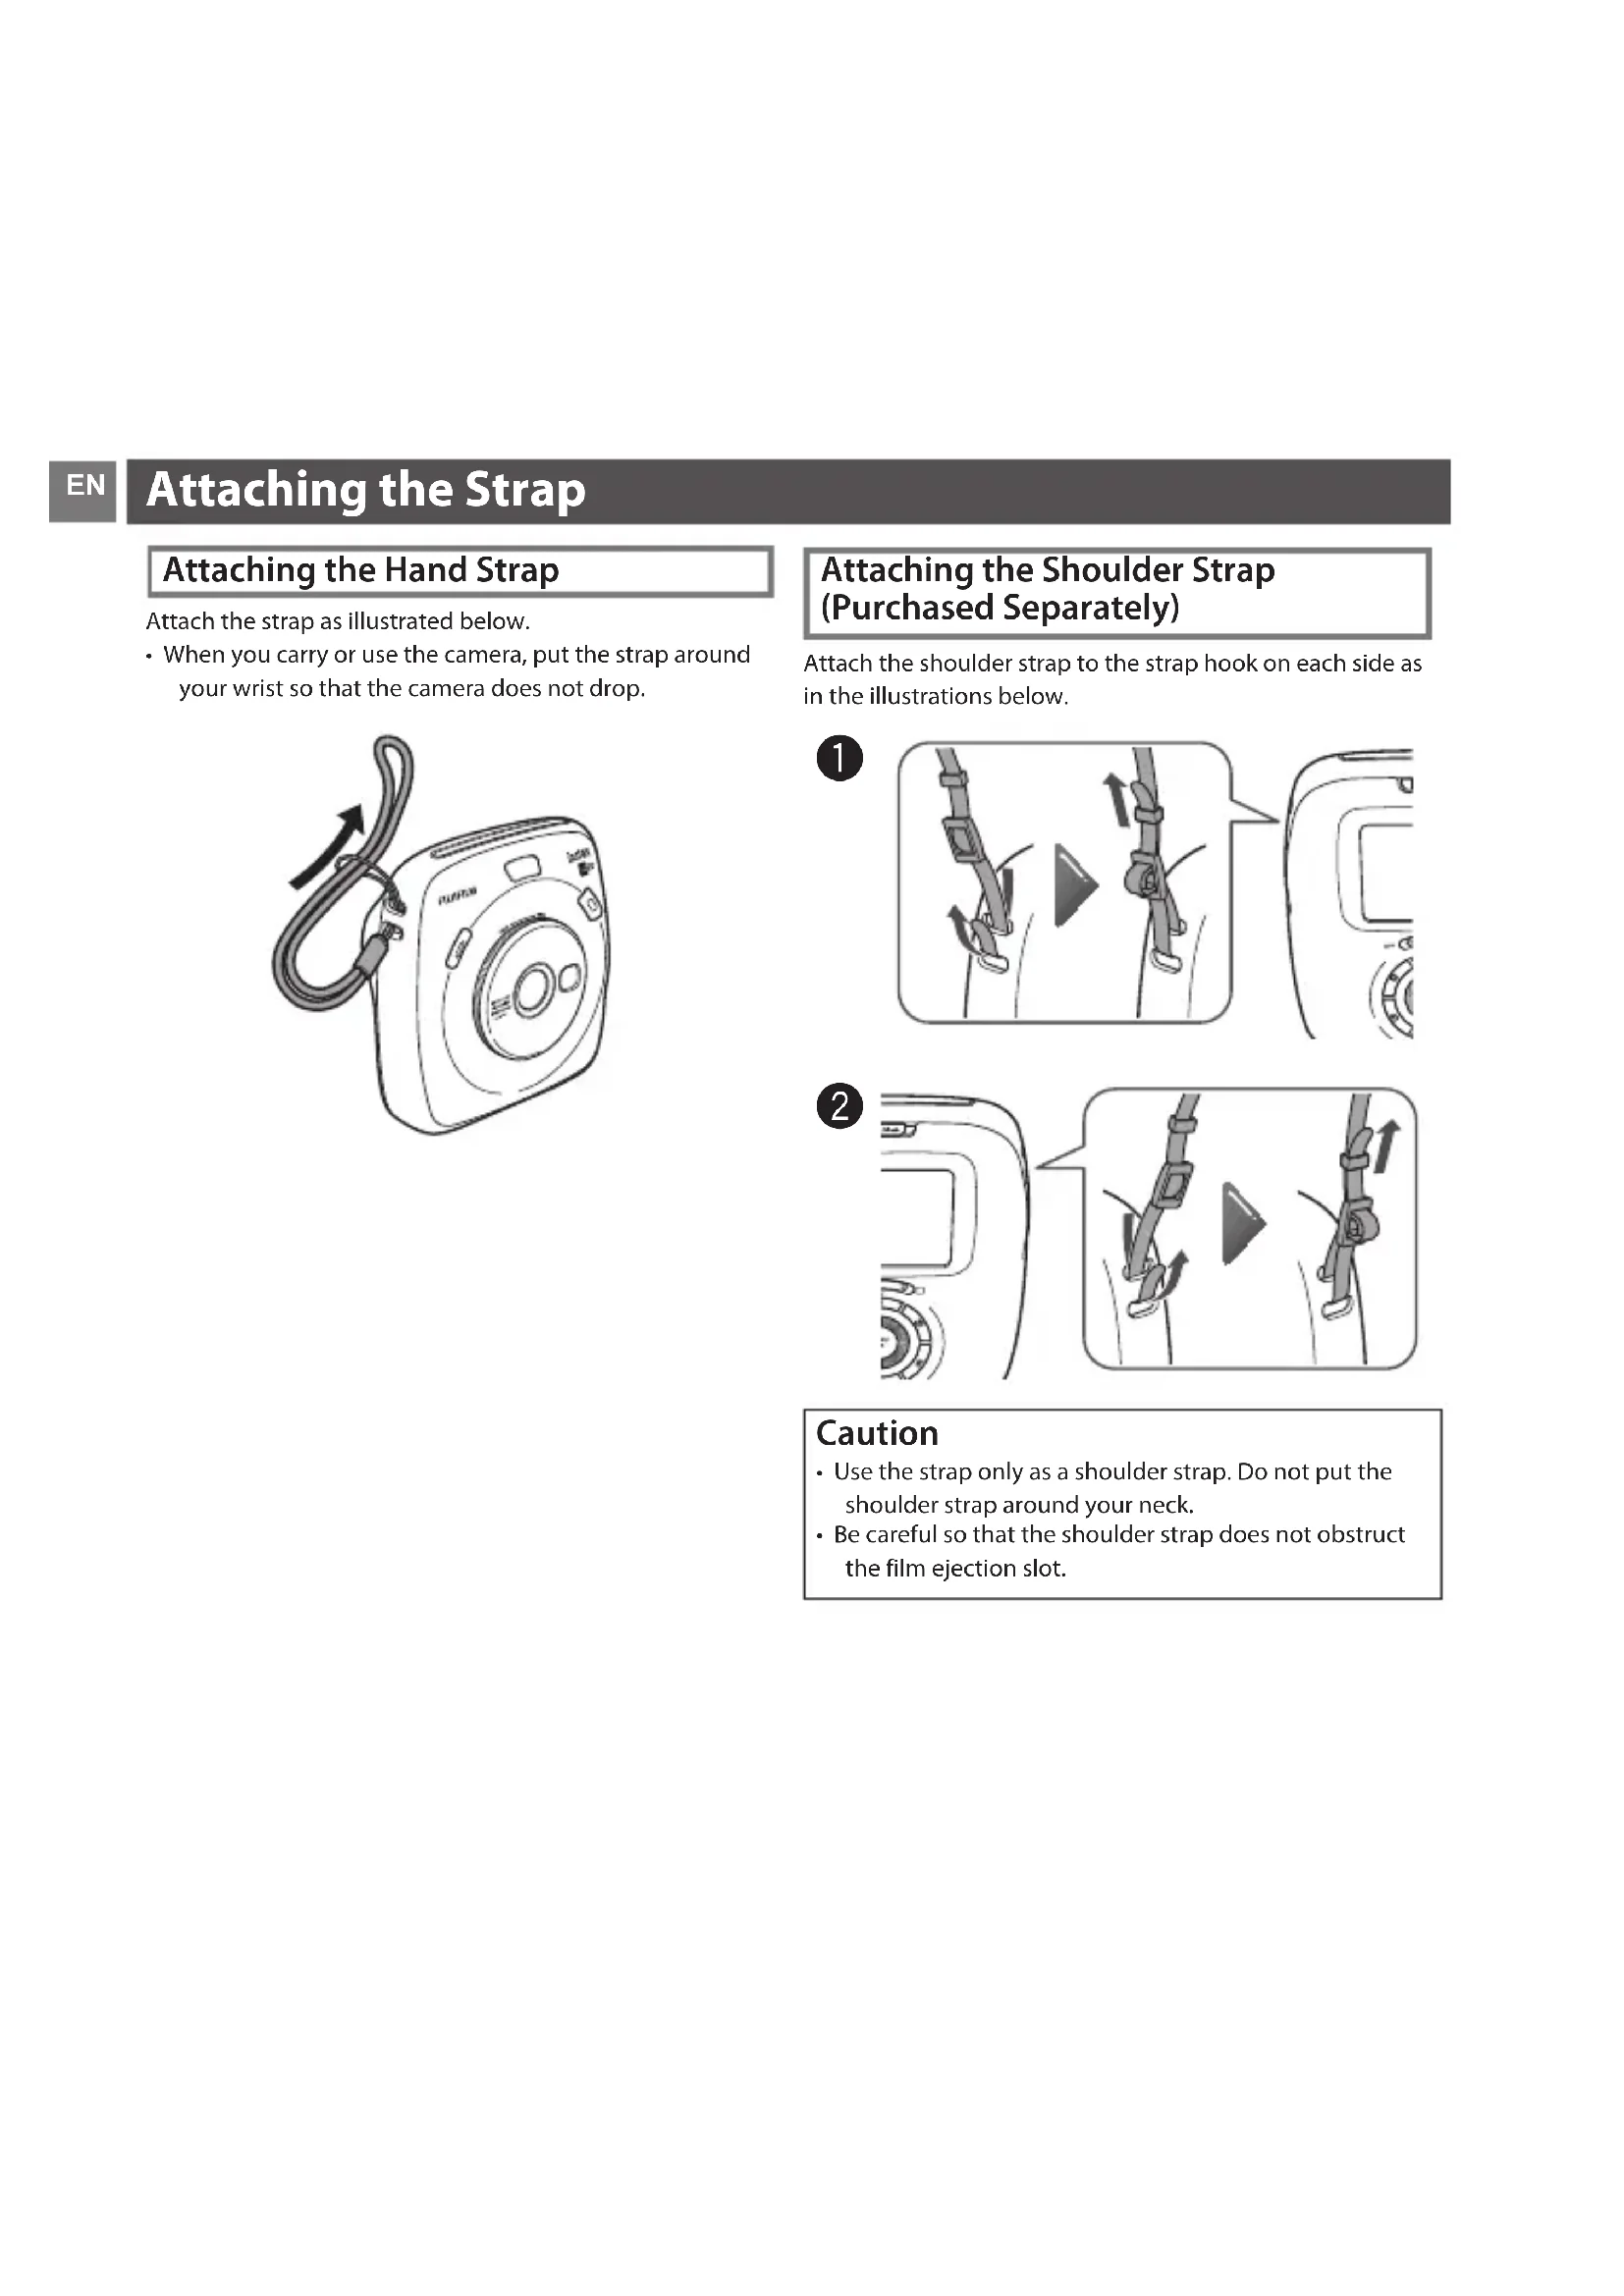
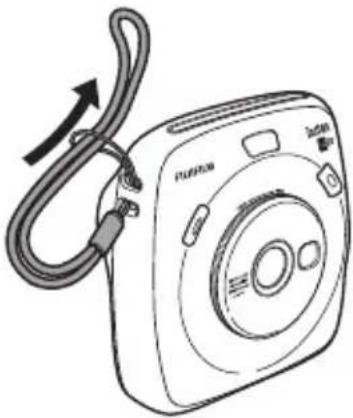
Attaching the Hand Strap
Attach the strap as illustrated below.
- When you carry or use the camera, put the strap around your wrist so that the camera does not drop.
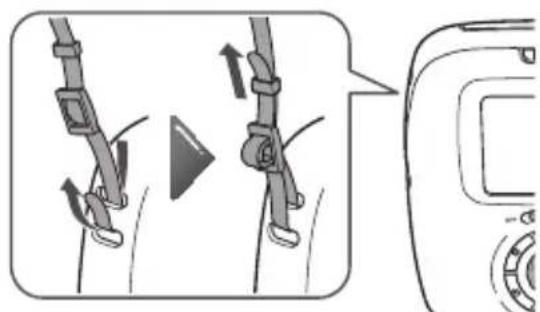
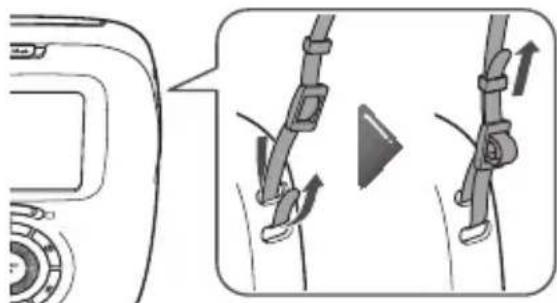
Attaching the Shoulder Strap (Purchased Separately)
Attach the shoulder strap to the strap hook on each side as in the illustrations below.
1
2
Caution
- Use the strap only as a shoulder strap. Do not put the shoulder strap around your neck.
- Be careful so that the shoulder strap does not obstruct the film ejection slot.
Charging the Battery
EN

Be careful of the orientation.
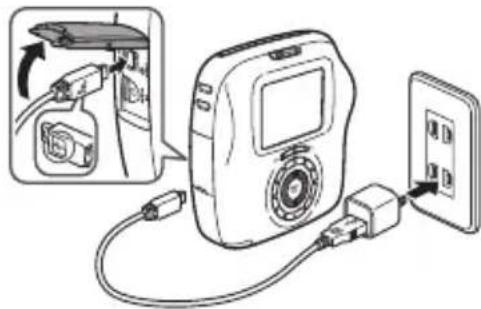
Connect the camera to a smartphone power adapter using the supplied USB cable to an indoor power outlet.
- Use a USB AC adapter to meet the rated output below: DC 5.0 V/1000 mA
- You can take a picture or print an image while charging is in progress.
- Charging time is approximately two to three hours.
Charging from a PC:
- Connect the camera and PC directly. Do not connect them via a keyboard or USB hub.
- If the PC enters the sleep mode while charging is in progress, charging will stop. If you continue charging, resume the PC and reconnect the USB cable.
- You may not be able to charge the camera from a PC depending on your PC specifications, settings, or status.
Caution
- You cannot remove the battery from the camera.
- The battery is not charged fully at shipment. Be sure to charge it before using the camera.
- Read the cautions in "The battery". (Page 40)
Charging status indication
| Status | While camera is on | While camera is off |
| While charging | The ! appears on the lower right of the LCD | Self timer lamp lights up. |
| Charging finished | The ! icon appears on the lower right of the LCD monitor. (Goes off when disconnecting the USB cable.) | Self timer lamp goes off. (The USB cable is connected.) |
| Charging error | An error message appears on the LCD monitor. | Self timer lamp flashes. |
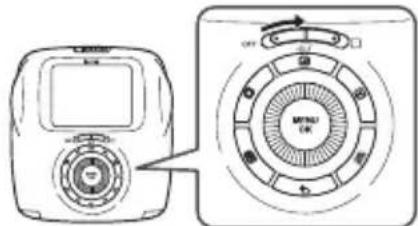
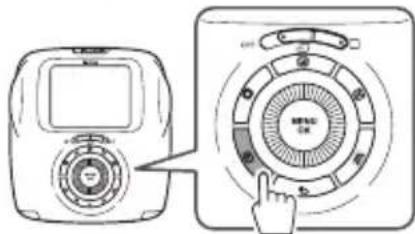
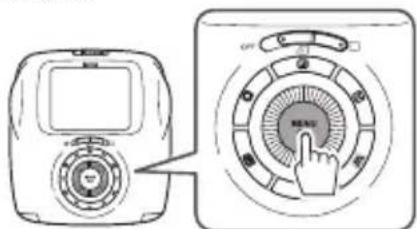
Turning the Camera on/off
To turn the camera on, use the power switch on the back and select still picture or movie.
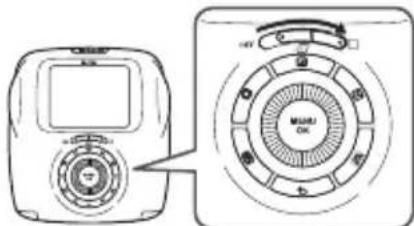
When you shoot a still picture:


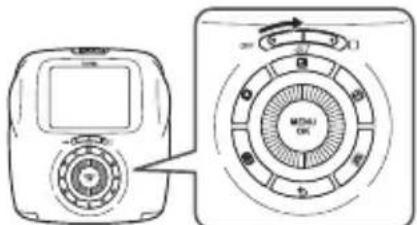
When you shoot a movie:

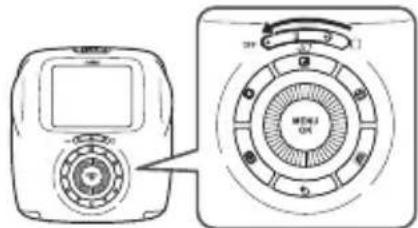
When you turn the camera off:
Slide the power switch to "OFF".
Checking Remaining Battery Life
Pressing the back) button on the shooting/playback screen displays remaining battery life on the LCD monitor.
| Indication | Remaining battery life |
| FULL | Battery is partially discharged. |
| MID | Battery is more than half discharged. Charging the battery is recommended. (Page 9) |
| LOW | Battery level is low. Charge as soon as possible. (Page 9) |
When the battery level is low, the icon appears on the lower right of the LCD monitor.
When no battery capacity remains, the ( EMP) icon appears enlarged on the LCD monitor and the camera turns off.
- If no operation occurs for a certain period of time, the camera turns off automatically. You can specify the length of time before the camera turns off. (Page 32)
- Pressing the (Playback) button displays the playback screen and changes to the playback mode.
- Pressing the shutter button fully during the playback mode displays the shooting screen and changes to the shooting mode.
Performing Initial Settings
EN
The language, date, and time are not specified when the camera is turned on for the first time. Follow the procedure below to specify them.
You can specify these settings at any time. See page 32 if you perform these settings later or change them.
1 Turning the camera on displays the language selection screen.
2 Select a language, then press the MENU/OK button or

The language is specified and the DATE/TIME screen appears.
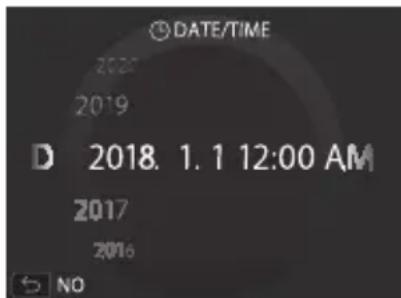
3 Specify the order, then press the MENU/OK button or

Select one of the orders below.
year/month/day
- month/day/year
day/month/year
The order is specified and the screen to specify the year, month, day, hour, and minute appears.
4 Specify the year, month, day, hour, and minute, then press the MENU/OK button or

Use to select an item (year, month, day, hour, or minute) to specify, then use to set the value.
Press the MENU/OK button.
Function Setting for the Shutter Button
Assign a function to each of the shutter buttons from the combinations on the table below.
When you shoot a still picture:
| Shutter button (Right) Shutter button (Left) | ||
| Function | Shutter button Shutter button | |
| Shutter button Shooting mode switching button | ||
| Shutter button OFF | ||
| Shooting mode switching button Shutter button | ||
| OFF Shutter button | ||
When you shoot a movie:
| Shutter button (Right) Shutter button (Left) | ||
| Function | Shutter button Shutter button | |
| Shutter button OFF | ||
| OFF Shutter button | ||
By default, shutter button function is assigned to both of the shutter buttons.
Use to select the combination when the SHUTTER BUTTON SETTINGS screen is displayed, then press the MENU/OK button.
- When you shoot a movie, you cannot assign the shooting mode switching function to either shutter button.
If you skip this procedure, press the (Back) button when each screen appears. The shooting screen appears.
Loading/Removing the INSTAX SQUARE Film Pack
Caution
Do not open the film door until you have used up the film; otherwise, the rest of the film is exposed and turns white and the film can no longer be used.
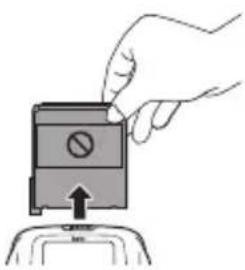
- When you load the film pack, never press the two rectangular holes on the back of the film pack.
- Never use a film pack beyond its shelf life; otherwise, it may damage the camera.
Use FUJIFILM Instant Film "instax SQUARE" only.
The instax mini film or instax WIDE film cannot be used. Notes on the film pack
Each FUJIFILM Instant Film "instax SQUARE" pack contains 1 black film protective cover and 10 film sheets.
- Only remove the film pack from its inner bag just before inserting into the camera.
- The film cover is ejected automatically when the film door is closed. The camera works to eject a film even though the film pack is not loaded.
For details, refer to the instructions and warnings on FUJIFILM Instant Film "instax SQUARE".
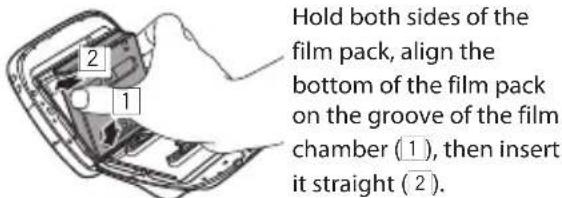
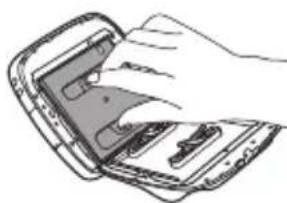
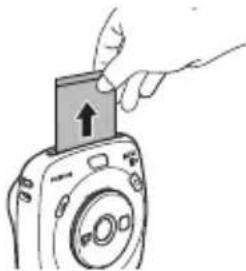
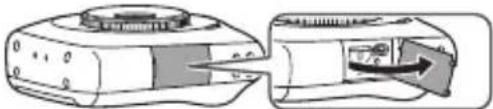
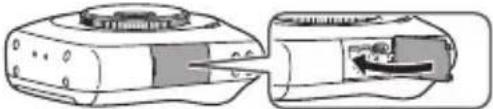
Loading the Film Pack
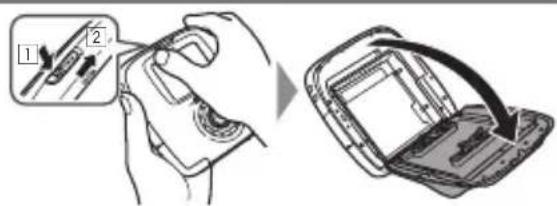
1
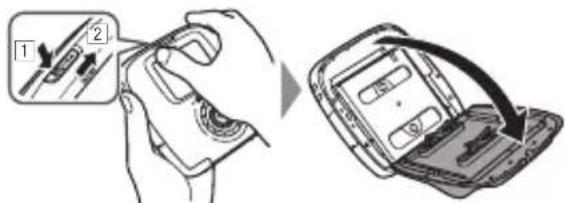
Press and hold the button of the film door lock (1), then slide the lever to the right (2) until the film door opens slightly.
2
3
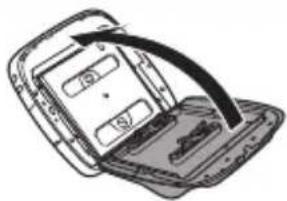
Close the film door. Make sure the film door lock clicks into place.
4
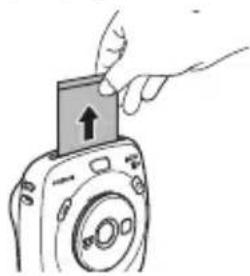
The film cover (black) is ejected automatically when the film door is closed. Remove the film cover from the film ejection slot.
Unloading a Used Film Pack
When no film is left, all dots on the right of the shooting screen are displayed in gray. (Page 19) Unload the film pack.
1
Press and hold the button of the film door lock (1) then slide the lever to the right (2) until the film door opens slightly.
2
Grasp the rectangular holes on the film pack, then pull it out straight.
Basic Photography and Playback
Taking a Picture
This section describes basic operation for photography.
1 Slide the power switch to (still picture).
Hold the camera.

3 Select the shooting mode or perform the steps to select your image effects. (Pages 20 to 26)
Use the zoom ring to confirm the desired composition of the final image.
Press the shutter button halfway to focus.
If the camera is able to focus: The camera beeps and the green focus frame appears on the monitor.
If the camera is unable to focus: The red focus frame appears on the monitor. Change the composition or use focus lock. (Page 22)
6 Lightly press the shutter button the rest of the way down to take the picture.
The picture is taken and it is saved in the camera's memory.
See page 18 for the procedure to print an image.
- If the print mode is set to auto print mode, the image will be printed. (Page 30)
- When you take a picture, hold the camera with both hands and brace your elbows against your sides.
- Be careful not to touch the lens surface when you press the shutter button.
- When you press the shutter button fully, press it lightly.
- Be careful that your fingers or the strap do not cover the flash, lens, or film ejection slot.
- If a subject is poorly lit, the flash may fire when the picture is taken. You can change the flash setting to disable flashing. (Page 23)
Cautions on the camera's memory
- When the memory becomes full, the shutter will not release and you cannot take a picture. Delete the images in the memory or use another memory card.
Images in the memory may be damaged or lost if the camera has any trouble. We recommend you store important image files as backup using other media (e.g. Hard disk, CD-R, CD-RW, or DVD-R, etc.). - If you request a repair, we cannot guarantee the safety of the images stored in memory.
- While the camera is being repaired, note that we may check the contents of images in the memory.
Basic Photography and Playback
Viewing Images
Images can be viewed on the monitor.
1 Slide the power switch to (still picture).
Press the (Playback) button.
The most recent image will be displayed.
Press or to select an image to view.
Pressing displays a previous image. Pressing displays a next image.
- Pressing the shutter button fully returns to the shooting screen.
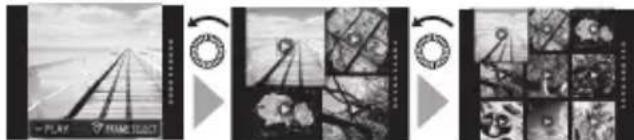
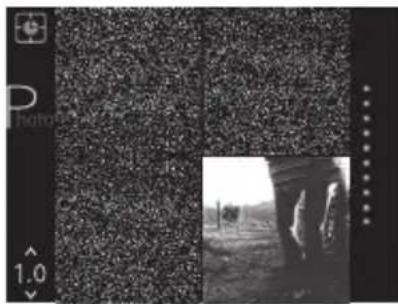
Changing the Playback Display
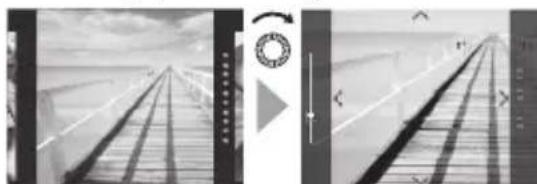
You can zoom in on the image on the monitor or change the number of images displayed at a time.
Zooming in on image
You can zoom in on an image on the monitor by turning the command dial clockwise.
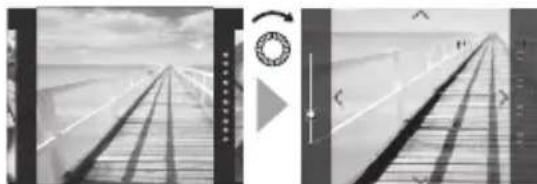
Normal Zoom
- Use buttons to move the view area.
- Pressing the MENU/OK button or (Back) button cancels zooming.
- You can print an image while it is zoomed in. (Page 18)
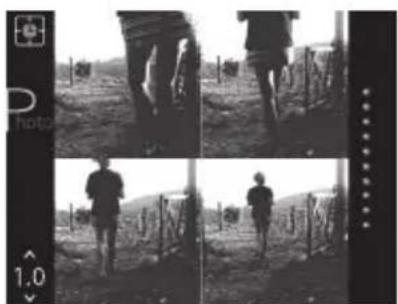
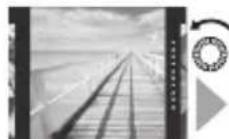
Changing the number of images on the monitor
Turning the command dial counterclockwise changes the number of images (one, four, or nine).
One image Four images Nine images
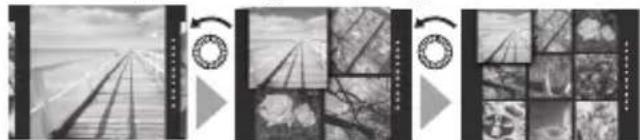
- Turning the command dial clockwise changes the number of images (four or one).
- Pressing the MENU/OK button or (Back) button cancels the multiple image display.
- You can print an image while four or nine images are displayed. (Page 18)
Shooting a Movie
This section describes basic operation for shooting a movie.
1
Slide the power switch to (movie).
2
Hold the camera.

3
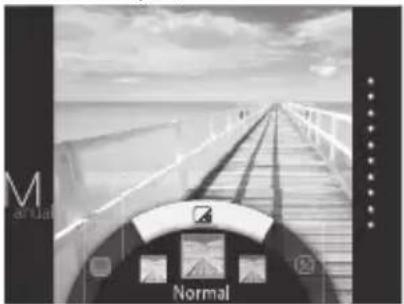
Perform the steps to select your image effects. (Pages 20 to 21)
Effects only for movie shooting
You can select three types of filters for movie shooting; "Retro", "Film Frame", and "Sequence". For details see page 20.
4
Use the zoom ring to confirm the desired composition of the final image.
5
Press the shutter button fully.
The screen below appears and movie shooting starts.
- You can use the zoom ring while shooting is in progress.
- You can see the elapsed time by the bar shown on the left.
- When you select "Retro", "Film Frame", or "Sequence", the camera applies the filter effect to the movie file while shooting is in progress.
6
Press the shutter button fully again.
Movie shooting finishes.
- When you shoot a movie, hold the camera with both hands and brace your elbows against your sides.
- Be careful not to touch the lens surface when you press the shutter button.
- Be careful that your fingers or the strap do not cover the flash, lens, or film ejection slot.
- When you use a memory card, a movie can be shot for up to 15 seconds.
- No sound can be recorded on the movie file.
- When you select "Retro", "Film Frame", or "Sequence", you cannot cancel the applied filter effect or apply another filter after shooting a movie.
Shooting a Movie and Playback
EN
Playing back Movies
Movies can be played back on the monitor.
1 Slide the power switch to (movie).
Press the (Playback) button.

The most recent movie thumbnail will be displayed.
Press or to select a movie to play back.
Pressing displays a previous thumbnail. Pressing displays a next thumbnail.
4 Press
The movie playback starts.
Operations during movie playback
- Press to pause playback. Pressing again resumes playback.
- While the playback is paused, pressing or , or turning the command dial allows you to play back frame by frame. In addition, pressing the MENU/OK button saves the displayed image (frame) as an image file.
- When the playback is finished, the movie thumbnail displayed previously appears.
Changing the number of images on the monitor
When the movie thumbnail is displayed, turning the command dial counterclockwise changes the number of images (one, four, or nine).
One image Four images Nine images
- Turning the command dial clockwise changes the number of images (four or one).
- Pressing the MENU/OK button or (Back) button cancels the multiple image display.
EN
Printing
Print an image following the steps below.
1 Slide the power switch to (still picture) or (movie).
The most recent image will be displayed.
3 Select an image to print.
- When you print a still picture:
Press or to select an image to print.
Pressing displays a previous image. Pressing displays a next image.
- When you print an image captured from a movie file:
① Press or to select a movie to play back.
Pressing displays a previous thumbnail. Pressing displays a next thumbnail.
② Press to play back the movie.
③ Press to pause playback.
④ Press or, or turn the command dial to select an image (frame) to print.
Press the MENU/OK button. The image is captured and saved.
To access a saved image captured from a movie file, slide the power switch to (still picture) on step 1, and proceed to step 2 and 3.
Printing
Adjust the image effect as necessary. (Pages 20 and 21)
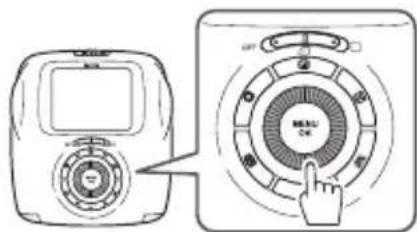
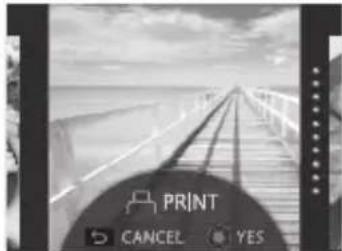
Press the (Print) button. The screen below appears.
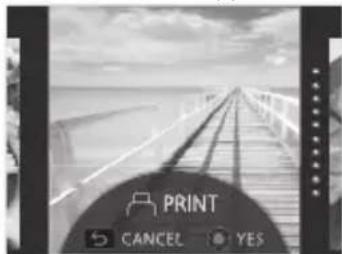
6 Press the MENU/OK button. Printing starts.. -To cancel printing press the 一 (Back) button.
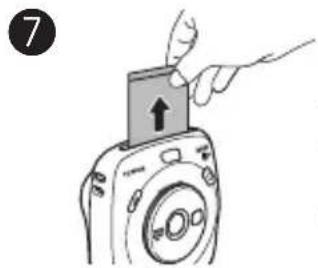
When the film has been ejected (the camera stops making a sound), grab the edges of the film, then take it out.
EN
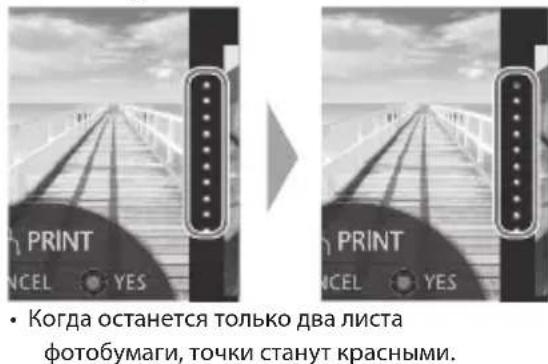
Film remaining indication
Dots on the right of the monitor indicates the number of remaining films. One dot turns gray every time you print an image.
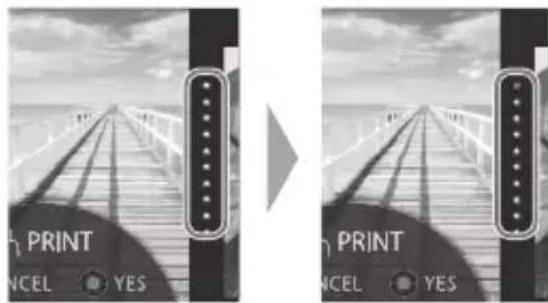
- When there are only two films left, the dots will turn red.
For still picture, you can print an image that is zoomed in or print four or nine images on one film. Use the command dial to change to the multiple image display on step 2 when the image to print is displayed. (Page 15)
- For details on taking out the film, refer to the instructions and warnings on the FUJIFILM Instant Film "instax SQUARE" pack.
The development time is approximately 90 seconds. (The time varies depending on the ambient temperature.)
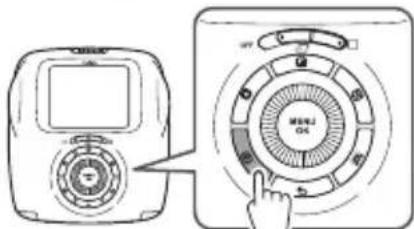
Adjusting/Processing Images (Eff ect)
You can select the image effects menu directly by pressing a button on the rear to adjust the image effect while the shooting/playback screen is displayed.
Filter
Follow the steps below to select a filter.
Press the (Filter) button while shooting/playback screen is displayed.
The screen below appears.
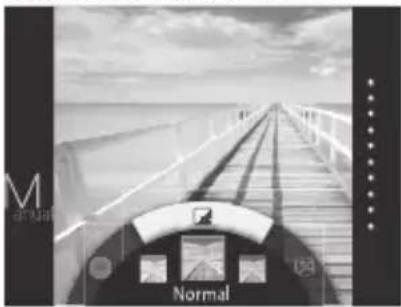
Use the command dial to select a filter.
For details on each filter see the table on the right.
Press the (Filter) button again.
The filter effect is applied to the image and returns to the previous screen.
- You can also return to the previous screen by pressing the MENU/OK button or (back) button.
To cancel the filter effect, press and hold the button.
Filter effects you can use
| Type Details |
| Cornelius Intensifies shadows and brightens highlights to the image. |
| Monochrome Turns your image into basic monochrome. |
| Luna Brightens the image and intensifies all colors. |
| Type Details | |
| Immerse Adds saturation and shadows. | |
| Amber Desaturates and adds an aged look to the image. | |
| Marmalade Adds a strong red tint and a burnt edge to the image. | |
| Martini Smooths skin tones with a slight vintage feel. | |
| Sepia | Strong taste of old school |
| Ropponi | Adds brightness and warmth to the image. |
| Highline | Intensifies shadows with a yellow tint. |
| Nostalgic (still picture only) | Add a pale color effect with a soft feel to an image. |
| Skin Brightening (still picture only) | Adds brightness to make your skin look more smooth and bright. |
| PARTIAL COLOR (RED)/(ORANGE) (YELLOW)/(GREEN) (BLUE)/(PURPLE) | Areas of the image that are the selected color are recorded in that color. All other areas of the image are recorded in black-and-white. |
| Retro *1 (movie shooting only) | Introduce a atmospheric retro feel to your movie. |
| Film Frame *1 (movie shooting only) | Add a film frame filter to your movie. |
| Sequence *1 (movie shooting only) | Create more dynamic images with a sequence filter. |
*1 After the filter effect is applied to the movie, "Normal" is displayed as the applied filter on the LCD monitor. In addition, you cannot cancel the applied filter effect or apply another filter for movie shooting after shooting a movie.
Adjusting/Processing Images (Eff ect)
EN
Adjusting the Brightness Vignette
Follow the steps below to adjust the brightness.
Press the (Brightness) button while shooting/ playback screen is displayed.
The screen below appears.
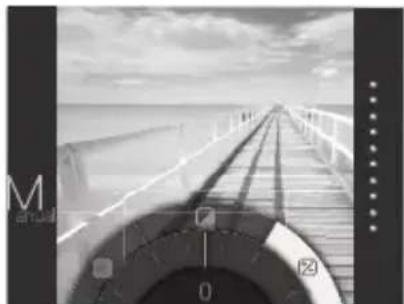
Use the command dial to adjust the brightness.
Turn the command dial clockwise to brighten the image, and turn the dial counterclockwise to darken it.
3 Press the (Brightness) button again.
The adjusted brightness is applied to the image and returns to the previous screen.
- You can also return to the previous screen by pressing the MENU/OK button or (back) button.
To cancel the adjusted brightness, press and hold the (Brightness) button.
Adjust the brightness of four corners on the image. Follow the steps below to adjust the brightness.
Press the (Vignette) button while shooting/ playback screen is displayed.
The screen below appears.
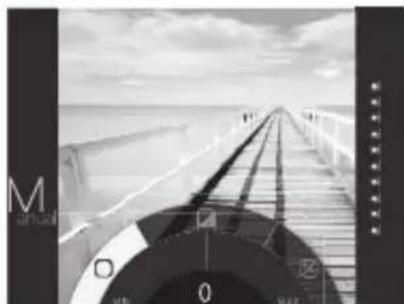
Use the command dial to adjust the brightness of the four corners.
Turn the command dial clockwise to darken the corners, and turn the dial counterclockwise to brighten them.
3 Press the (Vignette) button again.
The adjusted brightness is applied to the image and returns to the previous screen.
- You can also return to the previous screen by pressing the MENU/OK button or (back) button.
To cancel the adjusted brightness, press and hold the (Vignette) button.
Notes on image effects:
Each adjusted value or effect remains after you take a picture. However, it will be disabled when you view the image on a device (e.g. computer) other than this camera (except for filters "Retro", "Film Frame", and "Sequence").
- You can apply multiple effects to one image.
- Press and hold the (Back) button to cancel all adjusted values or effects.
- Depending on the subject or camera settings, images may (in some cases) be grainy or vary in brightness and hue.
More on Photography
Using AF/AE Lock Using the Self Timer
When you take a still picture, use "AF/AE lock" to lock focus/exposure by pressing the shutter button halfway. AF/ AE lock is useful when you take a picture with off-center subjects.

Position the subject to focus on the center, then press the shutter button halfway.
Pressing the shutter button halfway activates AF/ AE lock.

Decide the composition with the shutter button pressed halfway.

Press the shutter button all of the way down to take the picture.
As the camera may be unable to focus on the subjects listed below, we recommend you use AF/ AE lock.
- Very shiny subjects such as mirrors or car bodies
- Fast moving subjects
- Subjects photographed through a window or other reflective object
- Dark subjects and subjects that absorb rather than reflect light, such as hair or fur
- Insubstantial subjects, such as smoke or flame
- Subjects that show little contrast with the background (e.g. subjects that are the same color as the background)
- Subjects positioned in front of or behind a high-contrast object that is also in the focus frame (e.g. a subject photographed against a backdrop of highly contrasting elements)
Use the self timer to include a photographer in a group photo or to reduce blur when the shutter button is pressed.

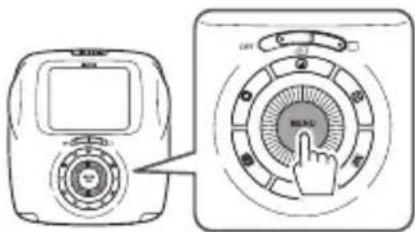
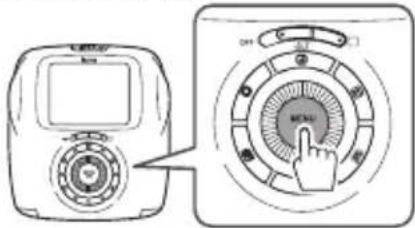
Press the MENU/OK button on the shooting screen.
The shooting menu appears.

Select SELF-TIMER, then press the MENU/OK button.

Select 10 SEC or 2 SEC, then press the MENU/OK button.

Press the shutter button fully.
- When you select 10 SEC:
When you press the shutter button, the AF-assist illuminator/Self timer lamp lights up, and then it flashes 3 seconds before shooting.
- When you select 2 SEC:
When you press the shutter button, the AF-assist illuminator/Self timer lamp flashes.
- To cancel the self timer, press the

ck) button.
More on Photography
EN
Using the Flash
Use the flash when shooting at night or indoors under low light.
Press the MENU/OK button on the shooting screen.
The shooting menu appears.
2 Select FLASH, then press the MENU/OK button.
3 Select the flash setting, then press the MENU/OK button.
See "Flash settings" for details on each flash setting.
Press the shutter button to shoot.
■ Flash settings
Select one of the settings below.

AUTO FLASH
The flash fires automatically when the camera recognizes it is dark. Recommended in most situations.

FORCED FLASH
The flash always fires regardless of the brightness of the subject. Use this setting for backlit subjects.

SUPPRESSED FLASH
The flash does not fire even when the subject is poorly lit. Recommended for when using a flash is prohibited. We recommend using a stable surface to steady the camera when it's dark.
Taking a Self Portrait (Selfie)
You can take a self portrait using the selfie mirror.
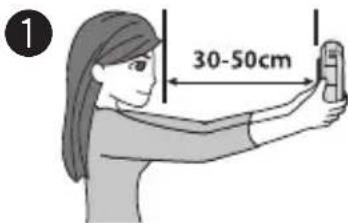
Hold the camera securely keeping 30~cm to 50~cm between you and the edge of the lens.
- Hold the camera securely especially in a dark place, to prevent blurring.


- When you take a photo, do not look at the flash; otherwise, an afterglow may interfere with your vision temporarily.
- If you press the shutter button while the flash is charging, the shutter will not release.
Changing the Shooting Mode
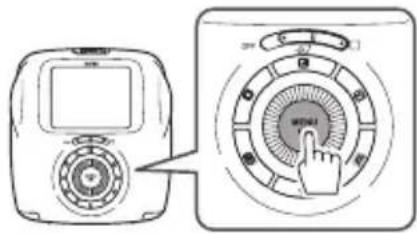
Select a shooting mode according to the subject or purpose.
Selecting a Shooting Mode Shooting Mode
Follow the steps below to select a shooting mode.

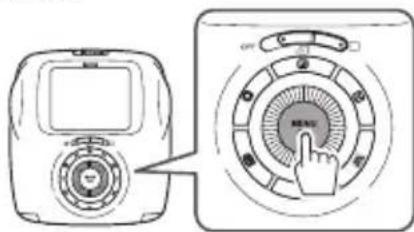
Press the MENU/OK button on the shooting screen.
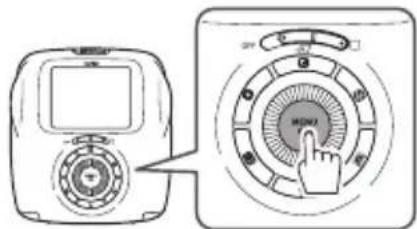
The shooting menu screen appears.

Select SHOOTING MODE, then press the MENU/OK button or

Select the shooting mode, then press the MENU/OK button.
The changed setting is applied.
When you use another shutter button to select a shooting mode, the mode switches every time you press the shutter button.
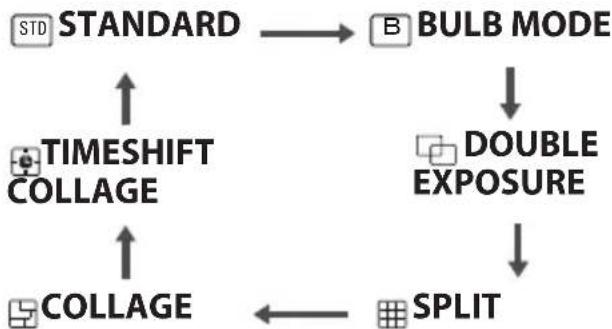

STANDARD
Select for normal photography.
The flash fires automatically when the camera recognizes it is dark.
You can select a setting so that the flash does not fire. (Page 23)

BULB MODE
The shutter is kept open while the shutter button is pressed. This should be used when shooting a night view. Use a stable surface to steady the camera.
- Adjust the time to hold the shutter button according to the brightness.

DOUBLE EXPOSURE
Press the shutter twice to combine two images into one picture. After you shoot the first subject, shoot the second.

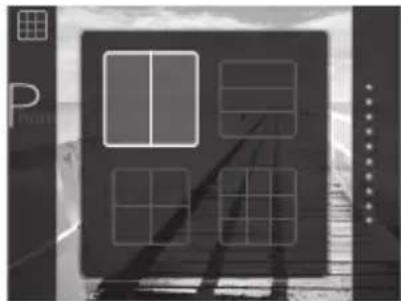
SPLIT
Multiple images can be captured on one image. Select four segmentation options: vertically halved, horizontally divided in three, divided in quarters and divided in nine.

COLLAGE
You can create a collage style image where one image is divided up at random or you can take photos for each segment.

TIMESHIFT
Four images can be taken with a time difference. Press the shutter button to shoot when four images appear on the monitor. The time difference between frames can be adjusted within 0.2 to 2.0 seconds.
Changing the Shooting Mode
EN
Select DOUBLE EXPOSURE for SHOOTING MODE, press the MENU/OK button, and then follow the procedure below.
1
Shoot the first subject.
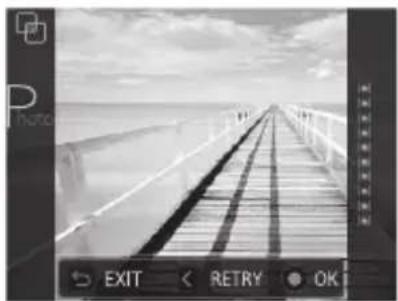
2
Press the MENU/OK button and shoot the second subject.
Press to retake the subject.
- Pressing S returns to the shooting screen.
3
Press the MENU/OK button.
Press to retake the subject.
- Pressing S returns to the shooting screen.
Select SPLIT for SHOOTING MODE, press the MENU/OK button, and then follow the procedure below.
1
Press or ,or turn the command dial to select a segment pattern, and press the MENU/OK button.
2
Shoot a subject for each segment.
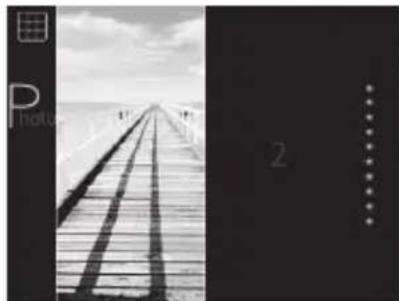
- If you stop shooting before completed, press confirm the message on the monitor, and then press the MENU/OK button. The monitor returns to the shooting screen.
Changing the Shooting Mode (Continued)
Select COLLAGEfor SHOOTING MODE press the MENU/OK button, and then follow the procedure below.

Press or to select a collage pattern, and press the MENU/OK button.


Shoot a subject for each segment.
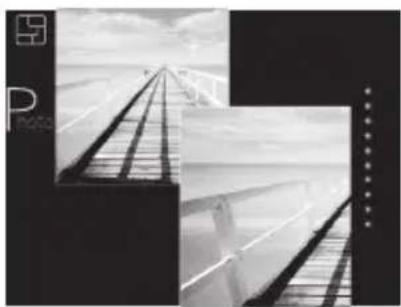
If you stop shooting before completed, press

confirm the message on the monitor, and then press the MENU/OK button. The monitor returns to the screen to select a collage pattern.
Select TIMESHIFT COLLAGE for SHOOTING MODE, press the MENU/OK button, and then follow the procedure below.

Four images appear with a time difference. The latest image appears in this order; lower right, lower left, upper right, and upper left.
Press the shutter button to shoot when four images appear on the monitor.
- Press or to adjust the time difference between frames.
Printing from Print History (Reprint)
EN
Print an image with the same settings (e.g. image effect) as those specified when you printed the image in the past. Follow the steps below for operation.
1
Press the (Playback) button.
The most recent image will be displayed.
2
Press the MENU/OK button.
The playback menu appears.
3
Select PRINT HISTORY, then press the MENU/OK button.
The screen to select an image appears.
-
Up to the last 50 images printed are stored in the memory.
-
If the print history exceeds 50, new print history overwrites the oldest image.
4
Press or to select an image to print.
Pressing displays a previous image. Pressing displays a next image.
- You can select a view with four or nine frames.
5
Press the (Print) button.
6
Press the MENU/OK button.
Printing starts.
Press the (Back) button to cancel printing.
7
When the film has been ejected (the camera stops making a sound), grab the edges of the film, then take it out.
- You cannot save existing print history onto a memory card.
All print history is deleted if you initialize the memory. (Page 32) - You cannot edit or apply effects on the images in the print history.
Using a Memory Card
This camera can save approximately 50 still images in the internal memory. However, using a memory card enables you to save more images.
Caution on the memory card
- Micro SD/micro SDHC cards have been approved for use in this camera. Using cards other than those specified could damage the camera.
- Memory cards are small and can be swallowed; keep out of reach of children. If a child swallows a memory card, seek medical assistance immediately.
- Do not turn the camera off or remove the memory card while the memory card is being formatted or data is being recorded or deleted from the card. Failure to observe this precaution could damage the card.
- Avoid using or storing memory cards in an environment where strong static electricity or electric noise is generated.
If you insert a memory card charged with static electricity into the camera, it may cause malfunction. In this case, turn the camera off and turn it on again. - Do not keep memory cards in a pocket as this can cause damage.
- When you remove the memory card after using the camera for a long time, the card may be warm. Please note, this is not a malfunction.
- Do not affix labels to memory cards. Peeling labels can cause camera malfunction.
Caution when using the memory card on computer
- Format memory cards before first use, and be sure to reformat all memory cards after using them in a computer or other device.
- Folders are created automatically if you use a memory card formatted with the camera. Do not change the folder/file name or delete a folder using a computer; otherwise, you cannot use the memory card.
- Use the camera to delete image files.
- Edit an image file after copying or moving it to a hard disk. Avoid editing an original image file.
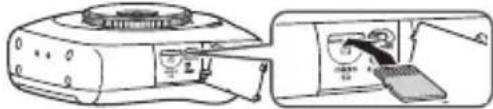
Inserting the Memory Card

Open the card slot cover.


As shown below, slide in the memory card until it clicks into place at the back of the slot.
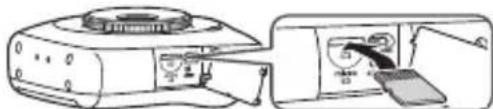

Close the card slot cover.
To remove the memory card, press it in and release it slowly. The card can be removed by hand.
Caution
- When you remove the memory card, press it with your finger and release the card gently; otherwise the card could come out of the slot too quickly.
Printing Images Taken with another Camera
You can print images taken with another camera by inserting a memory card containing the images. However, they should meet the conditions below.
- Copy images to print to the root directory instead of copying them to a folder.
- The file name should consist of four capital letters (A to Z) followed by four numeric characters.
Copying Images to the Computer
EN
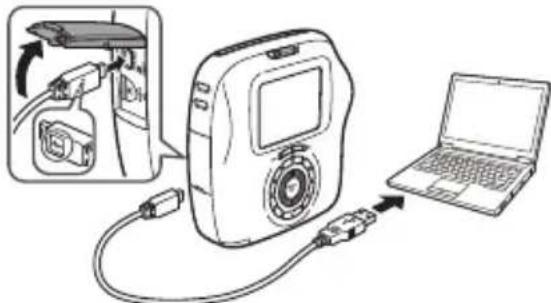
Connect the camera to the computer and copy images.
1
Start up the computer.
2
Turn the camera off.
3
Connect the camera to the computer using the supplied USB cable.
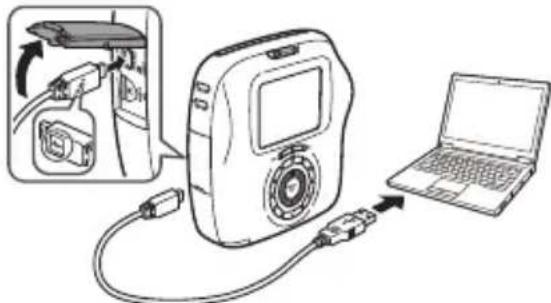
0
Make sure the orientation is correct and the connectors are fully inserted.
Connect the camera directly to the computer. Do not use a USB hub or keyboard.
4
Turn the camera on.
Select (still picture) or movie) according to the file type to copy.
5
When the computer recognizes the camera, select the camera on the menu and start copying the images.
6
Disconnect the camera from the computer.
After you have finished copying the images, turn the camera off, and then disconnect the USB cable from the computer.
Caution
- Do not cause the battery to run out while copying the images; otherwise, the images may be damaged.
- Do not turn the camera off or disconnect the USB cable from the computer; otherwise, the images may be damaged or lost.
- When you change the memory card, make sure the camera is disconnected from the computer.
- Do not disconnect the camera from the computer or unplug the USB cable soon after the "Copying" message goes off. The camera may access to the computer for a while even after the message goes off when you copy a large file.
- You cannot copy an image file from the computer to the camera.
ShootingMenu
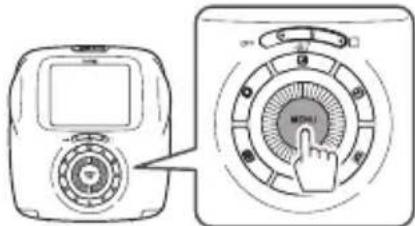
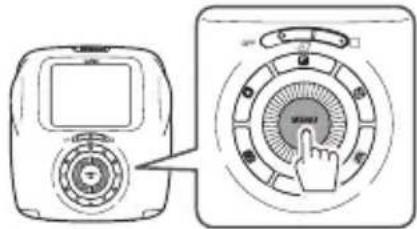
Follow the steps below to specify/change the shooting menu.
Press the MENU/OK button on the shooting screen.
The menu screen appears.
2 Select the setting item to change and change the setting.
3 Press the MENU/OK button.
The changed setting is applied.
4 Press the (Back) button.
The LCD monitor returns to the shooting screen.
Items on the shooting menu
SHOOTING MODE (still picture only)
Select a shooting mode according to the purpose or situation. (Page 24)
- You can also use a shutter button to which you assign the shooting mode switch function on SHUTTER BUTTON SETTINGS. Press the button repeatedly to choose a shooting mode.
FLASH (still picture only)
Select a setting for flash photography. (Page 23)
SELF-TIMER (still picture only)
Select a setting when using the self timer. (Page 22)
AFILLUMINATOR(still picture only)
If you select ON, the AF-assist illuminator lights up while focusing to assist auto focus when it is dark.
Option: ON/OFF
- The camera may be unable to focus using the AF-assist illuminator in some cases.
- When you are close to the subject, the AF-assist illuminator may not be as effective as you expect.
- Avoid shining the AF-assist illuminator directly into your subject's eyes.
EXPOSURE
Adjust the brightness of the image when you shoot a too bright, too dark, or high-contrast subject.
- The compensation value is valid even when you copy the image file to a computer or other devices.
FRAMINGGUIDE
If you select ON, the guide lines (vertical/horizontal) appear on the monitor.
Option: ON/OFF
AUTO PRINT (still picture only)
If you select ON, the camera starts to print an image soon after the photo is taken and saved.
Option: ONOFF
Playback Menu
Follow the steps below to specify/change the playback menu.

Press the MENU/OK button on the playback screen.
The menu screen appears.

Select the setting item to change and change the setting.

Press the MENU/OK button.
The changed setting is applied.

Press the Back) button.
The LCD monitor returns to the playback screen.

Items on the playback menu
Press the MENU/OK button to start printing. (Page 18)
PRINT HISTORY
Display up to 50 images that you have previously printed.
Select an image, then press the (Print) button to start printing. (Page 27)
Pressing the MENU/OK button allows you to delete an image in the print history one by one.
ERASE
Delete an image one by one or delete all at one time.
Option: FRAME ALL FRAMES
IMAGE ROTATE (still picture only)
Rotate an image by 90 degrees.
Use the command dial for operation.
COPY
Copy images in the camera's memory to a memory card and vice versa.
Follow the procedure below.
① Press the MENU/OK button or ▷.
② Select the destination, then press the MENU/OK button or
③ Select FRAME or ALL FRAMES, then press the MENU/OK button or.
Copying starts if you select ALL FRAMES.
Proceed to step 4 if you select FRAME.
④ Select an image to copy, then press the MENU/OK button or
AUTOROTATE PB (still picture only)
If you select ON, an image rotates on the playback screen.
Option: ON OFF
SetupMenu
Follow the steps below to specify/change the setup menu.
Press the MENU/OK button on the shooting/playback screen.
The menu screen appears.
2 Select the setting item to change and change the setting.
3 Press the MENU/OK button.
The changed setting is applied.
4 Press the (Back) button.
The LCD monitor returns to the shooting screen.
■ Items on the setup menu
DATE/TIME
Specify date and time. (Page 11)
DATE STAMP
If you select ON, the date of recording is printed on the lower right of the picture. The settings on DATE/TIME affect the order of year/month/day.
Specify the language displayed on the monitor.
OPERATION VOL.
Adjust the volume of the operation, shutter, or startup sound.
Option: OFF/1/2/3
Select OFF to disable sounds.
SHUTTERT BUTTON SETTINGS
Assign the function for the left/right shutter button. (Page 12)
AUTO POWER OFF
Select the length of time before the camera turns off automatically if no operations are performed.
Option: 5 MIN
RESET
Reset all settings to default values.
The date and time specified on DATE/TIME are not reset.
FORMAT
Initialize camera's memory or a memory card inserted in the card slot. All saved images will be deleted.
FIRMWARE UPGRADE
Update the firmware.
Save the firmware on a memory card in advance, insert it in the card slot, and then follow the instructions on the monitor.
Download the latest firmware from our website.
SPECIFICATIONS
EN
Camera
Image sensor 1/5-in., CMOS with primary color fiter
Effective pixels 1920 x 1920
Storage media Built-in memory, microSD/microSDHC memory card
| Recording capacity (still picture) | Built-in memory: Approx. 50 files (still picture), Approx. 30 seconds (movie) microSD/microSDHC memory card: Approx. 1000 fi les per 1 gigabyte |
| Recording capacity (movie) | microSD/microSDHC memory card: Approx. 3 minutes (total) per 1 gigabyte |
| File system | Still picture: Compliant with Design Rule for Camera File System (DCF), Exif Ver.2.3, Compliant with JPEG and PIM Movie: 800 x 800 x 15 fps, H.264 (No sound can be recorded.) |
Focal length Fixed as 33.4mm (35-mm format equivalent)
Aperture F2.4
Auto focus system Single AF (Contrast-detect TTL, equipped with AF illuminator)
Continuous AF (Only for movie shooting)
Focus range 10cm to
Shutter speed 1/7500 sec. to 1/2 sec. (Auto), maximum 10 sec. in Bulb mode
Sensitivity ISO 100 to 1600 (Auto)
Exposure control Programmed AE
Exposure compensation -2.0 EV to +2.0 EV in increments of 1/3 EV
Metering 256-segment through the lens (TTL) metering, Multi metering
White balance Auto
Auto/Forced Flash/Suppressed flash
Effective range: Approx. 50~cm to 8m
Shooting mode Standard, Double exposure, Bulb mode, Split, Collage, Time Shift Collage
Self-timer Approx. 10 sec./Approx. 2 sec.
Image effect 21 Filters (18 for still picture, 3 for movie shooting only), Brightness adjustment, Vignette
Playback function Trimming, Multi image playback
SPECIFICATIONS (Continued)
Printer
Film FUJIFILM Instant Film "instax SQUARE" (Purchased separately)
Photo capacity 10 prints/pack
Film size 86mm× 72mm
Image size 62 mm x 62 mm
Supported image size 800× 800 dots
Printing solution 12.5 dots/mm (318 dpi, 80 m dot pitch)
Printing levels 256 levels per color (RGB)
Supported image format
JPEG (Some images saved with a photo editing/processing software may not be displayed or printed.) JPEG files can be printed.
Printing time Approx. 12 seconds
Print timing Printing shortly after shooting/Printing after selecting image
Printing function Images on built-in memory/micro SD card
Reprint Printable up to the past 50 prints (Up to 50 images stored in print history)
Digital zoom Up to 4 X in shooting/printing
Others
LCD monitor
2.7-in. (6.9cm) TFT color LCD monitor, Pixels: Approx. 230k-dots
External interface
Micro USB Micro-B (For charging/file copying)
Power supply
Li-ion battery (Built-in, Cannot be removed.)
Charging function
Built-in
Printing capacity
Approx. 100 prints (From when the battery is charged fully)
- Varies depending on the conditions of use.
Charging time
Approx. 2 to 3 hours (Using 0.5 A USB port)
- Varies depending on air temperature.
Dimension
119 mm x 50 mm x 127 mm (W x D x H)
Weight
390 g (excluding fi lm pack and memory card)
440 g (including f lm pack and memory card)
Operating environment
Temperature: +5^ to +40^
Humidity: 20% to 80% (no condensation)
- Specific cations above are subject to change for improvement.
TROUBLESHOOTING
EN
Use the troubleshoot guide below if you are experiencing an issue with the camera. If you cannot find a solution, contact a FUJIFILM authorized distributor.
Or visit our website below.
During operation
| Problem Possible Causes Solution | ||
| The camera cannot be turned on. | ||
| The battery runs out too fast. | cold place. | |
| The camera turns off during operation. | ||
| The battery charge does not start. | connected to the indoor power outlet correctly. | outlet correctly. |
| It takes long to charge the battery. | very cold place. | cold. |
| During the battery charge, the Self timer lamp flashes, or an error message appears on the LCD monitor, indicating that the battery cannot be charged. | +5 °C and +40 °C. If this does not solve the problem, contact a FUJIFILM authorized distributor. | |
| An unintended language appears on the monitor. | setting on the setup menu is not correct. | |
| No picture is taken when the shutter button is pressed. | card is full. ⑤ The memory card contact (gold part) is dirty. ⑥ The memory card is damaged. | ⑤ Clean the memory card contact with a dry and soft cloth. ⑥ Insert a new memory card. |
TROUBLE SHOOTING (Continued)
| Problem Possible Causes Solution | ||
| The camera does not focus. | focus. (Page 22) | |
| The flash does not fire. | SUPPRESSED FLASH is selected for FLASH. | SUPPRESSED FLASH. (Page 23) |
| The flash does not fully light the subject. | flash. | |
| Images are blurred. | take a picture. | take a picture. |
| Images are blotchy. | selected at high temperatures. | does not indicate a malfunction. |
| The camera is unresponsive. | solve the problem, contact a FUJIFILM authorized distributor. | |
| The film pack cannot be loaded, or cannot be loaded easily. | correctly. | (No other fi Ims can be used.) yellow positioning mark in your camera. |
| The film cover cannot be ejected. | fi Im pack. | |
TROUBLESHOOTING
EN
Printed pictures
| Problem Possible Causes Solution | ||
| The correct date is not printed. | ||
| Part or whole finished print is white. | the fi lm was used. | all the fi lm. Otherwise, the rest of the fi lm may be exposed and unsuitable for use. |
| The picture is blurred. | immediately after it came out from the printer. | |
| A black line is printed on the bottom of the finished print. | dropped and the fi lm has become misaligned. | problem, load a new fi lm pack. |
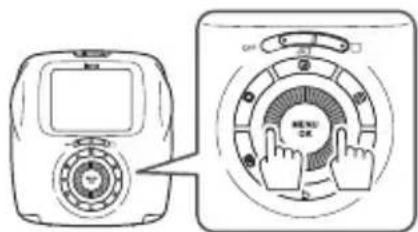
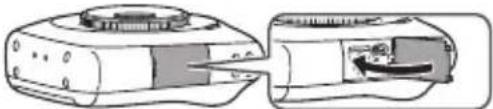
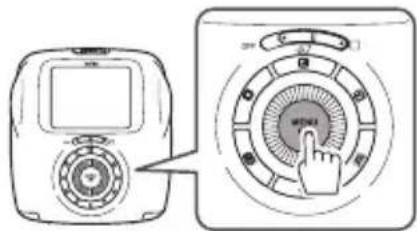
Using the Reset Button to Reset the Camera
If the camera does not work properly, use the reset button to reset the camera.
Open the card slot cover to access to the reset button.
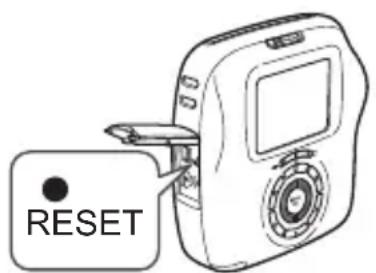
Press the reset button using the tip of a ballpoint pen or something similar.
IMPORTANT SAFETY NOTICE
This product has been designed with safety in mind, and to provide safe service when handled correctly and in accordance with the User's Guide and instructions. It is important that both the product and the INSTAX film are handled properly and used only to print pictures as instructed in this User's Guide and in the INSTAX mini film instructions. For your ease and safety, please follow what is written in this User's Guide. It is also a good idea to keep this User's Guide in a safe, easy to find place where you can refer to it if needed.
WARNING
This symbol indicates danger, which could result in injury or death. Please follow these instructions.
WARNING
If the camera becomes hot, emits smoke or a burnt smell or otherwise seem abnormal, immediately turn the camera off. Faults of this nature could start a fire and cause burns. (Take particular care to avoid burns when pulling out the USB cable.)
If the camera is dropped into water or if water or metal or other foreign objects get inside the camera, immediately disconnect the AC power adapter and unplug the AC power adapter from the power outlet. Faults of this nature could cause the camera to overheat or catch fire.
Do not use this camera in places where there is flammable gas or near open gasoline, benzine, paint thinner or other unstable substances which can give off dangerous vapors. Faults of this nature could cause the camera to explode or catch fire and cause burns.
As the battery is built inside the camera, do not subject it to heat, throw it into an open fire, attempt to drop it, or apply impact to it. Doing so could cause the camera to explode.
WARNING
Never attempt to take this product apart. You may be injured.
If anything is wrong with the camera, never attempt to repair it by yourself. You may be injured.
If this product is dropped or damaged so that the inside is showing, do not touch it. Contact your FUJIFILM dealer.
Do not touch any parts or projecting parts inside the back cover. You may be injured.
Never get this product wet or handle it with wet hands. Doing so may result in an electric shock.
If the camera will be left unused for a long period (because you are traveling, etc), disconnect the AC power adapter and unplug the USB cable. Failing to do so could cause a fire.
Do not move the camera while the USB cable is still connected to it. Doing so could damage the USB cable and cause a fire or electric shock.
Keep out of the reach of small children. This product could cause injury in the hands of a child.
Do not cover or wrap the camera or the AC power adapter in a cloth or blanket. This can cause heat to build up and distort the casing or cause a fire.
C E
The "CE" mark certifies that this product satisfies the requirements of the EU (European Union) regarding safety, public health, environment and consumer protection. ("CE" is the abbreviation of Conformité Européenne.)
COMMON SENSE CAMERA CARE
CAMERA CARE
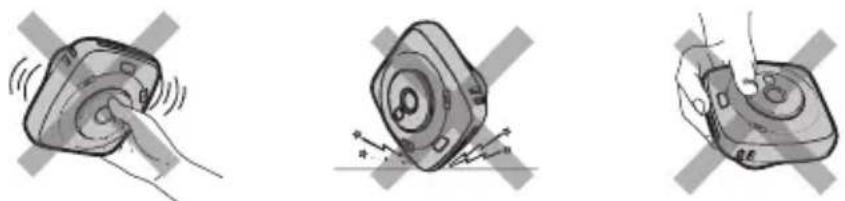
① Your camera is a precision instrument. Do not get it wet or drop it. Also, do not expose it to sand.
② Do not use a strap made for cellular phones or other similar electronic products. These straps are usually too weak to hold your camera securely. For safety, use only straps designed for your camera, and use only as specifically intended and instructed.
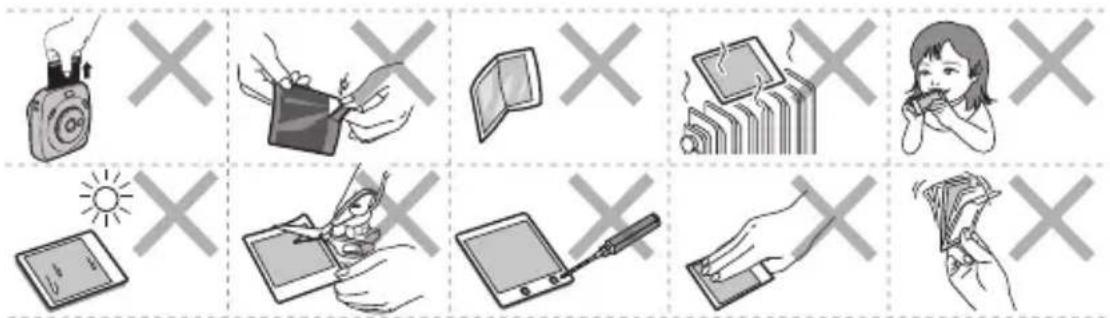
If you are not using your camera for a long period, keep it where it will be safe from heat, dust, and moisture.
④ Do not use solvent such as thinner or alcohol to remove dirt.
⑤ Keep the film chamber and camera interior clean to avoid damaging films.
In hot weather, do not leave your camera in hot places such as in a car or on the beach. Do not leave it in damp places for long periods.
⑦ Moth repellent gas such as naphthalene may affect your camera and prints. Be careful to keep your camera and prints in a safe, dry place.
Because your camera is software-controlled, there is the chance that on rare occasions it will malfunction.
If you experience incorrect operation, press the reset button on the camera.
Take great care to ensure that printed materials do not violate copyright, image rights, privacy or other personal rights and do not offend public decency. Actions that violate the rights of others, are contrary to public decency or constitute a nuisance may be punishable by law or otherwise legally actionable.
HANDLING LCD MONITOR
As the LCD monitor is easily damaged, do not scratch the surface with a solid material. To avoid the LCD monitor getting damaged, we recommend you attach a protective sheet (commercially available) on the monitor.
EN
EN
TheBattery
The following describes the proper use of batteries and how to prolong their life. Incorrect use can shorten battery life or cause leakage, overheating, fire, or explosion.
The battery is not charged at shipment. Charge the battery completely before use.
Notes on the Battery
The battery gradually loses its charge when not in use. Charge the battery one or two days before use.
Battery life can be extended by turning the camera off when not in use.
Battery capacity decreases at low temperatures; a depleted battery may not function when cold. To extend the battery life, warm the camera before using it.
Charging the Battery
Charge the battery using the supplied USB cable. Charging times will increase at ambient temperatures below +10^ or above +35^ . Do not attempt to charge the battery at temperatures above +40^ ; at temperatures below +5^ , the battery will not charge.
The battery does not however need to be fully discharged before charging.
Battery Life
At normal temperatures, the battery can be recharged about 300 times. A noticeable decrease in the length of time the battery will hold a charge indicates that it has reached the end of its service life.
Storage
Performance may be impaired if the battery is left unused for an extended period of time when fully charged. Deplete the battery fully before storing it.
Store the camera in a dry place with an ambient temperature of from +15^ to +25^ . Do not store in locations exposed to high extremes of temperature.
Cautions: Handling the Battery
- The battery and camera body may become warm to the touch after extended use. This is normal.
Certification marks acquired by the camera are located inside the film chamber.
Cautions during printing
INSTAX SQUARE FILM AND PRINT CARE
See FUJIFILM Instant Film "instax SQUARE" for film use instructions. Follow all instructions for safe and proper use.
for many hours.
starting to print pictures.
unused film. We recommend that you carry the camera and/or the film onto the aircraft as carry-on luggage. (Check with each airport for more information.)
Cautions on handling the fi Im and prints
For details, refer to the instructions and warnings on FUJIFILM Instant Film "instax SQUARE".
Information for traceability in Europe
Manufacturer: FUJIFILM Corporation
Address, City: 7-3, Akasaka 9-Chome,
Minato-ku, Tokyo
Country: JAPAN
Authorized representative in Europe:
FUJIFILM EUROPE GMBH
Address, City: Dusseldorf Heesenstrasse 31, 40549
Country: Germany
EN
DEUTSCH
Inhalt
Option: IMAGE TOUTES IMAGES
ROTATION IMAGE (images statiques uniquement)
TEXHINUeCKNE XAPAKTEPNCI.KI...313
YCTPAHEHNE HENOLADOK 315
BAKHAR INHOPMALIINIPO
B630PACHOCTN 318
Iocne npouteHnXpaHNTe3TOpyKOoDCTBO NOb3OBaTeJI B6e3OanChOM N IerKoDoCTynHom MceTe, YTo6bl K Hemy Bcerda MoJHO 6bl0 6bapntbca npn Heo6xoDMOCtN.
Ipepeinocnojb30BaHnneM
PpeJe cem npntyntb K nCnObl3OBaHIO fOTOKamepbI, npOBepbTe yka3aHHoe daJIee.

Y6eNTecb, YTO NOCTaBJIaEMbIe aKceccyapbl BKJIIOUeHbl B KOMnJIeKT IIOCTaBKN.

EEE cootbetCTbyeT NipeKTnBe.
HaHMeHOBaHnJaDeTaJeI
Pepenraaactb
RU

Bcnbikka/INdkaTop aBTocnycka

OTBepctne dny BbIBOda OTNeuaTKOB

Kpenenne npe meka

Khonka cnycka 3aTBopa (Cnpaba)

ObekTNB

3epkaIbue dIa ABTOIopTeTOB

KoIbUO macuTa6npoBaHn

Khonnka cnycka 3aTbopa (Cneba)

BLOKnopaTOp KpbIuKNOTceKa dIa foTo6ymaH

KpenneHne npeMeuka

Noprt USB

Khonka nepe3anycka
Гнздя Kapы
namу Micro SD

KpbIka rHe3da dna KapTbI namrTn

Khonka mnbtp)

KhoNka(BHbTeHPOBaHne)

CenKTopHa KhoNka/ NcKynpaBHeHn

Khonka (Bocnpoun3BedeHne)

5 Khonka (Ha3a)

KHOIIKa (IeuaTb)

KhoIIKa MENU/OK

KHonka (RpKocTb)

Kpbioka oTecka dna foTo6ymn

BbKIOHcATEb NHTAHN (HeNoBDKHOe 306paXeHE/BuDeo)

KK-MOHHTop
4 YkaKNTe rO, Mecau, DeHb, yacbl mHyTbI, a 3aTeM HaxMNTe KhoNky MENU/OK nnn
NcnoIb3yIte △,YTO6bl Bbl6paTb 3JIeMeHT IJHnHaCTpOuKN (rOd, MeCraU, DeHb, Yacbl NII MNHytbl), 3aTeM nCNoIb3yIYe △▼,YTO6bl yCTaHOBnTB 3HaueHne.
5 HaxmTe KhoNky MENU/OK.
3 Ykaxnte fOpMaT, a 3aTeM HaxmTe KHONKy MENU/OK nnn

Bb6epuTe OINH n3 npBedeHHbx HnXe oOpMaTOB.
ROJ/MecraU/JeHb
Mecu/DeHb/roD
- DeHb/Mecra/ROd
KordaΦopMaT yctaHOBJIeH,OTKpbIbAEcTcKpaH
YTO6bI YCTaHOBNTBoID, MeCAU, DeHb, YaCbI MmHyTbI.
Hac trokka yHKuIM dIy KHOKN cNycka 3aTBopa
Ha3haBte yHKcIIO kKaJDo KHOJaKe 3aTbOp aN3 KOM6HauN, yKa3aHHbX B Ta6nIe HnKe.
Korda BbINOJIHReTc foTOcBemKa:
I3o6paaxeHHMOxHO pOcMaTpNbA Tb Ha MOHTope.

CdBnHbTe BbIKIOuOaTeB NITaHIN B NOIOXKeHne (HeNOBnIXHOe N3o6paXKeHne).

HaxMMTe KhoNky (Bocnpo3BepeHne).

OTo6pa3ntcamaoeNoceIHeeN3o6paXKeHne.

HaKMTe nnnyTo6bI Bb16paTb n3o6paXeHne dna npocMOTpa.

HaKaTne oTo6paXaET npeBlyuuee n3o6paXeHne. HaKaTne oTo6paXaET cNeDyUoee n3o6paXeHne.
HaxaTne KhoNkCnCycka 3aTBopa NOnHOCTbIO BO3BpaaaeTKKpaHy CbeMKI.
I3meHeHne OTo6paXeHnBocnpOn3BeDeHn
Moxho yBeneuHTb n3o6paXeHne Ha MoHTope nIIN 13MeHHb KOJIueCTBO OJHOBpeMeHHO OTO6paXaembIX n3o6paXeHn.
yBennueHne n3o6paXeHna
BbMOKeTe yBeNnUHTb N3O6paKeHne Ha MOHTope, NOBepHyB DNCK ynpaBHeHnNo YacOBo CTpeJIke. CtaHdapt MacuTa6nPoBaHne
IcnoB3yute KHOKnD npocmoTpa.
-Пин Нжати Кногн MENU/OK Ил.Kногн (Hazad)OTMeHЯETcMaMuTa6nPoBaHne.
Mochho HaneuataTb 1306paXeHne, KOrDa OHO yBeneHeo. (Ctp. 298)
I3meHeHne KOnMueCTBa N3o6paXKeHn Ha MOHTope
Pn nobopoTe dncka ynpabHeHn npOTNB YacOBo CTpeKNu 3MeHReTc KOJIueCTBO N3O6paXeHn (OJHO, Yetbipe nn DeBtB).
Odno u3o6paXKeHne
YeTbipe n3o6paxKeHn
IeBraHn306paXKeHn

-Пи поворо te ДИСКУпавLEнЯ NOЧАСБОВ CTрЕКе ИЗМЕнЯТСКОЛИЧECTBO ИЗОБРАЖЕН (утыpe Или OДно).
-Пин Нжати KhoNkMENU/OK Ил Кногк (Ha3aI)OTMeHЯETcOДНOBpeMeHHoe OTO6paXeHne HECKONbKnx N3O6paXeHn.
Moxho HaneuataTb n06paXeHne, KOrda OTo6paXaIOTCaYtebipe nn DeBraTb n3o6paXeHn. (Ctp. 298)
BnndeocbemKa n BocnpoU3BeDeHne
BnDoeocbemka
B 3TOM pa3dene OINcBIAOTCA OCHOBHbIe ONEpaun BNDeocBemKn.
1 IpebeNTe BbIKIOuTeIb NITaHnB NIOJKeHne (BnJeO).
2 Bo3bMITE foToKaMepy.

BbINOHNHTe WArn No Bb6Opy 3ΦΦeKToB nIa n3o6paXeHn. (Ctp. 300-301)
3ΦΦeKtblToIbKOДЯBnIeOcbeMKN
BbMOKeTe BbIbpaTb OINH N3 Tpex TINOB FInbTpob
IIaBnDeocBemKn:《Retro》,《Film Frame》N《Sequence》.
Boone noDpo6HyIO INHΦopMauio CM. Ha cTp. 300.
IVcnoIb3yIte KOJIbO MacuTa6nPoBaHn, YTo6bl NOITBepdNTb HxKHyIO KOMNo3nCnIO KoHeuHoro n3o6paKeHn.
HaKMITE KNONky CnYcKa 3aTBOpa NOnHOCbIO. IOBNTcA kPaH, NOKa3aHHbI HNKe, n HaHHeTCBnDeOCbEMka.
BoBpeMcBemKMOxHO NcNoIb3OBA Tb KOJIbO macuTa6nupoBaHn.
Ha noIocobom nHnkaTope,OTobpaKaemOM CneBa,MOxHO yBnDeTb 3aTpaueHHoe BpEmr.
- PnBbIope «Retro», «Film Frame» nI IN «Sequence» foToKaMepa npImeHReT 3ΦΦeKT ΦNbTpKa K cAmOmy faNy C BnDeOpOJIKNOM B IpoUecce CbeMK.
6 Haxmte KhoNky cnyska 3aTbopa nonHOCTbIO eue pa3. BndeocbemKa 3aBepwaetc.
Korda chmaete Bndeo, depxnte foTOkamepy 06eMM pykamnpnKab JOKTN K TynOBu.
Cneinte 3a Tem,HTO6bI He KacaTbcra OBeKtNbA, Korda HaxnMaTe KONky Cnycka 3aTBopa.
CneIte 3a Tem, YTO6bI naIbUcI nnpeMeHb oToKamepbI He 3aKpbIBaJI NCBNtIKy, OBeKTHB nINOTBepCTne IJRA BbIOda OTNeuTkoB.
- Pn INCNOB3OBAHN KApTbI NaMRTN BInDeO MOXHO CHIMATb B TeueHne 15 ckyHd.
3ByK He 3aInCbBaetcB baiI BnJeO.
- PnBbIbope «Retro», «Film Frame» nII «Sequence» HeIb3a OTMeHHTb npIMeHeHHbI 3ΦΦeKT ΦNtpa IIN pIMeHHTb dpyroI ΦNtbp IIN BnDeOcBeMKn NOcIe CbEMKn BnDeOpOJIka.
BnndeocbemKa n BocnpoN3VeJeHne
Bocnpo3BeJeHne BndeO
BnIeO MoXHO BOCIpOn3BOJNTb Ha MOHTope.

IpeBcTe BbIKNoaTeNb NtTaHnB NnoJxHeN (BnuOe).

HaxmTe KhONky (BocpnOn3BeHeHne).
OTo6pa3ntcTnIKTORpamMa cAmoro nocJeHero BnDeo.

Haxmte nnn, TTo6bI Bbl6paTb Bndeo DnBocpnoun3BeDeHn.

Pn Haxattn OTo6pa3ntc TIKTORpMaMa npdeIduyero BnuDeo.
Pn HaxaTNI OTo6pa3ntcNtKToIpaMmnaocneyUoJeroBnDeo.

HaXmUTe


HaunhaetcBocnpoun3BeJeHne BUneo.
3 BbIeTe n3o6paKeHne Inna neaTn. KOrda BbInonHReTc neaTb CHIMKa:
HaxmTe nnn ▷,yTo6bI BbI6paTb 1306paXeHne InI neaTn.
Ipn Haxatn OTO6paxaetc npedbduyuee
H3o6paKeHne.
Ipn Haxatn OTO6paxaetc cneyuOuee
H3o6paKeHne.
Korda neyataete u3o6paXeHne, B3aToe u3
HaxMITE nIy,HTo6bI Bbl6paTb BnDeo 1A BOCnPon3BeHeN.
Pn Haxatnn OTO6pa3ntcN NKTOrpMaMa npdeBdyuero Bnueo.
Ipi Haxatni OTO6pa3ntcra NIKTORpamma nocneDyioo Bndeo.
② HaxMnTe V, yTO6bI BOCPON3BcTn BnDeo.

3 HaXMMTeV,HTo6bI npNoCTaHOBtB BOCpOu3BeDeHHe.
HaxMTe HnN NOBepHnTe DnCK ynpaBHeHn, T06bI Bb6paTb n3O6paXeHne (KaDp) Jnpeatn.
⑤ HaxmTe KhoNky MENU/OK. 1306paKeHne 6ydt 3aXBaYeHO coxpaHeHO.
ДяdoctynaKcoxpaHeHHOMy n3o6paXeHIO, 3axBaueHHOMy n3 φaINa BnDeO,CdBnHbTe BblIOuATEJIb NITaHnB NnOJOKeHne (HenoDBNXHoe n3o6paXeHne) B ware 1 n nepeiDNTe K wary 2 n 3.
Neuatab
4 Pn Heo6xOaMocT n OtperynpyTe 306paXeHn. (Ctp. 300 n 301)
5 Haxmte KhoNky (peaTb). NOBITcKpaH, nokaahhbl Hnke.
6 Haxmte KhoNky MENU/OK.
HaheTc neaTb.
Ja OTMeHbI neaTu Haxmte KhoNky (Ha3a).
Korda foToRaФИЯ 6удeТ BbIBeHeHa n3 foToKaМeРы (foToKaMepa nepeCTaHET n3ДaBaTb xapaKTePнbln 3Byk), BO3bMntecb 3a KpaI FOToRpaФИЯ n I3BnEKeNTe ee NOJIHOCTbIO.
Hnkaqna octabuxxra nctob foto6ymaru HnkaTophbe TOCKB npaBOy qactm MOHTopa yka3bBAOT KONueCTBO OCTabuxxcra nctob foto6ymar.
Onda Toka cTaHOBNTc cepo KaJb pa3, KOrda neaTaETc ONo n3O6paKeHne.
Hn HeNoDBHXHO n3o6paXeHnM oKHO paCneYaTaTb n3o6paXeHne, KOtOpoe 6blno yBEnuYeHo, nIpaCneYaTaTb YeTbipe nn DeBAtb n3o6paXeHn Ha OndHom IInCTe foTo6ymar. NcNoJb3yTe dNck ynpaBJIeHn, YTO6blpeuNTu K OTo6paXeHn HecKoNBkIX n3o6paXeHn B Ware 2, KOrda oTo6paKaetcra n3o6paXeHne Dn neaTu. (Ctp. 295)
-Дононтельнуинфорmaцию no n3BNeuehenio OTneuATKOB CM.ВИНСТPyкuaNXиnpedynpexdeHnax Ha KapTpudke cФOTObyMaRoI dЯ MОMeHTaJIbHoN neuataN «instax SQUARE» ot FUJIFILM.
Bpem npoBHeHn CoCTaBnEeT np6n3ntelbHO 90 ckyHd. (Bpem 3aBnCt OT TempeaTypbl okpykaioe cpebl).
HactpoIka/o6pa6oTKa n3o6paXeHn (əΦΦeKT)
Bb moKeTe Bb6paTb MeHIO 3ΦΦeKTOB, HENOCpeDCTBeHHO Haxa KHOKNy Ha 3aHHe N aHEnN, UTo6bI HAcPTpOnTb 3ΦΦeKT dIa I3o6paXeHN, Noka OTo6paXaETC 3KpaH CbeMKn/BOcnpOn3BeDeHN.
ΦnIbTp
BbINOHNTE yka3aHHble Hnke 7aH, qTo6bl BbI6paTb 0nIbTp.
HaxmTe KONky (DnIbTp) BO BpeM oTo6paKeHnE kpaHa CbeMK/BOcnpOn3BeDeHn.
PonBNTcAkpah, nokaahhhn HnHexe.
C nOMOu DnCKa ynpabHeHnBbIepeHte HnIbTp.
IOnJIHInTeJbHyIO INHΦOpMauIO O KaKdOM ΦNtpe CM. B Ta6JIue cnpaba.
HaXMMTe KHOIpKy (ΦnIbTp) eue pa3.
3ΦΦeKT ΦnIbTpapnpmEnHReTcKn3O6paXKeHIO, INpOINCXoIHTB03BpaT KnpEblDyUeMy 3KpaHy.
Takke MoXHO BepHybC K npdeBiyuemy EKpaHy, Haxab KhoNky MENU/OK nnn KhoNky (Ha3a).
YTO6bIOTMeHnTB3ΦΦeKT ΦnNbTpα,HaXmnte n ydepxnBaIte KHOIIKy (ΦnNbTp).
DocTyNhbIe 0f0eKtbl fNlbTpa
| Тип Описанne |
| Cornelius YcnilnBaet TeHи OcBETTЯET CBeTlbIe oblaCTn Ha n3O6paxKeHn. |
| Monochrome |
| Преобразует n3O6paxKeHnE B MOHOxPOMHoe n3O6paxKeHnE 6a3OBOrO ζBeta. |
| Luna DeJaet n3O6paxKeHnE ячe N ycnilnBaet BCE ζBeta. |
| Тип Onи сане | |||
| Immerse ДобавлияпспспспспспспспспспспспспспспспспспспспспспспспспспспспспспспспспспспспспспспспспспспспспспспспспспспcпспспспспспспспспспспспспспспспспспспспспспспспспспспспспспспспспспспспспспспспспспспспспспспспспспСпСпСпСпСпСпСпСпСпСпСпСпСпСпСпСпСпСпСпСпСпСпСпСпСпСпСпСпСпСпСпСпСпСпСпСпСпСпСпСпСпСпСпСпСпСпСпСпСпСпCпСпСпСпСпСпСпCпСпСпCпСпCпСпCпCпCпCпCпCпCпCпCпCпCпCпCпCпCпCпCпCпCпCпCпCпCпCпCпCпCпCпCпCпCпCпCпCпCпCпCпCпCпCпCпCпCпCпCпCпCпCпCпCпСпСпСпСпСпСпСпСпСпСпСпСпСпСпСпСпСпСпСпСпСпСпСпСпСпСпСпСпСпСпСпСпСпСпСпСпСпСпСпСпСпСпСпСпСпСпСпСпСпSССССССССССССССССССССССССССССССССССССССССССССССССССССССССССССССССССССССССССССССССССССССССССССССССССССCS | |||
| Immerse ДобавлияпспспспспспспспспспспспспспспспспспспспспспспспспспспспспспспспспспспспспспспспспспспспСпСССССССССССССССССССССССССССССССССССССССССССССССССССССССССССССССССССССССССССССССССССССССССССССССССССC | |||
| Amber | У重金属дунгларыздунгларыздунгларыздунгларыздунгларыздунгларыздунгларыздунгларыздунгларыздунгларыздунгларыздунгларыздунгларыздунg�чыздунгчыздунg�чыздунg�чыздунg�чыздунg�чыздунg�чыздунg�чыздунg�чыздунg�чыздунg�чыздунg�чыздунg�чыздунg�чыздунg�чыз徾ыз徾ыз徾ыз徾ыз徾ыз徾ыз徾ыз徾ыз徾ыз徾ыз徾ыз徾ыз徾ыз徾ыз徾ыз徾ыз徾ыз徾ыз徾ыз徾ыз徾ыз徾ыз徾ыз徾ыз徾ыз徿ыз徾ыз徿ыз徿ыз徿ыз徿ыз徿ыз徿ыз徿ыз徿ыз徿ыз徿ыз徿ыз徿ыз徿ыз徿ыз徿ыз徿ыз徿ыз徿ыз徿ыз徿ыз徿ыз徿ыз徿ыз徿ыз徿ыз徵ыз徵ыз徵ыз徵ыз徵ыз徵ыз徵ыз徵ыз徵ыз徵ыз徵ыз徵ыз徵ыз徵ыз徵ыз徵ыз徵ыз徵ыз徵ыз徵ыз徵ыз徵ыз徵ыз徵ыз徵ыз徴ыз徵ыз徵ыз徵ыз徵ыз徵ыз徵ыз徵ыз徵ыз徵ыз徵ыз徵ыз徵ыз徵ыз徵ыз徵ыз徵ыз徵ыз徵ыз徵ыз徵ыз徵ыз徵ыз徵ыз徵ыз徱ыз徱ыз徱ыз徱ыз徱ыз徱ыз徱ыз徱ыз徱ыз徱ыз徱ыз徱ыз徱ыз徱ыз徱ыз徱ыз徱ыз徱ыз徱ыз徱ыз徱ыз徱ыз徱ыз徱ыз徱ыз徵ыз徵ыз徵ыз徵ыз徵ыз徵ыз徵ыз徵ыз徵ыз徵ыз徵ыз徵ыз徵ыз徵ыз徵ыз徵ыз徵ыз徵ыз徵ыз徵ыз徵ыз徵ыз徵ыз徵ыз德ыз德ыз德ыз德ыз德ыз德ыз德ыз德ыз德ыз德ыз德ыз德ыз德ыз德ыз德ыз德ыз德ыз德ыз德ыз德ыз德ыз德ыз德ыз德ыз德ыз徵ыз徵ыз徵ыз徵ыз徵ыз徵ыз徵ыз徵ыз徵ыз徵ыз徵ыз徵ыз徵ыз徵ыз徵ыз徵ыз徵ыз徵ыз徵ыз徵ыз徵ыз徵ыз徵ыз徵ыз徻ыз徻ыз徻ыз徻ыз徻ыз徻ыз徻ыз徻ыз徻ыз徻ыз徻ыз徻ыз徻ыз徻ыз徻ыз徻ыз徻ыз徻ыз徻ыз徻ыз徻ыз徻ыз徻ыз徻ыз徻ыз徵ыз徵ыз徵ыз徵ыз徵ыз徵ыз徵ыз徵ыз徵ыз徵ыз徵ыз徵ыз徵ыз徵ыз徵ыз徵ыз徵ыз徵ыз徵ыз徵ыз徵ыз徵ыз徵ыз徵ыз循ыз徵ыз徵ыз徵ыз徵ыз徵ыз徵ыз徵ыз徵ыз徵ыз徵ыз徵ыз徵ыз徵ыз徵ыз徵ыз徵ыз徵ыз徵ыз徵ыз徵ыз徵ыз徵ыз徵ыз徵ыз徲ыз徵ыз徵ыз徵ыз徵ыз徵ыз徵ыз徵ыз徵ыз徵ыз徵ыз徵ыз徵ыз徵ыз徵ыз徵ыз徵ыз徵ыз徵ыз徵ыз徵ыз徵ыз徵ыз徵ыз徵ыз徸ыз徵ыз徵ыз徵ыз徵ыз徵ыз徵ыз徵ыз徵ыз徵ыз徵ыз徵ыз徵ыз徵ыз徵ыз徵ыз徵ыз徵ыз徵ыз徵ыз徵ыз徵ыз徵ыз徵ыз徵ыз徳ыз徵ыз徵ыз徵ыз徵ыз徵ыз徵ыз徵ыз徵ыз徵ыз徵ыз徵ыз徵ыз徵ыз徵ыз徵ыз徵ыз徵ыз徵ыз徵ыз徵ыз徵ыз徵ыз徵ыз徵ыз徿ыз徵ыз徵ыз徵ыз徵ыз徵ыз徵ыз徵ыз徵ыз徵ыз徵ыз徵ыз徵ыз徵ыз徵ыз徵ыз徵ыз徵ыз徵ыз徵ыз徵ыз徵ыз徵ыз徵ыз徴ыз徴ыз徵ыз徵ыз徵ыз徵ыз徵ыз徵ыз徵ыз徵ыз徵ыз徵ыз徵ыз徵ыз徵ыз徵ыз徵ыз徵ыз徵ыз徵ыз徵ыз徵ыз徵ыз徵ыз徵ыз徴ыз徱ыз徵ыз徵ыз徵ыз徵ыз徵ыз徵ыз徵ыз徵ыз徵ыз徵ыз徵ыз徵ыз徵ыз徵ыз徵ыз徵ыз徵ыз徵ыз徵ыз徵ыз徵ыз徵ыз徵ыз徴ыз德ыз德ыз德ыз德ыз德ыз德ыз德ыз德ыз德ыз德ыз德ыз德ыз德ыз德ыз德ыз德ыз德ыз德ыз德ыз德ыз德ыз德ыз德ыз德ыз徴ыз徴ыз徴ыз徴ыз徴ыз徴ыз徴ыз徴ыз徴ыз徴ыз徴ыз徴ыз徴ыз徴ыз徴ыз徴ыз徴ыз徴ыз徴ыз徴ыз徴ыз徴ыз徴ыз徴ыз徴ыз徵ыз徴ыз徴ыз徴ыз徴ыз徴ыз徴ыз徴ыз徴ыз徴ыз徴ыз徴ыз徴ыз徴ыз徴ыз徴ыз徴ыз徴ыз徴ыз徴ыз徴ыз徴ыз徴ыз徴ыз徴ыз徬ыз徴ыз徴ыз徴ыз徴ыз徴ыз徴ыз徴ыз徴ыз徴ыз徴ыз徴ыз徴ыз徴ыз徴ыз徴ыз徴ыз徴ыз徴ыз徴ыз徴ыз徴ыз徴ыз徴ыз徴ыз徻ыз徴ыз徴ыз徴ыз徴ыз徴ыз徴ыз徴ыз徴ыз徴ыз徴ыз徴ыз徴ыз徴ыз徴ыз徴ыз徴ыз徴ыз徴ыз徴ыз徴ыз徴ыз徴ыз徴ыз徴ыз循ыз徴ыз徴ыз徴ыз徴ыз徴ыз徴ыз徴ыз徴ыз徴ыз徴ыз徴ыз徴ыз徴ыз徴ыз徴ыз徴ыз徴ыз徴ыз徴ыз徴ыз徴ыз徴ыз徴ыз徴ыз征ыз徴ыз徴ыз徴ыз徴ыз徴ыз徴ыз徴ыз徴ыз徴ыз徴ыз徴ыз徴ыз徴ыз徴ыз徴ыз徴ыз徴ыз徴ыз徴ыз徴ыз徴ыз徴ыз徴ыз徴ыз徟能ロхк; Ropponi | ДобавлияпспспспспспспспспспспспспспспспспспспспспспспспспспспспспспспспспспспспспспспспспспспспспспспспS ДобавлияпспспспспспспспспспспспспспспспспспспспS ВИNTAJHONCHOUZC60B70306PGEY20306PGEY20306PGEY20306PGEY20306PGEY20306PGEY20306PGEY20306PGEY20306PGEY20306PGEY20306PGEY20306PGEY20306PGEY20305C60B70306PGEY20306PGEY20306PGEY20306PGEY20306PGEY20306PGEY20306PGEY20306PGEY20306PGEY20306PGEY20306PGEY20306PGE Y20306PGEY20306PGEY20306PGEY20306PGEY20306PGEY20306PGEY20306PGEY20306PGEY20306PGEY20306PGEY20306PGEY20306PGEY20310C60B70306PGEY20306PGEY20306PGEY20306PGEY20306PGEY20306PGEY20306PGEY20306PGEY20306PGEY20306PGEY20306PGEY20306PGE RopponiGnOJHONCHOUZC60B70306PGEY20306PGEY20306PGEY20306PGEY20306PGEY20306PGEY20306PGEY20306PGEY20306PGEY20306PGEY20306PGEY2040C60B70306PGEY20306PGEY20306PGEY20306PGEY20306PGEY20306PGEY20306PGEY20306PGEY20306PGEY20306PGEY20306PGEY20306P60B70306PGEY20306PGEY20306PGEY20306PGEY20306PGEY20306PGEY20306PGEY20306PGEY20306PGEY20306PGEY20306PGEY20306PGEY RopponiGnOJHONCHOUZC60B70306PGEY20306PGEY20306PGEY20306PGEY20306PGEY20306PGEY20306PGEY20306PGEY20306PGEY20306PGEY2 RopponiGnOJHONCHOUZC60B70306PGEY20306PGEY20306PGEY20306PGEY20306PGEY20306PGEY20306PGEY20306PGEY20306PGEY20306PGEY2 | ДобавлияпспспспспспспспспспспспспспспспспспспспспспспспспспспспспспспспспспспспспспспспспспспспспспспS Добавли�япспспспспспспспспспспспспспспспспспспспспспспспспспS ДобавлияпспспспспспспспспспспспспспспспспспспспспS RopponiGnOJHONCHOUZC60B70306PGEY20306PGEY20306PGEY20306PGEY20306PGEY20306PGEY20306PGEY20306PGEY20306PGEY20306PGEY2 0 RopponiGnOJHONCHOUZC60B70306PGEY20306PGEY20306PGEY20306PGEY20306PGEY20306PGEY20306PGEY20306PGEY20306PGEY20306PGEY2 |
IcnoJb3OBaHHeBCnblIKN
IcnoJIb3yIte BCnblkU npn CbemKe B HooHoe BpeMa IINB NOMeHnn npn HeNoCTaOuHOM OCBeHnn.

Haxmnte KhoNky MENU/OK Ha ekpahe CbeMkn.
IORBNTcMeHIO CbeMKn.

Bb6epuTe FLASH, a 3aTeM HaxMnTe KhONKy MENU/ OK.

Bb6epnte HactpoKy BCnbIuKn, 3aTeM HaKMnTe KhoNkY MENU/OK.
Iopno6Heo HAcTpoKe BCnblkN cm. B pa3dene «HAcTpoKn BCblkN»

HaXmnte KhONky cnYcka 3aTbopa, YTO6bl cdeIaN CHIMOK.

HacpoKn BCnbIuKn
BbIepnTe OndHy n3 npNBedeHbIX HnKe HaCtPoek.

AUTO FLASH
Bcnbka cpa6aTbIbaeT aBTOMaTHueckN, KOrda
ΦOTOKaMepa pacNo3Haet, YTO TemHo. PeKOMeHnyETcR
B 60nbWHCTBe CNTyaui.

FORCED FLASH
Bcblka cpa6aTabiBaet Bcerda, He3aBNCIMO OT npKocn o6bekTa. IcnoIb3yIte 3TOT npaMeTp dIy o6bekToB,OCBeueHHbx C3aDn.

SUPPRESSED FLASH
Bcblka He cpa6aTaBAeT daKe npn nnoxoy
ocBeueHNOCTNo6bekTa.PekomeHnyeTcra
ncnObl3OBaTb, KOrda CbeMka CO Bcblko 3anpeueHa.
Mb peKomeHnyem nCnoIb3OBA Tb CTOn dJa fNkcaun
foTOKaMepbI, KorDa TemHO.
CbeMa aBtonoptpeTa (cen)
C nOMOsbIO cneuaHbHO 3epKaIa IaABTONOpTpTa MoXHO JERKO CdeJaTb ABTONOpTpTe.


PnBtmeHIO Bocpon3BeHnA.
3 BbI6epuTe PRINT HISTORY, a 3aTeM HaXMMTe KhoNky MENU/OK.
PonBntc3kpaHnIyBb6opaN3o6paxKeHn.
-Последни 50 mctopn neaTu xpaHrTcB namrTu.
- Ecnn nctopnn neaatn npebblaaot 50, to HOBa nctopnn neaatn nepe3anncbIbaetcna CaMyIO nepByIO nCTOpNO.
Haxmte Hn, yTo6bI BbI6paTb 3o6paXeHne IJI neaTI.
Pn HaxaTn OTo6paKaetc npdeIyuee n3o6paKeHne.
Pn Haxatnn OTO6paxaetcnae yuue n3o6paKeHne.
MoxHO BbIbpaTb n3O6paXeHne C qETbIPbMa nn DeBraTbIO KaIpaMn.
Haxmnte KhoNky (Neayt).
6 HaxmTe KhONky MENU/OK.
HaHHeTc neaTaB.
Haxmnte KhoNk (Ha3a) Jn OTMHeI neaTu.
Korda foTOrpaФИЯ 6yIeT BbIBeHEn3
fOTOKaMepbl (fOTOKaMepa nepeCTaHET N3DaBaTb
XapaKTepHbI 3ByK),BO3BMITEc 3a KpaI
fOTORpaΦnN nI3BLeKInTe ee NOHOCtBuO.
HeIb38 coXpaHHTb NCTOpNIO neaTn Ha KapTe nAMrTu.
Bce nCTOpnn neaTu ydaIaHOTc,ecnN Bbl HnncnnaH3npye TaMrtb.(Ctp.312)
HeB03MOxHO B NCTOpH NeaTn peJaKTnpoBaTb H06paXeHn Hn PnmuMeHrTb K Hm 00fKeTbI.
YCTaHOBKa KapTbI NaMaTn
1 OtkpoTe KpbIuKy rHe3da KapTbI nAmrIn.
BCTaBbTe KapTy nAMrTn, KaK nOKa3aHo HnKe, Do 2 UeJIuKa B 3aDHeN qACTn rHe3da.
3aKpoIe KpbIshky IJRA He3da KapTbI NaMRTN.
UTo6bIu3BnueyKapTy nAMrTu,HaXMnTe Ha Hee MeDHeHHOOTnyCTnTe.KapTy nAMrTu MoXHo BbHyTb pyKoJ.
BHHMaHHe!
Korda n3Blekaete KapTu NaMHTu, HaxMMTe Ha Hee naIbUcEM N OCTOPOXHO OTNcyTte, INaHue KaP Ta naMTu MOKeT OCBO6OOnTb THe3DO CNIWKOM 6bICTpo.
IpeaTb n3O6paXeHn, cHraTbIX dpyrofoTOkamepoi
Moxho neuatab cHmKn, cIeHaHbIe pyroJ
foToKaMepoi, BCTaBnB KapTy nAmrTn, coepKauyIO
n3o6paKeHHa. Tem He MeHee OHn DoJXhbl
COOTBeTCTBOBaT yCJOBnM, pNBeDeHHbIM HIXke.
- CkOnnpyTe n3o6paKeHnI dI neaTn B KOpHeBoi KaTajor BmecTo KOIpnoBaHnI INX B NaNky.
-IMMaФaJaДонжHoCoCTOByI3YeTbIpex3aRnAbHbIX 6ykb (OT A Do Z), 3a KOTOpbIMn CJIeDyIOT YeTbIpe UΦpbI.
KoNpOBaHne n3o6paXeHn Ha KOMNbIOTeP
IopKnIOuHTe FOToKApEpy K KombIoTepy u CKOnIpyuTe n3O6paKeHna.

Bbkioute foToKaMepy.

PoiKJIIOUHTe foTOKaMepy K KOMNbIOTepy c nOmoUbIO Ka6eRA USB u3 KOMnNEkTA noCTaBKN.

Y6eHNTecb, YTO opneHTaun npabnBna pa3beMb BCTaBJIeHb Do ynpa.
IoiKJIIOUaIte foToKaMepy HeNocpeIcTBeHHo K KombIoTepy. He nCNoJIb3yIte KOHcEHTpaTop USB nn KnabNaTpy.

BkHouHTe foToKaMepy.
BbI6epuTe (HEnoDBNXHoe n3O6paXeHne) nn (BnuDeo) B COOTBeTCTBnC TINOM faIna dNkONIpOBaHn.

Iocne toro kak KOMnbIOTep pacno3Haet
fOTOKaMepy, BbI6epnte fOTOKaMepy B MeHIO
KOMnbIOTepa, a 3aTe MauHNTe KOINpOBaHne
n3O6paXKeHn.

OTcoeHnHTe foToKaMepy OT KOMNbTepea.
Iocne OKOHuaHn KOINPOBaHn N3O6paKeHn, BbIKIOHTe FOtOKaMepy,a 3aTeM OTCoeHNHTe Ka6eb USB OT KOMnbIoTepa.
BHHMaHne!
- 5aTapeH He IOnJxHa pa3pIaNTbC npn KOnIpuBaHm n3o6paXeHn, B IpOToHBom Cnyae I3o6paXeHn MoYr 6bItb NOBpeXeHbl.
He BbIKIouaTe foToKaMepy H He OTOeINHnTe Ka6eNB USB OT KOMNbIOTepa, B IpOToNBHom Cnyae n3o6paKeHHa MOryT 6bITb NOBpeXdEhbl nn noTepeHbI. - PnCmHe KapTbI NamTn y6eUntEcB TOM, YTO 0TOkAmpaOTcoeHHeHa OT KOMNbTepa.
He oToeHnHrTe foToKaMepy ot KOMnbIoTepa nn He oToeHnHrTe Ka6b USB BCKope nocTe TORO, KaK nCye3Het Coo6uHne «KonupobAHne». OToKaMepa MoKeT mMetb DoCTyn K KomnbIOTepy BV TeueHne HeKOToPoro BpeMeHN daKe nocTe TORO, KaK coo6uHne Hcye3HET, ecnn Konupobanc 60Jbwoi aiI.
-ФаинИЗБРАЖЕНЯСКOMПБЮТЕРаHAФOTOKAMepy HeKONIPYETCA.
MeHIOcbeMKn
YTo6bl yKa3aTb/H3MeHHTb MeHIO CbeMKN, BblONHHTe yKa3aHHbIe HnKe DeiCTBnR.
Haxmte KhoNky MENU/OK Ha ekpaHe cbeMkn.
IorBHTcKpaH MeHIO.
2 BbI6epHTeJJIeMeHrHaCTpoNdJaN3MeHeHnN 13MeHHTe HaCTpoNkY.
3 HaxmTe KhoNky MENU/OK.
OTo6pa3ntc4 n3MeHeHHaH hAcTpoKa.
4 HaxmTe KhoNky (Ha3a).
KK-MOHHTOP BO3BpaaaeTcK 3KpaHy cbeMKn.
3JIeMeHTbI MeHIO CbeMKU
SHOOTING MODE (TolbkoДгн HeNoBnHoro n3o6paKeHna)
Bb6epnte pexm CbeMKn B 3aBncumoctn OT ueJIN nn cnTuauu. (Ctp. 304)
- Moxho nCnoB3OBaTb KOnkny cnYcKa 3aTbopa, dna KOtopoI yHKnI nepeKlnOeHnI peXmAm cbemKn Ha3NaueHa Ha SHUTTER BUTTON SETTINGS. HaxmTe 3Ty KOnkny HeckoJbKO pa3, YTO6bl Bbl6paTb peXm CbeMkn.
FLASH(TolbkoДнгнedoBnKHOu3o6paKeHn)
Bb6epnte Hactpoynky nIy fOToCbeMKn CO BCnblkoK. (Ctp. 303)
SELF-TIMER (ToIbko dny HenoDnKHO rno 306paKeHHa)
Bb6epnte Hacptpoynky dny nCnoNb3OBAHnA BTOcnycka. (Ctp. 302)
AFILLUMINATOR (TOnbKO dIa HEnoDbuXHoro n3o6paXeHHa)
EcnBbIbIpaTcONTOBCNOMOraTeNbHnIOcBETKa aBTOΦOKyCnPOBKn 3arOpaTcRBO BpEmaΦOKyCnPOBKn IIN NOMOuN aBTOΦOKyCnPOBKe npn HeoCTaToCHOM OCBeueHN.
Onu:ON/OFF
B HEKOToPbIX Cnyuayx fOToKamepa MoKeT 6bITb He B COCToRHH CfOKyCnPOBaTcBc NOMOuBbIO BCNOMOraTeJbHOI NOCBETKn ABTOfOkycnPOBKN.
KordaBbI np6nXaeTcB K obkTeY cEmKn, BCNOMoTaTehna NOCBETKa aBTOOkyCnpOBKN MoKeT OKa3aTbcr He CTOnb 300eKtNBHO,KaOKuJaNoCb.
He CBeTHTe BCNOMORAtebHOI NOcBETKoABTOΦOKYCUPOBKn Bfla3a 06beKtCaEMKn.
EXPOSURE
Otperyu npyte npkocb n06paKeHn, KOrda CHmMaTe CnWkOM npKn, CNWkOM TeMHbI Nn BBICOKOKOHpacthBIOBeKT.
3HaueHne KoppeKunn DeiCTBntbHo DaXe npN KOINPOBaHN faIa n3o6paXeHna HA KOMNbIOTeP nn dpynye yctpoiCTBa.
FRAMINGGUIDE
EcnBb6npaTcON,ToHaMOHTope NOABTc HAnpabNIOUe NINNN(BepTNKaNbHbIe/Topu3OHTaNbHbIe).
Onu:ON/OFF
AUTO PRINT (Tolbko dny HenoDbuXhoro n3o6paXeHHa)
EcnBb6npaetcON,TO fOToKamepaHaHHT neaTaTb 1306paKeHHe BCKope nocLe CbeMKn U COxpaHeHn CHMkA.
Onu:ON/OFF
MehIO BocnpOn3BVeDeHnA
YTo6bIyKa3aTb/u3MeHHTb MeHO BocnpON3BeDeHnA, BblONHNTe yKa3aHHBHe HNKe WaH.
Haxmnte KhoNky MENU/OK Ha əKpaHe Bocnpoun3BeDeHn.
TnBtcaKpaHMeHIO.
2 BbI6epuTe 3JIeMeHT HAcTpOuKn IIN3MeHeHn IN3MeHInTe HaCTpOuKy.
3 Haxmte KhoNky MENU/OK. OTo6pa3ntc n3MeHeHHa HacTpoiKa.
HaxmTe KhoNky (Ha3a).
KK-MOHITOP BO3BpaaaetcK kkpany BOCPON3BeDeHn.
3IeMeHTbIMeHIO BocnpOn3BedeHn
HaxmTe KhoNky MENU/OK, yTo6bHa Haayt b Neayt. (Ctp. 298)
PRINT HISTORY
Ioka3bIbaetdo50n3o6paXeHn,KOToPbIeHaNeuTaHbI paHee.
BbI6epnte n3o6paXeHne,3aTeM hXMMTe KHOKNy (Neeatb),UTo6bl Naatb neaTb.(Ctp.307)
HaxaTneM KHONK MENU/OK MOxHNO no OndHomy ydaJIb t3o6paXeHn B NCTOpn NeaTn.
ERASE
YdaIte n3o6paXeHn no OndHomy nn ydaIte Bce 3a Odn pa3.
Onu:FRAMEALLFRAMES
IMAGE ROTATE (TolbkoДЯненoBuxHoro 306paXeHnA)
IobepHnte n3o6paKeHne Ha 90 rpaDycOB. NcnoJb3yTe DnCK ynpaBHeHna Dn BblONHeHn oepaun.
COPY
KoInpyTe n3O6paXeHn, HaxOJaUneC B nAmrTn
fToKamepbI, Ha KapTy nAmrTn, n Hao6OpOT.
CneyuTe npBBeDenHNo HnKe npOeDyepe.
①Haxmnte KhoNky MENU/OK wIn ▷
② BbI6epntMeCTo paCNoIOXeHn,HaXMnTe KHOKNy MENU/OK nn
③ Bb6epuTe FRAME ALL FRAMES,3aTeM HaxMnTe KhoNkY MENU/OK nn
KonipobAHne HaunHaeTc,ecn BbIbnpaETc ALL FRAMES.
EcnBbIbIpaTcFRAme,peepnTeKwary 4
④ Bb6epnte n3o6paXeHne nIg KOnuPoBaHnI, 3aTeMa HaxMnte KhoNky MENU/OK uJIn ▷.
AUTOROTATE PB (Tolbko Дяп Нених Horo 306paжehа)
EcnBb6npaETcON,ToHa3KpaHe BocnpOn3BepeHn 1306paKeHne 6ydt NobepHyTo.
Onu:ON OFF
MehnohactpoiKn
YTo6blyka3aTb/H3MeHHTb MeHIO HAcTpOuKN, BbINOJIHNTe yKa3aHHbIe HnKe IwAr.
HaKmTe KhoNky MENU/OK Ha ekpaHe cbeMkn/ Bocnpo3BedeHn.
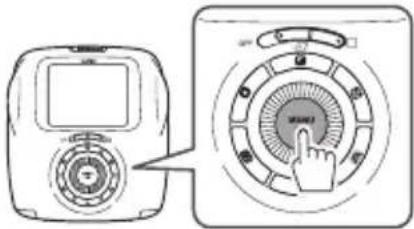
IorBHTcKpaH MeHIO.
2 BbI6epHTe 3JIeMeHr HAcTpoN Kn DnA N3MeHeHn N3MeHHTe HaCTpoN Ky.
3 HaxmTe KhoNky MENU/OK.
OTo6pa3ntc4 n3MeHeHHaH hAcTpoKa.
4 Haxmte KhoNky (Ha3a).
KK-MOHHTOP BO3BpaaaeTcK KkpaHy cbeMkn.
3neMeHTbIMeHIOHaCTpoIKu
DATE/TIME
YkaKnte daTy n Bpem. (Ctp. 291)
DATE STAMP
EcnBb6npaetcON,daT3aHnc6ydtHaeneataHa B npabOM HxKHeM yIy fOToRpaΦn. HAcTpoukN DATE/ TIME BnraIOT Ha nopAOK cJeDoBaHna rOa/Mecua/DnA.
YkaKNTe 3bIK dIg OTo6paKeHnHa MoHtOpe.
OPERATION VOL.
OtperyunpyTe rpoMKocTb onepaun, 3aTBopa nn 3Byka 3anycka.
Onzua: OFF/1/2/3
BbI6epnte OFF, uTo6bl OTKIOUHTb 3ByKn.
SHUTTER BUTTON SETTINGS
Ha3NahyTe ΦyHKUIO DnIa NeBOI/npaBOI KHOKN 3aTBopa. (Ctp.292)
AUTO POWER OFF
BbIepuTe BpeMeHHoINHTepBaII, nocne KOTOPORO
foToKaMepa aBTOMaTHueCKN BblKIOUHTcA, ecn He
BbINOJIHrTOc HnKaKne ONEpaUN.
Onu:5MIN
RESET
C6pocbTe Bce HacTpoKn K 3HaueHnIaM No yMoJUaHInIO.
IaTa N BpEmy, yKa3aHHbIe B DATE/TIME, He c6paCbBaIOrC.
FORMAT
HnuaHnyTe namrB foToKaMepb nn KaTp y naTn, BCTaBHeHHyO B rHe3do nn KapTb nnamrTn. Bce coXpaHeHHbe 3o6paxeHn 6ydyuAneHbl.
FIRMWARE UPGRADE
06HOBHTe MUKponporpaMMy.
CoxpaHNTe MKNpONpORpaMMy Ha KapTe NaMHTu, BCTaBbTe KaPTy NaMHTu B rHe3do dIra KapTbI NaMHTu, a 3aTeM BbINOJIHNTe INCHcpyKUIN, OTobpaKaMaBle Ha 3kpaHe.
3arpy3nte Mnkponporpammy nocJeHn Bepcnn c Hauero caTt.
TEXHUNYECKNEXAPAKTEPNUKNI
Φotokamepa
CBeToCyBCTBnTeIbHaMaMatpua 1/5IOmMa,CMOS CΦnIbTpOM OCHOBhIx LBeTOB
ΦΦeKTHBHe NIKceJn 1920x1920
CpeCTBa xpaHnnaHHbIX BcTpoeHHa naMaTb, KapTa naMaTn microSD/microSDHC
06bem 3aHnCn (HeNoDvXHoe BCTpoEHNa nAMrTb: npu65.50 faiIOB (HeNoDvXHoe H3o6paXeHne), npu65.30 cekynd (BnuDeo) Kapta naHTn microSD/microSDHC: Ppu65.1000 faiIOB Ha 1 rna6a
06bem 3a nci (Bnneo) KapTa narni microSD/microSDHC: npn6n. 3 mHyTb (Bcero) Ha 1 rna6aI
Фаиловая сисма HeNoDvHoe n3O6paXeHne: CobMeCTmOcTb c ПраBUnamn npoeKtIropOBaHnЯ dIЯ phIoBOw cnCTembl foToKaMep (DCF), Exif BepCnn 2.3, cobMeCTmOcTb c JPEG n PIM BvJeO:800x800x15 kaIp/c,H.264(3BykHe 3aIIncbBaETca).
Φokychoe paCCToHHe 3aФИКсUpOBaHo Ha 33,4 MM (3KbBvBaIeHT φOpMaTa 35 MM)
DnaΦparma F2,4
CnCTema aBTOfokcnpobKn OAnHapna AΦ (TTL c onpeJeHneHem KOHTpacta, c noCBeTko JnAΦ) HenpepbHna aBTOfokcnpobKa (ToIbKO InBn BnDeocbEmkn)
Dnana3OH oKycnpOBKn OT 10 cm Do∞
BbIepeKka 1/7 500 cek. - 1/2 cek. (ABTO), MaKc. 10 cek. BpeXmE BblpeKKN OT pyKn
UyBCTbNTbHOCb ISO 100-1600 (ABTO)
UnpaBHeHne 3KcNo3uNei 3anporpaMnpoBaHHa AE
3Kcnokoppekua-2,0EV...+2,0EVcwarom1/3 EV
3aMep 256-erMeHTbI eKcno3aMep cKBo3b oBeKTHB (TTL), MylbTu3aMep
BalaHc 6eJoro ABTO
Bcblka ATo/PrnHynteIbHa BCblka/NoaBHeHHa BCblka 3ΦΦeKTHBbI dnaIa3OH: Pn6J.50 cm-8M
Pexmcbemkn CtaHapT,BoHnAeKcno3uNp,Pexm BbIepxKn OT pyKn,CermHTHa cBemKa,KoJnaK,CbemKa C bpemeHHbIM Cdbirom
KK-MOHINTOP 2,7 HIOHMa (6,9 cm), CBETHOFT FKTKK-MOHINTOP
Пиксени: Прибл. 230 000 точек
BHeuHn HHTepcnc Micro USB Micro-B (Дязэрдкн/КошпобаньфйOB)
IITAHHe IITn-NOHHa 6aTape (BcTpoeHHa, He n3BneKaetc).
ФункцяЗapДКВCTpoHna
O6bem neuata Npi6n. 100 otneuATKO (CMOMeHTa nonHOIpaIKN 6aTape)
- 3aBnCtOT yCNoBn NcNoJb3ObaHnA.
BpeMa 3apAnKn Pnp6JI.2-3 yaca (C nCnoIb3ObaHneM npTa USB 0,5 A)
- 3aBnCt OT TempeaTpyb BO3dyxa.
Pa3mepbl 119MMx50MMx127MM(LxΓxB)
Macca 390 r (6e3 KapTpua c foTo6ymaor n KapTbI naTn)
440r(BkIIOUaKaPTpIxKcfoTo6yMaIOnnKapTy nAMTn)
Paboua cpe Taemepa:ot +5^ 10 +40^
BnaxHoCTb:OT 20% Do 80% (6e3 KOHdEHaun)
*TexHHuecknex xapaKTePncTNI MOrYt N3MeHrTbcyI JI MoePHN3aUNN I3JeJIa.
YCTPAHEHNE HENOJAOK
Ecnn Bbl cHnTaTe, yTo y fOtoKamepbI ecTb HeKOtOpBHe HenoJaKn, cm. npNBedeHHbHnHexe 63op. Ecnn He MoKeTe yCtpaHnTB HeNoJaKy, o6paTntecb K yNOnHomOeHHOMy dNcTpN6bHTopy FUJIFILM. Nn noCeTnte caT, yKa3aHHbHnHexe.
BoBpemnncnoJb3ObaHn
Meting 256-segment door de lens (TTL)-meting, Multi-meting
Witbalans Auto
MANIPULACE S LCD DISPLEJEM
RIESENIE PROBLEMOV 515
DOLEZITE BEZPECNOSTNÉ
UPOZORNENIE 518
Please refer to the supplied CONTACT INFORMATION sheet for inquiry.
If your country or region is not included in the sheet, please contact your local distributor.