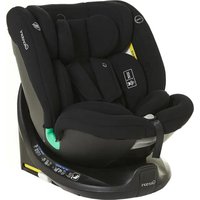
Pegasus Plus 123 Isofix - Car seat Giordani - Free user manual and instructions
Find the device manual for free Pegasus Plus 123 Isofix Giordani in PDF.
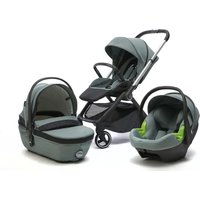
| Product Type | Car Seat |
| Brand | Giordani |
| Model | Pegasus Plus 123 Isofix |
| Standard | ECE R44/04 |
| Weight Groups | Group I (9-18 kg), Group II (15-25 kg), Group III (22-36 kg) |
| Installation | ISOFIX + Top Tether (Group I) or 3-point belt (Groups II/III) |
| Dimensions (L x H x D) | 69 x 63 x 45 cm |
| Structure Material | Polypropylene |
| Cover | 100% polyester, machine washable at 30°C |
| Harness | 5-point, height adjustable (5 positions in group I, 5 in group II/III) |
| Headrest | Height adjustable |
| Recline | Adjustable via front handle |
| ISOFIX System | Connectors with locking indicator |
| Top Tether | Belt with tension indicator (green indicator) |
| Usage | Front or rear seats, forward-facing |
| Maintenance | Removable washable cover; plastic parts cleanable with soapy water |
| Safety | Do not use on seat with front airbag; replace after an accident |
| Recommended lifespan | 5 years from production date |
Frequently Asked Questions - Pegasus Plus 123 Isofix Giordani
User questions about Pegasus Plus 123 Isofix Giordani
0 question about this device. Answer the ones you know or ask your own.
Ask a new question about this device
Download the instructions for your Car seat in PDF format for free! Find your manual Pegasus Plus 123 Isofix - Giordani and take your electronic device back in hand. On this page are published all the documents necessary for the use of your device. Pegasus Plus 123 Isofix by Giordani.
USER MANUAL Pegasus Plus 123 Isofix Giordani
Ningbo Welldon Manufacturing Co. Ltd
No.276 Huangjipu Road,
Jiangbei Hi-tech Industrial Zone,
Cicheng Town, Ningbo 315034, P.R.China
Distributed by:
HDG S.p.A.
Via delle Primule, 5 - 20815 Cogliate (MB) Italy
UK Approved to: ECE R44/04
natural_image
Line drawing of a car seat with no text or symbols1
IMPORTANTE:
LEGGERE ATTENTAMENTE PRIMA DELL'USO E CONSERVARE PER FUTURO RIFERIMENTO.
UK
IMPORTANT:
READ CAREFULLY BEFORE USE AND STORE FOR FUTURE REFERENCE.
E
IMPORTANTE:
LEER ATENTAMENTE ANTES DEL USO Y CONSERVAR PARA FUTURAS CONSULTAS.
P
IMPORTANTE:
LEIA ATENTAMENTE ANTES DE USAR O PRODUTO E GUARDE ESTE MANUAL PARA CONSULTAS FUTURAS.
GR
ΣΗΜΑΝΤΙΚΟ:
text_image
A B C D E F P Q R S O N M L I H G U VCOMPONENTI
F. Recline adjustment knob
G Harness adjustment strap
H Adjustment device
1 Cup holder
- Harness buckle
M. Baby insert
M. Baby insert
N Harness slots
Headrest
P Top tether release button
Q Top tether strap
R Top tether hook
S ISOFIX connector
T Cover
U Cover zin
VUSOFIX
√ ISO-FX release button
E COMPONENTES
A Manillar reposacabezas
DO NOT use with 2-point belt. ase install with the 3-point belt.
Please observe the regulations applicable to your particular country.
The safety belt must be approved to ECE R 16 or a comparable standard.
Do not use with 2-point belt.
Can be used if the vehicle seat is equipped with a 3-point belt.
natural_image
Illustration of a car seatbelt being lifted with blue arrows indicating force or pressure points (no text or symbols present)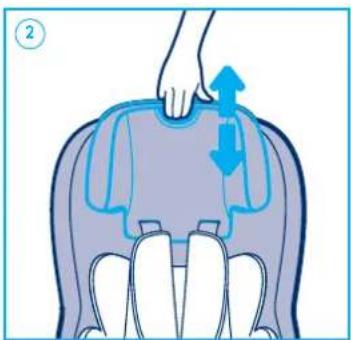
natural_image
Illustration of a person performing a back massage or pressure relief technique (no text or symbols present)
natural_image
Diagram showing two mechanical components with directional arrows indicating movement or force (no text or symbols)
natural_image
Illustration of a car seat with two blue straps and a small blue seat (no text or symbols)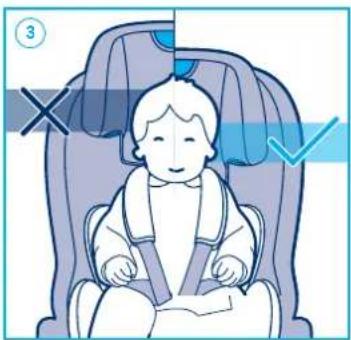
natural_image
Illustration of a child in a car seat with a crosshair and checkmark indicators (no text or symbols)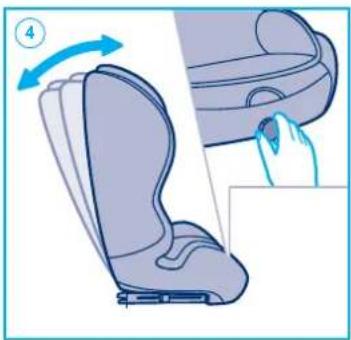
natural_image
Illustration of a car seatbelt being lifted, showing the seat and seat area with a hand inserting a clip (no text or symbols)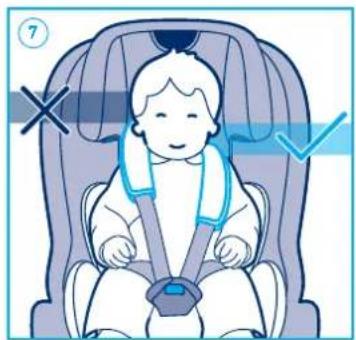
natural_image
Illustration of a baby in a child's seatbelt with a checkmark and X mark (no text or symbols)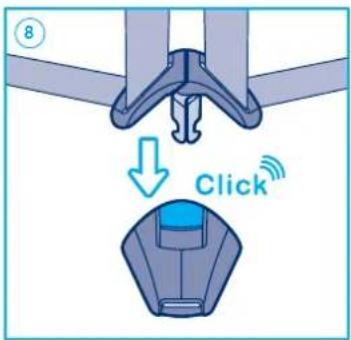
text_image
8 Click
natural_image
Illustration of a gray bicycle seat with blue directional arrows indicating rotation (no text or symbols)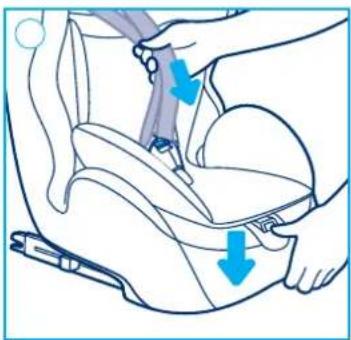
natural_image
Illustration of a car seatbelt being adjusted for a seatbelt, showing blue arrows indicating force or pressure points (no text or symbols present)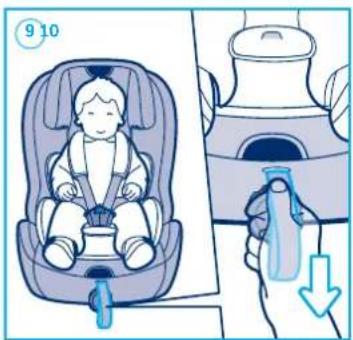
text_image
9 10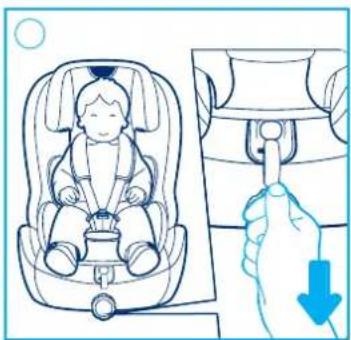
natural_image
Illustration of a baby car seat and its side arm, showing hand placement with a downward arrow (no text or symbols)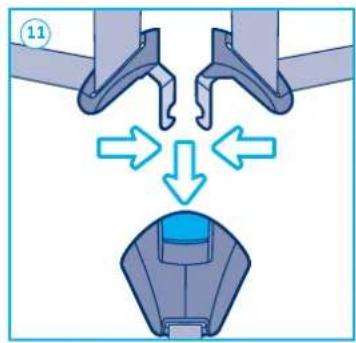
text_image
Diagram illustrating mechanical assembly or disassembly process with labeled component 11 and directional arrows indicating movement.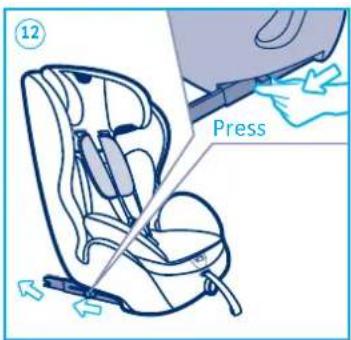
text_image
12 Press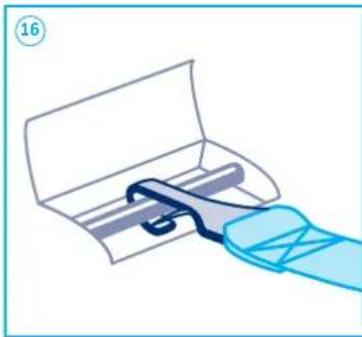
natural_image
Illustration of a hand holding a blue glove attached to a white object, with no visible text or symbols.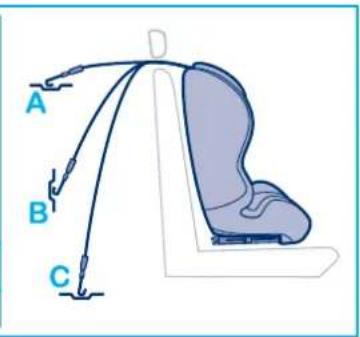
text_image
A B C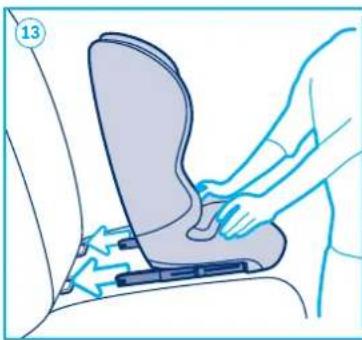
natural_image
Illustration of a person using a seatbelt to adjust the seat (no text or symbols present)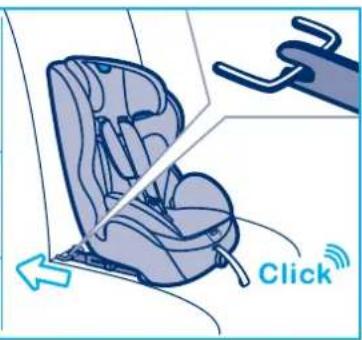
text_image
Click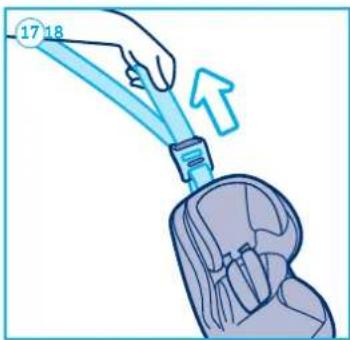
text_image
17 18
natural_image
Illustration of two blue-and-white cable clips with a checkmark overlay (no text or symbols)
text_image
14 15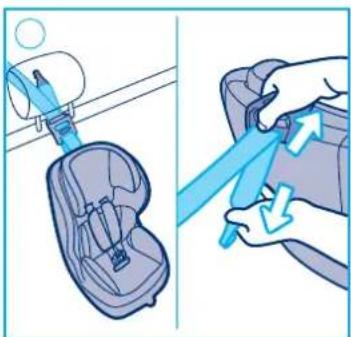
natural_image
Illustration of a car seat being adjusted for a cable, showing the handle and cable extension (no text or symbols)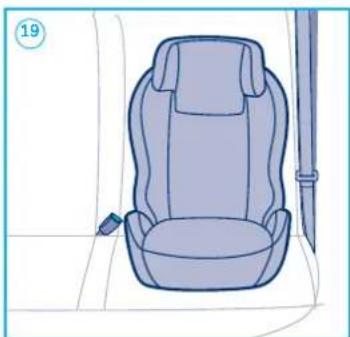
natural_image
Illustration of a car seat with a side arm and seatbelt, no text or symbols present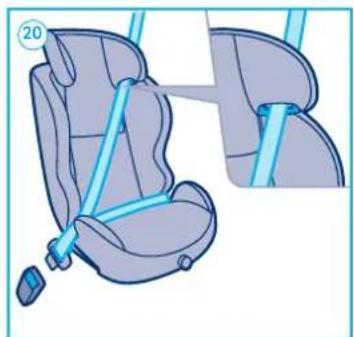
natural_image
Illustration of a car seatbelt with blue straps and a numbered label (20), no text or symbols present.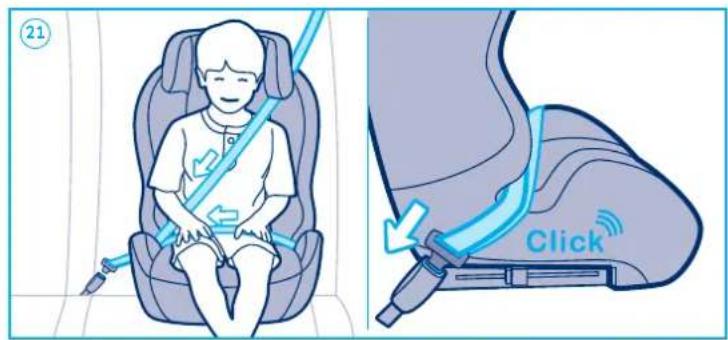
text_image
21 Click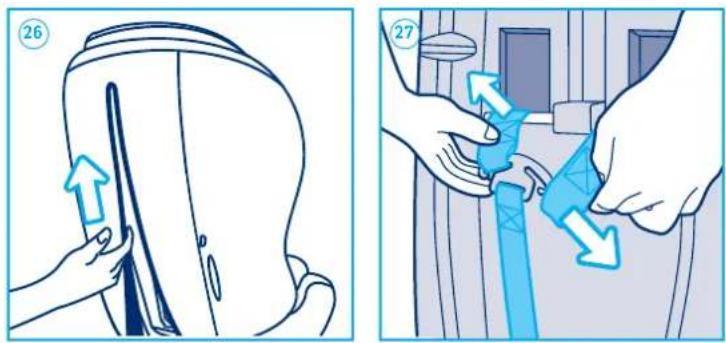
text_image
Illustration showing two steps of a bag being adjusted, with numbered arrows indicating movement and blue arrows highlighting changes.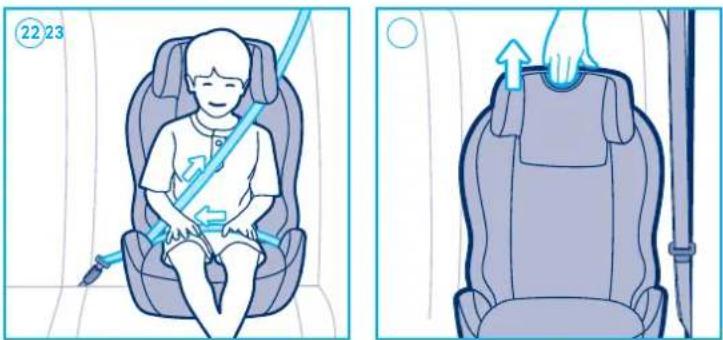
text_image
Illustration showing a child in a car seat with a blue belt and a hand pressing down the seat, alongside a close-up of the seat.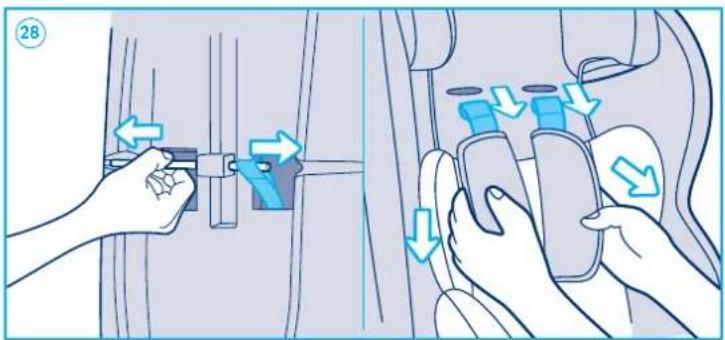
text_image
Diagram showing car seatbelt adjustment with blue arrows indicating movement, labeled with number 28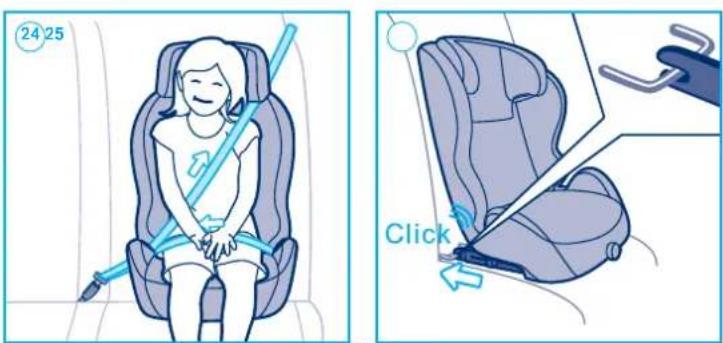
text_image
24 25 Click
text_image
Diagram showing car interior cleaning steps with blue arrows indicating direction of movement or repair
natural_image
Line drawing of a car seat with blue arrows indicating clockwise motion (no text or symbols)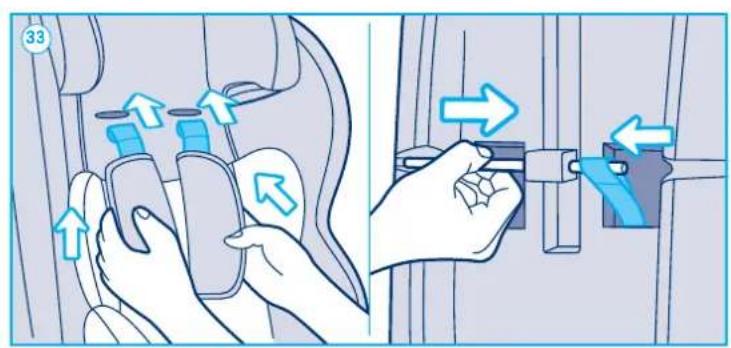
text_image
Diagram showing car seatbelt adjustment with arrows indicating movement and change in seatbelt usage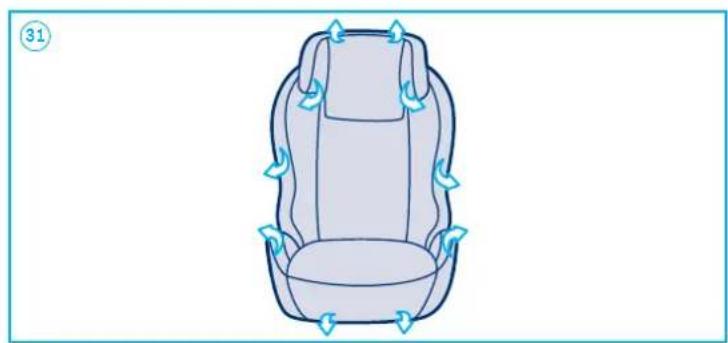
natural_image
Line drawing of a car seat with directional arrows indicating movement or flow (no text or symbols)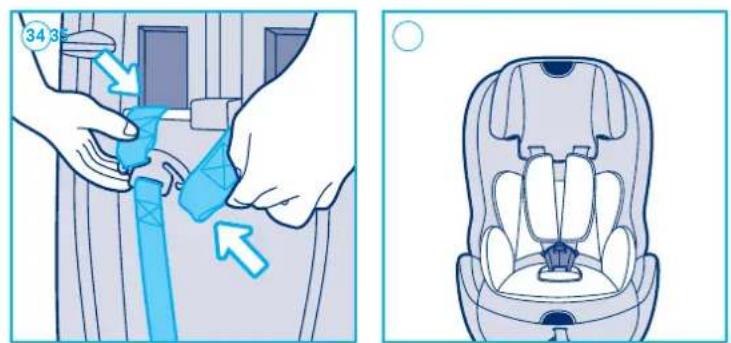
text_image
Illustration showing a person adjusting a blue belt buckle while another shows a car seat assembly with numbered parts.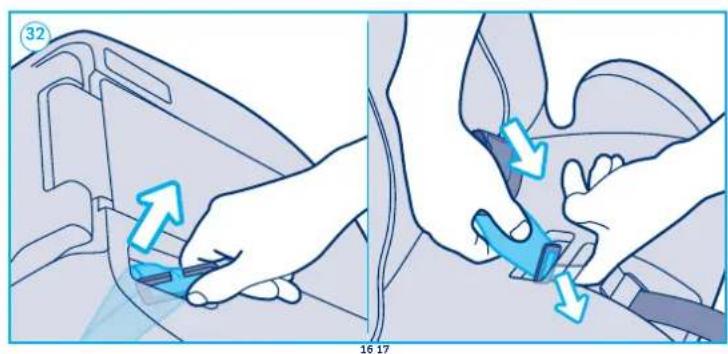
text_image
32 16 17GIORDANI PEGASUS PLUS ISOFIX 1/2/3 SEGGIOLINO AUTO (9 MESI-11 ANNI CIRCA)
How to adjust the belts, headrest and seat positions
IMPORTANT The correct belt height of the shoulder belts is attained when the belt disappears into the shell slightly above the shoulder of the child. Make sure that the shoulder belts fit properly over the shoulders of the child.
Adjusting the belts
- Loosen the harness straps by pressing the release button and pulling the harness straps as far as you can. Note! Do not pull the Shoulder pads.
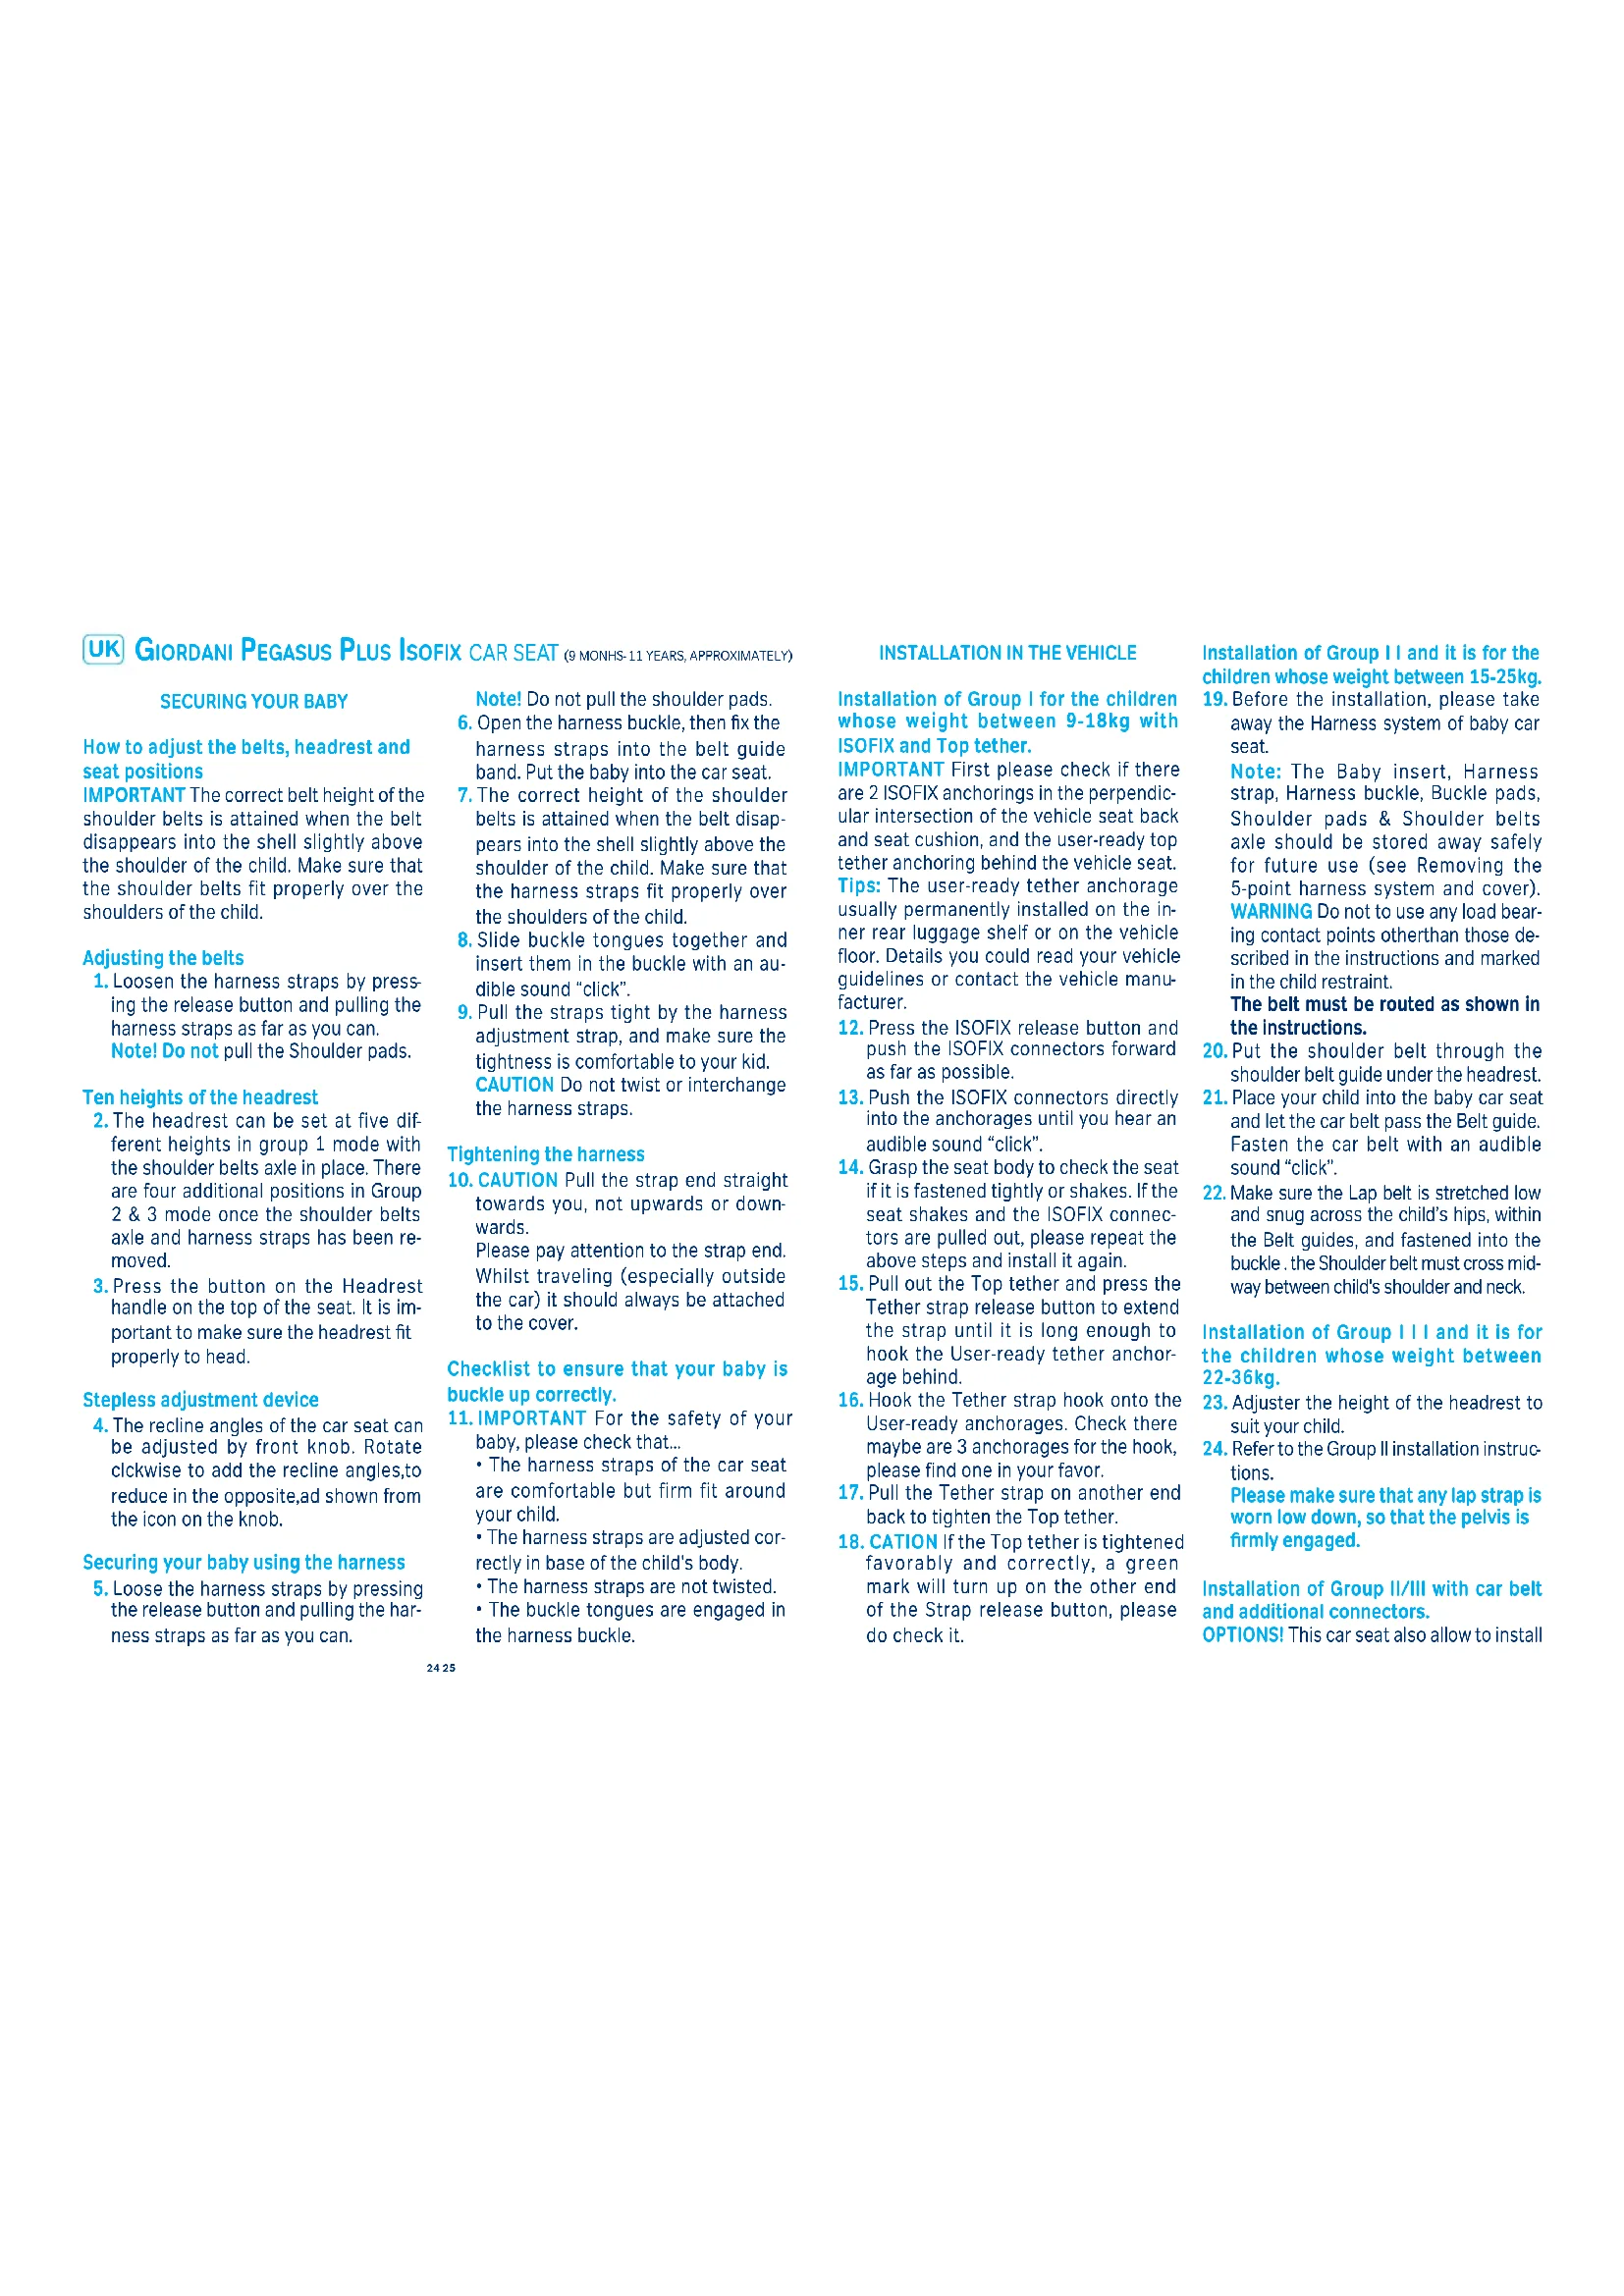
Ten heights of the headrest
- The headrest can be set at five different heights in group 1 mode with the shoulder belts axle in place. There are four additional positions in Group 2 & 3 mode once the shoulder belts axle and harness straps has been removed.
- Press the button on the Headrest handle on the top of the seat. It is important to make sure the headrest fit properly to head.
Stepless adjustment device
- The recline angles of the car seat can be adjusted by front knob. Rotate clickwise to add the recline angles, to reduce in the opposite, ad shown from the icon on the knob.
Securing your baby using the harness
- Loose the harness straps by pressing the release button and pulling the harness straps as far as you can.
Note! Do not pull the shoulder pads.
-
Open the harness buckle, then fix the harness straps into the belt guide band. Put the baby into the car seat.
-
The correct height of the shoulder belts is attained when the belt disappears into the shell slightly above the shoulder of the child. Make sure that the harness straps fit properly over the shoulders of the child.
-
Slide buckle tongues together and insert them in the buckle with an audible sound "click".
-
Pull the straps tight by the harness adjustment strap, and make sure the tightness is comfortable to your kid. CAUTION Do not twist or interchange the harness straps.
Tightening the harness
- CAUTION Pull the strap end straight towards you, not upwards or downwards. Please pay attention to the strap end. Whilst traveling (especially outside the car) it should always be attached to the cover.
Checklist to ensure that your baby is buckle up correctly.
- IMPORTANT For the safety of your baby, please check that...
• The harness straps of the car seat are comfortable but firm fit around your child.
• The harness straps are adjusted correctly in base of the child's body.
- The harness straps are not twisted. - The buckle tongues are engaged in the harness buckle.
INSTALLATION IN THE VEHICLE
Installation of Group I for the children whose weight between 9-18kg with ISOFIX and Top tether.
IMPORTANT First please check if there are 2 ISOFIX anchorings in the perpendicular intersection of the vehicle seat back and seat cushion, and the user-ready top tether anchoring behind the vehicle seat. Tips: The user-ready tether anchorage usually permanently installed on the inner rear luggage shelf or on the vehicle floor. Details you could read your vehicle guidelines or contact the vehicle manufacturer.
-
Press the ISOFIX release button and push the ISOFIX connectors forward as far as possible.
-
Push the ISOFIX connectors directly into the anchorages until you hear an audible sound "click".
-
Grasp the seat body to check the seat if it is fastened tightly or shakes. If the seat shakes and the ISOFIX connectors are pulled out, please repeat the above steps and install it again.
-
Pull out the Top tether and press the Tether strap release button to extend the strap until it is long enough to hook the User-ready tether anchorage behind.
-
Hook the Tether strap hook onto the User-ready anchorages. Check there maybe are 3 anchorages for the hook, please find one in your favor.
-
Pull the Tether strap on another end back to tighten the Top tether.
-
CATION If the Top tether is tightened favorably and correctly, a green mark will turn up on the other end of the Strap release button, please do check it.
Installation of Group II and it is for the children whose weight between 15-25kg.
- Before the installation, please take away the Harness system of baby car seat.
Note: The Baby insert, Harness strap, Harness buckle, Buckle pads, Shoulder pads & Shoulder belts axle should be stored away safely for future use (see Removing the 5-point harness system and cover). WARNING Do not to use any load bearing contact points other than those described in the instructions and marked in the child restraint.
The belt must be routed as shown in the instructions.
-
Put the shoulder belt through the shoulder belt guide under the headrest.
-
Place your child into the baby car seat and let the car belt pass the Belt guide. Fasten the car belt with an audible sound "click".
-
Make sure the Lap belt is stretched low and snug across the child's hips, within the Belt guides, and fastened into the buckle. the Shoulder belt must cross midway between child's shoulder and neck.
Installation of Group I I I and it is for the children whose weight between 22-36kg.
-
Adjuster the height of the headrest to suit your child.
-
Refer to the Group II installation instructions.
Please make sure that any lap strap is worn low down, so that the pelvis is firmly engaged.
Installation of Group II/III with car belt and additional connectors.
OPTIONS! This car seat also allows to install
with the ISOFIX, please operate as following:
- Extend the ISOFIX connectors and fix it into the ISOFIX anchorages until you hear an audible sound "click". Fasten the car belt. Details please refer to the abovementioned instructions for the car belt installation for group 2/3.
CARE INSTRUCTIONS
Removing the 5-point harness system and cover
- Open the snap buttons from the back of the car seat, then raise the cover as shown in the picture.
- Push down the adjustment device and pull the harness strap out the strap yoke from other side to unlock it.
- Pull the shoulder strap axle out, untie the gap of the shell Then unite the shoulder strap and pull it out from the harness slot.
- Loosen the bottom part of the cover and pull the belt clip through the belt clip slot. Then pull the buckle clip through the buckle clip slot.
- Remove 5-point harness system then remove the headrest cover and the shell cover.
Refitting the 5-point harness system and cover
- After washing, place the cover on the shell.
- Loosen the bottom part of the cover and pull the belt clip through the belt clip slot. Then pull the buckle clip through the buckle clip slot.
-
Put the end of the shoulder strap through the harness slot, fix into shoulder strap axle, and lock the shoulder strap axle to the seat shell.
-
Also put the end of the harness strap through the harness strap slot and shell, fix into the strap yoke, make sure the seat straps can not be rotated.
- Close the buckle, then fasten the cover all around. Check that it works!
CLEANING
Please be sure to use only original seat covers, as the seat cover is important to the proper functioning of the system. Replacement seat covers are available from your retailer and or at branches.
The child seat must not be used without the seat cover.
The seat cover should not be replaced with any other than the one recommended by the manufacturer, because the cover constitutes an integral part of the restraint performance.
The cover can be removed and washed with a mild detergent using the washing machine's cycle for delicate items (30°C). Please observe the instructions on the washing label of the cover. The colours of the cover may fade if washed at more than 30°C. Do not spin, and never tumble dry in an electric clothes dryer (the fabric may separate from the padding).
The plastic parts can be cleaned using soapy water. Do not use harsh cleaning agents (such as solvents).
The harness can be removed and washed in lukewarm soapy water.
Caution! Never remove the buckle tongues from the straps.

MATERIALS
Cover: 100% Polyester
Frame: Polypropylene
SIZES
L: 69 cm;
H: 63 cm;
D: 45 cm.
CHECKLIST
For safety's sake read through this check list before you set off.
Check that the harness belt system fits properly and tightly around your child and that the shoulder belts are at the correct height.
Check regularly that the belt in the baby car seat is not damaged. If it is damaged do not use your product in any circumstances and contact your supplier or importer (see address list in the service card).
Check that you have secured your baby car seat with the seat belt.
If you have any questions, please contact your supplier.
• Make sure that you have the following details to hand:
- Serial number underneath on the service card.
- Mark and type of vehicle and seat on which the baby car seat used.
• Age and weight of your child.
WARNINGS
- FAILURE TO OBSERVE THE ASSEMBLY INSTRUCTIONS PROVIDED BY THE MANUFACTURER MAY BE DANGEROUS FOR THE SAFETY OF THE CHILD.
- This is a child restraint system approved Regulation No.44,04 standards, for three different types of installation:
- using the ISOFIX and Top Tether anchoring systems, the device is classified as a "Universal" for Groupl(9-18kg), which under more stringent
conditions than those that were applied to earlier designs which do not carry this notice.
- using the child car seat without the optional ISOFIX, with the 3-point car seat belts, the device is classified as a "Universal" device, far Group 2&3 (15-36kg).
- using the optional ISOFIX, with the 3-point car seat belts, the device is classified as a "Semi-Universal" device which is compatible for use on the vehicles indicated in relative "List of approved vehicles", for Group 2&3 (15-36kg).
- A correct fit is likely if the vehicle manufacturer has declared in the vehicle the handbook that the vehicle is capable of accepting a "Universal" child restraint for this age group.
- To use the UNIVERSAL ISOFIX SYSTEM, it is approved to Regulation No. 44, 04 series of amendments for general use in vehicles fitted with ISOFIX anchorages systems. It will fit vehicles with positions approved as ISOFIX positions (as detailed in the vehicle handbook), depending on the category of the child seat and of the fixture.
- The mass group and the ISOFIX size class for which this device is intended is: ISOFIX size class B1.
- If in doubt, consult either the child restraint manufacturer or the retailer.
- Read this instruction manual carefully.
- The correct fitting of the ISOFIX and Top Tether anchoring systems or 3-point belt is of vital importance for the safety of your child.
- For the future use of the seat, it is important that you keep the instruction manual carefully.
- Never leave your child unattended in
the car.
- Do not use a child safety seat if the vehicle seat is equipped with a front airbags. This can be dangerous. This does not apply to so-called side airbags.
- Before use our product, please read the instruction manual carefully, the product is a safety product and is only safe when used in accordance with the instruction manual.
- The product must only be used on a forward facing seat that is fitted with the ISOFIX and Top Tether anchoring systems or 3-point belt which is approved according to ECE R16 or an equivalent standard.
- The product may be used on either the front or the back seat. However, we recommend that it is fitted on the back seat.
- The product has been approved according to the strictest European safety standards (ECE R44/04) and is suitable for Group I (9-18kg) with the ISOFIX and Top Tether anchoring systems, Group II (15-25kg) and Group III (22-36kg) with 3-point belt, or 3-point belt and additional anchors.
- After an accident the seat may become unsafe due to damage that is not be noticeable immediately. It should therefore be replaced. The safety of the seat can only be guaranteed by the manufacturer if it issued by the original owner.
- We advise you strongly that not to use a second-hand product, because you are not sure what has happened to it. The harness pads are important for the safety of your child, therefore use them at all the time.
- Ensure that all luggage and objects
likely to cause injury in the event of an accident are properly secured.
IMPORTANT
- It is recommended that the car seat should not be used more than 5 years from the date of production. The properties of the products may deteriorate due to, for example, ageing of the plastic and this may not be visible.
• The moving parts of the car seat should not be lubricated in any way. - The baby car seat must not be used without the cover. Please use an original cover, as the cover contributes to the safety of the seat.
- The seat must be secured with a seat belt or ISOFIX and Top tether, even
- when it not on use. An unsecured seat may injure other passengers in the car in an urgent stop.
- The rigid items and plastic parts of a child restraint must be so located and installed that they are not liable, during everyday use of the vehicle, to become trapped by a movable seat or in a door of the vehicle.
- Ensure that the seat is not damaged by the webbing between or underneath heavy luggage, adjustable seats or slamming the car door etc.
• To ensure the safety of the car seat, do not make changes or additions to the device without the approval of the competent authority. - In hot weather the plastic and metal parts of the product will be hot. You should cover the seat when the car parked under the sun.
• In order to prevent damage to the cover, do not remove the product's logo. - Use the seat even in a short journey, as this is when most accidents occur.
• Before the purchase, please check that the seat is proper for your car.
Take a short break in long journey. So that your child has some time forthe relaxation.
- Set a good example yourself and always wear your seat belt.
• Tell your child that he/she should be never play with the harness buckle.
- Contact your supplier or importer if you wish to make a warranty claim or have any other questions.
- Your car seat can be fixed safely on almost seats of the cars. However, on some seats the belts are fixed so that proper installation is not possible, in that case, try another seat.
FOR TECHNICAL OR COMMERCIAL REA- SONS, GIORDANI RESERVES THE RIGHT, AT ANY TIME AND ALSO ONLY IN A SPE- CIFIC COUNTRY, TO MODIFY THE TECHNI- CAL CHARACTERISTICS OF THE MODELS DESCRIBED IN THIS LEAFLET, AND/OR THE SHAPE, TYPE AND NUMBER OF THE ACCESSORIES SUPPLIED.