GN420C - Electric stapler MAKITA - Free user manual and instructions
Find the device manual for free GN420C MAKITA in PDF.

Frequently Asked Questions - GN420C MAKITA
User questions about GN420C MAKITA
0 question about this device. Answer the ones you know or ask your own.
Ask a new question about this device
Download the instructions for your Electric stapler in PDF format for free! Find your manual GN420C - MAKITA and take your electronic device back in hand. On this page are published all the documents necessary for the use of your device. GN420C by MAKITA.
USER MANUAL GN420C MAKITA
- Due to our continuing program of research and development, the specifications herein are subject to change without notice.
- Specifications and battery cartridge may differ from country to country.
| Symbols | |
| The following show the symbols used for the equipment. Be sure that you understand their meaning before use. | |
| Read instruction manual. | |
| Container under pressure, keep away from temperatures over 50°C (for ex. sun radiation) Keep container in a well ventilated place. | |
| Use only outside or well ventilated rooms. Do not breathe gas. | |
| Do not use near flames or sprays on heated surfaces. In use, may form flammable/explosive vapour-air mixture. | |
| Do not damage, puncture or burn even after use. | |
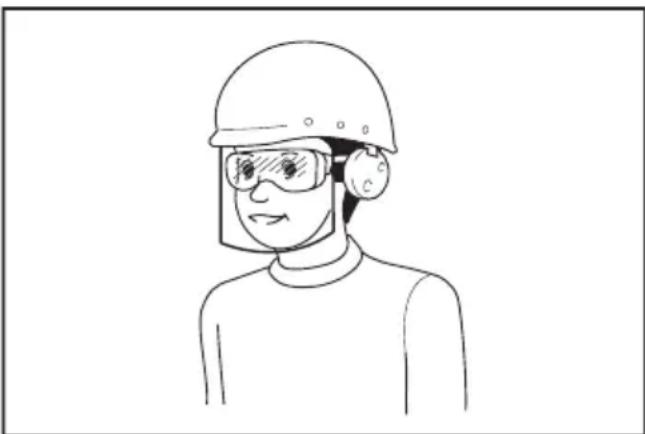
| Wear safety glasses. | |
| Wear ear protection. | |
| Keep fingers away from trigger when not driving fasteners to avoid accidental firing. | |
| Use only in ventilated area to avoid nausea and unconsciousness. Never use tool in combustible atmospheres. The tool exhaust may ignite flammable materials. | |
| Do not use on scaffoldings, ladders. | |
| Warning: hot surface! Do not touch around this symbol. Touching the surface may cause burns or injuries. | |
| Ni-MH Li-ion | Only for EU countries Due to the presence of hazardous com- ponents in the equipment, waste electrical and electronic equipment, accumulators and batteries may have a negative impact on the environment and human health. Do not dispose of electrical and electronic appliances or batteries with household waste! In accordance with the European Directive on waste electrical and electronic equip- ment and on accumulators and batteries and waste accumulators and batteries, as well as their adaptation to national law, waste electrical equipment, batteries and accumulators should be stored separately and delivered to a separate collection point for municipal waste, operating in acco- dance with the regulations on environmen- tal protection. This is indicated by the symbol of the crossed-out wheeled bin placed on the equipment. |
| Intended use |
| The tool is intended for securing a thin steel plate to the concrete. |
| Noise |
| The typical A-weighted noise level determined according to EN ISO 11148-13:Sound pressure level (LpA) : 96 dB (A)Sound power level (LWA) : 100 dB (A)Uncertainty (K) : 3 dB (A)Wear ear protection |
| Vibration |
| The vibration total value determined according to EN ISO 11148-13:Vibration emission (a1) : 3.5 m/s2Uncertainty (K) : 1.5 m/s2 |
| NOTE: The declared vibration emission value has been measured in accordance with the standard test method and may be used for comparing one tool with another. |
| NOTE: The declared vibration emission value may also be used in a preliminary assessment of exposure. |
WARNING: The vibration emission during actual use of the power tool can differ from the declared emission value depending on the ways in which the tool is used.
WARNING: Be sure to identify safety measures to protect the operator that are based on an estimation of exposure in the actual conditions of use (taking account of all parts of the operating cycle such as the times when the tool is switched off and when it is running idle in addition to the trigger time).
EC Declaration of Conformity
For European countries only
The EC declaration of conformity is included as Annex A to this instruction manual.
Gas nailer safety warnings
WARNING: Read all safety warnings and all instructions. Failure to follow the warnings and instructions may result in serious injury, electric shock and/or fire.
Save all warnings and instructions for future reference.
For personal safety and proper operation and maintenance of the tool, read this instruction manual before using the tool.
General safety
- Any other use except for intended use of this tool is forbidden. Fastener driving tools with continual contact actuation or contact actuation shall only be used for production applications.
- Keep fingers away from trigger when not operating this tool and when moving from one operating position to another.
- Multiple hazards. Read and understand the safety instructions before connecting, disconnecting, loading, operating, maintaining, changing accessories on, or working near the tool. Failure to do so can result in serious bodily injury.
- Keep all body parts such as hands and legs etc. away from firing direction and ensure fastener cannot penetrate workpiece into parts of the body.
- When using the tool, be aware that the fastener could deflect and cause injury.
- Hold the tool with a firm grasp and be prepared to manage recoil.
- Only technically skilled operators should use the fastener driving tool.
- Do not modify the fastener driving tool. Modifications may reduce the effectiveness of safety measures and increase the risks to the operator and/or bystander.
- Do not discard the instruction manual.
-
Do not use a tool if the tool has been damaged.
-
Be careful when handling fasteners, especially when loading and unloading, as the fasteners have sharp points which could cause injury.
- Always check the tool before use for broken, misconnected or worn parts.
- Do not overreach. Only use in a safe working place. Keep proper footing and balance at all times.
- Keep bystanders away (when working in an area where there is a likelihood of through traffic of people). Clearly mark off your operating area.
- Never point the tool at yourself or others.
- Do not rest your finger on the trigger when picking up the tool, moving between operating areas and positions or walking, as resting finger on trigger can lead to inadvertent operation. For tools with selective actuation, always check the tool before use to ascertain the correct mode is selected.
- Only wear gloves that provide adequate feel and safe control of triggers and any adjusting devices.
- When resting the tool, lay it down on the flat surface. If you use the hook equipped with the tool, hook the tool securely on the stable surface.
- Do not operate when under the influence of alcohol, drugs or the like.
Projectile hazards
- The fastener driving tool shall be disconnected when unloading fasteners, making adjustments, clearing jams or changing accessories.
- During operation be careful that fasteners penetrate material correctly and cannot be deflected/misfired towards operator and/or any bystanders.
- During operation, debris from workpiece and fastening/collation system may be discharged.
- Always wear protective goggles to protect your eyes from injury when using power tools. The goggles must comply with ANSI Z87.1 in the USA, EN 166 in Europe, or AS/NZS 1336 in Australia/New Zealand. In Australia/New Zealand, it is legally required to wear a face shield to protect your face, too.
It is an employer's responsibility to enforce the use of appropriate safety protective equipments by the tool operators and by other persons in the immediate working area.
- The risks to others shall be assessed by the operator.
- Be careful with tools without workpiece contact as they can be fired unintentionally and injure operator and/or bystander.
- Ensure tool is always safely engaged on the workpiece and cannot slip.
- Wear hearing protection to protect your ears against exhaust noise and head protection. Also wear light but not loose clothing. Sleeves should be buttoned or rolled up. No necktie should be worn.
Operating hazards
- Hold the tool correctly: be ready to counteract normal or sudden movements such as recoil.
- Maintain a balanced body position and secure footing.
- Appropriate safety glasses shall be used and appropriate gloves and protective clothing are recommended.
- Appropriate hearing protection shall be worn.
- Use the correct energy supply as directed in the instruction manual.
- Do not use the tool on moving platforms or back of trucks. Sudden movement of the platform may lose control of the tool and cause injury.
- Always assume that the tool contains fasteners.
- Do not rush the job or force the tool. Handle the tool carefully.
- Watch your footing and maintain your balance with the tool. Make sure there is no one below when working in high locations.
- On rooftops and other high locations, drive fasteners as you move forward. It is easy to lose your footing if you drive fasteners while inching backward. When driving fasteners against perpendicular surface, work from the top to the bottom. You can perform driving operations with less fatigue by doing so.
- A fastener will be bent or the tool can become jammed if you mistakenly drive fastener on top of another fastener or strike a knot in the wood. The fastener may be thrown and hit someone, or the tool itself can react dangerously. Place the fasteners with care.
- Never attempt to drive fasteners from both the inside and outside at the same time. Fasteners may rip through and/or fly off, presenting a grave danger.
Repetitive motions hazards
- When using a tool for long periods, the operator may experience discomfort in the hands, arms, shoulders, neck, or other parts of the body.
- While using a tool, the operator should adopt a suitable but ergonomic posture. Maintain secure footing and avoid awkward or off-balanced postures.
-
If the operator experiences symptoms such as persistent or recurring discomfort, pain, throbbing, aching, tingling, numbness, burning sensation, or stiffness, do not ignore these warning signs. The operator should consult a qualified health professional regarding overall activities.
-
The continuous use of the tool may cause repetitive strain injury due to recoil produced by the tool.
- To avoid repetitive strain injury, the operator should not overreach or use excessive force. Additionally, the operator should take a rest when feeling fatigue.
- Conduct a risk assessment regarding repetitive motion hazards. It should focus on muscular-skeletal disorders and be preferentially based on the assumption that decreasing fatigue during work is effective in reducing disorders.
Accessory and consumable hazards
- Remove the gas container and battery before changing/replacing accessories such as workpiece contact, or making any adjustments.
- Use only the sizes and types of accessories that are provided by the manufacturer.
- Use only lubricants recommended in this manual.
Workplace hazards
- Slips, trips and falls are major causes of workplace injury. Be aware of slippery surfaces caused by use of the tool and also of trip hazards caused by the air line hose.
- Proceed with additional care in unfamiliar surroundings. Hidden hazards may exist, such as electricity or other utility lines.
- This tool is not intended for use in potentially explosive atmospheres and is not insulated from coming into contact with electric power.
- Make sure there are no electrical cables, gas pipes etc. that could cause a hazard if damaged by use of the tool.
- Keep work area clean and well lit. Cluttered or dark areas invite accidents.
- There may be local regulations concerning noise which must be complied with by keeping noise levels within prescribed limits. In certain cases, shutters should be used to contain noise.
Dust and exhaust hazards
- Always check your surroundings. The exhaust from the tool may blow dust or objects and hit operator and/or bystanders.
- Direct the exhaust so as to minimize disturbance of dust in a dust filled environment.
- If dust or objects are emitted in the work area, reduce the emission as much as possible to reduce the health hazards and risk of injury.
Noise hazards
- Unprotected exposure to high noise levels can cause permanent, disabling, hearing loss and other problems such as tinnitus (ringing, buzzing, whistling or humming in the ears).
- Conduct a risk assessment regarding noise hazards in the work area and implement appropriate controls for these hazards.
- Appropriate controls to reduce the risk may include actions such as damping materials to prevent workpieces from "ringing".
-
Use appropriate hearing protection.
-
Operate and maintain the tool as recommended in these instructions, to prevent an unnecessary increase in noise levels.
- Take noise reduction measures, for example placing workpieces on sound damping supports.
Vibration hazards
- The vibration emission during operation depends on the gripping force, the contact pressure force, the working direction, the adjustment of energy supply, the workpiece, the workpiece support. Conduct a risk assessment regarding vibration hazards and implement appropriate controls for these hazards.
- Exposure to vibration can cause disabling damage to the nerves and blood supply of the hands and arms.
- Wear warm clothing when working in cold conditions, keep your hands warm and dry.
- If you experience numbness, tingling, pain or whitening of the skin in your fingers or hands, seek medical advice from a qualified occupational health professional regarding overall activities.
- Operate and maintain the tool as recommended in these instructions, to prevent an unnecessary increase in vibration levels.
- Hold the tool with a light, but safe, grip because the risk from vibration is generally greater when the grip force is higher.
Additional safety instructions for gas tools
- Use the tool only with the Makita genuine gas container.
- Be careful when using gas tools, as the tool can become hot, affecting grip and control.
- Gas fastener driving tools shall be used in ventilated spaces.
- In the case that liquid combustible gas comes into contact with human skin, injuries may occur.
- Gas containers shall be marked according to the required transport regulation.
- Handle gas containers carefully and check for damages. Damaged gas containers can explode and cause injury.
- Read and follow the instructions supplied with the gas container.
- Ensure combustible materials are not exposed to hot exhaust gases.
- Do not use gas tools in explosive areas as the sparks generated in the tool may cause fire or explosion.
- Gas containers should not be stored carelessly or at high temperature. Follow the local regulations and gas container's instructions for handling and disposal of gas containers and batteries or accumulators.
- For gas tools, a small release of gas might be generated by regular operations.
Battery tool use and care
-
Recharge only with the charger specified by the manufacturer. A charger that is suitable for one type of battery pack may create a risk of fire when used with another battery pack.
-
Use power tools only with specifically designated battery packs. Use of any other battery packs may create a risk of injury and fire.
- When battery pack is not in use, keep it away from other metal objects, like paper clips, coins, keys, nails, screws or other small metal objects, that can make a connection from one terminal to another. Shorting the battery terminals together may cause burns or a fire.
- Under abusive conditions, liquid may be ejected from the battery; avoid contact. If contact accidentally occurs, flush with water. If liquid contacts eyes, additionally seek medical help. Liquid ejected from the battery may cause irritation or burns.
- Do not use a battery pack or tool that is damaged or modified. Damaged or modified batteries may exhibit unpredictable behaviour resulting in fire, explosion or risk of injury.
- Do not expose a battery pack or tool to fire or excessive temperature. Exposure to fire or temperature above 130^ may cause explosion.
- Follow all charging instructions and do not charge the battery pack or tool outside the temperature range specified in the instructions. Charging improperly or at temperatures outside the specified range may damage the battery and increase the risk of fire.
Safety devices
- Make sure all safety systems are in working order before operation. The tool must not operate if only the trigger is pulled or if only the contact arm is pressed against the wood. It must work only when both actions are performed. Test for possible faulty operation with fasteners unloaded and the pusher in fully pulled position.
- Securing the trigger in the ON position is very dangerous. Never attempt to fasten the trigger.
- Do not attempt to keep the contact element depressed with tape or wire. Death or serious injury may occur.
- Always check contact element as instructed in this manual. Fasteners may be driven accidentally if the safety mechanism is not working correctly.
Service
- Perform cleaning and maintenance right after finishing the job. Keep the tool in tip-top condition. Lubricate moving parts to prevent rusting and minimize friction-related wear. Wipe off all dust from the parts.
- Ask Makita authorized service center for periodical inspection of the tool.
- To maintain product SAFETY and RELIABILITY, maintenance and repairs should be performed by Makita Authorized Service Centers, always using Makita replacement parts.
- Follow local regulations when disposing of the tool.
SAVE THESE INSTRUCTIONS.
WARNING: DO NOT let comfort or familiarity with product (gained from repeated use) replace strict adherence to safety rules for the subject product. MISUSE or failure to follow the safety rules stated in this instruction manual may cause serious personal injury.
Important safety instructions for battery cartridge
- Before using battery cartridge, read all instructions and cautionary markings on (1) battery charger, (2) battery, and (3) product using battery.
- Do not disassemble or tamper with the battery cartridge. It may result in a fire, excessive heat, or explosion.
- If operating time has become excessively shorter, stop operating immediately. It may result in a risk of overheating, possible burns and even an explosion.
- If electrolyte gets into your eyes, rinse them out with clear water and seek medical attention right away. It may result in loss of your eyesight.
- Do not short the battery cartridge:
(1) Do not touch the terminals with any conductive material.
(2) Avoid storing battery cartridge in a container with other metal objects such as nails, coins, etc.
(3) Do not expose battery cartridge to water or rain.
A battery short can cause a large current flow, overheating, possible burns and even a breakdown.
- Do not store and use the tool and battery cartridge in locations where the temperature may reach or exceed 50^ (122^) .
- Do not incinerate the battery cartridge even if it is severely damaged or is completely worn out. The battery cartridge can explode in a fire.
- Do not nail, cut, crush, throw, drop the battery cartridge, or hit against a hard object to the battery cartridge. Such conduct may result in a fire, excessive heat, or explosion.
- Do not use a damaged battery.
- The contained lithium-ion batteries are subject to the Dangerous Goods Legislation requirements.
For commercial transports e.g. by third parties, forwarding agents, special requirement on packaging and labeling must be observed.
For preparation of the item being shipped, consulting an expert for hazardous material is required.
Please also observe possibly more detailed national regulations.
Tape or mask off open contacts and pack up the battery in such a manner that it cannot move around in the packaging.
- When disposing the battery cartridge, remove it from the tool and dispose of it in a safe place. Follow your local regulations relating to disposal of battery.
- Use the batteries only with the products specified by Makita. Installing the batteries to non-compliant products may result in a fire, excessive heat, explosion, or leak of electrolyte.
- If the tool is not used for a long period of time, the battery must be removed from the tool.
- During and after use, the battery cartridge may take on heat which can cause burns or low temperature burns. Pay attention to the handling of hot battery cartridges.
- Do not touch the terminal of the tool immediately after use as it may get hot enough to cause burns.
- Do not allow chips, dust, or soil stuck into the terminals, holes, and grooves of the battery cartridge. It may cause heating, catching fire, burst and malfunction of the tool or battery cartridge, resulting in burns or personal injury.
- Unless the tool supports the use near high-voltage electrical power lines, do not use the battery cartridge near high-voltage electrical power lines. It may result in a malfunction or breakdown of the tool or battery cartridge.
- Keep the battery away from children.
SAVE THESE INSTRUCTIONS.
CAUTION: Only use genuine Makita batteries. Use of non-genuine Makita batteries, or batteries that have been altered, may result in the battery bursting causing fires, personal injury and damage. It will also void the Makita warranty for the Makita tool and charger.
Tips for maintaining maximum battery life
- Charge the battery cartridge before completely discharged. Always stop tool operation and charge the battery cartridge when you notice less tool power.
- Never recharge a fully charged battery cartridge. Overcharging shortens the battery service life.
- Charge the battery cartridge with room temperature at 10^ - 40^ (50°F - 104°F). Let a hot battery cartridge cool down before charging it.
- When not using the battery cartridge, remove it from the tool or the charger.
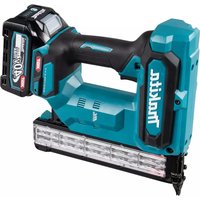
Overview of the nailer
Fig.1: 1. Fuel cover 2. Trigger 3. Magazine
- Pusher lever 5. Pusher button 6. Contact element 7. Exhaust vent 8. Lamp
- Indicating lamp 10. Battery cartridge
FUNCTIONAL DESCRIPTION
CAUTION:
Always be sure to remove the fuel cell, the battery cartridge and nails before adjusting or checking function on the tool.
Installing or removing battery cartridge
CAUTION:
- Always switch off the tool before installing or removing of the battery cartridge.
- Hold the tool and the battery cartridge firmly when installing or removing battery cartridge. Failure to hold the tool and the battery cartridge firmly may cause them to slip off your hands and result in damage to the tool and battery cartridge and a personal injury.
Fig.2: 1. Battery cartridge
To install the battery cartridge, hold it so that the battery cartridge front shape fits to that of the battery installment opening and slip it into place. Insert it all the way until it locks in place with a little click.
Fig.3: 1. Battery cartridge 2. Button
To remove the battery cartridge, withdraw it from the tool while pressing the both sides of the cartridge.
CAUTION:
Always insert the battery cartridge all the way until it locks in place. If not, it may accidentally fall out of the tool, causing injury to you or someone around you.
- Do not install the battery cartridge forcibly. If the cartridge does not slide in easily, it is not being inserted correctly.
Lighting up the lamp
CAUTION:
- Do not look in the light or see the source of light directly.
Fig.4: 1. Lamp button
To switch on the Lamp, press the lamp button. To switch off the lamp, press the lamp button again.
Fuel cell
Attaching the metering valve to the fuel cell
Fig.5: 1. Metering valve 2. Cap
Detach the cap (in case the metering valve is provided with the cap).
Fig.6
Push in the front edge.
Fig.7
Push in the rear edge until it seats.
Inserting the fuel cell
Fig.8
Push up and pull the fuel cover to open.
Fig.9: 1.Jet nozzle
Insert the fuel cell directing the jet nozzle of the metering valve toward the adaptor.
Fig.10
Insert the jet nozzle into the small hole of the adapter properly.
Fig.11
Put the fuel cover over the metering valve and push it down to latch.
Adjusting the nailing depth
CAUTION:
- Remove the fuel cell, the battery cartridge and nails before adjusting the depth of nailing.
Fig.12: 1. Adjuster
To get shallower depth, turn the adjuster to right direction as shown in the figure. To get deeper depth, turn the adjuster to left direction.
Do not turn the adjuster too much, or the adjuster may get stuck.
Indication lamp
Color of the indication lamp means the followings. Blinking green: Normal status
Blinking red: Need to recharge the battery cartridge. Lighting-up-red: Recharge the battery cartridge. Nailing cannot be performed due to no remaining battery capacity.
Blinking orange: Thoroughly cleaning is recommended. Refer to the section "MAINTENANCE" to clean inside of the tool thoroughly. To reset the orange blinking of the indicator lamp, push the contact element for five seconds, and then push the contact element five times.
Blinking orange after blinking green and red alternately: Fault detection is running. Remove and reinsert the battery cartridge to reset. If fault detection is running again, it is malfunction condition. Ask your local Makita service center to repair it.
Hook
CAUTION: Always remove the battery when hanging the tool. Do not hang the tool to your belt.
Fig.13: 1.Hook
The hook is convenient for hanging the tool temporarily. The hook can be set in two positions according to where the tool will be hung.
To change the hook position, push its feet in from both sides and shift to another position.
ASSEMBLY
CAUTION:
Always remove the fuel cell and the battery cartridge before carrying out any work on the tool.
Loading the nailer
▶ Fig.14: 1. Button
Insert a strip of nails into the slit in the rear of the magazine. The nails stop at the entrance of the magazine because of the nail stopper. Unlock the magazine by pressing the button of the nail stopper to insert the nails.
Fig.15: 1. Pusher lever
Pull the pusher lever with pressing the pusher button all the way to the rear of the magazine. Then release the pusher button, and return the pusher lever to the end of the strip gently.
Removing nails
▶ Fig.16: 1. Pusher lever 2. Nail stopper
Pull the pusher lever and push the pusher button to release the nail supporter, and then return the pusher lever to the top with pushing the pusher button.
Slide the nails toward the rear of the magazine. The nails stop at the entrance of the magazine because of the nail stopper. Unlock the magazine by pressing the button of the nail stopper to remove the nails.
Changing the magazine (optional accessory)
Fig.17: 1.Bolt
A magazine with different length is available as optional accessory. To change the magazine, loosen the bolt and remove the magazine.
Then install the new magazine. And fasten the bolt on the magazine.
OPERATION
WARNING:
- Do not touch around the exhaust vent. The surface will be very hot during or after an operation. Touching around the exhaust vent may cause burns or injuries.
CAUTION:
- Make sure all safety systems are in working order before operation.
Checking proper action before operation
Before operation, always check following points.
Make sure that the tool does not operate only by installing the battery cartridge and fuel cell.
Make sure that the tool does not operate only by pulling the trigger.
Make sure that the tool does not operate only by placing the contact element against the workpiece without pulling the trigger.
Make sure that the tool does not operate when pulling the trigger first and then placing the contact element against the workpiece.
Driving nails
Fig.18
- To drive a nail, place the contact element against the workpiece.
The fan motor is activated, fuel gas is injected into combustion chamber and mixed with air by the fan.
Fig.19: 1. Trigger - Hold the contact element pressing firmly and pull the trigger.
Fuel gas is combusted and the nail is driven. - Further driving can be initiated only after both the contact element and the trigger are released.
Nail-driving of concrete
WARNING:
- Use hardened nails only for concrete. Using other purposes nails may cause serious injuries. Do not nail directly on the concrete. Failure to do so may cause concrete fragments to fly off or nails to strike back, causing serious injuries.
- When driving nails, hold the tool so that it stands upright to the driving surface. Slanted nail-driving may cause concrete fragments to fly off or nails to strike back, causing serious injuries.
- Do not use the tool on the surface that objects hang from, such as area where hangers for sewer pipe, dust pipe etc. are set up
CAUTION:
- Use this tool only for soft concrete built up not so long before. Using on the hard concrete may cause nail bending or nail-driving to insufficient depth.
- When the penetration amount into concrete is required more than 20mm , driving nails to the sufficient length may not be obtained. Nails may be driven too shallow causing unstable workpiece, resulting in personal injury and damage to property.
- When driving nail directly onto hard surfaces such as steel and concrete, press the contact element firmly against the workpiece to prevent slipping.
Choose and use appropriate nails so that the penetration amount into concrete ranges 15mm - 20mm
Fig.20: 1. Thin steel plate 2. Penetration amount into concrete
Anti dry fire mechanism
This mechanism prevents the tool from firing without nail.
Dry fire prevention automatically functions when the rest of nails get to the last 2-3 pieces.
Jammed nailer
WARNING:
Always be sure to remove the fuel cell and the battery cartridge before clearing a jam.
CAUTION:
- Do not use deformed nails or nail strip. Failure to do so causes poor nail feeding.
Follow the removing nail procedure and remove the jammed nails.
▶ Fig.21: 1. Magazine
Remove the fuel cell, the battery cartridge and nails. Loosen the bolt on the magazine. Remove the magazine and remove the jammed nails.
Fig.22
If the nails cannot be removed after performing above method, do as follows.
Insert a small rod or the like into the ejection port and tap it with a hammer to drive out the jammed nails from the ejection port.
Fig.23: 1. Under driver guide 2. Bolt
Fig.24
If the nails still remain in the ejection port, do as follows. Loosen the bolts on the ejecting port by using a hex wrench. Remove the under driver guide. And remove the jammed nails.
Return the under driver guide and tighten the bolts after the jammed nails are removed.
Return the magazine and tighten the bolt.
MAINTENANCE
CAUTION:
- Always remove the fuel cell, the battery cartridge and nails before attempting to perform inspection or maintenance.
- Never use gasoline, benzine, thinner, alcohol or the like. Discoloration, deformation or cracks may result.
Maintenance after daily work
Always check the tool for its overall condition and loose screws before operation. Tighten as required. At the end of daily work, conduct an end-of-workday routine.
These simple steps are based on maintaining the safety and performance of the tool.
Before leaving the work site:
- Remove the battery cartridge and store in a tool-carrying case. Always use the tool-carrying case for transporting and storing the tool.
- Dispose of all empty cells where they will not be found by children, crushed, punctured or burned.
When you get home:
- Place the battery cartridge in its charger if it needs charging as indicated by the red indication lamp.
- Wipe the tool with a clean, soft cloth.
- Check the filter and clean if it is dusty.
Cleaning the air filter
Fig.25: 1.Filter cover
Fig.26: 1.Filter cover 2.Filter
Press slightly up the filter cover and remove it. And then simply lift out the filter.
Tap the filter lightly to remove any dust. Soap and water restores the filter to an almost new condition.
To maintain product SAFETY and RELIABILITY, repairs, any other maintenance or adjustment should be performed by Makita Authorized Service Centers, always using Makita replacement parts.
Thoroughly cleaning
If dry fires occur frequently, which means the tool is needed to be cleansed thoroughly.
See the accompanying cleaning guide for detail, and perform the cleaning.
If you have any questions regarding to cleaning, please ask your local Makita Service Center.
OPTIONAL ACCESSORIES
CAUTION:
- These accessories or attachments are recommended for use with your Makita tool specified in this manual. The use of any other accessories or attachments might present a risk of injury to persons. Only use accessory or attachment for its stated purpose.
If you need any assistance for more details regarding these accessories, ask your local Makita Service Center.
Nails
Magazine
- Fuel cell
- Cleaning kit
- Makita genuine battery and charger
NOTE:
- Some items in the list may be included in the tool package as standard accessories. They may differ from country to country.
ACCESSIONS EN OPTION
ATTENTION:
OPTIONELE ACCESSOIRES
ALETOP:
Móvo yia xwpe ts Eupwnns
H Oumuoppwong EK Tepiaa avetai Wc Napaprtma A oTo TAPOV EYXeipioo obnyiw.
PpOeIodOtIOInoEic aOoVaaleiaC yia To KApQwTIKo aepiou
A NPOEIOHOIH: AiaBaoTe oaes TIG PPO EIOOTIOHoeic aoaaieiac kai oaes tic onyies. H un nponTowtpoEOIOTIOINoeWv kai twv onyiWv mTOpei va onnynoe ie ooapopraupatioo, nKToPTAnjia kai/n TUPKayia.
Kivouoi TavaeIaHmuEvw kivnoewv
- KaTaNpHONEvOepyAeiouYiaeyAaN XPOVIKNIPEIIOBO,EvAsXeipOTnsMTOpeiVaBIOWeI Duaqopia OtaXepia,Toucbpaxioves,TOUs Wmuoc, Tov auXeva KAI aAaMaepn Tou oWpaTos TOU.
- Evw xpnoipootoe i eva epyaaleio, o xeiipiotnc 0a Tpentei va uioetnei mia katalnnn kai epyovoiik n otaoon. Aiatnpote aopaae c tnatma KAI aTTOPOUYET E TIG aediec kai aviooppoTc STAOEIC.
- Av O xeiipotnc biowoei ouuTTwata otwoc eriovnn kai enavaaauabavoupevn duoqopia, novo,KTtTO, alyoc, uupunnykaiaoua, ooudiaoua, aoonn kaoun aakayia, dev npetneiv aayoaneutai ta poeiodtointik a ndia. O xeiipotnc npetneiv va ouubouleuteiv evav apodio eTAYeApatia oTo Xwpo Tns Uyeiac, yia TIC suvoalkebpaatnpiotntctou.
- H ouvexoevn xpnon tou epyaieou mtopei va Tpokaleoi kakwoeic loyew enavaaauabavoe Vns katantovno n Tou opeilovta otnv avatu Atnou napaye to epyaiaio.
-
Ia va aTOnOeuxoI O TpaUaTIOuOc loyw ETTa-vaAuaBavouEvns KataTrovnoNc, O xEpiotns 6ev npTei va TeVTWvete UTEpOliKa n va xpnoioTOei UTEpOliKn Duvamn. EITINLeov, o xEpiOTnc 0a TpeTIe va EKoupacetai otav viowkouapueos.
-
Aieayayete aiooynon kivuvwovxetikau e touc kivouous tnc enavaalapavoevns kivnons. Oa penei va etikevtpwthetae muo- okeletikec biatapaxes ka, kata npotimno, va baoietai otnv utroeon ot n meiwon konw- ons kat anipkeia tnc epyaiae ivai atote- 5eogatikn otn meiwon twv diatapaxwv.
Kulak koruyuculari takin
Titresim
EN ISO 11148-13 uyarinca belirlenen titresim toplam degeri:
Titresim emisyonu (a_h) :3,5 m/s2 Belirsislik (K):1,5 m/s2