
Simply Cook Plus RK6221 - Rice cooker TEFAL - Free user manual and instructions
Find the device manual for free Simply Cook Plus RK6221 TEFAL in PDF.
| Product type | Multifunction rice cooker |
| Brand | Tefal |
| Model | Simply Cook Plus RK6221 |
| Cooking programs | 10 presets: Steam, Roast, Cakes, Sear, Porridge, Soup, Simmer, Rice/Cereals, Yogurt, Reheat |
| Special functions | Delayed start (up to 24 h), Automatic or manual keep warm, Manual mode (time/temperature setting) |
| Cooking capacity | Up to 8 cups of rice (approx. 1.2 kg) |
| Cooking technology | Fuzzy Logic for rice, automatic time and temperature adjustment |
| Included accessories | Removable cooking bowl, steaming basket, spatula, soup spoon, measuring cup |
| Lid | With removable inner lid, opening button, steam vent |
| Display | LED screen for time and temperature |
| Power | 800 W (estimated) |
| Voltage | 220-240 V, 50/60 Hz |
| Color | White/black (depending on model) |
| Weight | 3.5 kg (estimated) |
| Dimensions (L x W x H) | 30 x 30 x 25 cm (estimated) |
| Power supply type | Grounded plug |
| Max. altitude usage | 2000 m |
| Cleaning and maintenance | Bowl, measuring cup, spatula, spoon are dishwasher safe. Removable inner lid hand washable. Do not immerse the appliance. |
| Safety | Automatic shut-off, overheat protection, hot surfaces indicated, mandatory grounding plug |
| Spare parts / reparability | Replacement bowl available at authorized center. Removable power cord replaceable (special unit). |
| Warranty | 2 years (domestic use) - consult customer service |
| General information | For domestic use only. Do not use with an external timer. Keep out of reach of children under 8 years. |
Frequently Asked Questions - Simply Cook Plus RK6221 TEFAL
User questions about Simply Cook Plus RK6221 TEFAL
0 question about this device. Answer the ones you know or ask your own.
Ask a new question about this device
Download the instructions for your Rice cooker in PDF format for free! Find your manual Simply Cook Plus RK6221 - TEFAL and take your electronic device back in hand. On this page are published all the documents necessary for the use of your device. Simply Cook Plus RK6221 by TEFAL.
USER MANUAL Simply Cook Plus RK6221 TEFAL
A.LID
B. REMOVABLE INNER LID
C. REMOVABLE COOKING BOWL
C1. FOOD MARKING LEVEL (for rice/steam/stew/soup qty)
D. OPENING BUTTON
E. LED SCREEN for Time and T°C display
F. HEATING PLATE
$$ \begin{array}{l} \text {p a i b} \quad \text {p a u s} \quad . G \ \bar {a} \bar {a} \bar {a} \bar {a} \bar {a} \bar {a} \bar {a} \bar {a} \bar {a} \bar {a} \bar {a} \bar {a} \bar {a} \bar {a} \bar {a} \bar {a} \bar {a} \bar {a} \bar {a} \bar {a} \bar {a} \ \left. \int_ {0} ^ {1} f (x) d x \right| _ {0} ^ {\infty}. I \ \text {a} \text {i} \text {l} \text {l l} \text {j} \text {s} \text {u} \quad . J \ \begin{array}{l} \text {a l l} \ \text {K} \end{array} \ \left{ \begin{array}{l} \text {i d} \quad \text {a l} \quad \text {L} \end{array} \right. \ \ddot {a} \dot {s} \dot {z} \dot {t} \dots M \ \text {c l u o w} \quad \text {d e s o l o}. N \ \left. \right.\left. \right.\left. \right.\left.\left.\left.\left.\left.\left.\left.\left.\left.\left.\left.\left.\left.\left.\left.\left.\left.\left.\left.\left.\left.\left.\left.\left.\left.\left.\left.\left.\left.\left.\left.\right.\right.\right.\right.\right.\right.\right.\right.\right.\right.\right.\right.\right.\right.\right.\right.\right.\right.\right.\right.\right.\right.\right.\right.\right.\right.\right.\right.\right.\right.\right. \ \end{array} $$
AR
SK
A. VEKO
B. VYBERATEL'NE VNUTORNE VEKO
C. VYBERATEL'NA MISA NA VARENIE
C1. OZNACENIE HLADINY POTRAVIN (na urcenie mnozstva na vareni rye/ polievky/pri vareni na pare/duseni)
D. TLACIDLO NA OTVORENIE
E. LED OBRAZOVKA na zobrazenia casu a teploty v'C
F. PLATNA NA VARENIE
G. TELO ZARIADENIA
H. OVLADACI PANEL
I. UKONCENIE VARENIA NA PARE
1. VSTUP NAPAJANIA
K. SIETOVY KABEL
L. NAPAROVACI KOS
M. STIERKA
N. POLIEVKOVA LYZICA
0. ODMERKA s oznacenim ml
A. VIKO
B. ODNIMATELNE VNITRNI VIKO
C.VYJIMATELNA VARNA NADOB
C1. ZNACKA HLADINY UVNITR NADOBY (pro mnozstvi pfsad v reimech rye, pára, duseni, polevka)
D. TLACITKO PRO OTEVRENI
E. DISPLEJ LED, ktery ukazujce ca a teplotu
F. VARNA DESKA
G. TELO VYROBKA
H. OVLADACI PANEL
I. VYSTUP PARY
J.ZASUVKA NAPAJENI
K. NAPAJECI KABEL
L. NAPAROVACI KOSIK
M. STERKA
N. POLEVKOVÁ LŽICE
O. ODMERKA se značením ml
CS
HU
A. FEDÉL
B. ELTÁVOLÍTHATÓ BELSO FEDÉL
C. ELTÁVOLITHATO FOZO
C1. ETEL SZINTJELZOJE (mennyiseg rizshez/parolashoz/fozeshez/leveshez)
D. NYITOGOMB
E. LED-ES KEPERNYO az ido es a T°C kjelzésére
F. FOZOLAP
G. KÉSZÜLEKHÁZ
H. KEZELOPANEL
I. GOZKIMENET
J. TÁPCSATLAKOZÖ
K. TÁPKÁBEL
L. PAROLOKOSAR
M. LAPAT
N. LEVESESKANAL
O. MÉRÖPOHÁR ml jelzëssel
BS
A. POKLOPAC
B. ODVOJIVI UNUTARNJI POKLOPAC
C. ODVOJIVA POSUDA ZAKUHANJE
C1. OZNAKA NIVOA HRANE (za rizu / kuhanje na paru / crbu / supu)
D. TIPKA ZA OTVARANJE
E. LED EKRAN za prikaz vremena i T°C
F. PLOCA ZA ZAGRIJAVANJE
G. KUCISTE PROIZVODA
H. KONTROLNA PLOCA
I. IZLAZ ZA PARU
J. UTIKAC ZANAPAJANJE
K. KABAL ZA NAPAJANJE
L. KORPA ZAKUHANJE NA PARU
M. LOPATICA
N. KUTLAÇA
O. MJERNA ŠOLJA sa oznakama za ml
A. POKLOPAC
B. ODVOJIVI UNUTARNJI POKLOPAC
C. ODVOJIVA POSUDA ZAKUHANJE
C1. OZNAKA RAZINE HRANE (za rizu / kuhanje na pari / variva / juhe)
D. TIPKA ZA OTVARANJE
E. E. LED EKRAN za prikaz vremena i T'
F. GRIJAÇA PLOCA
G. KUCISTE PROIZVODA
H. UPRAVLJACKA PLOCA
I. IZLAZ ZA PARU
1. UTIKAC ZA NAPAJANJE
K. KABEL ZA NAPAJANJE
L. KOSARICA ZA KUHANJE NA PARI
M. LOPATICA
N. KUTLAÇA
O. MJERNA ŠALICA s oznakama za ml
HR
A. POKLOPAC
B. ODVOJIVI UNUTARNJI POKLOPAC
C. ODVOJIVA POSUDA ZAKUVANJE
C1. OZNAKA ZA NIVO HRANE (za pirina / kuvanje na pari / corbe / supe)
D. DUGME ZA OTVARANJE
E. LED EKRAN za prikaz vremena i temperature (^)
F. GREJNA PLOCA
A. KAPAK
B. IIOADBIXEHEBbTPEUH KANAK
C. ПОДВИЖHA KУТА 3A ГТBEHE
C1. MAPKIPOBKA 3A HIBO HA XPAHATA (3a opn3/kojueeCTBO 3a roTBeHe Ha npape/3adyuwaabe/Cyna)
D. 5YTOH 3A OTBAPRHE
E. CBETOIOIOEHEKPAH 3a noKa3BaHe HA BpeMeTo n tempepatypata ^ C
F. HAPRBAUJI NA IIOYA
A. CAPAC
B. CAPAC INTERIOR DETASABIL
C. VAS DE GATIT DETASABIL
C1. NIVEL MARCAJ ALIMENTE (pentru orez/gatire cu abur/ fierbere inabusita/cantitate supa)
D. BUTON DE DESCIDERE
E. ECRAN LED pentru afisaj timp si T°C
F. PLACÁ DE INCÁLZIRE
A. POKROV
B. ODSTRANLJIV NOTRANJI POKROV
C. ODSTRANLJIVA KUHALNA POSODA
C1. OZNAKA ZA RAZLICNO HRANO (za kolićn o za rij/parjenje/ enolonçnic/Juhe)
D. GUMB ZA ODPIRANJE
E. LED-ZASLON za prikaz casa in temperature
F. GRELNA PLOSCA
G. KUCISTE PROIZVODA
H. KONTROLNA TABLA
I. IZLAZ ZA PARU
J. UTIKAC ZA NAPAJANJE
K. KABL ZA NAPAJANJE
L. KORPA ZA KUVANJE NA PARI
M. LOPATICA
N. KUTLAÇA
O. MERNA SOLJA sa oznakama za ml
G.KOPNYC HA IPOJYKTA
H. KOHTPOJIENIHAHEJ
I.N3XOJ3AIIAPA
J.BXO3A3AXPAHBAHE
K. 3AXPAHBAUKA6EJI
L.KOLUHILUA3AIIAPA
M. JIINATYDA
N.JbXnUA3A CyTA
- MEPNTJIHA YAUJA c noka3aHn 3a ml
G. CORP PRODUS
H. PANOU DE COMANDA
I. IESIRE ABUR
J. INTRARE ALIMENTARE
K.CABLU DE ALIMENTARE
L. COS PENTRU ABUR
M. SPATULA
N. LINGURA SUPA
O. CUPA DE MASURARE cu marcaje in ml
G. OHISJE IZDELKA
H. NADZORNA PLOŠCA
I. IZHOD PARE
J.VHOD ZANAPAJANJE
K. NAPAJALNI KABEL
L. PARNA KOSARA
M. LOPATICA
N. ZLICA ZA JUHO
O. MERILNI LONCEK z oznakami mililitrov
SR
RO
A. KAAS
B. EEMALDATAV SISEMINE KAAS
C. EEMALDATAV MULTIKEETKAUSS
C1. TOIDU MARGISTUSTASE (risil/ aurutamise/hautamise/supi kogus)
D. AVAMISNUPP
N. SRIJUBOS SAUKSTAS
O. MATAVIMO INDAS su mi
indikacijomis
F. PLYTA GRZEJNA
G. KORPUS PRODUKTU
H.PANELSTEROWANIA
I. UJSCIE PARY
1. GNIAZDO ZASILANIA
K. PRZEWOD ZASILAJACY
L. KOSZYK DO GOTOWANIA NA PARZE
M. LOPATKA
N. LYZKA DO ZUPY
O. KUBEK Z MIARKA (podzia kaw ml)
ET
LT
PL
1


2


2

3


IMPORTANT SAFEGUARDS SAFETY INSTRUCTIONS
Read and follow the instructions for use. Keep them safe.
- This appliance is not intended to be operated by means of an external timer or a separate remote-control system.
- This appliance can be used by children aged from 8 years and above if they have been given supervision or instruction concerning use of the appliance in a safe way and if they understand the hazards involved. Cleaning and user maintenance shall not be made by children unless they are older than 8 years and supervised. Keep the appliance and its cord out of reach of children aged less than 8 years.
- Appliances can be used by persons with reduced physical, sensory or mental capabilities or lack of experience and knowledge if they have been given supervision or instruction concerning use of the appliance in a safe way and understand the hazards involved.
Children shall not play with the appliance. - This appliance is not intended for use by persons (including children) with reduced physical, sensory or mental capabilities, or lack of experience
and knowledge, unless they have been given supervision or instruction concerning use of the appliance by a person responsible for their safety.
EN
Children should be supervised to ensure that they do not play with the appliance.
- As this appliance is for household use only, it is not intended for use in the following applications and the guarantee will not apply for:
- Staff kitchen areas in shops, offices and other working environments
- Farms
- By clients in hotels, motels and other residential type environments
-
Bed and breakfast type environments
-
If your appliance is fitted with a removable power cord: if the power cord is damaged, it must be replaced by a special cord or unit available from an authorized service center.
- If your appliance is fitted with fixed power cord: if the power supply cord is damage, it must be replaced by the manufacturer, the manufacturer's after-sales service department or similarly qualified person in order to avoid any danger.
- The appliance must not be immersed in water or any other liquid.
11
- Use a damp cloth or sponge with dishwashing liquid to clean the accessories and parts in contact with foodstuff. Rinse with a damp cloth or sponge. Drying accessories and parts in contact with food with a dry cloth.
- If the symbol is marked on the appliance, this symbol means "Caution: surfaces may become hot during use".
- Caution: the surface of heating element is subject to residual heat after use.
- Caution: risk of injury due to improper use of the appliance.
- Caution: if your appliance has a removable power cord, do not spill liquid on the connector.
-
Always unplug the appliance:
-
immediately after use
- when moving it
-
prior to any cleaning or maintenance
-if it fails to function correctly -
Burns can occur by touching the hot surface of the appliance, the hot water, steam or the food.
- During cooking, the appliance gives out heat and steam. Keep face and hands away.
-
Cooking appliances should be positioned in a stable situation with the handles (if any) positioned to avoid spillage of the hot liquids.
-
Do not get face and hands close to the steam outlet. Do not obstruct the steam outlet.
EN
- For any problems or queries please contact our Customer Relations Team or consult our web site.
-
The appliance can be used up to an altitude of 2000m .
-
For your safety, this appliance complies with the safety regulations and directives in effect at the time of manufacture (Low-voltage Directive, Electromagnetic Compatibility, Food Contact Materials Regulations, Environment...).
- Check that the power supply voltage corresponds to that shown on the appliance (alternating current).
- Given the diverse standards in effect, if the appliance is used in a country other than that in which it is purchased, have it checked by an approved service centre.
CONNECTING TO THE POWER SUPPLY
-the appliance or the cord is damaged
the appliance has fallen or shows visible damage or does not work properly
-In the event of the above, the appliance must be sent to an approved Service Centre. Do not take the appliance apart yourself.
- Do not use the appliance if:
- Do not leave the cord hanging
Always plug the appliance into an earthed socket. - Do not use an extension lead. If you accept liability for doing so, only use an extension lead which is in good condition, has an earthed plug and is suited to the power of the appliance.
- Do not unplug the appliance by pulling on the cord.
Always disconnect the appliance from the supply before assembling, disassembling or cleaning.
USING THE APPLIANCE
- Use a flat, stable, heat-resistant work surface away from any water splashes.
- Do not allow the base of the appliance to come into contact with water
- Never try to operate the appliance when the bowl is empty or without the bowl.
- The cooking function/knob must be allowed to operate freely. Do not prevent or obstruct the function from automatically changing to the keep warm function.
- Do not remove the bowl while the appliance is working.
- Do not put the appliance directly onto a hot surface, or any other source of heat or flame, as it will cause a failure or danger.
- The bowl and the heating plate should be in direct contact. Any object or food inserted between these two parts would with the correct operation.
- Do not place the appliance near a heat source or in a hot oven, as serious damage could result.
- Do not put any food or water into the appliance until the bowl is in place.
- Respect the levels indicated in the recipes.
- Should any part of your appliance catch fire, do not attempt to put it out with water. To smother the flames use a damp tea towel.
- Any intervention should only be made by a service center with original spare parts.
PROTECT THE ENVIRONMENT
- Your appliance has been designed to run for many years. However, when you decide to replace it, remember to think about how you can contribute to protecting the environment.
- Before discarding your appliance you should remove the battery from the timer and dispose of it at a local civic waste collection centre (according to model).

Environment protection first!
① Your appliance contains valuable materials which can be recovered or recycled.
念 Leave it at a local civic waste collection point.
BEFORE THE FIRST USE
EN
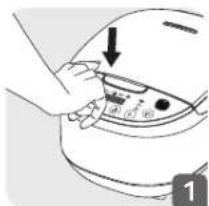
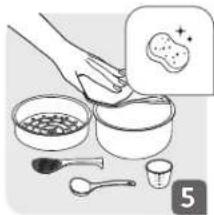
Unpack the appliance
- Remove the appliance from the packaging and unpack all the accessories and printed documents.
- Open the lid by pushing the opening button on the housing - fig.1. Read the Instructions and carefully follow the operation method.
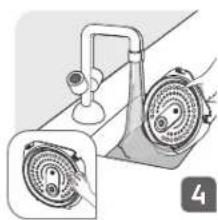
Clean the appliance
- Remove the bowl - fig.2, the inner lid and the pressure valve - fig.3.
- Clean the bowl, and the inner lid with a sponge and washing up liquid.
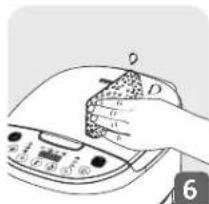
- Wipe the outside of the appliance and the lid with a damp cloth - fig.6.
- Dry off carefully.
- Carefully wipe the outside of the cooking bowl (especially the bottom).
FOR THE APPLIANCE AND ALL FUNCTIONS
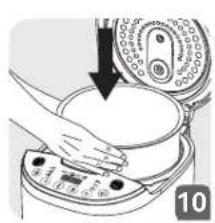
- Make sure that there are no foreign residues or liquid underneath the bowl and on the heating plate - fig.9.
- Place the bowl into the appliance, making sure that it is correctly positioned - fig.10.
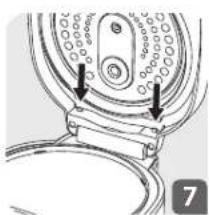
- Make sure that the inner lid is correctly in position - fig. 8.
- Close the lid in place so you hear a "click".
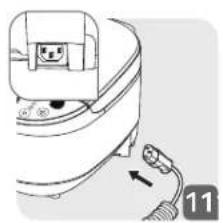
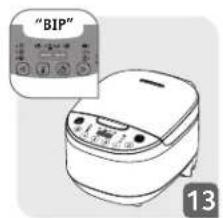
- Install the power cord into the socket of the multicooker base (fig.11) and then plug into the power outlet (fig.12). The appliance will ring a long sound «Beep», all the indicators on the control panel will light up for an instant. Then the display will show [---], and all the indicators will switch off. The appliance enters into standby mode, you can select the menu functions as you wish.
- Do not touch the heating plate when the product is plugged in or after cooking. Do not carry the product in use or just after cooking.
- This appliance is only intended for indoor use.
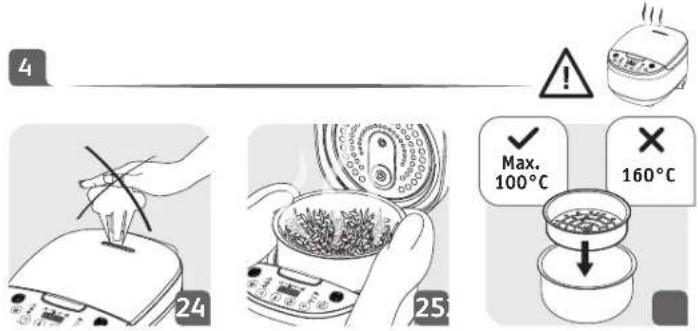
- Never place your hand on the steam vent during cooking, as there is a danger of burns - fig.24.
- Only use the inner bowl provided with the appliance.
-
The steam basket is conceived to be used with your multicooker only. It should be used with a temperature setting that does not exceed 100^ (fig.26). You can also use it in combination with the Rice/Cereal menu.
-
Do not pour water or put ingredients in the appliance without the bowl inside.
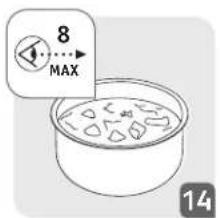
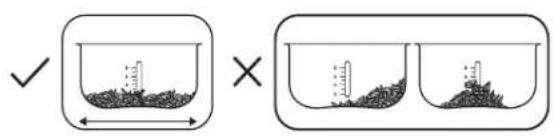
- The maximum quantity of water + ingredient should not exceed the highest mark inside the bowl - fig.14.
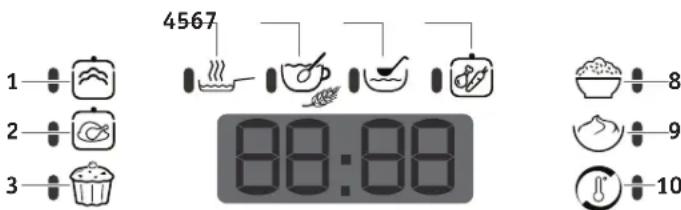
CONTROL PANEL - MENU DESCRIPTION
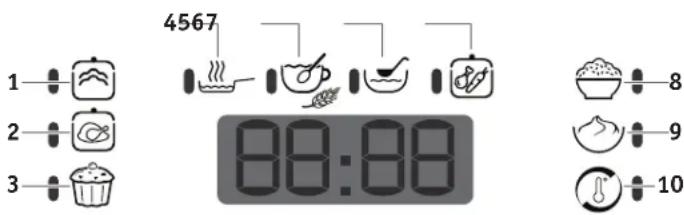
| MENU | Description MENU Description | |||
| 1 | STEAM Cooking food with vapor thanks to water in the pot and the use of the steam basket. Water quantity: 200-600ml. | 6 | SOUP Cooking chunky soups or meat/vegetable broth. Max total qty: level 8 in the pot. | |
| 2 | ROAST Cooking a whole or big piece of meat, fish or vegetables with a bit of fat and liquid. | 7 | STEW/SLOW COOK Cooking meat, fish and/or vegetables in some liquid, eventually with some fat. Max total qty: level 8 in the pot. | |
| 3 | BAKE Making desserts and cakes or preparation with a crust like bread (requires an intervention). | 8 | RICE/ CEREALS Cooking rice and grains. Refer to operating instructions on Rice/Cereal section. Max qty: level 8 in the pot. | |
| 4 | FRY Cooking ingredients with oil. Max oil qty: 350 ml. | 9 | YOGURT/ DOUGH RISING Fermenting yogurts directly inside the cooking pot or with oven-proof containers. Proofing a yeast dough | |
| 5 | PORRIDGE Cooking a thick mixture of grains and oat with milk/water. | 10 | REHEAT Making a cooked dish hot. |
There is an LED indicator next to each menu to indicate which menu you are selecting. For details about the use of each menu, refer to the "Menu details" section.
CONTROL PANEL - FUNCTION DESCRIPTION
| MENU Description | |
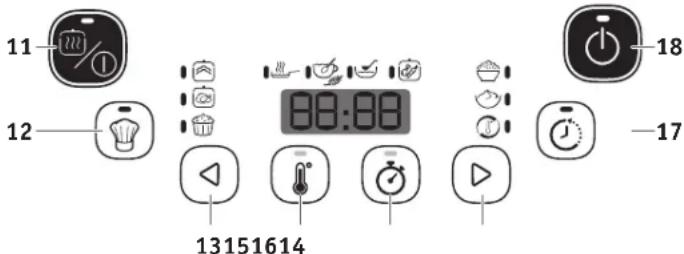
| 11 | CANCE/ KEEP WARM ● This key is used to cancel a cooking menu already launched (one press) or to activate Keep warm manually (during menu selection) ● The Keep Warm mode can be automatically activated at the end of specified menu (cf. "Cooking table") or manually activated. ● To cancel the automatic keep warm (before menu launch), you need to have a long press on this button, until you hear a bip sound. To re-activate the function, you can have a long press again on the key. ● Indicator is BLINKING during menu selection: it means that the cooking menu includes an automatic Keep Warm mode after the cooking cycle. ● Indicator is OFF when the cooking menu does not include the automatic Keep Warm mode. ● Indicator remains ON when the Keep Warm Mode is already activated. The screen will display the time of keeping warm. If you wish to stop the keep warm mode, press on the key. The LED indicator will turn off. ● To preserve the taste of your food, it is recommended not to use Keep warm for more than 12h. |
| 12 | MANUAL MODE ● Press this button to enter the Manual mode. Then press TEMPERATURE key (15) and TIMER key (16) to set your cooking parameters. Press on START key (17) to launch the cooking process. ● The settings selected are recorded for the next use. But you can also reset before each use, or adjust anytime during cooking. |
FUNCTION KEYS - DESCRIPTION
| 13 |  | Backward / «Decrease» button - This button is used to move backward in the menu selection. - It is also used for time and temperature settings as «decrease» digit |
| 14 |  | Forward / «Increase» button - This button is used to move forward in the menu selection - It is also used for time and temperature settings as «increase» digit |
| 15 |  | TEMPERATURE key with indicator - Press on this key to adjust the temperature. Then select \( \odot \) or (Key 13 & 14) - This key can be pressed during the cooking process if you wish to modify the temperature during the cooking process. - LED indicator is activated when the display screen is showing the temperature. |
| 16 |  | TIMER key with indicator - Press on this key to adjust the cooking time. Then select \( \odot \) or \( \square \) (Key 13 & 14) - This key can be pressed during the cooking process if you wish to add extra cooking or decrease the cooking time after launching the cooking menu. - LED indicator is activated when the display screen is showing the cooking time. |
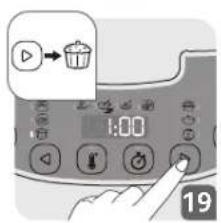
| 17 |  | DELAYED START key - Press this button to postpone the start of the cooking process. - Once pressed, the countdown will be showed on the display. - The LED indicator remains ON until the cooking process starts. When cooking starts, LED indicator switches from Delayed Start Key to Timer key. |
| 18 |  | START key - Press this button to start a cooking menu. - When the cooking cycle is stopped, a long press on the Start Key will turn OFF the display. - When the LED indicator stops blinking and remains ON, it means that the cooking is on progress. At the end of the cooking cycle, the LED switches to automatic keep warm (if applicable). Otherwise, it will blink. |
COOKING PROGRAMME TABLE
| ICON | MENUS | COOKING TIME TEMPERATURE DELAYED START | Automatic KEEP WARM | LID POSITION | ||||||||
| Default | Adjustable | Range De | fault Range | Range | Adjustable | Closed | Opened | |||||
| 1 | STEAM | 40 min 5 | min 15 m-2h | 100°C - | up to 24h | 5 min NO | YES - | |||||
| 2 | ROASTING | 45 min 5 | min | 30m-1h30m | 160°C | 140/150/160 | up to 24h | 5 min NO | YES - | |||
| 3 | BAKING | 1 h | 5 min | 30m-1h30m | 160°C 130/140/150/160 | NO | 5 min NO | YES - | ||||
| 4 | FRYING | 20 min | 1 min | 5m-1h30m | 160°C | 130/140/150/160 | NO | - | NO | YES | YES | |
| 5 | PORRIDGE | 20 min 1 | min | 5m-2h | 100°C 90/95/100 | up to 24h | 5 min | YES | YES - | |||
| 6 | SOUP | 1 h | 5 min 10 | m-2h 100°C | 90/100 | 0/110 | up to 24h | 5 min | YES | YES | YES | |
| 7 | STEW / SLOW COOK | 1 h | 5 min 20 | m-8h 100°C | 80/90/100 | 0/120 | up to 24h | 5 min | YES | YES | YES | |
| 8 | RICE/ CEREALS | Automatic | - | Automatic | Automatic | - | up to 24h | 5 min | YES | YES - | ||
| 9 | YOGURT / DOUGH RISING | 8 h | 15 min | 10min-12h | 40°C | 30/40°C | NO | - | NO | YES | - | |
| 10 | REHEAT | 25 min | 5 min | 5m-1h | 80°C | 80/100°C | NO | - | NO | YES | - | |
| 11 | DIY MANUAL MODE | 30 min 5 | min | 5m-9h | 100°C | 40-160°C (10°C incrementation) | up to 24h | 5 min NO | YES | YES | ||
| 12 | CANCEL / Automatic Keep Warm | - | - | - | 75°C | - | - | - | - | - | - | |
| 13 | DELAYED START | - | - | - | - | - | - | - | - | - | - | |
EN
HOW TO GET STARTED?
- Plug in your appliance and install your cooking pot into the product body, with the inner lid correctly put in place and the plug installed.
1. SELECTING YOUR COOKING PROGRAM
- Once the appliance is turned ON, the screen will display -Put your food into the cooking bowl. Then close the lid or not, depending on your recipe.
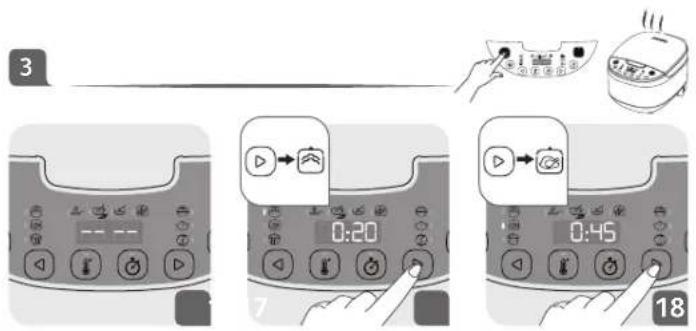
- Select your desired menu with the and keys (key 13 &14)
- By pressing on the light indicator of each menu will light up in the order of the menu listed from 1 to 10 on the previous page.
- By pressing on the light indicator of each menu will light up in the reverse order of the menu listed from 1 to 10 on the previous page.
- Press the START key (key 18) to launch the menu which has the LED ON. The indicator of the START key will stop blinking and remain ON when the menu is activated.
- The menu will operate with the default cooking parameters (refer to the Cooking Programme Table on the previous page)
- The LED screen will display the remaining cooking time (except for Rice/ Cereal menu) and automatically stop or switch to keep warm at the end of the cooking cycle (only for Porridge, Soup, Stew, Rice/Cereals)
2. ADJUSTING YOUR PARAMETERS BEFORE COOKING
Automatic KEEP WARM
- Only (Porridge), (Soup), (Stew), (Rice/Grains) menus can switch to automatic keep warm.
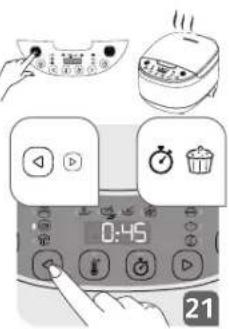
- If you wish to cancel the automatic keep warm function for these menus, please have a long press on the KEEP warm/Cancel button until you hear a beep sound and the indicator is not blinking anymore.
- The cancellation of the automatic keep warm can be operated only before you launch the menu.
Time & Temperature adjustment
Each menu has a default cooking temperature and time.
- If you wish to modify this preset cooking time and temperature, select the related key:
-Press on TIMER Key (key 16), then and/or key 13 & 14) to adjust the cooking time according to your recipe.
-Press on TEMPERATURE Key (Key 15), then and/or (Key 13 & 14) to adjust the cooking temperature according to your recipe.
3. ADJUSTING YOUR PARAMETERS DURING COOKING
- You can modify your cooking time and temperature any time during cooking (except for Keep Warm and (Rice/Cereal menu, and (Steam) which you can only adjust the cooking time.
- If you wish to modify your preset cooking time and temperature, select the related key and follow the same instruction as previously stated.
- You can open the lid anytime during cooking to add extra ingredients or check the cooking status.
- For Rice cooking and Baking, it is not recommended to open the lid before the near completion of the program and especially not for a prolonged time during the cooking process, as it will influence the cooking result.
4. ON COMPLETION OF COOKING
- Open the lid
Gloves must be used when manipulating the cooking bowl and steam basket. - You can serve food with the spatula or ladle provided with the appliance.
NB: It is not recommended to use metallic ustensile to manipulate food inside the cooking bowl, as it may deteriorate the cooking pot.
- Reclose the lid to keep the food warm.
- If the menu you used does not have an automatic keep warm, you can press on Keep warm/cancel key to activate the keep warm manually at the end of the cooking cycle.
- If the menu is in keep warm status, the light indicator will be ON.
- If you wish to turn off the Keep warm mode, you can simply press on Keep warm/cancel key. The related LED indicator will turn off.
5. TURNING OFF THE DISPLAY
- You can unplug the appliance after use, to turn OFF your appliance.
To turn the screen OFF, you can also have a long press (~5 secs) on the START key until a beep sound is heard.
To turn the screen ON again, press on any key from the interface.
MENUDDETAILS
1. M Menu
This cooking menu allows to cook dumplings, fish, meat, vegetables in a healthy way, thanks to hot vapor, allowing to limit the use of oil and to preserve more vitamins and nutrients than frying or boiling. You can use this menu to cook nutritious solid food for your child.
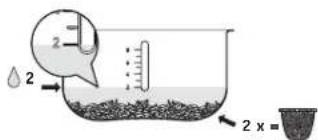
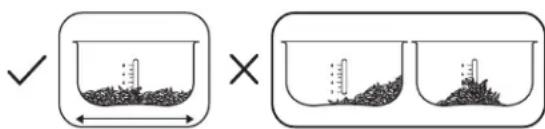
- Pour 600ml to 1L of water into the cooking bowl. It is recommended not to exceed the marking level 4 inside the cooking bowl, for faster preheat.
- For your reference, graduation 2 inside the pot = 600ml. Graduation 3 = 900ml, Graduation 4 = 1.2L
- Place your ingredients in the steam basket provided with the appliance, then place the basket on the cooking bowl.
- Close the lid. Then select the STEAM menu
- TIPS: the smaller the ingredients, the faster to cook. Here are some cooking times for your reference:
| Food | Estimated cooking time* (based on 600ml water) |
| Potatoes (halves ~ 50gr each) | 25 mins |
| Potatoes (slices, ~ 5 mm thick) | 15 mins |
| Broccoli / Cauliflower | 20 mins |
| Carrots (chunks) | 30 mins |
| Carrots (slices ~ 0.5mm thick) | 15 mins |
| Salmon | 15 mins |
| Meat patties | 15 mins |
| Dumplings | 30-45 mins |
- Preheat time is included. Cooking time may vary depending on the size and amount of your ingredients, but also by the amount of water put into the cooking pot.
NB: Be careful as the steam basket will be hot after cooking. If you wish to remove the steam basket from the cooking pot, it is recommended to use oven gloves.
2.10STMenu
EN
This menu is to cook a full piece of meat, fish or vegetables.
- You can fry your meat for 10-15 mins on each side first on the cooking mode (RY) before flipping it and switch the Cooking Mode (ROAST)
3. E Menu
This menu allows to make desserts like, cakes (130^ / 140^) or bread and other preparations with a bottom crust, to some extent.
- For breads, you can proof your yeast dough first with (YOGURT/DOUGH RISING) menu before you select (BAKE) menu. You will need to cook the 2 sides.
- After 40-45mins of cooking on one side, you will need to remove the pot with oven gloves and flip the dough upside down
- Then, cook for an extra 30-45 mins on the other side (NB: times are indications only, depends on your ingredients and taste).
Select 150^ / 160^ for a golden crust. - For recipes containing dairies or eggs (ex:cakes), you may select 130^ / 140^ temperatures.
- NB: It is highly recommended to use oven gloves to manipulate the cooking pot.
- It is not recommended to use any metal ustensile (especially with sharp edges) inside your cooking bowl in order to avoid any deterioration.
4. -Menu
This menu is to sauté/stir fry small pieces of food or fry meat, fish poultry or shallow-fry food such as croquettes. To use this menu, you need to have your food surface in contact with oil to create the crusty and flavorful layer.
Always use this function with oil and food.
- For more efficient frying, it is suggested to add enough oil inside the cooking bowl to cover the bottom and wait few minutes for the oil to heat up before adding the ingredients.
- You will hear 2 beep sounds when the oil has reached 160^ .
- It is recommended to stir your food from time to time.
- This program is not intended to deep-fry. It is not suggested to use more than 350ml of oil.
NOTE:
- It is important to make sure that the removable inner lid is well dried and that there is no residue of water in the silicone joint to avoid any risk of projection of hot oil during the close of the lid.
- Do not use the steam basket to cook with this function because it may cause the steam basket to melt.
5. RIDGE Menu
This menu allows to cook cereals such as millet, oat, rice or buckwheat with milk for a creamy and nourishing meal. You can use this function to cook a nutritious meal for your child.
- Once the oatmeal is cooked, it is best served immediately and should be consumed within 1 hour.
- To avoid the risk of overflow if you are using rice or grains, it is recommended to rinse thoroughly with water to remove part of the starch, before cooking.
6. 10P Menu
This menu allows to cook nutritious chunky soups and delicious natural meat or vegetable broth that can be used to cook your pilaf rice or risotto.
Soup is the perfect dish to hydrate while filling up your body.
- Your amount of ingredients and liquid should not exceed the maximum marking level 8 in the pot.
- NB: Do not use a hand blender to puree your soup into the pot. If you wish to puree your soup, transfer to a blender or to a suitable container before processing.
7. W/SLOW COOK Menu
EN
This menu allows to cook meat and vegetables in sauce.
- You can use this menu to slow cook at low heat (by selecting temperature 80^ / 90^ ) for longer hours in order to have a more tender meat texture (up to 8h).
- Setting up at 100^ / 120^ will allow to cook faster.
- Your amount of ingredients and liquid should not exceed the maximum marking 8 in the pot.
TIPS: For tastier results, we suggest to brown your meat and/or onions with some oil on the FRY menu for few minutes before starting to cook with the STEW/SLOW COOK menu
NB: The cooking time may vary depending on the size of your ingredients.
8. CEREALS Menu
This menu uses Fuzzy Logic technology to cook your rice for a perfect fluffy result. It will automatically adjust the cooking time and temperature according to your quantity of ingredient to be cooked. For this menu, you cannot set-up the cooking time, it is automatic.
TIPS FOR COOKING PERFECT RICE
RECOMMENDATIONS FOR BEST RICE COOKING
Before cooking, measuring the rice with measuring cup and rinse it (except for risotto rice).
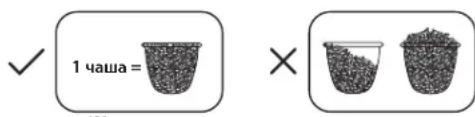
- Measure your quantity of rice to be cooked, using the cup provided with this appliance (ex: 1 cup, 2 cups, etc)
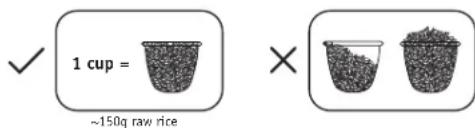
- Rinse your rice first to remove part of the starch in order to avoid a sticky result.
- Pour the rinsed rice into the bowl, evenly.
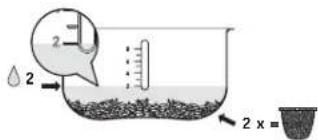
- Fill with cold water or meat/vegetable broth, up to the corresponding "CUP" mark printed in the bowl. For example, if you are cooking 2 cups of rice:
- Close the lid and select (RICE/CEREAL menu) according to the instructions provided in the "HOW TO GET STARTED?" section.
The screen will display - Press on the Start Key The indicator will stop blinking and remain ON.
- The display will flicker, the cooking process is launched.
- When the rice is ready, the multicooker will automatically switch to keep warm. The green indicator will turn ON.
- Once the green light is ON, stir the rice and then leave it in the multicooker for a few minutes longer in order to get perfect rice with separated grains.
- If you are cooking Pilaf rice, please make sure to always have the rice fully covered by liquid before closing the lid and launching the Rice/ Cereal menu.
This table below gives a guide to cook rice:
TIPS: These recommendations are indications only. You may adjust the water quantity depending on your taste.
| COOKING GUIDE FOR RICE - 8 cups | |||
| Qty of raw rice (in number of cups) | Qty of raw rice (equivalent in gr) | Water level in the bowl (+ rice) | Serves |
| 2 300 g | 2 cup mark 3per. | 4per. | |
| 4 600 g | 4 cup mark 5per. | 6per. | |
| 6 900 g | 6 cup mark 8per. | 10per. | |
| 8 1200 g | 8 cup mark 13per. | - 14per. | |
The time and temperature are automatic for rice cooking.
Please note that there are 7 steps:
Preheat Water absorb Temperature quick rise Keep boiling Water evaporation Braise rice Keep warm.
The cooking time depends on the quantity and type of rice.

URT / DOUGH RISING Menu
This menu allows you to make yogurt directly in the pot or with oven-compatible containers. It also offers the possibility to rise a yeast dough.
MAKING YOGURT
- Wash the bowl, dish or containers in warm water and washing up liquid, then rinse and dry them thoroughly.
- All the equipment used in the yogurt making process should be cleaned in a dishwasher. Sterilising is important to prevent the introduction of undesirable airborne organisms which could interfere with the incubation of the culture, and results in runny yogurt which will not set.
- Homemade yogurts do not contain the thickeners and stabilisers contained in some commercially produced yogurt and are often thinner in consistency. Sometimes homemade yogurt has nutritious clear whey on top which can be stirred back in. Alternatively, you can pour it off.
- Homemade natural yogurt can be flavoured with fresh fruit or cold cooked stewed fruit after preparation and chilling. If the fruit is added
before fermentation the fruit acids interfere with the setting process and the yogurts will be very runny. Some very acidic fruits, such as fresh pineapple, can cause the yogurt to curdle or separate. Acidic fruit is best served in a separate bowl.
CHOICE OF INGREDIENTS FOR YOGURT
Milk
What milk should you use?
All our recipes (unless otherwise stipulated) are prepared using cow's milk. You can use plant milk such as soya milk for example as well as sheep or goat's milk but, in this case, the firmness of the yogurt may vary depending on the milk used. Raw milk or long-life milks and all the milks described below are suitable for your appliance:
- Long-life sterilized milk: UHT whole milk results in firmer yogurt. Using semi-skimmed milk will result in less firm yogurt. However, you can use semi-skimmed milk and add one or two pots of powdered milk.
- Pasteurized milk: this milk gives a more creamy yogurt with a little bit of skin on the top.
- Raw milk (farm milk): this must be boiled. It is also recommended to let it boil for a long time. It would be dangerous to use this milk without boiling it. You must then leave it to cool before using it in your appliance. Culturing using yogurt prepared with raw milk is not recommended.
- Powdered milk: using powdered milk will result in very creamy yogurt. Follow the instructions on the manufacturer's box.
Choose a whole milk, preferably long-life UHT. Raw (fresh) or pasteurized milk must be boiled then cooled and needs the skin removing.
Theferment
For yogurt. This is made either from:
- One shop-bought natural yogurt with the longest expiry date possible; your yogurt will therefore contain more active ferment for a firmer yogurt.
-
From a freeze-dried ferment. In this case, follow the activation time specified on the ferment instructions. You can find these ferments in supermarkets, pharmacies and in certain health product stores.
-
From one of your recently prepared yogurt – this must be natural and recently prepared. This is called culturing. After five culturing processes, the used yogurt loses active ferments and therefore risks giving a less firm consistency. You then need to start again using a shop-bought yogurt or freeze-dried ferment.
If you have boiled the milk, wait until it has reached room temperature before adding the ferment.
Too high a heat may destroy the properties of your ferment.
Fermentation time
- Your yogurt will need between 6 and 12 hours of fermentation, depending on the basic ingredients and the result you are after.

- Once the yogurt cooking process is finished, the yogurt should be placed in a refrigerator for at least 4 hours and it can be kept max 7 days in refrigerator.
DOUGH RISING
Before using this menu to rise your yeast dough, you must knead your dough first.
- If you are kneading your dough manually, you can first mix your yeast with the warm water or milk in a cup. You can add 1 tsp of sugar to it and stir well to boost the activation of the yeast.
- If you see a foaming reaction within 10 mins, it means that your yeast is active.
- You can mix this liquid containing the activated yeast to the dry ingredients (flour+ salt) and complete with the remaining quantity of liquid needed for your recipe.
- It is usually recommended to knead your dough for about 15-20mins to reach a good and homogenous consistency.
-
Once you have reached a smooth consistency, place the dough into the cooking bowl, then close the lid.
-
Select the DOUGH RISING menu according to the instructions on "Selecting your menu" section.
The standard recommended time is usually 1h for a white bread dough. - NB: The proofing time required may vary depending on the nature and quality of your ingredients.
- If your dough did not rise at all after 30min-1h, your yeast may be deactivated or you used too hot liquid. In this case, you can re-incorporate some new yeast to save your dough.
TIPS: Avoid the yeast to be in direct contact with salt and do not use hot water. Salt is the enemy of yeast and high heat will kill the effect of the inactivated yeast. So make sure to use warm water instead of hot water.
NOTE: Do not use any metallic ustensile in the cooking pot to avoid any deterioration. If you wish to prepare the dough with a hand mixer, please use a suitable bowl and transfer the dough to the cooking bowl of your Tefal multicooker only from proofing.
10. 15EAT Menu
This menu is intended to make your cooked food hot. It is not intended to cook raw food.
Place your food into the cooking pot and close the lid. Select the REHEAT menu
CAUTION
- Never use the reheat function to defrost food.
- The cold food should not exceed 1/2 of the cooker's volume. Too much food cannot be thoroughly heated. Repeated use of "Reheat" or too little food will lead to burnt food and hard layer at the bottom.
- It is recommended not to reheat thick porridge, or it may become pasty.
- Do not reheat long-stored cold food to avoid smell.
- To reheat rice, it is recommended to add some water and stir the rice before starting.
- During reheating, it is recommended to stir the food from time to time.
11. UAL MODE Menu

Cooking anything with your Simply Cook Plus is really at your fingertips, also thanks to the Manual Mode.
- Set your own cooking time and temperature to cook the way you feel.
- Adjust the temperature to keep an automatic and stable heat monitoring or to boost the power and control how you want to cook your favorite meals.
Cottage cheese or sous-vide cooking some categories of food are possible thanks to the low temperature settings of your Manual mode.
Here are some indications to provide you with some guidance for even more recipe possibilities. - The Manual mode will record your latest preset parameters for the next use.
| T°C What can you do? |
| 40°C To warm up baby food or rise a dough |
| 80°C To make Cottage cheese |
| 100°C To bring water to boil |
| 110°C To make jam |
| 120°C To cook pasta |
| 130°C To brown your ingredients |
| 140°C To cook vegetables and poultry |
| 150°C Roasting meat |
| 160°C Frying meat and poultry |
To make Cottage Cheese. Kefir is used as the basis for cottage cheese. The ratio of kefir: cottage cheese is approximately 4: 1.
- If you are making jam, it is recommended to cook with the lid open.
12. ③ AYED START FUNCTION
- To use the delayed start function, choose a cooking program and the cooking time first.
-
Then, press the key (Delayed start) and choose the preset time.
-
The default preset time will start from your selected cooking time.
The range of preset is from the pre-selected cooking time up to 24 hours.
Each press of and key can increase or decrease the delayed start time. - When you have chosen the desired preset time, press Start key to enter cooking status, the START indicator will remain ON and the screen will display the number of hours left until the completion of the cooking menu.
- The LED indicator of Delayed Start remains ON until the cooking process starts. When cooking starts, LED indicator switches from Delayed Start Key to Timer key.
Note:
No delayed start function available for: (Fry), (Dead rising/
Yogurt), (Baking), (Reheat), and (Keep warm) functions.
CLEANING & MAINTENANCE
- Ensure that the multicooker is unplugged and has cooled down completely before performing any cleaning or maintenance.
- It is strongly recommended that you clean the appliance using a sponge after each use - fig.4-5-6.
- Make sure to wipe off the vapor condensation from the product body after each use.
- The cooking bowl, measuring cup, spatula and soup spoon are dishwasher safe.
Cooking bowl, steam basket
- We do not recommend using abrasive powders or scouring pads.
- If food is stuck to the bottom, pour some water into the bowl and leave to soak for a while before washing up.
- Dry off the cooking bowl thoroughly.
Caring for the cooking bowl.
- To care for your cooking bowl, carefully follow the instructions below:
- To ensure that the bowl remains in good condition, we recommend that you do not cut food in the bowl.
- Be sure to always return the bowl to the multicooker.
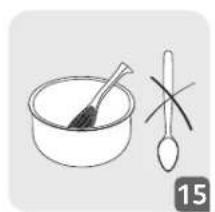
- Use the plastic spoon provided or a wooden spoon; do not use metal ustensiles to avoid damaging the surface of the bowl - fig.15.
-
To avoid any risk of corrosion, do not pour vinegar into the cooking bowl.
-
The surface of the bowl may change color after first use or with prolonged use. This color change is the effect of steam and water—it will not affect the use of the multicooker and is not hazardous to your health. You can continue to use it safely.
Cleaning the inner lid
Remove the inner lid by pushing outwards with both hands (fig.3). Clean it with a sponge and washing up liquid (fig.4). Then wipe dry and put it back behind the 2 ribs and push it on the top until it's fixed - (fig.7-8).
Cleaning and care of the other parts of the appliance
Clean the outside of the multicooker - fig.6, the inside of the lid and the cord with a damp cloth and wipe dry. Do not use abrasive products. Do not use water to clean the interior of the appliance body as it could damage the heat sensor.
TECHNICAL TROUBLESHOOTING GUIDE
| Malfunction description | Causes Solutions | |
| Control panel lights off and no heating. | Appliance not plugged in. | Check the appliance is plugged in the socket, and is switched on. |
| Control panel lights off and heating. | Problem of the connection of the indicator light or indicator light is damaged. | Send to authorized service center for repair. |
| Steam leakage during use. | Lid is badly closed. | Open and close the lid again. |
| Inner lid not positioned or assembled properly. | Ensure the inner lid is well positioned – fig.7-8 |
| Malfunction description | Causes Solutions | |
| Rice undercooked or overcooked. | Too much or not enough water compared to rice quantity. | Refer to rice cooking table for water quantity. Always add rice to the cooking bowl first, then add water to the water level mark on the inside of the bowl. |
| Rice undercooked or overcooked. | Insufficiently simmered. | Send to the authorized service center for repair. |
| Automatic keep warm function fails (apppliance stays on cooking programme or does not heat on keep warm). | The keep warm function has been cancelled by user during the setting. The function may only operate after Porridge, Soup, Stew, Rice/ cereals menus. | |
| E0 | The sensor on the top open circuit or short circuit. | |
| E1 | The sensor on the bottom open or short circuit. | Stop the appliance and restart the program. If the problem repeats, please send to the authorized service center for repair. |
Remark: If inner bowl is deformed, do not use it anymore and get a replacement from the authorized service center for repair.
aaiyiyil ciai yie gaiy jaiu
e gill palaal gaii paaol caiai . aIla e gll alj
aillgll 0000 gall jglg 1gagll gog oolj 1
auiu 1y g: aaius aaii jlgdu aalld aalld aalld
10J5.
gall 1
aill lue ay.uyg b jj pluauwll u y g pluauwul jy uay e gall yu
Jy g 15gbl sio gabll jgl plalol u 0u yj g 0g jgl g jgl u
jolalolololololololololololololololololololololololololololololololololololololololololololololololololololololol
1
aBglw aayb.(Jll)dyLd jy 111111111111
( G + J CHD) = CHD + JCHD
Lg jzjj 1
aal 100000000000000000000000000000000000000000000000000000000000000
.
| العربية الحرفية الحرفية الحرفية الحرفية الحرفية الحرفية الحرفية الحرفية الحرفية الحرفية الحرفية الحرفية الحرفية الحرفية الحرفية الحرفية الحرفية الحرفية الحرفية الحرفية الحرفية الحرفية الحرفية الحرفية الحرفية الحرفية الح註冊 العربية الح註冊 1. . . . . . . . . . . . . . . . . . . . . . . . . . . . . . . . . . . . . . . . . . . . . . . . . . . . . . . . . . . . . . . . . . . . . . . . . . . . . . . . . . . . . . . . . . . . . . . . . . . . . . العربية الح註冊 2. . . . . . . . . . . . . . . . . . . . . . . . . . . . . . . . . . . . . . . . . . . . . . . . . . . . . . . . . . . . . . . . . . . . . . . . . . . . . . . . . . . . . . . . . . . . . . . . . . . . . العربية الح註冊 3. . . . . . . . . . . . . . . . . . . . . . . . . . . . . . . . . . . . . . . . . . . . . . . . . . . . . . . . . . . . . . . . . . . . . . . . . . . . . . . . . . العربية الح註冊 4. . . . . . . . . . . . . . . . . . . . . . . . . . . . . . . . . . . . . . . . . . . . . . . . . . . . . . . العربية الح註冊 5. . . . . . . . . . . . . . . . . . . . . . . . . . . . . . . . . . . . . . . العربية الح註冊 6. . . . . . . . . . . . . . . . . . . . . . . . . . . . . . . . . . . . . . . . . . . . . . . . . . . . . . . . . . . . . . . . . . . . . . . . . . . . . . . . . . . . . . . . . . . . . . . . . . . . . . . . . . . . . . . . . . . . . . . . . . . . . . . . . . - . . . . . . . . . . . . . . . . . . . . . . . . . . . . . . . . . . . . . . . . . . . . . . . . . . . . . . . . . . . . . . . . . . . . . . . . . . . . . . . . . . . . . . . . . . . . . . . . . . . ? . . . . . . . . . . . . . . . . . . . . . . . . . . . . . . . . . . . . . . . . . . . . . . . . . . . . . . . . . . . . . . . . . . . . . . . . . . . . . . . . . . . . . . . . . . . . . . . . . . . - - - - - - - - - - - - - - - - - - - - - - - - - - - - - - - - - - - - - - - - - - - - - - - - - - - - - - - - - - - - - - - - - - - - - - - - - - - - - - - - - - - - - - - - - - - - - - - - - - - - - - . . . . . . . . . . . . . . . . . . . . . . . . . . . . . . . . . . . . . . . . . . . . . . . . . . . . . . . . . . . . . . . . . . . . . . . . . . . . . . . . . . . . . . . . . . . . . . . . . . . \. . . . . . . . . . . . . . . . . . . . . . . . . . . . . . . . . . . . . . . . . . . . . . . . . . . . . . . . . . . . . . . . . . . . . . . . . . . . . . . . . . . . . . . . . . . . . . . . . . . ; . . . . . . . . . . . . . . . . . . . . . . . . . . . . . . . . . . . . . . . . . . . . . . . . . . . . . . . . . . . . . . . . . . . . . . . . . . . . . . . . . . . . . . . . . . . . . . . . . . . > . . . . . . . . . . . . . . . . . . . . . . . . . . . . . . . . . . . . . . . . . . . . . . . . . . . . . . . . . . . . . . . . . . . . . . . . . . . . . . . . . . . . . . . . . . . . . . . . . . . = . . . . . . . . . . . . . . . . . . . . . . . . . . . . . . . . . . . . . . . . . . . . . . . . . . . . . . . . . . . . . . . . . . . . . . . . . . . . . . . . . . . . . . . . . . . . . . . . . . . / . . . . . . . . . . . . . . . . . . . . . . . . . . . . . . . . . . . . . . . . . . . . . . . . . . . . . . . . . . . . . . . . . . . . . . . . . . . . . . . . . . . . . . . . . . . . . . . . . . . = 0 = 0 = 0 = 0 = 0 = 0 = 0 = 0 = 0 = 0 = 0 = 0 = 0 = 0 = 0 = 0 = 0 = 0 = 0 = 0 = 0 = 0 = 0 = 0 = 0 = 0 |
a 1
j 100000000000000000000000000000000000000
yglall gagllg joljglall ydaabg plccn .
laalldcglg (jzbljzclll) @jde aalld clds.
dalsglg qg no lalssdglalglgll .
aelrtae laalldgallcg so ayllalldyqilglalll .
allglgrtllcoguyj @jzjjleabuJL .
jgl (jzll) @jde baleal, gjgill lalldgallgll .
die alall gajewg elao @jgog g jlgell
gall dgl Jus aaddll tcll.
gall uue gall aae Ie e 100led LED jgs Jp .
@glj j j j 100led LED jgs U
gaiiillgllljag45jgljjlllajaiy jaiy
a 1000000000000000000000000000000000000000
3y1 13
y/1j51 2
j 1
aill 111 111 111 111 111 111 111 111 111

. V
aall 1g jol g oal aial
a0jw03 yj6) aiaia 0j0 do j0i aaiy gaiy aiai all oia plaiuai d
10
aegll 1slll 1sllg 1gssd jgs
a 13 cui ju Jai yj g aai nao dae jai jai de uauu
cglgbl gaa ygalbdo valioa a:abgalo

A
Gao x j 1j Fuzzy Logic aai ai oiai iin
piu ciigai a5g gai ai jai jai jagai gai cai ai ai piai
Lalab ay u y glal ou ulc y aeall oia Jn
yjjj yj
jw yb Jy
(gjyjllj)abalg jolb1 g5 p 100
(du)log.1g≤

j 1 j 1 j 1 j 1 j 1 j 1 j 1 j 1 j 1 j 1 j 1 j 1 j 1 j 1 j 1 j 1 j 1 j 1 j 1 j 1 j 1 j 1 j 1 j 1 j 1 j 1 j 1 j 1 j 1 j 1 j 1 j 1 j 1 j 1 j
gabal 100
LgSd 1
- 12
jdl Cg jolal y
jio Jor o joi jolal y. gall y aas
:abgalo
a o lyai yog pue jog uia aii juuiy iuii iuii joi joi
ailll 1iie jolll jj jn j
aJgai jy gao u du y aagol oia go Jauu auu

.0
yolllg o elgall abnll g j jgl j lgl j nll yogll g a zll o
a 1000
a 100g a 100g g 100g g 100g g 100g
Laaa

.7c
jolal jg jil lgl aal gag calsll alglj yab aol oia
gjjjgl jdl jdldoolwclj
.01261 1201 1201 1201 1201
aegllgAglilwglgBglgSglgSglg
calalbal 12 4j cos 1. algll 3 calal balb g y bdo pdo y: abgolo
abla Jg wio g bdo
1gJ 2
1g1aall g1 clalll g1 pall no aL5 2ab3 (g) aaaa zell all oia
(1) 10 1 1 1 1 1 1 1 1 1 1 1 1 1 1 1 1 1
2
jlo a g jol gl (gao 10.14).gl l ao glal nai adall oia .lolega
SE = 1
jglll jdll ldl lgl llae paae
golulw g. 186
afo gao aowu wus u.(17 Jw)aigao 1 jgao y aygao sl
.
gaa aagaaaegaae gaae gaae gaae gaae gaae gaae
jg 1
$$ \therefore \log_ {2} (2) = 1 $$
j) jalab1 cui ge ciu 1k ay aeggo gall oagai
$$ \therefore \text {a i} \text {L} \text {l} \text {L} \text {l} \text {g} \text {w l} \text {w l} \text {k} \text {w l} \text {i} \text {w l} (\text {心} \text {w} \text {g} $$
jll jy y. jll jy no g g g y
i 1
ii jiyy nx liqgo yg yj g
2000 1 J L a E a J d j a J p a J .
Gg 1yJgssbI ggsll aolll gglgo jglll llo gdsd
daiiei slly daliobil jglu wabllo gjg jalil jadll gji)
$$ (\dots \ddot {4} s) $$
(00j1jll)jglg 100000000000000000000000000000000000
a aaii i 1y jyj yj yj yj yj yj yj
a
JyJyJyJyJyJyJy
dla 3a 1jg 5u
gao xie Jxu dao gj jno gog jlgqall bga
jglal 1ai jai y. iaoi dai jy jil jgal JnJl o
"
y
jfo jao jao jao jao jao jao jao
155 y puiuui 150eolld uig gao ge duu piuai i jioi
jglall jla gao lalg iog jgo gao jia jgog uu albu y
.
Joo aasll sloal no lo xg Jj jg gslil yji no ool
E
jUbyIgOu
auiuui uaii dali jia 3aiyjuy Jilai aub ciuuy logjo jglj151
aiaea aodj yyo lojg gaoaoo oog g ellw
jou duiu wui duai juo 3: ciu dui uui uui 18o jiu jiu jiu 13!
gaiabai gaiu gail uai la aoua paaiai ai y
Jbfo 1golao g aolob oLsU
S木弟形 COBD = S COD + S BDO - S BOC
auiu juaai JwJg aiai w g alluo uos aohp
g a.b jolab aaba: gbal palaal wali yll aljy 11
a 1
aai daa " gao jao li a o jao 1o 15 !
"puuuiy1i uaiuiau gau
puiuuiuy aaii 0jy juaaiaa
yolol ygdo yde jgld gblld pladwyl ggb:
puu yoojol aJyU JyIaBou bOjo jol 15 is:du
Jogshl 1e Jilw s
:ayyI yIyI yIyI yIyI yIyI yIyI yIyI yIyI yIyI yIyI yIyI yIyI yIyI yIyI yIyI yIyI yIyI yIyI yIyI yIyI yIyI yIyI yIyI yIyI yIyI yIyI y
0jolpa1uoyy1
alaa -
与 g = w jc = p j o
OCHRANA ZIVOTNÉHO PROSTMEDIA
Vas spotrebic bol navrnuty tak, aby fungoval dlhe roky. Ak sa ho vsk rozhodnete nahradit, nezabudnite zohladnit to, akym sposobom by ste mohli prispiet k ochrane zivotneho prostredia.
Pred likvidaciou spotrebica by ste mali zcasova cybrat bateriu a nechat juzlikvidovat v lokalnom mieste zberu domoveho opadu (v zavislosti od modelu).

Ona3BaHeTo Ha OKoJIHaTa Cpea e Ha NpBPO MCTO!
① Baunr ypei cBbpxa CEHN MaepnA, KOTo MOrat da ce pereHepnP aui peuKnpaT.
PpeaTe ro B MeTeH nyHKT 3a cb6nPaHe Ha 6ntOBn OTnaBtuN.
PA30IAKOBAHE HA YPEDA
PazonaKobaneHa ypeda
I3BaTe ypea ot onakOBkata n pa3oNAKOBAte BCNUKn akcecoapn N neaTHN DOkymeHTN.
OTbopete Kanaka, Kato HaTnchete 6yToHa 3a OTbapRHe Ha Kopnyca - nr.1. IpoHETe HNCTpyKuNTe N BHMATEHNO CneBaeHTe MeTOHa paOba.
TouncBaHe na ypeDa
- 3BaTe Kynata - Hr.2, BbtpewHnKaNk NkanaHa 3a HnraHTo - Hr.3.
- NocnteKynataN BbtpseHnKa nakc r6a an npenapat 3a MneHe Ha cbdoBe.
- 36bpwe BbHnHaT aac T ha ypea n Kaapa C bnaxha Kbpna -nir.6.
-Посушete BнмATEHNO.
BHNMaTeJIHO 36bPWeTe BbHnHaTt Ha KynTa 3a RotBeHe (No-cneuaHNO dbHOTO).
3A YPEDA N BCNUKN OYHKUN
yBepete ce,ye noi Kynata HnHa HarpBaata Tnoa Hma OCTbTu OT yJxNBEeCTBaHnnTeuHOCTn-9.
- NocTabeTe Kynata B ypeDa, KaTo ce yBepnte, Ye e pa3nolKeHa npabuHNo - 10.
- YBepete ce, ue BBtpeuHnT Kanak e pa3noJIOxKeH npabuHNO - fnr. 8.
3aTbOpTe KaNaka Ha MAcToO My, TaKa Ye Da yyeTe ,uPaKbaHe".
BkHouTe 3axpaHbAunKa6en B rHe3doTo B oChOBaTa HA MyIINKykbpa (fnr. 11) n CneT TOBA BKHouTe B KOHTAKta (fnr. 12). YpeBt ue m3dae Dblr 3ByKOB «CnHAn» N BCuKN INDnKAtoPn HA KOHTponHnnaHnue CBeTHa 3a KpKaTO. CneT TOBA HnDCnner ue ce nOKaKe [---] n BCuKN INDnKAtoPn ue Ce n3KnOHT. YpeBt Bn3a B pEKMn HA rOTOBHOCT, MOKeTe da n36epete JekAHnTE fynKUnn Ha MEHOTO.
He IOKOCABte HargBaUaTATAIIOU, KORA tyeBt E BKNIOUeH B KOHTAKTA UIN CNEI rOTBeHe. He HOCTe npOdyKTo IIO BpEme Ha pa6oTa UIN HENOpceDCTBEHO CLEI rOTBeHe.
To3n ypeE npedHa3HaeH cAmo 3a ynoTpe6a Ha 3akpntO.
Hnkora He noctabnre pKaTa cn Bbpyx Odywnka 3a npa no BpeMe Ha rotBeHe, TbK KaTO cbIeCTByBA ONaCHOCT OINr.24.
- Изпonsьаite сам Вьтшна Куна, пedingостава сypEDA.
KoMHnIaTa 3a npapa e npeHa3HaueHa 3a yNtpe6a camo C myTNkykbp. Ta Tp8BaDa ce m3no3Ba c HactpoKa Ha TemnepatypaT, KOTo He HAdBnuaBa 100°C (Phr. 26). MoKeTe da nH3no3BaTe N B KOMbHaunc m MeHTo Rice/ Cereal (Opn3/bPheHx pAnH).
He HaninbaTe BOaN He NoCTabYIe CbCTABKn BypeDa,6e3 Kynata Da e BbTpe B Hero.
- MaKcMmAHnOTo KOJIueCTBO BOda + CbCTaBKeIte He TpI6BaJa HAdBnWabAT MapKINPOBkATA 3a HaH-BuCOKO HNBO Btpe B Kynata -Φnr.14.
KOHTPOJEH PAHEJI - ONINCAHNE HA MEHOTATA
8. IIO RICE/CEREALS (OPM3/3bPHEHN XPAHN)
Toba MeHIO n3nON3Ba TexHOLOrOHTA Fuzzy Logic 3a rotBeHe Ha opH3 a nepFekTeH nyXkAB pezIyntat. Ta ABtOMATuHNO perynIPA BpEMeTo I TEMpePATpaTa 3a rotBeHe cnopeKoNlueCTBTO Ha cbCTaBKeTte, KOHTo NcKaTe Da CrotBtne. 3a ToBA MeHIO He MoKeTe Da HAcTPOTE BpEMeTo 3a rotBeHe, TO Ce 3aDaBA ABtOMATuHNo.
CbBETN3A TOTBEHE HA IEPKEKTEH OPIN3
PENOPbK3A HAI-DObPO FOTBEHE HA OPIN3
Ipei ngTBeHe n3Mepete opn3a C MePntenHaTa qhaa I ro n3nlaKHeTe (c n3KnIOueHHe Ha opn3a 3a pN30To).
- U3mepete KONMueCTBOTO opn3 3a rotBeHe, KaTO n3non3BaTe yaaTa, npedocTabeHa CTo3n ypeD (Happ.: 1 ya7a, 2 ya7u T.H.)
- IbpbBO n3nlaKHeOpn3a, 3a Da oTcpaHHTe qACT OT HmweCTeTO n Taka Da n36BerHete nonyuaabaHTo Ha neKab pe3ytat.
- 13cunnepepaBHomepHo 13nlaKaHaTnaOpn3 B Kynata.
HantbHnTe CbC tyeHa Boga nn MeceH/3eNeHuKOB 6ynbo DO cboTBeTHata MapKnpoBka ,CUP" (AUA),OTneHaTah B Kynata.
Haprimep, ako rotbrte 2 qaun opn3:
3aTbOpeteKaNakaun36epete MeHIO RICE/CERAL (OPN3/3bPHEHNXPAHN) cnopeINHCTpyKUnTe, npedocTaBEN b pa3den ,KAK DA 3AIOQHEM?".
EkpaHbT ue nokaxe
HaTnCHete 6yToHa Start (CTapT) HnKAtOpbT ue cnpe da Mura n ue ocTaHe da CBETU.
- DnCnPnEaT 1e MInrA, nPoueCbT Ha roTBeHe CTaptnpa.
Korato opn3bTe roTOB, MYTNkykbpbT ABTomATNUHO eIpeBKNIOH KbM peKIMa 3a noDdbpkaHe Ha ToNIIHa. 3eJIeHNr ININkATOp CBTHE.
CneI Kato 3eneHnAT CBETNIHEN INHINKAtop CBETHE,pa36bPKaHTe opn3a n CNE TOBA FO OCTABETe B MYTNKYKbPa 3a Oue HAKOJIKO MNHyTn, 3a da NONYHTe nepfekTeH opn3 cOTDeHn 3bpHa.
Ako rotBNTeOpnHuaΦ,MOJIa, yBepTe Ce,YeOpn3bT BnHaH e HAnbHIO nOKpIc TceHocT, pEa Da 3aTBopNTE Kanaka N da cTApTpate MeHTo Rice/ Cereal (Opn3/3bpHeHxpanu).
Ta3n Ta6nua no-dony Bn daBa hAcOKn 3a roTbeHe Ha opn3:
CbETn:Te3n npenopbkCa camaOpneHTnpOBbHm. MoKeTe da perynipate KOJIueCTBOTO BOda B 3aBcIMoCT OT BKyca Cn.
MOn,06bphTe BHMmaHne,ue HMa7 CtbnK:
PepBapuTeHNO 3aRpaBaHe A6copbmahe Ha B0daT Bb3o NOBuaBaHe Ha Tempeatypata POnIbpxHa HbapeHTo N3napBaHe Ha B0daT 3aNywaBaHe Ha opn3a POnIbpxHa HToNnHa.
BpeMeTo 3a roTBeHe 3aBnCn OT KOJInueCTBOTO H BnDa Ha opn3a.

MEHIO YOGURT/DOUGH RISING (KENCEJO MNRKO/BTACBAHE HA TECTO)
ToBA MeHO Bn N03BONBA Da nprirotBATE KNCeNo MNAKO DnpeKTHO B CbDa 3a roTBeHe HIN B KOHTeHepn, NoXoJaun 3a yNtpe6a BbB fypHa. To npednaru n BB3MOKHOCTTA 3a BTACBaHe Ha TECTO CMJ.
IPNIGOTBAHE HA KICENO MIAKO
I3MnTe Kynata NmCbDOBe CToNnBa BOa I npenapat 3a MneHe Ha CbdoBe, cneKoETo HnH3nKaHETe H NOcCyWte Do6pe.
BCNUKn CbDOBe INPUNBOPN,IN3NOJ3BAHIN B INPOUcEA H NpNIPOTBHe HA KNCENO MIAKO, TPA6Ba Da CE IN3MNBAT B CbDOMNHA MaUNHa. CTePNIN3HPaHETo e BaxHo, 3a Da CE PpeNDTbpATN NOJaHETo HA HexeNaHN MKNpOoPraH3MN, INpeHAcRn BB Bb3dYxa, KOINTo 6NxA MoTN Da IONpeuAT Ha INHKyBaIraTa HA KyNTypaTA N B Pe3yTTaT Da CE NONYuTHe KNCENO MIAKO, KOETHOAMA da Ce CBrCTN.
- DomauHIne KncenMnka He CbDbpKAT CbCTnteNte N CT6nn3atopnte, CbDbpKaunc B HAKON PpOINBExdAHN C TbpROBcA cEN Kncen Mnka U ChcTo Ca C No-PaKc KOHCNTeHua. POHkora DomaHHTO KNCeno MNAKO HMA NITATEHa 6nctpa cyPobAtka OTrope, KOrTO npaPa36bpKBaHe ue ce cmecn O6paTHo C KNCENOTMOKko.AKOKeenaete,MOXTeuJa n3neTe.
- DomaHOTo HATypaHNO KncENo MnKo MoKe Da Ce OBkyCn C npceHn NIOOBe UIN CTyEDH NIOOBe OT KOMNOT Cnei nprirotBHe N OxnaJdaHe. Ako NIOOBeTe Ce DoabRt PpeDn FepMeHTaunrTa, NIOOBIte KncEnHn Ie nonpeuat Ha Ipoucca Ha CbCTBaHe N KncENITE MNeKa 6bDat MHORo TeHN. HkON MHorO KncEnI NIOOBe, KaTO npceH aHaHac, Morat da Hakapat KncENoTo MnKO Da CE npceue Nn pa3dEln Ha Dbe φpaKuHn. Hai-do6pe e KncEnIte NIOOBe Da CE cepBupat B OTDeHNa KyNA.
U360P H A CbCTABK 3A KUCEIO MJIAKO
MЯko
KaKBO MJIKO TpR6Ba DA n3nON3BaTe?
BcNKn haNi peeertn (ocBeH aKO He e nocOeHO pyro) ce npiroTbT c KpaBe MIAKO. MoKTe Da n3NON3BaTe pactnteHIO mIAKO, KaTO HApnpMeP cOeBO mIAKO, KAkTO N OBEe NNI KO3e MIAKO, HO B TO3N CNYaH TbCToTa H KAICELOTO MIAKO MoKe Da Bapura B 3aBNCIMOCT OT n3NON3BaHOTo MIAKO. CypOBOTO MIAKO NIN DblrToPAHHTe MNEKA IN BCNUKN MNEKA, NOCOeHN No-DOLy, ca NOxOJaUN 3a n3NON3BaHe Bypeda:
-Дьлготраносторпимаю мяко:OT nbHOMaCHeHTo UHT mЯко ce
нolyа BA NO-tbCTO Kcnceno мяко.ИЗнOL3BaHTo Ha acTNoHO 6e3MaCneHo
mЯко ще дobete Do nolyuaBaHTo Ha No-MaNKo TbCTO Kcnceno мяко.
Быпеки ТОВА можete Ду ИЗПОЛ3BaTe YacTNoHO 6e3MaCneHo mЯко Ида
do6aBnTE eHa mIn DBe KOHcEpBn Mяко Ha npax.
- Nactbopn3npaHO Mmko: OT TOBA MmKO ce NOnyuBa NO-KpeMo06pa3Ho KNCENO MmKO C MaJIKO KaIMaK OTrope.
CypoBMO Mnko (ΦeepmepcKO Mnko):TOBa Mnko Tp6Ba Da ce Cbapu. PnenopbHTenHoe c bso Da ro octaBte Da BpN DJIro BpeMe. Onacho e da n3non3BaTe TOBa Mnko, 6e3 Da ro CBapnte. Cnei TOBa Tp6Ba Da ro octaBte Da n3CTHne, npdN da Ro n3non3Bate BypeDa. He ce npenopbBya 3akBacBaHe c Knceno Mnko, pnirotBeHo CbC cyPOBO Mnko.
Mnka H npax: npn n3no3BaHe Ha MnaKo Ha npax ue ce noynu MHoro Kpemoo6pa3HO KcCeo MnaKO. CneBaaTe NcHCTpykunTe, npedocabeHN Ha onakOBkata Ha npon3BODnteJ.
M36epete nblHomacneo MnaKo, 3a npednoHTane DblroTaHNO UHT mnaKo. Cypoboto (npcHo) nn NaCTbOpn3npaHO MnaKo Tp8Ba Da ce CBapu, cnd Koeto da Ce oxlaadn Da ceOTCTpaHKn KaMaKaT My.
3aKBaKaTa
3a Knceno MnaKo. MoXeTe da npriOTBnte O TeIN OH CneHNTE BapnHTN:
OTeHNO KyneHO OT TbproBckata MpeKa HAtypaHIO KncENo Mnko C Bb3MOxHO Hau-DbIbT cpoK HaToDHOCT BCNECTBHe HA ToBa BaWeto KncENo Mnko Ie CbIbPka No-aKTUBHa 3aKBacka 3a No-TbCTO KncENo Mnko.
OTIIOOHNIN3npaCyxa3kBaKa.BTo3nCnyaCneBaaTe BpeMeTO 3a AKTNIBPAPHe, NOCOeHO BV INCTpyKUnTE 3a 3akBaKata. MoKeTe da HamePte
Te3n 3aKbBcN B CynePMapKeTn, aNTeKN N B HЯКо Mara3Hn 3a 3dpaBOCNOBn npOyKTn.
OT eHNO OT Baunte HacKopo npiroTBeHN KcEni MneKa -TO Tp86Ba da e HaTypaHIO n npiroTbeHO HacKopo. ToBA ce HapuHa 3akBaCbaHe. CnED net npocca Ha 3akBaCbaHn 3nON3BaHOTo KcENO MnKro Iy6n AKTNBn 3AkBackn IN BCIECTBNE HA TOBA mHa PNCK Da CE NOnyU NKcENO MmRAO C NO-MaNKO TbCTa KOHCnCTeHnA. B TaKB CNyau Tp86Ba DA 3aOnOHeTe OTHOB, KATO N3NON3BATE KyNeHO OT TbpROBCKATA MPeka KcENO MnKO NN NINOΦNIN3npaHa 3kBAcKa.
Ako CTc CBapnnMnKATO, m3yakaiTe, DOKATO DOCTHRe CtaHa TempepaTpa, npedn da do6abute 3aKBackata.
Tbpe cnHATA tonnHa MoKe da yHnOxKn CBOIcTBata Ha 3aKBaCkata.
BpemeHaΦepMeHTaUa
-ΦeMpMeHTaunrTa Ha KInCeNoTo MnIgK Oe OTheme MeJxNy 6 n 12 yaca B 3aBNCIMoCT OTOCHOBHnTe CbCTaBKn I neyTata, KOITOnCKaTe da NonyuHte.

BG
CneI KaTo IpoOecbTa HApnroTBAHe Ha KNCeIOTo MNaKO PnKIOUCh, KNCeIOTo MNaKO Tp8Ba Da ce octaB u XnaDnHnK 3a Nohe 4 caca; To Moke da ce CbxpaHbBa MaKc.7 dHb B XnaDnHnK.
DOUGH RISING (BTACBAHE HA TECTO)
IpeMn Da n3noJIbATE TOBA MEHIO 3a BTacBaHe Ha TECTO C Ma, NbpBO Tp86Ba Da OMEcUTe TECTOTO.
- Ako Mecnte TectoTo p4H0, MoXeTe NpBPO da CmecTe MaTa c TOnnTa BOda nnn mnnkoto B uwa. KbM Hero MoXeTe da do6abute 1u.n.3axap n da pa36bpkate Do6pe, 3a da yckopnte AKTNBupaHeto Ha MaTa.
AkoBnnteO6pa3yBaHeHaTnHaBpAMKInTeHa10MnHyTu,TobaO3NaUaBA,MeMaTa eakTNbHa.
Moxete da cmecnte Ta3n TeuHcT, CbDpXaua WynHanata Ma, Cbc CyxHTe CbCTABKN (6paHNO + coN) n da DOnbHInTe CocHaIATO KONueCTBO TeuHcT, Heo6xoHMo 3a BaWATA peCenTA. - O6nKHOBeHc Ce npenOpBvBa TcToTO Da Ce MeCn Okono 15 - 20 MNHyTn,3a Da ce noynu do6pa nXOMOREHHa KOHCNCTeHcN.
CneI KaTO CTe IOCTINHann IJAAKc KOHCNTEHnra HA TECTOTo, rO NOCTABETe B Kynata 3a ROTBEHe, CneI KOETO 3aTBPope KaNaka.
- I36epete MeHTo DOUGH RISING (BTACBAHE HA TECTO) Cnopei HnCTpykunTe B pa3dJI, N36Op Ha MeHIO".
- CtanhapTHOTO npenopbHTeHOBpeMe 6nKHOBeHo e 1 u3a TcTo 3a 6JxI6.
3a6eJek:Heo6xOIMMOTBpMe 3a BtacBaHcMoKeJaBapnpaB3aBnMocT OT BUNA KauyctBOTo HA CbCTABKHTe.
Ako TectoTo Bn 3060 He ce H aHirHe cIe 30 MNHTn Do 1 cac, MaTa MoKe Da He e WynHana HIN CTe INNON3BaNIN TBbPde ropeua TeuHocT. B To3n CnyaM MoKete Da DO6aBNTe OTHOBO MAJKO HOBA Ma, 3a Da CNACITe TectoTO Cn.
CbETn: He donyckaIte MaT a da 6bde B npK KOHTAK CbC cOnTa n He n3non3BaIte ropeu bOda. CoT a e bpar Ha MaT, a Bucokata TemnepaTypa Ie y6ne eEkeT ha HeunHalaT a Ma. Taka ye He 3abpaBraTe da n3non3BaTe tonna BOda BMecTo ropeua BOda.
3A6EJIEXK4: He n3nON3BaIte MetaIIHn npIN6Opn B cbda 3a roTBeHe, 3a da n36erHete NOBpeHa NaOKpHTNeTo. Ako XenaTe Da npINOTBnTE TECTOTcPbueh MInKcep, MON, n3nON3BaIte NoDxOJa KyaN npExBbpNETe TECTOTo B Kynata 3a roTBeHe Ha MyTNkYkbpa Tefal cmo 3a BTacBaHe.
10. M O REHEAT (NPETONJIHHE)
ToBa MeHIO e npedHa3NaYeHO 3a cTOnIIHe Ha croTBeHa xpaHa. To He e npedHa3NaYeHO 3a roTBeHe Ha CypoBa XpaHa.
IocTaBeTe xpaHata B cbda 3a rotBeHe n 3aTbOpTe Kanaka. N36epTe MeHToREHEAT (NPETOJIHRe)
BHIMAHHE
Hikora He n3non3BaIte yHKuYra 3a npetonnHe 3pa3mpa3BaHe Ha xpaHa.
Ctydehata xpana he Tpr6ba da haBmuaaba 1/2 ot o6ema ha rotbapckn ypei. Tbbpde roJAMOTO KOJIueCTBO xpana hma da moKe da ce CTONNI HAnbHIO. Mhorokpathata ynotpe6a ha MeHOTo,Reheat" (PiPoternIHe) nn NOCTABAHETO Ha TBbpDE mANKO xpana ue doobede do 3araphe Ha xpaHATA n 06pa3yBaHa HTBpD CLOH Ha DbHOTO.
- PpenopbYBa ce da He npetonnIe Tbcta KaIa, B npotnbEn Cnyau TMAOKe da CTaHe KJIncaba.
- He npetonnne TbIro CbXpaHbAha CtydeHa XpHa, 3a da n36erHete noBata Ha MmPn3Ma.
3a da npetonnte opn3, ce npenopbya da do6abnte manko boda n da pa36bkate opn3a, npedna cTapnpata MeHIO. - IIO Bpeme Ha npetonnHero ce npenopbUba da pa36bpKbATE xpaHata OT BpemeHa Bpeme.
11. MODE MANUAL MODE (PbueH PEXIMM)
TOrBeHeTo HA BCaKaBn BnObe AYrTa C ypeDa Simply Cook Plus e HauCTHa IecHO 6laOapEnH N Ha Manual Mode (PbueH peKIM).
3aJnte CBOE co6CTBHeO BpeMe I TeMnepaTpy Ha rotBeHe, 3a Ja rotBnTe no NaHH, KOITo Bu xapecBa.
PerynpaTe TEmnpaTpata,3a Da NoDbpbKATE ABTomatueH n ctaBneH KOHTPOHa TOIINHATA IN3a Da yBeINHTE MOUHOCTTA N da KOHTPOIpate npiroTBHeTO Ha IIO6MNTe CNCTN.
-ПиговаянToHa cIpeHe KOTmJx MInrTOBHeHTo NO MeToJa Cy BnHa HЯКoI KaTEROpMn XpaHn e Bb3MOxHo 6NaIarOdapeHne Ha HAcTpoNKeTe 3a HnCKa TempepaTypa Ha Manual mode (PbueH peXm).
ETo HrKaON npIMepN, KOTo 1e Bn daaT HAcOKn 3a OSe NOBeYe Bb3MOxHocTN 3a peueNTN.
- Manual mode (Pbuehen pekmm) 3e 3a3a nnoocneHnTe npedapntnHO 3aadeHn ot Bac napametpn 3a cneBaaata ynoTpe6a.
| T°C KaKBo | MOXeTe Da NaHapBnTe? |
| 40°C | Да зaToPbIte 6e6eшka xpaHa Или Дa ИЗПОЛ3BaTe 3aВТСВАне на ТECTо |
| 80°CДa pyroTbIte CmpeHne KOTnДж | |
| 100°CДa CBaIte BODa | |
| 110°CДa pyroTbIte CmДko | |
| 120°CДa croTbIte NaCTa | |
| 130°CДa зaIbpxkIte CbSTabKи | |
| 140°CДa croTbIte 3eJeHcUzni ПТИЧИ прдуКТи | |
| 150°CДa ИЗпeчete MeCo | |
| 160°CДa ИЗпeчete MeCo И ПТИЧИ прдуКТи | |
3a nproTbHe Ha cnphe KOtJx. KaTo OCHOBa 3a cpeHTo KOtJx ce n3nol3Ba KeΦnp. CbToHoWeHHeTo KeΦnp: cnpEe KOtJx e np6n3ntenHO 4:1.
Ako npirotoBte cnaKo,ce npenopbua da roTbnt npn OTbopeH Kanak.
12. ② XUNA DELAYED START (OTJIOXEH CTAPT)
3a da n3nON3BaTe yHKUmaTa 3a OTNOKeH cTAP, NpPBO n36epeTe nporpaMa 3a rotBeHe IN BpEMTo 3a rotBeHe.
Cne ToBa HATNCHEte 6yToHa Delayed start (OtNoXeH cTapT) n 36epete npDabpntEnHO 3aAdeHOTo BpeMe.
- PnpBapntenHO 3aAedeHOT BpeMe no npda3bpahe ue 3anohe da Teue cnE HaCtbnBaHe Ha 36paHOT ot Bac BpeMe 3a rotBeHe.
-Диana30Hb3ап徝варителноЗадаын e ot п徝варитelноИЗбpaHOTOBpeMe 3a rotbeHe Do 24 yaca.
BCaKOHaNTCKaHe Ha6yToHaMOKe Da yBENuHn HAMn BpeMeTOHa OTNOKeHn CTapT.
Korato CTe n36pani JenaHOTOpnpdBapntEnHO 3aAedeHO BpeMe, HATNCHEt6yToHa Start (CTapt), 3a Da BnE3eTE BcSTOHe Ha rotBeHe, INHINKaTOpBT 3a START (CTAPT) ue octaHe da CBETN Ha ekpaHaJe Ce NOKaKe 6poarHa OCTaBaunte YacOBe Do 3abbpWbAHe Ha MeHIO ToTBeHe.
CBeToIOIOHnIAT NmIKaTOp 3a Delayed Start (OTNoXeH CTapT) oCTaba Da CBETN, DOKATO npOecbT Ha rTOBHe 3anoHc. Korato rTOBHeTo 3anoHc, CBeToIOIOHnIAT NmIKaTOp npeBKnOuBa OT 6yToHa Delayed Start (OTNoXeH CTAP) KbM 6yToHa Timer (TaImeP).
3a6eJekka:
Функцида 3а олнож стап He мосяд acе m3нольза 3a: Функципгу (Пьрхени), (Bread rising/Yogurt (Вразане Ha Tecto/kinceno Mnako), (Baking (Чужен Ha Tectehи n3dien), (Reheat (Ретоняne) n (Keep warm (Повдьхане Ha TOnnHa).
NIOYCTBAHE INIIOIDPbXKA
IpeiIN3BbPwBaHe Ha NoOHTBaHe NII NIOpBkKa Ce yBepe, Ye MyNTKykbpt E 3KIOUeH OT KOHTaTn H e HAnbHO OxJaDeH.
CnHNo ce npenopbya da nouuctBaTe ypea, kato n3no3BaTe r6a, cneBcKa ynotpe6a-4-5-6.
He 3a6paBnTe da n3tpnBaTe KOHdEHNpAlnte napn ot Kopnyca Ha npodykTa cned BcKa ynotpe6a.
Kynata 3a rotBeHe, MepntenHata yhaa, UnaTynata mIbXnUata 3a Cya MoarTa da CE MMRT BcbOMMnHa MaHHa.
Kyna 3a rotBeHe, KowHnua 3a napa
He npenopbVbame da n3non3BaTe a6pa3nBn npaxObe nn a6pa3nBn r6n.
AkoHaNbHOTe e3aIenHanaXpHaHa,HaJIeITeMaNkoBODaBKnPaTaNOCABTe DaCeHaKICHe,NpeDNaN3MMeTe.
- Pioocyuete do6pe Kynata 3a roTbeHe.
TpnuKn 3a Kynata 3a roTBeHe.
- OTHOCHO rpnKNTe 3a Kynata 3a rotBeHe CneBaaTe BnMaTeHnHcTpyKmnte NO-DONY:
3a da 3ana3nTe Kynata B Do6po CbCToHHe, npenopbYBaMe Da He peXeTe XpaHaBHe.
BnHaBpBaaHKeynaTaBMyTNKkbpa.
Излбайтпедостаьета пл actMacobЯlbxица Илдрь�аlbxица; He n3лбайтMetaHn np6opn,3aДа He nobpeinte nobbpxHOCTTaHa Kynata -fur.15.
3a da n36eHETe BCRAKbB PnCK OT KOP03N, He HANBaTe OcET B Kynata 3a rotBeHe.
Повьхонтва Куна може д ромени CBETA сн сдп пьвату ynotpe6a Ил пи порькгенна уnotpe6a. Тазни ромяна Ha CBETA e B pe3yntat Ha Вьздсctвneto Ha napata И ВODATA -ТЯ Нма д NOВИRE Ha ynotpe6ata Ha МуNTIkyKbpna He e onacha 3a BaWeto 3dpaBe. Можete д рорькпte ДЯ ИЗNON3BATE 6e30anacHo.
NouchBaHe Ha BbtpewHnKaIaK
N3BaTeTe BbTpeHnnaKanak, Kato ro HATNCHe HABhC Dbe pbue (fur. 3). NocHTeTe ro C Tb6a n npenapat 3a MneHe Ha cbdoBe (fur. 4). CneTobar noNDcywete, NoCTabete ro o6paTHo 3a2-Ta Pb6a n ro HATNCHe OTrope, Dokato UpaKaHe HA MCTOTOn - (fur.7-8).
TouncBahe n rpnxna 3a npynte qactn Ha ypeda
IOnHCTe BbHnHaT aCt HA MyJTNKyKbpA -FIn.6, BbTpEaHATA cact Ha KaNaka nKa6ena C MeKa Kbpna, cIeN KoTo NOcCyWete. He N3nonBaTe aBpa3NBn npOdykTu. He N3nonBaTe BOa 3a noOcHCTBaHe HbTpEwHocTt Ha ypeDa, TbN KaTO TOBA MoKe Da NoBpeDn CeH3Opa 3a TOnnHa.
TEXMHUECKO PbKOBOJCTBO 3A OTCTPAHBAHE HA HEM3IPABHOCTN
PIEVIENTOŠANA STRAVAS PADEVEI
- Nelietojiet ierici, ja:
-ierice vaitasvadsirbojati;
- ierieirokritusi,taiirredzamibojajumivailanedarbojaspareizi;
-ieprieks minetajos gadijumos icerice ir janogadapilnvarotaservisa centra. Neizjauciet iceri patstavigi.
- Nelauijiet vadam brivi nokarāties.
Noteikti pievienojiet ierici zemetai elektrotikla kontaktligzdae. - Nelietojiet pagarinatajvadu. Ja to lietojat uz savu atbildibu, tad izvelieties pagarinatajvadu, kas ir laba stavokli, kam ir spraudnis ar zemejuma savienojumu un kas ir piemeroits ierices jaudas nominalam.
- Neatvienojiet ierieks kontaktdaksu no Rozetes, velkot aiz vada.
- Pirms ierices saliksanas, izjauksanas vai tirisanas vienmer atvienojiet to no strvas kontaktligzdas.