Mini Space Cyclonic TW332188 - Vacuum Cleaner TEFAL - Free user manual and instructions
Find the device manual for free Mini Space Cyclonic TW332188 TEFAL in PDF.
Frequently Asked Questions - Mini Space Cyclonic TW332188 TEFAL
User questions about Mini Space Cyclonic TW332188 TEFAL
0 question about this device. Answer the ones you know or ask your own.
Ask a new question about this device
Download the instructions for your Vacuum Cleaner in PDF format for free! Find your manual Mini Space Cyclonic TW332188 - TEFAL and take your electronic device back in hand. On this page are published all the documents necessary for the use of your device. Mini Space Cyclonic TW332188 by TEFAL.
USER MANUAL Mini Space Cyclonic TW332188 TEFAL
Mini Space Cyclonic Mini
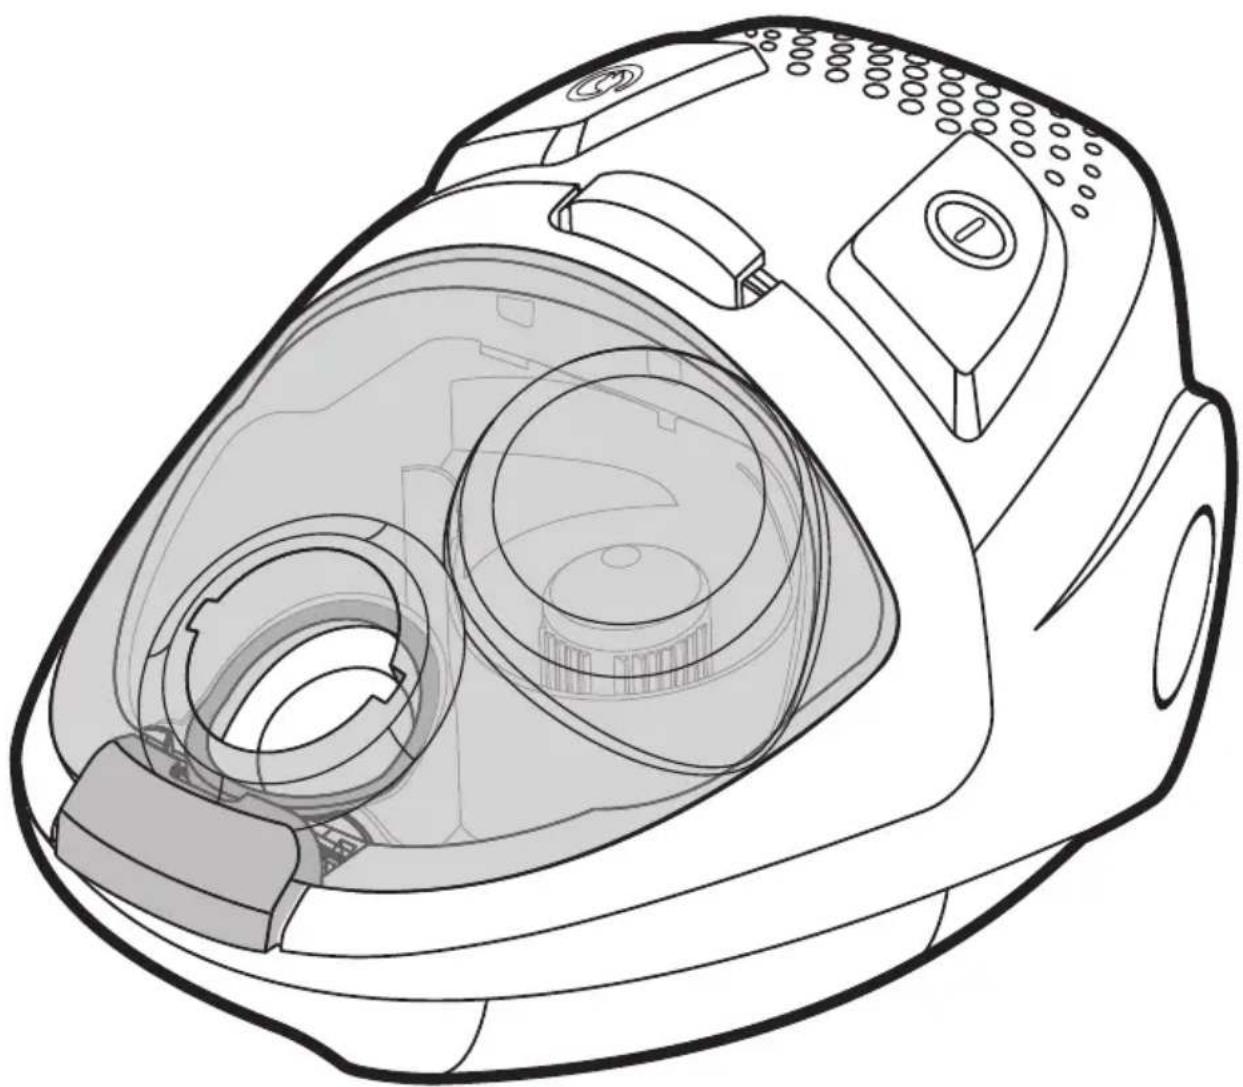
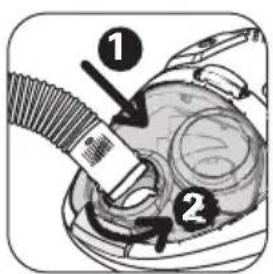
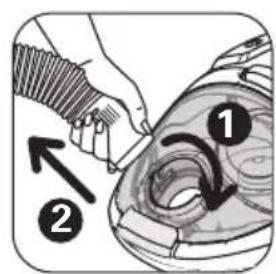

fig. 1 fig. 2 fig. 3 fig. 4

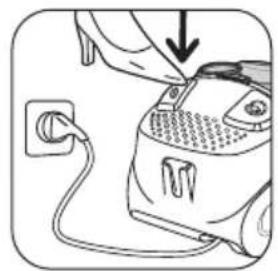

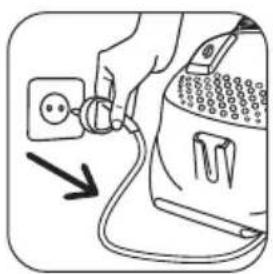
fig. 5 fig. 6 fig. 7 fig. 8
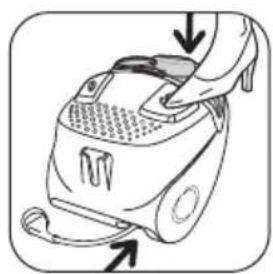
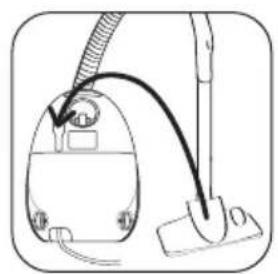

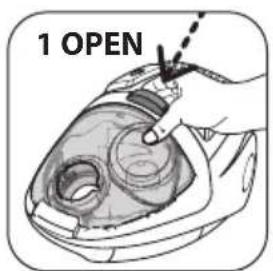
fig. 9 fig. 10 fig. 11 fig. 12
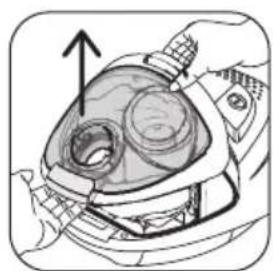
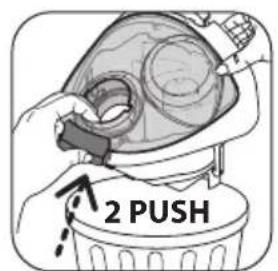
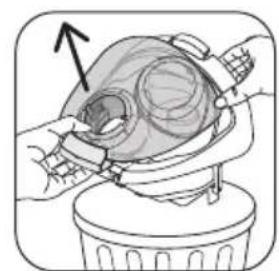
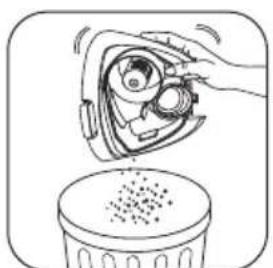
fig. 13 fig. 14 fig. 15 fig. 16
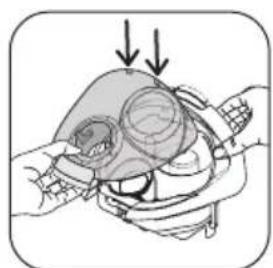

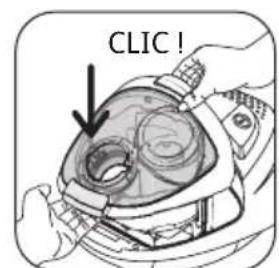

fig. 17 fig. 18 fig. 19 fig. 20
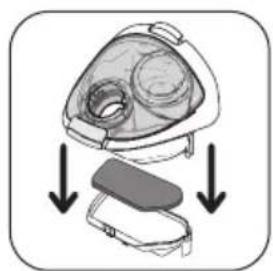
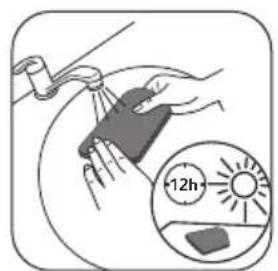
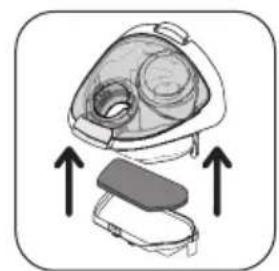
fig. 21 fig. 22 fig. 23 fig. 24
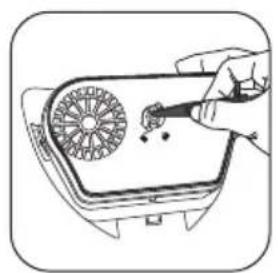
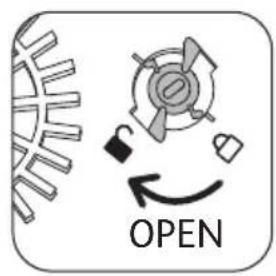
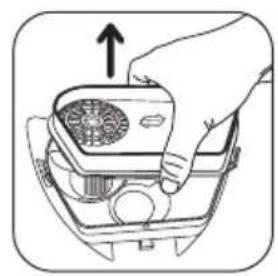
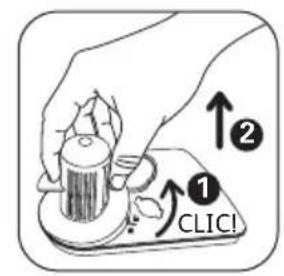
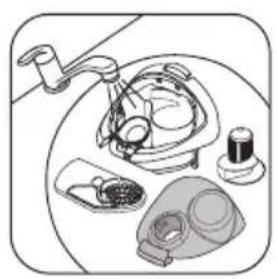
fig. 25 fig. 26 fig. 27 fig. 28
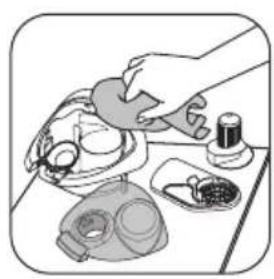
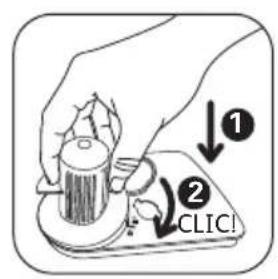
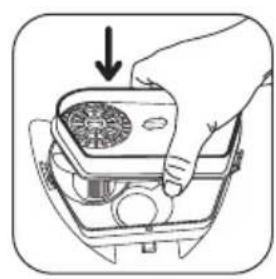

fig. 29 fig. 30 fig. 31 fig. 32
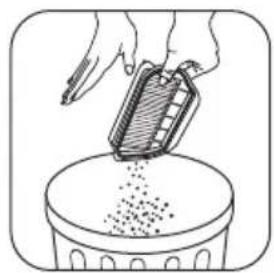
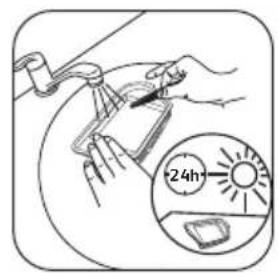
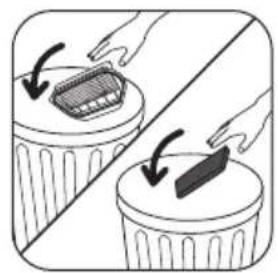
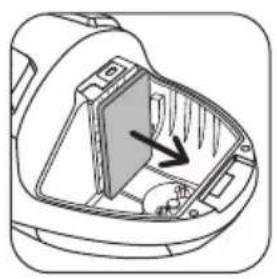
fig. 33 fig. 34 fig. 35 fig. 36

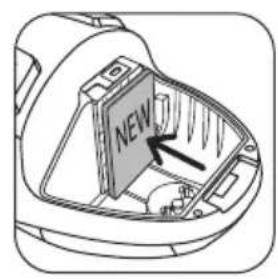
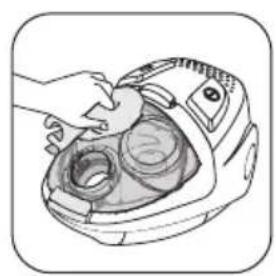
fig. 40fig. 37 f
I. CONSEILS DE SECURITE
For your safety, this appliance meets the applicable standards and regulations (Low Voltage Directives, Electromagnetic Compatibility, Environment,...).
EN
CONDITIONS OF USE
- Your vacuum cleaner is an electrical appliance: it must only be used under normal operating conditions.
- Use and store the appliance out of the reach of children. Never leave appliance unattended when it is switched on.
- Keep the nozzles and tube ends well away from eyes and ears.
- Do not vacuum damp surfaces, where there is water or liquids whatever their nature, hot substances, ultrafine substances (plaster, cement, ashes...), large sharp debris (glass), harmful products (solvents, paint strippers...), chemical products (acids, cleaning agents...), inflammable and explosive products (petrol or alcohol based).
- Never immerse the appliance in water, splash water onto it or store it outdoors.
- Do not use the appliance if it has been dropped and shows visible signs of damage or signs of not functioning properly.
In this case, do not open the appliance but send it to your closest Approved Service Centre or contact Tefal customer services (you can find their contact details on the last page).
ELECTRICAL POWER SUPPLYE
- Make sure that the operating voltage (voltage) of your vacuum cleaner is the same as your supply voltage: you can find this information on the under side of the appliance.
-
Unplug the appliance by removing the power plug:
-
immediately after use,
- before changing the accessories,
- before cleaning, maintaining or changing the filter.
- Do not use the appliance if the supply cord is damaged. To prevent any danger, all of the winder and supply cord of your vacuum cleaner must be replaced by a Tefal Approved Service Centre.
REPAIRS
Repairs should only be carried out by specialists using original replacement parts.
Repairing an appliance oneself can be dangerous for the user and will invalidate the guarantee.
II.DESCRIPTION
- a-Horizontal standing
b - Vertical standing - On/Off button
- Power cord rewind button
- Air outlet grill
- Carrying power nozzle
- Dust tray compartment
- Vacuum inlet
- Power cord
- Foam microfilter* (ref. XC0047 01)
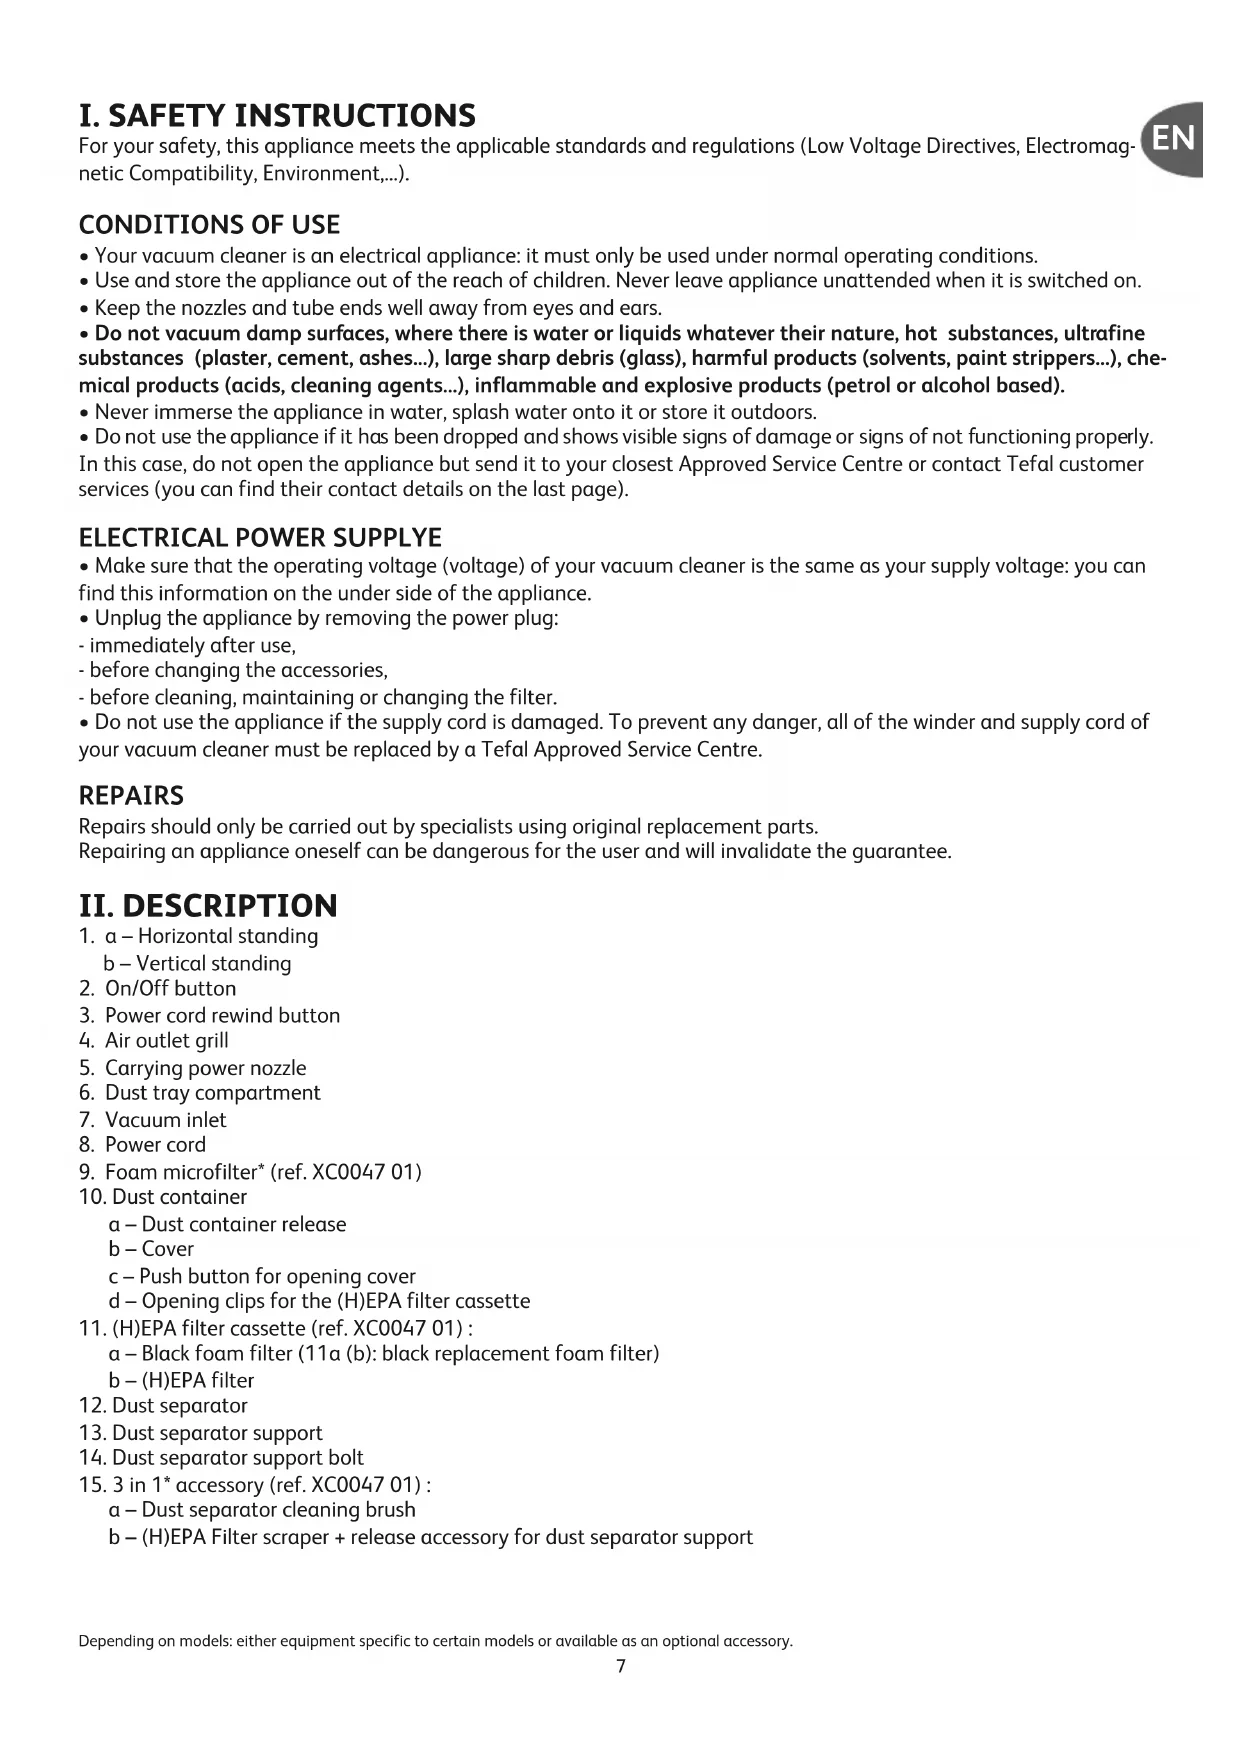
- Dust container
a - Dust container release
b-Cover
c - Push button for opening cover
d - Opening clips for the (H)EPA filter cassette
- (H)EPA filter cassette (ref. XC0047 01):
a- Black foam filter (11a (b): black replacement foam filter)
b-(H)EPA filter
- Dust separator
- Dust separator support
- Dust separator support bolt
15.3 in 1^* accessory (ref.XC0047 01):
a-Dust separator cleaning brush
b - (H)EPA Filter scraper + release accessory for dust separator support
Standard accessories:
- Flexible hose with power nozzle and adjustable manual power switch
- Telescopic tube*
- Tubes*
- All floor type nozzle
- Parquet nozzle*
- Upholstery nozzle*
- Crevice tool with little brush function*
- Turbo-brush*
- Mini turbo-brush*
III. BEFORE USING FOR THE FIRST TIME
REMOVING PACKAGING
- Unpack your appliance, keep your guarantee form and read the instructions carefully before using your appliance for the first time.
ADVICE AND PRECAUTIONS
Each time before use, the power cord must be unwound completely.
- Do not jam it and do not allow it to rub against sharp edges.
- If you're using an electrical extension, check that it is in perfect condition and that it is suited to the power of your vacuum cleaner.
- Do not move the vacuum cleaner by pulling on the power cord, the appliance must be moved using its carrying power nozzle.
- Do not use the power cord for lifting the appliance.
- Never unplug the appliance by pulling on the power cord.
- Never operate the vacuum cleaner without its dust container (10) or without the(H)EPA filter cassette (11):black foam filter (11a) and (H)EPA filter (11b).
- Check that the foam microfilter (9) is correctly in place.
- Only use original Tefal filters.
- Only use original Tefal accessories.
- if you experience difficulties obtaining the accessories and filters for this vacuum cleaner, contact Tefal customer services (you can find their contact details on the last page).
- Switch off and unplug your vacuum cleaner once you've finished using it.
- Always switch off and unplug your vacuum cleaner before maintaining or cleaning it.
- This appliance is not intended to be used by persons (including children) with reduced physical, sensory or mental capacities, or without the necessary experience and knowledge unless they are supervised or have been given instructions beforehand on the use of the appliance by a person responsible for their safety. Children should be supervised to make sure they do not play around with the appliance.
IV. USING THE APPLIANCE
ASSEMBLING THE ELEMENTS OF THE APPLIANCE
- Push the flexible hose (16) firmly into the vacuum inlet (7) and turn until it locks - Fig.1.
- To remove it, turn in the opposite direction and pull - Fig.2.
- If your vacuum cleaner is fitted with a telescopic tube (17): push the adjustment button forwards, pull out the required length of tube then release the button to block it- Fig.3. Otherwise, assemble the two tubes (18), by turning slightly - Fig.4.
- Fit the appropriate accessory to the end of the tube:
- For rugs and carpets: use the nozzle (19) in the retracted brush nozzle position - Fig.5.
- For parquets and smooth floors: use the nozzle (19) in the advanced brush nozzle position - Fig.5. or just use the parquet nozzle* (20).
- For corners and hard to reach spots: use the crevice tool with little brush function* (22) in flat nozzle position.
- For furniture: use the crevice tool with little brush function * (22) or the upholstery nozzle* (21).
Important!
Always switch off and unplug your vacuum cleaner before changing the accessories.
PLUGGING IN THE POWER CORD AND SWITCHING ON THE VACUUM CLEANER
- Unwind the power cord completely, plug in your vacuum cleaner - Fig.6 and press on the On/Off button (2) - Fig.7.
- Set the suction power using the manual power switch on the power nozzle: open the regulator cover to reduce the suction power manually, e.g.: on fragile surfaces... - Fig.8.
EN
STORING AND CARRYING THE APPLIANCE
- After use, switch off your vacuum cleaner by pressing the On/Off switch (2) and unplug it - Fig.9. Rewind the power cord by pressing the power cord rewind button (3) - Fig.10.
- In the vertical position, place the nozzle (19) in its storage compartment underneath the appliance (1b) - Fig.11.
- In the horizontal position, place the nozzle (19) in its storage compartment at the back of the appliance (1a)- Fig.12.
- Use the carrying power nozzle to carry your vacuum cleaner easily (5).
V. CLEANING AND MAINTENANCE
Important: Always switch off and unplug your vacuum cleaner before servicing or cleaning it. Important: Whenever cleaning the dust container, make sure you're standing over a dustbin.
REMOVE THE DUST CONTAINER (10)
- Remove the flexible hose (16) from the vacuum inlet (7) - Fig.2.
- Take out the dust container (10) from its compartment (6): press the dust container release clip (10a) - Fig.13, then remove the container - Fig.14.
1. EMPTY THE DUST CONTAINER
Important: empty the dust container (10) each time you finish using the vacuum cleaner.
- Lift off the cover (10b).
- Press the push button for opening the cover (10c) - Fig.15, then remove the cover - Fig.16.
- Empty the container over a dustbin - Fig.17.
- Make sure that there is no more dust left in the container.
- Put the cover back on (10b): place the sprockets in the notches - Fig.18, then close the cover - Fig.19.
- Put the container back in its compartment (6) - Fig.20.
2. CLEAN THE BLACK FOAM FILTER (11a)
Important!
To get the most out of your vacuum cleaner, make sure you wash the foam (11a) after each time you empty the dust container (10).
- Pull simultaneously on the opening clips for the (H)EPA filter cassette (10d) - Fig.21.
- Separate the black foam filter (11a) from the (H)EPA filter (11b) - Fig.22.
- Wash the black foam filter (11a) in tap water, wring it like a sponge then dry it for 12 hours - Fig.23.
- Once it is completely dry, assemble the (H)EPA filter cassette (11): the black foam filter (11a) and (H)EPA filter (11b) under the dust container (10) - Fig.24, put the cover back on - Fig.19, then put the dust container back in its compartment (6) - Fig.20.
Important!
The black foam filter (11a) must be put back in the appliance when it is completely dry.
You can still use your vacuum cleaner whilst the black foam filter is drying (11a) by using the replacement black foam filter(11a (b)).
3. CLEANING THE DUST CONTAINER (10) AND THE AIR/ DUST SEPARATOR (12)
Important: clean the dust container (10) and the dust separator (12) every month.
- Take the lid off (10b) using the push button for opening the cover (10c) - Fig.15-16.
- Empty the dust container over a dustbin - Fig.17.
- Unclip the (H)EPA filter cassette (11), by pulling simultaneously on the opening clips (10d) located at the ends of the dust container - Fig.21.
-
Lift off the (H)EPA filter cassette (11) - Fig.22.
-
Turn the container over and place the accessory* (15b) in the slot of the dust separator support bolt (14) - Fig.25.
- Open by turning in the unlocking direction (■) - Fig.26.
- Lift off the dust separator support (13) - Fig.27.
- Unclip then lift off the dust separator (12) taking care to do so in the unlocking direction ( ) - Fig.28
- Then place the dust container (10), the dust separator support (13) and the dust separator (12) in tap or soapy water - Fig. 29.
- Dry them with a cloth - Fig. 30.
- Once it's dry, replace then clip the dust separator (12) onto the dust separator support (13), following the locking direction (Fig.31.
- Put them back on the dust container (10) - Fig.32.
- Place the accessory* (15b) in the slot of the dust separator support bolt (14) - Fig.25.
- Close following the locking direction (Fig.33.
- Clip the (H)EPA filter cassette (11) (black foam filter (11a) + (H)EPA filter (11b)) in the container - Fig.24.
- Put the cover back (10b) - Fig.18-19 - and put the dust container back (10) in its compartment (6) - Fig.20.
4. CLEANING THE (H)EPA FILTER (11b)
The air we breathe contains particles that may be allergens: mite larvae and droppings, mould, pollen, smoke and animal residues (hair, skin, saliva, urine). The smallest particles penetrate deep into the respiratory system where they can cause inflammation and lung impairment.(H)EPA filters (High Efficiency Particulate Air) are used to filter out the smallest particles. With the (H)EPA filter, the air released back into the room is healthier than the air that is vacuumed.
Important!
Clean the (H)EPA filter cassette (11): black foam filter (11a) and (H)EPA (11b) filter every month.
- Remove the flexible hose (16) from the vacuum inlet (7) - Fig.2.
- Lift off the dust container (10) from its compartment (6) using the container's unlocking clip (10a) - Fig.13-14.
- Pull simultaneously on the opening clips for the (H)EPA filter cassette (10d) - Fig.21.
- Separate the black foam filter (11a) from the (H)EPA filter (11b) - Fig.22.
- Turn the (H)EPA filter over (11b), and give it a tap over a dustbin - Fig.34.
- Then scrape the filter with the accessory* (15b) under some warm water, then allow the (H)EPA filter to dry for 24 hours - Fig.35.
- Once it's completely dry, assemble the (H)EPA filter cassette (11): black foam filter (11a) and (H)EPA filter (11b) under the dust container (10) - Fig.24, then put the dust container back in its compartment (6) - Fig.20.
- Make sure that the (H)EPA filter (11b) is completely dry before putting it back in the appliance.
Important! Make sure that the whole filtration system is correctly in place before starting the appliance.
5. REPLACING THE FILTRATION SYSTEM (Ref. XC0047 01)
- Remove the flexible hose (16) from the vacuum inlet (7) - Fig.2.
- Lift off the dust container (10) from its compartment (6) using the container's unlocking clip (10a) - Fig.13-14.
5.1. HEPA FILTER CASSETTE (11)
- Pull simultaneously on the opening clips for the (H)EPA filter cassette (10d) - Fig.21.
- Separate the black foam filter (11a) from the (H)EPA filter (11b) - Fig.22.
- If the (H)EPA filter cassette (11) (black foam filter (11a) and (H)EPA filter (11b)) is damaged, throw it into the bin - Fig.36 and replace it with a new (H)EPA filter cassette (ref. XC0047 01).
- Assemble the (H)EPA filter cassette (11): black foam filter (11a) and (H)EPA filter (11b) under the container (10) - Fig.24 then put the dust container back in its compartment (6) - Fig.20.
5.2. FOAM MICROFILTER (9)
- Remove the foam microfilter* (9) - Fig.37.
- Throw the microfilter foam* (9) into the bin - Fig.38.
- Place a new foam microfilter* (9) (ref. XC0047 01) into its housing - Fig.39
- Make sure that the foam microfilter is correctly positioned* (9) before putting the dust container back(10).
CLEANING THE VACUUM CLEANER
- Wipe the body of the appliance and the accessories with a soft and damp cloth, then dry.
- Wipe the cover with a dry cloth - Fig.40.
- Do not use detergents, chemical or abrasive products.
Important: As soon as you notice that your vacuum cleaning is not working as well as it should be and before carrying out any checks, switch it off using the On/ Off button.
IF YOUR VACUUM CLEANER WON'T START
- The appliance has not got any power: check that the appliance is correctly plugged in.
IF YOUR VACUUM CLEANER DOESN'T HAVE ANY SUCTION POWER
- An accessory or the flexible hose is blocked: unblock the accessory or the flexible hose.
- Check that the dust container (10) is correctly fitted.
- Check that the cover is properly closed.
IF YOUR VACUUM CLEANER HAS LESS SUCTION POWER, MAKES A LOT OF NOISE, WHISTLES
- An accessory or the flexible hose is blocked: unblock the accessory or the flexible hose.
- The dust container is full: empty it (see chapter CLEANING AND MAINTENANCE).
- The filter system is saturated: clean the (H)EPA filter cassette (11) (see chapter CLEANING AND MAINTENANCE). If the problem persists, change the filter system (see chapter CLEANING AND MAINTENANCE).
- The adjustable manual power switch for the nozzle is open: close the adjustable manual power switch.
- Check that the dust container (10) is correctly placed in the dust tray compartment (6).
IF IT IS DIFFICULT TO MOVE THE NOZZLE
- Turn the nozzle regulator button to reduce the power.
- Check that the position (retracted brush / advanced brush) of the all-floor nozzle (19) is the right one for the floor surface being cleaned.
IF THE POWER CORD DOES NOT REWIND COMPLETELY
- The power cord is slowed down when rewinding: pull the power cord out again and press the power cord rewind button.
If a problem persists, take your vacuum cleaner to your local Tefal Approved Service Centre.
Check the list of Tefal Approved Service Centres or contact Tefal customer services (you can find contact details on the last page).
GUARANTEE
- This appliance has been designed for domestic use only; the manufacturer will accept no responsibility in the event of any inappropriate use or failure to comply with the instructions and the guarantee will cease to apply.
- Read the instructions for use carefully before using your appliance for the first time: any use of the appliance which does not conform to these instructions will release Tefal from any liability.
VII. ACCESSORIES*
| ACCESSORIES* | USE | FITTING AN ACCESSORY | PURCHASE LOCATIONS |
| Upholstery nozzle | For cleaning furniture. | Fit the upholstery nozzle to the end of the tube. | Tefal Approved Service Centres (see attached list of addresses). |
| Crevice tool with little brush accessory | To get into corners and places that are hard to reach. | Fit the crevice tool with little brush function at the end of the nozzle or the tube. | Tefal Approved Service Centres (see attached list of addresses). |
| Parquet nozzle | For fragile floors. | Fit the parquet nozzle to the end of the tube. | Tefal Approved Service Centres (see attached list of addresses). |
| Mini turbobrush | For cleaning furniture fabrics thoroughly. | Fit the mini turbobrush to the end of the tube. | Tefal Approved Service Centres (see attached list of addresses). |
| Turbobrush | For removing threads and animal fur embedded in rugs and carpets. | Fit the turbobrush to the end of the tube. | Tefal Approved Service Centres (see attached list of addresses). |
VIII. ENVIRONMENT
In accordance with current regulations, any appliance which is no longer needed must be rendered unusable once and for all: unplug and cut off the power cord before disposing of the appliance.
Please help us look after the environment!
① Your appliance contains many materials which can be recovered or recycled.
Leave it at a waste collection point so that it can be processed.

1.
nuuunnuuunnuuunnuuunnuuuuuuuuuuuuuuuuuuuuuuuuuuuuuuuuuuuuuuuuuuuuuuuuuuuuuuuuuuuuuuuuuuuuuuuuuuuuuuuuuuuuuuuuuuuuuuuuuuuuuuuuuuuuuuuuuuuuuuuuuuuuuuuuuuuuuuuuuuuuuuuuuuuuuuuuuuuuuuuuuuuuuuuuuuuuuuuuuuuuuuuuuuuuuuuuuuuuuuuuuUU
3.nvnaaanaanauu (10) uunnna/nu (12)
n: 10) uunu (12) nua
-anaan (10b) taunnuiuuaaau (10c)- 15-16
·wuaananaunuunuunuunuun-17
·iHepnnaa HEPAAan (11) 10d) aunnnnnaaanaan - 21
-unnaiyivnssay (H)EPA (11) aan - 22
·yuaunuuaa(15b)aauaanwuyuunu(14)-25
·i0aunnsuulnuanuaan()-26
·unwuyuuaan(13)-27
·aunununununununununununununununununununununununun
·nunnuu(10)wuuu(13)uaunu(12)nnanwaa-29
·的山
uun uun 12) uunuuuauuauu uun (13) uunnuuuaa ()-
·yauu(10)-32
·yua(15b)aunu(14)-25
yuyu:nuu:nuu