
X-plorer Serie 95 RG7975 - Vacuum Cleaner TEFAL - Free user manual and instructions
Find the device manual for free X-plorer Serie 95 RG7975 TEFAL in PDF.

| Brand | Tefal |
| Model | X-plorer Serie 95 RG7975 |
| Product Type | Robotic Vacuum Cleaner with Mopping |
| Dimensions (Approx.) | Diameter 330 mm, Height 96 mm |
| Weight (Approx.) | 3.5 kg |
| Power Supply | 100-240 V AC, 50/60 Hz (via docking station) |
| Battery Type | Lithium-ion (rechargeable) |
| Charging Time | 4-5 hours for full charge |
| Cleaning Modes | Automatic, Spot cleaning (1.5m x 1.5m), Schedule, Manual via app |
| Navigation System | Laser Distance Sensor (LDS) for mapping and navigation |
| Drop Sensors | 4 anti-drop sensors to detect stairs and cliffs |
| Wi-Fi Connectivity | 2.4 GHz (802.11 b/g/n), compatible with Tefal X-plorer app |
| Dust Box Capacity | Integrated dust box and water tank (exact capacity not specified, typical ~300 ml dust, ~150 ml water) |
| Filtration System | Pleated filter, foam filter, pre-filter (washable) |
| Mopping Function | Yes, with a washable mop pad and adjustable water flow |
| Maintenance Intervals | Clean filters weekly, replace filters every 6 months; clean side brushes monthly, replace every 6 months; clean wheels monthly |
| Safety Features | Anti-collision bumper, drop sensors, overheat protection |
| Error Code Support | Displays error codes on robot and app for troubleshooting (e.g., stuck wheels, sensors dirty) |
| Included Accessories | Docking station, adapter, side brushes, central brush, cleaning tool, washable mop |
Frequently Asked Questions - X-plorer Serie 95 RG7975 TEFAL
User questions about X-plorer Serie 95 RG7975 TEFAL
0 question about this device. Answer the ones you know or ask your own.
Ask a new question about this device
Download the instructions for your Vacuum Cleaner in PDF format for free! Find your manual X-plorer Serie 95 RG7975 - TEFAL and take your electronic device back in hand. On this page are published all the documents necessary for the use of your device. X-plorer Serie 95 RG7975 by TEFAL.
USER MANUAL X-plorer Serie 95 RG7975 TEFAL
natural_image
Ravon appliance with glowing blue light beam and smartphone displaying 'Yefat' logo (no text on device or background)1.
2.
3.
4.
5.
6.

7.
X-plorer Serie 95
natural_image
Exploded view diagram of a robotic vacuum cleaner with labeled components including fan, battery pack, and motor (no text or symbols present)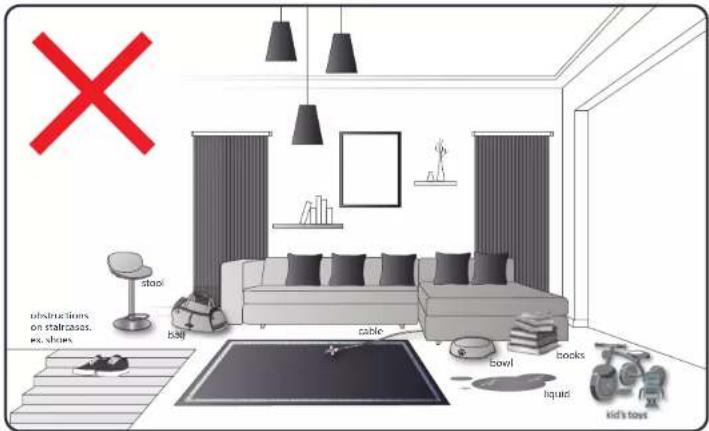
natural_image
Interior layout diagram of a modern living room with sofa, chairs, and wall-mounted furniture (no text or symbols)EN Your look is encountering some difficulties on canvas with fingers, ice thick, with long pulses, ice light fast bathes near carpet. IN Theorem robot's motion is not a way to be a hand to move the hands, but it's too much to be a hand to move the hands. It's too much to be a hand to move the hands. It's too much to be a hand to move the hands. It's too much to be a hand to move the hands. It's too much to be a hand to move the hands. It's too much to be a hand to move the hands. It's too much to be a hand to move the hands. It's too much to be a hand to move the hands. It's too much to be a hand to moves the hands. It's too much to be a hand to move the hands. It's too much to be a hand to move the hands. It's too much to be a hand to move the hands. It's too much to be a hand to move the hands. It's too much to be a hand to move the hands. It's too much to be a hand to move the hands. It's too much to be a hand to move the hands. It's too much tobe a hand to move the hands. It's too much to move the hands. It's too much to move the hands. It's too much to move the hands. It's too much to move the hands. It's too much to move the hands. It's too much to move the hands. It's too much to move the hands. It's too much to move the hands. It's too much to move the hands. It's too much to move the hands. It's too much to move the hands. It's too muchto move the hands. It's too muchto move the hands. It's too muchto move the hands. It's too muchto move the hands. It's too muchto move the hands. It's too muchto move the hands. It's too muchto move the hands. It's too muchto move the hands. It's too muchto move the hands. It's too muchto move the hands. It's too muchto move the hands. It's too muchtomove the hands. It's too muchto move the hands. It's too muchto move the hands. It's too muchto move the hands. It's too muchto move the hands. It's too muchto move the hands. It's too muchto move the hands. It's too muchto move the hands. It's too muchto move the hands. It's too muchto move the hands. It's too muchto move the hands.
1.

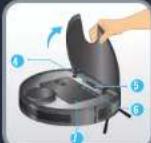
EN :
- Power / Start Pause
- LDS (Laser Distance Sensor)
- Recharge / Spot cleaning
- WIFI indicator LED
- Reset button
- Button for taking out dust
box and water tank - Dust box and water tank
- Air outlet
- Collision bumper
- Follow wall sens
RU:
EN:
- Dust box and water tank
- Water outlet adapter
- Filter
- Dust bin opening button
- Water inlet
- Water inlet cap
- Buckle
- Dust box and water tank separation button
- Pleated filter
- Foam filter
- Pre-filter
RU :
- Anti-drop sensor
- Side brush
- Wheel
- Water outlet
- Charging electrode
- Caster
- Rolling brush
- Rolling brush cover
RU :
EN:
- Lock
- Water outlet
- Removal button
- Slot
- Washable mop
RU :
natural_image
Three-step diagram showing a device with labeled ports and a mouse, no text or symbols present.
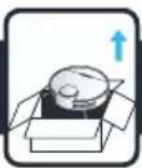
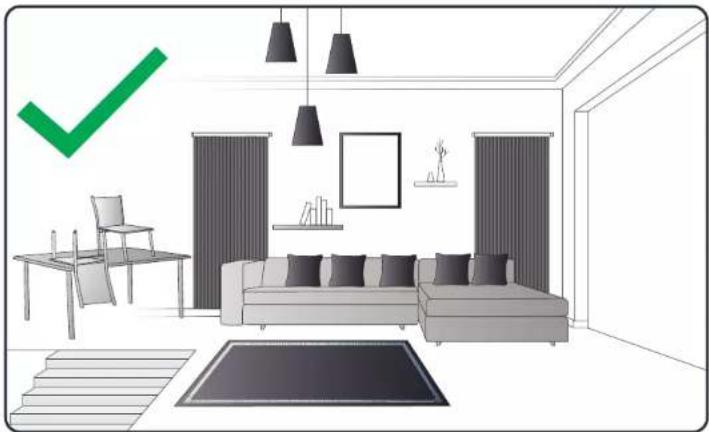
Remove the bottom cover and connect the docking station with the adapter, and pay attention to arranging adapter connection wires to avoid being wound during sweep. Put the bottom cover back.


To place the docking station, make sure there is an empty area of 0.5m on the side and 1.5m in front of the docking station. Do not install the docking station near stairs. The cable must be tight. Always place the docking station on hard floor. Do not place the docking station on carpet.

natural_image
Illustration of a laptop connected to a wall-mounted device (no text or symbols)
Connect the adapter to a wall socket. The docking station lights when the robot is not plugged in. Remove the protective strip on the bumper to ensure proper operation of the device.

EN
Please fully charge the robot before using it for the first time. To do so, place the robot on the docking station and align it to the charging terminal. When the robot is correctly plugged, the docking station light will switch off. When the white indicators on the robot are normally set on, the robot is fully charged (4-5 hours).
RU
In order to extend the battery lifespan, always keep the robot charging on the docking station while not using it.
When not using the vacuum cleaner for a long time, please fully charge the battery, switch off the robot and store the robot in a cool dry place.
RU
The robot has drop sensors to detect stairs and gaps. The robot will change direction when detecting them.
In order to correctly detect the floor level difference, make sure there are no objects (bags, shoes ...) on the floor next to gaps, stairs or on the stairs' steps.
The robot near stairs without objects [YES].
The robot near stairs with shoes, bags or other objects (the robot will not properly detect the stairs and therefore fall).
RU
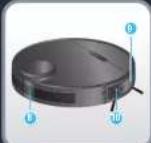
EN Press the button during 3 seconds to turn on power (when the robot is not being charged). The white indicator will be normally set on.
Reversely, press the button during 3 seconds to turn off power.
RU
Нажмите и удерживайте кнопку (в течение 3 секунд, чтобы включить питание (когда робот-пылесос не заряжается). Загорится белый индикатор.
И наоборот, нажмите и удерживайте кнопку (в течение 3 секунд, чтобы выключить питание.
PL Naciśnij przycisk (brzytrzymaj przez 3 sekundy, by włączyć zasilanie (gdy odkurzacz automatyczny nie jest ładowany). Biała kontrolka zaświeci się światłem ciągłym. Naciśnij przycisk (i przytrzymaj przez 3 sekundy, aby włączyć zasilanie.
ET Toite sisselülitamiseks vajutage nuppu ⏻ sekundit (kui parasjagu ei toimu roboti laadimist). Valge indikaator hakkab ühtlaselt põlema.
Toite väljalülistamiseks vajutage samuti nuppu ⏻ 3 sekundit.
LV Lai ieslēgtu ierīci, 3 sekundes turiet nospiestu pogu 📂laikā, kad robots netiek uzlādēts). Baltais gaismas indikators deg nemirgojot.
Lidzīgi, lai izslēgtu ierīci, 3 sekundes turiet nospiestu pogu 🔊.
LT Paspauskite mygtuką 📋 palaikykite 3 sekundes, kad jungtumėte maitinimą (kai robotas nejkraunamas). Baltas indikatorius paprastai bus jungtas.
Ir atvirkščiai, paspauskite mygtuką 📋 palaikykite 3 sekundes, norėdami išjungti maitinimą.
TR Gücü açmak 🔒 için 3 saniye boyunca düğmeye basin (robot şarj olmuyorken). Beyaz gösterge normal bir şekilde açık olur.
Benzer şekilde, gücü kapatmak 🔒 için 3 saniye boyunca düğmeye basin.
КУатын косу үшін үймесін 3 секунд бойы басыңыз (робот зарядталып түрмаған кезде). Ақ түсті индикатор қалыпыты түрде орнатылады.
Керісінше, куатын өшіру үшін үймесін 3 секунд бойы басыңыз.
When the robot is turned on, press the button to start automatic cleaning (or use X-plorer Series 75/95 app, see section 2).
Press ⏻ again to suspend cleaning.
Press ⏻ to stop current cleaning and return to the docking station.
The robot automatically goes back to the docking station under one of the following conditions:
• The robot has completely cleaned
- Battery power is insufficient; once the battery is charged to 80%, the robot will resume to complete the remaining cleaning work.
natural_image
Three-step diagram showing a hand holding a power switch, a grid-patterned panel, and a kitchen appliance (no text or symbols)EN
Press the button during 3 seconds to start spot cleaning mode. The robot will focus on a 1,5m x 1,5m specific area. After the whole area has been swept, the robot will automatically return to the charging dock.
RU
To fully benefit all the possibilities of your robot, download the free app "Tefal X-plorer Series 75&95" (you can use the QR code above to find it on AppStore or Google play) on your smartphone. Just follow the instructions in the application to enjoy the robot!
RU
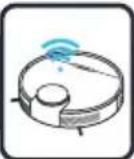
When the white indicator is flashing slowly, the device is waiting for connection. When the white indicator is flashing rapidly, the device is connecting WIFI. When the white indicator is normally set on, the device is connected!
RU
Wipe robot sensors with a dry, soft cloth including:
• Wall sensor on the right side of the robot
• Four anti-drop sensors on the bottom of the robot
• Infrared anti-collision sensor in front of the robot on the bumper
Please also wipe charging electrodes and the window of the charging dock regularly

natural_image
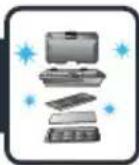
Six-step illustration showing a hand removing a plastic bag into a trash bin, with no text or symbols present.EN
To clean the dust box and water tank, open the robot cover, press the release button and remove the dust box and water tank.
Press the open button of the dust box and empty the dust box. Tap the dust box to knock off excess dirt.
Take out the foam filter and pleated filter. Clean the filters with the cleaning tool. Users can also wash the filters for deep cleaning.
Press the release button of dust box to separate the dust box from the water tank.
RU

Flush the water tank, dust box and filter module thoroughly with water.
Let the water tank, dust box and filter module naturally dry for the next use.
Put the pre-filter, foam filter and pleated filter back, and put the filter module back into the dust box.
Reinstall the water tank and dust box, and then install the module back to the machine.

natural_image
Illustration showing four steps of a device manipulation process: press, fan, lid, and rack (no text or symbols)
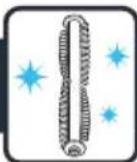
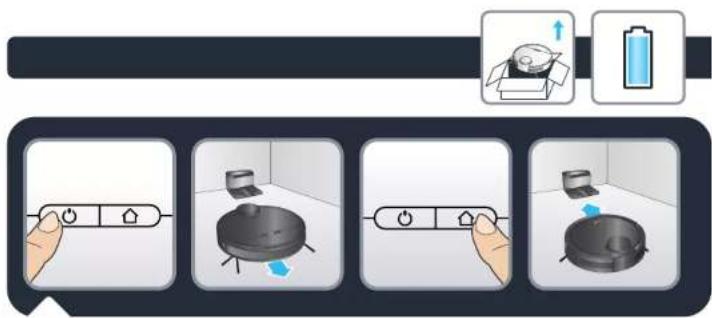
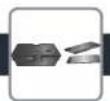
To clean the central brush, turn the robot OFF and turn the robot upside down. Press down the locker to take out the protective cover. And take out the central brush upwards. Clean the central brush with the cleaning tool.

natural_image
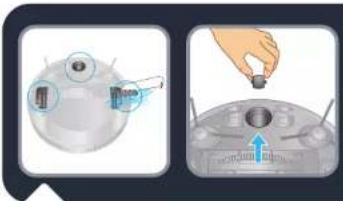
Two identical diagrams showing hands installing or adjusting a mechanical component on a spherical object, no text or symbols present.EN To replace the central brush after having cleaned it, put one end of the central brush into the corresponding hole first. Then press the brush cover and fix it with the locker
RU Чтобы установить центральную щетку на место после очистки, сначала вставьте один ее конец в соответствующий паз. Затем нажмите на крышку щетки и закрепите ее с помощью фиксатора.
PL Aby ponownie umieścić szczotkę centralną w urządzeniu po jej wyczyszczeniu, umieść jeden koniec szczotki w odpowiednim otworze. Następnie naciśnij pokrywę szczotki i zamocuj ją zamkiem.
ET Puhastatud keskharja tagasipanekuks asetage vastavasse avasse köigepealt üks keskharja ots. Seejärel vajutage peale harja kate ja fikseerige see riiviga.
Lai pēc tirišanas ievietotu centrālo birsti, vispirms ievietojiet centrālas birstes vienu galu attiecigajā atverē. Tad uzspiediet birstes pārsegu un nostipriniet ar fiksatoru.
LT Norėdami įstatyti atgal nuvalytą centrinį šepetėlj, pirmiausia įstatykite vieną centrinio šepetėlio galą i atitinkamą skylę. Tada užspauskite šepetėlio dangtelį ir užfiksuokite ji užraktu.
TR Temizledikten sonra orta fırçayı tekrar yerine takmak için önce orta fırçanın bir ucunu ilgili deliğe yerleştirin. Ardından fırça kapağına basın ve kilitleyerek sabitleyin.
Орталық қылшақты тазалағаннан кейін оны ауыстыру үшін, алдымен орталық қылшақтың бір үшын тиісті саңылауға салыңыз. Содан кейін қылшақ қақпағын басып, оны құлыппен бекітіңіз.
4.
natural_image
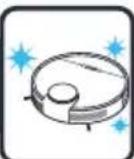
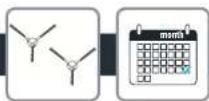
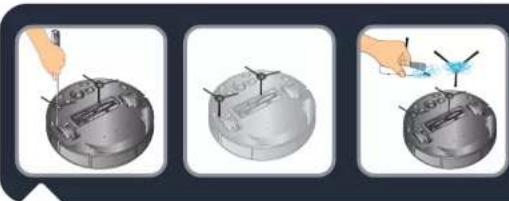
Three-step illustration showing a hand using a tool to adjust the sphere's surface, with no text or symbols present.EN To clean side brush, remove it by unscrewing it and use a cleaning brush to clean the side brush and the entanglements in the slot of the side brush. Clean side brushes once a month.
RU Чтобы очистить боковую щетку, разблокируйте ее, а затем открытите и очистите ее с помощью кисточки для очистки. Также прочистите труднодоступные места в отверстии боковой щетки. Очищайте боковые щетки один раз в месяц.
PL Aby wyczyścić szczotkę boczną, zdejmij ją, odkręcając ją, i za pomocą akcesorium do czyszczenia wyczyść szczotkę boczną oraz wpłądane zabrudzenia. Szczotki boczne należy czyścić raz w miesiącu.
ET Külgharja puhastamiseks keerake see lahti, puhastage seda puhastusharjaga ning eemaldage külgharja avasse sattunud mustus. Puhastage külgharju kord kuus.
Lai iztīrītu sānu birsti, atskrūvējiet un noņemiet to un ar tīrīšanas suku notīriet sānu birsti un netīrumus, kas iekērušies sānu birstes spraugā. Sānu birstes tiriet reizi mēnesi.
LT Norėdami nuvalyti šoninį šepetėlj, atsukite ir išimkite jį, tada valymo šepetėliu nuvalykite jį ir išvalykite tai, kas įsivėlę į šoninio šepetėlio plyšį. Valykite šoninį šepetėlj kartą per mėnesį.
TR Yan fırçayı temizlemek için yan fırçayı söküp çıkarın ve bir temizleme fırçası kullanarak yan fırçayı ve yan fırçanın yuvasındaki kabloları temizleyin. Yan fırçaları ayda bir temizleyin.
КК Буйр кылшакты тазалау ушін оны бұрап шешіп, тазалау кылшағын қолданып буйр кылшакты және буйр кылшактың ұяшығындағы орамдарды тазалаңыз. Буйр кылшақтарды айына бір рет тазалаңыз.
4.

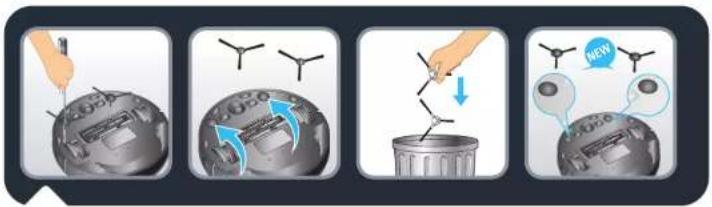
EN Replace side brushes every 6 months. Throw away the old brushes and replace them with new ones. Screw the new brushes on the robot.
RU Заменяйте боковые щетки каждые 6 месяцев. Выбросьте старые щетки и замените их новыми. Закрутите новые щетки на роботе-пылесосе.
PL Szczotki boczne należy wymieniać co 6 miesięcy. Wyrzucić stare szczotki i wymienić je na nowe. Przykręcić nowe szczotki do robota.
ET Vahetage külgharjad iga 6 kuu tagant välja. Visake vanad harjad ära ja vahetage uute vastu. Kruvige uued harjad roboti külge.
Lv Ik pēc 6 mēnešiem nomainiet sānu birstes. Izmetiet vecās birstes, nomainot tās ar jaunām. Pieskrūvējiet jaunās birstes pie robota.
LT Šoninius šepetėlius keiskite kas 6 mėnesius. Išmeskite senus šepetėlius ir pakeiskite juos naujais. Prisukite prie roboto naujus šepetėlius.
TR Yan fırçaları 6 ayda bir değiştirin. Eski fırçaları atın ve yenilerini takın. Yeni fırçaları robota vidalayın.
КК Буйр кылшактарды 6 ай сайын ауыстырып отырыныз. Если кылшактарды лактырып тастап, орнына жаңаларын салыңыз. Роботка жана кылшактарды бурап салыңыз.
4.
EN To clean the wheels, clean the front, left and right wheels once a month. The wheel shaft may be entangled by hair, cloth strips, etc. so please clean it in time!
RU
Чтобы поддерживать чистоту, очищайте колеса (переднее, левое и правое) один раз в месяц. На вал колеса могут наматываться волосы, нитки и другой мусор, поэтому его следует своевременно очищать!
PL Przednie, lewe i prawe koło należy wyczyścić razw miesiącu. Wałek koła może zostać zablokowany przez włosy, paski tkanin itp., dlatego należy go czyścić w odpowiednich odstępach czasu!
ET Rataste puhastamiseks puhastage esiratast ning paremat ja vasakut ratast kord kuus. Rataste öigeaegne puhastamine on oluline, sest rattavölli ümber vöivad keerduda juuksed, riideribad jne.
Lai riteni būtu tīri, tīriet priekšējo, kreisās un labās puses riteni reizi mēnesī. Uz ritenā ass var satities mati, diegi u.c., tāpēc tīriet to savlaicīgi!
LT Norėdami nuvalyti ratus, valykite priekinį, kairį ir dešinį ratus kartą per mėnesį. Rato ašis bus apsivėlusi plaukais, audinių atraižėlėmis ir kt., todėl valykite ją laiku!
TR Tekerleklerin temiz olmasını sağlamak için ön, sol ve sağ tekerlekleri ayda bir temizleyin. Tekerlek şaftı saç, iplikçik vb. nedeniyle sıkışabilir, bu nedenle lütfen tekerlekleri zamanında temizleyin!
КК
Донгалактарын тазалау ушін алдыңғы, сол және оң жақ донгалактарын айына бір рет тазалап тұрыңыз. Донгалак білігіне түк, мата жолактары және т.б. оралып қалуы мүмкін, сондықтан оны уақытылы тазалап тұрыңыз!
4.

| Component Cleaning the component Replacing the component | ||
| Dust collector After each use Not applicable | ||
| Filter Once a week Twice per year | ||
| Brush Once a week If required | ||
| Charging base Once a week Not applicable | ||
| Fall sensors Once a week Not applicable | ||
| Wheels Once a month Not applicable | ||
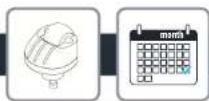
| Side brushes Once a month Twice per year | ||
Every 6 months replace the pleated filter and the foam with new ones to maintain optimal performances.

Do not throw the robot in the bin. Always wear gloves and protection. Remove the 5 screws. Remove the bottom cover. Take off the battery. Unplug the battery connector.

| Cannot start the robot | Make sure the robot is connected to power supply.Make sure the battery is fully charged. |
| The robot suddenly stops working | Check whether the robot is stuck or blocked by obstacles.Check whether the battery is too low.If the problem persists, please shut it down, wait for 3 seconds, and then restart it.The appliance may be overheating:Stop the appliance and leave cool for at least 1 hour.If it overshoots on repeated occasions, contact the Approved Services Centre. |
| Cannot charge the robot | Check whether the indicator on the charging dock is on (when the robot is not on the charging dock).If not, check that the charger is properly connected or contact an Approved services Centre to change the charger.Check whether the indicator on the charging dock is off and the indicator on the robot is flashing during charging.Wipe dust off charging electrodes with dry cloth. |
| The charger is getting hot | This is perfectly normal. The vacuum cleaner can remain permanently connected to the charger without any risk. |
| The robot cannot return to the charging dock | Clear the charging dock of objects within 0.5m on the left and right sides and within 1.5m ahead.Make sure that the robot starts cleaning from the charging dock without abnormal movement.When the robot is near the charging dock, it can return faster. But if the charging dock is located far away, the robot will need more time to return. Please wait during its return.Clean charging electrodes. |
| The cleaning schedule is not executed | Make sure the robot has been powered on.Set the time and schedule the time for automatic cleaning with the app.Make sure the appointment time has been set correctly.Check whether the battery level is too low to start cleaning.The robot will not start any scheduled cleaning when the task is being performed. |
| Suction whistling | Check the suction inlet for any obstruction.Empty the dust box.Clean filters.Check whether filters are wet due to water or other liquids on the floor. Let filters dry naturally thoroughly before use.The dust collector is not properly fitted:re-position it correctly.The intake head is clogged:remove the power-brush and clean it. |
| The rolling brush does not rotate | Clean the rolling brush.Check whether the rolling brush and the brush cover are installed correctly. |
| Abnormal action or sweep route of the robot | Carefully clean the sensor with dry cloth.Restart the robot. |
| No water released during mopping | Make sure there is enough water in the water tank.Check whether the mop module is installed correctly.Check whether the water outlet is blocked. |
| The robot cannot connect to your Wi-Fi network | Ensure that your Wi-Fi router supports 2.4GHz and 802.11 b/g/n bands as this equipment does not support 5GHz bands. |
6.

According to model: \*
When the robot fails, the red indicator on the robot will blink. Please check on the App the stated error code.
| Error code Solution | |
| Error 1: Collision bumper is stuck, please check. | The collision bumper is stuck. Please tap repeatedly to remove foreign matters. If there is no foreign matter, please relocate it and then start it. |
| Error 2: A wheel is stuck. Please check whether any foreign matter is stuck in the wheel, or move it to near its home position to start it. | If any wheel is stuck, please check whether any foreign matter is stuck in the wheel, or move it to near its home position to start it. |
| Error 3: A side brush is stuck, please check. | The side brush may be entangled with foreign matters. Please clean and restart it. |
| Error 4: The rolling brush is stuck. Please remove and clean it. | The rolling brush may be entangled with foreign matters. Please remove and clean it, its connections, its cover and the suction inlet. |
| Error 5: The robot is trapped. Please clear obstacles around. | The robot is trapped. Please clear obstacles around. |
| Error 6: The robot is trapped. Please move it near its home position to start it. | The robot may be suspended. Please relocate it and start. If the anti-drop sensor is too dirty, it may also cause the fault. Please wipe the anti-drop sensor to eliminate the fault. |
| Error 7: A wheel is suspended. Please move it to near its home position to start it. | A wheel is suspended. Please move it to near its home position to start it. |
| Error 8: The battery level is too low, and the robot is about to shut down automatically. Please charge it. | The battery level is too low, and the robot is about to shut down automatically. Please charge it. |
| Error 10: Optical flow sensor dirty. Please wipe it. | The optical flow sensor is covered by dust. Please wipe it. |
| Error 11: The recharge sensor is blocked. Please wipe it. | The recharge sensor is covered by dust. Please wipe it. |
| Error 12: The follow-wall sensor is blocked. Please wipe it. | The follow-wall sensor is blocked. Please wipe it. |
| Error 13: The robot is tilted. Please put the robot on the horizontal ground to start. | The robot is tilted during startup. Please put the robot on the horizontal ground to start. |
| Error 14: Please install the dust box and filters back. | Please install the dust box and filters back, and make sure that filters and the dust box are installed in place. Then please restart the robot. |
| Error 17: Restricted area detected. Please relocate it to start. | The robot is too close to a restricted area during starting. Please relocate it to start. |
| Error 18: The laser cover is stuck. Please check. | The pressure sensor for laser cover is pressed or stuck. Please relocate it to start. |
| Error 19: The laser sensor is stuck or twisted, please check. | The laser distance sensor is stuck by foreign matter. Please clear it. |
| Error 20: The laser sensor may be blocked, please check. | The laser distance sensor is blocked, please clear the blocking. Too spacious environment and multi-reflection environment such as metal mirrors also affect the normal operation of a laser distance sensor. Please relocate it to art. |
| Error 21: Please clear obstacles around the charging dock. | The robot may be stuck or trapped. Please clear obstacles around the robot. |
6.

| Error W1: Battery abnormal. Please consult the instructions or APP. | Please open the battery compartment, check whether the battery is properly connected, and try to restart the robot. The battery temperature is too high or too low. Please wait for the battery temperature to be normal (0 °C~46 °C/32°F~104°F) before use. If the error persists, please contact our Service Department. |
| Error W2: Wheel module abnormal. Please consult the instructions or APP. | Please check whether any foreign matter is stuck in a wheel and try to restart the robot. If the error persists, please contact our Service Department. |
| Error W3: Side brush module abnormal. Please consult the instructions or APP. | Please check whether any foreign matter is stuck in a side brush and try to restart the robot. If the error persists, please contact our Service Department. |
| Error W4: Rolling brush abnormal. Please consult the instructions or APP. | Please remove and clean it, its connections, its cover and the suction inlet. Please try to restart the robot after cleaning. If the error persists, please contact our Service Department. |
| *Error W5: Water pump abnormal. Please consult the instructions or APP. | Please clean the water tank, water pump connections on the tank and water pump connections on the robot, the water outlet at the robot bottom, and check the mop module. Please try to restart the robot with all modules installed back after cleaning. If the error persists, please contact our Service Department. |
| Error W6: Laser sensor abnormal. Please consult the instructions or APP. | Please check the laser sensor for foreign matter and try to restart the robot after cleaning. If the error persists, please contact our Service Department. |
| Error W7: Fan abnormal. Please consult the instructions or APP. | Please check whether any foreign matter is stuck in the fan and try to restart the robot. Please clean the dust box and filters and try to restart the robot. If the error persists, please contact our Service Department. |
6.6.

EN The languages TR, KK are included in the safety instructions.
For measuring dust collection performance in accordance with IEC 62885-7, testers can activate the straight line test by using the remote control feature in the app menu.
